

Page 1

Color
User Manual
Page 2

Copyright © 2009 Apple Inc. All rights reserved.
Your rights to the software are governed by the
accompanying software license agreement. The owner or
authorized user of a valid copy of Final Cut Studio software
may reproduce this publication for the purpose of learning
to use such software. No part of this publication may be
reproduced or transmitted for commercial purposes, such
as selling copies of this publication or for providing paid
for support services.
The Apple logo is a trademark of Apple Inc., registered in
the U.S. and other countries. Use of the “keyboard” Apple
logo (Shift-Option-K) for commercial purposes without
the prior written consent of Apple may constitute
trademark infringement and unfair competition in violation
of federal and state laws.
Every effort hasbeen made to ensure thatthe information
in this manual is accurate. Apple is not responsible for
printing or clerical errors.
Note: Because Apple frequently releases new versions
and updates to its system software, applications, and
Internet sites,images shownin this manualmay be slightly
different from what you see on your screen.
Apple
1 Infinite Loop
Cupertino, CA 95014
408-996-1010
www.apple.com
Apple, the Apple logo, ColorSync, DVD Studio Pro, Final
Cut, Final Cut Pro, Final Cut Studio, FireWire, Mac, Mac OS,
QuickTime, and Shake are trademarks of Apple Inc.,
registered in the U.S. and other countries.
Cinema Tools, Finder, and Multi-Touch are trademarks of
Apple Inc.
Production stills from the film “Les Poupets” provided
courtesy of Jean-Paul Bonjour. “Les Poupets” © 2006
Jean-Paul Bonjour. All rights reserved.
http://jeanpaulbonjour.com
Other company and product names mentioned herein
are trademarks of their respective companies. Mention of
third-party products is for informational purposes only
and constitutes neither an endorsement nor a
recommendation. Apple assumes no responsibility with
regard to the performance or use of these products.
Page 3

Contents
Welcome to Color9Preface
About Color9
About the Color Documentation10
Additional Resources10
Color Correction Basics13Chapter 1
The Fundamental Color Correction Tasks13
When Does Color Correction Happen?16
Image Encoding Standards23
Basic Color and Imaging Concepts28
Color Correction Workflows35Chapter 2
An Overview of the Color Workflow35
Limitations in Color37
Video Finishing Workflows Using Final Cut Pro39
Importing Projects from Other Video Editing Applications47
Digital Cinema Workflows Using Apple ProRes 444450
Finishing Projects Using RED Media56
Digital Intermediate Workflows Using DPX/Cineon Media65
Using EDLs, Timecode, and Frame Numbers to Conform Projects73
Using the Color Interface77Chapter 3
Setting Up a Control Surface78
Using Onscreen Controls78
Using Organizational Browsers and Bins82
Using Color with One or Two Monitors88
Importing and Managing Projects and Media91Chapter 4
Creating and Opening Projects92
Saving Projects92
Saving and Opening Archives95
Moving Projects from Final Cut Pro to Color95
Importing EDLs101
EDL Import Settings102
3
Page 4

Relinking Media104
Importing Media Directly into the Timeline105
Compatible Media Formats106
Moving Projects from Color to Final Cut Pro112
Exporting EDLs114
Reconforming Projects115
Converting Cineon and DPX Image Sequences to QuickTime115
Importing Color Corrections117
Exporting JPEG Images118
Configuring the Setup Room119Chapter 5
The File Browser119
Using the Shots Browser122
The Grades Bin128
The Project Settings Tab129
The Messages Tab135
The User Preferences Tab135
Monitoring Your Project149Chapter 6
The Scopes Window and Preview Display149
Monitoring Broadcast Video Output151
Using Display LUTs153
Monitoring the Still Store159
Timeline Playback, Navigation, and Editing161Chapter 7
Basic Timeline Elements162
Customizing the Timeline Interface163
Working with Tracks165
Selecting the Current Shot166
Timeline Playback166
Zooming In and Out of the Timeline169
Timeline Navigation170
Selecting Shots in the Timeline171
Working with Grades in the Timeline172
The Settings 1 Tab174
The Settings 2 Tab175
Editing Controls and Procedures176
Analyzing Signals Using the Video Scopes183Chapter 8
What Scopes Are Available?183
Video Scope Options185
Analyzing Images Using the Video Scopes187
4 Contents
Page 5

The Primary In Room207Chapter 9
What Is the Primary In Room Used For?207
Where to Start in the Primary In Room?208
Contrast Adjustment Explained210
Using the Primary Contrast Controls212
Color Casts Explained222
Using Color Balance Controls224
The Curves Controls234
The Basic Tab245
The Advanced Tab249
Using the Auto Balance Button251
The RED Tab252
The Secondaries Room257Chapter 10
What Is the Secondaries Room Used For?258
Where to Start in the Secondaries Room?259
The Enabled Button in the Secondaries Room260
Choosing a Region to Correct Using the HSL Qualifiers261
Controls in the Previews Tab268
Isolating a Region Using the Vignette Controls270
Adjusting the Inside and Outside of a Secondary Operation277
The Secondary Curves Explained278
Reset Controls in the Secondaries Room283
The Color FX Room285Chapter 11
The Color FX Interface Explained286
How to Create Color FX286
Creating Effects in the Color FX Room294
Using Color FX with Interlaced Shots300
Saving Favorite Effects in the Color FX Bin301
Node Reference Guide302
The Primary Out Room313Chapter 12
What Is the Primary Out Room Used For?313
Making Extra Corrections Using the Primary Out Room314
Understanding the Image Processing Pipeline314
Ceiling Controls315
Managing Corrections and Grades317Chapter 13
The Difference Between Corrections and Grades317
Saving and Using Corrections and Grades318
Managing Grades in the Timeline325
Using the Copy To Buttons in the Primary Rooms332
5Contents
Page 6

Using the Copy Grade and Paste Grade Memory Banks334
Setting a Beauty Grade in the Timeline334
Disabling All Grades335
Managing Grades in the Shots Browser336
Managing a Shot’s Corrections Using Multiple Rooms343
Keyframing347Chapter 14
Why Keyframe an Effect?347
Keyframing Limitations347
How Keyframing Works in Different Rooms349
Working with Keyframes in the Timeline351
Keyframe Interpolation353
The Geometry Room355Chapter 15
Navigating Within the Image Preview355
The Pan & Scan Tab356
The Shapes Tab361
The Tracking Tab370
The Still Store381Chapter 16
Saving Images to the Still Store381
Saving Still Store Images in Subdirectories383
Removing Images from the Still Store383
Recalling Images from the Still Store384
Customizing the Still Store View384
The Render Queue389Chapter 17
About Rendering in Color389
The Render Queue Interface395
How to Render Shots in Your Project396
Rendering Multiple Grades for Each Shot400
Managing Rendered Shots in the Timeline401
Examining the Color Render Log401
Choosing Printing Density When Rendering DPX Media402
Gather Rendered Media403
Calibrating Your Monitor405Appendix A
About Color Bars405
Calibrating Video Monitors with Color Bars405
Keyboard Shortcuts in Color409Appendix B
Project Shortcuts409
Switching Rooms and Windows410
Scopes Window Shortcuts411
6 Contents
Page 7

Playback and Navigation411
Grade Shortcuts412
Timeline-Specific Shortcuts413
Editing Shortcuts413
Keyframing Shortcuts414
Shortcuts in the Shots Browser414
Shortcuts in the Geometry Room414
Still Store Shortcuts414
Render Queue Shortcuts415
Using Multi-Touch Controls in Color417Appendix C
Multi-Touch Control of the Timeline417
Multi-Touch Control in the Shots Browser417
Multi-Touch Control of the Scopes418
Multi-Touch Control in the Geometry Room418
Multi-Touch Control in the Image Preview of the Scopes Window419
Setting Up a Control Surface421Appendix D
JLCooper Control Surfaces421
Tangent Devices CP100 Control Surface426
Tangent Devices CP200 Series Control Surface429
Customizing Control Surface Sensitivity434
7Contents
Page 8

Page 9

Welcome to Color
Welcome to the world of professional video and film grading and manipulation using
Color.
This preface covers the following:
• About Color (p. 9)
• About the Color Documentation (p. 10)
• Additional Resources (p. 10)
About Color
Color has been designed from the ground up as a feature-rich color correction environment
that complements a wide variety of post-production workflows, whether your project is
standard definition, high definition, or a 2K digital intermediate. If you've edited a program
using Final Cut Pro, it's easy to send your program to Color for grading and then send it
back to Final Cut Pro for final output. However, it's also easy to reconform projects that
originate as EDLs from other editing environments.
Preface
Color has the tools that professional colorists demand, including:
• Primary color correction using three-way color balance and contrast controls with
individual shadow, midtone, and highlight controls
• Curve controls for detailed color and luma channel adjustments
• Up to eight secondary color correction operations per shot with HSL qualifiers, vignettes,
user shapes, and separate adjustments for the inside and outside of each secondary
• Color FX node-based effects for creating custom color effects
• Pan & Scan effects
• Motion tracking that can be used to animate vignettes, user shapes, and other effects
• Broadcast legal settings to guarantee adherence to quality control standards
• Support for color correction–specific control surfaces
• And much, much more
9
Page 10

All of these tools are divided among eight individual “rooms” of the Color interface,
logically arranged in an order that matches the workflow of most colorists. You use Color
to correct, balance, and create stylized “looks” for each shot in your program as the last
step in the post-production workflow, giving your programs a final polish previously
available only to high-end facilities.
About the Color Documentation
The Color User Manual provides comprehensive information about the application and
is written for users of all levels of experience.
• Editors and post-production professionals from other disciplines who are new to the
color correction process will find information on how to get started, with detailed
explanations of how all controls work, and why they function the way they do.
• Colorists coming to Color from other grading environments can skip ahead to find
detailed information about the application’s inner workings and exhaustive
parameter-by-parameter explanations for every room of the Color interface.
Additional Resources
The following websites provide general information, updates, and support information
about Color, as well as the latest news, resources, and training materials.
Color Website
For more information about Color, go to:
• http://www.apple.com/finalcutstudio/color
Apple Service and Support Websites
The Apple Service and Support website provides software updates and answers to the
most frequently asked questions for all Apple products, including Color. You’ll also have
access to product specifications, reference documentation, and Apple product technical
articles:
• http://www.apple.com/support
For support information that's specific to Color, go to:
• http://www.apple.com/support/color
To provide comments and feedback about Color, go to:
• http://www.apple.com/feedback/color.html
A discussion forum is also available to share information about Color. To participate, go
to:
• http://discussions.apple.com
10 Preface Welcome to Color
Page 11

For more information on the Apple Pro Training Program, go to:
• http://www.apple.com/software/pro/training
11Preface Welcome to Color
Page 12

Page 13

Color Correction Basics
1
To better learn how Color works, it’s important to understand the overall color correction
process and how images work their way through post-production in standard definition
(SD), high definition (HD), and film workflows.
If you’re new to color correction, the first part of this chapter provides a background in
color correction workflows to help you better understand why Color works the way it
does. The second part goes on to explain color and imaging concepts that are important
to the operation of the Color interface.
This chapter covers the following:
• The Fundamental Color Correction Tasks (p. 13)
• When Does Color Correction Happen? (p. 16)
• Image Encoding Standards (p. 23)
• Basic Color and Imaging Concepts (p. 28)
The Fundamental Color Correction Tasks
In any post-production workflow, color correction is generally one of the last steps taken
to finish an edited program. Color has been created to give you precise control over the
look of every shot in your project by providing flexible tools and an efficient workspace
in which to manipulate the contrast, color, and geometry of each shot in your program.
When color correcting a given program, you’ll be called upon to perform many, if not all,
of the tasks described in this section. Color gives you an extensive feature set with which
to accomplish all this and more. While the deciding factor in determining how far you
go in any color correction session is usually the amount of time you have in which to
work, the dedicated color correction interface in Color allows you to work quickly and
efficiently.
Every program requires you to take some combination of the following steps.
13
Page 14

Stage 1: Correcting Errors in Color Balance and Exposure
Frequently, images that are acquired digitally (whether shot on analog or digital video,
or transferred from film) don’t have optimal exposure or color balance to begin with. For
example, many camcorders and digital cinema cameras deliberately record blacks that
aren’t quite at 0 percent in order to avoid the inadvertent crushing of data unnecessarily.
Furthermore, accidents can happen in any shoot. For example, the crew may not have
had the correctly balanced film stock for the conditions in which they were shooting, or
someone may have forgotten to white balance the video camera before shooting an
interview in an office lit with fluorescent lights, resulting in footage with a greenish tinge.
Color makes it easy to fix these kinds of mistakes.
Stage 2: Making Sure That Key Elements in Your Program Look the Way They Should
Every scene of your program has key elements that are the main focus of the viewer. In
a narrative or documentary video, the focus is probably on the individuals within each
shot. Ina commercial, the key element is undoubtedly the product (for example, the label
of a bottle or the color of a car). Regardless of what these key elements are, chances are
you or your audience will have certain expectations of what they should look like, and
it’s your job to make the colors in the program match what was originally shot.
When working with shots of people, one of the guiding principles of color correction is
to make sure that their skin tones in the program look the same as (or better than) in real
life. Regardless of ethnicity or complexion, the hues of human skin tones, when measured
objectively on a Vectorscope, fall along a fairly narrow range (although the saturation
and brightness vary). Color gives you the tools to make whatever adjustments are
necessary to ensure that the skin tones of people in your final edited piece look the way
they should.
Stage 3: Balancing All the Shots in a Scene to Match
Most edited programs incorporate footage from a variety of sources, shot in multiple
locations over the course of many days, weeks, or months of production. Even with the
most skilled lighting and camera crews, differences in color and exposure are bound to
occur, sometimes within shots meant to be combined into a single scene.
When edited together, these changes in color and lighting can cause individual shots to
stand out, making the editing appear uneven. With careful color correction, all the different
shots that make up a scene can be balanced to match one another so that they all look
as if they’re happening at the same time and in the same place, with the same lighting.
This is commonly referred to as scene-to-scene color correction.
Stage 4: Creating Contrast
Color correction can also be used to create contrast between two scenes for a more jarring
effect. Imagine cutting from a lush, green jungle scene to a harsh desert landscape with
many more reds and yellows. Using color correction, you can subtly accentuate these
differences.
14 Chapter 1 Color Correction Basics
Page 15

Stage 5: Achieving a “Look”
The process of color correction is not simply one of making all the video in your piece
match some objective model of exposure. Color, like sound, is a property that, when
subtly mixed, can result in an additional level of dramatic control over your program.
With color correction, you can control whether your video has rich, saturated colors or a
more muted look. You can make your shots look warmer by pushing their tones into the
reds, or make them look cooler by bringing them into the blues. You can pull details out
of the shadows, or crush them, increasing the picture’s contrast for a starker look. Such
subtle modifications alter the audience’s perception of the scene being played, changing
a program’s mood. Once you pick a look for your piece, or even for an individual scene,
you can use color correction to make sure that all the shots in the appropriate scenes
match the same look, so that they cut together smoothly.
Stage 6: Adhering to Guidelines for Broadcast Legality
If a program is destined for television broadcast, you are usually provided with a set of
quality control (QC) guidelines that specify the “legal” limits for minimum black levels,
maximum white levels, and minimum and maximum chroma saturation and composite
RGB limits. Adherence to these guidelines is important to ensure that the program is
accepted for broadcast, as “illegal” values may cause problems when the program is
encoded for transmission. QC standards vary, so it’s important to check what these
guidelines are in advance. Color has built-in broadcast safe settings (sometimes referred
to as a legalizer) that automatically prevent video levels from exceeding the specified
limits. For more information, see The Project Settings Tab.
Stage 7: Adjusting Specific Elements Separately
It’s sometimes necessary to selectively target a narrow range of colors to alter or replace
only those color values. A common example of this might be to turn a red car blue or to
mute the excessive colors of an article of clothing. These sorts of tasks are accomplished
with what’s referred to as secondary color correction, and Color provides you with numerous
tools with which to achieve such effects. For more information, see The Secondaries
Room.
Stage 8: Making Digital Lighting Adjustments
Sometimes lighting setups that looked right during the shoot don’t work as well in
post-production. Changes in the director’s vision, alterations to the tone of the scene as
edited, or suggestions on the part of the director of photography (DoP) during post may
necessitate alterations to the lighting within a scene beyond simple adjustments to the
image’s overall contrast. Color provides powerful controls for user-definable masking
which, in combination with secondary color correction controls, allow you to isolate
multiple regions within an image and fine-tune the lighting. This is sometimes referred
to as digital relighting. For more information, see The Secondaries Room and Controls in
the Shapes Tab.
15Chapter 1 Color Correction Basics
Page 16

Stage 9: Creating Special Effects
Sometimes a scene requires more extreme effects, such as manipulating colors and
exposure intensively to achieve a day-for-night look, creating an altered state for a
flashback or hallucination sequence, or just creating something bizarre for a music video.
In the Color FX room, Color provides you with an extensible node-based tool set for
creating such in-depth composites efficiently, in conjunction with the other primary and
secondary tools at your disposal. For more information, see The Color FX Room.
When Does Color Correction Happen?
A program’s color fidelity shouldn’t be neglected until the color correction stage of the
post-production process. Ideally, every project is begun with a philosophy of color
management that’s applied during the shoot, is maintained throughout the various
transfer and editing passes that occur during post-production, and concludes with the
final color correction pass conducted in Color. This section elaborates on how film and
video images have traditionally made their way through the post-production process.
For detailed information, see:
• Color Management Starts During the Shoot
• Initial Color Correction When Transferring Film
• Traditional Means of Final Color Correction
• Advantages of Grading with Color
Color Management Starts During the Shoot
Whether a program is shot using film, video, or high-resolution digital imaging of another
means, it’s important to remember that the process of determining a program’s overall
look begins when each scene is lit and shot during production. To obtain the maximum
amount of control and flexibility over shots in post-production, you ideally should start
out with footage that has been exposed with the end goals in mind right from the
beginning. Color correction in post-production is no substitute for good lighting.
Optimistically, the process of color correction can be seen as extending and enhancing
the vision of the producer, director, and director of photography (DoP) as it was originally
conceived. Often, the DoP gets personally involved during the color correction process
to ensure that the look he or she was trying to achieve is perfected.
At other times, the director or producer may change his or her mind regarding how the
finished piece should look. In these cases, color correction might be used to alter the
overall look of the piece (for example, making footage that was shot to look cool look
warmer, instead). While Color provides an exceptional degree of control over your footage,
it’s still important to start out with clean, properly exposed footage.
16 Chapter 1 Color Correction Basics
Page 17
Furthermore, choices made during preproduction and the shoot, including the film or
Telecine VideotapesVideotapesCamera Negative
video format and camera settings used, can have a profound effect on the amount of
flexibility that’s available during the eventual color correction process.
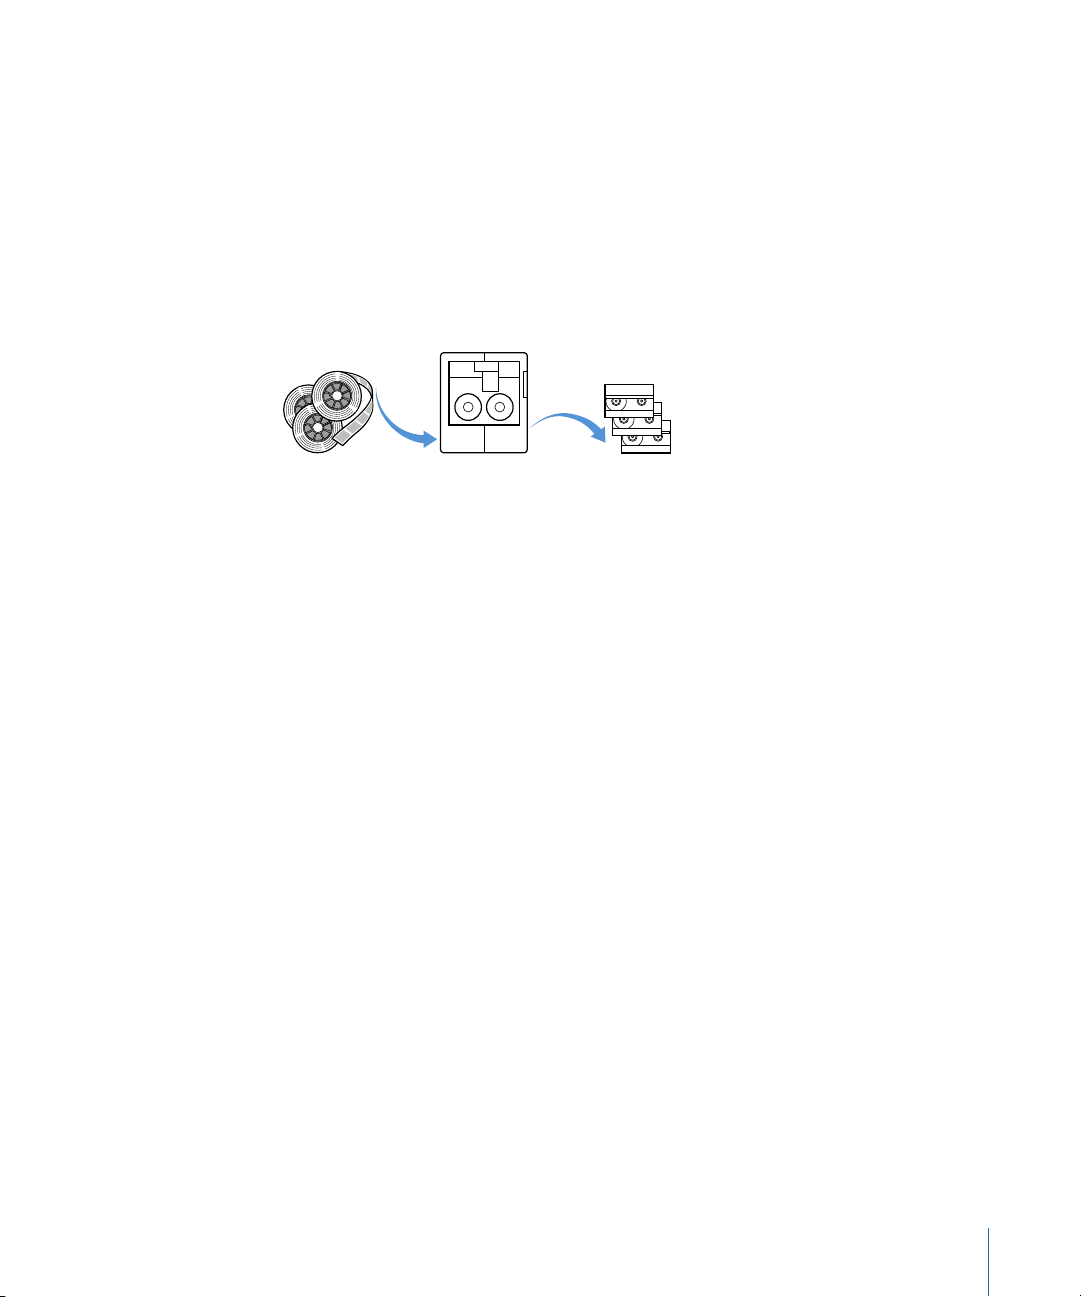
Initial Color Correction When Transferring Film
When a project has been shot on film, the camera negatives must first be transferred to
the videotape or digital video format of choice prior to editing and digital post using a
telecine or datacine machine. A telecine is a machine for transferring film to videotape,
while a datacine is set up for transferring film directly to a digital format, usually a DPX
(Digital Picture eXchange) or Cineon image sequence.
Usually, the colorist running the film transfer session performs some level of color
correction to ensure that the editor has the most appropriate picture to work with. The
goals of color correction at this stage usually depend on both the length of the project
and the post-production workflow that’s been decided upon.
• Short projects, commercials, spots, and very short videos may get a detailed color
correction pass right away. The colorist will first calibrate the telecine’s own color
corrector to balance the whites, blacks, and color perfectly. Then the colorist, in
consultation with the DoP, director, or producer, will work shot by shot to determine
the look of each shot according to the needs of the project. As a result, the editor will
be working with footage that has already been corrected.
• Long-form projects such as feature-length films and longer televisionprograms probably
won’t get a detailed color correction pass right away. Instead, the footage that is run
through the telecine will be balanced to have reasonably ideal exposure and color for
purposes of having a good image for editing, and left at that. Detailed color correction
is then done at another stage.
• Projects of any length that are going through post-production as a digital intermediate
are transferred with a color correction pass designed to retain the maximum amount
of image data. Since a second (and final) digital color correction pass is intended to be
performed at the end of the post-production process, it’s critical that the image data
is high quality, preserving as much highlight and shadow detail as possible. Interestingly,
since the goal is to preserve the image data and not to create the final look of the
program, the highest-quality image for grading may not bethe most visually appealing
image.
17Chapter 1 Color Correction Basics
Page 18

However the color correction is handled during the initial telecine or datacine transfer,
once complete, the footage goes through the typical post-production processes of offline
and online editorial.
Color Correcting Video Versus Film
Color has been designed to fit into both video and film digital intermediate workflows.
Since all footage must first be transferred to a QuickTime or image sequence format to
be imported into Color, film and video images are corrected using the same tools and
methods.
Three main attributes affect the quality of media used in a program, all of which are
determined when the footage is originally captured or transferred prior to Colorimport:
• The type and level of compression applied to the media
• The bit depth at which it’s encoded
• The chroma subsampling ratio used
For color correction, spatial and temporal compression should be minimized, since
compression artifacts can compromise the quality of your adjustments. Also, media at
higher bit depths is generally preferable (see Bit Depth Explained).
Most importantly of all, high chroma subsampling ratios, such as 4:4:4 or 4:2:2, are
preferred to maximize the quality and flexibility of your corrections. There’s nothing
stopping you from working with 4:1:1 or 4:2:0 subsampled footage, but you may find
that extreme contrast adjustments and smooth secondary selections are a bit more
difficult to accomplish with highly compressed color spaces.
For more information, see Chroma Subsampling Explained.
Traditional Means of Final Color Correction
Once editing is complete and the picture is locked, it’s time for color correction (referred
to as color grading in the film world) to begin. Traditionally, this process has been
accomplished either via a colortiming session for film or via a tape-to-tape color correction
session for video.
Color Timing for Film
Programs being finished and color corrected on film traditionally undergo a negative
conform process prior to color timing. When editorial is complete, the original camera
negative is conformed to match the workprint or video cut of the edited program using
a cut list or pull list. (If the program was edited using Final Cut Pro, this can be derived
using Cinema Tools.) These lists list each shot used in the edited program and show how
each shot fits together. This is a time-consuming and detail-oriented process, since
mistakes made while cutting the negative are extremely expensive to correct.
18 Chapter 1 Color Correction Basics
Page 19
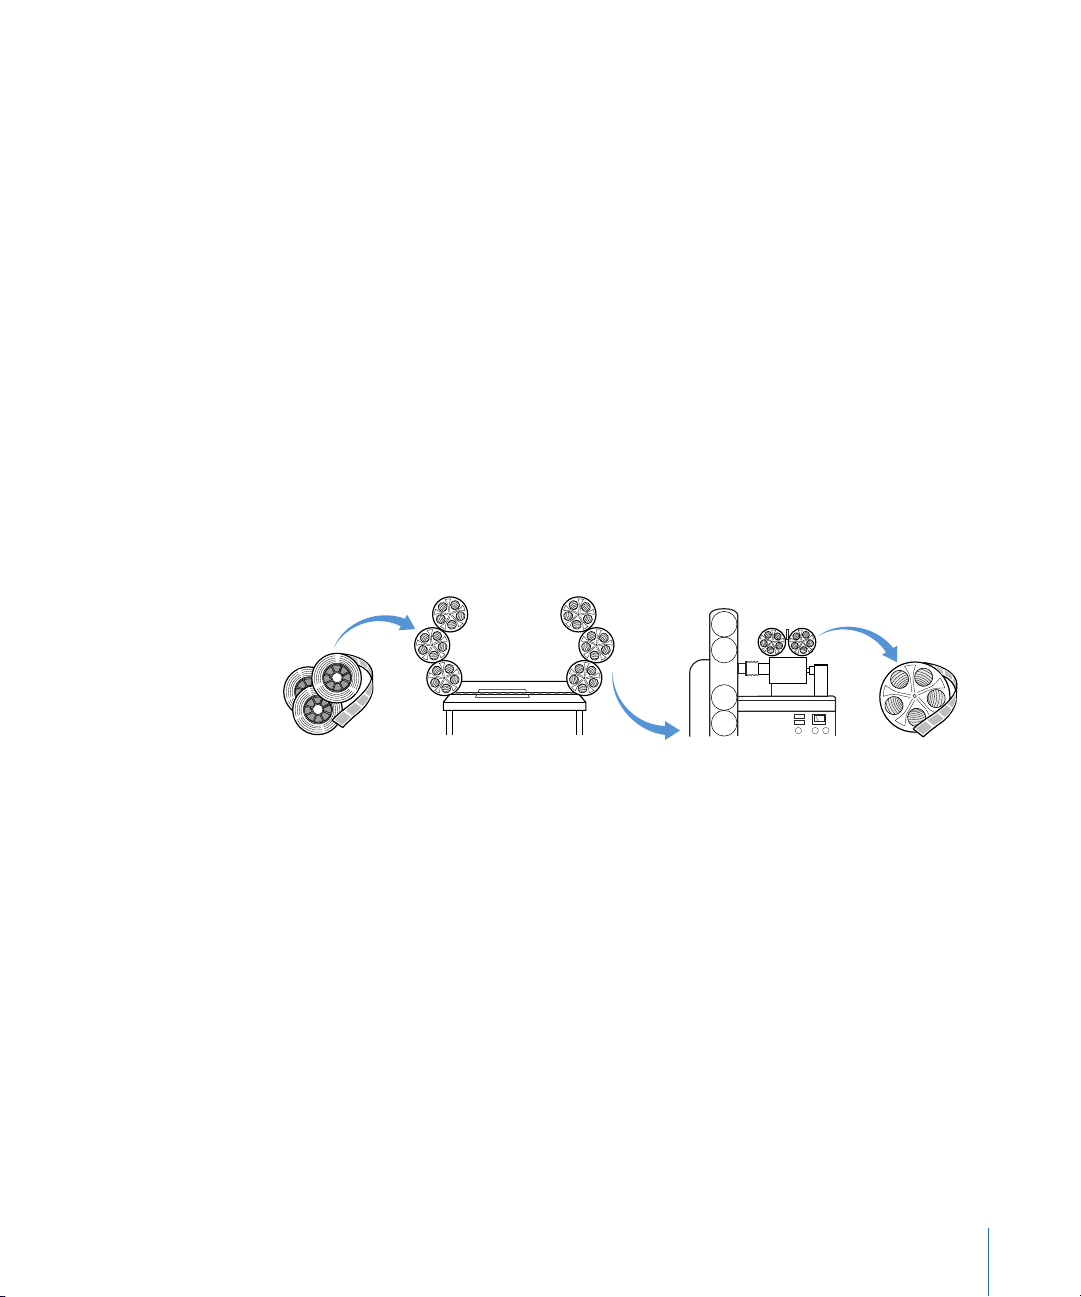
Once the camera negative has been conformed and the different shots physically glued
Conform Negative Final Film PrintOptical Color TimingCamera Negative
together onto alternating A and B rolls, the negative can be color-timed by being run
through an optical printer designed for this process. These machines shine filtered light
through the original negatives to expose an intermediate positive print, in the process
creating a single reel of film that is the color-corrected print.
The process of controlling the color of individual shots and doing scene-to-scene color
correction is accomplished with three controls to individually adjust the amount of red,
green, and blue light that exposes the film, using a series of optical filters and shutters.
Each of the red, green, and blue dials is adjusted in discrete increments called printer
points (with each point being a fraction of an f-stop, the scale used to measure film
exposure). Typically there’s a total range of 50 points, where point 25 is the original neutral
state for that color channel. Increasing or decreasing all three color channels together
darkens or brightens the image, while making disproportionate adjustments to the three
channels changes the color balance of the image relative to the adjustment.
The machine settings used for each shot can be stored (at one time using paper tape
technology) and recalled at any time, to ease subsequent retiming and adjustments, with
the printing process being automated once the manual timing is complete. Once the
intermediate print has been exposed, it can be developed and the final results projected.
While this system of color correction may seem cumbersome compared to today’s digital
tools for image manipulation, it’s an extremely effective means of primary color correction
for those who’ve mastered it.
Note: Color includes printer points controls for colorists who are familiar with this method
of color correction. For more information, see The Advanced Tab.
Tape-to-Tape Color Correction
For projects shot on videotape (and for those shot on film that will not receive a second
telecine pass), the color correction process fits into the traditional video offline/online
workflow. Once the edit has been locked, the final master tape is assembled, either by
being reconformed on the system originally used to do the offline or by taking the EDL
(Edit Decision List) and original source tapes to an online suite compatible with the source
tape formats. For more information about EDLs, see Importing Projects from Other Video
Editing Applications.
19Chapter 1 Color Correction Basics
Page 20
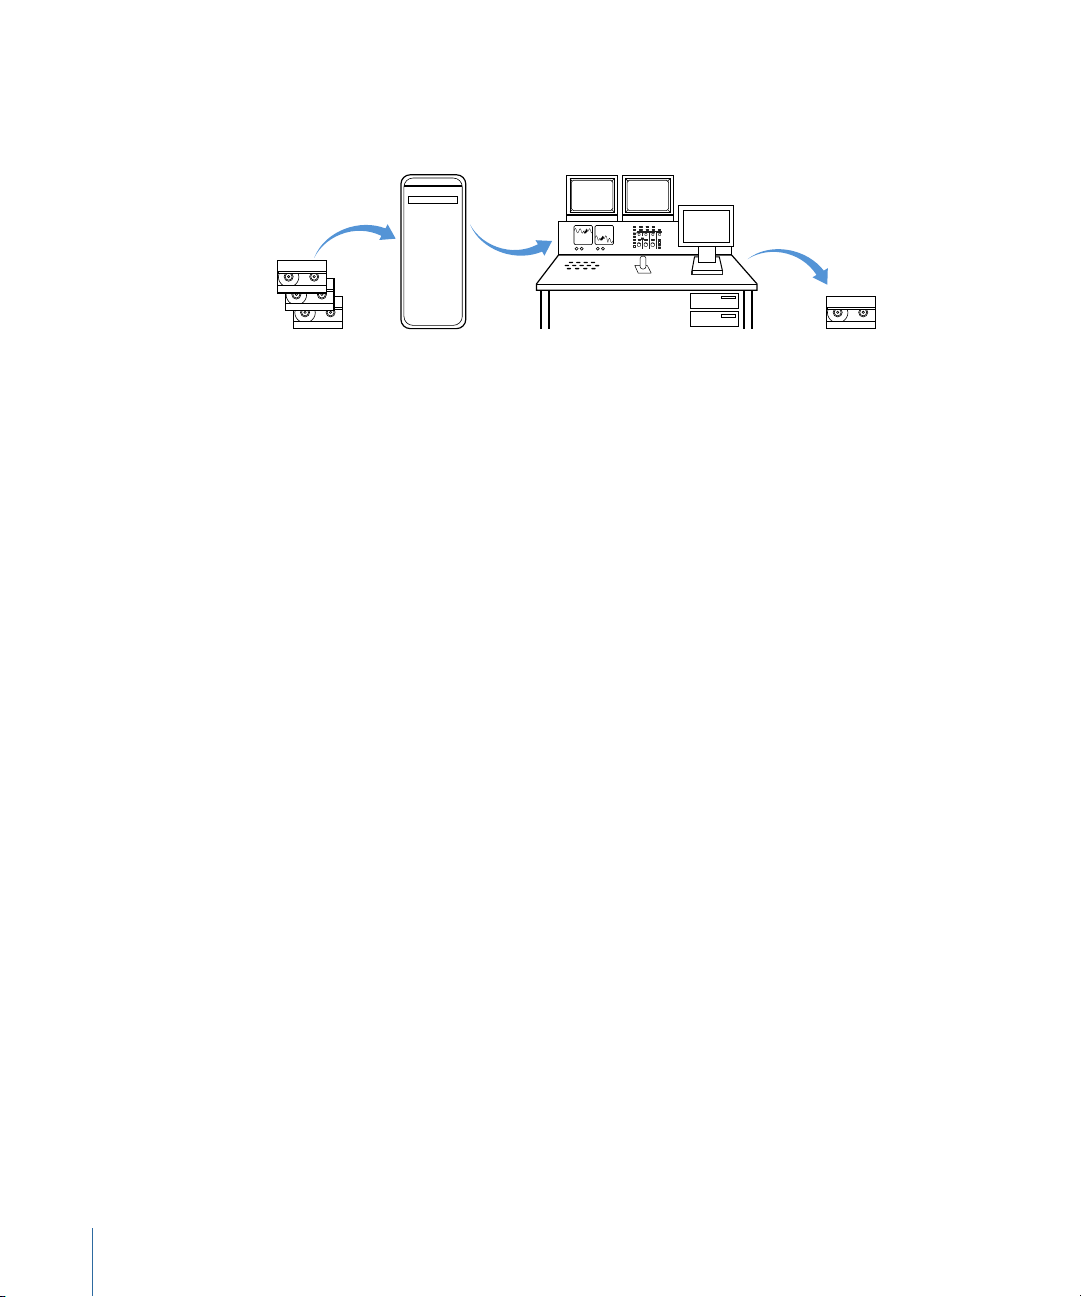
If the online assembly is happening in a high-end online suite, then color correction can
Videotapes
Tape Suite
Final Master TapeOffline Edit
be performed either during the assembly of the master tape or after assembly by running
the master tape through a color correction session.
Note: If the final master tape is color corrected, the colorist must carefully dissolve and
wipe color correction operations to match video dissolves and wipes happening in the
program.
Either way, the video signal is run through dedicated video color correction hardware
and software, and the colorist uses the tape’s master timecode to set up and preserve
color correction settings for every shot of every scene.
The evolution of the online video color correction suite introduced many more tools to
the process, including separate corrections for discrete tonal zones, secondary color
correction of specific subjects via keying and shapes controls, and many other creative
options.
Color Correcting via a Second Telecine Pass
Programs shot on film that are destined for video mastering, such as for an episodic
broadcast series, may end up back in the telecine suite for their final color correction
pass. Once editing is complete and the picture is locked, a cut list or pull list (similar to
that used for a negative conform) is created that matches the EDL of the edited program.
Using the cut list, the post-production supervisor pulls only the film negative that was
actually used in the edit. Since this is usually a minority of the footage that was originally
shot, the colorist now has more time (depending on the show’s budget, of course) to
perform a more detailed color correction pass on the selected footage that will be
assembled into the final video program during this final telecine pass.
Although this process might seem redundant, performing color correction directly from
the film negative has several distinct advantages. Since film has greater latitude from
black to white than video has, a colorist working straight off the telecine potentially has
a wider range of color and exposure from which to draw than when working only with
video.
20 Chapter 1 Color Correction Basics
Page 21
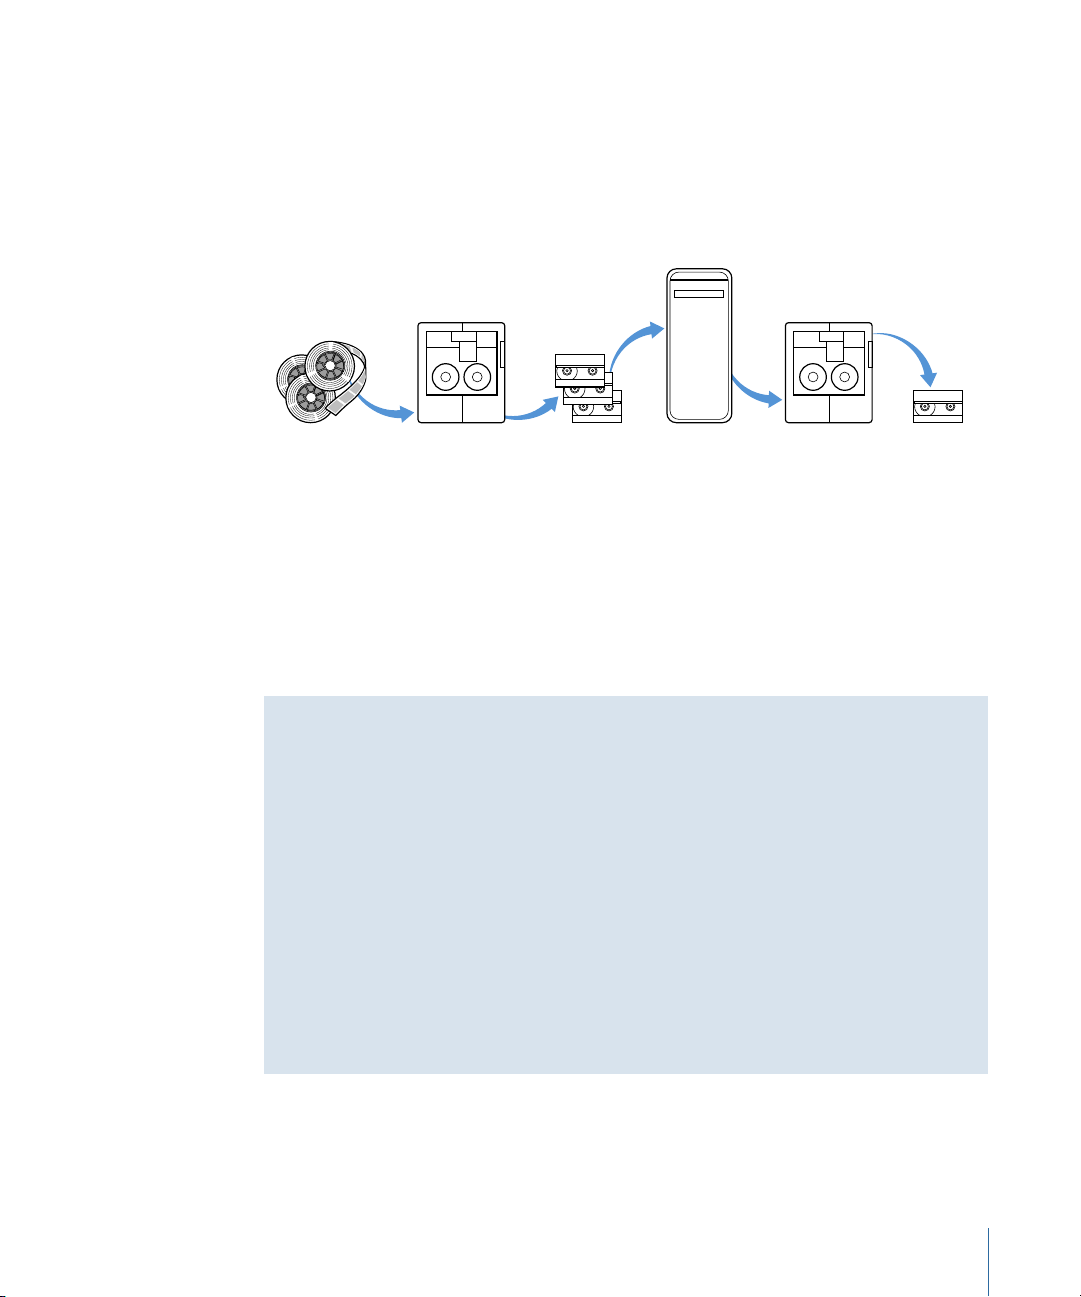
In addition, the color correction equipment available to the telecine colorist has evolved
Camera
Negative
Offline Media Reconform
Final Master
Inexpensive
One-Light
Telecine Pass
Best-Light
Telecine Pass
Offline Edit
to match (and is sometimes identical to) the tools available to online video colorists, with
the added advantage that the colorist can work directly on the uncompressed images
provided by the telecine.
After the conclusion of the second color correction pass, the color-corrected selects are
reassembled to match the original edit, and the project is mastered to tape.
Incidentally, even if you don’t intend to color correct your program in the telecine suite,
you might consider retransferring specific shots to make changes that are easier or of
higher quality to make directly from the original camera negative. For example, after
identifying shots you want to retransfer in your Final Cut Pro sequence, you can use
Cinema Tools to create a selects list just for shots you want to optically enlarge, speeding
the transfer process.
Other Advantages to Telecine Transfers
In addition to color correction, a colorist working with a telecine has many other options
available, depending on what kinds of issues may have come up during the edit.
• Using a telecine to pull the image straight off the film negative, the colorist can
reposition the image to include parts of the film image that fall outside of the action
safe area of video.
• With the telecine, the image can also be enlarged optically, potentially up to 50
percent without visible distortion.
• The ability to reframe shots in the telecine allows the director or producer to make
significant changes to a scene, turning a medium shot into a close-up for dramatic
effect, or moving the entire frame up to crop out a microphone that’s inadvertently
dropped into the shot.
21Chapter 1 Color Correction Basics
Page 22

Advantages of Grading with Color
When Does Color Correction Happen? discusses how color correction is accomplished in
other post-production environments. This section describes how Color fits into a typical
film or video post-production process.
Color provides many of the same high-end color correction tools on your desktop that
were previously available only in high-end tape-to-tape and telecine color correction
suites. In addition, Color provides additional tools in the Color FX room that are more
commonly found in dedicated compositing applications, which give you even more
detailed control over the images in your program. (For more information, see The Color
FX Room.)
Color has been designed as a color correction environment for both film and video. It’s
resolution-independent, supporting everything from standard definition video up to 2K
and 4K film scans. It also supports multiple media formats and is compatible with image
data using a variety of image sequence formats and QuickTime codecs.
Color also has been designed to be incorporated into a digital intermediate workflow.
Digital intermediate refers to a high-quality digital version of your program that can be
edited, color corrected, and otherwise digitally manipulated using computer hardware
and software, instead of tape machines or optical printers.
Editors, effects artists, and colorists who finish video programs in a tapeless fashion have
effectively been working with digital intermediates for years, but the term usually describes
the process of scanning film frames digitally, for the purposes of doing all edit conforming,
effects, and color correction digitally. It is then the digital image data which is printed
directly to film or compiled as a file for digital projection.
Finishing film or video programs digitally frees colorists from the limitations of film and
tape transport mechanisms, speeding their work by letting them navigate through a
project as quickly as they can in a nonlinear editing application. Furthermore, working
with the digital image data provides a margin of safety, by eliminating the risk of scratching
the negative or damaging the source tapes.
When Does Color Correction in Color Happen?
Color correction using Color usually happens at or near the conclusion of the online edit
or project conform, often at the same time the final audio mix is being performed. Waiting
until the picture is locked is always a good idea, but it’s not essential, as Color provides
tools for synchronizing projects that are still being edited via XML files or EDLs.
Color has been designed to work hand in hand with editing applications like Final Cut Pro;
Final Cut Pro takes care of input, editing, and output, and Color allows you to focus on
color correction and related effects.
22 Chapter 1 Color Correction Basics
Page 23

About Importing Projects and Media into Color
To work on a program in Color, you must be provided with two sets of files:
• Final Cut Pro sequence data can be sent to Color directly using the Send To Color
command. Otherwise, the edited project file (or files, if the program is in multiple reels)
should be provided in a format that can be imported into Color. Compatible formats
include Final Cut Pro XML files, and compatible EDL files from nearly any editing
environment.
• High-quality digital versions of the original source media, in a compatible QuickTime
or image sequence format.
Project and media format flexibility means that Color can be incorporated into a wide
variety of post-production workflows. For an overview of different color correction
workflows using Color, see Color Correction Workflows.
About Exporting Projects from Color
Color doesn’t handle video capture or output to tape on its own. Once you finish color
correcting your project in Color, you render every shot in the project to disk as an alternate
set of color-corrected media files, and you then send your Color project back to
Final Cut Pro, or hand it off to another facility for tape layoff or film out. For more
information, see The Render Queue.
What Footage Does Color Work With?
Color can work with film using scanned DPX or Cineon image sequences, or with video
clips using QuickTime files, at a variety of resolutions and compression ratios. This means
you have the option of importing and outputting nearly any professional format, from
highly compressed standarddefinition QuickTime DV-25 shots upthrough uncompressed
2K or 4K DPX image sequences—whatever your clients provide.
Image Encoding Standards
The sections listed below provide important information about the image encoding
standards supported by Color. The image data you’ll be color correcting is typically
encoded either using an RGB or Y′C
extremely flexible and capable of working with image data of either type. For detailed
information, see:
• The RGB Additive Color Model Explained
• The Y′C
Color Model Explained
BCR
• Chroma Subsampling Explained
• Bit Depth Explained
(sometimes referred to as YUV) format. Color is
BCR
23Chapter 1 Color Correction Basics
Page 24

The RGB Additive Color Model Explained
In the RGB color model, three color channels are used to store red, green, and blue values
in varying amounts to represent each available color that can be reproduced. Adjusting
the relative balance of values in these color channels adjusts the color being represented.
When all three values are equal, the result is a neutral tone, from black through gray to
white.
More typically, you’ll see these ratios expressed as digital percentages in the Color Parade
scope or Histogram. For example, if all three color channels are 0%, the pixel is black. If
all three color channels are 50%, the pixel is a neutral gray. If all three color channels are
100% (the maximum value), the pixel is white.
Animation (an older, 8-bit codec) and Apple ProRes 4444 (a newer 10-bit codec) are the
two most commonly used RGB QuickTime codecs. In digital intermediate workflows,
RGB-encoded images are typically stored as uncompressed DPX or Cineon image
sequences.
The Y′C
Video is typically recorded using the Y′C
Color Model Explained
BCR
color model. Y′C
BCR
color coding also employs
BCR
three channels, or components. A shot’s image is divided into one lumacomponent (luma
is image luminance modified by gamma for broadcast) and two color difference
components which encode the chroma (chrominance). Together, these three components
make up the picture that you see when you play back your video.
• The Y′ component represents the black-and-white portion of an image’s tonal range.
Because the eye has different sensitivities to the red, green, and blue portions of the
spectrum, the image “lightness” that the Y′ component reproduces is derived from a
weighted ratio of the (gamma-corrected) R, G, and B color channels. (Incidentally, the
Y′ component is mostly green.) Viewed on its own, the Y′ component is the
monochrome image.
• The two color difference components, CBand CR, are used to encode the color
information in such a way as to fit three color channels of image data into two. A bit
of math is used to take advantage of the fact that the Y′ component also stores green
information for the image. The actual math used to derive each color component is C
= B′ - Y′, while CR = R′ - Y′.
Note: This scheme was originally created so that older black-and-whitetelevisions would
be compatible with the newer color television transmissions.
Chroma Subsampling Explained
In Y′C
the luma channel. Because the human eye is more sensitive to differences in brightness
than in color, this has been used as a way of reducing the video bandwidth (or data rate)
requirements without perceptible loss to the image.
encoded video, the color channels are typically sampled at a lower ratio than
BCR
B
24 Chapter 1 Color Correction Basics
Page 25

The sampling ratio between the Y′, C
, and CRchannels is notated as a three-value ratio.
B
There are four common chroma subsampling ratios:
• 4:4:4: 4:4:4 chroma subsampled media encodes completely uncompressed color, the
highest quality possible, as the color difference channels are sampled at the same rate
as the luma channel. 4:4:4 subsampled image data is typically obtained via telecine or
datacine to an image sequence or video format capable of containingit, and is generally
employed for digital intermediate and film workflows. RGB encoded images such as
DPX and Cineon image sequences and TIFF files are always 4:4:4.
The Apple ProRes 4444 codec lets you capture, transcode to, and master media at this
high quality. (The fourth 4 refers to the ability of Apple ProRes 4444 to preserve an
uncompressed alpha channel in addition to the three color channels; however, Color
doesn’t support alpha channels.)
Be aware that simply rendering at 4:4:4 doesn’t guarantee a high-quality result. If media
is not acquired at 4:4:4, then rendering at 4:4:4 will preserve the high quality of
corrections you make to the video, but it won’t add color information that wasn’t there
to begin with.
As of this writing, few digital acquisition formats are capable of recording 4:4:4 video,
but those that do include HDCAM SR, as well as certain digital cinema cameras, including
the RED, Thompson Viper FilmStream, and Genesis digital camera systems.
• 4:2:2: 4:2:2 is a chroma subsampling ratio typical for many high-quality standard and
high definition video acquisition and mastering formats, including Beta SP (an analog
format), Digital Betacam, Beta SX, IMX, DVCPRO 50, DVCPRO HD, HDCAM, and D-5 HD.
Although storing half the color information of 4:4:4, 4:2:2 is standard for video mastering
and broadcast. As their names imply, Apple Uncompressed 8-bit 4:2:2, Apple
Uncompressed 10-bit 4:2:2, Apple ProRes 422, and Apple ProRes 422 (HQ) all use 4:2:2
chroma subsampling.
• 4:1:1 and 4:2:0: 4:1:1 is typical for consumer and prosumer video formats including
DVCPRO 25 (NTSC and PAL), DV, and DVCam (NTSC).
4:2:0 is another consumer-oriented subsampling rate, used by DV (PAL), DVCAM (PAL),
and MPEG-2, as well as the high definition HDV and XDCAM HD formats.
Due to their low cost, producers of all types have flocked to these formats for acquisition,
despite the resulting limitations during post-production (discussed below). Regardless,
whatever the acquisition format, it is inadvisable to master using either 4:1:1 or 4:2:0
video formats.
It’s important to be aware of the advantages of higher chroma subsampling ratios in the
color correction process. Whenever you’re in a position to specify the transfer format with
which a project will be finished, make sure you ask for the highest-quality format your
system can handle. (For more information about high-quality finishing codecs, see A
Tape-Based Workflow.)
25Chapter 1 Color Correction Basics
Page 26

As you can probably guess, more color information is better when doing color correction.
For example, when you make large contrast adjustments to 4:1:1 or 4:2:0 subsampled
video, video noise in the image can become exaggerated; this happens most often with
underexposed footage. You’ll find that you can make the same or greater adjustments
to 4:2:2 subsampled video, and the resulting image will have much less grain and noise.
Greater contrast with less noise provides for a richer image overall. 4:4:4 allows the most
latitude, or flexibility, for making contrast adjustments with a minimum of artifacts and
noise.
Furthermore, it’s common to use chroma keying operations to isolate specific areas of
the picture for correction. This is done using the HSB qualifiers in the Secondaries room.
(For more information, see Choosing a Region to Correct Using the HSL Qualifiers.) These
keying operations will have smoother and less noisy edges when you’re working with
4:2:2 or 4:4:4 subsampled video. The chroma compression used by 4:1:1 and 4:2:0
subsampled video results in macroblocks around the edges of the resulting matte when
you isolate the chroma, which can cause a “choppy” or “blocky” result in the correction
you’re trying to create.
Despite these limitations, it is very possible to color correct highly compressed video. By
paying attention to image noise as you stretch the contrast of poorly exposed footage,
you can focus your corrections on the areas of the picture where noise is minimized.
When doing secondary color correction to make targeted corrections to specific parts of
the image, you may find it a bit more time consuming to pull smooth secondary keys.
However, with care and patience, you can still achieve beautiful results.
Film Versus Video and Chroma Subsampling
With a bit of care you can color correct nearly any compressed video or image sequence
format with excellent results, and Color gives you the flexibility to use highly compressed
source formats including DV, HDV, and DVCPRO HD.
Standard and high definition video, on the other hand, is usually recorded with lower
chroma subsampling ratios (4:2:2 is typical even with higher-quality video formats, and
4:1:1 and 4:2:0 are common with prosumer formats) and higher compression ratios,
depending entirely upon the recording and video capture formats used. Since the
selected video format determines compression quality at the time of the shoot, there’s
nothing you can do about the lost image data, other than to make the best of what you
have.
In general, film footage is usually transferred with the maximum amount of image data
possible, especially when transferred as a completely uncompressed image sequence
(4:4:4) as part of a carefully managed digital intermediate workflow. This is one reason
for the higher quality of the average film workflow.
26 Chapter 1 Color Correction Basics
Page 27

Bit Depth Explained
Another factor that affects the quality of video images, and can have an effect on the
quality of your image adjustments, is the bit depth of the source media you’re working
with. With both RGB and Y′C
data is available, and the smoother both the image and your corrections will be. The
differences between images at different bit depths is most readily apparent in gradients
such as skies, where lower bit depths show banding, and higher bit depths do not.
The bit depth of your source media depends largely on how that media was originally
acquired. Most of the media you’ll receive falls into one of the following bit depths, all of
which Color supports:
• 8-bit: Most standard and high definition consumer and professional digital video formats
capture 8-bit image data, including DV and DVCPRO-25, DVCPRO 50, HDV, DVCPRO
HD, HDCAM, and so on.
• 10-bit: Many video capture interfaces allow the uncompressed capture of analog and
digital video at 10-bit resolution.
• 10-bit log: By storing data logarithmically, rather than linearly, a wider contrast ratio
(such as that of film) can be represented by a 10-bit data space. 10-bit log files are often
recorded from datacine scans using the Cineon and DPX image sequence formats.
• 12-bit: Some cameras, such as the RED ONE, capture digital images at 12-bit, providing
for even smoother transitions in gradients.
• 16-bit: It has been said that it takes 16 bits of linear data to match the contrast ratio
that can be stored in a 10-bit log file. Since linear data is easier for computers to process,
this is another data space that’s available in some image formats.
• Floating Point: The highest level of image-processing quality available. Refers to the
use of floating-point math to store and calculate fractional data. This means that values
higher than 1 can be used to store data that would otherwise be rounded down using
the integer-based 8-bit, 10-bit, 12-bit, and 16-bit depths. Floating Point is a
processor-intensive bit depth to work with.
encoded media, the higher the bit depth, the more image
BCR
Higher bit depths accommodate more image data by using a greater range of numbers
to represent the tonal range that’s available. This is apparent when looking at the numeric
ranges used by the two bit depths most commonly associated with video.
• 8-bit images use a full range of 0–255 to store each color channel. (Y′C
video uses
BCR
a narrower range of 16–235 to accommodate super-black and super-white.) 255 isn’t
a lot of values, and the result can be subtly visible “stairstepping” in areas of the picture
with narrow gradients (such as skies).
27Chapter 1 Color Correction Basics
Page 28

• 10-bit images, on the other hand, use a full range of 0 to 1023 to store each color
channel. (Again, Y′C
super-black and super-white.) The additional numeric range allows for smoother
gradients and virtually eliminates bit depth–related artifacts.
Fortunately, while you can’t always control the bit depth of your source media, you can
control the bit depth at which you work in Color independently. This means that even if
the source media is at a lower bit depth, you can work at a higher bit depth to make sure
that the quality of your corrections is as high as possible. In particular, many effects and
secondary corrections look significantly better when Color is set to render at higher bit
depths. For more information, see Playback, Processing, and Output Settings.
video uses a narrower range of 64–940 to accommodate
BCR
Basic Color and Imaging Concepts
Color correction involves controlling both an image’s contrast and its color (exercising
separate control over its hue and saturation). This section explains these important imaging
concepts so that you can better understand how the Color tools let you alter the image.
For detailed information, see:
• Contrast Explained
• Luma Explained
• Gamma Explained
• Chroma Explained
• Primary and Secondary Color Relationships Explained
• The HSL Color Space Model Explained
Contrast Explained
Contrast adjustments are among the most fundamental, and generally the first,
adjustments made. Contrast is a way of describing an image’s tonality. If you eliminate
all color from an image, reducing it to a series of grayscale tones, the contrast of the
picture is seen by the distribution of dark, medium, and light tones in the image.
Controlling contrast involves adjustments to three aspects of an image’s tonality:
• The black point is the darkest pixel in the image.
• The white point is the brightest pixel in the image.
28 Chapter 1 Color Correction Basics
Page 29
• The midtones are the distribution of all tonal values in between the black and white
WhiteBlack
Mids
points.
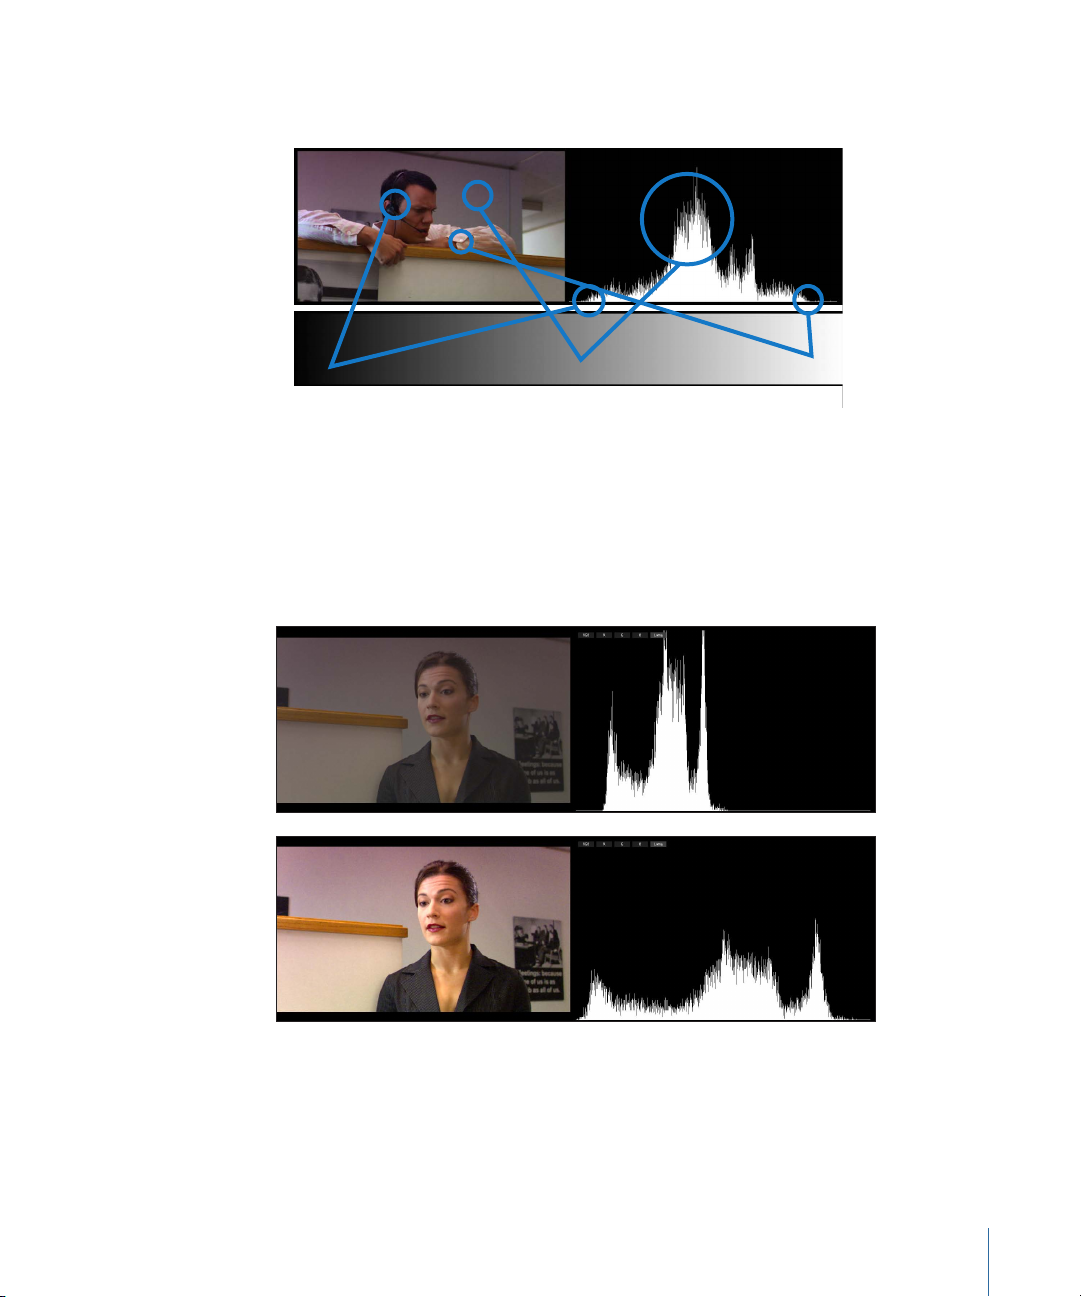
An image’s contrastratio is the difference between the darkest and brightest tonal values
within that image. Typically, a higher contrast ratio, where the difference between the
two is greater, is preferable to a lower one. Unless you’re specifically going for a
low-contrast look, higher contrast ratios generally provide a clearer, crisper image. The
following two images, with their accompanying Histograms which show a graph of the
distribution of shadows, midtones, and highlights from left to right, illustrate this.
In addition, maximizing the contrast ratio of an image aids further color correction
operations by more evenly distributing that image’s color throughout the three tonal
zones thatare adjusted with the three colorbalance controls in the Primary In, Secondaries,
and Primary Out rooms. This makes it easier to perform individual corrections to the
shadows, midtones, and highlights.
29Chapter 1 Color Correction Basics
Page 30

For more information about adjusting image contrast, see Contrast Adjustment Explained.
Black
0% luminance
100%
109%
White
Super-white
Luma Explained
Luma (which technically speaking is gamma-corrected luminance) describes the exposure
(lightness) of a video shot, from absolute black, through the distribution of gray tones,
all the way up to the brightest white. Luma can be separated from the color of an image.
In fact, if you desaturate an image completely, the grayscale image that remains is the
luma.
Luma is measured by Color as a digital percentage from 0 to 100, where 0 represents
absolute black and 100 represents absolute white. Color also supports super-white levels
(levels from 101 to 109 percent) if they exist in your shot. While super-white video levels
are not considered to be safe for broadcast, many cameras record video at these levels
anyway.
Note: Unadjusted super-white levels will be clamped by the Broadcast Safe settings (if
they’re turned on with their default settings), so that pixels in the image with luma above
100 percent will be set to 100 percent.
30 Chapter 1 Color Correction Basics
What Is Setup?
People often confuse the black level of digital video with setup. Setup refers to the
minimum black level assigned to specific analog video signals and is only an issue with
analog video output to the Beta SP tape format. If you are outputting to an analog tape
format using a third-party analog video interface, you should check the documentation
that came with that video interface to determine how to configure the video interface
for the North American standard for setup (7.5 IRE) or the Japanese standard (0 IRE).
Most vendors of analog video interfaces include a software control panel that allows
you to select which black level to use. Most vendors label this as “7.5 Setup” versus “0
Setup,” or in some cases “NTSC” versus “NTSC-J.”
Video sent digitally via SDI has no setup. The Y′C
video signals is 0 percent, 0 IRE, or 0 millivolts, depending on how you’re monitoring
the signal.
minimum black level for all digital
BCR
Page 31

Gamma Explained
Gamma refers to two different concepts. In a video signal, gamma refers to the nonlinear
representation of luminance in a picture displayed on a broadcast or computer monitor.
Since the eye has a nonlinear response to light (mentioned in The Y′C
Color Model
BCR
Explained), applying a gamma adjustment while recording an image maximizes the
perceptible recorded detail in video signals with limited bandwidth. Upon playback, a
television or monitor applies an inverted gamma function to return the image to its
“original” state.
You want to avoid unplanned gamma adjustments when sending media from Final Cut Pro
to Color. It’s important to keep track of any possible gamma adjustments that occur when
exporting or importing clips in Final Cut Pro during the editing process, so that these
adjustments are accounted for and avoided during the Final Cut Pro–to–Color roundtrip.
For more information on gamma handling in Final Cut Pro, see the Final Cut Pro 7
User Manual.
Gamma is also used to describe a nonlinear adjustment made to the distribution of
midtones in an image. For example, a gamma adjustment leaves the black point and the
white point of an image alone, but either brightens or darkens the midtones according
to the type of adjustment being made. For more information on gamma and midtones
adjustments, see The Primary In Room.
Chroma Explained
Chroma (also referred to as chrominance) describes the color channels in your shots,
ranging from the absence of color to the maximum levels of color that can be represented.
Specific chroma values can be described using two properties, hue and saturation.
Hue
Hue describes the actual color itself, whether it’s red or green or yellow. Hue is measured
as an angle on a color wheel.
31Chapter 1 Color Correction Basics
Page 32

Saturation
Saturation describes the intensity of that color, whether it’s a bright red or a pale red. An
image that is completely desaturated hasno color atall and is a grayscale image. Saturation
is also measured on a color wheel, but as the distance from the center of the wheel to
the edge.
As you look at the color wheel, notice that it is a mix of the red, green, and blue primary
colors that make up video. In between these arethe yellow, cyan, and magenta secondary
colors, which are equal mixes of the primary colors.
Primary and Secondary Color Relationships Explained
Understanding color wheel interactions will help you tosee how the Color controls actually
affect colors in an image.
Primary Colors
In any additive color model, the primary colors are red, green, and blue. These are the
three purest colors that can be represented, by setting a single color channel to 100
percent and the other two color channels to 0 percent.
Secondary Colors
Adding any two primary colors produces a secondary color. In other words, you create a
secondary color by setting any two color channels to 100 percent while setting the third
to 0 percent.
• Red + green = yellow
• Green + blue = cyan
• Blue + red = magenta
One other aspect of the additive color model:
• Red + green + blue = white
32 Chapter 1 Color Correction Basics
Page 33

All these combinations can be seen in the illustration of three colored circles below. Where
any two primaries overlap, the secondary appears, and where all three overlap, white
appears.
Complementary Colors
Two colors that appear 180 degrees opposite each other on the wheel are referred to as
complementary colors.
Adding two complementary colors of equal saturation to each other neutralizes the
saturation, resulting in a grayscale tone. This can be seen in the two overlapping color
wheels in the illustration below. Where red and cyan precisely overlap, both colors become
neutralized.
Understanding the relationship of colors to their complementaries is essential in learning
how to eliminate or introduce color casts in an image using the Color Primary or Secondary
color correction controls. For example, to eliminate a bluish cast in the highlights of
unbalanced daylight, you add a bit of orange to bring all the colors to a more neutral
state. This is covered in more detail in The Primary In Room.
33Chapter 1 Color Correction Basics
Page 34

The HSL Color Space Model Explained
The HSL color space model is another method for representing color and is typically used
for user interface controls that let you choose or adjust colors. HSL stands for hue,
saturation, and lightness (roughly equivalent to luminance) and provides a way of
visualizing the relationships among luminance, hue, and saturation.
The HSL color space model can be graphically illustrated as a three-dimensional cone.
Hue is represented by an angle around the base of the cone, as seen below, while
saturation is represented by a color’s distance from the center of the cone to the edge,
with the center being completelydesaturated andthe edge being saturated to maximum
intensity. A color’s brightness, then, can be represented by its distance from the base to
the peak of the cone.
Color actually provides a three-dimensional video scope that’s capable of displaying the
colors of an image within an extruded HSL space, for purposes of image analysis. For
more information, see The 3D Scope.
34 Chapter 1 Color Correction Basics
Page 35

Color Correction Workflows
2
Taking maximum advantage of Color requires careful workflow management.This chapter
outlines where Color fits into your post-production workflow.
Color has been designed to work hand in hand with editing applications like Final Cut Pro
via XML and QuickTime media support, or with other editorial environments via EDL and
image sequence support. While video and film input and editing are taken care of
elsewhere, Color gives you a dedicated environment in which to focus on color correction
and related effects.
This chapter gives you a quick overview of how to guide your project through a workflow
that includes using Color for color correction. Information is provided about both standard
and high definition broadcast video workflows, as well as 2K digital intermediate workflows.
This chapter covers the following:
• An Overview of the Color Workflow (p. 35)
• Limitations in Color (p. 37)
• Video Finishing Workflows Using Final Cut Pro (p. 39)
• Importing Projects from Other Video Editing Applications (p. 47)
• Digital Cinema Workflows Using Apple ProRes 4444 (p. 50)
• Finishing Projects Using RED Media (p. 56)
• Digital Intermediate Workflows Using DPX/Cineon Media (p. 65)
• Using EDLs, Timecode, and Frame Numbers to Conform Projects (p. 73)
An Overview of the Color Workflow
All controls in Color are divided into eight tabbed rooms, each of which corresponds to
a different stage in a typical color correction workflow. When you move from room to
room, the buttons, dials, and trackballs of your control surface (if you have one) remap
to correspond to the controls in that room.
35
Page 36

Each room gathers all the controls pertaining to that particular step of the color correction
process onto a single screen. These rooms are organized from left to right in the order
colorists will typically use them, so that after adjusting your project’s preferences in the
Setup room, you can work your way across from the Primary controls, to the Secondary
controls, Color FX, Primary Out, and finally Geometry as you adjust each shot in your
project.
• Setup: All projects begin in the Setup room. This is where you import and manage the
shots in your program. The grade bin, project settings, and application preferences are
also found within the Setup room. For video colorists, the project settings area of the
Setup room is where you find the Broadcast Safe controls, which allow you to apply
gamut restrictions to the entire program.
• Primary In: Primary color corrections affect the entire image, so this room is where you
make overall adjustments to the color and contrast of each shot. Color balance and
curve controls let you adjust colors in the shadows, midtones, and highlights of the
image. The lift, gamma, and gain controls let you make detailed contrast adjustments,
which affect the brightness of different areas of the picture. There are also controls for
overall, highlight, and shadow saturation, and printer point (or printer light) controls
for colorists used to color timing for film.
• Secondaries: Secondary color corrections are targeted adjustments made to specific
areas of the image. This room provides numerous methods for isolating, or qualifying,
the parts of the image you want to correct. Controls are provided with which to isolate
a region using shape masks. Additional controls let you isolate areas of the picture
using a chroma-keyed matte with individual qualifications for hue, saturation, and
luminance. Each shot can have up to eight secondary operations. Furthermore,
special-purpose secondary curves let you make adjustments to hue, saturation, and
luma within specific portions of the spectrum.
• Color FX: The Color FX room lets you create your own custom effects via a node-based
interface more commonly found in high-end compositing applications, similar to Shake.
These individual effects nodes can be linked together in thousands of combinations,
providing a fast way to create many different types of color effects. Your custom effects
can be saved in the Color FX bin for future use, letting you apply your look to future
projects.
• Primary Out: The Primary Out room is identical to the Primary In room except that its
color corrections are applied to shots after they have been processed by all the other
color grading rooms. This provides a way to post-process your images after all other
operations have been performed.
36 Chapter 2 Color Correction Workflows
Page 37

• Geometry: The Geometry room lets you pan and scan, rotate, flip, and flop shots as
necessary. The Geometry room also provides tools for creating custom masks and for
applying and managing motion-tracking analyses.How Geometry room transformations
are handled depends on your workflow:
• For projects being roundtripped from Final Cut Pro, Geometry room transformations
are not rendered by Color when outputting the corrected project media. Instead, all
the geometric transformations you create in Color are translated into Final Cut Pro
Motion tab settings when the project is sent back to Final Cut Pro. You then have
the option to further customize those effects in Final Cut Pro prior to rendering and
output.
• For 2K and 4K digital intermediates, as well as projects using 4K native RED QuickTime
media, Geometry room transformations are processed by Color when rendering the
output media.
Note: When you send a project from Final Cut Pro to Color, compatible Motion tab
settings are translated into Geometry room settings. You can preview and adjust these
transformations as you color correct. For more information, see The Geometry Room.
• Still Store: You can save frames from anywhere in the Timeline using the Still Store,
creating a reference library of stills from your program from which you can recall images
to compare to other shots you're trying to match. You can load one image from the
Still Store at a time into memory, switching between it and the current frame at the
position of the playhead using the controls in the Still Store menu. The Still Store also
provides controls for creating and customizing split screens you can use to balance
one shot to another. All Still Store comparisons are sent to the preview and broadcast
monitor outputs.
• Render Queue: When you finish grading your program in Color, you use the Render
Queue to manage the rendering of the shots in your project.
Limitations in Color
Color has been designed to work hand in hand with Final Cut Pro; Final Cut Pro lets you
take care of input, editing, and output, while Color allows you to focus on color correction
and related effects. Given this relationship, there are specific things it does not do:
• Recording: Color is incapable of either scanning or capturing film or video footage. This
means that you need to import projects and media into Color from another application.
• Editing: Color is not intended to be an editing application. The editing tools that are
provided are primarily for colorists working in 2K workflows where the Color project is
the final version that will become the digital master. By default, the tracks of imported
XML project files are locked to prevent new edits from introducing errors when the
project moves back to Final Cut Pro.
37Chapter 2 Color Correction Workflows
Page 38

To accommodate editorial changes, reconforming tools are provided to synchronize
an EDL or Final Cut Pro sequence with the version of that project being graded in Color.
For more information, see Reconforming Projects.
• Filters: Final Cut Pro FXScript or FxPlug filters are neither previewed nor rendered by
Color. However, their presence in your project is maintained, and they show up again
once the project is sent back to Final Cut Pro.
Note: It's not generally a good idea to allow various filters that perform color correction
to remain in your Final Cut Pro project when you send it to Color. Even though they
have no effect as you work in Color, their sudden reappearance when the project is
sent back to Final Cut Pro may produce unexpected results.
• Final Cut Pro Color Corrector 3-way filters: Color Corrector 3-way filters applied to clips
in your sequence are automatically converted into adjustments to the color balance
controls, primary contrast controls, and saturation controls in the Primary In room of
each shot to which they’re applied. Once converted, these filters are removed from the
XML data for that sequence, so that they do not appear in the sequence when it’s sent
back to Final Cut Pro.
If more than one filter has been applied to a clip, then only the last Color Corrector
3-way filter appearing in the Filters tab is converted; all others are ignored. Furthermore,
any Color Corrector 3-way filter with limit effects turned on is also ignored.
• Transitions: Color preserves transition data that might be present in an imported EDL
or XML file, but does not play the transitions during previews. How they're rendered
depends on how the project is being handled:
• For projects being roundtripped from Final Cut Pro, transitions are not rendered in
Color. Instead, Color renders handles for the outgoing and incoming clips, and
Final Cut Pro is relied upon to render each transition after the project's return.
• When rendering 2K or 4K DPX or Cineon image sequences, all video transitions are
rendered as linear dissolves when you use the Gather Rendered Media command to
consolidate the finally rendered frames of your project in preparation for film output.
This feature is only available for projects that use DPX and Cineon image sequence
media or RED QuickTime media, and is intended only to support film out workflows.
Only dissolves arerendered; any other type of transition (such as a wipe or iris) will be
rendered as a dissolve instead.
• Superimpositions: Superimposed shots are displayed in the Timeline, but compositing
operations involving opacity and composite modes are neither displayed nor rendered.
• Speed effects: Color doesn't provide an interface for adding speed effects, relying instead
upon the editing application that originated the project to do so. Linear and variable
speed effects that are already present in your project, such as those added in
Final Cut Pro, are previewed during playback, but they are not rendered in Color during
output. Instead, Final Cut Pro is relied upon to render those effects in roundtrip
workflows.
38 Chapter 2 Color Correction Workflows
Page 39

• Final Cut Pro generators and Motion projects: Final Cut Pro generators and Motion projects
are completely ignored by Color. How you handle these types of effects also depends
on your workflow:
• If you're roundtripping a project between Final Cut Pro and Color, and you want to
grade these effects in Color, you should render these effects as self-contained
QuickTime .mov files. Then, edit the new .mov files into your sequence to replace
the original effects shots prior to sending your project to Color.
• If you're roundtripping a project between Final Cut Pro and Color, and there's no
need to grade these effects, you don't need to do anything. Even though these effects
aren't displayed in Color, their position in the Timeline is preserved, and these effects
will reappear in Final Cut Pro when you send the project back. Titles are a good
example of effects that don't usually need to be graded.
• If you're working on a 2K or 4K digital intermediate or RED QuickTime project, you
need to use a compositing application like Shake or Motion to composite any effects
using the image sequence data.
Important: When you send frames of media to a compositing application, it's vital that
you maintain the frame number in the filenames of new image sequence media that
you generate. Each image file's frame number identifies its position in that program's
Timeline, so any effects being created as part of a 2K digital intermediate workflow
require careful file management.
• Video or film output: While Color provides broadcast output of your project's playback
for preview purposes, this is not intended to be used to output your program to tape.
This means that when you finish color correcting your project in Color, the rendered
output needs to be moved to Final Cut Pro for output to tape or to another environment
for film output.
Video Finishing Workflows Using Final Cut Pro
If a program has been edited using Final Cut Pro, the process of moving it into Color is
fairly straightforward. After editing the program in Final Cut Pro, you must reconform the
program, if necessary, to use the original source media at its highest available quality.
39Chapter 2 Color Correction Workflows
Page 40

Once that task has been accomplished, you can send the project data and files into Color
Media Data
Color
Final Cut Pro Final Cut Pro
XML
Online
Media
XML
New Color
Corrected
Media
Render
Edit
Final
Effects and
Output
Color
Correction
Send to
Final Cut Pro
Send to
Color
Output
Final Master
Source
Media
for color correction. Upon completion of the color correction pass, you need to render
the result and send the project back to Final Cut Pro for final output, either to tape or as
a QuickTime file.
Exactly how you conform your source media in Final Cut Pro depends on the type of
media that's used. For more information, see:
• A Tape-Based Workflow.
• Reconforming Online Media in a Tapeless Digital Video Workflow.
• Reconforming Online Media in a Film-to-Tape Workflow.
A Tape-Based Workflow
For a traditional offline/online tape-based workflow, the video finishing process is simple.
The tapes are captured into Final Cut Pro, possibly at a lower-quality offline resolution to
40 Chapter 2 Color Correction Workflows
ease the initial editing process by using media that takes less hard disk space and is easier
to work with using a wider range of computers.
Page 41

After the offline edit is complete, the media used by the edited program must be
Final Cut Pro
Output
Final Master
XML
Online
Media
XML
New Color
Corrected
Media
Offline Duplicates
Source Media
Final Cut Pro Color
Online
Reconform
Offline
Edit
Media Data
Send to
Color
RenderColor
Correction
Send to
Final Cut Pro
Final
Effects and
Output
recaptured from the source tapes at maximum quality. The resulting online media is what
will be used for the Final Cut Pro–to–Color roundtrip.
The following steps break this process down more explicitly.
Stage 1: Capturing the Source Media at Offline or Online Resolution
How youdecide to capture your media prior toediting depends onits format. Compressed
formats, including DV, DVCPRO-50, DVCPRO HD, and HDV, canbe captured at their highest
quality without requiring enormous storage resources. If this is the case, then capturing
and editing your media using its native resolution and codec lets you eliminate the
time-consuming step of recapturing (sometimes called conforming or reconforming) your
media later.
Uncompressed video formats, or projects where there are many, many reels of source
media, may benefit from being captured at a lower resolution or with a more highly
compressed codec. This will save disk space and also enable you to edit using less
expensive equipment. Later, you'll have to recapture the media prior to color correction.
Stage 2: Editing the Program in Final Cut Pro
Edit your program in Final Cut Pro, as you would any other project. If you're planning on
an extensive use of effects in your program during editorial, familiarize yourself with the
topics covered in Limitations in Color.
41Chapter 2 Color Correction Workflows
Page 42

Stage 3: Recapturing the Source Media at Online Resolution
If you originally captured your source media using an offline format, you need to recapture
the media used in your project at the highest available quality prior to sending it to Color.
• If your media was originally recorded using a compressed format (such as DV,
DVCPRO-50, DVCPRO HD, or HDV), then recapturing it using the original source codec
and resolution is fine; Color can work with compressed media and automatically
promotes the image data to higher uncompressed bit depths for higher quality imaging
when monitoring and rendering.
• If you're capturing a higher-bandwidth video format (such as Betacam SP, Digital
Betacam, HDCAM, and HDCAM SR) and require high quality but need to use a
compressed format to save hard disk space and increase performance on your particular
computer, then you can recapture using the Apple ProRes 422 codec, or the higher
quality Apple ProRes 422 (HQ) codec.
• If you're capturing high-bandwidth video and require the highest-quality uncompressed
video dataavailable, regardless ofthe storage requirements, you should recapture your
media using Apple Uncompressed 8-bit 4:2:2 or Apple Uncompressed 10-bit 4:2:2.
You may also want to take the opportunity to use the Final Cut Pro Media Manager to
delete unused media prior to recapturing in order to save valuable disk space, especially
when recapturing uncompressed media. For more information, see the Final Cut Pro 7
User Manual.
Note: Some codecs, such as HDV, can be more processor-intensive to work with than
others. In this case, capturing or recompressing the media with a less processor-intensive
codec, such as Apple ProRes 422 or Apple ProRes 422 (HQ), will improve your performance
while you work in Color, while maintaining high quality and low storage requirements.
Stage 4: Preparing Your Final Cut Pro Sequence
To prepare your edited sequence for an efficient workflow in Color, follow the steps
outlined in Before You Export Your Final Cut Pro Project.
Stage 5: Sending the Sequence to Color or Exporting an XML File
When you finish prepping your edited sequence, there are two ways you can send it to
Color.
• If Color is installed on the same computer as Final Cut Pro, you can use the Send To
Color command to move an entire edited sequence to Color, automatically creating a
new project file.
• If you're handing the project off to another facility, you may want to export the edited
sequence as an XML file for eventual import into Color. In this case, you'll also want to
use the Final Cut Pro Media Manager to copy the project's media to a single,
transportable hard drive volume for easy handoff.
42 Chapter 2 Color Correction Workflows
Page 43

Stage 6: Grading Your Program in Color
Use Color to grade your program. When working on a roundtrip from Final Cut Pro, it's
crucial to avoid unlocking tracks or reediting shots in the Timeline. Doing so can
compromise your ability to send the project back to Final Cut Pro.
If the client needs a reedit after you've started grading, you should instead perform the
edit back in Final Cut Pro, and export an XML version of the updated sequence which
you can use to quickly update the Color project in progress using the Reconform
command. For more information, see Reconforming Projects.
Stage 7: Rendering New Source Media and Sending the Updated Project to
Final Cut Pro
When you finish grading, you use the Color Render Queue to render all the shots in the
project as a new, separate set of graded media files.
Afterward, you need to send the updated project to Final Cut Pro using one of the two
following methods:
• If Color is installed on the same computer as Final Cut Pro, you can use the Send To
Final Cut Pro command.
• If you're handing the color-corrected project back to the originating facility, you need
to export the Color project as an XML file for later import into Final Cut Pro.
Important: Some parameters in the Project Settings tab of the Setup room affect how
the media is rendered by Color. These settings include the Deinterlace Renders, QuickTime
Export Codec, Broadcast Safe, and Handles settings. Be sure to verify these and other
settings prior to rendering your final output.
Stage 8: Adjusting Transitions, Superimpositions, and Titles in Final Cut Pro
To output your project, you need to import the XML project data back into Final Cut Pro.
This happens automatically if you use the Send To Final Cut Pro command. At this point,
you can add or adjust other effects that you had applied previously in Final Cut Pro, before
creating the program's final master. Things you may want to consider while prepping
the program at this stage include:
• Do you need to produce a "textless" master of the program, or one with the titles
rendered along with the image?
• Are there any remaining effects clips that you need to import and color correct within
Final Cut Pro?
Stage 9:Outputting the Final Video Master to Tape or Rendering a Master QuickTime
File
Once you complete any last adjustments in Final Cut Pro, you can use the Print to Video,
Edit to Tape, or Export QuickTime Movie command to create the final version of your
program.
43Chapter 2 Color Correction Workflows
Page 44

Reconforming Online Media in a Tapeless Digital Video Workflow
Final Cut Pro
XML
Online
Media
XML
New Color
Corrected
Media
Offline Duplicates
Final Cut Pro Color
Send to
Color
Render
Send to
Final Cut Pro
Final
Effects and
Output
Source Media
Media Data
Online
Reconform
Offline
Edit
Color
Correction
Output
Final Master
If a program uses a tapeless video format, the steps are similar to those described in A
Tape-Based Workflow; however, they likely involve multiple sets of QuickTime files: the
original media at online resolution and perhaps a second set of media files that have
been downconverted to an offline resolution for ease of editing. After the offline edit,
the online conform involves relinking to the original source media, prior to going through
the Final Cut Pro–to–Color roundtrip.
44 Chapter 2 Color Correction Workflows
Here's a more detailed explanation of the offline-to-online portion of this workflow.
Shoot the project using whichever tapeless format you've chosen. As you shoot, make
Stage 1: Shooting and Backing Up All Source Media
sure that you're keeping backups of all your media, in case anything happens to your
primary media storage device.
Stage 2: Creating Offline Resolution Duplicates and Archiving Original-Resolution
Media
If necessary, create offline resolution duplicates of the source media in whatever format
is most suitable for your system. Then, archive the original source media as safely as
possible.
Page 45

Important: When you create offline duplicates of tapeless media, it's vital that you
Telecine
Color
Final Cut Pro Final Cut Pro
XML
Online
Media
XML
New Color
Corrected
Media
Render
Send to
Final Cut Pro
Send to
Color
Offline
and Online
Edits
Final
Effects and
Output
Color
Correction
Camera
Negative
Media Data
Output
Final Master
Transferred
Video Media
duplicate and maintain the original filenames and timecode with which the source files
were created. This is critical to guaranteeing that you'll be able to easily relink to the
original high-resolution source files once the offline edit is complete.
Stage 3: Editing the Program in Final Cut Pro
Edit your program in Final Cut Pro, as you would any other project. If you're planning on
an extensive use of effects in your program during editorial, familiarize yourself with the
topics covered in Limitations in Color.
Stage 4: Relinking Your Edited Sequence to the Original Source Media
Once your offline edit is complete, you need to restore the original online-quality source
media and relink to or retransfer the high-resolution files.
Stage 5: Prerendering Effects, Sending the Sequence to Color, and Grading
At this point, the workflow is identical to Stage 6: Grading Your Program in Color in A
Tape-Based Workflow.
Reconforming Online Media in a Film-to-Tape Workflow
If you're working on a project that was shot on film but will be mastered on video, it must
be transferred from film to tape using a telecine prior to being captured and edited in
Final Cut Pro. At that point, the rest of the offline and online edit is identical to any other
tape-based format.
Here's a more detailed explanation of the offline-to-online portion of this workflow.
45Chapter 2 Color Correction Workflows
Page 46

Stage 1: Shooting Your Film
Shoot the project as you would any other film project.
Stage 2: Telecining the Dailies
After the film has been shot, process and telecine the dailies to a video format appropriate
for your workflow.
• Some productions prefer to save money up front by doing an inexpensive "one-light"
transfer of all the footage to an inexpensive offline video format for the initial offline
edit. (A one-light transfer refers to the process of using a single color correction setting
to transfer whole scenes of footage.) This can save time and money up front, but may
necessitate a second telecine session to retransfer only the footage used in the edit at
a higher level of visual quality.
• Other productions choose to transfer all the dailies (or at least the director's selected
takes) via a "best-light" transfer, where the color correction settings are individually
adjusted for every shot that's telecined, optimizing the color and exposure for each
clip. The footage is transferred to a high-quality video format capable of preserving as
much image data as possible. This can be significantly more expensive up front, but
saves money later since a second telecine session is not necessary.
Stage 3: Capturing the Source Media at Offline or Online Resolution
How you capture your media prior to editing depends on your workflow. If you telecined
offline-quality media, then you might as well capture using an offline-quality codec.
If youinstead telecined online-quality media,then you have the choiceof either pursuing
an "offline/online" workflow or capturing via an online codec and working at online quality
throughout the entire program.
Stage 4: Editing the Program in Final Cut Pro
Edit your program in Final Cut Pro, as you would any other project. If you're planning on
the extensive use of effects in your program during editorial, familiarize yourself with the
topics covered in Limitations in Color.
Stage 5: Recapturing or Retransferring the Media at Online Resolution
The way you conform your offline project to online-quality media depends on how you
handled the initial video transfer.
• If you originally did a high-quality telecine pass to an online video format, but you
captured your source media using an offline format for editing, you need to recapture
the media from the original telecine source tapes using the highest-quality
uncompressed QuickTime format that you can accommodate on your computer (such
as Apple ProRes 4444, Apple ProRes 422 (HQ), or Apple Uncompressed) and relink the
new media to your project.
46 Chapter 2 Color Correction Workflows
Page 47

• If you did an inexpensive one-light telecine pass to an offline video format, you'll want
to do another telecine pass where you transfer only the media you used in the program
at high quality. Using Cinema Tools, you can generate a pull list, which you then use
to carefully retransfer the necessary footage to an online-quality video format. Then,
you need to recapture the new online transfer of this media using the highest-quality
uncompressed QuickTime format that you can accommodate on your computer.
Important: Do not use the Media Manager to either rename or delete unused media in
your project when working with offline media that refers to the camera negative. If you
do, you'll lose the ability to create accurate pull lists in Cinema Tools.
Stage 6: Prerendering Effects, Sending the Sequence to Color, and Grading
At this point, the workflow is identical to Stage 6: Grading Your Program in Color in A
Tape-Based Workflow.
Importing Projects from Other Video Editing Applications
Color is also capable of importing projects from other editing environments, by importing
edit decision lists (EDLs). An EDL is an event-based list of all the edits and transitions that
make up a program.
Once you've imported your project file into Color and copied the program media onto a
storage device with the appropriate performance, you can then link the shots on the
Color Timeline with their corresponding media.
• For more information about importing EDLs into Final Cut Pro before sending to Color,
see Importing EDLs in a Final Cut Pro–to–Color Roundtrip.
• For more information about importing EDLs directly into Color, see Importing and
Notching Preedited Program Masters.
Importing EDLs in a Final Cut Pro–to–Color Roundtrip
If you've been provided with an edit decision list of the edited program and a box of
source media, you can import the EDL into Final Cut Pro to capture the project's media
and prepare the project for sending to Color. In addition to being able to recapture the
footage, Final Cut Pro is compatible with more EDL formats than is Color. Also, Final Cut Pro
is capable of reading superimpositions, all SMPTE standard transitions, and audio edits,
in addition to the video edits.
47Chapter 2 Color Correction Workflows
Page 48

Note: Although capable of importing EDLs directly, Color reads only the video portion
Output
Final Master
Media Data
Final Cut Pro
XML
Online
Media
XML
New Color
Corrected
Media
Final Cut Pro Color
Send to
Color
Render
Send to
Final Cut Pro
Final
Effects and
Output
Recapture
Media
Import EDL
to Create
Project
Color
Correction
EDL file
EDL
Source Media
of edits in track V1. Video transitions, audio, and superimpositions are ignored.
Here's a more detailed explanation of this workflow.
Stage 1: Importing the Project into Final Cut Pro
Import the EDL of the edited project into Final Cut Pro.
48 Chapter 2 Color Correction Workflows
Stage 2: Capturing Media at Online Resolution
You need to recapture the sequence created when importing the EDL using the
highest-quality QuickTime format that you can accommodate on your computer (such
as Apple ProRes 422 or Apple Uncompressed).
Stage 3: Prerendering Effects, Sending the Sequence to Color, and Grading
At this point, the workflow is identical to that in Stage 6: Grading Your Program in Color
in A Tape-Based Workflow.
Importing and Notching Preedited Program Masters
Another common way of obtaining a program for color correction is to be provided with
an edited master, either on tape or as a QuickTime movie or image sequence, and an
accompanying EDL. You can use the EDL to automatically add edits to the master media
file in Color (called "notching" the media), to make it easier to grade each shot in the
program individually.
Page 49

Important: The EDL import capabilities of Color are not as thorough as those in
Final Cut Pro
Online
Media
XML
Final
Effects and
Output
Final Cut Pro Color
Capture
Entire
Program
Create
Color
Project
from EDL
to “Notch”
Online
Media
Output
Final Master
Tape Master EDL file
EDL
Media Data
Color
Correction
Render
New Color
Corrected
Media
Send to
Final Cut Pro
Final Cut Pro, and are limited only to shots on track V1. All transitions in EDLs are imported
as dissolves. Superimpositions and audio are not supported, and will be ignored.
Here's a more detailed explanation of this workflow.
Stage 1: Capturing the Program Master
If you were given the program master on tape, you need to capture the entire program
using the highest-quality QuickTime format that you can accommodate on your computer
(such as Apple ProRes 4444, Apple ProRes 422 (HQ), or Apple Uncompressed). If you're
being given the program master as a QuickTime file, you should request the same from
whoever is providing you with the media.
For this process to work correctly, it's ideal if the timecode of the first frame of media
matches the first frame of timecode in the EDL.
Stage 2: Importing the EDL into Color and Relinking to the Master Media File
Either select the EDL from the Projects dialog that appears when you first open Color, or
use the File > Import > EDL command. When the EDL Import Settings dialog appears,
choose the EDL format, project, EDL, and source media frame rates.
To properly "notch" the master media file, you need to turn on "Use as Cut List," and then
choose the master media file that you captured or were given. For more information, see
Importing EDLs.
49Chapter 2 Color Correction Workflows
Page 50

Stage 3: Grading Your Program in Color
Use Color to grade your program, as you would any other.
Stage 4: Rendering New Source Media and Sending the Updated Project to
Final Cut Pro
When you finish grading, you use the Color Render Queue to render all the shots in the
project as a new, separate set of graded media files.
Afterward, you need to send the updated project to Final Cut Pro using one of the two
following methods:
• If Color is installed on the same computer as Final Cut Pro, use the Send To Final Cut Pro
command.
• If you're handing the color-corrected project back to the originating facility, you need
to export the Color project as an XML file for later import into Final Cut Pro.
Stage 5: Adjusting Transitions, Superimpositions, and Titles in Final Cut Pro
To output your project, you can use the Send To Final Cut Pro command, or you can
export an XML project file that can be manually imported into Final Cut Pro. At this point,
you can add other effects in Final Cut Pro, before creating the program's final master.
Stage 6:Outputting the Final Video Master to Tape or Rendering a Master QuickTime
File
Once you complete any last adjustments in Final Cut Pro, you can use the Print to Video,
Edit to Tape, or Export QuickTime Movie commands to create the final version of your
program.
Digital Cinema Workflows Using Apple ProRes 4444
If you’re working with images that were originated on film, HDCAM SR, or some other
high-resolution, RGB-based media, and your intention is to finish and output a project
to film, the Apple ProRes 4444 codec enables you to follow a simple, consolidated
workflow. Consider the following:
• If you’re working with film, you can scan all footage necessary for the project, and then
convert the DPX or Cineon files to Apple ProRes 4444 media in Color.
• If you’re working with DPX or Cineon image sequences from other sources, these can
be converted into Apple ProRes 4444 media using Color, as well.
• If you’re working with HDCAM SR media, you can ingest it directly as Apple ProRes
4444 clips using Final Cut Pro with a capture device that supports this. Both HDCAM
SR and Apple ProRes 4444 are RGB-based, 4:4:4 color subsampled formats, so one is a
natural container for the other.
50 Chapter 2 Color Correction Workflows
Page 51

Once all your source media has been transcoded or captured as Apple ProRes 4444, it
can be imported into your Final Cut Pro project. If necessary, you can then create a
duplicate set of lower-resolution offline media with which you can edit your project more
efficiently.
Upon completion of the offline edit, you then relink the program to the original Apple
ProRes 4444 media before sending the sequence to Color, where you’ll be grading your
program. Ultimately, you’ll send the finished media that Color renders directly to the film
recording facility.
51Chapter 2 Color Correction Workflows
Page 52

Mastering from a single set of Apple ProRes 4444 media keeps your workflow simple,
HDCAM SR Media
Camera
Negative
Datacine
Transfers
2K/4K DPX
Image
Sequence
Color
Correction
Final Cut Pro
Ingest into
Final Cut Pro
Color
Offline Edit
Color
DPX
Convert to
QuickTime
Media
Media Data
Send to Color
Create offline
duplicates
Apple ProRes
4444 Media
Edit Conform
Film Output
Film
Recorder
Film
Print
Final Output
Sequence
DPX
Render
making media management straightforward, and eliminating the need to retransfer or
relink to the source DPX media later. The only disadvantage to this method is that it can
require a substantial amount of storage, depending on the length and shooting ratio of
the project.
The following steps break this process down more explicitly. Because of the extra steps
needed, this workflow assumes that you’re shooting film.
Stage 1: Running Tests Before You Begin Shooting
Ideally, you should do some tests before principal photography to see how the film
scanner–to–Color–to–film recorder pipeline works with your choice of film formats and
52 Chapter 2 Color Correction Workflows
stocks. It's always best to consult with the film lab you'll be working with in advance to
get as much information as possible.
Page 53

Stage 2: Scanning All Film as DPX Image Sequences
Depending on how the shoot was conducted, you can opt to do a best-light datacine of
just the selects, or of all the camera negative (if you can afford it). The scanned 2K or 4K
digital source media should be saved as DPX or Cineon image sequences.
To track the correspondence between the original still frames and the offline QuickTime
files that you'll create for editing, you should ask for the following:
• A non-drop frame timecode conversion of each frame's number (used in that frame's
filename), saved within the header of each scanned image.
• It can also help to organize all of the scanned frames into separate directories, saving
all the frames from each roll of negative to separate directories (named by roll). This
will help you to keep track of each shot’s roll number later.
Stage 3: Converting DPX Image Sequences to Apple ProRes 4444 QuickTime Files in
Color
Since Final Cut Pro doesn’t work directly with image sequences, you need to create
high-quality, online-resolution QuickTime duplicates using Color before you can begin
editing. Once you’ve done this, it’s a good idea to archive both the original source media
and the converted Apple ProRes 4444 media as safely as possible.
You can use Color to create online-resolution QuickTime versions of each DPX image
sequence you need to use in your edit. To do this, create a new project with the Render
File Type set to QuickTime and the Export Codec set to Apple ProRes 4444. Then, edit all
the shots you want to convert into the Timeline, grade them if necessary, add them to
the Render Queue, and click Start Render.
When you convert the DPX files to offline QuickTime files using Color, the timecode
metadata stored in the header of each DPX frame is copied into the timecode track of
each .mov file that’s created. (If there’s no timecode in the DPX headers, the frame number
in the DPX filename will be converted into timecode, instead. For more information, see
How Does Color Relink DPX/Cineon Frames to an EDL?).
This helps you to maintain the correspondence between the source DPX media and the
Apple ProRes 4444 QuickTime files you’ve created, in case you ever need to go back to
the original media. To make this easier, enter the roll number of each image sequence
into the reel number of the converted QuickTime clip. You can do this in the Final Cut Pro
Browser.
For more information, see Converting Cineon and DPX Image Sequences to QuickTime.
53Chapter 2 Color Correction Workflows
Page 54

Stage 4: Creating Offline Resolution Clips for Editing in Final Cut Pro (Optional)
This step is especially useful if you’re working on a project at 4K resolution. High-resolution
media can be processor-intensive, reducing application responsiveness and real-time
processing unless you have an exceptionally robust system. If this is the case, you can
create an offline set of media (using whichever resolution and codec your particular
workflow requires) with which to work using the Media Manager in Final Cut Pro.
If you downconvert to a compressed high definition format, such as Apple ProRes 422 or
Apple ProRes 422 (HQ), you can offline your project on an inexpensively equipped
computer and still be able to output and project it at a resolution suitable for high-quality
client and audience screenings during the editorial process.
Once you finish your offline edit, you can easily reconform your sequence to the
high-resolution Apple ProRes 4444 source media you generated.
Stage 5: Doing the Offline Edit in Final Cut Pro
Edit your project in Final Cut Pro, being careful not to alter the timecode or duration of
the offline master media in any way.
Stage 6: Preparing Your Final Cut Pro Sequence
To prepare your edited sequence for an efficient workflow in Color, follow the steps
outlined in Before You Export Your Final Cut Pro Project. If you’re planning on printing
to film, it’s prudent to be even more cautious and eliminate any and all effects that are
unsupported by Color, since the media rendered by Color will be the final media that’s
delivered to the film recording facility.
• Clips using speed effects should be rendered as self-contained QuickTime movies, with
the resulting media files reedited into the Timeline to replace the original effects. This
is also true for any clip with effects you want to preserve in the final program, including
filters, animated effects, composites, opacity settings, and embedded Motion projects.
• The only type of transition that Color is capable of processing is the dissolve. Any other
type of transition in the sequence will be rendered as a dissolve of identical duration.
• The only other types of effect that Color supports are Position, Rotation, Scale, and
Aspect Ratio Motion tab settings, which are converted into Pan & Scan room settings.
While keyframes for these settings in Final Cut Pro cannot be sent to Color, the Pan &
Scan settings can be keyframed in Color later.
Stage 7: Sending the Sequence to Color or Exporting an XML File
When you finish prepping your edited sequence, there are two ways you can send it to
Color.
• If Color is installed on the same computer as Final Cut Pro, you can use the Send To
Color command to move an entire edited sequence to Color, automatically creating a
new project file.
54 Chapter 2 Color Correction Workflows
Page 55

• If you're handing the project off to another facility, you may want to export the edited
sequence as an XML file for eventual import into Color. In this case, you'll also want to
use the Final Cut Pro Media Manager to copy the project's media to a single,
transportable hard drive volume for easy handoff.
Stage 8: Grading Your Program in Color
Grade your program in Color as you would any other.
Important: When grading scanned film frames for eventual film output, it's essential to
systematically use carefully profiled LUTs (look up tables) for monitor calibration and to
emulate the ultimate look of the project when printed out to film. For more information,
see Using LUTs.
Stage 9: Rendering Graded Media Out of Color
Once you finish grading the project in Color, use the Render Queue to render out the
final media. If the film recording facility you’re working with requires an image sequence,
now is the time to:
• Change the Render File Type to DPX or Cineon, depending on what the facility has
requested.
• Choose the Printing Density to match your facility’s recommendations.
• If you’ve been using a LUT to monitor your program while you work, turn it off by
choosing File > Clear Display LUT. Otherwise, you’ll bake the LUT into the rendered
media.
• Double-check the Broadcast Safe and Internal Pixel Format settings to make sure they’re
appropriate for your project.
Rendering high-resolution media will take time. Keep in mind that the Render Queue has
been set up to let you easily render your project incrementally; for example, you can
render out all the shots of a program that have been graded that day during the following
night to avoid having to render the entire project at once.
However, when you're working on a project using 2K image sequence scans, rendering
the media is only the first step. The rendered output is organized in the specified render
directory in such a way as to easily facilitate managing and rerendering the media for
your Color project, but it's not ready for delivery to the film recording facility until the
next step.
Stage 10: Assembling the Final Image Sequence for Delivery
Once every single shot in your program has been rendered, you need to use the Gather
Rendered Media command to consolidate all the frames that have been rendered,
eliminating handles, rendering dissolves, copying every frame used by the program to a
single directory, and renumbering each frame as a contiguously numbered image
sequence. Once this has been done, the rendered media is ready for delivery to the film
recording facility.
55Chapter 2 Color Correction Workflows
Page 56

Stage 11: Creating Additional Transitions, Effects, and Titles
In a 2K or 4K workflow, you can also use a compositing application such as Shake to create
additional transitions or layered effects, including superimpositions, titles, and other
composites, after the color correction has been completed.
Each image file's frame number identifies its position in that program's Timeline. Because
of this, when you send frames to a compositing application, it's vital that the frame
numbers in filenames of newly rendered media are identical to those of the original
source media. This requires careful file management.
Finishing Projects Using RED Media
RED media has become an important acquisition format for both broadcast and digital
cinema. When you install the necessary software to use RED media with Final Cut Studio,
you get access to a variety of workflows for ingesting, grading, and mastering programs
using native RED QuickTime movies in Final Cut Pro and Color.
This section describes the various RED workflows that Final Cut Studio supports. For
information about grading controls that are specific to native RED QuickTime clips, see
The RED Tab.
When you’re working on a project that uses RED media, there are essentially four workflows
you can follow:
Transcode All Native RED QuickTime Media to Apple ProRes 422 (HQ)
If you’re mastering specifically to video, one very simple workflow is to transcode from
RED to Apple ProRes 422 (HQ) clips, and then master Apple ProRes 422 (HQ). After initially
ingesting and transcoding using the Log and Transfer window, this workflow is similar
to the master flowchart shown in Video Finishing Workflows Using Final Cut Pro.
Keep in mind that whenever you transcode native RED R3D media to Apple ProRes using
the Log and Transfer window, you preprocess the original RAW image data. For more
information, see RED Metadata Versus Color Processing in Transcoded Media.
• Advantages: Simple workflow for video mastering. Apple ProRes 422 (HQ) can be easily
edited on most current computers. Apple ProRes 422 (HQ) is suitable for high definition
video mastering, and media can be sent directly to Color for finishing without the need
to reconform.
• Disadvantages: Transcoding may take a long time. You lose the quality advantage of
being able to grade and finish using the RAW RGB 4:4:4 data thatnative RED QuickTime
files provide.
56 Chapter 2 Color Correction Workflows
Page 57

Ingest Native RED QuickTime Media for Editing and Finishing
It’s also possible to edit and finish using native RED QuickTime media. This is an efficient
workflow that skips the need for reconforming, and gives you access to the high-quality
native image data when you grade in Color. Since working with native RED QuickTime
media is processor-intensive, this workflow may be most appropriate for short-form
projects and spots. This workflow is illustrated in Editing and Finishing with RED QuickTime
Media.
• Advantages: Ingesting RED QuickTime media is fast when compared to transcoding.
Skips the need for an offline reconform. Provides maximum data fidelity through direct
access to each shot’s native R3D image data.
• Disadvantages: RED QuickTime media is processor-intensive when editing.
Ingest Transcoded Apple ProRes Media for Editing; Conform to Native RED QuickTime
for Finishing
The mostpractical workflow for long-form work when you want to be able to grade using
native REDQuickTime media involves transcoding the original RED media to Apple ProRes
media for efficient offline editing, and then reconforming your edited sequence back to
native REDQuickTime media for final mastering and color correction in Color. This workflow
is illustrated in Offline Using Apple ProRes; Finishing with RED Media.
• Advantages: Apple ProRes 422 (HQ) can be easily edited on most current computers.
After you reconform, this workflow provides maximum data fidelity through direct
access to each shot’s native R3D image data.
• Disadvantages: Reconforming is an extra step that requires good organization.
Improving Performance When Using Native RED QuickTime Media in
Color
Toget the best performance when working with native RED QuickTime media (especially
when working with 4K media, which can be extremely processor-intensive), be sure to
turn on Enable Proxy Support in the User Prefs tab of the Setup room. These are the
suggested settings for optimal performance:
• Set Grading Proxy to Half Resolution
• Set Playback Proxy to Quarter Resolution
Proxies for native RED QuickTime media are generated on the fly, without the need to
prerender proxy files as you do with DPX or Cineon media. For more information on
the Color proxy settings, see Using Proxies.
57Chapter 2 Color Correction Workflows
Page 58

Color
Render
Final Cut Pro
Edit Using
ProRes
Media
Film Output
Film
Recorder
Film
Print
Final Output
Sequence
Video Output
Final Cut Pro
Videotape
QuickTime
Master
Rendered
QuickTime
Media
DPX
RED Media
Directories
Archive
Original RED
Media
Ingest Offline
ProRes
Media
Gather
Rendered
Media
Send to Final Cut Pro
Send to Color
Color
Correction
Reingest and
Reconform to
Native RED QT
Media Data
Export
QuickTime or
Edit to Tape
Offline Using Apple ProRes; Finishing with RED Media
An advantage to editing with Apple ProRes media is that it’s less processor-intensive than
editing using RED QuickTime files, which makes editing in Final Cut Pro more efficient.
After you reconform, you can still work in Color at the higher quality with access to all of
the raw image data in the R3D file, since Color can bypass QuickTime and use the RED
framework directly to read the native 2K or 4K RGB 4:4:4 data inside of each file.
The only real disadvantages to this workflow are that the initial transcoding stage can be
time-consuming, and that later, reconforming is an extra step that requires careful
organization.
The following steps break this process down more explicitly.
58 Chapter 2 Color Correction Workflows
Page 59

Stage 1: Archiving the Original RED Media
It’s always recommended that you archive all of the original RED media for your project
onto one or more backed-up volumes. Whether you’re shooting with CF cards or a RED
drive, you should always copy the entire contents of each CF card or drive that you’ve
finished recording with to an individually named folder on your archive volume.
• If you’re using CF cards: The contents of each card should be copied into separate
directories. For example, if you’ve shot a project using 12 CF cards, at the end of the
process you should have 12 different directories (perhaps named “MyGreatProject_01”
through “MyGreatProject_12”), each of which contains the entire contents of the CF
card to which it corresponds.
• If you’re using RED drives: You should copy the entire contents of the drive to a new
folder every time you fill it up or are finished with a particular part of your shoot. For
example, if you’re archiving the contents of the drive after every day’s shoot, then after
four days you should have four directories (perhaps named “MyGreatProject _Day01”
through “MyGreatProject_Day04”).
Each folder or disk image you copy RED media into must have a unique name; preferably
one that clearly identifies the contents. After you copy the RED media into these folders,
they will contain one or more sub-folders with an .RDM extension that contain the actual
RED media. The name of the enclosing RDM folder will be used as the reel name for each
clip that’s ingested by Final Cut Pro during the log and transfer process.
After you initially copy the RED media, you may elect to change the name of the RDM
folders to something more readable (the .RDM extension itself is optional). If you make
such changes, make sure that the name of each folder is unique, and do not under any
circumstances change the names of any folders or files that appear within.
After you've ingested the media using the Log and Transfer window, do not change the
name of the RDM folder again. Doing so will jeopardize your ability to later reconform
offline sequences to the original RED source media.
Important: It's not recommended to enter new reel names for RED media that you ingest
using the Reel field of the Log and Transfer window.
Stage 2: Ingesting Media Using Apple ProRes to Perform the Offline-Quality Edit
If it’s necessary to edit your program at offline quality for efficiency, transcode the archived
RED media to one of the Apple ProRes codecs using the Log and Transfer window in
Final Cut Pro.
See the Final Cut Pro 7 User Manual for more information about transcoding on ingest,
and which codec to choose for offline work.
59Chapter 2 Color Correction Workflows
Page 60

Stage 3: Editing Using Apple ProRes Media
Edit your project in Final Cut Pro, being careful not to alter the timecode of the offline
master media in any way. If you want to minimize the amount of preparation you’ll be
doing later in Stage 5: Preparing Your Final Cut Pro Sequence, keep the following
limitations in mind while you edit:
• Restrict transitions in your project to cross dissolves only. When you render DPX image
sequences out of Color and use the Gather Rendered Media command to prepare a
single image sequence for film printing, Color automatically processes all cross dissolves
in your program. Other transitions are not supported, and will instead be processed as
cross dissolves if they’re present in your project.
• Keyframes are not sent from Final Cut Pro to Color, so don’t use the Motion tab to create
animated Pan & Scan effects. Instead, use the Pan & Scan tab in the Geometry room of
Color, which lets you scale, recenter, change the aspect ratio of, and rotate your clips,
and which can be keyframed. Pan & Scan effects are rendered along with your grades
when you render DPX or Cineon image sequences out of Color.
• Don’t use superimpositions, transfer modes, speed effects, or filters, unless you’re
planning on prerendering these clips (exporting each as a self-contained QuickTime
clip and reediting them into the Timeline to replace the original effects) as Apple ProRes
4444 media before you send them to Color. Color does not render these effects.
Stage 4: Reconforming Your Project to Native RED QuickTime Media
Once your edit is locked, prepare your edited sequence to be media-managed by moving
all video clips that aren’t being superimposed as part of a compositing operation down
to track V1. This makes navigation and grade management much easier once you start
working in Color, and also eliminates unused clips directly from the Timeline, reducing
the amount of media needing to be reconformed.
Next, you’ll media manage your project to create an offline version of youredited sequence
with the appropriate sequence settings, and then batch transfer the resulting sequence
using the Log and Transfer window to reingest native RED QuickTime media from the
originally archived RED media directories.
See the Final Cut Pro 7 User Manual for more information.
60 Chapter 2 Color Correction Workflows
Page 61

Stage 5: Preparing Your Final Cut Pro Sequence
To prepare your edited sequence for an efficient workflow in Color, follow the steps
outlined in Before You Export Your Final Cut Pro Project. If you’re planning on printing
to film, it’s prudent to be even more cautious and eliminate any and all effects that are
unsupported by Color, since the media rendered by Color will be the final media that’s
delivered to the film recording facility.
• Clips using speed effects should be rendered as self-contained QuickTime movies, with
the resulting media files reedited into the Timeline to replace the original effects. This
is also true for any clip with effects you want to preserve in the final program, including
filters, animated effects, composites, opacity settings, and embedded Motion projects.
• The only type of transition that Color is capable of processing is the dissolve. Any other
type of transition in the sequence will be rendered as a dissolve of identical duration.
• The only other types of effect that Color supports are Position, Rotation, Scale, and
Aspect Ratio Motion tab settings, which are converted into Pan & Scan room settings.
While keyframes for these settings in Final Cut Pro cannot be sent to Color, the Pan &
Scan settings can be keyframed in Color later.
Stage 6: Sending the Finished Sequence to Color
When you finish prepping your edited sequence, there are two ways you can send it to
Color.
• If Color is installed on the same computer as Final Cut Pro, you can use the Send To
Color command to move an entire edited sequence to Color, automatically creating a
new project file.
• If you're handing off the project to another facility, you may want to export the edited
sequence as an XML file for eventual import into Color. In this case, you'll also want to
use the Final Cut Pro Media Manager to copy the project's media to a single,
transportable hard drive volume for easy handoff.
Stage 7: Grading Using Additional RED Tab Settings in the Primary In Room
Once in Color, you have access to each clip’s camera setting metadata via the RED tab in
the Primary In room. You can use the RED image data as is, or make adjustments as
necessary. For more information, see The RED Tab.
You may also find it to your advantage to use a proxy setting in Color to speed up effects
processing as you work, especially if you’re working with 4K source media. For example,
setting Grading Proxy to Half Resolution and Playback Proxy to Quarter Resolution will
significantly improve real-time performance as you work in Color, while still allowing you
to monitor your data with complete color accuracy at approximately 1K. For more
information, see Using Proxies.
Important: Clips that have been transcoded to Apple ProRes 422 (HQ) cannot access
these native camera settings, as they no longer contain the native RED raw image data.
61Chapter 2 Color Correction Workflows
Page 62

Stage 8: Choosing How to Render the Final Graded Media
When working with native RED QuickTime media, the frame size of your final graded
media is determined by the Resolution Presets menu in the Project Settings tab of the
Setup room. For more information, see Resolution and Codec Settings.
The format you use to render your final graded media depends on whether you’re planning
on printing to film, or sending the program back to Final Cut Pro for output to video.
• If you’re rendering for film output: Change the Render File Type pop-up menu to DPX
or Cineon (depending on what the facility doing the film printing asks for), and choose
the appropriate 2K or 4K resolution from the Resolution Preset pop-up menu. If you
choose DPX, you also need to choose the appropriate Printing Density. For more
information, see Choosing Printing Density When Rendering DPX Media.
• If you’re rendering to send back to Final Cut Pro for video output: Keep the Render File
Type pop-up menu set to QuickTime and choose an appropriate mastering codec from
the QuickTime Export Codec pop-up menu. For more information, see Compatible
QuickTime Codecs for Output. Keep in mind that the RED QuickTime format is a
read-only format; you cannot master a program using this format.
Note: Rendering native RED QuickTime media is processor-intensive, and rendering times
can be long, especially at 4K resolutions.
Stage 9: Assembling the Final Image Sequence for Delivery, or Sending Back to
Final Cut Pro
The final stage of finishing your project depends, again, on whether you’re printing to
film, or outputting to video.
• If you’re rendering for film output: Once every single shot in your program has been
rendered, use the Gather Rendered Media command to consolidate all the frames that
have been rendered, eliminating handles, rendering dissolves, copying every frame
used by the program to a single directory, and renumbering each frame as a
contiguously numbered image sequence. Once this hasbeen done, the renderedmedia
is ready for delivery to the film recording facility. For more information, see Gather
Rendered Media.
• If you’re rendering to send back to Final Cut Pro for video output: Simply send your project
back to Final Cut Pro after you finish rendering it. For more information, see Sending
Your Project Back to Final Cut Pro.
Editing and Finishing with RED QuickTime Media
The advantage of this workflow is that it skips the need for reconforming, giving you
access to high-quality image data when you grade in Color. Ingesting RED QuickTime
media is fast when compared to transcoding. This is a good workflow for projects such
as short-form and spots.
62 Chapter 2 Color Correction Workflows
Page 63

Color
Final Cut Pro
Film Output
Film
Recorder
Film
Print
Final Output
Sequence
Video Output
Final Cut Pro
Videotape
QuickTime
Master
Rendered
QuickTime
Media
DPX
RED Media
Directories
Archive
Original RED
Media
Ingest Media
as Native RED
Quicktime
Gather
Rendered
Media
Send to Final Cut Pro
Send to Color
Render
Color
Correction
Edit
Media Data
Export
QuickTime or
Edit to Tape
The main disadvantage is that RED QuickTime media is processor-intensive when editing.
Because of performance limitations, editing with less powerful computers or editing a
feature length show using 4K RED QuickTime media may not be practical.
The following steps break this process down more explicitly.
Stage 1: Importing Media as Native RED QuickTime Clips
Import all of your RED media using the Native option in the Log and Transfer window.
For more information, see the Final Cut Pro 7 User Manual.
Stage 2: Editing Using Native RED QuickTime Media
Edit your project in Final Cut Pro. For the smoothest editing experience, choose Unlimited
RT from the Timeline RT pop-up menu, set Playback Video Quality to Low or Medium,
and set Playback Frame Rate to Full.
63Chapter 2 Color Correction Workflows
Page 64

For more information onediting programs that will beprinted to film, see Stage 3: Editing
Using Apple ProRes Media.
Stage 3:Preparing Your Final Cut Pro Sequence, Sending to Color, Grading, Rendering,
and Finishing
Because you’re already working with native RED QuickTime media, no reconforming is
necessary. At this point, the workflow is identical to Stage 5: Preparing Your Final Cut Pro
Sequence.
Use Unlimited RT When Editing Native RED QuickTime Media in
Final Cut Pro
As mentioned previously, RED QuickTime media is processor-intensive to work with in
Final Cut Pro. For the smoothest editing experience, choose Unlimited RT from the
Timeline RT pop-up menu, set Playback Video Quality to Low or Medium, and set
Playback Frame Rate to Full.
RED Metadata Versus Color Processing in Transcoded Media
The Color, Color Temp, and View RED camera settings in use while shooting are stored
as metadata within each recorded R3D file. If you ingest or reconform using native RED
QuickTime media, this metadata remains intact, and is accessible via the RED tab of the
Primary In room. This is the most flexible way to work, as this image metadata has no
effect on the actual RAW R3D data that the camera has recorded, and, in fact, if you’re
unhappy with how the current metadata settings are processing the image, you can
change them to retrieve additional image data from the RAW source.
When you transcode R3D media to one of the Apple ProRes codecs using the Log and
Transfer window, this metadata is used to preprocess the color and contrast of the
transcoded media as long as the RED FCP Log and Transfer plugin submenu of the Action
pop-up menu is set to Native, which is the default setting. The result is that each
transcoded clip visually matches the image that was monitored during the shoot. This
preprocessing is “baked” into each ingested clip. If you want to later reapply a different
type of image preprocessing to a clip, you need to reingest it from the original source
media.
If necessary, you can choose other color processing options from the RED FCP Log and
Transfer plugin submenu of the Action pop-up menu. For more information, see the
Final Cut Pro 7 User Manual.
64 Chapter 2 Color Correction Workflows
Page 65

Digital Intermediate Workflows Using DPX/Cineon Media
Color supports grading for 2K and 4K digital intermediate workflows. Simply put, the term
digital intermediate (DI) describes the process of performing all effects and color correction
using high-resolution digital versions of the original camera negative. Color can work
with 2K and 4K 10-bit log image sequences produced by datacine scanners, processing
the image data with extremely high quality and rendering the result as animage sequence
suitable for film output.
The following sections describe different 2K and 4K workflows that you can follow and
show you how to keep track of your image data from stage to stage.
• For more information on tapeless online/offline DI workflows, see A Tapeless DI
Workflow.
• For more information about DI workflows involving telecined offline media, see A Digital
Intermediate Workflow Using Telecined Media.
• For more information about how Color reconforms media in DI workflows, see Using
EDLs, Timecode, and Frame Numbers to Conform Projects.
A Tapeless DI Workflow
The easiest digital intermediate (DI) workflow is one where you scan all footage necessary
for the offline edit and then create a duplicate set of offline media to edit your project
with. Upon completion of the offline edit, you then relink the program to the original 2K
or 4K source frames in Color.
65Chapter 2 Color Correction Workflows
Page 66

Deriving the offline media from the original digital media keeps your workflow simple
Color
Conform
Gather
Rendered
Media
Render
Color
Correction
Final Cut Pro
Offline
Edit
Film Output
Offline Media
(With Cloned
Timecode)
Datacine
Transfers
EDL
Film
Recorder
Film
Print
Final Output
Sequence
DPX
2K/4K DPX
Image Sequence
DPX
Offline
Quicktime
Conversion
Color
Media Data
Camera
Negative
and eliminates the need to retransfer the source film later. The only disadvantage to this
method is that it can require an enormous amount of storage space, depending on the
length and shooting ratio of the project.
The following steps break this process down more explicitly.
Stage 1: Running Tests Before Shooting
Ideally, you should do some tests before principal photography to see how the film
scanner–to–Color–to–film recorder pipeline works with your choice of film formats and
stocks. It's always best to consult with the film lab you'll be working with in advance to
get as much information as possible.
Stage 2: Scanning All Film as 2K or 4K DPX Image Sequences
Depending on how the shoot was conducted, you could opt to do a best-light datacine
of just the selects or of all the camera negative, if you can afford it. The scanned 2K digital
source media should be saved as DPX or Cineon image sequences.
66 Chapter 2 Color Correction Workflows
Page 67

To track the correspondence between the original still frames and the offline QuickTime
files that you'll create for editing, you should ask for the following:
• A non-drop frame timecode conversion of each frame's number (used in that frame's
filename) saved within the header of each scanned image.
• It can also help to organize all of the scanned frames into separate directories, saving
all the frames from each roll of negative to separate directories (named by roll).
• The resulting DPX files should be named using the following format:
fileName_0123456.dpx (For more information on naming DPX and Cineon files, see
Required Image Sequence Filenaming.)
Stage 3: Converting the DPX Image Sequences to Offline-Resolution QuickTime Files
Create offline-resolution duplicates of the source media in whatever format is most
suitable for your editing system. Then, archive the original source media as safely as
possible.
When you convert the DPX files to offline QuickTime files:
• The roll number of each image sequence (taken from the name of the directory that
encloses the frames being converted) is used as the reel number for each .mov file.
• The timecode values stored in the header of each frame file are used as the timecode
for each .mov file. If there’s not timecode in the header, the frame number in the
filename is converted to timecode and used, instead.
You can use Color to perform this downconversion by creating a new project with the
Render File Type set to QuickTime and the Export Codec set to the codec you want to
use. Then, simply edit all the shots you want to convert into the Timeline, add them to
the Render Queue, and click Start Render. For more information, see Converting Cineon
and DPX Image Sequences to QuickTime.
You can also use Compressor to perform this downconversion. For more information, see
the Compressor documentation.
Tip: If you downconvert to a compressed high definition format, such as Apple ProRes 422
or Apple ProRes 422 (HQ), you can offline your project on an inexpensively equipped
computer system and still be able to output and project it at a resolution suitable for
high-quality client and audience screenings during the editorial process.
Stage 4: Doing the Offline Edit in Final Cut Pro
Edit your project in Final Cut Pro, being careful not to alter the timecode or duration of
the offline media in any way.
67Chapter 2 Color Correction Workflows
Page 68

Stage 5: Preparing Your Final Cut Pro Sequence
To prepare your edited sequence for an efficient workflow in Color, follow the steps
outlined in Before You Export Your Final Cut Pro Project. Because you’ll be exporting an
EDL to Color in order to relink to the original DPX image sequences, it’s prudent to be
extremely conservative and eliminate any and all effects that are unsupported by the
CMX EDL formats, or by Color itself.
Cross dissolves are the one exception. These are the only type of transition that Color
supports. Any other type of transition will be rendered as a cross dissolve of identical
length.
Stage 6: Exporting an EDL
When you finish with the edit, you need to generate an EDL in either the CMX 340, CMX
3600, or GVG 4 Plus formats.
Important: You cannot use the Send To Color command to move projects to Color that
are being reconformed to DPX or Cineon media.
Stage 7: Importing the EDL into Color and Relinking to the Original DPX Media
Use the File > Import > EDL command to import the EDL. In the Import EDL dialog, specify
the directory where the original high-resolution source media is located, so that the EDL
is imported and the source media is relinked in one step. For more information, see
Importing EDLs.
Stage 8: Grading Your Program in Color
Grade your program in Color as you would any other. For better performance, it’s advisable
to use the Proxy controls in the User Prefs tab of the Setup Room to work at a lower
resolution than the native 2K or 4K frame size of the media. For more information, see
Using Proxies.
Important: When grading scanned film frames, it's essential to systematically use carefully
profiled LUTs for monitor calibration and to emulate the ultimate look of the project
when printed out to film. For more information, see Using LUTs.
Stage 9: Conforming Transitions, Effects, and Titles
In a 2K workflow, you also need to use a compositing application such as Shake to create
any transitions or layered effects, including superimpositions, titles, and other composites,
using the 2K image sequence data.
Important: Each image file's frame number identifies its position in that program's
Timeline. Because of this, when you send frames to a compositing application, it's vital
that the frame numbers in filenames of newly rendered media are identical to those of
the original source media. This requires careful file management.
68 Chapter 2 Color Correction Workflows
Page 69

Stage 10: Rendering Your Media Out of Color
Once you finish grading the project in Color, use the Render Queue to render out the
final media. The Render Queue has been set up to let you easily render your project
incrementally; for example, you can render out all the shots of a program that have been
graded that day during the following night to avoid rendering the entire project at once.
However, when you're working on a project using 2K image sequence scans, rendering
the media is only the first step. The rendered output is organized in the specified render
directory in such a way as to easily facilitate managing and rerendering the media for
your Color project, but it's not ready for delivery to the film recording facility until the
next step.
Stage 11: Assembling the Final Image Sequence for Delivery
Once every single shot in your program has been rendered, you need to use the Gather
Rendered Media command to consolidate all the frames that have been rendered,
eliminating handles, copying every frame used by the program to a single directory, and
renumbering each frame as a contiguously numbered image sequence. Once this has
been done, the rendered media is ready for delivery to the film recording facility.
69Chapter 2 Color Correction Workflows
Page 70

A Digital Intermediate Workflow Using Telecined Media
Camera
Negative
Cinema Tools
Color
FLEx
Final Cut Pro
Datacine
Telecine
EDL
Media Data
Film Output
Film
Recorder
Film
Print
Final Output
Sequence
DPX
Export
Pull List
Render
Color
Correction
Conform
Gather
Rendered
Media
Offline
Edit
Create
Database
Capture
DPX
Image
Sequence
DPX
A more traditional way to edit and color correct a project is to do an offline edit using a
less expensive telecine transfer of the dailies, and then do a datacine film scan of only
the shots used in the edit to create the online media.
70 Chapter 2 Color Correction Workflows
The following steps break this process down more explicitly.
Stage 1: Shooting the Film
Ideally, you should do some tests before principal photography to see how the film
scanner–to–Color–to–film recorder pipeline works with your choice of film formats and
stocks. It's always best to consult with the film facility you'll be working with in advance
to get as much information as possible.
Page 71

Stage 2: Telecining the Dailies
Once the film has been shot, telecine the dailies to a video format that's appropriate for
the offline edit. Whether or not you telecine to a high definition video format for the
offline depends on the configuration of the editing system you'll be working with and
the amount of hard disk space available to you.
Of more importance is the frame rate at which you choose to telecine the dailies.
• To eliminate an entire media management step, it's recommended that you telecine
the film directly to a 23.98 fps video format.
• Otherwise, you can telecine to a 29.97 fps video format and use Cinema Tools in a
second step to perform 3:2 pull-down removal.
To more easily maintain the correspondence between the telecined video and the 2K or
4K film frames that will be scanned later, you should request that:
• A marker frame is assigned to each roll of film at a point before the first shot begins,
with a hole punch permanently identifying that frame. This marker frame is assigned
the timecode value of XX:00:00:00 (where XX is an incremented hour for each
subsequent camera roll being transferred), and determines the absolute timecode for
each shot on that roll.
• The timecode recorded to tape during the offline telecine must be non-drop frame.
• Each roll of negative should be telecined to a separate reel of tape. This way, the reels
specified by the EDL will match the rolls of camera negative from which the shots are
scanned.
• If the transfer is being done strictly for offline editing, you can ask for a window burn
that displays both timecode and edgecode to provide an additional means of reference.
If you’re transferring film to a 4:3 aspect ratio video format, you may elect to have this
window burn made in the black letterboxed area so it doesn’t obscure the image. It
may also be possible to write the edgecode number of the source film to the user bit
of VITC timecode for electronic tracking. Ask the facility doing the transfer what would
be best for your situation.
Stage 3: Using Cinema Tools and Final Cut Pro to Perform the Offline Edit
As with any other film edit, generate a Cinema Tools database from the ATN, FLEx, FTL,
or ALE telecine log files provided by the telecine operator, then export an XML-based
batch capture list you can import into Final Cut Pro to use to capture the corresponding
media and edit the program.
Important: When working with offline media that tracks the original camera negative,
do not use the Media Manager to either rename or delete unused media in your project.
If you do, you'll lose the ability to create accurate pull lists in Cinema Tools.
71Chapter 2 Color Correction Workflows
Page 72

Stage 4: Preparing Your Final Cut Pro Sequence
To prepare your edited sequence for an efficient workflow in Color, follow the steps
outlined in Before You Export Your Final Cut Pro Project. Because you’ll be exporting an
EDL to Color in order to relink to the original DPX image sequences, it’s prudent to be
extremely conservative and eliminate any and all effects that are unsupported by the
CMX EDL formats, or by Color itself.
Cross dissolves are the one exception. These are the only type of transition that Color
supports. Any other type of transition will be rendered as a cross dissolve of identical
length.
Stage 5: Exporting an EDL for Color and a Pull List for the Datacine Transfer
Once the offline edit is complete, you need to export a pull list out of Final Cut Pro to give
to the facility doing the final datacine transfer at 2K or 4K resolution. You also need to
export the entire project as an EDL for importing and conforming in Color.
• The pull list specifies which shots were used in the final version of the edit. (This is
usually a subset of the total amount of footage that was originally shot.) Ideally, you
should export a pull list that also contains the timecode In and Out points corresponding
to each clip in the edited project. This way, the timecode data can be written to each
frame that's scanned during the datacine transfer to facilitate conforming in Color.
• The EDL moves the project's edit data to Colorand contains the timecode data necessary
to conform the scanned image sequence frames into the correct order.
Stage 6: Doing a Datacine Transfer of the Selected Shots from Negative to DPX
Using the pull list generated by Cinema Tools, have a datacine transfer made of every
shot used in the project.
During the datacine transfer, specify that the timecode of each frame of negative be
converted to frames and used to generate the filenames for each scanned DPX file, and
that the timecode also be written into the DPX header of each shot. The names of the
resulting image sequence should take the following form: fileName_0123456.dpx. For
more information about filenaming conventions,see Required Image Sequence Filenaming.
Each image sequence from the film scanner must be saved into a directory that is named
with the number of the roll of camera negative from which it was scanned. There should
be separate directories for each roll of camera negative that's scanned.
Stage 7: Importing the EDL into Color and Relinking to the Original DPX Media
Use the File > Import > EDL command to import the EDL. In the Import EDL dialog, you
also specify the directory where the original high-resolution source media is located, so
that the EDL is imported and the source media is relinked in one step.
72 Chapter 2 Color Correction Workflows
Page 73

Stage 8: Grading Your Program in Color
Grade your program in Color as you would any other. For better performance, it’s advisable
to use the Proxy controls in the User Prefs tab of the Setup room to work at a lower
resolution than the native 2K or 4K frame size of the media. For more information, see
Using Proxies.
Important: When grading scanned film frames, it's essential to systematically use carefully
profiled LUTs for monitor calibration and to emulate the ultimate look of the project
when printed out to film. For more information, see Using LUTs.
Stage 9: Conforming Transitions, Effects, and Titles, Rendering Media,and Gathering
Rendered Media
At this point, the process is the same as in Stage 9: Conforming Transitions, Effects, and
Titles in A Tapeless DI Workflow.
Using EDLs, Timecode, and Frame Numbers to Conform Projects
Using careful data management, you can track the relationship of the original camera
negative to the video or digital transfers that have been made for offline editing using
timecode. The following sections provide information on how Color tracks these
correspondences.
• For more information on how Color relinks DPX images to EDLs, see How Does Color
Relink DPX/Cineon Frames to an EDL?
• For more information on how color parses EDLs for DI conforms, see Parsing EDLs for
Digital Intermediate Conforms.
• For more information on how your image sequences should be named for DI workflows,
see Required Image Sequence Filenaming.
How Does Color Relink DPX/Cineon Frames to an EDL?
The key to a successful conform in Color is to make sure that the timecode data in the
EDL is mirrored in the scanned DPX or Cineon frames you're relinking to. The
correspondence between film frames and timecode is created during the first telecine
or datacine transfer session.
How Is Film Tracked Using Timecode?
A marker frame is assigned to the very beginning of each roll of film, at a point before
the first shot begins (typically before the first flash frame). A hole is punched into the
negative, which permanently identifies that frame. This marker frame is assigned the
timecode value of XX:00:00:00 (where XX is an incremented hour for each subsequent
camera roll being transferred), creating an absolute timecode reference for each frame
of film on that roll. Each camera roll of film is usually telecined to a new reel of videotape
(each reel of tape usually starts at a new hour), or datacined to a separate directory of
DPX files.
73Chapter 2 Color Correction Workflows
Page 74

This makes it easy to create and maintain a film frame-to-timecode correspondence
between the original camera negative and the transferred video or DPX media. This
correspondence carries through to the captured or converted QuickTime media that you
edit in Final Cut Pro. As an added benefit of this process, you can always go back to the
original rolls of camera negative and retransfer the exact frames of film you need, as long
as you accurately maintain the reel number and timecode of each clip in your edited
sequence.
If you’re having a datacine transfer done, you also need to request that the frame numbers
incorporated into the filenames of the transferred image files be based on the absolute
timecode that starts at each camera roll’s marker frame. Your final DPX or Cineon image
sequences should then have frame numbers in the filename that, using a bit of
mathematical conversion, match the timecode value in the header information,providing
valuable data redundancy.
How Color Relinks DPX/Cineon Media to EDLs Using Timecode
Later, when Color attempts to relink the EDL that you’ve exported from Final Cut Pro to
the transferred DPX or Cineon image sequence media, it relies on several different
methods, depending on what information is available in the image sequence files:
• First, Color looks for a timecode value in the header metadata of each DPX or Cineon
frame file. If this is found, it's the most reliable method of relinking.
• If there's no matching timecode number in the header metadata, then Color looks for
a correspondence between the timecode value requested in the EDL and the frame
numbers in the filename of each DPX or Cineon frame. This also requires that the files
be strictly named. For more information, see Required Image Sequence Filenaming.
• Color also looks for each shot’s corresponding reel number (as listed in the EDL) in the
name of the directory in which the media is stored. Each frame of DPX or Cineon media
from a particular roll of camera negative should be stored in a separate directory that’s
named after the roll number it was scanned from. If there are no roll numbers in the
enclosing directory names, thenColor attempts to relink all the shots using the timecode
number only.
After you import an EDL with linked DPX or Cineon image sequence media, a Match
column appears in the Shots browser. This column displays the percentage of confidence
that each shot in the Timelinehas been correctly linked to its corresponding DPX, Cineon,
or QuickTime source media, based on the methods used to do the linking. For more
information, see Explanation of Percentages in the Match Column.
Relinking DPX/Cineon Frames to an EDL Using a Cinema Tools Database
If issues arise when conforming an EDL to DPX or Cineon media in Color, you can create
a Cinema Tools database with which to troubleshoot the problem.
74 Chapter 2 Color Correction Workflows
Page 75

If you don’t already have a Cinema Tools database tracking your film media, you can easily
create one. To create a Cinema Tools database from one or more directories of DPX or
Cineon image sequences, simply drag all of the enclosing directories onto the Cinema Tools
application icon, and a database is generated automatically. If necessary, you can use the
Cinema Tools interface to check the reel numbers and timecode values of each shot,
correcting any problems you find.
Afterward, when you’re conforming an EDL to DPX or Cineon media in Color, you can
choose the Cinema Tools database as your source directory in the EDL Import Settings
window. (See Importing EDLs for more information.) This way,your updated reel numbers
and timecode values will be used to link your Color project to the correct source media.
For more information on creating Cinema Tools databases from DPX or Cineon media,
see the Cinema Tools documentation.
Note: Changing information in a Cinema Tools database does nothing to alter the source
media files on disk.
Parsing EDLs for Digital Intermediate Conforms
This section explains how Color makes thecorrespondence betweenthe timecode values
in an EDL and the frame numbers used in the timecode header or filename of individual
image sequence frames.
Here's a sample line from an EDL:
001 004 V C 04:34:53:04 04:35:03:04 00:59:30:00 00:59:40:00
In every EDL, the information is divided up into eight columns:
• The first column contains the edit number. This is the first edit in the EDL, so it is labeled
001.
• The second column contains the reel number, 004. This is what the directory that
contains all of the scanned DPX or Cineon image files from camera roll 004 should be
named.
• The next two columns contain video/audio track and edit information that, while used
by Color to assemble the program, isn't germane to conforming the media.
The last four columns contain timecode—they're pairs of In and Out points.
• The first pair of timecode values are the In and Out points of the original source media
(usually the telecined tape in ordinary online editing). In a digital intermediate workflow,
this is used for naming and identifying the scanned frames that are output from the
datacine.
• The second pair of In and Out points identifies that shot's position in the edited program.
These are used to place the media in its proper location on the Timeline.
75Chapter 2 Color Correction Workflows
Page 76

Required Image Sequence Filenaming
Here's a sample filename of the first image sequence file that corresponds to the EDL
event shown in Parsing EDLs for Digital Intermediate Conforms:
fileName_0494794.dpx
The first portion of the filename for each scanned frame (the alpha characters and
underscore) is an ignored but necessary part of the filename. The file's frame number
should equal the (non-dropframe) timecode conversion of that value appearing in the
EDL.
For example, a frame with timecode 05:51:18:28 would have a frame number of 632368.
Numeric extensions must always be padded to seven digits; in this case, you would add
one preceding 0, like this:
fileName_0632368.dpx
The following filename formats are also acceptable:
fileName 0632368.dpx
fileName0632368.dpx
fileName-0632368.dpx
fileName.0632368.dpx
Important: For Color to be able to link to a media file, filenames need at minimum an
alpha-only character name (consisting of at least one upper- or lowercase character),
frame number, and a .dpx or .cin file extension.
76 Chapter 2 Color Correction Workflows
Page 77

Using the Color Interface
3
You can work in Color either by using a mouse with the onscreen interface, or, more
directly, by using a dedicated control surface that’s been designed for professional color
correction work.
This chapter covers the general interface conventions used by Color. It describes the use
of controls that are shared by multiple areas of the interface, as well as some of the
specialized controls that are unique to color correction applications.
This chapter covers the following:
• Setting Up a Control Surface (p. 78)
• Using Onscreen Controls (p. 78)
• Using Organizational Browsers and Bins (p. 82)
• Using Color with One or Two Monitors (p. 88)
77
Page 78

Setting Up a Control Surface
B3R3
B2
B1R1
R2
F1
M1
W1
W2
W3
W4
W5
W6
W7
JOG SHUTTLE
M2 M3
1 2 3 4 5 6 7 8
PAGE
M4 M5
F2
F3
F4
F5
F6
F7
F8
F1
MEM
ALT
GRACE DELETE
OUTINMARK
CUE
DO UNDO
MORE
REDO
7
4
1
00 0
2 3
-
5 6 +
8
9
PREV NEXT
MODE
CLEAR
F2 F3 F7 F8 F9
F4 F5 F6
Color was designed from the ground up to support control surfaces specifically designed
for color correction from manufacturers such as Tangent and JL Cooper Designs. These
control surfaces typically include three trackballs that correspond to the three overlapping
tonal zones of the Primary and Secondary color balance controls (shadows, midtones,
and highlights), three rotary controls for the three contrast controls (black level, gamma,
and white point), and a number of other rotary controls and buttons that support different
functions depending on which room you’ve selected.
You can either choose a control surface to use when Color starts up, or click Show Control
Surface Dialog in the User Prefs tab of the Setup room to choose an available control
surface at any time. For more information on setting up a control surface, see Setting Up
a Control Surface. For more information on configuring a control surface from within
Color, see Control Surface Settings.
Using Onscreen Controls
78 Chapter 3 Using the Color Interface
If you don’t have a control surface, you can still operate every feature in Color using the
onscreen controls. In addition to the standard buttons, checkboxes, and pop-up menus
common to most applications, Color uses some custom controls that are described in
this section. See the referenced sections for more information on:
• Using the Mouse
• Tabs
• Using Text Fields and Virtual Sliders
• Using Timecode Fields
• Using Color Balance Controls
Page 79

Using the Mouse
Color supports the use of a three-button mouse, which provides quick access to shortcut
menus and various navigational shortcuts. Color also supports the middle scroll wheel
or scroll ball of a three-button mouse, either for scrolling or as a button.
Documentation referenceMouse button
ClickLeft mouse button
Middle mouse button or middle-clickMiddle mouse button
Right-click (identical to Control-click with a single button mouse)Right mouse button
Note: Many controls can be accelerated up to ten times their normal speed by pressing
the Option key while you drag.
Tabs
Tabsare used to navigate among the eight different Color “rooms.” Each room is a distinct
portion of the interface that contains all the controls necessary to perform a specific task.
Changing rooms changes the available interface, the keyboard shortcuts, and the mapping
of the control surface controls.
Some rooms have additional features that are revealed via tabs within that room.
Using Text Fields and Virtual Sliders
There are four types of data that can populate edit fields in Color:
• Timecode
• Text, including filenames, directory paths, and so forth
• Whole numbers; fields that display whole numbers cannot accept either decimals or
fractional values
• Percentages and fractional values, such as 0.25 or 1.873
There are four ways you can modify text fields.
To enter text into a field using the keyboard
1 Move the pointer into the text field you want to edit, and do one of the following:
• Click once within any field to place the insertion point at the position you clicked.
• Double-click within any field to select the word at the position of the pointer.
• Triple-click within any field to select the entire contents of that field.
The text in that field becomes highlighted.
2 Type something new.
79Chapter 3 Using the Color Interface
Page 80

3 Press Return to confirm the change.
To modify the value of a numeric or percentage-based text field with a virtual slider
1 Move the pointer to the field you want to adjust.
2 Middle-click and drag to the left to decrease its value, or to the right to increase its value.
3 Release the mouse button when you’re finished.
To modify the value of a numeric or percentage-based text field with a scroll wheel
1 Move the pointer to the field you want to adjust.
2 Without clicking in the field, roll the scroll wheel or ball up to increase that field’s value,
or down to decrease that field’s value.
To adjust a field using a shortcut menu
Control-click or right-click any field, and choose one of the following options from the
µ
shortcut menu:
• Reset: Resets the field to its default setting.
• Min: Chooses the minimum value available to that field.
• Max: Chooses the maximum value available to that field.
• Set as Default: Changes the default value of a parameter to whatever value is currently
specified. After changing the default value, you can change the value of that parameter
back to the value you specified by clicking Reset.
Using Timecode Fields
Timecode fields display timing information, such as media In and Out points, and the
position of the playhead. Time is represented in Color in one of two ways:
• Within fields, most time values are represented with standard SMPTE timecode. SMPTE
timecode is represented by four colon-delimited pairs of digits: hh:mm:ss:ff, where hh
is hours, mm is minutes, ss is seconds, and ff is frames.
• Time values in the Timeline ruler may be displayed as non-drop frame timecode, drop
frame timecode, or frames.
Note: Drop frame timecode appears with a semicolon between the seconds and frames
positions.
Here are some pointers for entering values into the hours, minutes, seconds, and frames
positions of timecode fields:
• Time values are entered from left to right (similar to entering a duration into a
microwave); however, the last value you type is assumed to be the last digit of the
frames position.
• Press Return whenever you’ve finished typing a timecode value to confirm the new
value you entered.
80 Chapter 3 Using the Color Interface
Page 81

• If you enter a partial number, the rightmost pair of numbers is interpreted as frames
and each successive pair of numbers to the left populates the remaining seconds,
minutes, and hours positions. Omitted numbers default to 00.
For example, if you enter 1419, Color interprets it as 00:00:14:19.
• When you enter timecode in a field, you don’t need to enter all of the separator
characters (such as colons); they’re automatically added between each pair of digits.
• You can type a period to represent a pair of zeros when entering longer durations.
For example, type “3.” (3 and a period) to enter timecode 00:00:03:00. The period is
automatically interpreted by Color as 00.
• To enter 00:03:00:00, type “3..” (3 and two periods).
These periods insert pairs of zeros into both the seconds and frames position.
• Type “3...” to enter 03:00:00:00.
• Use the Plus Sign key (+) to enter a series of single-digit values for each time position.
For example, type “1+5+8” to enter timecode 00:01:05:08.
Using Color Balance Controls
Color controls are used in several rooms in Color to let you choose and modify colors
using the HSL model.
• Dragging within the main color wheel lets you simultaneously adjust the hue and
saturation of the selected color.
A crosshair within the color wheel shows the current color value that’s being selected.
The remaining controls depend on the type of color control being displayed.
• Dragging up and down within the multicolored Hue slider lets you adjust the hue.
• Dragging up within the single-colored Saturation slider increases the saturation of the
current hue; dragging down decreases its saturation.
• Dragging up within the single-colored Brightness slider increases the brightness of the
current color; dragging down decreases its brightness.
81Chapter 3 Using the Color Interface
Page 82

The angle at which colors appear on the color wheel of color controls can be customized
to match the interface of other color correction systems you may be used to. In addition,
the speed with which control surface joyballs (trackballs) adjust the corresponding Color
color controls can be modified. For more information, see Control Surface Settings.
Using Organizational Browsers and Bins
Color offers several browsers and bins for organizing shots, media, and grades that share
some common controls. All these browsers and bins are used to manage files on your
hard disk, rather than data that’s stored within the Color project file itself. As a result, their
controls are used to navigate and organize the directory structure of your hard disk, much
as you would in the Finder. See the following sections for more information on:
• The File Browser
• The Shots Browser
• The Grades Bin
• Corrections Bins
• Browser, Still Store, Grades, and Corrections Bins Controls
• How Are Grades and Corrections Saved and Organized?
The File Browser
The browser that dominates the left half of the Setup room lets you navigate the directory
structure of your computer’s disk drives (and by extension any RAID, DAS, and SAN
volumes that are currently mounted) in order to find and import compatible QuickTime
and still image media files.
It’s important to remember that the file browser is not the same as a project bin. The files
displayed within the file browser are not associated with your Color project in any way
unless you drag them into the Timeline manually, or relink the shots of an imported
project to their associated media files on disk using the Relink Media or Reconnect Media
command.
Note: The file browser displays only directories and media files that are compatible with
Color.
82 Chapter 3 Using the Color Interface
Page 83

When you select a media file in the file browser, a panel appears to the right displaying
the first frame of that file along with information underneath.
The information given includes:
• Shot Name: The filename
• Duration: Its total duration
• Codec: The codec used to encode that file
• Resolution: The frame size of the file, width by height
• Frame Rate: The frame rate of the file
• Timecode: The timecode value of the first frame in that file
• Import: This button lets you edit the currently selected shot into the Timeline at the
current position of the playhead.
Collapsing the File Browser
If you like, the file browser can be collapsed so that the tabbed area on the right can
occupy the entire Color window.
To collapse the file browser
Move the pointer to the file browser divider at the right side of the file browser, and when
µ
it’s highlighted in blue, click once to collapse it.
83Chapter 3 Using the Color Interface
Page 84

To expand the file browser
Move the pointer to the file browser divider at the left side of the window, and when it’s
µ
highlighted in blue, click once to expand it.
For more information on the Setup room, see Configuring the Setup Room.
The Shots Browser
The other browser in the Setup room is the Shots browser. This browser lets you see all
the shots that are in the current project in either icon or list view.
In icon view, you can create groups of shots to which you can apply a single correction
or grade to at once. For more information, see Managing Grades in the Shots Browser.
In list view, you can sort all of the shots using different info fields. For more information
on using the Shots browser, see Using the Shots Browser.
The Grades Bin
The Grades bin, in the Setup room, lets you save and organize grades combining primary,
secondary, and Color FX corrections into a single unit.
84 Chapter 3 Using the Color Interface
Page 85

You can use this bin to apply saved grades to other shots in the Timeline. The contents
of the Grades bin are available to all Color projects opened while logged into that user
account. For more information on saving and applying grades, see Saving Grades into
the Grades Bin.
Corrections Bins
The Primary In and Out, Secondaries, and Color FX rooms all allow you to save the
corrections made inside those rooms as individual presets that you can apply to later
shots. The contents of corrections bins are available to all Color projects opened while
logged into that user account.
• Primary In and Out: Let you save and organize primary corrections. The Primary In and
Primary Out rooms both share the same group of saved corrections.
• Secondaries: Lets you save and organize secondary corrections.
• Color FX: Lets you save and organize Color FX corrections.
Corrections Versus Grades
There is a distinct difference between corrections and grades in Color. Corrections refer
to adjustments made within a single room. You have the option to save individual
corrections inside the Primary In and Out, Secondaries, and Color FX rooms and apply
them to shots individually.
A grade can include multiple corrections across several rooms; you can save one or more
primary, secondary, and Color FX corrections together. By saving a group of corrections
as a grade, you can apply them all together as a single preset.
Browser, Still Store, Grades, and Corrections Bins Controls
All browsers and bins share the following controls:
Display Controls
All browsers and bins have display controls that let you choose how you want to view
and organize their contents.
• List View button: Displays the contents of the current directory as a list of filenames.
• Icon View button: Displays the contents of the current directory as icons.
• Icon Size slider: Appears only in icon view. Scales the size of icons.
85Chapter 3 Using the Color Interface
Page 86

Directory Navigation Controls
The file browser and Grades and corrections bins also have directory navigation controls
that you can use to organize and browse the grades and corrections that are saved on
your hard disk.
• Up Directory: Moves to and displays the contents of the parent directory.
• Home Directory: Navigates to the appropriate home directory for that browser or bin.
This is not your Mac OS X user home directory. The home directory is different for each
bin:
• File browser: The Home button takes you to the currently specified Color media
directory.
• Primary In,Secondaries, ColorFX, and Primary Out: Home takes you to the appropriate
subdirectory within the /Users/username/Library/Application Support/Color directory.
Each room has its own corresponding subdirectory, within which are stored all the
corrections you’ve saved for future use.
• Still Store: Home takes you to the StillStore directory inside the current project
directory structure.
File Controls
The file browser and Grades and corrections bins also have directory creation and
navigation controls at the bottom.
• File field: Displays the file path of the currently viewed directory.
• Directory pop-upmenu: This pop-up menugives you a fast way to traverse upand down
the current directory hierarchy or to go to the default Color directory for that room.
• New Folder button: Lets you create a new directory within the currently specified path.
You can create as many directories as you like to organize the grades and corrections
for that room.
• Save button: This button saves the grade or correction settings of the shot at the current
position of the playhead in the directory specified in the above text fields.
86 Chapter 3 Using the Color Interface
Page 87

• Load button: Applies the selected grade or correction to the shot that’s at the current
position of the playhead (if no other shots are selected) or to multiple selected shots
(ignoring the shot at the playhead if it’s not selected). As with any Color bin, items
displayed can be dragged and dropped from the bin into the Timeline.
How Are Grades and Corrections Saved and Organized?
Grades and corrections that you save using the Grades and Corrections bins in Color are
saved within the Color preferences directory in your /Users/username/Library/Application
Support/Color directory.
Location on diskSaved correction category
/Users/username/Library/Application Support/Color/Grades/Grades
/Users/username/Library/Application Support/Color/Primary/Primary corrections
/Users/username/Library/Application Support/Color/Secondary/Secondary corrections
/Users/username/Library/Application Support/Color/Effects/Color FX corrections
Saved grades and corrections in these bins are available to every project you open.
Individual corrections in each of the above directories are saved as a pair of files: an .lsi
file that contains a thumbnail for visually identifying that grade, and the specific file for
that type of correction which actually defines its settings. Unless you customized the
name, both these files have the same name, followed by a dot, followed by the date (day
month year hour.minute.secondTimeZone), followed by the file extension that identifies
the type of saved correction it is.
• Grade_Name.date.lsi: The thumbnail image used to represent that grade in icon view
• Grade_Name.date.pcc: Primary correction file
• Grade_Name.date.scc: Secondary correction file
• Grade_Name.date.cfx: Color FX correction file
Saved grades are, in fact, file bundles that contain all the correction files that make up
that grade. For example, a grade that combines primary, secondary, and Color FX
corrections would be a directory using the name given to the grade,
“Grade_Name.date.grd,” containing the following files:
• Grade_Name.date.lsi
• Grade_Name.date.pcc
• Grade_Name.date.scc
• Grade_Name.date.cfx
87Chapter 3 Using the Color Interface
Page 88

Reorganizing Saved Corrections and Grades in the Finder
Each of the corrections bins in Color simply mirrors the contents of the corresponding
subdirectory in the /Users/username/Library/Application Support/Color directory. You
can use the Finder to reorganize your saved corrections and grades by creating new
subdirectories and moving previously saved grades and corrections into them.
When you move saved corrections from one directory to another, it’s important that you
copy both the .lsi thumbnail image for that grade and the .pcc, .scc, or .cfx file that contains
the actual grade information, together.
If you reorganize saved grades and corrections in the Finder while Color is open, you
need to manually refresh the contents of the Grades and corrections bins you changed
so that they correctly display the current contents.
To update the contents of the currently displayed corrections bin
Click the Home button.
µ
Moving Saved Corrections and Grades to Other Computers
If you have saved corrections and grades that you want to move to Color installations on
other computers, you can simply copy the folders described in How Are Grades and
Corrections Saved and Organized? to a portable storage device and then copy their
contents into the corresponding folders on the new system. The next time you open
Color, the saved corrections and grades will appear as they did before.
Using Color with One or Two Monitors
Color is compatible with both one- and two-monitor computer configurations, and
requires a minimum resolution of 1680 x 1050 in either mode. Most users will benefit
from using Color in dual display mode with two monitors, as this provides the most screen
real estate and also allows for the most flexible use of the preview and video scopes
displayed in the Scopes window of the second monitor.
However, Color can also be used in single display mode, which lets you operate Color in
situations where a second display is not available. Single display mode is only
recommended on 30-inch Cinema Displays.
Warning: It is not recommended to run Color on a system with more then one graphics
card. For two-monitor support, both monitors should be connected to the same graphics
card.
88 Chapter 3 Using the Color Interface
Page 89

To switch between single and dual display modes
Do one of the following:
Choose Window > Single Display Mode or Dual Display Mode.
µ
Press Shift-Command-0 to switch between modes.
µ
You must quit Color and reopen it for this change to take effect.
89Chapter 3 Using the Color Interface
Page 90

Page 91

Importing and Managing Projects and Media
Color provides powerful tools for managing projects and media as you work.
This chapter describes the commands and methods used to create and save projects,
move projects from Final Cut Pro to Color and back again, and link and otherwise manage
your projects and media once they’re within Color. It also covers compatible media
formats, EDL import and export, and the conversion of DPX and Cineon image sequences
to QuickTime media.
This chapter covers the following:
• Creating and Opening Projects (p. 92)
• Saving Projects (p. 92)
• Saving and Opening Archives (p. 95)
• Moving Projects from Final Cut Pro to Color (p. 95)
• Importing EDLs (p. 101)
• EDL Import Settings (p. 102)
• Relinking Media (p. 104)
• Importing Media Directly into the Timeline (p. 105)
• Compatible Media Formats (p. 106)
• Moving Projects from Color to Final Cut Pro (p. 112)
• Exporting EDLs (p. 114)
• Reconforming Projects (p. 115)
4
• Converting Cineon and DPX Image Sequences to QuickTime (p. 115)
• Importing Color Corrections (p. 117)
• Exporting JPEG Images (p. 118)
91
Page 92

Creating and Opening Projects
When you open Color, you’re presented with a dialog from which you can open an existing
project or create a new one. Most users will send projects to Color straight from
Final Cut Pro, but there are specific workflows that require you to create a new project
in Color.
To open an existing project
Do one of the following:
If Color is already open, choose File > Open (or press Command-O), choose a project from
µ
the Projects dialog, then click Open.
Double-click a Color project file in the Finder.
µ
Open Color, choose a Color project file using the Projects dialog, then click Open.
µ
Color can have only one project open at a time, so opening a second project closes the
one that was originally open.
To create a new project when Color is first opened
1 Open Color.
The Projects dialog opens to the Default Project Directory you chose when you first
opened Color.
2 Click New Project.
The New Project dialog appears.
3 Type a name for the project in the Name of New Project field, then click Save.
A new project is created and opened.
To create a new project while Color is open
1 If necessary, save the current project.
Color can have only one project open at a time, so creating a new project will close the
currently open project.
2 Choose File > New (or press Command-N).
3 Click New Project.
The New Project dialog appears.
4 Type a name for the project in the Name of New Project field, then click Save.
A new project is created and opened.
Saving Projects
Saving a project works the same way in Color as it does in any other application you’ve
used. As with any application, you should save early and often as you work.
92 Chapter 4 Importing and Managing Projects and Media
Page 93

To save a project
Choose File > Save (or press Command-S).
µ
To revert the project to the last saved state
Choose File > Revert (or press Command-R).
µ
Color also has an automatic saving mechanism which, when turned on, saves the current
project at an interval set by the Auto Save Time (Minutes) parameter in the User Prefs
tab of the Setup room. By default, automatic saving is turned on, with the interval set to
5 minutes. For more information, see Auto Save Settings.
Note: Whenever you manually save a project, an archive is also automatically saved with
the date and time as its name. When a project is automatically saved, an archive is not
created. This prevents your archive list from being inundated with entries. For more
information, see Saving and Opening Archives.
What Is a Color Project?
The only shots that are in your project are those in the Timeline (which are also mirrored
in the Shots browser). Color projects only contain a single sequence of shots. Furthermore,
Color projects have no organizational notion of shots that aren’t actually in the Timeline,
and so they contain no unused media.
93Chapter 4 Importing and Managing Projects and Media
Page 94

The Contents of Color Projects
Color projects are actually bundles. Inside each Color project bundle is a hierarchical
series of directories, each of which contains specific components belonging to that
project, which are either image or XML files. It’s possible to open a Color bundle using
the ShowPackage Contentscommand in the Finder. The directory structure and contents
of these bundles are described here.
• Archives directory: Contains all the saved archives of that project. Each archive is
compressed using both .tar and .gzip compression (a “tarball”) and is identified with
the .tgz extension.
• .lsi file: This is an image file that contains the frame at the position of the playhead
when you last saved.
• .pdl file: This is the XML-based project file itself, which contains all the information
that organizes the shots, timing, and grades used in that project.
• Shots directory: Each shot in your project’s Timeline has a corresponding subdirectory
here. Each subdirectory contains some or more of the following:
• Grade1 (through 4) subdirectories: These directories contain all the correction files
associated with that grade.
• ShotName.lsi file: This is that shot’s thumbnail as displayed in the Timeline.
• ShotName.si file: This file contains that shot’s name, media path, and timing
information.
• Grade_Name.date.pcc: Primary correction description
• Grade_Name.date.scc: Secondary correction description
• Grade_Name.date.cfx: Color FX correction description
• PanAndScan subdirectory: This directory contains a .kfd file that stores keyframe
data and a .pns file that stores pan and scan data.
• shot_notes.txt file: If a note is present for that shot, it’s saved here.
• StillStore directory: This directory contains all the Still Store images that you’ve saved
for reference within that project. Each reference still has two corresponding files, an
.lsi file which is that image’s thumbnail icon and a .sri file which is the full-resolution
image (saved using the DPX image format).
Important: It is not recommended that you modify the contents of Color project files
unless you know exactly what you’re doing. Making changes manually could cause
unexpected problems.
94 Chapter 4 Importing and Managing Projects and Media
Page 95

Saving and Opening Archives
An archive is a compressed duplicate of the project that’s stored within the project bundle
itself. For efficiency, the archive file lacks the thumbnail and Still Store image files that
the full version of the project contains. Archives only save the state of the internal project
file, Timeline, shot settings, grades, corrections, keyframes, and Pan & Scan settings, which
are easily compressed and occupy little space.
Whenever you manually save your project, an archive is automatically created that is
named using the date and time at which it was saved. If you want to save an archive of
your project at a particular state with a more easily identifiable name, you can use the
Save Archive As command.
To save an archive of the project with a specific name
1 Choose File > Save Archive As (or press Command-Option-S).
2 Type a name into the Archive Name field, then click Archive.
There is no limit to the number of archives you can save, so the archives list can grow
quite long. Archives are compressed using both .tar and .gzip (a “tarball”) so they take
up little room. All archive files for a particular project are saved in the Archives subdirectory
inside that project bundle.
Later, if anything should happen to your project file’s settings, or if you want to return
the project to a previously archived state, you can load one of the archive files.
To open an archive
1 Choose File > Load Archive (or press Command-Option-O).
2 Select an archive to open from the Load Archive window, then click Load Archive.
Opening an archive overwrites the current state of the project with that of the archive.
Moving Projects from Final Cut Pro to Color
One of the easiest ways of importing a project is to send a Final Cut Pro sequence to Color
using one of two XML-based workflows. This section discusses how to prepare your
projects in Final Cut Pro and how to send them using XML. For more information, see:
• Before You Export Your Final Cut Pro Project
• Using the Send To Color Command in Final Cut Pro
• Importing an XML File into Color
• Video Finishing Workflows Using Final Cut Pro
95Chapter 4 Importing and Managing Projects and Media
Page 96

Before You Export Your Final Cut Pro Project
Whether you’re working on your own project, or preparing a client’s project in advance
of a Color grading session, you should take some time to prepare the Final Cut Pro
sequence you’ll be sending in order to ensure the best results and smoothest workflow.
Here are some recommended steps.
Move Clips That Aren’t Being Composited to Track V1 in the Timeline
Editors often use multiple tracks of video to assemble scenes, taking advantage of the
track ordering rules in Final Cut Pro to determine which clips are currently visible. It’s
generally much faster and easier to navigate and work on a project that has all its clips
on a single video track. It’s recommended that you move all video clips that aren’t being
superimposed as part of a compositing operation down to track V1.
Remove Unnecessary Video Filters
You aren’t required to remove video filters from a sequence you’re sending to Color. In
fact, if there are one or more effects filters that you want to keep, then it’s perfectly fine
to leave them in. However, it's not usually a good idea to allow filters that perform color
correction operations (such as Brightness and Contrast, RGB Balance, or Desaturate) to
remain in your sequence. Even though they have no effect as you work in Color, they’ll
be redundant after you’ve made additional corrections, and their sudden reappearance
when the project is sent back to Final Cut Pro may produce unexpected results.
Organize All Color Corrector 3-Way Filters
Color Corrector 3-way filters applied to clips are handled differently; they’re automatically
converted into Primary In room adjustments. However, if more than one filter has been
applied to a clip, then only the last Color Corrector 3-way filter appearing in the Filters
tab is converted; all others are ignored. Furthermore, any Color Corrector 3-way filter with
Limit Effects turned on is also ignored.
Converted Color Corrector 3-way filters are removed from the XML data for that sequence,
so that they do not appear in the sequence when it’s sent back to Final Cut Pro.
Note: Because Final Cut Pro is a Y′C
processing application, and Color is an RGB
BCR
processing application, Color Corrector 3-way conversions are only approximations and
will not precisely match the original corrections made in Final Cut Pro.
Divide Long Projects into Reels
To better organize rendering and output, and to maximize performance when you work
with high-bandwidth formats (such asuncompressed high definition, RED, or DPX media),
you should consider breaking long-form projects down into separate 15- to 23-minute
sequences (referred to as reels) prior to sending them to Color. While reel length is arbitrary,
film reels and broadcast shows often have standard lengths that fall within this range.
(Twenty-two minutes is standard for a film reel.) If your project has an unusually large
number of edits, you might consider dividing your program into even shorter reels.
96 Chapter 4 Importing and Managing Projects and Media
Page 97

Each reel should begin and end at a good cut point, such as the In point of the first shot
of a scene, the Out point of the last shot of a scene, or the end of the last frame of a fade
to black. As you’re creating your reels, make sure you don’t accidentally omit any frames
in between each reel. This makes it easier to reassemble all of the color-corrected reels
back into a single sequence when you’re finished working in Color.
Tip: Breaking a single program into reels is also the best way for multi-room facilities to
manage simultaneous rendering of projects. If you have multiple systems with identical
graphics cards and identical versions of Color in each room, you can open a reel in each
room and render as many reels simultaneously as you have rooms. Each system must
have identical graphics cards as the type of GPU and amount of VRAM may affect render
quality. For more information, see The Graphics Card You’re Using Affects the Rendered
Output.
Export Self-Contained QuickTime Files for Effects Clips You Need to Color Correct
Color is incapable of either displaying or working with the following types of clips:
• Generators
• Motion projects
If you want to grade such clips in Color, you need to export them as self-contained
QuickTime files and reedit them into the Timeline of your Final Cut Pro sequence to
replace the original effects before you send the sequence to Color.
If you don’t need to grade these effects in Color, then you can simply send the project
with these clips as they are, and ignore any gaps that appear in Color. Even though these
effects won’t appear in Color, they’re preserved within the XML of the Color project and
they will reappear when you send that project back to Final Cut Pro.
Tip: Prior to exporting a project from Final Cut Pro, you can also export a single,
self-contained QuickTime movie of the entire program and then reimport it into your
project and superimpose it over all the other clips in your edited sequence. Then, when
you export the project to Color, you can turn this “reference” version of the program on
and off using track visibility whenever you want to have a look at the offline effects or
color corrections that were created during the offline edit.
Use Uncompressed or Lightly Compressed Still Image Formats
If your Final Cut Pro project uses still image files, then Color supports every still format
that Final Cut Pro supports. (Color supports far fewer image file formats for direct import;
see Compatible Image Sequence Formats for more information.) For the best results, you
should consider restricting stills in your project to uncompressed image formats such as
.tiff, or if using .jpg stills, make sure they’re saved at high quality to avoid compression
artifacts. If you’ve been using low-quality placeholders for still images in your program,
now is the time to edit in the full-resolution versions.
97Chapter 4 Importing and Managing Projects and Media
Page 98

It’s also important to make sure that the stills you use in your Final Cut Pro project aren’t
any larger then 4096 x 2304, which is the maximum image size that Color supports. If
you’re using larger resolution stills in your project, you may want to export them as
self-contained QuickTime files with which to replace the original effects.
To optimize rendering time, Color only renders a single frame for each still image file.
When your project is sent back to Final Cut Pro, that clip reappears as a still image clip in
the Final Cut Pro Timeline.
Important: If any stills in your project are animated using Scale, Rotate, Center, or Aspect
Ratio parameter keyframes from Final Cut Pro, these keyframes do not appear and are
not editable in Color, but they are preserved and reappear when you send your project
back to Final Cut Pro. For more information, see Exchanging Geometry Settings with
Final Cut Pro.
Make Sure All Freeze Frame Effects Are on Track V1
All freeze frame effects need to be on track V1 for Color to correctly process them. After
rendering, freeze frames continue to appear in the sequence that is sent back to
Final Cut Pro as freeze frame clips.
Important: Freeze frame clips on any other video track will not be rendered, and will
reappear after the sequence is sent to Final Cut Pro as the original, ungraded clip.
Make Sure All Clips Have the Same Frame Rate
It’s not recommended to send a sequence to Color that mixes clips with different frame
rates, particularly when mixing 23.98 fps and 29.97 fps media. The resulting graded media
rendered by Color may have incorrect timecode and in or out points that are off by a
frame. If you have one or more clips in your sequence with a frame rate that doesn’t
match the timebase of the sequence, you can use Compressor to do a standards conversion
of the mismatched clips. For more information, see Rendering Mixed Format Sequences.
Media Manage Your Project, If Necessary
If you’re delivering a Final Cut Pro project to a Color suite at another facility, you may
want to eliminate unused media to save disk space (especially if you’ll be recapturing
uncompressed media), and consolidate all the source media used by your project into a
single directory for easy transport and relinking. This is also a good step to take prior to
recapturing your media, to avoid recapturing unnecessary media.
Recapture Offline Media at Online Quality, If Necessary
If the project was edited at offline quality, you need to recapture all the source media at
the highest available quality before you send it to Color. Be sure you choose a high-quality
codec, either using the native codec that the source footage was recorded with or using
one of the supported uncompressed codecs. For more information on which codecs are
supported by Color, see Compatible Media Formats.
98 Chapter 4 Importing and Managing Projects and Media
Page 99

Important: If you’re recapturing or transcoding video clips that were originally recorded
with a Y′C
format, be sure that the codec you use to recapture, export, or transcode
BCR
your media doesn’t clamp super-white and overly high chroma components from the
original, uncorrected media. It’s usually better to correct out-of-gamut values within Color
than it is to clamp these levels in advance, potentially losing valuable image data.
Check All Transitions and Effects If You Plan to Render 2K or 4K Image Sequences for Film Out
When rendering out 2K or 4K DPX or Cineon image sequences, all video transitions are
rendered as linear dissolves when you use the Gather Rendered Media command to
consolidate the finally rendered frames of your project in preparation for film output. This
feature is only intended to support film out workflows. Any other type of transition (such
as a wipe or iris) will be rendered as a dissolve instead, so it’s a good idea to go through
your project and change the type and timing of your transitions as necessary before
sending your project to Color.
Furthermore, effects that would ordinarily reappear in a sequence that is sent back to
Final Cut Pro, such as speed effects, superimpositions, composites, video filters, motion
settings that don’t translate into Pan & Scan parameters, generators, and Motion projects,
will notbe rendered if you render 2K or 4K DPX or Cineon imagesequences for film output.
In this case, it’s best to export all such clips as self-contained QuickTime files with which
to replace the original effects, before you send the sequence to Color.
Using the Send To Color Command in Final Cut Pro
Once you’ve prepared your sequence, you can use the Send To Color command in
Final Cut Pro to automatically move your sequence into Color (as long as Final Cut Pro
and Color are installed on the same computer).
You can only send whole sequences to Color. It’s not possible to send individual clips or
groups of clips from a sequence unless you first nest them inside a sequence.
To send a sequence from Final Cut Pro to Color
1 Open the project in Final Cut Pro.
2 Select a sequence in the Browser.
3 Do one of the following:
• Choose File > Send To > Color.
• Control-click the selection, then choose Send To > Color from the shortcut menu.
4 Choose a name for the project to be created in Color, then click OK.
A new Color project is automatically created in the default project directory specified in
User Preferences. The shots that appear in the Timeline should match the original
Final Cut Pro sequence that was sent.
99Chapter 4 Importing and Managing Projects and Media
Page 100

Don’t Reedit Projects in Color
By default, all the video tracks of projects sent from Final Cut Pro are locked. When you’re
grading a project, it’s important to avoid unlocking them or making any editorial changes
to the shots in the Color Timeline if you’re planning to send the project back to
Final Cut Pro.
If you need to make an editorial change, reedit the original sequence in Final Cut Pro,
export a new XML file, and use the Reconform command to update the Color Timeline
to match the changes. For more information, see Reconforming Projects. For more
information about Final Cut Pro XML files, see the Final Cut Pro 7 User Manual.
Importing an XML File into Color
If you need to deliver a Final Cut Pro sequence and its media to another facility to be
graded using Color, you can also use the Export XML command in Final Cut Pro to export
the sequence. For more information about exporting XML from Final Cut Pro, see the
Final Cut Pro 7 User Manual.
In Color, you then use the Import XML command to turn the XML file into a Color project.
To speed up this process, you can copy the XML file you want to import into the default
project directory specified by Color.
To import an XML file into Color
1 Do one of the following:
• Open Color.
• If Color is already open, choose File > Import > XML.
2 Choose an XML file from the Projects dialog.
3 Click Load.
A new Color project is automatically created in the default project directory specified in
User Preferences. The shots that appear in the Timeline should match the original
Final Cut Pro sequence that was exported.
Don’t Reedit Imported XML Projects in Color
By default, all the video tracks of imported XML projects are locked. When you’re grading
a project, it’s important to avoid unlocking them or making any editorial changes to
the shots in the Color Timeline if you’re planning to send the project back to Final Cut Pro.
If you need to make an editorial change, reedit the original sequence in Final Cut Pro,
export a new XML file (see the Final Cut Pro 7 User Manual for more information), and
use the Reconform command to update the Color Timeline to match the changes. For
more information, see Reconforming Projects.
100 Chapter 4 Importing and Managing Projects and Media
 Loading...