

Page 1

Designing AirPort
Extreme Networks
Page 2

© 2004 Apple Computer, Inc. All rights reserved.
Apple, the Apple logo, AirPort, AppleShare, Apple Store, AppleTalk, Mac, and Mac OS are trademarks of
Apple Computer, Inc., registered in the U.S. and other countries. Rendezvous is a trademark of Apple Computer, Inc.
Wi-Fi is a registered certification mark, and Wi-Fi Protected Access is a certification mark, of the Wi-Fi Alliance. 019-0152
Page 3

Page 4

1
Contents
Chapter 1 5 Getting Started
6
How AirPort Works
6
How Wireless Internet Access Is Provided
7
Configuring AirPort Extreme Base Station Internet Access
7
AirPort Setup Assistant
7
AirPort Admin Utility
8
Extending the Range of Your AirPort Network
8
Printing via an AirPort Extreme Base Station
9
Sharing Your Computer’s Internet Connection
Chapter 2 11 Network Basics
13
Software Used for IP Networking in Mac OS X
14
Software Used for AirPort Networking in Mac OS X
Chapter 3 15 AirPort Security
15
Security for AirPort Networks at Home
16
Security for AirPort Networks in Business and Education
17
Wi-Fi Protected Access (WPA)
Chapter 4 19 AirPort Extreme Network Designs
20
Using the AirPort Setup Assistant
20
Using AirPort Admin Utility
21
Setting Up the AirPort Network
27
Configuring and Sharing Internet Access
48
Setting Advanced Options
62
Solving Problems
63
More Information About AirPort
Chapter 5 65 Behind the Scenes
65
Basic Networking
68
Using the AirPort Extreme Base Station
69
Items That Can Cause Interference With AirPort
3
Page 5

Page 6

1
Getting Started
1
AirPort offers an easy and affordable way to provide
wireless Internet access and networking anywhere in the
home, classroom, or office.
Instead of using traditional cables to create a network, AirPort uses wireless local area
network (LAN) technology to provide wireless communication between computers.
Through a wireless network you can access the Internet, share files, play multiplayer
games, and more.
Using AirPort technology, you can:
Create a wireless network in your home or school using an AirPort Extreme Base
•
Station, then connect to the Internet and share the connection among several
computers simultaneously. An entire family or classroom can be on the Internet at
the same time.
•
Set up a wireless connection to your standard computer network. AirPort-equipped
computers can then have access to an entire network without being connected with
a cable.
Connect multiple computers in a wireless “Computer-to-Computer” network so that
•
you can share files or play network games.
You can set up an AirPort Extreme Base Station and connect to the Internet without
wires in minutes. But since the AirPort Extreme Base Station is a flexible and powerful
networking device, you can also create an AirPort network that does much more. If you
want to design an AirPort network that provides Internet access to non-AirPort
computers via Ethernet, or take advantage of some of the base station’s more
advanced features, use this document to design and implement your network.
Note:
Some of the AirPort features described in this book are available only in
Mac OS X version 10.3 or later, using AirPort 3.4 or later. If you are using an earlier
version of Mac OS X or AirPort, images shown in this book may be slightly different
from what you see on your screen.
5
Page 7

How AirPort Works
Traditionally, sharing files and information between computers required them to be
connected by wires. With AirPort, the data is transferred between computers using
radio waves through a wireless network.
There are two ways to create a wireless network:
You can use an AirPort-equipped computer to create a temporary “Computer-to-
•
Computer” network, which other AirPort-equipped computers within range can join.
•
You can create a more permanent wireless network using a base station. In this kind
of network, all wireless communication goes through the base station to the Internet
or to other computers on the network.
You can also incorporate AirPort technology into an existing Ethernet network by
connecting an AirPort Extreme Base Station to the network. This allows non-AirPort
computers to communicate with AirPort computers.
The typical indoor range for an AirPort connection is up to 150 feet (45 meters). Range
in a wireless network may vary with site conditions.
How Wireless Internet Access Is Provided
Wireless Internet access requires an AirPort Card or an AirPort Extreme Card, an AirPort
Extreme Base Station, and an account with an Internet service provider (fees may
apply). Some Internet service providers (ISPs) are not currently compatible with AirPort.
Some cable modem and DSL providers may not be compatible with AirPort. Contact
your service provider for more information.
AirPort technology is similar to cordless telephone technology. The handset of the
cordless phone makes a wireless connection to the base, which is connected to
the telephone system. Likewise, with AirPort, your computer does not establish a
wireless connection with your ISP directly. You set up a wireless connection from the
computer to a base station that is connected to the Internet by a wire, such as a
DSL or telephone line.
Use AirPort to provide wireless Internet access and share a single Internet connection
among multiple computers in the following ways:
•
Connect the AirPort Extreme Base Station to a DSL or cable modem. If the base
station has an internal modem, you can connect it to a telephone line. The AirPort
Extreme Base Station receives webpages and email content from the Internet via its
Internet connection and then sends it to AirPort-equipped computers, using the
wireless network.
Connect the AirPort Extreme Base Station to an existing network that already has
•
Internet access, such as in a school or small office. AirPort-equipped computers
connect wirelessly to the base station and receive network and Internet content.
6 Chapter 1
Getting Started
Page 8

Configuring AirPort Extreme Base Station Internet Access
Like your computer, the AirPort Extreme Base Station must be set up with the
appropriate hardware and Internet Protocol (IP) networking information to connect to
the Internet. To provide the Internet configuration information, you can use the AirPort
Setup Assistant to transfer your computer’s Internet settings to the base station. The
setup assistant then asks a series of questions to determine how the base station’s
other interfaces should be set up.
To set up more complex configurations, you use AirPort Admin Utility. For more
information about the AirPort Setup Assistant and AirPort Admin Utility, see the
following sections.
AirPort Setup Assistant
The AirPort Setup Assistant, located in Applications/Utilities, walks you through base
station setup and changes your computer’s Internet settings to use AirPort instead of
a wired connection to the Internet.
Use the AirPort Setup Assistant to enter the settings your base station needs to
connect to the Internet. Enter the settings you received from your ISP for the internal
modem, Ethernet, or PPP over Ethernet (PPPoE). You can also give your AirPort network
a name and password. When you have finished entering the settings, the AirPort Setup
Assistant transfers the settings to your base station and your base station shares its
Internet connection with computers that join its AirPort network.
For instructions on using the AirPort Setup Assistant, see “Using the AirPort Setup
Assistant” on page 20.
AirPort Admin Utility
AirPort Admin Utility is a convenient way to make quick adjustments to your base
station configuration. The AirPort Extreme Base Station’s advanced networking features
can be configured only with AirPort Admin Utility.
Use AirPort Admin Utility when:
•
You want to provide Internet access to computers that connect to the base station
using Ethernet
•
You have already set up your base station, but you need to change one setting, such
as the phone number for your ISP
•
You need to configure advanced base station settings such as channel frequency,
security options, closed networks, DHCP lease time, access control, WAN privacy,
power controls, remote dial-in, or port mapping
For instructions on using AirPort Admin Utility, see “Using AirPort Admin Utility” on
page 20.
Chapter 1
Getting Started
7
Page 9

Extending the Range of Your AirPort Network
You can extend the range of your network by using AirPort Admin Utility to set up
wireless connections between multiple base stations in your network, known as a
Wireless Distribution System (WDS), or to connect the base stations via Ethernet to
create a roaming network. If your base station has an antenna port, you can also
extend the range of your wireless network by connecting an Apple-certified external
antenna to the antenna port. For more information on setting up a Wireless
Distribution System or a roaming network, see “Connecting Additional Base Stations to
Your AirPort Network” on page 49.
Some models of the base station can receive power through the Ethernet WAN port
when it is connected to 802.3af-compliant Power Sourcing Equipment (PSE) with a CAT
5 Ethernet cable. A PSE is a line-powered Ethernet device, like a switch or a hub, that
supplies power to Powered Devices (PDs) over the Ethernet cable. Powering the base
station using a PSE is known as
If your base station can receive power over Ethernet, the base station and the
mounting bracket conform to UL Standard 2043, “Fire Test for Heat and Visible Smoke
Release for Discrete Products and Their Accessories Installed in Air-Handling Spaces,”
for placement in the air-handling space above suspended ceilings. Using Power over
Ethernet allows you to install a base station in places away from a standard electrical
outlet. For more information about using PoE, see the documentation that came with
your base station.
Power over Ethernet
(PoE).
To use the base station in an air-handling space above suspended ceilings, you must
connect the Ethernet WAN port to an 802.3af-compliant PSE with a plenum-rated
Ethernet cable. You cannot use the AC power adapter to power a base station installed
in an air-handling space. When the base station receives power over Ethernet, the USB
port is disabled. Do not connect an external antenna to a base station mounted in an
air-handling space.
Printing via an AirPort Extreme Base Station
If you have a USB printer connected to the base station, computers on the AirPort
network can print to the printer by selecting it via Rendezvous in Printer Setup Utility,
located in Applications/Utilities. You must use Mac OS X version 10.2.3 or later to print
to a USB printer via an AirPort Extreme Base Station. Check the AirPort website at
www.apple.com/airport for a list of supported printers.
If your base station supports PoE, and is receiving power from an 802.3af-compliant
PSE, the USB port is disabled and you cannot connect a printer to the USB port.
8 Chapter 1
Getting Started
Page 10
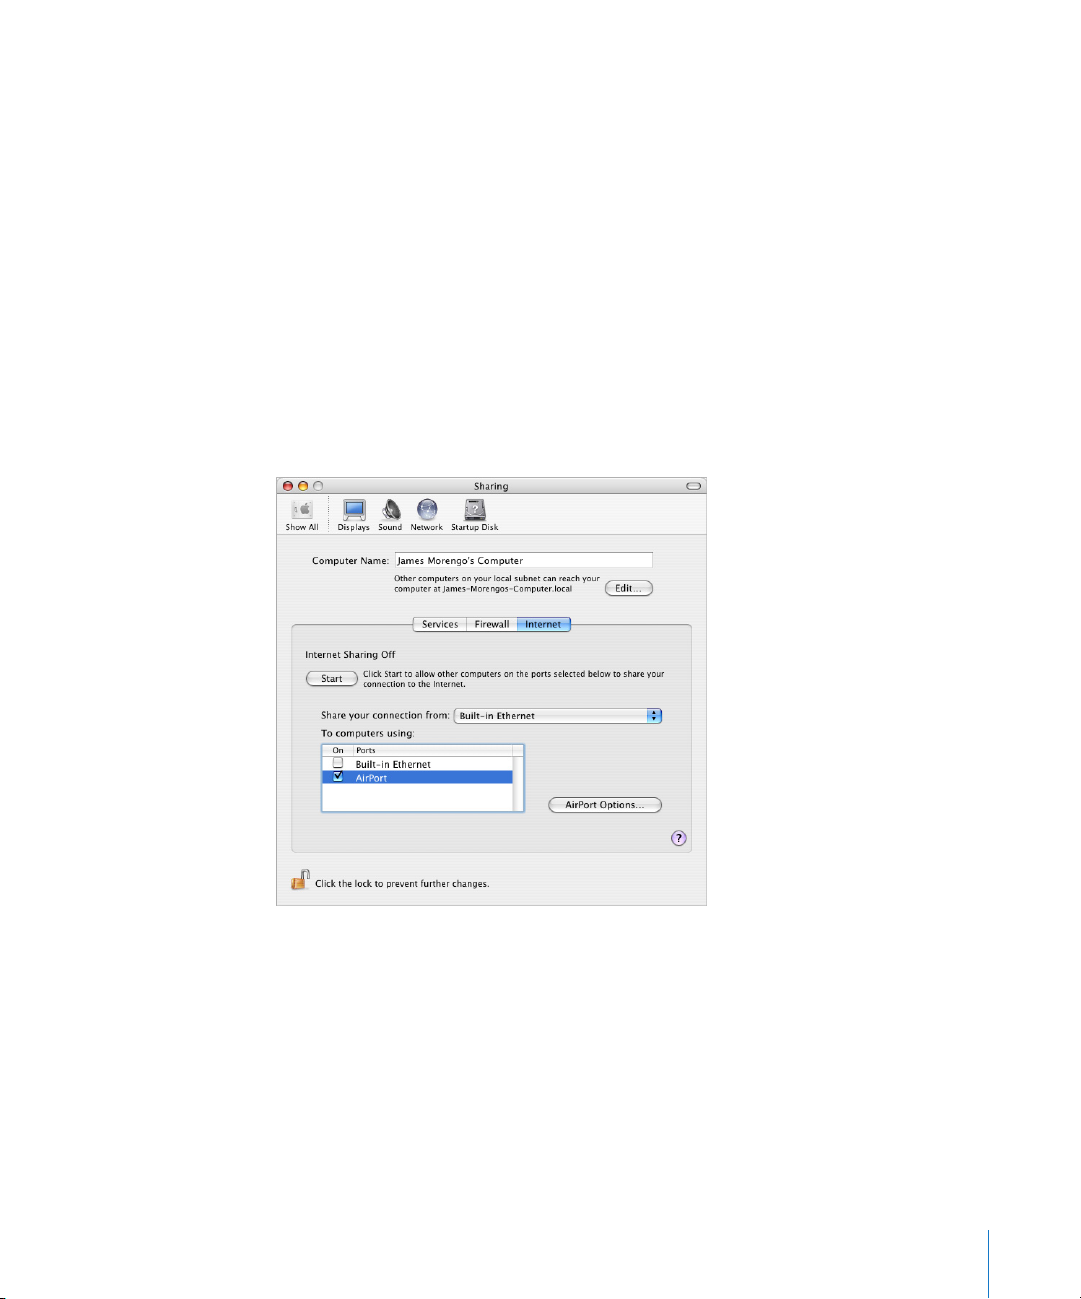
Sharing Your Computer’s Internet Connection
If you have an AirPort Card installed in your computer and you are connected to the
Internet, you can share your Internet connection with other computers using Mac OS X
version 10.2 or later. This is sometimes called using your computer as a
station.
You can share your Internet connection as long as your computer is connected to the
Internet. If your computer goes to sleep or is restarted, or if you lose your Internet
connection, you need to restart Internet sharing.
To start Internet sharing:
1
Open System Preferences, click Sharing, and then click Internet.
2
Select how you would like to share your Internet connection, then click Start. You can
choose to share your Internet connection with AirPort-equipped computers, computers
with built-in Ethernet, or both.
software base
Note:
If your Internet connection and your local network use the same port (built-in
Ethernet, for example), contact your ISP before you turn on Internet sharing. In some
cases (if you use a cable modem, for example) you might unintentionally affect the
network settings of other ISP customers, and your ISP might terminate your service to
prevent you from disrupting its network.
Chapter 1
Getting Started
9
Page 11
3
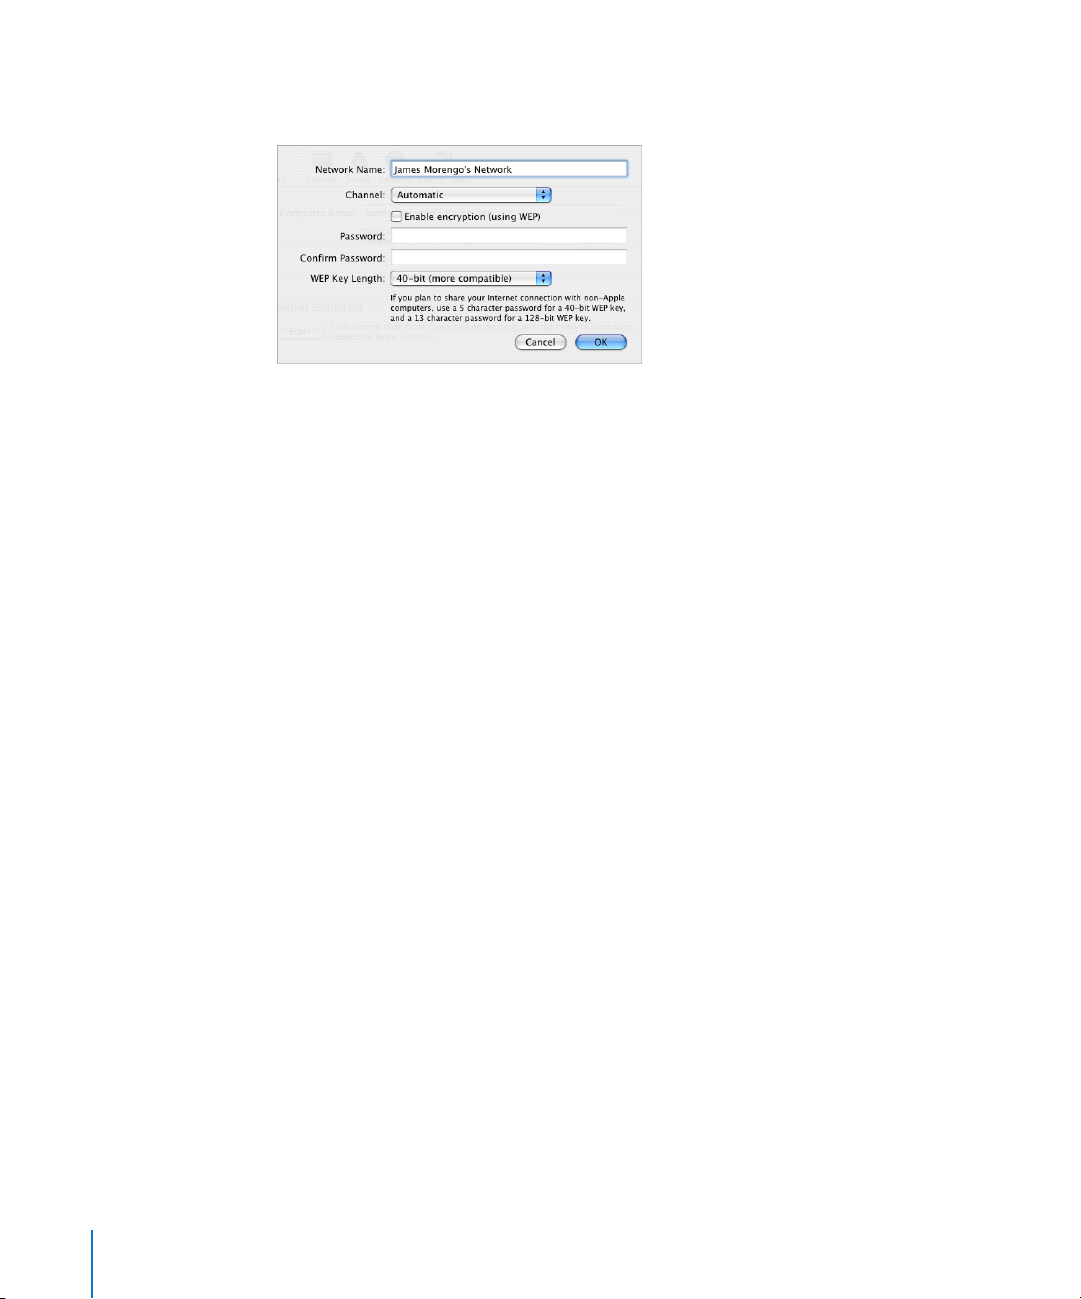
If you select “Share your Internet connection with AirPort-equipped computers,” click
AirPort Options to give your network a name and password.
Note:
To take advantage of AirPort’s advanced security options, use AirPort Admin
Utility to set up an AirPort Extreme Base Station.
10 Chapter 1
Getting Started
Page 12

2
Network Basics
2
This chapter contains information about your computer’s
network settings, what they do, and how to adjust them
in Mac OS X. It also describes the software used for IP and
AirPort networking.
To take advantage of all the power and flexibility of AirPort, you may need to change
the network settings on your computer or your base station.
If you make frequent changes to your network settings, it helps to be aware of what
the settings do and what they mean. Understanding these network basics makes
configuring and adjusting your computer and AirPort network settings simple and
easy.
Configuring your computer involves two steps:
•
Selecting a network (Ethernet or AirPort)
•
Configuring Internet Protocol (IP)
Step 1: Select Your Network
To join an Ethernet network, connect an Ethernet cable to the Ethernet port on your
computer and to an open port on your Ethernet network.
To create or join an AirPort network, use the AirPort status menu in the menu bar to
turn on AirPort and choose an available AirPort network.
Once you are connected, both types of networks work the same way.
Step 2: Configure IP on Your Computer
Configuring IP consists of two steps:
•
Selecting a networking interface
•
Selecting a configuration method
11
Page 13
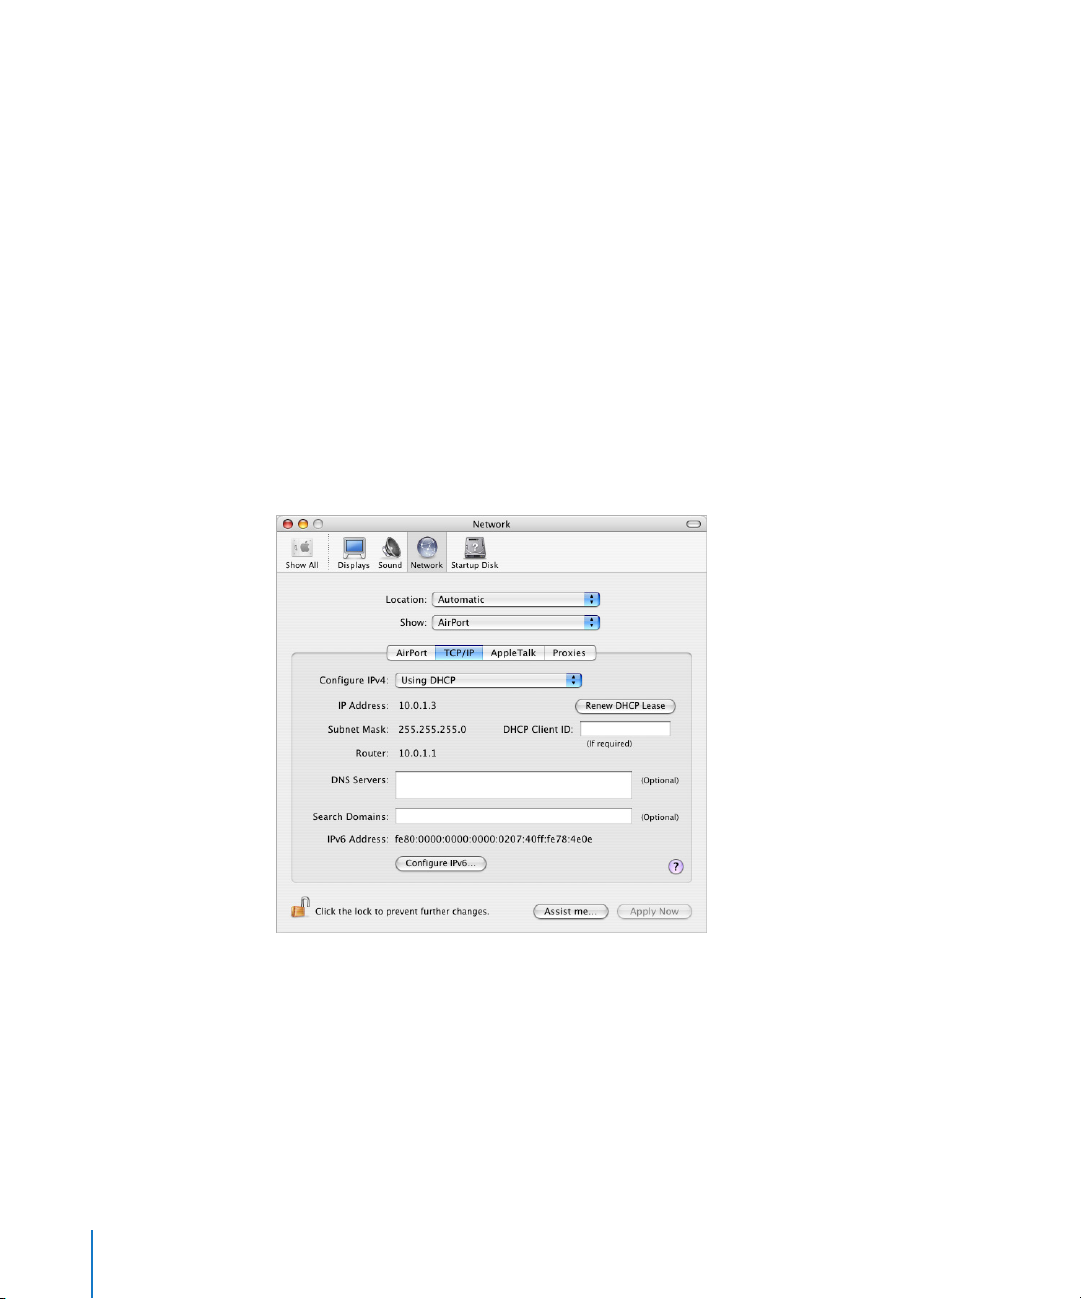
To configure IP:
1
Open the Network pane of System Preferences, and then choose Built-in Ethernet from
the Show pop-up menu if you are connecting to an Ethernet network, or AirPort if you
are connecting to an AirPort network.
2
Click TCP/IP, and then choose the configuration method from the Configure IPv4
pop-up menu.
The three most frequently used methods are PPP, DHCP, and Manually.
•
PPP is used for dial-up modem connections to your ISP and the Internet.
DHCP is used frequently on Ethernet networks and by DSL or cable modem
•
providers.
•
Manual configurations are used on Ethernet networks and sometimes by DSL and
cable modem providers. Your network administrator or ISP should provide you with
the appropriate configuration information if you configure IPv4 manually.
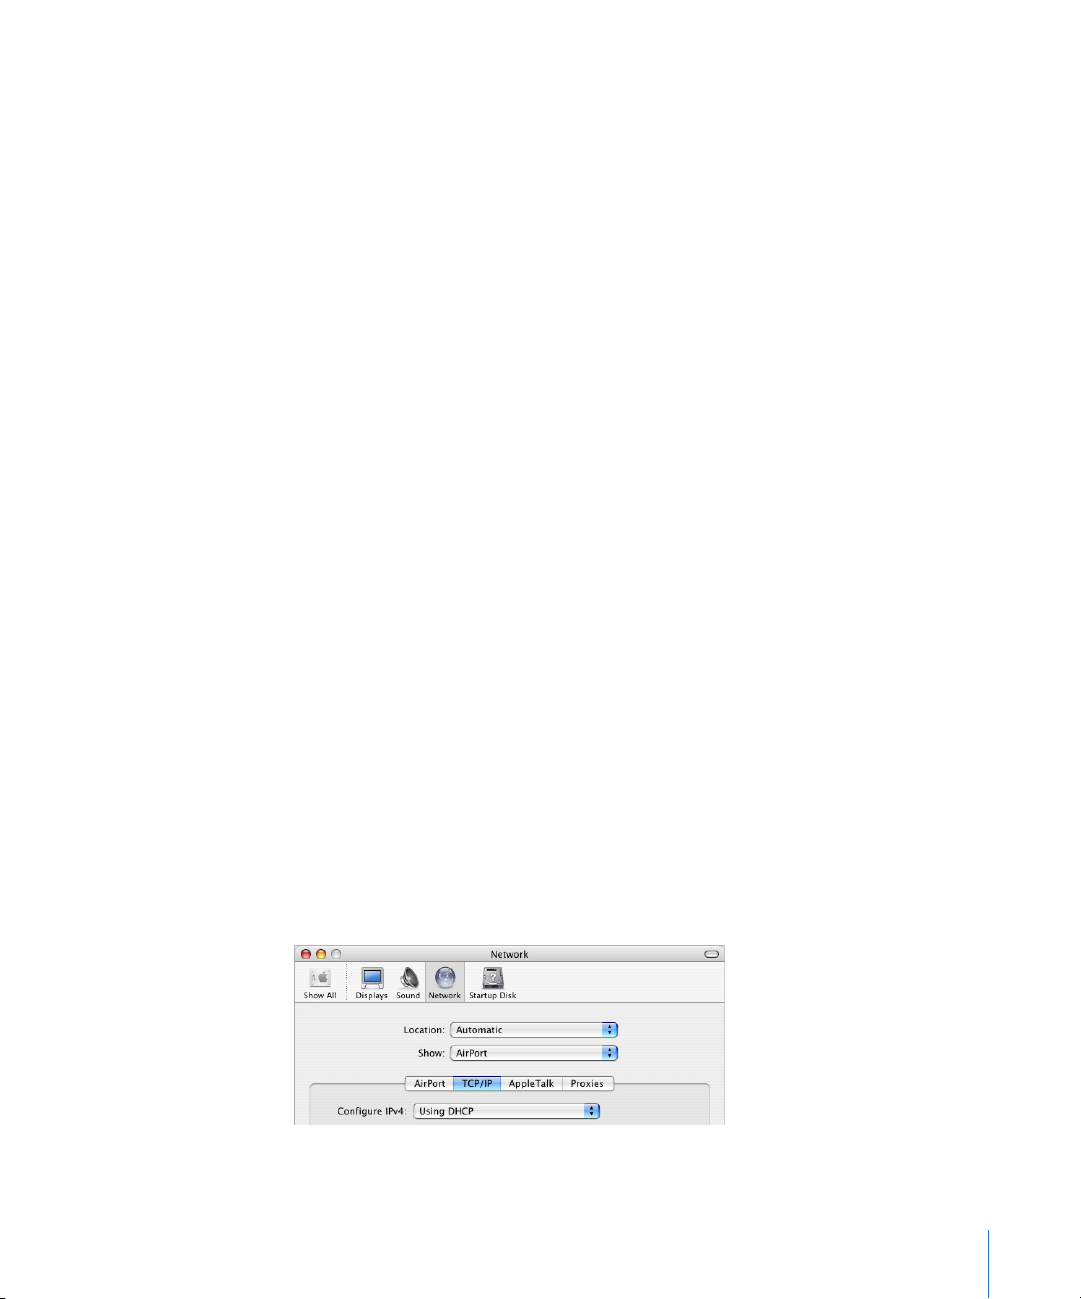
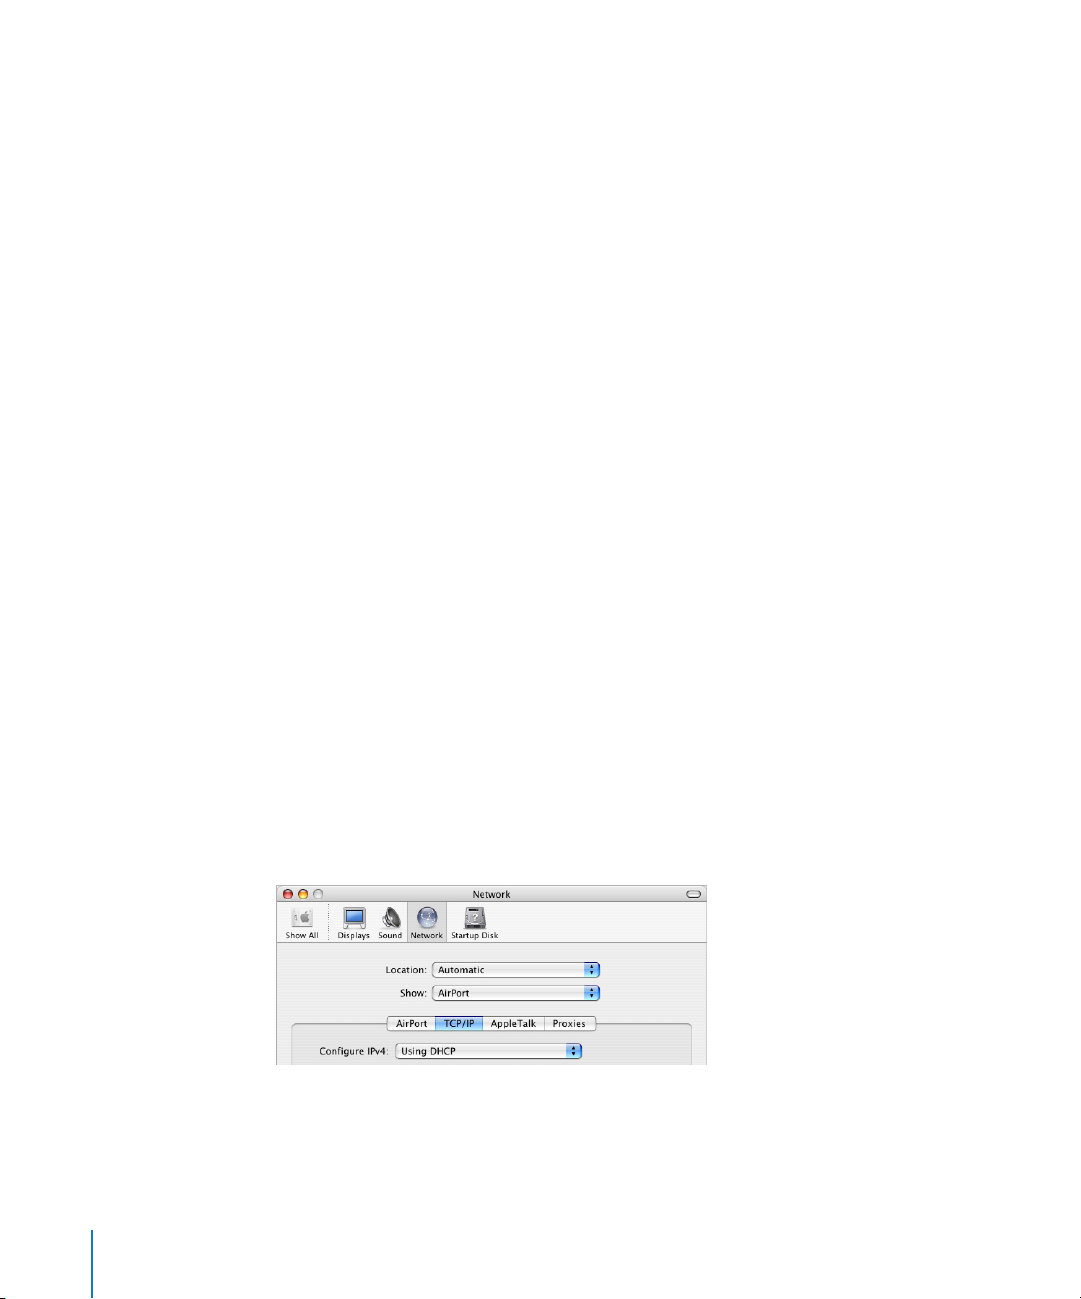
For example, below is the Network pane of System Preferences, configured to use
AirPort for the network interface and DHCP for the TCP/IP configuration.
If you have trouble connecting to the Internet, check these network and IP
configurations on your computer first.
12 Chapter 2
Network Basics
Page 14

Software Used for IP Networking in Mac OS X
You’ll frequently use several preferences and applications on your computer for
networking. Here’s what each is used for:
Network Preferences
Use the Show pop-up menu to configure how you connect to the network or the
Internet, for example via AirPort or Ethernet.
Use the TCP/IP pane of Network preferences to configure your computer for IP
networking. The information in this pane must be correct to connect to the Internet.
To configure how you receive an IP address, for example manually or via DHCP, use the
Configure IPv4 pop-up menu.
Use the remaining fields to fill in the other information you need in order to connect to
the Internet. Contact your ISP or network administrator for the information to type in
these fields.
Internet Connect Application
Use the Internet Connect application to specify the phone number, user name, and
password for making a dial-up connection to the Internet. If you use a dial-up
connection to the Internet, the AirPort Setup Assistant transfers the settings in the
Internal Modem portion of the Internet Connect application to the base station.
If you use AirPort to connect to the Internet, choose AirPort from the Configuration
pop-up menu.
You also use Internet Connect to authenticate with or set up a network protected
by 802.1X.
AppleTalk
AppleTalk is a protocol used in local networks. Use the AppleTalk pane of Network
preferences to set up AppleTalk networking.
Location Management
Use the Location pop-up menu in Network preferences to manage sets of TCP/IP,
AppleTalk, and Internet Connect configurations. After you create your locations, you
can switch all of your network settings by choosing a location from the Location
pop-up menu in Network preferences. For more information about network locations,
see Mac OS Help, available in the Help menu.
Chapter 2
Network Basics
13
Page 15

Software Used for AirPort Networking in Mac OS X
You’ll use different Mac OS X and AirPort applications to create and manage your
wireless network. Here’s what each is used for:
Internet Connect Application
Use the Internet Connect application to:
•
Turn AirPort on or off
Monitor the signal quality of the AirPort wireless connection
•
•
Find the Base Station ID (the hardware address of your AirPort Extreme Base Station)
•
See the connection status of an AirPort Extreme Base Station that is configured to
connect to a dial-up ISP
•
Select an AirPort network
Create or join a Computer-to-Computer network
•
•
Join a closed network
Join or set up an 802.1X protected network
•
AirPort Status Menu
Use the AirPort status icon in the menu bar to:
Turn AirPort on or off
•
•
Monitor the signal quality of the AirPort wireless connection
Select an AirPort network
•
•
Open the Internet Connect application
Create or join a Computer-to-Computer network
•
AirPort Setup Assistant
Use the AirPort Setup Assistant to:
Set up your computer to join an existing AirPort network
•
•
Set up an AirPort Extreme Base Station
AirPort Admin Utility
Use AirPort Admin Utility to set optional advanced settings and to:
•
Download the base station configuration to your computer
Modify the configuration on your base station
•
•
Set advanced security options for the AirPort network
Upload a modified configuration to the base station
•
• Upgrade the base station software
14 Chapter 2
Network Basics
Page 16

3 AirPort Security
3
This chapter provides an overview of the security features
available in AirPort Extreme for Mac OS X 10.3.
Apple has designed the AirPort Extreme Base Station to provide multiple levels of
security, so you can enjoy peace of mind when you access the Internet, manage online
financial transactions, or send and receive email. The base station also includes a slot
for inserting a Kensington lock to deter theft.
For information and instructions for setting up these security features, see “Setting Up
the AirPort Network” on page 21.
Security for AirPort Networks at Home
Network attacks can occur through wireless as well as wired networks. Apple gives you
ways to protect your entire AirPort network as well as the data that travels over it.
Firewall
You can separate your wireless network from the outside world with firewall protection.
The AirPort Extreme Base Station has a built-in firewall that creates a barrier between
your network and the Internet, protecting data from Internet-based IP attacks. The
firewall is automatically turned on when you set up the base station to share a single
Internet connection. For computers with a cable or DSL modem, AirPort can actually be
safer than a wired connection.
Closed Network
Creating a closed network keeps the network name and the very existence of your
network private. The network will not show up in a scan of available networks, so
prospective users of your network must know the network name and password to
access it.
15
Page 17

Password Protection and Encryption
AirPort uses password protection and encryption to deliver a level of security
comparable to traditional wired networks. Users can be required to enter a password to
log in to the AirPort network. When transmitting data and passwords, the base station
uses up to 128-bit encryption, through either Wi-Fi Protected Access™ (WPA) or Wireless
Equivalent Privacy (WEP), to scramble data and help keep it safe.
Note: WPA security features are available only to AirPort Extreme Base Stations, AirPort
and AirPort Extreme clients using Mac OS X 10.3 or later and AirPort 3.3 or later, and to
non-Apple clients using other 802.11 wireless adapters that support WPA.
If you’re using AirPort in conjunction with an America Online account, you can use AOL
parental controls on the AirPort Extreme Base Station to further restrict access. The
settings you configure are used for all clients connected to that base station.
Security for AirPort Networks in Business and Education
Businesses, schools, colleges, and universities want to restrict network communications
to authorized users and keep data safe from prying eyes, so AirPort Extreme hardware
and software provide a robust suite of security mechanisms.
Transmitter Power Control
Because radio waves travel in all directions, they can extend outside the confines of a
specific building. The Transmitter Power setting in AirPort Admin Utility lets you adjust
the transmission range of your base station’s network. Only users within the network
vicinity have access to the network.
MAC Filtering
Every AirPort and wireless card has a unique MAC address. For AirPort and AirPort
Extreme Cards, the MAC address is sometimes referred to as the AirPort ID. Support for
MAC (Media Access Control) filtering lets administrators set up a list of MAC addresses
and restrict access to the network to only those users whose MAC addresses are in the
access control list.
RADIUS Support
The Remote Authentication Dial-In User Service (RADIUS) makes securing a large
network easy. RADIUS is an access control protocol that allows a system administrator
to create a central list of the computers that can access the network. Placing this list on
a centralized server allows many base stations to access the list and makes it easy to
update. If the MAC address of a user’s computer (which is unique to each 802.11
wireless card) is not on your approved MAC address list, the user cannot join your
network.
16 Chapter 3 AirPort Security
Page 18

LEAP Support
The Lightweight Extensible Authentication Protocol (LEAP) is a security protocol used
by Cisco access points to dynamically assign a different WEP key to each user. AirPort
Extreme is compatible with Cisco’s LEAP security protocol, enabling AirPort users to join
Cisco-hosted wireless networks using LEAP.
Wi-Fi Protected Access (WPA)
There has been increasing concern about the vulnerabilities of WEP. In response, the
Wi-Fi Alliance, in conjunction with the IEEE, has developed a strongly enhanced,
interoperable security standard called Wi-Fi Protected Access (WPA).
WPA is a specification that brings together standards-based, interoperable security
enhancements that strongly increase the level of data protection and access control for
wireless LANs. WPA provides wireless LAN users with a high level of assurance that their
data remains protected and that only authorized network users can access the
network. A wireless network that uses WPA requires that all computers that access the
wireless network have WPA support. It provides a high level of data protection and
(when used in Enterprise mode) requires user authentication.
The main standards-based technologies that comprise WPA include Temporal Key
Integrity Protocol (TKIP), 802.1X, Message Integrity Check (MIC), and Extensible
Authentication Protocol (EAP).
TKIP provides enhanced data encryption by addressing the WEP encryption
vulnerabilities, including the frequency with which keys are used to encrypt the
wireless connection. 802.1X and EAP provide the ability to authenticate a user on the
wireless network.
802.1X is a port-based network access control method for wired as well as wireless
networks. The IEEE adopted 802.1X as a standard in August 2001.
The Message Integrity Check (MIC) is designed to prevent an attacker from capturing
data packets, altering them, and resending them. The MIC provides a strong
mathematical function in which the receiver and the transmitter each compute and
then compare the MIC. If they do not match, the data is assumed to have been
tampered with and the packet is dropped.
Some of the EAP protocols handle the presentation of a user’s credentials in the
form of digital certificates. A user’s digital certificates can comprise user names and
passwords, smart cards, secure IDs, or any other identity credentials that the IT
administrator is comfortable using. WPA uses a wide variety of standards-based EAP
implementations, including EAP-Transport Layer Security (EAP-TLS), EAP-Tunnel
Transport Layer Security (EAP-TTLS), and Protected Extensible Authentication Protocol
(PEAP).
Chapter 3 AirPort Security 17
Page 19

WPA has two modes: Enterprise mode, which uses a RADIUS server for user
authentication, and Personal mode, which relies on the capabilities of TKIP without
requiring a RADIUS server.
Note: WPA security features are available only to AirPort Extreme Base Stations, AirPort
and AirPort Extreme clients using Mac OS X 10.3 or later and AirPort 3.3 or later, and
clients using other 802.11 wireless adapters that support WPA.
WPA Enterprise
WPA is a subset of the draft IEEE 802.11i standard and effectively addresses the Wireless
Local Area Network (WLAN) security requirements for the enterprise and provides a
strong encryption and authentication solution prior to the ratification of the 802.11i
standard. In an enterprise with IT resources, WPA should be used in conjunction with
an authentication server such as RADIUS to provide centralized access control and
management. With this implementation in place, the need for add-on solutions such as
Virtual Private Networks (VPN) may be eliminated, at least for securing the wireless link
in a network.
WPA Personal
For home or Small Office/Home Office (SO/HO) networks, WPA runs in Personal mode,
taking into account that the typical household or small office does not have an
authentication server. Instead of authenticating with a RADIUS server, users manually
enter a password to log in to the wireless network. When the user enters the password
correctly, the base station starts the encryption process using TKIP. TKIP takes the
original password and derives its encryption keys mathematically from the network
password. TKIP then regularly changes and rotates the encryption key so that the same
encryption key is never used twice. This all happens behind the scenes. Other than
entering the network password, the user isn’t required to do anything to make WPA
Personal work in the home.
18 Chapter 3 AirPort Security
Page 20

4 AirPort Extreme Network Designs
4
This chapter provides overview information and
instructions for the types of AirPort networks you can
set up.
Configuring your base station to implement a network design involves three steps:
Step 1: Setting Up the AirPort Network
Computers communicate with the AirPort Extreme Base Station over the AirPort
wireless network. When you set up the AirPort network created by the base station, you
can name the wireless network, assign a password needed to join the wireless network,
and other options.
Step 2: Configuring and Sharing Internet Access
When computers access the Internet via the AirPort network, the base station connects
to the Internet and transmits information to the computers over the AirPort network.
You provide the base station with settings appropriate for your ISP and configure how
the base station shares this connection with other computers.
Step 3: Setting Advanced Options
These settings are optional for most users. They include using the base station as a
bridge between your AirPort network and an Ethernet network, controlling access to
an AirPort network, setting advanced security options, setting up a Wireless
Distribution System (WDS) to extend the AirPort network to other base stations, and
fine-tuning other AirPort settings.
For specific instructions on all these steps, refer to the sections later in this chapter.
You can do most of your setup and configuration tasks with the AirPort Setup Assistant.
To set advanced options, you need to use AirPort Admin Utility.
19
Page 21
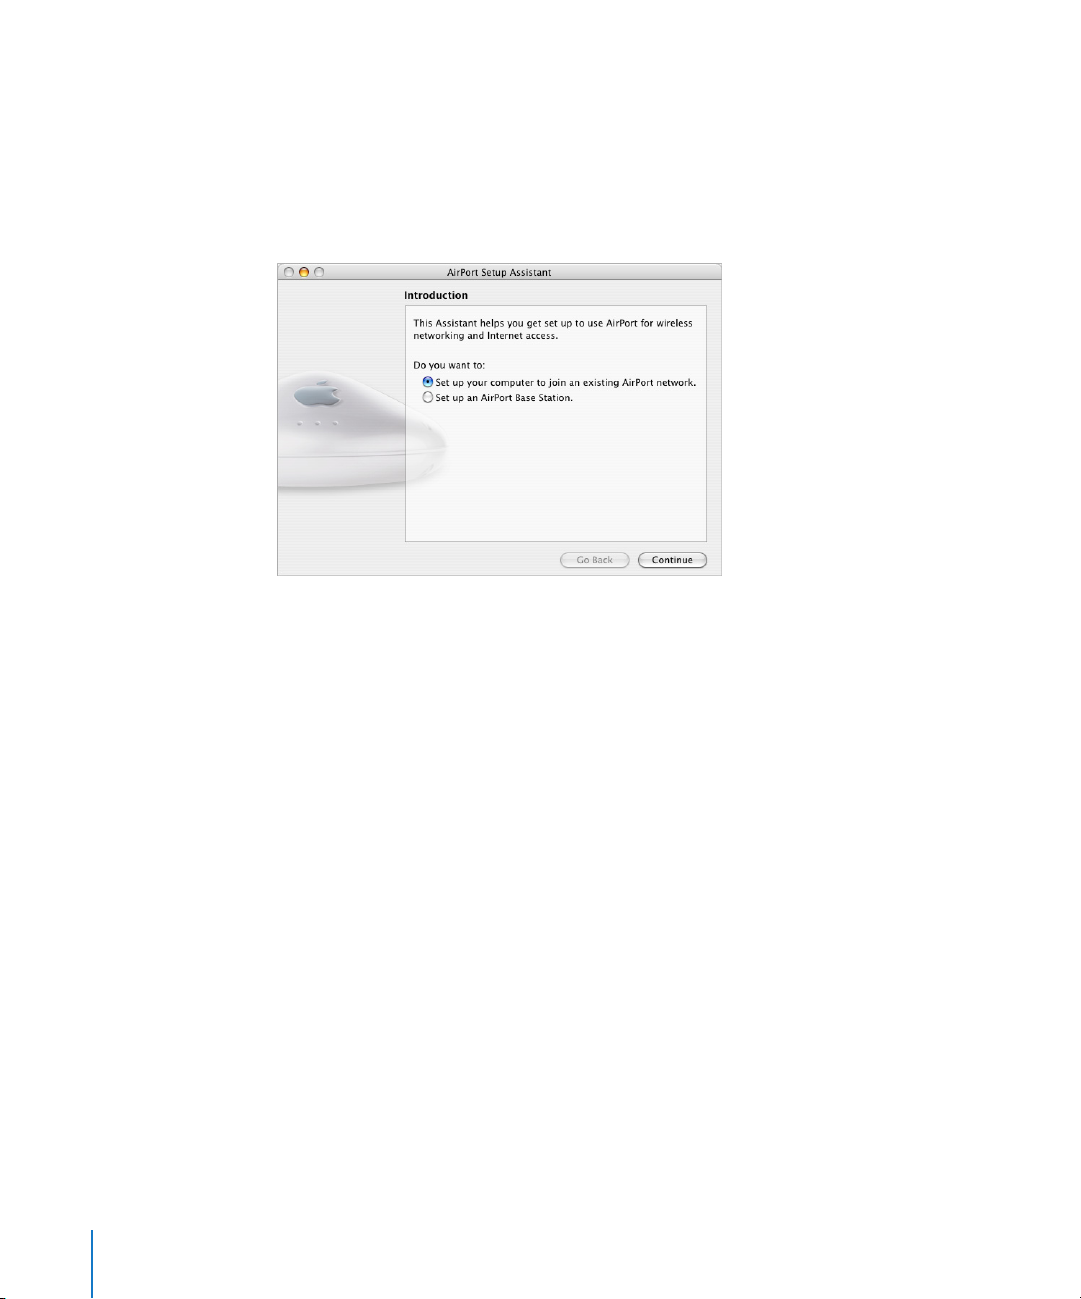
Using the AirPort Setup Assistant
To set up and configure your computer or base station to use AirPort for wireless
networking and Internet access, use the AirPort Setup Assistant.
1 Open the AirPort Setup Assistant, located in Applications/Utilities.
2 Select “Set up your computer to join an existing AirPort network” or “Set up an AirPort
Base Station.”
3 Follow the onscreen instructions and enter the settings from your ISP or network
administrator.
Using AirPort Admin Utility
To modify the base station configuration, open the configuration with
AirPort Admin Utility.
To open your base station’s configuration:
1 Open AirPort Admin Utility, located in Applications/Utilities.
2 Select your base station and click Configure.
3 Enter the base station password if necessary. The default base station password is
public.
If you don’t see your base station in the Select Base Station window:
1 Open the AirPort status menu and make sure that you have joined the AirPort network
created by your base station.
2 Make sure your network and TCP/IP settings are configured properly.
Choose AirPort from the Show pop-up menu in the Network pane of System
Preferences. Then choose Using DHCP from the Configure IPv4 pop-up menu in
the TCP/IP pane.
20 Chapter 4 AirPort Extreme Network Designs
Page 22

If you can’t open the base station’s configuration:
1 Make sure your network and TCP/IP settings are configured properly.
Choose AirPort from the Show pop-up menu in the Network pane of System
Preferences. Choose Using DHCP from the Configure IPv4 pop-up menu in the
TCP/IP pane.
2 Make sure you entered the AirPort Extreme Base Station password correctly. The
default password is public. If you have forgotten the base station password, you can
reset it to public by resetting the base station.
To reset the base station password to public, press and hold the reset button for one
second.
If you are on an Ethernet network that has other base stations, or you are
using Ethernet to connect to the base station:
AirPort Admin Utility scans the Ethernet network to create the list of base stations in
the Select Base Station window. As a result, when you open AirPort Admin Utility, you
may see base stations that you cannot configure.
Setting Up the AirPort Network
The first step in configuring your base station is setting up the AirPort network it will
create. You can set up most AirPort networks using the AirPort Setup Assistant. Open
the setup assistant, located in Applications/Utilities. Follow the onscreen instructions
and enter the information from your ISP or network administrator.
To configure a network manually or set advanced options, open your base station’s
configuration in AirPort Admin Utility, located in Applications/Utilities.
1 Choose the network of the base station you want to configure from the AirPort status
menu.
2 Open AirPort Admin Utility and select the base station from the list. If you don’t see the
base station you want to configure, click Rescan to scan for available base stations, then
select the base station.
Chapter 4 AirPort Extreme Network Designs 21
Page 23
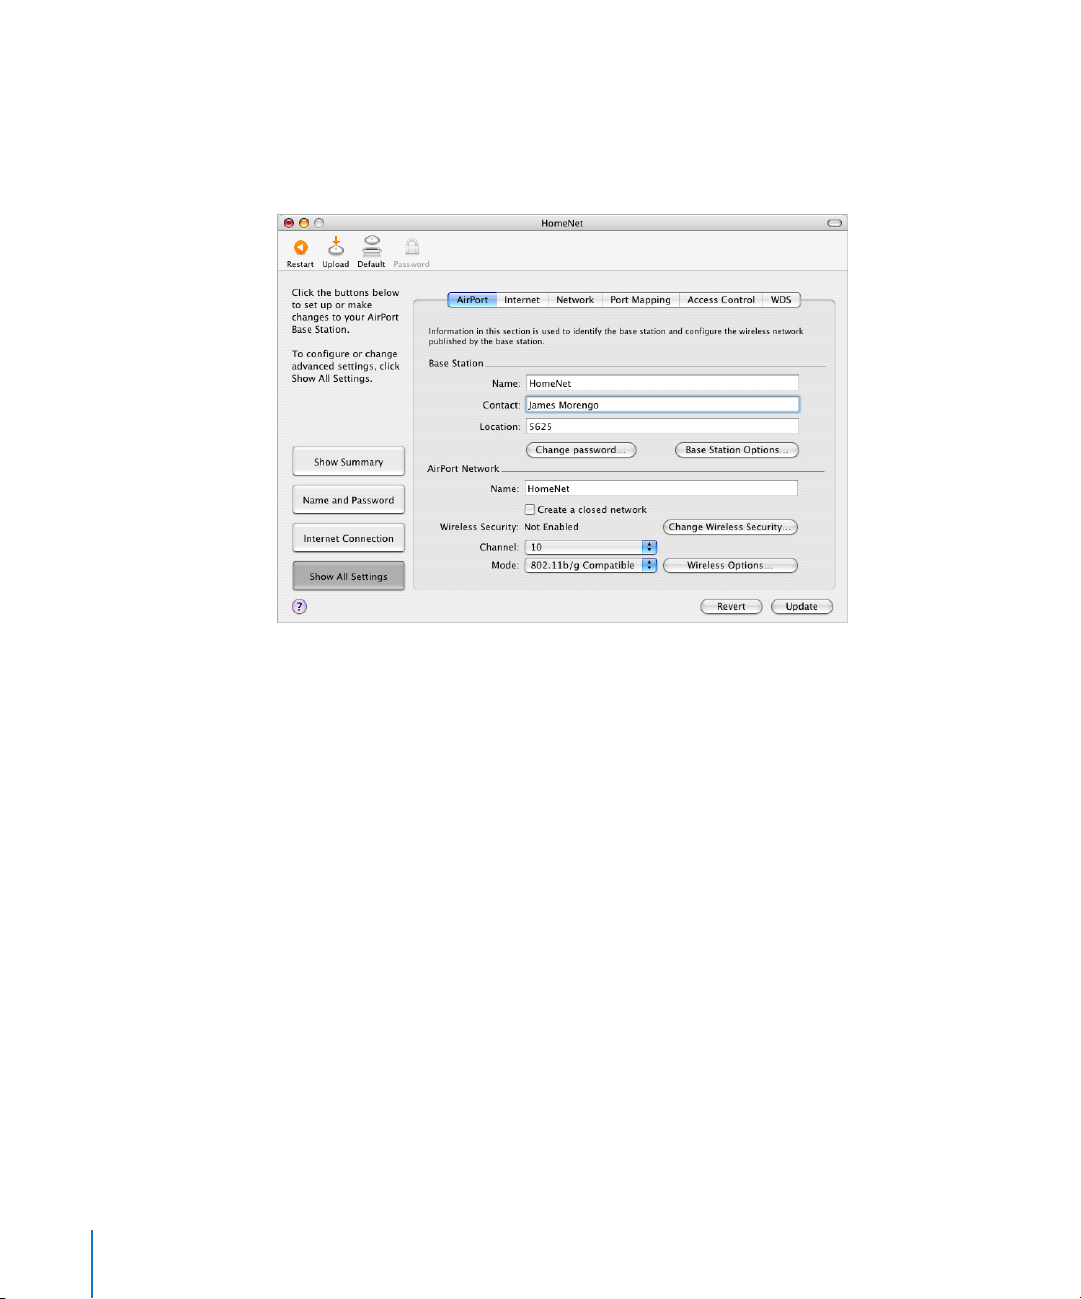
3 If you are prompted for a password, enter it, then click Configure.
When AirPort Admin Utility opens, it displays a summary of the base station’s current
settings. To enter or change settings, click Show All Settings.
Enter information in the AirPort pane.
Naming the Base Station
Give the base station an easily identifiable name. This makes it easy for administrators
to locate a specific base station on an Ethernet network with multiple base stations.
The optional Contact and Location fields may also be helpful if you have more than
one base station on your network.
Changing the Base Station Password
The base station password protects the base station configuration so that only the
administrator can modify it. The default password is public. It is a good idea to change
the base station password to prevent unauthorized changes to the base station.
If the base station password is not changed from public, you will not be prompted for a
password when you select it from the Select Base Station list and click Configure.
Naming the AirPort Network
Give your AirPort network a name. This name appears in the AirPort status menu on the
AirPort-equipped computers that are in range of your AirPort network.
22 Chapter 4 AirPort Extreme Network Designs
Page 24
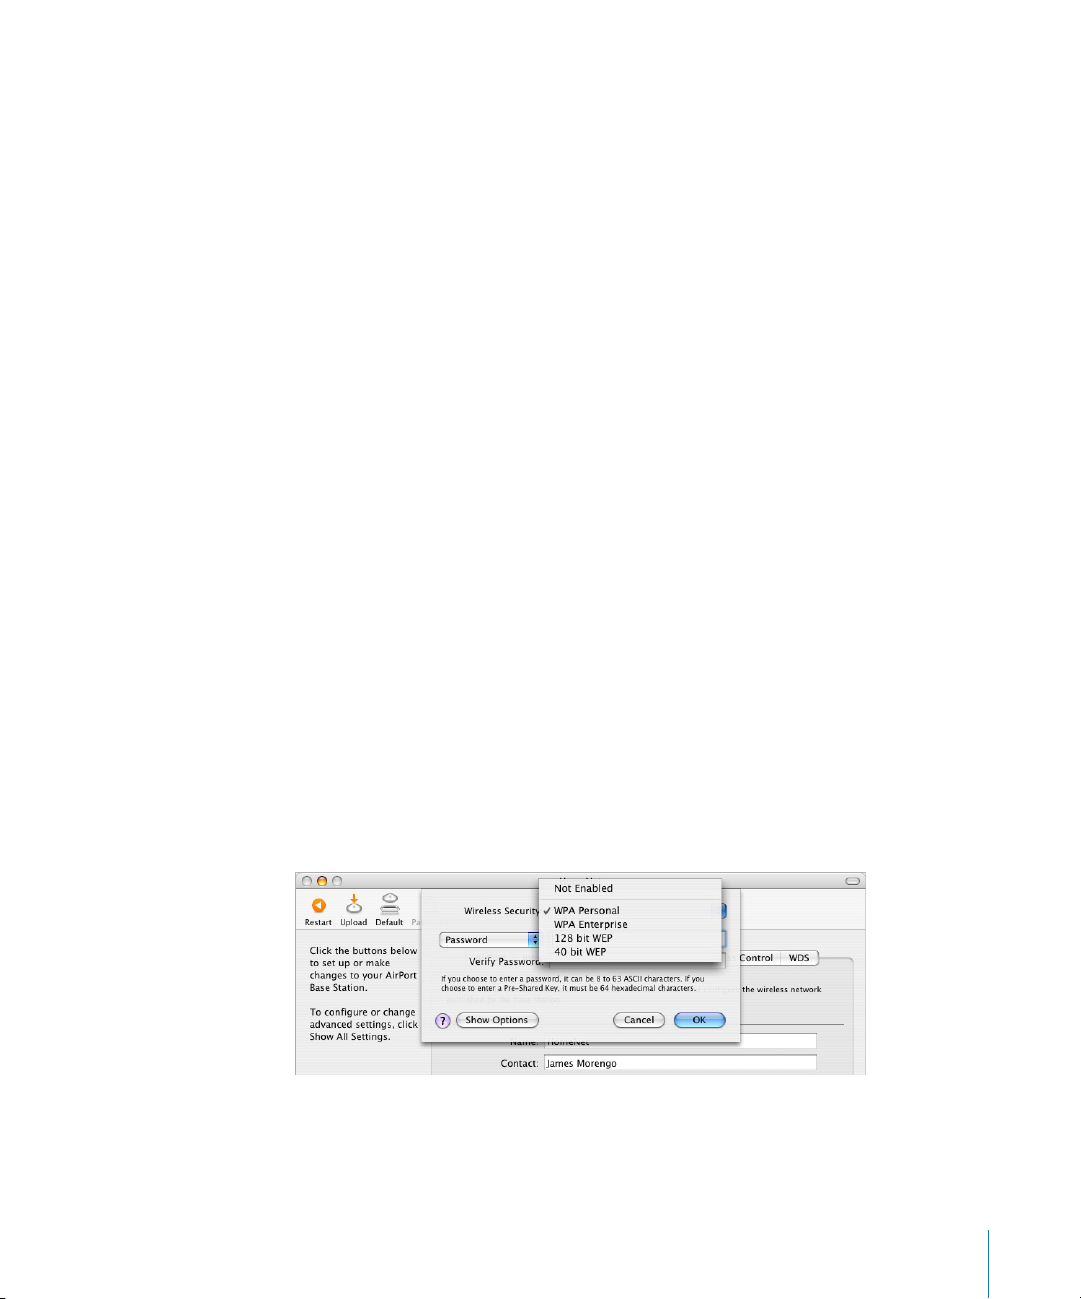
Password-Protecting Your Network
To password-protect your network, you can choose from a number of wireless security
options. In the AirPort pane of AirPort Admin Utility, click Change Wireless Security and
choose one of the following options:
• Not Enabled Choosing this option turns off all password protection for the network.
Any computer with a wireless adapter or card can join the network.
• 128 bit or 40 bit WEP Choose either of these options to protect your network with a
Wireless Equivalent Protection password. Your AirPort Extreme Base Station supports
40-bit and 128-bit encryption. Choose standard 40-bit encryption for maximum
compatibility, or choose 128-bit encryption, which provides maximum WEP security.
If you choose 128-bit encryption, only computers with 128-bit encryption-capable
wireless networking cards will be able to join your network. If you choose 40-bit
encryption, computers with 40-bit and 128-bit encryption-capable wireless
networking cards will be able to join your wireless network, but they will join with
only 40-bit encryption.
• WPA Personal Choose this option and enter a password for the wireless network.
When a wireless client enters the password correctly, the base station starts the
encryption process using TKIP.
The password you choose can be between 8 and 63 ASCII characters, or if you
choose to enter a Pre-Shared Key, it must be exactly 64 hexadecimal characters.
• WPA Enterprise Choose this option if you are setting up a network that includes a
RADIUS server. Enter the IP address and port number for the RADIUS server, and
enter a “shared secret,” which is the password for the server.
Note: WPA security features are available only to AirPort Extreme Base Stations,
AirPort and AirPort Extreme clients using Mac OS X 10.3 or later and AirPort 3.3 or
later, and clients using other 802.11 wireless adapters that support WPA.
For more information and instructions for setting up WPA on your network,
see “Using Wi-Fi Protected Access (WPA)” on page 56.
Chapter 4 AirPort Extreme Network Designs 23
Page 25

Joining a 128-Bit Encrypted Wireless Network
If you want to join a wireless network that requires 128-bit encryption, you have two
options for entering a password, depending on the password scheme the network
administrator has set up.
If you were given a password that is 13 characters, enter it exactly. Thirteen-character
passwords are usually case-sensitive.
Example: password12345
If you were given a password that is 26 characters, put a dollar sign ($) before the
password. Twenty-six-character passwords may be case-sensitive.
Example:
$12345678901234567890abcdef
If you need additional information on your 128-bit password, contact your network
administrator.
Joining a WPA Personal Network
If you want to join a wireless network that is protected by WPA Personal (also known as
Pre-Shared Key), you must enter either an ASCII password of 8 to 63 ASCII characters, or
a hexadecimal password of exactly 64 hexadecimal characters. Check with your system
administrator to find out which to use.
This is an example of an ASCII password: pass1234
This is an example of a hexadecimal password:
abcd1234abcd1234abcd1234abcd1234abcd1234abcd1234abcd1234abcd1234
Joining a WPA Enterprise Network
If you are joining a WPA Enterprise network, you were probably given an Internet
Connect configuration file that contains network settings specific to the network you
want to join. Double-click the configuration file to open it in Internet Connect. If
prompted, enter the user name and password you were given for the network, and if
necessary, choose the network from the Wireless Network pop-up menu.
Once the network settings are in Internet Connect, you should be able to choose the
WPA Enterprise network from the AirPort status menu. You may be prompted for your
user name and password.
Some authentication protocols, such as TLS, require a digital certificate to authenticate
the user before joining the network. If your network administrator gave you a digital
certificate file, open it in Keychain Access (located in Applications/Utilities),
authenticate your network credentials, and join the network.
Check with your network administrator for more information about digital certificates
and joining a WPA Enterprise network.
24 Chapter 4 AirPort Extreme Network Designs
Page 26

Changing the Channel
The “channel” is the radio frequency over which your base station communicates. If you
use only one base station (for example, at home), you probably won’t need to change
the channel frequency. If you set up multiple base stations in a school or office, use
different channel frequencies for base stations that are within approximately 150 feet of
each other.
Adjacent base stations should have at least three channels between their channel
frequencies. So if base station A is set to channel 1, base station B should be set to
channel 4 or higher.
AirPort-equipped computers automatically tune to the channel frequency your base
station is using when they join the AirPort network. If you change the channel
frequency, AirPort client computers do not need to make any changes.
Creating a Closed Network
The closed network option provides additional security by hiding the name of the
network created by the AirPort Extreme Base Station. Users must enter the exact
network name and password to join the AirPort network.
To create a closed network, select the “Create a closed network” checkbox in the
AirPort pane of the AirPort Admin Utility.
To join a closed network, users of client computers must follow these steps:
1 Click the AirPort status icon in the menu bar and choose Other from the list of available
networks.
2 Enter the name and password of the AirPort network.
Note: The AirPort Setup Assistant can’t create a connection to a base station with a
closed network. Use AirPort Admin Utility to modify the configuration of a base station
with a closed network. To use AirPort Admin Utility to set other advanced options,
see “Setting Advanced Options” on page 48.
Choosing the Network Mode
Choose 802.11b Only from the Mode pop-up menu if computers with 802.11b wireless
cards will join the network. The transmission rate of the network will be at 802.11b
speed, up to 11 megabits per second. Computers with 802.11g cards will be able to join
this network, but will join at 802.11b speed.
Choose 802.11g Only if only computers with 802.11g wireless cards will join the network.
The transmission rate of the network will be at 802.11g speed, up to 54 megabits per
second. Computers with 802.11b wireless cards will not be able to join this network.
Choose 802.11b/g Compatible if computers with either type of wireless card will join
the network. Each client computer will transmit at its highest speed.
Chapter 4 AirPort Extreme Network Designs 25
Page 27

Setting Wireless Options
Click the Wireless Options button to set the multicast rate of the network, enable
interference robustness, and adjust the transmitter power of the base station. Settings
in this pane can reduce the range of the base station and should not be modified
without good reason.
Setting the Multicast Rate
Use the “Multicast rate” pop-up menu to set the multicast rate. Increase the rate to
improve the performance of certain types of network activity, like video or audio
streaming. The increase in performance will reduce the range of the wireless network.
Enabling Interference Robustness
Select “Enable interference robustness” when the base station is in an environment
with other 2.4 Ghz devices that can interfere with your network. Devices that can cause
interference include cordless telephones, some television repeaters, and microwave
ovens. For more examples of devices that can cause interference, see “Items That Can
Cause Interference With AirPort” on page 69.
Note: Client computers using AirPort Extreme wireless cards must choose Interference
Robustness from the AirPort status menu in the menu bar to take advantage of this
feature.
Adjusting Transmitter Power
Use the Transmitter Power pop-up menu to reduce the power the base station uses
and limit the range of the base station. This may be useful in areas where many base
stations are in close proximity to each other. Client computers will need to be closer
to the base station in order to join the network it creates. Choose a milliwatt setting
from 1 to 32. The larger the number, the greater the network range.
To set more advanced security options, see “Keeping Your Network Secure” on
page 56.
26 Chapter 4 AirPort Extreme Network Designs
Page 28
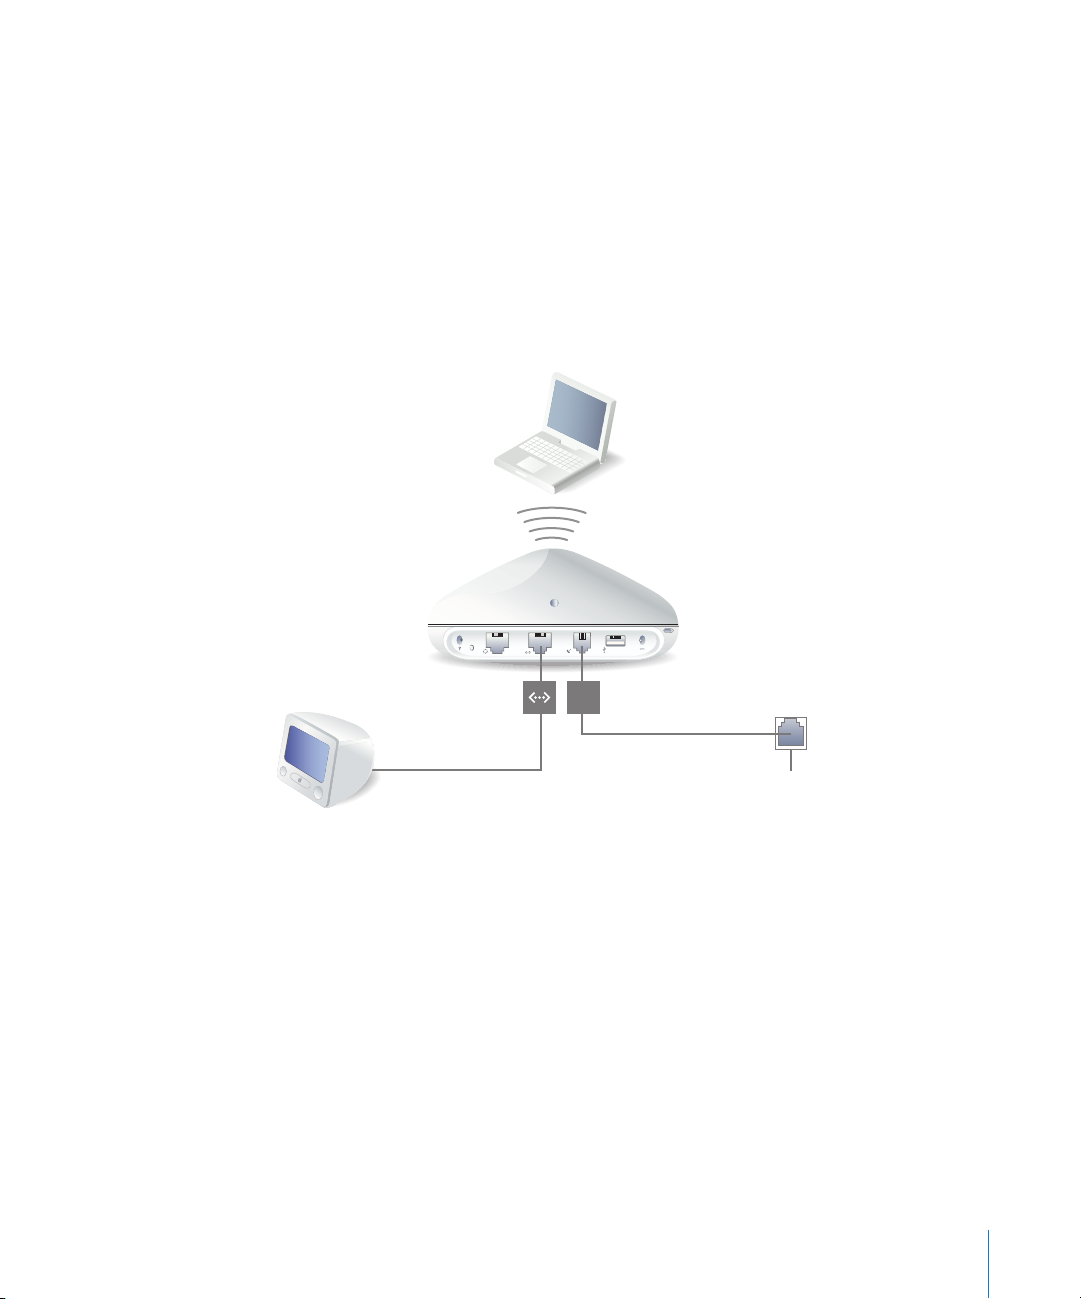
Configuring and Sharing Internet Access
The next step is setting up your base station’s Internet connection and sharing its
Internet access with client computers. The following three sections tell you what to do,
depending on how your base station connects to the Internet.
You’re Using a Dial-Up Internet Service Provider (ISP)
If your AirPort Extreme Base Station came with an internal modem, you can set up its
connection to the Internet with the AirPort Setup Assistant. You only need to use
AirPort Admin Utility to adjust optional advanced base station settings, such as port
mapping, advanced security options, or controlling access to your AirPort network.
What It Looks Like
AirPort Extreme
Base Station
W
Phone jack (to the Internet)
How It Works
• The base station connects to your ISP and the Internet using its internal modem.
• Computers using AirPort or computers connected to the base station’s Ethernet LAN
(G) port can connect to the Internet through the AirPort Extreme Base Station.
• AirPort computers and Ethernet computers communicate with one another through
the base station using AppleTalk and other networking protocols.
Chapter 4 AirPort Extreme Network Designs 27
Page 29

What You Need for a Dial-Up Connection
Components Check √ Comments
Working dial-up ISP account
using standard PPP
Make sure you have the
following:
• ISP phone number
• account name and password
• DNS address
• other information your ISP
may provide
AirPort Extreme Base Station
with an internal modem
Ethernet hub If you want to add more than
You can get this information
(except the account password)
from the Internet Connect
application and Network
preferences on the computer
you use to access the Internet.
If Network preferences on your
computer doesn’t have DNS
information, you may not need
to provide DNS information in
the AirPort Setup Assistant.
Place the base station near a
phone jack and power outlet.
one computer to your network
using Ethernet, you need an
Ethernet hub.
What to Do
If you are using the AirPort Setup Assistant to configure the AirPort Extreme
Base Station for Internet access:
1 Open the AirPort Setup Assistant, located in Applications/Utilities.
2 Select “Set up an AirPort Base Station” and follow the onscreen instructions.
3 Enter the phone number and other account information for your ISP.
28 Chapter 4 AirPort Extreme Network Designs
Page 30
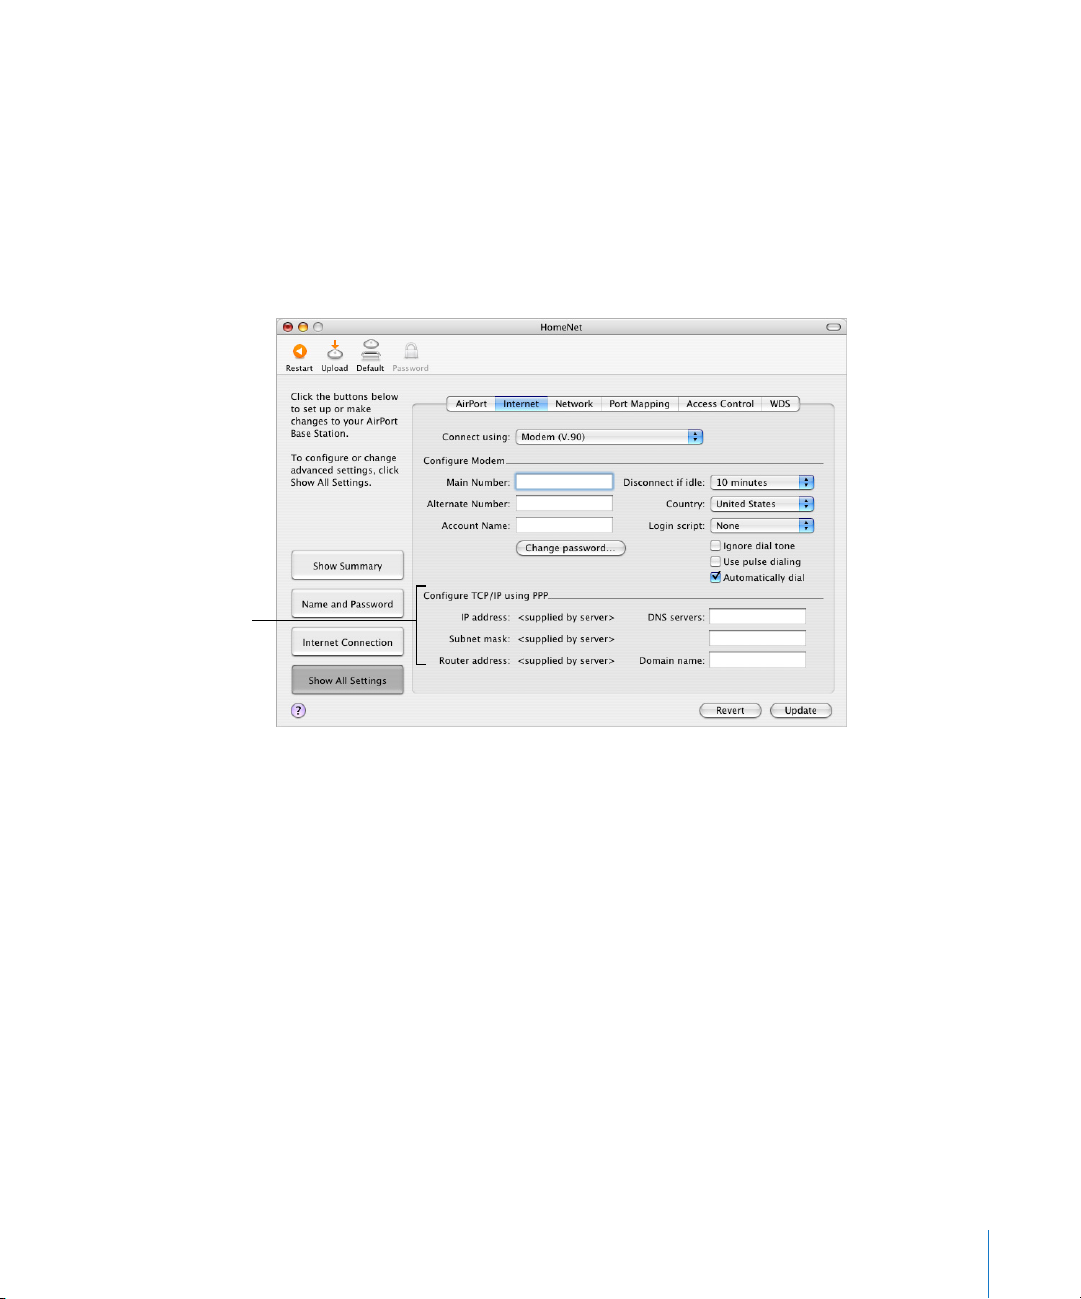
If you are using AirPort Admin Utility to configure the AirPort Extreme Base
Station for Internet access:
1 Open AirPort Admin Utility, located in Applications/Utilities. Select your base station
and click Configure.
2 Click Show All Settings.
3 Click Internet and choose Modem (V.90) from the “Connect using” pop-up menu if you
are connecting to an ISP. Enter the phone number and other account information. The
“DNS servers” and “Domain name” information may be optional; check with your ISP.
Contact your ISP for the
information you should
enter in these fields.
If you have difficulty connecting, you can try to connect at a slower modem speed
by choosing Modem (V.34) from the “Connect using” pop-up menu.
Chapter 4 AirPort Extreme Network Designs 29
Page 31
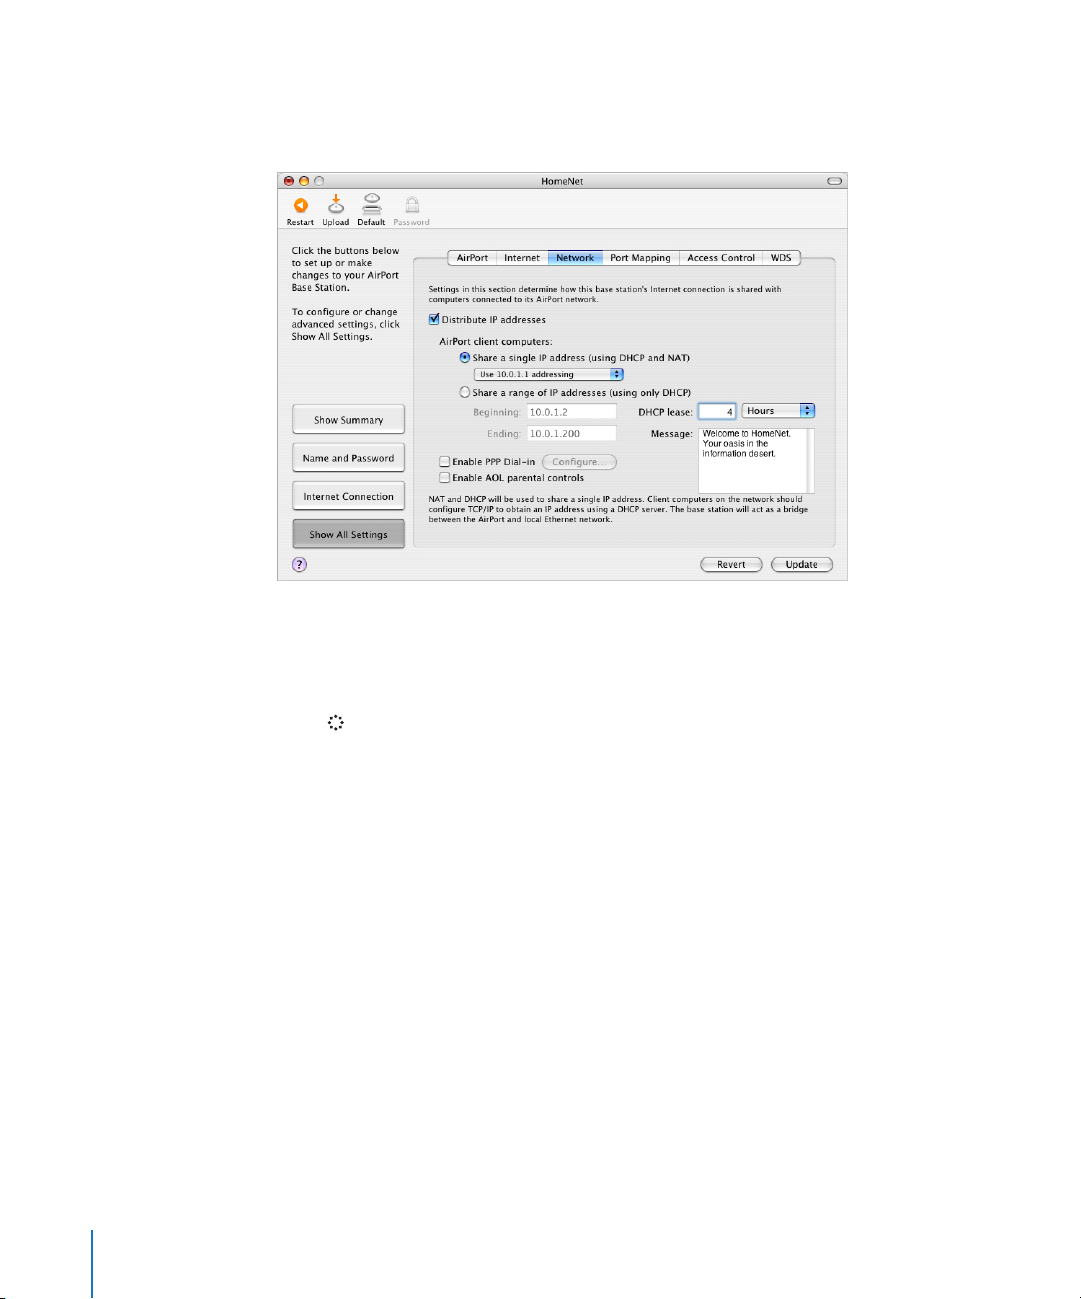
4 Click Network and configure how the base station will share its Internet access with
AirPort and Ethernet computers. Select the “Distribute IP addresses” checkbox and the
“Share a single IP address (using DHCP and NAT)” button.
By default, AirPort and Ethernet client computers share a single IP address using
Network Address Translation (NAT ). The base station acts as a bridge between the
AirPort and local Ethernet networks. When Modem is selected in the “Connect using”
pop-up menu in the Internet pane, both the Ethernet LAN (G) port and the Ethernet
WAN ( ) port are bridged, and both can share a single IP address using NAT.
Important: If you are connecting to the Internet by Ethernet or PPPoE, only the
Ethernet LAN (G) port is bridged.
Enabling NAT lets you share a single Internet connection among several computers.
Enabling DHCP lets the base station dynamically and automatically assign IP addresses
to client computers, which simplifies each computer’s TCP/IP configuration. Bridging
allows devices and computers using Ethernet and computers using AirPort to
communicate with one another.
Note: If your base station can use Power over Ethernet and receive power and the
network connection on the WAN port, by default NAT is not enabled.
5 If you want to adjust optional advanced settings, go to “Setting Advanced Options” on
page 48. If you are finished changing settings, click the Update button. Your computer
transfers the new settings to the base station. When the transfer is complete, the base
station restarts and its new settings are active.
30 Chapter 4 AirPort Extreme Network Designs
Page 32
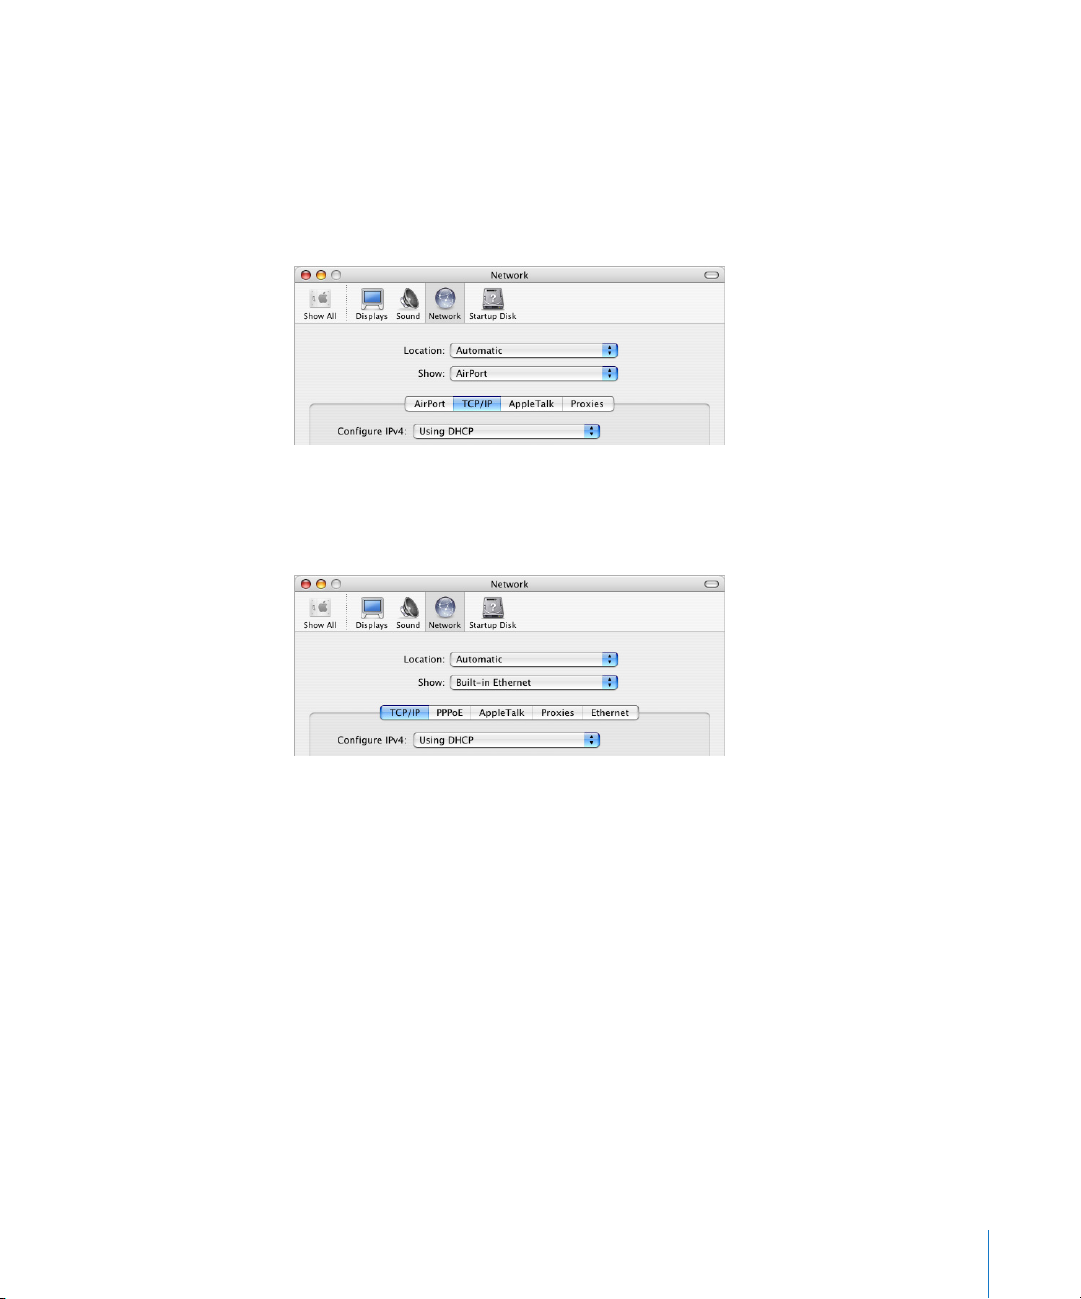
Setting Up Client Computers
To configure TCP/IP on client computers:
1 Open System Preferences on the client computer and click Network.
2 Do one of the following:
a If the client computer is using AirPort, choose AirPort from the Show pop-up menu
and Using DHCP from the Configure IPv4 pop-up menu in the TCP/IP pane.
b If you enabled a DHCP server when you set up the base station’s network, and the
client computer is using Ethernet, choose Built-in Ethernet from the Show pop-up
menu and Using DHCP from the Configure IPv4 pop-up menu in the TCP/IP pane.
Chapter 4 AirPort Extreme Network Designs 31
Page 33
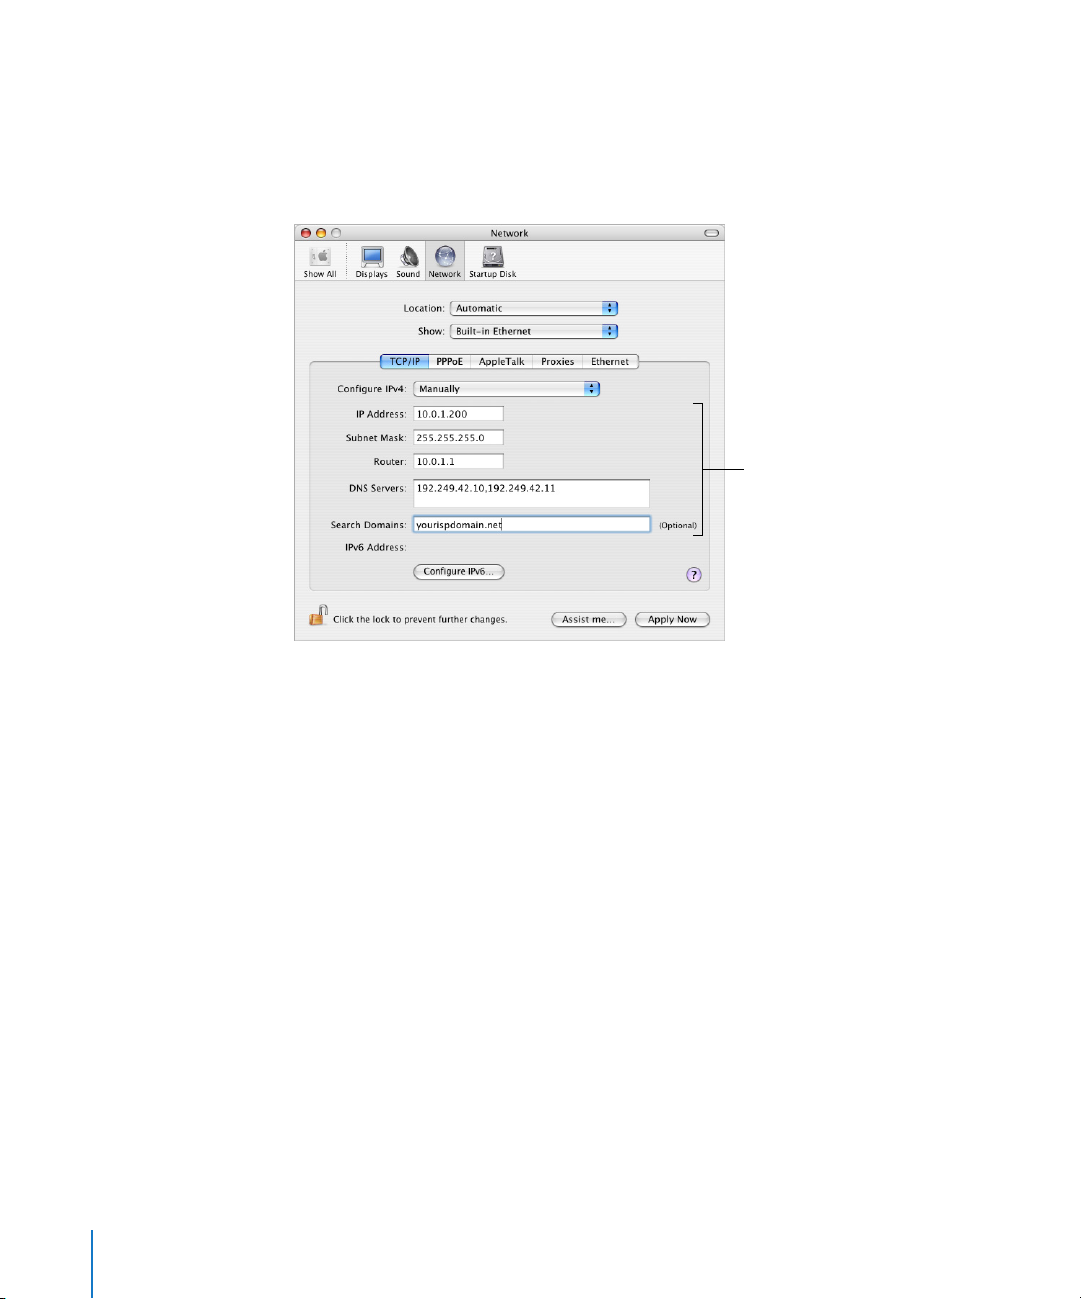
c If you selected “Share a range of IP addresses (using only DHCP)” when you set up
the base station’s network, you can provide Internet access to Ethernet client
computers by setting the client IP addresses manually. Choose Built-in Ethernet from
the Show pop-up menu, and choose Manually from the Configure IPv4 pop-up
menu.
Contact your ISP
for the information
you should enter in
these fields.
When you configure Ethernet clients manually for a base station that provides NAT
services over Ethernet, use IP addresses in the range 10.0.1.2 to 10.0.1.200, 172.16.1.2 to
172.16.1.200, or 192.168.1.2 to 192.168.1.200.
In the Subnet Mask field, enter 255.255.255.0. In the Router field, enter 10.0.1.1 ,
172 .16 .1.1, o r 192 .16 8 .1.1 , d e p ending on which addressing scheme you used. Enter the
same name server address and search domain information that you entered in the
base station configuration.
32 Chapter 4 AirPort Extreme Network Designs
Page 34
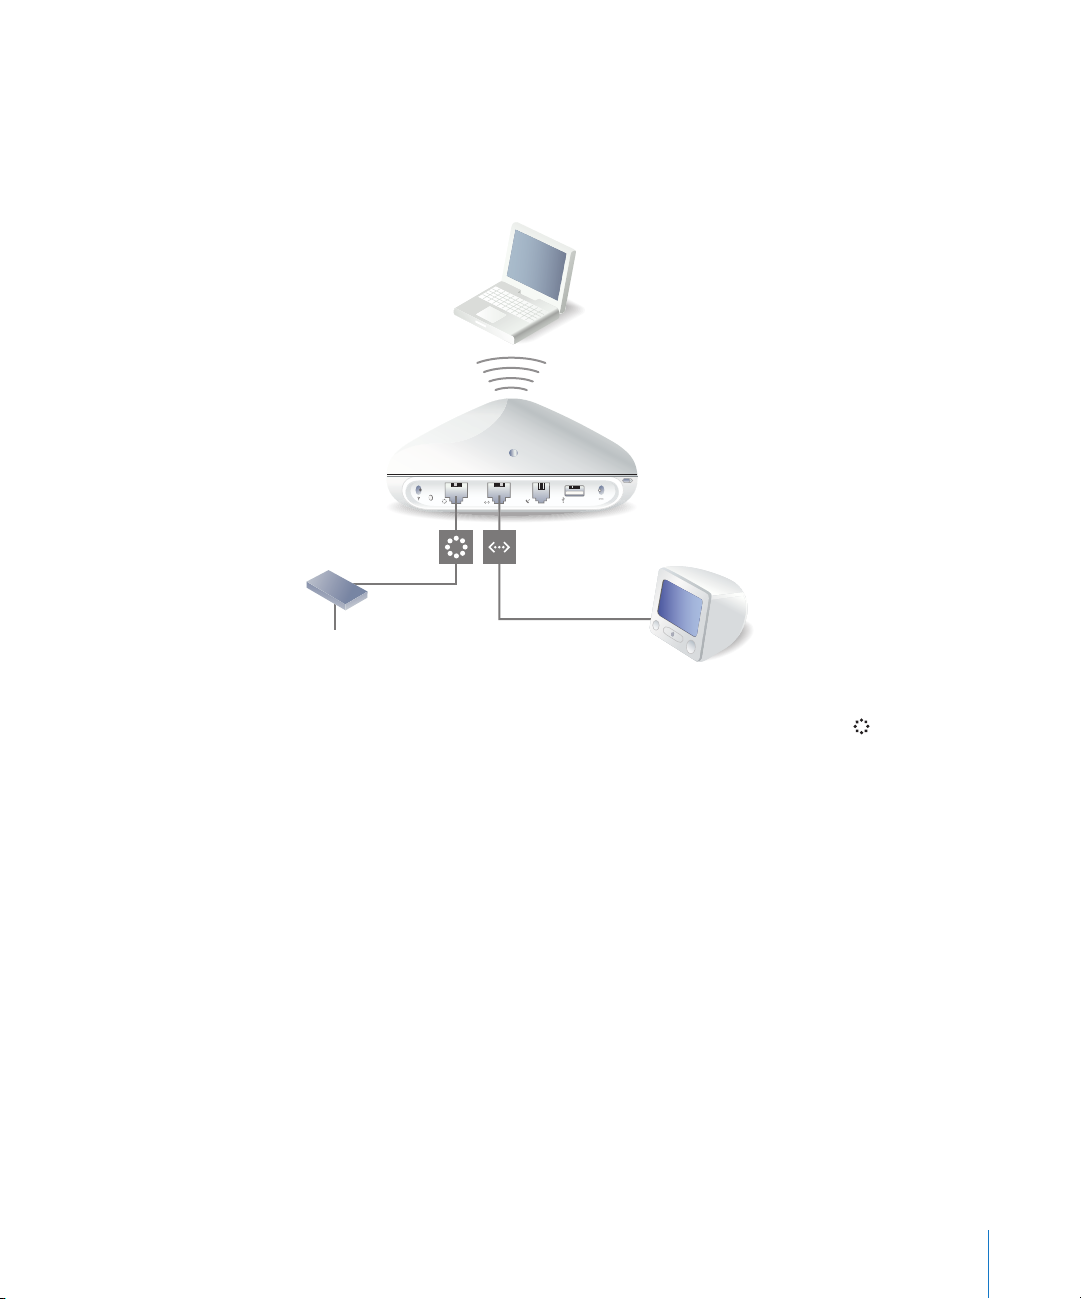
You’re Using a DSL or Cable Modem
In most cases, you can implement this network design with the AirPort Setup Assistant.
You only need to use AirPort Admin Utility to adjust optional advanced base station
settings.
What It Looks Like
AirPort Extreme
Base Station
Cable/DSL modem
To the Internet
How It Works
• The base station connects to the Internet through its Ethernet WAN ( ) connection
to your DSL or cable modem.
• Computers using AirPort or computers connected to the base station’s Ethernet LAN
(G) port connect to the Internet through the AirPort Extreme Base Station.
• AirPort computers and Ethernet computers communicate with one another through
the base station.
Important: Connect Ethernet computers that are not connected to the Internet to
the base station’s LAN (G) port only. Since the base station can provide network
services, you must set it up carefully to avoid interfering with other services on your
Ethernet network.
Chapter 4 AirPort Extreme Network Designs 33
Page 35

What You Need for a DSL or Cable Modem Connection
Components Check √ Comments
Internet account with cable
modem or DSL service provider
AirPort Extreme Base Station Place the base station near your
Ethernet hub
Does your service provider use a
static IP or DHCP configuration?
Check √
You can get this information
from your service provider or the
Network preferences pane on
the computer you use to access
the Internet through this service
provider.
DSL or cable modem.
If you want to add more than
one computer to your network
using Ethernet, you need an
Ethernet hub.
What to Do
If you are using the AirPort Setup Assistant to configure the AirPort Extreme
Base Station for Internet access:
1 Open the setup assistant, located in Applications/Utilities.
2 Select “Set up an AirPort Base Station” and follow the onscreen instructions.
3 Enter the settings for your service provider.
If you are using AirPort Admin Utility:
1 Make sure that your DSL or cable modem is connected to the Ethernet WAN ( ) port
on your base station.
2 Open AirPort Admin Utility, located in Applications/Utilities. Select your base station
and click Configure.
3 Click Show All Settings.
4 Click Internet. Choose Ethernet or “PPP over Ethernet (PPPoE)” from the “Connect using”
pop-up menu, depending on which one your service provider requires. If your service
provider gave you PPPoE connection software, such as EnterNet or MacPoET, choose
PPPoE.
Note: If you are connecting to the Internet through a router using PPPoE and your base
station is connected to the router via Ethernet, you do not need to use PPPoE on your
base station. Choose Ethernet from the “Connect using” pop-up menu in the Internet
pane, and deselect the “Distribute IP addresses” checkbox in the Network pane. Contact
your service provider if you aren’t sure which one to select.
34 Chapter 4 AirPort Extreme Network Designs
Page 36
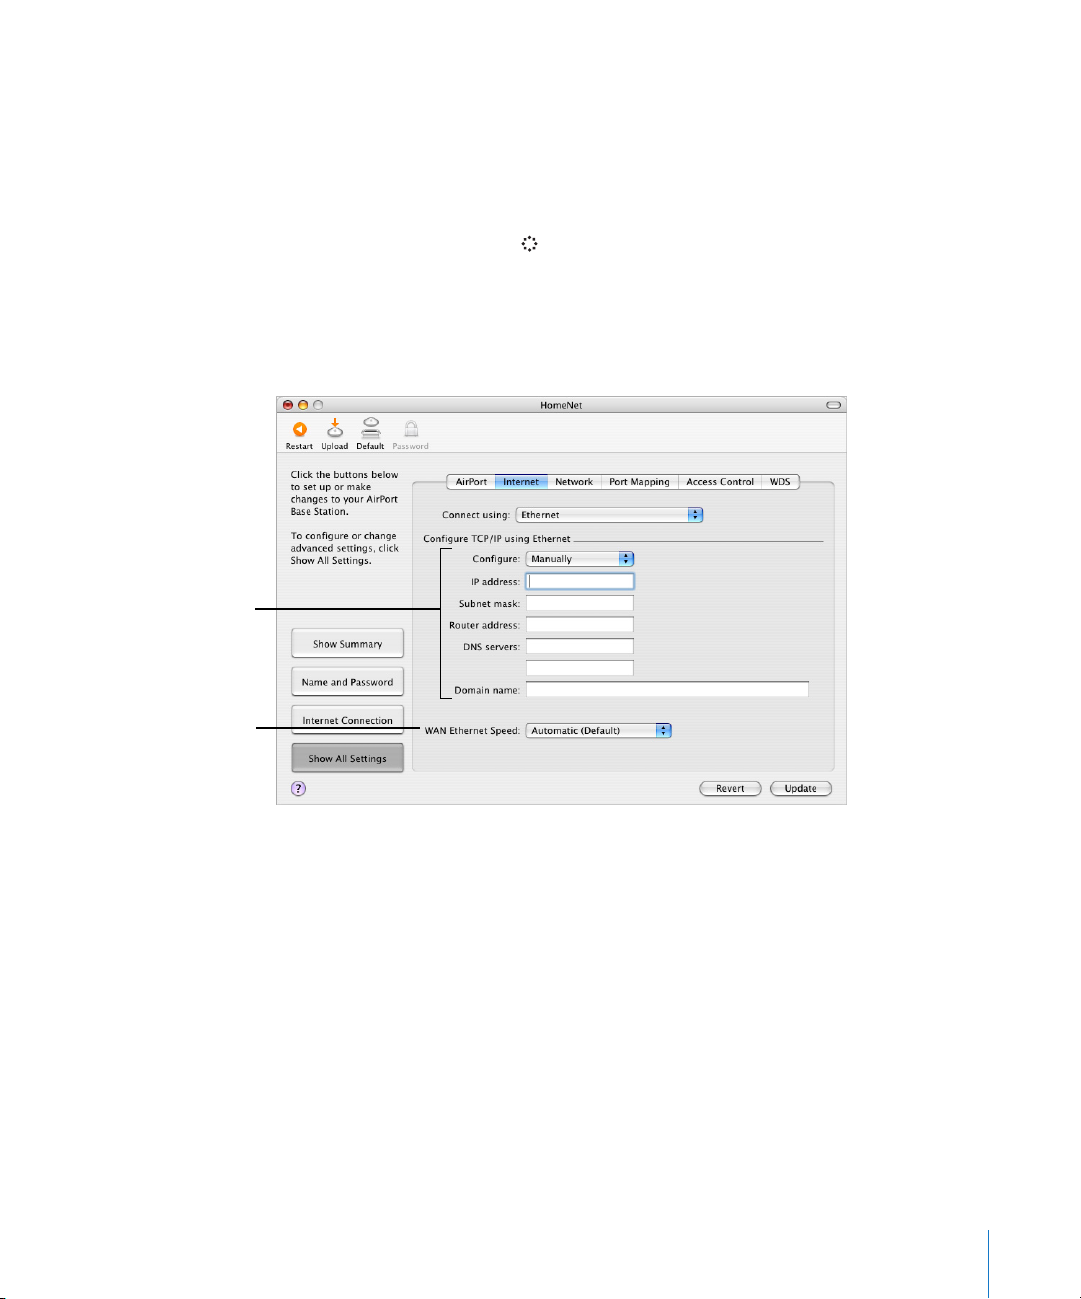
Contact your service
provider for the
information you should
enter in these fields.
5 If you chose Ethernet from the “Connect using” pop-up menu, choose Manually or
Using DHCP from the Configure pop-up menu, depending on how your service
provider provides IP addresses. If your provider gave you an IP address and other
numbers with your subscription, use that information to configure the base station IP
address manually. If you aren’t sure, ask your service provider.
If your service provider asks you for the MAC address of your base station, use the
address of the Ethernet WAN ( ) port, printed on the label on the bottom of the base
station.
If you configure TCP/IP manually, choose Manually from the Configure pop-up menu
and enter your own IP address information in the fields below the Configure pop-up
menu.
Use this pop-up menu
if you need to adjust
the speed of the
Ethernet WAN port.
If you have already used the AirPort Setup Assistant to set up your AirPort Extreme Base
Station, the fields below the Configure pop-up menu may already contain the
information appropriate for your service provider.
You can change the WAN Ethernet speed if you have specific requirements for the
network you are connected to. In most cases, the settings that are configured
automatically are correct. Your service provider should be able to tell you if you need
to adjust these settings.
Changing the WAN Ethernet speed can affect the way the base station interacts with
the Internet. Unless your service provider has given you specific settings, use the
automatic settings. Entering the wrong settings can affect network performance.
Chapter 4 AirPort Extreme Network Designs 35
Page 37
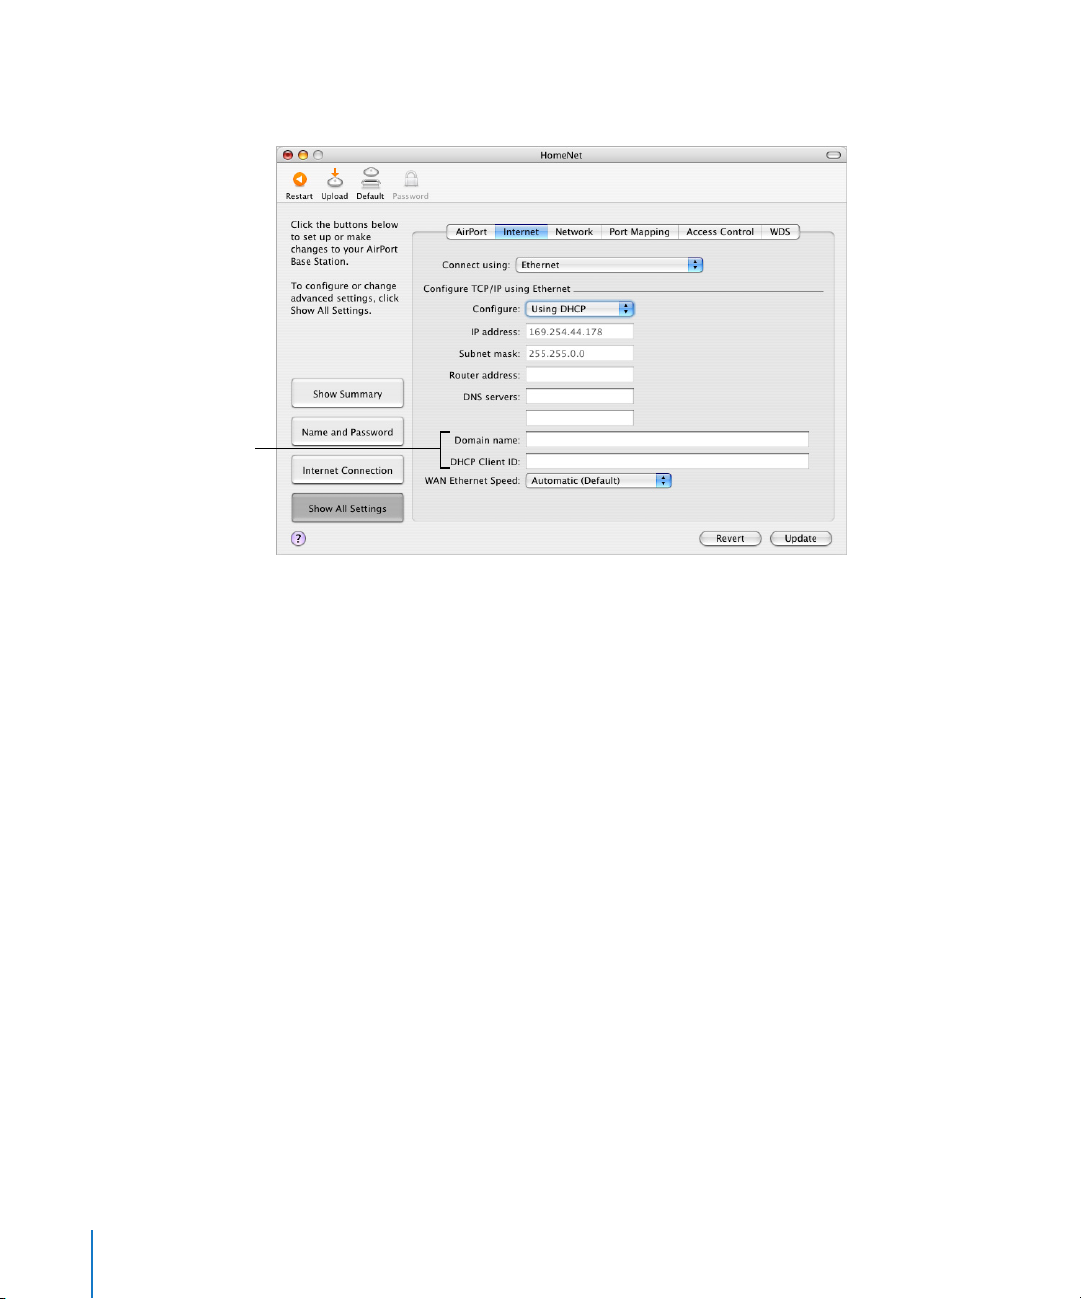
Your service provider
may require you to
enter information
in these fields.
If you configure TCP/IP using DHCP, choose Using DHCP from the Configure pop-up
menu. Your IP addresses are delivered by the DHCP server.
36 Chapter 4 AirPort Extreme Network Designs
Page 38
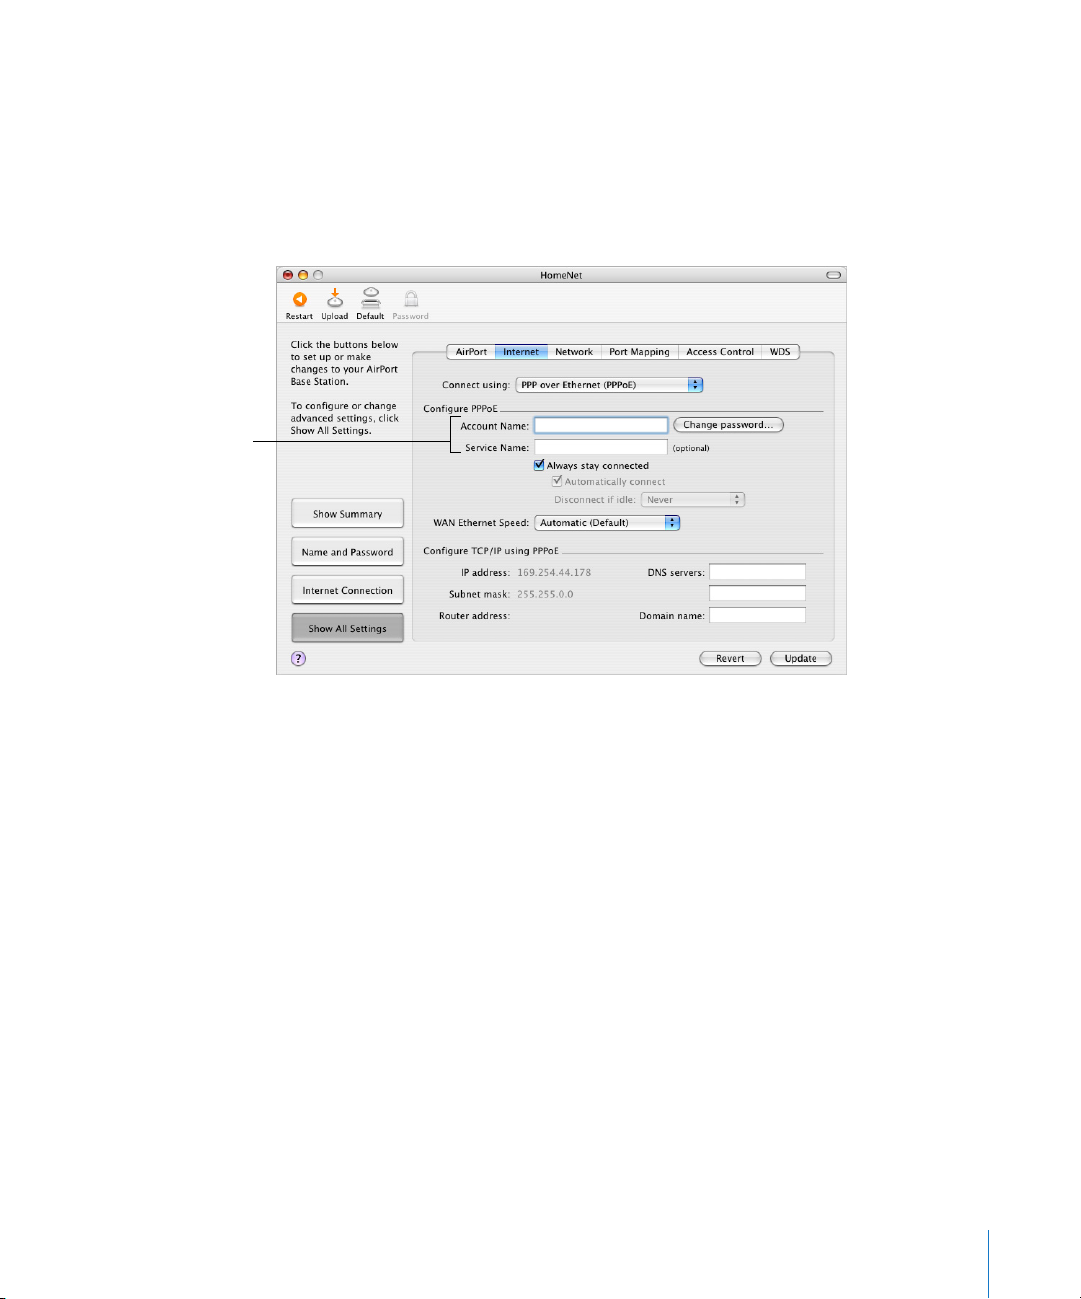
for the information
6 If you chose “PPP over Ethernet (PPPoE)” from the “Connect using” pop-up menu, enter
the PPPoE settings your service provider gave you. Leave the Service Name field blank
unless your service provider requires a service name. Contact your ISP for the
information to enter in the “DNS servers” and “Domain name” fields.
Note: With AirPort, you don’t need to use a third-party PPPoE connection application.
You can connect to the Internet using AirPort.
Contact your
service provider
you should enter
in these fields.
If you are connecting to the Internet through a router using PPPoE and your base
station is connected to the router via Ethernet, you do not need to use PPPoE on your
base station. Choose Ethernet from the “Connect using” pop-up menu in the Internet
pane, and deselect the “Distribute IP addresses” checkbox in the Network pane.
Chapter 4 AirPort Extreme Network Designs 37
Page 39
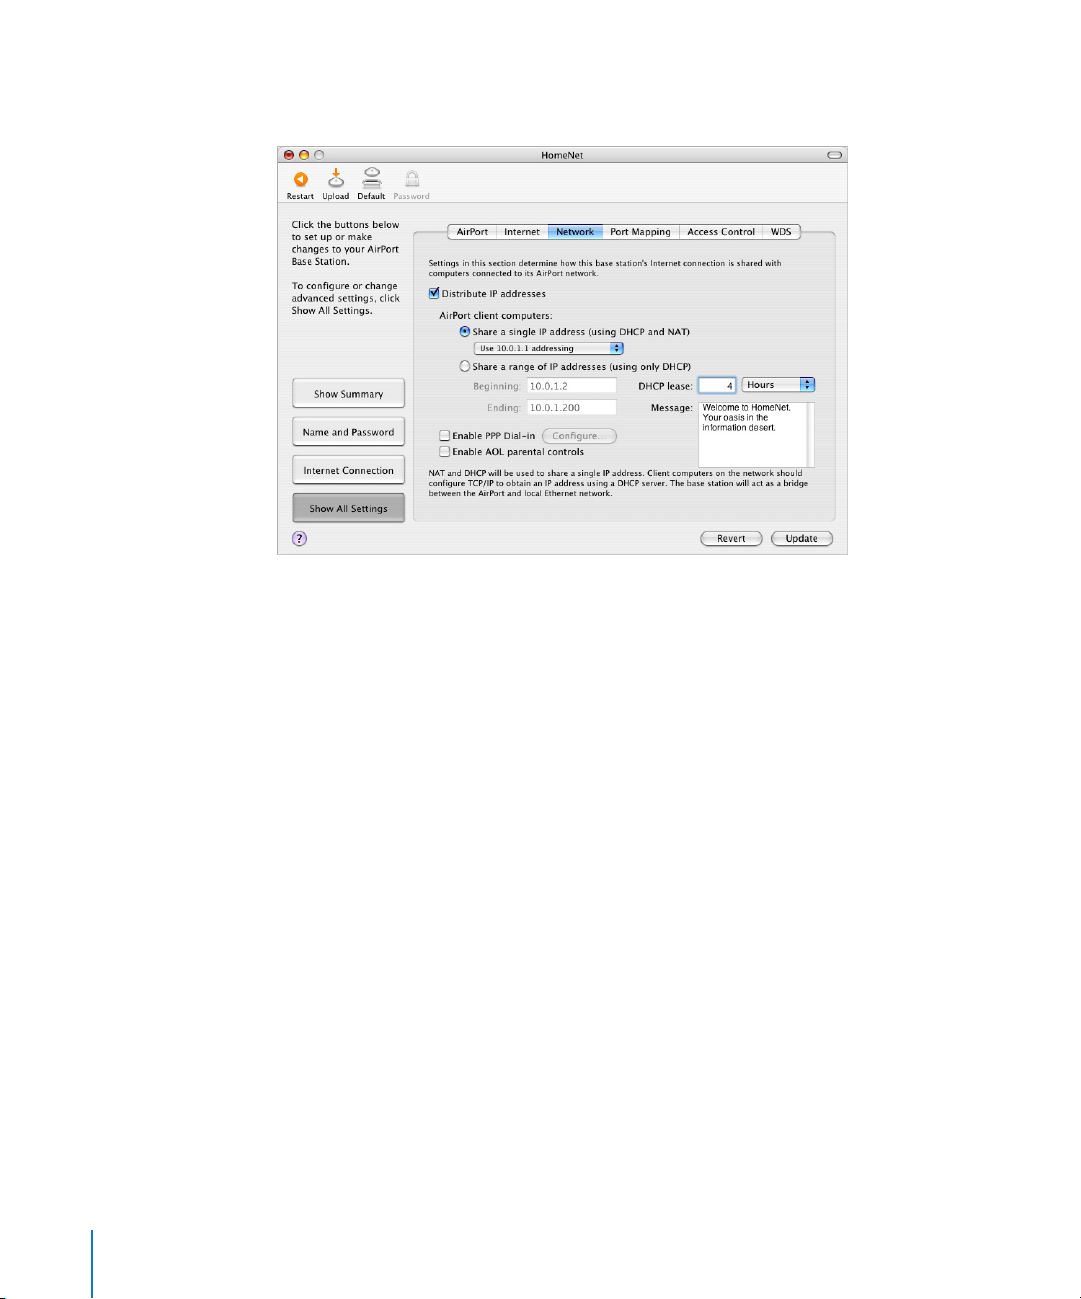
7 Click the Network button and configure how the base station will share its Internet
access with AirPort and Ethernet computers.
• To share a single Internet connection with AirPort computers, make sure “Distribute
IP addresses” and “Share a single IP address (using DHCP and NAT)” are selected. If
you have been given a range of public IP addresses by your ISP, you can select the
“Share a range of IP addresses (using only DHCP)” option.
• If you want to connect an AppleTalk Ethernet printer to the base station or use
AppleTalk between wired and wireless computers, make sure the devices are
connected to the Ethernet LAN (G) port on the base station.
• Ethernet computers connected to the Ethernet LAN (G) port share Internet access
and a single IP address (using NAT).
• Enabling NAT lets you share a single Internet connection among several computers.
Enabling DHCP lets the base station dynamically and automatically assign IP
addresses to client computers, which simplifies each computer’s TCP/IP
configuration. By default, the base station allows devices and computers using
Ethernet and computers using AirPort to communicate with one another using
non-IP protocols like AppleTalk.
• If you want to use the parental controls you have set up with your America Online
(AOL) account, select the “Enable AOL parental controls” checkbox. This will copy the
parental controls to your base station.
• If you want people joining your AirPort network to be greeted with a personal
message, type it in the Message field.
38 Chapter 4 AirPort Extreme Network Designs
Page 40
• If your base station has an internal modem, select “Enable PPP Dial-in” to allow you
to dial in to the AirPort Extreme Base Station from a computer modem over a
standard, analog phone line. Dialing in to your base station gives you access to your
home network and the Internet through your home network Internet service
provider (ISP).
To set up your base station for PPP dial-in:
a Connect a phone line to the modem (W) port on your base station.
b In the Network pane of AirPort Admin Utility, select “Enable PPP Dial-in” and
click Configure.
c Enter the user name and password, and set other options.
Because you set the base station to answer incoming calls, consider using a
dedicated phone line for your base station. Other calls coming in on the same line
could cause the base station modem to disconnect.
You cannot enable PPP dial-in if the base station is set up to use a PPP connection to
your Internet service provider.
With PPP dial-in enabled, the base station is set to share a single IP address (using
DHCP and NAT) only; it cannot share a range of IP addresses (using only DHCP).
Note: If you dial in to your base station from a V.90 modem, the best speed you can
expect is the V.34 speed of 33600 bits per second (bps). This is a limitation of the V.90
standard and is not caused by a problem with your modem or base station.
8 If you want to adjust optional advanced settings, go to “Setting Advanced Options” on
page 48. If you are finished changing settings, click the Update button. Your computer
transfers the new settings to the base station. When the transfer is complete, the base
station restarts and its new settings are active.
Setting Up Client Computers
To configure TCP/IP on client computers:
1 Open System Preferences on the client computer and click Network.
2 Do one of the following:
a If the client computer is using AirPort, choose AirPort from the Show pop-up menu
and Using DHCP from the Configure IPv4 pop-up menu in the TCP/IP pane.
Chapter 4 AirPort Extreme Network Designs 39
Page 41
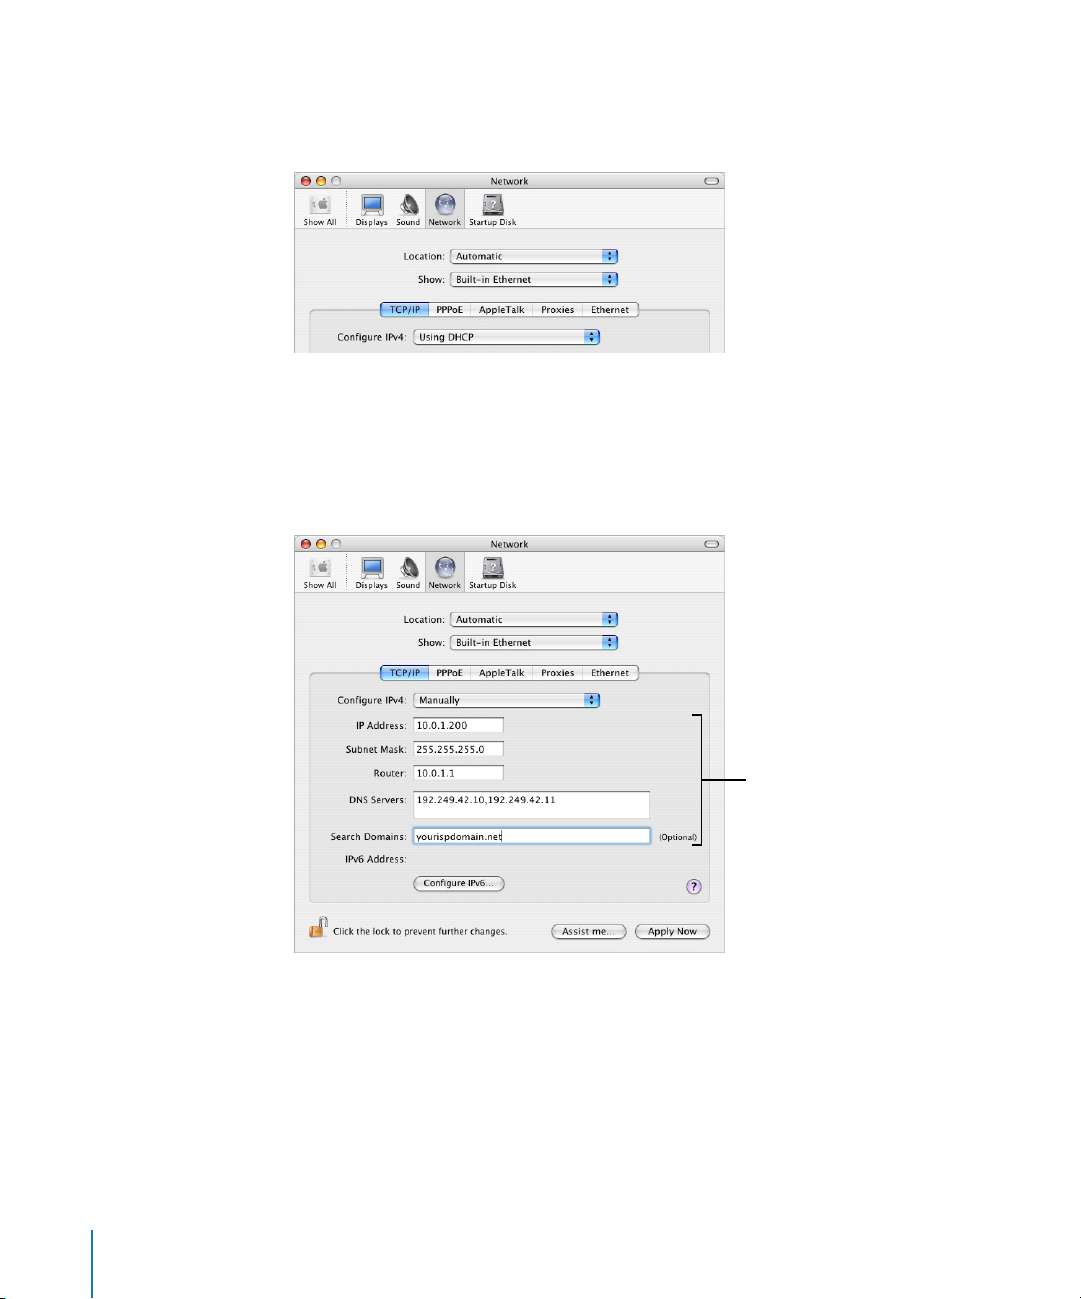
b If you enabled a DHCP server when you set up the base station’s network, and the
client computer is using Ethernet, choose Built-in Ethernet from the Show pop-up
menu and Using DHCP from the Configure IPv4 pop-up menu in the TCP/IP pane.
c If you selected “Share a range of IP addresses (using only DHCP)” when you set
up the base station’s network, you can provide Internet access to Ethernet client
computers by setting the client IP addresses manually. Choose Built-in Ethernet
from the Show pop-up menu, and choose Manually from the Configure IPv4
pop-up menu.
When you configure Ethernet clients manually for a base station that provides
NAT over Ethernet, you can use IP addresses in the range 10.0.1.2 to 10.0.1.200.
In the Subnet Mask field, enter 255.255.255.0. In the Router field, enter 10.0.1.1.
Enter the same name server address and search domain information that you
entered in the base station configuration.
40 Chapter 4 AirPort Extreme Network Designs
Contact your ISP for
the information you
should enter in these
fields.
Page 42
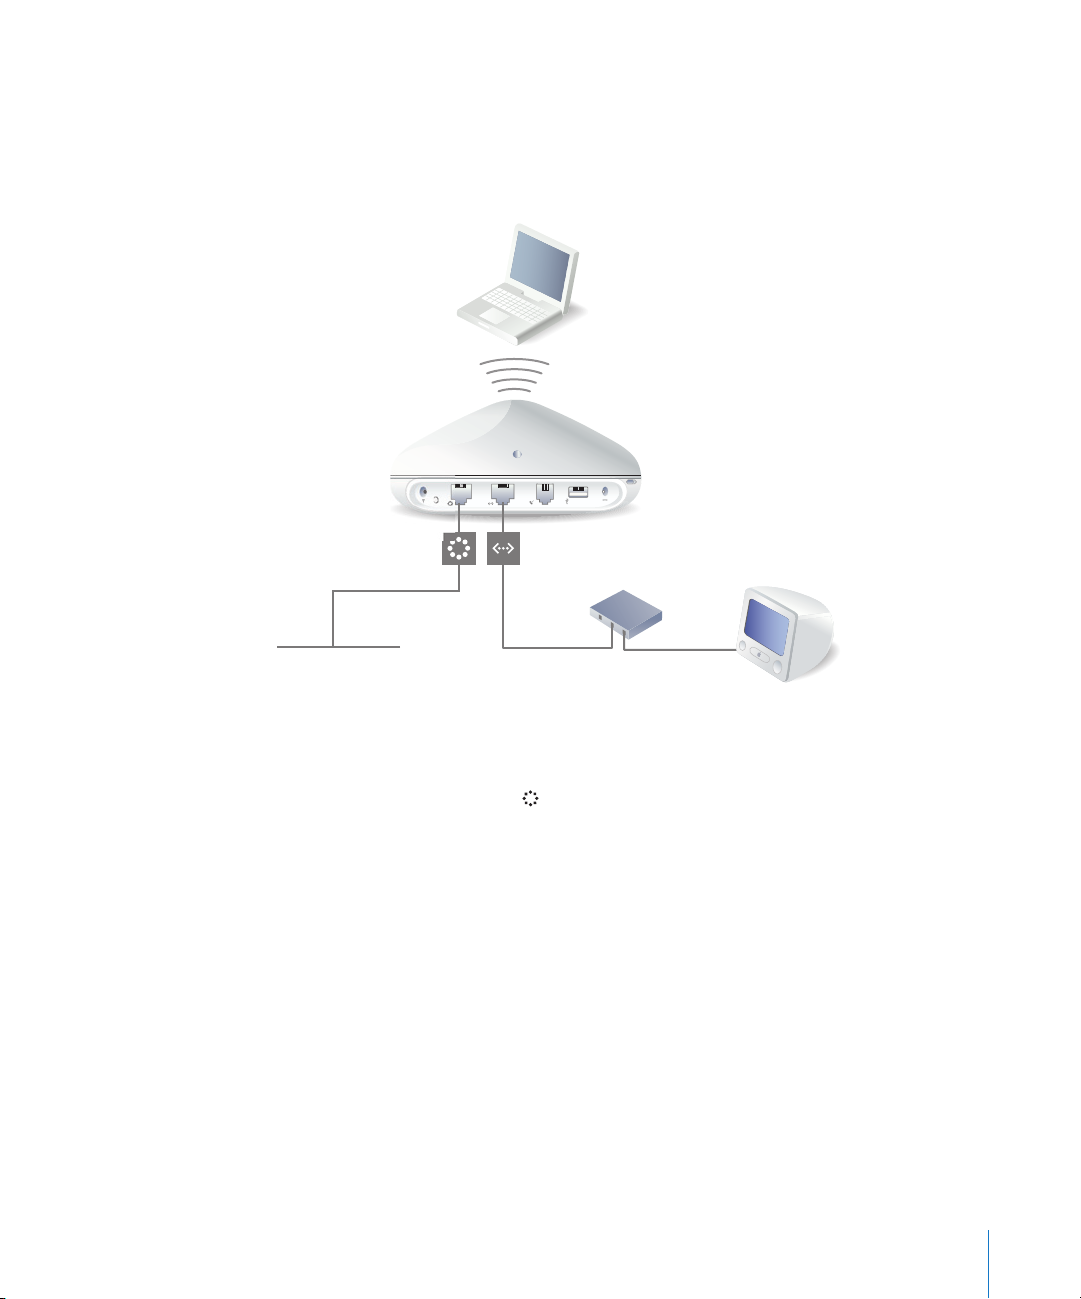
You’re Using an Existing Ethernet Network
You can use the AirPort Setup Assistant to set up the base station for Internet access
through an existing Ethernet network. Use AirPort Admin Utility if you need to adjust
optional advanced base station settings.
What It Looks Like
AirPort Extreme
Base Station
To the Internet via
an Ethernet network
Ethernet hub
How It Works
• The base station uses your Ethernet network to communicate with the Internet
through the Ethernet WAN ( ) port.
• AirPort and Ethernet clients access the Internet and the Ethernet network through
the AirPort Extreme Base Station.
Chapter 4 AirPort Extreme Network Designs 41
Page 43

What You Need for an Ethernet Connection
Components Check √ Comments
AirPort Extreme Base Station
Ethernet hub If you want to add more than
one computer to your AirPort
network using Ethernet, you
need an Ethernet hub.
If you use an Ethernet hub, make
sure you connect the cable from
your Ethernet network to the
hub’s uplink port. Do not
connect the AirPort Extreme
Base Station to the uplink port.
Ethernet cables
What to Do
If you are using the AirPort Setup Assistant to set up a base station on an
existing Ethernet network:
1 Open the setup assistant, located in Applications/Utilities.
2 Select “Set up an AirPort Base Station” and follow the onscreen instructions.
3 Enter the account information you were given by your service provider or network
administrator.
If you are using AirPort Admin Utility:
1 Open AirPort Admin Utility, located in Applications/Utilities.
2 Select your base station and click Configure.
3 Click Show All Settings.
42 Chapter 4 AirPort Extreme Network Designs
Page 44
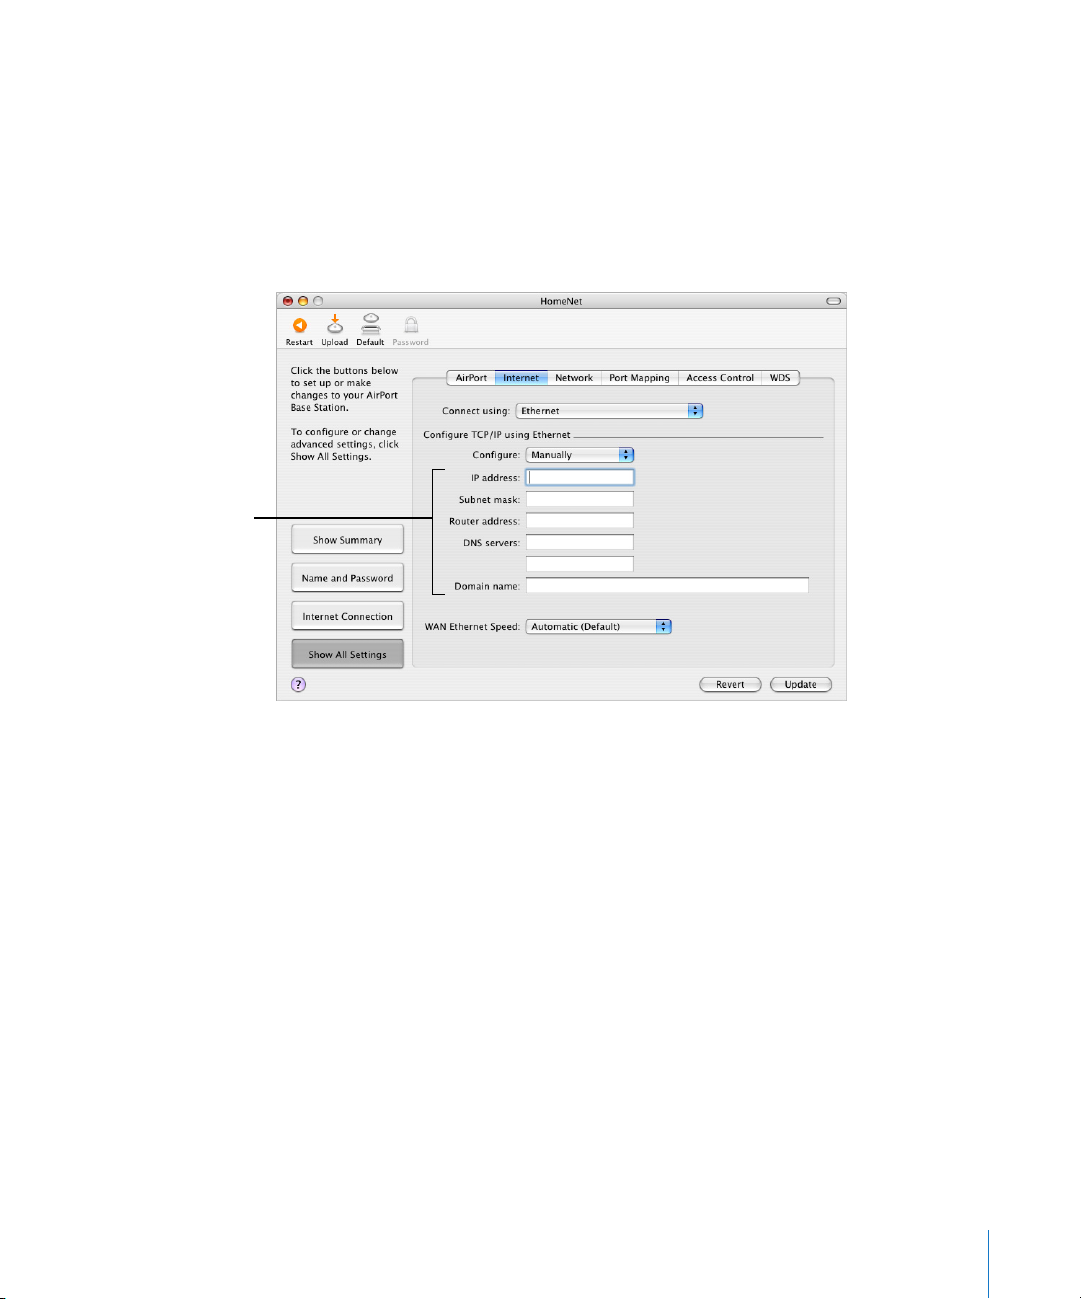
Contact your network
administrator for the
information you should
enter in these fields.
4 Click Internet and choose Ethernet from the “Connect using” pop-up menu.
5 Choose Manually or Using DHCP from the Configure pop-up menu, depending on how
IP addresses are provided on your Ethernet network. If you aren’t sure, ask your service
provider or network administrator.
If your addresses are provided manually, choose Manually from the Configure pop-up
menu. Enter your IP address information in the fields below the Configure pop-up
menu.
If you have already used the AirPort Setup Assistant to set up your AirPort Extreme Base
Station, the fields below the Configure pop-up menu may already contain the
appropriate information.
Chapter 4 AirPort Extreme Network Designs 43
Page 45
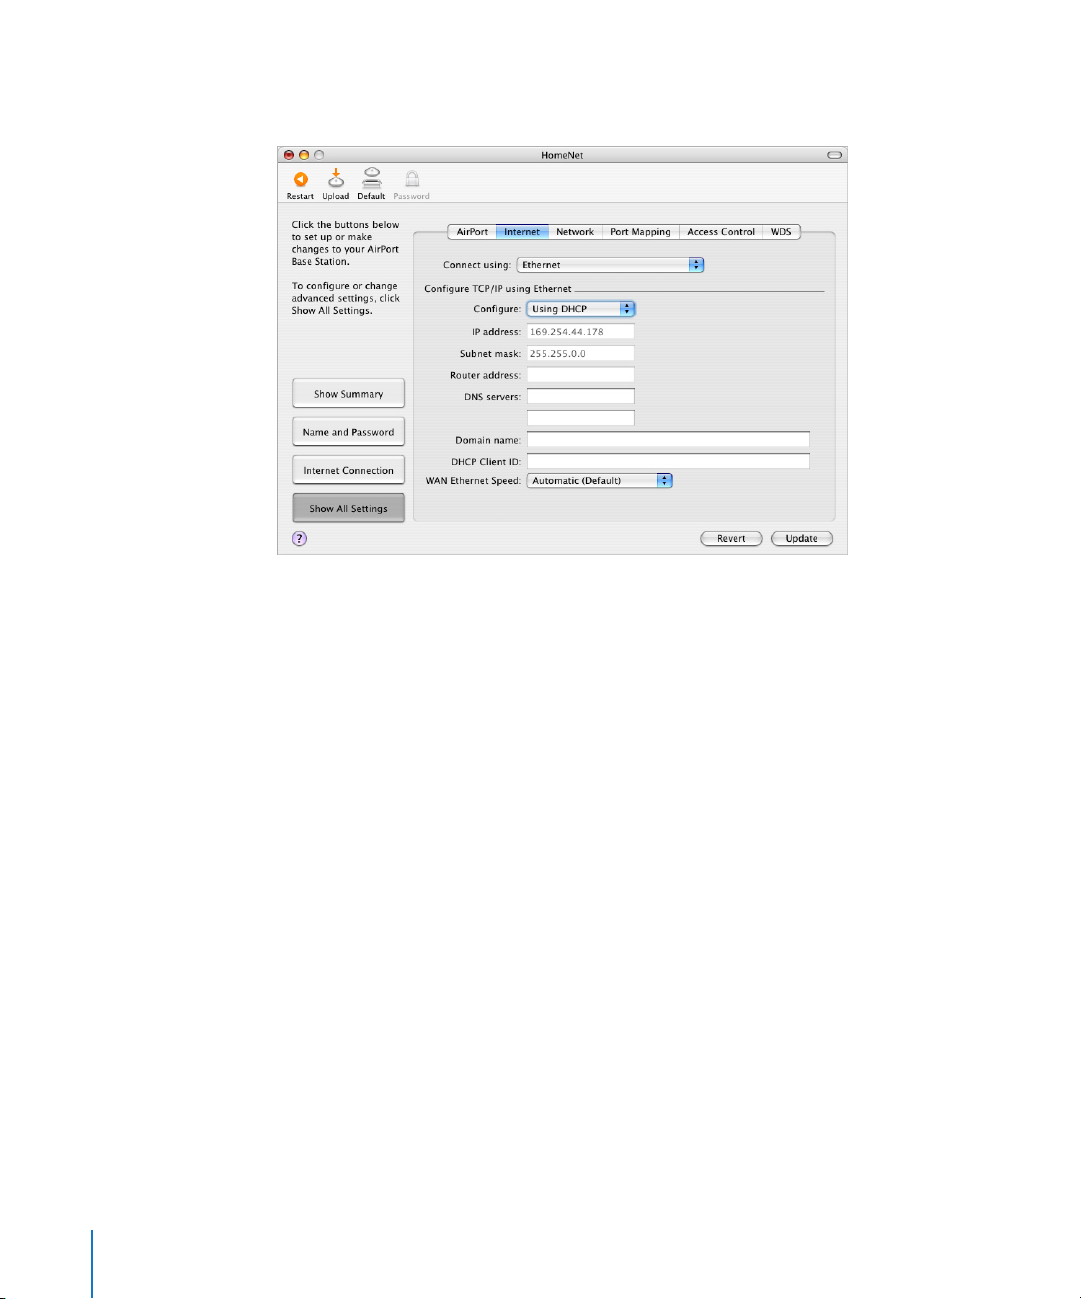
If your IP address is provided by DHCP, choose Using DHCP from the Configure
pop-up menu.
44 Chapter 4 AirPort Extreme Network Designs
Page 46
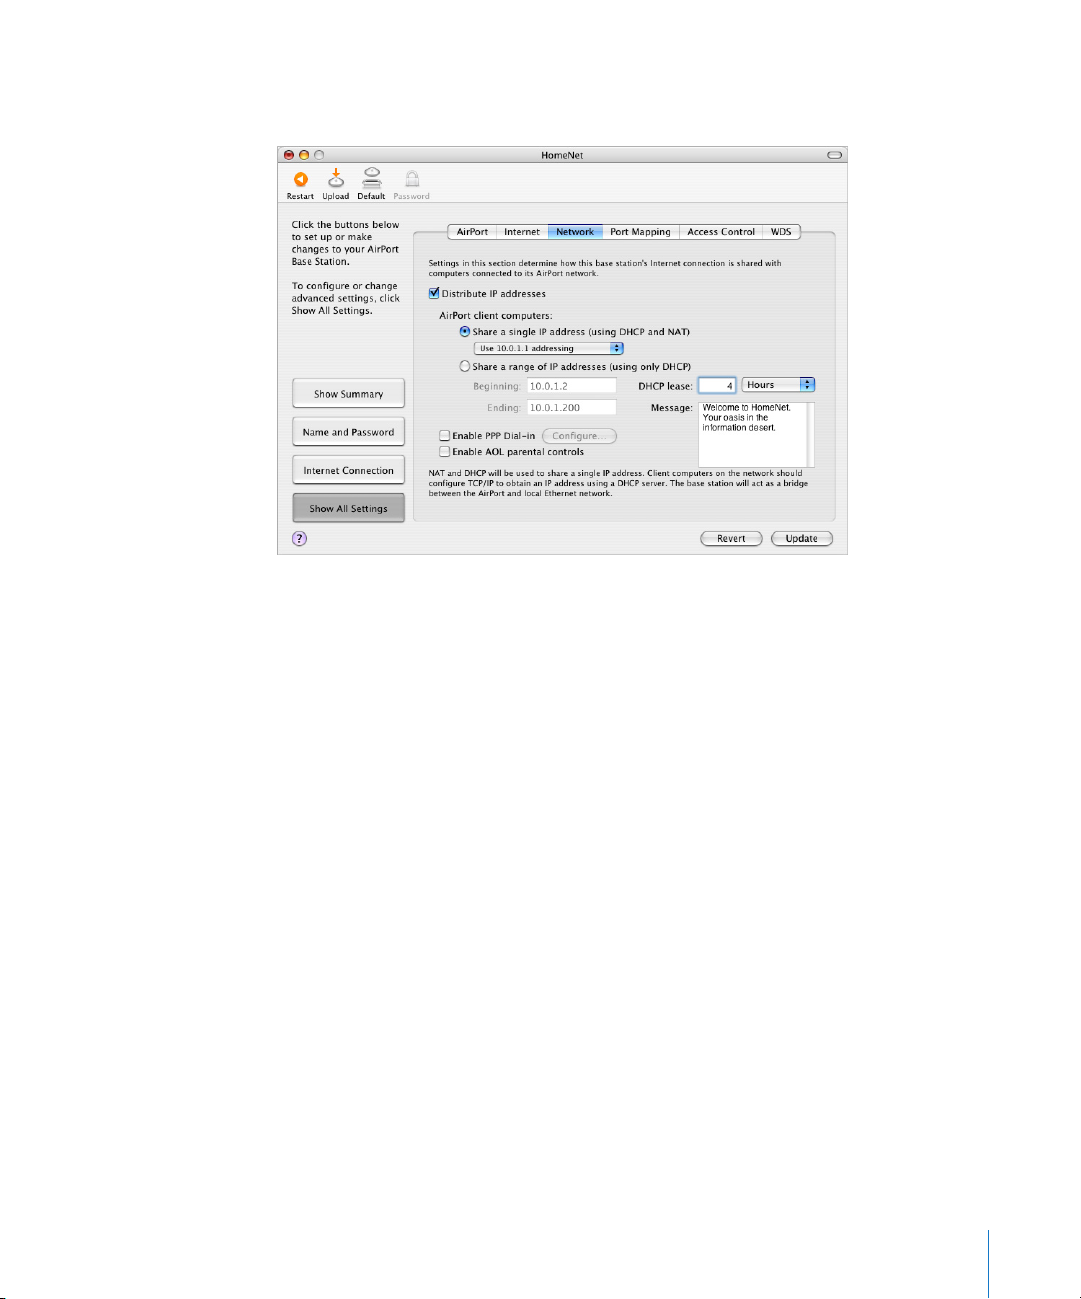
6 Click the Network button and select how the base station will share its Internet access
with AirPort and Ethernet computers.
• If you want to use the base station to share a single IP address, click the “Distribute
IP addresses” checkbox and the “Share a single IP address (using DHCP and NAT)”
button.
• If you want to share a range of public IP addresses, click the “Share a range of IP
addresses (using only DHCP)” button.
• If you don’t want the base station to provide IP addresses (using DHCP or NAT) to
AirPort computers, see “Using the AirPort Extreme Base Station as a Bridge” on
page 48.
Important: Since the base station can provide network services, you must set it up
carefully to avoid interfering with other services on your Ethernet network.
• If you want to use the parental controls you have set up with your America Online
(AOL) account, select the “Enable AOL parental controls” checkbox. This will copy the
parental controls to your base station. For more information, contact AOL.
Chapter 4 AirPort Extreme Network Designs 45
Page 47
• If your base station has an internal modem, select “Enable PPP Dial-in” to allow you
to dial in to the AirPort Extreme Base Station from a computer modem over a
standard, analog phone line. Dialing in to your base station gives you access to your
network and the Internet through your network’s Internet service provider (ISP).
To set up your base station for PPP dial-in:
a Connect a phone line to the modem (W) port on your base station.
b In the Network pane of AirPort Admin Utility, select “Enable PPP Dial-in” and click
Configure.
c Enter the user name and password, and set other options.
Because you set the base station to answer incoming calls, consider using a
dedicated phone line for your base station. Other calls coming in on the same line
could cause the AirPort Extreme Base Station modem to disconnect.
With PPP dial-in enabled, the base station is set to share a single IP address (using
DHCP and NAT) only; it cannot share a range of IP addresses (using only DHCP).
Note: If you dial in to your base station from a V.90 modem, the best speed you can
expect is the V.34 speed of 33600 bits per second (bps). This is a limitation of the V.90
standard and is not caused by a problem with your modem or base station.
7 If you want to adjust optional advanced settings, go to “Setting Advanced Options” on
page 48. If you are finished changing settings, click the Update button. Your computer
transfers the new settings to the base station. When the transfer is complete, the base
station restarts and its new settings are active.
Setting Up Client Computers
To configure TCP/IP on client computers:
1 Open System Preferences on the client computer and click Network.
2 For AirPort clients, choose AirPort from the Show pop-up menu and Using DHCP from
the Configure IPv4 pop-up menu in the TCP/IP pane. For Ethernet clients, choose
Built-in Ethernet from the Show pop-up menu and Using DHCP from the Configure
IPv4 pop-up menu in the TCP/IP pane.
Joining an AirPort Network
To join your AirPort network, clients can choose the network from the AirPort status
menu in the menu bar.
46 Chapter 4 AirPort Extreme Network Designs
Page 48
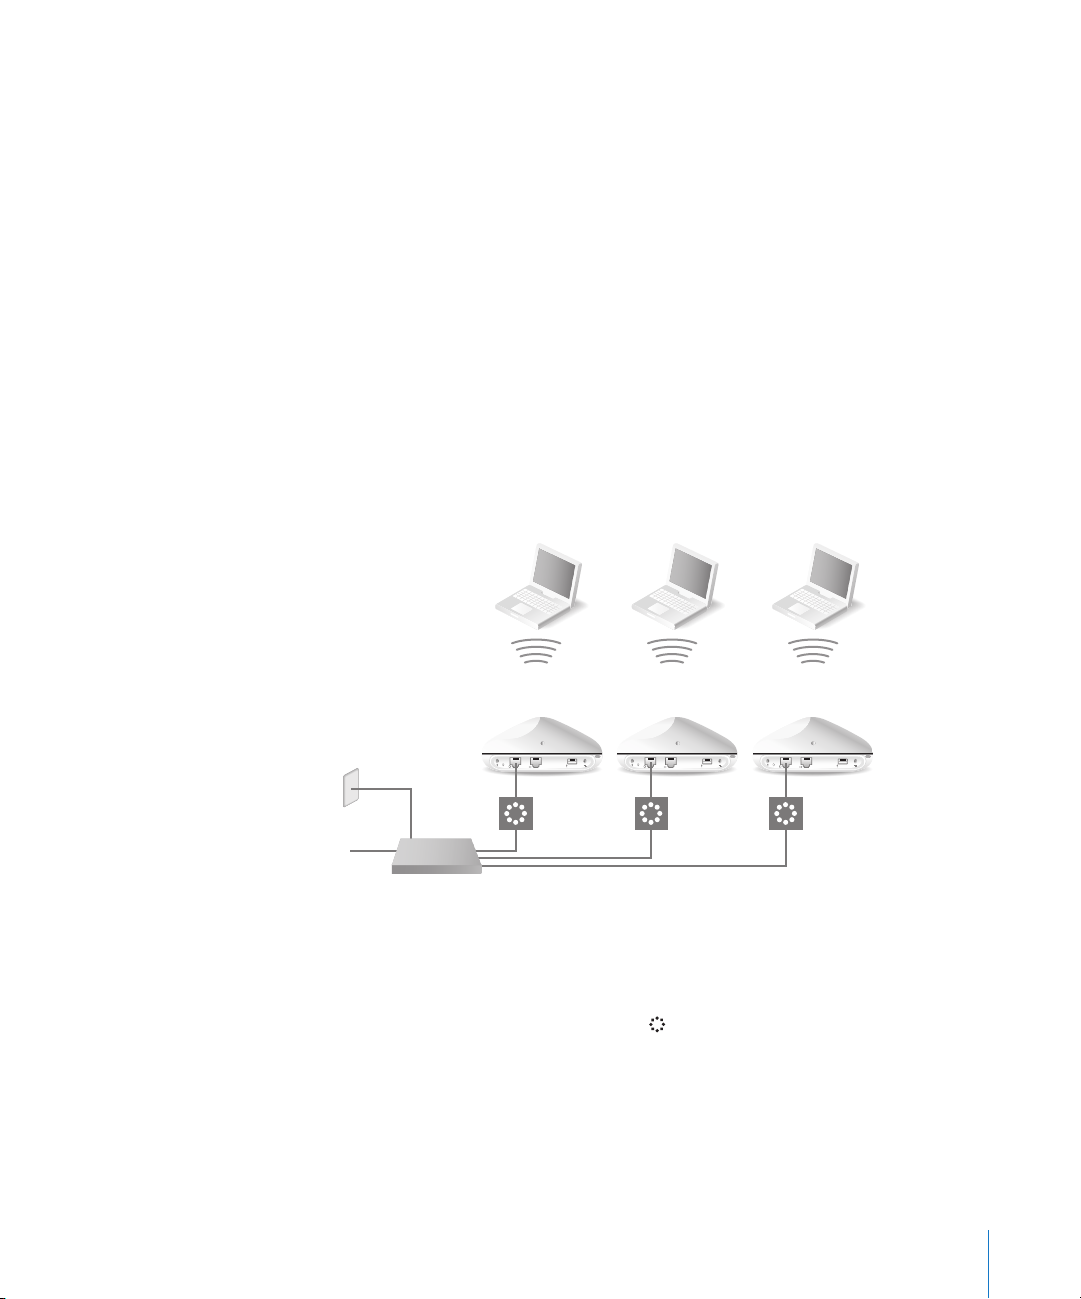
You’re Using Base Stations Powered Over Ethernet on an
Existing Network
If your base station supports it, you can connect multiple base stations to 802.3afcompliant Power Sourcing Equipment (PSE), and deliver both power and the network
and Internet connection over the same cable. See the documentation that came with
your base station to make sure the base station supports Power over Ethernet (PoE).
If your base station supports PoE, the base station and the mounting bracket conform
to UL Standard 2043 for placement in the air-handling space above suspended ceilings.
Using Power over Ethernet allows you to install a base station in places away from a
standard electrical outlet.
To use the base station in an air-handling space above suspended ceilings, you must
connect the Ethernet WAN port to an 802.3af-compliant PSE with a plenum-rated
Ethernet cable. You cannot use the AC power adapter to power a base station installed
in an air-handling space. Do not connect an external antenna to a base station
mounted in an air-handling space.
What It Looks Like
AirPort Extreme
Base Stations
AC power
outlet
To Network
802.3af-compliant
Power Sourcing Equipment
(PSE)
Plenum-rated Ethernet cables
How It Works
• The base station uses your Ethernet network to communicate with the Internet and
receives power through the Ethernet WAN ( ) port.
• AirPort clients access the Internet and the Ethernet network through the AirPort
Extreme Base Station.
Chapter 4 AirPort Extreme Network Designs 47
Page 49

What You Need for a Power Over Ethernet Connection
Components Check √ Comments
AirPort Extreme Base Station or
multiple base stations that
support PoE
802.3af-compliant Power
Sourcing Equipment (PSE)
Plenum-rated Ethernet cables If you are mounting the base
station in the air-handling space
above a suspended ceiling, you
need to use plenum-rated
Ethernet cables.
What to Do
Follow the instructions in the previous section, “You’re Using an Existing Ethernet
Network” on page 41, to set up the AirPort network.
Setting Advanced Options
Using the AirPort Extreme Base Station as a Bridge
You can turn off the base station’s Internet sharing features (which provide IP addresses
to AirPort computers using DHCP or NAT) to allow bridging between the network’s
wireless and wired computers. With bridging turned on, AirPort computers have access
to all services on the Ethernet network, and the base station does not provide Internet
sharing services.
Using the base station as a bridge can be a way to address incompatibilities between
the base station’s Internet sharing features and your ISP’s connection method.
To use the base station as a bridge, all AirPort and Ethernet computers need to have
IP addresses set manually and use the same subnet mask.
To set up the base station as a bridge:
1 Open AirPort Admin Utility (in Applications/Utilities) and open your base station’s
configuration.
2 Click Show All Settings.
3 Click Network.
4 Deselect the “Distribute IP addresses” checkbox.
48 Chapter 4 AirPort Extreme Network Designs
Page 50
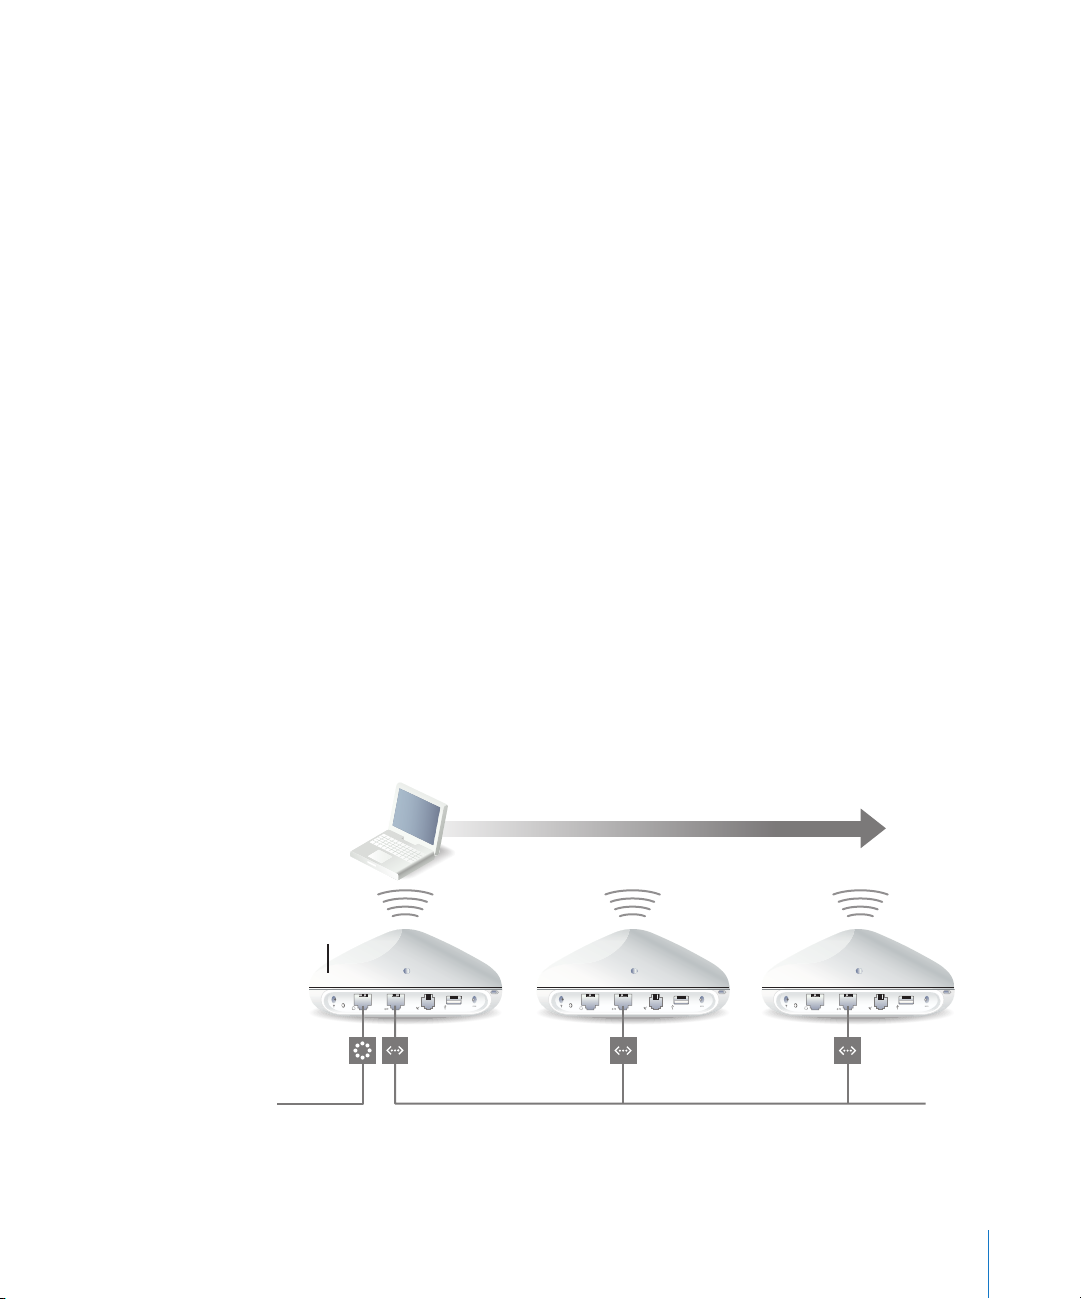
Connecting Additional Base Stations to Your AirPort Network
You can connect additional AirPort Extreme Base Stations to extend the range of your
wireless network. You can connect the base stations wirelessly or using Ethernet. A
network with base stations connected using Ethernet is known as a roaming network.
Connecting base stations wirelessly creates what is known as a Wireless Distribution
System (WDS).
Setting Up Roaming
Multiple AirPort Extreme Base Stations can be set up to create a single wireless
network. Client computers using AirPort can move from base station to base station
with no interruption in service (a process known as roaming).
To set up roaming:
1 Connect all of the AirPort Extreme Base Stations to the same subnet on your Ethernet
network.
2 Give each base station a unique name.
3 Give each base station the same network name and password.
4 Set up the base stations as bridges, following the instructions in the previous section.
If you want one AirPort Extreme Base Station to assign IP addresses using
DHCP, also do the following:
1 Set up one base station to act as the DHCP server.
2 Set up the other base stations as bridges, following the instructions in the previous
section.
The base station acting as a DHCP server can receive its IP address from the DHCP
server on the Ethernet network.
AirPort
DHCP
server
To the Internet
Chapter 4 AirPort Extreme Network Designs 49
network
AirPort
network
Ethernet LAN
AirPort
network
Page 51
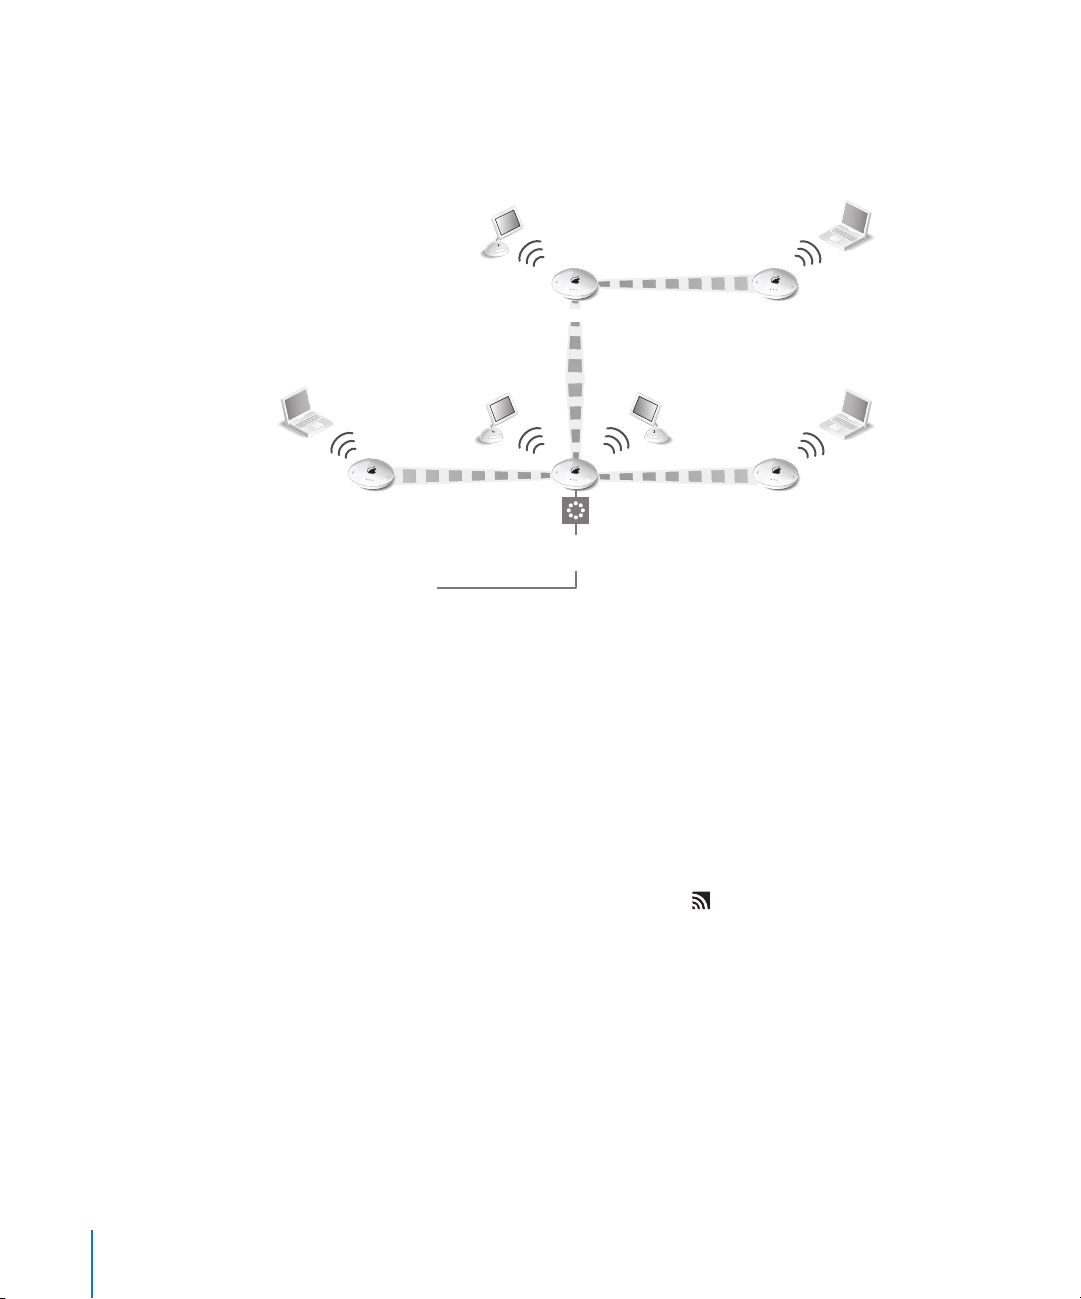
Setting Up a Wireless Distribution System (WDS)
When you connect base stations wirelessly in a WDS, you set up each base station as
either a main base station, a remote base station, or, if you are using AirPort 3.1 or later,
a relay base station.
Relay base station
Remote base station
Main base station
connected to the Internet
To the Internet
Remote base station
Remote base station
A main base station is connected to the Internet and shares its connection with remote
and relay base stations. A remote base station shares the main base station’s Internet
connection. A relay base station shares the main base station’s Internet connection and
transfers the connection to other remote or relay base stations.
All three base station configurations (main, remote, and relay) can also share the main
base station’s Internet connection with client computers wirelessly, or with Ethernet if
the client computers are connected to the base station or Ethernet.
When you set up base stations in a WDS, you need to know the AirPort ID of each base
station. The AirPort ID is also known as the MAC address and is printed on the label on
the bottom of the base station next to the AirPort ( ) symbol. To make it easier to set
up a WDS, place all of the base stations on a table and plug them into a power supply.
As part of the WDS setup process, you might consider giving all the base stations
unique names, to make them easier to identify in the future.
Note: If your network is protected by either WPA Personal or WPA Enterprise, you can’t
set up a Wireless DIstribution System. If you want to set up a WDS, select a different
security option (Not Enabled or 128 bit or 40 bit WEP) from the Wireless Security popup menu in the AirPort pane of AirPort Admin Utility.
50 Chapter 4 AirPort Extreme Network Designs
Page 52
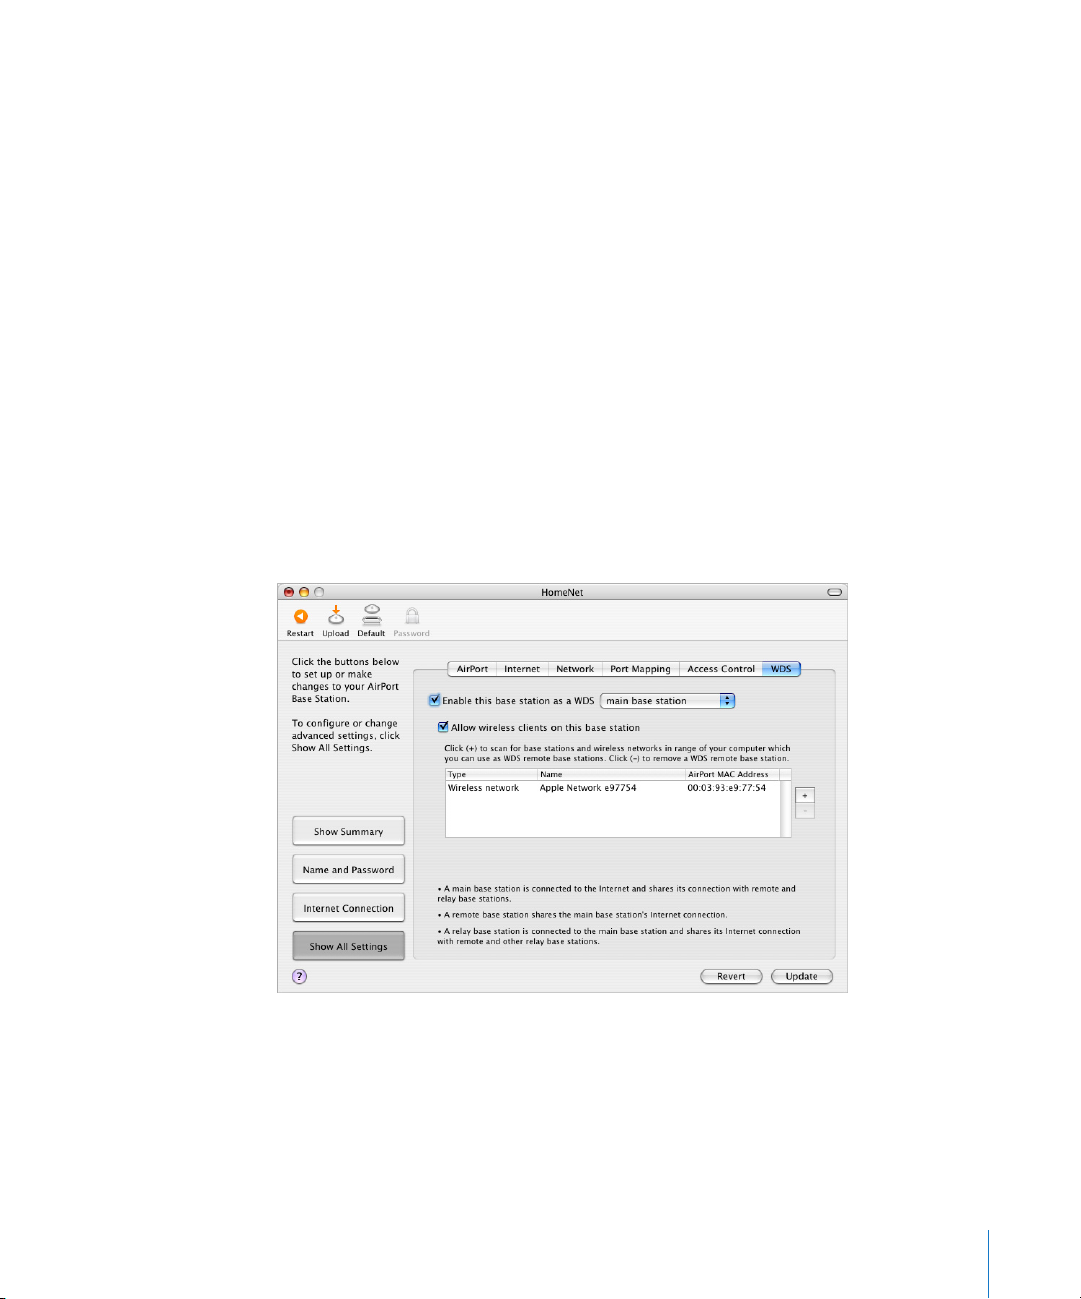
To set up the main base station to share its Internet connection with
other base stations:
1 Click the AirPort status menu in the menu bar and choose the wireless network created
by the base station you want to set up as the main base station.
2 Open AirPort Admin Utility (in Applications/Utilities), select the main base station, and
click Configure. Enter the base station password if necessary. If the base station is using
the default password of public, you will not be prompted for a password.
3 Click Show All Settings, and then click WDS.
4 Select the “Enable this base station as a WDS” checkbox, and choose “main base
station” from the pop-up menu.
5 Click the Add (+) button to scan for base stations in range of your computer. Click
Rescan if a base station you expect to see doesn’t appear in the list.
6 Select the base stations you want to set up as remote base stations. Deselect the “Auto
configure as a WDS remote base station” checkbox if you want to set up the remote
base station manually.
Select a base station and click the Delete (–) button to remove the base station from
the list.
7 Click Update to send the new settings to the base stations in the WDS.
Chapter 4 AirPort Extreme Network Designs 51
Page 53
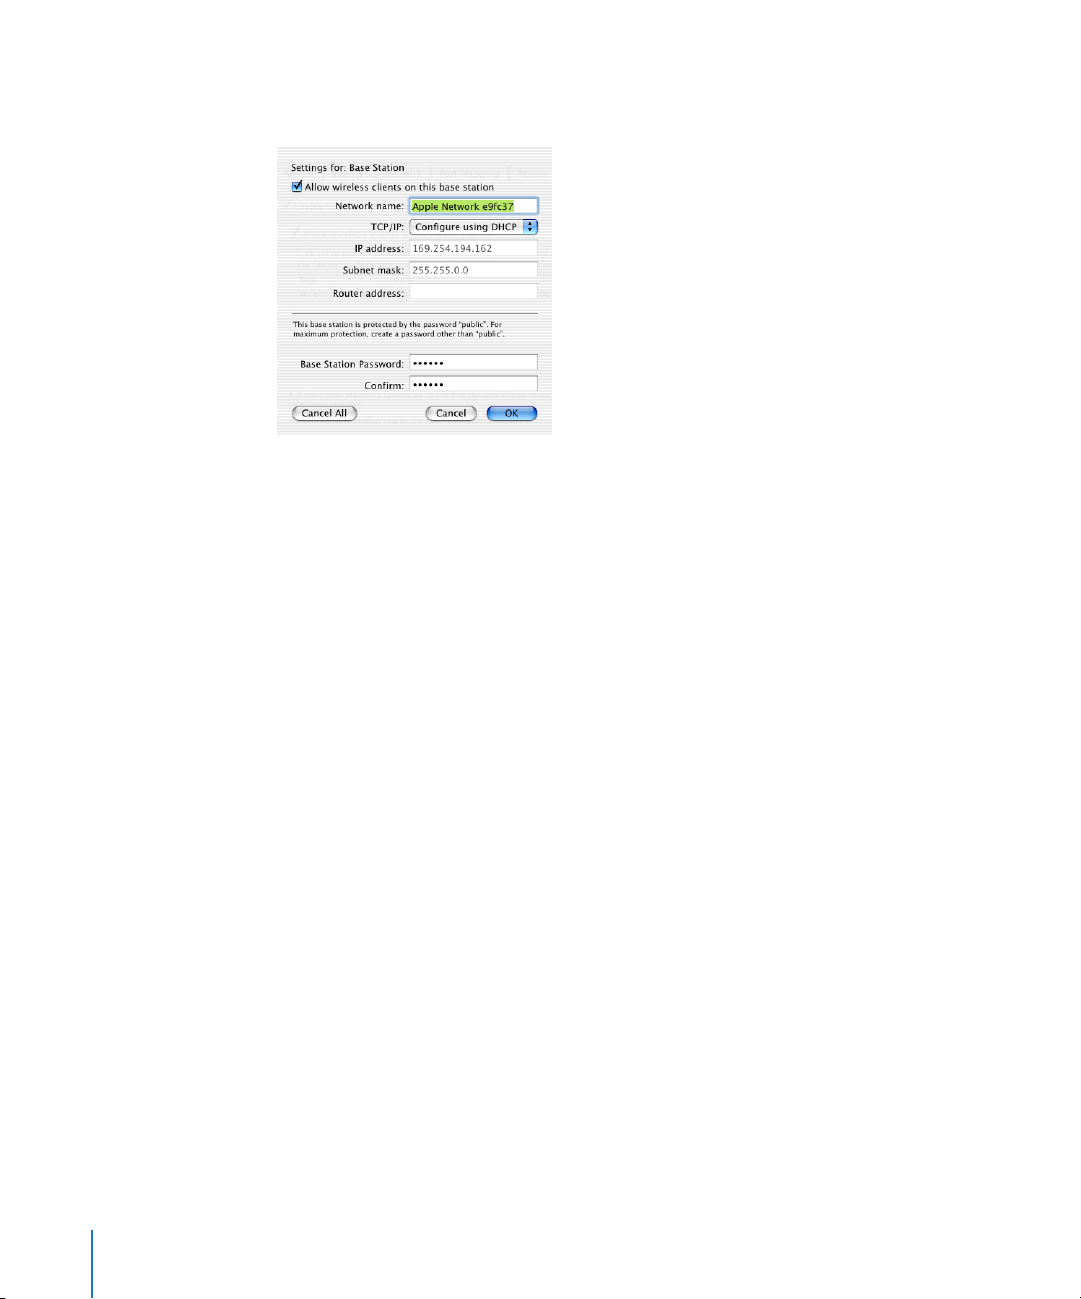
After you click Update, you can give each base station a name and password, and
choose how the base station receives IP addresses.
By default, the “Allow wireless clients on this base station” checkbox is selected. If you
deselect the “Allow wireless clients on this base station” checkbox, and later want to
change the settings on the base station, you must connect to the base station’s LAN
port with an Ethernet cable. You will not be able to connect to the base station
wirelessly.
To set up an additional remote base station to connect to the main
base station:
If you want to add additional remote or relay base stations to the WDS after setting up
the main and remote base stations, use AirPort Admin Utility again.
Remote base stations need to be on the same channel as the main base station. Before
setting up additional remote base stations, find the channel of the main base station in
the AirPort pane of AirPort Admin Utility.
1 Click the AirPort status menu in the menu bar and choose the wireless network created
by the base station you want to set up as a remote base station.
2 Open AirPort Admin Utility (in Applications/Utilities), select the remote base station,
and click Configure. Enter the base station password if necessary. If the base station is
using the default password of public, you will not be prompted for a password.
3 Enter the same network password as the main base station if necessary.
4 Click Show All Settings.
5 Click AirPort and choose the same channel as the main base station from the Channel
pop-up menu.
52 Chapter 4 AirPort Extreme Network Designs
Page 54
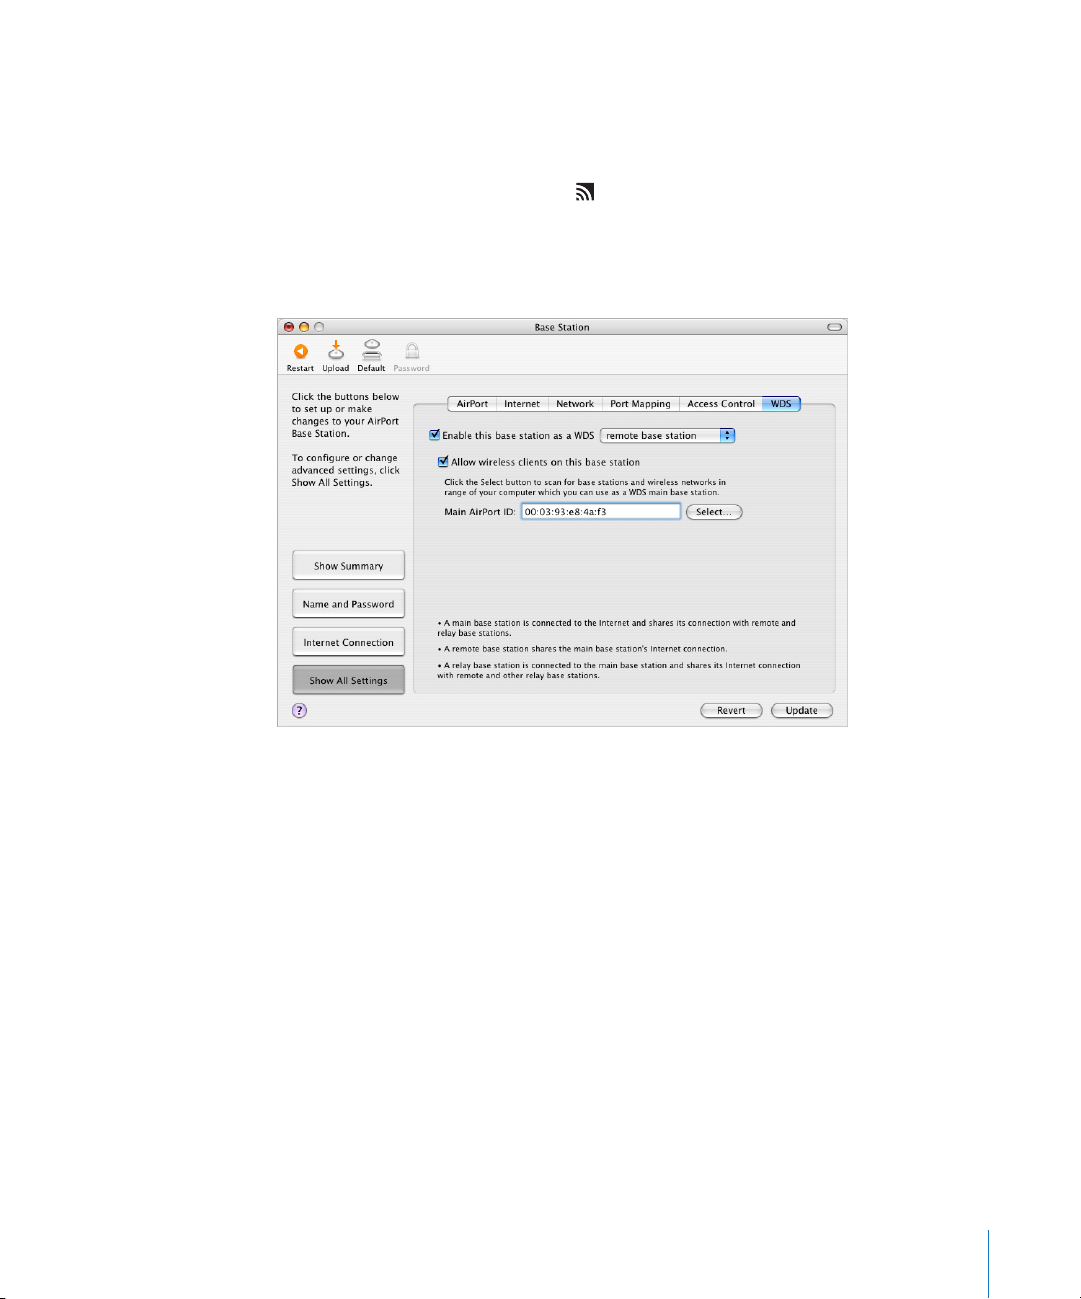
6 Click the WDS button and select the “Enable this base station as a WDS” checkbox, and
choose “remote base station” from the pop-up menu.
7 Enter the MAC address of the main base station in the Main AirPort ID field. The MAC
address is also referred to as the AirPort ID and is printed on the label on the bottom of
the base station, next to the AirPort ( ) symbol.
If you don’t want to enter the MAC address manually, click Select to scan for base
stations in range of your computer and select the base station you want to use as the
main base station.
8 Click Update to transfer the settings to the base station.
By default, the “Allow wireless clients on this base station” checkbox is selected. If you
deselect the “Allow wireless clients on this base station” checkbox, and later want to
change the settings on the base station, you must connect to the base station’s LAN
port with an Ethernet cable. You will not be able to connect to the base station
wirelessly.
To set up a relay base station to connect to the main base station and share its
connection with additional remote base stations:
If you want to set up a relay base station in the WDS to share its connection with other
remote base stations and wireless clients, use AirPort Admin Utility again.
When you set up a relay base station, you also need to set up at least one additional
remote base station to share the relay’s connection. To set up a relay base station,
first set up the base station as a remote base station by following the instructions
on page 52.
Chapter 4 AirPort Extreme Network Designs 53
Page 55
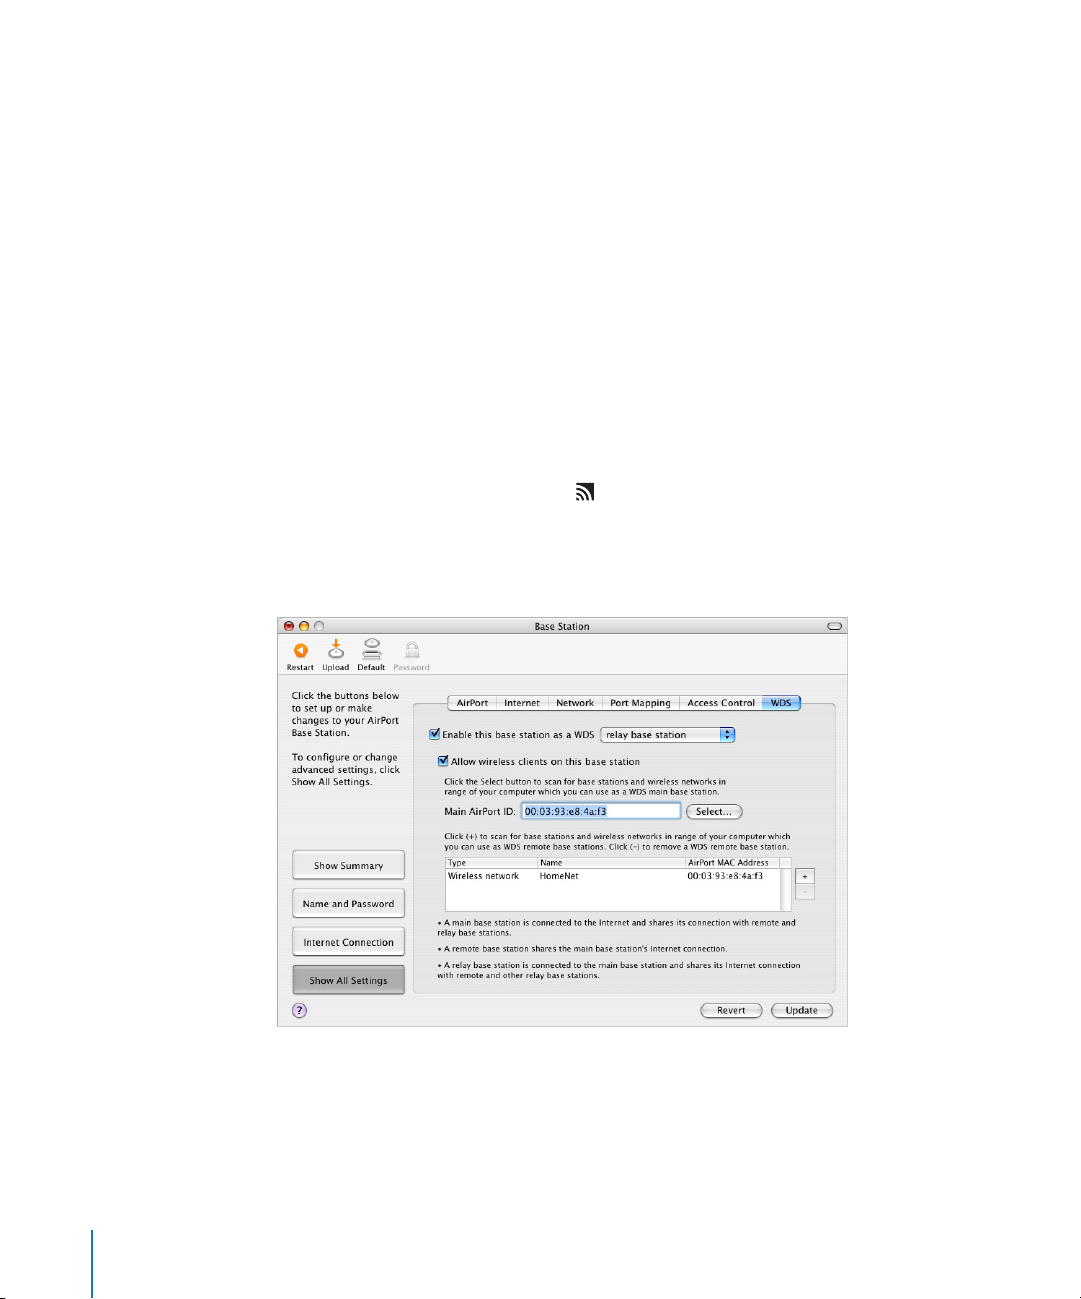
Relay and remote base stations need to be on the same channel as the main base
station. Before setting up a relay or remote base station, find the channel of the main
base station in the AirPort pane of AirPort Admin Utility.
1 Click the AirPort status menu in the menu bar to join the wireless network created by
the base station you want to set up as the relay base station.
2 Open AirPort Admin Utility (in Applications/Utilities), select the relay base station, and
click Configure. If the base station is using the default password of public, you will not
be prompted for a password.
3 Enter the same network password as the main base station, if necessary.
4 Click Show All Settings.
5 Click the WDS button and select the “Enable this base station as a WDS” checkbox, and
choose “relay base station” from the pop-up menu.
6 Enter the MAC address of the main base station in the Main AirPort ID field. The MAC
address is also referred to as the AirPort ID and is printed on the label on the bottom of
the base station, next to the AirPort ( ) symbol.
If you don’t want to enter the MAC address manually, click Select to scan for base
stations in range of your computer and select the base station you want to use as a
main base station.
54 Chapter 4 AirPort Extreme Network Designs
Page 56

7 Click the Add (+) button to scan for base stations in range of your computer. Click
Rescan if the base station you expect to see doesn’t appear in the list. Deselect the
“Auto configure as a WDS remote base station” checkbox if you want to set up the
remote base station manually.
Select a base station and click the Delete (–) button to remove a base station from
the list.
8 Select the base stations you want to set up as remote base stations.
9 Click Update to transfer the new WDS settings to the relay and remote base stations.
Extending the Range of Your AirPort Network
In addition to adding additional base stations to your network, you can attach an
Apple-certified external antenna to some models of base stations to extend your
network’s range. You can attach an omnidirectional antenna to broaden the range of
the network in all directions, or you can add a unidirectional antenna to extend the
network further in one direction. External antennas are available from your Appleauthorized dealer, Apple retail stores, or the Apple Store at www.apple.com/store.
Note: After attaching an external antenna, you must unplug the base station’s power
adapter and then plug it back in.
Important: If your base station is using Power over Ethernet and is mounted in an
air-handling space, do not connect an external antenna. External antennas do not meet
the requirements for placement in air-handling spaces.
Controlling the Range of Your AirPort Network
You can also shorten the range of your AirPort network. This might be useful if you
want to control who has access to the network by restricting the range to a single
room, for example.
To shorten the range of your AirPort network:
1 Open AirPort Admin Utility (in Applications/Utilities).
2 Select your base station and click Configure.
3 Click AirPort and then click Wireless Options.
4 Choose a milliwatt setting from the Transmitter Power pop-up menu. The lower the
milliwatt setting, the shorter the range.
Chapter 4 AirPort Extreme Network Designs 55
Page 57

Keeping Your Network Secure
Your network is protected by the password you assign to it. However, you can take
additional steps to help keep your network secure.
Networks managed by Simple Network Management Protocol (SNMP) may be
vulnerable to denial-of-service attacks. Similarly, if you configure your base station over
the WAN port, it may be possible for unauthorized users to change network settings.
When remote configuration is enabled, the base station’s Rendezvous information (the
base station name and IP address) is published over the WAN port. Turning off remote
configuration may provide additional security.
To help protect your network and base station:
1 Open AirPort Admin Utility, select your base station, and click Configure.
2 Click Show All Settings.
3 Click Base Station Options in the AirPort pane.
4 Make sure the Enable SNMP Access and Enable Remote Configuration checkboxes are
not selected.
Using Wi-Fi Protected Access (WPA)
This version of AirPort supports WPA, the latest security standard for wireless networks.
Using Mac OS X 10.3 and its 802.1X authentication capabilities, WPA security delivers
more sophisticated data encryption than WEP, and also provides user authentication,
which was virtually unavailable with WEP.
Note: WPA security features are available only to AirPort Extreme Base Stations, AirPort
and AirPort Extreme clients using Mac OS X 10.3 or later and AirPort 3.2 or later, and
non-Apple clients using other 802.11 wireless adapters that support WPA.
AirPort 3.2 and later supports two modes of WPA: Enterprise mode, which uses a
RADIUS server for user authentication, and Personal mode, which relies on the
capabilities of TKIP without requiring a RADIUS server.
Enterprise mode is designed for a larger network in which an IT professional is most
likely setting up and managing the network. In order to set up a WPA Enterprise
network, an 802.1X connection must be set up first in Internet Connect. The 802.1X
connection requires an authentication protocol, like TTLS, LEAP, or PEAP. It also requires
an authentication server to manage network users’ credentials and certificates.
Personal mode is for the home or small office network and can be set up and managed
by most users. Personal mode does not require a separate authentication server. Users
of the network usually need only enter a user name and password to join the network.
56 Chapter 4 AirPort Extreme Network Designs
Page 58

To set up a WPA Enterprise network:
Setting up a WPA Enterprise network requires setting up a RADIUS server to manage
and validate network users’ credentials, such as user names, passwords, and user
certificates. See the documentation that came with the RADIUS server to set it up. Once
the server is set up, follow these steps to set up a WPA Enterprise network.
1 Open Internet Connect, located in the Applications folder.
2 Choose File > New 802.1X Connection.
3 Choose Edit Configurations from the Configuration pop-up menu.
4 Enter the settings for the connection.
• Enter a name for the configuration.
• Choose the network from the Wireless Network pop-up menu.
• Choose the authentication protocol of the RADIUS server. See the documentation
that came with the server for more information.
• Configure the protocol, if necessary. Some authentication protocols require
additional settings, like an outer identity or a digital certificate. See the
documentation that came with the server for more information.
Note: Some of the authentication protocols require digital certificate authorization on
the server. See the documentation that came with your server to create and distribute
digital certificates.
5 Click OK to save the connection settings.
Choose File > Export Configurations to create a file you can distribute to network users.
6 Open AirPort Admin Utility, select your base station, and click Configure.
7 Click Show All Settings, and then click Change Wireless Security in the AirPort pane.
8 Choose WPA Enterprise from the Wireless Security pop-up menu.
9 Enter the IP address, port, and shared secret (or password) of the primary and
secondary RADIUS authentication servers.
To set up a WPA Personal network:
1 Open AirPort Admin Utility, select your base station, and click Configure.
2 Click Show All Settings, and then click Change Wireless Security in the AirPort pane.
3 Choose WPA Personal from the Wireless Security pop-up menu.
4 Choose Password from the pop-up menu to enter an ASCII password of 8 to 63 ASCII
characters, or choose Pre-Shared Key to enter a hexadecimal password of exactly 64
hexadecimal characters.
Chapter 4 AirPort Extreme Network Designs 57
Page 59

Setting Up Access Control
Access control lets you specify which AirPort computers can send or receive
information through the base station to the wired network.
Each AirPort-equipped computer has a unique AirPort ID (also known as the MAC
address). You can restrict access by creating an access control list that includes only the
MAC addresses for computers you want to access your wired network.
To find the MAC address (AirPort ID) of your computer’s AirPort Card, click the AirPort
button in the Network pane of System Preferences.
To set up the access control list:
1 Open AirPort Admin Utility, select your base station, and click Configure.
2 Click Show All Settings.
3 Click Access Control.
4 Click Add (+) and enter the AirPort ID (MAC address) and an optional description for
the computers that will access the network. Select an AirPort ID and click Delete (–) to
remove it from the list.
Important: AirPort access control prevents computers that aren’t on the access control
list from accessing the wired network connected to the base station. It does not
prevent computers from joining the AirPort wireless network. For information on how
to prevent unauthorized computers from joining the AirPort network, see “Setting Up
the AirPort Network” on page 21.
You can also add the MAC address of a third-party 802.11 wireless networking card to
the access control list. Most third-party cards have the MAC address on a label attached
to the metal case of the card.
Access control is not compatible with WPA Enterprise mode. You can use either access
control or WPA Enterprise in a network, but you can’t use both.
Using a RADIUS Server
Using a RADIUS (Remote Authentication Dial-In User Service) server on your network
lets you authenticate MAC addresses (AirPort IDs) on a separate computer, so that each
base station on the network doesn’t need to store the MAC addresses of computers
that have access to the network. Instead, all the addresses are stored on a server that is
accessed through a specific IP address.
To set up authentication using a RADIUS server:
1 On the server, enter the MAC addresses of the computers that will access the network.
2 When the RADIUS server is set up, open AirPort Admin Utility, select your base station,
and click Configure.
3 Click Show All Settings.
58 Chapter 4 AirPort Extreme Network Designs
Page 60

4 Click Access Control.
5 Choose a format from the RADIUS pop-up menu.
If you choose Default, the base station formats the MAC addresses as 010203-0a0b0c
and they are used as the user names on the RADIUS server. The shared secret is the
password for users joining the network. This format is often used for Lucent and Agere
servers.
If you choose Alternate, MAC addresses are formatted as 0102030a0b0c and are used
for both the user name and password by users joining the network. This format is often
used for Cisco servers.
6 Enter the IP address, port, and shared secret (or password) for the primary and
secondary servers.
See the RADIUS documentation that came with your server, or check with the network
administrator for more information on setting up the RADIUS server.
The access control list and RADIUS work together. When a user tries to join a network
that authenticates using access control or a RADIUS server, the base station looks first
in the access control list, and if the MAC address is there the user can join the network.
If the MAC address is not in the access control list, the base station checks the RADIUS
server for the MAC address. If it is there, the user can join the network.
Note: RADIUS access control is not compatible with WPA Enterprise mode. You can use
either RADIUS access control or WPA Enterprise in a network, but you can’t use both.
Using Port Mapping
AirPort uses Network Address Translation (NAT) to share a single IP address with the
computers that join the AirPort network. To provide Internet access to multiple
computers with one IP address, NAT assigns private IP addresses to each computer on
the AirPort network, then matches these addresses with port numbers. The base
station creates a port-to-private IP address table entry when a computer on your
AirPort (private) network sends a request for information to the Internet.
If you are running a web, AppleShare, or FTP server on your AirPort network, other
computers initiate communication with your server. Since the base station has no table
entries for these requests, it has no way of directing the information to the appropriate
computer on your AirPort network.
To ensure that requests are routed to your web, AppleShare, or FTP server properly, you
need to establish a permanent IP address for your server and provide inbound port
mapping information to the AirPort Extreme Base Station.
Chapter 4 AirPort Extreme Network Designs 59
Page 61
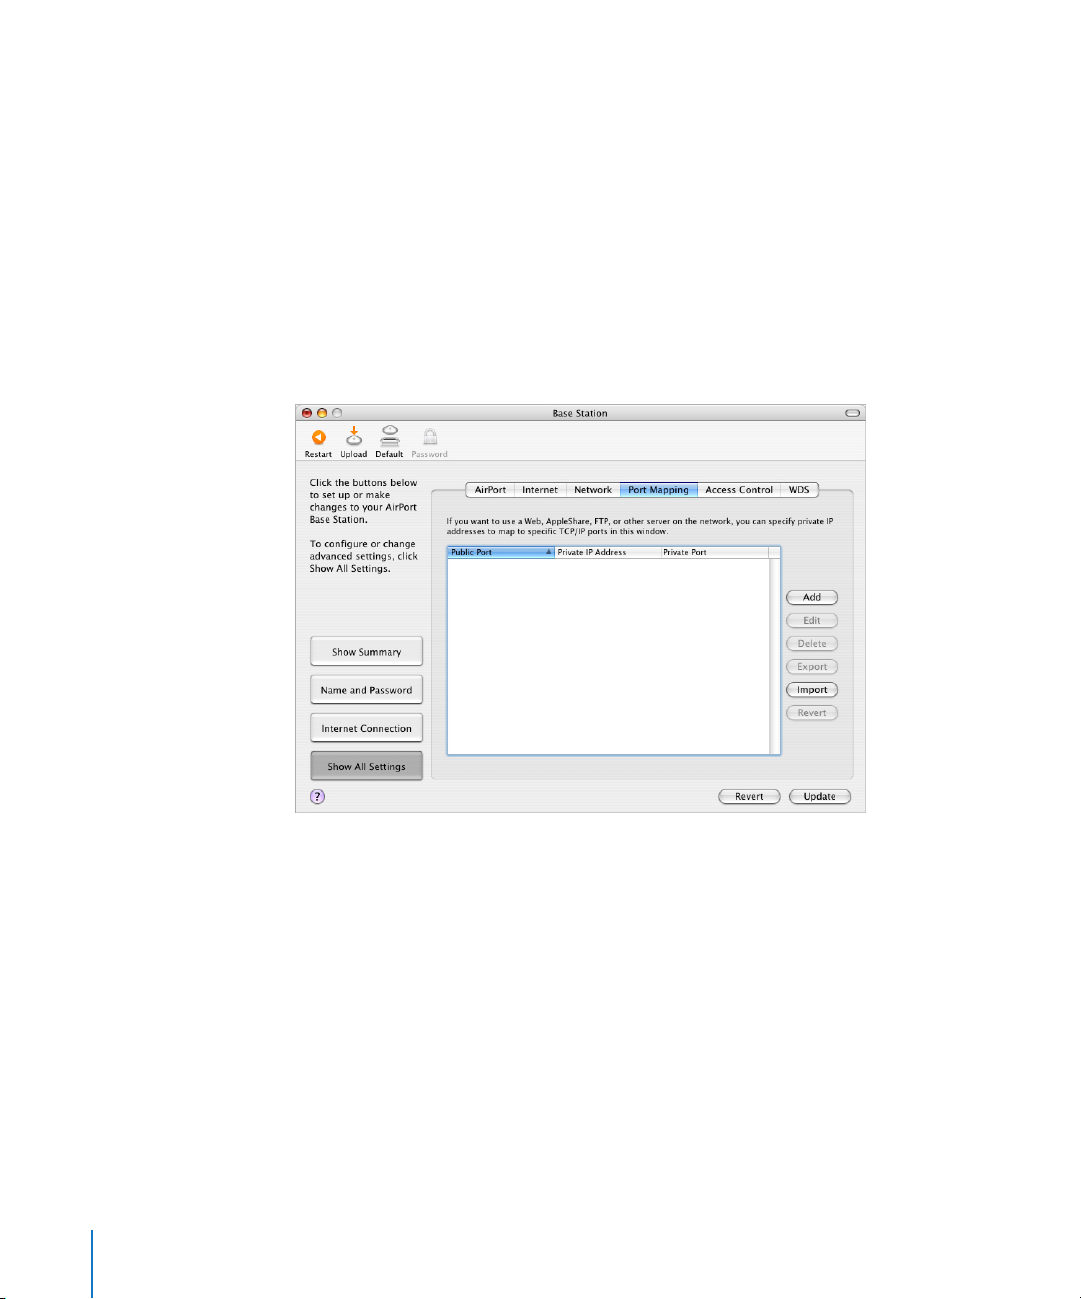
To set up inbound port mapping:
1 Open AirPort Admin Utility, select your base station, and click Configure.
2 Click Show All Settings.
3 Click Port Mapping.
In the Port Mapping pane, click Add and enter the following information:
• Public Port The port number other computers will use to access the services
provided by your computer. For example, computers look for web services on
port 80.
• Private IP Address The manually assigned, private IP address of your computer.
• Private Port The port that will be used on your computer to provide services. In
most cases, you can use the same number as the public port.
To use port mapping, you must configure TCP/IP manually on the computer that is
running the web, AppleShare, or FTP server.
You can also set up a computer as a default host to establish a permanent IP address
for the computer and provide inbound port mapping information to the AirPort
Extreme Base Station. This is sometimes known as a DMZ and is useful when playing
some network games or videoconferencing.
To set up a default host:
1 Open AirPort Admin Utility, select your base station, and click Configure.
2 Click Show All Settings.
3 Click Base Station Options.
4 Select the “Enable Default Host at” checkbox. The default IP address is 10.0.1.253.
60 Chapter 4 AirPort Extreme Network Designs
Page 62

5 Enter the same IP address on the host computer.
a Open the Network pane of System Preferences on the host computer.
b Choose AirPort from the Show pop-up menu.
c Choose Manually from the Configure IPv4 pop-up menu.
d Enter the same IP address you entered in the Enable Default Host pane of AirPort
Admin Utility.
Setting DHCP Lease Time
Set the DHCP lease time to control the amount of time that an IP address is valid for a
computer. This feature is especially useful in schools and other environments where
users switch between computers frequently. Using very short leases, DHCP can
dynamically reconfigure networks in which there are more computers than available IP
addresses.
Set the DHCP lease time in the Network pane of AirPort Admin Utility.
Base Station Logging
You can set up the base station to log status information to the Mac OS X system log
(or Syslog). This is helpful for troubleshooting problems and monitoring base station
performance.
To set up base station logging:
1 Open AirPort Admin Utility, select your base station, and click Configure.
2 Click Show All Settings.
3 Click Base Station Options.
4 Select “Enable Base Station Logging to” and enter the IP address of the computer that
will receive the base station logs.
5 Choose a level from the Logging Level pop-up menu.
6 Select Set Date & Time Automatically and choose an NTP server from the pop-up
menu.
You need to assign a Network Time Protocol (NTP) server for the base station, so the
log information will contain the accurate time of the status logs.
Use the Mac OS X Console application, located in Applications/Utilities, to view the logs
on the computer receiving them.
Chapter 4 AirPort Extreme Network Designs 61
Page 63
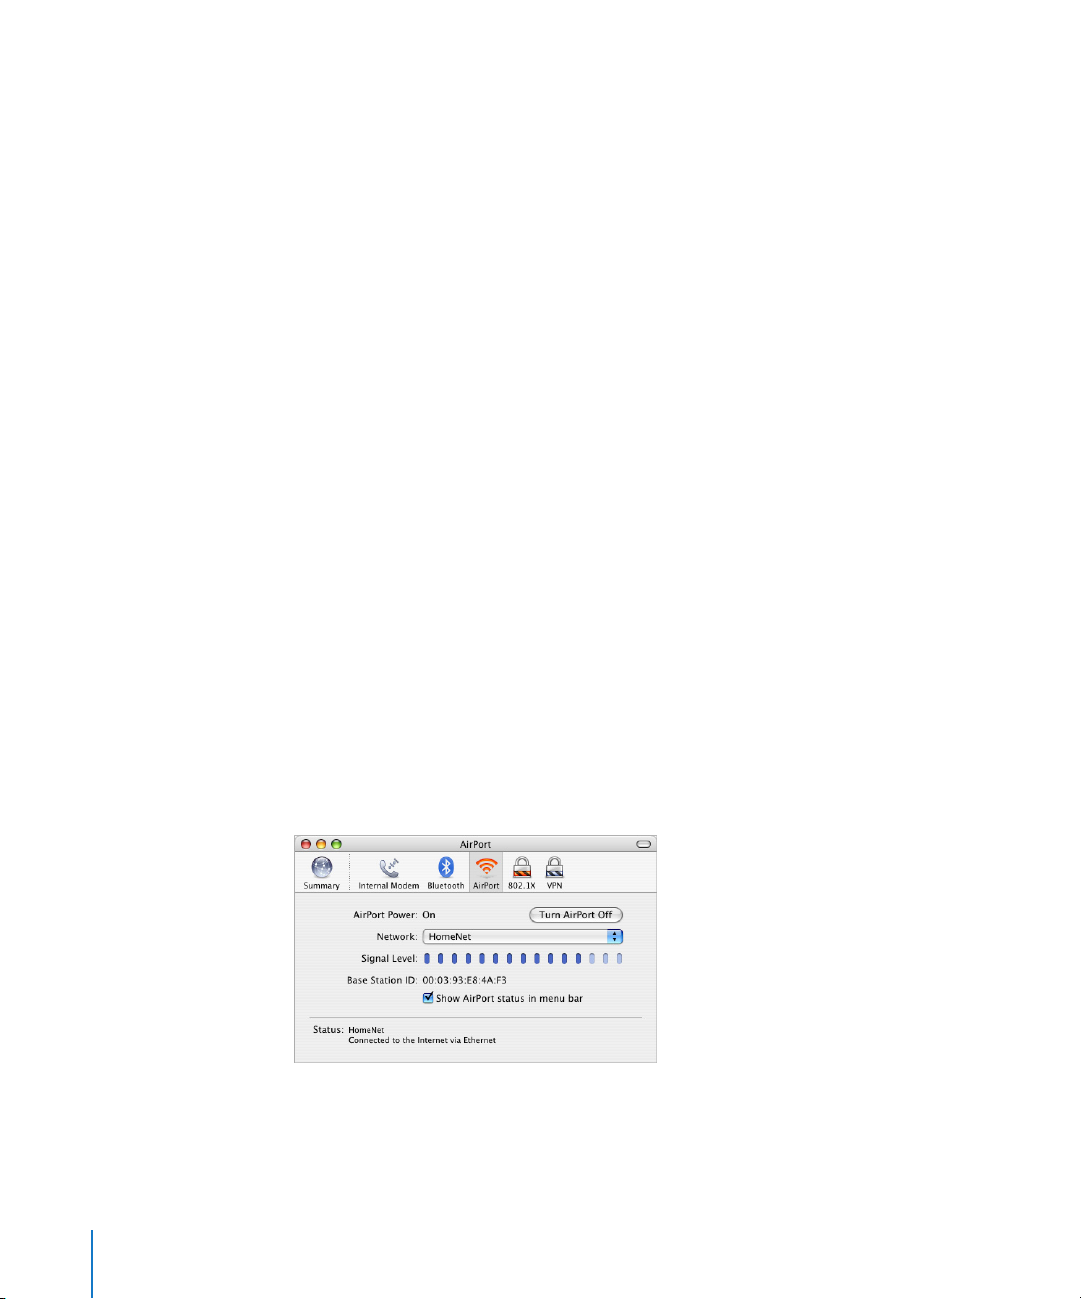
Connecting a USB Printer to the AirPort Extreme Base Station
You can connect a USB printer to the AirPort Extreme Base Station, so that anyone on
the network using Mac OS X v10.2.3 or later can print to that printer.
To use a printer on your network:
1 Connect the printer to the USB port on the AirPort Extreme Base Station.
2 On the client computers, open Printer Setup Utility (located in Applications/Utilities)
and select the printer from the list. If the printer is not in the list, click Add and then
choose Rendezvous from the pop-up menu, then select the printer from the list.
Note: If you are using Power over Ethernet and the base station receives power and a
network connection over the WAN port, the USB port is disabled. You can’t use a USB
printer if your base station is powered over Ethernet. See the documentation that came
with your base station.
Solving Problems
If you have trouble connecting to the Internet with any AirPort network design, try
the following:
• Make sure the base station is connected to the Internet. The computers on your
AirPort network cannot connect to the Internet if your base station is not connected
to the Internet.
• Check your Internet connection using your computer. If you can’t connect with your
computer, the problem may be with your Internet connection.
• Check the active network ports by choosing Active Network Ports from the Show
pop-up menu in the Network pane of System Preferences. Make sure the ports you
want to use are selected.
• Open Internet Connect (in the Applications folder on the hard disk) and choose
AirPort from the Configuration pop-up menu.
• Check to make sure that the computer has joined the AirPort network created by
your base station.
62 Chapter 4 AirPort Extreme Network Designs
Page 64

• Restart your computer. This renews the IP address you receive from the base station.
The IP addresses should be in the range of 10.0.1.2 to 10.0.1.200, 172.16.1.2 to
172.16.1.200, or 192.168.1.2 to 192.168.1.200, depending on the address scheme the base
station uses.
• If the base station is set up as a DHCP server, make sure the “Distribute IP addresses”
checkbox is selected in the Network pane of AirPort Admin Utility.
More Information About AirPort
You can find more information about AirPort in the following locations:
• AirPort Help
Look in AirPort Help for information on setting up an AirPort network, using
an AirPort Extreme Base Station, editing base station settings, avoiding sources
of interference, locating additional information on the Internet, and more. Choose
Help > Mac Help, and then choose Library > AirPort Help.
• World Wide Web
Apple AirPort website at www.apple.com/airport
Apple Support website at www.apple.com/support
Chapter 4 AirPort Extreme Network Designs 63
Page 65

Page 66

5 Behind the Scenes
This chapter defines terms and concepts used when
working with computer networks. Use it as a reference to
help you understand what is taking place behind the
scenes of your AirPort wireless network.
Basic Networking
Packets and Traffic
Information travels across a network in chunks called packets. Each packet has a
header that tells where the packet is from and where it’s going, like the address on
the envelope when you send a letter. The flow of all these packets on the network is
called traffic.
5
How Information Reaches Its Destination
Hardware Addresses
Your computer “listens” to all of the traffic on its local network and selects the
packets that belong to it by checking for its hardware address (also called the media
access control, or MAC address) in the packet header. This address is a number unique
to your computer.
Every hardware product used for networking is required to have a unique hardware
address permanently embedded in it. Your AirPort Card’s number is called the
AirPort ID.
IP Addresses
Since the Internet is a network of networks (connecting millions of computers),
hardware addresses alone are not enough to deliver information on the Internet. It
would be impossible for your computer to find its packets in all the world’s network
traffic, and impossible for the Internet to move all traffic to every network.
65
Page 67

So your computer also has an IP (Internet Protocol) address that defines exactly where
and in what network it’s located. IP addresses ensure that your local Ethernet network
only receives the traffic intended for it. Like the hierarchical system used to define zip
codes, street names, and street numbers, IP addresses are created according to a set of
rules, and their assignment is carefully administered.
The hardware address is like your name; it uniquely and permanently identifies you. But
it doesn’t offer any clues about your location, so it’s only helpful in a local setting. An IP
address is like your street address, which contains the information that helps letters
and packages find your house.
Rules for Sending Information (Protocols)
A protocol is a set of rules that define how communication takes place. For instance, a
networking protocol may define how information is formatted and addressed, just as
there’s a standard way to address an envelope when you send a letter.
Important Networking Devices
Bridges
A bridge joins two networks at the hardware level. Other protocols see the two
networks as the same.
Routers
A router connects two IP networks. In contrast to a bridge, which joins networks at the
hardware level, a router directs network IP traffic based on information stored in its
routing tables. A routing table matches IP addresses with hardware addresses. The
router stamps each incoming IP packet with the hardware address that corresponds to
that IP address. As a result, the packet can be picked up by the right computer on the
hardware network.
DNS (Domain Name Server)
Networks (domains) on the Internet have names that correspond to their IP addresses.
A Domain Name Server maintains a list of domain names and their corresponding
addresses. That is why you can go to the Apple website by typing www.apple.com
instead of the IP address.
66 Chapter 5 Behind the Scenes
Page 68

Important Networking Terms
TCP/IP (Transport Control Protocol/Internet Protocol)
TCP/IP is a collection of protocols that underlies almost every form of communication
on the Internet.
DHCP (Dynamic Host Configuration Protocol)
DHCP is a method of automatically assigning IP addresses. Instead of permanently
assigning addresses to individual users, addresses are assigned by the DHCP server
when clients need them. This means that instead of entering several fields of long
addresses, users need only to select DHCP as their configuration method for IP
networking.
PPP (Point-to-Point Protocol)
PPP is the most common protocol for providing IP services over a dial-up modem.
PPPoE (Point-to-Point Protocol over Ethernet)
PPPoE is a protocol used on some DSL lines for providing IP services. It allows DSL
network providers to bill customers using their existing PPP equipment. If your ISP
provided you with PPPoE connection software, such as EnterNet or MacPoET, then
you connect via PPPoE. With AirPort, you do not need to use a third-party PPPoE
application.
NAT (Network Address Translation)
NAT is used to share one IP address among several computers. A device set up as a NAT
router uses a collection of “private” IP addresses (in the range 10.0.1.2 to 10.0.1.200) to
allow several computers to access the Internet using one “public” IP address. When a
computer using a private IP address requests information from the Internet, the NAT
router keeps a record of the computer making the request, and sends the information
to the Internet using its own IP address. When the response comes back from the
Internet, the NAT router forwards the packet to the appropriate computer.
IP Subnet
An IP subnet is a local network as defined by IP network numbers. Connecting to a
subnet involves connecting to the appropriate hardware network and configuring IP
for that network.
Chapter 5 Behind the Scenes 67
Page 69
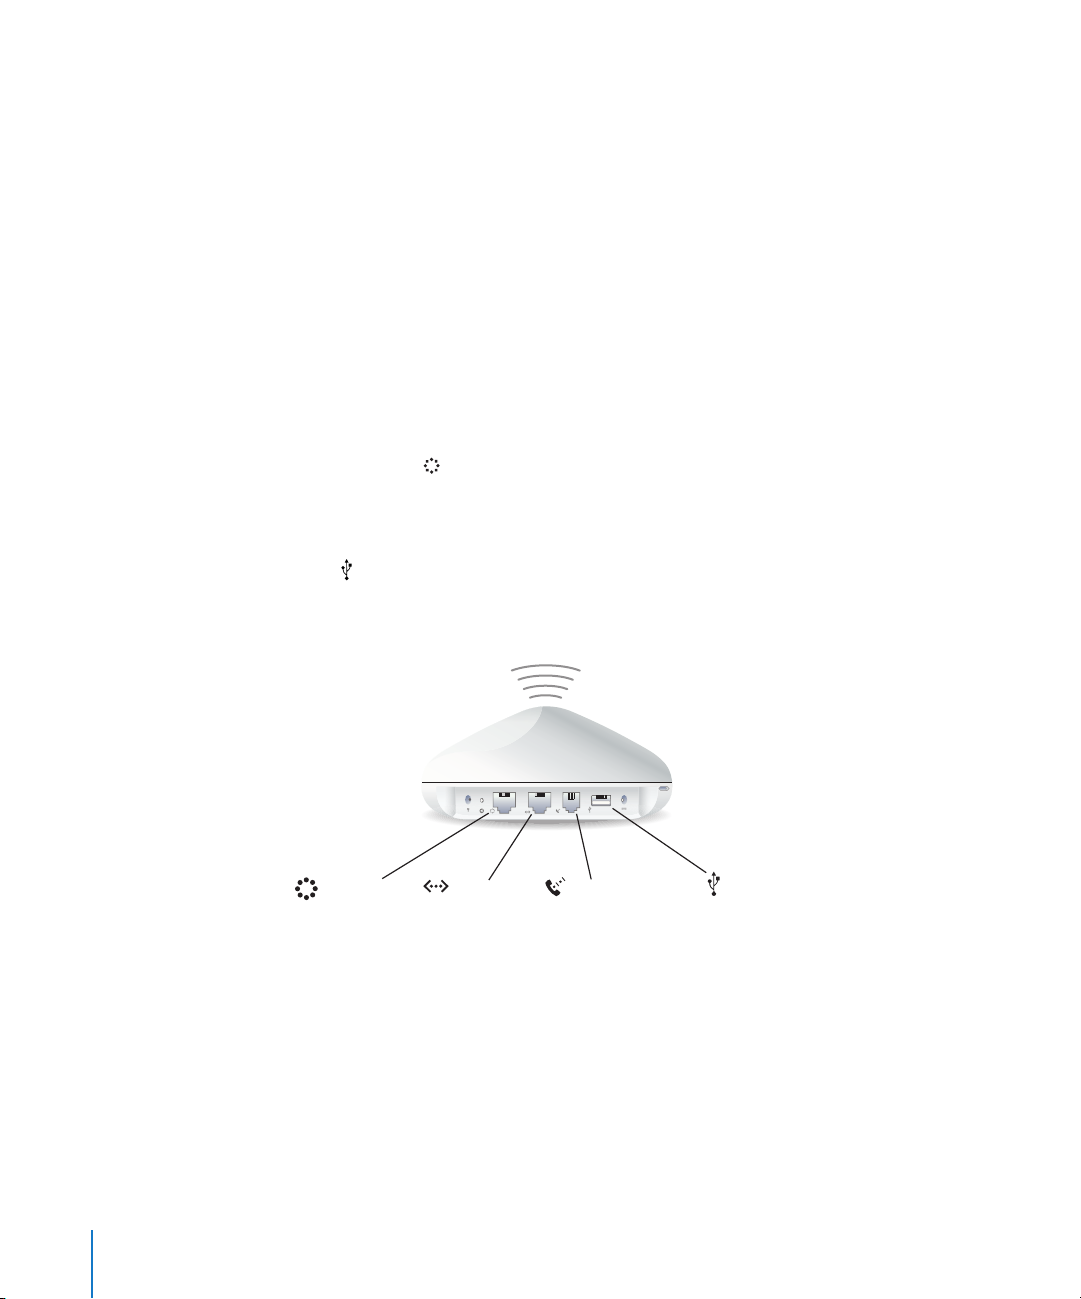
Using the AirPort Extreme Base Station
This section describes the different network interfaces of the AirPort Extreme Base
Station and describes the functions the base station can provide.
Base Station Interfaces
To configure the AirPort Extreme Base Station, you configure how its networking
interfaces will be used. The AirPort Extreme Base Station has five hardware networking
interfaces:
• AirPort interface The AirPort interface creates an AirPort network for AirPort-
equipped computers to join. The base station can provide IP services like DHCP and
NAT over this interface. The base station cannot use the AirPort interface to establish
a connection with the Internet.
• Modem (W) interface The modem interface is used to establish PPP connections to
the Internet. These connections provide IP services to the base station. (Available on
some models.)
• Ethernet WAN ( ) interface The Ethernet WAN interface is used to connect DSL or
cable modems and connect to the Internet.
• Ethernet LAN (G) interface The Ethernet LAN interface provides IP services to local
Ethernet clients.
• USB ( ) interface The USB interface is used to connect a USB printer to the AirPort
Extreme Base Station.
Ethernet
(WAN) port
AirPort interface
Ethernet
(LAN) port
Internal
modem port
(on some models)
USB
printer port
68 Chapter 5 Behind the Scenes
Page 70

Base Station Functions
• Bridge The AirPort Extreme Base Station is configured by default as a bridge
between the wireless AirPort network and the wired Ethernet network.
Connecting an AirPort network to an Ethernet network through the base station
Ethernet LAN (G) port bridges the wireless AirPort network to the wired Ethernet
network.
Important: If you are connecting an Ethernet network to the base station Ethernet
LAN (G) port, make sure the Ethernet network does not have an Internet
connection.
• NAT router One of the most powerful features of the AirPort Extreme Base Station is
its ability to share one Internet connection with multiple computers. To provide this
service, the base station acts as a router. The base station can be configured to
provide both bridging services and routing services at the same time.
• DHCP server When you configure the base station to act as a DHCP server, it
provides IP addresses to client computers that are configured to obtain IP addresses
using DHCP. Using DHCP makes IP configuration simple for client computers, since
they don’t need to enter their own IP information.
Items That Can Cause Interference With AirPort
The farther away the interference source, the less likely it is to cause a problem. The
following items can cause interference with AirPort communication:
• Microwave ovens
• DSS (Direct Satellite Service) radio frequency leakage
• The original coaxial cable that came with certain types of satellite dishes. Contact
the device manufacturer and obtain newer cables.
• Certain electrical devices, such as power lines, electrical railroad tracks, and power
stations
• Cordless telephones that operate in the 2.4 gigahertz (GHz) range. If you have
problems with your phone or AirPort communication, change the channel of your
base station.
• Other AirPort networks
• Adjacent base stations using nearby channels. If base station A is set to channel 1,
base station B should be set to channel 4 or higher.
• Moving objects that temporarily place metal between your computer and the
base station
Chapter 5 Behind the Scenes 69
 Loading...