


9007A
Quick Start Guide
Thank you for buying the ALCATEL ONETOUCH 9007A. We hope you will enjoy your high-quality communication experience.
You have purchased a product which uses the open source (http://opensource.org/) programs mtd, msdosfs, netfilter/ iptables and initrd in object code and other open source programs licensed under the GNU General Public License and Apache License.
We will provide you with a complete copy of the corresponding source codes upon request within a period of three years from the distribution of the product by TCL Communication Ltd.
You may download the source codes from http://sourceforge. net/projects/alcatel/files/. The provision of the source code is free of charge from internet.
English - CJB1BU1ALAAA
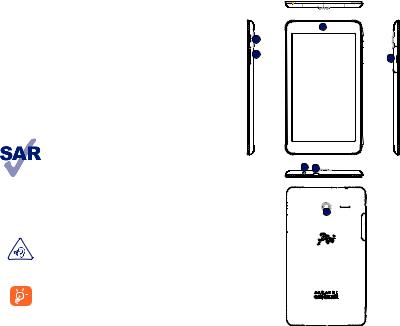
Table of contents
1 |
Yourdevice................................................................... |
1 |
|
|
1.1 |
Appearanceillustration......................................................... |
1 |
|
1.2 |
Homescreen........................................................................... |
3 |
|
1.3 |
Apps and widgets.................................................................... |
6 |
|
1.4 |
Basic operation....................................................................... |
7 |
2 |
Settings.......................................................................... |
9 |
|
|
2.1 |
Device....................................................................................... |
9 |
|
2.2 |
Personal.................................................................................. |
10 |
|
2.3 |
System..................................................................................... |
10 |
3 |
Phone call................................................................... |
11 |
|
|
3.1 |
Placing a call.......................................................................... |
11 |
|
3.2 |
Answering or rejecting a call............................................ |
12 |
4 |
Onetouch Connect.................................................... |
13 |
|
Safety information......................................................... |
14 |
||
General information...................................................... |
22 |
||
12 MONTHS LIMITED WARRANTY.......................... |
23 |
||
This device meets applicable national SAR limits of 1.6 W/kg. SAR values can be found on page 18 of this user guide.When carrying the device or using it while worn on your body, either use an approved accessory such
www.sar-tick.com as a holster or otherwise maintain a distance of 0 mm from the body to ensure compliance with RF exposure requirements. Note that the product may be transmitting even if you are not using it.
To prevent possible hearing damage, do not listen at high volume levels for long periods. Exercise caution when holding your device near your ear while the loudspeaker is in use.
The tablet contains magnets which may interfere with other devices and items (such as credit card, pacemakers, defibrillators, etc.). Maintain at least 15 cm of separation between your tablet and the devices/items mentioned above.
1 Your device
1.1Appearance illustration
1
 3
3
4 |
5 |
|
2 6
 7
7
1

Number |
Function |
1 |
Front camera |
2 |
Headset connector |
3 |
Power key |
4 |
Volume Up/Down |
5 |
SIM card and microSD card |
6 |
Micro-USB connector/Battery charge |
7 |
Rear camera |
Inserting the micro SIM card & the microSD card
To avoid damage, insert your SIM and microSD card in the correct direction. Refer to the instructions given below.
1 |
2 |
3 |
4 |
Note
Charge the device before using it for the first time. Press and hold the Power key to turn on the device. After starting up, the Home screen appears.When the device is low on power, a battery icon will appear on the screen indicating that you should charge the device. Only use the charger recommended by TCL Communication Ltd. and its affiliates.
This device can't be charged through a USB computer connection.
1.2Home screen
Your device includes three pages of Home screen giving you more space to add your own favorite apps, folders, and widgets for one-touch access. To switch between screens, sliding your finger to the left or right.
1.2.1Lock/Unlock your screen
Once your device is powered on, it shows a locked screen interface, which is set as default.
Press and slide up the locked screen to unlock, slide left to access the camera, or slide right to access the call interface.
2 |
3 |
1.2.2Icons on your screen
Google Search |
|
|
|
|
|
Status Bar |
|
|
|
|
|||
|
|
|
|
|
Voice Actions |
|
|
|
|
|
All Apps |
|
|
|
|
|
Home |
|
Back |
|
|
|
|
|
|
|
|
|
|
|
|
|
Recent apps |
|
|
|
|
|
|
|||
Name |
|
|
|
Description |
|||
Touch it to access the Google Search |
|||||||
Search |
engine. |
||||||
|
|
||||||
Voice |
Use Voice Actions to watch a video, send |
||||||
Actions |
email, set alarm, get directions, etc. |
||||||
All Apps |
Touch to show a list of apps. |
||||||
|
|
||||||
Back |
Go back to the previous menu or screen. |
||||||
|
|
||||||
Home |
Return to the Home screen. |
||||||
|
|
||||||
Recent apps |
Press to view recent apps. |
||||||
|
|
|
|
|
|
|
|
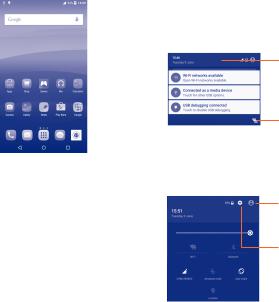
Touch and drag down the Status bar to open the Quick settings panel or Notification panel. Touch and drag up to close it.
Notification panel
When there are notifications, touch and drag down the Status bar to open the Notification panel and read the detailed information.
Touch to switch to the
Quick settings panel.
Touch to clear all event–based notifications (other ongoing notifications will remain).
Note: After opening the Notification panel, you can touch
 to switch to the Quick settings panel, or drag down the Status bar again to access the Quick settings panel.
Quick settings panel
Touch to close the
Quick settings panel and
Notification panel.
Touch to access Settings, where you can set more items.
You can enable or disable functions or change modes by touching the icons on Quick settings panel.
4 |
5 |
Note: After touching |
to close the Quick settings panel |
|
and Notification panel, the screen will display the user |
||
information you have set in |
Contacts |
|
1.3Apps and widgets
1.3.1Apps
The Applications (apps) list contains all pre-embedded and newly installed apps. To access the apps list, touch the all apps key  on the Home screen.
1.3.2Widgets
Long press an empty area on the Home screen and select Widgets to access the widgets library.
1.3.3Get more apps
Touch the Google Play Store icon  to get more apps.
1.3.4Create and manage shortcuts on the Home Screen
Long press an app or widget from the library. It will automatically appear on the Home screen so you can drag it to your preferred location.
1.3.5Remove App from the Home screen
Long press the app you want to delete from the Home screen, drag it right over the " Remove", which is at the top center of the screen.
1.3.6Uninstall apps
Press |
to enter all Apps, then long press the app you want |
to uninstall, drag it over the " Uninstall", which appears at the top-left of the screen.
1.4Basic operation
1.4.1Power on your device
Press and hold the Power key until the tablet powers on. It will take a few seconds before the screen lights up.
1.4.2Power off your device
•Press and hold the Power key for about 3 seconds until the options appear, select Power off to power off your device.
•Press and hold the Power key about 10 seconds to shut down your device.
1.4.3Stand-by mode
Press Power key once to shut down the screen and the product enters stand-by mode.
Note: Without operation, the product will enter stand-by mode automatically. Press Power key once to wake it up.
1.4.4Connecting to a computer via USB
When connecting your device to computer via USB, you can transfer files between your device and the computer.
1.4.5Change your wallpaper
Long press an empty area on the Home screen, then select WALLPAPERS to set wallpaper.
You can also change your wallpaper from Settings > Display > Wallpaper, select an image, then touch Set wallpaper.
6 |
7 |
 Loading...