


BE6914001M |
EN |
OVEN |
USER MANUAL |
|
SV |
UGN |
BRUKSANVISNING |
|
NO OVN |
BRUKERMANUAL |
|
|
ES |
HORNO |
MANUAL DEL USUARIO |
|
DK |
OVN |
BRUGERVEJLEDNING |
|
FI |
UUNI |
KÄYTTÖOHJE |
|
EË |
ЦПХСНПУ |
ЕГЧЕЙСЙДЙППДЗГЙЩН |
|
PT |
FORNO |
MANUAL DO UTENTE |
2
FOR PERFECT RESULTS
Thank you for choosing this AEG product. We have created it to give you impeccable performance for many years, with innovative technologies that help make life simpler – features you might not find on ordinary appliances. Please spend a few minutes reading to get the very best from it.
ACCESSORIES AND CONSUMABLES
In the AEG webshop, you’ll find everything you
need to keep all your AEG appliances looking spotless and working perfectly. Along with a wide range
of accessories designed and built to the high quality standards you would expect, from specialist cookware to cutlery baskets, from bottle holders to delicate laundry bags…
Visit the webshop at:
www.aeg-electrolux.com/shop
Contents 3
CONTENTS
4 Safety information
7 Product description
8 Before first use
13 Using the accessories
17 Helpful hints and tips
19 Care and cleaning
23 Installation instructions
26 What to do if...
27 Environment concerns
The following symbol are used in the text:
Important informations concerning your personal safety and information on how to avoid damaging the appliance.
General information and tips.
Environmental information.
Subject to change without notice
4Safety information
SAFETY INFORMATION
Before the installation and use, read this manual carefully:
•For your personal safety and the safety of your property
•For the respect of the environment
•For the correct operation of the appliance.
Always keep these instructions with the appliance also if you move or sell it.
The manufacturer is not responsible if incorrect installation or use results in damage.
•This appliance can be used by children aged from 8 years and above and persons with reduced physical, sensory or mental capabilities or lack of experience and knowledge if they have been given supervision or instruction concerning use of the appliance in safe way and understand the hazards involved. Children shall not play with the appliance.
•Keep all packaging away from children. There is the risk of suffocation or physical injury.
•Keep children and animals away from the appliance when the door is open or the appliance is in operation. There is the risk of injury or other permanent disability.
•If the appliance has Child Lock or Key Lock (Control Lock) function, use it. It prevents children and animals from accidental operation of the appliance.
General safety
•Do not change the specifications of this appliance. There is the risk of injury and damage to the appliance.
•Do not let the appliance stay unattended during operation.
•Switch off the appliance after each use.
Installation
•Only an approved electrician can install and connect the appliance. Contact an approved service centre. This is to prevent the risks of structural damage or physical injury.
•Make sure that the appliance is not damaged because of transport. Do not connect a damaged appliance. If necessary, contact the supplier.
•Remove all packaging, stickers and layers from the appliance before first use. Do not remove the rating plate. It can invalidate the guarantee.
•Make sure that the appliance is disconnected from the power supply during the installation.
•Be careful when you move the appliance. The appliance is heavy. Always use safety gloves. Do not lift the appliance by the handle.
•You must have correct isolation devices: line protecting cut-outs, fuses (screw type fuses removed from the holder), earth leakage trips and contactors.
•Before the installation, make sure that the kitchen cabinet has the recess dimensions applicable.

Safety information |
|
5 |
|
|
|
•Make sure that the appliance is installed below and adjacent safe structures.
•Keep the minimum distances to the other appliances and units.
•The appliance cannot be positioned on a base.
•Built in ovens and built in cooking surfaces are attached with special connection system. To prevent damage to the appliance, only use an appliance with the appliances
from the same manufacturer.
Electrical connection
•The appliance must be earthed.
•Make sure that the electrical data on the rating plate agree with your domestic power supply.
•Information on the voltage is on the rating plate.
•Always use a correctly installed shockproof socket.
•Do not use multi-way plugs, connectors and extension cables. There is the risk of fire.
•Do not replace or change the mains cable. Contact the service centre.
•Make sure not to squash or cause damage to the mains plug (if applicable) and cable behind the appliance.
•Do not pull the mains cable to disconnect the appliance. Always pull the mains plug– if applicable.
Use
•The appliance is only for domestic use. Do not use the appliance for commercial and industrial use.
•Only use the appliance for domestic cooking tasks. This is to prevent physical injury to persons or prevent damage to property.
•Do not use the appliance as a work surface or storage surface.
•The interior of the appliance and the accessories become hot during use. There is the risk of burns. Use safety gloves when you insert or remove the accessories or pots.
•Be careful when you remove or install the accessories to prevent damage to the oven enamel.
•Always stay away from the appliance when you open the door while the appliance is in operation. Hot steam can release. There is the risk of skin burns.
•To prevent damage or discoloration to the enamel:
–do not put any objects directly on the appliance floor and do not cover it with aluminium foil;
–do not put hot water directly into the appliance;
–do not keep moist dishes and food in the appliance after you finish the cooking.
•Discoloration of the enamel has no effect on the performance of the appliance
•Do not apply pressure on the open door.
•Always close the appliance door when you cook, even while grilling.
Care and cleaning
• Before maintenance, switch off the appliance and disconnect the appliance from the power supply.
6Safety information
•Before maintenance, make sure that the appliance is cold. There is the risk of burns. There is the risk that the glass panels can break.
•Keep the appliance clean at all times. A build-up of fats or other foodstuff can result in a fire.
•Regular cleaning prevents the surface material from deteriorating
•Use a deep baking tray for very moist cakes to prevent that fruit juices cause stains that can be permanent.
•For your personal safety and the safety of your property, only clean the appliance with water and a soap. Do not use flammable products or products that can cause corrosion.
•Do not clean the appliance with steam cleaners, high-pressure cleaners, sharp objects, abrasive cleaning agents, abrasive sponges and stain removers
•If you use an oven spray, follow the instructions from the manufacturer.
•Do not clean the glass door with abrasive cleaning agents or metal scraper. Heat resistant surface of the inner glass can break and shatter.
•When the door glass panels are damaged they become weak and can break. You must replace them. Contact the service centre.
•Be careful when you remove the door from the appliance. The door is heavy!
•Do not clean catalytic enamel (if applicable).
Risk of fire
•Open the door carefully. The use of ingredients with alcohol can cause a mixture of alcohol and air. There is the risk of fire.
•Do not let sparks or open flames come near the appliance when you open the door.
•Do not put flammable products or items that are wet with flammable products, and/or fusible objects (made of plastic or aluminium) in, near or on the appliance.
Oven lamp
•Disconnect the appliance from the power supply before the replacement of the oven lamp. There is the risk of electrical shock!
Service centre
•Only an approved engineer can repair or work on the appliance. Contact an approved service centre.
•Use only original spare parts.
Disposal of the appliance
• To prevent the risk of physical injury or damage
–Disconnect the appliance from the power supply.
–Cut off the mains cable and discard it.
–Discard the door catch. This prevents children or small animals from being closed inside of the appliance. There is the risk of suffocation.
Product description |
|
7 |
|
|
|
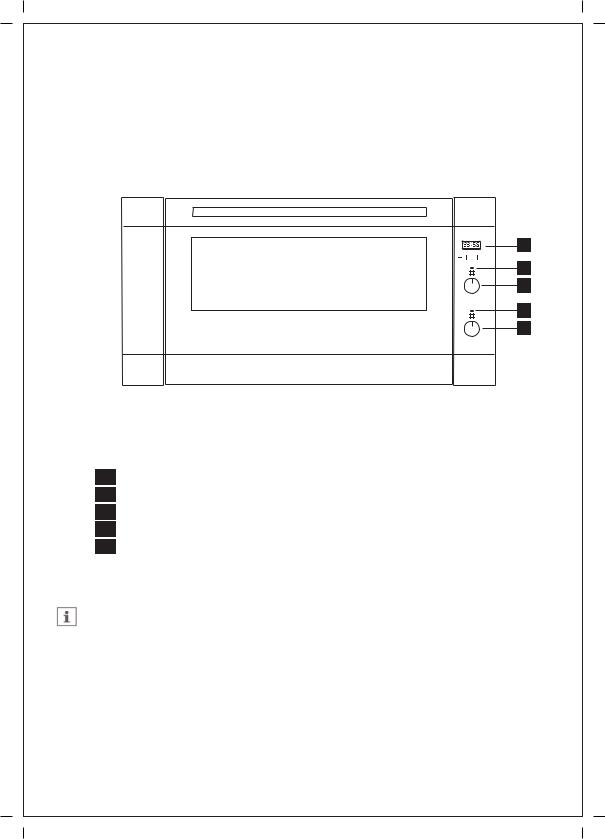
PRODUCT DESCRIPTION
Control panel
1
Mode
2
3
4
5
1
2
3
4
5
Electronic programmer Thermostat indicator lamp Thermostat knob
Power on indicator lamp Functions selector knob
IMPORTANT
It is important that all the operations related to installation and regulation be carried out by specialised staff in accordance with the norms in force. The specific instructions are described in the chapters for the installer. Before using the appliance, carefully remove the special protective film that protects the stainless steel or anodized aluminium items.
The oven’s thermal isolation and the grease residue from the work produce smoke and unpleasant odours during the first few minutes of use. We advise heating the empty oven to maximum temperature for about 45 minutes at first use.

8Before first use
OVEN ACCESSORIES
•Oven shelves
For dishes, cake tins, items for roasting and grilling.
•Baking tray
For cakes and biscuits
•Dripping tray
For baking and roasting or as a pan for collecting fat.
25 |
40 |
•Core temperature sensor
The core probe is particularly useful when cooking roasts and large cuts of meat. It is inserted directly inside the food to read the inside temperature.
Before first use |
|
9 |
|
|
|
BEFORE FIRST USE
WARNING!
Refer to "Safety information" chapter.
Initial Cleaning
•Remove all parts from the appliance.
•Clean the appliance before first use.
Refer to chapter "Care and Cleaning".
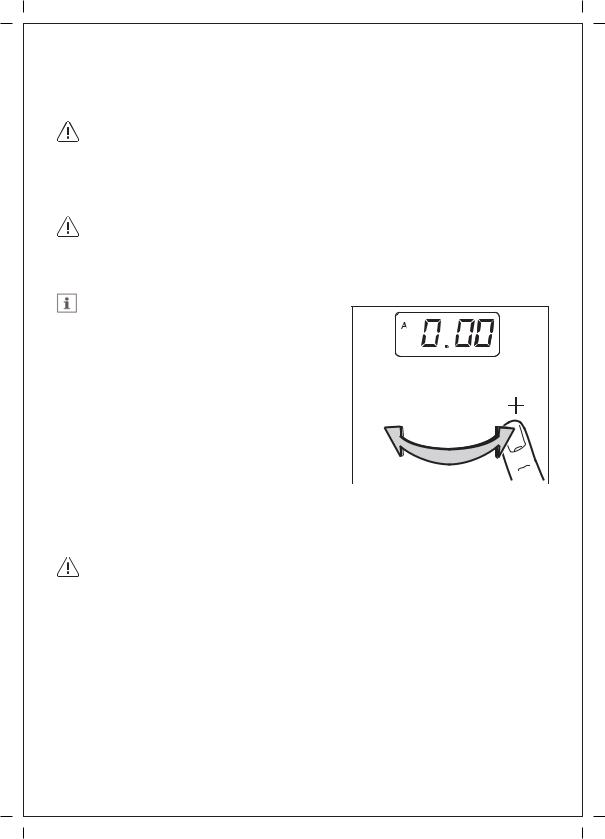
Setting the time
The oven works only with the time set.
On connecting the oven to the power supply, |
|
|
|
|
|
or when the power is restored after an outage, |
|
|
|
|
|
the symbol "A" (automatic) and the clock |
|
|
|
|
|
automatically flash on the display. |
|
|
|
Mode |
|
|
|
|
|
||
Press on the selector button (Mode) for about |
|
|
|
|
|
|
|
|
|
||
|
|
|
|
|
|
|
|
|
|
|
|
3 seconds and set the time using the sensor |
|
|
|
|
|
buttons " + " or " - ". |
|
|
|
|
|
After about 5 seconds, the display stops |
|
|
|
|
|
flashing and indicating the set time. |
|
|
|
|
|
|
|
|
|
|
DAILY USE
WARNING!
Refer to "Safety information" chapter.
Activating and deactivating the appliance
1.Turn the control knob for the oven functions to select an oven function.
2.Turn the control knob for the temperature to select a temperature.
3.To deactivate the appliance turn the control knobs for the oven functions and temperature to off position.
10 Before first use
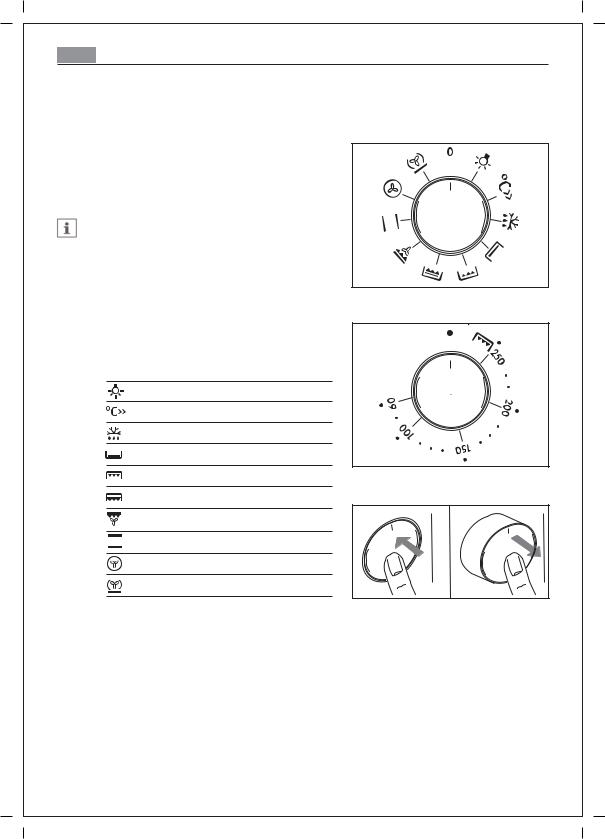
OVEN FUNCTIONS
Electric oven
Oven functions knob (fig. 6). Oven thermostat knob (fig. 7).
The function and thermostat symbols are on the retractable knobs.
To use the oven, press and release the knobs (fig. 8).
•These knobs allow you to choose the appropriate heating for the various types of cooking, activating the heating elements, and adjust the temperature setting as required.
Light
Fast heat up
Defrost
Bottom heat
Grilling
Fast grilling
Turbo grilling
Conventional cooking
True fan cooking
Pizza setting
Fig. 6
Fig. 7
Fig. 8
Before first use |
|
11 |
|
|
|
IMPORTANT
• This oven is always used with the DOOR CLOSED.
Traditional baking
•Turn the functions knob (fig. 6) to the symbol  and the thermostat knob
(fig. 7) to the required temperature. Preheating of the oven is recommended until the thermostat indicator light switches off, to show the selected temperature has been reached in the center of the oven. This function is recommended for the foods needing highest cooking temperatures or in earthenware pots. When heating food from the bottom shelf turn the function knob to the symbol  .
.
With this type of cooking use one tray for optimal cooking.
Forced convection baking
•Turn the function knob (fig. 6) to the symbol  , then turn the thermostat knob (fig. 7) to required temperature. With this function more than on tray may be used at the same time because hot air is forced by the fan around the food and between the trays.
Also the temperature to be selected for cooking is 10-15% lower than the corresponding value for traditional baking and the action of the hot air will do more uniformly dried and crust your food. When using one tray only the lower runner is suggested to be used in order to be easily checked by the oven window without opening the door. Preheating time will be very short (15 minutes are sufficient also for very sensitive items such as soufflés or whisked sponges) and the more common foods may be cooked from a “cold start”.
Cooking time
•This MULTIFUNCTION oven is engineered to offer you the best cooking way for the most common international foods. Cooking results are a matter of personal preference and may easily be adjusted to follow individual requirements by slight changes to the temperature or/and cooking time.
Using the grill
•Turn the function knob (fig. 6) to the symbol  (or to the symbol
  for small quantities of steaks).
FOR GRILLING TURN THE THERMOSTAT KNOB (fig. 7) TO THE 250  .
.

12 Before first use
Using turbo grilling |
|
• The fan assisted grill functions, corresponding to the symbol |
are suitable for wet |
or thick food because the action of the hot air will provide even distribution cooking, and the heat will enter into the food more gradually by reducing the radiation of the grill. When using this function turn they knob on 200°C thermostat.
Defrost
•Turn the selector knob to “  ”.
”.
This activates the fan motor, which speeds up defrosting of food by circulating air inside the oven chamber.
Turn the oven thermostat knob (fig. 7) to 250°C.
IMPORTANT
Always set the grill grid in the highest possible rack (but not too close to the heating element: fatty foods give off smoke and may start a fire) place a pan in the lowest possible rack for collecting juice. If a grease fire should occur in a pan put out the flame by placing a lid on the pan: NEVER THROW WATER ON A GREASE FIRE.
Thermostat indicator lamp
•This light is on when you turn the thermostat knob and switches off when the oven reaches the selected temperature and will cycle on and off during the cooking in line with the oven temperature.
Oven lamp
•This light is always on with every selected function by the function knob (fig. 6). When needing the inside lighted up without any heating element switched on turn the selector knob to the symbol  .
.
Using the accessories |
|
13 |
|
|
|
USING THE ACCESSORIES
WARNING!
Refer to "Safety information" chapter.
Core temperature sensor
• Insert the probe in the meat so that the tip is in the centre of the food.
• Insert the probe plug in the socket located on the side of the oven.
Removing the temperature sensor
Attention: The core temperature sensor is very hot!
Risk of burns when removing the probe tip and plug!
•Unplug the probe and take the meat out of the oven.
•Switch the oven off.
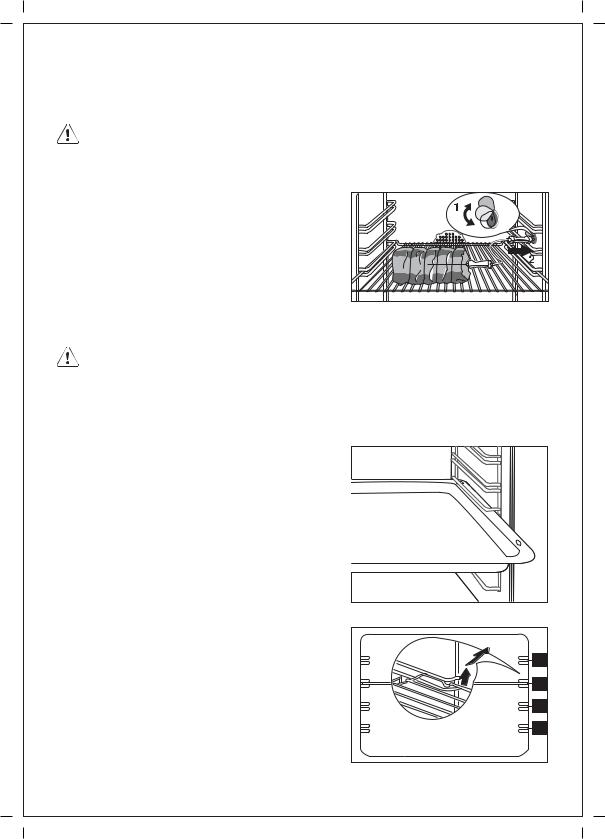
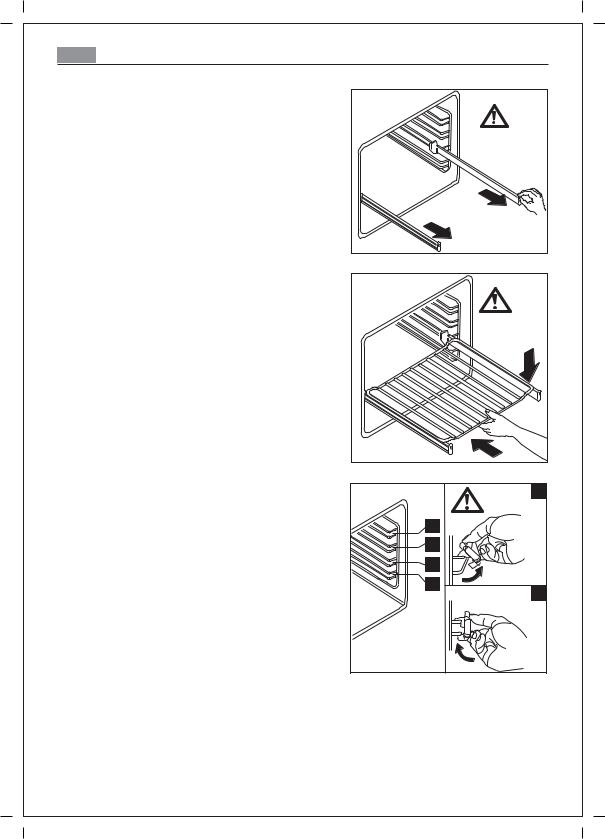
Inserting the drip-tray
• Insert the drip-tray between the side guides, on one of the oven levels.
Inserting the shelf
•Insert the shelf between the side guides, on one of the oven levels.
•There are two indentations on the side edges of the shelf. This shape prevents the grill from overturning.
•To remove the shelf from the oven, pull it outward, tilting it up.
4 |
3 |
2 |
1 |
14 |
Using the accessories |
|
|
Telescopic runners |
|
|
• Telescopic runners are fitted on the insertion |
°C |
|
levels. The telescopic runners facilitate |
|
|
insertion and removal of the shelves. |
|
|
1. Pull out the right and left telescopic |
|
|
runners. |
|
2.Insert the shelf on the telescopic runners and gently push them inside the oven.
•The telescopic runners can be put on cooking levels 1 - 2 - 3 - 4 following the steps shown in figure.
|
°C |
°C |
A |
|
|
4 |
|
3 |
|
2 |
|
1 |
B |
|
Using the accessories |
|
15 |
|
|
|
ATTENTION
Do not close the door if the telescopic runners are not completely inside the oven. Otherwise the door glass and enamel could become damaged.
ATTENTION
The telescopic runners and other accessories become very hot when the appliance is being used. Wear oven gloves or use equivalent protection.
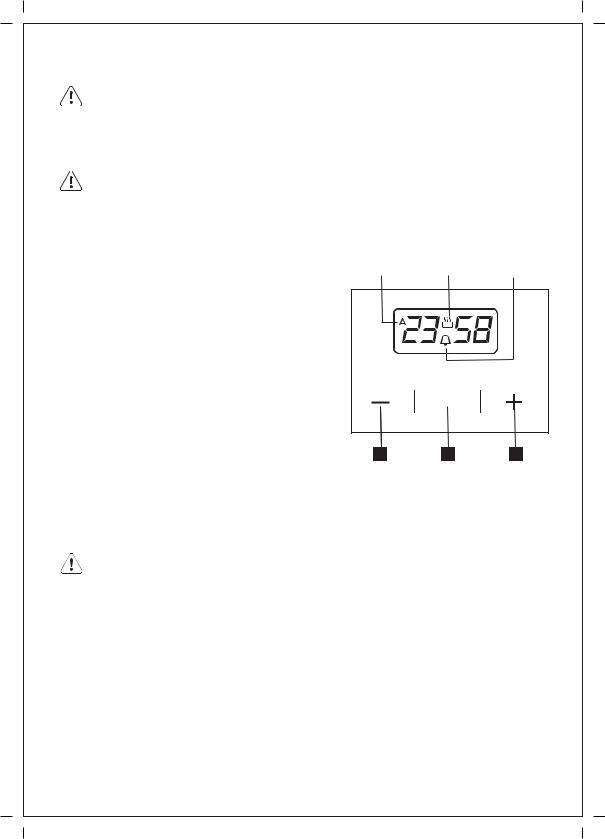
Display
|
|
1 |
Automatic mode indicator |
|
On indicator |
2 |
|
|
Timer indicator |
3 |
|
|
" + " button |
4 |
|
|
Selection button |
5 |
|
|
" - " button |
65 |
Setting functions
Timer
1 |
|
2 |
|
3 |
Mode
6 |
5 |
4 |
•By pressing the selector button mode for about 3 seconds the display and the bell symbol  appears. Set the desired time with the + / - buttons.
The setting is completed after five seconds.
•An acoustic signal sounds at the end of the set time; the signal can be stopped by pressing the mode button.
Press the + and - buttons together (for about 3 seconds) to return to manual mode.
The pot symbol  will appear on the display.
Semiautomatic mode with cooking duration
•Press on the selector button mode for about 3 seconds and lightly touch it several times until the message Dur appears on the display. Set the desired duration with the + / - buttons. The pot symbol  and the symbol "A" (automatic) will appear.
Cooking will start immediately and at the end of the set time, the oven switches off and the acoustic signal sounds.
The acoustic signal stops on pressing the mode button.
Press the + and - buttons together (for about 3 seconds) to return to manual mode. The pot symbol  will appear on the display.

16 Using the accessories
Semiautomatic mode with cooking end.
•Press on the selector button mode for about 3 seconds and lightly touch it several times until the message End appears on the display. Set the desired cooking end time with the + / - buttons. The pot symbol and the symbol "A" light up.
When then time coincides with the set cooking end time, the oven switches off and an acoustic signal sounds.
The acoustic signal stops on pressing the mode button.
Press the + and - buttons together (for about 3 seconds) to return to manual mode. The pot symbol  will appear on the display.
Fully automatic mode
•Press on the selector button mode for about 3 seconds and lightly touch it several times until the message Dur appears on the display. Set the desired duration with the + / - buttons.
Press on the selector button mode again and the message End will appear; set the desired cooking end time with the + / - buttons.
The pot symbol appears when the time coincides with the required start time.
At the end of the automatic programme, the acoustic signal sounds, the pot symbol goes off and the oven switches off. Press the mode button to stop the acoustic signal. Press the + and - buttons together for about 3 seconds to return to manual mode. The pot symbol  will appear on the display.
WARNING!
please be aware that when selecting the delay start function, condensation will occur at the end of the cooking cycle; this will show on the oven walls cavity and door inner glass.
Checking programmes
The time remaining in set programmes can be always be checked by selecting the previously set programmes again.
Setting the temperature in the centre of the meat
•After having connected the core temperature sensor, the display shows two important temperatures:
-The instantaneous temperature measured in the centre of the meat. (indicated by the two digits on the left part of the display - pre-set value 30 °C).
-the desired temperature in the centre of the meat (indicated by the two digits on the right part of the display - pre-set value 80 °C).
Press on the + button for about 3 seconds and set the desired temperature in the centre of the meat with + and - buttons.

Helpful hints and tips 17
•Set the cooking function and the oven temperature. An acoustic signal sounds when the set temperature in the centre of the meat is reached and the oven switches off automatically.
Press any button to stop the signal and turn off the oven by turning the central knobs on position " 0 ".
Cooling fan
•The oven is equipped with a fan for cooling the control panel, knobs and oven door grip. To prevent dangerous overheating, this fan continues to work EVEN AFTER THE OVEN IS SWITCHED OFF, until the temperature falls to normal levels.
HELPFUL HINTS AND TIPS
Information on acrylamides
Important! According to the newest scientific knowledge, if you brown food (specially the one which contains starch), acrylamides can pose a health risk. Thus, we recommend that you cook at the lowest temperatures and do not brown food too much.
Cooking
General instructions
•The new oven can cook/roast differently with respect to the oven previously used. Therefore, it is advisable to adapt the basic settings normally used (temperature, cooking times, etc.) and the activation levels according to that given in the tables.
•In case of prolonged cooking times, the oven may be switched off about 10 minutes beforehand, in order to exploit the residual heat.
With frozen foods, the plates used can become buckled during cooking. The buckling should disappear once the plates have cooled. Using the cooking tables
•It is advisable to set the lowest temperature value the first time.
•For personal recipes not mentioned among those in the tables, use the values given for similar recipes.
•For baking cakes on several levels, the time required may increase by 1015 minutes.
•Food and cakes of different heights may show different amounts of browning at the start of baking/cooking. If so, do not change the temperature setting. These differences are reduced during baking/cooking.
18 Helpful hints and tips
Cooking table
type of |
|
Quantity |
|
Guide No. |
|
Temperature |
|
Time |
|
pre-heating |
cooking |
|
kg |
|
from bottom |
|
°C |
|
in min. |
|
|
|
|
|
|
|
|
|
|
|
|
|
|
|
|
|
|
|
|
|
|
|
|
Sponge cake |
0,5x2 |
2 |
175 |
35 |
no |
|||||
Pizza |
|
1 |
|
3 |
|
max |
|
15 |
|
yes |
Chicken |
|
21/2 |
|
2 |
|
200 |
|
100 |
|
no |
|
|
|
|
|
|
|
|
|
|
|
type of |
|
Quantity |
|
Guide No. |
|
Temperature |
|
Time |
|
pre-heating |
cooking |
|
kg |
|
from bottom |
|
°C |
|
in min. |
|
|
|
|
|
|
|
|
|
|
|
|
|
|
|
|
|
|
|
|
|
|
|
|
|
|
|
|
cooking |
|
|
|
|
|
|
|
|
|
|
multiple sngle |
|
|
|
|
|
|
|
|
|
|
|
|
|
|
|
|
|
Sponge cake |
|
0,5x4 |
|
2+4 |
|
170 |
|
50 |
|
no |
Sponge cake |
|
0,5x2 |
|
3 |
|
170 |
|
40 |
|
no |
Pizza |
|
1+1 |
|
2+4 |
|
max |
|
15+5* |
|
yes |
|
|
|
|
|
|
|
|
|||
Pizza |
|
1 |
|
3 |
|
max |
|
12-15 |
|
yes |
|
|
|
|
|
|
|
||||
Chicken |
|
21/2 |
|
2 |
|
200 |
|
90 |
|
yes |
(*)= To obtain a good result, we advise inverting the level of the trays during the last 5 minutes of cooking.
type of |
|
Quantity |
|
Guide No. |
|
Temperature |
|
Time |
|
pre-heating |
cooking |
|
kg |
|
from bottom |
|
°C |
|
in min. |
|
|
|
|
|
|
|
|
|
|
|
|
|
Toast |
|
|
|
4 |
|
max |
|
50 |
|
yes |
Mixed grill |
|
|
|
3 |
|
max |
|
20 |
|
yes |
Smoked bacon |
|
|
|
4 |
|
max |
|
6 |
|
yes |
Hamburger |
|
11/2 |
|
4 |
|
max |
|
10+8 |
|
yes |
|
|
|
|
|
|
|
|
|
||
Sausages |
|
|
|
4 |
|
max |
|
18 |
|
yes |
|
|
|
|
|
|
|
|
|
||
Pork chop |
11/2 |
|
4 |
|
max |
|
10+10 |
|
yes |
|
Steak |
|
11/2 |
|
4 |
|
max |
|
8+6 |
|
yes |
|
|
|
|
|
|
|
|
|
|
|
type of |
|
Quantity |
|
Guide No. |
|
Temperature |
|
Time |
|
pre-heating |
cooking |
|
kg |
|
from bottom |
|
°C |
|
in min. |
|
|
|
|
|
|
|
|
|
|
|
|
|
Chicken |
|
1 |
|
2 |
|
200 |
|
25+15 |
|
yes |
|
|
|
|
|
|
|
|
|
|
|

Care and cleaning 19
CARE AND CLEANING
IMPORTANT
•Cleaning should be carried out when the appliance is COOL AND SWITCHED OFF AT THE MAINS SUPPLY.
Always clean off spillage as quickly as possible to prevent burning on which will make removal more difficult.
•Wash with a clean cloth soaked in hot soapy water, rinse and dry with a soft cloth.
 WARNING
•Do not use abrasives, caustic pastes or sprays, coarse cleaning pads or powders.
•Do not use excessive water when cleaning your oven in order to avoid water passing through clefts into the back of controls panel or of the unit.
•Do not use harsh abrasive cleaners or sharp metal scrapers to clean the oven door glass they can scratch the glass surface, which may result in shattering of the glass.
•Do not use steam cleaners to clean the oven.
The oven accessories (shelve, grid, oven shelf carriers) and the oven door also, can be removed for easier washing, to be done with a mild detergent solution. The slots in the front of the appliance for the passage of the air must carefully kept unobstructed for an efficient cooling of the unit.
Shelf support
• The shelf support is fixed with three pins; simply push the support slightly downwards to remove it.
20 Care and cleaning
Oven light
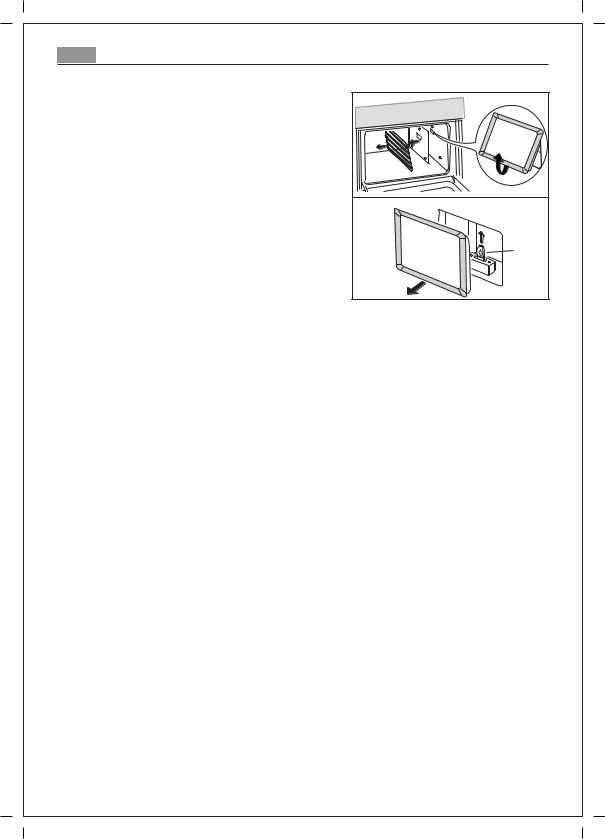
•When the oven is cool, reach the light glass cover and disassemble it as shown in figure. Replace the bulb A with a new one with the same specifications and reassemble the cover. Bulb replacement is not covered by your Guarantee.
 WARNING
•Ensure that the appliance is switched off before replacing the lamp to avoid the possibility of electric shock.
A |
A |
|
Care and cleaning 21
Removal of oven door
•To make cleaning easier, remove the oven door as follows:
1)Open the oven door completely.
2)Flip the hinge hooks "A" outwards (see fig. 9).
3)Shut the oven door slowly until it reaches hooks "A", making sure these are locked into slots "B" of the oven door, as shown in fig. 10.
4)Using both hands, push the oven door lightly inwards, toenable the door hinges "C" to come away from the slots "D" (see fig. 11) and pull the door towards you until it is released from the oven.
•After cleaning it, reposition it correctly following the abovesteps in the reverse order and flipping hooks "A" inwardsbefore you shut the oven door (fig. 12).
A |
A |
B
A 
Fig. 9 |
Fig. 10 |
|
A |
C |
|
D |
|
Fig. 11 |
Fig. 12 |
 WARNING
•Do not use rough or abrasive materials or sharp metal scrapers to clean the glass doors of the oven since they may scratch the surface and cause the glass to break.

22 Care and cleaning
Removal of interior glasses of the oven door
•The interior glasses of the oven door can be removed:
with the oven door in semi-open position, remove the glass stoppers A (as shown in fig. 12A), profile B (fig. 12B) and, using both hands, remove the first glass C as shown in figure 12C.
•Open the oven door completely and remove the second glass D using both hands as shown in figure 12D.
1 |
Fig 12A |
Fig 12B |
2 |
A |
B |
|
||
|
|
|
3 |
|
|
|
|
R |
|
|
D |
C |
|
|
Fig 12C |
Fig 12D |
Fig 12E |
•After cleaning, reassemble the glasses following the above steps in the reverse order.
 WARNING
•The glass must be reassembled correctly so that the symbol (R), printed on the surface, is in the 'lower-right corner when the door is completely open (Fig. 12E). Replace the rubbers in the points indicated by Fig. 12F.
•Be careful, because the glasses could shatter. In this case, do not use the oven anymore and call the after-sales service.
Fig 12F |

Installation Instructions |
|
23 |
|
|
|
INSTALLATION INSTRUCTIONS
 WARNING
•Attention: The new appliance may only be installed and connected by a registered expert.
Please comply with this. If you do not, any damage resulting is not covered by the warranty.
Safety information for the installer
•If supply cord damaged, it must be replaced by the manufacturer or approved service agent.
•The electrical installation is to be set up so that the appliance can be isolated from the mains with a minimum 3mm all-pole contact separation.
Suitable separation devices include e.g. cut-outs, fuses (screw fuses are to be taken out of the holder), RCD’s and contactors.
•Anti-shock protection must be provided by the installation.
•The built-in unit must meet the stability requirements of DIN 68930.
•Means for disconnection must be incorporated in the fixed wiring in accordance with the local wiring rules.
Only for Denmark:
Important! The conductor having green/yellow insulation shall only be connected to a terminal marked  or
or  .
.
24 Installation Instructions
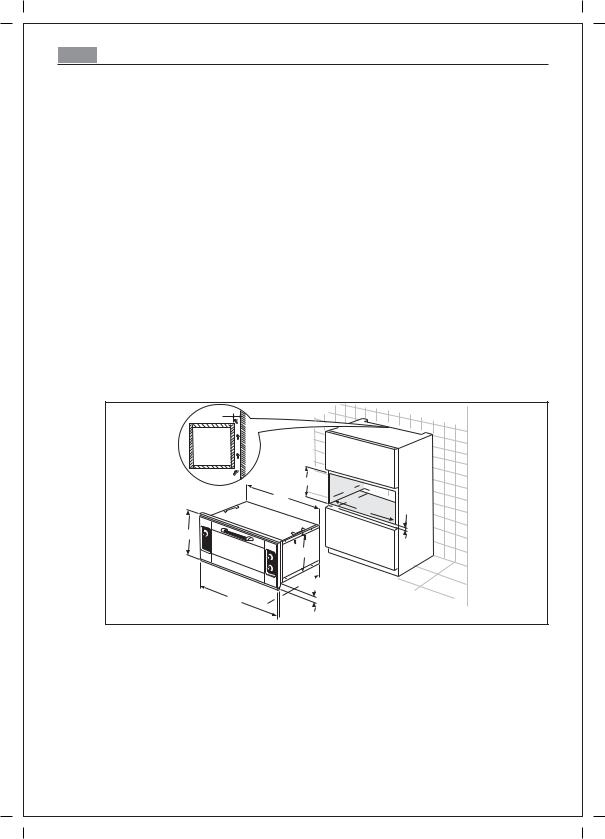
Fitting in modular cabinets
•For proper operation of appliances fitted in modular cabinets, the cabinets must have suitable characteristics; given below are the dimensions of the oven and the compartment, and instructions for fitting and assembly (Fig. 14 and 15).
•In conformity with the safety regulations, protection against contact with the electrical parts must be ensured by correct fitting of the appliance.
•All the parts ensuring protection, and even a covering panel (e.g. if the appliance is positioned at the beginning or end of modular units), must be fixed in such a way that they cannot be removed without the aid of a tool. In modular units, the layers of plastic material in veneered wood must be worked with adhesives resistant to a temperature of 120°C.
•Plastic materials and adhesives not resistant to this temperature are the cause of warping and ungluing.
50
467
895 |
±1 |
460 
855
455
545
550 min. 

 450
450 
 860
860
20 
12
15min
Building-in
Fig. 14
Installation Instructions |
|
25 |
|
|
|
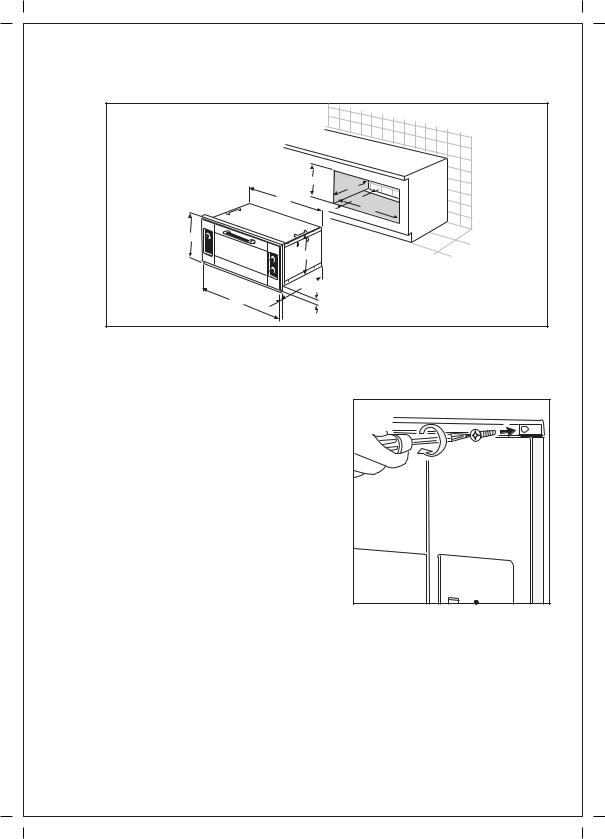
Building under
|
460 |
550 min. |
|
|
|
855 |
|
450 |
|
|
860 |
467
455
545
895 |
±1 |
20 |
12
Fitting and assembly
•Insert the appliance in the compartment; fix the oven casing to the cabinet with four wood screws suitable for the special holes made in the perimeter frame (fig. 16).
•If also inserting a top equipped with electric hotplate, the electrical connection of the top and that of the oven must be made separately, for electrical reasons and to facilitate oven removal.
•Any extensions must be made with cables suitable for the required power.
Fig. 15
Fig. 16

26 What to the if...
WHAT TO DO IF…
WARNING!
Refer to "Safety information" chapter.
Problem |
|
Possible cause |
|
Remedy |
|
|
|
|
|
|
|
|
|
|
The oven does not heat up |
|
The oven is not switched on |
|
Switch on the oven (refer to |
|
|
|
|
chapter "Daily use) |
The oven does not heat up |
|
The fuse in the fuse box is |
|
Control the fuse. If the fuse is |
|
|
released |
|
released more than one time, |
|
|
|
|
refer to a qualified electrician. |
The oven lamp does not operate |
|
The oven lamp is defective |
|
replace the oven lamp |
|
|
|||
|
|
|
|
|
Steam and condensation settle |
|
You left the dish in the oven |
|
Do not leave the dishes in the |
on the food and in the oven |
|
for too long |
|
oven for longer than 15-20 |
cavity |
|
|
|
minutes after the cooking |
|
|
|
|
processends |
|
|
|
|
|
If you cannot find a solution to the problem yourself, contact your dealer or the service
centre.
The necessary data for the service centre is on the rating plate. The rating plate is on
the rear frame of the oven.
We recommend that you write the data here:
Model (MOD.) .........................................
Product number (PNC) .........................................
Serial number (S.N.) .........................................

Environment concerns |
|
27 |
|
|
|
ENVIRONMENTAL CONCERNS
This appliance is marked according to the European directive 2002/96/EC on Waste Electrical and Electronic Equipment (WEEE).
By ensuring this product is disposed of correctly, you will help prevent potential negative consequences for the environment and human health, which could otherwise be caused by inappropriate waste handling of this product.
The symbol  on the product, or on the documents accompanying the product, indicates that this appliance may not be treated as household waste. Instead it shall be handed over to the applicable collection point for the recycling of electrical and electronic equipment. Disposal must be carried out in accordance with local environmental regulations for waste disposal.
For more detailed information about treatment, recovery and recycling of this product, please contact your local city office, your household waste disposal service or the shop where you purchased the product.
 WARNING!
Important: if the oven is no longer to be used, it should be made inoperable by cutting the power supply cable, after unplugging it from the power supply. Disused appliances can be a safety risk as children often play with them. For this reason it is advisable to make the oven safe.

28
FÖR PERFEKT RESULTAT
Tack för att du har valt denna AEG-produkt. Vi har skapat den för att ge dig en klanderfri prestanda i många år, med nyskapande teknik som hjälper till att göra livet enklare. Funktioner som du kanske inte finner hos vanliga apparater. Var vänlig ägna några minuter åt att läsa för att få ut det allra bästa av den.
TILLBEHÖR OCH KONSUMTIONSVAROR
I AEG:s webbutik hittar du allt du behöver för att hålla alla dina AEG-apparater fläckfria och i perfekt skick. Tillsammans med ett brett sortiment av tillbehör som har utformats och konstruerats enligt de höga kvalitetsnormer som du förväntar dig, från kokkärl till bestickkorgar, från flaskhållare till tvättpåsar för ömtåliga plagg...
Besök webbutiken på:
www.aeg-electrolux.com/shop
Innehåll 29
INNEHÅLL
4 Säkerhetsanvisningar
7 Produktbeskrivning
8 Före den första användningen
13 Användning av tillbehören
17 Praktiska råd och tips
19 Skötsel och rengöring
23 Installationsanvisningar
26 Vad gör jag om...
27 Miljöhänsyn
Följande symboler används i texten:
Viktiga upplysningar angående din personliga säkerhet och information om hur man undviker att skada apparaten.
Allmän information och tips.
Miljöinformation.
Ändringar kan göras utan föregående meddelande.
30 Säkerhetsanvisningar
SÄKERHETSANVISNINGAR
Läs denna bruksanvisning noggrant före installation och användning:
•För din personliga säkerhet och din egendoms säkerhet
•Av respekt för miljön
•För korrekt användning av apparaten.
Förvara alltid dessa instruktioner tillsammans med apparaten även om du flyttar eller säljer den. Tillverkaren är inte ansvarig om felaktig installation eller användning leder till skador.
Barn och sårbara människors säkerhet
•Denna apparat kan användas av barn från 8 år och uppåt samt av personer med nedsatt fysisk, sensorisk eller mental förmåga eller brist på erfarenhet och kunskap om de övervakas eller har fått instruktioner om säker användning av apparaten samt förstår de risker som finns. Barn får inte leka med apparaten.
•Håll allt förpackningsmaterial utom räckhåll för barn. Det finns risk för kvävning eller fysisk skada.
•Håll barn och djur borta från apparaten när luckan är öppen eller apparaten är i drift. Det finns risk för skada eller annan permanent funktionsnedsättning.
•Om apparaten har Barnlåseller Nyckellåsfunktion (Kontrollås) använd den. Den hindrar barn och djur från oavsiktlig användning av apparaten.
Allmän säkerhet
•Ändra inte apparatens specifikationer. Det finns risk för personskador och skador på apparaten.
•Låt inte apparaten stå utan uppsikt under driften.
•Stäng av apparaten efter varje användning.
Installation
•Endast en behörig elektriker kan installera och ansluta apparaten. Kontakta en godkänd serviceverkstad. Detta för att förebygga risken för strukturella eller fysiska skador.
•Kontrollera att inte apparaten har skadats under transporten. Anslut inte en skadad apparat. Kontakta leverantören om det är nödvändigt.
•Ta bort allt förpackningsmaterial, klistermärken och omslag från apparaten före den första användningen. Avlägsna inte typskylten. Detta kan upphäva garantin.
•Se till att apparaten är skiljd från elnätet under installationen.
•Var försiktig när du flyttar på apparaten. Apparaten är tung. Använd alltid skyddshandskar. Lyft inte apparaten i handtaget.
•Du måste ha rätt isoleringsutrustning: linjeskyddande frånslagsdon, säkringar (säkringar av skruvtyp som avlägsnats från hållaren), jordfelsbrytare och kontaktorer.
•Se till före installationen att inbyggnadsskåpet har de rätta dimensionerna.
 Loading...