


Instruction Manual
5-in-1 PRO Weather Sensor
model 06014RM
Package Contents
1. 5-in-1 PRO Weather Sensor
2. Mounting Hardware
3. Sensor Mounting Bracket
4. Instruction Manual
IMPORTANT |
PRODUCT MUST BE REGISTERED |
TO RECEIVE WARRANTY SERVICE |
|
PRODUCT REGISTRATION |
|
Register online |
|
to receive 1 year |
|
warranty protection |
► |
www.AcuRite.com |
|
|
Register a Product |
Questions? Contact Customer Support at (844) 228-5465 or visit www.AcuRite.com.

Features & Benefits
1
2
11
6
5-IN-1 SENSOR
1.Rainfall Collector Funnel
2.Solar Cell Panels
Converts sunlight into power to run
internal aspirating fan.
Internal Aspirating Fan
(not shown)
Draws ambient air into
sensor to reduce solar radiation heating, resulting in more accurate temperature measurement.
3.A-B-C Switch
ID code that must match display’s
A-B-C switch to ensure units synchronize.
4.Battery Compartment
7
9
3 4
5 8
10
5.Temperature & Humidity Sensors
(internal)
6.Mounting Point
7.Wind Speed Anemometer
8.Wind Direction Vane
9.Mounting Bracket
10.Mounting Hardware includes anchors & screws.
Qty |
|
Diameter Length |
5 |
#4 |
3/4” |
1 |
#4 |
1/2” |
1 |
#6 |
1/2” |
11.Debris Filter
Pre-installed to prevent debris from entering the rain gauge.
2
SETUP
5-in-1 Sensor Setup
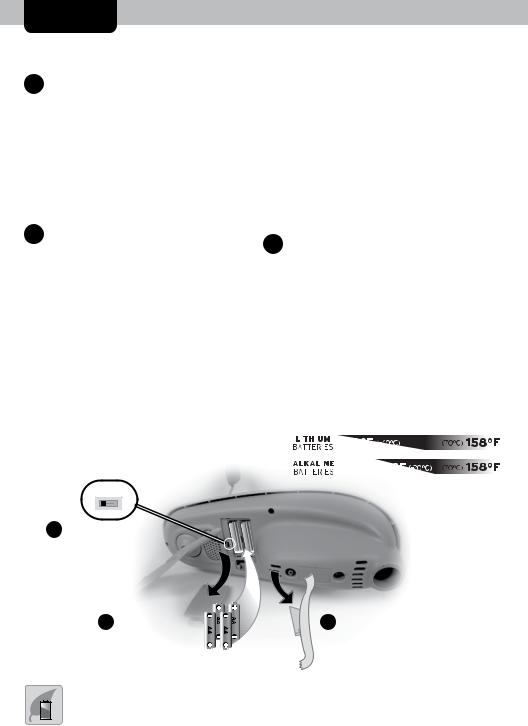
1 Set the A-B-C Switch
Locate the A-B-C switch inside the battery compartment. Set the A-B-C switch to A, B or C. You must select the same letter choice for both the sensor and the companion unit (not included) in order for the units to synchronize.
The 5-in-1 sensor requires lithium batteries in low temperature conditions. Cold temperatures can cause alkaline batteries to function improperly. Use lithium batteries in the 5-in-1 sensor for temperatures below -4ºF / -20ºC.
2 Install or Replace Batteries |
3 Remove Rain Gauge Stabilizer |
|||||||||
Batteries MUST be installed for |
||||||||||
Locate and remove the rain gauge |
||||||||||
this product to operate. AcuRite |
||||||||||
stabilizer (plastic tab) taped into |
||||||||||
recommends high quality alkaline |
||||||||||
the bottom of the sensor. The rain |
||||||||||
or lithium batteries for the best |
||||||||||
gauge will not function until this is |
||||||||||
product performance. Heavy duty |
||||||||||
removed. |
||||||||||
or rechargeable batteries are not |
||||||||||
|
|
|
|
|
|
|
|
|
||
recommended. |
|
|
|
|
|
|
|
|
|
|
|
|
|
|
|
|
|
|
|
|
|
|
|
|
|
|
|
|
|
|
|
|
|
|
|
|
|
|
|
|
|
|
|
|
|
|
|
|
|
|
|
|
|
|
|
|
|
|
|
|
|
|
|
|
|
|
|
|
|
|
|
|
|
|
|
|
A B C
1 A-B-C Switch
2 |
Install Batteries |
3 |
Rain Gauge Stabilizer |
|
4 AA Batteries |
|
Remove and discard |
PLEASE DISPOSE OF OLD OR DEFECTIVE BATTERIES IN AN ENVIRONMENTALLY SAFE WAY AND IN ACCORDANCE WITH YOUR LOCAL LAWS AND REGULATIONS.
BATTERY SAFETY: Clean the battery contacts and also those of the device prior to battery installation. Remove batteries from equipment which is not to be used for an extended period of time. Follow the polarity (+/-) diagram in the battery compartment. Promptly remove dead batteries from the device. Dispose of used batteries properly. Only batteries of the same or equivalent type as recommended are to be used. DO NOT incinerate used batteries. DO NOT dispose of batteries in fire, as batteries may explode or leak. DO NOT mix old and new batteries or types of batteries (alkaline/standard). DO NOT use rechargeable batteries. DO NOT recharge non-rechargeable batteries. DO NOT short-circuit the supply terminals.
3
 Loading...