


CONTENTS |
|
Unpacking Instructions.............. |
2 |
Package Contents..................... |
2 |
Product Registration.................. |
2 |
Features & Benefits: Rain Gauge.... |
3 |
Features & Benefits: Display......... |
4 |
Setup....................................... |
5 |
Rain Gauge Setup.................... |
5 |
Display Setup........................... |
6 |
Set Time, Date & Units.............. |
7 |
Placement Guidelines................ |
7 |
Instruction Manual
Rain Gauge
model 02446
Rain Gauge Installation............. |
8 |
Using the Rain Gauge............... |
9 |
Programmable Rain Alarm........ |
9 |
Troubleshooting...................... |
10 |
Calibration.............................. |
11 |
Care & Maintenance.............. |
12 |
Specifications......................... |
12 |
FCC Information..................... |
12 |
Customer Support................... |
13 |
Warranty............................... |
13 |
Questions? Contact Customer Support at www.AcuRite.com/support or email support@chaney-inst.com
SAVE THIS MANUAL FOR FUTURE REFERENCE.

Congratulations on your new AcuRite product. To ensure the best possible product performance, please read this manual in its entirety and retain it for future reference.
Unpacking Instructions
Remove the protective film that is applied to the LCD screen prior to using this product. Locate the tab and peel off to remove. Remove packing materials from inside of the rain gauge.
Package Contents
1.Display
2.Rain Gauge
3.Instruction Manual
IMPORTANT PRODUCT MUST BE REGISTERED
TO RECEIVE WARRANTY SERVICE
PRODUCT REGISTRATION
Register online to receive 1 year warranty protection
www.AcuRite.com
2
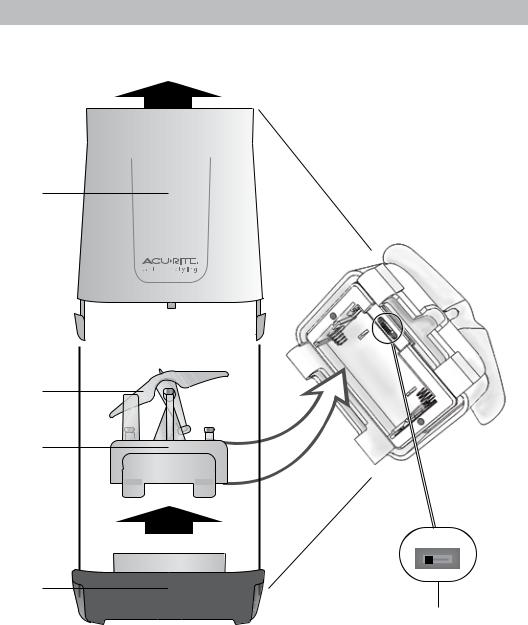
Features & Benefits
1
2
3
SQUEEZE
4
RAIN GAUGE
1.Rain Gauge Cover
2.Rain Gauge Tipping Cups
Collects and empties rain for continuous rain measurement.
5
3.Battery Compartment & Electronics Box
4.Rain Gauge Base
5.A-B-C Switch
ID code that must match display’s A-B-C switch to ensure units synchronize.
3
Features & Benefits
|
13 |
6 |
14 |
|
7
15
8
5 |
|
|
|
|
|
|
|
|
|
|
9 |
|
||||
|
|
|
|
|
|
|||||||||||
4 |
|
|
|
|
|
|
|
|
10 |
|
||||||
|
|
|
|
|
|
|
|
|
||||||||
|
|
|
|
|
|
|
|
|
|
|
|
|
|
|
|
|
|
|
|
|
|
|
|
|
|
|
|
|
|
|
|
|
|
3 |
|
|
|
|
|
|
|
|
|
|
|
|
|
|
|
|
|
|
|
|
|
|
|
|
|
|
|
|
|
|
|
|
|
2 |
|
|
|
|
|
|
|
|
|
|
|
|
11 |
16 |
||
|
|
|
|
|
|
|
|
|
|
|
||||||
|
|
|
|
|
|
|||||||||||
|
|
|
|
|
||||||||||||
|
|
|
|
12 |
|
|||||||||||
|
|
|
|
|||||||||||||
1
17
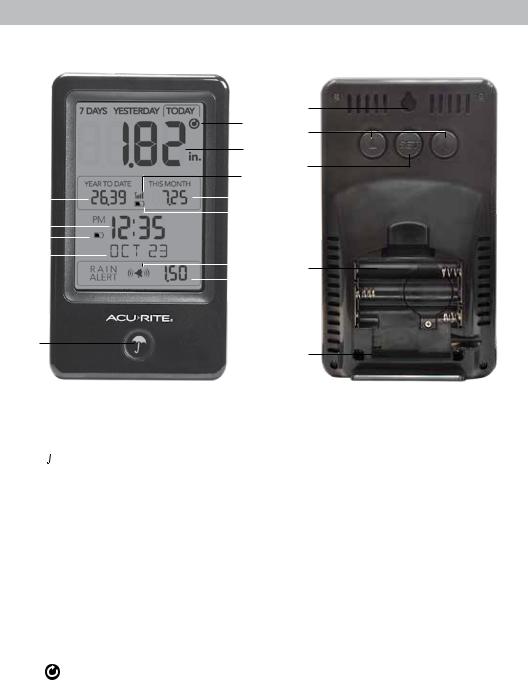
DISPLAY
1. Button
Press to manually toggle between rainfall readings for TODAY YESTERDAY, 7 DAYS, or by MONTH. Press and hold to automatically toggle between readings for TODAY, YESTERDAY and 7 DAYS.
2 . Date
3.Display Low Battery Indicator
4.Clock
5.Year-To-Date Rainfall Total
6.Icon
Indicates rainfall readings are in auto-cycle mode.
7.Rainfall Total
For time range indicated above.
8.Rain Gauge Signal Strength
9.Month-To-Date Rainfall Total
10.Rain Gauge Low Battery Indicator
11. Icon
Icon
Indicates a rain alert has been set.
12.Rain Alert Value
Alarm will sound if value is exceeded for today’s rainfall.
13.Integrated Hang Hole
For easy wall mounting.
14. &
& Buttons
For setup preferences and to adjust rain alert value.
15.SET Button
For setup preferences.
16.Battery Compartment
17.A-B-C Switch
For setup preferences.
18.Battery Compartment Cover
(not shown)
4

SETUP
Rain Gauge Setup
Install or Replace Batteries
AcuRite recommends high quality alkaline batteries for the best product performance. Heavy duty or rechargeable batteries are not recommended.
1 |
2 SQUEEZE |
SQUEEZE 3 |
4 |
|
LARGE |
LARGE |
|
|
TAB |
|
|
|
TAB |
|
|
|
|
|
SQUEEZE TABS TO OPEN
1.Separate rain gauge cover from the base by gently squeezing tabs and pulling the cover upwards.
2.Remove battery box by squeezing the two tabs on each end together.
3.Remove and discard cardboard rain gauge stabilizer.
4.Insert 2 x AA batteries into the battery compartment as shown. Follow the polarity (+/-) diagram in the battery compartment.
5.Securely place the battery box back into the rain gauge base.
6.Securely re-attach the rain gauge cover onto rain gauge base.
Set the A-B-C Switch
Locate the A-B-C switch inside the battery compartment. Set the A-B-C switch to A, B or C. You must select the same letter choices for both the rain gauge and the display in order for the units to synchronize.
A-B-C Switch
Set to match display
5
6
5
 Loading...