


 Loading...
Kodak EasyShare photo printer 300
User’s Guide
www.kodak.com
For interactive tutorials, www.kodak.com/go/howto

Eastman Kodak Company
Rochester, New York 14650
© Eastman Kodak Company, 2004
All screen images are simulated.
Kodak, EasyShare, and XtraLife are trademarks of Eastman Kodak Company.
P/N 4J3105

Product features
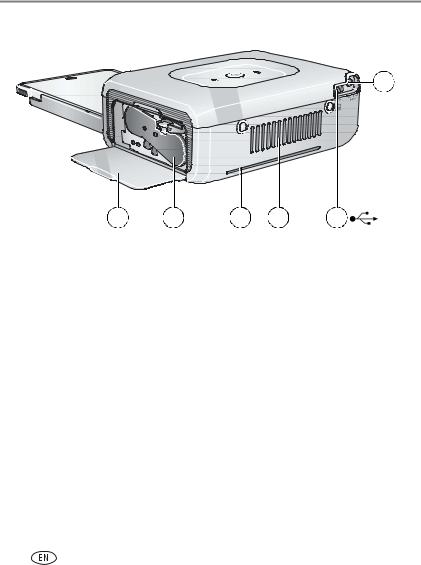
Front/top/side view
1
2
6
5
3
|
|
|
4 |
1 |
On/Off button/light |
4 |
Paper tray door |
2 |
Color cartridge light |
5 |
USB device connector (for PictBridge compatible device) |
3 |
Paper tray |
6 |
Paper light |
www.kodak.com/go/support |
i |
Product features
Back/top/side view
1
|
6 |
5 |
|
4 |
3 |
2 |
1 |
Power connector (DC-in) |
|
4 |
Slot for paper path |
|
|
2 |
USB connector (to computer) |
|
5 |
Color cartridge (installed as shown) |
||
3 |
Cooling vents |
|
6 |
Cartridge door |
|
|
ii |
www.kodak.com/go/support |

Table of contents |
|
|
1 |
Getting started ...................................................................................... |
1 |
|
Finding a location for your photo printer........................................................ |
1 |
|
Connecting and turning on the power ........................................................... |
2 |
|
Handling and storing the color cartridge ........................................................ |
3 |
|
Installing and removing the color cartridge .................................................... |
3 |
|
Handling and storing the paper ..................................................................... |
4 |
|
Loading the paper......................................................................................... |
5 |
|
Installing and removing the paper tray........................................................... |
6 |
|
Setting the picture quality on your digital camera........................................... |
7 |
2 |
Printing from a PictBridge compatible camera ...................................... |
8 |
|
Removing the perforated tabs from the paper................................................ |
9 |
|
Canceling printing......................................................................................... |
9 |
3 |
Installing software ............................................................................... |
10 |
|
Minimum system requirements .................................................................... |
10 |
|
Installing the software................................................................................. |
10 |
4 |
Printing from a computer .................................................................... |
13 |
|
Connecting to a computer ........................................................................... |
13 |
|
Canceling printing....................................................................................... |
16 |
5 |
Care and maintenance ........................................................................ |
17 |
|
General care ............................................................................................... |
17 |
|
Cleaning the paper feed roller ..................................................................... |
18 |
|
Traveling with your photo printer................................................................. |
19 |
www.kodak.com/go/support |
iii |

Table of contents |
|
|
6 |
Troubleshooting .................................................................................. |
20 |
|
Printing problems........................................................................................ |
20 |
|
Photo printer status lights ........................................................................... |
26 |
7 |
Getting help ........................................................................................ |
29 |
|
Helpful links................................................................................................ |
29 |
|
Telephone customer support ....................................................................... |
30 |
8 |
Appendix ............................................................................................. |
31 |
|
Photo printer specifications ......................................................................... |
31 |
|
Important safety instructions ....................................................................... |
32 |
|
Upgrading your software and firmware........................................................ |
32 |
|
Additional care and maintenance ................................................................ |
32 |
|
Warranty..................................................................................................... |
33 |
|
Regulatory information................................................................................ |
35 |
iv |
www.kodak.com/go/support |
1 Getting started
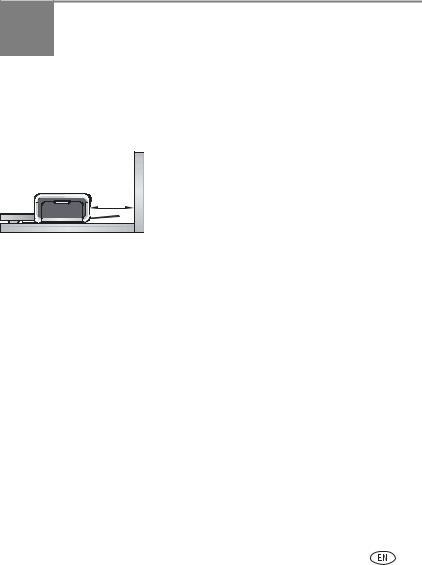
Finding a location for your photo printer
■Place the photo printer on a flat, clean, dust-free surface, in a dry location, and out of direct sunlight.
5 in.
(12.7 cm)
■Allow at least 5 in. (12.7 cm) clearance from the back of the photo printer for paper travel.
■For proper ventilation, make sure the top and back of the photo printer are not blocked.
■When connecting power or USB cables, keep the cables clear of the paper path to the front and rear of the photo printer.
■Avoid areas where ventilation ducts, open doors, or frequent passersby might expose the photo printer and paper to high levels of dust and debris. Airborne dirt particles can affect picture quality.
■Allow enough space on all sides of the photo printer to let you connect and disconnect cables, change the color cartridge, and add paper.
www.kodak.com/go/support |
1 |
Getting started
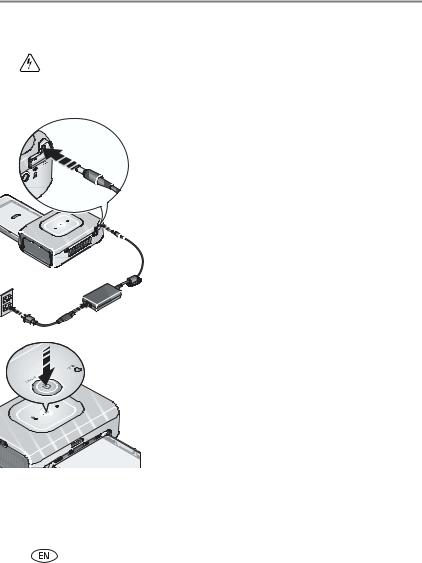
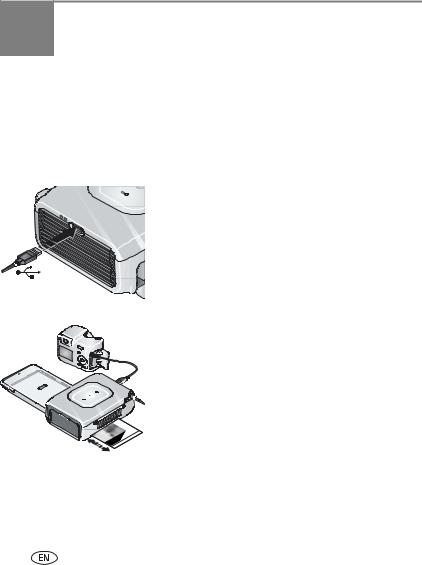
Connecting and turning on the power
RISK OF ELECTRIC SHOCK:
Use only the AC power adapter included with your photo printer. Other adapters or cords can damage your camera, photo printer, or computer.
1Connect the AC power cord to the AC power adapter, then to the back of the photo printer.
NOTE: The AC power cord included with your photo printer may not require assembly, and may be different from the one shown.
2 Plug the AC power cord into a power outlet.
3 Press the On/Off button,  , to turn the power on.
The photo printer initializes and the On/Off button glows steady green.
Turning the power off
To turn the power off, press and hold the On/Off button for two seconds.
2 |
www.kodak.com/go/support |

Getting started
Handling and storing the color cartridge
■For best quality prints, store the color cartridge in a location where the temperature does not exceed 85 °F (30 °C).
■To avoid getting fingerprints on the ribbon, handle the color cartridge by the spool ends.
■Keep the color cartridge away from direct sunlight and out of high-temperature environments (such as a vehicle parked in the sun).
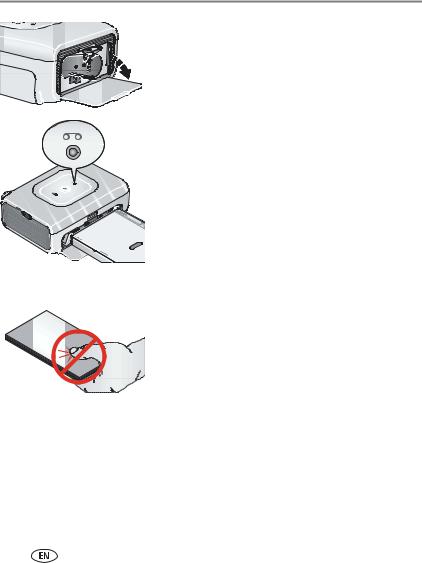
Installing and removing the color cartridge
1 Open the cartridge door on the side of the photo printer.
2Check to make sure there is no slack in the color cartridge ribbon.
To remove slack, push in on the cartridge spool, then rotate the spool clockwise.
IMPORTANT: Be careful not to rotate the spool more than necessary. Doing so could reduce the number of prints you are able to make.
3 Slide the color cartridge in, label side up, with the arrow pointing toward the photo printer. Push the cartridge until it "clicks" into place.
4 Close the cartridge door.
IMPORTANT: The color cartridge may lock in place if there is a paper error. Do not attempt to remove the cartridge without first clearing the paper error. Make sure the Paper light is off before attempting to remove the cartridge (see Paper light under Photo printer status lights, page 26).
www.kodak.com/go/support |
3 |
Getting started
To remove the color cartridge, open the cartridge door, then push up on the green lever and slide the cartridge out.
■ When 5 or fewer prints remain, the Color cartridge light blinks slowly for several seconds.
■ When the color cartridge is depleted, the Color cartridge light glows steady red.
After installing a new color cartridge, press the On/Off button to clear the cartridge error and resume printing.
Handling and storing the paper
■To avoid fingerprints, handle the paper by the edges or by the perforated tabs. Do not touch the glossy side of the paper.
■ When storing paper, do not remove paper that is in the paper tray. Instead, remove the paper tray itself, then close the paper tray cover and paper tray door to keep out dust and debris.
■Store paper flat.
■Keep the paper away from direct sunlight and out of high-temperature environments (such as a vehicle parked in the sun).
4 |
www.kodak.com/go/support |
Getting started
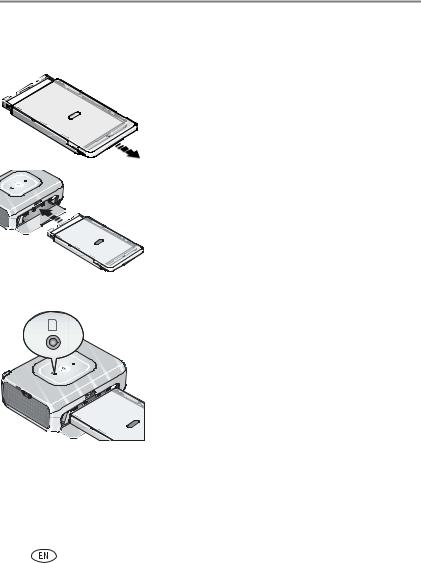
Loading the paper
1 Remove the paper tray from the photo printer if installed (see page 6).
2 Slide the paper tray cover back until it "clicks" into place, about 1.25 in. (3 cm), then lift up on the end of the paper tray cover.
3Carefully "fan" the paper to keep the sheets from sticking together.
IMPORTANT: Do not load more than 25 sheets of paper. Use the upper limit line inside the paper tray as a guide to prevent overloading. Do not load paper that is missing perforated tabs. To avoid fingerprints, do not touch the glossy side of the paper.
4 Load the paper into the paper tray, with the Kodak logo side facing down.
5 Close the paper tray cover.
Purchase Kodak color cartridge & paper kits and other accessories at a retailer of Kodak products, or visit www.kodak.com/go/accessories.
www.kodak.com/go/support |
5 |
Getting started
Installing and removing the paper tray
1 Open the paper tray door.
2 Slide the paper tray cover back until it "clicks" into place, about 1.25 in. (3 cm).
3 Slide the paper tray in the printer tray slot until the tray locks into place.
IMPORTANT: To ensure the paper tray fits squarely on the photo printer, make sure to keep the paper tray cover all the way open while installing.
Pull the paper tray out to remove it.
Close the paper tray cover and paper tray door to keep out dust and debris.
■ When the paper tray is empty, the Paper light glows steady red.
After refilling and installing the paper tray, press the On/Off button to clear the paper error and resume printing.
6 |
www.kodak.com/go/support |
Getting started
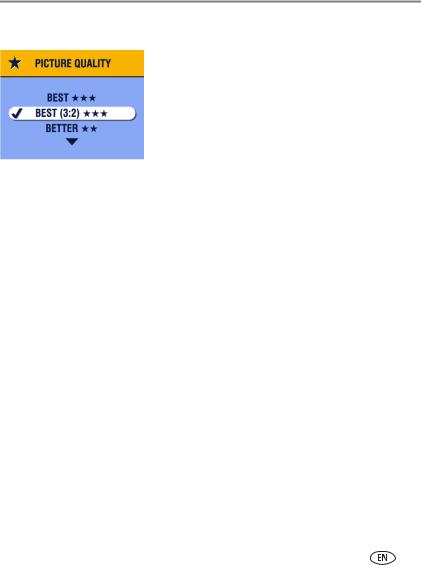
Setting the picture quality on your digital camera
Before taking pictures, change the picture quality setting (or resolution) on your digital camera to 3:2  . This ensures that the pictures you take are proportional to the photo printer paper, preventing unwanted cropping of your pictures.
See your camera user’s guide for more information.
www.kodak.com/go/support |
7 |
2Printing from a PictBridge compatible camera
The Kodak EasyShare photo printer 300 offers PictBridge compatibility, which lets you print from your Kodak EasyShare digital camera or any PictBridge compatible camera or device.
1 Take pictures with your camera (see your camera user’s guide).
 2 Connect your PictBridge compatible camera to the photo printer using the USB cable for your camera. Plug one end of the cable into the camera and the other into the USB device connector located on the side of the photo printer.
 NOTE: If the PictBridge compatible camera is already plugged in but the connection is no longer available, disconnect then
  reconnect the USB cable to re-establish the connection.
3 Use your digital camera to review pictures, choose printing options, and print. See your camera user’s guide for details.
The On/Off button blinks while printing. The paper
cycles four times during the printing process before the
finished print is ejected. The first three passes apply
layers of yellow, magenta, and cyan colors to the print,
and the fourth pass applies the Kodak XtraLifeTM
coating that protects and preserves the image.
IMPORTANT: Wait until printing is complete before removing paper, the paper tray, or the camera. Failure to do so can cause paper misfeeds or jams.
8 |
www.kodak.com/go/support |
Loading...