


®
HOME APPLIANCES
Installation Instructions and
Use and Care Guide
Kitchen Faucets
Model Series |
Model Series |
KKFV01SP |
KKFV01LP |
Model Series
KKFV01PP
IMPORTANT: READ AND SAVE THESE INSTRUCTIONS.
FOR RESIDENTIAL USE ONLY. |
|
IMPORTANT: |
|
Installer: Leave installation instructions with the homeowner. |
8559765A |
Homeowner: Keep installation instructions for future reference. |
INSTALLATION
REQUIREMENTS
Tools and Parts
Gather the required tools and parts before starting installation. Read and follow the instructions provided with any tools listed here.
Tools needed
■Adjustable wrench
■Slip joint pliers
■#2 Phillips screwdriver
■Basin wrench (optional)
Tools needed
Remove parts from carton. Check that all parts are included.
All models:
■Faucet assembly
■Plastic base
■⁄" (2 mm) Allen wrench
Model series KKFV01SP & KKFV01PP:
■Weights
■Check valve assembly
–2 fiber seals
Location Requirements
IMPORTANT: Observe all governing codes and ordinances.
■Check location where faucet will be installed. Proper installation is your responsibility. Make sure you have everything necessary for correct installation. It is the responsibility of the installer to comply with installation specifications and with state and local plumbing codes. Protect faucet and water lines leading to faucet against freezing. Damage from freezing is not covered by the warranty.
■Faucet requires a 1³⁄" (3.5 cm) diameter opening in sink or countertop. If hole is not available for mounting it is recommended that a qualified installer be contacted to drill the hole for your installation in a sink deck or countertop. Thickness of sink or countertop hole must not exceed 1³⁄" (4.4 cm).
■Hot and cold water supply lines must be available and if they are not it is recommended that a qualified plumber install the necessary piping.
■Faucet hoses are equipped with compression type seals and do not require sealing compounds to prevent leaking.
■As with all metal objects, follow proper handling techniques.
■It is recommended that a qualified plumber/installer install the faucet. The faucet installation must comply with national and local plumbing codes and ordinances.
■The faucet should be examined for damage prior to installation. Do not install a damaged faucet. Instead, return the faucet to the dealer from whom you purchased it. Failure to do so will void the warranty.
INSTALLATION
INSTRUCTIONS
1.Before installing the faucet, flush water supply pipes thoroughly. Shut off water supply valves.
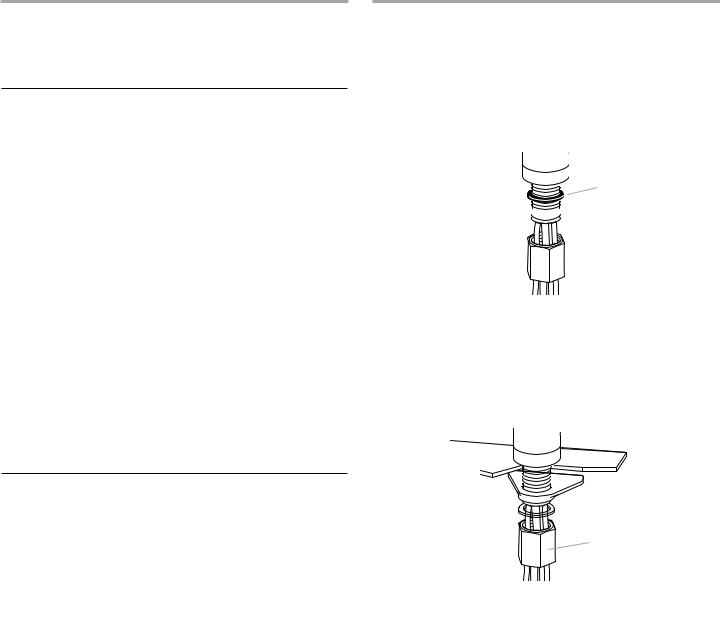
2.Remove nut, metal washer and rubber washer from faucet. Do not remove rubber o-ring in bottom of faucet base.
A

 B
B
 C
C
A.Rubber washer
B.Metal washer
C.Nut
3.Feed tubing through hole in sink or countertop and then insert faucet assembly into hole.
4.Reinstall the parts onto the threaded shank of the faucet in the following order: rubber washer, plastic base, metal washer and nut. Hand-tighten nut.
 A
A
 B
B
 C
C
 D
D
A.Rubber washer
B.Plastic base
B.Metal washer
C.Nut
5.Align faucet and securely hand-tighten the nut to prevent faucet base from turning when moving operating lever. For Model series KKFV01SP and KKFV01PP, be sure the control lever is pointed toward the right side of the sink.
2
6.Model series KKFV01SP and KKFV01PP only: Connect the sprayer hose to the supply hose using the check valve assembly and fiber seals. Be sure the check valve assembly is positioned correctly; the arrow should be pointing down away from the faucet. Insert a fiber seal between sprayer hose and check valve assembly and attach them. Insert a fiber seal between the check valve assembly and supply hose and attach them.

 A
A
 B
B

 C
C
 D
D

 E
E
A.Supply hose
B.Fiber seal
C.Check valve
D.Fiber seal
E.Sprayer hose
7.Connect the red-striped braided hose to the hot water supply valve. Connect the blue-striped braided hose to the cold water supply valve. Be sure to hold the supply hoses in place when tightening the nut to prevent the hoses from twisting.
8.Model series KKFV01SP and KKFV01PP only: Be sure the sprayer hose is fully inserted into the faucet body. Under the sink, use the screws provided to attach the weight(s) onto the sprayer hose on the spout side of the hose loop, just above the bend in the hose.
For model series KKFV01PP attach one weight. For model series KKFV01SP attach both weights.
A
 B
B
A.Weight
B.Spray hose
9.Move the faucet lever to the closed (forward) position and open supply valves. Check connections for leaks.
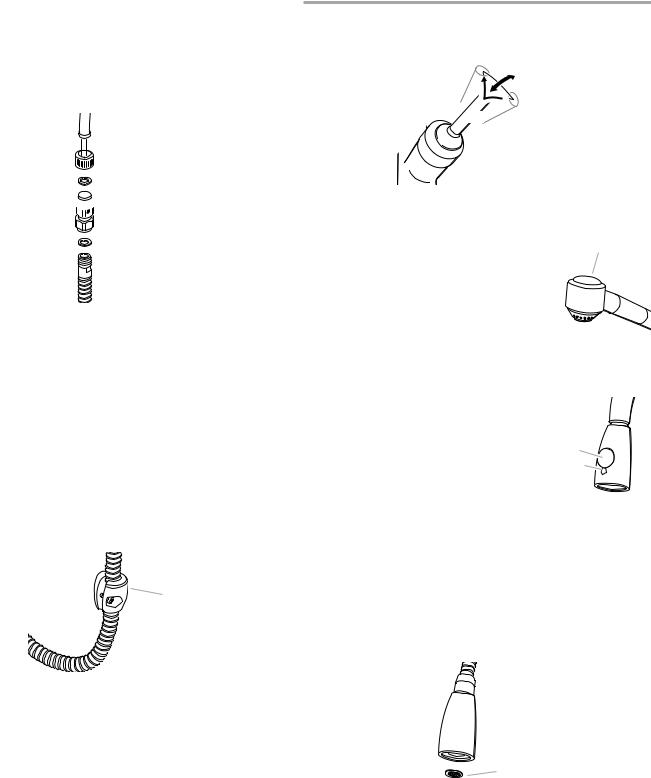
10.Remove aerator from faucet and flush the hot and cold lines until water is clear.
The aerator is in the end of the faucet. Loosen with a wrench to remove.
11.Reinstall the aerator into faucet after flushing the water lines and tighten with a wrench.
OPERATION
full hot
full on

 full cold off
Model series
■ The flow of water can be a stream or spray. A stream is the
default water setting. |
spray |
|
■Change to spray by pushing the diverter button on top of the spray assembly.
■ Change to stream by shutting the faucet off. The spray assembly automatically resets.
■ The spray assembly can be drawn approximately 20 inches out of the faucet spout.
Model series KKFV01SP:
■The flow of water can be a stream or spray. A stream is the default water setting.
■Change to spray by pushing the large diverter button on top of the spray
assembly. |
spray |
■ Change to stream by pushing the small |
stream |
diverter button just below the large |
|
button or by shutting the faucet off. |
|
■The spray assembly can be drawn approximately 20 inches out of the faucet spout.
Cleaning
Aerator:
The aerator should be removed periodically and cleaned out under running water. If it is very dirty it should be put in common household vinegar and allowed to soak overnight. Reinstall and tighten with a wrench.
Chrome faucet:
model series KKFV01SP
A
A. aerator
Use liquid cleansers or soapy water. Polish with a soft cloth.
NOTE: Anti-lime or acidic cleansers such as scouring agents or abrasive sponges are to be avoided.
Stainless Steel faucet:
Use a cloth and clean water or a very diluted washing liquid. Polish with a soft cloth.
NOTE: Anti-lime or acidic cleansers such as scouring agents or abrasive sponges are to be avoided.
3
 Loading...