


1235cn
Table of contents
 Loading...
Dell 1235cn
Multi Functional Printer
User’s Guide
www.dell.com | support.dell.com
2 | Features of your new laser printer
features of your new laser printer
Your new printer is equipped with a number of special features that improve the quality of the documents you print.
With the printer, you can:
Print with excellent quality and speed
• You can print in a full range of colors using cyan, magenta,
yellow, and black.
• You can print with a resolution of up to 2400 x 600 dpi. See
Software section.
• Your printer prints A4-sized paper at up to 16 ppm and
letter-sized paper at up to 17 ppm. In Color mode, your
printer prints A4-sized or letter sized paper at up to 4 ppm.
Handle many different types of printable mate ria l
•The 150-sheet tray supports plain paper in various sizes:
letterhead, envelopes, labels, custom-sized media,
postcards, and heavy paper.
Create professional documents
• Print Watermarks. You can customize your documents with
words, such as “Confidential”. See Software section.
• Print Posters. The text and pictures of each page of your
document are magnified and pri nt ed acro ss th e shee t of
paper and can then be taped together to form a poster. See
Software section.
• You can use preprinted forms and letterhead with plain
paper. See Software section.
Save time and money
• To save paper, you can print multiple pages on one single
sheet of paper.
• This printer automatically conserves electricity by
substantially reducing power consumption when not in use.
• To save paper, you can print on both sides of the paper
(double-sided printing). See Software section.
Print in various environments
• You can print with Windows 2000/XP/2003/Vista as well as
Macintosh systems.
• Your printer is equipped with a USB interface and a
network interface.
Copy originals in several formats
• Your printer can print multiple image copies from the
original document on a single page.
• There are special functions to erase catalog and
newspaper background.
• The print quality and image size may be adjusted and
enhanced at the same time.
Scan the originals and send it right away
• Scan in color and use the precise compressions of JPEG,
TIFF and PDF formats.
• Quickly scan and send files to multiple destinations using
Networks scanning.
Set a specific time to transmit a Fax
• You can specify a certain time to transmit the fax and also
send the fax to several stored destinations.
• After the transmission, the printer may print out the fax
reports according to the setting.
SPECIAL FEATURES
Features of your new laser printer | 3
ABOUT THIS USER’S GUIDE
This user’s guide provides information about basic understanding of the printer as well as detailed explanation on each step during the actual usage. Both novice
users and professional users can refer to this guide for installing and using the printer.
Some terms in this guide are used interchangeably, as below:
• Document is synonymous with original.
• Paper is synonymous with media, or print media.
Following table offers the conventions of this guide:
CONVENTION DESCRIPTION EXAMPLE
Bold Used for texts on the display or actual prints on the printer. Start
Note Used to provide additional information or detailed specification of the printer
function and feature.
The date format may differ from
country to country
Caution Used to give users information to protect the printer from possible mechanical
damage or malfunction.
Do not touch the green underside of
the toner cartridge.
Footnote Used to provide more detailed information on certain words or a phrase. a. pages per minute
(See page 1 for more
information)
Used to guide users to the reference page for the additional detailed information. (See page 1 for more information)
4 | Features of your new laser printer
FINDING MORE INFORMATION
You can find information for setting up and using your printer from the following resources, either as a print-out or onscreen.
Quick Install Guide Provides information on setting up your printer and this requires that you follow the instructions in the guide to prepare the printer.
Online User’s Guide Provides you with step-by-step instructions for using your printer’s full features, and contains information for maintaining your printer,
troubleshooting, and installing accessories.
This user’s guide also contains a Software section to provide you with information on how to print documents with your printer in
various operating systems, and how to use the included software utilities.
Note
You can access the user’s guide in other languages from the Manua l folder on the printer software CD.
Printer Driver Help Provides you with help information on printer driver properties and instructions for setting up the properties for printing. To access a
printer driver help screen, click
Help
from the printer properties dialog box.
Dell website
If you have Internet access, you can get help, support, printer drivers, manuals, and order information from the Dell website,
www.dell.com and support.dell.com.
Safety information | 5
safety information
IMPORTANT SAFETY SYMBOLS AND PRECAUTIONS
What the icons and signs in this user’s guide mean:
These warning signs are here to prevent injury to you and others. Follow them explicitly. After reading this section, keep it in a safe
place for future reference.
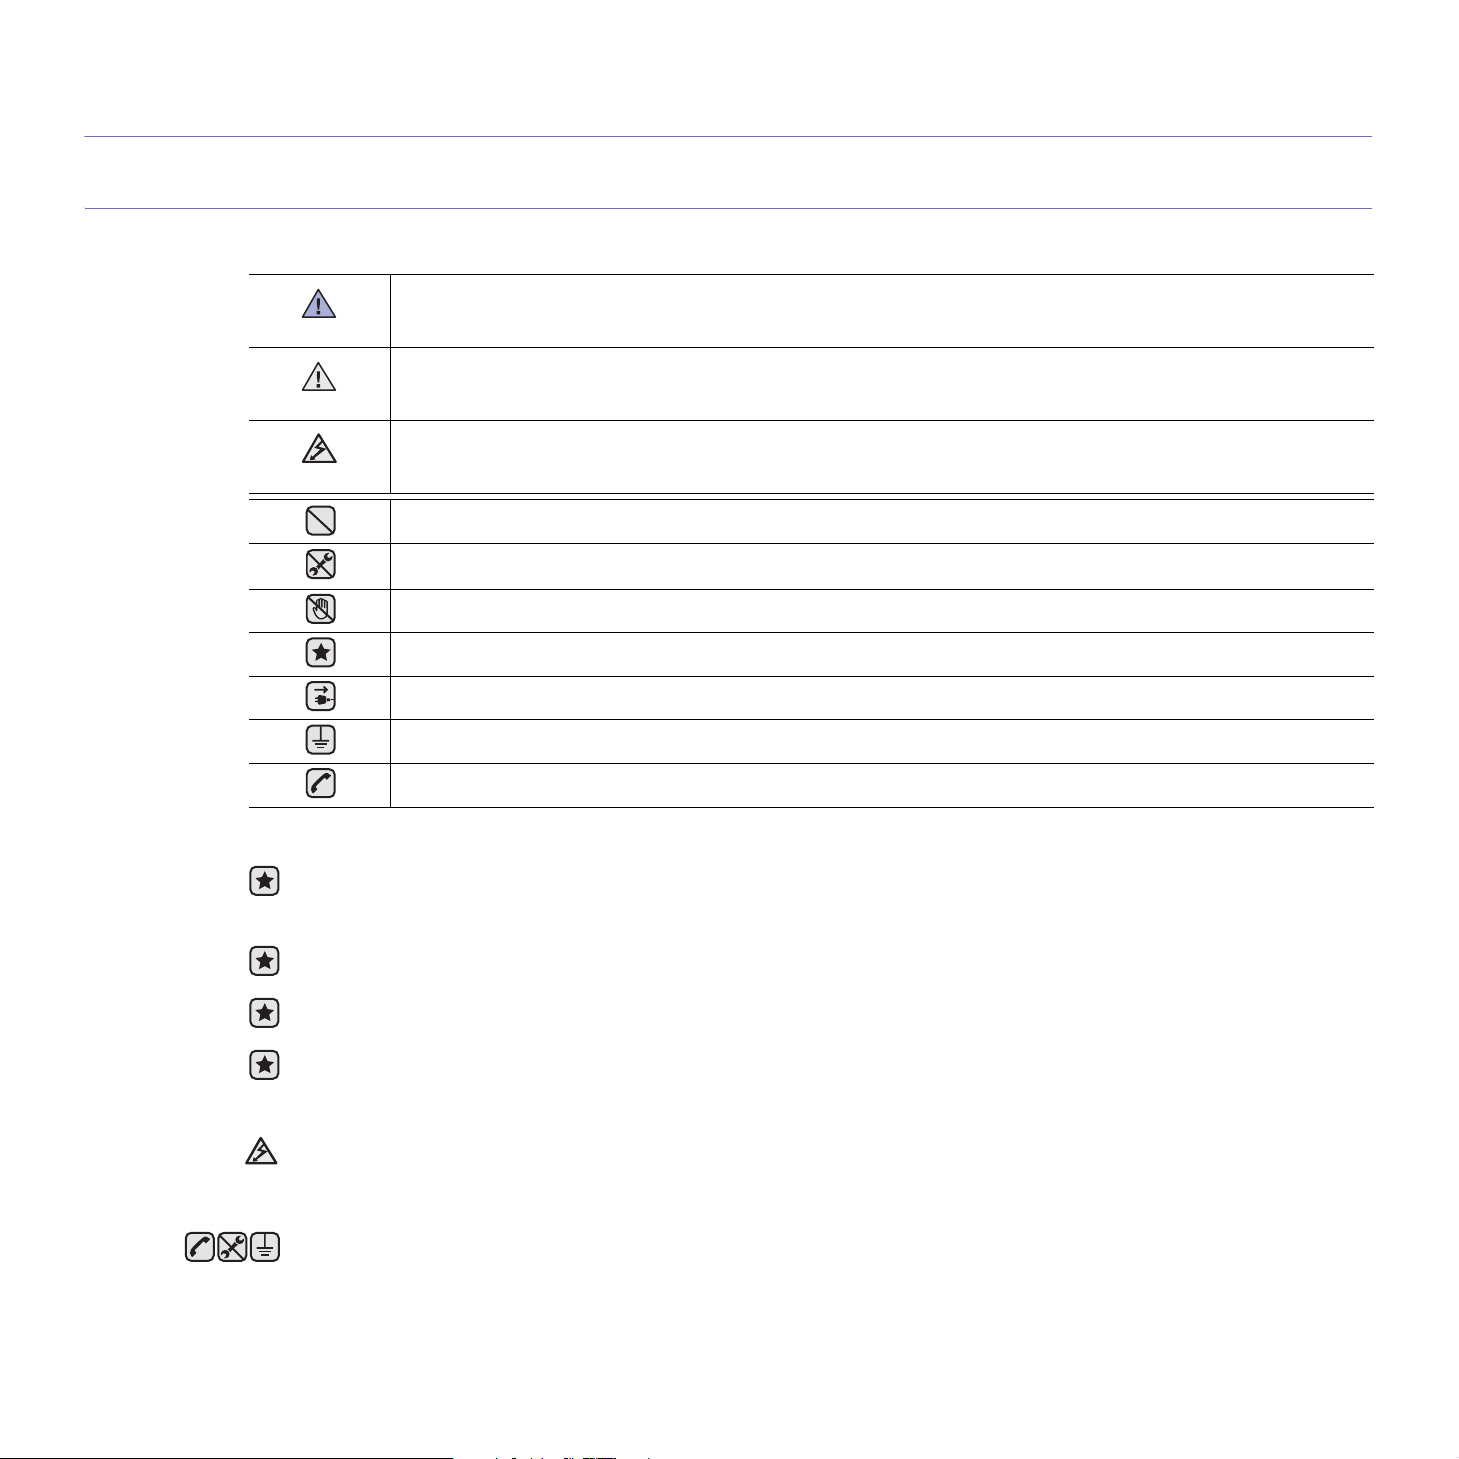
WARNING
Hazards or unsafe practices that may result in severe personal injury or death.
CAUTION
Hazards or unsafe practices that may result in minor personal injury or property damage.
CAUTION
To reduce the risk of fire, explosion, electric shock, or personal injury when using your laser Multi-Function Printer (MFP),
follow these basic safety precautions:
Do NOT attempt.
Do NOT disassemble.
Do NOT touch.
Follow directions explicitly.
Unplug the power plug from the wall socket.
Ensure the MFP is grounded to prevent electric shock.
Call the service center for help.
1. Read and understand all instructions.
2. Use common sense whenever operating electrical appliances.
3. Follow all warnings and instructions marked on the printer and in the literature accompanying the printer.
4. If an operating instruction appears to conflict with safety information, heed the safety information. You may have misunderstood the
operating instruction. If you cannot resolve the conflict, contact your sales or service representative for assistance.
5. Unplug the printer from the AC wall socket and/or telephone jack before cleaning. Do not use liquid or aerosol cleaners. Use only a
damp cloth for cleaning.
6. Do not place the printer on an unstable cart, stand or table. It may fall, causing serious damage.
7. Your printer should never be placed on, near or over a radiator, heater, air conditioner or ventilation duct.
8. Do not allow anything to rest on the power. Do not place your printer where the cords will be abused by persons walking on them.
9. Do not overload wall outlets and extension cords. This can diminish performance, and may result in the risk of fire or electric shock.
10.Do not allow pets to chew on the AC power, telephone or computer interface cords.
11.Never push objects of any kind into the printer through case or cabinet openings. They may touch dangerous voltage points, creating
a risk of fire or shock. Never spill liquid of any kind onto or into the printer.
12.To reduce the risk of electric shock, do not disassemble the printer. Take it to a qualified service technician when repair work is
required. Opening or removing covers may expose you to dangerous voltages or other risks. Incorrect reassembly could cause
electric shock when the unit is subsequently used.
6 | Safety information
13.Unplug the printer from the telephone jack, computer and AC wall outlet and refer servicing to qualified service personnel under the
following conditions:
• When any part of the power cord, plug or connecting cable is damaged or frayed.
• If liquid has been spilled into the printer.
• If the printer has been exposed to rain or water.
• If the printer does not operate properly after instructions have been followed.
• If the printer has been dropped, or the cabinet appea rs damaged.
• If the printer exhibits a sudden and distinct change in performance.
14.Adjust only those controls covered by the operating instructions. Improper adjustment of other controls may result in damage, and
may require extensive work by a qualified service technician to restore the printer to normal operation.
15.Avoid using this printer during a lightning storm. There may be a remote risk of electric shock from lightning. If possible, unplug the
AC power and telephone cord for the duration of the lightning storm.
16.The Power cord supplied with your printer should be used for safe operation. If you are using a cord which is longer than 2 m with
110 V printer, then it should be 16 AWG
a
or bigger.
17.Use only No.26 AWG or larger telephone line cord.
18.SAVE THESE INSTRUCTIONS
19.This printer can be operated only in the country you have purchased (due to different voltage, telecommunication configuration and
etc.).
a.AWG: American Wire Gauge

7 | Contents
2 Features of your new la se r printe r
5 Safety information
INTRODUCTION
11
11 Printer overview
11 Front view
11 Rear view
12 Control panel overview
13 Understanding the Status LED
13 Acknowledging the status of the toner cartridge
14 Menu overview
15 Supplied software
15 Printer driver features
15 Printer driver
GETTING STARTED
16
16 Setting up the hardware
17 System requirements
17 Microsoft® Windows®
17 Macintosh
18 Setting up the network
18 Supported operation environments
18 Configuring network protocol via the printer
18 Using the SetIP program
18 Installing the driver software
19
20 Printer's basic settings
20 Altitude adjustment
20 Changing the display language
20 Setting the date and time
20 Changing the clock mode
20 Changing the default mode
20 Setting sounds
21 Entering characters using the number keypad
21 Using the save modes
21 Auto continue
LOADING ORIGINALS AND PRINT MEDIA
23
23 Loading originals
23 On the scanner glass
23 In the ADF
24 Selecting print media
25 Specifications on print media
26 Media sizes supported in each mode
26 Guidelines for special print media
27 Changing the size of the paper in the paper tray
28
29 Printing on special print materials
29 Feeding the print material manually
29 Setting the paper size and type
COPYING
30
30 Copying
30 Changing the settings for each copy
30 Darkness
30 Original Type
30 Reduced or enlarged copy
31 Changing the default copy settings
contents

8 | Contents
contents
31 ID card copying
31 Using special copy features
31 2-up or 4-up copying
31 Poster copying
32 Clone copying
32 Erasing background images
32 Gray enhance copying
32 Setting copy timeout
SCANNING
33
33 Scanning basics
33 Scanning from the control panel
33 Setting scan information in Dell Scan Manager.
33 Scanning to application programs
34 Scanning by a network connection
34 Scanning to Email
35 Changing the settings for each scan job
35 Changing the default scan settings
35 Setting up Address Book
35 Registering speed email numbers
35 Configuring group email numbers
35 Using Address Book entries
35 Searc hi n g Addre ss Boo k fo r an entry
36 Printing Address Book
BASIC PRINTING
37
37 Printing a document
37 Canceling a print job
FAXING
38
38 Sending a fax
38 Setting the fax header
38 Adjusting the document settings
39 Sending a fax automatically
39 Sending a fax manually
39 Confirming a transmission
39 Automatic redialing
39 Redialing the last number
39 Send i n g a fa x to mu ltiple destinations
40 Sending a delayed fax
40 Send i n g a pri o rity fax
41 Receiving a fax
41 Changing receiving modes
41 Receiving automatically in Fax mode
41 Receiving manually in Tel mode
41 Receiving manually using an extension telephone
41 Receiving automatically in Ans/Fax mode
41 Receiving faxes using DRPD mode
42 Receiving in secure receiving mode
42 Activating secure rec eiving mode
42 Receiving faxes in memory
42 Forwarding faxes
43 Fax setup
43 Changing the fax setup options
44 Changing the default document settings
44 Printing sent fax report automatically

Contents | 9
contents
44 Setting up Address Book
USING USB MEMORY DEVICE
46
46 About USB memory
46 Plugging in a USB memory device
46 Scanning to a USB memory device
46 Scanning
47 Customizing Scan to USB
47 Printing from a USB memory device
47 To print a document from a USB memory device:
47 Backing up data
47 Backing up data
47 Restoring data
48 Managing USB memory
48 Deleting an image file
48 Formatting a USB memory device
48 Viewing the USB memory status
48 Printing directly from a digital camera
MAINTENANCE
49
49 Printing reports
49 Printing a report
49 Adjusting the color contrast
50 Clearing memory
50 Cleaning your printer
50 Cleaning the outside
50 Cleaning the inside
52 Cleaning the scan unit
53 Maintaining the cartridge
53 Toner cartridge storage
53 Expected cartridge life
53 Redistributing toner
53 Replacing the toner cartridge
55 Replacing the imaging unit
56 Replacing the waste toner container
57 Maintenance parts
57 Checking replaceables
57 Managing your printer from the website
57 To access Embedded Web Service:
57 Checking the printer’ s se r i a l num ber
TROUBLESHOOTING
58
58 Tips for avoiding paper jams
58 Clearing document jams
58 Exit misfeed
59 Roller misfeed
59 Clearing paper jams
59 In the tray 1
59 In the fuser unit area
60 In the paper exit area
62 Understanding display messages
65 Solving other problems
65 Pape r fe ed i ng
65 Printing problems
66 Printing quality problems
68 C op y i ng problems
69 Scanning problems
69 Dell Scan Manager problems
70 Fax problems
70 Common Windows problems

10 | Contents
contents
70 Common Macintosh problems
ORDERING SUPPLIES
71
71 Supplies
71 How to purchase
SPECIFICATIONS
72
72 General specifications
73 Printer specifications
73 Scanner specifications
73 Copier specifications
74 Facsimile specifications
GLOSSARY
75
INDEX
79
11 | Introduction
introduction
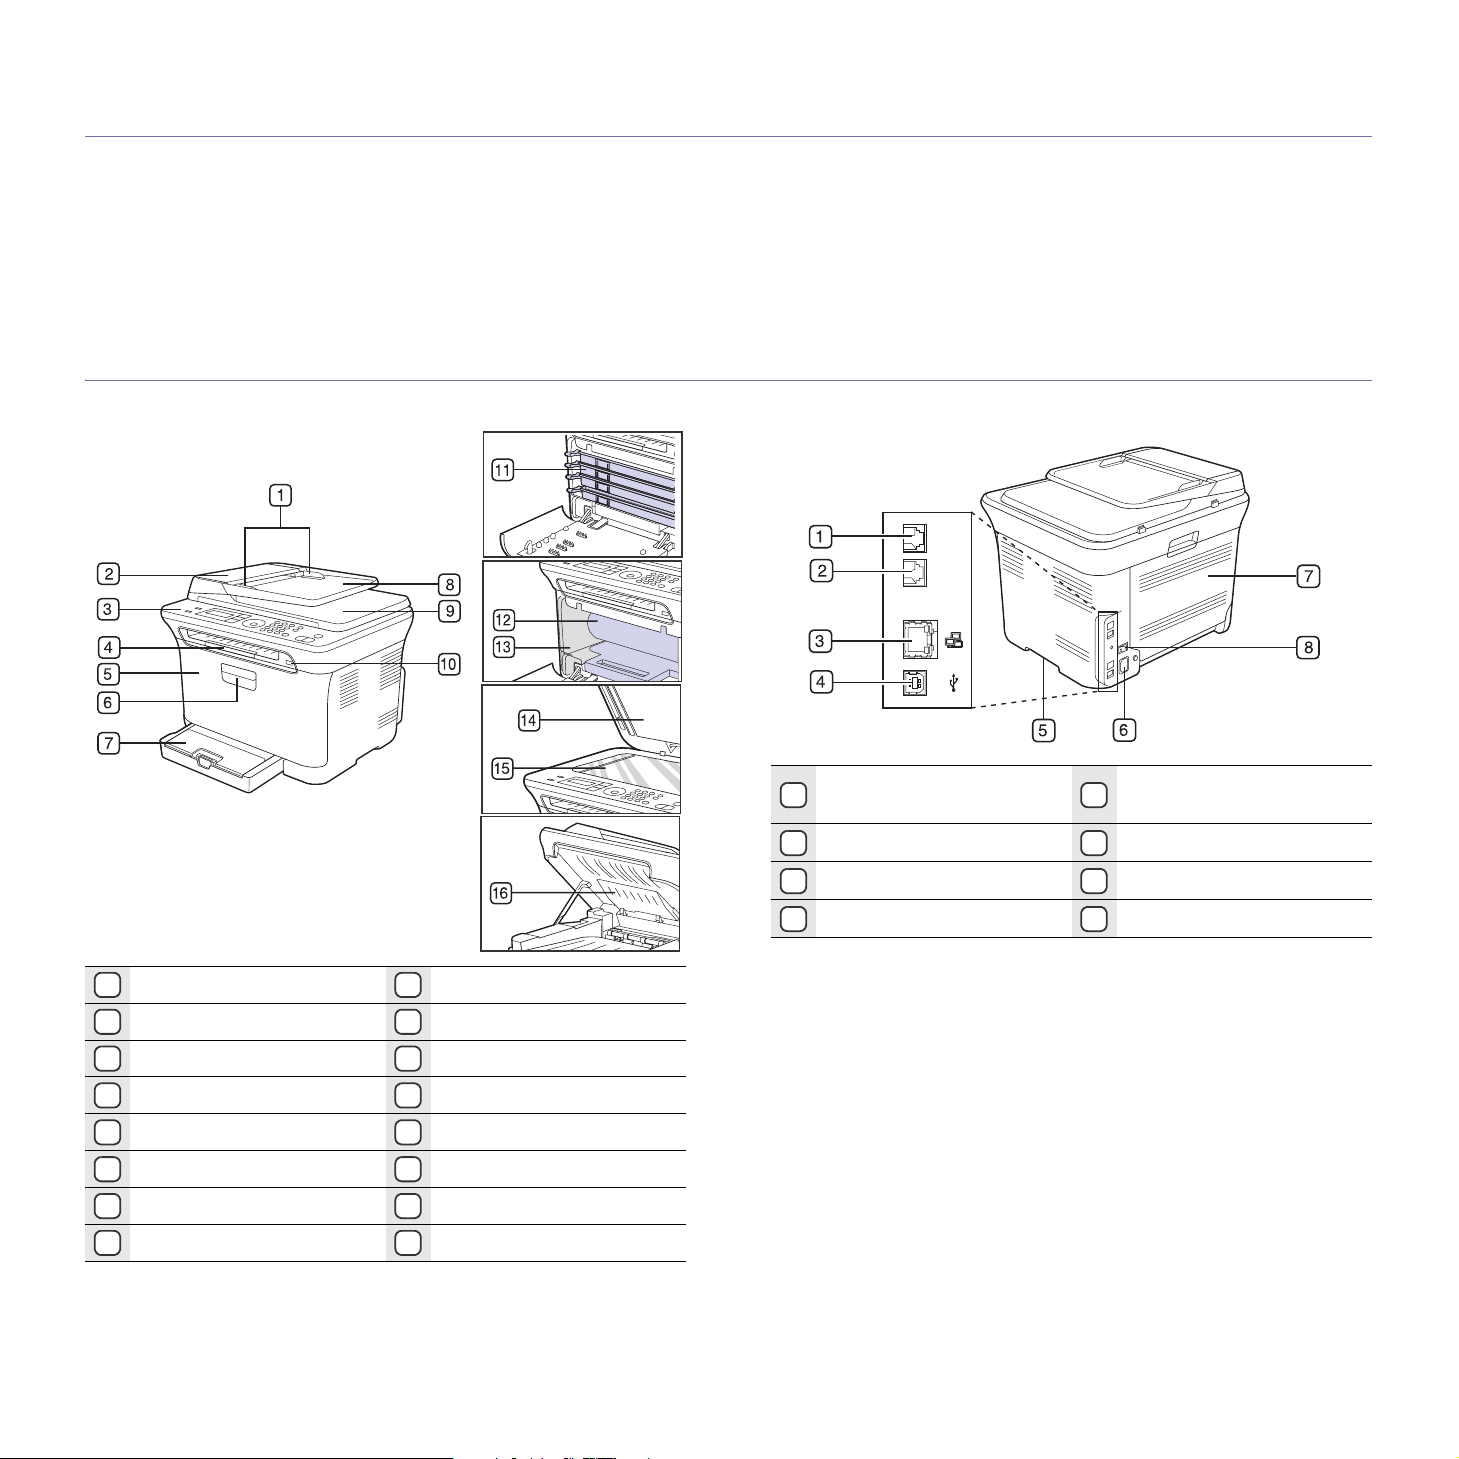
These are the main components of your printer:
This chapter includes:
• Printer overview
• Control panel overview
• Understanding the Status LED
• Acknowledging the status of the toner cartridge
• Menu overview
• Supplied software
• Printer driver features
PRINTER OVERVIEW
Front view Rear view
1
Document width guides
9
Document output tray
2
ADF
10
USB connector
3
Control panel
11
Toner cartridge
4
Output support
12
Imaging unit
5
Front cover
13
Waste toner container
6
Front cover handle
14
Scanner lid
7
Tray 1
15
Scanner glass
8
Document input tray
16
Scan unit
1
Extension telephone socket
(EXT)
5
Handle
2
Telephone line socket
6
Power receptacle
3
Network port
7
Rear cover
4
USB port
8
Power switch
Introduction |12
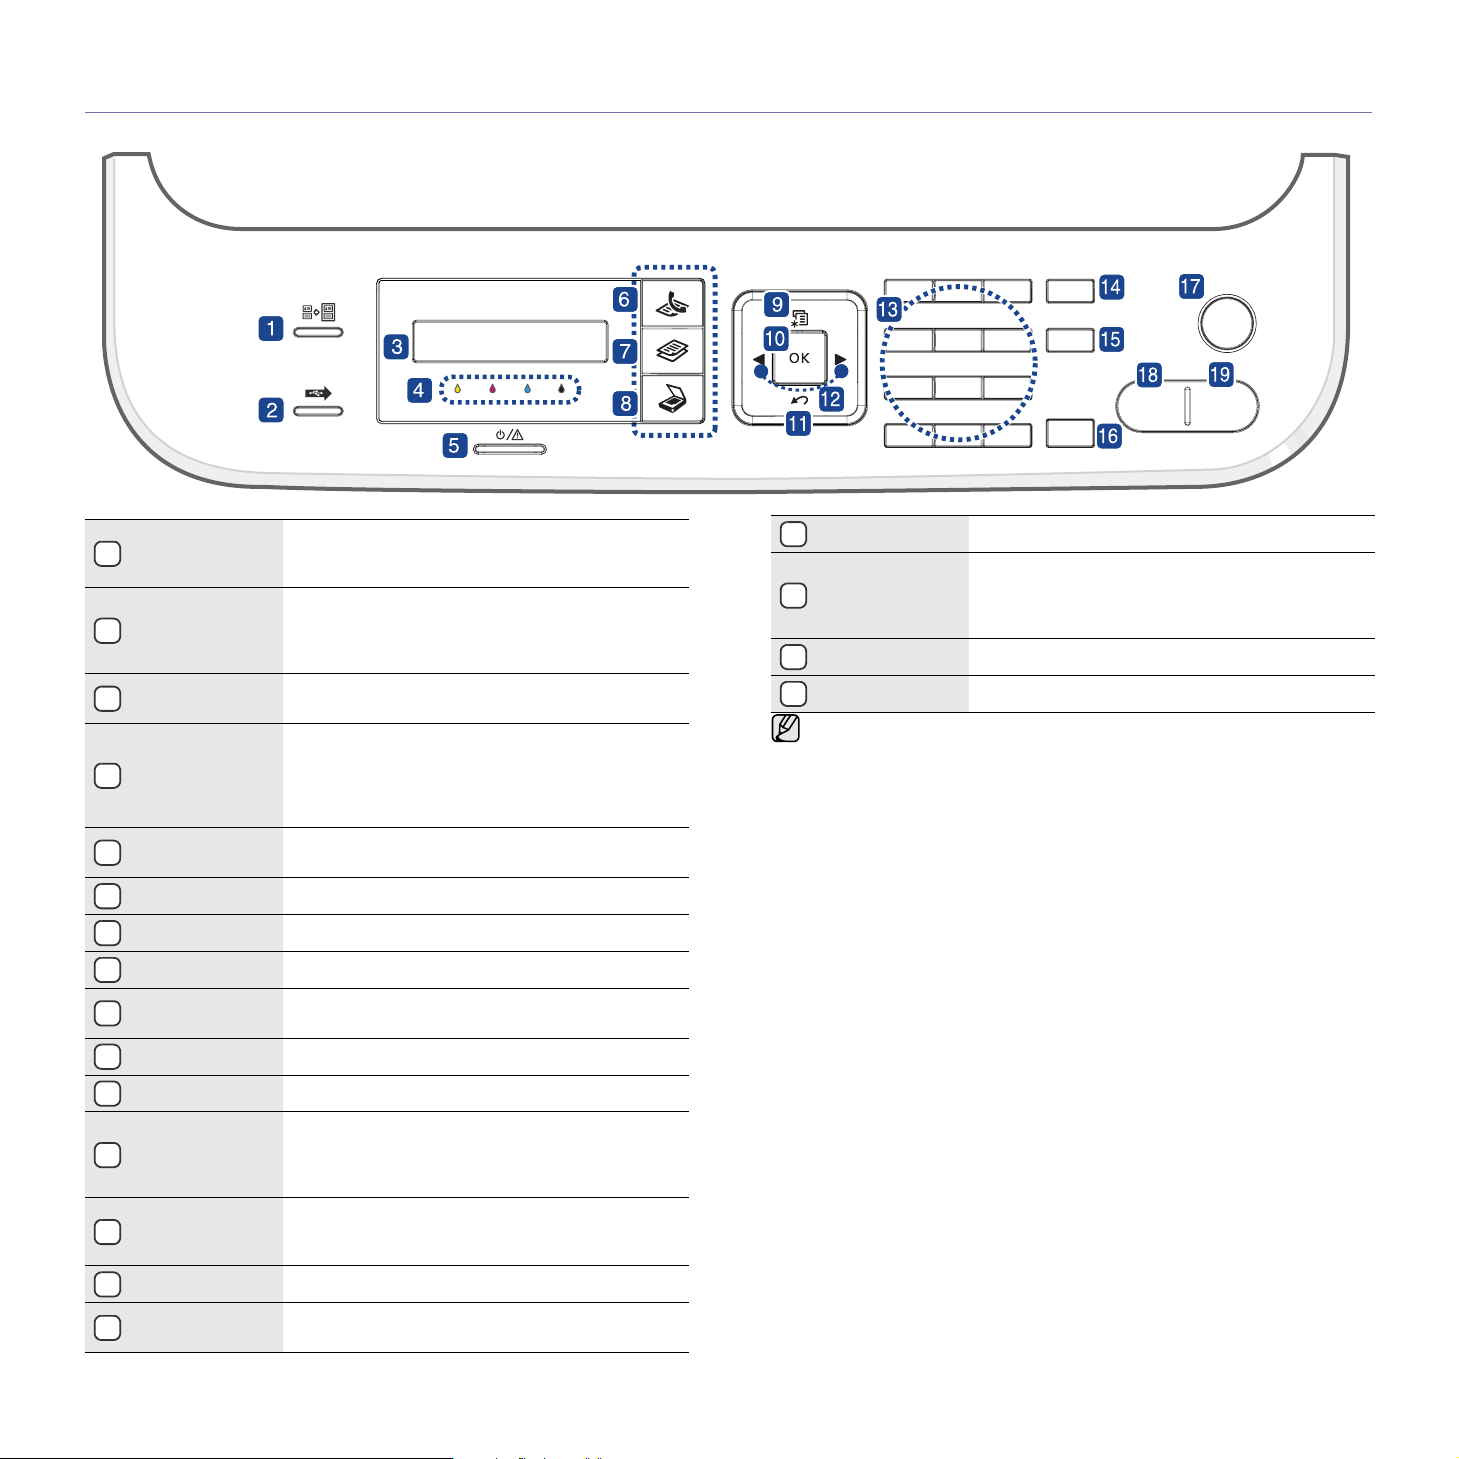
CONTROL PANEL OVERVIEW
Dell 1235cn
1
ID Copy
You can copy both sides of an ID card (e.g.,
driver's license) to a single side of paper. See "ID
card copying" on page 31.
2
Direct USB
Allows you to directly print files stored on a USB
Memory device when it is inserted into the USB
connector on the front of your printer. See "About
USB memory" on page 46.
3
Display
Shows the current status and prompts during an
operation.
4
Toner colors
The toner colors shown below the LCD display
co-works with the display messages. See Status
LED with the toner cartridge messages. See
"Acknowledging the status of the toner
cartridge" on page 13.
5
Status
Shows the status of your printer. See
"Understanding the Status LED" on page 13.
6
Fax Activates Fax mode.
7
Copy Activates Copy mode.
8
Scan/Email Activates Scan mode.
9
Menu
Enters Menu mode and scrolls through the
available menus.
10
OK Confirms the selection on the screen.
11
Back Sends you back to the upper menu level.
12
Left/right arrow
Scroll through the options available in the
selected menu, and increase or decrease values.
When entering characters, use right key to add
empty space.
13
Number keypad
Dials a number or enters alphanumeric
characters. See "Keypad letters and
numbers" on page 21.
14
Address Book Allows you to search for stored email addresses.
15
Redial/Pause
In ready mode, redials the last number, or in Edit
mode, inserts a pause into a fax number.
16
On Hook Dial Engages the telephone line.
17
Stop/Clear
Stops an operation at any time. In ready mode,
clears/cancels the copy options, such as the
darkness, the document type setting, the copy
size, and the number of copies.
18
Black Start Starts a job in Black and White mode.
19
Color Start Starts a job in Color mode.
• All illustrations on this user’s guide may differ from your printer
depending on its options or models.
• The surface of the output tray may become hot if you print a large
number of pages at once. Ensure that you do not touch the
surface, and do not allow children near it.
Introduction |13
UNDERSTANDING THE STATUS LED
The color of the Status LED indicates the printer's current status.
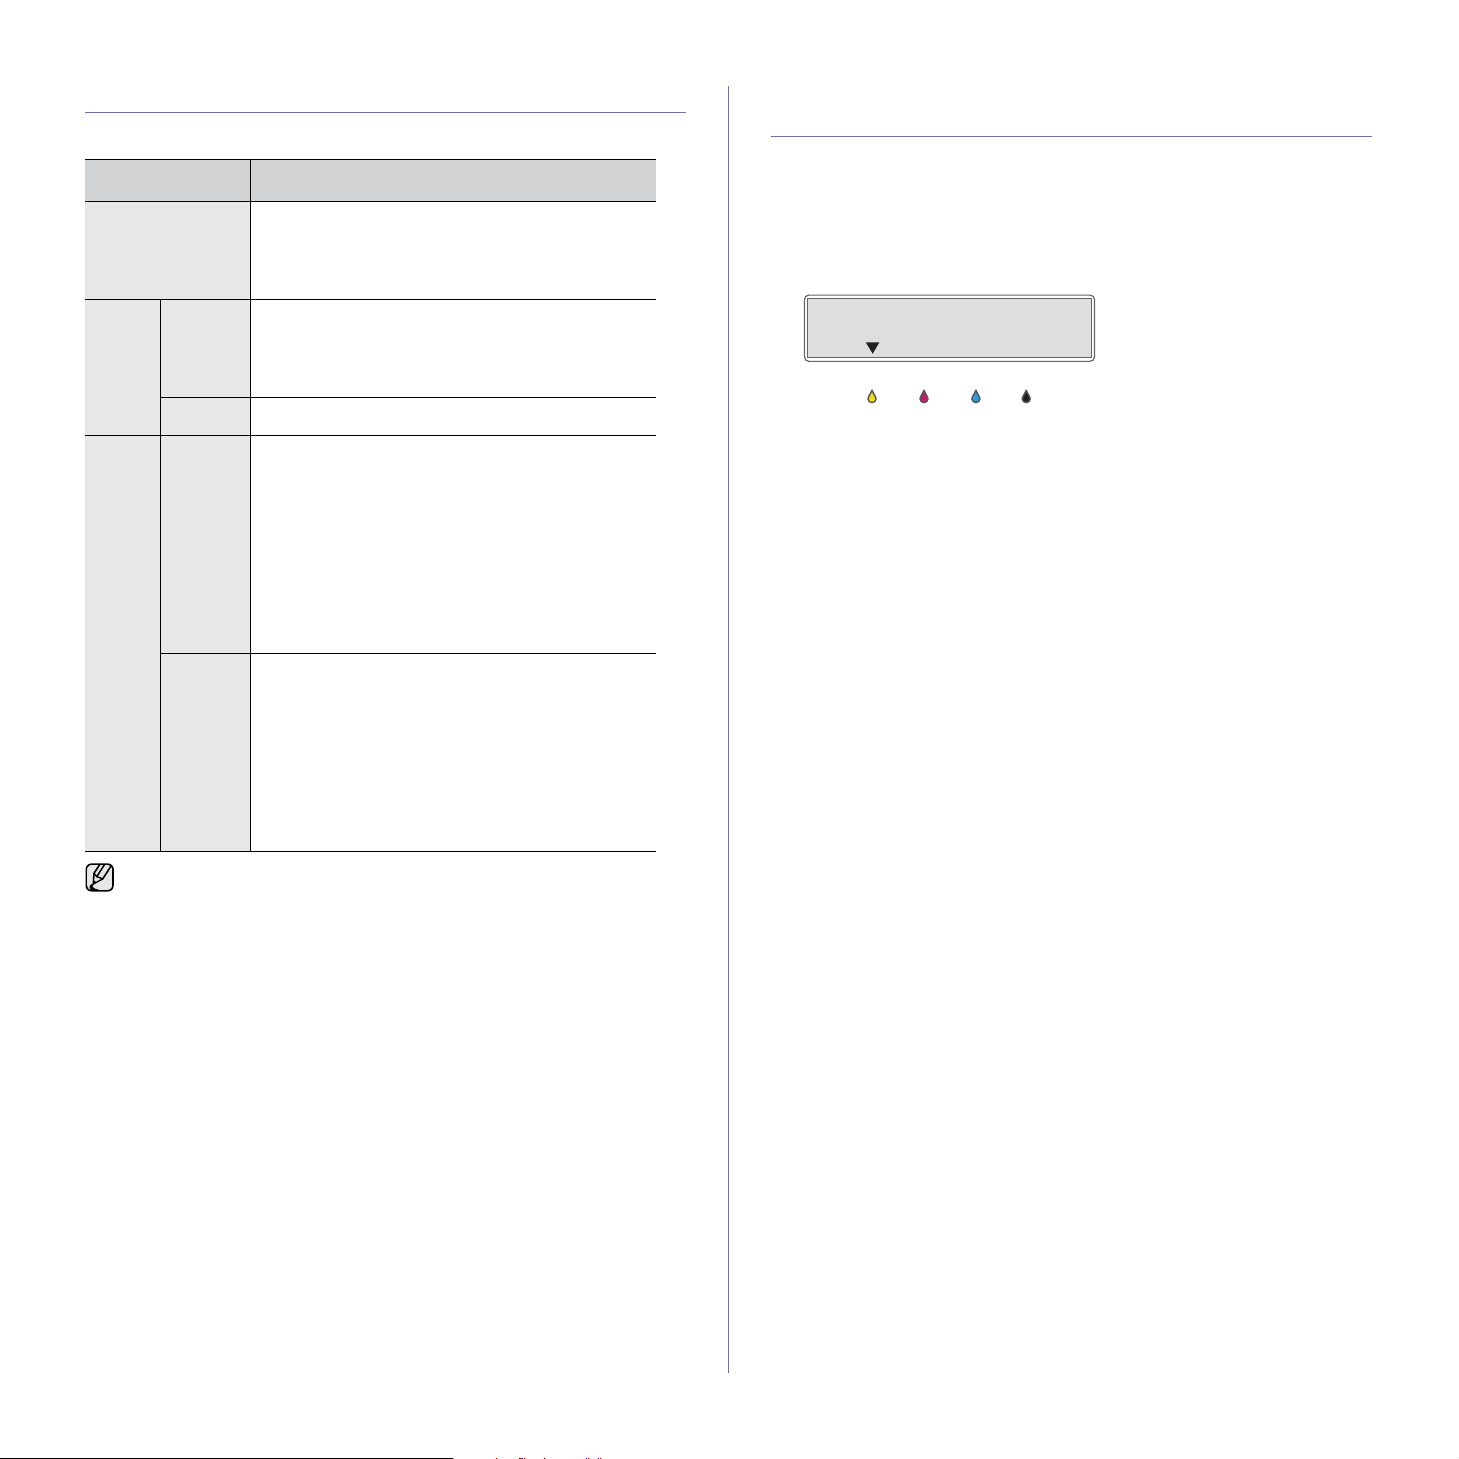
ACKNOWLEDGING THE STATUS OF THE
TONER CARTRIDGE
The status of toner cartridges is indicated by the Status LED and the LCD
display. If the toner cartridge is low or needs to be replaced, the Status LED
turns red and the display shows the message. However the arrow mark
shows which color toner is of concern or needs replacement with a new
cartridge.
Example:
The above example shows the yellow cartridge status indicated by the
arrow. Check the message to find out what the problem is and how to solve
it. See "Understanding display messages" on page 62 for more information
on error messages.
STATUS DESCRIPTION
Off • The printer is powered off-line.
• The printer is in power save mode. When data
is received, or any button is pressed, it
switches to on-line automatically.
Green Blinking • When the green LED blinks slowly, the printer
is receiving data from the computer.
• When the green LED blinks rapidly, the printer
is printing data.
On • The printer is powered on and can be used.
Red Blinking • A minor error has occurred and the printer is
waiting for the error to be cleared. Check the
display message, and solve the problem
referring to "Understanding display
messages" on page 62.
• The toner cartridge is low. Order a new toner
cartridge, see "Ordering supplies" on page 71.
You can temporarily improve print quality by
redistributing the toner. See "Replacing the
toner cartridge" on page 53.
On • A problem has occurred such as a paper jam,
cover is open or no paper in the tray, so that
the printer cannot continue the job. Check the
message on the display, and see
"Understanding display messages" on
page 62 to solve the problem.
• The toner cartridge is empty, exhausted, or
needs to be changed. See "Understanding
display messages" on page 62.
Always check the message on the display to solve the problem. The
instruction in the Troubleshooting section will guide you to operate the
printer properly. See "Understanding display messages" on page 62
for more information.
14 | Introduction
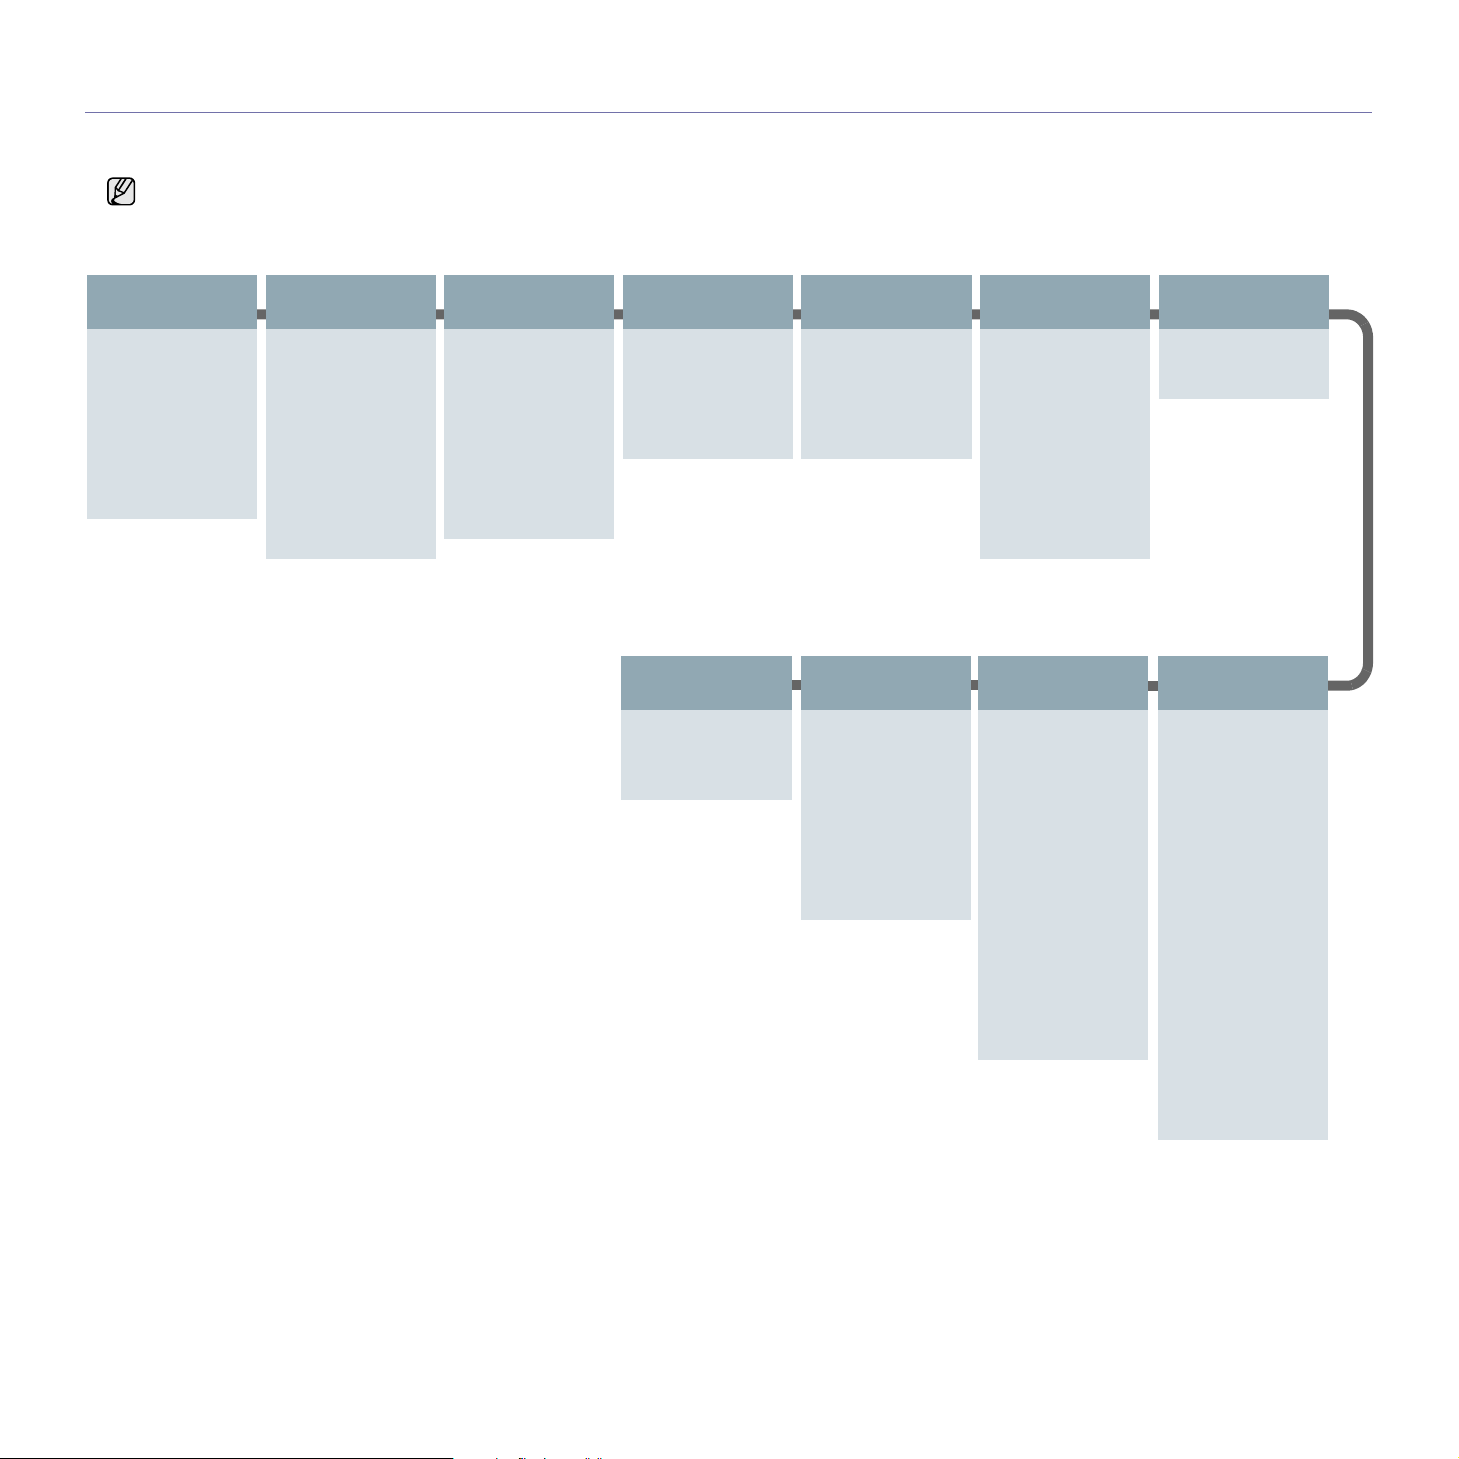
MENU OVERVIEW
The control panel provides access to various menus to set up the printer or use the printer’s functions. These menus can be accessed by pressing Menu. Refer to
the following diagram.
Some menus may not appear in the display depending on options or models. If so, it is not applicable to your printer.
.
Fax Feature
Darkness
Resolution
Multi Send
Delay Send
Priority Send
Forward
Secure Receive
Add Page
Cancel Job
Fax Setup
Sending
Redial Times
Redial Term
Prefix Dial
ECM Mode
Send Report
Image TCR
Dial Mode
Receiving
Receive Mode
Ring to Answer
Fax Setup
(Continued)
Stamp RCV Name
RCV Start Code
Auto Reduction
Discard Size
Junk Fax Setup
DRPD Mode
Change Default
Resolution
Darkness
Auto Report
Copy Feature
Reduce/Enlarge
Darkness
Original Type
Layout
Adjust Bkgd.
Gray Enhance
Copy Setup
Change Default
Copies
Copy Collation
Reduce/Enlarge
Darkness
Original Type
Scan Feature
USB feature
Scan Size
Original Type
Resolution
Scan Color
Scan Format
E-mail Feature
Scan Size
Original Type
Resolution
Scan Color
Scan Setup
Change Default
USB Default
E-mail Default
System Setup
(Continued)
Report
All Report
Configuration
Supplies Info
Address Book
Send Report
Sent Report
Fax RCV Report
Schedule Jobs
JunkFax Report
Network Info.
User Auth List
Maintenance
CLR Empty Msg
Supplies Life
Color
Serial Number
System Setup
(Continued)
Clear Setting
All Settings
Fax Setup
Copy Setup
Scan Setup
System Setup
Network Setup
Address Book
Sent Report
Fax RCV Report
Network
TCP/IP
Ethernet Speed
Clear Setting
Network Info
System Setup
Machine Setup
Machine ID
Machine Fax No.
Date & Time
Clock Mode
Language
Default Mode
Power Save
Timeout
Altitude Adj.
Auto Continue
Import Setting
Export Setting
Paper Setup
Paper Size
Paper Type
Sound/Volume
Key Sound
Alarm Sound
Speaker
Ringer
Introduction |15
SUPPLIED SOFTWARE
You must install the printer software using the supplied CD to use your
printer as a printer and a scanner, after you have set up your printer and
connected it to your computer. The CD provides you with the following
software.
PRINTER DRIVER FEATURES
Your printer drivers support the following standard features:
• Paper orientation, size, source and media type selection
• Number of copies
In addition, you can use various special printing features. The following
table shows a general overview of features supported by your printer
drivers:
Printer driver
CD
CONTENTS
Printer
software CD
Windows •
Printer driver
: Use this driver to take full
advantage of your printer’s features.
•
Scanner driver
: TWAIN and Windows
Image Acquisition (WIA) drivers are
available for scanning documents on
your printer.
•
SmarThru
a
: This is the accompanying
Windows-based software for your
multifunctional printer.
•
Dell Toner Management System™
:
Displays the status of the printer and the
name of the job when you send a job to
print. The Dell Toner Management
System™ window also displays the level
of toner remaining and allows you to
order replacement toner cartridges.
•
Printer Setting Utility
: This program
allows you to set up printer’s other
options from your computer desktop.
•
Firmware Update Utility
: This program
helps you to update printer’s firmware.
•
SetIP
: Use this program to set your
printer’s T
CP/IP addresses.
a.Allows you to edit a scanned image in many ways using a powerful image
editor and to send the image by email. You can also open another image
editor program, like Adobe® Photoshop®, from SmarThru. For details, see
the onscreen help supplied on the SmarThru program.
Macintosh
• Printer driver: Use this driver to take
full advantage of your printer’s
features.
• Scanner driver: TWAIN driver is
available for scanning documents on
your printer.
•
Printer Setting Utility
: This program
allows you to set up printer’s other
options from your computer desktop.
FEATURE WINDOWS MACINTOSH
Color mode OO
Printer quality option OO
Poster printing OX
Multiple pages per sheet
(N-up)
OO
Fit to page printing O
O
a
a.This feature is supported only MAC OS X 10.4 ~ 10.5.
Scale printing OO
Watermark OX
Overlay OX
16 | Getting started
getting started
This chapter gives you step-by-step instructions for setting up the printer.
This chapter includes:
• Setting up the hardware
• System requirements
• Setting up the network
• Printer's basic settings
SETTING UP THE HARDWARE
This section shows the steps to set up the hardware which is explained in
the Quick Install Guide. Ensure you read Quick Install Guide and complete
following steps.
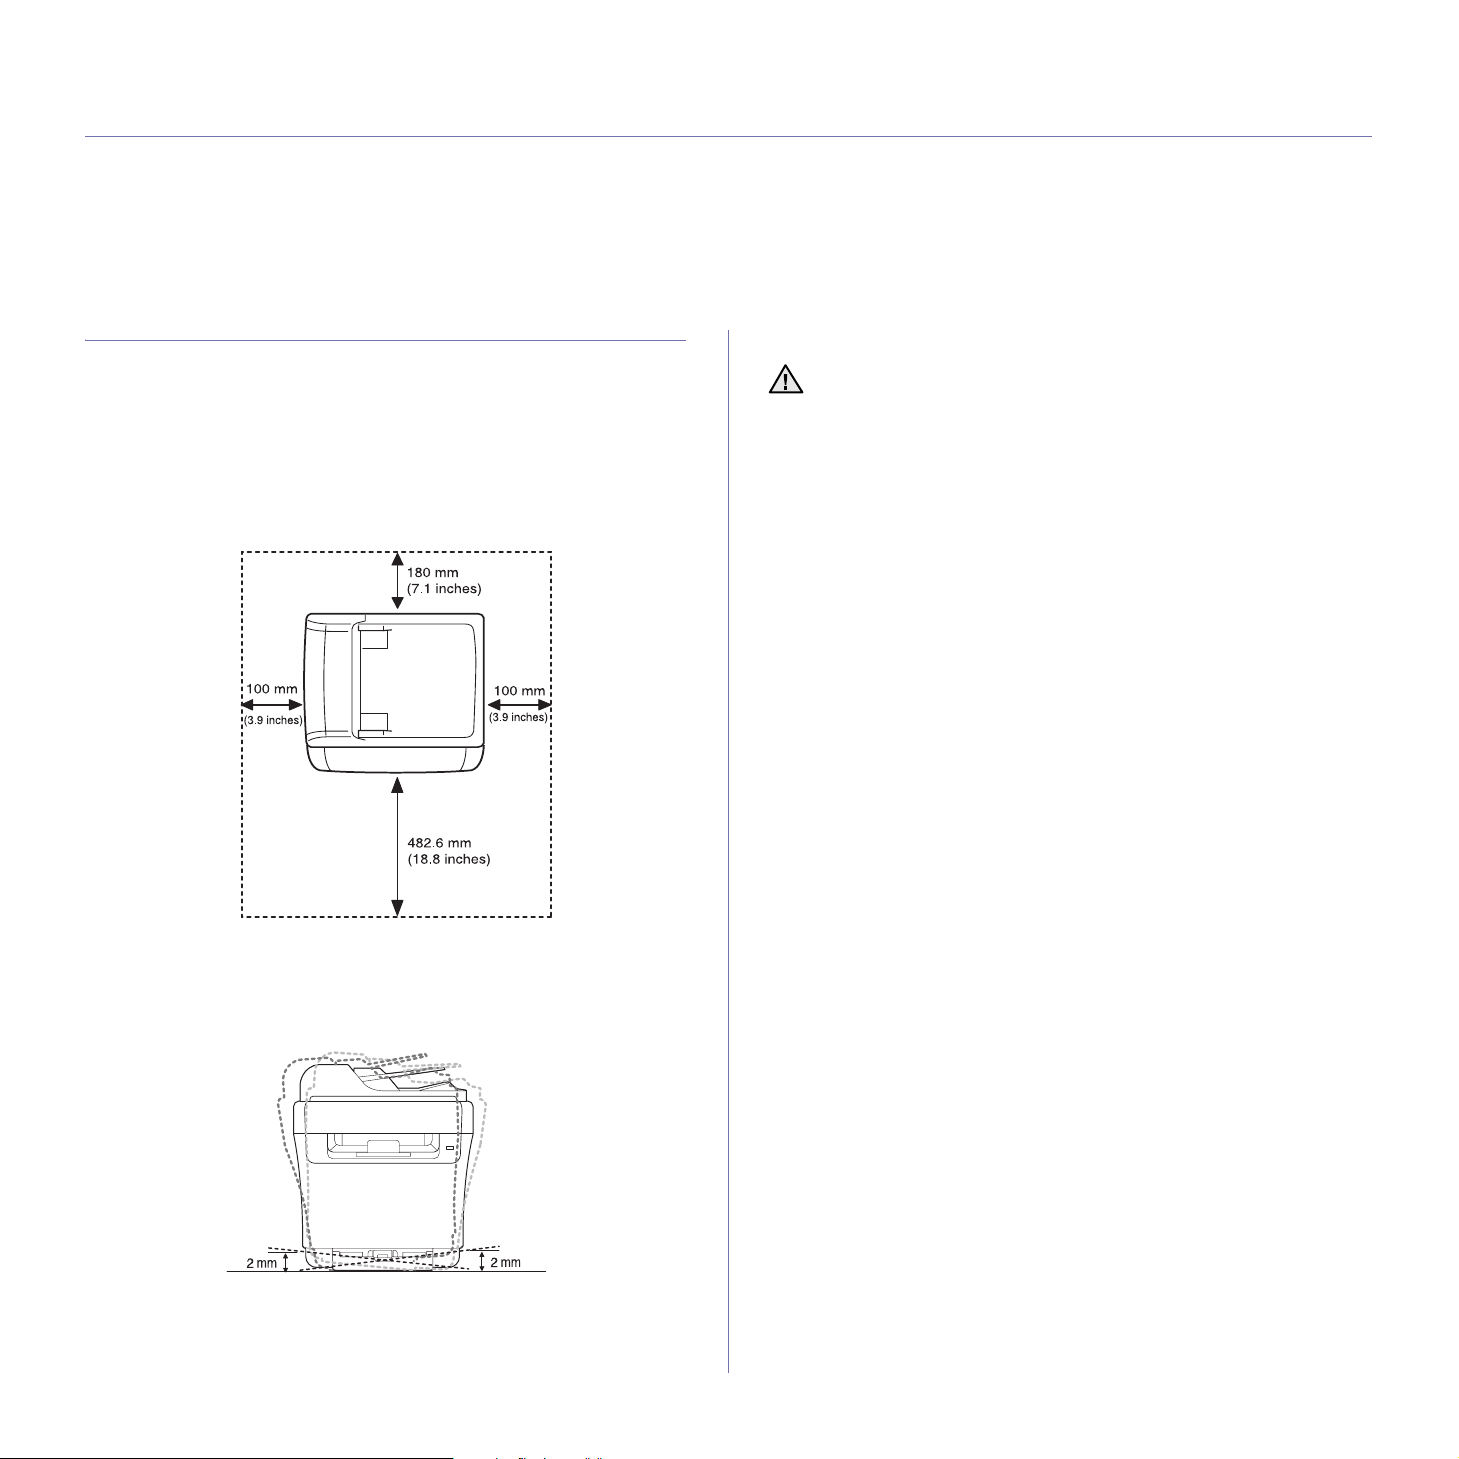
1. Select a stable location.
Select a level, stable place with adequate space for air circulation. Allow
extra space to open covers and trays.
The area should be well-ventilated and away from direct sunlight or
sources of heat, cold, and humidity. Do not set the printer close to the
edge of your desk or table.
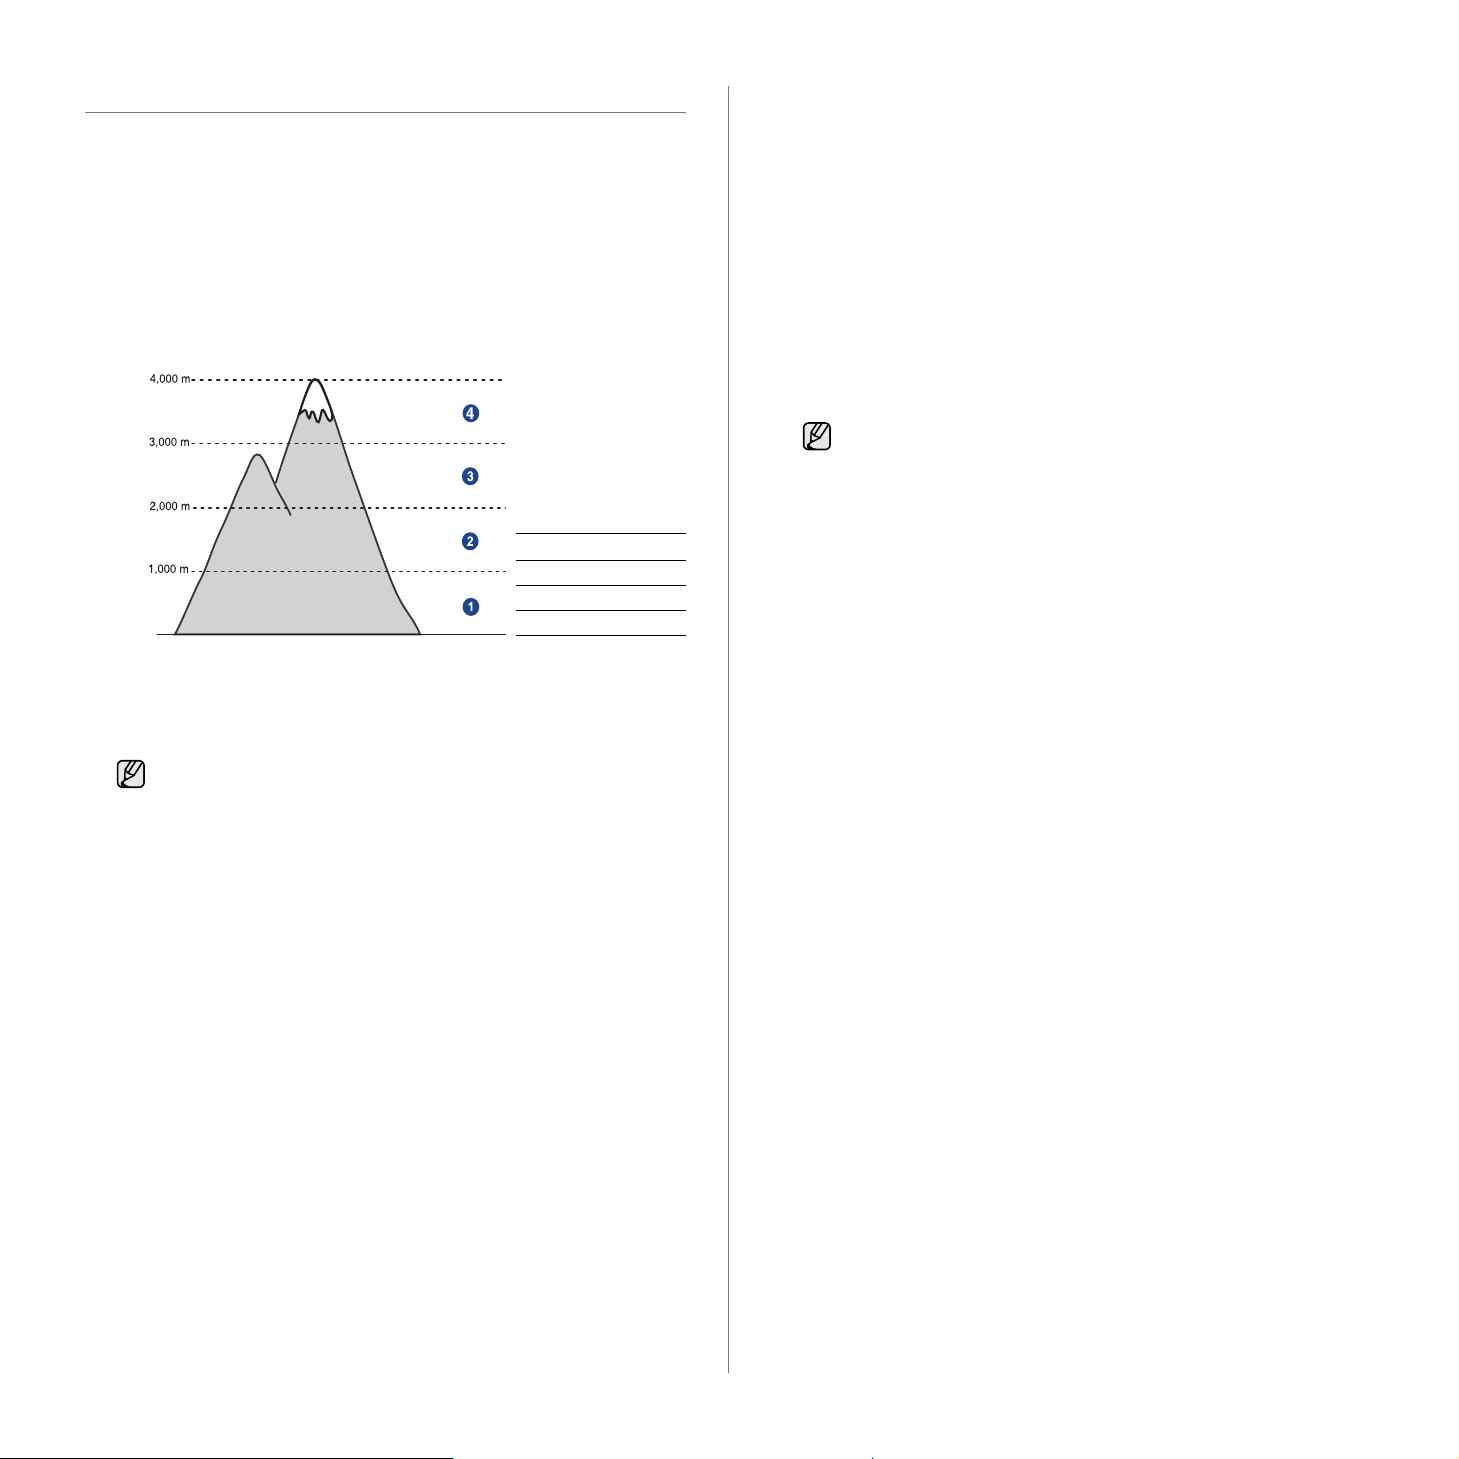
Printing is suitable for altitudes under 1,000 m (3,281 ft.). Refer to the
altitude setting to optimize your printing. See "Altitude adjustment" on
page 20 for more information.
Select a flat, stable surface so that the printer is not inclined greater than
2 mm (0.08 inch). Otherwise, printing quality may be affected.
2. Unpack the printer and check all the enclosed items.
3. Remove the tape holding the printer tightly.
4. Load paper.
5. Ensure that all the cables are connected to the printer.
6. Turn the printer on.
When you move the printer, do not tilt or turn it upside down.
Otherwise, the inside of the printer may be contaminated by toner,
which can damage the printer or result in bad print quality.
Getting started |17
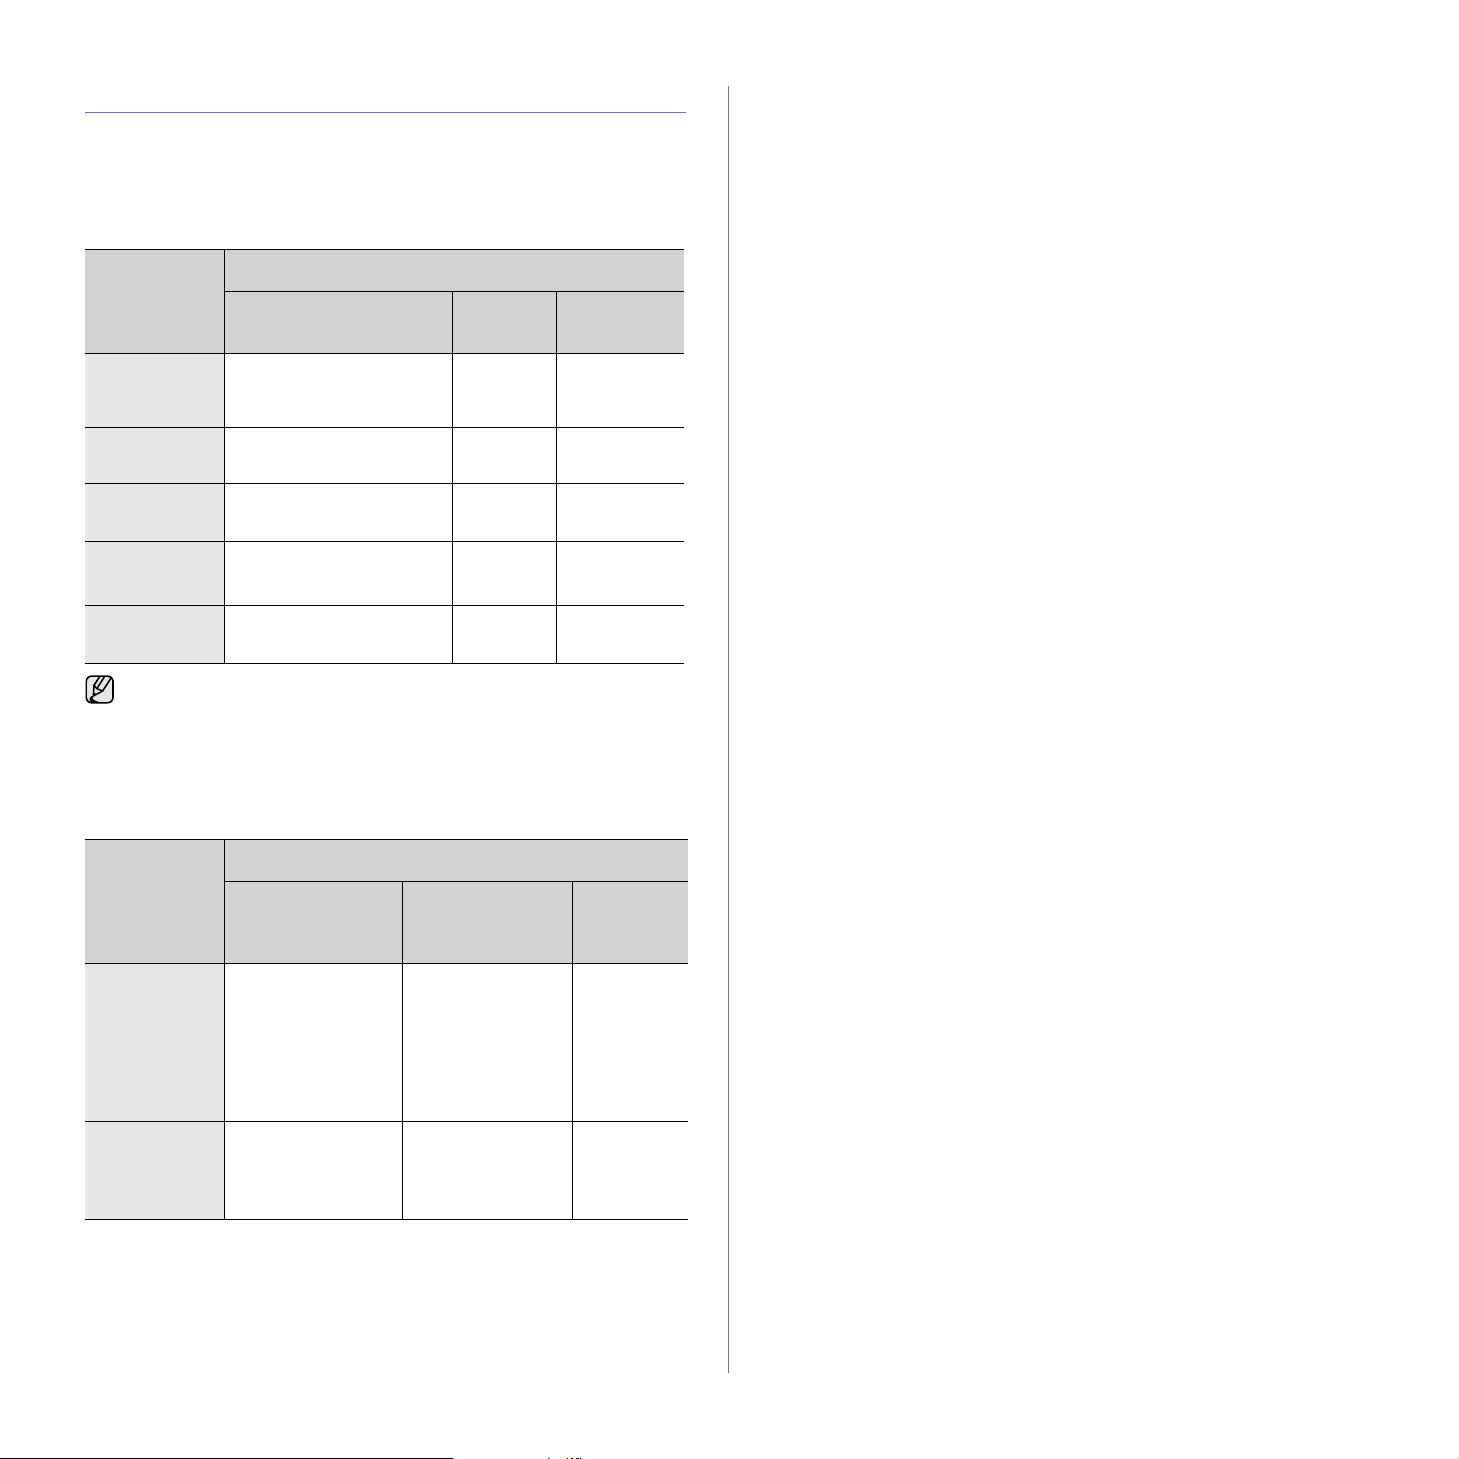
SYSTEM REQUIREMENTS
Before you begin, ensure that your system meets the following
requirements:
Microsoft® Windows®
Your printer supports the following Windows operating systems.
Macintosh
OPERATING
SYSTEM
REQUIREMENT (RECOMMENDED)
CPU RAM
FREE HDD
SPACE
Windows
2000
Intel® Pentinum® II 400
MHz (Intel Pentium III 933
MHz)
128 MB
(256 MB)
600 MB
Windows XP Intel Pentium III 933 MHz
(Intel Pentium IV 1 GHz)
128 MB
(256 MB)
1.5 GB
Windows
Server 2003
Intel Pentium III 933 MHz
(Intel Pentium IV 1 GHz)
128 MB
(512 MB)
1.25 GB to
2 GB
Windows
Vista
®
Intel Pentium IV 3 GHz 512 MB
(1024 MB)
15 GB
Windows
Server 2008
Intel Pentium IV 1 GHz
(Intel Pentium IV 2 GHz)
512 MB
(2048 MB)
10 GB
• Internet Explorer 6.0 or higher is the minimum requirement for all
Windows operating systems.
• Software installation can be only be performed by users with
Administrator rights.
• Windows Terminal Service is compatable with this printer.
OPERATING
SYSTEM
REQUIREMENT (RECOMMENDED)
CPU RAM
FREE
HDD
SPACE
Mac OS X
10.3 ~ 10.4
• I ntel Processor
• Power PC G4/G5
• 128 MB for a
Power-PC
based Mac
(512 MB).
• 512 MB for an
Intel-based Mac
(1 GB)
1 GB
Mac OS X 10.5 • I ntel Processor
• 867 MHz or
faster Power PC
G4 /G5
512 MB (1 GB) 1 GB
18 | Getting started
SETTING UP THE NETWORK
You need to set up the network protocols on the printer to use it in the
network environment. You can set up the basic network settings through the
printer's control panel.
Supported operation environments
The following table shows the network environments supported by the
printer:
Configuring network protocol via the printer
To set up TCP/IP network parameters:
1. Ensure your printer is connected to the network with an RJ-45 Ethernet
cable.
2. Ensure you have turned on the printer.
3. Press Menu on the control panel, until you see Network on the bottom
line of the display and press OK.
4. Press the left/right arrow until TCP/IP appears and press OK.
5. Press the left/right arrow until Static appears and press OK.
6. Press the left/right arrow until IP Address appears and press OK.
Enter a byte between 0 and 255 using the number keypad and press the
left/right arrow to move between bytes.
Repeat this to complete the address from the 1st byte to the 4th byte.
7. When you have finished, press OK.
Repeat steps 6 and 7 to configure the other TCP/IP parameters: subnet
mask and gateway address.
Using the SetIP program
This program is for the network IP setting using the MAC address which is
the hardware serial number of the network printer card or interface.
Especially, it helps the network administrator set several network IPs at the
same time.
Installing the program
1. Insert the driver CD provided along with your machine. When the
driver CD runs automatically, close the window.
2. Start Windows Explorer and open the X drive. (X represents your
CDROM drive.)
3. Double-click Application > SetIP.
4. Double-click Setup.exe to install this program.
5. Click OK.
If necessary, select a language from the drop-down list.
6. Follow the instructions in the window and complete the installation.
Setting network values
1. Print the printer’s network configuration report to find your printer’s
MAC address. See "Printing reports" on page 49.
2. From the Windows Start menu, select All Programs → Dell → Dell
printers → Dell 1235cn Color Laser MFP → SetIP.
3. Click to open the TCP/IP configuration window.
4. Enter the network card's MAC address, IP address, subnet mask,
default gateway, and then click Apply.
5. Click OK. The printer prints the network information. Confirm that the
settings are correct.
6. Click Exit.
Installing the driver software
You have to install the printer software for printing. The software includes
drivers, applications, and other user friendly programs. The following
procedure is based on Windows XP. If you use Macintosh operating system,
see the Software section.
ITEM REQUIREMENTS
Network interface • Ethernet 10/100 Base-TX
Network operating system • Windows 2000/XP/2003/Vista
• MAC OS 10.3 ~ 10.5
Network protocols •TCP/IP
• Standard TCP/IP
•LPR
• IPP/HTTP
• Bonjour
• DHCP
•BOOTP
If you are in a non-static IP address environment and need to setup a
DHCP network protocol, go to the http://developer.apple.com/
networking/bonjour/download/, select the program Bonjour for
Windows compatible with your computer's operating system, and
install the program. This program will allow you to fix the network
parameter automatically. Follow the instruction in the installation
window.
Contact the network administrator if you are not sure how to
configure.
You can also set up the network settings through the network
administration programs.
• Embedded Web Service: Web server embedded on your
network print server, which allows you to:
- Configure the network parameters necessary for the printer to
connect to various network environments.
- Customize printer settings.
• SetIP: Utility program that allows you to select a network
interface and manually configure the IP addresses for use with
the TCP/IP protocol. See "Using the SetIP program" on page 18.
• You can only use SetIP program when your printer is connected to
a network.
• The following procedure is based on Windows XP.
When you enter the MAC address, enter it without colon(:).
• The following procedure is applicable when the printer is being
used as a network printer. If you want to connect your printer with a
USB cable, refer to Software section.
• The procedure and popup window which appear during the
installation may differ depending on the operating system, the
printer feature, or the interface in use.
Getting started |19
1. Connect the network cable to your printer.
2. Ensure that the network setup for your printer is completed. See "Setting
up the network" on page 18. All applications should be closed on your
computer before beginning installation.
3. Insert the Printer Software CD into your CD drive.
The CD should automatically run, and an installation window appears.
If the installation window does not appear, click Start → Run. Type
X:\Setup.exe, replacing “X” with the letter which represents your CD
drive and click OK.
If you are running Windows Vista, click Start → All Programs →
Accessories → Run, and type X:\Setup.exe.
If the AutoPlay window appears, click Run Setup.exe in Install or run
program field, and click Continue in the User Account Control
window.
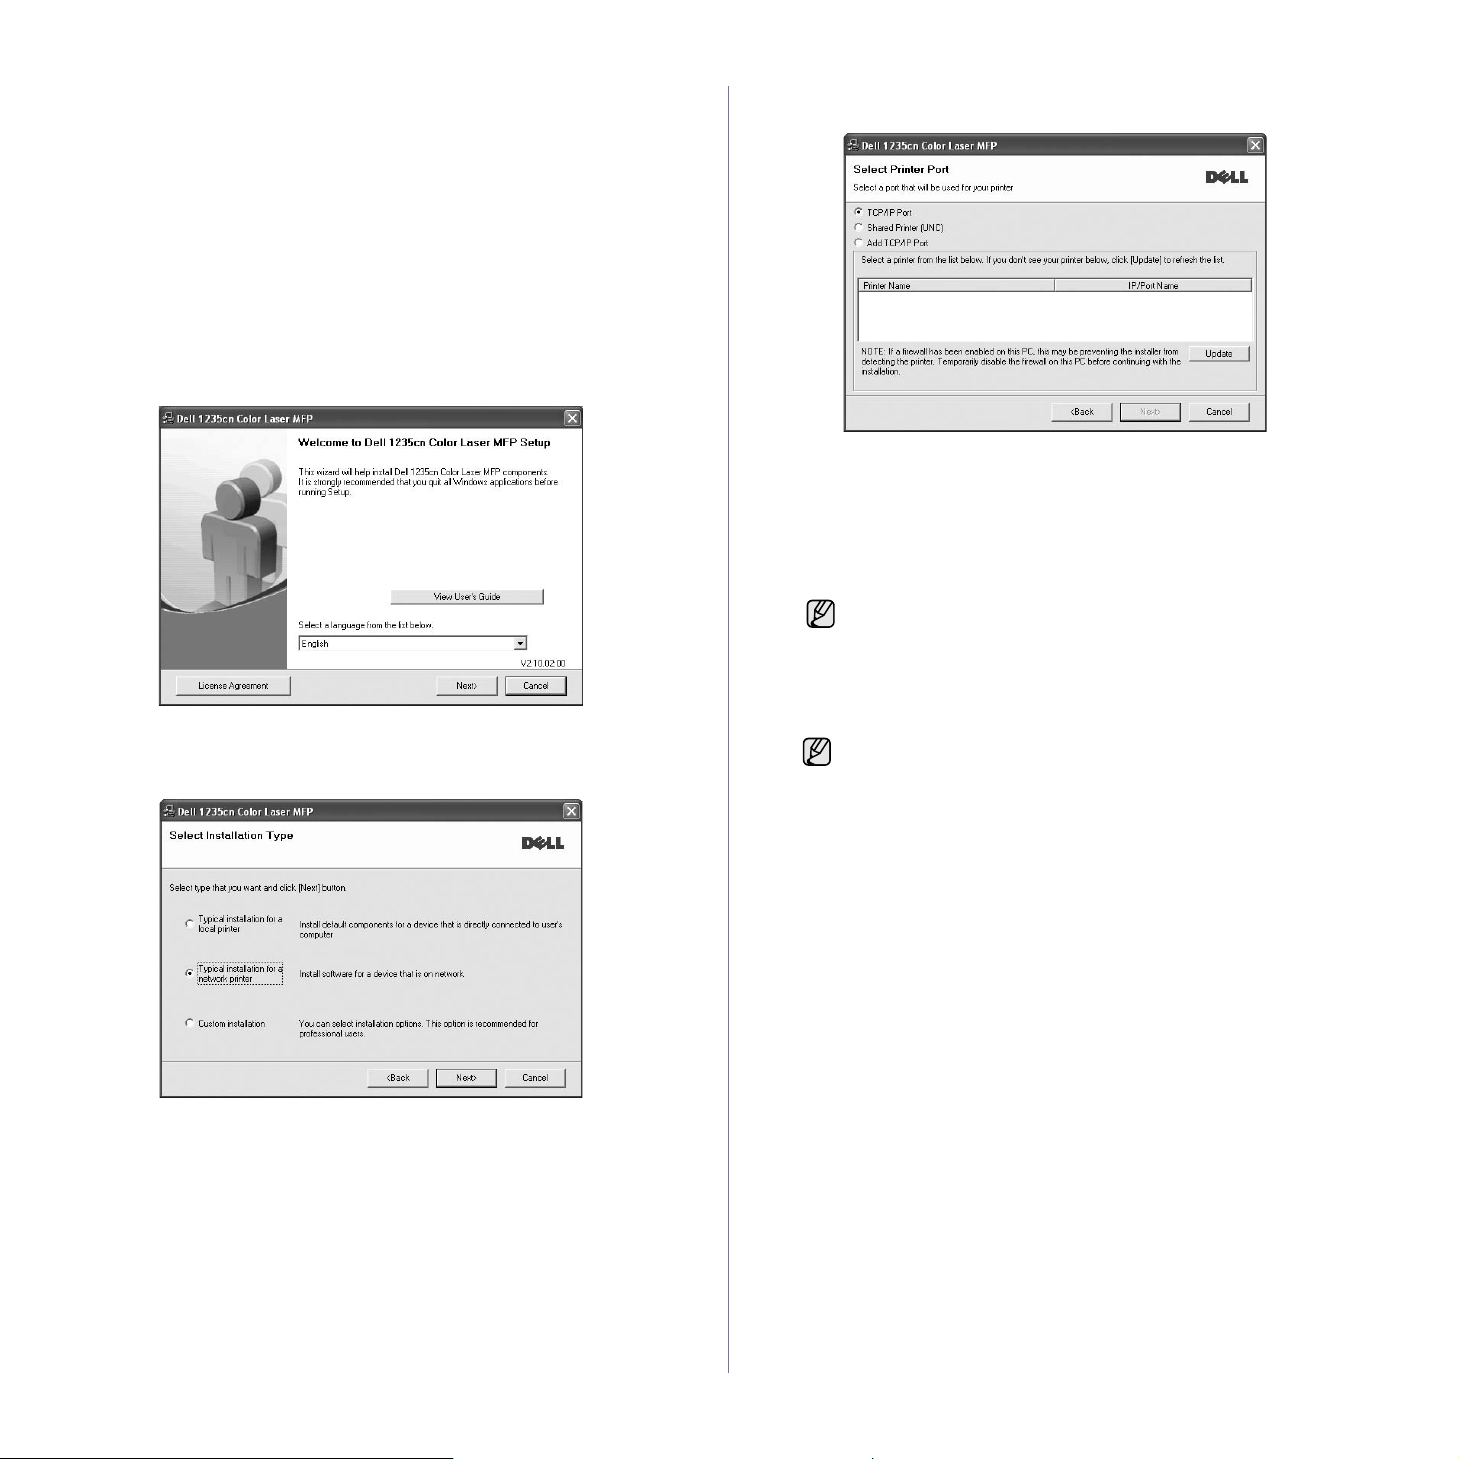
4. Click Next.
• The window shown above may differ slightly, if you are reinstalling
the driver.
5. Select Typical installation for a network printer, and then click Next.
6. The list of printers available on the network appears. Select the printer
you want to install from the list and then click Next.
• If you do not see your printer on the list, click Update to refresh the
list, or select Add TCP/IP Port to add your printer to the network. To
add the printer to the network, enter the port name and the IP
address for the printer.
• To find a shared network printer (UNC Path), select Shared Printer
[UNC] and enter the shared name manually or find a shared printer
by clicking the Browse button.
7. After the installation is complete, a window appears asking you to print a
test page. If you wish to do so, select the corresponding checkbox(es)
and click Finish.
If you are not sure of the IP address, contact your network
administrator or print network information. See "Printing
reports" on page 49.
• If your printer does not work properly after the installation, try
to reinstall the printer driver. See Software section for more
information.
• During the printer driver installation process, the driver installer
detects the location information for your operating system and
sets the default paper size for your printer. If you use a
different Windows location, you must change the paper size to
match the paper you usually use. Go to printer properties to
change the paper size after installation is complete.
20 | Getting started
PRINTER'S BASIC SETTINGS
After installation is complete, you may want to set the printer's default
settings. Refer to the next section if you would like to set or change values.
Altitude adjustment
The print quality is affected by atmospheric pressure, which is determined
by the height of the printer above sea level. The following information will
guide you on how to set your printer for the best print quality or best quality
of print.
Before you set the altitude value, find the altitude where you are using the
printer.
1. Click Start → All Programs → Dell → Dell Printers → Dell 1235cn
Color Laser MFP → Printer Setting Utility.
You can also click Printer Setting Utility on the status bar in Mac OS X.
2. Click Setting → Altitude Adjustment. Select the appropriate value
from the dropdown list, and then click Apply.
Changing the display language
To change the display language in the control panel:
1. Press Menu until System Setup appears on the bottom line of the
display and press OK.
2. Press OK when Machine Setup appears.
3. Press the left/right arrow until Language appears and press OK.
4. Press the left/right arrow until the language you want appears and press
OK.
5. Press Stop/Clear to return to ready mode.
Setting the date and time
The current date and time are shown on the display when your printer is on
and ready to work. All of your faxes will have the date and time printed on
them.
1. Press Menu until System Setup appears on the bottom line of the
display and press OK.
2. Press OK when Machine Setup appears.
3. Press the left/right arrow until Date & Time appears and press OK.
4. Enter the correct time and date using the number keypad.
Month = 01 to 12
Day = 01 to 31
Year = requires four digits
Hour = 01 to 12 (12-hour mode)
00 to 23 (24-hour mode)
Minute = 00 to 59
You can also use the left/right arrow to move the cursor under the
digit you want to correct and enter a new number.
5. To select AM or PM for 12-hour format, press the
*or # button or any
number button.
When the cursor is not under the AM or PM indicator, pressing the
*or #
button immediately moves the cursor to the indicator.
You can change the clock mode to 24-hour format (e.g. 01:00 PM as
13:00). For details, see next section (Changing the clock mode).
6. Press OK to save the time and date.
When you enter a wrong number, Out of Range appears and the printer
does not proceed to the next step. If this happens, re-enter the correct
number.
7. Press Stop/Clear to return to ready mode.
Changing the clock mode
You can set your printer to display the current time in either a 12-hour or 24-
hour format.
1. Press Menu until System Setup appears on the bottom line of the
display and press OK.
2. Press OK when Machine Setup appears.
3. Press the left/right arrow until Clock Mode appears and press OK.
4. Press the left/right arrow to select the other mode and press OK.
5. Press
Stop/Clear
to return to ready mode.
Changing the default mode
Your printer is preset to Copy mode. You can switch this default mode
between Fax mode and Copy mode.
1. Press Menu until System Setup appears on the bottom line of the
display and press OK.
2. Press OK when Machine Setup appears.
3. Press the left/right arrow until Default Mode appears and press OK.
4. Press the left/right arrow until the default mode you want appears and
press OK.
5. Press Stop/Clear to return to ready mode.
Setting sounds
You can control the following sounds:
• Key Sound: Turns the key sound on or off. With this option set to On
, a
tone sounds each time a key is pressed.
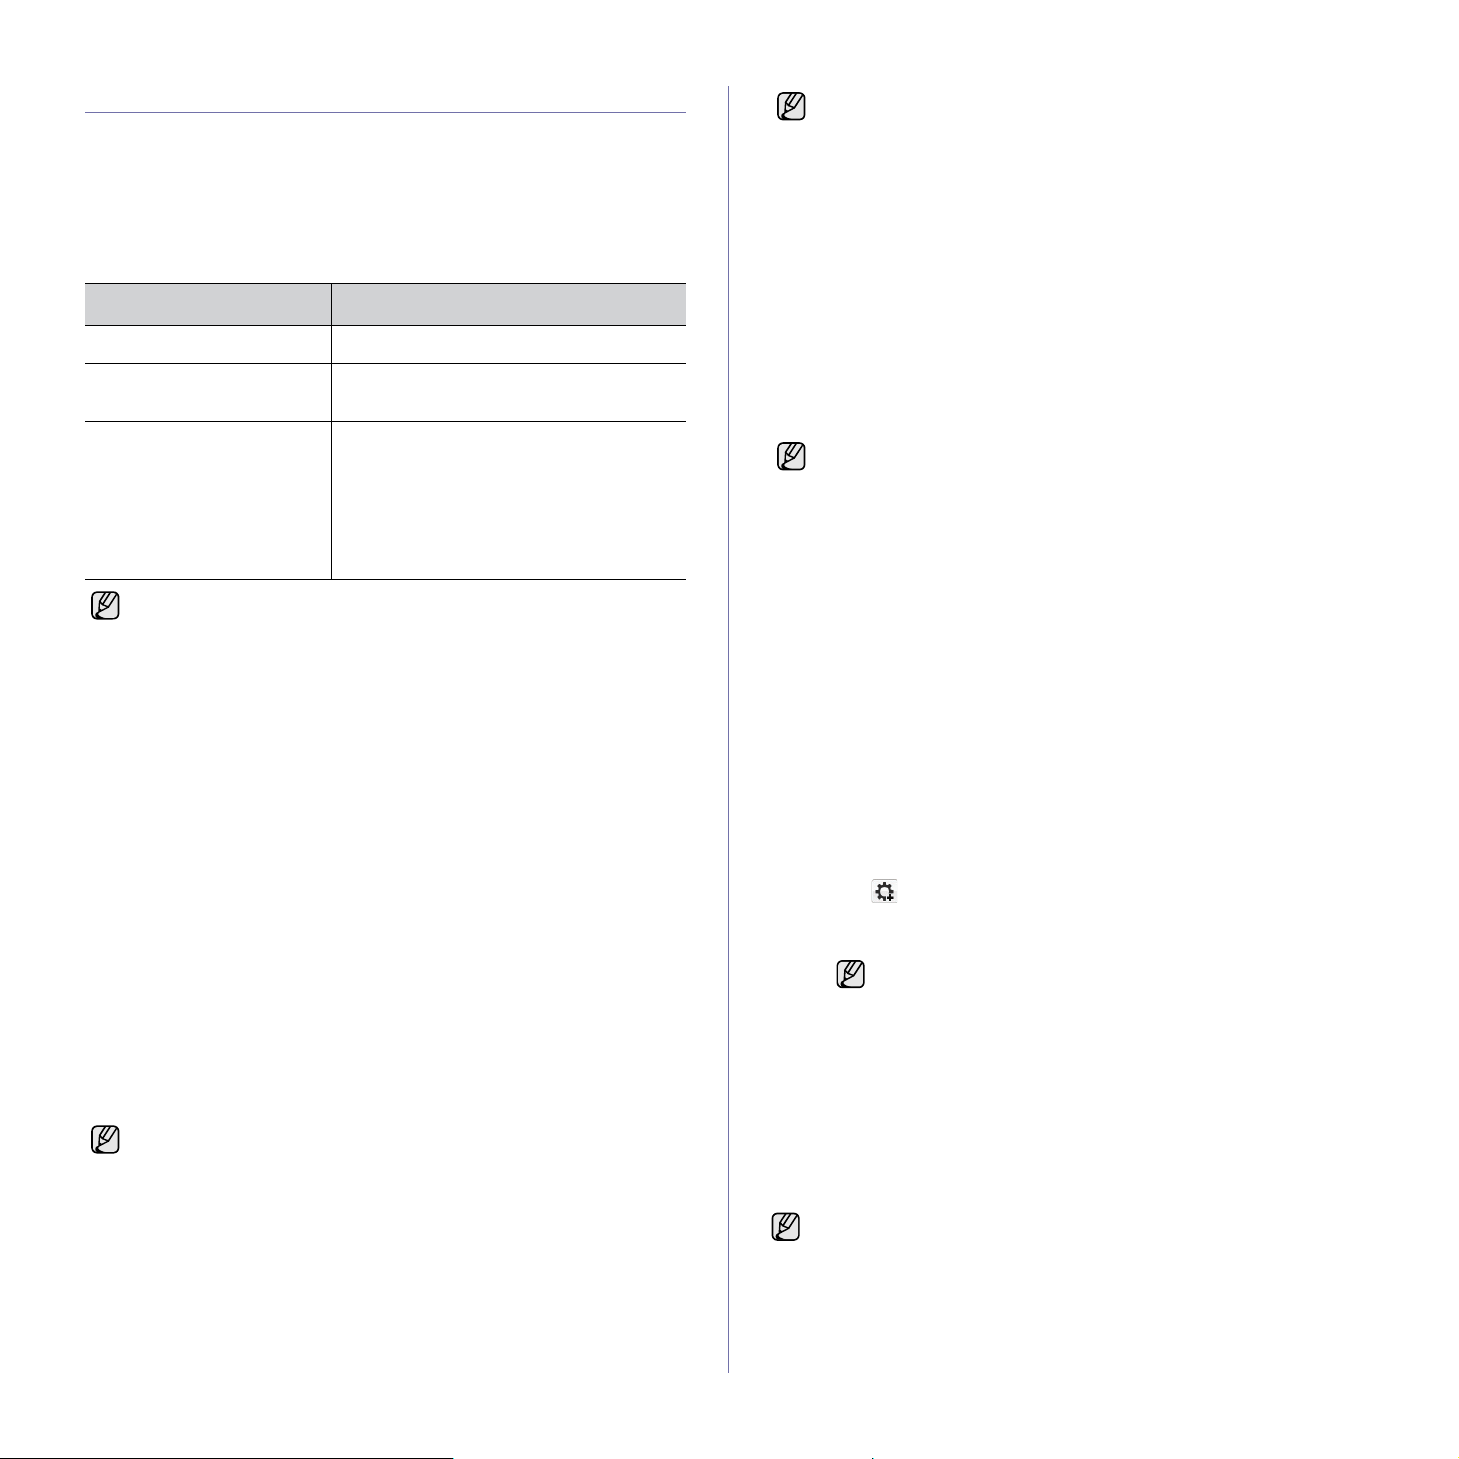
1 Normal
2 High 1
3 High 2
4 High 3
If your printer is connected to a network, Embedded Web Service
screen appears automatically. Click Machine Settings → Setup
(or Machine Setup) → Adj.. Select the appropriate altitude value,
and then click Apply.
The date format may differ from country to country
Getting started |21
• Alarm Sound: Turns the alarm sound on or off. With this option set to
On
, an alarm tone sounds when an error occurs or fax communication
ends.
• Speaker: Turns on or off the sounds from the telephone line through
the speaker, such as a dial tone or a fax tone. With this option set to
Comm. which means “Common,” the speaker is on until the remote
printer answers.
• Ringer: Adjusts the ringer volume. For the ringer volume, you can
select Off, Low, Mid, and High.
Speaker, ringer, key sound, and alarm sound
1. Press Menu until System Setup appears on the bottom line of the
display and press OK.
2. Press the left/right arrow until Sound/Volume appears and press
OK.
3. Press the left/right arrow until the sound option you want appears
and press OK.
4. Press the left/right arrow until the desired status or volume for the
sound you have selected appears and press OK.
5. If necessary, repeat steps 3 through 5 to set other sounds.
6. Press Stop/Clear to return to ready mode.
Speaker volume for On Hook Dial
1. Press On Hook Dial. A dial tone sounds from the speaker.
2. Press the left/right arrow until you hear the volume you want.
3. Press Stop/Clear to save the change and return to ready mode.
Entering characters using the number keypad
As you perform various tasks, you may need to enter names and numbers.
For example, when you set up your printer, you enter your name or your
company’s name, and the fax number. When you store fax numbers or
email addresses in memory, you may also enter the corresponding names.
Entering alphanumeric characters
1. When you are prompted to enter a letter, locate the button labeled
with the character you want. Press the button until the correct letter
appears on the display.
For example, to enter the letter O, press 6, labeled with MNO.
Each time you press 6, the display shows a different letter, M, N, O,
m, n, o and finally 6.
You can enter special characters, such as space, plus sign, and etc.
For details, see the below section.
2. To enter additional letters, repeat step 1.
If the next letter is printed on the same button, move the cursor by
pressing the
left/right arrow button and then press the button labeled
with the letter you want. The cursor will move to the right and the
next letter will appear on the display.
You can enter a space by pressing 1 twice.
3. When you have finished entering letters, press OK.
Keypad letters and numbers
Correcting numbers or names
If you make a mistake while entering a number or name, press the left/
right arrow button to delete the last digit or character. Then enter the
correct number or character.
Inserting a pause
With some telephone systems, you must dial an access code (9, for
example) and listen for a second dial tone. In such cases, you must
insert a pause in the telephone number. You can insert a pause while
you are setting up speed dial numbers.
To insert a pause, press Redial/Pause at the appropriate place while
entering the telephone number. A - appears on the display at the
corresponding location.
Using the save modes
Power Save mode
Power Save mode allows your printer to reduce power consumption
when it is not in actual use. You can turn this mode on and select a
length of time for which the printer waits after a job is printed before it
switches to a reduced power state.
1. Press Menu until System Setup appears on the bottom line of the
display and press OK.
2. Press OK when Machine Setup appears.
3. Press the left/right arrow until Power Save appears and press OK.
4. Press the left/right arrow until the time setting you want appears and
press OK.
5. Press Stop/Clear to return to ready mode.
Auto continue
This option allows you to set the printer to continue printing or not, in case
the paper size you have set and the paper within the tray mismatches.
1. Press Menu until System Setup appears on the bottom line of the
display and press OK.
2. Press OK when Machine Setup appears.
3. Press the left/right arrow until Auto Continue appears and press OK.
4. Press the left/right arrow until the binding option you want appears.
•On:Automatically prints after set time passes, when the paper size
You can adjust the volume level using On Hook Dial.
You can adjust the speaker volume only when the telephone line is
connected.
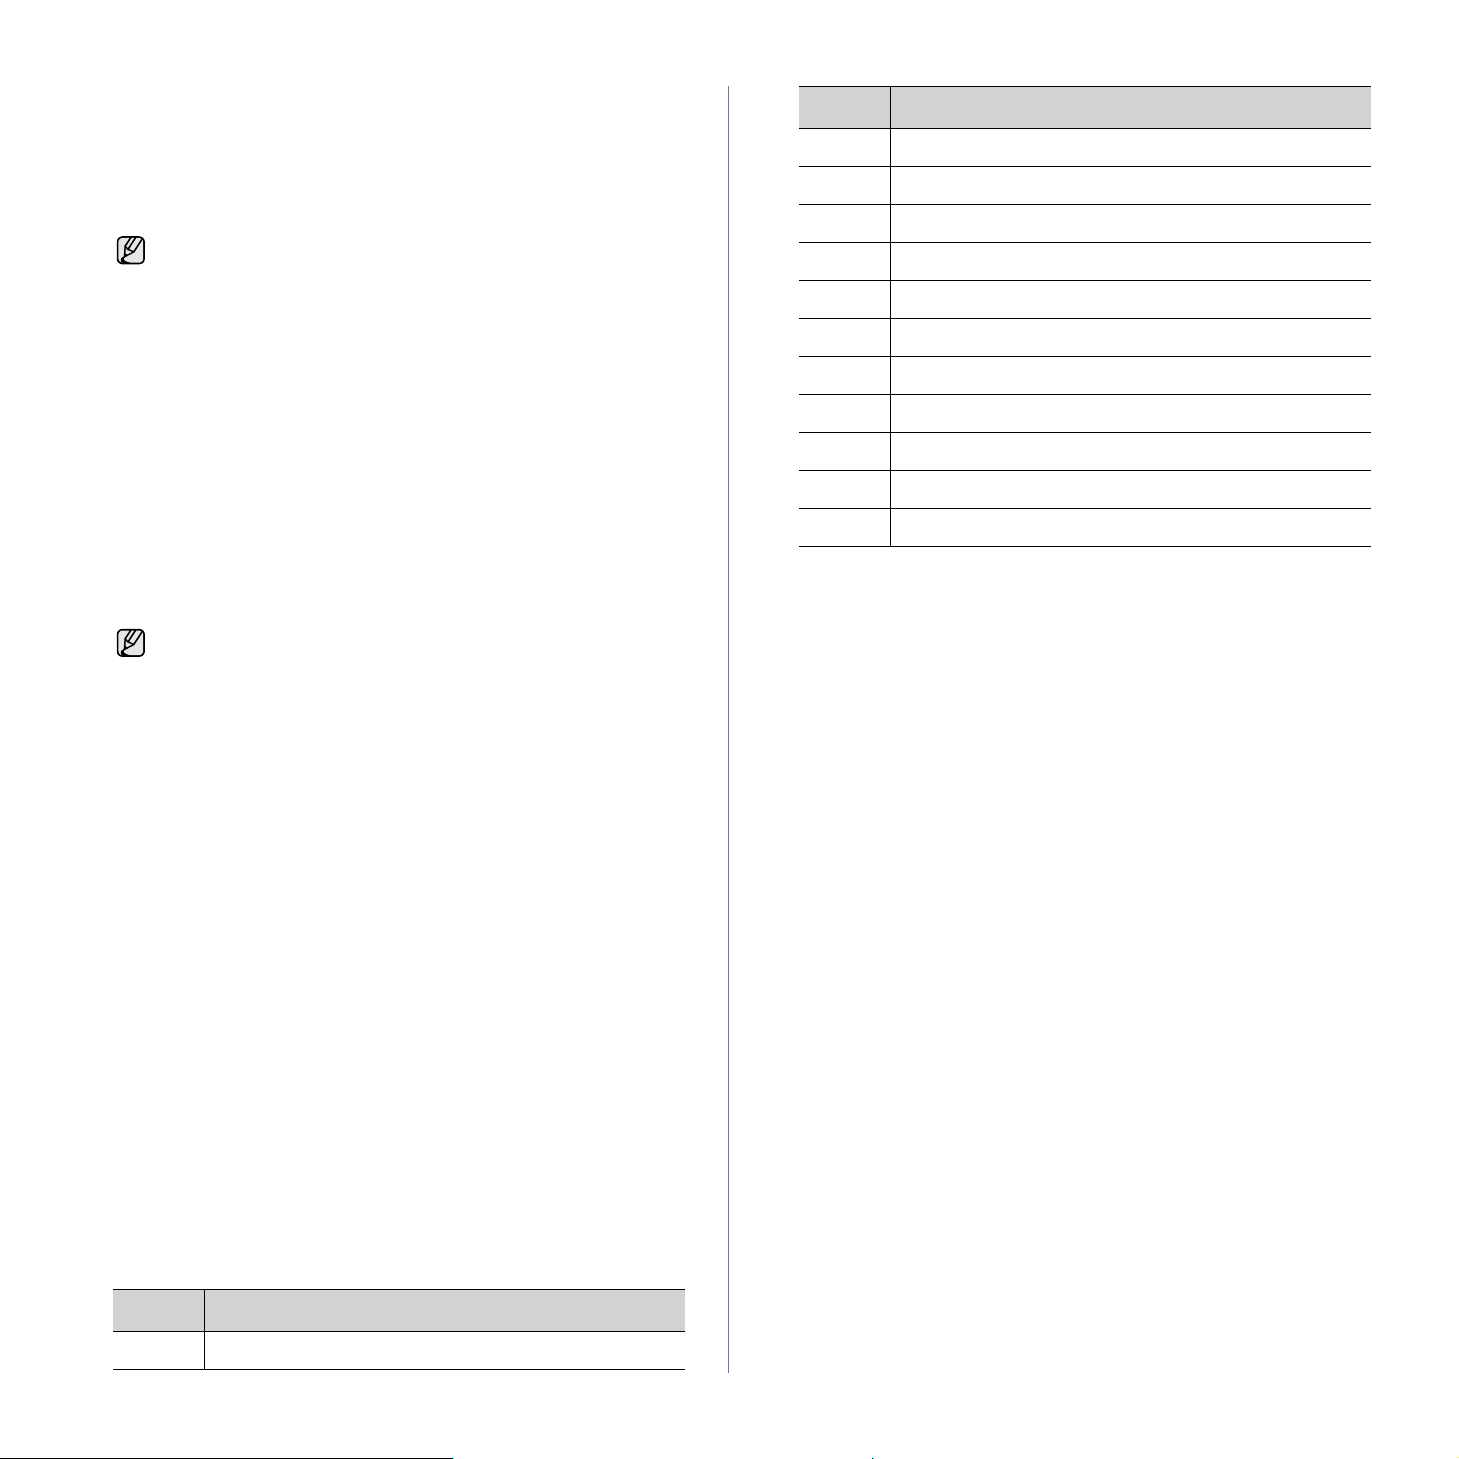
KEY ASSIGNED NUMBERS, LETTERS, OR CHARACTERS
1 @ / . ‘ 1
2 A B C a b c 2
3 D E F d e f 3
4 G H I g h i 4
5 J K L j k l 5
6 M N O m n o 6
7 P Q R S p q r s 7
8 T U V t u v 8
9 W X Y Z w x y z 9
0 + - , & 0
* *
# #
KEY ASSIGNED NUMBERS, LETTERS, OR CHARACTERS

22 | Getting started
mismatches the tray paper size.
• Off: Waits until you press Black Start or Color Start on the control
panel, when the paper size mismatches the tray paper size.
5. Press OK to save your selection.
6. Press Stop/Clear to return to ready mode.
Loading originals and print media |23
loading originals and print media
This chapter introduces you to loading originals and print media into your printer.
This chapter includes:
• Loading originals
• Selecting print media
• Changing the size of the paper in the paper tray
• Printing on special print materials
• Setting the paper size and type
LOADING ORIGINALS
You can use the scanner glass or ADF to load an original for copying,
scanning, and sending a fax.
On the scanner glass
Ensure that no originals are in the ADF. If an original is detected in the ADF,
the printer gives it priority over the orig i n al on the scanner glass. To get the
best scan quality, especially for colored or gray-scaled images, use the
scanner glass.
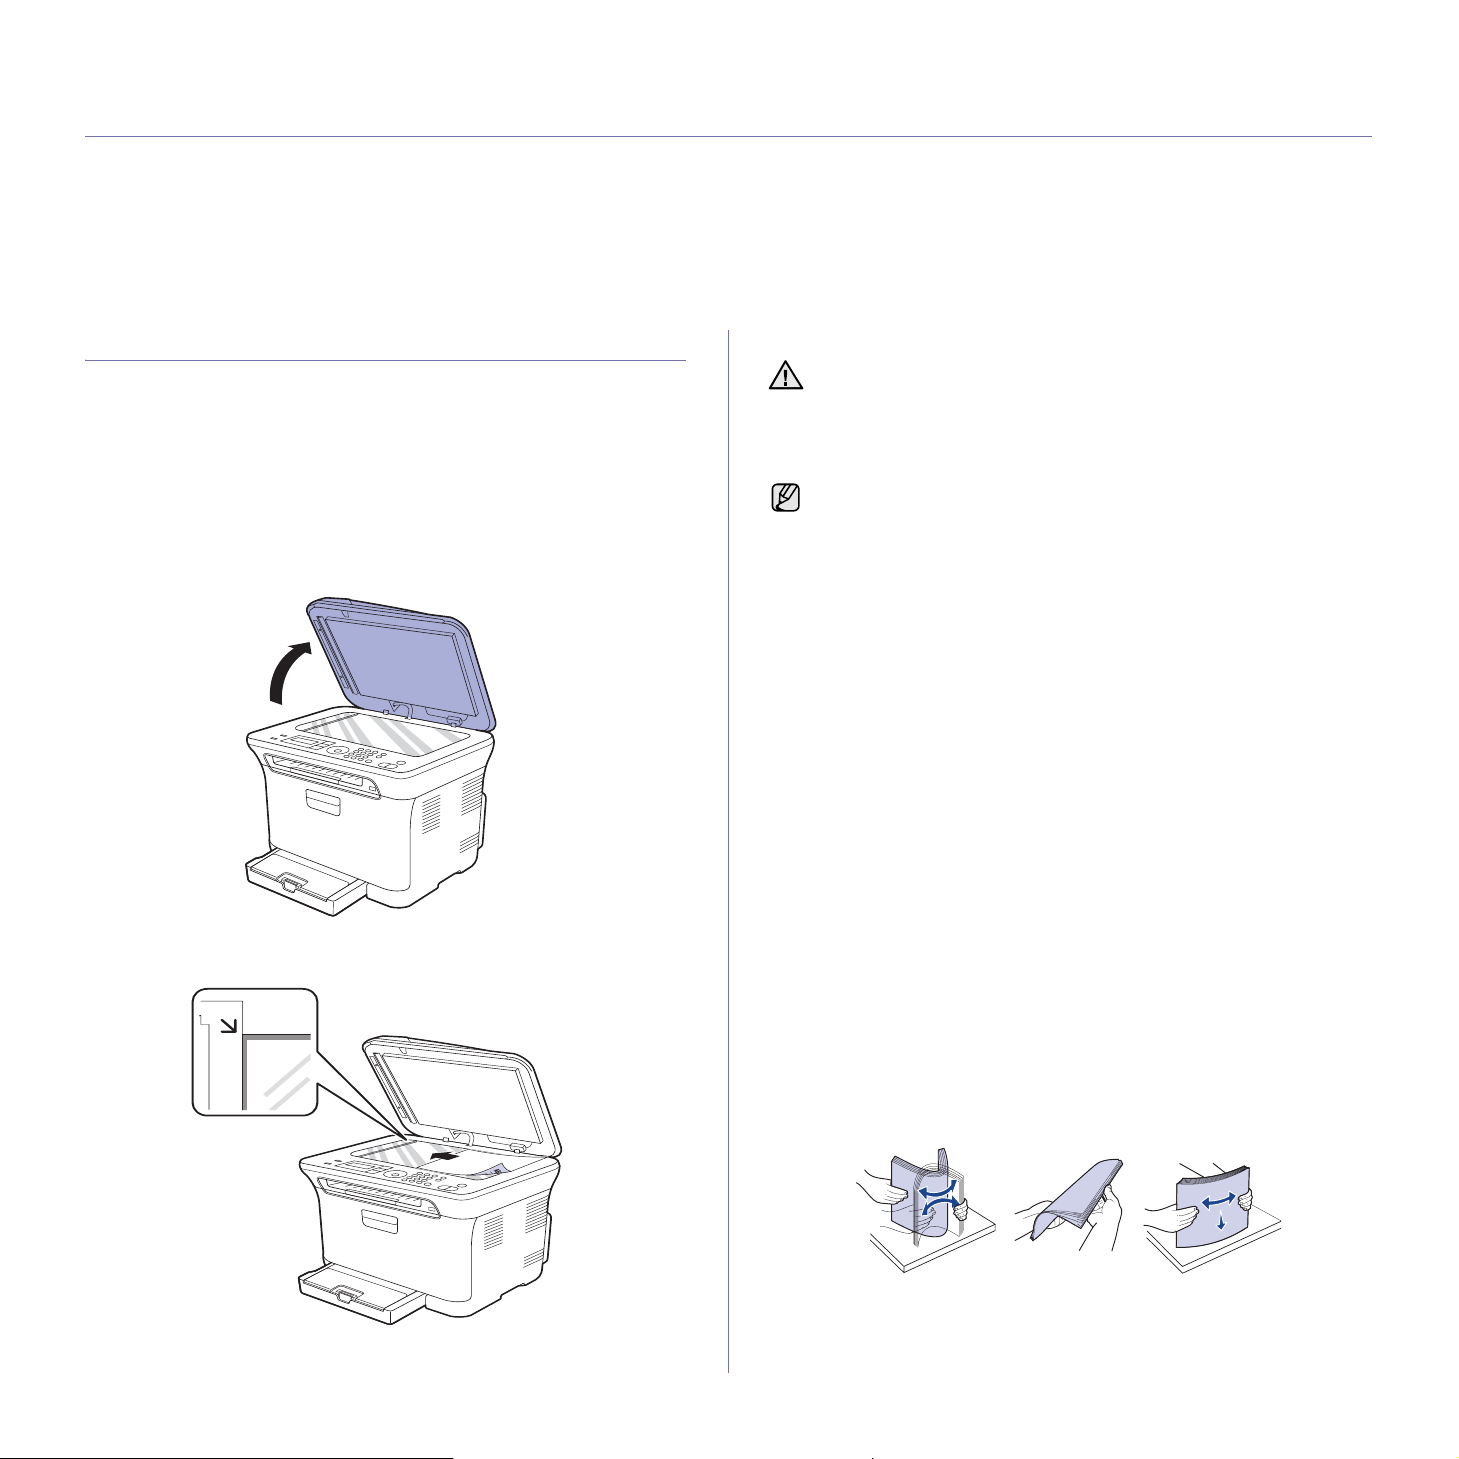
1. Lift and open the scanner lid.
2. Place the original face down on the scanner glass and align it with the
registration guide at the top left corner of the glass.
3. Close the scanner lid.
In the ADF
Using the ADF, you can load up to 15 sheets of paper (75 g/m
2
, 20 lb bond)
for one job.
When you use the ADF:
• In the ADF: Do not load paper smaller than 142 x 148 mm (5.6 x
5.8 inches) or larger than 216 x 356 mm (8.5 x 14 inches).
• Do not attempt to load the following types of paper:
- carbon-paper or carbon-backed paper
- coated paper
- onion skin or thin paper
- wrinkled or creased paper
- curled or rolled paper
- torn paper
• Remove all staples and paper clips before loading.
• Ensure any glue, ink, or correction fluid on the paper is completely dry
before loading.
• Do not load originals that include different sizes or weights of paper.
• Do not load booklets, pamphlets, transparencies, or documents having
other unusual characteristics.
1. Flex or fan the edge of the paper stack to separate the pages before
loading originals.
• Be careful not to break the scan glass. You may get hurt.
• Be careful not to let the scan cover fall over your hands. You may
get hurt.
• When scanning or copying, do not look at the light inside the
scanner. It is harmful for your eyes and it can be dangerous.
• Leaving the scanner lid open while copying may affect copy quality
and toner consumption.
• Dust on the scanner glass may cause black spots on the printout.
Always keep the scanner glass clean.
• If you are copying a page from a book or magazine, lift the scanner
lid until its hinges are caught by the stopper and then close the lid.
If the book or magazine is thicker than 30 mm, start copying with
the lid open.
24 | Loading originals and print media
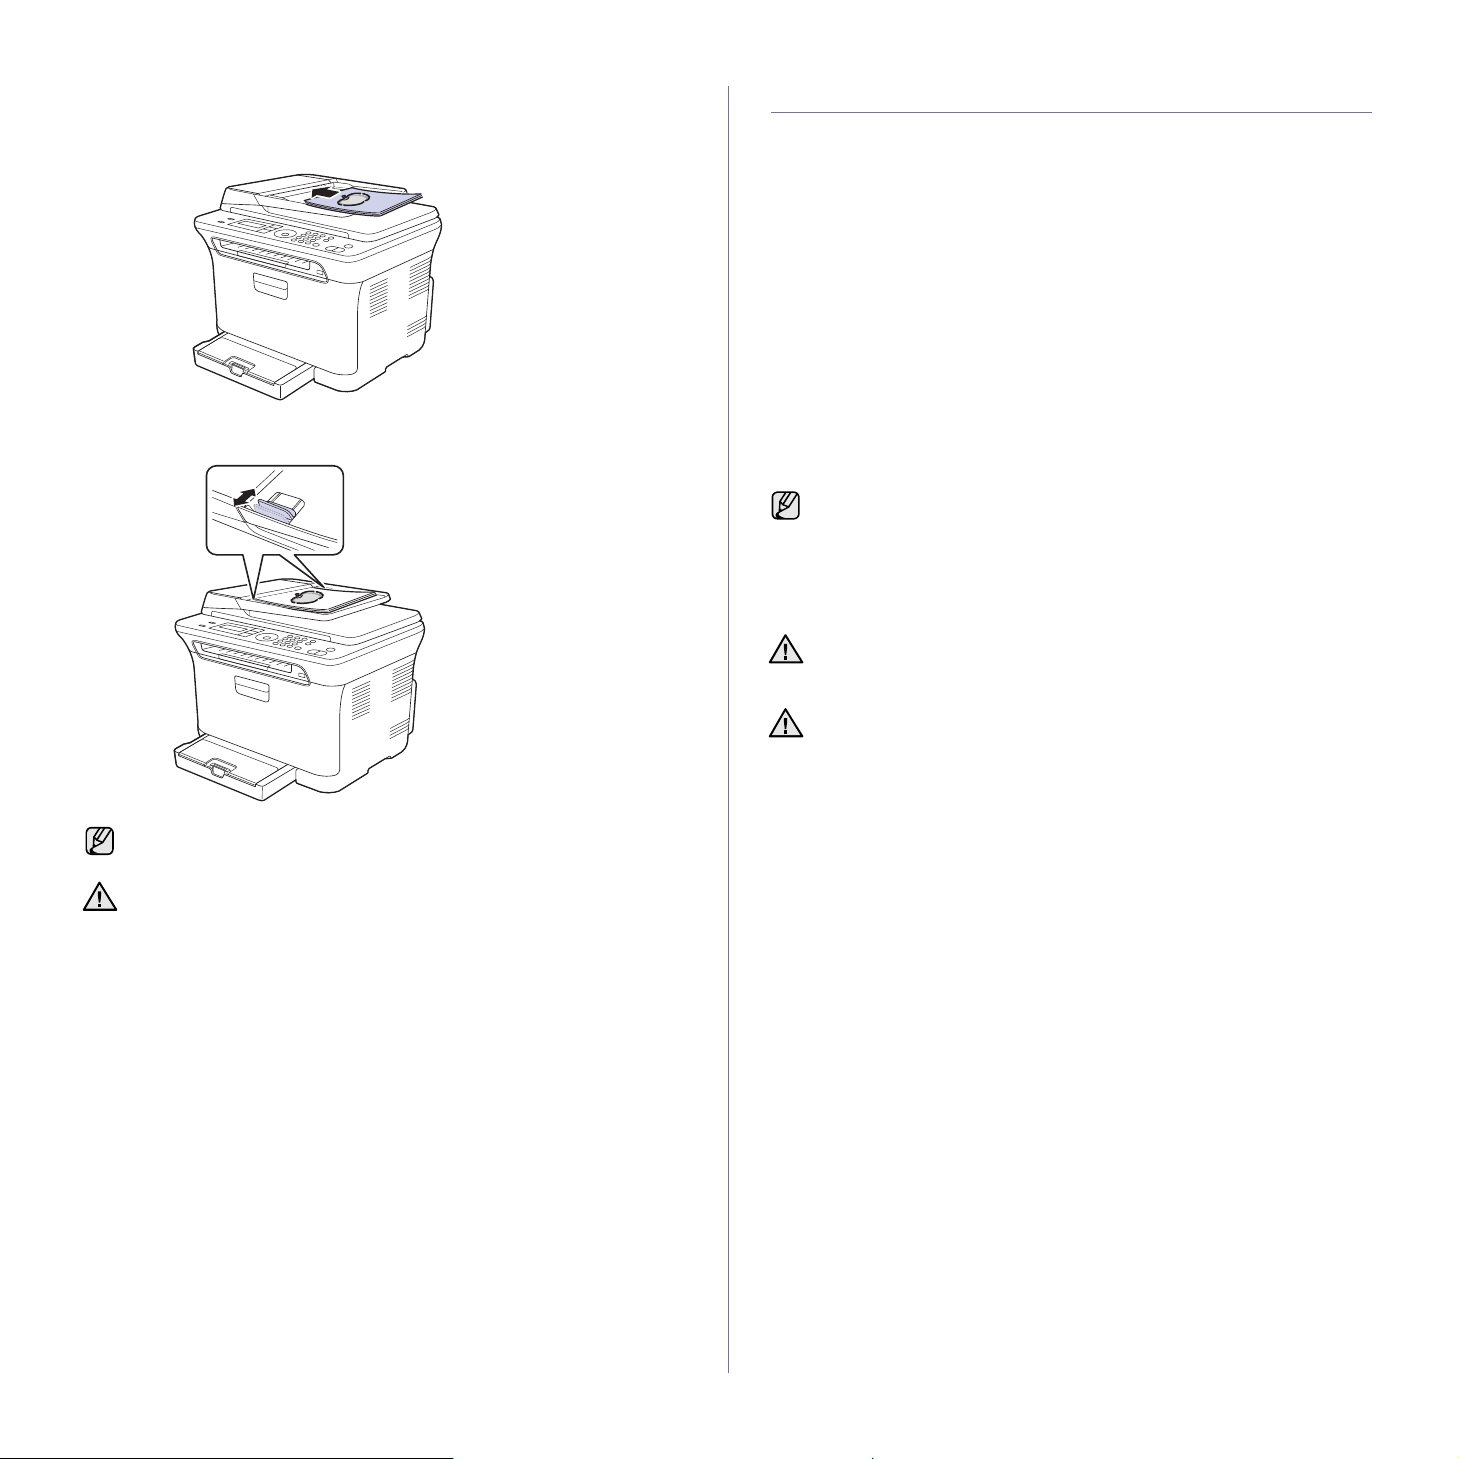
2. Load the original face up into the ADF. Ensure that the bottom of the
original stack matches the paper size marked on the document input
tray.
3. Adjust the document width guides to the paper size.
SELECTING PRINT MEDIA
You can print on a variety of print media, such as plain paper, envelopes,
labels, and transparencies. Always use print media that meet the guidelines
for use with your printer. Print media that does not meet the guidelines
outlined in this user’s guide may cause the following problems:
• Poor print quality
• Increased paper jams
• Premature wear on the printer.
Properties, such as weight, composition, grain, and moisture content, are
important factors that affect the printer’s performance and the output quality.
When you choose print materials, consider the following:
• The type, size and weight of the print media for your printer are
described later in this section.
• Desired outcome: The print media you choose should be appropriate for
your project.
• Brightness: Some print media are whiter than others and produce
sharper, more vibrant images.
• Surface smoothness: The smoothness of the print media affects how
crisp the printing looks on the paper.
Dust on the ADF glass may cause black lines on the printout. Always
keep the ADF glass clean.
Be careful not to put your hands in the ADF roller. You may get hurt.
• Some print media may meet all of the guidelines in this section and
still not produce satisfactory results. This may be the result of
improper handling, unacceptable temperature and humidity levels,
or other variables over which Dell has no control.
• Before purchasing large quantities of print media, ensure that
it
meets the requirements specified in this user’s guide.
Using print media that does not meet these specifications may cause
problems, requiring repairs. Such repairs are not covered by Dell’s
warranty or service agreements.
Ensure that you do not use the inkjet photo paper with this printer. It
could cause damage to the printer.
Loading originals and print media |25
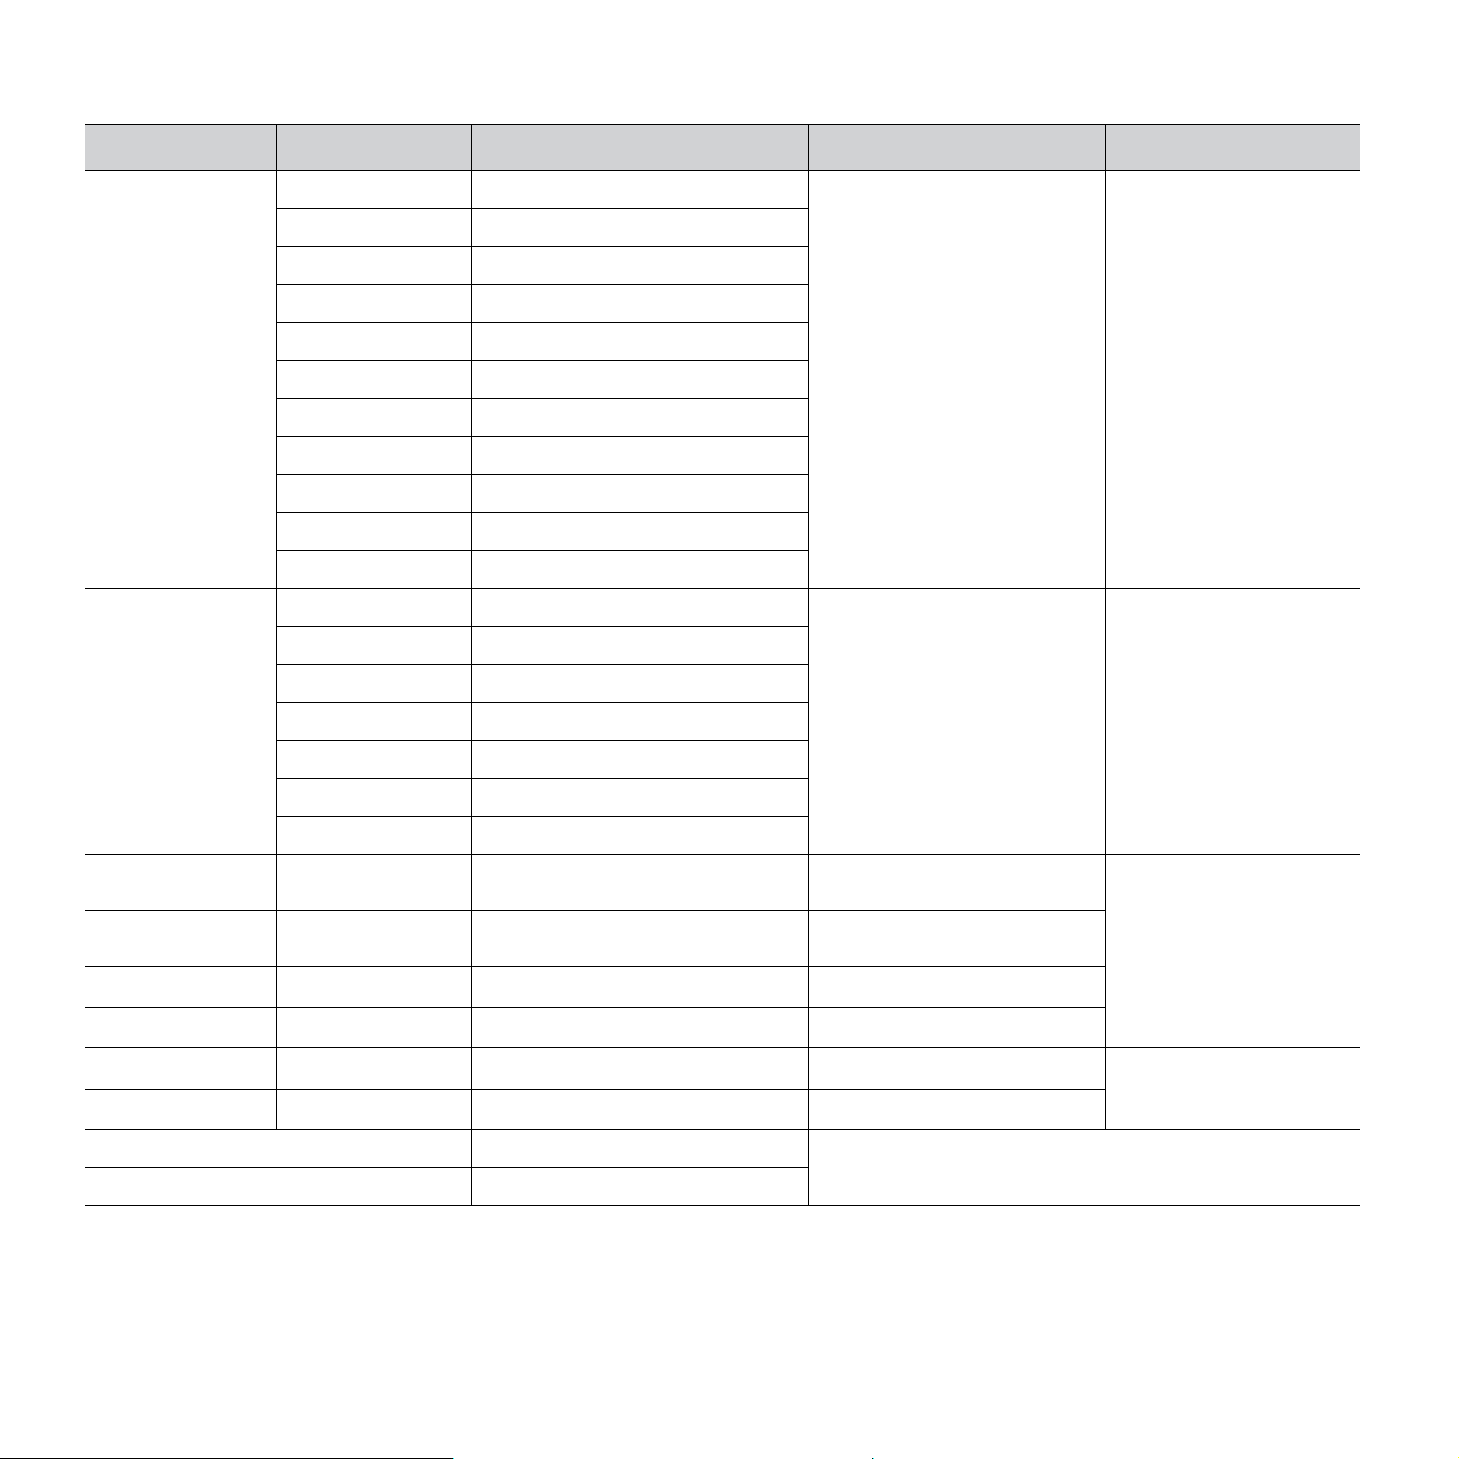
Specifications on print media
TYPE SIZE DIMENSIONS
WEIGHT
A
CAPACITY
B
Plain paper Letter 216 x 279 mm (8.5 x 11 inches)
60 to 105 g/m
2
(16 to 28 lb bond) • 150 sheets of 75 g/m
2
(20 lb bond) paper for the
tray
Legal 216 x 356 mm (8.5 x 14 inches)
US Folio 216 x 330 mm (8.5 x 13 inches)
A4 210 x 297 mm (8.26 x 11.69 inches)
Oficio 216 x 343 mm (8.5 x 13.5 inches)
JIS B5 182 x 257 mm (7.16 x 10.11 inches)
ISO B5 176 x 250 mm (6.93 x 9.84 inches)
Executive 184 x 267 mm (7.25 x 10.5 inches)
Statement 140 x 216 mm (5.5 x 8.5 inches)
A5 148 x 210 mm (5.82 x 8.26 inches)
A6 105 x 148 mm (4.13 x 5.82 inches)
Envelope Envelope Monarch 98 x 191 mm (3.87 x 7.5 inches)
75 to 90 g/m
2
(20 to 24 lb bond)
5 sheet for manual feeding in
the tray
Envelope 6 3/4 92 x 165 mm (3.62 x 6.5 inches)
Envelope No. 10 105 x 241 mm (4.12 x 9.5 inches)
Envelope No. 9 98 x 225 mm (3.87 x 8.87 inches)
Envelope DL 110 x 220 mm (4.33 x 8.66 inches)
Envelope C5 162 x 229 mm (6.37 x 9.01 inches)
Envelope C6 114 x 162 mm (4.48 x 6.38 inches)
Thick paper See to the Plain
paper section
See to the Plain paper section
90 to 105 g/m
2
(24 to 28 lb bond)
5 sheet for manual feeding in
the tray
Thin paper See to the Plain
paper section
See to the Plain paper section
60 to 70 g/m
2
(16 to19 lb bond)
Labels
c
Letter, A4 See to the Plain paper section
120 to 150 g/m
2
(37 to 40 lb bond)
Card stock Post card 101.6 x 152.4 mm (4 x 6 inches)
105 to 163 g/m
2
(28 to 43 lb bond)
Transparency
d
Letter, A4 See to the Plain paper section
138 to 146 g/m
2
(37 to 39 lb bond)
1 sheet for manual feeding in
the tray
Glossy paper Letter, A4 See to the Plain paper section
160 g/m
2
(44 lb bond)
Minimum size (custom) 76 x 160 mm (3 x 6.3 inches)
60 to 163 g/m
2
(16 to43 lb bond)
Maximum size (custom) 216 x 356 mm (8.5 x 14 inches)
a.If media weight is over 105 g/m
2
(28 lb bond), load a paper into the tray one by one.
b.Maximum capacity may differ depending on media weight, thickness, and environmental cond itions.
c.Smoothness: 100 to 250 (sheffield)
d.Recommended media: Transparency for a Color Laser Printers by 3M such as PP2500.
26 | Loading originals and print media
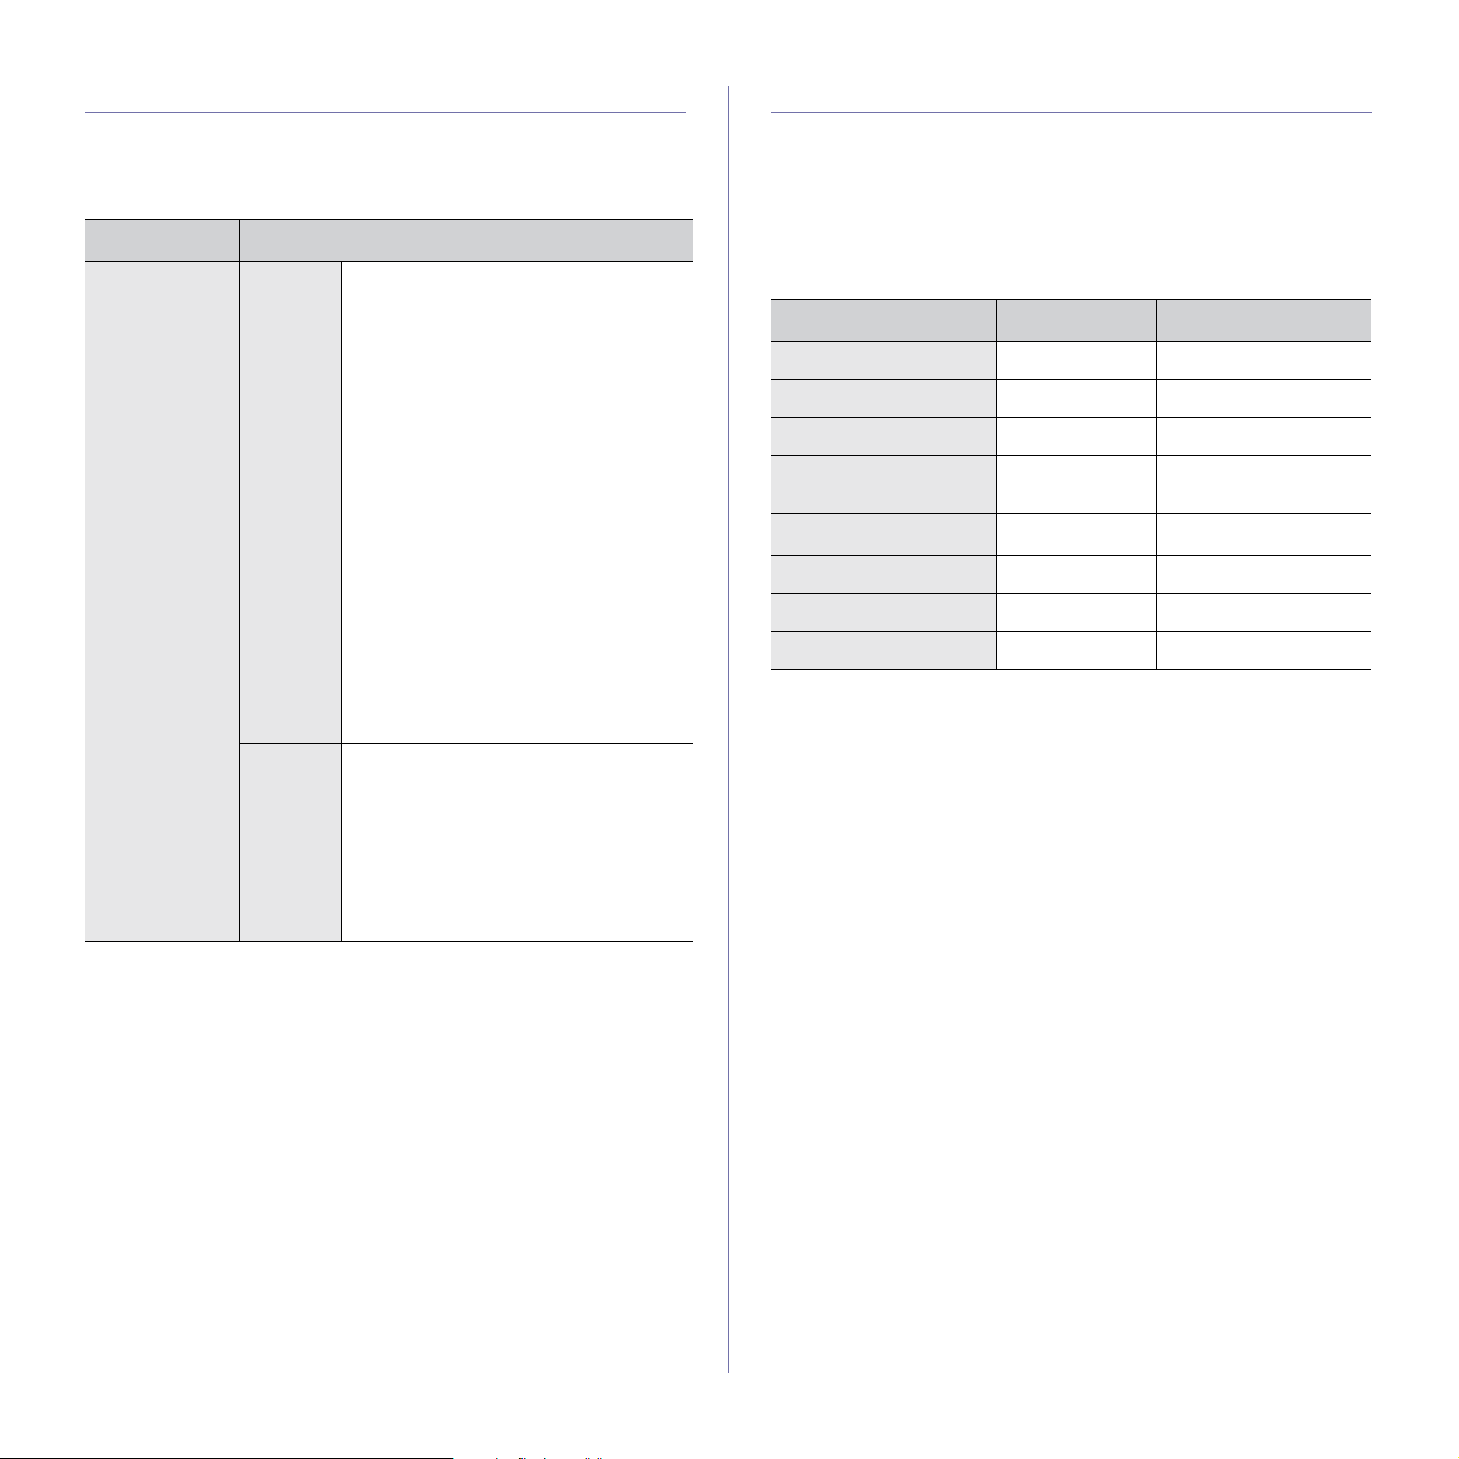
Media sizes supported in each mode
Guidelines for special print media
MODE SIZE SOURCE
Copy mode Letter, A4, Legal,
Oficio, US Folio,
Executive, JIS B5, A5,
A6
tray 1
Print mode All sizes supported by
the printer
tray 1
Fax mode Letter, A4, Legal tray 1
MEDIA TYPE GUIDELINES
Envelopes • Successful printing on envelopes depends upon the
quality of the envelopes. When selecting envelopes,
consider the following factors:
- Weight: The weight of the envelope paper should
not exceed 90 g/m
2
or jamming may occur.
- Construction: Prior to printing, envelopes should
lie flat with less than 6 mm curl, and should not
contain air.
- Condition: Envelopes should not be wrinkled,
nicked, or otherwise damaged.
- Temperature: You should use envelopes that are
compatible with the heat and pressure of the
printer during operation.
• Use only well-constructed envelopes with sharp and
well creased folds.
• Do not use stamped envelopes.
• Do not use envelopes with clasps, snaps, windows,
coated lining, self-adhesive seals, or other synthetic
materials.
• Do not use damaged or poorly made envelopes.
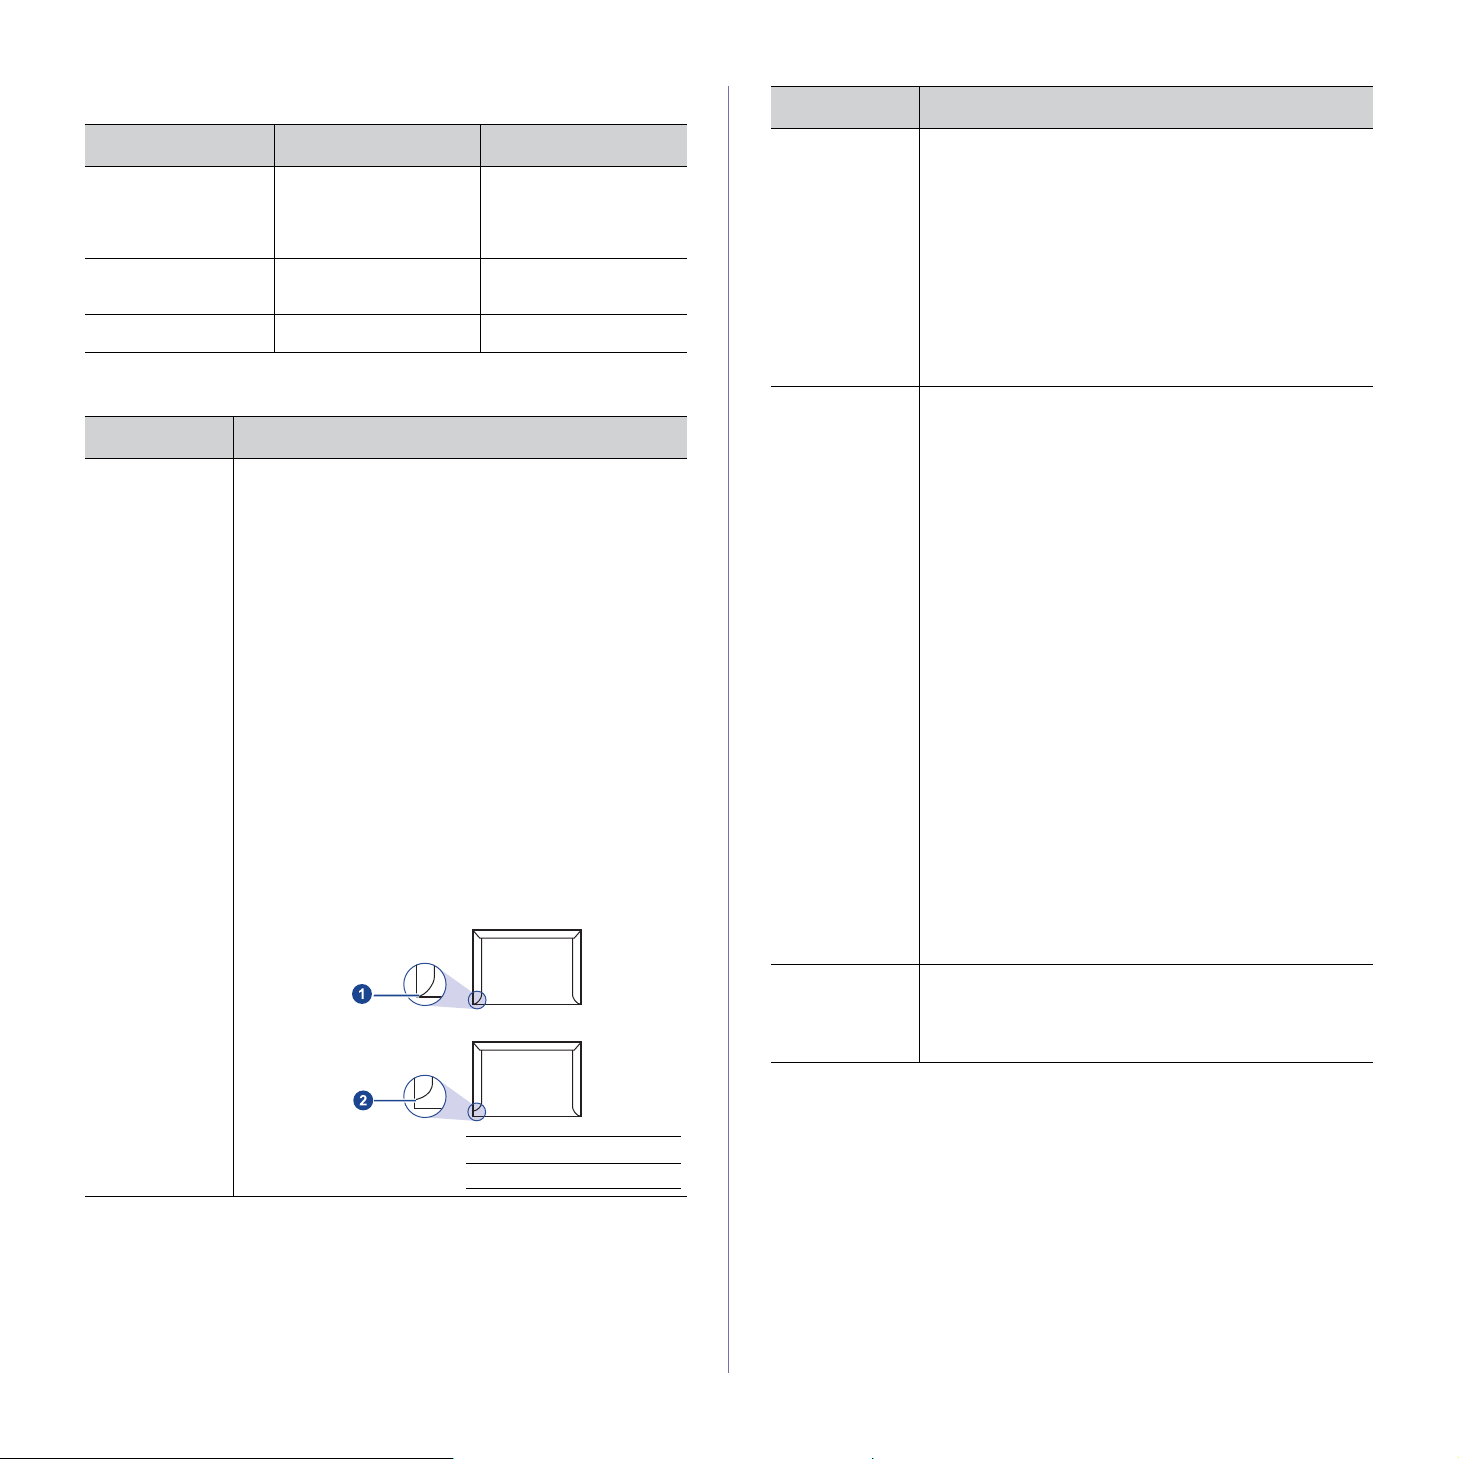
• Ensure that the seam at both ends of the envelope
extends all the way to the corner of the envelope.
1 Acceptable
2 Unacceptable
Envelopes
(Continued)
• Envelopes with a peel-off adhesive strip or with
more than one flap that folds over to seal must use
adhesives compatible with the printer’s fusing
temperature for 0.1 second. Check your printer’s
specification to view the fusing temperature, see
"Printer specifications" on page 73. The extra flaps
and strips might cause wrinkling, creasing, or jams,
and may even damage the fuser.
• For the best print quality, position margins no closer
than 15 mm from the edges of the envelope.
• Avoid printing over the area where the envelope’s
seams meet.
Labels • To avoid damaging the printer, use only labels
designed for use in laser printers.
- When selecting labels, consider the following
factors:
- Adhesives: The adhesive material should be
stable at your printer’s fusing temperature. Check
your printer’s specification to know the fusing
temperature, see "General specifications" on
page 72.
- Arrangement: Only use labels with no exposed
backing between them. Labels can peel off sheets
that have spaces between the labels, causing
serious jams.
- Curl: Prior to printing, labels must lie flat with no
more than 13 mm of curl in any direction.
- Condition: Do not use labels with wrinkles,
bubbles, or other indications of separation.
• Ensure that there is no exposed adhesive material
between labels. Exposed areas can cause labels to
peel off during printing, which can cause paper
jams. Exposed adhesive can also cause damage to
printer components.
• Do not run a sheet of labels through the printer more
than once. The adhesive backing is designed for
only a single pass through the printer.
• Do not use labels that are separating from the
backing sheet or are wrinkled, bubbled, or otherwise
damaged.
Card stock or
custom-sized
materials
• Do not print on media smaller than 76 mm wide or
356 mm long.
• In the software application, set margins at least
6.4 mm away from the edges of the material.
MEDIA TYPE GUIDELINES
Loading originals and print media |27
CHANGING THE SIZE OF THE PAPER IN THE
PAPER TRAY
To load longer sizes of paper, such as Legal-sized paper, you need to
adjust the paper guides to extend the paper tray.
To change the tray 1 size to other size, you must adjust the paper length
guide properly.
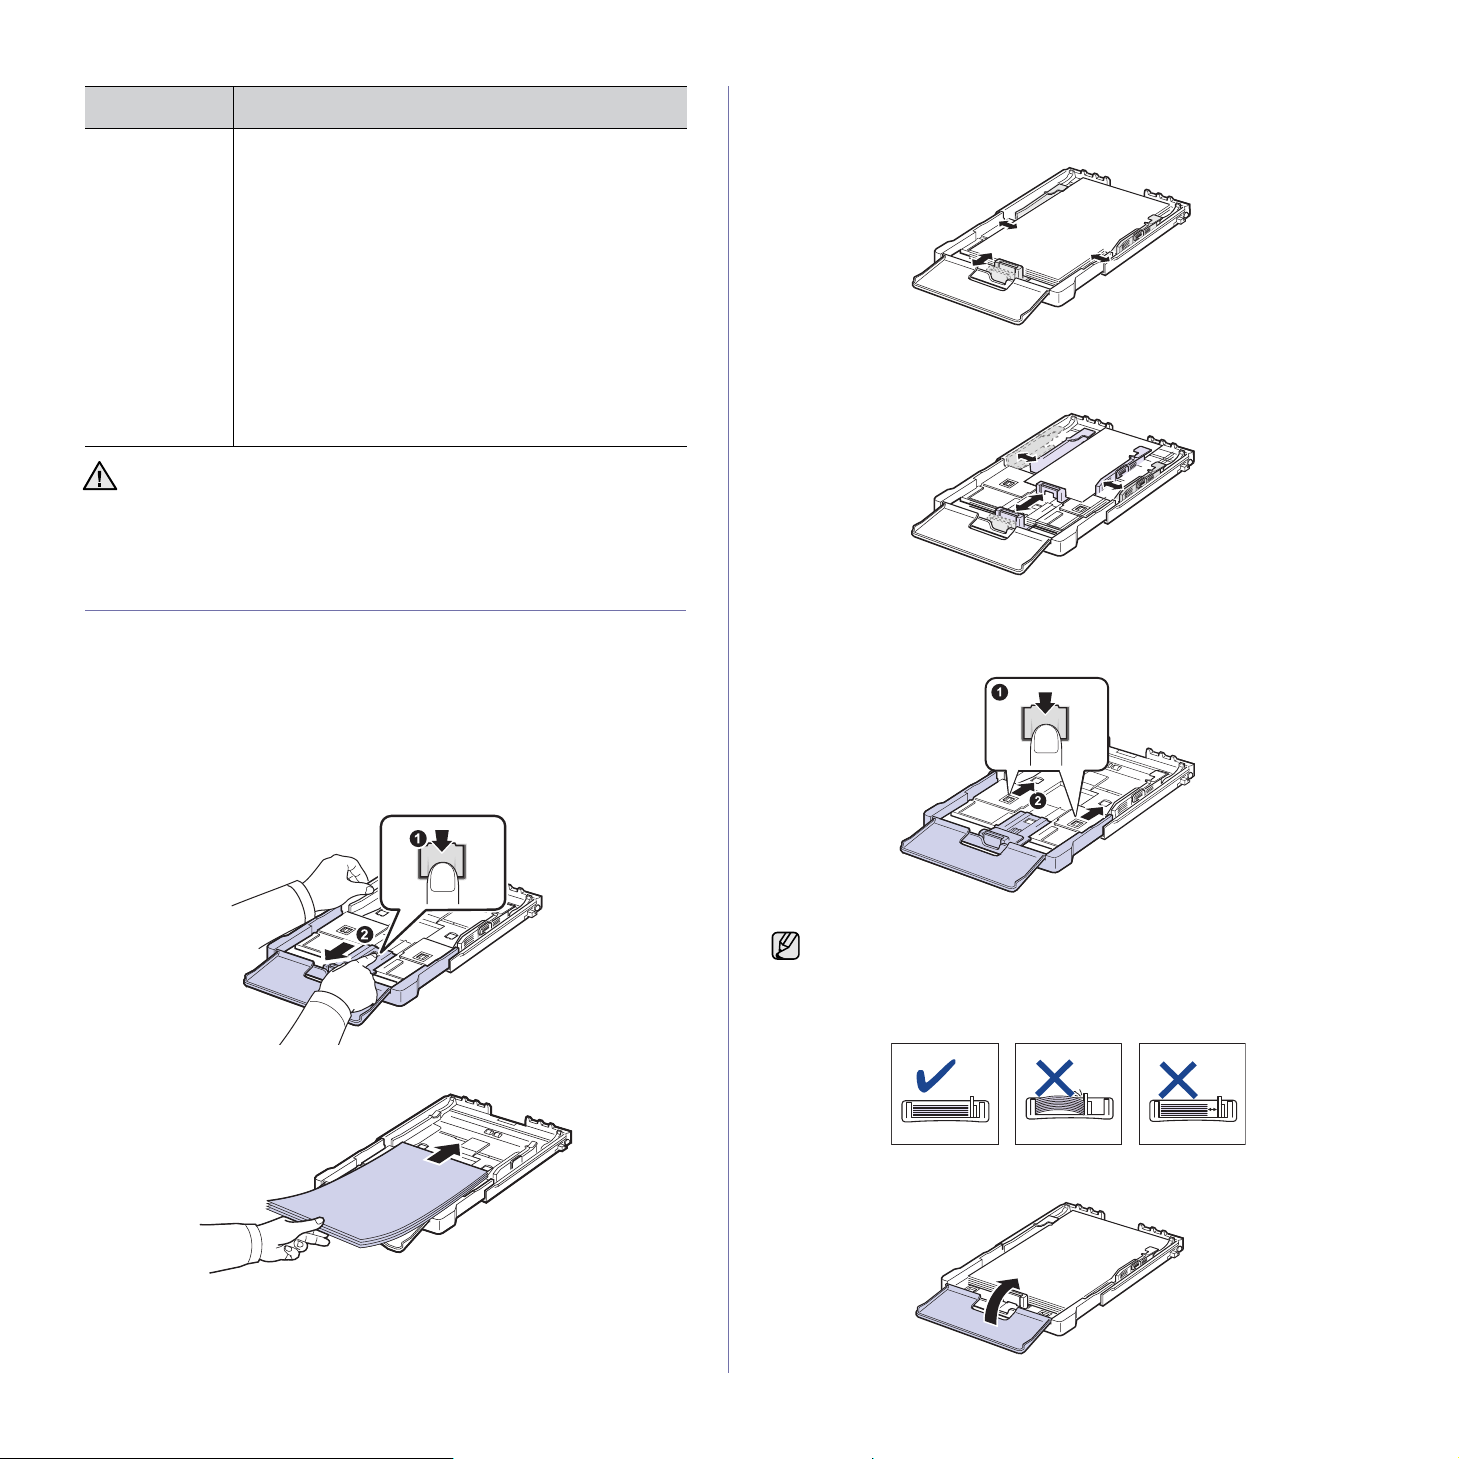
1. Pull the tray 1 out of the printer. Open the paper cover and remove
paper from the tray 1 if necessary.
2. Pressing and unlatching the guide lock in the top of the tray, pull the tray
out manually.
3. Load paper into the tray.
4. Slide the paper length guide until it lightly touches the end of the paper
stack. Squeeze the paper width guide and slide it to the edge of the
paper stack without causing it to bend.
For paper smaller than Letter-sized, return the paper guides to their
original positions and adjust the paper length guide and paper width
guide.
If the paper that you need to print is shorter than length 222 mm
(8.74 inches), press and unlatch the guide lock in the tray, push the tray
in manually.
Adjust the paper length guide and paper width guide.
5. Close the paper cover.
Preprinted
paper
• Letterhead must be printed with heat-resistant ink
that will not melt, vaporize, or release hazardous
emissions when subjected to the printer’s fusing
temperature for 0.1 second. Check your printer’s
specification to know the fusing temperature, see
"General specifications" on page 72.
• Letterhead ink must be non-flammable and should
not adversely affect printer rollers.
• Forms and letterhead should be sealed in a
moisture-proof wrapping to prevent changes during
storage.
• Before you load preprinted paper, such as forms
and letterhead, verify that the ink on the paper is
dry. During the fusing process, wet ink can come off
preprinted paper, reducing print quality.
Using photographic paper or coated paper may cause problems,
requiring repairs. Such repairs are not covered by Dell’s warranty or
service agreements.
MEDIA TYPE GUIDELINES
• Do not push the paper width guides far enough to cause the
materials to warp.
• If you do not adjust the paper width guides, it may cause paper
jams.
28 | Loading originals and print media
6. Slide the tray 1 back into the printer.
7. After loading paper, set the paper type and size for the tray. See "Setting
the paper size and type" on page 29.
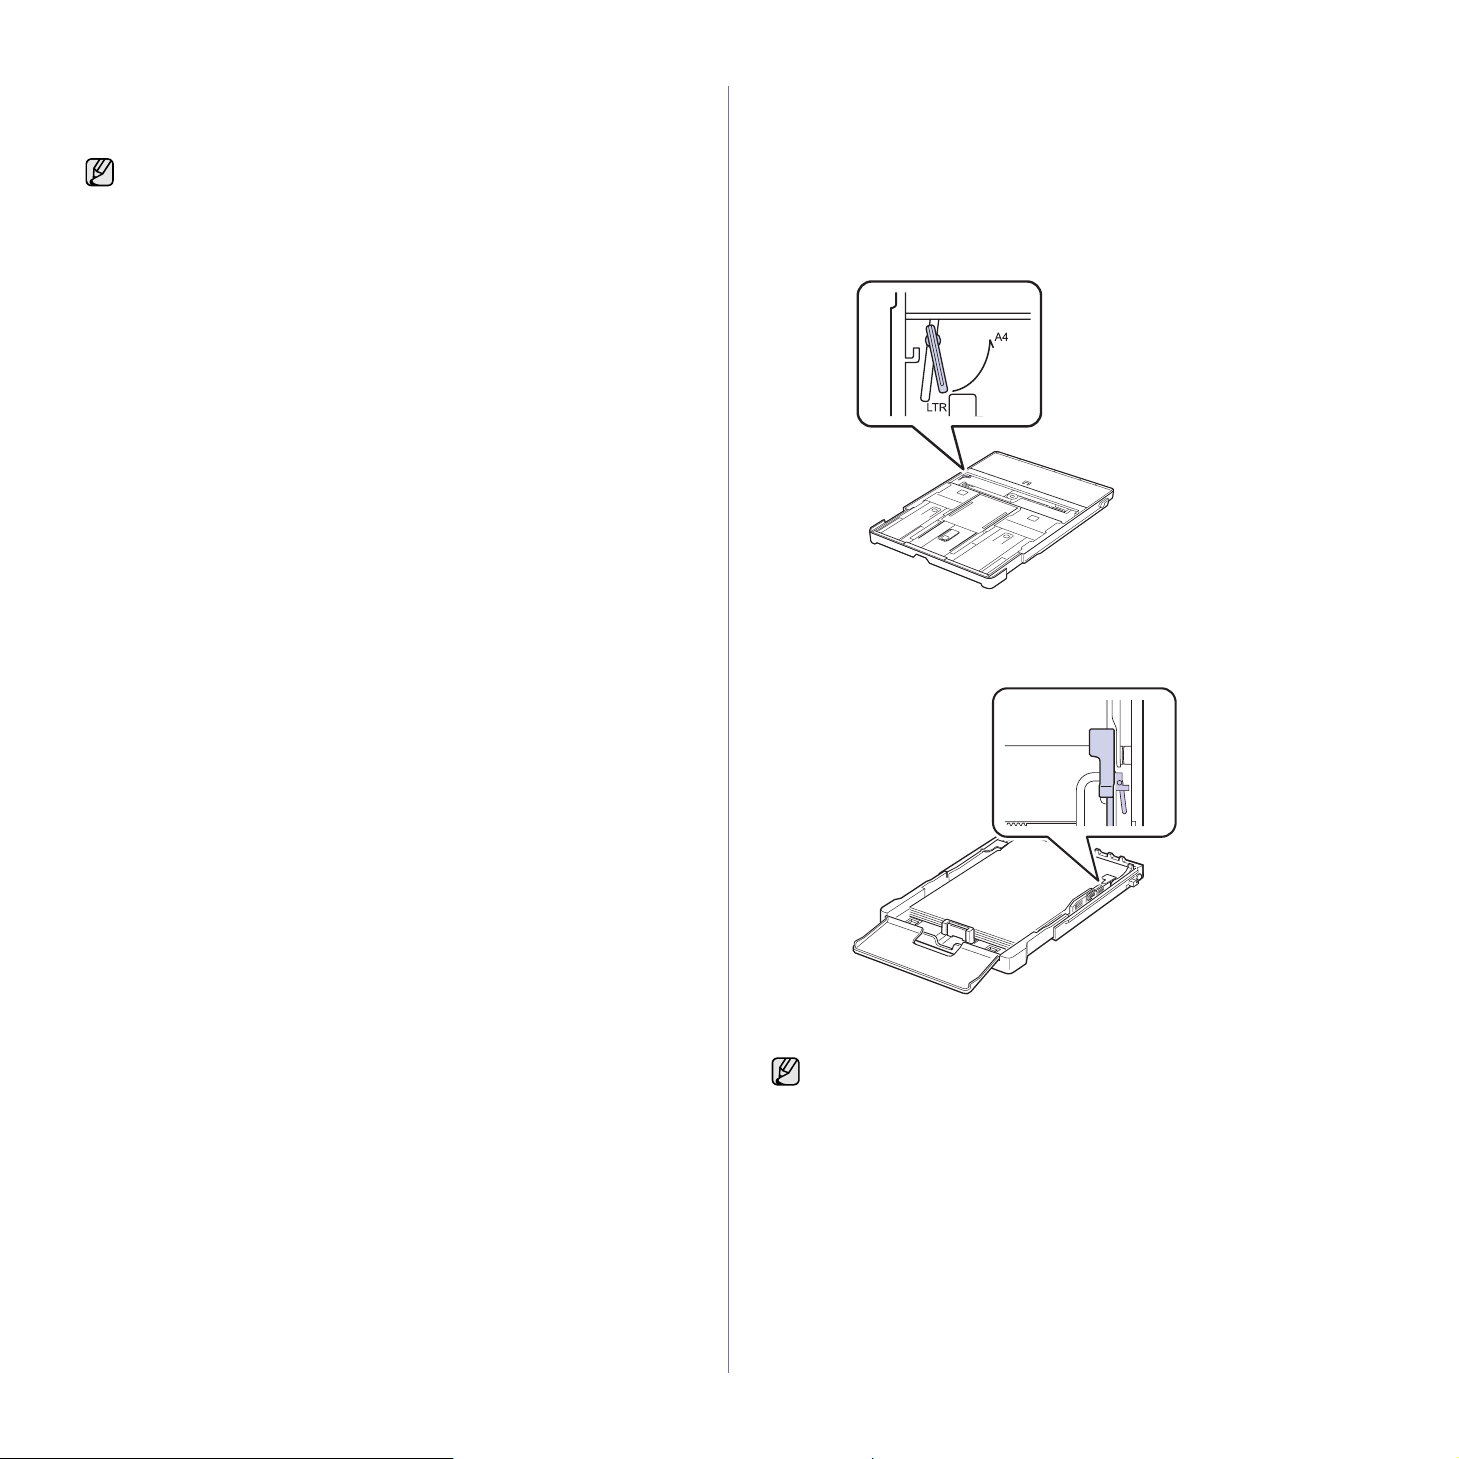
The tray is preset to Letter or A4 size, depending on your country. To
change the size to A4 or Letter, you must adjust the lever and paper width
guide properly.
1 Pull the tray out of the printer. Open the paper cover and remove paper
from the tray if necessary.
2 If you want to change the size to Letter, hold the lever at the back of the
tray, and rotate the lever clockwise.
3 Squeeze the paper width guide and slide it to the edge of the lever.
• Due to insufficient paper in the tray, the paper length guide moves
inward, load the tray with enough paper.
• If you experience problems with paper feed, load a paper into the
tray one by one.
• You can load previously printed paper. The printed side should be
facing up with an uncurled edge at the front. If you experience
problems with paper feed, turn the paper around. Note that print
quality is not guaranteed.
If you want to change the size to A4, first move the paper width guide
to left and rotate the lever counterclockwise. If you force the lever, it
could damage the tray.

Loading originals and print media |29
PRINTING ON SPECIAL PRINT MATERIALS
The printer can hold special sizes and types of print material, such as
postcards, note cards, and envelopes. Especially, it is useful for single page
printing on letterhead or colored paper.
Feeding the print material manually
• Load only one size of print media at a time in the tray.
• To prevent paper jams, do not add paper when there is still paper in the
tray. This also applies to other types of print media.
• Print media should be loaded face up with the side you want to print, and
the top edge going into the tray first. Place print materials in the center of
the tray.
• Always load only the specified print media to avoid paper jams and print
quality problems. See "Selecting print media" on page 24.
• Flatten any curl on postcards, envelopes, and labels before loading
them into the tray.
1. Load the paper. See "Changing the size of the paper in the paper
tray" on page 27.
2. When you print in an application, start the print menu.
3. Before you print, open printer properties.
4. Press the Paper tab in printer properties, and select an appropriate
paper type.
5. Select Manual Feeder in paper source, then press OK.
6. Start printing in the application.
7. Press the Color Start or
Black Start
button on the printer to start feeding,
then the printer starts printing.
SETTING THE PAPER SIZE AND TYPE
After loading paper in the paper tray, you need to set the paper size and
type using the control panel buttons. These settings will apply to Copy and
Fax modes. For computer-printing, you need to select the paper size and
type in the application you use on your computer.
1. Press Menu until System Setup appears on the bottom line of the
display and press OK.
2. Press the left/right arrow until Paper Setup appears and press OK.
3. Press OK when Paper Size appears.
4. Press the left/right arrow until the paper size you are using appears and
press OK.
5. Press the left/right arrow until Paper Type appears and press OK.
6. Press the left/right arrow until the paper type you are using appears and
press OK.
7. Press Stop/Clear to return to ready mode.
Depending on the media type you are using, keep the following
loading guidelines:
• Envelopes: Flap side down and with the stamp area on the top left
side.
• Labels: Print side up and top short edge entering the printer first.
• Preprinted paper: Design side up with the top edge toward the
printer.
• Card stock: Print side up and the short edge entering the printer
first.
• Previously printed paper: Previously printed side down with an
uncurled edge toward the printer.
If you want to use a label, set the paper type to Label.
• If you are printing multiple pages, load the next sheet after first
page prints out, and press the Color Start or
Black Start
button.
Repeat this step for every page to be printed.
• The settings you change remain in effect only while you are using
the current application.
If you want to use special sized paper such as billing paper, select
Custom in the Paper tab in the printer properties. See Software
section.

30 | Copying
copying
This chapter gives you step-by-step instructions for copying documents.
This chapter includes:
• Copying
• Changing the settings for each copy
• Changing the default copy settings
• Using special copy features
• Setting copy timeout
COPYING
1. Press Copy.
Ready to Copy appears on the top line of the display.
2. Load originals face up into the ADF, or place a single original face down
on the scanner glass.
For details about loading an original. See "Loading originals" on
page 23.
3. Enter the number of copies using the number keypad, if necessary.
4. If you want to customize the copy settings including copy size, darkness,
and original type, by using the control panel buttons. See "Changing the
settings for each copy" on page 30.
If necessary, you can use special copy features, such as 2-up or 4-up
copying.
5. Press Color Start to begin color copying.
Or, press Black Start to begin black and white copying.
CHANGING THE SETTINGS FOR EACH COPY
Your printer provides default settings for copying so that you can quickly
and easily make a copy. However, if you want to change the options for
each copy, use the copy function buttons on the control panel.
Darkness
If you have an original containing faint markings and dark images, you can
adjust the brightness to make a copy that is easier to read.
1. Press Copy.
2. Press Menu until Copy Feature appears on the bottom line of the
display and press OK.
3. Press the left/right arrow until Darkness appears and press OK.
4. Press the left/right arrow until the contrast mode you want appears and
press OK.
•Light:Works well with dark print.
•Normal:Works well with standard typed or printed originals.
•Dark:Works well with light print.
5. Press Stop/Clear to return to ready mode.
Original Type
The original type setting is used to improve the copy quality by selecting the
document type for the current copy job.
1. Press Copy.
2. Press Menu until Copy Feature appears on the bottom line of the
display and press OK.
3. Press the left/right arrow until Original Type appears and press OK.
4. Press the left/right arrow until the image mode you want appears and
press OK.
•Text:Use for originals containing mostly text.
•Text/Photo:Use for originals with mixed text and photographs.
•Photo:Use when the originals are photographs.
• Magazine: Use when the originals are magazines.
5. Press Stop/Clear to return to ready mode.
Reduced or enlarged copy
You can reduce or enlarge the size of a copied image from 25% to 400%
when you copy original documents from the scanner glass, or from 25% to
100% from the ADF.
To select from the predefined copy sizes:
1. Press Copy.
2. Press Menu until Copy Feature appears on the bottom line of the
display and press OK.
3. Press the left/right arrow until Reduce/Enlarge appears and press
OK.
4. Press the left/right arrow until the size setting you want appears and
press OK.
To scale the copy by directly entering the scale rate:
1. Press Copy.
2. Press Menu until Copy Feature appears on the bottom line of the
display and press OK.
3. Press the left/right arrow until Reduce/Enlarge appears and press
OK.
4. Press the left/right arrow until Custom appears and press OK.
5. Press the left/right arrow to enter the copy size you want. Pressing
and holding the button allows you to quickly scroll to the number you
want.
6. Press OK to save the selection.
7. Press Stop/Clear to return to ready mode.
You can cancel the copy job during an operation. Press Stop/Clear,
and the copying will stop.
If you press Stop/Clear while setting the copy options, al l of th e
options you have set for the current copy job will be canceled and
returned to their default status. Or, they will automatically return to
their default status after the printer completes the copy in progress.
When you make a reduced copy, black lines may appear at the
bottom of your copy.
Loading...