


1 |
USER’S MANUAL |
|
|
|
Part 2 |
Deluxe Tapeless Digital Answering System with Mailboxes 1725
Fold open this manual for information about this product’s installation and operation. Please also read
Part 1 – Important Product Information.
AT&T and the globe symbol are registered trademarks of AT&T Corp. licensed to Advanced American Telephones.
© 2000 Advanced AmericanTelephones. All rights reserved. Printed in Mexico. 850002650 Issue 1AT&T 5/00
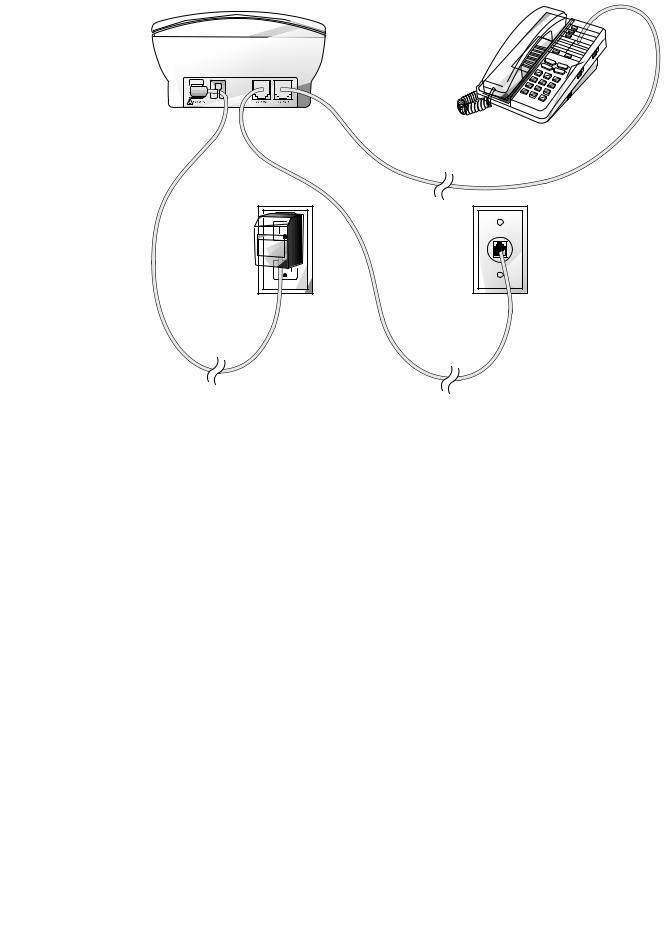
I N S T A L L A T I O N
1Connect the line cord.
Plug one end of the telephone line cord into the jack labeled TEL LINE on the back of the system. Plug the other end into a phone wall jack.
2Connect the telephone.
NOTE: If you do not want to connect a telephone, skip to Step 3.
Plug the line cord from the telephone into the jack labeled TEL SET on the back of the system.
3Connect the power cord.
Plug the power cord into the jack labeled  POWER on the back of the system. Plug the power cord into an electrical outlet not controlled by a wall switch. Fit the power cord behind the strain relief tab. (When you connect the system to power, the Message Window flashes CL to indicate that you need to set the clock. See “Setting the Clock” in the
OPERATION section of this manual.)

O P E R A T I O N
Record and hear |
Message Window |
outgoing announcement |
|
Use with other buttons to |
|
change settings |
|
Turn system on or off
Delete all or selected messages
Preview first five seconds of each message
Repeat all or part of a message
Access mailboxes
Microphone
Set and hear time/day
Record memo or phone conversation
Set and hear Remote Access and Priority Calling Codes
Select announcement callers will hear
Select number of times line rings before system answers
Skip all or part
Turn Audible Message of a message
Alert on or off
Adjust listening volume during message playback
Stop message playback
O P E R A T I O N
Setting the Clock
You’ll need to set the clock so it can record the day and time each message is received.
1Press and release g. The Message Window displays CH.
2Press and release C. The current day setting is announced.
3To change the day setting, hold down /or ?until the correct day is announced. Then release the button.
4Press and release C. The current hour setting is announced.
5To change the hour setting, hold down /or ?until the correct hour is announced. Then release the button.
6Press and release C. The current minutes setting is announced.
7To change the minutes setting, hold down /or ?until the correct minutes setting is announced. Then release the button.
8Press and release C. The new day and time are announced.
To check the clock, press and release
C.
About Mailboxes
This answering system offers you four voice mailboxes, providing a convenient way to share an answering system with other members of your household or business. Callers using a touch tone phone can select in which mailbox their messages will be recorded by pressing 1,
2, 3, or 4 after the system answers the call. Those not using a touch tone phone, or those who do not press 1, 2, 3, or 4, can still leave a message, which is automatically recorded in Mailbox 1.
Announcement Options
Before using this answering system, you should record an announcement (up to three minutes long) that callers will hear when the system answers a call. When you record this announcement, make sure you indicate who has been assigned each mailbox, and that callers should press 1, 2, 3, or 4 to access the appropriate mailbox.
For example,
"Hello. You’ve reached Meadowlark Nursery. To leave a message for Ms. Arbor, press 2. To leave a message for Ms. Brooks, press 3. To leave a message for Mr. Cardinal, press 4. If you don’t have a touch tone phone, wait for the tone."
You can record up to three different announcements — A, B, and AO. Announcements A and B are used when you want the system to record callers’ messages. Announcement AO (Announcement Only) is used when you want to give information to callers. (Some businesses use this announcement to advise callers of their hours of operation.) By setting the ANNC SELECT switch
to A, B, or AO, you decide which announcement your callers will hear when the system answers a call.
If you choose not to record an announcement for A or B, the system answers with a prerecorded announcement:
“Hello. Please leave a message after the tone.” The system does not have a prerecorded announcement for AO.
Recording Your Announcement
A total of about 24 minutes of recording time is available for announcements and messages. Each announcement can be up to three minutes long; however, shorter announcements leave more recording time for messages. For best results, record your announcement in a quiet environment, without “background” noise.
1Move the ANNC SELECT switch, located on the right side of the system, to the announcement you want to record.
2Press and release g. The Message Window displays CH.
3Press and release A. The system beeps. Speak toward the microphone normally, from about nine inches away. While you are recording, the
Message Window displays the elapsed time of your recording.
4Press Swhen you are finished. The system automatically plays back your announcement.
 Loading...