


ZYXEL NAS326 User guide

Quick Start Guide
Cloud Storage
NAS Series
Version 5.1
Edition 2
User’s Guide
Default Login Details
Web Address nas326
nas542
www.zyxel.com
User Name admin
Password 1234
nas540
nas520
Copyright © 2016 ZyXEL Communications Corporation

Related Documentation and Online Support
Related Documentation and Online Support
IMPORTANT!
READ CAREFULLY BEFORE USE.
KEEP THIS GUIDE FOR FUTURE REFERENCE.
Screenshots and graphics in this book may differ slightly from your product due to differences in
your product firmware or your computer operating system. Every effort has been made to ensure
that the information in this manual is accurate.
Related Documentation
•Quick Start Guide
The Quick Start Guide shows how to connect the NAS and get up and running right away.
• Web Configurator Online Help
The embedded Web Help contains descriptions of individual screens and supplementary
information.
Online Support Information
Visit our product support website at http://www.zyxel.com/support/support_landing.shtml and
choose from these topics:
• ZyXEL Support Center - Acquire firmware, software, FAQ, product application or other support
files for ZyXEL devices.
• Downloads - Acquire firmware, software, driver or other support files for ZyXEL devices.
• Knowledge Base - Find articles related to product applications, FAQ, and user experience.
• Warranty Information - ZyXEL offers warranty to the original end user (purchaser) that the
product is free from any material or workmanship defects for a specific period (the Warranty
Period) from the date of purchase. The Warranty Period varies by region.
• Product Registration - Register your ZyXEL product to receive the latest drivers and firmware
updates.
Cloud Storage User’s Guide
2

Contents Overview
Contents Overview
Getting to Know Your NAS ......................................................................................................................14
Getting Started ........................................................................................................................................19
Accessing Your Cloud Remotely .............................................................................................................26
zCloud ..................................................................................................................................................... 30
Managing Users, Groups, and Shares ....................................................................................................33
Backing Up, Retrieving, and Syncing Files ............................................................................................. 34
Web Desktop at a Glance ..................................................................................................................36
Web Configurator ....................................................................................................................................38
Storage Manager ....................................................................................................................................47
Status Center ........................................................................................................................................103
Control Panel .......................................................................................................................................106
Videos, Photos, Music, & File Browser .................................................................................................124
Administrator .........................................................................................................................................139
Managing Packages ..............................................................................................................................144
Tutorials ................................................................................................................................................ 146
Technical Reference ........................................................................................................................201
Status Screen ........................................................................................................................................203
System Setting ......................................................................................................................................205
Applications ...........................................................................................................................................213
Packages ..............................................................................................................................................246
Auto Upload ..........................................................................................................................................262
Dropbox .................................................................................................................................................274
Using Time Machine with the NAS ........................................................................................................ 278
Users ..................................................................................................................................................... 281
Groups ..................................................................................................................................................287
Shares ...................................................................................................................................................291
WebDAV ................................................................................................................................................300
Maintenance Screens ...........................................................................................................................302
Protect ...................................................................................................................................................321
Troubleshooting .................................................................................................................................... 337
Cloud Storage User’s Guide
3

Table of Contents
Table of Contents
Related Documentation and Online Support.....................................................................................2
Contents Overview ..............................................................................................................................3
Table of Contents .................................................................................................................................4
Chapter 1
Getting to Know Your NAS.................................................................................................................14
1.1 Overview ...........................................................................................................................................14
1.2 LEDs .................................................................................................................................................15
1.3 Hard Disks .........................................................................................................................................16
1.4 SD Card ............................................................................................................................................16
1.5 Power Button .....................................................................................................................................16
1.6 COPY/SYNC Button ..........................................................................................................................17
1.7 RESET Button ...................................................................................................................................17
Chapter 2
Getting Started....................................................................................................................................19
2.1 Overview ...........................................................................................................................................19
2.2 FindMe ..............................................................................................................................................19
2.3 NAS Starter Utility .............................................................................................................................19
2.3.1 NAS Seeker Screen ................................................................................................................20
2.3.2 Main NAS Starter Utility Screen ...............................................................................................21
2.3.3 Directory of the NAS ................................................................................................................22
2.3.4 Network Drive ..........................................................................................................................23
2.3.5 Configure System Settings ......................................................................................................23
Chapter 3
Accessing Your Cloud Remotely.......................................................................................................26
3.1 myZyXELCloud Service ....................................................................................................................26
3.2 ZyXEL Drive ...................................................................................................................................... 26
3.2.1 ZyXEL Drive Welcome .............................................................................................................26
3.2.2 NAS and File List .....................................................................................................................27
3.2.3 Uploading and Media Streaming .............................................................................................28
Chapter 4
zCloud..................................................................................................................................................30
4.1 Using zCloud .....................................................................................................................................30
4.2 zCloud TV Streaming ........................................................................................................................31
Cloud Storage User’s Guide
4

Table of Contents
Chapter 5
Managing Users, Groups, and Shares..............................................................................................33
5.1 Managing Users, Groups, and Shares ..............................................................................................33
Chapter 6
Backing Up, Retrieving, and Syncing Files......................................................................................34
6.1 About Backups ..................................................................................................................................34
6.2 Managing a USB Device and USB Backups .....................................................................................34
6.3 Remote Backups ...............................................................................................................................34
6.4 Internal Backups ............................................................................................................................... 34
6.5 Cloud Backups .................................................................................................................................. 35
6.6 Synchronizing Files ........................................................................................................................... 35
Part I: Web Desktop at a Glance.....................................................................36
Chapter 7
Web Configurator................................................................................................................................38
7.1 Overview ...........................................................................................................................................38
7.2 Accessing the NAS Web Configurator .............................................................................................. 38
7.3 Desktop ............................................................................................................................................41
7.3.1 Status Zone .............................................................................................................................43
7.3.2 Grouping Icons ........................................................................................................................44
Chapter 8
Storage Manager.................................................................................................................................47
8.1 Overview ...........................................................................................................................................47
8.2 Storage Manager Overview ..............................................................................................................47
8.3 Internal Storage ................................................................................................................................49
8.3.1 Creating a Volume ...................................................................................................................55
8.3.2 Managing a Volume ................................................................................................................. 56
8.3.3 Creating a Volume on Disk Group ...........................................................................................64
8.3.4 Editing a Volume on Disk Group ..............................................................................................69
8.3.5 Disk Group ...............................................................................................................................69
8.3.6 Hard Disk ................................................................................................................................. 74
8.4 iSCSI .................................................................................................................................................81
8.4.1 iSCSI LUNs Screens ...............................................................................................................82
8.4.2 iSCSI Targets Screens ...........................................................................................................86
8.5 External Storage ...............................................................................................................................95
8.5.1 What You Need to Know About External Storage .................................................................... 95
8.5.2 External Storage Screen .........................................................................................................95
8.5.3 Format the Volume ..................................................................................................................97
Cloud Storage User’s Guide
5

Table of Contents
8.6 Technical Reference ..........................................................................................................................98
Chapter 9
Status Center.....................................................................................................................................103
9.1 Overview ......................................................................................................................................... 103
9.1.1 System Information ................................................................................................................103
9.1.2 Network .................................................................................................................................104
Chapter 10
Control Panel ...................................................................................................................................106
10.1 Overview .......................................................................................................................................106
10.2 What You Can Do ......................................................................................................................... 106
10.3 What You Need to Know ...............................................................................................................106
10.4 TCP/IP Screens ............................................................................................................................107
10.4.1 Configuring General TCP/IP Settings .................................................................................. 107
10.4.2 Configuring Network Interface .............................................................................................108
10.4.3 Configuring Web Configurator ............................................................................................. 112
10.4.4 Configuring Network Diagnosis ...........................................................................................113
10.5 UPnP Port Mapping Screen .......................................................................................................... 113
10.5.1 UPnP and the NAS’s IP Address ......................................................................................... 114
10.5.2 UPnP and Security .............................................................................................................. 115
10.5.3 The NAS’s Services and UPnP ........................................................................................... 115
10.5.4 UPnP Router ....................................................................................................................... 116
10.5.5 Configuring UPnP Port Mapping ......................................................................................... 116
10.6 Terminal Screen ........................................................................................................................... 119
10.7 DyDNS Screen .............................................................................................................................120
10.8 FW Upgrade Screen ....................................................................................................................122
Chapter 11
Videos, Photos, Music, & File Browser...........................................................................................124
11.1 Overview .......................................................................................................................................124
11.2 File Browser .................................................................................................................................124
11.2.1 Configure Share Screen .....................................................................................................126
11.2.2 Share and Folder Names .....................................................................................................128
11.3 Photo .............................................................................................................................................128
11.3.1 Exif and Google Maps (Photos) ...........................................................................................130
11.3.2 Slideshow (Photos) .............................................................................................................. 131
11.4 Music .............................................................................................................................................132
11.4.1 Now Playing (Music) ............................................................................................................134
11.5 Video .............................................................................................................................................134
11.6 Playzone Settings ..........................................................................................................................136
11.7 Application Zone ............................................................................................................................138
11.8 Media Server .................................................................................................................................138
Cloud Storage User’s Guide
6

Table of Contents
11.9 iTunes Server ................................................................................................................................138
Chapter 12
Administrator ....................................................................................................................................139
12.1 Overview .......................................................................................................................................139
12.2 Administrator Screens .................................................................................................................. 139
12.2.1 Global Administrator Icons .................................................................................................140
12.2.2 Navigation Panel ................................................................................................................140
12.2.3 Main Window ......................................................................................................................142
12.2.4 Status Messages ................................................................................................................ 142
12.2.5 Common Administrator Screen Icons ................................................................................. 142
12.2.6 Session Example (Windows) ...............................................................................................142
Chapter 13
Managing Packages .........................................................................................................................144
13.1 About Packages ............................................................................................................................ 144
13.2 Managing Packages ......................................................................................................................144
13.3 Available Packages .......................................................................................................................145
Chapter 14
Tutorials.............................................................................................................................................146
14.1 Overview .......................................................................................................................................146
14.2 Windows 7 Network ......................................................................................................................146
14.2.1 If the NAS Icon Does Not Display ........................................................................................148
14.2.2 NAS Icon Right-click Options ..............................................................................................149
14.3 Windows 7 Network Map ..............................................................................................................150
14.4 Playing Media Files in Windows 7 .................................................................................................152
14.5 Windows 7 Devices and Printers ..................................................................................................152
14.5.1 Windows 7 Desktop Shortcut ..............................................................................................153
14.6 File Sharing Tutorials ....................................................................................................................155
14.6.1 Creating a User Account .....................................................................................................155
14.6.2 Creating a Share .................................................................................................................156
14.6.3 Creating a Group .................................................................................................................157
14.6.4 Accessing a Share From Windows Explorer .......................................................................158
14.6.5 Accessing a Share Using FTP .............................................................................................160
14.6.6 Accessing a Share Through the Web Configurator .............................................................161
14.7 Download Service Tutorial ............................................................................................................162
14.7.1 Copying/Pasting a Download Link ....................................................................................... 162
14.7.2 Configuring the Download Service Preferences ..................................................................165
14.7.3 Using Download Service Notification ...................................................................................168
14.8 Printer Server Tutorial ...................................................................................................................171
14.9 Copy and Flickr Auto Upload Tutorial ...........................................................................................173
14.10 FTP Uploadr Tutorial ................................................................................................................... 174
Cloud Storage User’s Guide
7

Table of Contents
14.11 Web Configurator’s Security Sessions ........................................................................................177
14.11.1 Customizing the NAS’s Certificate .....................................................................................177
14.11.2 Downloading and Installing Customized Certificate ...........................................................179
14.11.3 Turn on the NAS’s Web Security ....................................................................................... 182
14.12 Using FTPES to Connect to the NAS ..........................................................................................188
14.13 Using a Mac to Access the NAS .................................................................................................189
14.13.1 Finder ................................................................................................................................ 189
14.13.2 Go Menu ............................................................................................................................191
14.14 How to Use the BackupPlanner .................................................................................................. 191
14.14.1 Creating an Archive Backup ..............................................................................................192
14.14.2 Creating a Synchronization Backup ..................................................................................194
14.14.3 Restoring Archived Files by Backup Job ...........................................................................196
14.14.4 Restoring by Backup Files .................................................................................................198
Part II: Technical Reference..........................................................................201
Chapter 15
Status Screen....................................................................................................................................203
15.1 Overview .......................................................................................................................................203
15.2 Status Screen ................................................................................................................................203
Chapter 16
System Setting..................................................................................................................................205
16.1 Overview .......................................................................................................................................205
16.2 What You Can Do ......................................................................................................................... 205
16.3 What You Need to Know ...............................................................................................................205
16.4 Package Management Screen .....................................................................................................207
16.4.1 Displaying the Package Information ...................................................................................208
16.5 Server Name Screen .................................................................................................................... 209
16.6 Date/Time Screen ......................................................................................................................... 210
Chapter 17
Applications......................................................................................................................................213
17.1 Overview .......................................................................................................................................213
17.2 What You Can Do ......................................................................................................................... 213
17.3 What You Need to Know ...............................................................................................................213
17.4 FTP Server Screen .......................................................................................................................215
17.5 Media Server Screens .................................................................................................................216
17.5.1 Media Server Share Publish Screen .................................................................................217
17.5.2 Media Server Logitech® Media Server Screen .................................................................218
17.6 iTunes Server Screen ..................................................................................................................218
Cloud Storage User’s Guide
8

Table of Contents
17.7 Download Service Screen .............................................................................................................219
17.7.1 Adding a Download Task .....................................................................................................222
17.7.2 Configuring General Download Settings ............................................................................. 223
17.7.3 Configuring the P2P Download Settings .............................................................................225
17.7.4 Edit IP Filter ........................................................................................................................227
17.7.5 Selecting Files to Download ................................................................................................228
17.7.6 Displaying the Task Information ..........................................................................................229
17.8 Web Publishing Screen .................................................................................................................230
17.9 Print Server Screen ...................................................................................................................... 231
17.9.1 Print Server Rename ..........................................................................................................232
17.10 Copy/Sync Button Screen ...........................................................................................................232
17.11 Technical Reference ....................................................................................................................234
17.11.1 Sharing Media Files on Your Network ................................................................................234
17.11.2 Download Service ..............................................................................................................235
17.11.3 Download Service Notification ...........................................................................................236
17.11.4 P2P Download Security .....................................................................................................236
17.11.5 Web Publishing Example ...................................................................................................238
17.11.6 Web Publishing ..................................................................................................................240
17.11.7 Printer Sharing ...................................................................................................................240
17.11.8 Copying Files .....................................................................................................................241
17.11.9 Synchronizing Files ............................................................................................................242
17.12 Syslog Server Screen ................................................................................................................243
Chapter 18
Packages...........................................................................................................................................246
18.1 Overview .......................................................................................................................................246
18.2 What You Can Do ......................................................................................................................... 246
18.3 NFS Screen .................................................................................................................................247
18.3.1 Add/Edit NFS Share ........................................................................................................... 248
18.3.2 NFS Session .......................................................................................................................249
18.4 TFTP Server Screen ...................................................................................................................250
18.5 pyLoad Screen ..............................................................................................................................251
18.6 ownCloud Setup ............................................................................................................................ 251
18.7 Memopal .......................................................................................................................................254
18.8 GoogleDriveClient ........................................................................................................................256
18.8.1 Account Setting Screen .......................................................................................................256
18.8.2 Account Setting Add Screen ................................................................................................258
18.8.3 Update Period Screen ......................................................................................................... 261
Chapter 19
Auto Upload ......................................................................................................................................262
19.1 Overview .......................................................................................................................................262
19.2 What You Can Do ......................................................................................................................... 262
Cloud Storage User’s Guide
9

Table of Contents
19.3 What You Need to Know ...............................................................................................................262
19.4 Flickr/YouTube Screen .................................................................................................................262
19.4.1 Configuring the Flickr Settings ............................................................................................263
19.4.2 Configuring the YouTube Settings ......................................................................................267
19.5 FTP Uploadr Screen .....................................................................................................................270
19.5.1 Adding or Editing an FTP Server Entry ..............................................................................271
19.5.2 FTP Uploadr Preferences Screen ......................................................................................272
Chapter 20
Dropbox.............................................................................................................................................274
20.1 Overview .......................................................................................................................................274
20.2 Dropbox Screen ............................................................................................................................274
20.3 How to Use Dropbox with the NAS ...............................................................................................276
Chapter 21
Using Time Machine with the NAS..................................................................................................278
21.1 Overview .......................................................................................................................................278
21.2 Time Machine Screen ...................................................................................................................278
21.3 Using Time Machine .....................................................................................................................278
Chapter 22
Users..................................................................................................................................................281
22.1 Overview .......................................................................................................................................281
22.2 What You Can Do ......................................................................................................................... 281
22.3 Users Screen ...............................................................................................................................281
22.3.1 User Icons ........................................................................................................................... 283
22.3.2 Adding or Editing an Account .............................................................................................283
22.3.3 Usernames ..........................................................................................................................284
22.4 Displaying User Info ......................................................................................................................285
Chapter 23
Groups...............................................................................................................................................287
23.1 Overview .......................................................................................................................................287
23.2 What You Can Do ......................................................................................................................... 287
23.3 Groups Screen ............................................................................................................................. 287
23.3.1 Adding or Editing a Group ...................................................................................................288
23.3.2 Group Names ...................................................................................................................... 289
Chapter 24
Shares................................................................................................................................................291
24.1 Overview .......................................................................................................................................291
24.2 What You Can Do ......................................................................................................................... 291
24.3 Shares Screen .............................................................................................................................291
Cloud Storage User’s Guide
10

Table of Contents
24.3.1 Adding or Editing Share ......................................................................................................293
24.3.2 Configuring Advanced Share Access .................................................................................294
24.3.3 Public and ANONYMOUS Share Access Rights .................................................................295
24.4 Recycle Bin Configuration Screen ...............................................................................................295
24.4.1 Recycle Bins ........................................................................................................................295
24.4.2 Configuring Recycle Bins ....................................................................................................296
24.5 Share Browser Screen .................................................................................................................296
24.5.1 Moving or Copying Files .....................................................................................................298
Chapter 25
WebDAV.............................................................................................................................................300
25.1 Overview .......................................................................................................................................300
25.2 WebDAV Screen ...........................................................................................................................300
25.3 How to Use NetDrive with the NAS ............................................................................................... 301
Chapter 26
Maintenance Screens.......................................................................................................................302
26.1 Overview .......................................................................................................................................302
26.2 What You Can Do ......................................................................................................................... 302
26.3 Power Screen ...............................................................................................................................302
26.3.1 Editing the Power Control Schedule Screen ......................................................................304
26.4 Log Screen ...................................................................................................................................306
26.4.1 Report Config Screen ..........................................................................................................307
26.4.2 Email Setting ......................................................................................................................308
26.4.3 Report Setting .....................................................................................................................308
26.4.4 Syslog Server Setting .........................................................................................................309
26.5 Configuration Screen ...................................................................................................................310
26.6 SSL Certification .......................................................................................................................... 311
26.6.1 Modifying or Creating a Certificate .....................................................................................312
26.7 Shutdown Screen ......................................................................................................................... 313
26.8 Unpair myZyXELcloud Screen ......................................................................................................314
26.9 Technical Reference ......................................................................................................................314
26.9.1 Log Classes .........................................................................................................................314
26.9.2 Log Severity Levels .............................................................................................................315
26.9.3 Log Messages .....................................................................................................................315
Chapter 27
Protect ...............................................................................................................................................321
27.1 Overview .......................................................................................................................................321
27.2 What You Can Do ......................................................................................................................... 321
27.3 Backup Screens ............................................................................................................................ 321
27.3.1 Backup: Step 1 ....................................................................................................................322
27.3.2 Backup: Step 2 ....................................................................................................................323
Cloud Storage User’s Guide
11

Table of Contents
27.3.3 Backup: Step 3 ....................................................................................................................325
27.3.4 Backup: Step 4 ....................................................................................................................326
27.3.5 Edit Job Screen ................................................................................................................... 327
27.3.6 Edit Job: Step 1 ...................................................................................................................328
27.3.7 Edit Job: Step 2 ...................................................................................................................329
27.3.8 Restore Archive Screen .......................................................................................................330
27.3.9 Restore Archive: Step 1 .......................................................................................................330
27.3.10 Restore Archive: Step 2 .....................................................................................................331
27.3.11 Restore Archive: Step 3 .....................................................................................................331
27.4 Restore Screen .............................................................................................................................332
27.4.1 Restore: Step 1 ....................................................................................................................332
27.4.2 Restore: Step 2 ....................................................................................................................334
27.4.3 Restore: Step 3 ....................................................................................................................334
27.4.4 Restore: Step 4 ....................................................................................................................335
27.5 Configuration File Backup and Restoration ...................................................................................336
Chapter 28
Troubleshooting................................................................................................................................337
28.1 Troubleshooting Overview ............................................................................................................337
28.2 Power, Hardware, Connections, and LEDs ...................................................................................337
28.3 NAS Starter Utility .........................................................................................................................339
28.4 NAS Login and Access .................................................................................................................340
28.4.1 Enabling Scripting of Safe ActiveX Controls ........................................................................341
28.5 I Cannot Access The NAS ............................................................................................................343
28.6 Users Cannot Access the NAS .....................................................................................................344
28.7 External USB Drives .....................................................................................................................345
28.8 Storage ..........................................................................................................................................345
28.9 Firmware ....................................................................................................................................... 346
28.10 File Transfer ................................................................................................................................ 346
28.11 Networking ..................................................................................................................................347
28.12 Some Features’ Screens Do Not Display ....................................................................................347
28.13 Media Server Functions ..............................................................................................................348
28.14 Download Service Functions ....................................................................................................... 350
28.15 Web Publishing ...........................................................................................................................350
28.16 Auto Upload ................................................................................................................................351
28.17 Package Management ................................................................................................................352
28.18 Backups ......................................................................................................................................352
28.19 Google Drive ...............................................................................................................................353
Appendix A Product Specifications..................................................................................................354
Appendix B Customer Support ........................................................................................................355
Appendix C Legal Information .........................................................................................................361
Cloud Storage User’s Guide
12

Table of Contents
Index ..................................................................................................................................................366
Cloud Storage User’s Guide
13

1.1 Overview
Use the NAS as your own personal cloud. Here are some key features:
Start using ZyXEL NAS instantly with FindMe - Use ZyXEL FindMe to discover your NAS on your
home network and get in control in under 15 seconds. Then do an easy installation with no need to
install a NAS utility.
Access and share files from your NAS wherever you are - Using the ZyXEL Drive mobile app
makes it easy.
Create a shared cloud space for people without a NAS - Provide your cloud space for your
friends or family members when you share a folder from the NAS with the ZyXEL Drive mobile app.
Your friends and family members don’t need to purchase an additional NAS - just install the Z yXE L
Drive mobile app on their mobile devices.
CHAPTER 1
Getting to Know Your NAS
Protect your data from drive failure - The NAS’s RAID 1 capability clones contents from one
drive to another. If a drive is damaged or corrupted, you still have another drive to restore from or
use.
Get up and running quickly with the easy-to-use interface - The ZyXEL NSM (NAS Station
Management) 5.1 intelligent desktop provides a rich feature set of tools with an easy-to-understand
GUI design to help you get things done quickly. The multitasking capability through a multi- window
interface enables you to quickly get applications up and running.
Check your NAS while you’re away - Even if you have several ZyXEL NAS devices, visit the
myZyXELcloud Web portal from anywhere to see their health status at a glance.
Stream multimedia contents to your big screen TV - Bring your favorite multimedia files on
the NAS to the big screen. ZyXEL zCloud app lets you pla y your favorite videos, music, or photos on
your big screen with TV streaming devices such as Apple TV, Google Chromecast, Roku 3, and
Amazon Fire TV; or directly on smart TVs like those from Samsung and LG.
Cloud Storage User’s Guide
14
Chapter 1 Getting to Know Your NAS
NAS
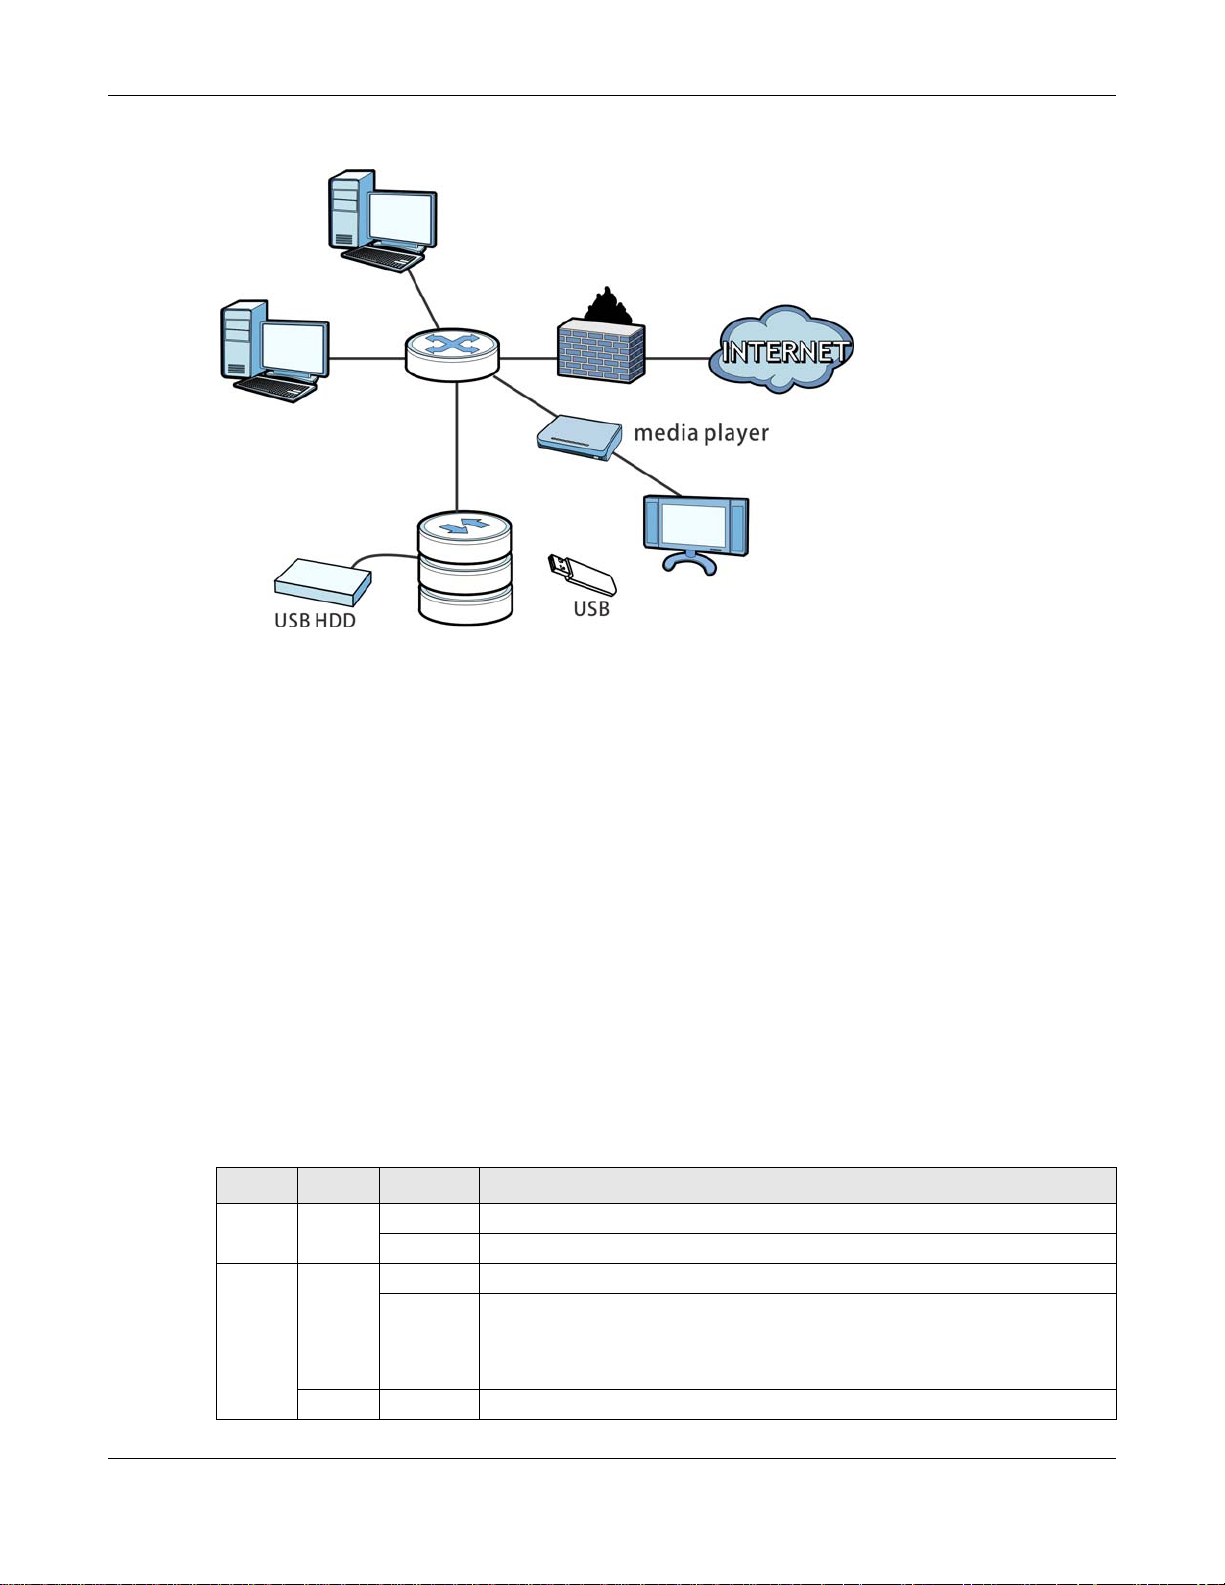
Figure 1 Example of the NAS in a Home Network
Above is the NAS in a home network. Users back up and share data on the NAS. The media player
plays the NAS’s media files on the TV. A USB hard drive provides extra storage space and files are
copied directly from the USB mass storage device to the NAS.
Place the NAS behind a firewall and/or IDP (Intrusion Detection and Prevention) device to protect it
from attacks from the Internet.
Refer to the Quick Start Guide for hardware connections and how to install and remove hard drives
from the disk trays.
Note: Turn off and disconnect the NAS before you install or remove the internal hard disk
1.2 LEDs
This table describes the NAS’s LEDs.
Table 1 LEDs
LED COLOR STATUS DESCRIPTION
POWER White On The NAS is turned on and receiving power.
SYSTEM White On The NAS has fully started and is operating normally.
or disks.
Off The NAS is turned off.
Blinking The NAS is starting up or upgrading the firmware.
Note: Do not turn off the NAS while it is upgrading the firmware or you may
render it unusable.
Red On The NAS has a system error.
Cloud Storage User’s Guide
15
Chapter 1 Getting to Know Your NAS
Table 1 LEDs (continued)
LED COLOR STATUS DESCRIPTION
HDD White On The hard disk drive is connected properly to the NAS. This LED stays on
white when the hard disk drive is in hibernation if you do not enable sleeping
HDD LED blinking.
Blinking The NAS is saving data to the hard disk drive.
Slow
Blinking
Red On The NAS detected an error on the hard disk drive (like a bad sector for
Off The NAS cannot detect a hard disk in the disk bay or the LED is disabled.
COPY White On A USB device is connected to the NAS and the NAS is ready to copy.
Blinking The NAS is copying or synchronizing files.
Red On Copying or synchronizing files to or from the USB or SD failed.
Off No USB device is connected.
LAN1 /
LAN2
Green On The NAS has a successful 10/100 Mbps Ethernet connection.
Blinking The 100M LAN is sending or receiving packets.
Off The NAS does not have a 10/100 Mbps Ethernet connection.
Amber On The NAS has a successful 1000 Mbps Ethernet connection.
Blinking The 1000 M LAN is sending or receiving packets.
Off The NAS does not have a 1000 Mbps Ethernet connection.
Sleeping HDD LED blinking is enabled and the hard disk drive is in
hibernation.
example). The NAS automatically tries to recover a bad sector, but the LED
stays red until the NAS restarts.
1.3 Hard Disks
The NAS has internal hard disk bays. Install SATA (Serial Advanced Technology Attachment) hard
disks. Note that the SATA hard disks are treated as internal or SATA volumes. Any hard disk
connected to a USB port is considered an external or USB volume.
1.4 SD Card
Use up to a 128 GB SDXC card with the front panel SD card slot. The SD card slot works with the
COPY/SYNC button (see Section 1.6 on page 17 for details).
1.5 Power Button
Use the power button on the front panel to turn the NAS on or off.
• Press the power button for one second to turn on the NAS.
Cloud Storage User’s Guide
16

Chapter 1 Getting to Know Your NAS
Press
1 Beep
2 Beeps
2 more seconds
Release for
3 seconds
Release for
software
shutdown
hardware
shutdown
Press
1 Beep
2 Beeps
IP Address
Password
Clear All Settings
5 more seconds
Release to
Release to Reset
Figure 2 Using the Power Button to Turn Off the NAS
• To have the NAS go through its normal software shutdown process and turn itself off, press the
power button until you hear one beep (after about three seconds), then release it.
• To perform a hardware shutdown and have the NAS immediately turn itself off without going
through the normal shutdown process, press the power button until you hear a second beep
(after about five seconds), then release it.
1.6 COPY/SYNC Button
Use the COPY/SYNC button on the front panel to copy or synchronize files between a connected
USB or SD device and the NAS. See Section 17.10 on page 232 for more details on how to
configure the copy/sync settings.
1.7 RESET Button
Use the RESET button on the rear panel to restore the NAS’s default settings.
Figure 3 The RESET Button
• Press the RESET button until you hear one beep (after about two seconds), then release it. You
will hear one more beep after you release the button.
This resets the NAS’s IP address and password to the default values.
• Press the RESET button until you hear two beeps. After the second beep, continue pressing the
button for five more seconds, then release it. You will hear three quick beeps after you release
the button.
This resets the NAS to the factory default configuration. All settings you have configured on the
NAS, including IP address, password, user accounts, groups, and so on will be reset to the
factory defaults.
The reset process does NOT affect the volume settings, nor data stored on the NAS.
Cloud Storage User’s Guide
17

Chapter 1 Getting to Know Your NAS
You should periodically back up your configuration file to your computer (see Section 26.5 on page
310 for details about managing the NAS’s configuration file). You could then restore your
configuration in the event that you or someone else reset the NAS to the factory defaults.
Note: Keep the NAS in a secure location in order to prevent unauthorized reset of the
device.
You may need to close and re-open the NAS Starter Utility to discov er the NAS. This is because the
NAS automatically re-acquires IP address information, so its IP address may change. If no IP
address information is assigned, the NAS uses Auto-IP to assign itself an IP address and subnet
mask. For example, you could connect the NAS directly to your computer. If the computer is also
set to get an IP address automatically, the computer and the NAS will choose addresses for
themselves and be able to communicate.
Cloud Storage User’s Guide
18
2.1 Overview
Use FindMe or the NAS Starter Utility to find and access the NAS and the files on it.
The NAS Starter Utility supports Windows XP, Windows Vista, Windows 7, and Windows 8. Click
Help to open a Web Help page about the NAS Starter Utility screens.
Note: Installing this version of the NAS Starter Utility uninstal ls p r evious versions.
Note: Refer to the Quick Start Guide for your NAS’s hardware connections and the steps
for installing the NAS Starter Utility.
CHAPTER 2
Getting Started
2.2 FindMe
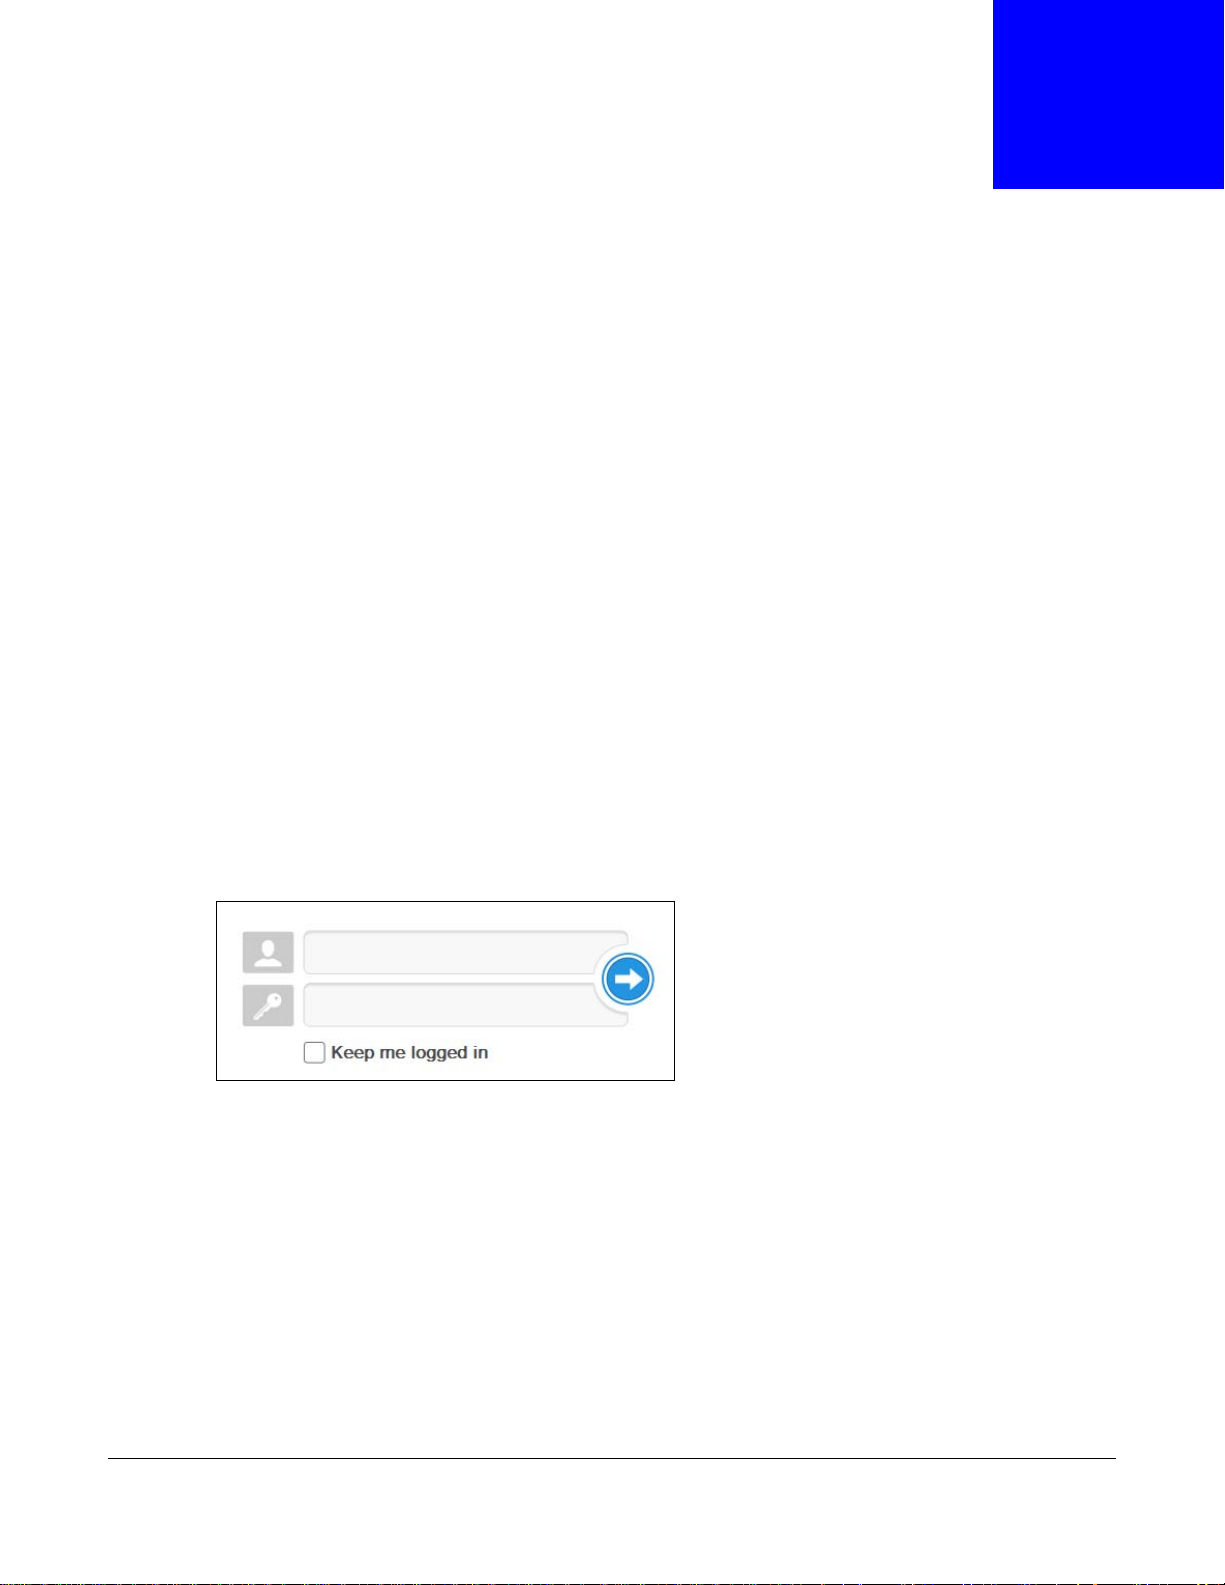
1 Connect to https://findme.zyxel.com in your browser to find and connect to your NAS.
2 Use the default username “admin” and password “1234” to log in. See Chapter 7 on page 38 for
more on the web desktop.
Figure 4 NAS Login Screen
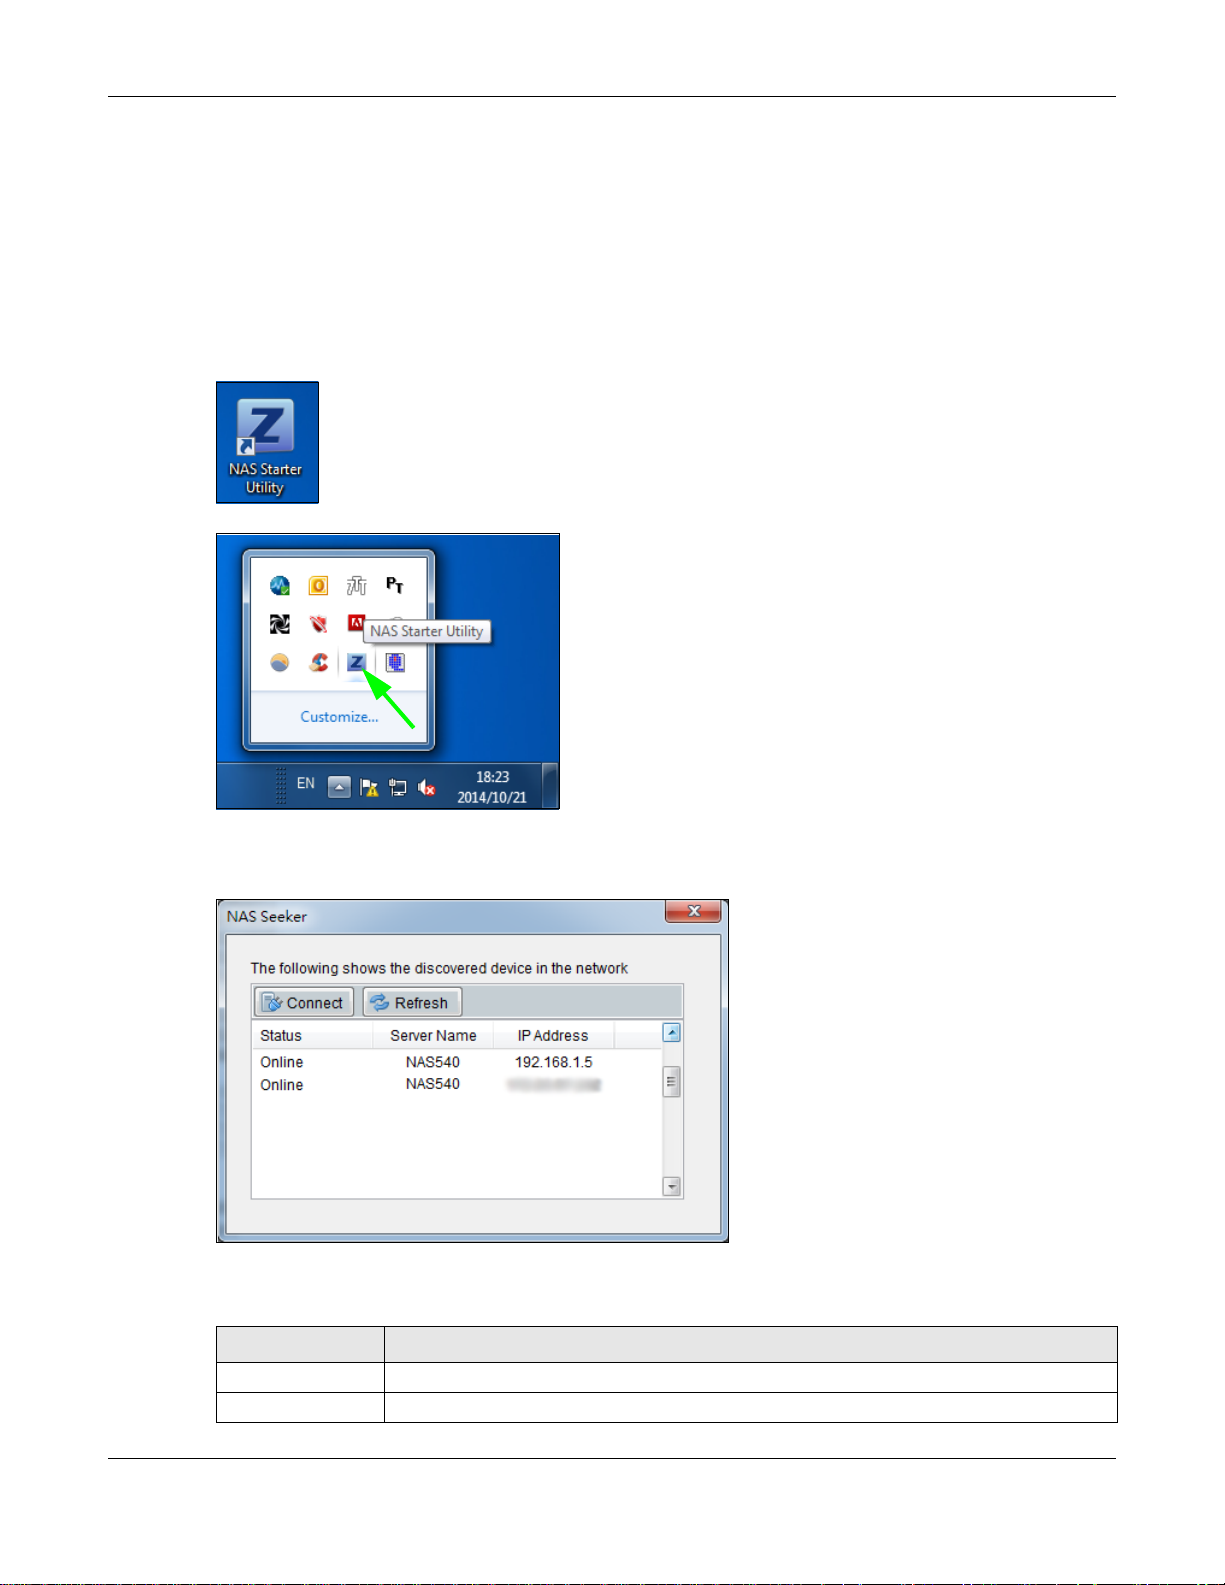
2.3 NAS Starter Utility
• The NAS Starter Utility broadcasts a request packet when you first run it. Each NAS has an NAS
Starter Utility Agent that always listens and responds to requests from the NAS Starter Utility.
The NAS Starter Utility receives the response packet that contains information, such as host
name, IP, and so on.
• If you plan to use more than one NAS in your network, configure them with unique server
names. This enables you to identify each NAS in the NAS Starter Utility screens.
Cloud Storage User’s Guide
19
2.3.1 NAS Seeker Screen
Use this screen to view the NASs in your network. The NAS’s Server Name. The default is ‘NAS’
followed by the number of your model (‘NAS540’ for example). See Section 2.3.5 on page 23 for
how to change it to a more recognizable one in your network.
Click the NAS Starter Utility icon on your desktop or in the Windows system tray to start the NAS
Starter Utility. Alternatively you can click Start > Programs > ZyXEL > NAS Starter Utility.
Figure 5 NAS Starter Utility Desktop Icon
Figure 6 NAS Starter Utility Windows System Tray Icon
Chapter 2 Getting Started
The first time you open the NAS Starter Utility the discovery screen appears as follows.
Figure 7 NAS Seeker
The following table describes the labels in this screen.
Table 2 NAS Seeker
LABEL DESCRIPTION
Connect Select a NAS and click this to connect to it.
Refresh Click this to refresh the screen. The NAS Starter Utility does not automatically refresh.
Cloud Storage User’s Guide
20
Chapter 2 Getting Started
Table 2 NAS Seeker (continued)
LABEL DESCRIPTION
Status This shows whether the NAS is Online, Unreachable, Configuring, or Config Failed.
Server Name This is the server name you configured for the NAS. If you have more than one NAS in
your network, it is recommended that you give each one a unique name for identification
purposes.
IP Address This is the current IP address of the NAS.
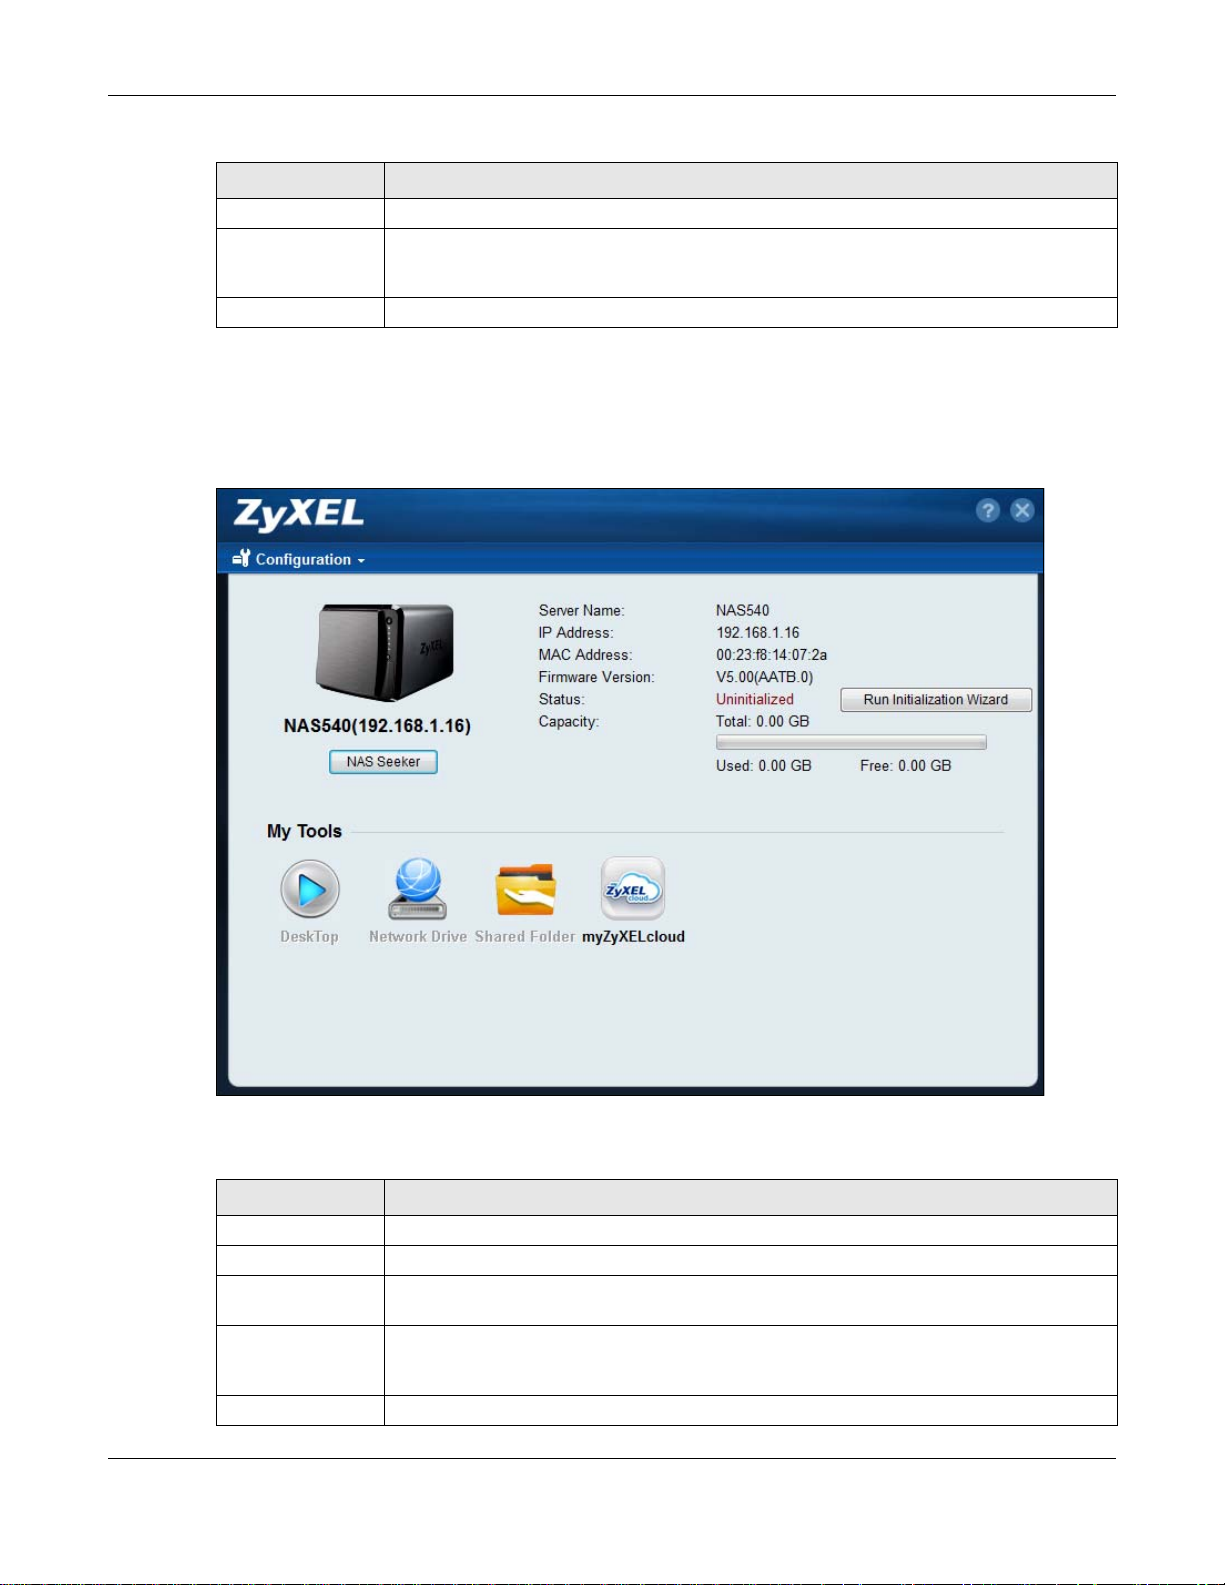
2.3.2 Main NAS Starter Utility Screen
The main NAS Starter Utility screen displays after you select an NAS in the NAS Seeker screen.
Figure 8 NAS Starter Utility Main Screen
The following table describes the labels in this screen.
Table 3 NAS Starter Utility Main Screen
LABEL DESCRIPTION
? Click this to display the utility help.
Configuration Click this to configure system sett ings (see Section 2.3.5 on page 23).
NAS Seeker Click this to use the NAS Seeker scre en (Section 2.3.1 on page 20) to find and connect to
Server Name This is the server name you configured for the NAS. If you have more than one NAS in
IP Address This is the current IP address of the NAS.
a different NAS on your network.
your network, it is recommended that you give each one a unique name for identification
purposes.
Cloud Storage User’s Guide
21
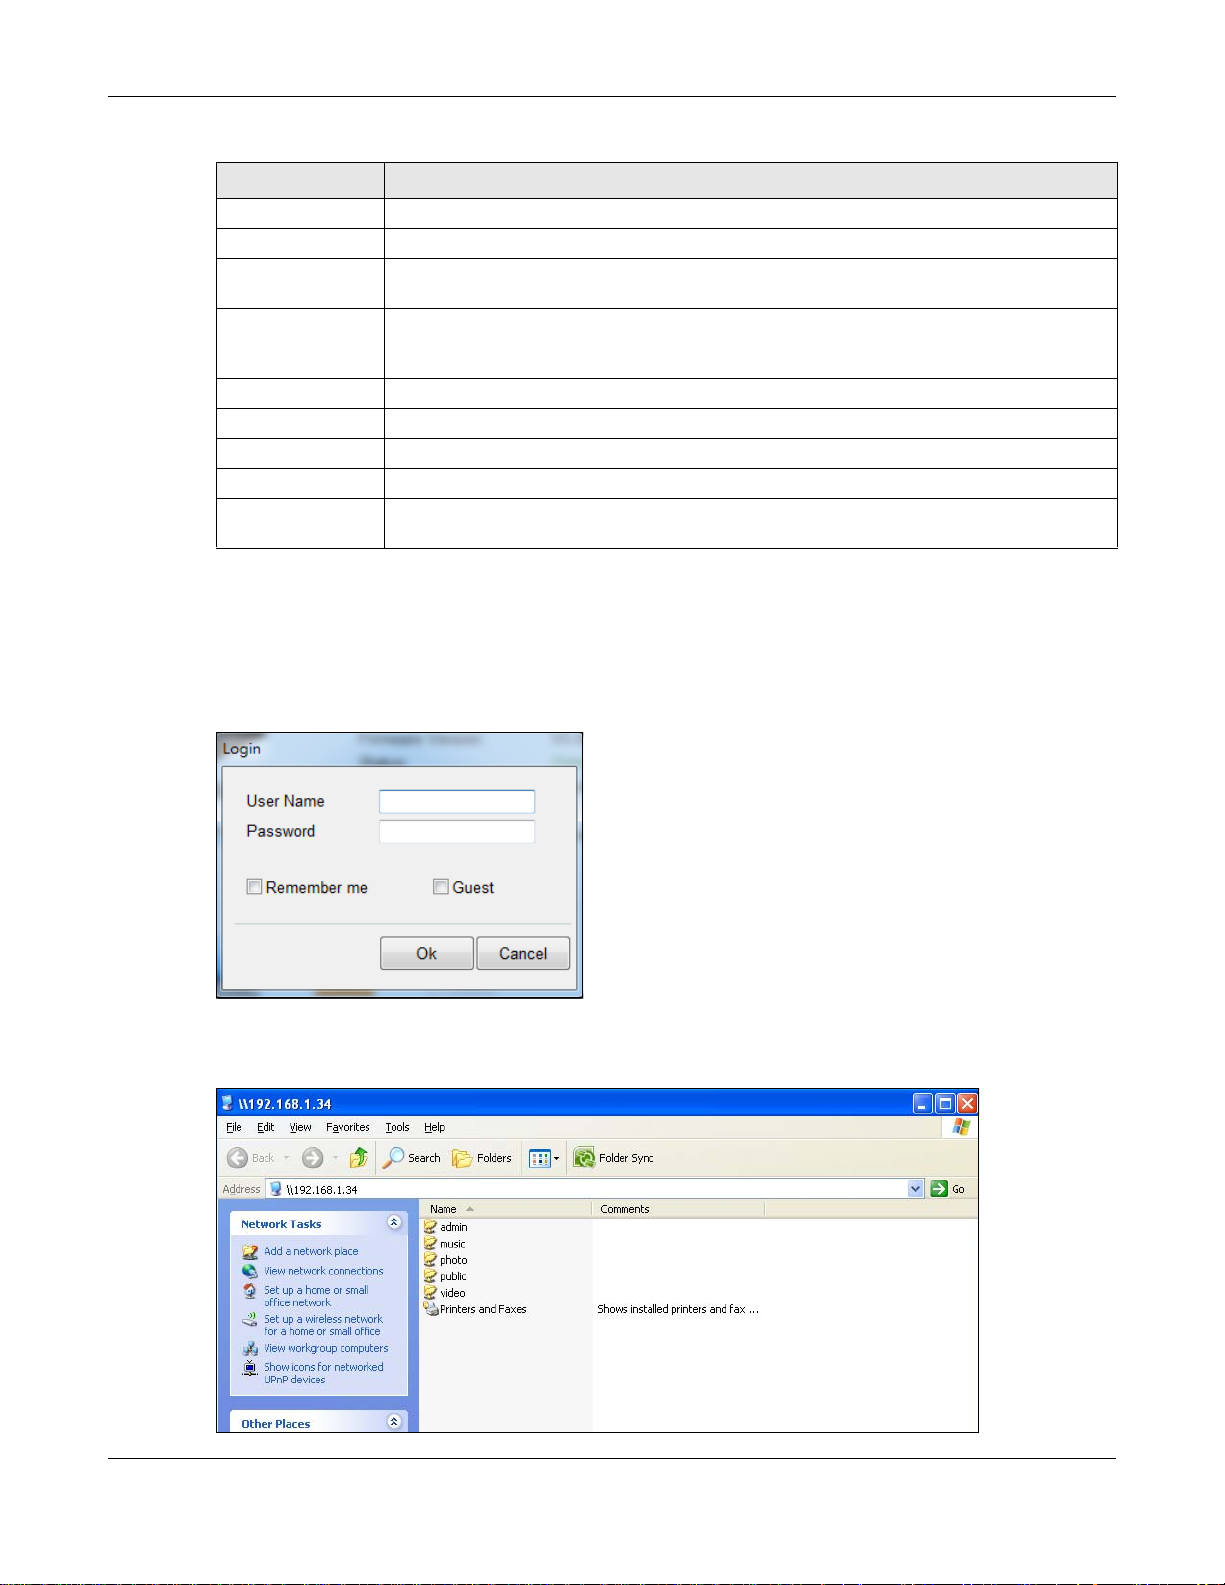
Table 3 NAS Starter Utility Main Screen (continued)
LABEL DESCRIPTION
MAC Address This is the NAS’s unique physical hardware address (MAC).
Firmware Version This shows the version of firmware the NAS is currently using.
Status This shows whether the NAS is Online, Uninitialized, Unreachable, Configuring, or
Config Failed.
Run Initialization
Wizard
Capacity This shows the NAS’s total, in-use, and remaining storage capacity.
DeskT op Click this button to go to the W eb Configurator lo gin screen (see Section 7.2 on page 38).
Network Drive Click this to add the NAS as a network drive in your computer’s Windows Explorer.
Shared Folder Click this to log into the NAS’s file directory in Windows Explorer.
myZyXELcloud Click this to go to myclou d.zyxel.c om to set up a free DDNS hostnam e for the NAS so y ou
This button displays if the NAS detects that the NAS has not yet configured any of the
installed hard disks. Click this button to go to the Web Configurator login screen (see
Section 7.2 on page 38).
can connect to it easily from the Internet.
2.3.3 Directory of the NAS
In the main NAS Starter Utility screen click Shared Folder to log into the NAS’s file directory in
Windows Explorer. Enter the administrator user name and password and click Login.
Chapter 2 Getting Started
Figure 9 Login
The utility opens the NAS’s directory in Windows Explorer.
Figure 10 Directory
Cloud Storage User’s Guide
22
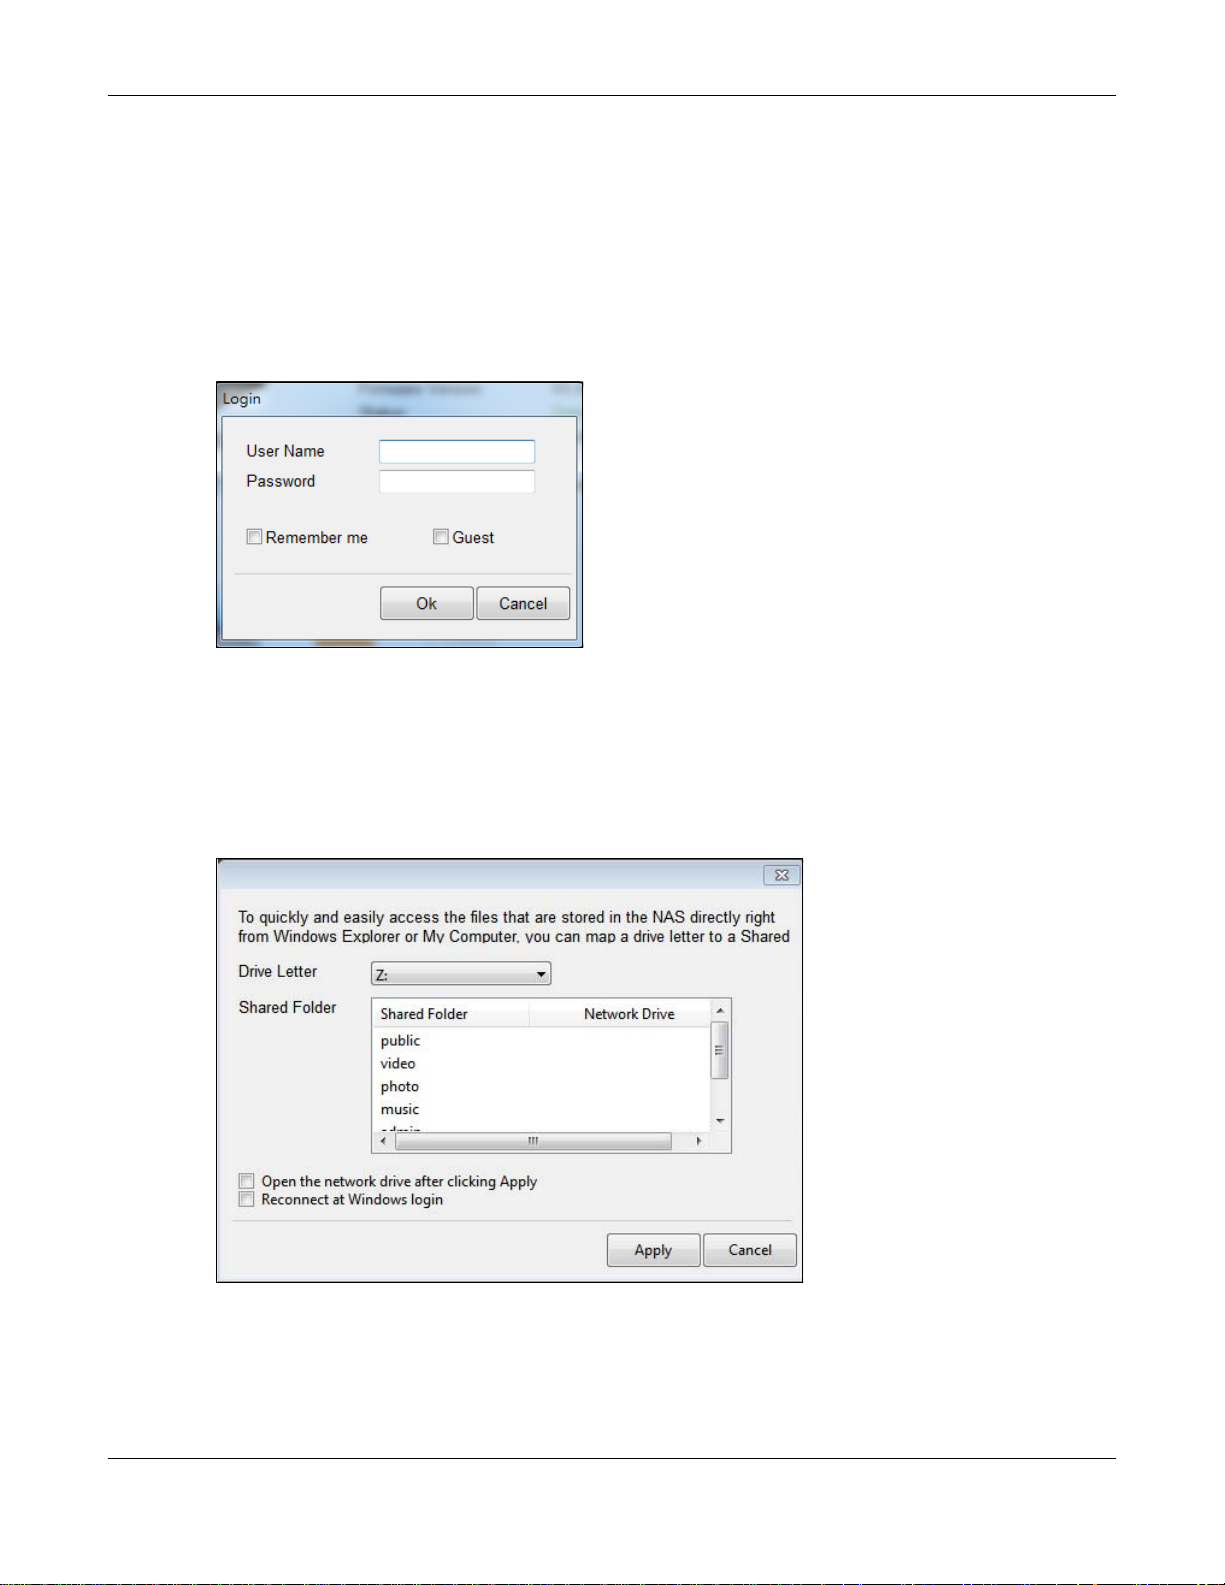
2.3.4 Network Drive
In the main NAS Starter Utility screen click Network Drive to add the NAS as a network drive in
your computer’s Windows Explorer.
Enter your user name and password and click Login to be able to add the NAS’s shares to which
you have access as network drives. Otherwise select Guest and click Login to be able to add the
NAS’s public shares as network drives.
Figure 11 Login
Chapter 2 Getting Started
Select a share on the NAS and the drive letter on your computer to which you want to map it. The
shares that each user can select to map depends on the user’s permissions. For example, if share1
is private to user1, then only user1 is allowed to map share1. The table displays the NAS shares
that are already mapped to drive letters on your computer. After you click Apply you can see the
new drive in Windows Explorer (My Computer) where you can access and use it like your
computer’s other drives.
Figure 12 Network Drive
2.3.5 Configure System Settings
Use these screens to be able to change the NAS’s server name, time zone, PPPoE, IP address,
subnet mask, default gateway, or DNS settings.
Cloud Storage User’s Guide
23
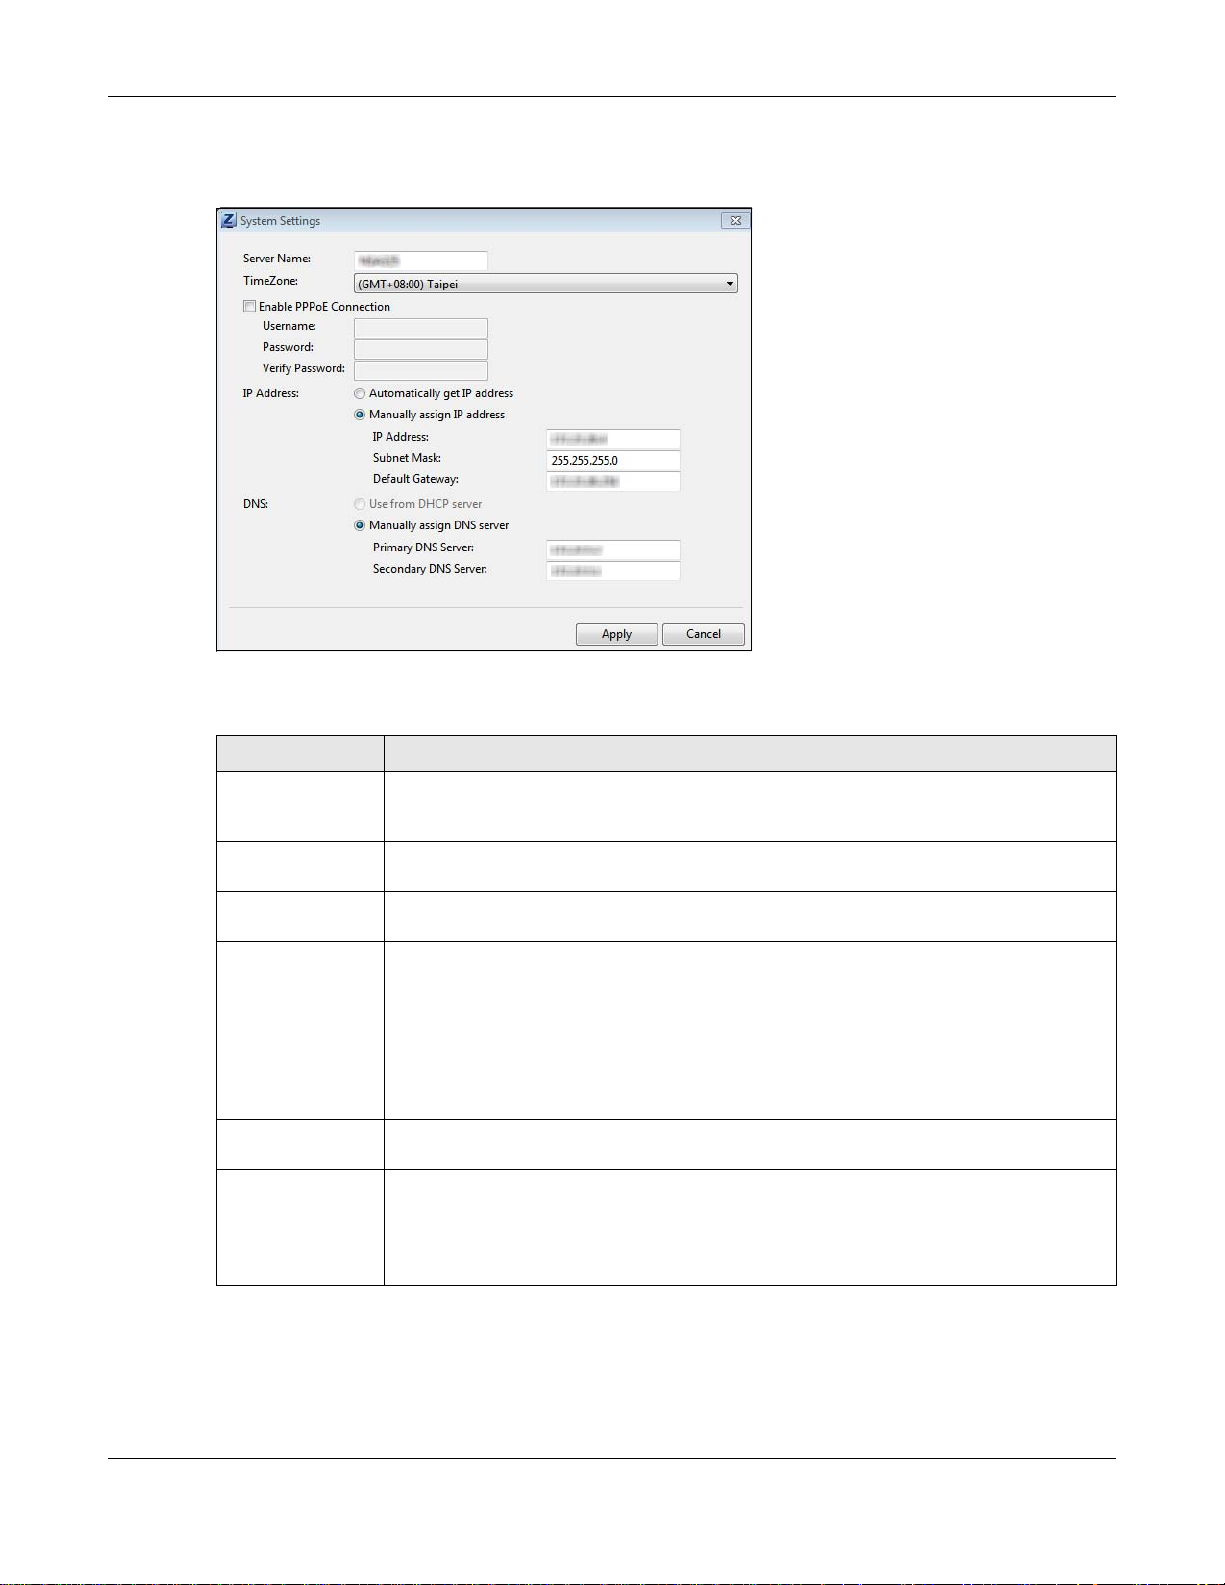
Chapter 2 Getting Started
Click Configuration > System Setting in the main utility screen to display the following screen.
Figure 13 NAS Starter Utility > Configuration > System Setting
The following table describes the labels in this screen.
Table 4 NAS Starter Utility > Configuration > System Setting
LABEL DESCRIPTION
Server Name Specify a name to uniquely identify the NAS on your network. You can enter up to 15
alphanumeric characters with minus signs allowed but not as the last character. The
name must begin with an alphabetic character (a-z) and is case sensitive.
Time Zone Choose the time zone of your location. This will set the time difference between your
time zone and Greenwich Mean Time (GMT).
Enable PPPoE
Connection
IP Address Use these fields to configure the IP address of the LAN interface through which you are
Automatically get
IP address
Manually assign IP
address
Click this if your Internet connection requires you to enter a user name and password to
connect to the Internet. Enter your user name and password
connected to the NAS.
When the LAN interfaces are set to stand-alone, this configures the IP address of the LAN
interface in the same subnet as your computer . It configures LAN1 if both LAN interfaces
are in the same subnet as your computer.
If you use the administrator configuration screens to set the LAN interfaces to link
aggregation, this configures the IP address that both LAN interfaces share.
Select this if the NAS is automatically assigned an IP address from the ISP or a DHCP
server in your network.
Select this if you want to assign the NAS a fixed IP address, subnet mask and default
gateway.
Note: Do not configure an IP address that is already in use in your network. This results to
a network IP address conflict and makes the NAS inaccessible.
Cloud Storage User’s Guide
24
Chapter 2 Getting Started
Table 4 NAS Starter Utility > Configuration > System Setting (continued)
LABEL DESCRIPTION
Use from DHCP
server
DNS Domain Name System (DNS) is for mapping a domain name to its corresponding IP
Domain Name System (DNS) is for mapping a domain name to its corresponding IP
address and vice versa. Select this if the NAS is automatically given DNS information
from the ISP or a DHCP server in your network.
address and vice versa.
Select Use from DHCP server if the NAS is automatically given DNS information from
the ISP or a DHCP server in your network.
Select Manually assign DNS server if you were given specific IP address(es) of the
DNS server(s). Enter the primary and secondary DNS in the corresponding fields.
Cloud Storage User’s Guide
25

Accessing Your Cloud Remotely
Use the NAS to set up your own secure personal cloud. Keep y our videos, photos, music, and files
safely at home and under your control. Access, share, and stream files from anywhere using your
PC, Mac computer, and mobile devices.
3.1 myZyXELCloud Service
Use the myZyXELCloud service at https://mycloud.zyxel.com to set up a free hostname like
name.zyxel.me and set the NAS to use it. This lets you easily access the NAS through the Internet.
The myZyXELcloud Web portal also lets you monitor the NAS’s health from anywhere.
3.2 ZyXEL Drive
CHAPTER 3
Use the ZyXEL Drive app to stream or download photos, videos, and music to your Android or iOS
phone through the Internet. You can also upload files from your phone to the NAS.
After setting up the myZyXELCloud service, go to http://zyxel.to/zdrive to get the Zy XEL Drive app
for your Android or iOS phone.
Log in, sign-up, and start playing.
3.2.1 ZyXEL Drive Welcome
Community Sharing - Send invitation links to friends and family to conveniently share selected
NAS folders.
DirectConnect - Privately and securely access your NAS content from anywhere.
Cloud Storage User’s Guide
26
Chapter 3 Accessing Your Cloud Remotely
Figure 14 ZyXEL Drive Welcome
3.2.2 NAS and File List
My own NAS - Access and share files from your own NAS.
Shared With Me - Access files on someone else’s NAS folder that they have shared with you.
Cloud Storage User’s Guide
27

Chapter 3 Accessing Your Cloud Remotely
Figure 15 NAS and File List
3.2.3 Uploading and Media Streaming
Use ZyXEL Drive to upload photos and videos from your mobile device to the NAS. You can also
stream videos and music stored on the NAS.
Cloud Storage User’s Guide
28
Chapter 3 Accessing Your Cloud Remotely
Figure 16 Uploading and Media Streaming
Cloud Storage User’s Guide
29
CHAPTER 4
zCloud
ZyXEL zCloud app lets you play your favorite multimedia files on the NAS on your big screen TV.
Use TV streaming devices such as Apple TV, Google Chromecast, Roku 3, and Amazon Fire TV; or
play files directly on smart TVs like those from Samsung and LG.
• Browse your media contents from your NAS directly on your Android or iOS device.
• View photos stored on your NAS with the app's built-in slideshow.
• Play music stored on your NAS.
• Watch videos stored on your NAS .
• Upload files from your Android device to your NAS.
• Upload photos and videos from your iOS device to your NAS.
• Browse and manage files stored on the NAS.
• Compatibility: Requires Android 4.0.3 or later or iOS 7 or 8.
4.1 Using zCloud
Install the zCloud app from Google Play or the Apple App store. Then tap the zCloud icon to open it.
Figure 17 zCloud Icon
The main menu displays.
Cloud Storage User’s Guide
30