

Page 1

IG-4160
IG-4160
IG-4160IG-4160
Zoom Internet
Zoom Internet
Zoom InternetZoom Internet
Gateway
Gateway
GatewayGateway
User Guide
Page 2

NOTICE
NOTICE
NOTICENOTICE
This document contains proprietary information protected by copyright, and
this Manual and all the accompanying hardware, software, and
documentation are copyrighted. No part of this document may be
photocopied or reproduced by mechanical, electronic, or other means in
any form.
The manufacturer does not warrant that the hardware will work properly in
all environments and applications, and makes no warranty or representation,
either expressed or implied, with respect to the quality, performance,
merchantability, or fitness for a particular purpose of the software or
documentation. The manufacturer reserves the right to make changes to the
hardware, software, and documentation without obligation to notify any
person or organization of the revision or change.
All brand and product names are the trademarks of their respective owners.
© Copyright 2001
All rights reserved.
Page 3

Contents
GETTING STARTED .......................................................... 4
ACKAGE CONTENTS .......................................................... 4
1.1 P
OU WILL ALSO NEED ....................................................... 4
1.2 Y
1.3 I
NSTALLATION ROAD MAP ................................................... 5
AMILIARIZING YOURSELF WITH YOUR GATEWAY ...................... 7
1.4 F
1.5 C
ONNECTING THE PC AND THE IG-4160 ................................ 9
CONFIGURING YOUR INTERNET ACCESS METHOD....... 11
SING A CABLE OR DSL MODEM WITH A DYNAMIC IP ADDRESS ..13
2.1 U
2.2 U
SING A DSL MODEM WITH A STATIC IP ADDRESS ..................15
SING A DSL MODEM WITH PPPOE.....................................16
2.3 U
2.4 U
SING A DIAL-UP OR ISDN MODEM .....................................17
SING THE GATEWAY WITHOUT WAN ACCESS .......................19
2.5 U
SETTING UP THE GATEWAY AS A PRINT SERVER ......... 20
3.1 C
ONNECTING THE PRINTER TO THE GATEWAY .........................20
NSTALLING THE PRINT SERVER SOFTWARE ON A CLIENT PC.......21
3.2 I
3.3 C
ONFIGURING THE PRINT SERVER FUNCTION ..........................22
NINSTALLING THE PRINT SERVER .......................................26
3.4 U
ADVANCED SETUP OPTIONS.......................................... 27
4.1 M
ODIFYING FIREWALL SETTINGS .........................................27
ONFIGURING THE LAN DHCP SERVER ................................31
4.2 C
4.3 C
ONFIGURING A VIRTUAL SERVER ........................................32
ONFIGURING LAN MAC ADDRESSES ...................................34
4.4 C
4.5 C
ONFIGURING THE ROUTER ACCESS CONTROL.........................36
ONFIGURING THE WAN PING RESPONSE ..............................38
4.6 C
HE CLONE WAN MAC FEATURE ........................................38
4.7 T
SYSTEM ADMINISTRATION ........................................... 40
ONITORING SYSTEM STATUS ............................................40
5.1 M
5.2 P
ERFORMING SYSTEM ADMINISTRATION TASKS........................42
ESETTING THE GATEWAY TO ITS DEFAULT SETTINGS...............44
5.3 R
REGULATORY INFORMATION ........................................ 45
Page 4

Getting Started
1.1 Package Contents
Check that your package includes the following items:
• One Internet Gateway
• One CD-ROM
• One power adapter and power cord
• One Ethernet cable
• Installation instructions, including a Quick Start for cable
modem users, and this User Guide.
If anything is missing or damaged, please contact your supplier.
1.2 You Will Also Need
The IG-4160 is compatible with computers using the Windows,
Macintosh, and Linux operating systems.
1
Optionally, you can use your Gateway as a print server and share a
parallel port printer connection among multiple PCs. (Note: This
option is only for Windows computers.) If you want to use your
Gateway as a print server, you will need a standard parallel printer
and cable.
4 IG-4160 Zoom Internet Gateway User Guide
Page 5
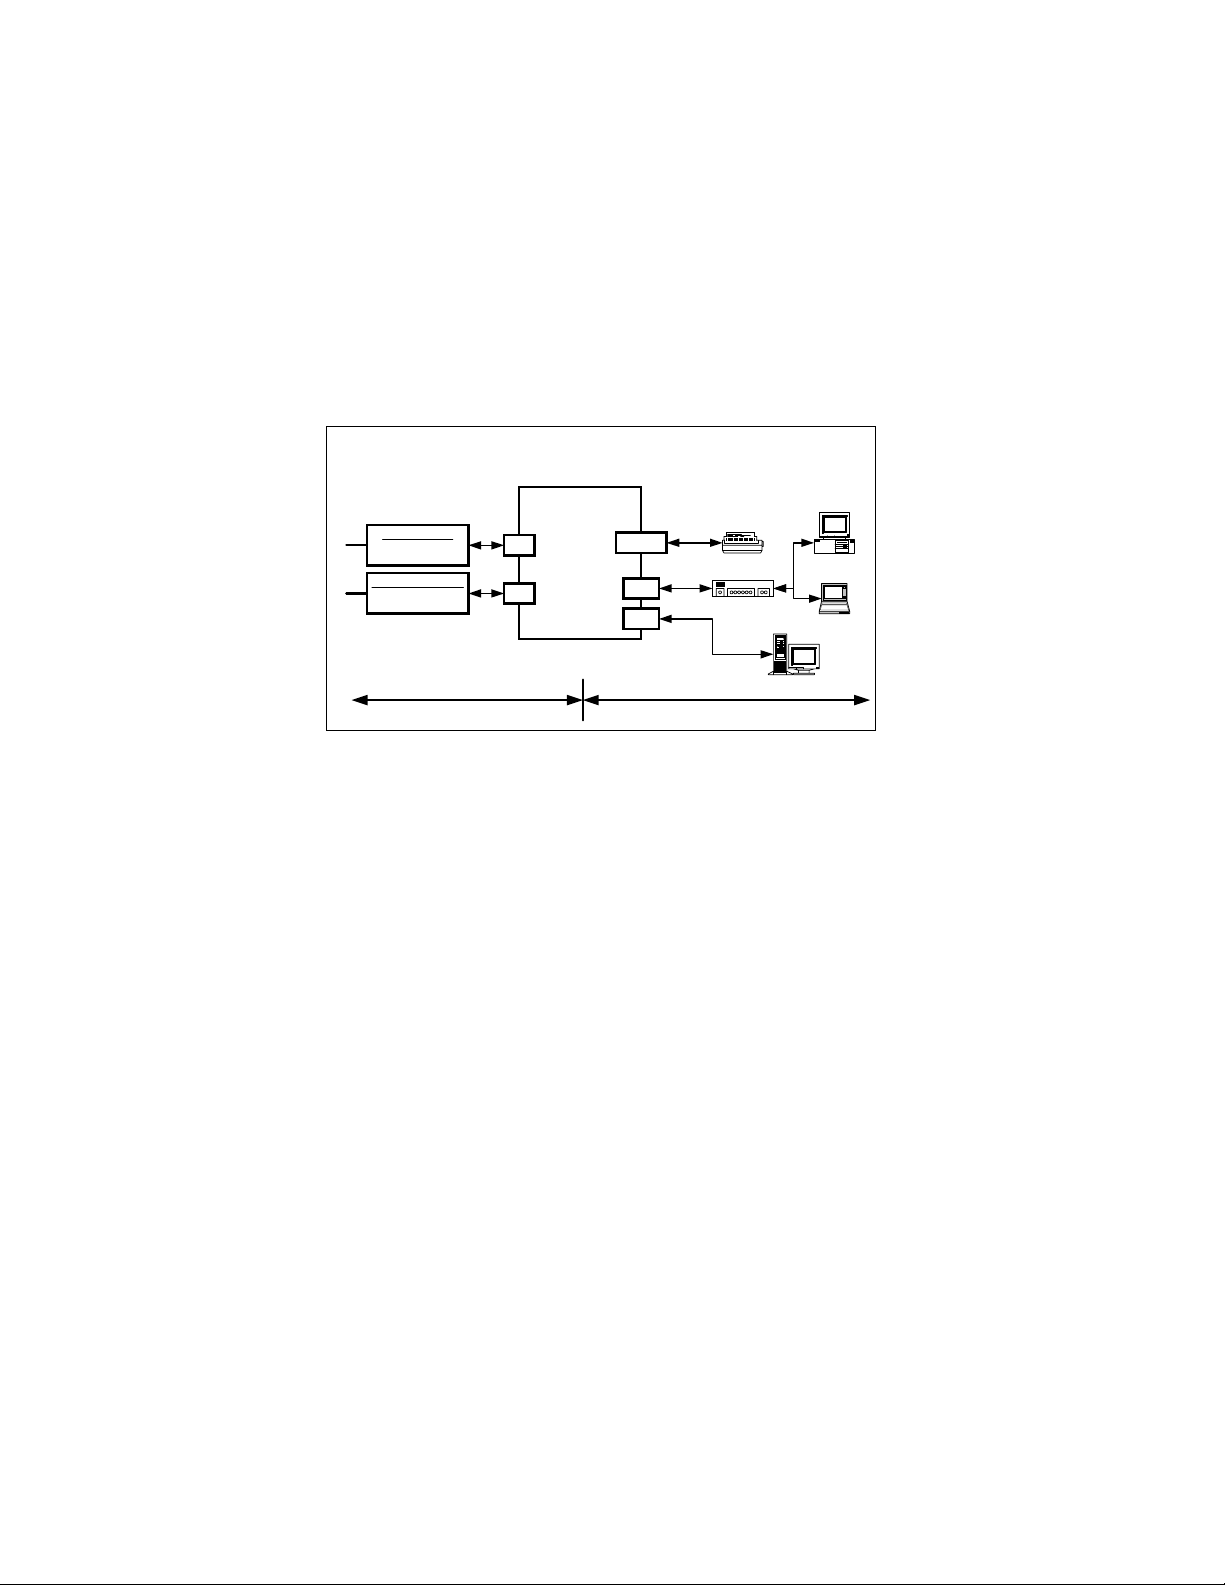
1.3 Installation Road Map
The following diagram depicts the different setups that are possible
with your Zoom IG-4160 Internet Gateway.
EQUIPMENT CONFIGURATIONS
WAN DEVICES LAN DEVICES
RS232 MODEM S
DIAL-UP MODEMS
ISDN MODEMS
ETHERNET MODEMS
CABLE MODEMS
ADSL MODEMS
UNPROTECTED (Public Network)
Or
WAN
Internet G atew ay
COM
WAN
IG-4160
PRINTER
PRINTER
LAN 1
LAN 2
PROTEC TED (Private Network)
HUB
DMZ
LAN
SERVER
DESKTOP PC
10/100BaseT
LAPTOP PC
10/100BaseT
The first step is to decide what type of WAN device you intend to
use to access the Internet. (Your choices are depicted on the lefthand side of the diagram above.)
Once you’ve made that decision, the key stages to set up and use
your Gateway are as follows:
1111
Connect the hardware.
2222
Establish wired communication with the Gateway using a PC
that we’ll call the Administrator PC.
3333
Configure your Internet access method using the
Administrator PC.
4444
Connect to the Internet.
Using the following flowchart as a road map should simplify the
process of setting up your Gateway. You can also keep this
flowchart as a handy reference, should you ever want to modify
your Gateway setup.
Chapter 1: Getting Started 5
Page 6
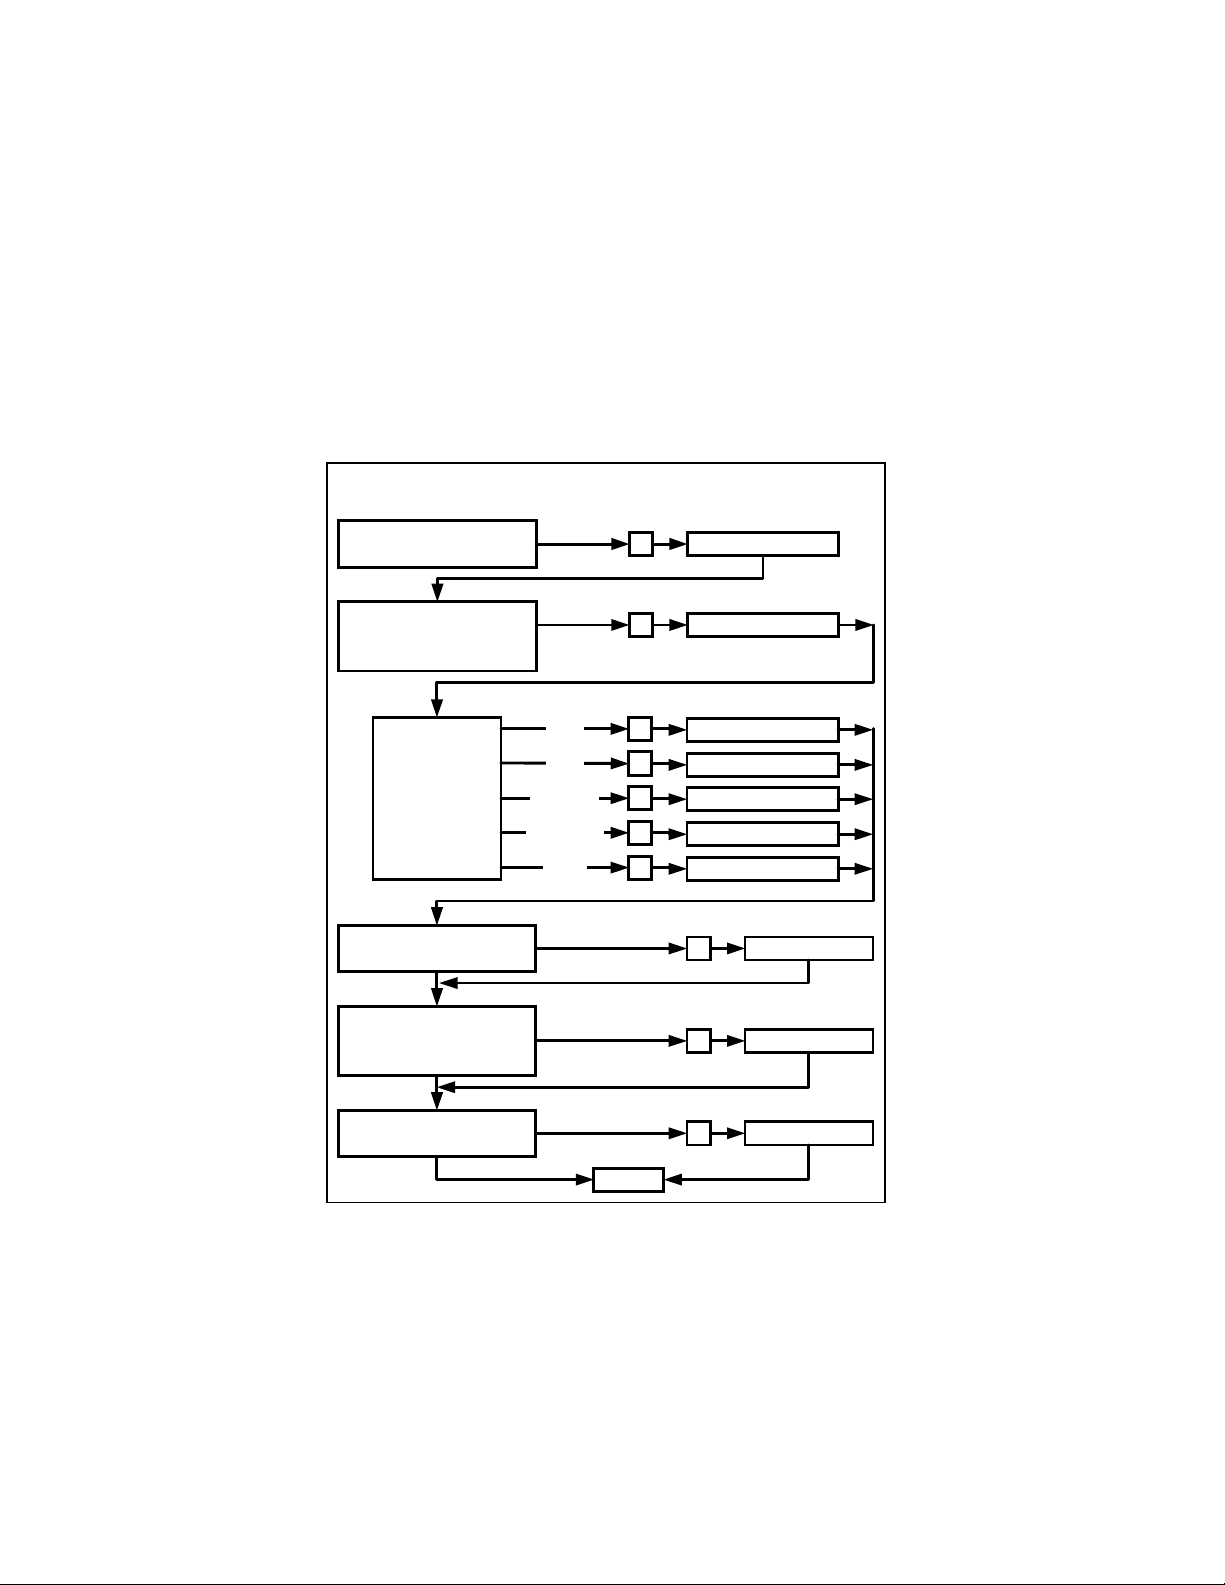
In this manual we also describe additional options and features
available to you. For example, you can connect a printer to your
Gateway and share it among multiple users. You can also add more
sophisticated capabilities to the Gateway. For instance, you can
modify its built-in firewall protection to accommodate special
gaming or video applications. The flowchart also includes these
additional chapters.
PLAN YOUR GATEW AY SETUP
How Do You Plan to Use Your Gateway?
Fam iliarize you rs elf w ith
the Internet G atew ay
Chapter 1.1 to 1.4
Connecting your
Adm inistrator P C to th e
Gateway
Select the W AN
Device you
wa nt to u se to
conn ect to the
Interne t
Are you connecting a
Shared Printer?
No
Do you plan to use the
System Administration
functions?
No
No
Do you plan to use the
Advanced Features?
No
Check Only One
Cable
Modem
ADSL
Modem
ADSL Modem
with PPPoE
Dial-up or ISDN
Modem
No WAN
Device *
(* Sele ct for AP M ode or P rinter Sh are O nly)
Yes
Yes or Unsure
Yes or Unsure
Done
Go to Ch ap ter 1.5
Go to Ch ap ter 2.1
Go to Ch ap ter 2.2
Go to Ch ap ter 2.3
Go to Ch ap ter 2.4
Go to Ch ap ter 2.5
Go to Ch ap ter 3
Go to Ch ap ter 4
Go to Ch ap ter 5
6 IG-4160 Zoom Internet Gateway User Guide
Page 7
1.4 Familiarizing Yourself with Your Gateway
The Gateway has LED indicators on its front panel so you can
monitor its operation and perform troubleshooting if necessary.
The table below defines these LEDs and how to interpret them.
This table is for reference only and is not required for IG-4160
installation.
LED Function Color Status Description
POWER
SYS
WAN
Link/Act
1~2
100BaseT
1~2
Power
indicator
System
status
WAN port
activity
Wired LAN
port link
activity status
Wired LAN
port data rate
Green On Power is on.
Blinking @
1 sec.
Orange
Green
Green On
Green
intervals
Rapid
blinking
On WAN port is linked.
Blinking
Blinking
Off
On Data rate=100Mbps
Off Data rate=10Mbps
Gateway is
functioning properly.
Gateway is resetting
to factory defaults.
WAN port is
sending or receiving
data.
LAN port is
connected. No data
is flowing.
LAN port is
connected. Data is
flowing.
LAN port is not
connected.
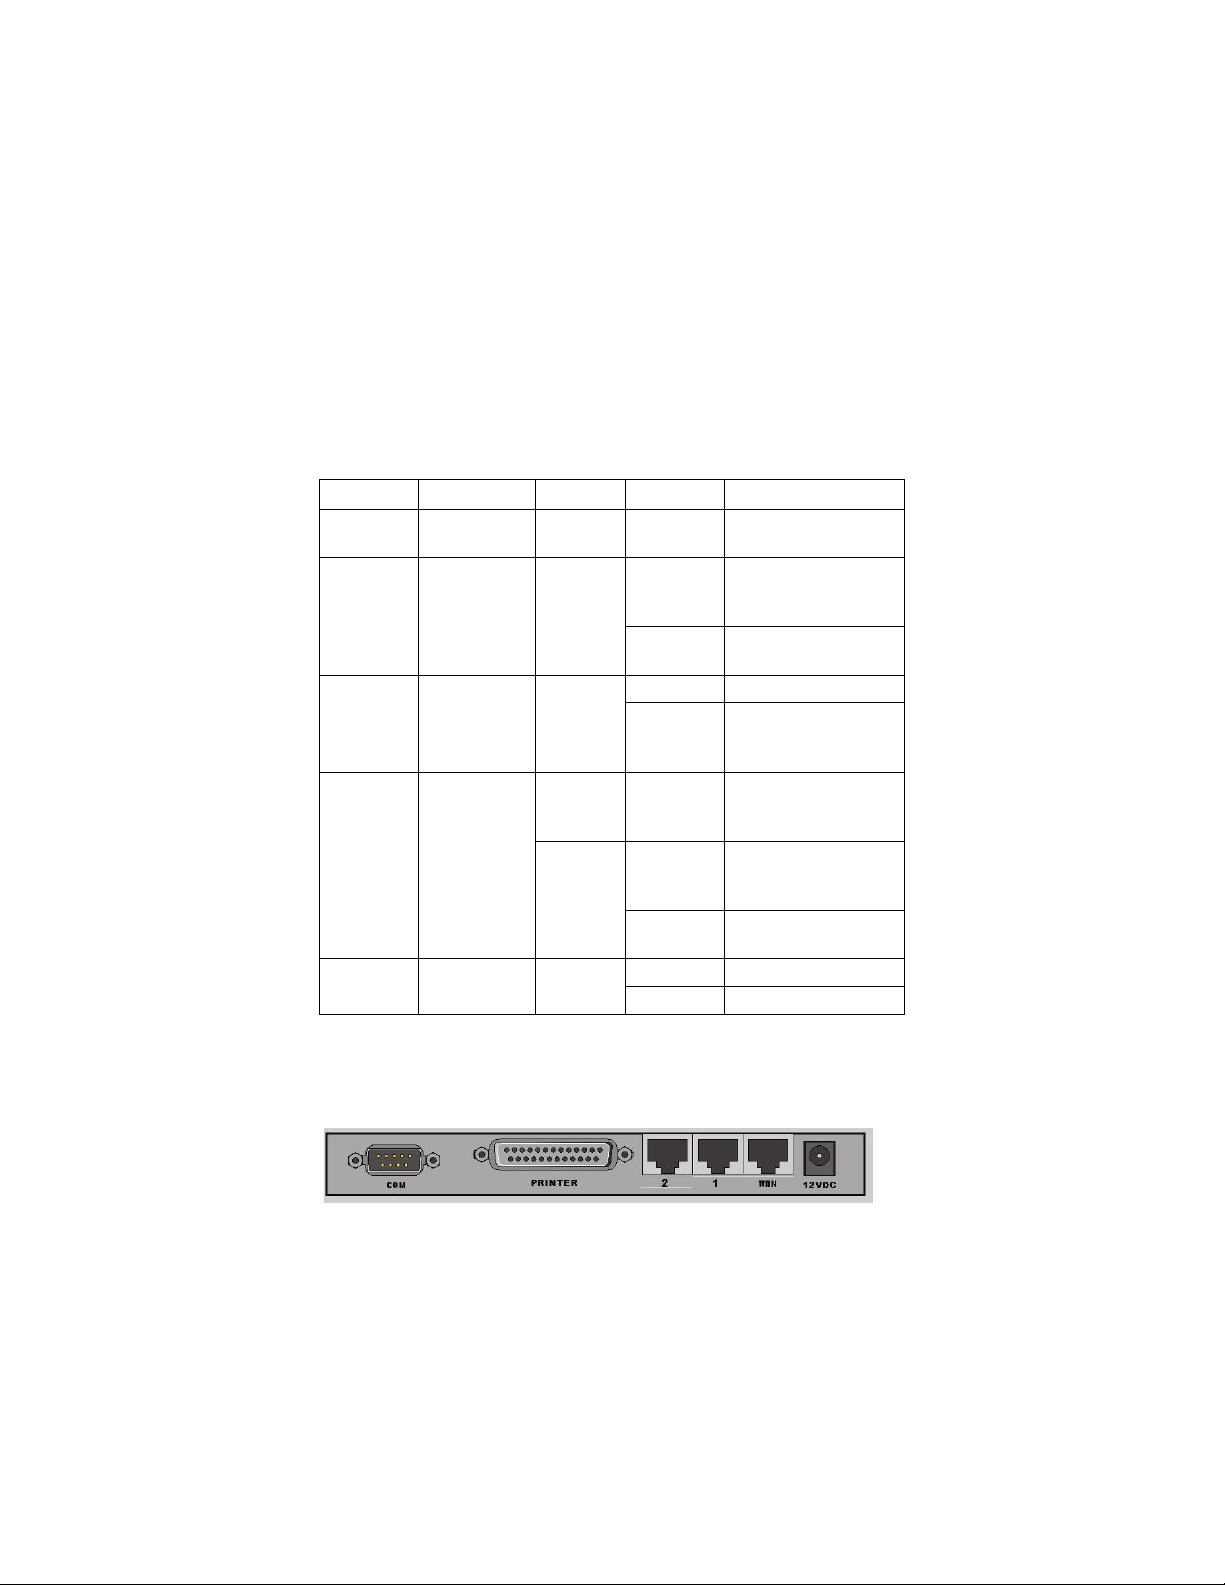
The back panel of your Gateway looks like this.
Chapter 1: Getting Started 7
Page 8

The table below explains the purpose of these back panel ports, or
jacks. When you connect your modem to your Gateway, all
connections will originate from this back panel.
Port Description
COM
PRINTER
1
2
WAN
12VDC
Serial port in case you want to connect a dial-up or ISDN
modem
Parallel printer port for optional printer
A LAN port for connecting networked computers and other
10/100BaseT Ethernet LAN devices
A second LAN port for connecting networked computers
and other 10/100BaseT Ethernet LAN devices
In case you want to connect an Ethernet cable or DSL
modem
Power: DC 12V, 1.5A (minimum)
Before connecting your modem and Gateway, be sure to review
the following pre-installation checklist.
PRE-INSTALLATION CHECKLIST
Review this checklist before setting up your Gateway and modem
✔ Check with your service provider: If you have a cable modem,
you may have to register your Gateway’s WAN MAC address
before setting up the Gateway. Note: The WAN MAC address
is printed on the Gateway’s bottom case label.
✔ Is your Internet or online service working properly? If
necessary, refer to the instructions provided by your service
provider.
✔ Check that an Ethernet NIC card is already installed in your
PC, then turn to page 9.
8 IG-4160 Zoom Internet Gateway User Guide
Page 9
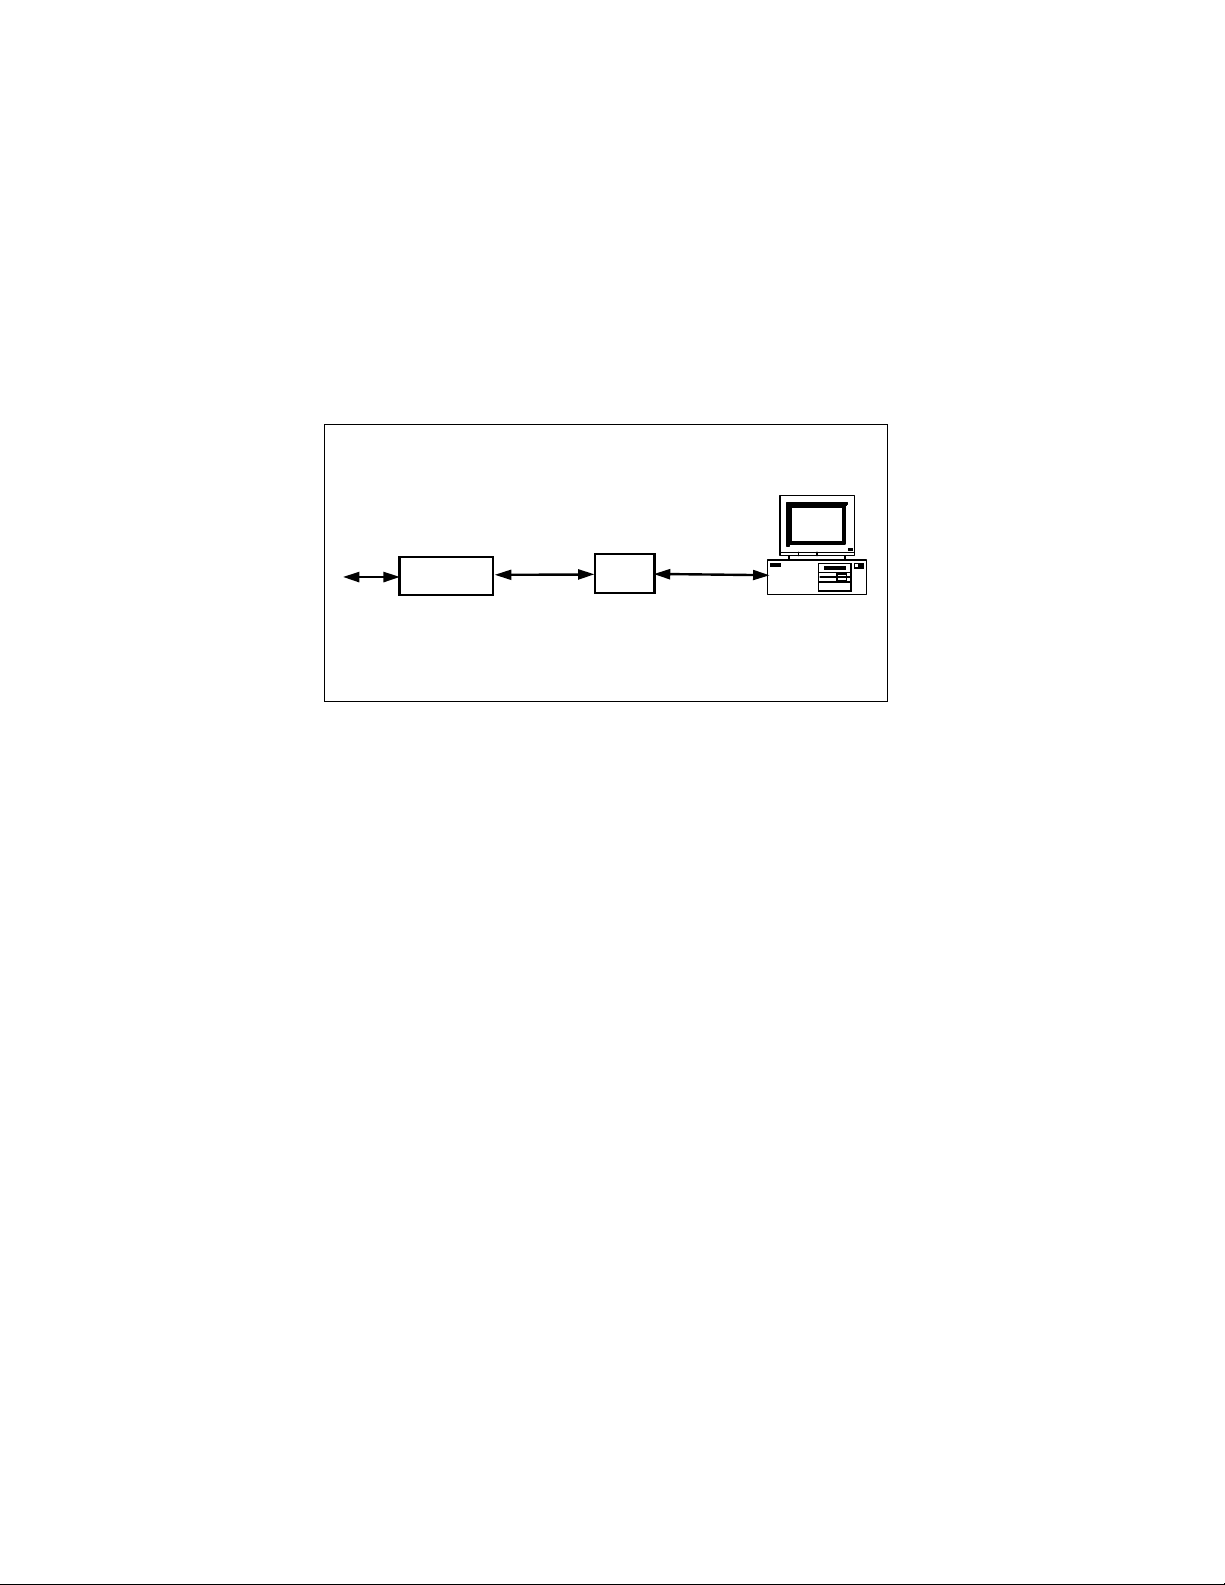
1.5 Connecting the PC and the IG-4160
The diagram below shows what your completed setup will look
like.
RF (COAXIAL) O R
PHONE LINE
CONNECTION
AAAA
BBBB
CCCC
MODEM
CABLE/DSL MODEM
ETHERNET
(WAN) CABLE
DIAL-UP/ISDN MODEM
SERIAL (COM PORT) CABLE
Be sure you’ve completed the pre-installation checklist on
page 8.
IG-4160
ETHERNET CABLE
(LA N)
or
Shut off your computer and turn off your modem. Don’t
plug the Gateway in yet.
For cable and DSL modems:
Unplug the Ethernet cable from your PC and plug it into
the WAN port on the back of the Gateway. Don’t unplug
the Ethernet cable plugged into the modem.
For dial-up and ISDN modems:
Unplug the serial cable from the PC and plug it into the
COM port on the back of the Gateway. Don’t unplug the
serial cable plugged into the modem.
Using the Ethernet cable supplied with the Gateway, plug
one end into a LAN port (labeled 1 and 2) on the back of
the Gateway and plug the other end into the PC.
Admin PC
Chapter 1: Getting Started 9
Page 10

DDDD
Turn the modem back on. If you are using a cable or DSL
modem, wait until it synchronizes itself with the modem
service. (You’ll know it’s synchronized when the cable
modem’s light goes from blinking to steady.)
EEEE
FFFF
Plug the Gateway in: Plug one end of its power adapter into
the 12VDC power jack on the back of the Gateway and
then plug the other end into a wall outlet. The Gateway’s
SYS indicator will come ON for about 10 seconds, and
then it will flash rapidly a few times. When the indicator
flashes continuously once per second, the start-up process
is complete, and your Gateway is ready.
Note: If you are using a cable modem and your service
provider has instructed you to call back with your
Gateway’s WAN MAC address, now is the time to do so.
Turn your computer back on and restart it.
10 IG-4160 Zoom Internet Gateway User Guide
Page 11

2
Configuring Your Internet
Access Method
This chapter explains how to configure your Internet access
method, or WAN type, which is the next step in the installation
process. Note: The Gateway’s default Internet access method
is Cable or DSL Modem using a Dynamic IP Address.
Note:
Now that you have connected your modem and Gateway, you are
ready to communicate with the Gateway and configure your WAN
type.
1111
2222
If you prefer to set up your Gateway using an interactive
online guide, please refer to the accompanying Zoom CD
and the Smart Start program.
Launch your Web browser on the Administrator PC, type the
Gateway’s default IP address—192.168.123.254—and press
Enter.
The Login screen displays. Type the system password in the
System Password field (default is admin), and click the
Login button.
Note: If the Login screen doesn’t display, perform the
following in this order:
Recheck all connections.
aaaa
Restart the Gateway.
bbbb
Perform a “hard” reset. (See page 44.)
cccc
Chapter 2: Configuring Your Internet Access Method 11
Page 12
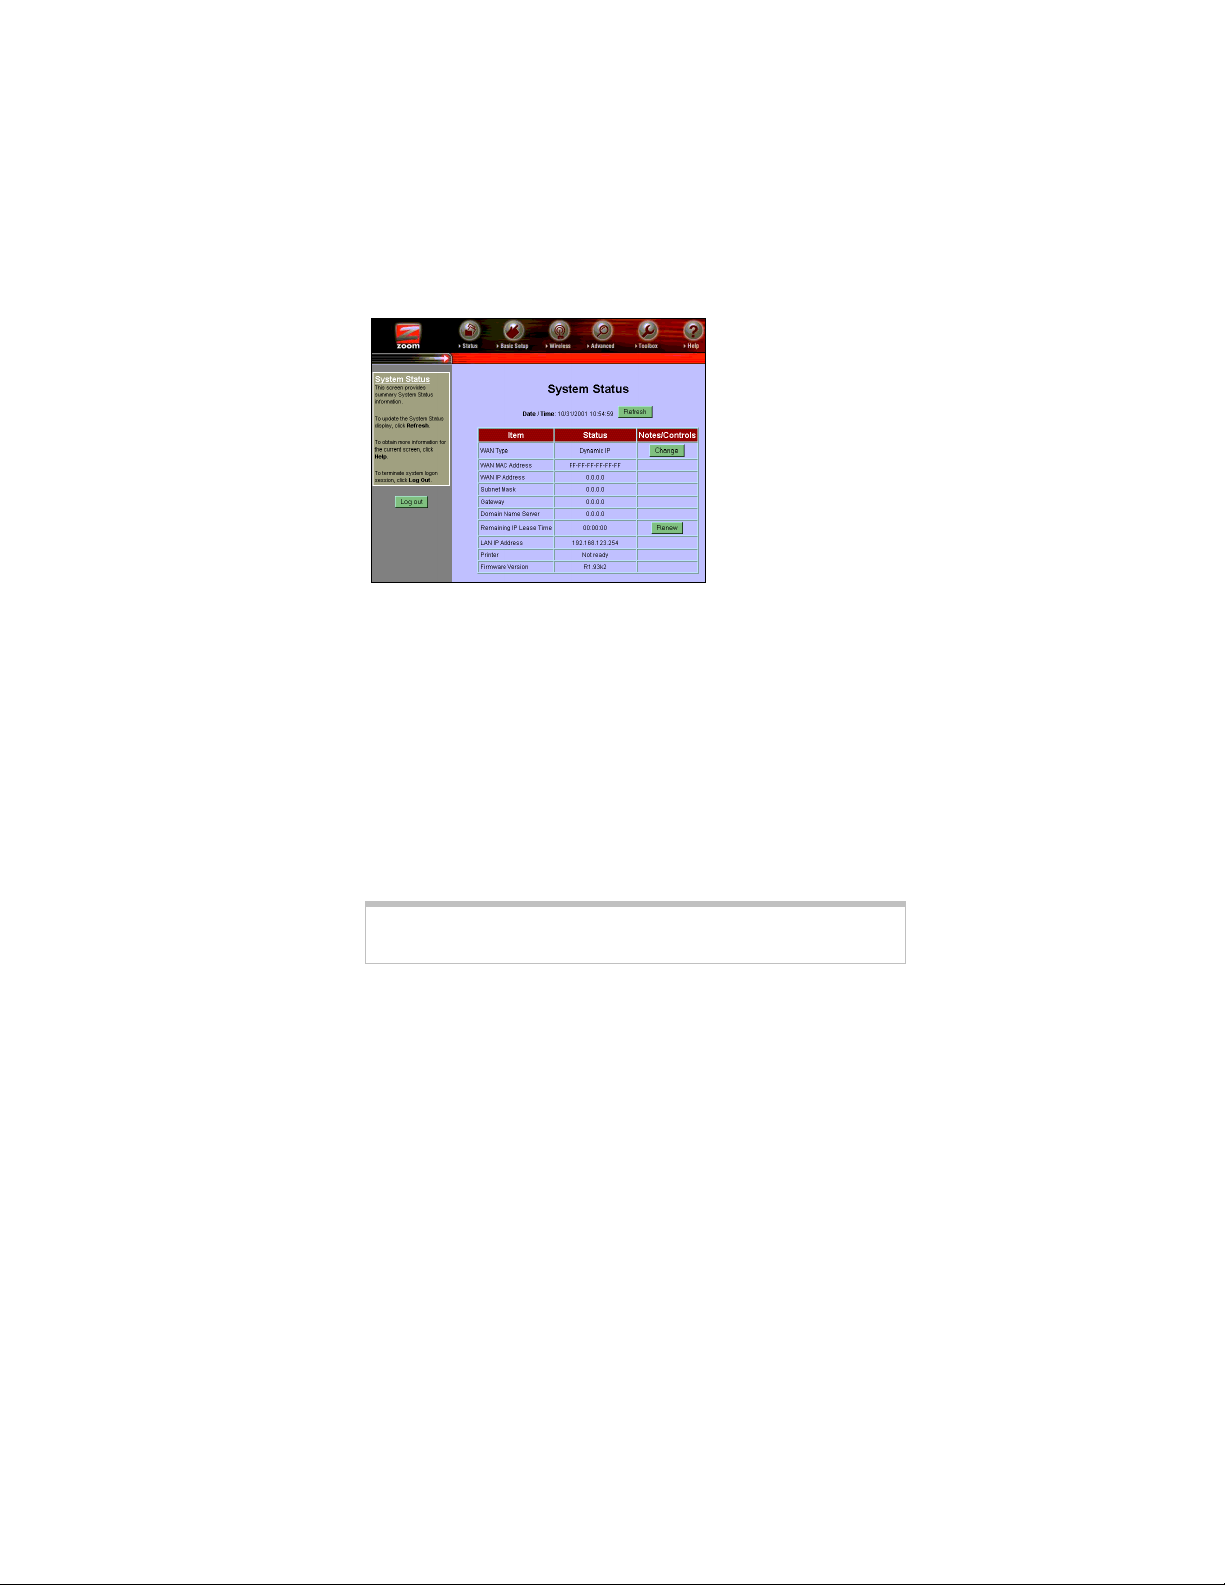
The System Status screen displays.
3333
This screen provides details about the type of WAN device
you are using, or how you are connected to the Internet.
(Refer to Chapter 5 System Administration for more
information about the System Status screen.)
Note: The wireless features are not supported in your IG-
4160.
The default Internet access method is Cable Modem or
DSL Modem (Dynamic IP Address). If you want to
connect to the Internet using a different WAN type, click the
Change button or the Basic Setup icon at the top of the
user interface.
Note:
The Basic Setup screen displays.
4444
12 IG-4160 Zoom Internet Gateway User Guide
Click the Refresh button to update the contents of
the status display.
Page 13
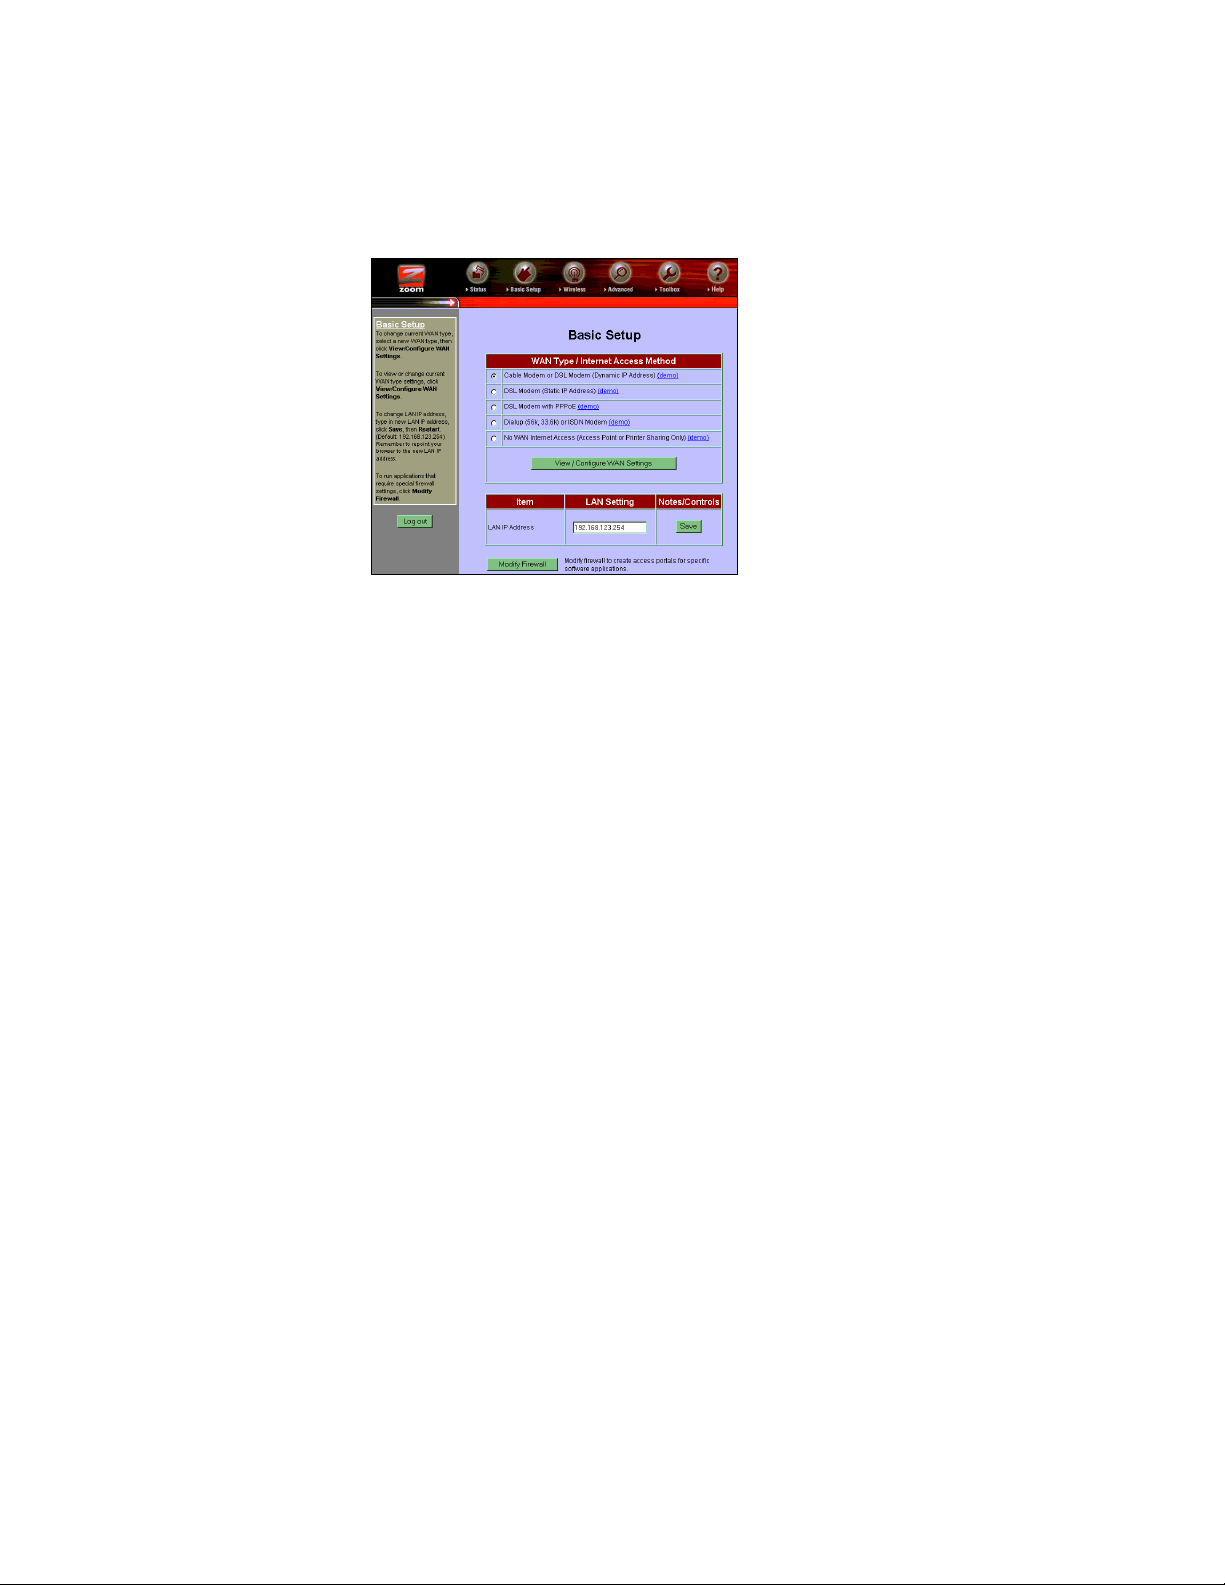
In addition to Cable Modem or DSL Modem (Dynamic
IP Address) (see below), your choices are as follows:
•
DSL Modem with Static IP Address (turn to page 15)
•
DSL Modem with PPPoE (turn to page 16)
•
Dial-up or ISDN Modem (turn to page 17)
•
No WAN Internet Access (turn to page 19).
To change your WAN type, select the correct button, then
click View/Configure WAN Settings.
2.1 Using a Cable or DSL Modem with a
Dynamic IP Address
•
The Gateway’s default Internet access method is Cable or
DSL Modem with a Dynamic IP Address.
•
If this is your Internet access method, you don’t necessarily
have to make any changes. To review your settings, click
View/Configure WAN Settings from the Gateway’s Basic
Setup screen.
Chapter 2: Configuring Your Internet Access Method 13
Page 14
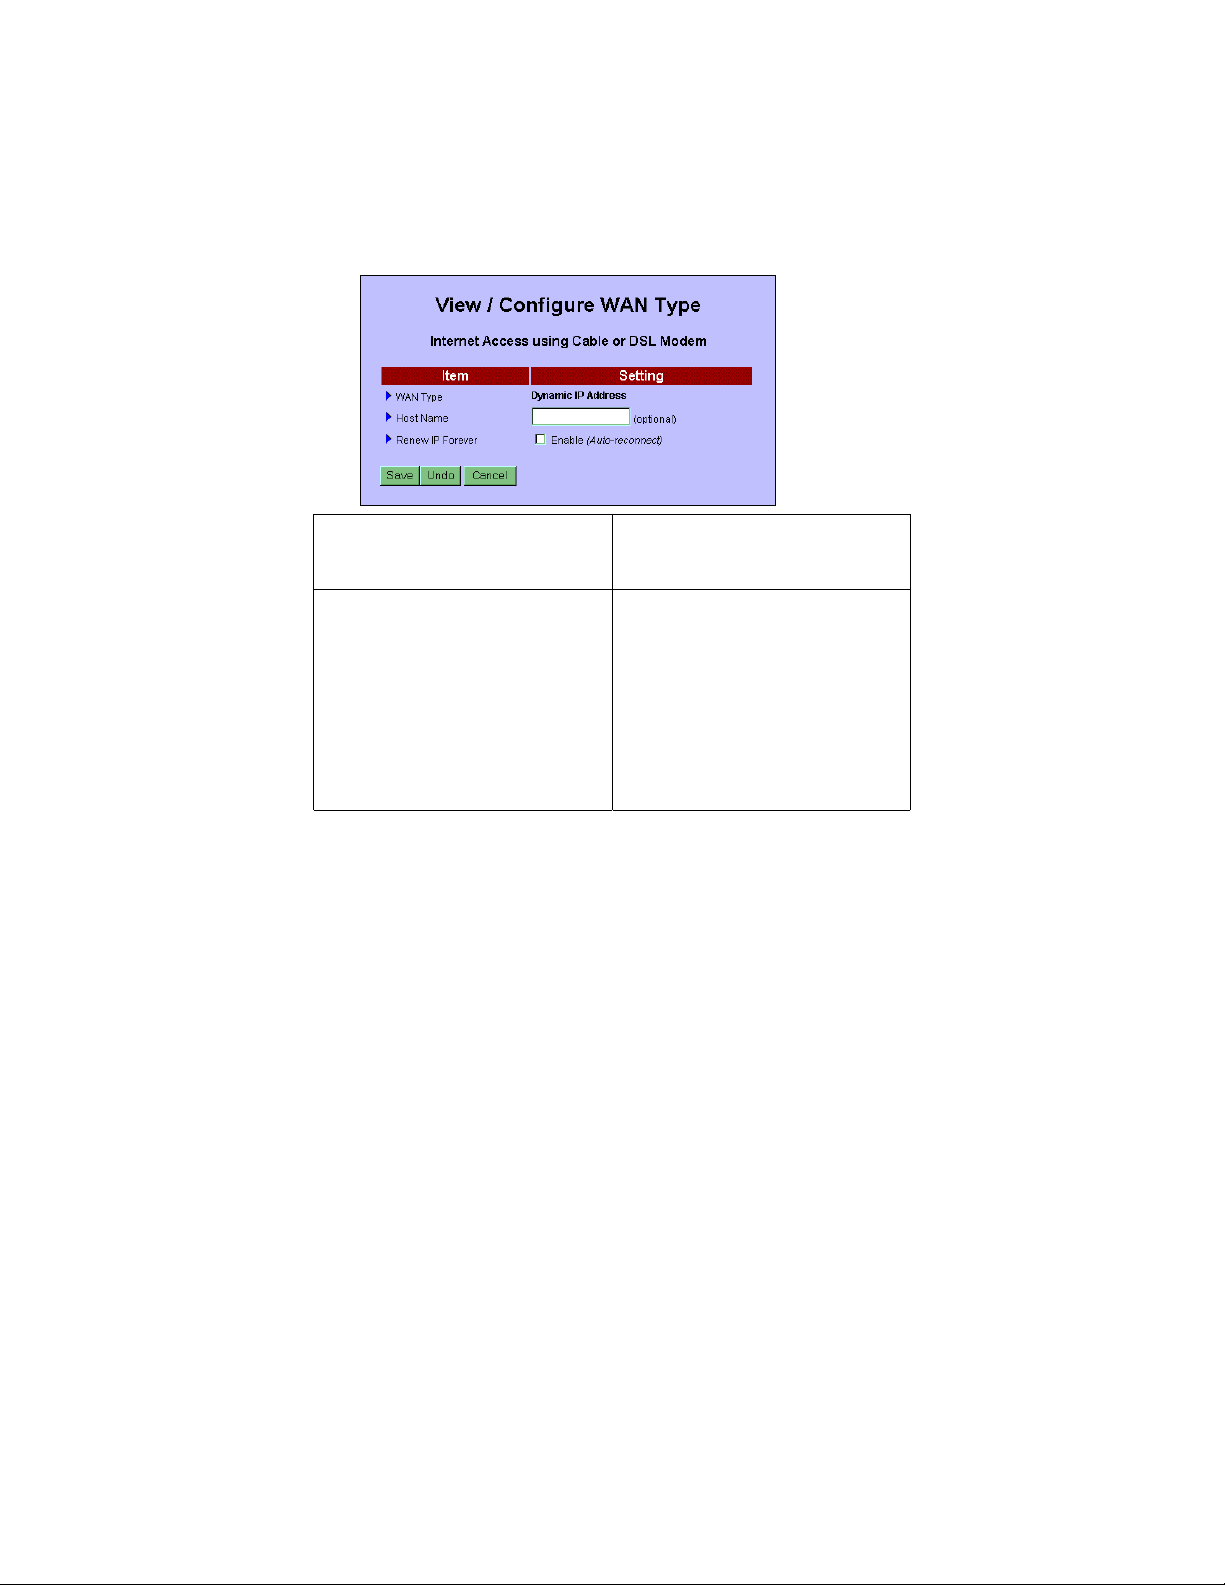
Host Name
(Optional)
Renew IP Forever Disabled
•
If you change any settings, click Save (and Restart if you are
May be required by some service
providers. If so, your service
provider will inform you.
by default. Check the
Enable (Auto-reconnect)
you want the Gateway to renew
the IP address automatically when
the IP address lease is about to
expire. This option also allows the
Gateway to automatically connect
to your service provider after the
Gateway is restarted or if the
connection is interrupted.
prompted to do so).
Return to the road map on page 6 to review your setup plan.
box if
14 IG-4160 Zoom Internet Gateway User Guide
Page 15
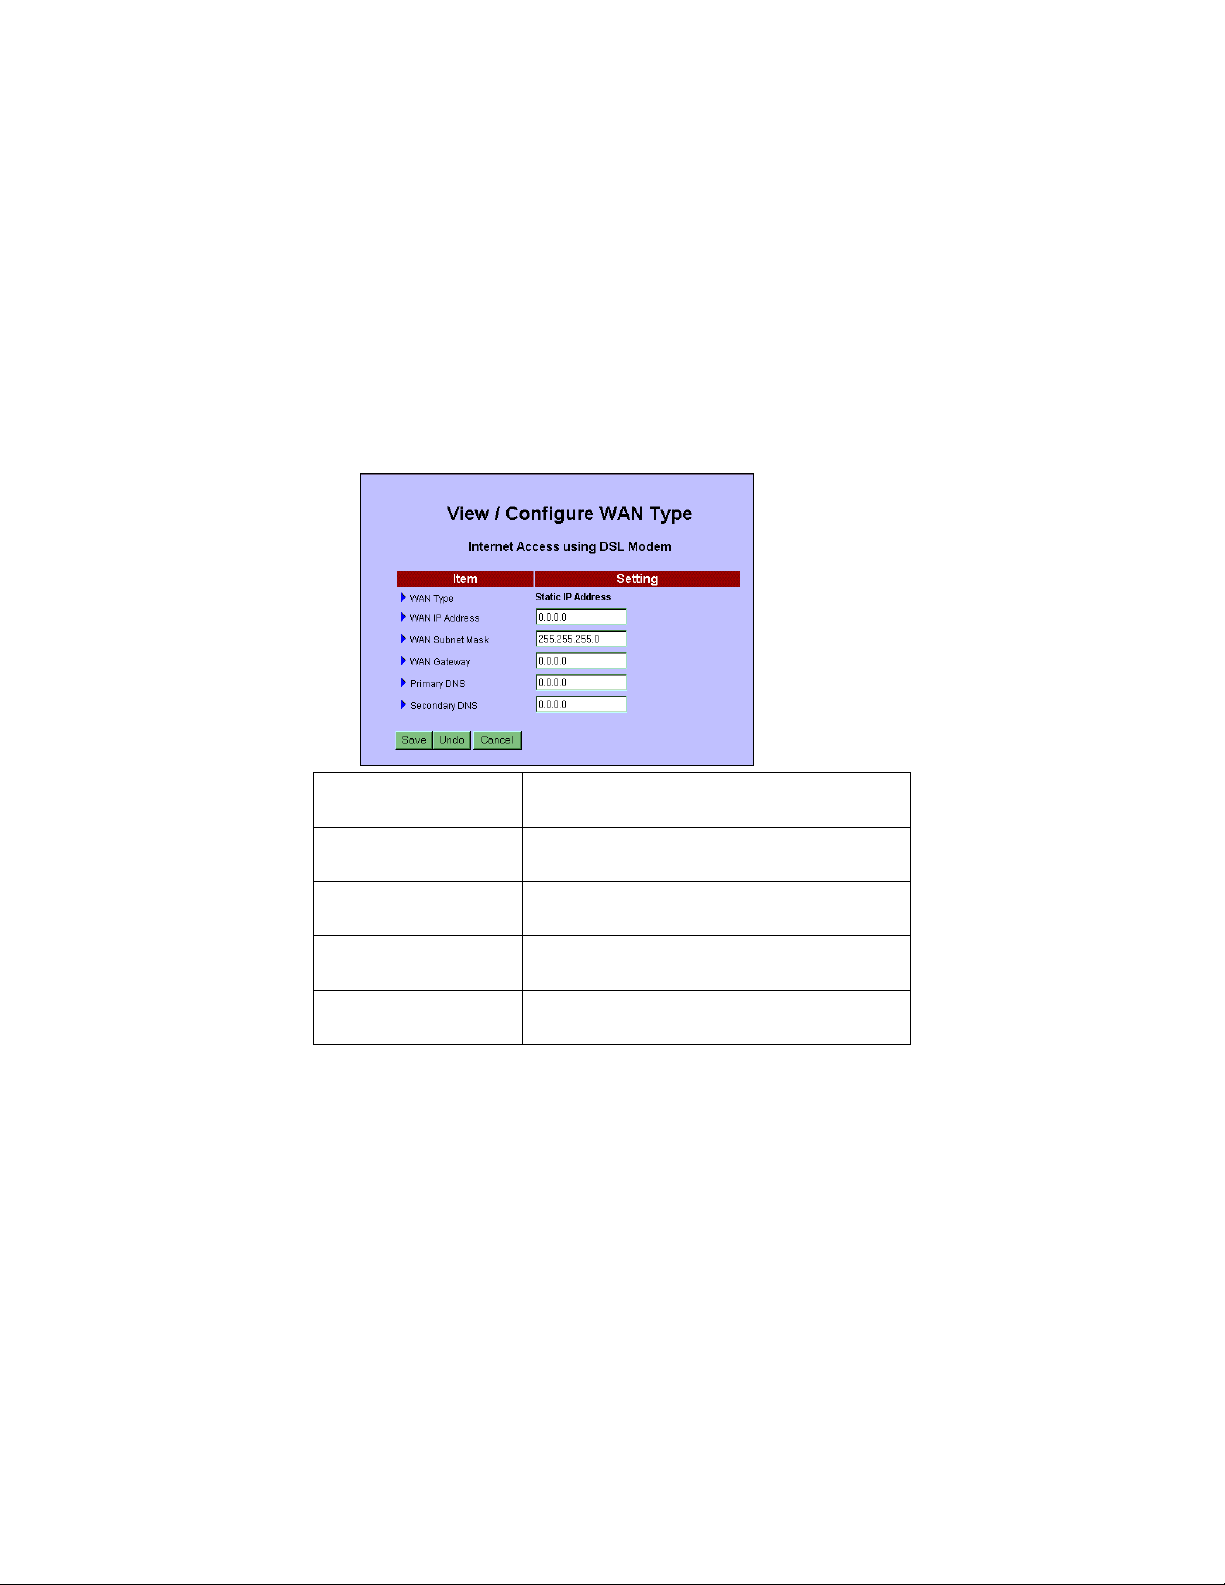
2.2 Using a DSL Modem with a Static IP Address
•
From the Gateway’s Basic Setup screen, select the DSL
Modem (Static IP Address) button and then click
View/Configure WAN Settings. A screen displays with
several fields to fill in.
WAN IP Address
WAN Subnet Mask
WAN Gateway
Primary DNS*
Secondary DNS*
*
Primary and Secondary DNS addresses are the addresses of the initial
server and the backup server assigned to request a Web-name-to-IPaddress lookup, respectively. Note: If you set these addresses as
0.0.0.0, they will be automatically assigned.
•
Once you have filled in all the information, click Save (and
Type the IP address your service provider has
given you.
Type the mask your service provider has
given you.
Type your service provider’s Gateway IP
address. Assigned by your service provider.
Domain Name Server IP address. Assigned
by your service provider.
Backup Domain Name Server IP address.
Assigned by your service provider.
Restart if you are prompted to do so).
Return to the road map on page 6 to review your setup plan.
Chapter 2: Configuring Your Internet Access Method 15
Page 16

2.3 Using a DSL Modem with PPPoE
•
From the Gateway’s Basic Setup screen, select DSL Modem
with PPPoE and click View/Configure WAN Settings. A
screen displays with several fields to fill in. These fields control
your shared PPPoE session, which is active whenever any
computer on your LAN accesses the Internet.
PPPoE Account Name
PPPoE Password
Maximum Idle Time
(seconds)
0=never disconnect
1-999=allowed
default=300
PPPoE Service Name
(Optional)
Assigned IP Address
(Optional)
•
Once you have filled in all the information, click Save (and
Type the name your service provider
has given you.
The Password is also given by your
service provider. After the Password is
set, this field will appear empty.
The length of time you can be idle
before your service provider will
disconnect your session. If
reconnect
will automatically connect to your
service provider after the Gateway is
restarted or the connection is
interrupted.
Only type a Service Name if your
service provider requires it.
Required by those service providers
that provide PPPoE session control
with a Static IP address.
is enabled, the Gateway
Auto-
Restart if you are prompted to do so).
Return to the road map on page 6 to review your setup plan.
16 IG-4160 Zoom Internet Gateway User Guide
Page 17

2.4 Using a Dial-up or ISDN Modem
•
From the Gateway’s Basic Setup screen, select the Dialup
(56k, 33.6k) or ISDN Modem button and then click
View/Configure WAN Settings. A screen displays with
several fields to fill in. These fields control your shared PPP
(Point to Point Protocol) session, which is active whenever any
computer on your LAN must access the Internet.
Chapter 2: Configuring Your Internet Access Method 17
Page 18

Dial-up Telephone Number
Dial-up Account Name
Dial-up Password
Maximum Idle Time
(seconds):
0=Never disconnect
1-999=allowed
default=300
Connection Type:
Permanent Connection
Connection Type:
Redial on Data Traffic
Demand
Connection Type:
Manually Dial the
Connection
Baud Rate (serial COM port)
Primary DNS*
Secondary DNS*
Extra Settings
(Optional)
Type the number your service
provider has given you. Note: Make
sure you include all dialing characters
for your location. Refer to your
modem manual for dial-string
programming.
Type the name your service provider
has given you.
The Password is also assigned by
your service provider. Note: After the
Password is set, this field will appear
empty.
The length of time you can be idle
before the Gateway will disconnect
your dial-up session. Set it to 0 or
Permanent Connection
click
disable.
Connection is always on. The
Gateway will automatically connect to
your service provider after you restart
it or if the connection is interrupted.
A dial-up session will be reestablished if any computer on your
LAN needs Internet access.
A dial-up session will be established
only when the system administrator
clicks the
Status
The communication speed on the
COM port or serial cable between the
Gateway and dial-up or ISDN modem.
Domain Name Server IP address.
Assigned by your service provider.
Backup Domain Name Server IP
address. Assigned by your service
provider.
You can add an initialization string
and send it to your modem or ISDN
TA to optimize the quality of your
communication. Refer to your modem
manual for instructions.
dial
screen.
button on the
to
System
18 IG-4160 Zoom Internet Gateway User Guide
Page 19

*
Primary and Secondary DNS addresses are the addresses of the initial
server and the backup server assigned to request a Web-name-to-IPaddress lookup, respectively. Note: If you set these addresses as
0.0.0.0, they will be automatically assigned.
•
Once you have filled in all the information, click Save (and
Restart if you are prompted to do so).
Return to the road map on page 6 to review your setup plan.
2.5 Using the Gateway Without WAN Access
You can also use the Gateway to share a printer among multiple
PCs rather than as a means of accessing the Internet
•
To configure your Gateway to operate this way, from the
Gateway’s Basic Setup screen, click the No WAN Internet
Access button and then click View/Configure WAN
Settings. You will see a confirming screen prompting you to
save your choice. Click Save (and Restart if you are prompted
to do so).
Return to the road map on page 6 to review your setup plan.
Chapter 2: Configuring Your Internet Access Method 19
Page 20

3
Setting up the Gateway as a
Print Server
If you have a Windows PC, you can use your Gateway to share
a printer. Setting up your Gateway as a print server is a threestage process.
Connecting the printer to the Gateway.
1111
Installing the software from the Zoom CD on all the PCs
2222
that will share the printer.
Configuring the print server function.
3333
Configuration instructions differ slightly, depending on your
PC’s operating system.
3.1 Connecting the Printer to the Gateway
To connect a printer to the Gateway, you need a standard parallel
printer and cable.
On the back panel of the Gateway, plug the 25-pin end of the
printer cable into the jack labeled Printer. Plug the other end of
the cable into the jack on the back of the printer.
The next stage is to install the print server software.
20 IG-4160 Zoom Internet Gateway User Guide
Page 21

3.2 Installing the Print Server Software on a Client PC
You must install the print server software on each PC that will
share the printer connected to the Gateway. Follow these steps.
1111
Insert the Zoom CD-ROM into your computer’s CD-ROM
drive. The following dialog box should display automatically. If
it doesn’t, double-click the setup.exe icon in the CD-ROM’s
folder.
2222
Click the Zoom Software button.
3333
Click the Install Print Server button. The installation will
proceed.
4444
When the Welcome dialog box displays, click the Next
button.
5555
Select the destination folder and click Next. The setup
program will install the Print Server in the destination folder.
6666
When prompted, click Finish.
7777
When prompted, select the entry, Yes, I want to restart my
computer now, and click OK. Once you restart your
computer, the software installation is complete.
The final stage is to configure the print server function.
Chapter 3: Setting up the Gateway as a Print Server 21
Page 22

3.3 Configuring the Print Server Function
To configure the Gateway’s Print Server function, you must choose
one of two sets of instructions:
•
If you have already set up the printer that is connected to the
Gateway, follow the steps below.
•
If you haven’t already set up the printer that is connected to
the Gateway, follow the steps on page 24.
If You Have an Existing Printer
Note:
1111
The illustrations here are representative. Depending on
your PC’s operating system, your printer dialog boxes may
look slightly different.
From the PC’s desktop, click Start | Settings | Printers.
Because you have a previously installed printer, you will see its
icon in the Printers folder. In our example, it is the HP
LaserJet 6L.
22 IG-4160 Zoom Internet Gateway User Guide
Page 23

2222
Right-click the printer icon, and select Properties to display
the Properties dialog box.
3333
Click the Details or Ports tab.
4444
Choose PRTmate: (All-in-1 IP-Sharer) from the Print To…
list. If PRTmate: (All-in-1 IP-Sharer) is not in the list, click
Add Port – Other and select PRTmate port.
Chapter 3: Setting up the Gateway as a Print Server 23
Page 24

5555
Click the Port Settings or Configure Port button. You will be
prompted to type the Gateway’s LAN IP address. Type it in
(the default is 192.168.123.254), and click OK.
6666
If prompted again, click OK or Finish. That’s it. Now your
Print Server is ready.
If You Don’t Have an Existing Printer
If you want to configure your Gateway’s Print Server function, but
don’t have a printer installed yet, follow the instructions below.
Note:
1111
2222
24 IG-4160 Zoom Internet Gateway User Guide
The illustrations here are representative. Depending on
your PC’s operating system, your printer dialog boxes may
look slightly different.
From the PC’s desktop, click Start | Setting | Printers, and
double-click Add Printer to display the Add Printer Wizard
dialog box. Click Next.
The following dialog box displays. You must select Local
Printer. Then click Next.
Page 25

3333
Scroll the displayed list, select the manufacturer and model of
your printer, and click Next.
Note:
4444
5555
If you can’t locate your printer on the list, refer to the CD-
ROM, floppy disk, or documentation that came with your
printer.
A dialog box displays, prompting you for the name of the port
that you want to use for this printer. Select PRTmate: All-in-1
IP-Sharer, and then click the Configure Port or Port
Settings button.
You will be prompted to enter the Gateway’s LAN IP address.
Type it in (the default is 192.168.123.254), and click OK.
Continue to click Next until the process is complete, when
you will be prompted to click Finish. Now your Print Server is
ready.
Chapter 3: Setting up the Gateway as a Print Server 25
Page 26

3.4 Uninstalling the Print Server
Should you want to remove the Gateway’s Print Server, follow
these steps.
1111
From the PC’s desktop, click Start | Settings | Control
Panel and then double-click Add/Remove Programs.
2222
From the resulting displayed dialog box, select Print Server
and click the Change/Remove or Add/Remove button.
(Depending on your operating system, the button may have a
slightly different label.)
3333
When prompted to Confirm File Deletion, click Yes.
4444
Once the uninstall process is complete, you will be prompted
to click OK. Then click OK again and Close to close the
Add/Remove Programs folder.
5555
Restart your PC.
Note:
26 IG-4160 Zoom Internet Gateway User Guide
The user documentation and the Smart Start program are
also installed on your computer when you install the Print
Server. To remove these items, from the desktop, go to
Start | Programs | Zoom | Uninstall.
Page 27

4
Advanced Setup Options
In addition to its basic setup options, the Zoom IG-4160
Internet Gateway includes options for specialized, or
advanced, settings. If you are like most users, you will not need
these options. Your Gateway is designed so that the basic
setup settings are sufficient for most users. This chapter is
applicable to you only if you need to perform sophisticated
tasks such as those listed below:
Modify the firewall to open up access portals to special
•
applications, such as games or videoconferencing.
Configure the LAN DHCP server.
•
Configure a Virtual Server.
•
Configure a DMZ Host.
•
Use a non-standard FTP port.
•
Configure LAN MAC Addresses.
•
Configure the Router Access Control option.
•
Use the WAN Ping Response Disable feature.
•
Use the Clone WAN MAC Address option.
•
4.1 Modifying Firewall Settings
If you want to use special applications such as certain Internet
games, videoconferencing, and Internet telephony, you often have
to use non-standard ports or multiple open ports. A port is an
endpoint to a logical connection; the port number identifies the
logical channel being used; for example, port 21 is associated with
FTP (File Transport Protocol). By definition, your Gateway’s
firewall prevents unauthorized access to any open ports. Some
applications require access to ports that your firewall would
normally deny. You must modify the Gateway’s firewall settings if
you want to accommodate these types of applications.
Chapter 4: Advanced Setup Options 27
Page 28

Specifying Special Application Settings
To make it easier to use, your Gateway includes some
preprogrammed special application settings—for example, MSN
Gaming Zone and Battle.net. To enable one of these
preprogrammed applications, follow these steps.
1111
Open the Gateway’s Basic Setup screen by clicking the samenamed icon at the top of the main interface window, and click
the Modify Firewall button to display the following screen.
2222
Select the application you want to enable from the dropdown
list, and select the ID number you want to associate it with.
The ID number is a convenient way to remember and use a
particular combination of Trigger and Incoming Ports; for
example, if you frequently use the same gaming application,
you might want to associate it with ID 1. You can store as
many as eight special applications in the table.
3333
Click Copy. The Trigger and Incoming Ports will
automatically appear alongside the selected ID number, and
the Enable box will be checked.
4444
Click Save to save your changes, or click Undo to start over.
Note:
28 IG-4160 Zoom Internet Gateway User Guide
To disable a special application, uncheck the Enable box.
Page 29

If you want to use a special application that isn’t on the Gateway’s
preprogrammed list, we recommend that you first visit this web
site:
www.practicallynetworked.com/sharing/specialapps.htm.
This site contains easy-to-understand instructions about special
applications and trigger and port usage. It also includes a list of
open ports, which you will need to manually set triggers and
incoming ports.
A trigger is the numeric name for an outbound port. If you send an
outbound packet that is associated with a particular trigger, the
Gateway will monitor this packet; when it sees an inbound packet
associated with this trigger, it will allow the inbound packet
through the firewall.
An incoming port is the numeric name for an inbound port.
Incoming ports are always associated with certain triggers. The
Gateway “binds” single or multiple inbound packets to certain
triggers, and allows those specified packets through the firewall,
once they are “triggered” by the outbound ports.
Note:
Only one computer at a time can use a special application
and open port(s).
For some specialized applications, modifying the firewall settings in
the way described above will not suffice. Some applications—
NetMeeting, for example—require completely unrestricted access.
For these applications, you should use the alternative method of
changing the IP address of the DMZ Host, described below.
Setting the DMZ Host’s IP Address
If you want to allow one computer on your LAN unrestricted
Internet access (for example, to set up a web server), you can
define a DMZ (Demilitarized Zone) for it. All IP packets flowing
to and from that computer will be unrestricted by the firewall. You
can define one IP address for this DMZ host. Follow these steps.
Chapter 4: Advanced Setup Options 29
Page 30

1111
Open the Gateway’s Advanced Setup screen by clicking the
same-named icon at the top of the main interface window.
2222
In the LAN Setup Items list, next to the entry IP Address of
DMZ Host, there is an IP Address box. Type the IP address
of the computer you want to have unrestricted Internet access,
and check the Enable box.
Note:
3333
CAUTION!
Using a Non-standard FTP Port
In certain cases, you may want to access an FTP server via a port
different than the standard FTP port of 21. To change the FTP
port number, follow these steps.
1111
30 IG-4160 Zoom Internet Gateway User Guide
You must also set up your DMZ host with the same static
IP address you’ve entered here.
Click Save to save your changes, or click Undo to start over.
Use the DMZ Host feature only with the utmost
care. It opens up the DMZ computer’s entire
contents to the Internet; there is no firewall
protection whatsoever.
Open the Gateway’s Advanced Setup screen by clicking the
same-named icon at the top of the main interface window.
Page 31

2222
In the LAN Setup Items list, next to the entry Non-standard
FTP Port, highlight the Non-standard FTP field and type in
the number you want to use.
3333
Click Save to save your changes (or Undo to start over).
Note:
FTP port is temporary. It will be lost when you restart the
Gateway.
For security reasons, specifying the use of a non-standard
4.2 Configuring the LAN DHCP Server
If your LAN has a lot of computers, it can be a time-consuming
task to configure each one with an IP address. DHCP (Dynamic
Host Configuration Protocol) offers a rather simple approach to
handling all the requisite computer settings. A DHCP server
automatically issues IP addresses to computers on the network.
Each computer retains the use of that IP address for a specific time
period (the lease time) defined by the system administrator.
The Gateway’s DHCP server is enabled by default and can assign
as many as 253 IP addresses.
To modify the configuration of the LAN DHCP server for your
Gateway, follow these steps.
1111
Open the Gateway’s Advanced Setup screen by clicking the
same-named icon at the top of the main interface window and
click the DHCP Server button to display the DHCP Server
screen. To disable DHCP Server, click Disable. To configure
DHCP Server, click Enable and proceed to Step 2.
Chapter 4: Advanced Setup Options 31
Page 32

2222
Define the range of IP addresses you want to use by filling in
the IP Pool Starting and Ending Address fields.
Note: You need only type the last three digits of the IP
addresses. (The first nine will be automatically entered based
on your Gateway address.) The starting IP address can be 1239; the ending IP address can be 2-253.
3333
Optional Entries: Domain Name and Gateway Address.
A domain name is a means of easily identifying your network.
The Gateway IP address would be the IP address of an
alternate Gateway (if you were to use one).
4444
Click Save to save your changes (or Undo to start over).
If you want to review the list of users connected to the DHCP
server or see what IP addresses are in use, click View DHCP
Clients List.
4.3 Configuring a Virtual Server
Your Gateway includes the ability to support a virtual server. By
implementing a virtual server, a system administrator can give users
who are outside the firewall access to Web, FTP, or other Internet
services that are provided inside the firewall. This is done on a
case-by-case basis.
32 IG-4160 Zoom Internet Gateway User Guide
Page 33

To simplify the task of setting up a virtual server, the Gateway
includes a preprogrammed list of well-known Internet services. To
enable one of these preprogrammed services, follow these steps.
Note:
1111
2222
You can ensure that a user always has the same IP address
by “locking” their MAC address to a specific IP address.
Click LAN MAC Address Control to set this up.
Open the Gateway’s Advanced Setup screen by clicking the
same-named icon at the top of the main interface window and
click the Virtual Server button to display the Virtual Server
screen.
From the Select Service dropdown list, select the service you
want for that particular user—for example, SMTP. (The port
number appears in parentheses.)
3333
Click the ID number you want to associate with that service
and click Copy.
The ID number is a convenient way to refer to a particular
computer.
4444
Under Server IP, type the last three numbers of that particular
user’s IP address. (The available range is 1-254.) The Enable
box will be checked automatically. You can disable any
application by unchecking the Enable box.
5555
Click Save to save your changes (or Undo to start over).
Chapter 4: Advanced Setup Options 33
Page 34

If you want to use a special service that isn’t on the Gateway’s
preprogrammed list, you can do so manually. Before you do so,
however, we recommend that you visit this web site:
http://www.practicallynetworked.com/sharing/specialapps.
htm. This site contains easy-to-understand instructions about
special services. It also includes a list of open ports, which you will
need to set up a virtual server.
Once you have determined which Service Port you want to use,
type in the number, then type the last three numbers of that
particular user’s IP address and check Enable. (The available range
is 1-254.)
4.4 Configuring LAN MAC Addresses
The Gateway’s LAN MAC Address Control option gives a
system administrator control over each individual computer’s
network privileges. This feature is also useful as an additional
security measure, because you can restrict access to known
computers on the network. The LAN MAC Address Control
option uses a 12-digit alphanumeric string to uniquely identify each
network hardware device.
The Connection Control item allows control over which clients
have access to the Gateway. You have two choices: allow or deny.
If you deny a client a connection, it cannot access any Internet,
print server, or administrative functions.
Note:
To set up LAN MAC Address Control parameters, follow the
steps below. Refer to the accompanying table if you need additional
information regarding the differences in privileges.
34 IG-4160 Zoom Internet Gateway User Guide
The Association Control item is for wireless access only
and is not supported in your IG-4160.
Page 35

1111
Open the Gateway’s Advanced Setup screen by clicking the
same-named icon at the top of the main interface window, and
click the LAN MAC Address Control button. Then check the
MAC Access Control Enable box.
2222
Specify which devices you want to be able to connect or
associate with the Gateway by checking the accompanying
Enable boxes and selecting allow or deny from the
dropdown lists.
3333
Define the LAN MAC address and IP address pairs. Use the
Prev Page and Next Page buttons to scroll the list of pairs.
(The Gateway can hold a maximum of 32 pairs.) Use the
DHCP clients dropdown list to find LAN MAC addresses
known to the DHCP server. Check the Conn. (connection)
boxes for each LAN client. Note: The Assoc. box is not
activated on your IG-4160.
4444
Click Save to save your changes (or Undo to start over).
The following table lists what a client can and cannot do when
Conn. is enabled or disabled.
Connection Definition
Connection checked Full access to the Internet and all
network resources
Connection not checked
Chapter 4: Advanced Setup Options 35
Can communicate with other LAN
clients, but cannot connect to the
Internet, use the print server
function, or communicate with the
Gateway
Page 36

4.5 Configuring the Router Access Control
The Router Access Control option allows a system administrator
to give clients or groups of clients specific access rights to Internet
services. To set up this feature, follow the steps below. We’ve also
included a list of common service port numbers on page 37.
Note:
1111
2222
3333
We recommend that you define the LAN MAC-address to
LAN IP-address relationships before beginning the
process of configuring Router Access Control. Click the
LAN MAC Address Control button to proceed.
Open the Gateway’s Advanced Setup screen by clicking the
same-named icon at the top of the main interface window,
click Router Access Control, and check the Enable box.
Divide users into different groups. Users are identified by their
IP addresses. You can assign members in three special Groups.
Any unassigned members belong to the Default Group.
Assign the access rights of each group. You can allow or
block access to specified TCP and UDP ports and Internet
services. The table below shows a sample.
Group Members Access Right Definition
Default - Allow () No access rights
Group 1 50-99
Group 2 100-199 Block (21,144)
Group 3 1-9,20 Block () Full access (block nothing)
36 IG-4160 Zoom Internet Gateway User Guide
Allow (80,110,
25)
Can browse(80), receive(110)
and send(25) email only
Cannot read newsgroups
(144) and cannot FTP(21)
Page 37

4444
Click Save to save your changes (or Undo to start over).
Sample Service Port Number Table
Service Port Service Usage Protocol
113 Auth authentication Authentication
Service Protocol
53 DNS domain names Domain Name
Service
21 FTP file transfers
25 SMTP send email Simple Mail
110 POP3 read email Post Office Protocol
1723 PPTP secure
communications
23 Telnet terminal session TELNET
80 Web web access HTTP World Wide
88 Kerberos authentication Kerberos
79 Finger system/user data Finger
69 tftp file transfers Trivial File Transfer
161 SNMP system
management
144 news newsgroups News
File Transfer
Protocol
Transfer Protocol
Point to Point
Tunneling Protocol
Web
Simple Network
Management
Protocol
Chapter 4: Advanced Setup Options 37
Page 38

4.6 Configuring the WAN Ping Response
The Gateway’s WAN Ping Response feature is enabled by
default. That way, anyone can “ping” your Gateway to determine if
it is still active on the network. (Ping stands for Packet INternet
Groper.) Oftentimes helpful during network testing and debugging,
this utility sends out a packet and waits for a response. You should
also be aware that some people ping others to access their IP
addresses and hack into their systems.
If you want your Gateway to respond to a Ping request, go to the
Advanced Setup screen and click Enable. To prevent anyone
outside the LAN from pinging your Gateway, click Disable.
Note:
Some service providers will ping you occasionally to
determine whether you are online and still need an Internet
connection. If you have disabled the WAN Ping
Response option, your service provider may log you off.
If in doubt, contact your service provider.
4.7 The Clone WAN MAC Feature
Clicking the Clone button copies the MAC address of your
computer’s NIC card to the Gateway’s WAN MAC address. Thus,
if you’ve already given your MAC address to your service provider,
you can keep using it. (Note: Cloning applies to the NIC card of
the computer that is connected to the Gateway.) This function is
useful if your service provider records the MAC address of your
computer. Cloning it avoids delays caused by the need to re-register
MAC addresses.
To clone the WAN MAC address, follow these steps.
1111
Disconnect all LAN devices from your Gateway—except the
computer that you want to clone.
2222
In the Advanced Setup screen, click the Clone button. You
will see your computer’s MAC address displayed in the current
WAN MAC address field.
38 IG-4160 Zoom Internet Gateway User Guide
Page 39

3333
Click the Save button.
Note: As a safety precaution, you may see the following dialog box
when you click the Clone button. Be sure that your service
provider has recorded your computer’s WAN MAC address.
Chapter 4: Advanced Setup Options 39
Page 40

5
System Administration
Using a Web-based browser such as Netscape Communicator
or Internet Explorer, you can monitor and administer the IG-
4160. This Web-based approach works with any Windows,
Macintosh, or Unix computer. Using any PC, launch your
browser and type the Gateway’s IP address:
192.168.123.254
192.168.123.254.
192.168.123.254192.168.123.254
5.1 Monitoring System Status
From the System Status screen, you can review the Gateway’s
current network settings. This screen also provides details about
the status of your WAN type, or how you are connected to the
Internet (cable modem, dial-up modem, etc.).
From the Login screen, type the system password (default is
admin) and click Login to display the System Status screen.
Clicking the Refresh button updates the contents of the status
display. Clicking the Change button or the Basic Setup icon lets
you change your WAN type.
40 IG-4160 Zoom Internet Gateway User Guide
Page 41

The System Status screen displays the following types of
information.
•
WAN MAC Address: This is the MAC address of the WAN
port of the Gateway. This MAC address may be needed by
your service provider to register your connection. It is printed
on the Gateway’s bottom label.
•
WAN IP Address: This IP address is assigned to your
Gateway WAN port by your service provider.
•
Subnet Mask: This is your service provider’s IP address
subnet mask.
•
Gateway: This is your service provider’s IP address for the
Internet WAN Gateway.
•
Domain Name Server (DNS): This is the address of the first
server assigned to process a Web-Name-to-IP-address lookup.
•
Remaining IP Lease Time: The IP lease time is the amount
of time that your account has to “lease,” or use, an IP address
to access the Internet. Typically, IP lease times are measured in
hours or days. This field shows how much time is left before
the current “lease” expires. Click Renew to begin your lease
anew. You can opt to have the lease automatically renew itself.
•
LAN IP Address. This is the IP address of the LAN ports
(LAN 1, LAN 2).
•
Firmware Version.
The System Status screen also provides details about any attached
peripherals, such as a printer or dial-up or ISDN modem. It
displays information such as the
•
Printer: If you are connected to a printer, the status will be
Ready, Paper out or Not ready. A Kill button may appear,
so you can stop a print job in progress.
•
Dial-up Modem: If you are using a dial-up or ISDN modem,
the status will be Ready, Not ready, or Dialing. When there
is a connection, the connection speed will be displayed. When
the modem is ready, you will see a button to manually “dialup” the connection. When the modem is connected, you will
see a button to manually “hang-up” the modem.
Chapter 5: System Administration 41
Page 42

5.2 Performing System Administration Tasks
Clicking the Toolbox icon at the top of any Gateway user interface
screen brings up the Administrator Toolbox, from which you can
monitor or change several system administration-type settings.
For example, you can
•
Change the Administrator’s password.
Type the existing password, then type the new password twice
(once for verification purposes). If you change your password
and then forget it, your only recourse is to reset it to the
default by performing a “hard” system reset (see page 44).
•
Change the duration of the Administrator Timeout setting.
Adminstrator Timeout is the length of time that an
administrator connected to the Gateway can be idle before
being automatically logged out. The default is 600 seconds (10
minutes). To disable this feature, type 0. The maximum
timeout is 9,999 seconds (2 hours, 46 minutes).
•
Change the IP address of the Remote Administrator Host.
Check the Enable box next to the Remote Administrator
Host item if you want to perform administration tasks from
outside your private LAN. The default is 0.0.0.0, which means
42 IG-4160 Zoom Internet Gateway User Guide
Page 43

that any host can connect to the Gateway to take care of
administrative tasks. By entering a specific IP address, only that
computer can perform remote administration. If you want to
specify a group of trusted users’ IP addresses, use subnet mask
addresses and
notation; for example, 10.1.2.0/24. Note:
/nn
When you enable Remote Administration Host, the web
server port will be shifted to 88 (the default is 80).
•
View System Log.
Click this button to view a log of system activity.
•
View current System Firmware Version.
Check which system firmware version the Gateway is using.
•
Upgrade Now.
Clicking this button displays a screen from which you can
upgrade the Gateway’s firmware. Note: You must first
download the upgrade (for example, from our web site or from
a floppy disk). Then click Browse and select the file location
and upgrade filename. Alternatively, you can type a pathname
and filename of your choosing. The upgrade file should have a
.bin extension.
VERY IMPORTANT!
Do not shut off power to the Gateway while you are
upgrading it.
•
Backup your Gateway System Settings to the
Administrator’s computer.
Click the Backup button to save your current settings to a file
on your computer. If you want to tinker with the system
settings, this feature lets you save a backup of the current
settings should you ever want to reinstate them.
•
Restore Saved System Settings.
Click this button to retrieve a backup file containing a
complete set of system settings. Note: A file of this type would
be stored on your PC.
•
Revert back to Default.
Clicking Default lets you return your Gateway to its factory
settings. Follow the onscreen directions.
Chapter 5: System Administration 43
Page 44

The Gateway’s user interface uses four basic buttons, which are
listed in the table below.
BUTTON FUNCTION
Save
Undo
Restart
Help
To save changes.
To undo any changes and start over.
To restart the Gateway.
Tip:
You must restart the Gateway if you have
changed your type of Internet access method
(WAN type). In all other instances, you will be
prompted if you need to restart the Gateway.
Clicking the
displays the Gateway’s context-sensitive help.
Help
icon at the top of any screen
Note:
We strongly recommend that you change the administrator
password to safeguard the security of your network.
5.3 Resetting the Gateway to Its Default Settings
If you lose your Gateway link and cannot communicate with it, you
can re-establish a connection by performing a “hard” reset to the
factory default settings.
•
Unplug the Gateway’s power adapter.
•
Using a paper clip, press the Reset button on the Gateway’s
front panel. While holding in the Reset button, plug the power
adapter back in, count to 8, and then release the button. The
Gateway’s SYS LED will blink quickly eight to ten times and
then it will blink slowly, about once per second. You are now
guaranteed that all system settings are set to the Gateway’s
factory defaults.
Note: The Gateway’s default IP address is 192.168.123.254.
44 IG-4160 Zoom Internet Gateway User Guide
Page 45

Appendix
Regulatory Information
FCC Part 15 B Emissions Statement
This equipment has been tested and found to comply with the limits for a
Class B digital device, pursuant to part 15 of the FCC Rules. These limits
are designed to provide reasonable protection against harmful interference
in a residential installation. This equipment generates, uses and can radiate
radio frequency and, if not installed and used in accordance with the
instructions, may cause harmful interference to radio communications.
However, there is no guarantee that interference will not occur in a
particular installation. If this equipment does cause harmful interference
to radio or television reception, which can be determined by turning the
equipment off and on, the user is encouraged to try to correct the
interference by one or more of the following measures:
Reorient or relocate the receiving antenna.
•
Increase the separation between the equipment and receiver.
•
Connect the equipment into an outlet on a circuit different from that
•
to which the receiver is connected.
Consult the dealer or an experienced radio/TV technician for help.
•
Declaration of Conformity
The manufacturer declares under sole responsibility that this equipment is
compliant to Directive 1999/5/EC (R&TTE Directive) via the following
standards:
Standards Dates
EN 55022: 1998
EN 55024: 1998
EN 61000-3-2 1995
EN 61000-3-3 1995
The product is CE Marked.
Appendix: Regulatory Information 45
Page 46

Department of Commerce End User
Statement
This item falls under the jurisdiction of the Department of Commerce,
and as such, the requirement set forth in section 740-17 of the Export
Administration Regulation must be complied with. See the following Web
sites for more information:
Bureau of Export Administration
http://www.bxa.doc.gov/DPL/Default.shtm
http://www.bxa.doc.gov/Entities/
Code of Federal Regulations
http://w3.access.gpo.gov/bxa/ear/ear_data.html
Federal law prohibits the sale or distribution of certain products to certain
individuals and organizations. Denied persons or organizations may not,
directly or indirectly, participate in any way in any transaction involving
any commodity, software or technology exported or to be exported from
the United States that is subject to Export Administration Regulations.
The above Web sites provide a detailed list of individuals and
organizations that have been determined to present an unacceptable risk
of diversion to developing weapons of mass destruction or missiles used
to deliver those weapons.
Electrostatic Discharge Statement
The unit may require resetting after a severe electrostatic discharge event.
46 Appendix: Regulatory Information
Page 47

Page 48

3411-A 27248 ©2001
 Loading...