

Page 1

ZoomAir
ZoomAir™ IG-4150
ZoomAirZoomAir
Model 4150
Installation Guide
Reference Manual
IG-4150
IG-4150 IG-4150
&
Page 2

NOTICE
NOTICE
NOTICENOTICE
This document contains proprietary information protected by copyright, and
this Manual and all the accompanying hardware, software, and
documentation are copyrighted. All rights are reserved. No part of this
document may be photocopied or reproduced by mechanical, electronic, or
other means in any form.
The manufacturer does not warrant that the hardware will work properly in
all environments and applications, and makes no warranty or representation,
either expressed or implied, with respect to the quality, performance,
merchantability, or fitness for a particular purpose of the software or
documentation. The manufacturer reserves the right to make changes to the
hardware, software, and documentation without obligation to notify any
person or organization of the revision or change.
All brand and product names are the trademarks of their respective owners.
© Copyright 2001
All rights reserved.
Page 3

Contents
CHAPTER 1 ABOUT THE ZOOMAIR IG-4150 ..................................5
RODUCT AND DOCUMENTATION OVERVIEW ....................................... 5
P
N
ETWORK OPTIONS OVERVIEW ....................................................... 7
C
HAPTER 2 CONNECTING AND POWERING UP THE IG-4150.............9
ONNECTING THE CABLES .............................................................. 9
C
P
OWERING UP THE UNIT ............................................................. 10
HAPTER 3 INSTALLING THE IG-4150 SETUP UTILITY..................13
C
I
NSTALLING THE UTILITY ............................................................. 13
IG-4150 S
F
INDING MORE INFORMATION ....................................................... 15
HAPTER 4 CONFIGURING TYPICAL IG SETTINGS.........................17
C
I
NTRODUCTION......................................................................... 17
ONFIGURING THE SETTINGS ........................................................ 18
C
C
HECKING THE IP ADDRESS ......................................................... 29
F YOU ENCOUNTER OBSTACLES .................................................... 30
I
C
HAPTER 5 CONFIGURING CUSTOM SETTINGS..............................33
NTRODUCTION......................................................................... 33
I
C
USTOMIZING THE SETTINGS........................................................ 33
HANGING THE DEFAULT WEP ENCRYPTION KEY ............................... 48
C
WEP I
C
HAPTER 6 USING THE IG-4150 ..............................................51
ENERAL GUIDELINES................................................................. 51
G
ALL-MOUNT THE IG-4150........................................................ 52
W
IG-4150 B
IG-4150 S
C
HAPTER 7 ZONEALARM FIREWALL AND ADSUBTRACT...................57
Z
ONEALARM ............................................................................ 57
ONEALARM AND ZONEALARM PRO ................................................ 58
Z
DSUBTRACT ........................................................................... 60
A
A
PPENDIX A IG-4150 SPECIFICATIONS ....................................61
ETUP UTILITY: OTHER FUNCTIONS .................................. 14
NTEROPERABILITY BETWEEN GATEWAYS AND WIRELESS CLIENTS ... 49
UTTONS ................................................................... 52
PECIAL MODES ........................................................... 55
A
PPENDIX B UPGRADING THE FIRMWARE....................................65
A
PPENDIX C INTERNET SERVICE PROVIDER INFORMATION .............67
A
PPENDIX D REGULATORY INFORMATION....................................69
USTOMER SERVICE INFORMATION .............................................72
C
iii
Page 4

iv
Page 5

1
About the ZoomAir IG-4150
Product and Documentation Overview
ZoomAir wireless LAN products incorporate the latest networking
technology to offer you an easy and inexpensive way to build a
wireless network in your home or office. This manual introduces
you to the ZoomAir IG-4150 Internet Gateway, model 4150. It
describes all the features and the most common configurations of
the Gateway.
Box Contents
Your IG box contains the following components:
• ZoomAir IG-4150 unit
• ZoomAir IG-4150 documentation package, including:
—User’s Manual (this document)
—Quick Start Guide
—WEP Booklet
—Technical Support/Warranty Flyer
• ZoomAir CD-ROM (for contents, see the next section)
• Telephone cable
• Power cube
• CD-ROM Contents
Page 6

The following are the contents of your ZoomAir CD:
• ZoomAir IG-4150 Setup Utility software
• User’s Manual, Quick Start Guide, and WEP Booklet
(in .pdf format)
• Internet security software
—ZoneAlarm Firewall software
—ZoneAlarm Pro (30-day trial) Firewall software
—AdSubtract ad-blocking software
• Customer support information
• Frequently asked questions (FAQ)
• Electronic warranty registration
• Technical support and warranty information
Manual Summary
Chapters 2 through 5 explain how to make the IG-4150
operational. Chapters 6 and 7 and the appendices contain useful
information that is not essential for getting your IG-4150 to work.
Below is a summary of the IG-4150 installation. The manual is
organized in the same sequence. For installation instructions, skip
to Chapter 2.
1
Connect the cables to establish an Internet, LAN, or WAN
connection (Chapter 2).
2
Power up the IG-4150 unit (Chapter 2).
3
Install a Wireless Client on a computer on your network. You
will use the same Client and computer to select a mode for the
IG-4150 and configure it.
Note: See the manual for your Wireless Client.
4
Using the Wireless Client from the same computer, install the
IG-4150 Setup Utility (Chapter 3).
6 ZoomAir IG-4150 Installation Guide & Reference Manual
Page 7

5
Select a mode for the IG-4150 and configure its settings using
the Setup Utility.
Note: The IG-4150 is in the factory default mode – Cable Modem.
You can change the mode when you configure the device
(Chapter 4 or 5).
Network Options Overview
The IG-4150 is a Base Station that routes communication between
wireless computers and the Internet and/or other computer
networks.
You can use the IG to provide wireless Internet access and wireless
LAN or WAN communication in several ways. In this manual, we
refer to each method as a mode:
• Via Cable modem (the IG-4150 factory default mode)
• Via Telephone Line using the built-in 56K/V.90 modem
• Via ADSL modem (with PPPoE)
• Via ISDN/DSL device (for example, VDSL, HDSL,
IDSL, SDSL, and others)
• Via LAN Infrastructure
• Via [No Internet], if you do not want to use your IG-4150
for wireless Internet access (For instance, you may simply
want to connect the IG-4150 to your wired Ethernet
network.)
Chapter 1 About the ZoomAir IG-4150 7
Page 8

Page 9

Connecting and Powering Up
the IG-4150
The first step in getting your IG-4150 to work is to connect the
cables and power up the unit as described in this chapter.
Connecting the Cables
Follow these steps:
1
Press the latches and remove the cover of the IG.
2
Plug the power connector into the power socket on the IG
unit.
3
Connect the cable for Internet access:
• For Wireless Internet Access via Telephone Line, plug one
end of the RJ-11 telephone cable into socket a (as
illustrated on the next page) and the other end into a
telephone outlet.
2
In some countries outside North America, you may need
an adapter plug to connect the cable to the outlet.
Page 10
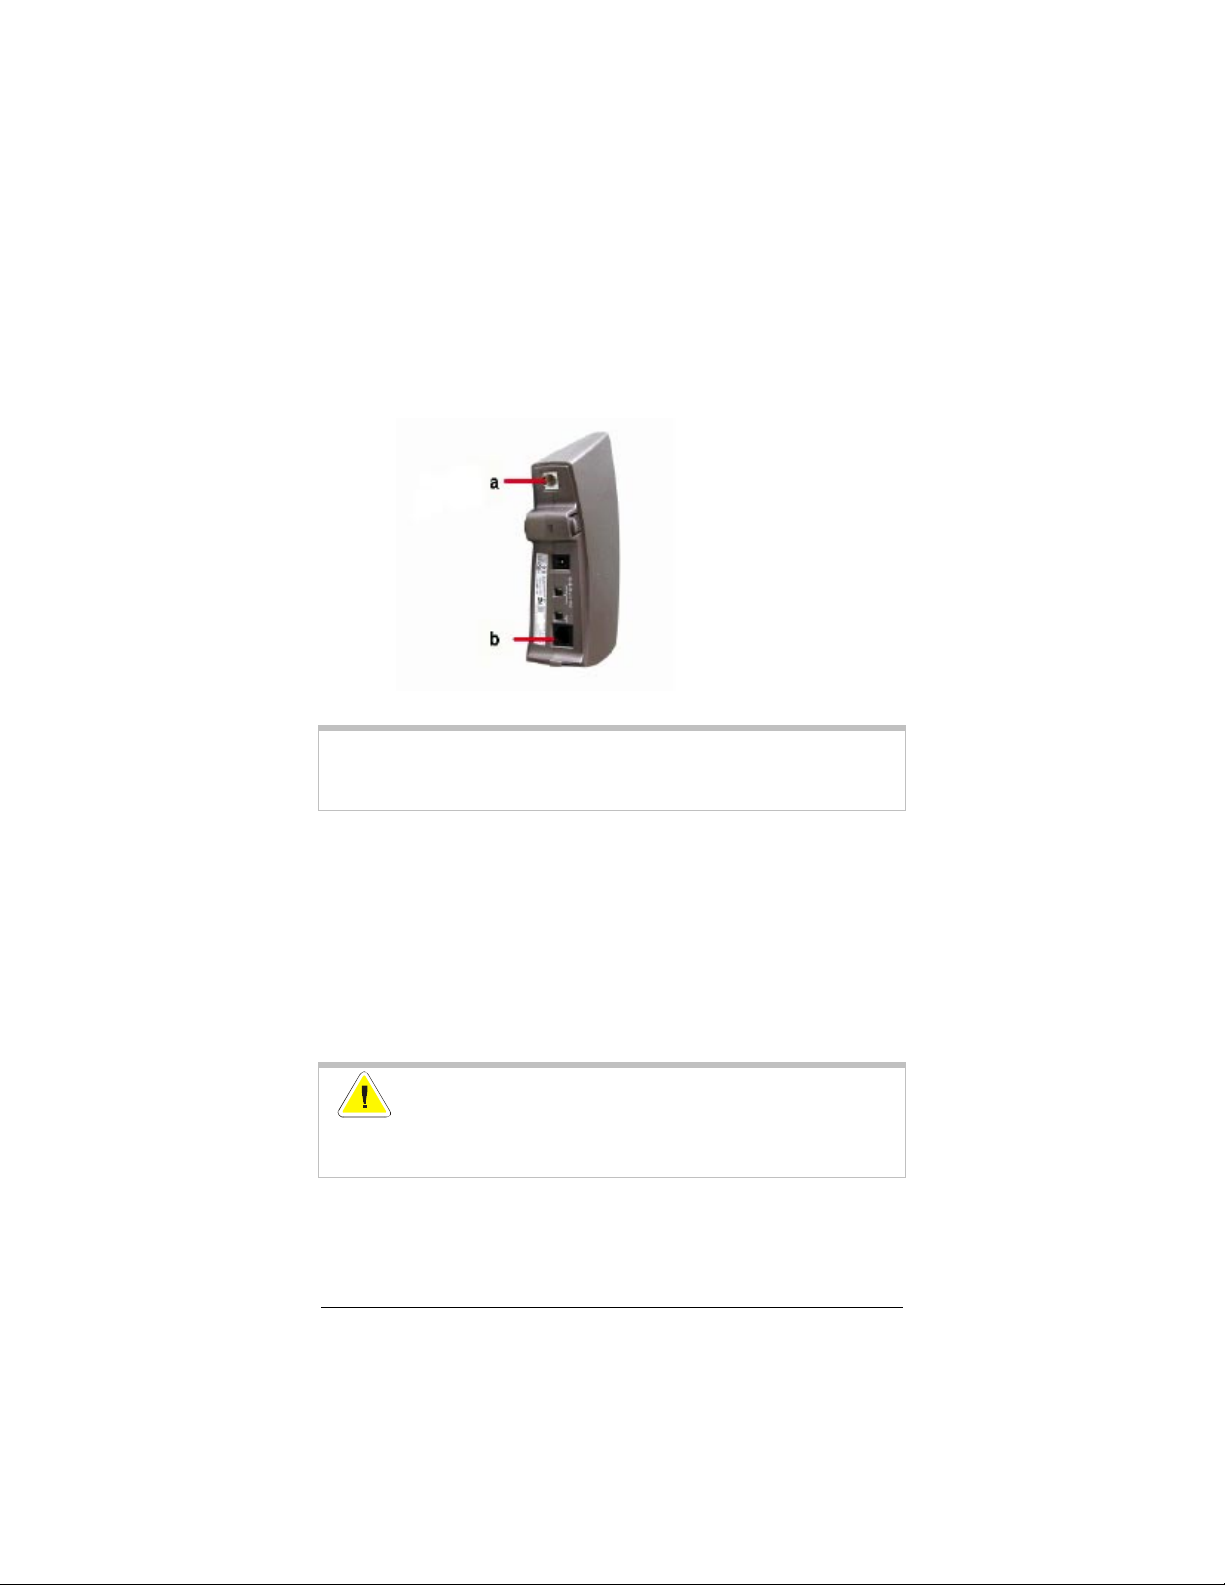
• For Wireless Internet Access via External Devices
(ADSL/PPPoE, Cable, ISDN/DSL modems) or if you are
using a 10BT LAN, plug an RJ-45 Ethernet cable into
socket b. Then connect the other end of the cable to the
External Device.
Note: Telephone adapter plugs and the Ethernet cable are
available at your local computer dealer. See Appendix A for
information about cable and connector types.
4
Place the unit on a flat surface and route the cables through the
cable entrance.
5
Close the cover by attaching it to the unit and pressing the
latches.
Powering Up the Unit
1
Plug the power adapter into an AC power outlet.
! CAUTION: After connecting power to the IG, do not
cover the unit or block the airflow to the
unit with any other objects.
10 ZoomAir IG-4150 Installation Guide & Reference Manual
Page 11

2
Monitor the LED activity on the unit. The LEDs change color
from Yellow to Red to Green to indicate start-up diagnostics.
When finished (after approximately 30 seconds), the IG shows
LED activity as listed in the table on the next page.
Icon Name Activity Description
Power Steady Green Power enabled.
Wireless Flashing Green
Off No communication.
Ethernet Flashing Green
Off No communication.
IG-4150
Modem
Next, install the IG-4150 Setup Utility as described in Chapter 3.
Flashing Green
Off No communication.
Wireless activity between
the IG and wireless
stations.
Communication between
the IG and the wired
Ethernet equipment
(Cable or DSL modem).
Modem activity between
the IG and your phone
line.
Chapter 2 Connecting and Powering Up the IG-4150 11
Page 12

Page 13
3
Installing the IG-4150
Setup Utility
Installing the Utility
Note: At this point, you should have installed a Wireless Client on
at least one computer on your network (see the
documentation for the Wireless Client). You will use this
computer and the connected Wireless Client to install the
IG-4150 Setup Utility.
After you have connected the cables to your IG-4150 and powered
up the unit, you must install the IG-4150 Setup Utility on a
computer on your network to change the IG’s settings. Follow the
installation procedure described below:
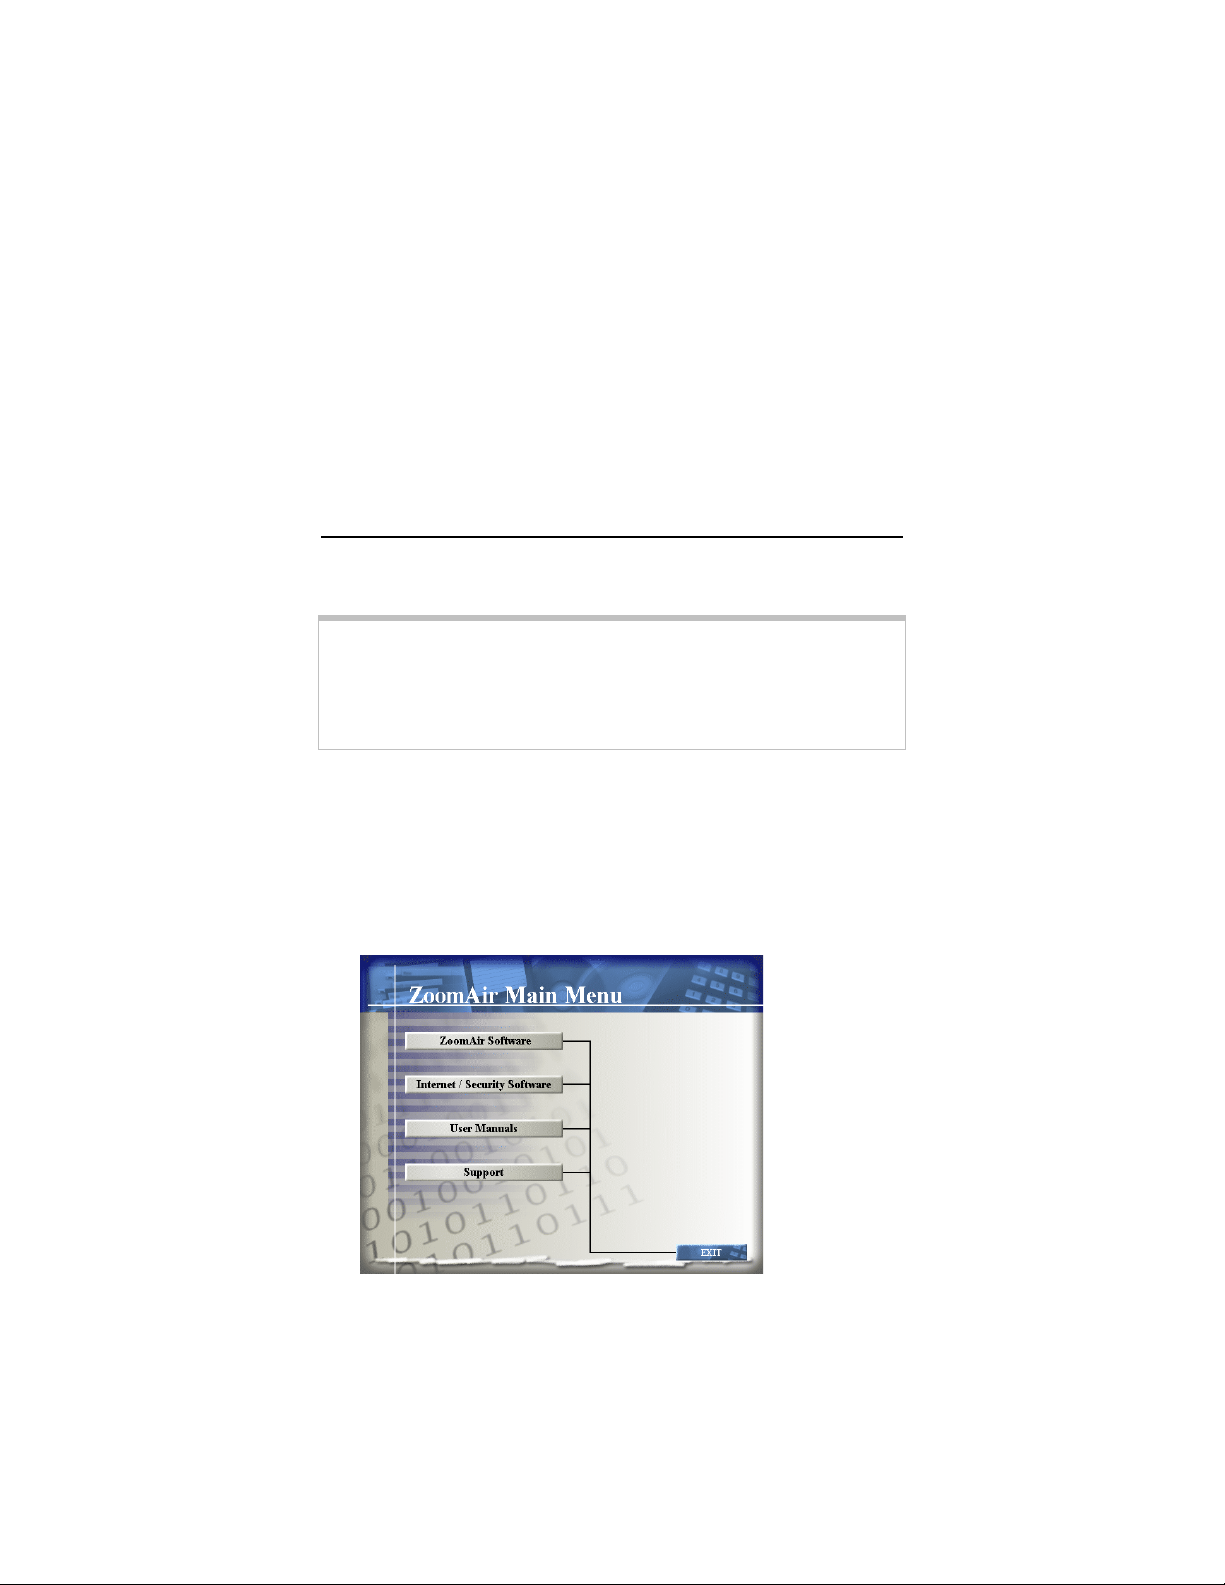
1
Insert your ZoomAir CD in the CD-ROM drive of the
computer that has the Wireless Client installed. The CD runs
automatically. The ZoomAir Main Menu opens:
Page 14
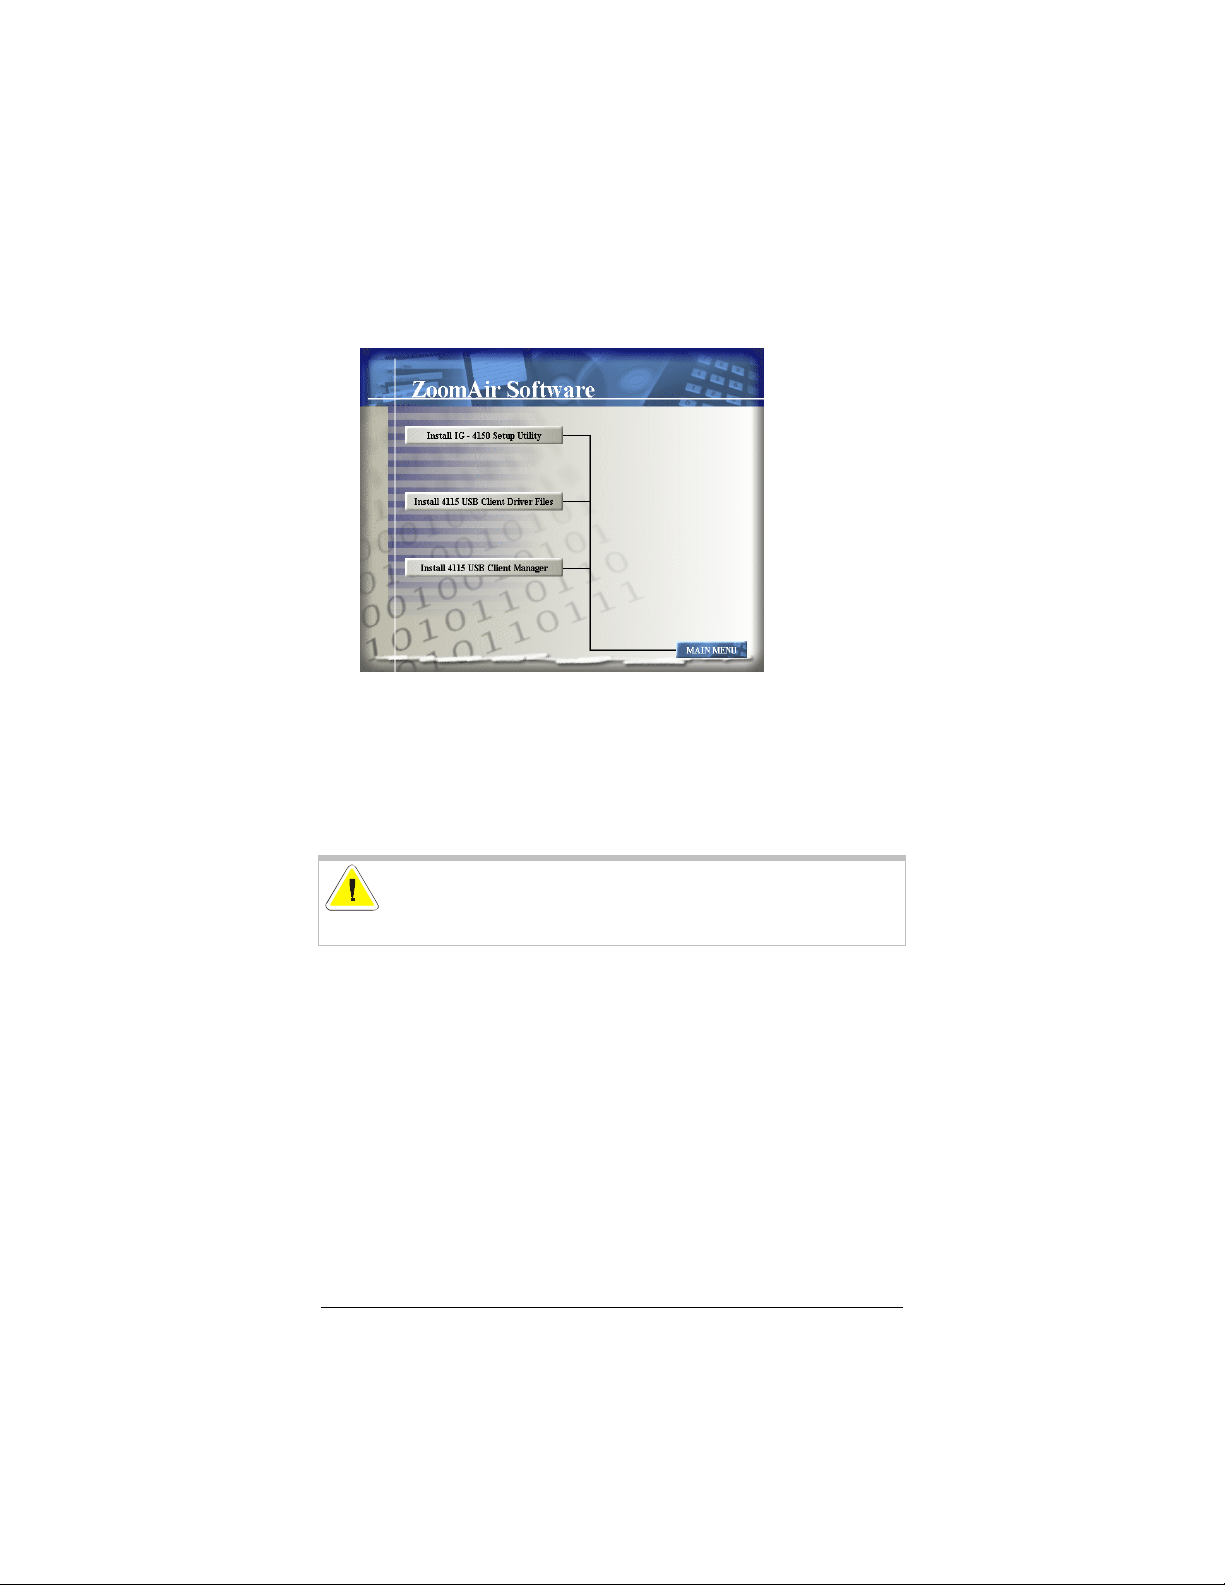
2
Click ZoomAir Software. In the ZoomAir Software screen,
click Install IG-4150 Setup Utility.
3
Follow the prompts. In the Question dialog box, click Yes to
install Java Runtime Environment 1.3.
At the end of the IG Setup Utility installation, the IG Setup
Utility icon appears on your desktop.
Read the next chapter for instructions on how to configure the IG.
WARNING: You must exit the IG-4150 Setup Utility if
you have to unplug the device for any reason.
IG-4150 Setup Utility: Other Functions
The remainder of this chapter contains information that is not
essential for installing the IG-4150, but you may find it useful later
as you use your IG. If you would like, you can skip to Chapter 4.
View/Modify IG-4150 Settings
The IG Setup Utility allows you to view or modify the following
network settings:
• Internet Access Settings
• Wireless Connection Settings
14 ZoomAir IG-4150 Installation Guide & Reference Manual
Page 15

Internet Access Settings
To set up your IG-4150 for Dial-Up Internet access you need
information from your Internet Service Provider (ISP), such as user
name, password, telephone number and IP address.
Next, select how you wish to connect to your ISP:
• Wireless Internet Access via Telephone Line
• Wireless Internet Access via External Devices
Follow the instructions on your screen, or click Help for more
information.
Wireless Connection Settings
Change these settings to increase the security of your wireless
network. Set up special connection requirements and improve your
wireless communication.
Wireless Channel
To transmit and receive data, the IG-4150 uses a frequency
channel. If neighboring wireless networks are using the same
channel, you may experience poor performance. Try other channels
until you find one that allows the best performance.
Finding More Information
For more detailed information, consult the following sources:
• The FAQ (Frequently Asked Questions) section of your
ZoomAir CD. This section contains detailed instructions.
Access it from the Main Menu by clicking the FAQ
button.
• The ZoomAir IG context-sensitive Help. Click the Help
button on the screens of your IG Setup Utility.
Chapter 3 Installing the IG-4150 Setup Utility 15
Page 16

Page 17

4
Configuring Typical IG Settings
Introduction
Note: You need to configure your IG only once, the first time you
use it.
After you have installed the IG-4150 Setup Utility (see Chapter 3),
you must select a mode for the IG and configure it. To configure
the IG, you will use a computer with a Wireless Client installed.
The key aspect of the IG-4150 configuration is selecting a mode in
which you want the device to operate.
In this chapter, we explain the typical configuration of the IG-4150
in all modes. Chapter 5 contains information regarding custom
security configurations in all modes.
Cable modem is the factory default mode for the IG-4150.
Page 18
Configuring the Settings
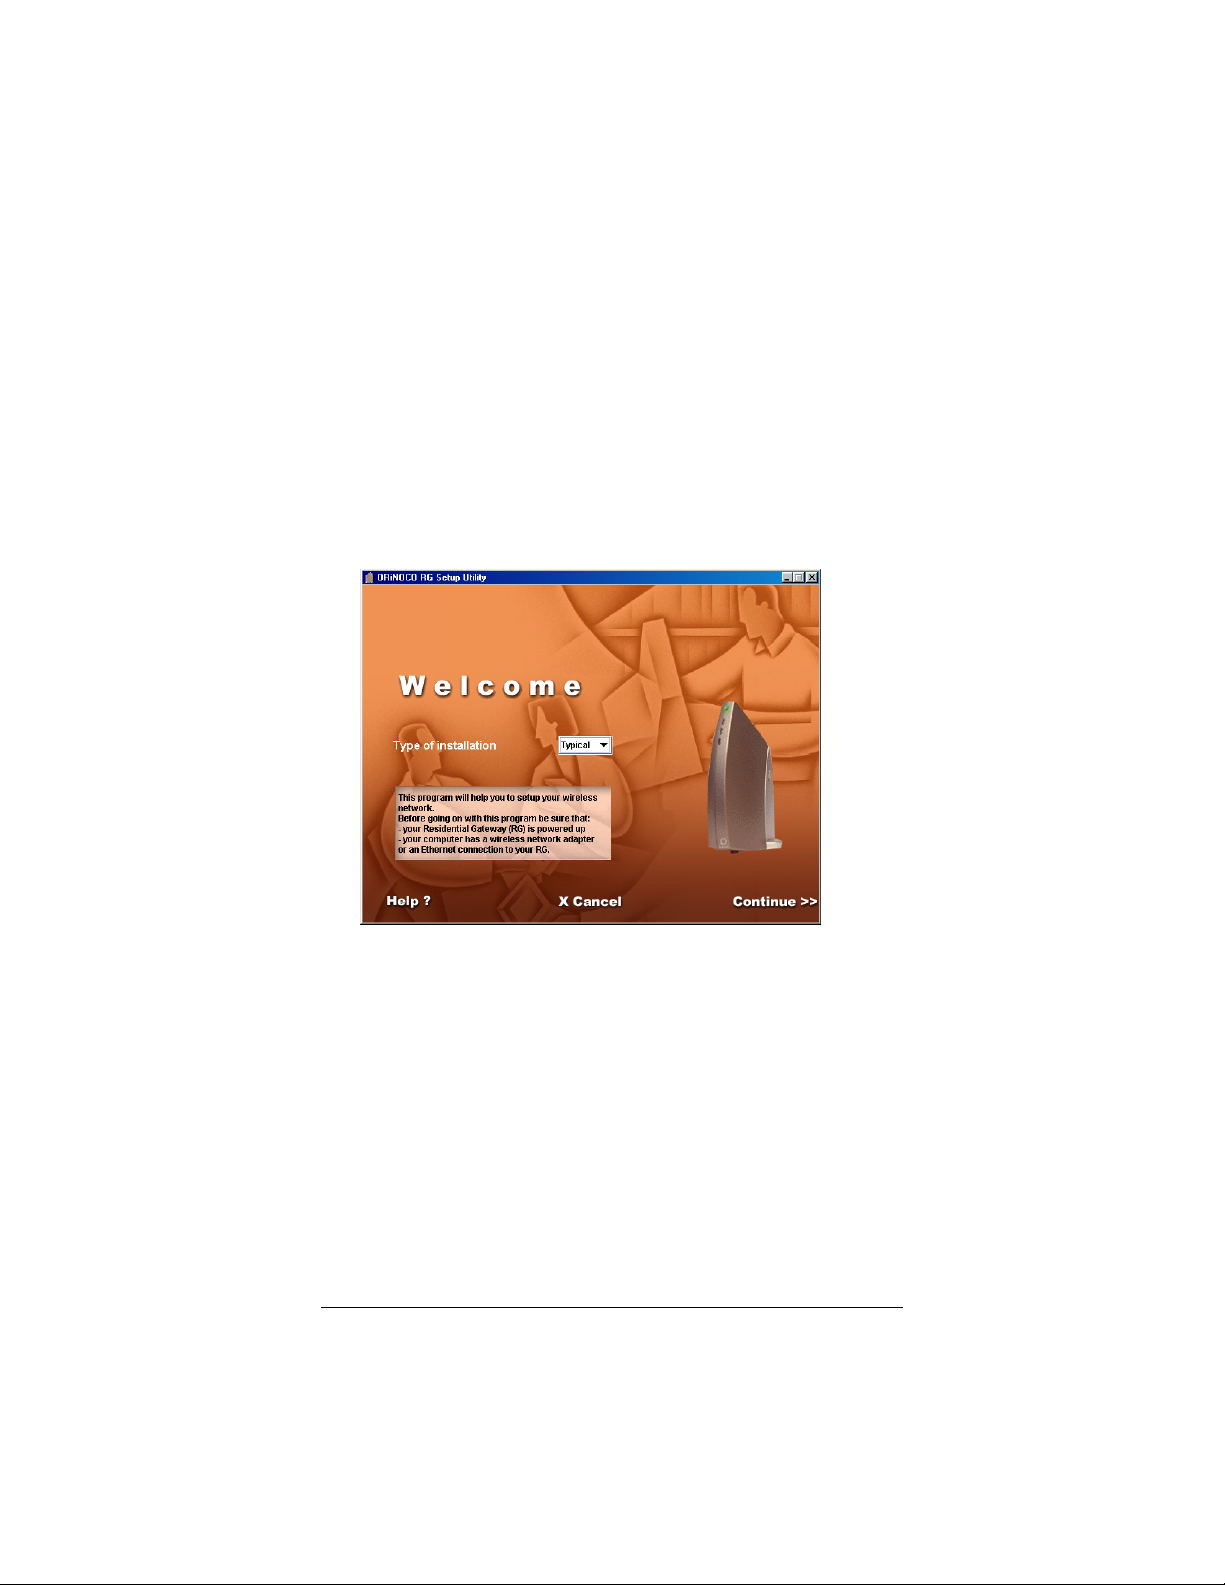
1
Double-click the IG Setup Utility icon on your desktop. The
Welcome screen appears, as shown on the next page. For
Type of installation, select Typical and click Continue.
If you want to change the default WEP Encryption Key to
maximize the security of your network, go to Chapter 5 for
instructions on configuring the custom settings.
2
In the Identify your IG screen, enter the ID number of your
IG unit in the IG Network Name text box. The ID number is
the 6-character Network Name printed on the bottom and
back labels on the IG unit. Any letters in the ID must be
lowercase. Click Continue.
18 ZoomAir IG-4150 Installation Guide & Reference Manual
Page 19

Note: After you have identified your IG-4150, you may be
instructed to upgrade the firmware on your device. Refer to
Appendix B for more information.
3
After you have identified your IG, press the F12 key to check
your IG Ethernet MAC-address. The following window will
open. Write down the MAC-address on the last page of this
manual. Your cable service provider will ask for it, and you
may need it if you contact Technical Support or Customer
Service. Click Close.
Chapter 4 Configuring Typical Settings 19
Page 20
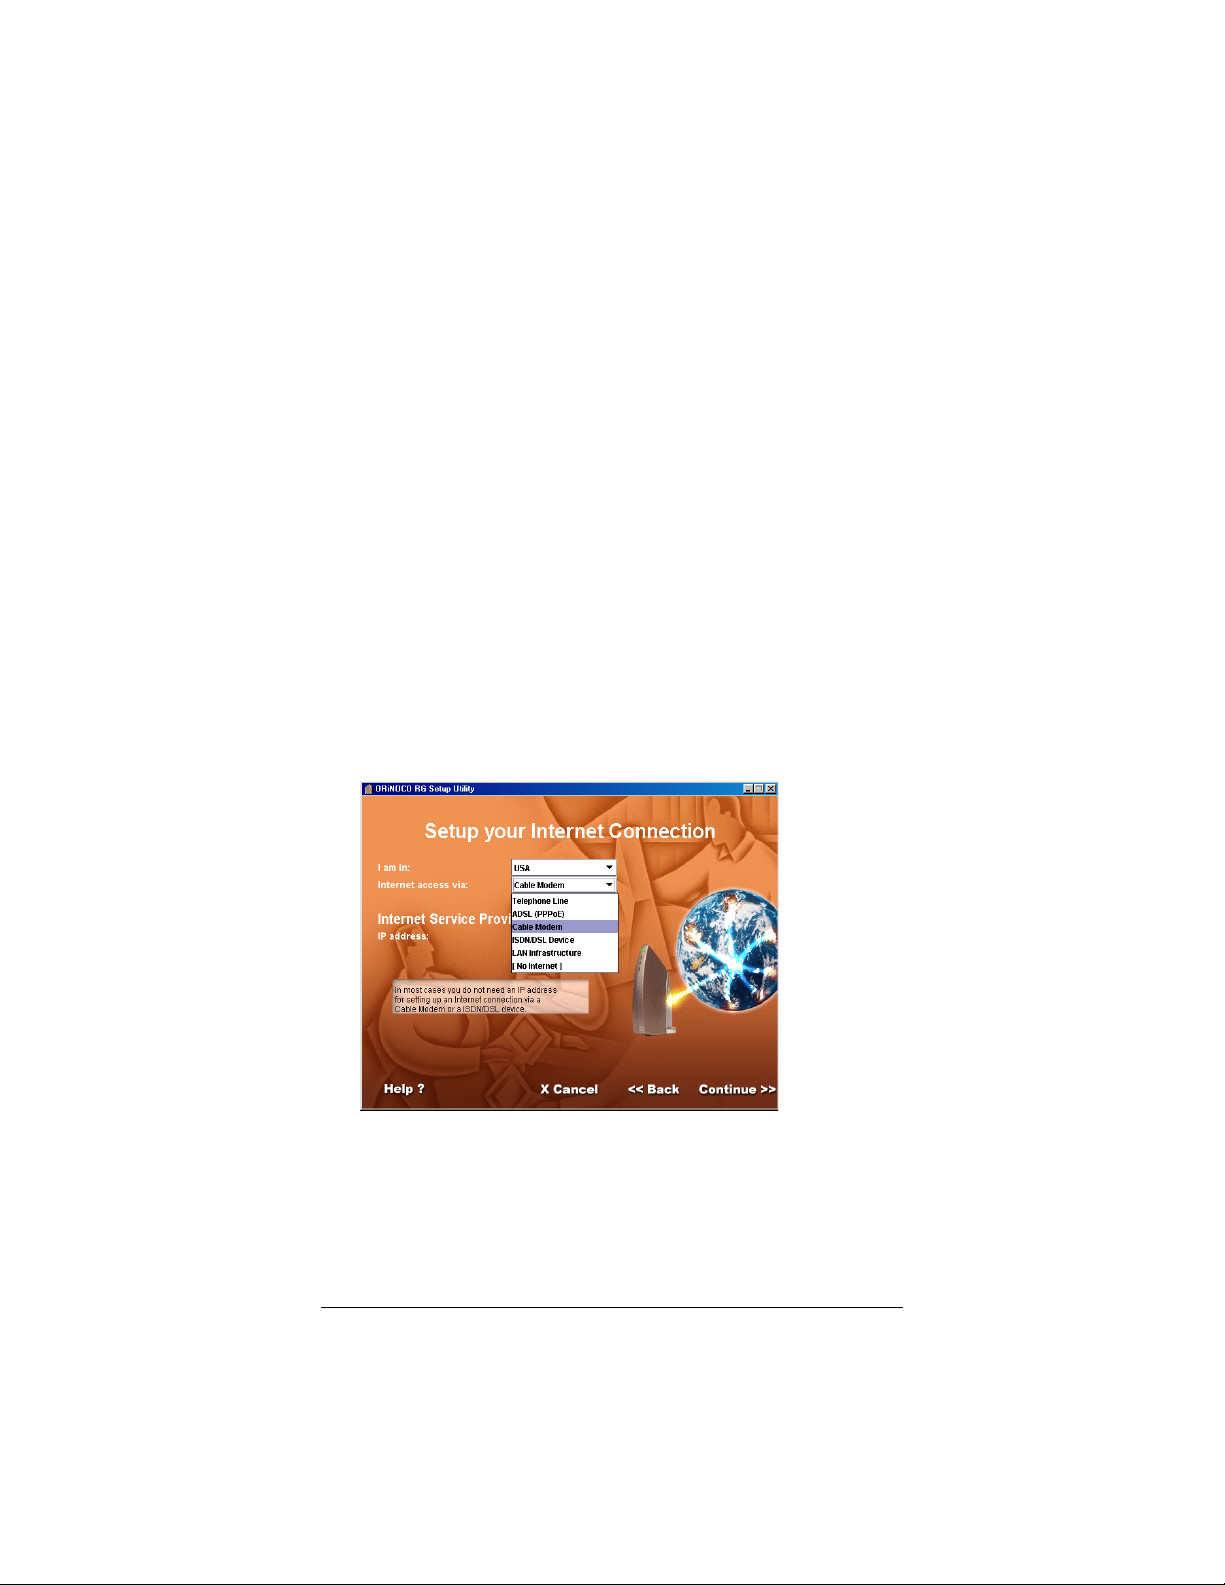
4
In the Setup your Internet Connection screen, select the
country in which you are located, and select a method of
Internet access. Your options are:
• Cable modem (factory default mode; see below)
• Telephone line (see page 22)
• ADSL/PPPoE (see page 24)
• ISDN/DSL device (see page 26)
• LAN infrastructure (see page 28)
Internet Access via Cable Modem
If you want to access the Internet through a cable modem (the
factory default mode), follow this procedure to configure your IG:
1
In the Setup your Internet Connection screen, select Cable
Modem under Internet access via, and then select
Automatic under IP address. Click Continue.
20 ZoomAir IG-4150 Installation Guide & Reference Manual
Page 21

2
Click Continue in the Overview Of Your Settings screen:
3
Before you click Finish in the Overview Of Your Settings
screen, you can double-check all the IG settings. Use the Back
button on the bottom of the screen to return to the previous
screens.
4
Click Exit in the Ready! screen:
You have configured your IG to connect to the Internet in the
Cable Modem mode. Go to Checking the IP Address on page 29.
Chapter 4 Configuring Typical Settings 21
Page 22

Internet Access via Telephone Line
If you want to access the Internet over a telephone line, the
procedure for configuring your IG is as follows:
1
In the Setup your Internet Connection screen, select
Telephone Line under Internet access via. The screen
changes as follows:
In the Disconnect if idle for drop-down menu, your options
range from 1 to 40 minutes. Under Dial using, you can select
Tone or Pulse. Finally, you can select automatic dialing. Click
Continue.
For additional information, click the Help button.
22 ZoomAir IG-4150 Installation Guide & Reference Manual
Page 23

2
The Overview Of Your Settings screen appears, showing
your current settings. Click Continue.
3
Before you click Finish in the Overview Of Your Settings
screen, you can double-check all the IG settings. Use the Back
button on the bottom of the screen to return to the previous
screens.
4
Click Exit in the Ready! screen:
You have configured your IG to connect to the Internet in the
Telephone Line mode. Proceed to Checking the IP Address on
page 29.
Chapter 4 Configuring Typical Settings 23
Page 24

Internet Access via ADSL (PPPoE)
If you want to connect to the Internet using ADSL with PPPoE,
follow this procedure:
1
In the Setup your Internet Connection screen, select ADSL
(PPPoE) under Internet access via. The screen changes as
follows:
Under Connection, you can select Automatic, Continuous,
or On Request.
Under Disconnect if idle for, your options range from 1-40
minutes. Click Continue.
For more information on these options, click Help.
24 ZoomAir IG-4150 Installation Guide & Reference Manual
Page 25

2
The Overview Of Your Settings screen appears, showing
your current settings. Click Continue.
For more information, click Help. If you want to change the
settings in the dialog box, contact your network administrator.
3
Before you click Finish in the Overview Of Your Settings
screen, you can double-check all the IG settings. Use the Back
button on the bottom of the screen to return to the previous
screens.
4
Click Exit in the Ready! screen:
You have configured your IG to connect to the Internet in the
ADSL with PPPoE mode. Proceed to Checking the IP Address on
page 29.
Chapter 4 Configuring Typical Settings 25
Page 26

Internet Access via ISDN/DSL
If you want to access the Internet using an ISDN/DSL device, the
procedure for configuring your IG is as follows:
1
In the Setup your Internet Connection screen, select
ISDN/DSL Device under Internet access via, and then
click Automatic under IP address. Click Continue.
26 ZoomAir IG-4150 Installation Guide & Reference Manual
Page 27

2
Click Continue in the Overview Of Your Settings screen:
For more information, click Help. If you want to change the
settings in the dialog box, contact your network administrator.
3
Before you click Finish in the Overview Of Your Settings
screen, you can double-check all the IG settings. Use the Back
button on the bottom of the screen to return to the previous
screens.
4
Click Exit in the Ready! screen:
You have configured your IG to connect to the Internet in the
ISDN/DSL mode. Go to Checking the IP Address on page 29.
Chapter 4 Configuring Typical Settings 27
Page 28

Internet Access via LAN Infrastructure
If you want to access the Internet through a LAN infrastructure,
follow this procedure to configure your IG:
1
In the Setup your Internet Connection screen, select LAN
Infrastructure under Internet access via. Click Continue.
2
Click Continue in the Overview Of Your Settings screen:
For information, click Help. If you want to change the settings
in the dialog box, consult your network administrator.
28 ZoomAir IG-4150 Installation Guide & Reference Manual
Page 29

3
Before you click Finish in the Overview Of Your Settings
screen, you can double-check all the IG settings. Use the Back
button on the bottom of the screen to return to the previous
screens.
4
Click Exit in the Ready! screen:
You have configured your IG to serve as a transparent wireless
bridge in a LAN infrastructure environment. Proceed below to
Checking the IP Address.
Checking the IP Address
Note: A computer on your network cannot communicate with any
devices on that or another network or access the Internet if
it has not been assigned an IP address. In the modes
described in this manual (with the exception of LAN
Infrastructure), a computer Client should receive an IP
address from the IG. Therefore, you may want to make
sure that your Client(s) is receiving an IP address through
your IG.
To verify that a computer is receiving an IP address through the
IG, do the following:
1
Click Start | Run.
2
In the Run dialog box, enter winipcfg. The IP Configuration
dialog box opens.
3
Under Ethernet Adapter Information, select the correct
adapter (for example, ZoomAir). The default IP address
assigned to the wireless client through the IG is 10.0.1.x.
Chapter 4 Configuring Typical Settings 29
Page 30

4
If the computer is not registering an IP address, click Release
All | Renew All. (See below.)
You have successfully installed and configured your IG-4150. Now
you can use your wireless network or open your browser to access
the Web through the IG-4150.
If you would like to maximize the security of your wireless
network, please go to Chapter 5.
If you are having difficulty accessing the IG, please continue below.
If You Encounter Obstacles
If you have difficulty accessing the IG to view or modify its current
settings:
• View/Modify the settings of the wireless adapter in your
computer to ensure that:
The Network Name matches the value printed on the label
at the back of the IG.
30 ZoomAir IG-4150 Installation Guide & Reference Manual
Page 31

The default WEP Encryption Key matches the last five
digits of the Network Name (if you have not changed the
default value).
• View/Modify the Networking properties on your
computer to ensure that the TCP/IP protocol is installed
for your wireless client adapter.
To do so, click Start | Settings | Control Panel.
Double-click Network. Select TCP/IP—>ZoomAir
USB Card. Make sure that the protocol is bound to the
wireless product (see the last line in the screen below:
TCP/IP—>ORiNOCO USB Card) to assign the
wireless client adapter a valid IP address to access the IG.
If the protocol is not installed, click Add. Under
Manufacturers, select Microsoft. Under Network
Protocols, select NetBEUI or TCP/IP and click OK.
• View/Modify the Networking properties on your
computer to ensure that the TCP/IP protocol has DHCP
enabled to obtain an IP Address from the IG
automatically.
Chapter 4 Configuring Typical Settings 31
Page 32

To do so, click Start | Settings | Control Panel.
Double-click Network. Select TCP/IP—>ZoomAir
USB Card and click Properties. Under IP Address,
select Obtain an IP address automatically.
• Consult your Microsoft documentation and/or Help
system for information about setting the TCP/IP network
protocol.
32 ZoomAir IG-4150 Installation Guide & Reference Manual
Page 33

5
Configuring Custom Settings
Introduction
This chapter describes the IG-4150 custom settings, which allow
you to maximize the security of your wireless network through the
use of a WEP Encryption Key and a Setup Utility password.
Customizing the Settings
To configure a custom setting, follow the procedure below:
1
Double-click the IG Setup Utility icon on your desktop. The
Welcome screen appears. For Type of installation, select
Custom so that you can change the default WEP Encryption
Key and set a password for the IG Setup Utility.
You can make this selection and decide not to change the
default WEP Encryption Key and password.
Click Continue.
Page 34

2
In the Identify your IG screen, enter the ID number of your
IG unit in the IG Network Name text box. The ID number is
the 6-character Network Name printed on the bottom and
back labels on the IG unit. Any letters in the ID must be
lowercase. Click Continue.
3
After you have identified your IG, press the F12 key to check
your IG Ethernet MAC-address. The following window will
open. Write down the MAC-address on the last page of this
manual. Your cable service provider will ask for it, and you
may need it if you contact Technical Support or Customer
Service. Click Close.
In the Setup your Internet Connection screen, select the country
in which you are located, and select a method of Internet access.
34 ZoomAir IG-4150 Installation Guide & Reference Manual
Page 35

To configure your IG-4150, select a mode below, and go to the
appropriate page.
• Cable modem (factory default mode; see below)
• Telephone line (see page 38)
• ADSL/PPPoE (see page 41)
• ISDN/DSL device (see page 43)
• LAN infrastructure (see page 46)
Internet Access via Cable Modem
If you want to access the Internet through a cable modem, follow
this procedure to configure your IG:
1
In the Setup your Internet Connection screen, select Cable
Modem under Internet access via, and then select
Automatic under IP address. Click Continue.
Chapter 5 Configuring Custom Settings 35
Page 36

2
The Overview Of Your Settings screen appears:
Setting the Wireless Channel
If you have difficulty connecting through the default channel,
click the top Change button to select a different channel. See
Technical Specifications on page 61 for more information.
Configuring the Security Settings
Click the middle Change button to change the default WEP
Encryption Key of your IG (the new string must contain five
characters). Type a new Key in place of the default (see the
section on Changing the Default WEP Encryption Key on
page 48 and the WEP Booklet). Select Enable password
(disabled by default) and type a password to restrict access to
the IG Setup Utility. If you want to reset the default values,
click Set defaults and Ok. For maximum security, we
recommend changing the default values.
36 ZoomAir IG-4150 Installation Guide & Reference Manual
Page 37

Viewing the Network Topology Settings
To access your Network Topology settings, click the bottom
Change button. The following dialog box opens:
3
Before you click Finish in the Overview Of Your Settings
screen, you can double-check all the IG settings. Use the Back
button on the bottom of the screen to return to the previous
screens.
4
Click Exit in the Ready! screen:
You have configured your IG to access the Internet in the Cable
Modem mode. Go to Checking the IP Address on page 29.
Chapter 5 Configuring Custom Settings 37
Page 38

Internet Access via Telephone Line
If you want to access the Internet over a telephone line, the
procedure for configuring your IG is as follows:
1
In the Setup your Internet Connection screen, select
Telephone Line under Internet access via. The screen
changes as follows:
In the Disconnect if idle for drop-down menu, your options
range from 1 to 40 minutes. Under Dial using, you can select
Tone or Pulse. Finally, you can select automatic dialing. Click
Continue.
For additional information, click the Help button.
38 ZoomAir IG-4150 Installation Guide & Reference Manual
Page 39

2
The Overview Of Your Settings screen appears, showing
your current settings.
Setting the Wireless Channel
If you click the Change button next to Wireless channel, the
following dialog box opens; the default is A (channel 1). If you
have difficulty connecting through this channel, try a different
one (see Technical Specifications on page 61).
Configuring the Security Settings
Click the Change button next to Security to change the
default WEP Encryption Key of your IG (the new string must
contain five characters).
There are two security settings that you can modify:
• the password to the IG Setup Utility itself (disabled by
default)
• the WEP Encryption Key used by your wireless network
Chapter 5 Configuring Custom Settings 39
Page 40

Type a new Key in place of the default (see the section
Changing the Default WEP Encryption Key on page 48 and
the WEP Booklet). Select Enable password and type a
password to restrict access to the IG Setup Utility. If you want
to reset the default values, click Set defaults and Ok. (For
maximum security, we recommend changing the default
values.)
Note that it is advisable not to use the default value especially
if you have an “always-on” connection, such as DSL or Cable.
Viewing the Network Topology Settings
To access your Network Topology settings, click the Change
button next to Network Topology. For more information,
click Help. If you want to make changes in the dialog box,
consult your network administrator.
5
Before you click Finish in the Overview Of Your Settings
screen, you can double-check all the IG settings. Use the Back
button on the bottom of the screen to return to the previous
screens.
40 ZoomAir IG-4150 Installation Guide & Reference Manual
Page 41

6
Click Exit in the Ready! screen:
You have configured your IG for Internet access in the Telephone
Line mode. Go to Checking the IP Address on page 29.
Internet Access via ADSL (PPPoE)
If you want to connect to the Internet using ADSL, follow this
procedure:
1
In the Setup your Internet Connection screen, select ADSL
(PPPoE) under Internet access via. The screen changes as
follows:
Under Connection, you can select Automatic, Continuous,
or On Request.
Under Disconnect if idle for, your options range from 1-40
minutes. Click Continue.
For more information on these options, click Help.
Chapter 5 Configuring Custom Settings 41
Page 42

2
The Overview Of Your Settings screen appears, showing
your current settings.
Setting the Wireless Channel
Click the top Change button to select a different channel if
you have difficulty connecting through the default channel (see
Technical Specifications on page 61).
Configuring the Security Settings
Click the middle Change button to change the default WEP
Encryption Key of your IG (the new string must contain five
characters). Type a new Key in place of the default (see the
section Changing the Default WEP Encryption Key on page
48 and the WEP Booklet). Select Enable password (disabled
by default) and type a password to restrict access to the IG
Setup Utility. If you want to reset the default values, click Set
defaults and Ok. For maximum security, we recommend
changing the default values.
42 ZoomAir IG-4150 Installation Guide & Reference Manual
Page 43

Viewing the Network Topology Settings
To access your Network Topology settings, click the bottom
Change button. The following dialog box opens:
For more information, click Help. If you want to change the
settings in the dialog box, contact your network administrator.
3
Before you click Finish in the Overview Of Your Settings
screen, you can double-check all the IG settings. Use the Back
button on the bottom of the screen to return to the previous
screens.
4
Click Exit in the Ready! screen:
You have configured your IG to access the Internet in the ADSL
(PPPoE) mode. Go to Checking the IP Address on page 29.
Internet Access via ISDN/DSL
If you want to access the Internet using an ISDN/DSL device, the
procedure for configuring your IG is as follows:
Chapter 5 Configuring Custom Settings 43
Page 44

1
In the Setup your Internet Connection screen, select
ISDN/DSL Device under Internet access via, and then
click Automatic under IP address. Click Continue.
2
The Overview Of Your Settings screen appears:
Setting the Wireless Channel
If you have difficulty connecting through the default channel,
click the top Change button to select a different channel. For
more information, see Technical Specifications on page 61.
44 ZoomAir IG-4150 Installation Guide & Reference Manual
Page 45

Configuring the Security Settings
Click the middle Change button to change the default WEP
Encryption Key of your IG (the new string must contain five
characters). Type a new Key in place of the default (see the
section Changing the Default WEP Encryption Key on page
48 and the WEP Booklet). Select Enable password (disabled
by default) and type a password to restrict access to the IG
Setup Utility. If you want to reset the default values, click Set
defaults and Ok. For maximum security, we recommend
changing the default values.
Viewing the Network Topology Settings
To access your Network Topology settings, click the bottom
Change button. The following dialog box opens:
For more information, click Help. If you want to change the
settings in the dialog box, contact your network administrator.
3
Before you click Finish in the Overview Of Your Settings
screen, you can double-check all the IG settings. Use the Back
button on the bottom of the screen to return to the previous
screens.
4
Click Exit in the Ready! screen:
You have configured your IG to access the Internet in the
ISDN/DSL Device mode. Go to Checking the IP Address on
page 29 for an explanation of an important part of the
configuration process.
Chapter 5 Configuring Custom Settings 45
Page 46

Internet Access via LAN Infrastructure
If you want to access the Internet through a LAN infrastructure,
follow this procedure to configure your IG:
1
In the Setup your Internet Connection screen, select LAN
Infrastructure under Internet access via. Click Continue.
2
The Overview Of Your Settings screen appears:
Setting the Wireless Channel
If you have difficulty connecting through the default channel,
click the top Change button to select a different channel. For
more information, see Technical Specifications on page 61).
46 ZoomAir IG-4150 Installation Guide & Reference Manual
Page 47

Configuring the Security Settings
Click the middle Change button to change the default WEP
Encryption Key of your IG (the new string must contain five
characters). Type a new Key in place of the default (see the
section Changing the Default WEP Encryption Key on page
48 and the WEP Booklet). Select Enable password (disabled
by default) and type a password to restrict access to the IG
Setup Utility. If you want to reset the default values, click Set
defaults and Ok.
Viewing the Network Topology Settings
To access your Network Topology settings, click the bottom
Change button. The following dialog box opens:
For information, click Help. If you want to change the settings
in the dialog box, consult your network administrator.
3
Before you click Finish in the Overview Of Your Settings
screen, you can double-check all the IG settings. Use the Back
button on the bottom of the screen to return to the previous
screens.
4
Click Exit in the Ready! screen:
You have configured your IG to serve as a transparent wireless
bridge in a LAN infrastructure environment. Go to Checking the
IP Address on page 29 for an explanation of an important part of
the configuration process.
Chapter 5 Configuring Custom Settings 47
Page 48

Changing the Default WEP Encryption Key
While selecting a mode for your IG-4150 and customizing its
settings, you can change the default WEP Encryption Key to
maximize the security of your wireless network.
Note: The IG-4150 has 64-bit Encryption enabled by default.
Therefore, you must enable 64-bit Encryption on your
Wireless Client.
Communication on your network is possible only among wireless
computers and other devices using the same WEP Encryption Key
(this key must be enabled). You can check and/or change the
default WEP Encryption Key on your IG from a computer that
has a Wireless Client installed.
If you have a ZoomAir IG and Wireless Client, the default WEP
Encryption Key consists of the last five numbers of the ID number
of your IG, which is indicated on the bottom and back labels of the
IG unit (for example, if ID number = 01bc99 then default WEP
Encryption Key = 1bc99). You can change the five characters in
the WEP Encryption Key string on a ZoomAir IG to any other
characters by selecting the Custom configuration option as
described in the preceding sections (see Configuring Custom
Settings, starting on page 33).
The IG ID number is also the Network Name, which serves as the
SSID as well. You cannot change this value.
The ZoomAir IG-4150 always has 64-bit encryption enabled, and
you cannot disable this feature. Therefore, any Wireless Client with
which you want your IG to communicate also must use 64-bit
encryption.
Note: If you are not using a ZoomAir IG-4150 with a ZoomAir
USB Client-4115 or PC Card on your network, see the
following section and the WEP Booklet for information on
WEP interoperability. Otherwise, return to the Overview
Of Your Settings screen in the IG Setup Utility to finish
configuring the device.
48 ZoomAir IG-4150 Installation Guide & Reference Manual
Page 49

WEP Interoperability Between Gateways and Wireless Clients
Note: For detailed information on WEP interoperability scenarios,
refer to the WEP Booklet.
If you have a ZoomAir IG-4150 and Intersil Wireless Clients:
1
Determine the default WEP Encryption Key of the IG (the
last five of the six characters in the Network Name – indicated
on the back and bottom labels of the device).
2
Convert the IG WEP Encryption Key to Hex Keys, using the
ASCII-to-Hex Conversion Chart in the WEP Booklet.
3
Set the Client Hex Keys to match the default WEP Encryption
Key of the IG (consult the WEP Booklet).
4
Through the IG Utility on the Client, change the default WEP
Encryption Key of the IG.
5
Set the Client’s Hex Keys to match the new Key of the IG
(Consult the WEP Booklet)
6
Set all Clients on the network to the same Hex Keys.
Chapter 5 Configuring Custom Settings 49
Page 50

Page 51

6
Using the IG-4150
General Guidelines
When using your IG-4150, please follow the guidelines listed
below:
Safety Guidelines
Do not cover the unit or block the airflow to the unit. Keep the IG
away from excessive heat and humidity. Protect the unit from
vibration and dust. Always disconnect the IG power adapter before
cleaning.
Operation Guidelines
To maximize the wireless coverage, place the unit as centrally as
possible (depending on the wireless computer’s vicinity). See also
Wall-Mount the IG-4150 on page 52.
The IG unit can be cleaned with a soft tissue. To avoid damage, do
not use liquids like alcohol or acetone. Do not rinse the unit with
fluids.
The IG consumes very little power. In order to extend the life of
your IG it is better to leave the unit powered on.
Page 52

Wall-Mount the IG-4150
If you want to mount the IG-4150 on the wall, proceed as follows:
1
Remove the cover.
2
Use a small screwdriver to open the three cover screw holes.
3
Decide where and how you want to place the IG (you may
consider mounting the unit upside down in an elevated
location to be able to see the LEDs).
4
Place the cover against the wall, and put three marks on the
wall to indicate the screw positions.
5
Use the screws and the plugs that came with your kit to fix the
cover to the wall.
6
Close the IG.
IG-4150 Buttons
The IG unit has two small buttons for troubleshooting purposes.
• Reset button
• Reload button
52 ZoomAir IG-4150 Installation Guide & Reference Manual
Page 53

Remove the cover from the IG unit to have access to these
buttons.
Reset button
This button allows you to recover from a situation in which the IG
may be in a deadlock situation. Pressing the button is the same as
disconnecting the IG from the power supply source.
After the reset, the IG reverts to the previous configuration profile.
!
CAUTION: Pressing the reset button disables all network
communications for a few minutes.
Reload button
Use this button only when you are not able to connect to your IG;
for example, when you have forgotten the IG password or WEP
Encryption Key.
This button allows you to disable the WEP Encryption Key and
the password. It also resets the DHCP settings of the device. Thus,
you have temporary access to the IG without the correct password
and WEP Encryption Key.
Chapter 6 Using the IG-4150 53
Page 54

! CAUTION: Pressing the Reload button changes the IG
settings. To prevent irreversible changes, you must
disable Encryption on your Wireless Client to access your
IG in this forced Reload mode
Follow this procedure to disable Encryption:
1
Use a small screwdriver to press the Reload button on your
IG. The top LED on the IG changes from green to orange.
This is the only LED that is lit in this mode.
2
Access the IG remotely through your Wireless Client by
clicking the ZoomAir Client Manager icon on the taskbar in
the lower right-hand corner of your desktop. The icon will be
grayed out because you have pressed the Reload button on
your IG.
.
3
From the Actions menu, select Add/Edit Configuration
Profile, click the Edit Profile button, and clear the Enable
Data Security checkbox. Click OK.
The Client Manager icon turns green again as a radio
connection is established between your IG and your Wireless
Client. You can now use the IG, bypassing the password and
the WEP Encryption Key. To avoid risk of intrusion, do not
leave your network without a WEP Encryption Key for long.
54 ZoomAir IG-4150 Installation Guide & Reference Manual
Page 55

IG-4150 Special Modes
Special IG modes occur:
• After supplying power to the unit (powering up):
The IG automatically starts to operate within one minute.
See Powering Up the Unit on page 10.
• After finishing the configuration of the IG Setup Utility
from your computer:
The new network settings are sent from your computer to
the IG.
The IG restarts automatically within one minute.
• After pressing the Reset button:
The IG restarts and automatically returns to normal
operation within one minute.
• After pressing the Reload button for 2 seconds:
The IG enters the Soft Reload mode for 5 minutes.
Chapter 6 Using the IG-4150 55
Page 56

Page 57

7
ZoneAlarm Firewall and
AdSubtract
Your ZoomAir IG CD contains three additional programs, which
increase Internet security on your network:
• ZoneAlarm Firewall
• ZoneAlarm Pro Firewall (30-day free trial)
• AdSubtract
To install any of these programs, from the Main Menu, click the
Internet/Security Software button, then click the logo for the
program you want to install, and follow the prompts. Install the
programs on each computer separately.
ZoneAlarm, ZoneAlarm Pro, and AdSubtract support the
following operating systems:
• Windows 98/98SE
• Windows Me
• Windows 2000
ZoneAlarm
ZoneAlarm, a self-configuring firewall, protects your computer
from malicious programs like Spyware and trojan horses while you
are connected to the Internet. It allows you to control the Internet
traffic on your computer as well as how applications access the
Internet.
Page 58

ZoneAlarm provides “always-on” Internet security:
• Dynamic Firewall can block attempts to connect to your
computer from the Internet.
• High Security Level makes your computer invisible from
the Internet so you will not be a target for hackers and
intruders.
• High Security Level also provides an easy way to configure
the firewall, without requiring you to program protocols
and ports.
After you have installed ZoneAlarm from your ZoomAir CD, you
access, configure, and use the program through the ZoneAlarm
icon that appears in your system tray. Double-click the icon to
access the control panel (shown below):
Navigation and use are easy, with concise explanations of each
component of the graphical user interface. Place your cursor over
a button on your screen, and a pop-up description of the feature
will appear.
ZoneAlarm and ZoneAlarm Pro
The following are the key features of ZoneAlarm and ZoneAlarm
Pro; the latter program is an improved version of the former:
• Simplicity—you do not have to learn about protocols,
ports, and firewall programming.
• Security—ZoneAlarm makes your computer invisible on
the Web.
58 ZoomAir IG-4150 Installation Guide & Reference Manual
Page 59

• Flexibility—ZoneAlarm/Pro allows you to customize your
firewall for both local and Internet zones.
• Remote blocking—you can program the Internet lock to
block all traffic when your computer is unattended.
• Control—you determine which applications can connect
to the Internet or receive input from the Internet.
• Activity monitoring—ZoneAlarm alerts you of any
Internet activity that can affect your computer while
connected; the program allows you to stop any activity
instantly.
The following are the additional features of ZoneAlarm Pro:
• Advanced MailSafe—prevents e-mail viruses and other
potentially dangerous e-mail attachments by checking 37
suspect attachment types; you can also customize
additional suspect attachment types.
• Password protection—makes your security settings
tamperproof.
• ICS (Internet Connection Sharing) capability—Allows
configuration of an ICS network.
• Logging of intrusion attempts—helps you organize and
maintain a data list of attempted intrusions by
automatically archiving them to a directory.
• Control over the restricted zone—you can restrict access
to your computer from individual computers or groups of
computers.
• Advanced firewall control—lets you further customize
your local and Internet security zones by enabling NAT
and by blocking or allowing NetBIOS, DHCP, DNS, and
ICMP.
Chapter 7 ZoneAlarm Firewall and AdSubtract 59
Page 60

AdSubtract
The standard edition of AdSubtract, which is available on your
ZoomAir CD, blocks Internet ads and cookies. To install
AdSubtract, from the Main Menu, click the Internet/Security
Software button, then click the AdSubtract logo. Follow the
prompts.
The following are some of the features of AdSubtract:
• Speeds up Web surfing by eliminating ads
• Enhances online privacy by blocking cookies
• Monitors the number of ads and cookies it blocked
• Works with any connection to the Web: dial-up modems,
cable modems, LAN or DSL connections
• Works with all browsers: Internet Explorer, Netscape,
AOL, and Opera
• Configures all browsers automatically
• Installs in approximately 30 seconds
60 ZoomAir IG-4150 Installation Guide & Reference Manual
Page 61

Appendix A
IG-4150 Specifications
Technical Specifications
Compatibility IEEE 802.11b Standard for high-speed
wireless LANs.
Bit Error Rate
Range Up to 550 meters.
Better than 10
-5
.
Frequency
Band/Channels
Encryption
2.4 GHz
Selectable Channels:
—Channel 1 (or A): 2412 MHz
—Channel 4 (or B): 2427 MHz
—Channel 7 (or C): 2442 MHz
—Channel 10 (or D): 2457 MHz
64-bit Wired Equivalent Privacy (WEP) based
on the RC4 algorithm.
Power Specifications
Input Voltage to IG-4150 9V DC
Input Voltage Power Adapter 100V AC to 240V AC +/- 10%
Power Adapter Frequency 47 to 63 Hz
Page 62

Interfaces (built-in)
a ZoomAir wireless interface
b 56K V.90 modem
RJ-11 connector (female)
1.8 m/6 ft. cable (included)
c 10BaseT Ethernet (wired as DTE)
RJ-45 connector (female)
Cable not included
Use straight-through Ethernet cable to connect the device to
external modems (for example, ISDN, ADSL, or Cable) or to
a Network Hub.
Note: Ethernet modems are wired as DCE.
62 ZoomAir IG-4150 Installation Guide & Reference Manual
Page 63

Physical Specifications
IG-4150 Power Adapter
Dimensions
208 x 52 x 155mm 78 x 48 x 75mm
(HxWxL)
Weight 350g
Operating
0 to +40
o
C 0 to +50oC
—
Temperature
Storage
-10 to +50
o
C -20 to +85oC
Temperature
Humidity max. 95% (non-
20 to 90%
condensing)
Barometric Pressure 740 to 1050 hPa
—
Radio Specifications
Radio Output
Power
Spreading 11-chip Barker sequence
Environment 11Mb/s 5.5Mb/s 2Mb/s 1Mb/s
15 dBm (nominal)
Wireless Data Rate
Max. range
Modulation
technique
Receiver
160m
(525ft.)
DSSS
CCK
-82 dBm -87 dBm -91 dBm -94 dBm
270m
(885ft.)
DSSS
CCK
400m
(1300ft.)
DSSS
DQPSK
550m
(1750ft.)
DSSS
DBPSK
sensitivity (for
-5
BER = 10
Delay Spread
)
65 ns 225 ns 400 ns 500 ns
(at FER of
<1%)
Appendix A IG-4150 Specifications 63
Page 64

The device automatically selects the best data rate for the current
radio connection.
Note: The range values provide a rule of thumb and may vary
according to the actual radio conditions at the location
where the product is installed. The range of your wireless
devices can be affected when:
• Antennas are placed near metal surfaces and solid high-density
materials.
• The radio signal is absorbed by obstacles or objects; for
example, in areas with floor to ceiling walls, the range can be
decreased to 15% on its maximum value.
64 ZoomAir IG-4150 Installation Guide & Reference Manual
Page 65

Appendix B
Upgrading the Firmware
Your ZoomAir IG-4150 requires minimal user involvement in
firmware upgrading. (Firmware is also known as embedded
software.)
When you install the IG Setup Utility, it verifies the existing
version of the firmware and replaces it if a more recent version is
available.
The IG Setup Utility with the latest version of the firmware is
available on your ZoomAir CD.
Page 66

Page 67

Appendix C
Internet Service Provider
Information
When you obtain an account with a Dial-Up Internet Service
Provider (ISP), you typically receive the following information:
• Telephone numbers to dial in to your ISP (Wireless
Internet Access via Telephone Line)
• Account Name (or User Name)
• Account Password (or User Password)
Depending on the type of Internet account you have, you may
receive additional settings that you might need to enter in the IG
configuration.
If your ISP is a cable or DSL provider, he or she may need to
know your Ethernet MAC address, which is available only when
you are running the IG Setup Utility. The IG ID number is the last
3 bytes of the radio MAC address. This number is shown on the
exterior labels on your ZoomAir IG.
To obtain the Ethernet MAC address, you must run the IG Setup
Utility, access the IG, and press the F12 key.
Page 68

Page 69

Appendix D
Regulatory Information
FCC Part 15 Emissions Statement
This equipment has been tested and found to comply with the limits for a Class B
digital device, pursuant to part 15 of the FCC Rules. These limits are designed to
provide reasonable protection against harmful interference in a residential
installation. This equipment generates, uses and can radiate radio frequency and, if
not installed and used in accordance with the instructions, may cause harmful
interference to radio communications.
However, there is no guarantee that interference will not occur in a particular
installation. If this equipment does cause harmful interference to radio or
television reception, which can be determined by turning the equipment off and
on, the user is encouraged to try to correct the interference by one or more of the
following measures:
• Reorient or relocate the receiving antenna.
• Increase the separation between the equipment and receiver.
• Connect the equipment into an outlet on a circuit different from that to which
the receiver is connected.
• Consult the dealer or an experienced radio/TV technician for help.
FCC Part 68 Statement
This equipment complies with Part 68 of the FCC rules. The unit bears a label
which contains the FCC registration number and Ringer Equivalence Number
(REN). If requested, this information must be provided to the telephone
company.
This equipment uses the following standard jack types for network connection:
RJ11C.
This equipment contains an FCC-compliant modular jack. It is designed to be
connected to the telephone network or premises wiring using compatible modular
plugs and cabling which comply with the requirements of FCC Part 68 rules.
The Ringer Equivalence Number, or REN, is used to determine the number of
devices that may be connected to the telephone line. An excessive REN may cause
the equipment to not ring in
of the RENs of all equipment on a line should not exceed five (5.0).
In the unlikely event that this equipment causes harm to the telephone network,
the telephone company can temporarily disconnect your service. The telephone
company will try to warn you in advance of any such disconnection, but if advance
notice isn’t practical, it may disconnect the service first and notify you as soon as
response to an incoming call. In most areas, the sum
Page 70

possible afterwards. In the event such a disconnection is deemed necessary, you
will be advised of your right to file a complaint with the FCC.
From time to time, the telephone company may make changes in its facilities,
equipment, or operations that could affect the operation of this equipment. If this
occurs, the telephone company is required to provide you with advance notice so
you can make the modifications necessary to obtain uninterrupted service.
U.S. REPAIR CENTER INFORMATION:
Zoom Telephonics, Inc.
645 Summer Street
Boston, MA 02210
USA
Telephone Number: (617) 423 1072
Facsimile Number: (617) 542 8276
There are no user serviceable components within this equipment.
It shall be unlawful for any person within the United States to use a computer or
other electronic device to send any message via a telephone facsimile unless such
message clearly contains, in a margin at the top or bottom of each transmitted
page or on the first page of the transmission, the date and time it is sent and an
identification of the business, other entity, or individual sending the message and
the telephone number of the sending machine or of such business, other entity, or
individual. The telephone number provided may not be a 900 number or any
other number for which charges exceed local or long distance transmission
charges. Telephone facsimile machines manufactured on and after December 20,
1992, must clearly mark such identifying information on each transmitted
message. Facsimile modem boards manufactured on and after December 13, 1995,
must comply with the requirements of this section.
This equipment cannot be used on public coin phone service provided by the
telephone company. Connection to Party Line Service is subject to state tariffs.
Contact your state public utility commission, public service commission, or
corporation commission for more information.
Declaration of Conformity
The manufacturer declares under sole responsibility that this equipment is
compliant to Directive 1999/5/EC (R&TTE Directive) via the following
standards:
Standards
EN 60950
ETS 300 328 : 1996
ETS 300 826 : 1997
The product is CE Marked.
70 ZoomAir IG-4150 Installation Guide & Reference Manual
Page 71

FCC Warning
Warning: Changes or modifications to this unit not expressly approved by the
party responsible for compliance could void the user’s authority to operate the
equipment.
Caution: For the purpose of satisfying FCC RF exposure compliance
requirements, antennas should be positioned in such a way that a separation
distance of at least 20cm is maintained between the transmitter’s radiating
structures and the body of the user or nearby persons.
FCC Part 15 C Statement
This equipment is approved under Subpart C of FCC Part 15, under the FCC
Identifier IMRWLPCE24H.
Department of Commerce End User Statement
This item falls under the jurisdiction of the Department of Commerce, and as
such, the requirement set forth in section 740-17 of the Export Administration
Regulation must be complied with. See the following Web sites for more
information:
Bureau of Export Administration
http://www.bxa.doc.gov/DPL/2_denial.htm
http://www.bxa.doc.gov/Entities/
Code of Federal Regulations
http://www.access.gpo.gov/bxa/car/ear_data.html
Federal law prohibits the sale or distribution of certain products to certain
individuals and organizations. Denied persons or organizations may not, directly
or indirectly, participate in any way in any transaction involving any commodity,
software or technology exported or to be exported from the United States that is
subject to Export Administration Regulations. The above Web sites provide a
detailed list of individuals and organizations that have been determined to present
an unacceptable risk of diversion to developing weapons of mass destruction or
missiles used to deliver those weapons.
Intended Use
The intended use for this RLAN equipment is operation in the 2.4GHz frequency
band.
Appendix D Regulatory Information 71
Page 72

Customer Service Information
We recommend that you take a few moments to fill in the
following information for future reference. In the event you need
to call Technical Support or Customer Service, you will need the
information below.
ZoomAir Model _______________________
(located on the box)
Serial Number _______________________
(located on the device)
Network Name _______________________
(located on the device)
Ethernet MAC Address _______________________
Date of Purchase _______________________
Store or Dealer _______________________
1831-A 27205 ©2001
 Loading...