

Page 1
H8
Handy Recorder
Quick Guide
You must read the Usage and Safety Precautions before use.
The Operation Manual can be downloaded from the ZOOM website (www.zoom.jp/docs/h8).
This page has files in PDF and ePub formats.
The PDF file format is suitable for printing on paper and reading on a computer.
The ePub format can be read with electronic document readers and is designed for reading on
smartphones and tablets.
© 2020 ZOOM CORPORATION
Copying or reprinting this manual in part or in whole without permission is prohibited.
Product names, registered trademarks and company names in this document are the property of their respective
companies.
All trademarks and registered trademarks in this document are for identification purposes only and are not intended
to infringe on the copyrights of their respective owners.
You might need this manual in the future. Always keep it in a place where you can access it easily.
The contents of this manual and the specifications of the product could be changed without notice.
Page 2
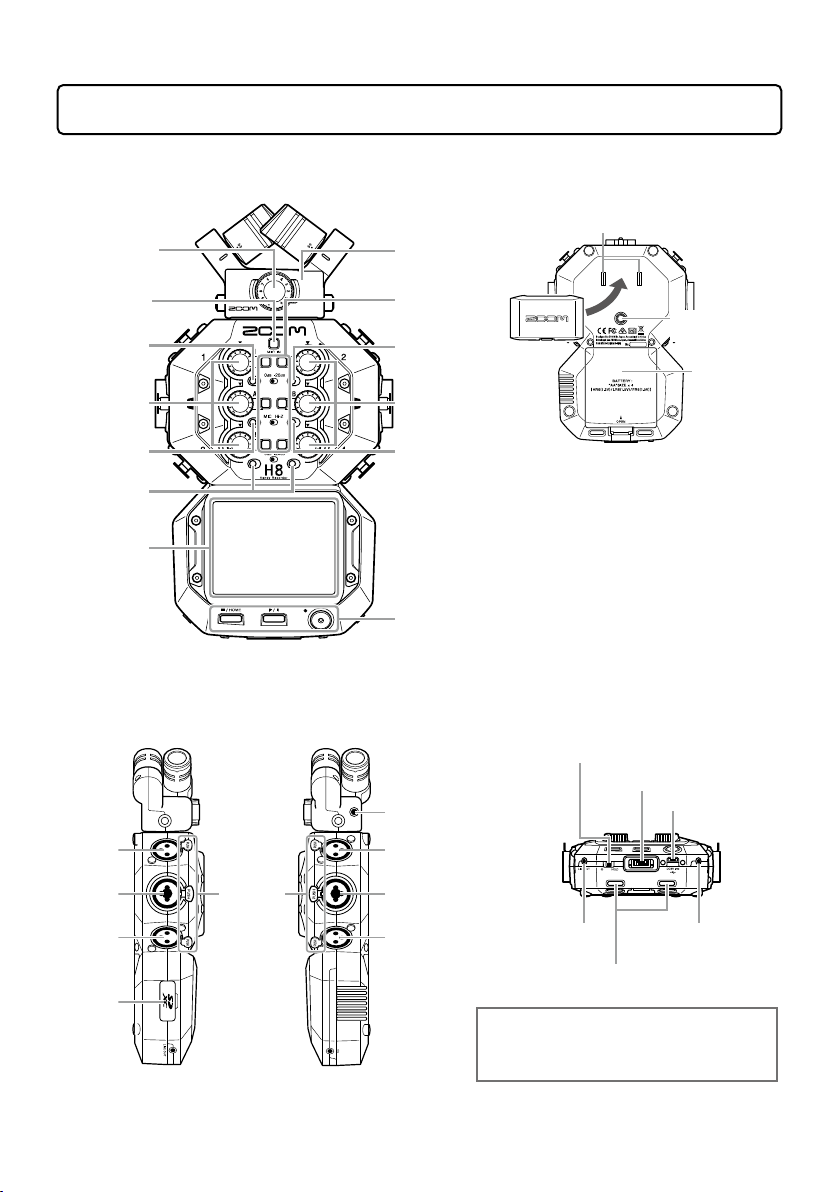
Names of parts
To p
Mic input volume
L/R
Mic track button
PAD switch 1
Input volume
1/3/A
Hi-Z switch A
PAD switches
3/4
Touchscreen
XY mic
Track buttons/
indicators
1/2/3/4/A/B
PAD switch 2
Input
volume
2/4/B
Hi-Z switch B
STOP/HOME button
PLAY/PAUSE button
REC button
Bottom
Mic connector cap
attachment points
Left side Right side Front
Power/Hold switch
MIC/LINE IN jack
(supports
plug-in power)
REMOTE jack
USB (Micro-B) port
Tripod mounting
threads
Battery
compartment
cover
Input 1
Input A
Input 3
SD card
slot
Lock
release
buttons
Input 2
Input B
Input 4
LINE OUT
jack
By connecting a ZOOM BTA-1 or other dedicated
wireless adapter to the REMOTE jack and using
the dedicated controller app, the
operated from an iOS/iPadOS device.
PHONE OUT jack
Strap attachment holes
H8 can be
2
Page 3
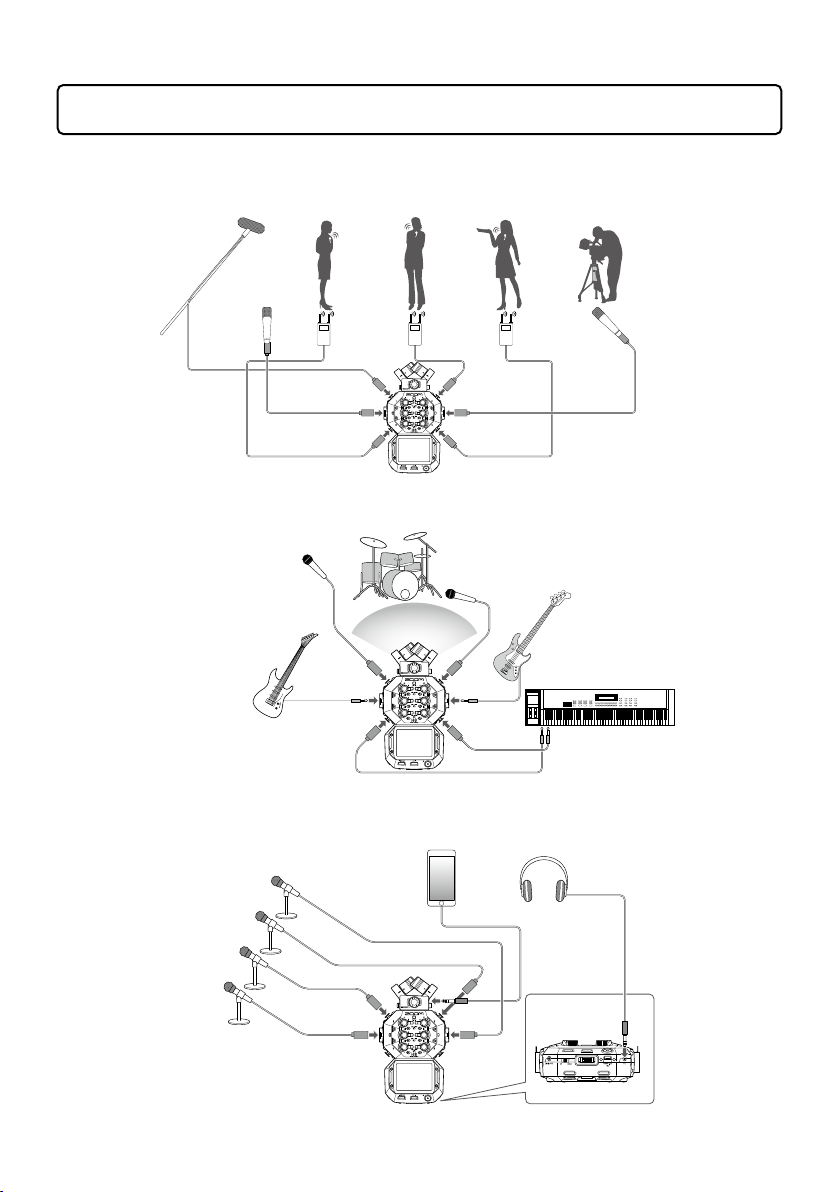
Connection examples
Field recording
Gun mic
Wireless lavalier mics
Music creation
Electric guitar
Podcasting
Mics with
tabletop
stands
Ambient
mic
Vocal mic
Lavalier
receivers
Audio device, etc.
Lavalier
receivers
Drum mic
Ambient
mic
Electric bass
Keyboard
Headphone
3
Page 4
Preparations
NOTE
• Use alkaline batteries, rechargeable NiMH batteries or lithium batteries.
• To enable accurate display of remaining battery charge, set the battery type using
Home Screen > SYSTEM > Battery.
• SD cards must be formatted by H8 before use. To format, use Home Screen > SD
CARD > Format.
HINT
AC power can be used by connecting a dedicated AC adapter (ZOOM AD-17) to the USB
port.
NOTE
• If “No Card !” appears on the display, confirm that an SD card is inserted properly.
• If “Card Protected !” appears on the display, the SD card write-protection is enabled.
Slide the lock switch on the SD card to disable write-protection.
• If “Invalid Card !” appears on the display, the card is not formatted correctly. Format
the card or use a different card.
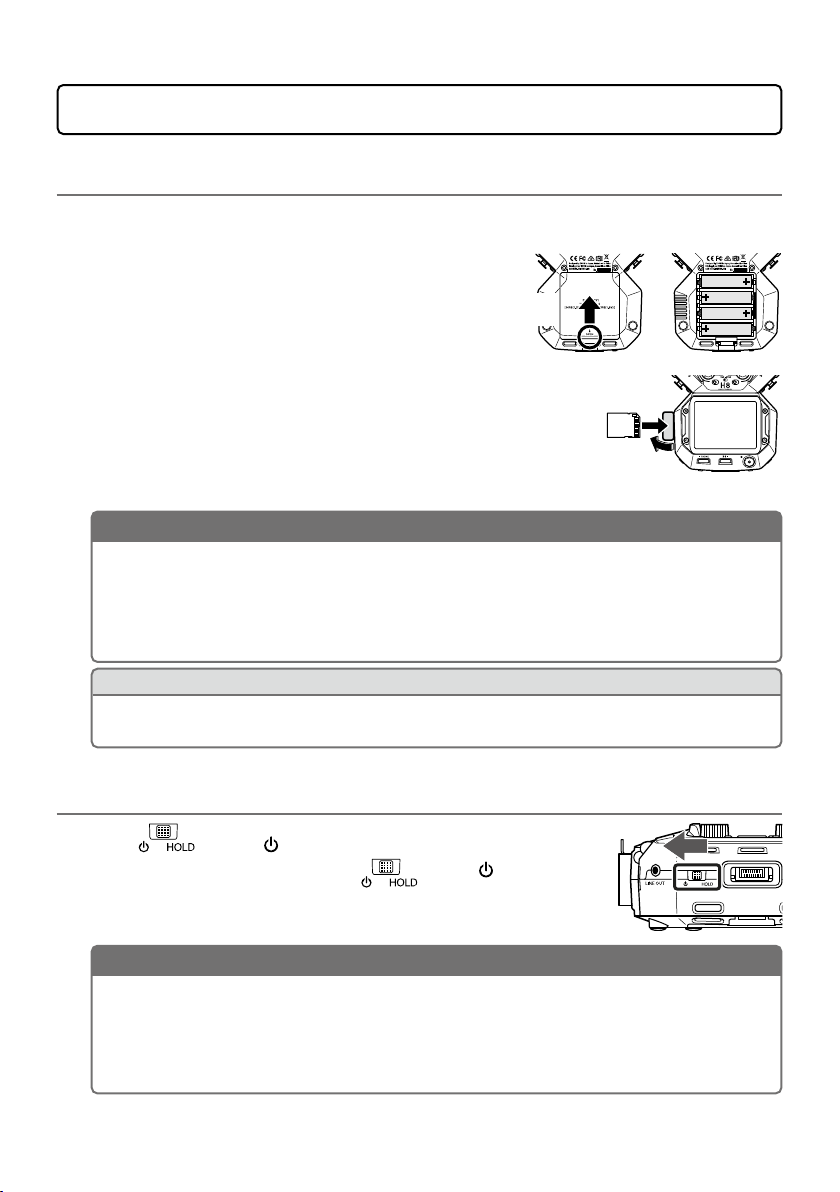
Installing batteries and an SD card
Installing batteries
After turning the power off, open the battery
1.
compartment cover and install batteries.
Installing an SD card
After turning the power off, open the SD card slot
1.
cover and insert an SD card.
To remove an SD card, push it further into the slot
and then pull it out.
Open while
pressing up
Left side of bottom section
SD card slot
Turning the power on/off
Slide toward to turn the power on.
1.
When the power is off, keep sliding toward until the
ZOOM logo appears.
4
Page 5
HINT
• Sliding to toward HOLD will disable button and touchscreen operations.
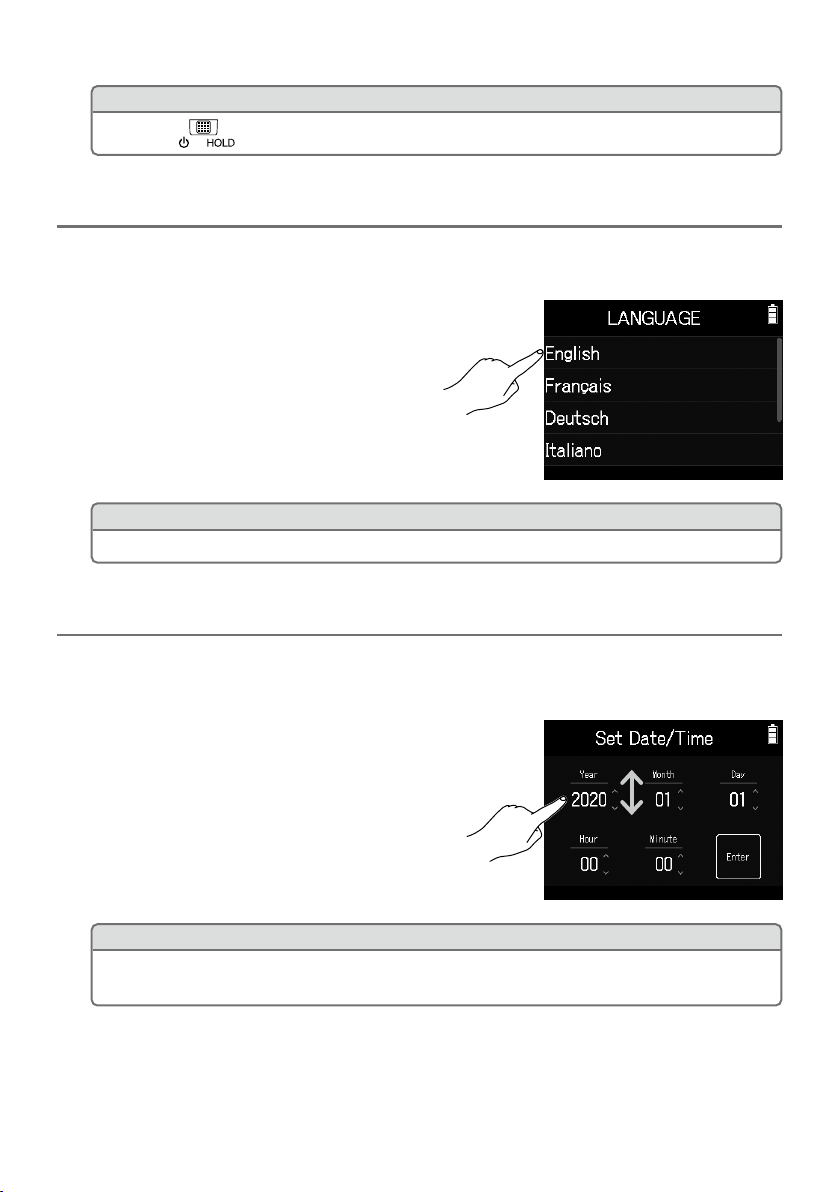
Setting the language (first time starting up)
HINT
The display language can be changed later using Home Screen > LANGUAGE.
HINT
The date and time setting can be changed later using Home Screen > SYSTEM >
Date/Time > Set Date/Time.
The first time you turn the power on after purchase, set the touchscreen display
language when the language setting screen opens.
Tap the language you want to set.
1.
Setting the date and time (first time starting up)
When the date and time setting screen opens after the language settings screen, set
the date and time.
Swipe the date and time items to set them.
1.
Tap Enter.
2.
5
Page 6

Screen appearance
On the H8, tap, swipe and slide on the screen to make settings and select functions
to adjust.
Home Screen
The Home Screen appears when the H8 starts up.
From the Home Screen, three recording applications, various setting screens and
other functions can be launched.
Swipe to
change
• Tap an icon to launch that app.
• Press
to return to the Home Screen.
FIELD app
Use this when field recording with the
XY mic.
This app is also good for capturing
sound for movies and videos as well as
recording live concerts, for example,
using external mics.
MUSIC app
Use this when making music.
In addition to punch-in/out functions
for vocals and instruments, this app
can also mix down multiple tracks with
volume and panning settings.
PODCAST app
This app is good for preparing audio
materials for podcasts as well as live
streaming. Sound pads can be used to
play jingles and special effects, for
example, with a single touch.
6
Page 7

H8 folder and file structure
Files assigned to sound
(FIELD app recording)
(MUSIC app recording)
(PODCAST app recording)
When recording with the H8, folders and files are created on SD cards in the
following manner. All three apps (FIELD, MUSIC and PODCASTS) can be used with
projects that have been made. (Recording and playback of 96 kHz/16-bit and
96 kHz/24-bit WAV files is only supported by the FIELD app.)
The
manages recording and playback data in units called projects.
H8
Project folders are created with names like“[date]_001”
and“[date]_002”. (The date format is YYYYMMDD.)
FIELD app recordings MUSIC app recordings PODCAST app recordings
Root
F200101_001
M200101_001 P200101_001
pads in the PODCAST
app are copied here.
SOUNDPAD
Mic12.wav
Stereo file recording of
signals from MIC IN
Mic12_BU.wav
Stereo file backup
recording of signals
from MIC IN at a level
12 dB lower
Tr12.wav
Stereo file recording of
input 1 and 2 signals
TrA.wav
Mono file recording of
input A signal
TrLR.wav
Stereo file recording of
built-in mixer L/R output
F200101_001.h8prj
Project file
Mic12.wav
1st stereo file
recording of signals
from MIC IN
MIc12_01.wav
2nd stereo file
recording of signals
from MIC IN
Tr1.wav
1st mono file recording
of input 1 signal
Tr1_01.wav
2nd mono file recording
of input 1 signal
M200101_001.h8prj
Project file
Tr1.wav
Mono file recording of
input 1 signal
Tr2.wav
Mono file recording of
input 2 signal
TrA.wav
Mono file recording of
input A signal
Tr34.wav
Stereo file recording of
sound pad track
P200101_001.h8prj
Project file
opening.wav
bgm1.wav
7
Page 8

Input and output settings
HINT
When connecting an ordinary mic, set the PAD switch to 0dB.
NOTE
• When connecting devices that are not compatible with phantom power, do not turn
phantom power on. Doing so could damage the device.
• When connecting a dynamic mic, phantom power does not need to be supplied.
HINT
In addition to +48 V, phantom power can also be set to +24 V.
Setting input sources
Set according to the devices connected to Inputs 1–4/A/B.
Connecting a mixer or other device with a +4 dBu standard output level
(Inputs 1–4)
Set the corresponding PAD switches ( ) to –20dB.
1.
Connecting guitars and other devices
with high output impedance (Inputs A/B)
Set the corresponding Hi-Z switches ( )
1.
to Hi-Z.
PAD switches
(1/2)
Hi-Z
switches
PAD switches
(3/4)
Connecting condenser mics and other devices that require phantom
power (Inputs 1–4/A/B)
Tap these in the following order:
1.
• FIELD app screen >
• MUSIC app screen > select track >
• PODCAST app screen >
Tap Phantom.
2.
Tap On/Off to set to On.
3.
> select track
> select track
8
Page 9

Enabling tracks (and stereo linking)
HINT
While pressing a track button, pressing the adjacent button (1 and 2, 3 and 4, or A and B)
will stereo link those tracks, making a stereo track and creating stereo files on the SD
card. Do the same thing to end a stereo link.
Select which tracks to record from MIC IN, 1–4 and A/B.
The MIC IN, 1–4 and A/B tracks correspond to the MIC IN, 1–4 and
A/B inputs.
Launch the recording app, and press the track buttons ( ) for
1.
the tracks to record so that the corresponding LED indicators
light red.
Adjusting input levels (trim)
Adjust the input levels to record with high audio quality.
Turn for the selected tracks to adjust their input levels.
1.
Adjust so that their peak levels stay
around –12 dB on the level meter.
Adjusting headphone and speaker levels
Use headphones, for example, to monitor input/playback sounds and adjust levels
(volume).
Tap / at the top right of the screen.
1.
A speaker icon will appear when headphones are not connected.
Slide to adjust the volume.
2.
When done adjusting, tap the volume value at the top
3.
right of the screen.
9
Page 10

Using the FIELD app
NOTE
• When recording is paused, a mark is added at that point.
• A maximum of 99 marks can be added in each project.
• If the recording file size exceeds 2 GB when recording with the FIELD or PODCAST
apps, a new project folder will be created automatically and recording will continue.
Sound will not be interrupted between files.
• Track indicators (LEDs) will blink and clip indicators will appear lit when loud sounds
are input. Adjust the input level so that the clip indicators do not light.
Recording/playback
project name
Status icon
Level meters
Track numbers
REW/FF buttons
Recording
Press on the FIELD app screen.
1.
Operations during recording
Progress barTime display
Remaining battery charge
(Red)
Empty
Headphone/speaker
volume button
Clipping indicators
Settings button
Track settings button
Recording format button
Full
Function Control operation
Pause/resume recording (add mark)
Stop
Press
Press
.
or .
10
Page 11

Playing recordings
Press on the FIELD app screen.
1.
Operations during playback
Function Touchscreen/control operation
Select playback project/move to mark
Search forward/backward Press and hold
Pause/resume playback
Stop Press
Tap
Slide left/right.
Press
.
.
.
.
Other functions
Function name Details
Automatic recording Recording can be started and stopped automatically in response to
the input level.
Pre-recording This function enables recording for up to 6 seconds before
pressed.
Sound markers Half-second tone signals (sound markers) can be output from the
PHONE OUT and LINE OUT jacks when recording is started and
stopped. Since sound markers are also written to recording files,
when recording audio for video with the
signal to the camera input can make synchronizing audio and video
easier.
Backup Rec When using a mic capsule with up to two channels on the MIC IN, a
backup recording file can be recorded at a level 12 dB lower than the
set input level. This can be used to replace the regular recording file
if its recording level was too high, causing distortion, for example.
H8, sending its output
is
L/R track recording A stereo file recording of the L/R outputs from the built-in mixer can
be simultaneously created.
11
Page 12

Using the MUSIC app
NOTE
When a new project is created, all recording tracks will be off, so change settings as
necessary.
Time display Progress bar
Recording/playback
project name
Status icon
Clipping indicators
Level meters
Faders
Track buttons
Low/Mid/High
equalization
Creating new projects
Tap to change
screens
Remaining battery charge
(Red)
Empty
Headphone/speaker
volume button
Track display
switching button
Settings button
Track settings button
Effect settings button
Effect sends
Pan
Full
In the MUSIC app, a project must be created before starting recording.
On the MUSIC app screen, tap and select > New Project > Rec Format
1.
in order.
Tap a Rec Format setting value to select it, and tap .
2.
Tap Create, and input the project name.
3.
Tap Enter.
4.
12
Page 13

HINT
• The recording formats that can be set are 44.1 kHz/16-bit WAV, 44.1 kHz/24-bit WAV,
48 kHz/16-bit WAV, and 48 kHz/24-Bit WAV.
• Effects can only be used when the recording format is 44.1 kHz/16-bit WAV or
44.1 kHz/24-bit WAV.
• To open an existing project, select it from > Projects.
Adjusting the input signal monitoring mix
On the MUSIC app screen, slide faders ( ) up and down.
1.
Recording
Press
1.
on the MUSIC app screen.
This starts recording standby.
Press .
2.
This starts recording.
Operations during recording
Function Control operation
Pause/resume recording
Stop
Press
Press
.
or .
Playing recordings
Press
1.
on the MUSIC app screen.
Other functions
Function name Details
Effects These alter the sounds of instruments, voices and other sources. The
included effects, which are equivalent to those in ZOOM multi-effects
processors, can be used with a variety of instruments. Using the free
Guitar Lab effect management application on a computer (Mac/Windows),
you can add effects that are distributed online as well as edit and back up
patch memories, for example.
Metronome This is useful when recording instrument performances.
File assignment Track files recorded in other projects can be freely assigned to tracks.
Punch in/out/new
file recording
Mixdown Levels, panning, EQ and effects can be adjusted for multiple track sound
These functions can be used to make a new recording of an already
recorded track partially or from the beginning.
sources, and a mixed stereo track file can be created.
Operations during playback
Function
Search forward/
backward
Pause/resume playback
Stop
Slide
Press
Press
Touchscreen/
control operation
.
13
left/right.
.
Page 14

Using the PODCAST app
NOTE
The podcast app creates a stereo file that mixes in the sound pad signals. Inputs 3 and 4
cannot be used.
Recording/playback
project name
Status icon
Sound pads
Recording
Press on the PODCAST app screen.
1.
Operations during recording
Function Control operation
Pause/resume recording (add mark)
Stop
Progress barTime display
Press
Press
.
or .
Remaining battery charge
(Red)
Empty
Headphone/speaker
volume button
Clipping indicators
Pad level
Level meters
Track settings button
Settings button
Full
14
Page 15

Playing recordings
Press on the PODCAST app screen.
1.
Operations during playback
Function Touchscreen/control operation
Select playback project/move to mark Tap
Search forward/backward Press and hold
Skip 15 seconds
Pause/resume
Stop
Slide
Tap
Press
Press
/ .
/ .
left/right.
/ .
.
.
Other functions
Function name Details
Sound pads Audio files (WAV format) can be assigned to buttons on the
touchscreen that play them back. These are useful, for example, for
playing effect sounds during podcasting and streaming as well as
during live theater and music performances.
When shipped new from the factory, the
and 4 are pre-assigned to sound pads.
Effects These alter the sounds of instruments, voices and other sources. The
included effects, which are equivalent to those in ZOOM multieffects processors, can be used with a variety of instruments. Using
the free Guitar Lab effect management application on a computer
(Mac/Windows), you can add effects that are distributed online as
well as edit and back up patch memories, for example.
H8 has 13 built-in sounds,
15
Page 16

Main Specifications
Number of input channels 8 (XY mic capsule, 1-4, A, B)
Number of output channels 1 (combined stereo headphone/line)
Connectors MIC IN ZOOM mic connector
Phantom power +24 V/+48 V (independent ON/OFF for INPUTS 1–4, A
Recorder Recording media Cards that support SD/SDHC/SDXC specifications
Audio interface Multitrack mode 44.1/48/96 kHz, 16/24-bit, 12-in/2-out
Tuner Chromatic/Guitar/Bass/Open A/Open D/Open E/
Built-in speaker 400 mW 8Ω mono speaker
Display 2.4" (320×240) full-color touchscreen LCD
Power • 4 AA batteries (alkaline, NiMH or lithium)
Estimated continuous operation time using batteries
(hours: minutes)
External dimensions
Weight
Note: When using a USB cable designed for recharging, audio interface, SD card reader and Guitar Lab
connection functions cannot be used.
INPUT 1-4 XLR jacks (2: HOT)
INPUT A/B XLR/TRS combo jacks (XLR: 2 hot, TRS: TIP hot)
USB USB Micro-B
REMOTE ZOOM BTA-1 or other dedicated wireless adapter
LINE OUT 3.5 mm stereo mini
PHONE OUT 3.5 mm stereo mini
Formats WAV: 44.1/48/96 kHz, 16/24-bit, mono/stereo
Maximum
simultaneous recording
tracks
Stereo mix mode 44.1/48 kHz, 24-bit, 2-in/2-out
(audio interface, mass storage and Guitar Lab
connection functions)
Note: Use a USB cable that supports data transfer.
Operation using USB bus power is possible.
and B)
MP3: 128, 192, 320 kbps
12 (MIC IN, backup recording, 1-4, A, B, and LR)
Open G/DADGAD
• AC adapter (ZOOM AD-17): DC 5 V/1A
• USB bus power
Using alkaline batteries
Using XY mic, 44.1 kHz/24-bit (stereo × 1): about
15:00
• The above values are approximate.
• Continuous battery operation times were
determined using in-house testing methods. They
will vary greatly according to use conditions.
H8: 116.4 mm (W) × 163.3 mm (D) × 48.6 mm (H)
XYH-6: 78.9 mm (W) × 60.2 mm (D) × 45.2 mm (H)
H8: 354 g XYH-6: 130 g
ZOOM CORPORATION
4-4-3 Kanda-surugadai, Chiyoda-ku, Tokyo 101-0062 Japan
www.zoom.co.jp
Z2I-3957-01
 Loading...