

Page 1
Reproduction of this manual, in whole or in part,by any means, is prohibited.
© ZOOM Corporation
OPERATION MANUAL
English
Page 2

Special features of H4n
001
Special features of H4n
* Please read this manual carefully to ensure comprehensive knowledge and proper use of the H4n.
After reading through it, please keep the manual for future reference
• An all-in-one handy recorder.
You can enjoy recording and creating your own music any time, anywhere with
the H4n.
The H4n has a very compact 280 g lightweight design, equipped with high quality
stereo condenser microphones arranged in an XY pickup pattern, a built-in speaker,
SD card recording, mixer and internal effects.
• Versatile eld recorder with multi-track capability.
The H4n is capable of recording in several different operation modes: <STEREO mode> which is capable of high quality stereo recording; <4CH mode>
which can record 4 discrete channels simultaneously using the on-board microphones and the external inputs; <MTR mode> which allows you to record
multiple tracks in multiple passes, overdubbing one or two tracks at a time. In
<STAMINA mode> you can record for up to 11 hours using batteries only.
• Newly designed XY stereo microphones allow variable
recording patterns from 90 to 120 degrees.
The H4n allows the user to adjust the angle of the onboard microphones to address a wider range of recording scenarios. If you want a wider area of sound,
you can set the microphones to 120 degrees. Or set them to 90 degrees for a
more focused sound source. Either way, the mics retain their XY configuration,
so you can record natural stereo sound with no phase cancellation.
• XLR-1/4-inch combo jacks allow direct connection of
any sound source.
We’ve loaded the H4n with a versatile array of input options to accommodate a
variety of recording sources. Any type of microphone (including condensers),
electric instrument (guitar, bass, keyboard) or line level source can be connected
to the H4n.
• It can be used as an Audio Interface/SD card reader for
a computer.
An onboard USB 2.0 Hi-Speed jack allows direct connection to a computer. You
can use it as an audio interface with built-in effects (sampling rate 44.1 kHz).
You can also use the H4n as an SD card reader for your computer. You can even
take the recorded files from your computer and create an audio CD using those
files as material in any DAW software.
• Other built-in functions: Tuner/Metronome/Karaoke.
The H4n can be used as a standard chromatic tuner. It is also capable of more
irregular tuning functions, like for a 7-string guitar or a 5-string bass, along with
others. The H4n has a metronome function convenient for practice and multitrack recording.
You can change playback speed between the ranges of 50% to 150%.
There are many other effects functions included, such as center cancel function
for stereo files, Karaoke function with variable key control, language learning and
voice training function
Thank you very much for purchasing our ZOOM H4n Handy Recorder (hereinafter abbreviated to H4n).
The H4n has the following special features.
Page 3
The H4n is ideal for the following scenarios
002
The H4n is ideal for the following scenarios
Piano recitals
Any field sound recordingRecording the meetings
Live performance recording
Vocal recording
The band practices
Recording acoustic guitar sound
Transfer analogue sound sources to digital sources
Drum practice recording
Page 4

A table of contents
A table of contents
003
Special features of H4n ����������������������� 001
The H4n is ideal for the following scenarios ��������������002
A table of contents �������������������������003
Safety precautions for users ��������������������� 006
Copyright warnings ������������������������� 007
Getting started
1-1 Recording flow using the H4n ������������������ 009
1-2 Easy recording guide [STEREO MODE] �������������� 011
2-1 Name and function of each part �����������������013
2-2 Included Accessories ���������������������� 015
3 Battery/Power setting ��������������������� 017
4-1 Power On and Off, How to use power and hold switch �������019
4-2 How to use the [REC] and transport control buttons �������� 021
4-3 How to use the track [1], [2], [3] and [4] buttons ���������� 022
4-4 How to use the input [MIC], [1] and [2] buttons ����������� 023
4-5 How to use REC LEVEL and VOLUME ��������������024
4-6 How to use [DIAL] and [MENU] buttons ��������������025
5-1 Insert a SD card ������������������������ 027
5-2 Set date and time <DATE/TIME> ����������������� 028
6-1 Setting up: How to connect external audio devices ��������� 029
6-2 Setting up: Built-in microphones �����������������030
6-3 Setting up: Built-in microphones /outside microphone with plug-in power �031
6-4 Setting up: INPUT [1], [2] connections and phantom power source �� 032
6-5 Setting up: USB connection, H4n used as an Audio Interface ���� 033
6-6 Setting up: USB connection, H4n used as a SD card reader ����� 035
6-7 Setting up: Built-in speaker �������������������036
7-1 About H4n modes �����������������������037
7-2 Selecting a <MODE> ���������������������� 038
7-3 Details about modes ���������������������� 039
8-1 <MODE> screens: STEREO and STAMINA modes ���������040
8-2 <MODE> screen: 4CH mode ������������������041
8-3 <MODE> screen: MTR mode ������������������ 042
8-4 <MODE> screen: MAIN MENU������������������043
9 Option: Remote control operation ���������������� 045
Operations
1-01 Setting / Recording: Set input source and recording level ����� 047
1-02 Setting / Recording: Recording in STEREO and STAMINA mode � � 049
1-03 Setting / Recording: Recording format <REC FORMAT> ����� 051
1-04 Setting / Recording: File name <FILE NAME> ���������� 052
1-05 Setting / Recording: Recording on 4CH mode ���������� 053
1-06-1 Setting / Recording: Recording in MTR mode ���������� 055
1-06-2 Setting / Recording: Recording <OVER WRITE> in MTR mode ��057
Page 5

A table of contents
004
1-06-3 Setting / Recording: Recording <ALWAYS NEW> in MTR mode ��058
1-07 Setting / Recording: TRACK MENU in MTR mode �������� 059
1-08-1 Setting / Recording: Re-recording, <PUNCH IN/OUT> automatic �061
1-08-2 Setting / Recording: Re-recording, <PUNCH IN/OUT> manual ��063
2-01-1 Recording function <AUTO REC> ���������������065
2-01-2 Recording function <AUTO REC STOP> ������������ 066
2-02 Recording function <PRE REC> ����������������067
2-03 Recording function <LO CUT> ����������������068
2-04 Recording function <COMP/LIMIT> �������������� 069
2-05 Recording function <REC LEVEL AUTO> ������������ 070
2-06 Recording function <MONITOR> ���������������071
2-07 Recording function <MONO MIX> ��������������� 072
2-08 Recording function <MS STEREO MATRIX>����������� 073
3-01-1 Tuner <TUNER (CHROMATIC) > ���������������� 075
3-01-2 Tuner, all other <TUNER> ������������������� 076
3-01-3 Tuner <TUNER (CALIB) > ������������������� 077
3-01-4 Tuner <TUNER (INPUT) > �������������������078
3-02 Metronome <METRONOME> ����������������� 079
3-03-1 All about EFFECT ���������������������� 081
3-03-2 Effect <EFFECT> ���������������������� 083
3-03-3 Effect <EDIT>, patch edit �������������������084
3-03-4 Effect <EDIT (PRE AMP) >, editing PRE AMP modules ������ 085
3-03-5 Effect <EDIT (EFX) >, editing EFX modules ����������� 086
3-03-6 Effect <EDIT (LEVEL/RENAME) > ��������������� 087
3-03-7 Effect <EDIT (STORE) > �������������������088
3-03-8 Effect <IMPORT>, taking in a patch from another PROJECT ��� 089
3-04-1 A sing-along machine <KARAOKE> preparation ��������� 091
3-04-2 A sing-along machine <KARAOKE> recording ���������� 093
4-01 Playback : Playback files (stereo, 4ch and stamina modes) ����094
4-02 Playback : <PLAY MODE> ������������������ 095
4-03 Playback : Setting marks ������������������� 096
4-04 Playback : <AB REPEAT> �������������������097
4-05 Playback : <SPEED> ��������������������� 099
4-06 Playback : <MIXER> ��������������������� 100
4-07 Playback : Playback files (MTR mode) ������������� 101
4-08 Playback : Appointing time with a counter �����������102
5-01 Edit / Output : <FOLDER SELECT> ��������������103
5-02 Edit / Output : <FILE SELECT> ���������������� 104
5-03 Edit / Output : <FILE INFORMATION> ������������� 105
5-04 Edit / Output : <FILE DELETE> ����������������106
5-05 Edit / Output : <FILE DELETE ALL> �������������� 107
5-06 Edit / Output : <FILE (COPY)> �����������������108
5-07 Edit / Output : <FILE RENAME> ���������������� 109
5-08 Edit / Output : <FILE MP3 ENCODE> ������������� 111
Page 6

A table of contents
005
5-09 Edit / Output : <FILE NORMALIZE> �������������� 112
5-10 Edit / Output : <FILE STEREO ENCODE> ������������ 113
5-11 Edit / Output : <MARK LIST> �����������������115
5-12 Edit / Output : <DIVIDE> ������������������� 116
5-13 Edit / Output : <MOVE> �������������������117
5-14 Edit / Output : <NEW PROJECT> ���������������118
5-15 Edit / Output : <PROJECT (SELECT) > ������������� 119
5-16 Edit / Output : <PROJECT (DELETE) > ������������� 120
5-17 Edit / Output : <PROJECT (RENAME) > ������������ 121
5-18 Edit / Output : <PROJECT (COPY) > �������������� 122
5-19 Edit / Output : <PROJECT (BOUNCE) > ������������ 123
5-20 Edit / Output : <PROJECT (PROTECT) > ������������ 125
6-01 Utility : <DISPLAY BACK LIGHT> ���������������126
6-02 Utility : <DISPLAY CONTRAST> ����������������127
6-03 Utility : <BATTERY TYPE> ������������������128
6-04 Utility : <VERSION> ��������������������� 129
6-05 Utility : <FACTORY RESET>������������������ 130
6-06 Utility : <REMAIN> ���������������������� 131
6-07 Utility : <FORMAT> ��������������������� 132
6-08 Utility : <VERSION UP> ������������������� 133
6-09 Utility: How to use H2 and H4 SD cards ������������ 134
Reference
Main spec list by mode ����������������������� 137
Available setting menu list by each mode ��������������� 138
Effect types on MTR mode and the parameter �������������139
H4n patch list ��������������������������� 145
H4n products spec ������������������������� 147
When you think something may be wrong with your machine �������148
Index �������������������������������149
Page 7
Safety precautions for users
006
Safety precautions for users
SAFETY PRECAUTIONS
In this manual, the warning and caution symbols are used
to highlight dangerous accidents and troubles for users to
read so that accidents can be prevented. The meanings of
these symbols are as follows:
If the users ignore this symbol and handle the
device the wrong way, serious injury or death
could result.
If the users ignore this symbol and handle the
device the wrong way, bodily injury and damage
to the equipment could result.
Please read through the following safety tips and
precautions to ensure hazard-free use of the H4n.
Power requirements
Since power consumption of this unit is fairly
high, we recommend the use of an AC adapter
whenever possible. In case you use batteries, use
either alkaline or nickel-metal hydride batteries.
[AC adapter operation]
• Make sure to use only an AC adapter, DC5 center
plus 1A (ZOOM AD 14).The use of other than the
specified type may damage the unit and pose a
safety hazard.
• Connect the AC adapter only to an AC outlet
that supplies the rated voltage required by the
adapter.
• When disconnecting the AC adapter from the AC
outlet, make sure grasp the adapter itself and
never pull at the cable.
• During lightning or when not using for an
extended period, disconnect the AC adapter
from the AC outlet.
[Battery operation]
• Use two conventional size AA-1.5 volt batteries.
• H4n cannot be used for recharging. Pay close
attention to the labeling of the batteries to make
sure you choose the correct ones.
• When not using for an extended period, remove
the batteries from the unit.
• If battery leakage has occurred, wipe the battery
compartment and battery terminals carefully to
remove all remnant of battery fluid.
• When using the unit, the battery compartment
cover should be closed.
Environment
To prevent unexpected troubles and malfunctions,
avoid using H4n in environment where it will be
exposed to:
• Extreme temperatures
• Heat sources such as radiators or stoves
• High humidity or moisture
• Excessive dust or sand
• Excessive vibration or shock
Handling
• Never place any objects filled with liquids, such
as a vase, on the H4n since this can cause
electric shock.
• Never place naked flame sources, such as lighted
candles, on the H4n since this can cause fire.
• The H4n is a precision instrument. Do not exert
undue pressure on the keys and other controls.
Take care not to drop, bump, and do not subject
it to shock or excessive pressure, which can
cause serious troubles.
• Take care that no foreign objects (coins or pins
etc.) or liquids (water, alcoholic drinks and
juice)can enter the unit.
• Do not place the H4n speaker closer to other
precision instruments (watch and computer),
electronic medical instruments, or magnetic cards.
Connecting cables and input and output jacks
You should always turn off the power to the H4n and
all other equipment before connecting or disconnecting
any cables. Make sure to disconnect all a connection
cables and the power code before moving the H4n.
Alterations
Never open the case of the H4n or attempt to
modify the product in any way since this can result
in damage to the unit.
Volu me
Do not use the H4n at a loud volume for a long
time since this can cause hearing impairment.
USAGE PRECAUTIONS
Electrical interference
For safety considerations, the H4n has been designed
to provide maximum protection against the emission of
electromagnetic radiation from inside the device, and
protection from external interference. However, the
equipment that is very susceptible to interference or that
emits powerful electromagnetic waves should not be placed
near the H4n, as the possibility of interference cannot be
ruled out entirely.
With any type of digital control device, the H4n included,
electromagnetic interference can cause malfunctioning
and can corrupt or destroy data. Care should be taken to
minimize the risk of damage.
Cleaning
Use a soft, dry cloth to clean the H4n. If necessary, slightly
moisten the cloth. Do not use abrasive cleanser, wax, or
solvents (such as paint thinner or cleaning alcohol), since
these may dull the finish or damage the surface.
Please keep this manual in a convenient
place for future reference.
Page 8

Copyright warnings
007
Copyright warnings
Recording of live performances
Many artists and most live venues do not allow recording and photography
and will check for cameras and recorders at the entrance. Even if recording is
allowed, it is prohibited to sell, distribute, or upload to the Internet without the
organizer’s authorization. Copyright violation is a crime.
Capturing music and sound files
Saving music to CD, MP3, or other media, reproducing files for personal use can
be considered a copyright violation.
Trademarks:
• The SD symbol and SDHC symbol are trademarks.
• The use of MPEG Layer-3 audio compression technology is licensed from Fraunhofer IIS
and Sisvel SpA.
• Windows is a registered trademark of US Microsoft Corporation.
• Mac OS and Macintosh is a trademark of Apple Inc.
• Steinberg and Cubase are registered trademarks of Steinberg Media Technologies GmbH Inc.
• Names of manufacturers and products are each respective owner’s trademarks or registered.
Page 9
Getting started
008
Getting started
Page 10
Recording ow using the H4n
009
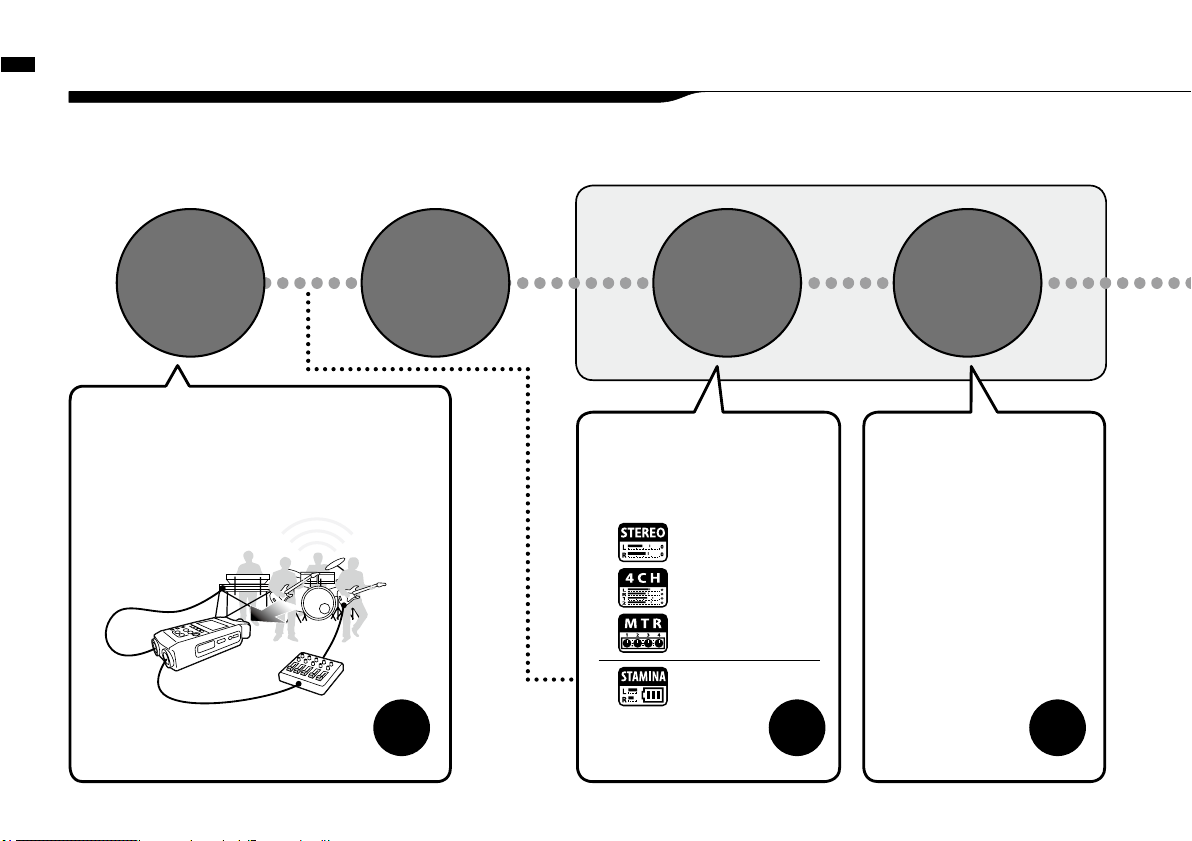
1-1 Recording flow using the H4n
The following is the basic ow of recording operation for the H4n. Depending on the application of the recording, you can select which
recording mode and audio quality setting is right for the situation.
Switch on
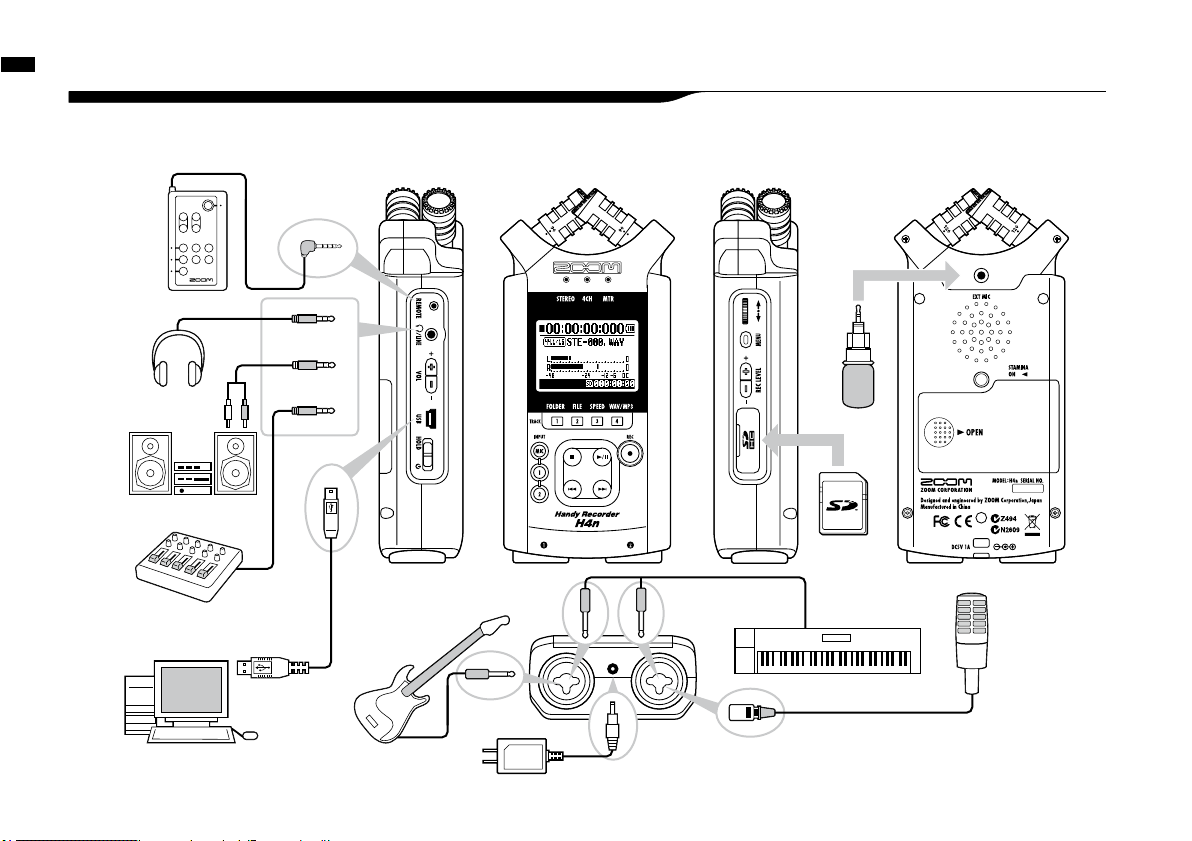
Connecting
to other audio
devices
Set-up
Select
the Mode
Set-up the
recording
method
1) The H4n has built-in microphones as well as
2 input jacks with phantom power for use with any
external microphone. A USB cable is included to
connect H4n to the computer.
The H4n is powered by AA batteries or a Plug-in
Power Source.
3) You can select your favorite
settings;
• AUTO REC
• REC LEVEL AUTO
• LO CUT
• COMP/LIMIT
• MONO MIX
• TUNER
• METRONOME
• EFFECT/PATCH
• KARAOKE and so on.
P.029
〉〉〉〉
2) You can select among 4 Modes;
STEREO, 4CH, MTR & STAMINA
suitable for different input sources
and output file formats.
STEREO Mode
4CH Mode
MTR Mode
P.037
〉〉〉〉
P.065-
〉〉〉〉
STAMINA Mode
P.019
Page 11
Recording ow using the H4n
010
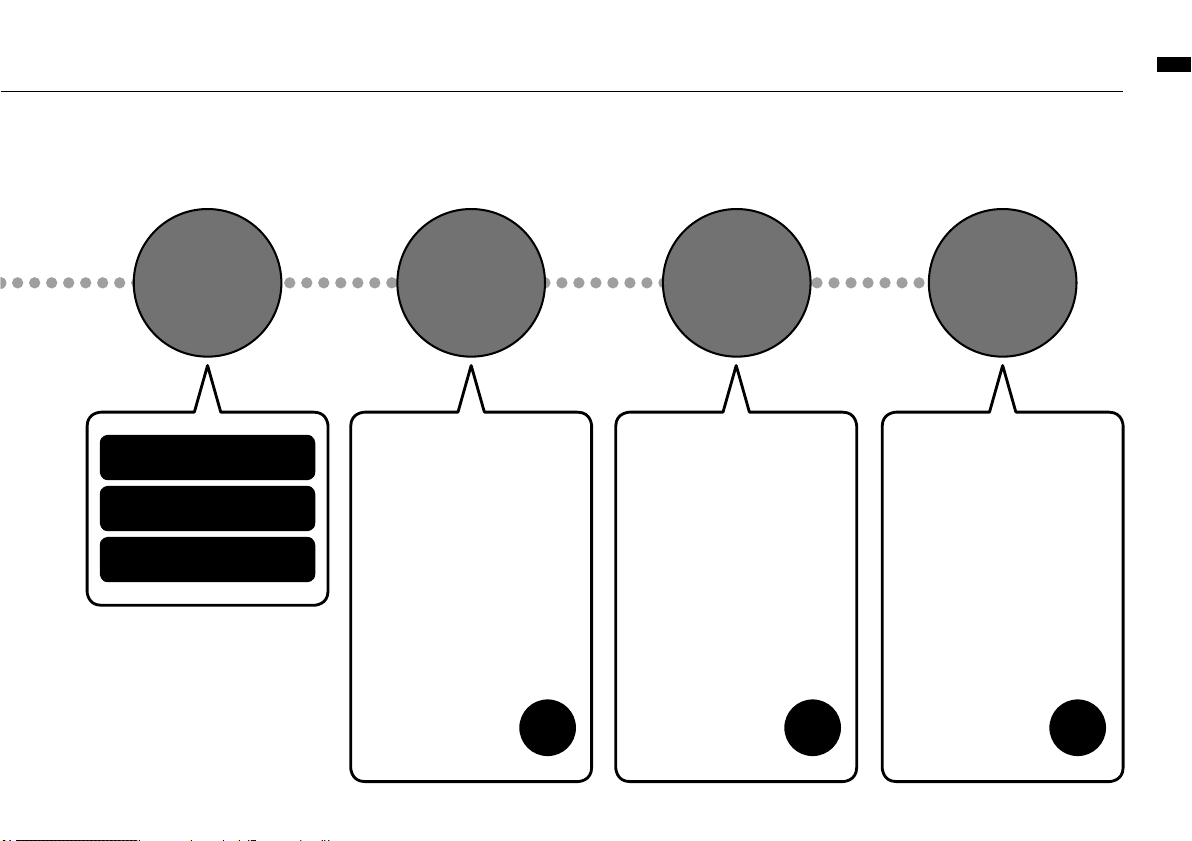
Edit·OutputRECORD
Playback
and conrm
RE-RECORDING
(Recording again
from scratch)
Recording on STEREO mode/
STAMINA mode………P.049
Recording on 4CH mode
……………P.053
Recording on MTR mode
……………P.055
5) The H4n has very convenient
ways to swiftly review/playback
a recording as well as marking
/finding specific sections and
repeating sections of the recording:
6) In MTR mode the punch-in/
punch-out function enables you
to re-record only the section you
want to correct.
7) The recordings are saved as
FILES and PROJECTS, and you
can edit them in various ways.
P.094-
〉〉〉〉
P.061-
〉〉〉〉
P.105 -
〉〉〉〉
•
FILE INFORMATION
•
FILE MP3 ENCODE
•
FILE STEREO ENCODE
•
DIVIDE
•
MOVE
•
BOUNCE
and so on.
• PLAY MODE
• AB REPEAT
• SPEED
• MARK LIST
and so on.
• PUNCH-IN/OUT
and so on.
Page 12
Monitor the input sound
rec level
Easy recording guide [STEREO MODE]
011
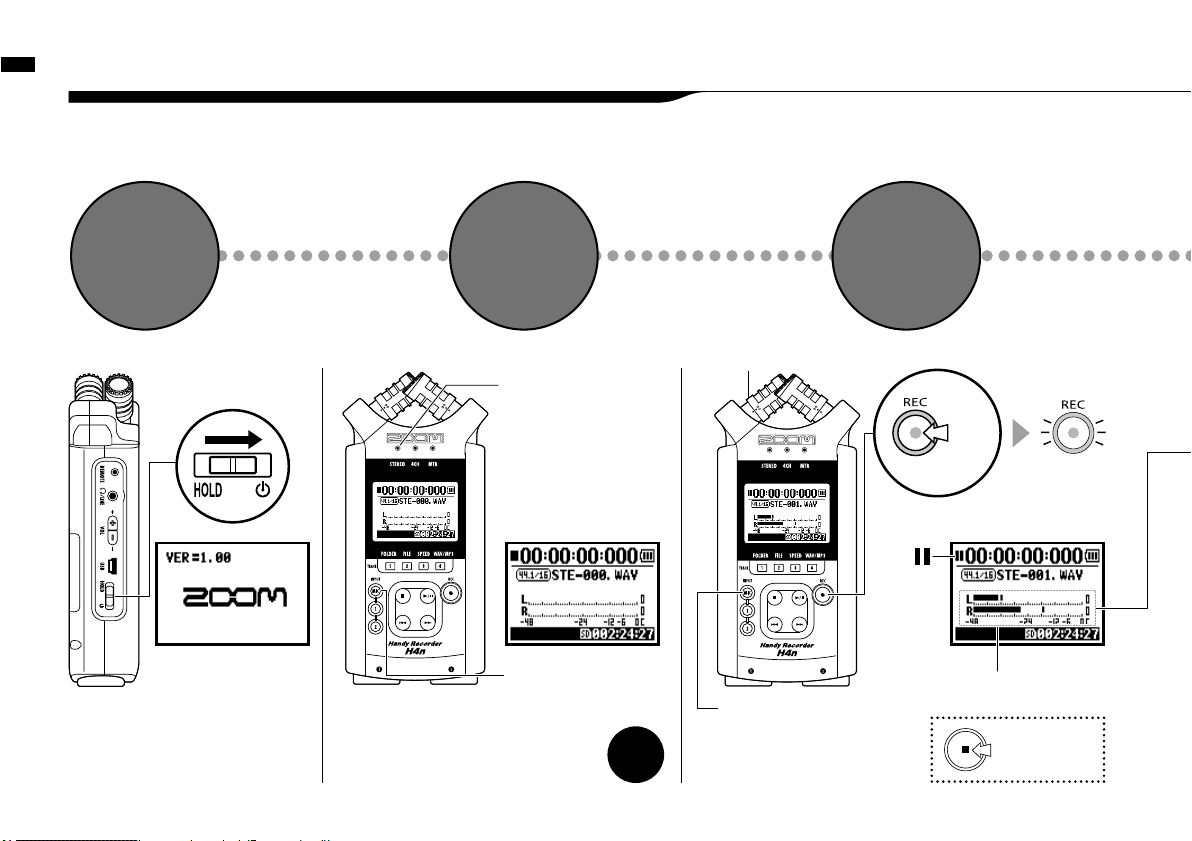
1-2 Easy recording guide [STEREO MODE]
The following is basic recording instructions using the built-in stereo microphones and built-in speaker
in STEREO MODE.
[LEFT PANEL]
Power switch
ON
1
[POWER]
switch on.
Conrm
STEREO
M O DE
2
P.038
〉〉〉〉
In case of a wrong MODE indicator
or a wrong screen
RECORD READY
OR STANDBY
CONDITION
3
STEREO
mode indicator
light on
[STEREO TOP SCREEN]
MIC button light on
*switch on from built-in
microphones.
Made new le
Input from the built-in
microphones
MIC lamp lights
blinks
Press here
when you want
to stop.
blinks
Press.
[FRONT PANEL]
Recording
standby mark
Page 13
Easy recording guide [STEREO MODE]
012
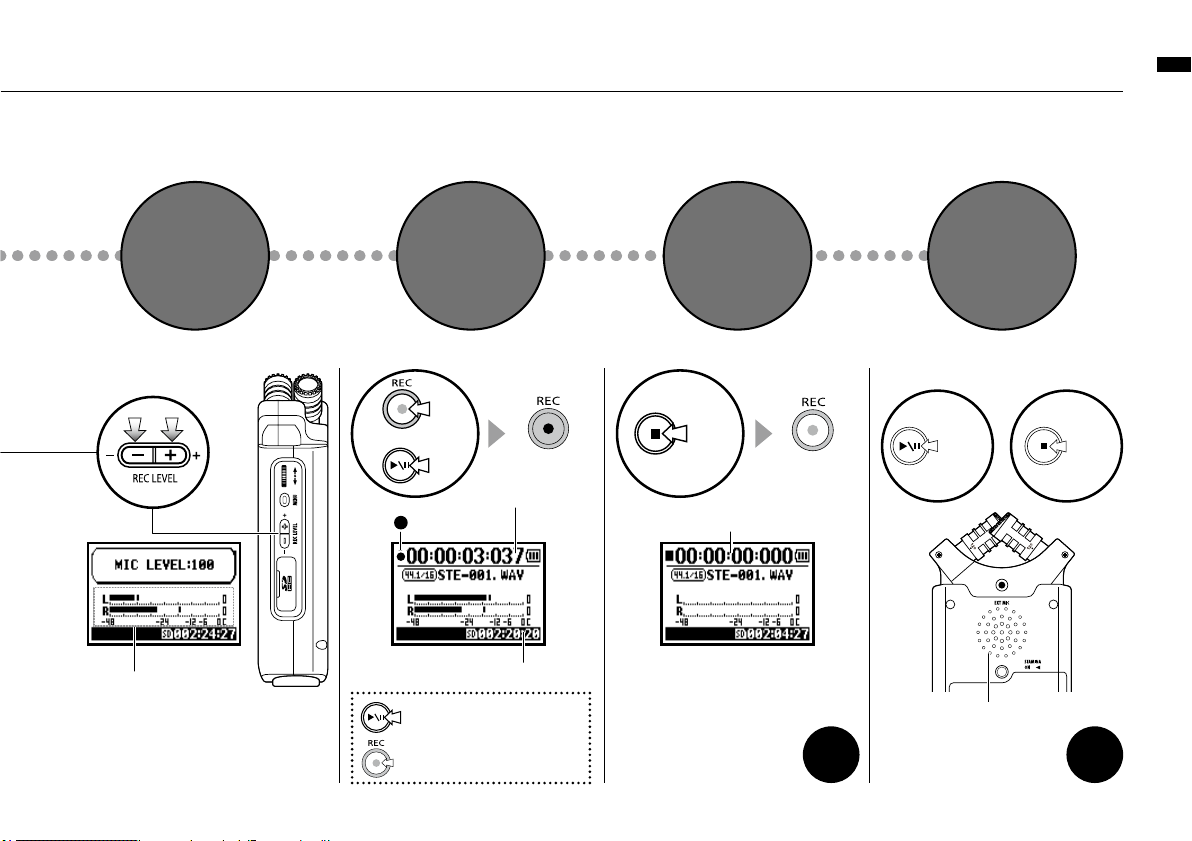
ADJUST
INPUT LEVEL
START
RECORDING
STOP
RECORDING
Adjust the input sound
rec level
P.094
〉〉〉〉
In detail
4 5 6
PLAYBACK
7
DECREASE
−
light on
Counter turns
Remaining time on SD CARD
Counter returns 0:00:00:00:000
light off
Pause Recording
Counter doesn’t return 0
[STOP]
[RIGHT PANEL]
Now recording
mark
Press.
[BACK PANEL]
Output: Built-in speaker
Press.
[PLAYBACK]
Mark Recording
Places Mark at specific time in
WAV file format
or
Press.
P.049
〉〉〉〉
In detail
INCREASE
+
Press.
Page 14
Name and function of each part
013
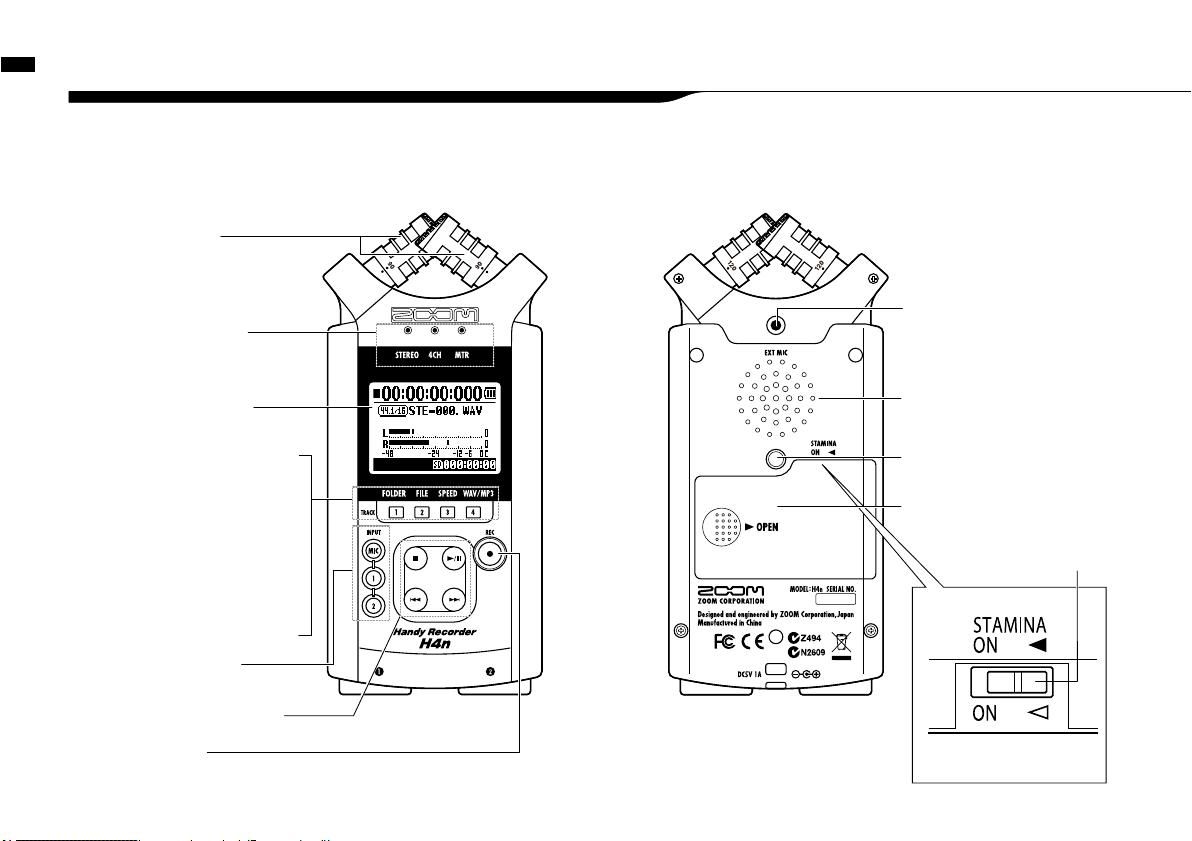
2-1 Name and function of each part
90 / 120°
Variable XY
Stereo microphones
(Built-in)
Backlight Equipped
Display
[REC] Button
STEREO/4CH/MTR
mode indicator
INPUT: Buttons for
[MIC] [1], [2]
Transport Control Buttons
[FRONT PANEL] [BACK PANEL]
Threaded Tripod mount
Battery cover
A built-in mono speaker
• Short cut buttons on
STEREO/4CH mode
[1] <FOLDER>
[2] <FILE>
[3] <SPEED>*
STEREO mode
[4] <WAV/MP3>
*STEREO/4CH mode
• On MTR mode
Buttons for
TRACK [1], [2], [3], [4]
Input jacks for external stereo
microphone
STAMINA mode
switch
Page 15
Name and function of each part
014
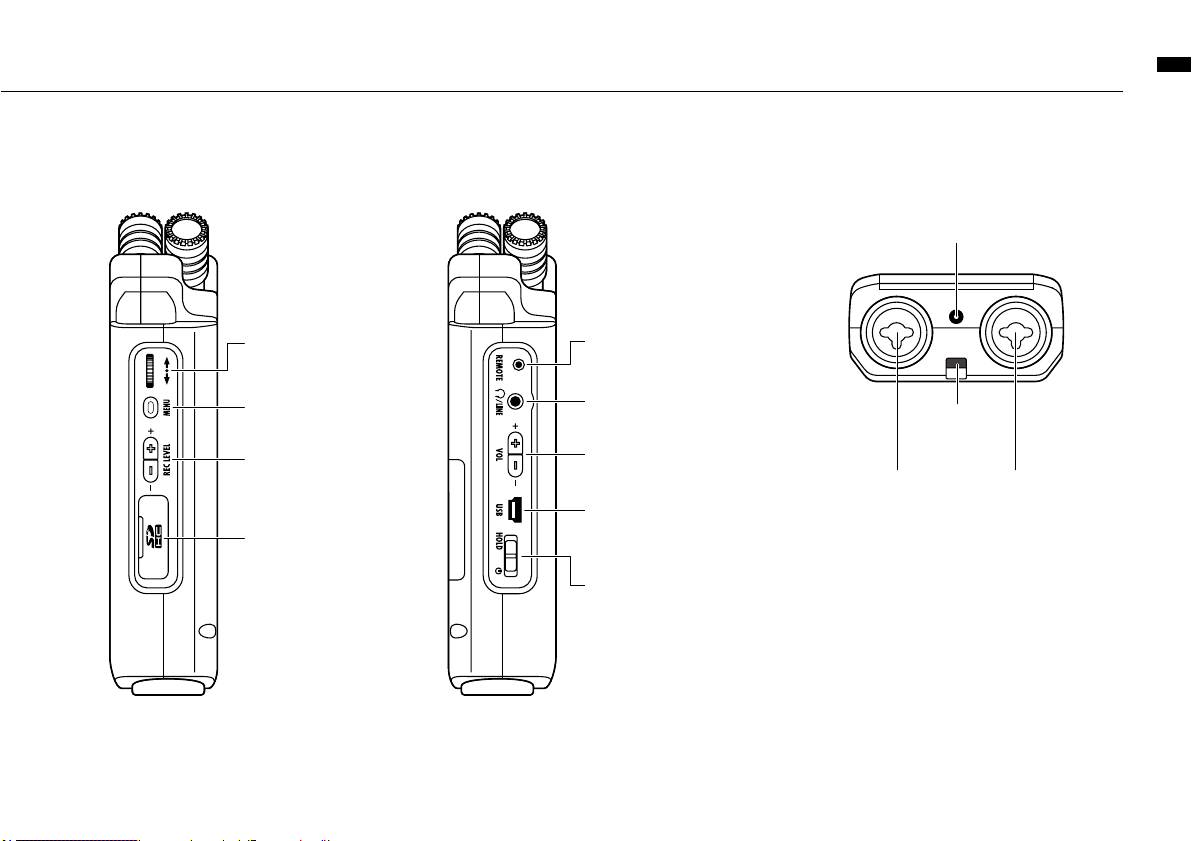
[BOTTOM PANEL]
DC5V AC ADAPTER jack
Optional remote-control jack
[LINE/PHONE] output jack
USB port
POWER switch
HOLD switch
[LEFT PANEL]
[DIAL]
[MENU] button
REC LEVEL [ + / − ]
SD card slot
[RIGHT PANEL]
VOLUME [ + / − ]
Installed hole
for a strap
XLR/STANDARD PHONE
INPUT [1] jack
XLR/STANDARD PHONE
INPUT [2] jack
Page 16
Included Accessories
015
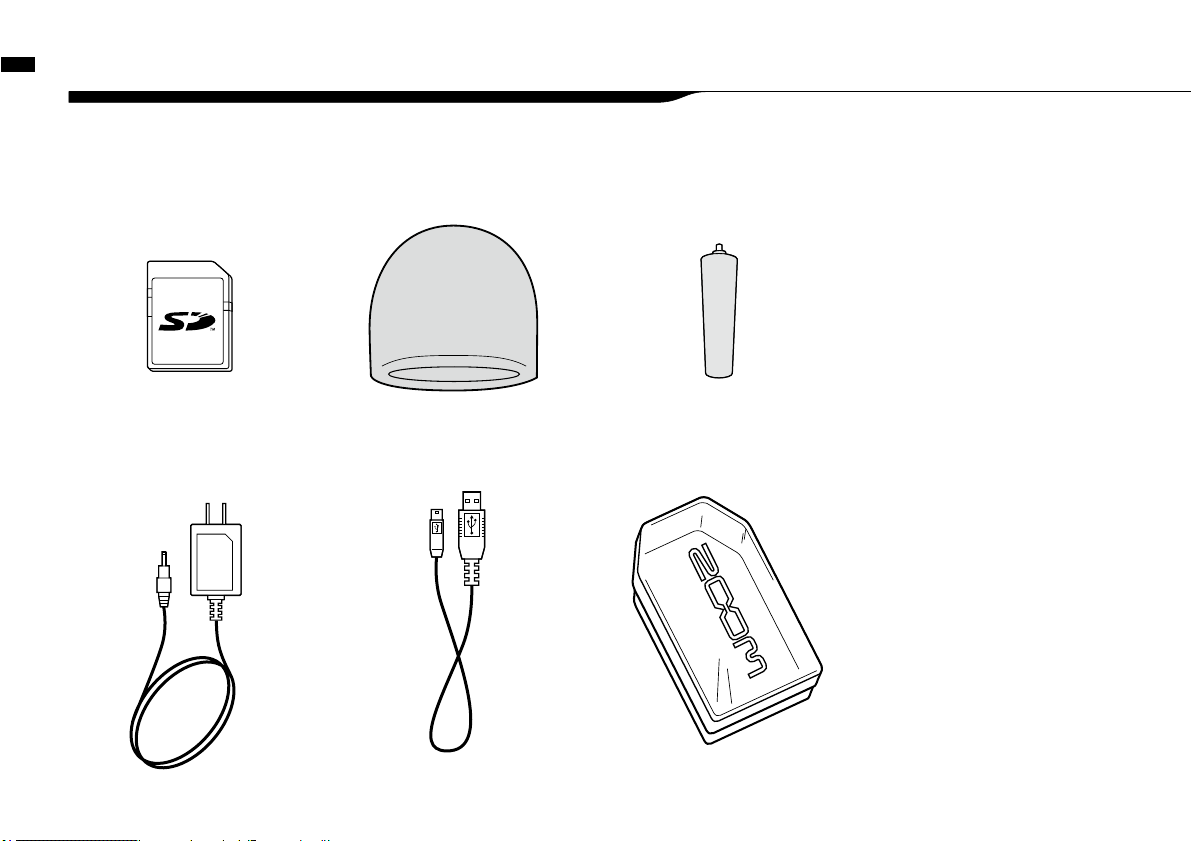
2-2 Included Accessories
The following accessories are included in the H4n package.
Inspect the package contents to be sure all accessories are included.
SD CARD
MAIN BODY CASE
MICROPHONE STAND
ADAPTER
AC ADAPTER
(ZOOM AD-14)
USB CABLE
WINDSHIELD
Cubase LE4
Instruction manual
DAW start-up guide
Page 17
Installation of the attachments and options
016
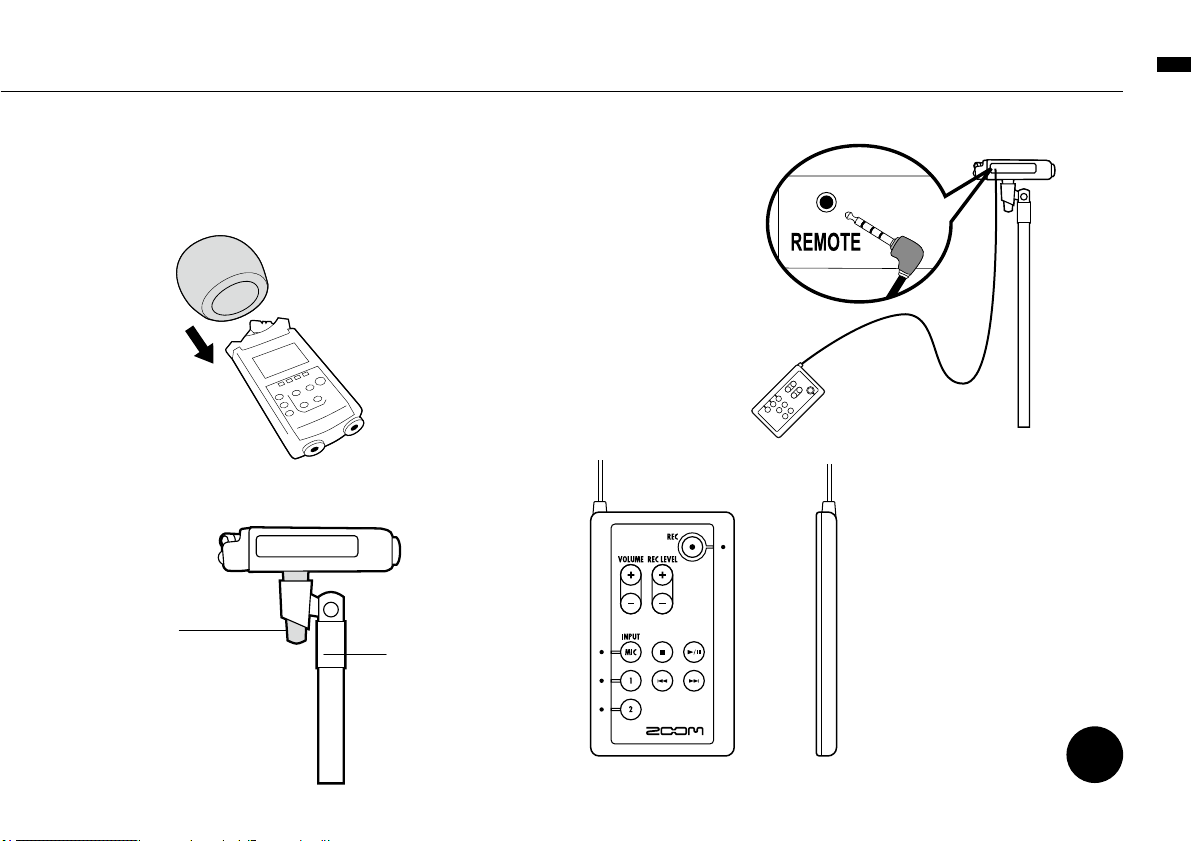
•How to use the windshield
Remote control
(Option, sold separately)
P.045
〉〉〉〉
Operation of
remote control
Microphone
stand adapter(Accessory)
Microphone stand
•How to mount to a microphone stand
[FRONT PANEL] [SIDE PANEL]
When recording outside in
the field, covering the built-
in microphones with this
windshield, you can reduce
wind noise.
Use a microphone adapter
(optional attachment) to install
the H4n unit and the stand can
grip the adapter firmly.
Page 18
Battery/Power setting
017
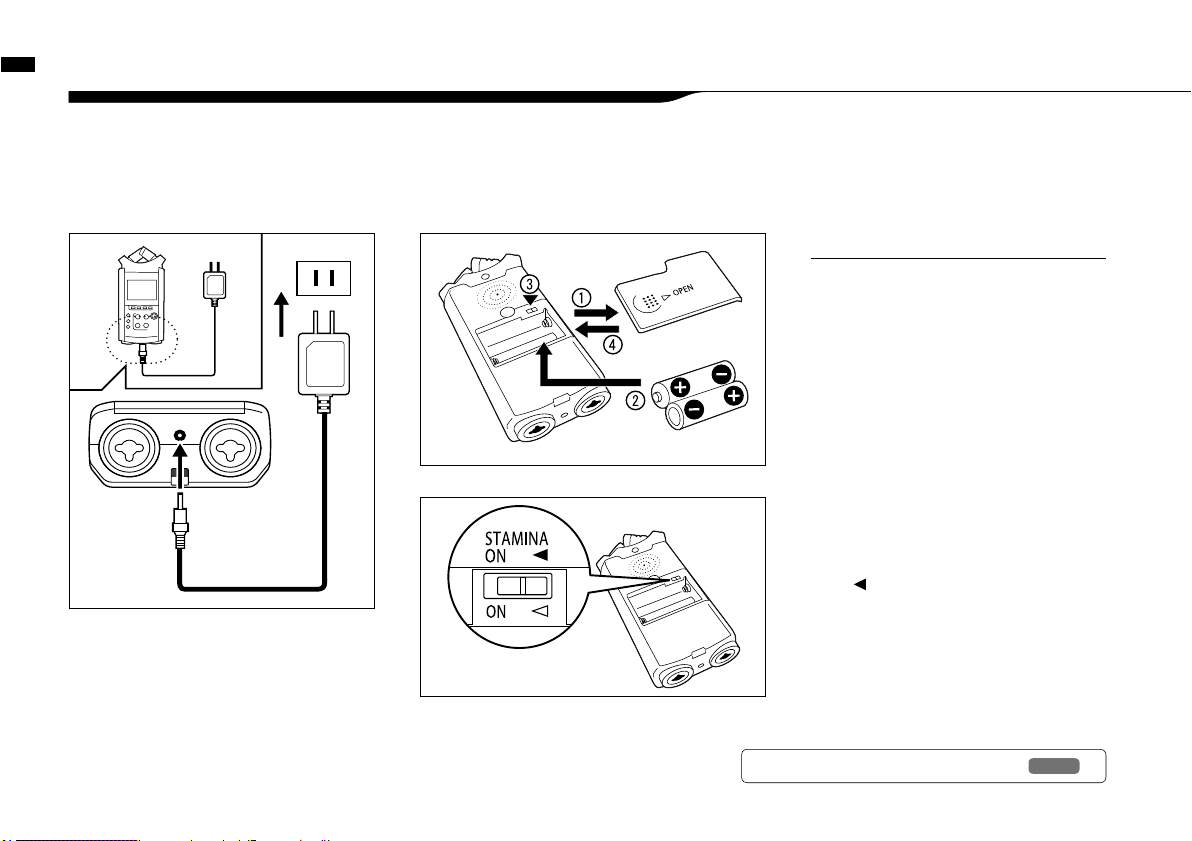
3 Battery/Power setting
Power for H4n recorder is supplied by the included AC adapter or batteries.
• AC power operation
An AC adapter is included.
• Battery installation
Install two size AA batteries (IEC R6)
An attached AC adapter
Zoom AD-14
Use of an AC adapter other
than the one included may
cause trouble.
2
Insert two size AA batteries
ensuring you match the
polarity markings ( + and − ).
* Illustration : open the battery compartment
cover and insert batteries.
1
Open the battery
compartment cover.
Make sure the power is off!
Whenever you open the battery compartment
cover or plug in/unplug the AC adapter, make
sure the power is off, otherwise the recording
data can be destroyed.
NOTE:
Ref.
☞
Explanation about the Stamina Mode.
P.037
: Use in general (Using AC adapter,
batteries)
ON : Stamina Mode On (Eco-power mode
when using batteries)
3
Set the Stamina Mode
Switch.
* Illustration of a Stamina Switch on.
4
Close the battery
compartment cover.
* Illustration of closing the battery
compartment cover.
Page 19
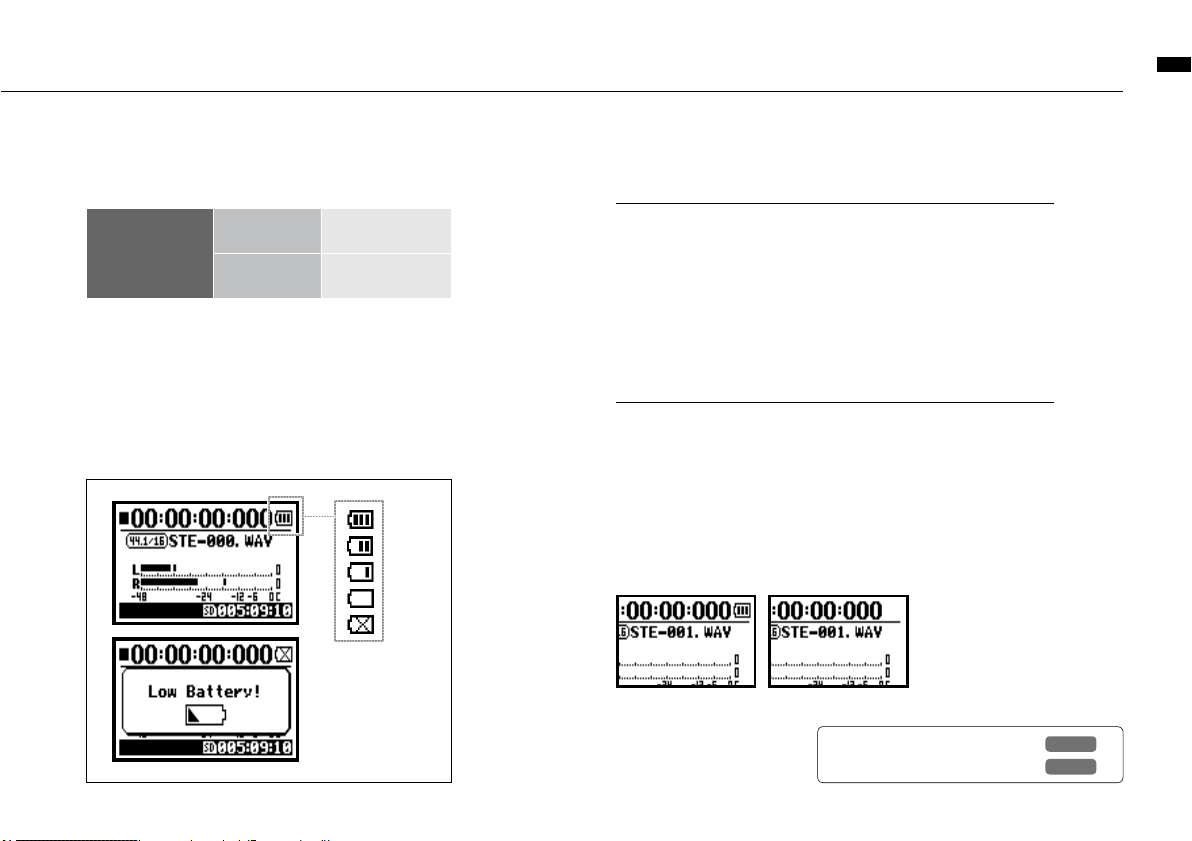
Battery/Power outlet setting
018
To measure the lifetime of the battery
The remaining lifetime of the battery is measured more precisely
by using the battery type setting on the H4n.
Saving period for the setting <DATE/TIME>
Whenever power supply is off by dead battery, the H4n can save
the date/time setting for three minutes. When the saving time is
over, the setting will be returned to the default value.
Screen indicator for power
HINT:
• Remaining lifetime of the battery
When “Low Battery!” indication appears, immediately
switch off unit and exchange batteries, or shift power
source to AC adapter.
When remaining battery
life is getting short, “Low
Battery” indication will
be shown every two
seconds and the power
will switch off shortly after.
FULL
EMPTY
• Battery’s approximate lifetime
Usable batteries
You can use conventional alkaline and nickel metal hydride batteries.
Power supply from USB
Connect the USB cable to the H4n while it’s already connected to
the computer with the power switch off, and power is automatically
turned on via USB bus power supply. This function is only available
when the H4n is used as an SD card reader or an audio interface.
NOTE:
Alkaline battery
in general use about 6 hours
in stamina mode
use
about 11 hours
* Approximate lifetime when it is used for continuous recording on
WAV 44.1 kHz/16bit format.
Using batteries Using AC adapter
Ref.
☞
<BATTERY TYPE>
P.128
Ref.
☞
<USB BUS POWER>
P.033
Page 20
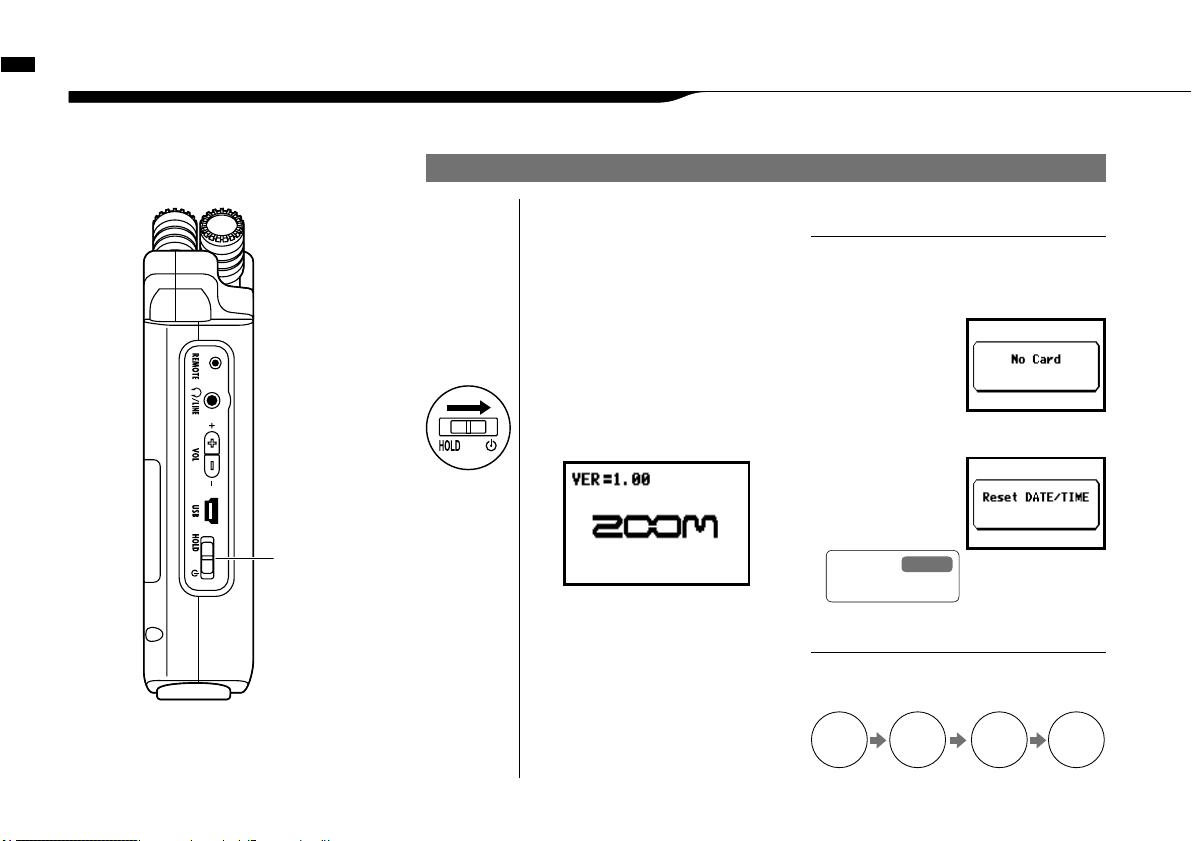
Power On and Off, How to use power and hold switch
019
4-1 Power On and Off, How to use power and hold switch
[
LEFT PANEL
]
POWER switch
HOLD switch
POWER ON / BOOTING UP
2
Insert SD card.
1
[Preparation]
Make sure all equipment is
turned off.
4
Switch on connected
instruments and monitors.
• Before switching the power on, lower
the volume of instruments and monitors
connected to the H4n.
• If the display reads
"N o Card" when boot-
ing up, make sure
that the SD card is
inserted correctly.
• If the display says "Reset DATE/TIME"
when booting
up, the date and
time are set to the
primary value.
NOTE
When using additional audio devices, power
them on in the following order:
HINT:
Procedure for power on.
3
[Power On _ Boot up]
Slide the power switch.
AMPMixerH4n
Instruments
ON ON ONON
Ref.
<DATA/TIME>
P.028
Page 21
Power On and Off, How to use power and hold switch
020
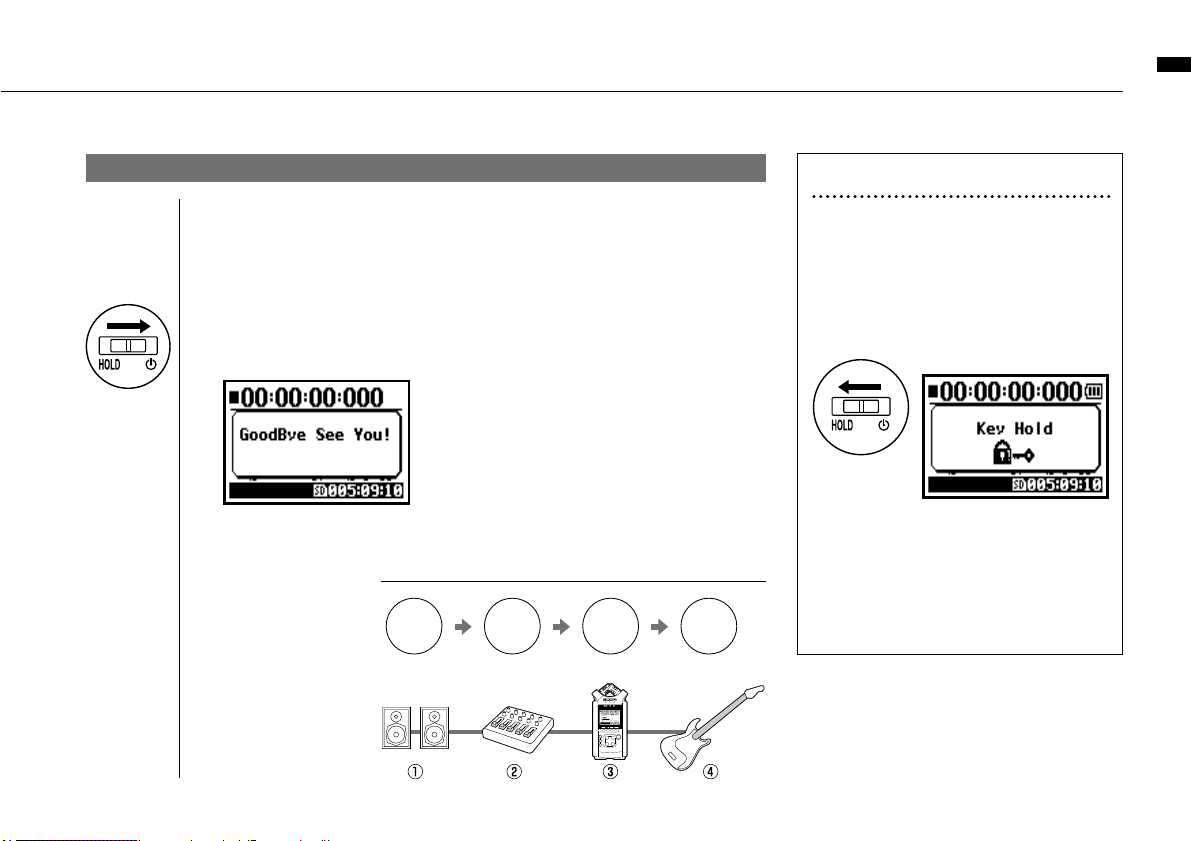
POWER OFF / SHUT DOWN
1
[Preparation]
Turn off monitors first then instruments
2
[Power Off _ Shut down]
Slide the power switch.
HOLD Function
The H4n features a HOLD function to make
any button operation inactive, preventing errors
during recording.
To engage the hold function,
slide switch to hold position.
If you press any button while the HOLD
function is engaged, the screen will display
“Key Hold” for two seconds. To disengage
the HOLD mode, slide power switch out of
hold position.
HINT
Procedure for power off
AMP
OFF
Mixer
OFF
Instruments
OFF
H4n
OFF
* shut down screen
* ‘Key Hold’ display
Page 22
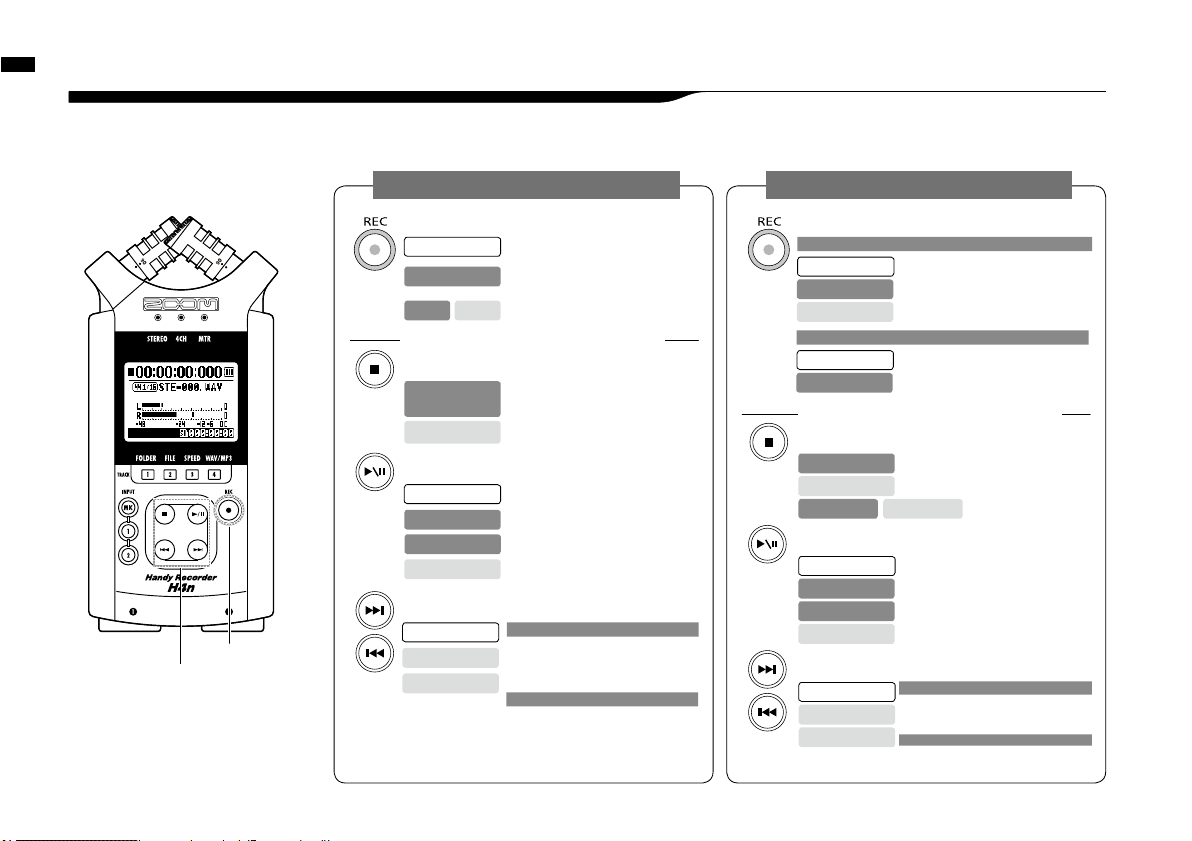
How to use the [REC] and transport control buttons
021
4-2 How to use the [REC] and transport control buttons
Buttons like [REC], [STOP], [PLAY/PAUSE], [FF], [REW] each have different functions depending
on the H4n’s operation MODE.
STEREO/4CH/STAMINA MODE MTR MODE
[FRONT PANEL]
transport control buttons
[REC] button
[REC] button
Set to overwrite recording
Playback
Stops recording and resets the counter
Record, Recording Standby
Stop recording
(You can continue playback while recording)
Stop
Engages recording standby mode
Stops recording and counter
Stop
Recording in ALWAYS NEW mode
Starts recording and counter
Recording Standby
[REC] button
Ente r recordi ng standb y mode and
reset the counter to 0
Stop
Start recording and counter
Recording Standby
Place a mark (WAV FILE only)
Record
Playback
[STOP] button
Stop recording and the counter stops
Recording
Stop playback and the counter stops
Playback
Stop each movement
Recording-pause
Playback-pause
[FF] [REW] buttons
Stop
Playback
Playback-pause
[FF] : Moves forward through file in one second increments
[REW]:
Returns to the begining of the file
Press for less than one second
Scans through file in forward or reverse
direction.
Press for more than one second
[FF], [REW] buttons
Stop
Playback
Playback-pause
Scans through file in forward or reverse
direction.
The longer the button is pressed, the faster
the scanning speed. Fast Forward or Rewind
will stop at the beginning or end of the file.
Press for more than one second
[FF] move to next file
[REW] returns to the begining of the file
* However if there is a marker in a WAV file,
the button moves to the marking place.
Press for less than one second
[STOP] button
Stop recording and reset counter
Recording,
recording standby,
Recording-pause
Stop playback and counter
Playback-pause
[PLAY/PAUSE] button
Start playback and counter
Stop
Pause or restart recording
Recording,
Recording-pause
Pause or restart playback
Playback-pause
Start recording and counter
recording standby
TRANSPORT CONTROL BUTTONS
TRANSPORT CONTROL BUTTONS
[PLAY/PAUSE] button
Pause Playback
Playback
Starts playback
Stop
Recording
In OVERWRITE mode: No function
In ALWAYS NEW mode: pause recording
Starts recording and counter
Recording standby
Page 23
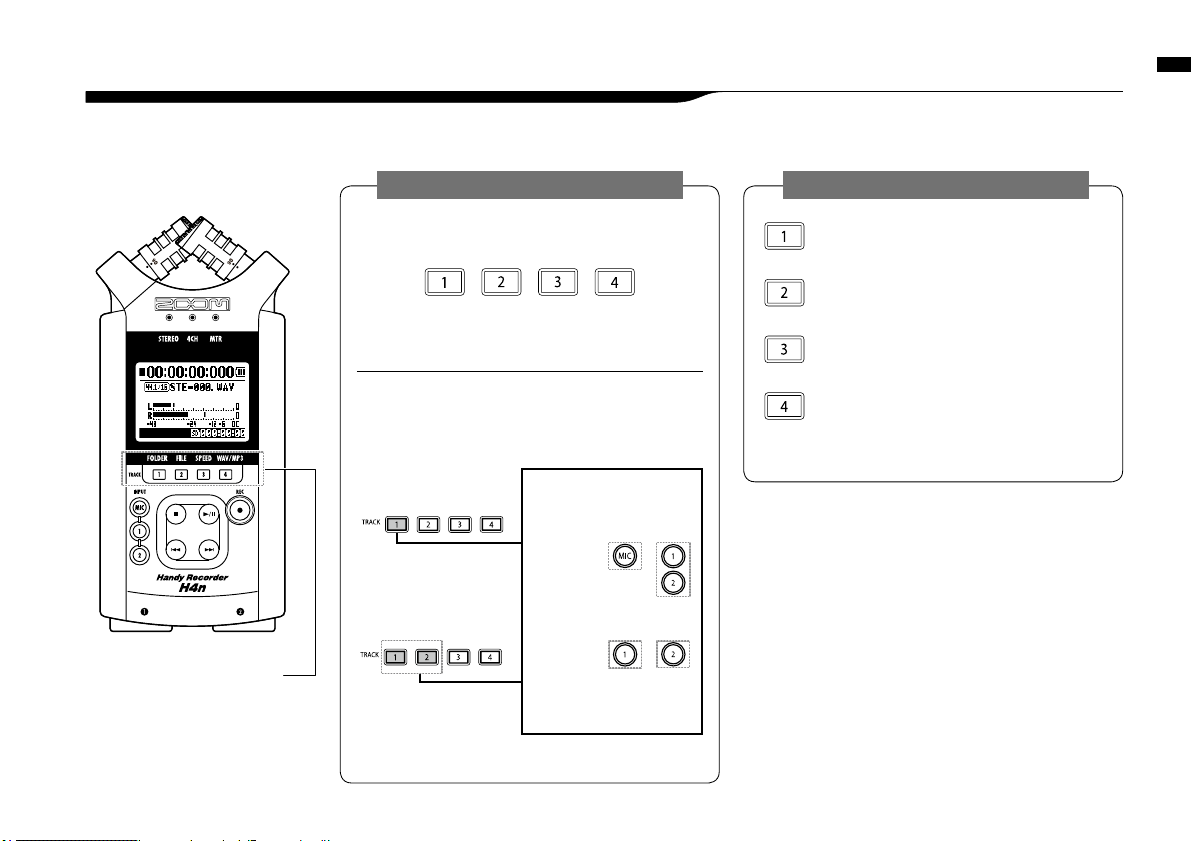
How to use the track [1], [2], [3] and [4] buttons
022
4-3
How to use the track [1], [2], [3] and [4] buttons
The buttons of TRACK [1] – [4] have different functions depending on the MODE.
STEREO/4CH/STAMINA MODE
Move to the
<FOLDER SELECT> menu
Move to the <FILE> menu
Move to the <SPEED> menu
(only STEREO MODE)
Move to the <REC FORMAT> menu
(STEREO MODE, 4CH MODE)
TRACK [1]–[4]
[Front Panel]
MTR MODE
Make settings of the track and the input source
* track #3 and #4 are
the same
Select two tracks
* track #2-#4 are the
same, press the
number you select
Select only one track
Switch from ‘RECORDING’ to ‘PLAYBACK’ of the
tracks, or the other way around
When you start recording, press the track number you want
to record and the track becomes ‘Recording Standby’ status.
That track button will then become illuminated.
These operations are not available during
recording and playback.
After selecting the track, use the input source buttons to select
the input for that track.Using the INPUT button you can record
in mono, stereo or a combination of those.
* Those operations are not valid
during recording and playback.
* Input selections are
those four different
combinations.
For stereo input you
select from
[MIC] and [1] [2]
For a mono input you
can select either from
[1] or [2]
Page 24
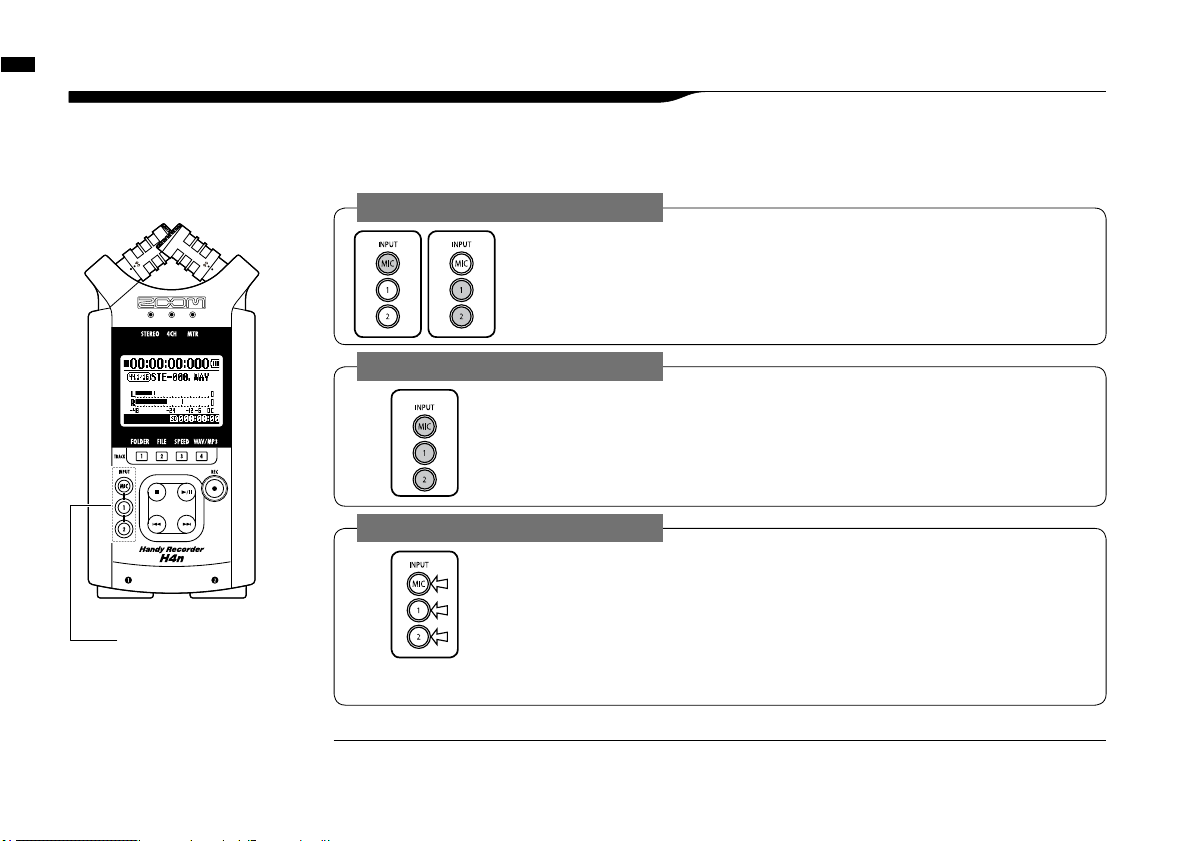
How to use the input [MIC], [1] and [2] buttons
023
4-4 How to use the input [MIC], [1] and [2] buttons
These buttons have different functions depending on the various modes.
[FRONT PANEL]
INPUT [1] & [2]
buttons
STEREO/STAMINA MODE
Select INPUT [MIC] or INPUT [1] [2] and the corresponding button lights up.
Whether you select the INPUT [1] or INPUT [2] button, they will both respond the same
Both buttons light up after the selection. (Once lighted the buttons do not respond)
Any other settings about input sources like [REC LEVEL, should be made to the lighted target.
* When the presently selected input clips its button will blink.
4CH MODE
Use all input sources like [MIC], [1] and [2] = All [MIC], [1] and [2] light on.
When you switch to 4CH, H4n will receive 2- system stereo inputs from [MIC] and [1] [2]
altogether. When you press the lighted button, each shows its input level and you can make
adjustment to recording level operating [REC LEVEL].
* When the input clips the corresponding button blinks.
MTR MODE
Select [MIC], [1] and [2] individually and the corresponding button lights up.
You can select individually INPUT [MIC], [1] and [2]
• When you use built-in and the external stereo microphones, select INPUT [MIC].
• When you make stereo input using the external input jack, select both INPUT [1] and [2].
You press either INPUT [1] or [2] button and then press another button.
*
When the selected input clips its button blinks.
What is clipping?
HINT:
The input level reaches up to the maximum which the H4n can record, that is 0 dB.
In this case the recording sound can be distorted and need adjustment of recording level.
Page 25
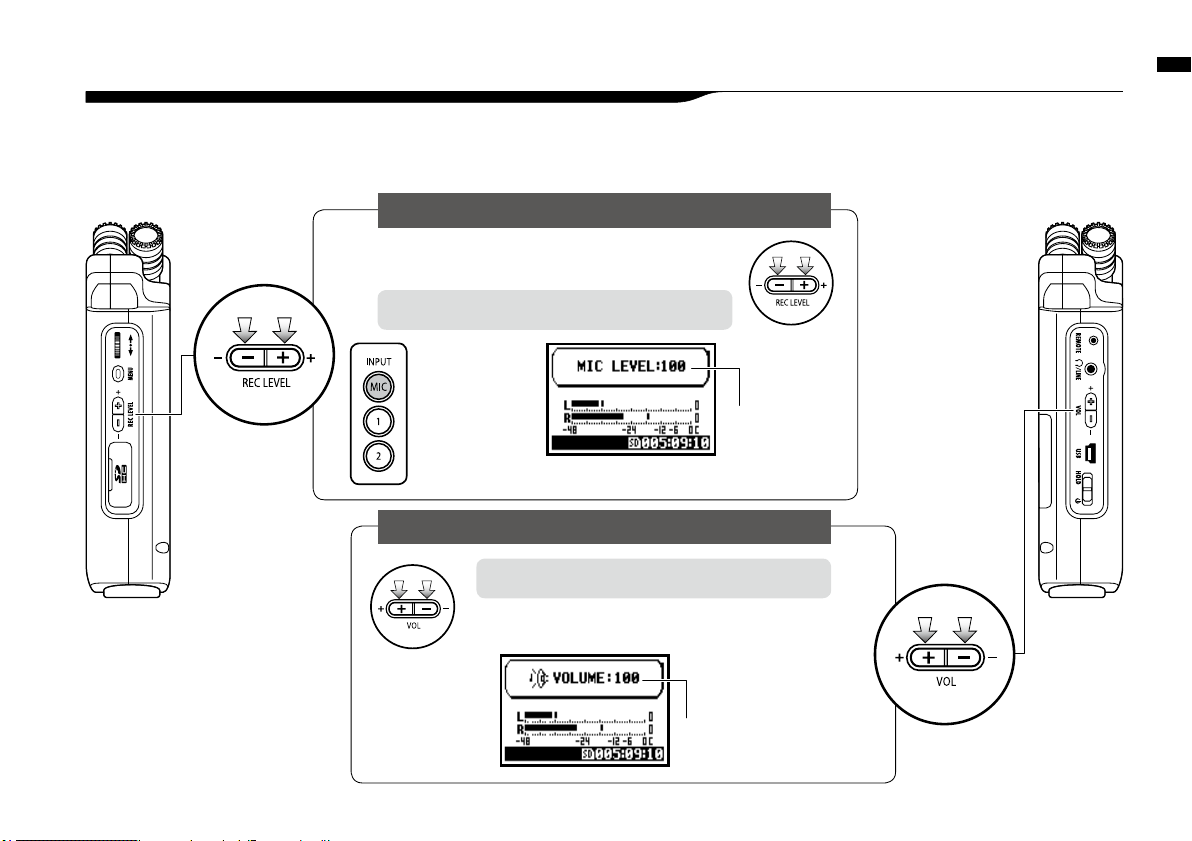
How to use REC LEVEL and VOLUME
024
4-5 How to use REC LEVEL and VOLUME
These keys allow you to adjust the levels of recording input and output volume.
(All the modes are the same)
‘REC LEVEL’ IN ANY MODE
The recording levels coming from the INPUT [1] & [2] can
be adjusted from 1 to 100 with the (+/−) key.
Press the ‘REC LEVEL’ = Adjusting
[LEFT PANEL]
Output volume from the built-in speaker and output
jacks can be adjusted from 0 to 100 with the (+/−) key.
Press the ‘VOL’ = Adjusting
[VOLUME] IN ANY MODE
REC LEVEL
[RIGHT PANEL]
VOLUME
1 _ 100
+ : Increase reception
level (amplify)
− : Decrease reception
level (reduce)
Target setting:
Press INPUT [MIC], [1]
and [2] buttons and
select the input source
which you want to
adjust the recording
level.
0 _ 100
+ : Increase Volume
− : Decrease Volume
Page 26
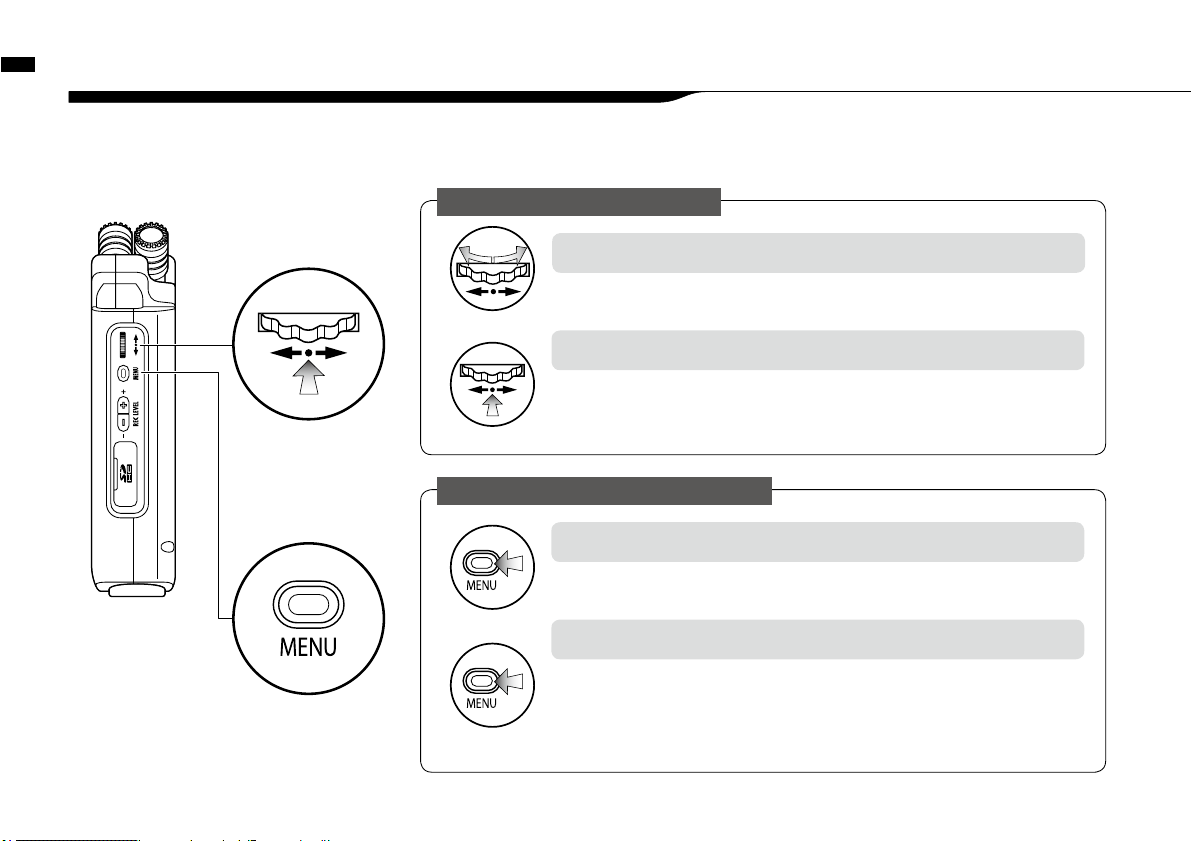
4-6 How to use [DIAL] and [MENU] buttons
How to use [DIAL] and [MENU] buttons
025
The basic operation for [DIAL]
Rotate the [DIAL], and the cursor on the display will move along the [DIAL]
Rotate the [DIAL] = select an item
Press down [DIAL], your selection is confirmed.
➞
for additional selections, move on to the next screen.
➞
When you complete selections, the screen returns back to the previous one.
Press in the [DIAL] = conrm the selection
[DIAL] and [MENU] buttons are used for various settings while recording and during playback.
Here are some basic explanations about each operation.
[RIGHT PANEL]
[
MENU]button
The basic operation for [MENU] button
When setting recording or playback method, Press [MENU] button at the top screen
of each mode.
Calling [MENU] screen
If you press the [MENU] button during any setting operation, its operation will be
canceled and the screen returns back to the previous one.
To cancel setting operation and to return back to the top screen of the each mode,
press [MENU] button for more than 2 seconds.
Canceling the setting
Select
Press
Select
Long Press
[
DIAL
]
Page 27
How to use [DIAL] and [MENU] buttons
026
The operation when [ ] cursor is on display (Date·Time Setting, Changing File Name Directory, etc)
The operation when the selections are listed on screen
About the ‘⁄’ on the selection lists
When you see
this display,
there are more
selections on the
next screen. Highlight arrow and press
[DIAL] in to move on to the next screen.
When you rotate the [DIAL],
[ ] moves accordingly.
[ ] move accordingly.
Pressing [DIAL] in, change
the numbers and letters.
The item letters or
numbers are reversed
→
Rotate [DIAL] to
change the numbers
and letters→Press
[DIAL] down to confirm
your selection.
[ ] move accordingly.
Push [DIAL] in, to confirm
your selection.
the screen returns back
to the previous one.
By rotating the [DIAL],
the selection lists will
move accordingly.
[DIAL] operation on the top screen
Moving [DIAL] on
the top screen,
'cursor' moves.
Pressing (highlight)
[ ] selects 'COUNTER' to enable ad-
justment or calls up the setting menu.
* Available only on MTR mode.
Page 28
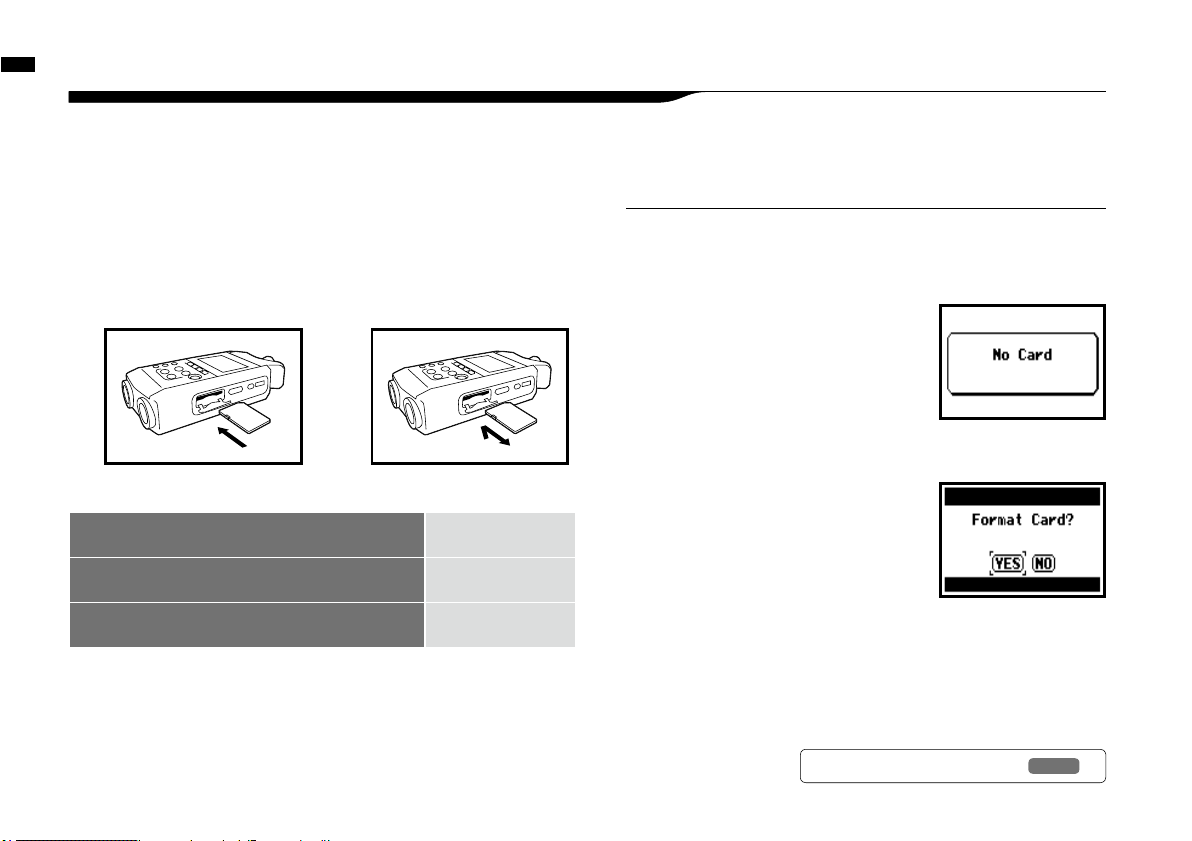
2
Push the SD card in to
remove it from the slot.
Insert a SD card
027
5-1 Insert a SD card
The SD card is required to record. Make sure to turn off power before inserting or removing the SD card.
1
Make sure power is off.
2
Insert the SD card into
the slot.
[How to install the SD card]
SD card capacity time to record (approx.)
4GB SDHC card Recording time
WAV 44.1 kHz/16 bits
(measured in terms of stereo track)
approx. 380 minutes
MP3 44.1 kHz/128 kbps
(measured in terms of stereo track)
approx. 68 hours
[How to remove the SD card]
1
Make sure power is off.
POWER OFF !
Never insert or remove the SD card while the power is on. This may
destroy the data.
CAUTIONS WHEN INSERTING
SD CARD
• You can use 16MB to 32GB SD cards.
For a list of operation certified SD
cards please refer to ZOOM’s website:
http://www.zoom.co.jp/
• When you use the SD card for your
computer, digital camera or other machine,
formatting in the H4n is required.
• When “No Card” is seen on the display at
boot-up, check if the SD card is correctly
inserted.
• When “Format Card” is seen on the display
at booting-up, this means the SD card has
not been formatted in the H4n. To format,
press [DIAL] down and select OK button.
• When the booting-up screen says “Card
Protect”, the card is covered with OVERWRITE PROTECT. To release
this protect slide the lock switch of the SD card.
"Warning" no SD card in
when booting - up.
This “Warning” will show
when an SD card is not in
a recognized format. Select
<YES> to format card and all
of the data will be deleted.
NOTE:
Ref.
☞
To use SD card for H2/H4
P.13 4
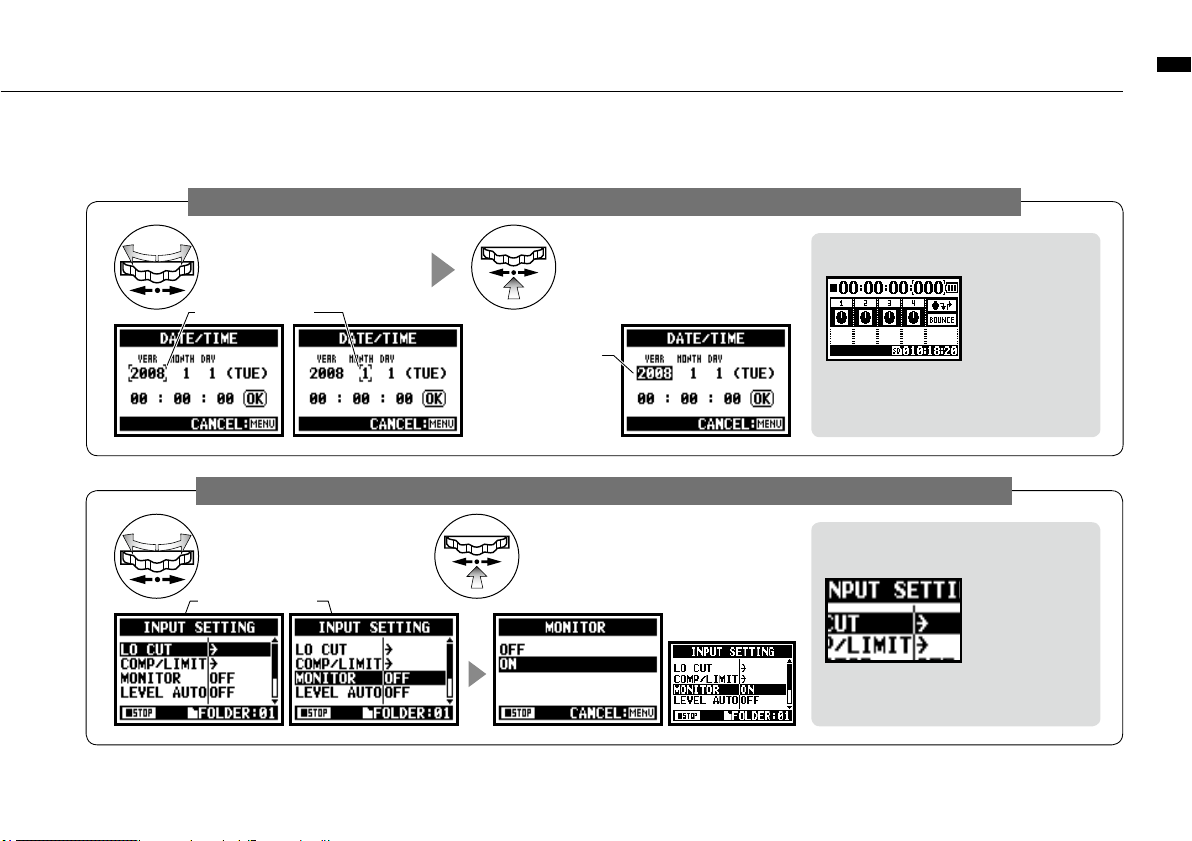
Page 29
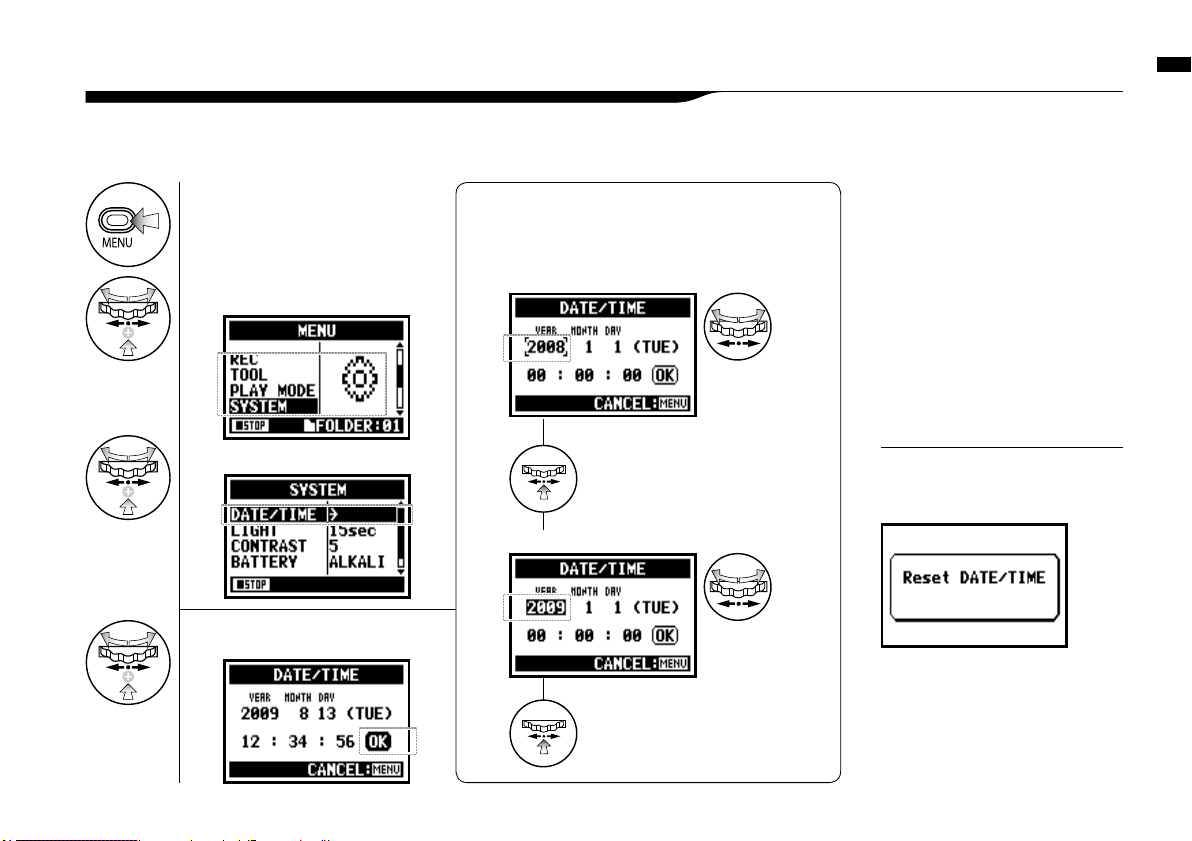
Set date and time <DATE/TIME>
028
5-2 Set date and time <DATE/TIME>
Each file will automatically record the date/time.
To facilitate searching for files by date, be sure to set the date/time after every battery change.
1
Press.
2
Select <SYSTEM> and press.
3
Select <DATE/TIME> and press.
5
Select <OK> and press.
4
Set YEAR➝MONTH➝DAY➝TIME
(Time: Minute: Second)
Select the item on <DATE/TIME>:
You can select the
item while moving
[ ] of the [DIAL].
[Change the figure number]:
You can select the
number by rotating
the [DIAL].
Press the [DIAL] in
* The selected item values are highlighted.
Press the [DIAL] in
* [ ] comes out on display.
When “Reset DATE/TIME” is seen
during boot-up, the date/time needs
to be set.
NOTE:
• When there is no power source
connected for more than three
minutes, the DATE/TIME setting
will return to the default value.
• You cannot use this setting during
recording and playback.
Page 30
Setting up: How to connect external audio devices
029
6-1 Setting up: How to connect external audio devices
The H4n offers versatile connectivity with options for any recording application.
Remote control
(option)
Headphones
Mixer
USB
Personal computer (PC)
Stereo
microphones
SD card
INPUT: instrument
(microphone)
INPUT: instrument
(keyboard)
H4n’s very own AC adapter
INPUT: instrument
(guitar)
Monitor
Page 31

Setting up: Built-in microphones
030
6-2 Setting up: Built-in microphones
These are special features of the H4n’s built-in microphones.
LOCATION OF THE MICROPHONES UNDER XY SYSTEM
Capturing sound in a stereo image.
DIRECTIVITY OF 90°, 120°
movable
General stereo microphones H4n stereo microphones
Stereo images with no phase cancellation.
General stereo microphones H4n stereo microphones
Center 90°
Width 120°
High quality microphones in an XY
pattern ensure a natural stereo image
when recording sounds.
Stereo recording is often done by placing two
microphones in a V shape. Pointing microphones outward
will result in stereo separation, however the recording
will lack defintion around the center position, resulting in
a poor stereo image.
The H4n utilizes an X Y stereo mic configuration. By
placing two microphones in a crossed pattern (opposing
angles), the H4n can cover a wide area and capture sound
sources in the center with clarity and definition. Sounds
reach both mics simultaneously, and therefore no phase
cancellation occurs between right and left channels.
Time lag
Page 32
Built-in
microphones
Setting up: Built-in microphones /outside microphones with plug-in power
The input jack for the external microphone is suitable for microphones that require <PLUG-IN> power.
6-3
Setting up: Built-in microphones /outside microphone with plug-in power
031
Sound source
30_50cm
Close microphone recording
Please put H4n 30 - 50 cm away from the
sound source.
1
Press.
3
Select
<PLUG-IN>
and press.
[How to make setting of <PLUG-IN> power]
Here you can
connect a
microphone.
INPUT [MIC]
*You cannot use
both the built-in
and the external
microphone
together.
When you use the external microphone, be sure to
select the correct setting.
External microphone recording
2
Select
<INPUT>
and press.
4
Select<ON>
and press.
Press the [MENU] button for
more than 2 seconds, and start
operation from the top screen.
Built-in
microphones
The external
stereo microphone
input-jack for
plug-in power
Make sure the recording sound
sources are all located in the
range of T zone of the Built-in
microphones.
Off microphone recording
INPUT [MIC]
Plug-in and phantom
power can not be set
during recording and
playback.
NOTE:
Page 33

Setting up: INPUT [1], [2] connections and phantom power source
032
Using INPUT [1] and INPUT [2] you can connect to a guitar, a bass, a keyboard, etc.
6-4 Setting up: INPUT [1], [2] connections and phantom power source
For a guitar or a bass, you can
directly plug into either INPUT [1]
or INPUT [2].
For a keyboard with stereo output,
you can plug into both the INPUT
[1] and the INPUT [2].
Connecting to instruments
Connecting to a microphone
To connect a microphone you connect X L R plugs to INPUT
[1] and INPUT [2]. In case you need phantom power, such as
using a condenser microphone, be sure to select the following
setting.
1
Press.
3
Select
<PHANTOM>
and press.
[How to make setting of <PHANTOM> power]
4
Select
the voltage
and press.
2
Select
<INPUT>
and press.
Press the [MENU] button for
more than 2 seconds, and start
operation from the top screen.
Some condenser microphones
cannot operate with +24V
phantom power, but comparing
to +48V setting this function is
useful for battery operation to
economize electric consumption.
NOTE:
Condenser
microphone
*for phantom
power
Dynamic
microphone
INPUT[1] INPUT[2]
Page 34

The H4n can be used as a two-in/two-out USB interface at 44.1kHz or 48kHz.
6-5 Setting up: USB connection, H4n used as an Audio Interface
2
Press on the top screen.
4
Select <AUDIO I/F> and press.
5
Select <FREQUENCY>
and press.
7
Select <CONNECT>
and press.
1
Connect H4n to
computer with USB cable.
USB
3
Select <USB> and press.
6
Select a sampling rate
and press.
From
power OFF
From
power ON
Using USB bus power,
H4n start booting-up
Display of USB setting screen
Connect H4n
to computer
with USB cable.
Setting up: USB connection, H4n used as an Audio Interface
033
Two channels can be sent and
received while it connects a
computer and by using of
44.1kHz or 48 kHz.
Ref.
☞
<TUNER>
P.0 75
<MONITOR>
P.0 71
<PHANTOM>
P.032
<PLUG-IN>
P.0 31
<EFFECT>
P.0 83
displayed a active function
displayed input or output level
Page 35

Setting up: USB connection, H4n used as an Audio Interface
034
Usage of AUDIO INTERFACE
• You can record and playback
signals directly to and from your
DAW software using the H4n.
• In this mode, you can use the
H4n’s built-in effects on input sig-
nals.
• Effects can only be used when the
sampling rate is set to 44.1kHz.
• You do not need a specific driver
to use the H4n as an USB audio
interface.
• When using a specific DAW,
please refer to its respective user
manual.
HINT:
• You cannot change a sampling
rate while computer is recognizing
H4n as an audio interface.
• To connect as an Audio I/F, make
sure that a sampling rate (step 6)
matches the recording software
and playback file.
• You cannot use this setting during
recording and playback.
NOTE:
[Button operation during setting and <AUDIO I/F> menu]
Press.
Select
and press.
EFFECT Use EFFECT (only on 44.1 kHz)
TUNER Use TUNER
MONITOR Use MONITOR
PHANTOM Use PHANTOM power
PLUG-IN Use PLUG-IN power
DISCONNECT Disconnect
<AUDIO I/F> MENU
[Selection of input source]
When you select an input the corresponding
input button lights, confirming the
selection. To turn off the input, press the
corresponding input button and the light
will turn off.
* When no input is selected and no input buttons are
lit, you are sending no signal to the computer.
To monitor input signals, you must turn the
<MONITOR> setting on.
[You can use those
buttons during setting]
* Adjust input / output level
* Call [MENU] and make setting
Page 36

Setting up: USB connection, H4n used as a SD card reader
035
When you use the H4n as a SD card reader, make the following settings.
6-6 Setting up: USB connection, H4n used as a SD card reader
USB
2
Press on the top screen.
• Before physically unplugging USB
cable (and H4n) from computer,
be sure to perform the “safely
remove hardware” function on the
computer first. Unplugging USB
cable (and H4n) without performing
this function may damage files.
• Compatible operating system
Windows XP
Mac OS X (10.2 or later)
NOTE:
1
After it’s powered ‘ON’,
connect the H4n to the computer
with the USB cable.
4
Select <STORAGE> and press.
connection completed
3
Select <USB> and press.
USB bus power
USB bus power is the method to
supply power from a computer
through the USB cable.
Connecting USB with the H4n power
off condition, H4n automatically
boots up and displays USB menu.
Usage of a SD card reader
• You can use files recorded on the
H4n on your computer.
• The H4n can use audio files created on your computer.
HINT:
From
power OFF
From
power ON
Connect H4n to computer
with USB cable.
Using USB bus power,
H4n start booting-up
Display of USB setting screen
Page 37

036
H4n built-in speaker
This is a mono speaker for playback.
Without connecting headphones to
[LINE/PHONE] jack, you can easily
playback the recorded data and listen.
6-7 Setting up: Built-in speaker
The H4n is equipped with a built-in mono speaker.
There is no output when [LINE/
PHONE] jack is plugged in.
When setting is the <MONITOR>,
there is no output of the input signals.
The built-in speaker cannot be used
when recording in standby on MTR
mode.
NOTE:
When you can use this function:
• The FILE playback
• Using as <AUDIO I/F>.
• Nothing connected to the [LINE/
PHONE] jack.
HINT:
Setting up: Built-in speaker
Page 38

About H4n modes
037
• STEREO mode
7-1 About H4n modes
There are four operational modes in H4n: STEREO/STAMINA, 4 CH (CHANNEL), MTR (MULTI TRACK) mode.
You can choose the mode according to your need.
• STAMINA mode • 4CH mode • MTR mode
• One-pass stereo recording of live
performance or rehearsal.
• Direct recording of a single instrument.
• Field recording.
• Voice memos.
•
Record important points during a conference.
• ‘Live’ outside recording.
• At the conference, or the places
difficult to change batteries.
• Simultaneous recording with both
line input and a microphone.
• Surround recording via front and
rear microphone placement.
• Simultaneous recording of both
ambient and direct sound sources.
• Record both ambient and direct
sounds to add a live feel to recorded performances.
• Record one track at a time and then
combine them.
• Overdubbing.
• Record using effects
• Mixing track levels after recording.
• Indoor or outdoor rehearsals.
You can easily create a stereo recording
via the built-in microphones or an
external microphone.
The STEREO mode is convenient
to record a band’s live performance,
acoustic instrument, voice, lecture,
or a subtle soundscape. you can then
transfer the file to a stereo WAV/MP3
recorder,player.
This mode allows for longer battery
life. STAMINA mode operation is
similar to STEREO mode, but with
less functions.
Continuous usage time for Alkaline
batteries: approximately 11 hours
(battery life can be less depending on
usage).
When in STAMINA mode, the H4n
can only record/playback in WAV
44.1kHz/16-bit and MP3 format.
When using batteries STAMINA mode
can be turned on using the stamina
switch before booting up.
▶
P.017
In 4Ch mode, you can record two
stereo signals simultaneously. You
can capture both live sounds via built-
in mics and direct instruments via
external inputs simultaneously.
You can record using effects. You can
also overdub recordings and use sound
files previously recorded using the
H4n’s other modes.
When creating a demo, you can record
backing tracks at home and record
instrumental tracks at the studio while
listening to the backing tracks.
Page 39

Selecting a <MODE>
038
7-2 Selecting a <MODE>
Be sure to select the appropriate mode for your application.
MODE
indicator
STAMINA mode
display here.
Confirmation of the mode
• The current mode is indicated on the FRONT
PANEL by Mode Indicator LEDs.
• The H4n will power up in the same mode it was in
when turned off.
• When booting up for the first time, the default
mode is ‘STEREO’.
HINT:
1
Press.
2
Select <MODE> and press.
3
Select among STEREO, 4CH
and MTR modes and press.
*To engage STAMINA
mode, use the switch
located in the battery
compartment.
STEREO
4CH
MTR
Press the [MENU] button for
more than 2 seconds, and start
operation from the top screen.
Page 40

Details about modes
039
7-3 Details about modes
Input and output levels as well as saving and formatting data are different in each mode.
MTR mode
STAMINA MODE
STEREO mode 4CH mode
In 4CH MODE the H4n records two stereo
WAV files: one stereo WAV file for the built-in
microphones and one stereo WAV file for the inputs.
These FILES are saved in one of the ten fixed
folders.
In STEREO mode, you can select 2 different inputs
either INPUT[MIC] or INPUT[1] and INPUT[2],
and operate them as one stereo file.
The resulting FILE is saved in one of the ten sub-
folders of the STEREO folder.
In STAMINA mode, the functions are limited to
maximize the battery life time.
You can record tracks in MONO or STEREO from
INPUT [1], INPUT [2] or the internal microphones.
You can combine them with tracks recorded in other
modes or <OVERDUB> additional tracks.
In MTR mode, project data and settings are saved as
a PROJECT in the MTR folder.
Page 41

<MODE> screens: STEREO and STAMINA modes
040
8-1 <MODE> screens: STEREO and STAMINA modes
• Explanation of the top screen
Recording lapse and playback lapse:
Display: 00(time):00(minute):00(second):000(1/1000second)
Counter
File format during selecting,
recording and playback.
• WAV FILE: Hz/bit
• MP3 FILE: bit rate
FILE FORMAT
Display example of 96kHz/24bit
Display example of MP3 128kbps
STAMINA MODE
When the display of “Low Battery” is shown,
it is time to change battery.
REMAINING BATTERY LIFETIME during battery running
FILE NAMES during selecting, recording
and playback work.
If there is no file in any folder, the screen says ‘No
Data’.
FILE NAMES
Remaining recording capacity time on SD card.
REMAINING RECORDING TIME
Displays the recording and playback level.
LEVEL METER
Stamina
Icon
CLIP METER
The clip meter light turns on when the recording
and playback level reach 0dB and remains lit until
the file ends or the stop button is pressed.
<PHANTOM> power source
48V/24V
P.032
<COMP/LIMIT> function
P.069
<LO CUT> function
P.068
<MS STEREO MATRIX>
P.073
Indicator of option settings: ON or OFF
When each optional function is ON, display
says following:
Display of recorder’s condition
STOP
PLAY
▲
PAUSE
blink
REC
●
Recording Standby
blink
[REC] button
blinks
[REC] button
lights o n
Page 42

041
8-2 <MODE> screen: 4CH mode
• Explanation of the top screen
Displays the recording and playback level
corresponding to each input source.
[MIC] �����Input from either the built- in microphones
or an external stereo microphone
[IN] ��������Input from INPUT [1] and INPUT [2]
INPUT SOURCE and LEVEL METER
<MODE> screen: 4CH mode
Recording lapse and playback lapse:
Display: 00(time):00(minute):00(second):000(1/1000second)
Counter
File format during selecting,
recording and playback.
FILE FORMAT
Display of recorder’s condition
STOP
PLAY
▲
PAUSE
blink
REC
●
Recording Standby
blink
[REC] button
blinks
[REC] button
lights o n
When the display of “Low Battery” is shown,
it is time to change battery.
REMAINING BATTERY LIFETIME during battery running
FILE NAMES during selecting, recording
and playback work.
If there is no file in any folder, the screen says ‘No
Data’.
FILE NAMES
Remaining recording capacity time on SD card.
REMAINING RECORDING TIME
CLIP METER
The clip meter light turns on when the recording
and playback level reach 0dB and remains lit until
the file ends or the stop button is pressed.
<PHANTOM> power source
48V/24V
P.032
<COMP/LIMIT> function
P.069
<LO CUT> function
P.068
<MS STEREO MATRIX>
P.073
Indicator of option settings: ON or OFF
When each optional function is ON, display
says following:
Page 43

<MODE> screen: <MTR> mode
042
8-3 <MODE> screen: MTR mode
• Explanation of the top screen
Recording lapse and playback lapse:
Display: 00(time):00(minute):00(second):000(1/1000second)
➀
Counter
During recording standby operation the track or its
icon is highlighted.
TRACK NUMBER
Displays the master left and right output levels
L R LEVEL METER
This displays the recording and playback level
corresponding to each track 1-4..
LEVEL METER
➃
BOUNCE ICON
Selecting this icon brings up BOUNCE settings
.
P.12 3
Counter Function:
Appoint time
Ref.
☞
P.10 2
This is where track settings like ‘volume,’ ‘pan,’
‘stereo or mono’ are made. Selecting this icon
with the jog dial will access the track menu.
P.0 59
➁
TRACK MENU ICON
Selecting this icon brings up the PUNCH IN/
PUNCH OUT settings.
The icon only appears when recording in OVERWRITE
mode.
P.0 58
➂
AUTO PUNCH IN and AUTO PUNCH OUT ICONS
[DIAL] operations
on the top screen
➀ ➁ ➂ ➃
<EFFECT> function
<PHANTOM> power source
48V/24V
<PROTECT> function
P.12 5
P.032
P.0 81
When each optional function is ON, display
says following:
Indicator of option settings: ON or OFF
Cursor
STOP
REC
●
Recording Standby
blink
[REC] button
lights o n
[REC] button
blinks
PLAY
▲
PAUSE
blink
Display of recorder’s condition
Remaining recording capacity time on SD card.
REMAINING RECORDING TIME
When the display of “Low Battery” is shown,
it is time to change battery.
REMAINING BATTERY LIFETIME during battery running
only when recording
[ALWAYS NEW] setting
only when recording
<ALWAYS NEW> setting
Page 44

<MODE> screen: MAIN MENU
043
8-4 <MODE> screen: MAIN MENU
The Menu icon list is displayed by [MENU] button.
1
Press.
2
Select items
and press.
4CH mode
MTR mode
STAMINA mode
CANCEL:
To return back to the top,
press [MENU] button
more than 2 seconds.
<FOLDER>
<FOLDER>
<PROJECT>
<FILE>
<FILE>
<FILE>
<INPUT>
<INPUT>
<EFFECT>
<REC>
<REC>
<INPUT>
<TOOL>
<REC MODE>
<TOOL>
STEREO mode
Page 45

<MODE> screen: MAIN MENU
044
<PLAY MODE>
<MIXER>
<TOOL>
<SYSTEM>
<PLAY MODE>
<SYSTEM>
<SD CARD>
<SYSTEM>
<SD CARD>
<USB>
<SD CARD>
<USB>
<MODE>
<USB>
<MODE>
<MODE>
Display at the bottom of Menu screen
In the recording and playback menu, the current recording condition is displayed at the bottom left of the
screen.
Set STAMINA mode with the STAMINA switch before starting
the unit when operating with battery power.
P.019
On the right bottom
of the screen the
current folder number
is displayed (On
Stereo, 4ch and
Stamina mode).
Stop
Pause (playback)
Playback
Recording Standby /
Pause
Recording Standby
On MTR mode and reco rding on
OVERWRITE
Recording
In MTR mode, the
current project name
is displayed.
Page 46

Option: Remote control operation
045
When you use the optional remote controller, you can operate the H4n from a distance.
9 Option: Remote control operation
[STOP] button
Stop recording and return to 0
Record, Recording Standby,
Temporary stop
Stop playback and the counter stops
Playback temporary stop
Stop recording and the counter stops
Recording
Stop playback and the counter stops
Playback
Stop each movement
Recording temporary stop
Playback temporary stop
[FF], [REW] buttons
Stop
Playback
Playback temporary stop
[FF] : Moves forward through file in one second increments
[REW]: Returns to the begining of the file
Press for less than one second
Scans through file in forward or reverse
direction.
Press for more than one second
Scans through file in forward or reverse direction.
The longer the button is pressed, the faster
the scanning speed. Fast Forward or Rewind
will stop at the beginning or end of the file.
Press for more than one second
[FF] move to next file
[REW] returns to the begining of the file
* However if there is a marker in a WAV file,
the button moves to the marking place.
Press for less than one second
Stop
Playback
Playback temporary stop
Pause playback
Playback
Start playback
Stop
Recording
While overwrite setting : Stops recording
While always new setting : Pauses recording
Start playback and the counter begins
to move
Stop
Restarts recording
Recording,temporary stop
Starts playback
Playback, temporary stop
Starts recording
Recording standby
[PLAY/PAUSE] button
Remote control button operation
LOCATOR buttons
REC LEVEL [ +/− ]
1-100
+: increase reception
= amplification
−: decrease reception
= diminution
VOLUME [+/−
]
0-100
+: increase (higher)
−: decrease (lower)
INPUT buttons, [MIC] [1] [2]
AND INDICATORS
(green, yellow, red)
Select the input source
* the indicator corresponding to the
button shows input condition.
Green : The input source selected
Yellow : The level of the input is
over −6dB.
Red : The input is clipping
[REC]
button
Engages recording standby condition and
counter resets to 0.
Stop
Start recording and the counter begins to
move
Recording Standby
Place a mark (only for WAV FILE)
Recording
Playback
Set to overwrite recording
Playback
Starts recording and sets the counter to 0
Record, Recording Standby
Stop recording
(You can continue playback while recording)
Stop
Engage recording standby condition
Stop recording and the counter stops
Stop
Start recording and the counter begins to
move
Recording Standby
Set always new recording
* This can be used only when the recording standby track available.
Recording and placing marks.
Start recording and the counter begins to move
Recording standby
INDICATOR (red)
Page 47
Operations
Operations
046
Page 48

1
Select INPUT
and press.
047
Control settings for the targets, built-in microphones or external input jacks.
1-01 Setting / Recording: Set input source and recording level
STEREO MODE 4CH MODE
Use the stereo input source of either [MIC] or INPUT [1] [2].
Use both [MIC] and INPUT [1] [2] stereo input.
or
Light on
Connecting the external
microphone sets input
automatically
Built-in microphones
(stereo)
External stereo
microphone
Both light
up at once
INPUT [1] jack
INPUT [2] jack
Connecting the external
microphone sets input
automatically
Built-in Microphones
(stereo)
External stereo
microphone
All lights on
INPUT [1] jack
INPUT [2] jack
* Selection is available at
any time during Stop,
Recording Standby or
Recording.
or
The selected
buttons light on.
or
2
Press REC LEVEL and
adjust the levels.
Setting / Recording: Set input source and recording level
1
Select INPUT and press.
2
Press REC LEVEL and
adjust the levels.
On the top screen of the 4CH mode,
press REC LEVEL button, and display
“REC LEVEL TARGET” appears. Select
the input and press.
HINT:
The recording level selected is
displayed
Page 49

Setting / Recording: Set input source and recording level
048
TRACK 1 TRACK 2 TRACK 3 TRACK 4
MONAURAL STEREO MONAURAL MONAURAL
STEREO MONAURAL MONAURAL
MONAURAL MONAURAL STEREO
STEREO STEREO
MTR MODE
Any of tracks 1-4 can be set for mono or stereo input.
SELECT the input per track one by one and adjust.
Use the REC LEVEL
1
Press the selected track
and input button.
2
Press REC LEVEL and
adjust the level.
SELECT the input to 2 tracks and adjust.
+
In MTR mode, you can record multiple tracks in
multiple passes. You can also send any input to any
track.
HINT:
Page 50

1
[RECORDING STANDBY]
press.
Setting / Recording: Recording in STEREO and STAMINA mode
049
These are the steps to begin recording in STEREO or STAMINA mode.
1-02 Setting / Recording: Recording in STEREO and STAMINA mode
3
Adjust the recording
level of the input source.
4
[REC START]
press.
5
[REC FINISH]
press.
STEREO MODE TOP
2
Select an input
source and press.
light on
Using built-in microphones, press [MIC],
using external inputs press INPUT [1] and
INPUT [2].
light blinks
a new file
name here
light off
light on
[RECORDING DIRECTION]
5. Recording completes
1. Recording standby
2. Select the input source
3. Adjust the recording level of
the source
* Change the FILE setting.
• REC FORMAT,
• FILE NAME TYPE
* Use the recording functions.
AUTO REC/STOP, PRE REC,
REC LEVEL AUTO
*marks mean you can record without
those settings.
Confirmation of the mode.
(Stereo mode)
Recording
4. Start recording: Temporary
stop, Start recording again,
Put a mark
blinks
* Use METRONOME
The number
figures rotate.
The counter
returns back
to 0.
Press the [MENU] button for
more than 2 seconds, and start
operation from the top screen.
Page 51

Setting / Recording: Recording on STEREO and STAMINA mode
050
In STEREO mode you can
record in 19 different file for-
mats using WAV and MP3.
Recording format must be
selected before recording of
a file begins.
HINT:
<REC FORMAT>
Recorded files are named
automatically. You can
choose from two formats:
<DEFAULT> and <DATE>.
<DEFAULT>:STE-×××
<DATE>:090531-×××
* The recording date is written.
The initial format is
<DEFAULT>
<FILE NAME> change
When the recording format
is WAV, you can mark your
file by pressing the [REC]
button while recording.
You can move swiftly to
the marked position during
playback. When you make
a temporary stop on WAV
FILE, the mark will be placed
at the stop position.
MARK
While recording and playback, no <REC FORMAT> change
nor FILE NAME TYPE change is possible.
NOTE:
Press
light blinks
[TEMPORARY STOP]
Counter doesn’t return to 0.
blinks
Press
light on
[RECORDING AGAIN]
You can start recording from
the position you stopped on
the same file.
<PRE REC>
Ref.
☞
<AUTO REC>
<REC LEVEL AUTO>
<METRONOME>
P.079
Mark setting
P.096
P.065
P.070
P.067
<FILE NAME>
P.052
<R EC FOR MAT>
P.051
Page 52

Setting / Recording: Recording format <REC FORMAT>
051
Choose recording file settings <REC FORMAT> before recording.
VARIETY OF WAV FILES
Formats are: 44.1/48/96 kHz indicates the sampling
rate of the analog-to-digital conversion. 16/24-bit
indicates the bit depth of the analog-to-digital conversion.
The larger the number, the higher the sound quality,
but the files that are created are larger as well.
The WAV files recorded on STEREO/4CH/STAMINA
mode correspond to BWF (Broadcast Wave Format)
and include marks and production date.
VARIETY OF MP3
Select the bit rate which indicates information
volume per minute. The bigger the number, the lower the rate of compression and the higher the sound
quality. The higher compression MP3 will occupy
less space on an SD card
VBR (Variable Bit Rate) means the bit rate (recording quality) is automatically adjusted based on input
information.
HINT:
1-03 Setting / Recording: Recording format <REC FORMAT>
How to use WAV and MP3 format
• The WAV FILES with no compression are used for
high quality sound recording. Because data is not
compressed, the volume of the file will increase
compare to MP3 format.
• MP3 FILES decrease the sound quality because of
data compression, but are useful to save SD card
capacity and to record much more sounds.
NOTE:
1
Press.
3
Select <REC FORMAT> and press.
2
Select <REC> and press.
4
Select one and press.
default;
WAV44.1 kHz/16bit.
REC FORMAT
STEREO mode
WAV
44.1kHz/16bit
44.1kHz/24bit
48kHz/16bit
48kHz/24bit
96kHz/16bit
96kHz/24bit
MP3
48kbps
56kbps
64kbps
80kbps
96kbps
112kbps
128kbps
160kbps
192kbps
224kbps
256kbps
320kbps
VBR
4CH mode
WAV
44.1kHz/16bit
44.1kHz/24bit
48kHz/16bit
48kHz/24bit
Press the [MENU] button for
more than 2 seconds, and start
operation from the top screen.
"Short cut"
Pressing TRACK
on the top screen.
Page 53

When recording, a file name is automatically assigned. To change that, take the following steps.
Setting / Recording: File name <FILE NAME>
052
1-04 Setting / Recording: File name <FILE NAME>
• You can set the DATE type only on STEREO
mode.
• You can use other file names on STEREO
and MTR mode. Those setting is operated on
<FILE RENAME>
NOTE:
1
Press.
3
Select <FILE NAME> and press.
2
Select <REC> and press.
The initial notation
is <DEFAULT>
4
Select and press.
File Name
STEREO mode:
<DEFAULT>
STE-×××.wav (mp3) : 'STE-'3 figures, extension
* <MONO MIX> setting
MONO-×××.wav(mp3) : 'MONO' 3 figures, extension
<DATE> 090531-×××.wav(mp3) : year, date yymmdd-3 figures, extension
4CH mode:
No change
4CH-×××M.wav
Record file of the built-in microphones: '4CH-' 3 figures 'M' extension
4CH-×××I.wav
Record file of the external input: '4CH-' 3 figures 'I' extension
MTR mode:
STEREO FILE
MONO FILE
TRK1-××.wav : 'TRK' track number- 2 figures, extension
* On stereo tracks put the track number like [1] [2] using L and R.
Ref.
☞
<FILE RENAME>
P.109
Press the [MENU] button for
more than 2 seconds, and start
operation from the top screen.
Page 54

1
[RECORDING STANDBY]
press.
Setting / Recording: Recording on 4CH mode
053
This is the method to record 4 channel stereo sounds coming from the built-in mic and the external
input jack.
1-05 Setting / Recording: Recording on 4CH mode
3
Adjust the recording level
of the input sources.
4
[START RECORDING]
press.
5
[COMPLETE RECORDING]
press.
STEREO
MODE TOP
2
[Adjust the recording level]
Select the input sources and
press.
light on
* When you use the built-in microphones:
select [MIC]
Connection from outside:
INPUT [1] and [2]
light blinks
a new file
name here
light off
* Use the recording functions: •
AUTO REC/STOP
• PRE REC
• REC LEVEL AUTO
1. Recording standby.
2. Select the input source.
3. Adjust the recording level of
the source.
* Use the METRONOME
5. Recording completes.
Recording operation.
4. Start recording
• temporary stop
• record again
• put a mark on a file.
Change to 4CH mode
*You can record skipping this step.
light on
or
blinks
The number
figures rotate.
Counter
returns back
to 0.
* Change the FILE setting.
• REC FORMAT
Press the [MENU] button for
more than 2 seconds, and start
operation from the top screen.
[RECORDING DIRECTION]
Page 55

Setting / Recording: Recording on 4CH mode
054
HINT:
Mark
While the recording format is WAV,
if you press [REC] button during
recording operation, the mark is
put on the file and you can move
swiftly to the marked position
during playback.
When you pause, that becomes
the mark position.
While recording and playback, no <REC FORMAT> is
possible.
NOTE:
Mode change
P.038
Press.
light blinks
Press.
light on
[RECORDING AGAIN]
[TEMPORARY STOP]
Continue recording from the
position stopped on the same file.
Counter doesn’t return back to 0.
blinks
FILE NAME
On 4CH mode the input from
the built-in and the external
microphones is saved separately
as STEREO WAV FILE.
Those 2 files are always
administered as one pair and
named as the following depending
on the input:
[MIC] file: 4CH×××M.wav
INPUT [1] [2] file: 4CH×××I.wav
On screen 2 files noted 'M/I' at
one time.
* You cannot change the file name.
<REC FORMAT> CHANGE
If you want change, operate before
recording.
<PRE REC>
Ref.
☞
<AUTO REC>
<REC LEVEL AUTO>
<METRONOME>
P.079
Mark setting
P.096
P.065
P.070
P.067
<FILE NAME>
P.052
<R EC FOR MAT>
P.051
file name
Page 56

Setting / Recording: Recording in MTR mode
055
Using multiple tracks, you can combine mono and stereo recordings.
1-06-1 Setting / Recording: Recording in MTR mode
[RECORDING DIRECTION]
* This means you can record without this setting.
Change to MTR mode
Create a new PROJECT.
Record the second track
Complete recording
Recording Standby
Record the first track.
Select the [REC] mode
Start recording
1
Press.
3
Select either <OVERWRITE> or
<ALWAYS NEW> and press.
2
Select <REC MODE>
and press.
Change to <REC MODE>, <OVERWRITE/ ALWAYS NEW>
Press the [MENU] button for
more than 2 seconds, and start
operation from the top screen.
Temporary Stop
Re-start
<OVERWRITE> and SAVE.
* Setting up PUNCH IN/OUT
* Use the METRONOME
* Set up the EFFECT
<ALWAYS NEW>.
* Use the METRONOME
* Set up the EFFECT
Make setting (mix)
• TRACK MENU setting
Adjust the track
• LEVEL • PAN
Make setting (mix)
• TRACK MENU setting
Adjust the track
• LEVEL • PAN
Select the track to record
• Select the input source
• Adjust the recording level of
the source
Select the track to record
• Select the input source
• Adjust the recording level of
the source
Page 57

Setting / Recording: Recording in MTR mode
056
Only one recording track Two recording tracks
1. Input source comes from either INPUT [1] or INPUT [2].
INPUT [1] or [2] TRACK Track 1 or 3
Track 2 or 4
INPUT [1] or [2]
The same signals are sent to both tracks.
1. Input source comes from either INPUT [1] or INPUT [2].
2. The input source comes from either [MIC] or INPUT [1] [2].
Track 1 or 3Built-in microphone L
Track 2 or 4Built-in microphone R
Track 1 or 3INPUT [1]
Track 2 or 4INPUT [2]
or
2. Input sources come from both [MIC]s or INPUT [1] & [2].
Recording is created by mixing signals from both sources
Built-in microphone L
Built-in microphone R
+
TRACK
or
INPUT [1]
INPUT [2]
+
TRACK
About INPUT SOURCE and TRACK
Page 58

Setting / Recording: Recording <OVER WRITE> in MTR mode
057
You can select from two recording modes.
Using the <OVERWRITE> mode, you can overwrite new sounds on the existing file.
1-06-2 Setting / Recording: Recording <OVER WRITE> in MTR mode
1
Select the TRACK.
The selected
‘TRACK’ light on.
Counter won’t be reset to 0 when
using.
2
Press.
3
[START RECORDING]
press.
You can get back to the beginning of the file with the REW button. This will allow
you to listen to what you’ve just recording by pressing the PLAY/PAUSE button.
Counter doesn’t return back to 0.
4
[STOP RECORDING]
press.
Choose the appropriate
settings for your application
☞
Input setting � P.055
☞
Recording functions … P.059−
displays input level
light on
light on
light off
MTR MODE
TOP
Press the [MENU] button for
more than 2 seconds, and start
operation from the top screen.
Page 59

In ALWAYS NEW, a new file is made whenever it records.
1-06-3 Setting / Recording: Recording <ALWAYS NEW> in MTR mode
1
Select the TRACK.
The selected
TRACK light on.
Counter won’t be reset to 0 when using.
2
Press.
Setting / Recording: Recording <ALWAYS NEW> in MTR mode
058
3
[START RECORDING]
press.
The PLAY/PAUSE button will allow you to listen back to the recorded file.
Counter return back to 0.
4
[STOP RECORDING]
press.
displays input level
light on
or
Light blinks
light off
MTR MODE
TOP
blink
Press the [MENU] button for
more than 2 seconds, and start
operation from the top screen.
Choose the appropriate
settings for your application
☞
Input setting � P.055
☞
Recording functions … P.059−
Page 60

Setting / Recording: TRACK MENU in MTR mode
059
This is an exclusive menu available only in MTR mode to set a track.
Link tracks together, create a stereo track, or you can create a special setting for output effects.
1-07 Setting / Recording: TRACK MENU in MTR mode
Select TRACK MENU
1
On the top screen select
'TRACK MENU ICON' and
press.
TRACK MENU icon
Select a target project and start ……P.119
HINT:
Set the balance of Left and Right position of the tracks
Setting value: L100 _ C _ R100
Default: C (Center)
PAN
HINT
Set the output level of a track
Setting value: Mute, −48.0dB _ +12.0dB
Default: 0.0dB
LEVEL
currently selecting track
TRACK MENU
file names allocated to tracks
Adjust the output level of a track
Set the value and press.
Select <LEVEL> and press.
fader Icon changes
Select <PAN> and press.
Adjust the output pan of a track
Set the value and press.
pan Icon
changes
Press the [MENU] button for
more than 2 seconds, and start
operation from the top screen.
Page 61

Setting / Recording: TRACK MENU in MTR mode
060
Select <KARAOKE> and press.
Setting <KARAOKE>
Set the value and press.
HINT:
Setting stereo link on creates a stereo track from tracks
1 and 2 or 3 and 4. Setting stereo link off creates a mono
track. Setting value: ON/OFF Default: OFF
STEREO LINK
Select <FILE> and press.
Allocate les to a track
Select the <FILE> to be
allocated and press.
Display for the file list available
to allocate with corresponding
file style.
• You can only playback a mono file on 'MONO TRACK' and
a stereo file on 'STEREO TRACK'.
• When <STEREO LINK> is turned on, no file will be
assigned to the track, and "NO DATA" will be displayed.
• When you change from 'ON' to 'OFF', the setting of <PAN>
returns to the previous one.
• When you change from 'OFF' to 'ON', the setting of
<LEVEL> and <PAN> return to 'DEFAULT'.
NOTE:
• You cannot record on the <KARAOKE> track.
• When the <STEREO LINK> turns on automatically with a
monaural track setting, it turns to "NO DATA" condition.
• When the <KARAOKE> track has been set, you cannot
make the other tracks <KARAOKE>.
NOTE:
Setting for <STEREO LINK>,
<FILE> and <KARAOKE> are
not available during recording,
playback and also when
tracks are armed.
NOTE:
HINT:
You can only use KARAOKE setting on one pair of stereo
tracks; either 1 and 2 or 3 and 4. In KARAOKE mode, you
can set KEY CONTROL and CENTER CANCEL operations.
Setting value: ON/OFF Default: OFF
Select <STEREO LINK> and press.
Setting <STEREO LINK>
Set the value and press.
The display of
'LEVEL METER'
changes 'STEREO'.
When change the
format, the display
says "NO DATA".
Only on MTR MODE
Page 62

2
Select <FILE> and press.
Setting / Recording: Re-recording, <PUNCH IN/OUT> automatic
061
This function, <PUNCH IN/OUT>, allows you to partially re-record a recorded file.
Here we explain how to start <PUNCH IN> and end <PUNCH OUT> automatically.
1-08-1 Setting / Recording: Re-recording, <PUNCH IN/OUT> automatic
Allocate les to a track
Set the recording start position, <PUNCH IN>
3
Select any desirable <FILE> and press.
4
Press[START PLAYBACK].
Icon interchanges
6
Find the desirable position for ‘PUNCH IN’
and press.
5
Select PUNCH IN _ PUNCH OUT ICON and press.
PUNCH IN / PUNCH
OUT icon
1
On the top screen select
'TRACK MENU ICON' and press.
TRACK MENU icon
Change from <REC MODE>
to <OVERWRITE> …………P.055
Press the [MENU] button for
more than 2 seconds, and start
operation from the top screen.
Page 63

Setting / Recording: Re-recording, <PUNCH IN/OUT> automatic
062
• You can set the position for <PUNCH IN / OUT> while
stopped by using the counter. First set each time and move
the cursor to <PUNCH IN / OUT>, and then press [DIAL].
• During <PUNCH OUT> _ Step 7-, if you press [DIAL]
again, all the setting will be cancelled.
HINT:
Appointing the time
using a counter
P.102
Ref.
☞
Set the recording end position, <PUNCH OUT>
7
Press the desirable position for
‘PUNCH OUT’.
The PUNCH OUT setting
confirmed
When the track reaches the ‘PUNCH
IN’ point, the REC light will turn on,
recording will start.
[1] When the track reaches the
‘PUNCH OUT’ point, the light will
blink and recording will stop.
[1] When in punch in / out mode,
the light is on during recording and
blinks during record standby.
→
PUNCH OUT
PUNCH OUT
Start Stop
the practical re-re cording parts
PLAY
PLAY
REC
Re-recording
10
Press TRACK [1] [PLAYBACK _ RECORDING].
Rewind the file to the head
(Counter: 0) or to the position to
start re-recording ‘PUNCH IN’.
8
9
Press TRACK [1], Recording Standby.
+
Setting available on MTR
mode and <OVERWRITE>
recording.
NOTE
Only on MTR MODE
Page 64

2
Select <FILE> and press.
Setting / Recording: Re-recording, <PUNCH IN/OUT> manual
063
Using [OVERWRITE] recording operation in MTR mode, you can manually punch in and out. Press [REC] button
during playback, from that pressed position you can start re-recording.
1-08-2 Setting / Recording: Re-recording, <PUNCH IN/OUT> manual
Allocate les to a track
点滅
light on
Playback
3
Select any desirable <FILE> and press.
1
On the top screen select
'TRACK MENU ICON' and press.
5
Press [START PLAYBACK].
4
Press [RECORDING STANDBY].
Change from <REC MODE>
to <OVERWRITE> …………P.055
Press the [MENU] button for
more than 2 seconds, and start
operation from the top screen.
Page 65

Setting / Recording: Re-recording, <PUNCH IN/OUT> manual
6
Performance (Not recording).
8
Performance (Recording).
9
Press [FINISH RECORDING].
PLAY PLAY
REC
→
▲
RECORDING START
▲
FINISH RECORDING
Start Stop
Re-recording
Re-recording (Manual <PUNCH IN/OUT>)
064
light on
light on
7
Press [START RECORDING].
10
Press [PLAYBACK FINISH].
light off
light on
Only on MTR MODE
Page 66

Recording function <AUTO REC>
065
The H4n can detect when the input level surpasses your predetermined level, and can automatically start recording from the recording standby position.
2-01-1 Recording function <AUTO REC>
• You cannot use this setting
during recording and playback.
• You cannot use this function
together with <REC LEVEL
AUTO>, <PRE REC> and
<PRE COUNT>.
NOTE:
1
Press.
4
[START LEVEL SETTING]
Select <START LVL> and press.
3
Select <AUTO REC> and press.
2
Select <REC> and press.
While <AUTO REC> operation
is on, the display of “Wait for
Signal” appears during recording
standby. That watches whether
the present input level goes
over the recording start level.
Display of “Wait for Signal”
Start level
Present input level
Pressing the [MENU] button long
for two seconds, start to operate
from the top screen of the MODE.
6
Select<ON/OFF> and press.
7
Select<ON>and press.
5
Adjust the level.
Set the input lev el to start recording
automatically.
During “wait for signal” you can
also start recording manually by
pressing the REC button.
HINT:
Page 67

Recording function <AUTO REC STOP>
066
When <AUTO REC> is on and recording, the H4n will automatically stop recording when the input level goes below a predetermined level.
2-01-2 Recording function <AUTO REC STOP>
• You cannot use this
function during recording
and playback.
• When <AUTO REC STOP>
is on, you can finish
recording with pressing
[STOP] button.
NOTE:
1
Press.
2
Select <REC> and press.
3
Select <AUTO REC> and press.
4
[STOP LEVEL SETTING]
Select <STOP LVL> and Press.
5
Adjust the level.
6
Select <AUTO STOP> and press.
7
Select the time setting.
Select from 1-5 seconds to stop
recording after the signals have be-
come lower than the STOP LEVEL.
Press the [MENU] button for
more than 2 seconds, and start
operation from the top screen.
When<[AUTO REC STOP>
is on, ‘STOP LEVEL’ display
appears during recording.
Stop level
Present input level
Set the input level at which
recording will stop
HINT:
Page 68

Recording function <PRE REC>
067
The <PRE REC> setting can be initialized by pressing the [REC] button, automatically adding the
previous 2 seconds to your recording.
2-02 Recording function <PRE REC>
• You cannot use this setting during recording and playback.
• When recording on 96 kHz, 4CH mode, the maximum
PRE REC time is one second.
• You cannot use this function together with AUTO REC and
PRE COUNT.
NOTE
1
Press.
4
Select <ON> and press.
2
Select <REC> and press.
3
Select <PRE REC> and press.
Press the [MENU] button for
more than 2 seconds, and start
operation from the top screen.
In PRE REC mode the H4n will pre-record audio two seconds before the record button is pressed.
HINT
Page 69

Recording function <LO CUT>
068
The <LO CUT> filter setting allows you to eliminate wind or blowing noises.
2-03 Recording function <LO CUT>
• You can Select the <LO CUT> filter among eleven
frequencies, such as OFF, 80, 98, 115, 133, 150, 168,
185, 203, 220, and 237 Hz. When selecting higher
numbers, you should verify the outcome before recording.
• The smaller the number, the lower the cut-off frequency.
.
HINT:
1
Press.
4
Select the setting input source.
2
Select <INPUT> and press.
Press the [MENU] button for
more than 2 seconds, and start
operation from the top screen.
3
Select <LO CUT>and Press.
5
Select the cutoff frequency.
Page 70

Recording function <COMP/LIMIT>
069
The <COMP / LIMIT> setting can compensate for volume differences. For each input source, low
level input signals are lifted up and high level input signals are controlled down when recording.
2-04 Recording function <COMP/LIMIT>
1
Press.
3
Select <COMP/LIMIT> and press.
4
Select the setting input source.
5
Select the setting target.
HINT:
OFF
Compressor and Limiter are off
COMP1 (GENERAL)
Standard compressor
The compressor
can compress
higher level sounds
and raise the level.
COMP2 (VOCAL)
Compressor suitable for vocal
COMP3 (DRUM)
Compressor suitable for drum and
percussion
LIMIT1 (GENERAL)
Standard limiter
The limiter can
compress when
the input signals go
over the fixed level
LIMIT2 (CONCERT)
Limiter suitable for ‘live’
LIMIT3 (STUDIO)
Limiter suitable for ‘studio’ recording
2
Select <INPUT> and press.
Press the [MENU] button for
more than 2 seconds, and start
operation from the top screen.
Page 71

Recording function <REC LEVEL AUTO>
070
This function automatically sets the level for recording.
2-05 Recording function <REC LEVEL AUTO>
When <REC LEVEL AUTO> is used, the unit automatically
determines the recording levels using the signal present during recording standby. If the volume surpasses 6dB during
recording, the input level is automatically adjusted with the
new level displayed on the screen for two seconds.
HINT:
Display when
recording standby
Display when -6dB is exceeded while recording
• You cannot use this function together with <AUTO REC>.
• You cannot use this setting during recording and playback.
NOTE:
STEREO MODE 4CH MODE
Present input level
1
Press.
2
Select <INPUT> and press.
3
Select <LEVEL AUTO>and press.
4
Select <ON>
Press the [MENU] button for
more than 2 seconds, and start
operation from the top screen.
Page 72
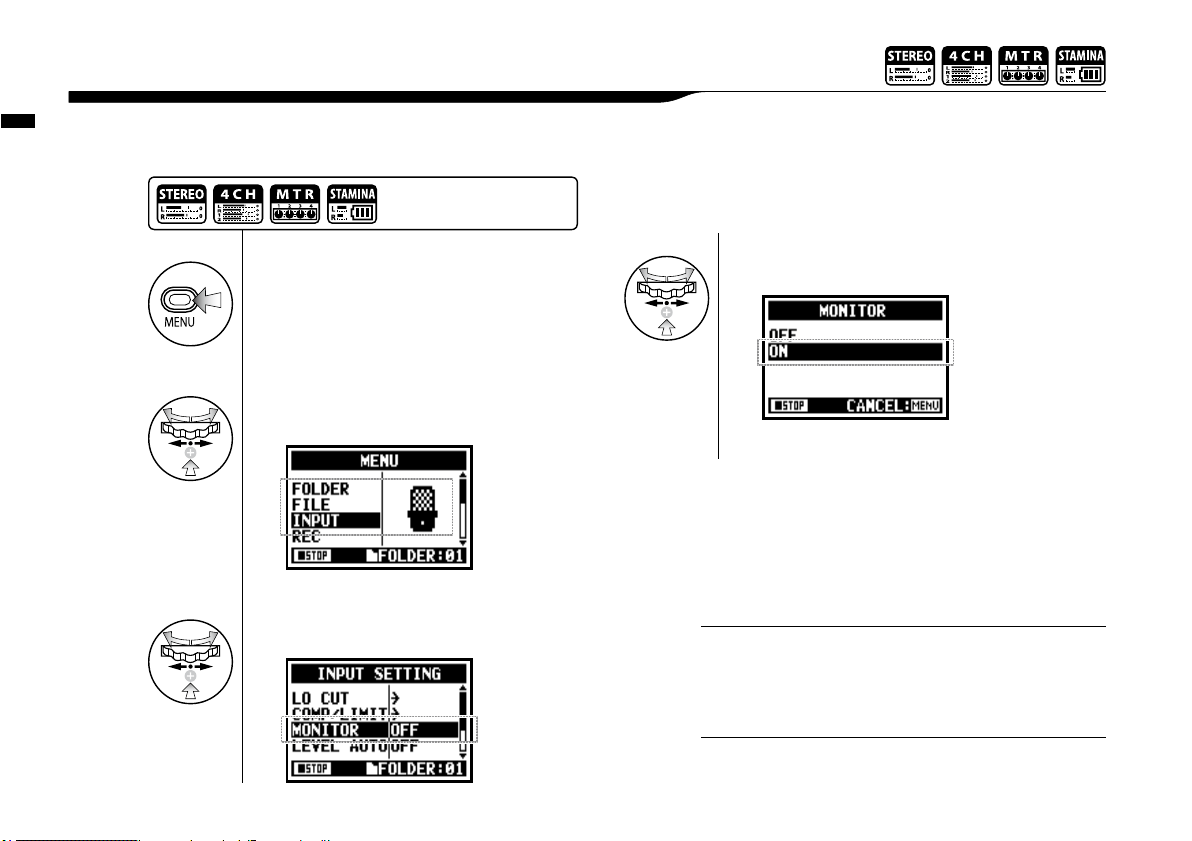
Recording function <MONITOR>
071
Turning on the MONITOR function allows you to monitor input signals at all times.
2-06 Recording function <MONITOR>
You cannot monitor the input sound through the built-in
speaker.
NOTE:
1
Press.
2
Select <INPUT> and press.
3
Select <MONITOR> and press.
4
Select <ON> and press.
You can always monitor the input source through [LINE/
PHONE MINI STEREO OUT] during recording standby.
HINT:
Press the [MENU] button for
more than 2 seconds, and
start operation from the top
screen.
Page 73

Recording function <MONO MIX>
072
Engaging <MONO MIX> blends the left and right signals down to mono then records dual-mono to each left and right channel.
2-07 Recording function <MONO MIX>
• The name of the recorded file making <MONO MIX> valid
is “MONO-xxx”
• You cannot use this function together with <MS STEREO
MATRIX>.
• You cannot use this setting during recording and playback.
NOTE:
1
Press.
2
Select <INPUT> and press.
4
Select <ON> and press.
3
Select <MONO MIX> and press.
Press the [MENU] button for
more than 2 seconds, and start
operation from the top screen.
Page 74

Recording function <MS STEREO MATRIX>
073
This function enables you to convert the stereo microphone signals when using a MID/SIDE recording configuration.
2-08 Recording function <MS STEREO MATRIX>
<ON / OFF>
Make the setting <ON/OFF> of
<MS STEREO MATRIX>.
<MID LEVEL>
<MID>is a directional microphone receiving
the recording targets.
Setting value: MUTE, −48.0 _ +12.0dB
Default: +0.0dB
1
Press.
2
Select <INPUT> and press.
3
Select <MS MATRIX> and press.
4
Make each setting accordingly.
Select
Select
Select
Adjust
Press the [MENU] button for
more than 2 seconds, and start
operation from the top screen.
Page 75

Recording function <MS STEREO MATRIX>
074
You cannot use this function
together with <MONO MIX>.
NOTE:
<SIDE LEVEL>
A bi-directional microphone <SIDE> and
<MID> are perpendicular each other.
Setting value: MUTE, −48.0 _ +12.0dB
Default: +0.0dB
<SOURCE>
Enable to select what input is effective.
(Only on 4CH mode)
<CH SETTING>
Allocate <MID> inputs and <SIDE>
inputs between
L-ch (INPUT [1]) and R-ch (INPUT [2]).
Select
Adjust
Select
Select
Select
Select
Page 76

Tuner <TUNER (CHROMATIC) >
075
The H4n features a tuner with multiple tuning modes.
3-01-1 Tuner <TUNER (CHROMATIC) >
Not available during recording and playback.
NOTE:
• The input source signals selected at the present become
the tuning target.
• Operating under 4CH mode, at Step 4 select <INPUT>
and select the input source, and then continue to steps 5.
HINT:
1
Press.
2
Select <TOOL> and press.
3
Select <TUNER> and press.
4
Select <CHROMATIC> and press.
Low
The name of the [NOTE] shows the
nearest one to the input signals.
The indicator shows the input signals are higher or lower than the
‘NOTE’ described below.
Both marks light on when the inputs signals match the ‘NOTE’.
These dots show how
much gaps exist between
the input signals and the
indicated NOTE.
High
5
Tuning.
Press the [MENU] button for
more than 2 seconds, and start
operation from the top screen.
Ref.
☞
Relationship between string numbers and notes
P.078
Display of tuning
Page 77

Tuner, all other <TUNER>
076
Aside from CHROMATIC, there are other tuning modes such as GUITAR, BASS, OPEN A, OPEN D, OPEN E, OPEN G and DADGAD.
3-01-2 Tuner, all other <TUNER>
1
Press.
2
Select <TOOL> and press.
3
Select <TUNER> and press.
4
Select the tuning mode and press.
5
Tuning.
Press the [MENU] button for
more than 2 seconds, and start
operation from the top screen.
String number currently selected.
You can [DIAL] and select.
The indicator shows the input signals are higher or lower than the
‘NOTE’ described below. Both marks light on when the input signals
match the ‘NOTE’.
These dots show how
much gaps between the
input signals and the
indicated NOTE.
High
Low
Not available during recording and playback.
NOTE:
• The input source signals selected at the present become
the tuning target.
• Operating under 4CH mode, at Step 4 select <INPUT>
and select the input source, and then continue to steps 5.
HINT:
Ref.
☞
Relationship between string numbers and notes
P.078
Display of tuning
Page 78

This function allows you to calibrate the tuner.
3-01-3 Tuner <TUNER (CALIB) >
• The initial setting is 440Hz.
• You can make any setting per 1Hz from 435Hz to 445Hz.
HINT:
Not available during recording and playback.
NOTE:
1
Press.
2
Select <TOOL> and press.
3
Select <TUNER> and press.
4
Select <CALIB> press.
5
Select frequency numbers.
Tuner <TUNER (CALIB) >
077
Press the [MENU] button for
more than 2 seconds, and start
operation from the top screen.
The <TUNER> operation
up to here is in common.
Page 79

Tuner <TUNER (INPUT) >
078
In 4CH mode you can select the input source for the tuner.
3-01-4 Tuner <TUNER (INPUT) >
4
Select <INPUT> and press.
5
Select input source and press.
Tuning display
HINT:
Not available during recording and playback.
NOTE:
When tuning is low
When tuning is high
No input sound (chromatic)
Tuner type
String number/ note name
1 2 3 4 5 6 7
GUITAR E B G D A E B
BASS G D A E B
OPEN A E C# A E A E
OPEN D D A F# D A D
OPEN E E B G# E B E
OPEN G D B G D G D
DADGAD D A G D A D
Tuner type and code
〈
TUNER〉…P.075
Only on 4CH MODE
Press the [MENU] button for
more than 2 seconds, and start
operation from the top screen.
Page 80

Metronome <METRONOME>
079
The metronome has other convenient functions such as click, pre-count, tempo, sound, etc.
3-02 Metronome <METRONOME>
<CLICK>
This setting turns the metronome on or off during recording, playback or both. This setting
must be made before recording or playback.
<PRE COUNT>
Set the count number just before the
beginning of recording. Setting is impossible
when <PRE REC> and <AUTO REC> is ON.
Select
SelectSelect
Select
Select beat.
Select among OFF,1-8 beat
and SPECIAL.
Count of <SPECIAL>
OFF
/
--Recording / Playback
---Only during recording
---Only during playback
1
Press.
2
Select <TOOL> and press.
3
Select <METRONOME>and press.
4
Make each setting selection.
Select conditions
Press the [MENU] button for
more than 2 seconds, and start
operation from the top screen.
Page 81

Metronome <METRONOME>
080
<TEMPO>
Set the metronome speed.
Adjust
Select
default: 120.0.
<SOUND>
Set the metronome tone.
Select
Select
default: bell sound.
<PATTERN>
Set the pattern of the metronome.
Select
Select
default: 4/4.
<LEVEL>
Set for the volume of the metronome.
Select
Select
You can set between 40.0
and 250.0 BPM, per 0.1.
You can select among BELL,
CLICK, STICK, COWBELL
and HI-Q.
You can select among 0/4
(no accent), 1/4_ 8/4, and 6/8.
You can select among eleven
levels.
The metronome starts at the beginning of recording and playback. If you
start in the middle of a song or track, the metronome beats may not be in
sync with the song.
NOTE:
Page 82

All about EFFECT
081
Brief outline about how to use <EFFECT>, its flow, input and output
3-03-1 All about EFFECT
[Flow of the EFFECT]
Change of the mode (MTR mode)
P.038
Recording
P.055
#1 Use <EFFECT>
Use the pre-set patch as it is
P.083
#2 Edit the patch <EDIT>
Select the pre-set that’s closest to your desired sound.
Edit the modules
Adjust the level of the patch Change the name of the patch
Store the contents of editing : <STORE>
P.088
Adjust the parameter
Select modules
<PRE AMP>
<EFX>
#3 Import the patch <IMPORT>
Select the mode
Import one <EACH>
Import all <ALL>
P.089
P.139
P.085
P.086
P.087 P.087
Page 83

All about EFFECT
082
About input and output of [EFFECT]
You can use EFFECT in MTR mode for mono or stereo signals. The flow of signals will
change corresponding to the input sources and recording tracks.
2. Input source comes from either [MIC] or INPUT [1] [2]
TRACK
Built-in MIC L or INPUT [1]
Built-in MIC R or INPUT [2]
+ +
EFFECT
PRE AMP EFX
1. Input source comes from either INPUT [1] or [2]
TRACK
+
EFFECT
PRE AMP EFX
INPUT [1] or [2]
Two recording
tracks:
One recording
track:
1. Input source comes from either INPUT [1] or [2]
2. Input source comes from either [MIC] or INPUT [1] [2]
TRACK
TRACK
+
EFFECT
PRE AMP EFX
TRACK
TRACK
EFFECT
PRE AMP EFX
INPUT [1] or [2]
Built-in MIC L or INPUT [1]
Built-in MIC R or INPUT [2]
Only on MTR MODE
Page 84

4
Select No. : PATCH NAME and press.
1
Press.
2
Press <EFFECT> and press.
3
Press <ON> and press.
Effect <EFFECT>
083
3-03-2 Effect <EFFECT>
PATCH
Effects module settings are
saved as a ‘patch’.
60 patches are available
and 50 of them have been
programmed.
NOTE:
Using the EFFECT made up of 2 modules in MTR mode, you can add various effects to the input signals.
Ref.
☞
P.146
patch list
P.145
6
Pressing [MENU] for more
than two seconds returns
you to the top screen.
When EFFECT is on, display
will show off.
IMPORT: Carry in a PATCH from
the other PROJECT
PATCH NUMBER: PATCH NAME.
EDIT: Create a new PATCH,
Edit a PATCH.
Press the [MENU] button for
more than 2 seconds, and start
operation from the top screen.
5
Select PATCH and press.
Only on MTR MODE
Page 85

Effect <EDIT>, patch edit
084
You can create your own patch by combining effects and adjusting the parameter settings.
3-03-3 Effect <EDIT>, patch edit
5
Select the desired sound No.
:PATCH NAME and press.
6
Select <EDIT> and press.
7
Select the PARAMETER which
you want to change and press.
EDIT MENU
<PRE AMP>
PRE AMP module contains
guitar and bass amp modeling effects.
<EFX>
EFX module contains modulation, chorus and delay effects.
<LEVEL>
Adjust PATCH level.
<STORE>
Save the set the PATCH.
<RENAME>
Change the PATCH NAME.
Only on MTR MODE
Page 86
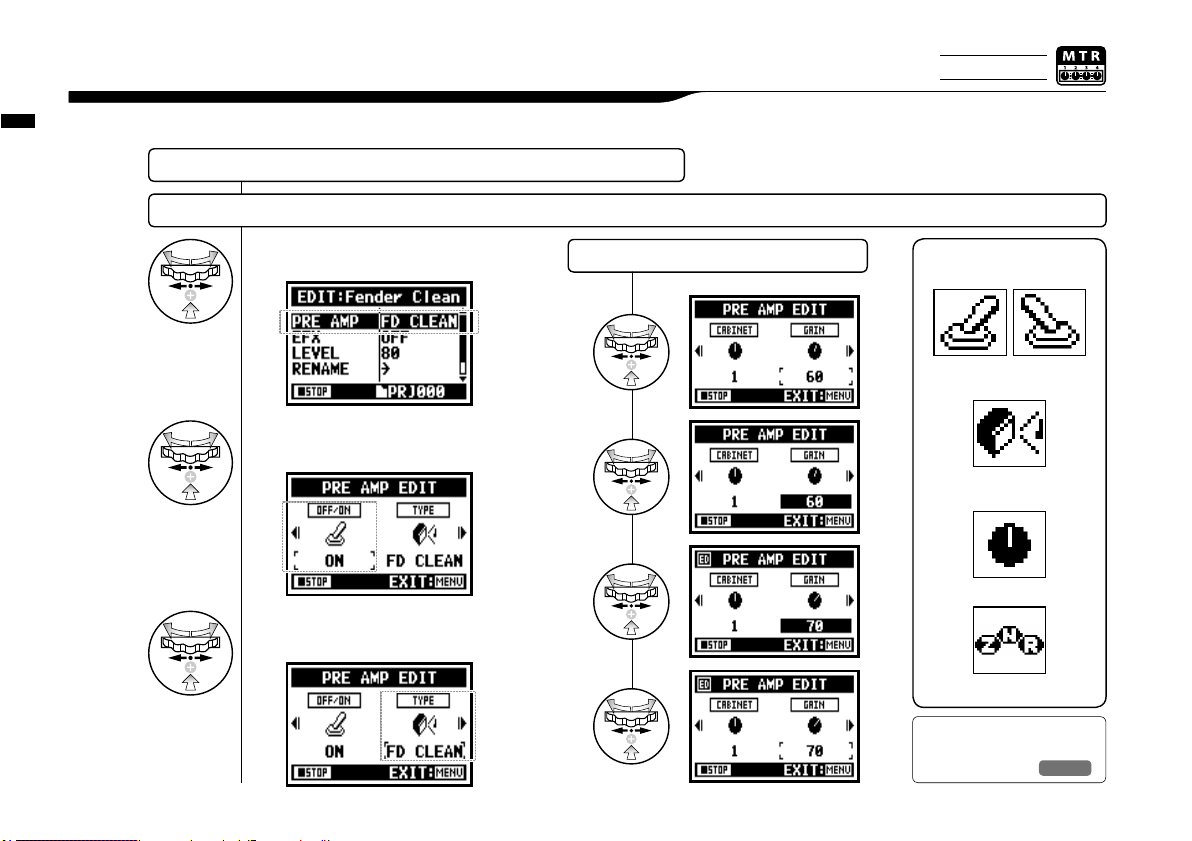
Effect <EDIT (PRE AMP) >, editing PRE AMP modules
085
You can edit the PATCH using PRE SET EFFECT.
3-03-4 Effect <EDIT (PRE AMP) >, editing PRE AMP modules
ZNR ICON
EFFECT TYPE: SET THE AMP TYPE
CABINET.EQ.LEVEL. ETC.
PRE AMP MODULE CONDITION
ON / OFF
ICON
7
Select <PRE AMP>and press.
8
Press <ON/OFF> and PRE AMP
module turns on.
ADJUST PARAMETER
Select the desired PATCH and edit it....P084
ADJUST PRE AMP module
9
Select editing PARAMETER
and press.
Ref.
☞
PRE AMP module PARAMETER
P.139
Only on MTR MODE
Page 87

Effect <EDIT (EFX) >, editing EFX modules
Edit the patch by selecting from various parameters that correspond closest to your desired effect.
3-03-5 Effect <EDIT (EFX) >, editing EFX modules
Select the nearest image PATCH and edit it....P084
ADJUST EFX module
9
Select editing PARAMETER
and press.
8
Press <ON/OFF> and EFX
module turns on.
7
Select <EFX> and press.
086
EFFECT TYPE: SET THE EFX
VARIOUS PARAMETERS
PRE AMP MODULE CONDITION
ON / OFF
ICON
Ref.
☞
EFX module PARAMETER
P.141
To select PRE AMP and EFX
modules, make setting after
changing the module status
ON.
Default: When a module
is OFF, no parameters or
settings are shown.
When OFF, you cannot select
modules.
HINT:
Only on MTR MODE
Page 88

Effect <EDIT (LEVEL/RENAME) >
Adjust the levels of the patch and change the name.
3-03-6 Effect <EDIT (LEVEL/RENAME) >
Select <LEVEL> and press.
Change the number and
press.
Select <STORE> to save
the patch. To return to the
top without saving the edit/
change, hit MENU.
NOTE:
EFFECT〈EDIT〉…P.084
LEVEL RENAME
087
1
2
Select <RENAME> and
press.
1
Change the PATCH name
and press.
2
Select <OK> and press.
3
Only on MTR MODE
Page 89

Effect <EDIT (STORE) >
088
Select not <STORE>.
(not stored)
Selecting “YES” will overwrite
the current patch. To save
without overwriting an existing patch, select an empty
patch during STORE operation. Patch changes are only
stored for the current project.
10
Select <STORE> and press.
11
Select the ‘PATCH No.’
where to save and press.
12
Select <EXECUTE> and press.
NOTE:
The items you edited have ‘ED’ display and confirmed by
<STORE>operation.
3-03-7 Effect <EDIT (STORE) >
EFFECT〈EDIT〉…P.084
STORE
Only on MTR MODE
Confirmed <STORE>.
Page 90

Effect <IMPORT>, taking in a patch from another PROJECT
089
You can apply the edited and saved EFFECT PATCH, used in other project to the current PROJECT.
3-03-8 Effect <IMPORT>,
taking in a patch from another PROJECT
1
Press <IMPORT> from
the <EFFECT> screen.
3
Select your desired mode
and press.
2
Select <MODE> and press.
<ALL> read in all patches
4
Select PROJECT
and press.
SELECTED EFFECT...P.083<EFFECT>
5
Select <NEXT> and press.
6
Select <YES> and press.
All the patch selected at
step 4 are now read in to
the present project.
Page 91

Effect <IMPORT>, taking in a patch from another PROJECT
090
<EACH> import one patch
When pressing the
<IMPORT>, “No Other
Project!” display will
appear when there is
no PROJECT.
NOTE:
HINT:
Read in MODE
Read in PROJECT
Start importing
current PROJECT
Selected PROJECT
8
Select <YES> and press.
5
Select <NEXT> and press.
6
Select an import patch and press.
7
Select which patch you want
to import to the present
project and press.
The patch selected at step6 is now
imported to the present project.
Only on MTR MODE
Page 92
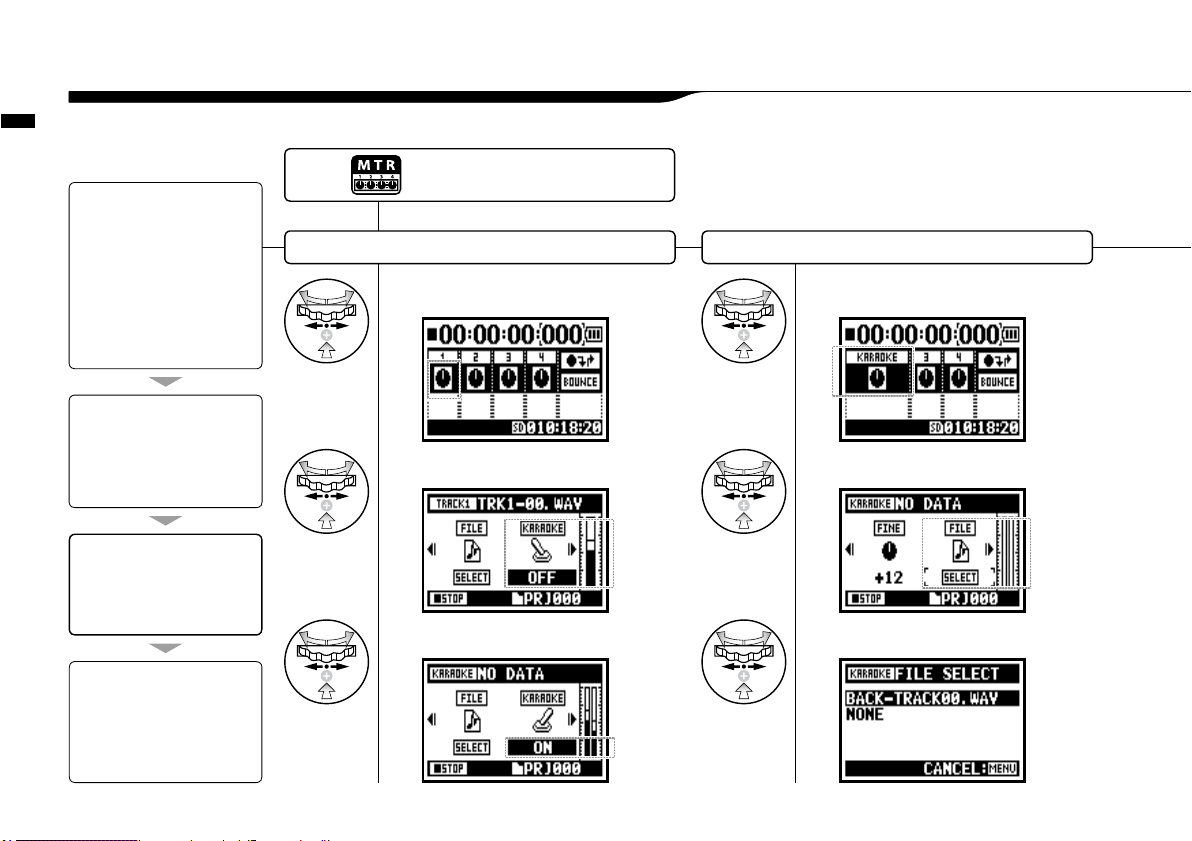
A sing-along machine <KARAOKE> preparation
091
Create spontaneous music files and convert them into KARAOKE form, then record vocals or additional guitar sounds over those files.
3-04-1 A sing-along machine <KARAOKE> preparation
KARAOKE track preparation Allocate an optional le on to KARAOKE track
1
Select TRACK MENU icon and press.
2
Select <KARAOKE> and press.
3
Select <ON> and press.
4
Select TRACK MENU icon and press.
5
Select <FILE> and press.
6
Select an optional file and press.
[Flow of the KARAOKE]
[KARAOKE OPERATION]
4. Connect the microphone
5. Make the setting for the
recording tracks
6. Make 'RECORDING' on.
• Playback
• Recording
[Setting KARAOKE]
(Prepare tracks for the Karaoke)
1. Select 'TRACK MENU ICON' and
open the 'TRACK MENU'
2. Make <KARAOKE> on.
3. Allocate files.
[Preparation]
Prepare the stereo files for the
background
Create a new project for
“Karaoke”
………P.118
Import the file to the project
• Copy the file to the project folder
……P.039
• Use <MOVE> function……P.117
[Adjustment of the Karaoke tracks]
• LEVEL
• CENTER CANCEL
• KEY
• FINE·FINE
Press the [MENU] button for
more than 2 seconds, and start
operation from the top screen.
Page 93

A sing-along machine <KARAOKE> preparation
092
Change the KEY of KARAOKE track
Continue to the next page
The contents of KARAOKE
TRACK are different from a
general TRACK MENU.
HINT:
(LEVEL)
(CNT CANCEL)
(KEY)
(FINE)
(FILE)
(KARAOKE)
Make CENTER CANCELATION of the KARAOKE track
10
Select TRACK MENU icon
and press.
7
Select TRACK MENU icon
and press.
8
Select <CNT CANCEL> and press.
9
Convert that into <ON> and press.
11
Select <KEY> and press.
12
Adjust and press.
Only on MTR MODE
Page 94

A sing-along machine <KARAOKE> recording
093
3-04-2 A sing-along machine <KARAOKE> recording
You cannot use this function
together with <EFFECT>.
NOTE:
+
A slight adjustment of KARAOKE TRACK KEY.
1
Connect the microphone.
2
Select the track menu icon and press.
3
Press ‘PRACTICE’ (no recording).
[START RECORDING]
Press [REC] button and make
recording standby condition.
After that press [PLAY/PAUSE]
button to start recording.
Recording on KARAOKE
Ref.
☞
<TRACK MENU>
P.059
14
Select <FINE> and press.
15
Make adjustment and press.
13
Select TRACK MENU icon
and press.
Press the INPUT button corresponding
to the connected input jack.
4
Only on MTR MODE
Page 95

Playback : Playback files (stereo, 4ch and stamina modes)
094
Immediately after recording, you can playback the file by pressing the [PLAY/PAUSE] button.
If you prefer to call up the files for later playback, take the following steps.
4-01 Playback : Playback files
(stereo, 4ch and stamina modes)
1
Press.
2
Select <FILE> and press.
3
Select the targeted file
and press.
4
Select <SELECT> and press.
You should confirm the file name.
5
[START PLAYBACK]
Press.
Press the [MENU] button for
more than 2 seconds, and start
operation from the top screen.
• On the top screen you can move directly to Step 3,
just press TRACK [2] button.
• If you press [PLAY/PAUSE] button after selecting
files, the selected file starts playback immediately.
• You can select files in the folder directly using [DIAL]
from the top screen.
HINT:
Ref.
☞
<FILE SELECT>
P.104
"Short cut"
Pressing TRACK
on the top screen.
“Short cut”
You can select the
file in the folders
on the top screen.
Page 96

Playback : <PLAY MODE>
095
Aside from general playback, you can also select
1) one file only playback, 2) repeat playback of one file, and 3) all files repeat playback.
4-02 Playback : <PLAY MODE>
You cannot use this setting during recording
and playback.
NOTE:
1
Press.
2
Select <PLAY MODE> and press.
3
Select a play mode and press.
PLAY ALL Playback all the files in the folder.
PLAY ONE Playback one file.
REPEAT ONE Playback repeat of one composition only.
REPEAT ALL Playback all files in the folder.
Select desirable mode.
4
[START PLAYBACK]
Press.
Press the [MENU] button for
more than 2 seconds, and start
operation from the top screen.
Page 97

Playback : Setting marks
096
While operating file playback you can create marks at desired spots.
You can move easily to the spot during playback.
4-03 Playback : Setting marks
• Mark function is available only in case of WAV format.
• The maximum marks you can place in one file are 99.
• Once a mark has been created it cannot be deleted.
NOTE:
During playback operation,
press the [REC] button.
How to create marks
How to playback the marked file
FILE
• Pressing [REC] button during recording, you can
create marks.
• You can recognize marks in the file in the <MARK LIST>.
HINT:
You can move to the marked position
pressing [FF] and [REW] buttons in the
files with marks.
Ref. ☞<MARK LIST>
P. 115
Mark A
Current position
Mark B
Page 98

Playback : <AB REPEAT>
097
4-04 Playback : <AB REPEAT>
The <AB REPEAT> repeat setting allows you to playback two points on the file repeatedly.
1
Press.
2
Select <TOOL> and press.
3
Select <AB REPEAT > and press.
4
[START PLAYBACK] Press.
point A moves.
5
[Set up point A] Press.
A mark is placed at point A, then mark B appears and moves until set
6
[Set up point B] Press.
Playback continues
repeatedly between the
indicated locations.
Press the [MENU] button for
more than 2 seconds, and start
operation from the top screen.
You can set point [A] and [B] while stopped.
HINT:
Page 99

Playback : <AB REPEAT>
098
Caution:
When you move around in the file using [FF]
and [REW] buttons and whenever you press
the button for less than 2 seconds (quick
press), it will move to the next file. If there is
a mark, it will move to the marked point.
By pressing the [FF] and [REW] buttons for
more than 2 seconds you can move to a
desired point.
HINT:
After setting up A and B
points press the [REC] button,
you can cancel all settings.
During recording and playback,
you cannot make any settings
after Step 3 of <AB REPEAT>.
NOTE:
<AB REPEAT>
FIX/CLEAR of A & B point
STOP
PLAYBACK/TEMPORARY STOP of the file
Holding the key for more than one second,
operate wind-forward and rewind
Just press the button, and move back or
forward to the file
* However if there is a marker in a WAV file,
the button moves to the marking place.
or
Movable with
a long press.
Page 100

1
Press.
2
Select <TOOL> and press.
3
Select <SPEED> and press.
Playback : <SPEED>
099
You can adjust playback speed of the file.
4-05 Playback : <SPEED>
• You can move swiftly to this menu pressing TRACK [3] button on the top
screen of each mode.
• You can set up playback speed between 50% and 150% with increments or
decrements of 5%. (Default; 100%)
• You can move the playback location using [FF] [REW] button.
HINT:
During recording and playback, you cannot make any settings after Step 3 of
<SPEED>.
NOTE:
5
[START PLAYBACK] Press.
or
4
Adjust playback speed.
You can set up playback
speed between 50% and
150% with increments or
decrements of 5%.
Press the [MENU] button for
more than 2 seconds, and start
operation from the top screen.
"Short cut"
Pressing TRACK
on the top screen.
Only on STEREO MODE
 Loading...