

Page 1

Operation Manual
English
© ZOOM Corporation
Reproduction of this manual, in whole or in part,
by any means, is prohibited.
Page 2
W
W
W
W
W
SAFETY PRECAUTIONS / Usage Precautions
• High humidity or moisture
SAFETY PRECAUTIONS
In this manual, symbols are used to highlight warnings and
cautions for you to read so that accidents can be prevented. The
meanings of these symbols are as follows:
This symbol indicates explanations about extremely
dangerous matters. If users ignore this symbol and
handle the device the wrong way, serious injury or
arning
death could result.
This symbol indicates explanations about dangerous
matters. If users ignore this symbol and handle the
device the wrong way, bodily injury and damage to
Caution
the equipment could result.
Please observe the following safety tips and precautions to
ensure hazard-free use of the H4.
Power requirements
Since power consumption of this unit is fairly high, we
arning
recommend the use of an AC adapter whenever
possible. When powering the unit from batteries, use
only alkaline types.
[AC adapter operation]
• Be sure to use only an AC adapter which supplies 9 V DC,
300 mA and is equipped with a "center minus" plug
(Zoom AD-0006). The use of an adapter other than the
specified type may damage the unit and pose a safety
hazard.
• Connect the AC adapter only to an AC outlet that supplies
the rated voltage required by the adapter.
• When disconnecting the AC adapter from the AC outlet,
always grasp the adapter itself and do not pull at the cable.
• During lightning or when not using the unit for an
extended period, disconnect the AC adapter from the AC
outlet.
[Battery operation]
• Use two conventional IEC R6 (size AA) batteries
(alkaline).
• The H4 cannot be used for recharging.
•Pay close attention to the labelling of the battery to make
sure you choose the correct type.
• When not using the unit for an extended period, remove
the batteries from the unit.
• If battery leakage has occurred, wipe the battery
compartment and the battery terminals carefully to
remove all remnants of battery fluid.
• While using the unit, the battery compartment cover
should be closed.
Environment
To prevent the risk of fire, electric shock or
arning
malfunction, avoid using your H4 in environments
where it will be exposed to:
• Extreme temperatures
• Heat sources such as radiators or stoves
• Excessive dust or sand
• Excessive vibration or shock
Handling
•Never place objects filled with liquids, such as vases, on
arning
the H4 since this can cause electric shock.
• Do not place naked flame sources, such as lighted candles,
on the H4 since this can cause fire.
• The H4 is a precision instrument. Do not exert undue
pressure on the keys and other controls. Also take care not
Caution
to drop the unit, and do not subject it to shock or excessive
pressure.
•Take care that no foreign objects (coins or pins etc.) or
liquids can enter the unit.
Connecting cables and input and output
jacks
Caution
You should always turn off the power to the H4 and all
other equipment before connecting or disconnecting
any cables. Also make sure to disconnect all connection
cables and the power cord before moving the H4.
Alterations
Never open the case of the H4 or attempt to modify the
arning
product in any way since this can result in damage to
the unit.
Volume
Do not use the H4 at a loud volume for a long time
Caution
since this can cause hearing impairment.
Usage Precautions
Electrical interference
For safety considerations, the H4 has been designed to provide
maximum protection against the emission of electromagnetic
radiation from inside the device, and protection from external
interference. However, equipment that is very susceptible to
interference or that emits powerful electromagnetic waves
should not be placed near the H4, as the possibility of
interference cannot be ruled out entirely.
With any type of digital control device, the H4 included,
electromagnetic interference can cause malfunctioning and can
corrupt or destroy data. Care should be taken to minimize the
risk of damage.
Cleaning
Use a soft, dry cloth to clean the H4. If necessary, slightly
moisten the cloth. Do not use abrasive cleanser, wax, or solvents
(such as paint thinner or cleaning alcohol), since these may dull
the finish or damage the surface.
Please keep this manual in a convenient place for
future reference.
2
ZOOM H4
Page 3

Contents
SAFETY PRECAUTIONS / Usage
Precautions ............................................2
Overview ...................................................5
Introducing the H4 ...................................6
Stereo Mode and 4-Track Mode ...........6
Mixer Functions .....................................7
Effects ....................................................7
Parts of the H4 .........................................8
Getting Connected .................................10
About SD Cards ......................................10
Operation on Battery Power .................11
Power On/Off ..........................................11
Power-on .............................................11
Power-off .............................................11
Recording ...............................................12
Setup ....................................................12
Recording steps ..................................12
Quick Guide 1
Stereo mode basic operation..............14
Preparations before recording ............14
Starting the H4 ....................................... 14
Adjusting the input sensitivity/recording
level ..................................................... 14
Using effects ........................................ 16
Recording ............................................17
Selecting a file for playback ................... 18
Quick Guide 2
4-track mode basic operation ............19
Step 1: Preparations ............................19
Switch to 4-track mode .......................... 19
Creating a new project ........................... 20
Making metronome settings ..................20
Step 2: Recording the first track ......... 21
Selecting the input source/recording
track ..................................................... 21
Adjusting the input sensitivity/recording
level ..................................................... 22
Selecting an effect patch .......................24
Recording/Playback ............................... 25
Step 3: Add more tracks ..................... 26
Preparations ........................................... 26
Recording/Playback ............................... 26
Step 4: Mixing and bounce ................. 27
Mixing .................................................... 27
Bounce ................................................... 28
Stereo Mode .......................................... 30
What is stereo mode? ......................... 30
Switching to stereo mode ................... 30
Recording in stereo mode ..................31
Select input source ................................ 31
Adjust recording level ............................ 31
Automatic adjustment of recording level
(Auto gain function) .............................33
Select recording format ......................... 34
Record ................................................... 35
Using the monitor function .................... 36
Playback in stereo mode .................... 36
Selecting a file for playback ................... 36
Locating a point in a recording
(Locate) ................................................ 37
Playing a specified section repeatedly
(A-B repeat) ........................................ 38
4-Track Mode ......................................... 39
What is 4-track mode? ........................ 39
Switching to 4-track mode ................. 39
Selecting the recording mode ............ 40
About the recording mode ..................... 40
Selecting the recording mode ................ 41
Operation differences according to
recording mode ................................... 41
Recorder .............................................. 42
Selecting files for playback .................... 42
Using the locate function and A-B
repeat function in 4-track mode .......... 43
Re-recording only a specified region
(punch-in/out function) ........................ 43
Combining multiple tracks on one file
(bounce function) ................................. 45
Mixer .................................................... 47
About the mixer in 4-track mode ........... 47
Selecting the input source ..................... 48
Adjusting the recording level ................. 48
Selecting the recording track ................. 50
Using the monitor function .................... 51
4-track mixing (volume/panning) ........... 51
Linking two tracks (stereo link) .............. 53
ZOOM H4
3
Page 4

Contents
Projects................................................ 54
What is a project? ...................................54
Basic project operations .........................54
Creating a new project ...........................55
Selecting a project ..................................55
Changing a project name .......................56
Copying a project ...................................57
Deleting a project ...................................57
Write-protecting a project ......................58
Tuner ....................................................59
Using the chromatic tuner ......................59
Using other tuner types ..........................60
Effects .....................................................62
About Effects ....................................... 62
Using effects in stereo mode ..............62
Using effects in 4-track mode .............64
About effect input/output .......................64
Selecting a patch ....................................64
Editing a patch ........................................65
Saving a patch ........................................67
Assigning a name to a patch ..................68
Importing a patch ...................................69
Managing Recorded Files ..................... 71
About recorded files ............................71
Basic file operations ............................71
Renaming a file ....................................72
Deleting a file ....................................... 73
Copying a file (4-track mode only) ...... 73
Importing a file (4-track mode only) ....74
Checking the file size ..........................76
Miscellaneous Settings ......................... 77
Metronome setting ..............................77
Controlling the display
contrast/backlight .............................78
Turning the phantom power supply
on/off .................................................79
Controlling the key-hold function .......79
Using the USB function .......................80
Using the H4 as audio interface for a
computer ..............................................80
Using the H4 as an SD card reader ........82
SD card operations ..............................83
Checking available space on the SD
card ......................................................83
Initializing an SD card .............................84
About the software version .................84
Specifications .........................................86
Troubleshooting .....................................88
Problems during recording/
playback ............................................ 88
Other problems ................................... 88
Effect Types and Parameters ................89
Effect types and parameters in
4-track mode ..................................... 89
PREAMP module ....................................89
EFX module ............................................ 91
Effect types in stereo mode ................ 95
MIC MODEL module ..............................95
COMP/LIMIT module ..............................95
H4 Patch List ..........................................96
Contents of SD Card ..............................97
INDEX ......................................................98
• Windows and Windows XP are registered
trademarks of Microsoft Corporation.
• Macintosh and MacOS are registered
trademarks of Apple Computer.
• The SD symbol is a trademark.
• All other trademarks, product names, and
company names mentioned in this
documentation are the property of their
respective owners.
• Manufacturer names and product names
mentioned in this documentation are
trademarks or registered trademarks of their
respective owners. The names are used only to
illustrate sonic characteristics and do not
indicate any affiliation with ZOOM
CORPORATION.
4
ZOOM H4
Page 5

Overview
Thank you for selecting the
"
H4
"). The H4 is an attractive product with the following features.
●
All-in-one type handy recorder
In a compact package weighing a mere 190 grams, the H4 offers a high-performance stereo
condenser mic, SD card recorder, mixer, effect section, metronome, and more. Easily record
and produce music on the go, wherever you are.
●
Applications range from field recording to multi-track use
The H4 offers a choice of stereo mode for instant stereo recording, and 4-track mode which
allows simultaneous playback of four tracks and recording of two tracks. Use the unit in the
field to capture your melody ideas, quickly record a band, or to expand your sound collection.
Or use it as a multi-track recorder to overdub instruments and vocals.
●
Convenient bounce function
Once you have recorded four tracks, you can bounce the contents onto a stereo or mono file. By
assigning the resulting file to a recorder track, you can then continue to add more instrument or
vocal parts using the remaining tracks. Recorded files can also be copied to a computer for
further processing or burning onto an audio CD.
●
Two types of effects built in
The H4 comes with two built-in effect modules. The PREAMP module simulates the
characteristics of famous guitar and bass amps as well as various mic preamps. The EFX
module offers chorus and other modulation effects and spatial effects such as delay. Since the
input signal can be effect processed before recording, all you need to do is directly hook up your
guitar and bass and you're in business.
●
Functions as audio interface or SD card reader for a computer
The USB port of the H4 lets you easily connect the unit to a computer, for use as an audio
interface with built-in effects. (Effects can only be used when the sampling rate is 44.1 kHz.)
Another option is to use the H4 as an SD card reader, to quickly transfer files for import into
DAW software or for creating audio CDs.
●
Built-in tuner and metronome
The integrated tuner not only allows chromatic tuning but also supports 7-string guitar, 5-string
bass and other unconventional tunings. The metronome function is great when doing multitrack recordings or for use during practice sessions.
Please take the time to read this manual carefully to get the most out of the unit and
to ensure optimum performance and reliability.
Keep this manual at hand for future reference.
ZOOM Handy Recorder H4
(subsequently referred to simply as the
ZOOM H4
5
Page 6
Introducing the H4
This section explains the main features and functions of the H4.
In 4-track mode, the H4 functions as a multi-
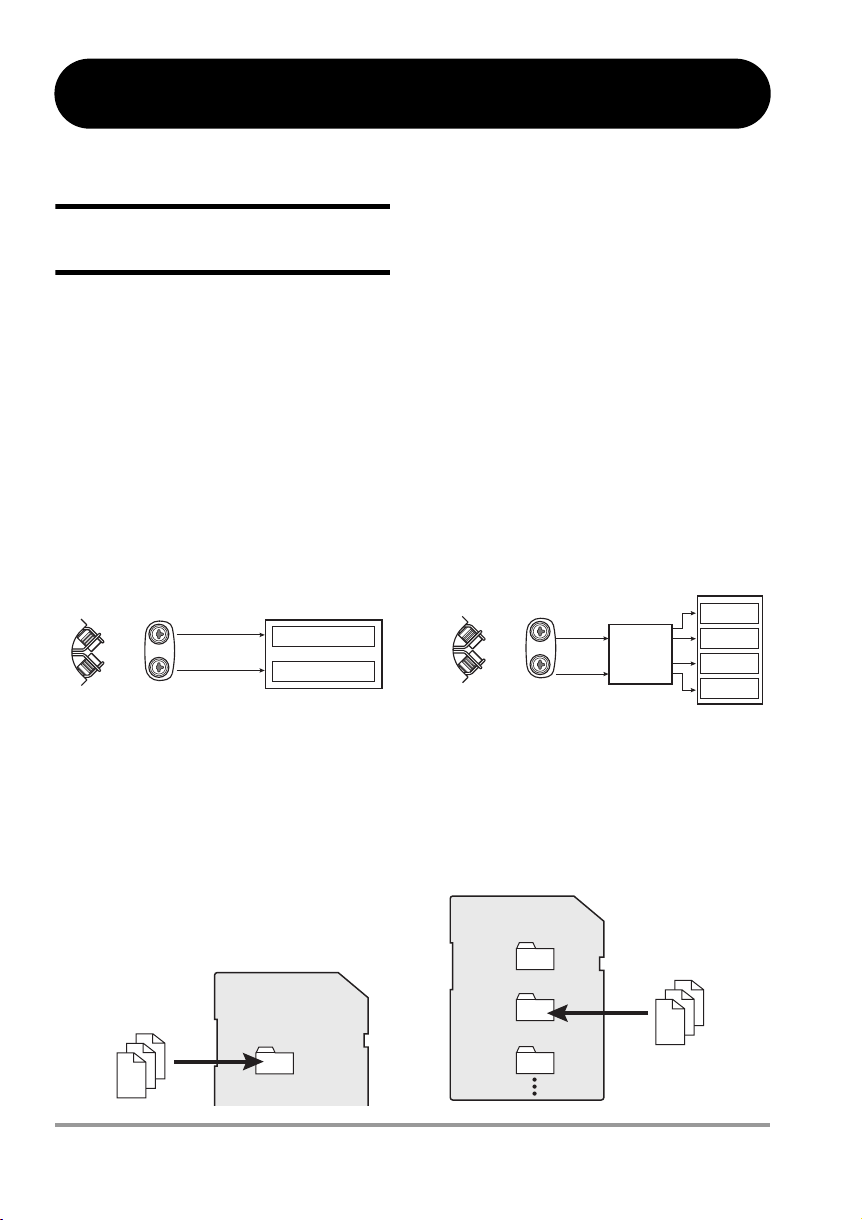
Stereo Mode and 4-Track
Mode
The H4 has two main operation modes, namely
"stereo mode" and "4-track mode". You select
one of these modes when using the unit.
In stereo mode, two signals either from the builtin stereo mic or from the [INPUT 1]/[INPUT 2]
jacks are used as recording sources to create a
stereo file on the SD card. This is great for
making full-fledged recordings in the field or to
capture the performance of a band in one go. It
also allows the H4 to be used as voice recorder
that's ready at a moment's notice.
Stereo mode
or
Built-in
stereo mic
[INPUT 1] jack
[INPUT 2] jack
Input 1
Input 2
Recorder
L stereo track
R stereo track
track recorder. This mode allows simultaneous
recording of 2 tracks and simultaneous playback
of 4 tracks. This lets you do things such as
creating a backing of drum machine and bass and
then produce a guitar or vocal overlay in the
studio.
After recording all four tracks, the individual
volume and panning (left/right positioning) of
each track can be adjusted for playback, and a
stereo or mono file can be created on the SD
card. By assigning the resulting file to a
particular track, you can free up the remaining
tracks to record more instruments or vocals to
create an overlay.
4-track mode
Built-in
stereo mic
or
[INPUT 1] jack
[INPUT 2] jack
Input 1
Input 2
Input
mixer
Recorder
Track 1
Track 2
Track 3
Track 4
You can select either WAV or MP3 as recording
format, and you can change the sampling rate
and bit rate as required. The recorded stereo files
are saved in a dedicated folder (hierarchical unit)
for the stereo mode. These files can be sent to a
computer via the USB port, for burning onto CDR/RW discs or for processing with DAW
software.
Files recorded in
stereo mode are
saved here
SD card
Dedicated stereo
mode folder
6
The recording format is fixed to WAV (sampling
rate 44.1 kHz/bit rate 16 bit). The individual files
created by recording in 4-track mode are saved
on the SD card in separate folders for each
project.
SD card
Project 1 folder
Project 2 folder
Project 3 folder
Files recorded in
4-track mode for
project 2 are saved
here
ZOOM H4
Page 7

Mixer Functions
When the H4 is operating in 4-track mode, two
kinds of mixers can be used, namely the input
mixer and track mixer.
Input 1
Input 2
Input
mixer
(for volume and panning)
Tra ck 1
Tra ck 2
Tra ck 3
Tra ck 4
Recorder
Track mixer
Introducing the H4
The effect section of the H4 offers multiple
single effects (effect modules) such as
compressor and preamp. The available effect
module configuration and input/output
specifications depend on the operation mode.
In stereo mode, the two effect modules MIC
MODEL and COMP/LIMIT can be used. (The
MIC MODEL module can be used only if the
built-in stereo mic is selected as input source.) In
this mode, both effect input and effect output are
in stereo.
Stereo mode module configuration
(Stereo input → Stereo output)
[LINE OUTPUT] jack
The input mixer takes up to two signals from the
built-in stereo mic or the [INPUT 1]/[INPUT 2]
jacks and sends them on in mixed form or
separately to the recorder tracks.
The track mixer adjusts the volume and panning/
balance of each signal recorded on the four
tracks and produces a stereo output signal.
Effects
The H4 also incorporates an effect section
immediately after the input that can be used to
process the input signal before recording it on the
tracks.
Stereo mode
Input 1
Input 2
Effect
section
4-track mode
Input 1
Input 2
Input
mixer
Effect
section
Recorder
L stereo track
R stereo track
Recorder
Track 1
Track 2
Track 3
Track 4
MIC MODEL COMP/LIMIT
In 4-track mode, the two effect modules
PREAMP and EFX can be used. In this mode,
the effect input is monaural and the effect output
is in stereo. (If only one track is selected as
recording target, the signal will be combined to
mono immediately after the effect section.)
4-track mode module configuration
(Mono input → Stereo output)
PREAMP EFX
ZOOM H4
7
Page 8
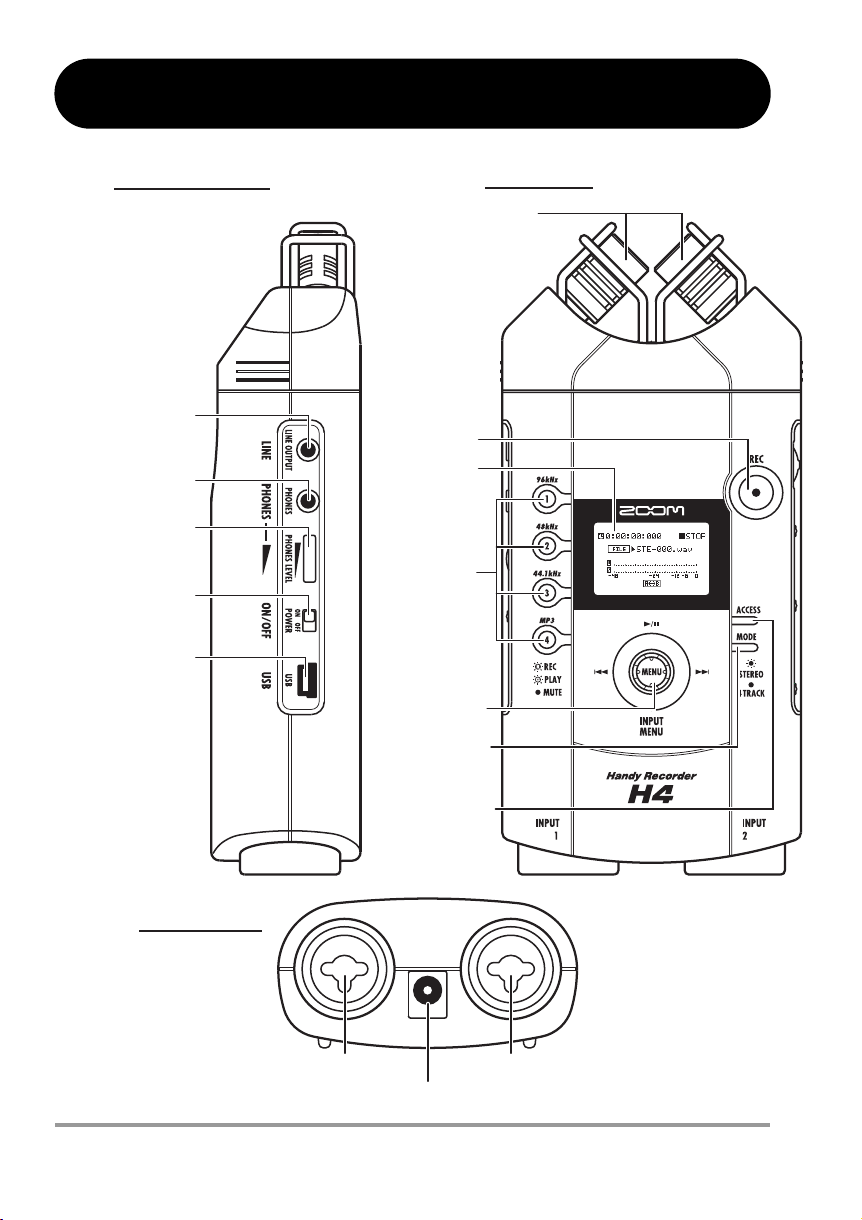
Parts of the H4
Left side panel
[LINE OUTPUT]
jack
[PHONES]
jack
[PHONES LEVEL]
knob
[POWER]
switch
[USB]
port
Top panel
Built-in stereo mic
[REC] key
Display
TRACK
[1] – [4] keys
[MENU] key
[MODE]
indicator
[ACCESS]
indicator
Rear panel
[INPUT 1] jack
[DC IN] jack
8
[INPUT 2] jack
ZOOM H4
Page 9

(1)
Slide the section with
your index finger to release
the lock.
(2) With the lock released,
grasp the cover with your
thumb and middle finger
and lift it.
Parts of the H4
(3) Flip the cover open
in the forward direction.
(1)
Battery compartment
cover
Jog dial
[MIC GAIN]
switch
[INPUT 2 GAIN]
switch
(2)
Opening the battery compartment cover
(3)
(1)
(2)
(3)
[SD CARD] slot
(2)
Right side panel
ZOOM H4
[INPUT 1 GAIN]
switch
Battery Battery
Front panel
9
Page 10
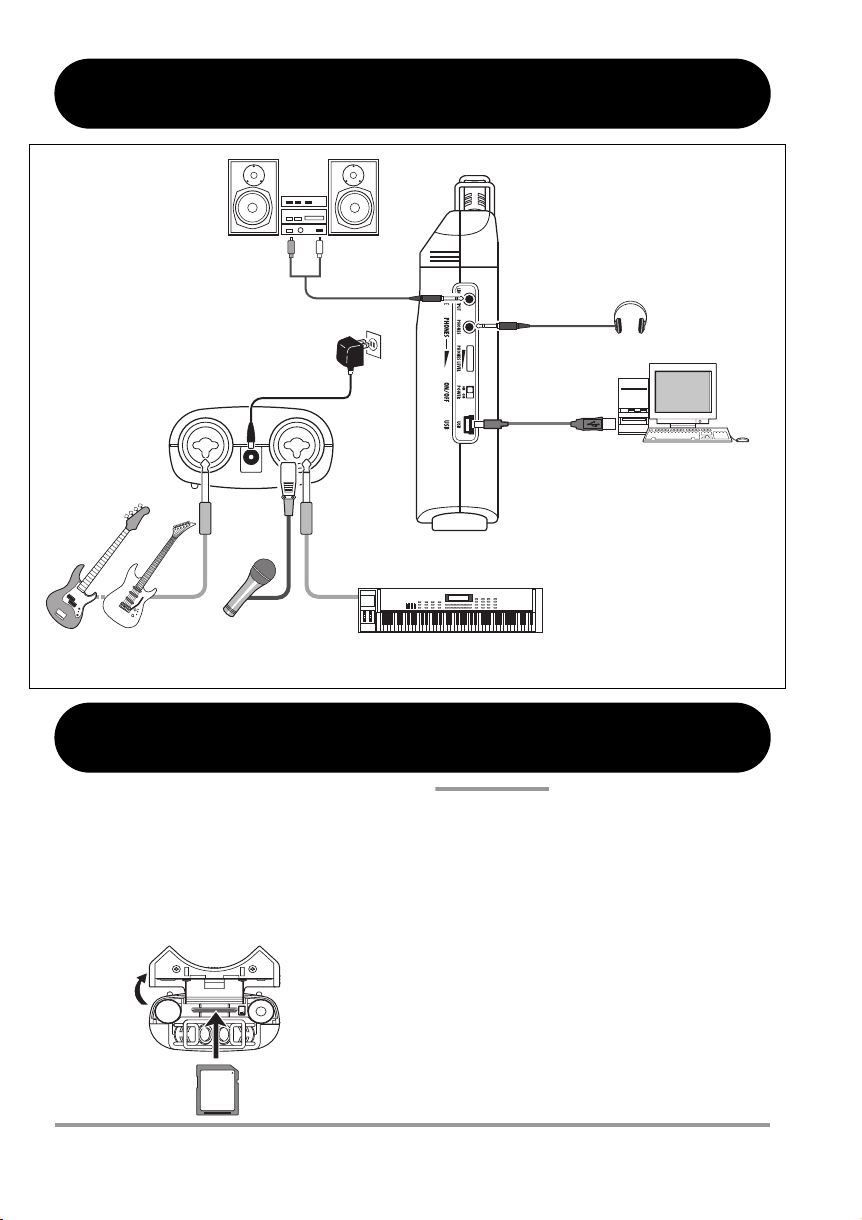
Getting Connected
SD
To monitor the output of
the H4 with a stereo
audio system, use a Y
cable connected to the
[LINE OUTPUT] jack.
To operate the H4 on AC power, be
sure to use only the supplied AC
adapter (ZOOM AD-0006). Using a
different adapter can lead to damage.
H4 rear panel
Bass
Guitar
Mic
The [INPUT 1]/[INPUT 2] jacks can be used to connect external
equipment such as a mic, bass, guitar, or keyboard.
About SD Cards
Monitor
system
AC adapter
H4 side panel
To monitor the output of the H4
with headphones, connect them to
the [PHONES] jack and adjust the
listening level with the [PHONES
LEVEL] knob. This jack carries the
same signal as the [LINE OUTPUT]
jack.
Headphones
Computer
When the H4 is connected to a
computer via the [USB] port, it can be
used as audio interface or SD card
reader for the computer, and audio
files stored on the SD card in the H4
can be transferred to the computer.
Keyboard
For using the H4, an SD card is required as a
recording medium. Before turning power to the
H4 on, insert the card into the [SD CARD] slot as
shown in the illustration below. Be sure to push
the card fully into the slot. To remove the card,
first push it into the slot to disengage and then
pull it out.
[SD CARD]
slot
SD card
10
NOTE
• If the SD card is inserted with wrong
orientation, it will not go all the way into the
slot.
• Never insert or remove the SD card while power
to the H4 is on. Otherwise data can be
destroyed.
•You can use off-the-shelf SD cards with a
capacity from 16 MB to 2 GB.
•To use a SD card that has previously been
initialized in a computer or digital camera or
similar, be sure to format in the H4 first
p. 84).
(
→
• If an operation requiring an SD card is
attempted while no SD card is inserted, the
indication "No Card" appears.
ZOOM H4
Page 11

Operation on Battery Power
The H4 can be powered from batteries which must be purchased separately. Insert the batteries as
follows.
1.
Open the battery compartment cover
as described on page 9.
2.
Insert two IEC R6 (size AA) batteries.
Close the battery compartment cover.
3.
NOTE
• When the unit is operated on batteries, the
Power On/Off
Use the following procedure to turn the H4 on and off.
Power-on
1.
Verify that power to the H4 and any
peripheral equipment is off.
Turn down the volume control on connected
instruments, the H4, and the monitoring
system.
2.Insert the SD card into the [SD
CARD] slot (
3.
Set the [POWER] switch on the H4
to On.
NOTE
• If the indication "No Card" appears at startup,
the H4 has not detected an SD card. Verify
that an SD card is correctly inserted.
• If the indication "Format Card?" appears at
startup, the H4 has detected that the SD card
is not initialized. To execute the initialization
process, bring the cursor to the OK button
and press the jog dial.
4.Turn power to other equipment on
in the order connected instruments
p. 10).
→
indication "Low Battery!" will appear on the
display when the batteries are exhausted. In
this case, turn the unit off and replace the
batteries as soon as possible with fresh ones.
• When the unit is operated on batteries, you
should not open the battery compartment
cover while power is on. Otherwise the sudden
interruption of power may lead to data loss.
monitoring system.
→
Power-off
1.
Turn power to other equipment off
in the order monitoring system
connected instruments.
Set the [POWER] switch on the H4
2.
to Off.
The message "GoodBye See You!" is shown on
the display and the H4 is turned off.
Information about current operations is
automatically saved on the SD card.
NOTE
• Always use the [POWER] switch to turn the
unit on and off.
• Never disconnect or connect the AC adapter
while power is on. Otherwise data loss may
occur.
• In particular, do not plug in or unplug the AC
adapter while the [ACCESS] indicator is lit.
Otherwise data can be destroyed.
→
ZOOM H4
11
Page 12

Recording
This section shows how you can try out the H4 straight away by doing some recording. The steps are for
using the stereo mode with the built-in stereo mic.
pick up the sound of footsteps, drum vibrations
Setup
To record on-mic, place the sound source at
about 30 to 50 centimeters from the H4.
etc. You should therefore place the H4 on a table
or a chair, or use a tripod with the supplied
adapter.
On-mic recording
Sound
source
About
30 – 50 cm
To record off-mic, the sound source should be
within the range of the two intersecting lines
from the two built-in mics.
Off-mic recording
Built-in stereo mic
Recording steps
1.
Turn power to the H4 on.
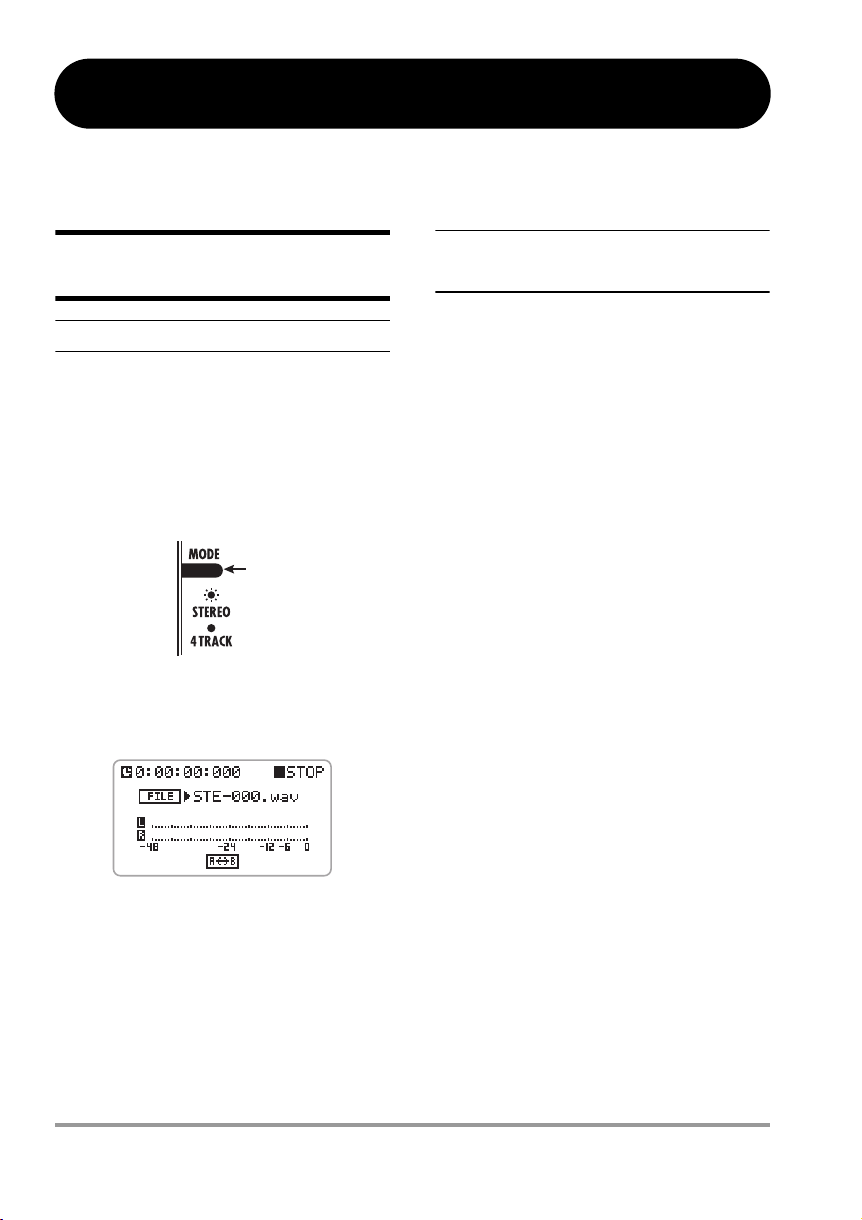
2.
The [MODE] indicator lights up.
Verify that the H4 is set to stereo
mode.
Stereo mode
Lit
If the [MODE] indicator is out, the H4 is in
4-track mode. Switch it to stereo mode
(
p. 30).
→
3.
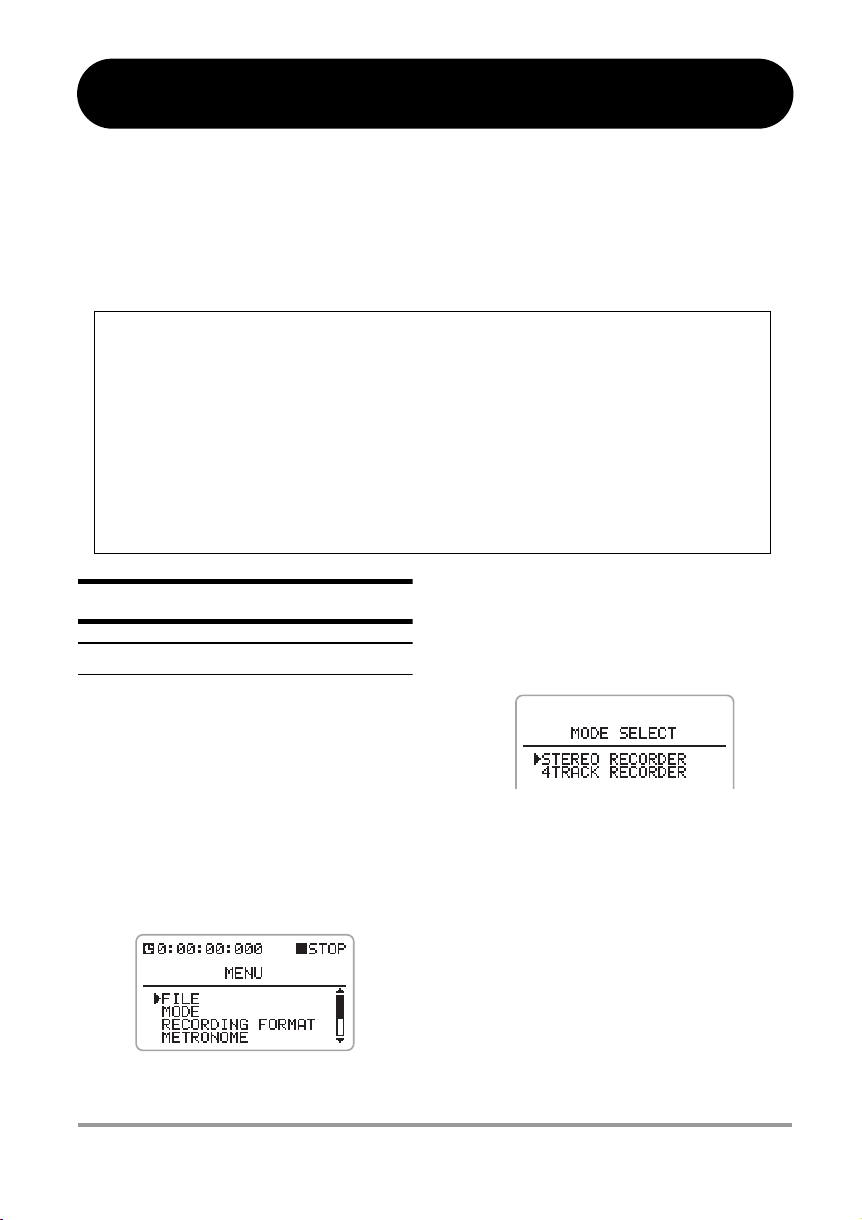
Verify that the following indication is
shown on the display.
Built-in
stereo mic
If the H4 is placed directly on the floor, it may
12
This is the top screen for the stereo mode. If
another screen is shown, repeatedly press the
center of the [MENU] key until the above screen
appears.
ZOOM H4
Page 13

4.
Use the TRACK [1] – [4] keys to
select the recording format.
The recording format selected by each key is as
shown below. Recording quality and file size
decrease from top to bottom.
●
[MIC GAIN] switch setting
Recording
TRACK [1] key
WAV (96 kHz)
TRACK [2] key
WAV (48 kHz)
TRACK [3] key
WAV (44.1 kHz)
TRACK [4] key
MP3 (44.1 kHz)
Press the key for the desired format and sampling
rate, so that the key lights up. Then press the
center of the [MENU] key repeatedly until to
return to the top screen of the stereo mode.
HINT
If required, you can also change the bit rate
(resolution) of the recording format.
Press the [REC] key.
5.
The [REC] key flashes and the H4 goes into
record standby mode. The display now operates
as a level meter showing the input level from the
built-in stereo mic. The input signal can be
monitored via the [LINE OUTPUT] jack and
[PHONES] jack.
Setting Application
For on-mic recording of instruments or
single-session recording of a band
L
performance.
For recording of acoustic guitar and
M
other instruments with low volume.
Off-mic recording setting, mostly for use
H
in the field.
HINT
You can fine adjust the recording level manually
or automatically (
NOTE
If the level meter does not register at all when the
unit is pointed towards the sound source and the
unit shows the above screen, the [INPUT 1]/
[INPUT 2] jacks may be selected as input source.
Switch the input source to the built-in stereo mic
p. 31).
(
→
Press the [REC] key once more.
7.
The [REC] key lights up and recording starts.
To stop recording, press the [REC]
8.
key or press the top (@
[MENU] key.
p. 31, 33).
→
) of the
Input level
6.
To obtain optimum volume levels, set
the [MIC GAIN] switch so that the
meter indication on the display stays
just below 0.
ZOOM H4
To check the recorded content,
9.
press the top (@
The recorded content is played back via the
[LINE OUTPUT] jack and [PHONES] jack.
) of the [MENU] key.
13
Page 14
Quick Guide 1
This section explains the basics of using the unit in stereo mode. As an example, it shows how to record a
band performance in one go with the built-in stereo mic.
Stereo mode basic operation
Preparations before
recording
Starting the H4
Connect the monitor system to the
1.
H4, and turn power on in the order
H4
→
monitor system.
Verify that the [MODE] indicator is lit.
2.
Stereo mode
Lit
If the [MODE] indicator is out, the H4 is in 4track mode. Switch it to stereo mode (
→
p. 30).
Adjusting the input sensitivity/
recording level
To record the input signal with optimum quality,
the input sensitivity and recording level must be
adjusted correctly.
◆
Input sensitivity adjustment
The input sensitivity adjustment controls the
input level to the analog section, to ensure that
the signal from the built-in stereo mic or the
[INPUT 1]/[INPUT 2] jacks can be handled by
the H4 at an appropriate level.
1.
Use the [MIC GAIN] switch on the
right side panel to adjust the input
sensitivity (
◆
Recording level adjustment
The recording level adjustment controls the gain
of the signal to be recorded by the recorder, in
other words it sets the input level to the digital
section of the H4. The method described in this
section uses the auto gain function to detect the
level and make the adjustment automatically.
→
page 13).
The display shows the stereo mode top screen.
If another screen is shown, press the center of the
[MENU] key repeatedly to bring up the screen
shown above.
14
2.
At the stereo mode top screen, press
the bottom of the [MENU] key.
The [MENU] key serves for calling up various
menus of the H4, and it also functions as the
recorder transport key pad. It works differently
depending on whether the top, bottom, left, right,
or center portion of the key is pressed (see
illustration on next page).
When you press the bottom (INPUT MENU) of
ZOOM H4
Page 15
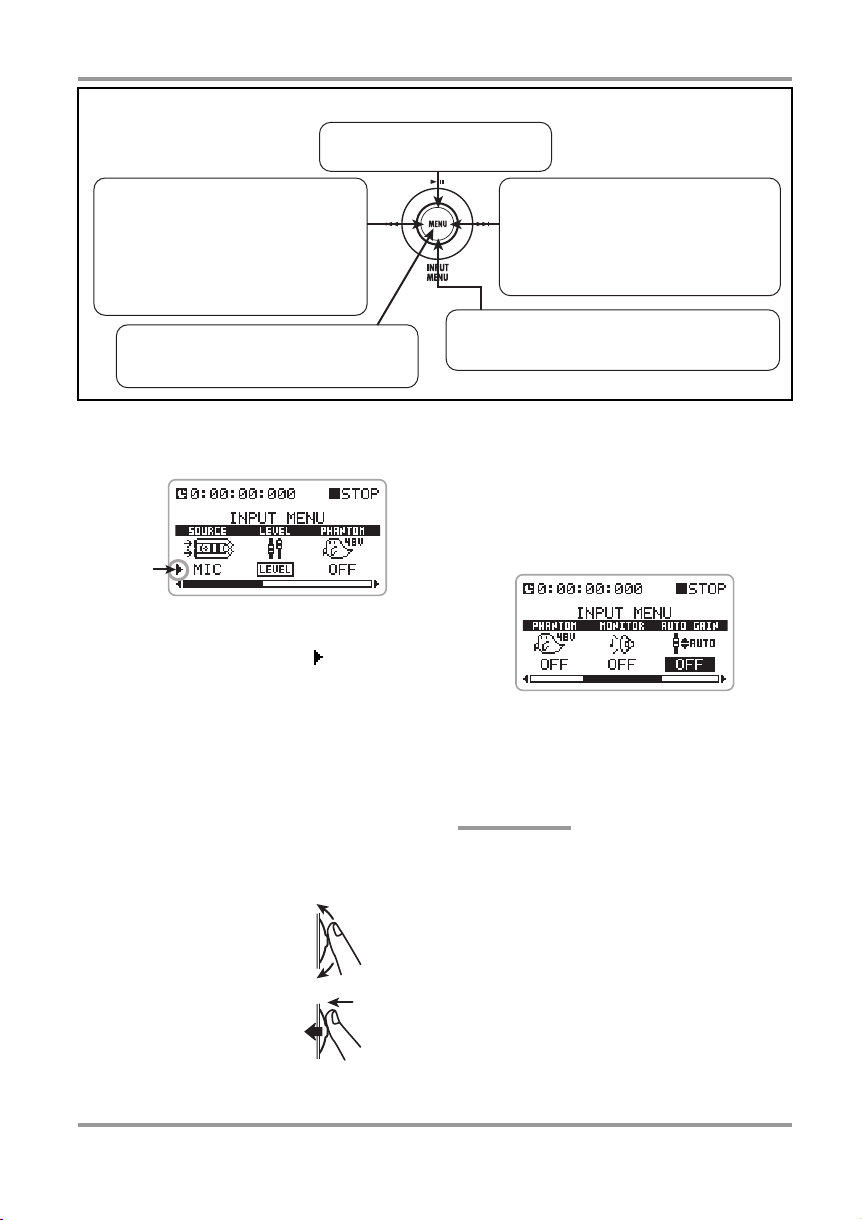
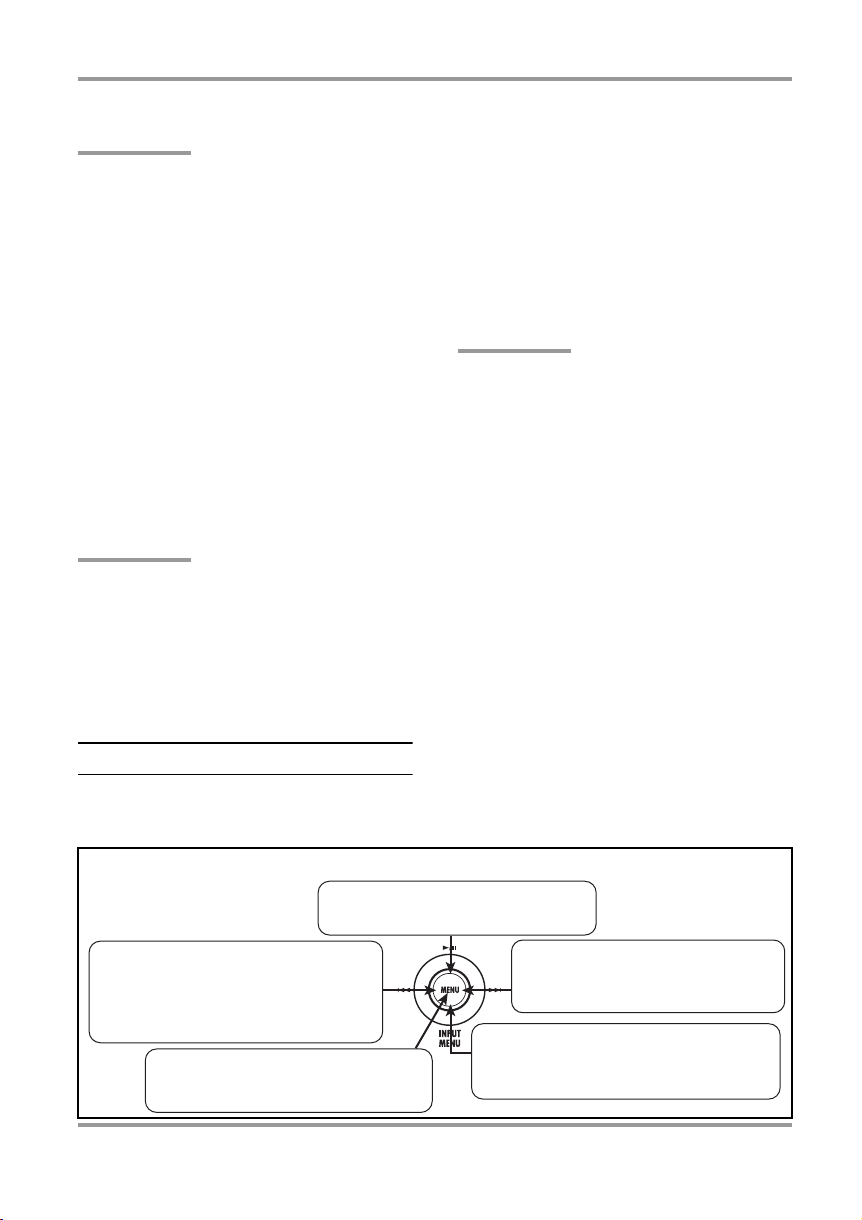
[MENU] key functions in stereo mode
Press top (@) of [MENU] key
Start/stop recorder playback.
Quick Guide 1
Stereo mode basic operation
Hold down left part (U) of [MENU]
key
Fast-reverse from current point in
1-second increments.
Press left part (U) of [MENU] key
Return counter to zero. If counter is at
zero, select previous file.
Press center of [MENU] key
Display main menu for various settings
(or return to immediately preceding screen).
the [MENU] key at the top screen of the stereo
mode, the following INPUT menu appears.
Cursor
This screen lets you select the input source and
fine-adjust the input level. The “ ” symbol on
the screen is called the cursor. It indicates which
item is currently selected for an operation.
Move the jog dial up/down to bring
3.
the cursor to the “AUTO GAIN” item,
then press the jog dial inwards.
The jog dial on the right side panel allows the
following two actions.
●
Move up/down
Pushing the jog dial up or
Move
up/down
down serves to move the
cursor on the screen and to
change setting values.
●
Press
Press
Pushing the jog dial
inwards accepts a selected
item or a changed setting.
Hold down right part (I) of [MENU]
key
Fast-forward from current point in
1-second increments.
Press right part (I) of [MENU] key
Select next file.
Press bottom (INPUT MENU) of [MENU] key
Display INPUT menu for making various input
related settings.
When you move the jog dial up/down at the
above screen and bring the cursor to “AUTO
GAIN”, the AUTO GAIN function is selected as
setting item. In this condition, pressing the jog
dial enables switching the auto gain function
between on and off.
Move the jog dial up/down to display
4.
“ON”. Then press the jog dial.
The auto gain function is now on.
HINT
• It is also possible to set the recording level
manually (
• The auto gain function adjusts the input level to
the digital section. If using the function does
not result in a suitable input level, you should
adjust the input sensitivity (analog level)
(
5.
→
p. 31).
→
p. 13).
Press the center of the [MENU] key
to return to the stereo mode top
screen.
ZOOM H4
15
Page 16
Quick Guide 1
Stereo mode basic operation
6.
At the stereo mode top screen, press
the [REC] key.
The [REC] key flashes, and the recorder is now
in the standby condition.
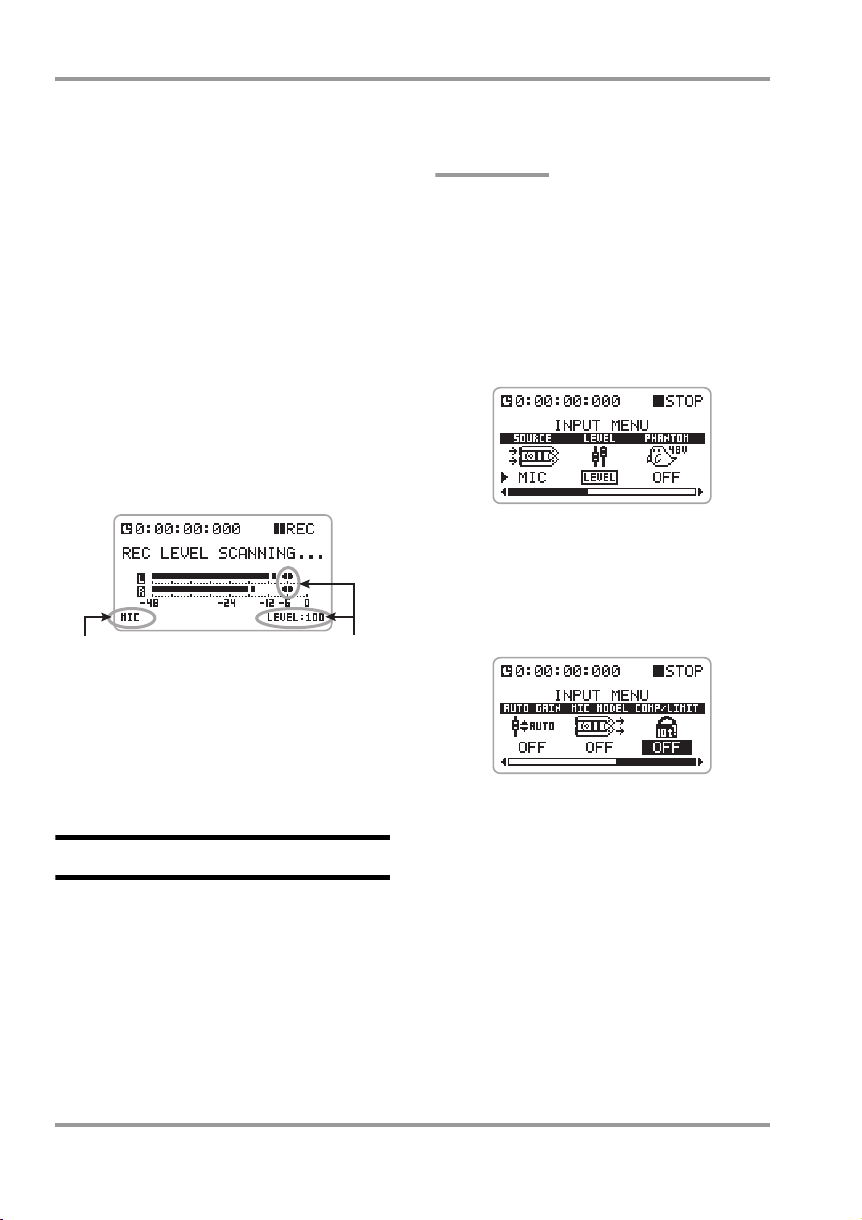
When the auto gain function is enabled, the
indication “REC LEVEL SCANNING...” will be
shown when you switch the recorder to standby.
7.
Point the mic(s) at the performers
and have them play at the loudest
level.
The H4 detects the level of the currently selected
input source and adjusts the recording level
accordingly. If the band you are recording does
not play louder than during this test, the entire
recording should be possible without distortion.
Currently selected
input source
Automatically set
recording level
change the characteristics of the built-in stereo
mic.
HINT
The mic simulation effects are available only when
using the built-in stereo mic.
1.
At the stereo mode top screen, press
the bottom of the [MENU] key.
The INPUT menu for making various input
related settings appears.
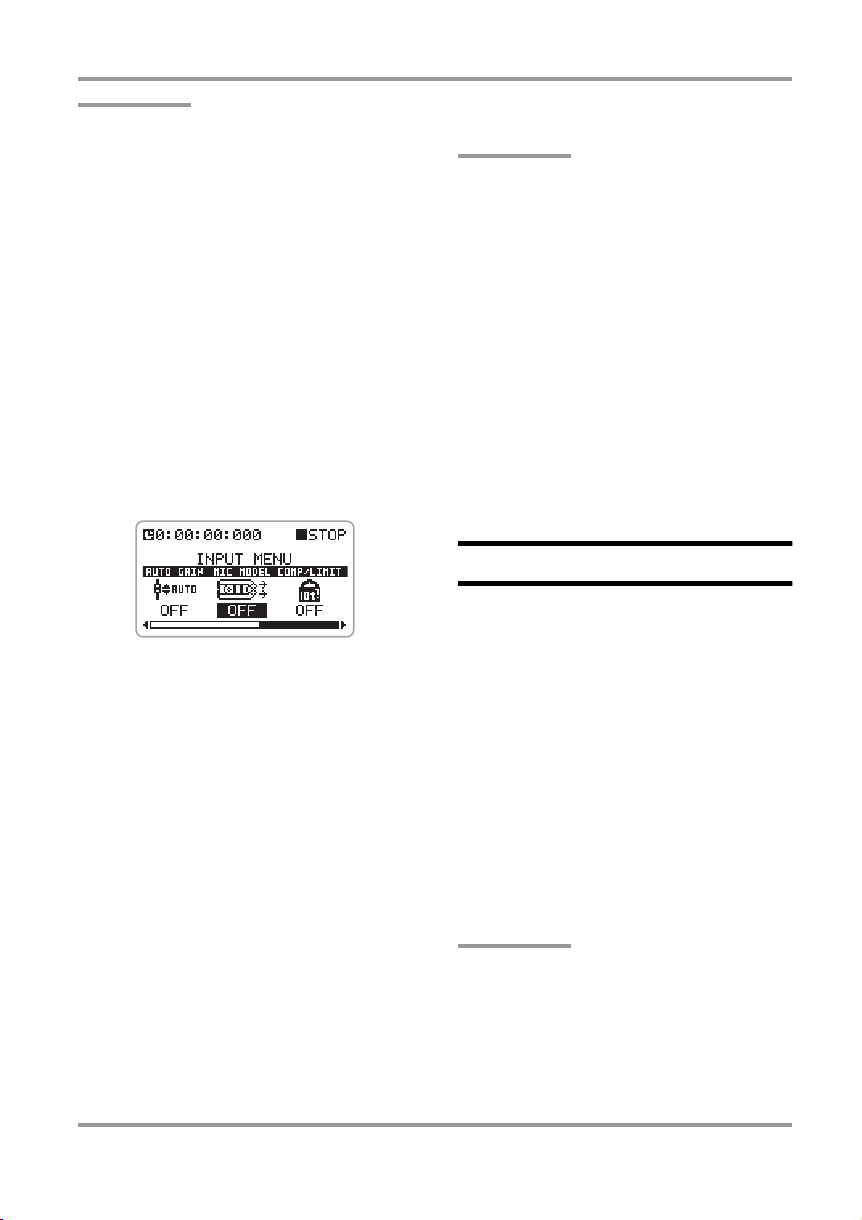
Bring the cursor to the “COMP/
2.
LIMIT” item and press the jog dial.
The COMP/LIMIT (compressor/limiter) module
settings can now be made.
To cancel the recording standby
8.
condition, press the left part (U
right part (I
[MENU] key.
), or top (@
) of the
),
Using effects
In stereo mode, you can use various effects of the
H4. The compressor/limiter module is useful to
prevent distortion due to sudden volume peaks
and to keep even low sounds at a suitable level.
The sound character of the built-in stereo mic
can be altered using a number of mic simulation
effects. This section describes how to use the
effect section to adjust the input signal level and
16
Move the jog dial up/down to select
3.
one of the following settings.
• OFF (default)
The COMP/LIMIT module is off.
• COMP
The compressor which attenuates high-level
signals and boosts low-level signals is active.
• LIMIT
The limiter which attenuates high-level
signals that exceed a certain threshold is
active.
ZOOM H4
Page 17
Quick Guide 1
Stereo mode basic operation
HINT
To check the action of the effect, press the [REC]
key to set the H4 to the recording standby
condition, and then monitor the signal at the [LINE
OUTPUT] or [PHONES] jack while the instruments
to record are being played.
4.
To accept the settings for the COMP/
LIMIT module, press the jog dial.
5.
Bring the cursor to the “MIC MODEL”
item and press the jog dial.
If the built-in stereo mic is selected as input
source, the MIC MODEL module is available in
addition to the COMP/LIMIT module. This
module simulates the characteristics of various
well-known microphone models.
Move the jog dial up/down to change
6.
the MIC MODEL module settings.
The following microphone simulation settings
are available.
• OFF (default)
The MIC MODEL module is off.
• SM57, MD421, U87, C414
The MIC MODEL module is enabled, and the
respective mic characteristics are simulated.
For details on mic characteristics, see page
95.
7.
To accept the settings for the MIC
MODEL module, press the jog dial.
8.
To return to the stereo mode top
screen, press the center of the
[MENU] key.
HINT
• In stereo mode, you only need to select an
effect type. There is no provision for adjusting
detailed parameters.
• For details about the effects available in stereo
mode, see the reference section at the end of
this manual.
• If you have switched effects on or off or
changed effect settings, the recording level will
have to be readjusted.
• Manufacturer names and product names
mentioned in this documentation are
trademarks or registered trademarks of their
respective owners. The names are used only to
illustrate sonic characteristics and do not
indicate any affiliation with ZOOM
CORPORATION.
Recording
To record in stereo mode, proceed as follows.
At the stereo mode top screen, use
1.
the TRACK [1] – [4] keys to select the
recording format (
Press the [REC] key.
2.
The [REC] key flashes, and the recorder is now
in the standby condition.
The level meter on the display lets you check the
input signal level (recording level). You can also
monitor the input signal via the [LINE
OUTPUT] jack/[PHONES] jack.
HINT
• If the monitor function (→ p. 36) is on, the signal
can always be monitored via the [LINE
OUTPUT] jack/[PHONES] jack, even if the unit
is not in recording standby mode.
• If the auto gain function is on, the input signal
level will be detected when you set the H4 to
→
p. 13).
ZOOM H4
17
Page 18

Quick Guide 1
the recording standby condition.
To start recording, press the [REC]
3.
key once more.
If required, you can use the metronome function
while recording (
To stop recording, press the [REC]
4.
key, or press the top (@
[MENU] key.
The counter returns to zero. If you press the top
(@
) of the [MENU] key in this condition, the
recording is played back from the beginning.
If you press the [REC] key again, the recorder
goes again into the standby condition, and you
can record a new stereo file.
NOTE
In stereo mode, a new stereo file is created every
time from the beginning. It is not possible to
record onto an existing file or start recording from
a specified position. (For information on how to
delete unneeded stereo files, see page 73.)
Stereo mode basic operation
→
p. 77).
) of the
Selecting a file for playback
In stereo mode, one stereo file (WAV or MP3
format) is created for each recording operation.
These files are stored on the SD card in the
dedicated “STEREO” folder.
To select a file from this folder for playback,
proceed as follows.
Name of currently selected file
HINT
• Files recorded in stereo mode have the name
“STE-xxx.wav (mp3)” which is assigned
automatically (where xxx is a number from 000
to 999).
→
•You can change the file name (
Move the jog dial up/down to bring
2.
the cursor to the file name. Then
press the jog dial.
File selection is now possible.
Move the jog dial up/down to select a
3.
file.
All files recorded in stereo mode are shown in
turn.
To accept the file selection, press the
4.
jog dial.
To play the selected file, press the
5.
top (@
) of the [MENU] key.
The file selected in step 3 is played back.
p. 72).
Verify that the display shows the
1.
stereo mode top screen.
18
6.
To stop playback, press the top (@
of the [MENU] key once more.
)
ZOOM H4
Page 19
Quick Guide 2
In 4-track mode, the H4 operates as a multi-track recorder with four tracks. This section explains the
basics of using the unit in 4-track mode. As an example, it shows how to record instruments or vocal parts
one track at a time, and perform a final mix.
In this section, the recording mode is “Overwrite” (every recording operation overwrites the current file).
Note that operation steps differ depending on the recording mode. For details, see page 41.
The description in this section covers the following four steps.
●
Step 1: Preparations
This includes selecting the mode, creating a project, and other preparation for recording.
●
Step 2: Recording the first track
Record the first track using the input signal after effect processing.
●
Step 3: Add more tracks
While listening to the recorded track, record the second and subsequent tracks.
●
Step 4: Mixing and bounce
Create a stereo mix while adjusting the level and panning settings for the four recorded
tracks. Then write the final stereo mix to a file (bounce).
Step 1: Preparations
Switch to 4-track mode
4-track mode basic operation
Move the jog dial up/down to bring
2.
the cursor to “MODE”. Then press
the jog dial.
The MODE SELECT screen appears.
In the default condition, the H4 operates in stereo
mode (the [MODE] indicator on the top panel is
lit). To switch the H4 to 4-track mode, proceed
as follows.
At the stereo mode top screen, press
1.
the center of the [MENU] key.
The main menu for making various settings
appears.
ZOOM H4
Move the jog dial up/down to bring
3.
the cursor to “4TRACK RECORDER”.
Press the jog dial.
4.
The H4 switches to 4-track mode and the
[MODE] indicator goes out. The display
automatically changes to the 4-track mode top
screen.
19
Page 20

Quick Guide 2
HINT
To return from 4-track mode to stereo mode,
perform the same steps from the 4-track mode
top screen, select “STEREO RECORDER”, and
press the jog dial.
4-track mode basic operation
Creating a new project
In 4-track mode, the H4 manages recordings in
units called “projects”. When you start a new
recording, create a project as follows.
At the 4-track mode top screen,
1.
press the center of the [MENU] key.
The main menu for making various settings
appears.
press the jog dial.
The default name for the new project is shown.
Name for
project to be
created
HINT
You can change the name of the project at this
→
p. 55), or you can change it later
point (
→
p. 56).
(
4.
To create the new project, move the
jog dial up/down to bring the cursor
to the OK button, and then press the
jog dial.
The newly created project is automatically
loaded, and the 4-track mode top screen appears.
If you select the CANCEL button instead of the
OK button, the new project is not created, and
the PROJECT menu appears again.
Move the jog dial up/down to bring
2.
the cursor to “PROJECT”. Then
press the jog dial.
The PROJECT menu for project related
operations appears.
HINT
When you call up the PROJECT menu, the current
project is saved automatically.
3.
Move the jog dial up/down to bring
the cursor to “NEW PROJECT”. Then
20
Making metronome settings
The H4 incorporates a metronome function that
is useful for practice or for multi-track recording.
Listening to the metronome during recording can
help keep correct timing when adding
instrumental or vocal tracks. (The sound of the
metronome is not recorded on the track.)
This section explains how to set the metronome
tempo and volume.
1.
At the 4-track mode top screen,
press the center of the [MENU] key.
The main menu for making various settings
appears.
2.
Move the jog dial up/down to bring
ZOOM H4
Page 21

Quick Guide 2
4-track mode basic operation
the cursor to “METRONOME”. Then
press the jog dial.
The METRONOME setting screen appears.
3.
Move the jog dial up/down to bring
the cursor to “CLICK”. Then press
the jog dial.
The CLICK menu appears. This menu lets you
select under which conditions the metronome
click sound is heard. Available settings are as
follows.
R
Playback only
O
Recording only
O
/R
Recording and playback
OFF
Always off (default)
4.
Move the jog dial up/down to select
“
O
/R
”. Then press the jog dial.
The display returns to the condition of step 3.
The LEVEL menu for setting the metronome
level appears.
8.
Move the jog dial up/down to set the
level. Then press the jog dial.
HINT
You can also change the settings for pre-count
(default: OFF) and beat (default: 4/4), as described
on page 77.
Step 2: Recording the first
track
Now you are ready to record the first track while
listening to the metronome sound.
HINT
When recording the first track, it is recommended
to choose guitar chords or another part where the
song progression can be easily followed. You may
also want to record a guide melody using guitar
chords and vocals first, then add other
instruments, and finally replace the guide track
with the main vocal track.
5.
Move the jog dial up/down to bring
the cursor to “TEMPO”. Then press
the jog dial.
The TEMPO menu for selecting the metronome
tempo appears.
6.
Move the jog dial up/down to select
the desired tempo value (40.0 – 250.0
BPM). Then press the jog dial.
To try out the metronome and check the tempo,
you can press the top (@
7.
Move the jog dial up/down to bring
the cursor to “LEVEL”. Then press
the jog dial.
) of the [MENU] key.
ZOOM H4
Selecting the input source/
recording track
This section explains how to select the input
source and recording track in 4-track mode.
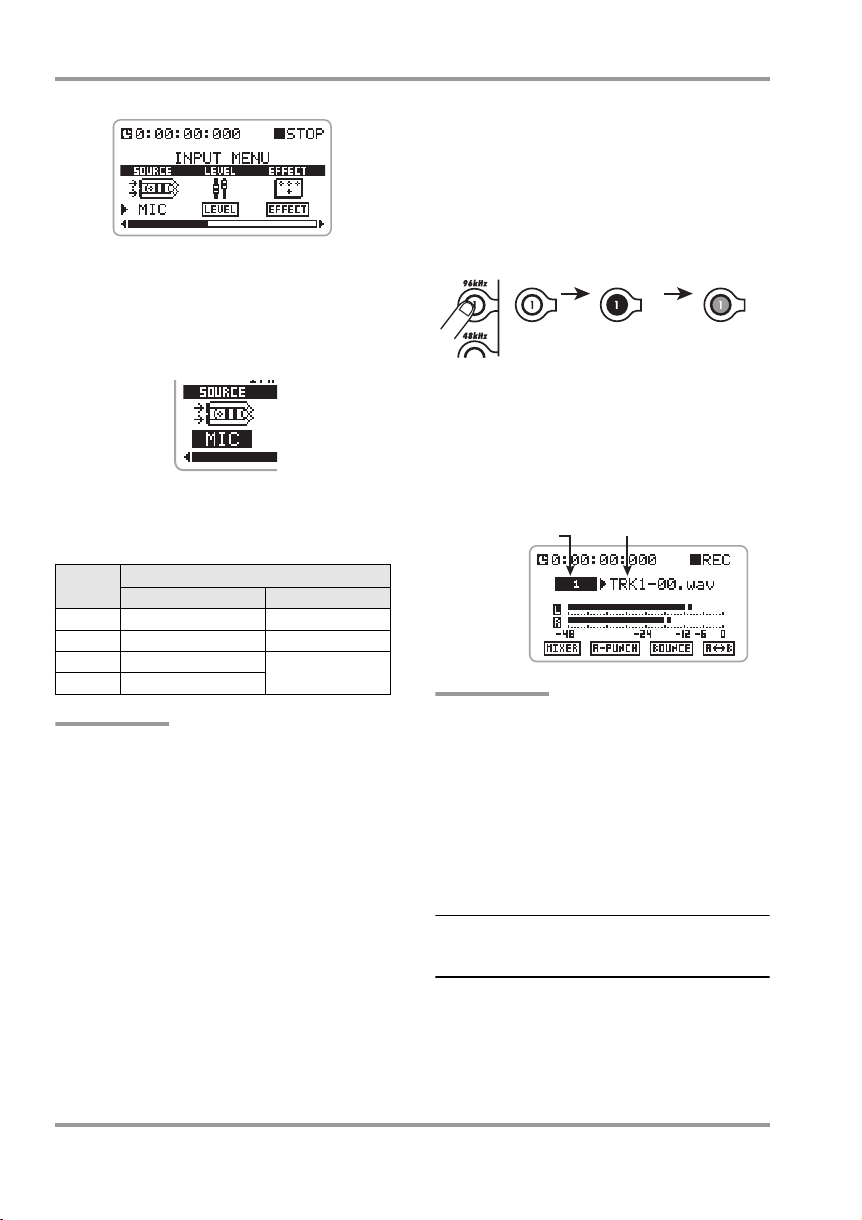
At the 4-track mode top screen,
1.
press the bottom (INPUT MENU) of
the [MENU] key.
The INPUT menu for making various input
related settings appears.
21
Page 22
Quick Guide 2
2.
Move the jog dial up/down to bring
4-track mode basic operation
the cursor to “SOURCE”. Then press
the jog dial.
The input source can now be selected.
respective key repeatedly until it is lit
in red.
In 4-track mode, the TRACK [1] - [4] keys serve
to switch the status (record/playback condition)
of tracks 1 - 4. Each push of the key cycles
through the following three status settings.
Out Lit in red Lit in green
Mute Recording Playback
enabled
TRACK [1] – [4] keys
For example, when you press the TRACK [1]
key so that it is lit in red, the display changes as
follows.
In 4-track mode, the following selections are
available.
Display
MIC
IN1&2
IN1
IN2
Built-in stereo mic L Built-in stereo mic R
[INPUT 1] jack [INPUT 2] jack
[INPUT 1] jack
[INPUT 2] jack
Input source
Input 1 Input 2
HINT
• When IN1&2 or MIC is selected, the input mixer
will receive two signals.
• The built-in stereo mic always feeds the two L/
R channels as a set.
Move the jog dial up/down to select
3.
the input source, and then press the
jog dial.
The selection is accepted.
4.
Press the center of the [MENU] key
to return to the 4-track mode top
screen.
5.
To select the recording track, use the
TRACK [1] – [4] keys and press the
Name of file recorded
Recording target
track
on track
HINT
•To record two different instruments
simultaneously on two tracks, select a track
pair (tracks 1/2 or 3/4) as recording target
→
p. 50).
(
•To record the sound source in stereo, you can
use a function called “stereo link” to link a track
pair (tracks 1/2 or 3/4) and use them as a stereo
→
p. 53).
track (
Adjusting the input sensitivity/
recording level
To adjust the input sensitivity of the
1.
input source, use the [MIC GAIN]
switch, [INPUT 1 GAIN] switch, or
[INPUT 2 GAIN] switch.
When recording with the built-in stereo mic, use
22
ZOOM H4
Page 23

the [MIC GAIN] switch to set the sensitivity to a
A
suitable level. (For information on recommended
settings, see page 13.)
When recording via the [INPUT 1]/[INPUT 2]
jacks, use the [INPUT 1 GAIN] switch or
[INPUT 2 GAIN] switch to set the sensitivity to a
suitable level. For information on recommended
settings, see the table below.
[INPUT 1 GAIN]/[INPUT 2 GAIN] switch
●
setting
Setting
L
M
H
For use when an electric guitar or other
line-output device is connected directly.
Also used for on-mic recording with a
condenser mic or other high-output mic
connected to the balanced input (XLR).
For on-mic recording of vocals or
instruments from a close range
For off-mic recording with a greater
distance to instruments or for recording
an instrument with a low volume level.
Application
NOTE
Note that the signal input to the H4 will be
distorted if the input sensitivity is not set correctly.
2.
At the 4-track mode top screen,
press the bottom of the [MENU] key.
The INPUT menu for making various input
related settings appears.
Quick Guide 2
lphanumeric
indication of input source
4-track mode basic operation
Recording level for input
source selected by cursor
Input signal level
HINT
• The alphanumeric indication at the left of the
signal level bars shows the input source (“1”
and “2” for the [INPUT 1]/[INPUT 2] jacks and
“L” and “R” for the built-in stereo mic).
• While this screen is being shown, the input
signal can be monitored via the [LINE OUTPUT]
jack/[PHONES] jack.
If two input sources (IN1&2) have
4.
been selected, move the jog dial up/
down to bring the cursor to the input
source for which to adjust the
recording level.
5.
Press the jog dial to bring up the
fader icon on the meter display.
The recording level can now be adjusted. While
the fader icon is shown, the cursor is not
displayed.
Fader icon
6.
Adjust the recording level by moving
the jog dial up/down while sound is
being produced.
Move the jog dial up/down to bring
3.
the cursor to “LEVEL”. Then press
the jog dial.
The screen for adjusting the recording level
appears.
ZOOM H4
The recording level setting can be checked at the
top right. To record with optimum sound quality,
the input signal level should be set as high as
possible, without exceeding the 0 (dB) indication
on the meter. The setting range is 0 – 127. When
23
Page 24
Quick Guide 2
4-track mode basic operation
the recording level is too high, the sound will be
distorted.
NOTE
In 4-track mode, the auto gain function is not
available.
To terminate the recording level
7.
setting, press the jog dial.
The recording level is now set. The fader icon
disappears and the cursor appears again.
If you have selected two input
8.
sources (IN1&2), repeat steps 4 – 7 to
adjust the recording level for the
other source.
To return to the 4-track mode top
9.
screen, repeatedly press the center
of the [MENU] key.
Selecting an effect patch
In 4-track mode, the signal can be processed by
the preamp and modulation effects before being
recorded on the track.
A collection of effect settings in 4-track mode is
referred to as a “patch” which can be stored. The
H4 has a total capacity for 60 patches, of which
50 are already preprogrammed at the factory.
This section describes how to select a stored
patch.
NOTE
In the default condition, the effect section is set to
off in 4-track mode.
1.
At the 4-track mode top screen,
press the bottom (INPUT MENU) of
the [MENU] key.
The INPUT menu appears.
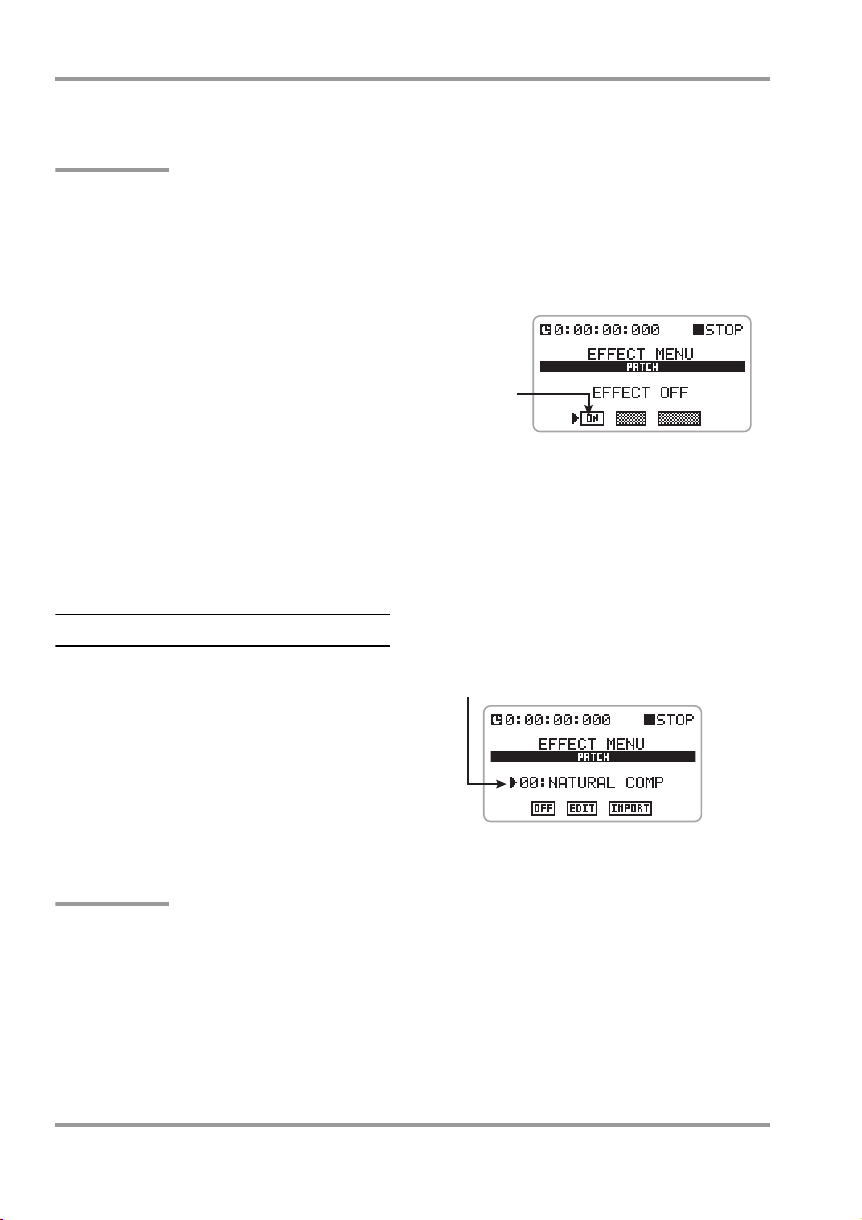
2.
Bring the cursor to the “EFFECT”
item and press the jog dial.
The screen for selecting effect patches appears.
When a project is in the default condition, the
effect section is off. (In this condition, the ON/
OFF button at the bottom of the display shows
“ON” because it will turn the effect section on
when clicked.)
ON/OFF
button
Verify that the cursor is on the ON/
3.
OFF button and press the jog dial.
The effect section is activated. (The ON/OFF
button at the bottom of the display now shows
“OFF” because it will turn the effect section off
when clicked.) The currently selected patch
number and patch name are shown in the center
of the display.
Currently selected patch number/patch name
Bring the cursor to the patch
4.
number/patch name indication and
press the jog dial.
The patch selection can now be changed.
Move the jog dial up/down to select
5.
the patch, and then press the jog dial.
To select the patch while monitoring the sound,
press the TRACK key for the track you want to
monitor so that the key is lit up in red and is set
24
ZOOM H4
Page 25
Quick Guide 2
4-track mode basic operation
to the recording standby condition.
HINT
• In 4-track mode, the input signal can be
monitored when there is at least one track in
the recording standby condition (TRACK key lit
in red).
• While the counter is being shown on the
display, the H4 can always be set to the
recording standby condition, and recording for
a track can be carried out. However, if there is
no track in recording standby condition,
pressing the [REC] key has no effect.
• If the indication “EMPTY” is shown as the patch
name, a blank patch is selected. This will have
no effect on the sound.
6.
To return to the 4-track mode top
screen, repeatedly press the center
of the [MENU] key.
HINT
• If you have switched effects on or off or
changed effect settings, the recording level will
have to be readjusted (
• When effect processing is off, a recording level
setting of 100 will result in unity gain (no
amplification).
→
p. 22).
Recording/Playback
When preparations are complete, you are ready
to record an instrument on the first track.
1.
Out of the TRACK [1] – [4] keys,
press the key for the track to record,
so that the key is lit in red.
The input signal can now be monitored via the
[LINE OUTPUT] jack or [PHONES] jack.
2.
Press the [REC] key so that the key is
lit up in red.
The H4 goes into the recording standby mode.
HINT
When the monitor function (→ p. 51) is enabled,
the input signal can be monitored also if no track
is set to recording standby.
Press the top (@
3.
) of the [MENU] key.
Recording starts.
To stop recording, press the [REC]
4.
key again or press the top (@
) of the
[MENU] key.
The [REC] key goes out and recording ends.
5.
Tap the left part (U
) of the [MENU]
key.
The counter returns to the zero position.
In 4-track mode, the [MENU] key has the
functions shown below.
6.
To check the recorded content,
[MENU] key functions in 4-track mode (Overwrite mode)
Press top (@) of [MENU] key
Start/stop recorder recording/playback.
Hold down left part (U) of [MENU] key
Fast-reverse from current point in 1-second
increments.
Press left part (U) of [MENU] key
Return counter to zero.
Press center of [MENU] key
Display main menu for various settings
(or return to immediately preceding screen).
ZOOM H4
Hold down right part (I) of [MENU]
key
Fast-forward from current point in
1-second increments.
Press bottom (INPUT MENU) of [MENU]
key
Display INPUT menu for making various input
related settings.
25
Page 26

Quick Guide 2
4-track mode basic operation
press the top (@
When you press the top (@
while the [REC] key is out, the tracks for which
the TRACK [1] – [4] keys are lit in green
(playback) or red (recording enabled) are played
back.
7.
When the recorded content is as you
want it, go to the 4-track mode top
screen and press the TRACK key for
the recorded track, so that the key is
lit in green.
The track is now set to playback, which will
prevent inadvertent recording on that track.
To redo the recording, repeat steps 2 – 6.
HINT
With the H4 in the default condition, recording a
track again will overwrite the previous content. If
this is not desired, you can change the setting of
the H4 so that a new file is created for every
recording (
→
p. 40).
) of the [MENU] key.
) of the [MENU] key
Step 3: Add more tracks
While listening to the metronome and the
recorded track, you can record other instruments
or vocal parts on the second and subsequent
tracks.
Preparations
Connect the instrument or mic for the
1.
next recording to the H4, or place the
H4 at a suitable position when using
the built-in stereo mic (
Select the input source and
2.
recording track as described in the
section “Selecting the input source/
recording track”
→
(→ p. 21)
p. 12).
of “Step 2:
Recording the first track”.
3.
Adjust the input sensitivity and
recording level as described in the
section “Adjusting the input
sensitivity/recording level” (
of “Step 2: Recording the first track”.
4.
Select the effect patch as described
in the section “Selecting an effect
patch” (
Recording the first track”.
→
p. 24 ) of “Step 2:
→
p. 22 )
Recording/Playback
When preparations are complete, you are ready
to record an instrument or vocal part on the next
track while listening to the first track.
Press the [REC] key so that the key is
1.
lit up in red.
The H4 goes into the recording standby mode.
HINT
To control the balance between the playback
signal of the recorded track and the input signal
for the current track, you can adjust the volume
level of the recorded track (
Press the top (@
2.
Recording starts. You can also use a pre-count at
this point. The pre-count setting can be controlled
from the METRONOME menu (
To stop recording, press the [REC]
3.
key again or press the top (@
[MENU] key.
The [REC] key goes out and recording ends.
Tap the left part (U
4.
key.
→
p. 51).
) of the [MENU] key.
→
p. 77).
) of the
) of the [MENU]
26
ZOOM H4
Page 27
The counter returns to the zero position.
5.
To check the recorded content,
press the top (@
All recorded tracks are played back.
6.
When the recorded content is as you
want it, go to the 4-track mode top
screen and press the TRACK key for
the recorded track, so that the key is
lit in green.
) of the [MENU] key.
Quick Guide 2
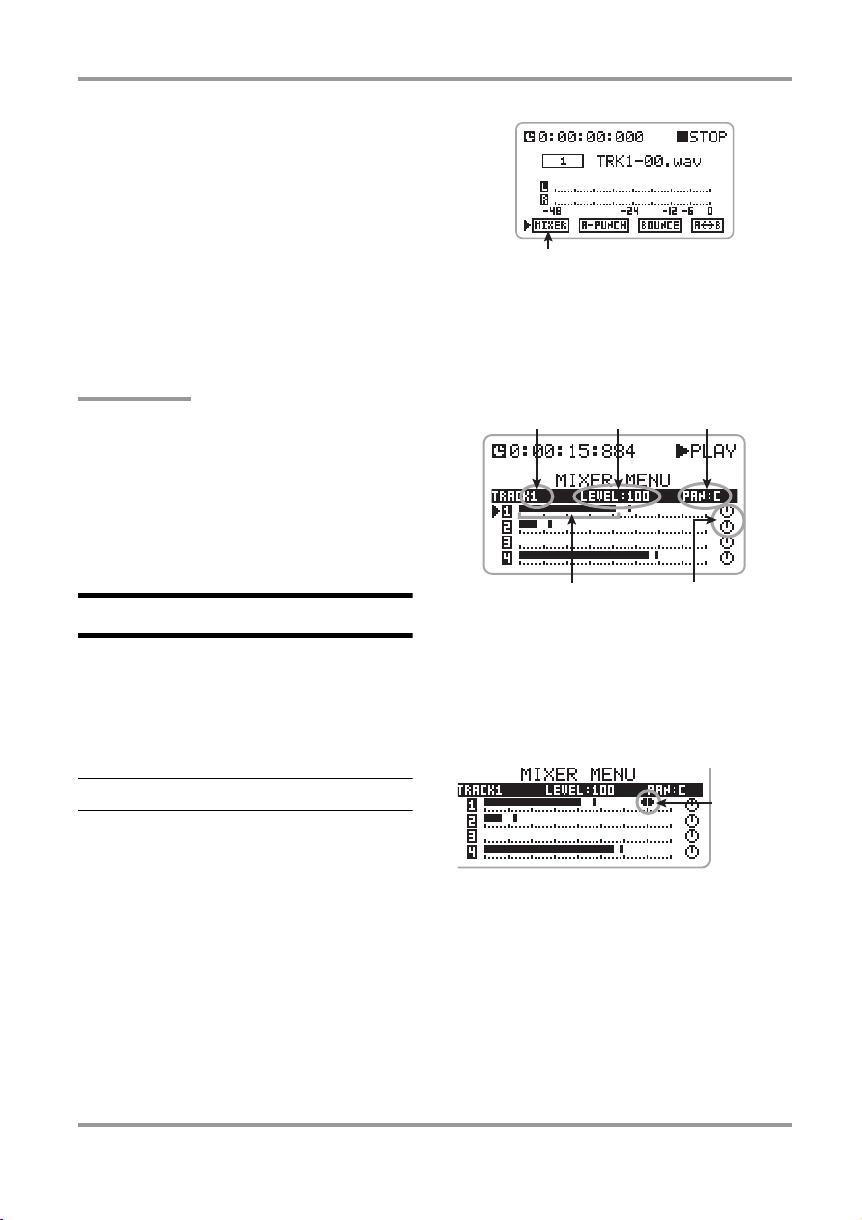
MIXER button
3.
Press the jog dial.
The MIXER screen for making mixer settings
appears.
4-track mode basic operation
HINT
If there was a mistake, you can rerecord only a
part of the track using the punch-in/out function
→
p. 43).
(
Record the other tracks using the same
procedure.
Step 4: Mixing and bounce
When all four tracks have been recorded, you can
adjust the volume level and panning (left/right
positioning) to create a two-channel mix and
write the result to a stereo file (bounce).
Mixing
You can adjust the volume and panning for
recorded tracks as follows.
1.
Verify that the TRACK [1] – [4] keys
are lit in green.
At this stage, the metronome should normally be
set to OFF (
2.
→
p. 77).
At the 4-track mode top screen,
move the jog dial up/down to bring
the cursor to the MIXER button.
Track number
Level meter for each track and panning icon
4.
Move the jog dial up/down to bring
the cursor to the number of the track
whose level and panning you want to
adjust. Then press the jog dial.
The cursor disappears and the fader icon appears.
Move the jog dial up/down to adjust
5.
the level.
The volume (level) can be adjusted in the range
from 0 to 127.
You can press the top (@
and adjust the level while the recorder performs
playback.
Level and panning value for
track selected with cursor
Fader icon
) of the [MENU] key
ZOOM H4
27
Page 28

Quick Guide 2
6.
To adjust the pan setting, press the
jog dial once more and then move
the jog dial up/down.
When you press the jog dial, an up/down arrow
symbol appears to the left of the panning icon.
The pan setting range is L100 – C – R100.
To accept the pan setting, press the
7.
jog dial.
The up/down arrow symbol disappears and the
cursor appears again.
Repeat steps 4 – 7 to adjust the level
8.
and panning for other tracks.
Tap the left part (U
9.
key to return to the counter zero
position.
4-track mode basic operation
Up/down
arrows symbol
) of the [MENU]
Bounce
When the downmix is complete, you are ready to
write the result to a stereo file (bounce). The file
can then be sent to a computer via the USB
connection, for example to burn an audio CD.
You can also assign the stereo file to two tracks
of the H4 and then use the remaining two tracks
to record more instruments or vocal parts.
1.
Verify that the TRACK [1] – [4] keys
are lit in green.
Note that tracks for which the key is not lit
(muted tracks) will not be included in the file
produced after bouncing.
HINT
The file produced by bouncing reflects the
panning and volume settings for each track.
At the 4-track mode top screen,
2.
move the jog dial up/down to bring
the cursor to the BOUNCE button.
10
Put the recorder in playback mode
.
and check the output level with the
level meter.
If the signal level reaches 0 dB, adjust the track
volume level once more.
11
When the level check is complete,
.
press the top (@
to stop the recorder.
) of the [MENU] key
28
BOUNCE button
Press the jog dial.
3.
The BOUNCE screen for controlling the bounce
function appears.
ZOOM H4
Page 29
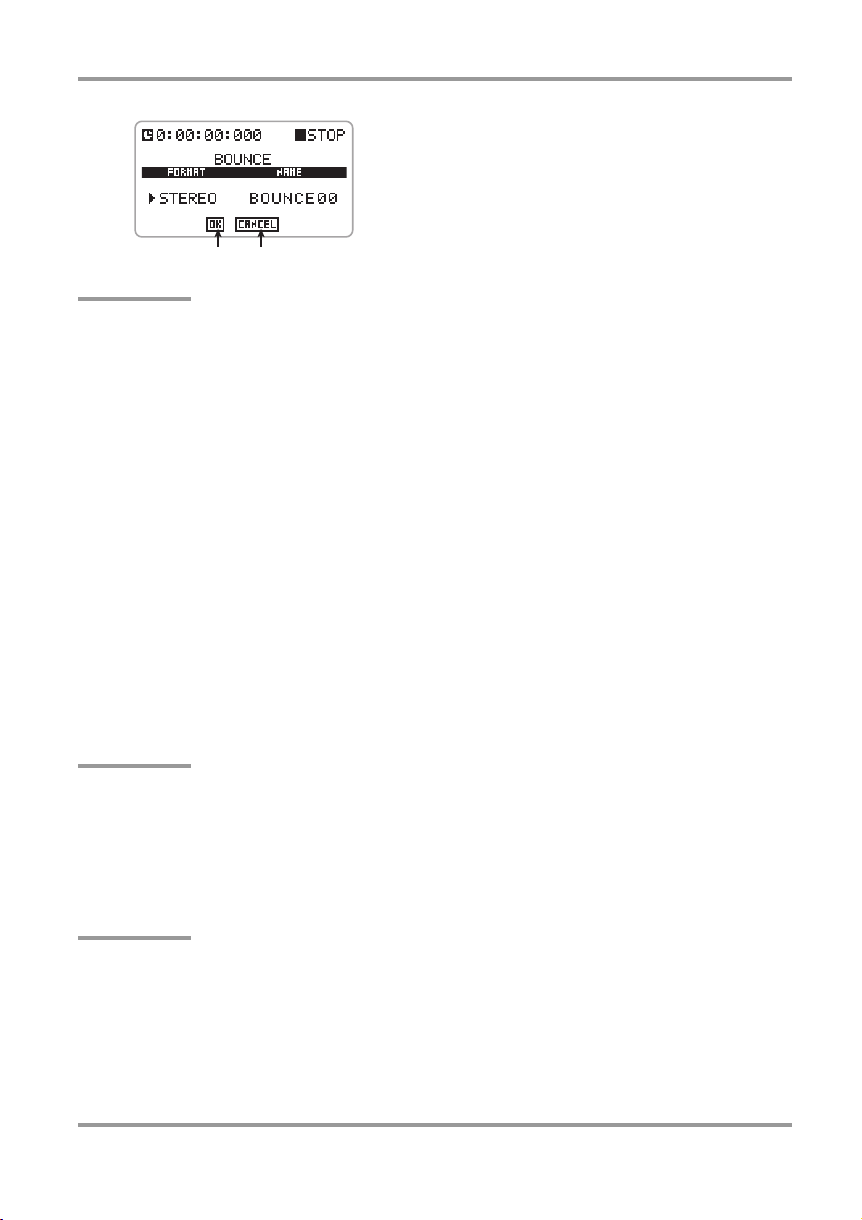
OK button CANCEL button
HINT
• This screen lets you change the format of the
resulting file (mono/stereo; default: stereo) or
specify the file name (
• If you do not specify a name, the file created by
bouncing will be automatically assigned a
name using the pattern “BOUNCExx.wav”
(where xx is a number from 00 – 99).
4.
To execute the bounce function,
→
p. 45).
move the jog dial up/down to bring
the cursor to the OK button. Then
press the jog dial.
While the bounce function is being executed, the
indication “Now Processing” is shown on the
display.
The file created by bouncing is saved in the same
“PROJxxx” folder as the other files recorded for
the current project (xxx = 000 – 999).
Quick Guide 2
4-track mode basic operation
HINT
To check the bounce result using the H4 or to add
more tracks, assign the bounced file to one or two
→
tracks (
stereo link for tracks 1/2 or 3/4 must be enabled
to allow assigning the file to the stereo track
(
p. 42). If a stereo file was produced,
→
p. 53).
NOTE
If the SD card runs out of space during the
bounce operation, the indication “Card Full!”
appears on the display, and the operation is
canceled. Press the jog dial to close the window
and delete files that are no longer needed. Then
perform the bounce operation once more.
ZOOM H4
29
Page 30
Stereo Mode
This section describes the stereo mode functions and operation steps.
What is stereo mode?
In stereo mode, two signals either from the builtin stereo mic or from the [INPUT 1]/[INPUT 2]
jacks are used as recording sources to create a
stereo file. You can select either WAV or MP3 as
format for the recorded file, and you can change
the sampling rate and bit rate as required.
NOTE
• In stereo mode, only stereo recording and
playback are possible. Multi-track recording is
not supported.
• In stereo mode, recording will always start out
with a new file, at the beginning of the file. It is
not possible to use and overwrite an existing
file.
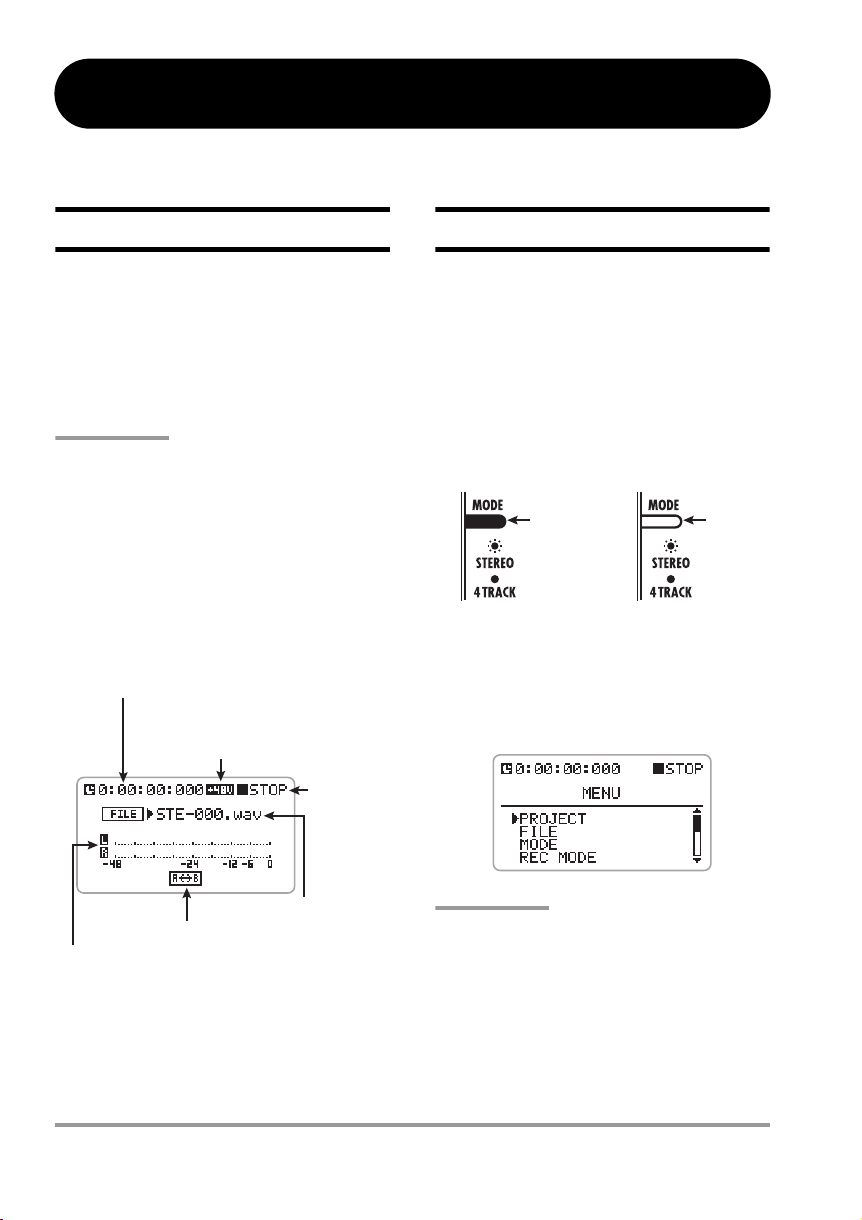
The stereo mode top screen is shown below.
Counter showing the current recorder position
Phantom power supply on/off
(When set to on, the phantom
voltage +48V or +24V is shown)
Recorder
operation
status
Switching to stereo mode
The two main operation modes of the H4 are
stereo mode and 4-track mode. When power to
the H4 is turned on, it will be in the mode that
was selected the last time the unit was used.
The currently selected mode is shown by the
[MODE] indicator on the top panel. When the
indicator is lit, the unit is in stereo mode. When
the indicator is out, the unit is in 4-track mode.
Stereo mode 4-track mode
Lit
1.
Stop the recorder and press the
center of the [MENU] key.
The main menu for making various settings
appears.
Out
A-B repeat function enable button
Recording/playback level meter
30
Selected file name
NOTE
The items shown on the main menu are different
for stereo mode and 4-track mode.
2.
Move the jog dial up/down to bring
the cursor to “MODE” and then press
the jog dial.
The MODE SELECT screen appears.
ZOOM H4
Page 31

To switch to stereo mode, move the
3.
jog dial up/down to bring the cursor
to "STEREO RECORDER" and then
press the jog dial.
The H4 switches to stereo mode and the
[MODE] indicator lights up.
The display automatically changes to the stereo
mode top screen.
HINT
When you switch from 4-track mode to stereo
mode, the project you were working on up to that
point will be automatically saved.
Recording in stereo mode
Stereo Mode
The input source can now be selected.
3.
Move the jog dial up/down to select
the input source.
The following selections are available.
Display
MIC
IN1&2
4.
To confirm the input source
selection, press the jog dial.
5.
To return to the stereo mode top
screen, press the center of the
[MENU] key.
Input source
Built-in stereo mic L/R
[INPUT 1]/[INPUT 2] jacks
This section explains the steps required for
recording in stereo mode.
Select input source
You can select either the signal from the [INPUT
1]/[INPUT 2] jacks or the built-in stereo mic as
input source to be assigned to the stereo tracks.
1.
At the stereo mode top screen, press
the bottom (INPUT MENU) of the
[MENU] key.
The INPUT menu for making various input
related settings appears.
2.
Move the jog dial up/down to bring
the cursor to “SOURCE”, then press
the jog dial.
ZOOM H4
Adjust recording level
Perform these steps to optimize the level of the
signal sent to the stereo tracks.
Select the input source as described
1.
above.
When using the [INPUT 1]/[INPUT 2] jacks as
input source, verify that an external microphone
or other device is connected.
Use the [MIC GAIN] switch (for the
2.
built-in stereo mic) or the [INPUT 1
GAIN]/[INPUT 2 GAIN] switches (for
the [INPUT 1]/[INPUT 2] jacks) to
adjust the input sensitivity.
31
Page 32

Stereo Mode
A
There are three settings for the input sensitivity:
L (Low)
→
M (Medium) → H (High)
Note that the signal input to the H4 will be
distorted if the input sensitivity is not set
correctly.
Current
recording
level
Fader icon
●
[INPUT 1 GAIN]/[INPUT 2 GAIN] switch
setting
Setting Application
For use when an electric guitar or other
line-output device is connected directly.
L
Also used for on-mic recording with a
condenser mic or other high-output mic
connected to the balanced input (XLR).
For on-mic recording of vocals or
M
instruments from a close range.
For off-mic recording with a greater
H
distance to instruments or for recording
an instrument with a low volume level.
●
[MIC GAIN] switch setting
Setting
For on-mic recording of instruments
L
or single-session recording of a band
performance.
For recording of acoustic guitar and
M
other instruments with low volume.
Off-mic recording setting, mostly for
H
use in the field.
At the stereo mode top screen, press
3.
Application
the bottom (INPUT MENU) of the
[MENU] key.
The INPUT menu for making various input
related settings appears.
Move the jog dial up/down to bring
4.
the cursor to “LEVEL”. Then press
the jog dial.
The INPUT LEVEL screen for adjusting the
recording level appears.
lphanumeric indication of input source
The alphanumeric indication at the left of the
signal level bars shows the input source (“1” and
“2” for the [INPUT 1]/[INPUT 2] jacks and “L”
and “R” for the built-in stereo mic).
Bring the cursor to the track whose recording
level you want to adjust, and then press the jog
dial. A fader icon appears next to the meter
display, and the recording level can be adjusted.
HINT
• While this screen is being shown, the input
signal can be monitored.
• If the built-in stereo mic has been selected as
input source in stereo mode, the two input level
settings are always linked.
NOTE
If the auto-gain function (→ p. 33) is on, the
recording level cannot be adjusted manually.
(Steps 5 and 6 cannot be carried out.)
5.
To adjust the recording level, move
the jog dial up or down.
The recording level changes according to the jog
dial up/down movement.
The recording level setting can be checked at the
top right. To record with optimum sound quality,
the input signal level should be set as high as
possible, without exceeding the 0 (dB) indication
on the meter. The setting range is 0 – 127. When
the recording level is too high, the sound will be
distorted.
32
ZOOM H4
Page 33

Stereo Mode
HINT
• The recording level set here also influences the
signal level after effect processing. When
switching between effect on and off or when
changing effect settings, the recording level will
have to be readjusted.
• When effect processing is off, a recording level
setting of 100 will result in unity gain (no
amplification).
When the recording level setting is as
6.
desired, press the jog dial.
The recording level setting is finalized. The fader
icon disappears and the cursor appears again.
To return to the stereo mode top
7.
screen, press the center of the
[MENU] key repeatedly.
To send the input signal to the stereo
8.
tracks, press the [REC] key so that it
flashes. The H4 is now in the
recording standby condition.
The input signal is sent to the stereo tracks and
can be monitored.
The display changes as follows.
Name of file created by this operation
Input level
Recording standby
indication
straight away.
1.
Connect the microphone and
instruments as required, and set the
input sensitivity to match the input
source.
2.
At the stereo mode top screen, press
the bottom (INPUT MENU) of the
[MENU] key.
The INPUT menu for making various input
related settings appears.
3.
Move the jog dial up/down to bring
the cursor to “AUTO GAIN”. Then
press the jog dial.
The auto gain function can now be switched on
or off.
4.
Move the jog dial up/down to select
“ON”. Then press the jog dial.
The auto gain function is now enabled.
Automatic adjustment of recording
level (Auto gain function)
In stereo mode, a function for automatically
adjusting the recording level (auto gain function)
is available. This is convenient to start recording
ZOOM H4
5.
Press the center of the [MENU] key
to return to the stereo mode top
screen.
6.
To set the recording level
automatically using the auto gain
function, press the [REC] key so that
the key flashes and the recorder is in
the recording standby indication.
The indication “REC LEVEL SCANNING...”
appears on the display. The unit detects the level
of the currently selected input source and adjusts
33
Page 34

Stereo Mode
the gain accordingly. When recording an
instrument, briefly play it at the loudest level.
The setting will then be made in such a way that
the sound will not be distorted during recording.
The level scanning continues until you press the
[REC] key once more and start recording.
Current input source Automatically set
recording level
HINT
In recording standby mode, the input level can be
checked with the meter indication.
The alphanumeric indication at the left of the
signal level bars shows the input source (“1” and
“2” for the [INPUT 1]/[INPUT 2] jacks and “L” and
“R” for the built-in stereo mic).
Select recording format
In stereo mode, you can select either WAV or
MP3 as the format for saving the recorded
content. The settings for sampling rate and bit
rate can also be changed if required.
Stop the recorder, and press the
1.
center of the [MENU] key.
The stereo mode main menu appears.
The RECORDING FORMAT screen appears.
NOTE
In 4-track mode, the recording format is fixed to
WAV (44.1 kHz/16 bit). The main menu in 4-track
mode therefore does not have a “RECORDING
FORMAT” item.
The available sampling rate and bit rate settings
for the two formats are listed below.
FORMAT
WAVE
MP3
SAMPLE BIT
44.1, 48, 96kHz 16, 24bit
48, 56, 64, 80, 96,
44.1kHz (fixed)
112, 128, 160, 192,
224, 256, 320kbps,
VBR
When WAV is selected as recording format,
higher sampling rate and bit rate settings will
provide higher sound quality. However, the
resulting file size will also be bigger.
When MP3 is selected as recording format,
higher bit rate settings will provide higher sound
quality. The setting “VBR” is for “Variable Bit
Rate”. With this setting, the bit rate adapts to the
amount of information that is to be encoded. This
method makes it possible to achieve fairly small
file sizes without excessive degradation of sound
quality.
Move the jog dial up/down to bring
2.
the cursor to “RECORDING
FORMAT”. Then press the jog dial.
34
3.
To select the recording format and
sampling rate/bit rate, proceed as
follows.
(1) Move the jog dial up/down to bring the
cursor to the item to be set.
It is recommended to first select the recording
ZOOM H4
Page 35

Stereo Mode
format and then the sampling rate/bit rate.
(2) Press the jog dial.
The setting can now be changed.
(3) Move the jog dial up/down to change the
setting.
(4) To accept the new setting, press the jog
dial.
HINT
If you attempt to change the setting while the
recorder is operating, the indication “Stop
Recorder!” appears. In this case, press the center
of the [MENU] key to close the window and stop
the recorder before proceeding.
(5) Repeat steps (1) – (4) as required to set
other items.
Press the center of the [MENU] key
4.
to return to the stereo mode top
screen.
The new format will apply to the next recording.
In stereo mode, it is also possible to use the
TRACK [1] – [4] keys to switch the recording
format.
The key assignment is as follows.
TRACK [1] key
WAV (96 kHz)
TRACK [2] key
WAV (48 kHz)
TRACK [3] key
WAV (44.1 kHz)
TRACK [4] key
MP3 (44.1 kHz)
When you press a key, the key lights up and the
screen of step 2 appears, with the respective
format and sampling rate selected. If required,
change also the bit rate.
Record
Recording in stereo mode is performed as
follows.
At the stereo mode top screen, press
1.
the [REC] key.
The [REC] key flashes and the recorder is in the
recording standby condition.
In this condition, the input signal level (recording
level) can be checked with the meter indication.
If you press the left part (U
top (@
) of the [MENU] key, the recording
standby condition is canceled.
HINT
At any time when the counter is being shown on
the display, recording can be carried out.
2.
To start recording, press the [REC]
key once more.
A metronome function for use during recording
is also available (
3.
To stop recording, press the [REC]
key once more, or press the top (@
of the [MENU] key.
The counter returns to zero. If you press the top
(@
) of the [MENU] key in this condition, you
can play back the recording from the beginning.
→
p. 77).
), right part (I
), or
)
ZOOM H4
35
Page 36

Stereo Mode
Using the monitor function
To monitor the level of the input signal in stereo
mode, the recorder must be set to recording
standby mode, or the INPUT LEVEL screen for
adjusting the recording level must be brought up.
However, when the monitor function has been
set to ON in the INPUT menu, the input signal
can always be monitored.
1.
At the stereo mode top screen, press
the bottom (INPUT MENU) of the
[MENU] key.
The INPUT menu for making various input
related settings appears.
2.
Move the jog dial up/down to bring
the cursor to “MONITOR”. Then
press the jog dial.
The monitor function can now be switched on or
off.
Playback in stereo mode
This section explains the steps required for
playback of a file recorded in stereo mode.
Selecting a file for playback
In stereo mode, each recording session will
produce one stereo file (WAV or MP3). These
files are saved in a dedicated folder on the SD
card called “STEREO”. The procedure for
selecting a file from this folder for playback is
explained below.
1.
Verify that the display shows the
stereo mode top screen.
File selection is carried out at the top screen.
Name of currently selected file
Move the jog dial up/down to select
3.
“ON”. Then press the jog dial.
The monitor function is now enabled.
Press the center of the [MENU] key
4.
to return to the stereo mode top
screen.
36
HINT
• When there is no file recorded in stereo mode,
the indication “NO DATA” is shown.
• Files recorded in stereo mode have the name
“STE-xxx.wav (mp3)” which is assigned
automatically. (xxx is a number from 000 to
999.)
→
•You can change the file name (
2.
Move the jog dial up/down to bring
the cursor to the desired file name.
Then press the jog dial.
The file name is shown in reverse, and file
selection is possible.
3.
Move the jog dial up/down to select a
p. 72).
ZOOM H4
Page 37

Stereo Mode
file.
All files in the dedicated folder for stereo mode
files are shown in turn. There is no need to
switch the H4 to different formats as for
recording.
4.
To accept the file selection, press the
jog dial.
5.
To play the selected file, press the
top (@
) of the [MENU] key.
The file selected in step 3 is played back.
6.
To stop playback, press the top (@
of the [MENU] key once more.
HINT
• In stereo mode, the [MENU] key can also be
used to select a file.
• By briefly pressing the right part (
[MENU] key, you can jump to the next file. After
returning to the counter zero position, you can
jump to the previous file by pressing the left
U
) of the [MENU] key.
part (
•You can switch files while the recorder is
playing.
I
)
) of the
Locating a point in a recording
(Locate)
This section describes how to move to any
counter position in a recording.
1.
Verify that the recorder is stopped
and that the display shows the stereo
mode top screen.
The locate function is available from the top
screen only.
Counter
Move the jog dial up/down to bring
2.
the cursor to the digit of the counter
that you want to specify.
The counter digits have the following meaning,
proceeding from the left: hours, minutes,
seconds, milliseconds
Hours Minutes Seconds Milliseconds
NOTE
Files in the same folder are not sorted in the order
they were recorded, but by the start of the file
name. The character sort order is as follows.
(space) !#$%&'()+,-.
0123456789;=@
ABCDEFGHIJKLMNOPQRSTUVWX
YZ[]^_`
abcdefghijklmnopqrstuvwxyz{}
~
ZOOM H4
3.
Press the jog dial when the cursor is
at the desired digit.
The value of that digit can now be changed.
NOTE
In stereo mode, you cannot use the locate function
to move to a point that exceeds the file length.
Move the jog dial up/down to change
4.
the counter indication, and then
press the jog dial.
The change is accepted and the recorder moves
to the specified point. If necessary, bring the
cursor to other digits and repeat the procedure.
37
Page 38

Stereo Mode
Pressing the top (@
start playback from that point.
) of the [MENU] key will
Playing a specified section
repeatedly (A-B repeat)
The A-B repeat function lets you specify a point
A and point B and automatically play the section
between these two points repeatedly. This is
convenient for example to check a specific part
of a recording.
Verify that the stereo mode top
1.
screen is being shown on the display.
Settings for A-B repeat are made at the top
screen.
A↔B button
Locate the start point for the range
2.
to be repeated.
Move the jog dial up/down to bring
3.
the cursor to the A
press the jog dial.
The A↔B button flashes and that point is set as
the A-B repeat start point (point A).
HINT
In stereo mode, points A and B can be set only
while the recorder is in playback or stop mode
(not during recording).
4.
Locate the end point for the range to
be repeated. Bring the cursor to the
A
↔
B button and press the jog dial.
↔
B button. Then
The A↔B button changes from flashing to
reverse indication, and that point is set as the
A-B repeat end point (point B).
NOTE
To redo the point A/B setting, bring the cursor to
↔
B button and press the jog dial to return
the A
the button indication to the original condition.
Then repeat the procedure.
To start repeat playback, press the
5.
top (@
) of the [MENU] key.
Playback starts. When the end point (point B) is
reached, the recorder returns to the start point
(point A), and playback continues.
A B
Playback
NOTE
• If you set point B before point A, repeat
playback occurs between points B
• If you start playback at a location after both
point A and B, repeat playback is not carried
out. Instead, normal playback occurs.
• In stereo mode, the A-B repeat function is not
available during recording.
6.
To stop repeat playback, press the
top (@
) of the [MENU] key once
more.
Even after stopping, you can use A-B repeat
again, until you cancel the function.
7.
To cancel A-B repeat, bring the
cursor to the A
the jog dial.
The button indication returns to the original
condition, and the settings for points A and B are
lost.
↔
B button and press
→
A.
38
ZOOM H4
Page 39

4-Track Mode
This section describes the 4-track mode functions and operation steps.
What is 4-track mode?
In 4-track mode, the H4 functions as a multitrack recorder. This mode allows simultaneous
recording of 2 tracks and simultaneous playback
of 4 tracks. This lets you do things such as create
a backing of drum machine and bass and then
produce a guitar or vocal overlay in the studio.
After recording all four tracks, the individual
volume and panning (left/right positioning) of
each track can be adjusted for playback, and a
stereo or mono file can be created on the SD
card.
4-track mode supports both stereo recording and
mono recording. For stereo recording, the
combinations of track 1/2 or track 3/4 must be
used. The possible mono/stereo combinations for
the four tracks are therefore as shown below.
Track 1 Track 2 Track 3 Track 4
Mono Mono Mono Mono
Stereo Mono Mono
Mono Mono Stereo
Stereo Stereo
NOTE
• In 4-track mode, recordings (songs) are
managed in units called "projects" (
• The recording format in 4-track mode is fixed to
WAV (44.1 kHz/16 bit).
→
p. 54).
When phantom power supply is on,
Counter showing the
current recorder position
Currently selected
track number
Meter showing
record/playback level
Buttons for functions available in 4-track mode
+48V/+24V is shown
Selected file name
for the current track
Recorder
operation status
Switching to 4-track mode
The currently selected mode of the H4 is shown
by the [MODE] indicator on the top panel. When
the indicator is lit, the unit is in stereo mode.
When the indicator is out, the unit is in 4-track
mode.
To switch the H4 to 4-track mode, proceed as
follows.
Stop the recorder and press the
1.
center of the [MENU] key at the top
screen.
The main menu for making various settings
appears.
The top screen of the 4-track mode is shown
below.
ZOOM H4
39
Page 40

4-Track Mode
NOTE
The items shown on the main menu are different
for stereo mode and 4-track mode.
2.
Move the jog dial up/down to bring
the cursor to "MODE". Then press
the jog dial.
The MODE SELECT screen appears.
Move the jog dial up/down to bring
3.
the cursor to "4TRACK RECORDER".
Press the jog dial.
4.
The H4 switches to 4-track mode and the
[MODE] indicator goes out.
The display automatically changes to the 4-track
mode top screen.
Selecting the recording
mode
This section describes how to select one of the
two recording modes available in 4-track mode.
About the recording mode
In 4-track mode, there are basically two basic
recording modes, namely the "Overwrite" mode
and the "Always New" mode. These modes are
characterized as follows.
starting a recording also partway through a
track, and a function called punch-in/out (
→
p. 43) that overwrites only a specified section
is also supported.
First recording pass
Second recording pass
Later material overwrites
existing material
●
Always New mode
In this mode, a new file is created for every
recording operation, as in stereo mode.
Recording always starts from the beginning
of a file (song). Recorded files are saved in a
dedicated folder on the SD card with the
name "PROJxxx" (where xxx is a number
from 000 to 999). The file to play for each
track can be selected later.
This is useful to record multiple takes of a vocal
or guitar passage and then later compare the
takes and select the best one.
First recording pass
Second recording pass
Third recording pass
First recording pass
Second recording pass
A new file is created the second time
and becomes the playback target
The first file is no longer
the playback target
Third recording pass
A new file is created the third time
and becomes the playback target
Overwrite mode (default)
●
In this mode, you record on a track that
already has material on it, and you overwrite
the existing material. This mode allows
40
Other files can later be
selected for playback
ZOOM H4
Page 41

4-Track Mode
Selecting the recording mode
This section explains how to select the recording
mode.
HINT
The recording mode setting is saved separately
for each project.
Verify that the recorder is stopped
1.
and press the center of the [MENU]
key at the top screen.
The main menu for making various settings
appears.
Move the jog dial up/down to bring
2.
the cursor to "REC MODE". Then
press the jog dial.
The REC MODE SELECT screen appears.
Operation differences according to
recording mode
The recording operation steps differ according to
the currently selected recording mode.
◆
Recording in Overwrite mode
At the 4-track mode top screen,
1.
press one of the TRACK [1] – [4] keys
repeatedly until the key is lit in red, to
select the track on which to record.
To start recording, press the [REC]
2.
key so that the key lights up (unit is in
recording standby condition). Then
press the top (@
Recording begins.
HINT
It is also possible to first press the top (@
[MENU] key to start playback and then press the
[REC] key at the point where you want recording
to start. This method is convenient to perform
manual punch-in.
3.
To stop recording, press the [REC]
key once more, or press the top (@
of the [MENU] key.
Recording stops. If you have used the [REC]
key, the unit continues in playback mode.
) of the [MENU] key.
) of the
)
To change the recording mode, move
3.
the jog dial up/down to display
"OVER WRITE" or "ALWAYS NEW".
The displayed mode is selected.
To return to the 4-track mode top
4.
screen, press the center of the
[MENU] key.
ZOOM H4
◆
Recording in Always New mode
At the 4-track mode top screen,
1.
press one of the TRACK [1] – [4] keys
repeatedly until the key is lit in red, to
select the track on which to record.
To start recording, press the [REC]
2.
key so that the key lights up (unit is in
recording standby condition), and
then press the [REC] key once more.
41
Page 42

4-Track Mode
The [REC] key stays lit constantly, and recording
begins.
3.
To stop recording, press the [REC]
key once more, or press the top (@
of the [MENU] key.
Recording is completed and the recorder stops.
Recorder
This section explains how to operate the recorder
in 4-track mode.
Selecting files for playback
Files recorded in 4-track mode are saved by
project on the SD card. In Always New mode,
you can record multiple files and later select the
file to play for each track.
The procedure for assigning a saved file to a
track is described below.
1.
Bring up the 4-track mode top
screen on the display.
File selection is carried out at the top screen.
Number of currently selected track
Currently selected file name
• Files recorded in stereo mode (provided that
the recording format is 44.1 kHz/16 bit) can be
included in a 4-track mode project and
assigned to tracks 1/2 or 3/4 (
)
Use the TRACK [1] – [4] keys to
2.
select the track to which you want to
assign a file.
The selected track number appears on the
display, and the name of the file currently
selected for the track is shown.
HINT
• The TRACK [1] – [4] keys not only serve to
change the status of a track (off: out, playback:
lit in green, record: lit in red) but also allow the
selection of a track.
• When the TRACK [1] - [4] key for a track that is
currently not selected is pressed once, the
track will be selected, but its status does not
change.
Number of selected track
Currently selected file name
HINT
•Tracks for which stereo link is enabled are
shown as "1/2" and "3/4". In this case, pressing
the key for either of the two tracks will select
both.
• If no file is selected for a track, the indication
"NO DATA" is shown.
→
p.74).
HINT
• Files recorded in 4-track mode are
automatically assigned names using the
pattern "TRKx-yy.wav" (where x is the track
number and yy is a number from 00 – 99).
• For stereo files covering two tracks recorded
with stereo link enabled, the track number "x" is
always the sequence "12" or "34".
42
Move the jog dial up/down to bring
3.
the cursor to the file name indication.
Then press the jog dial.
The file can now be selected.
Move the jog dial up/down to select a
4.
file.
For mono tracks, only monaural files can be
selected. For tracks where stereo link is enabled,
ZOOM H4
Page 43

4-Track Mode
only stereo files can be selected.
HINT
As long as the file is from the same project, a
track other than one used during recording can
also be selected.
NOTE
It is not possible to select the same file for
multiple tracks.
To accept the file selection, press the
5.
jog dial.
The file for playback is selected.
Repeat steps 2 – 5 to assign files to
6.
other tracks in the same way.
Out of the TRACK [1] – [4] keys,
7.
press the key for the desired track,
so that the key is lit in green
(playback).
To play the files assigned to the
8.
tracks, press the top (@
[MENU] key.
The respective files of the tracks are played.
) of the
Using the locate function and A-B
repeat function in 4-track mode
In 4-track mode, you can locate a specific point
and use the A-B repeat function as in stereo
mode. For details, see page 37, 38.
Re-recording only a specified
region (punch-in/out function)
Punch-in/out is a function that lets you re-record
just a specified region of a previously recorded
track. The action of switching a currentlyplaying track to record mode is called "punchin", and the action of switching back from
recording to playback is called "punch-out".
The H4 provides two ways to do this. You can
control the operation manually ("manual punchin/out"), or you can cause punch-in/out to occur
automatically at previously specified points
("auto punch-in/out").
NOTE
Punch-in/out is possible only in Overwrite mode.
◆
Manual punch-in/out
To manually re-record only a part of an audio
track, proceed as follows.
1.
At the top screen, press one of the
TRACK [1] – [4] keys to select the
track you want to re-record.
The display shows the number of the selected
track.
Number of currently selected track
Currently selected file name
NOTE
• If Overwrite mode is selected in 4-track mode,
the A-B repeat function is available during
playback, stop, and recording.
• If Always New mode is selected in 4-track
mode, the A-B repeat function is not available
during recording (as in stereo mode).
ZOOM H4
Press the same TRACK [1] – [4] key
2.
that you pressed in step 1 repeatedly,
so that the key is lit in red.
The input signal can now be monitored. The
number of the track selected as recording target
is shown in reverse.
43
Page 44

4-Track Mode
A
Input
signal level
3.
Locate a point slightly before the
intended punch-in point, and press
the top (@
4.
When you come to the punch-in
point, press the [REC] key.
The [REC] key lights up, and track recording
begins from that location (punch-in).
5.
When you come to the intended
punch-out point, press the [REC] key
once more.
The [REC] key goes out, and the H4 switches
from recording to playback (punch-out).
6.
Press the top (@
to stop the recorder.
To check the results, use the locate
7.
function to move to a point before
the punch-in point, and press the top
(
@
) of the [MENU] key.
◆
Auto punch-in/out
To automatically re-record only a part of an
audio track by specifying the punch-in/out points
beforehand, proceed as follows.
At the top screen, press one of the
1.
TRACK [1] – [4] keys to select the
track you want to re-record.
The display shows the number of the selected
track.
) of the [MENU] key.
) of the [MENU] key
-PUNCH
button
2.
Press the same TRACK [1] – [4] keys
that you pressed in step 1 repeatedly,
so that the key is lit in red.
The input signal can now be monitored. The
number of the track selected as recording target
is shown in reverse.
3.
Locate the intended punch-in point.
4.
Move the jog dial up/down to bring
the cursor to the A-PUNCH button.
Then press the jog dial.
The A-PUNCH button flashes, and the point is
set as the punch-in point where auto punch-in/out
will begin.
NOTE
In Always New mode, the A-PUNCH button is
grayed out and cannot be selected.
Locate the intended punch-out point
5.
and bring the cursor to the A-PUNCH
button. Then press the jog dial.
The A-PUNCH button changes from flashing to
reverse, and the point is set as the punch-out
point where auto punch-in/out will end. When
auto punch-in/out is enabled, the TRACK key(s)
will flash while the recorder is before the punchin point and after the punch-out point.
NOTE
•To redo the punch-in/out point setting, bring
the cursor to the A-PUNCH button and press
the jog dial to return the button indication to the
original condition. Then repeat steps 3 – 5.
44
ZOOM H4
Page 45

•
If you set the punch-out point before the punch-in
point, the range is specified as out
HINT
The punch-in/out point setting can be made in the
playback or the stop condition of the recorder.
Locate a point slightly before the
6.
intended punch-in point.
To rehearse the auto punch-in/out
7.
process, press the top (@
[MENU] key.
When the punch-in point is reached, the
respective track is muted, and muting is canceled
when the out point is reached. The remaining
tracks and the input signal can continue to be
monitored, but actual recording is not carried
out.
→
in.
) of the
4-Track Mode
9.
To stop playback, press the top (@
of the [MENU] key.
The recorder stops.
.
10
To cancel auto punch-in/out, bring
the cursor to the A-PUNCH button
and press the jog dial.
The button returns to the original condition and
auto punch-in/out is canceled. The settings for
the punch-in/out points are also lost.
.
11
To check the recorded content,
locate a point slightly before the
punch-in point, and press the top (@
of the [MENU] key.
Combining multiple tracks on one
file (bounce function)
)
)
Punch-in point Punch-out point
Track
Playback PlaybackMute
To perform the actual auto punch-in/
8.
out process, press the [REC] key so
that the key flashes, and then press
the top (@
When the punch-in point is reached, recording on
the respective track starts automatically (punchin). When the punch-out point is reached,
recording on the respective track ends
automatically (punch-out).
Track
HINT
During the mute interval, the TRACK key(s) will
change from flashing to constantly lit. During
recording, the TRACK key(s) and [REC] key both
change from flashing to constantly lit.
) of the [MENU] key.
Punch-in point Punch-out point
Playback PlaybackRecord
ZOOM H4
"Bounce" is a function that mixes the sound from
tracks 1 – 4 and outputs it to a single file (stereo
or mono). This allows you to record parts such as
vocals, guitar, backing etc. separately and then
use these elements to create a stereo file. By
assigning the resulting file to a stereo track, you
can free up the other tracks for further recording
of more instruments or parts.
The bounce range extends from the beginning of
the recording to the end of the track. It is not
possible to bounce only part of a recording.
The illustration below shows an example for
bouncing 4 tracks onto a stereo file.
5 minutes
Track 1
Track 2
Track 3
Track 4
Bounce
5 minutes
Stereo file
45
Page 46

4-Track Mode
1.
At the 4-track mode top screen,
select the track(s) you want to use as
a bounce source by using the TRACK
[1] – [4] keys. Press the respective
key repeatedly until it is lit in green.
Note that tracks for which the key is not lit
(muted tracks) will not be included in the file
produced after bouncing.
2.
Press the top (@
to start playback of the recorder, and
adjust panning (only for stereo files)
and volume level of each track, while
monitoring the overall output level.
Output level
The file produced by bouncing reflects the
panning and volume settings for each track. For
information on adjusting these parameters, see
"4-track mixing (volume/panning)" on page 51.
) of the [MENU] key
BOUNCE button
OK button CANCEL button
4.
To select the format for the bounce
target file (stereo or mono), move the
jog dial up/down to bring the cursor
to the "FORMAT" item. Then press
the jog dial.
The format can now be changed.
5.
Move the jog dial up/down to select
"STEREO" or "MONO". The press the
jog dial.
When STEREO is selected
●
The created stereo file reflects both the
panning and the volume settings.
When MONO is selected
●
The panning setting is disregarded. The
volume setting for final L and R output is
added up and divided by 2. This gives the
volume level of the file.
NOTE
If the level meter indication shows that signal
clipping occurs, lower the volume setting for each
track.
When level checking is complete, press the top
(
@
) of the [MENU] key to stop the recorder.
3.
Move the jog dial up/down to bring
the cursor to the BOUNCE button.
Then press the jog dial.
The BOUNCE screen for controlling the bounce
function appears.
46
6.
To set the name for the file after
bouncing, move the jog dial up/down
to bring the cursor to the "NAME"
item. Then press the jog dial.
The cursor disappears and the first character is
underlined. In this condition, you can change the
file name.
Underline
ZOOM H4
Page 47

4-Track Mode
HINT
If you do not specify a name here, the file created
by bouncing will be automatically assigned a
name using the pattern "BOUNCExx.wav" (where
xx is a number from 00 – 99).
When the underline is shown, change the name
as follows.
(1) Move the jog dial up/down to bring the
underline to the character you want to
change. Then press the jog dial.
The character can now be changed.
(2) Move the jog dial up/down to change the
character.
The following characters are available.
0 – 9
A – Z, a – z
(space) ! # $ % & ' ( ) + , - . ; = @ [ ] ^ _
' { } ˜
(3) Press the jog dial to accept the selected
character.
(4) Repeat steps (1) – (3) as required to
specify the entire name.
(5) Move the jog dial up/down to bring the
underline beyond the left or right edge of
the name string.
The underline disappears and the cursor appears
again. The name change is now complete.
7.
To execute the bounce function,
move the jog dial up/down to bring
the cursor to the OK button. Then
press the jog dial.
While the bounce function is being executed, the
indication "Now Processing" is shown on the
display.
The file created by bouncing is saved in the same
location as the other files recorded for the current
project. To check the bounce result, assign the
file to a track (
→
p. 42).
HINT
If you select the CANCEL button instead of the
OK button, the operation is abandoned and the
unit returns to the top screen of the 4-track mode.
NOTE
If the SD card becomes full during the bounce
operation, the indication "Card Full!" appears, and
the process cannot be completed. Press the jog
dial to close the window, delete files that are no
longer required, and then perform the bounce
operation once more.
Mixer
This section explains the use of the mixer in 4track mode.
About the mixer in 4-track mode
When the H4 is operating in 4-track mode, two
kinds of mixers can be used, namely the input
mixer and track mixer.
The input mixer takes up to two signals from the
built-in stereo mic or the [INPUT 1]/[INPUT 2]
jacks and sends them on in mixed form or
separately to the recorder tracks.
Input 1
Input 2
Input
mixer
(for volume and panning)
The track mixer adjusts the volume and panning/
balance of each signal recorded on the four
tracks and produces a stereo output signal.
Tra ck 1
Tra ck 2
Tra ck 3
Tra ck 4
Recorder
Track mixer
[LINE OUTPUT] jack
ZOOM H4
47
Page 48

4-Track Mode
NOTE
• The input signal can be processed using the
built-in effects (
• If stereo link for two odd/even numbered track
pairs (1/2 and 3/4) is enabled, the respective
track pair can be used as a stereo track with
linked parameters (
→
p. 62).
→
p. 53).
Selecting the input source
This section explains how to select the two input
signals to assign to the input mixer. The L/R
signals from the built-in stereo mic or the signals
from the [INPUT 1]/[INPUT 2] jacks can be
selected. The input source selected here is sent to
the recorder tracks.
1.
At the 4-track mode top screen,
press the bottom of the [MENU] key.
The INPUT menu for making various input
related settings appears.
Display
MIC
IN1&2
IN1
IN2
HINT
• When MIC or IN1&2 is selected, the input mixer
• The built-in stereo mic always feeds the two L/
4.
5.
Input 1 Input 2
Built-in stereo mic L
[INPUT 1] jack [INPUT 2] jack
[INPUT 1] jack
[INPUT 2] jack
will receive two signals.
R channels as a set. It is not possible to
combine for example the L channel of the builtin stereo mic with the [INPUT 2] jack.
To accept the input source selection,
press the jog dial.
To return to the 4-track mode top
screen, press the center of the
[MENU] key.
Input source
Built-in stereo mic
R
Adjusting the recording level
2.
Move the jog dial up/down to bring
the cursor to "SOURCE". Then press
the jog dial.
The input source can now be selected.
Move the jog dial up/down to select
3.
the input source.
The following selections are available.
48
This section describes how to adjust the
recording level for the signal supplied to the
input mixer.
Select the input source as described
1.
above.
When using the [INPUT 1]/[INPUT 2] jacks as
input source, verify that an external microphone
or other device is connected.
Adjust the input sensitivity with the
2.
[MIC GAIN] switch, [INPUT 1 GAIN]
switch, or [INPUT 2 GAIN] switch, as
required.
There are three settings for the input sensitivity:
L (Low)
→
M (Medium) → H (High). For
ZOOM H4
Page 49

4-Track Mode
A
information on recommended settings, see page
32.
NOTE
Note that the signal input to the H4 will be
distorted if the input sensitivity is not set correctly.
3.
At the 4-track mode top screen,
press the bottom of the [MENU] key.
The INPUT menu for making various input
related settings appears.
Move the jog dial up/down to bring
4.
the cursor to "LEVEL". Then press
the jog dial.
The INPUT LEVEL screen for adjusting the
recording level appears.
Currently selected
input source
lphanumeric indication
of input source
Recording level of source
selected with cursor
Signal input
level
HINT
• The alphanumeric indication at the left of the
signal level bars shows the input source ("1"
and "2" for the [INPUT 1]/[INPUT 2] jacks and
"L" and "R" for the built-in stereo mic).
• While this screen is being shown, the input
signal can be monitored via the [LINE OUTPUT]
jack and [PHONES] jack.
5.
When IN1&2 is selected, move the
jog dial up/down to bring the cursor
to the input source whose level you
want to adjust.
6.
Press the jog dial to bring up the
fader icon next to the meter display.
The recording level can now be adjusted. While
the fader icon is being shown, the cursor is not
shown.
Fader icon
Move the jog dial up/down to adjust
7.
the recording level.
The recording level setting can be checked on the
display. To record with optimum sound quality,
the input signal level should be set as high as
possible, without exceeding the 0 (dB) indication
on the meter. The setting range is 0 – 127. When
the recording level is too high, the sound will be
distorted.
HINT
• The recording level set here also influences the
signal level after effect processing. When
switching between effect on and off or when
changing effect settings, the recording level
may have to be readjusted.
• When effect processing is off, a recording level
setting of 100 will result in a unity gain (no
amplification) being sent to the track. If the level
meter indication shows that signal clipping
occurs, readjust the input source sensitivity
setting.
8.
To terminate the recording level
setting, press the jog dial.
The recording level is set. The fader icon
disappears, and the cursor appears again.
If IN1&2 has been selected, repeat steps 5 – 8 for
ZOOM H4
49
Page 50

4-Track Mode
the other input source.
9.
To return to the 4-track mode top
screen, repeatedly press the center
of the [MENU] key.
Selecting the recording track
When the recording level has been adjusted, you
must select the track(s) for recording. The signal
processing method differs, depending on whether
one or two input sources are selected, and
whether one or two tracks have been selected.
Verify that the recorder is stopped
1.
and bring up the 4-track mode top
screen.
To select only one track as recording
2.
target, use the TRACK [1] – [4] keys
and press the respective key
repeatedly until it is lit in red.
The selected track appears as a mono track on the
top screen. The number of the track is shown in
reverse.
Track number
The signal of the source is sent to the selected
track.
●
When there are two input sources
The signals of input 1/2 are mixed and sent to
the selected track.
Input source: mono
Input
Input source: stereo
Input 1
Input 2
Input mixer
To select two tracks (mono track x 2,
3.
Recorder
Tra ck
Recorder
Tra ck
or stereo track) as recording target,
use the TRACK [1] – [4] keys as
follows.
●
To select two mono tracks
Repeatedly press one of the TRACK [1]/[2]
keys or the TRACK [3]/[4] keys until the
respective key is lit in red. Then hold down
that key and press the other TRACK key so
that it lights up in red.
The track number corresponding to the second
TRACK key is shown on the display. (To show
the other track number, press the first TRACK
key once more.)
NOTE
If one of two tracks for which stereo link is
enabled is selected, the other track is also
selected as recording target. Unless you disable
the stereo link setting, it is not possible to select
only one track.
●
When there is one input source
50
Track number
HINT
To select two mono tracks, the combination of
tracks 1 and 2 or 3 and 4 can be used.
ZOOM H4
Page 51

To select two stereo linked tracks
●
In the case of two tracks for which stereo link
is enabled, the TRACK keys are also linked.
Press either TRACK [1] or [2] or TRACK [3]
or [4] repeatedly, until the key is lit in red.
The other key will also light up, and both
tracks are selected as recording targets.
The display shows the track number as 1/2 or
3/4.
In either case, the signal flow is as follows,
depending on whether the source is mono or
stereo.
Single input source
●
The same signal is sent to both tracks.
Input source: mono
Input
Two input sources
●
The signal from input source 1 is sent to the
odd-numbered track, and the signal from
input source 2 to the even-numbered track.
Input source: stereo
Input 1
Input 2
Recorder
Track 1 or 3
Track 2 or 4
Recorder
Track 1 or 3
Track 2 or 4
4-Track Mode
Using the monitor function
To monitor the input signal in 4-track mode, you
normally have to press one of the TRACK [1] –
[4] keys so that the key is lit in red and the track
is selected as recording target, or bring up the
screen for adjusting the recording level.
Alternatively, you can set the monitor function to
ON on the INPUT menu. In this case, the input
signal will always be monitored.
To turn the monitor function on, proceed as
follows.
1.
At the 4-track mode top screen,
press the bottom of the [MENU] key.
The INPUT menu for making various input
related settings appears.
2.
Move the jog dial up/down to bring
the cursor to "MONITOR". Then
press the jog dial.
You can now switch the monitor function on or
off.
3.
Move the jog dial up/down to display
"ON". Then press the jog dial.
The monitor function is now enabled.
4.
To return to the 4-track mode top
screen, repeatedly press the center
of the [MENU] key.
4-track mixing (volume/panning)
HINT
To use both tracks as a stereo track, you should
enable stereo link (
stereo track, a stereo file is created.
→
p. 53). When recording on a
ZOOM H4
When performing playback in 4-track mode, you
can freely adjust the volume (level) and panning
(left/right positioning). Especially with the
bouncing function, it is important to get the
mixing balance between the 4 tracks right and to
establish proper positioning.
51
Page 52

4-Track Mode
1.
At the 4-track mode top screen,
select the track(s) for playback
source by using the TRACK [1] – [4]
keys. Press the respective key
repeatedly until it is lit in green.
Output level
MIXER button
2.
Move the jog dial up/down to bring
the cursor to the MIXER button. Then
press the jog dial.
The MIXER screen for making mixer settings
appears.
Level and panning value for
Track number
track selected with cursor
The cursor disappears and the fader icon appears.
Fader icon
5.
Move the jog dial up/down to adjust
the level.
The volume (level) can be adjusted in the range
from 0 to 127.
6.
To adjust the pan/balance setting,
press the jog dial once more and
then move the jog dial up/down.
When you press the jog dial, an up/down arrow
symbol appears to the left of the icon.
Up/down arrows
The pan/balance setting range is L100 – C –
R100. When you change the setting, the icon
shape also changes accordingly.
Level meter for each track and panning icon
Move the jog dial up/down to bring
3.
the cursor to the number of the track
whose level and panning you want to
adjust.
HINT
• For tracks with stereo link enabled, the cursor
moves to the position between the track
numbers (1/2 or 3/4).
• For tracks with stereo link enabled, the pan
setting adjusts the level balance between the
two tracks.
Press the jog dial.
4.
52
To accept the pan/balance setting,
7.
press the jog dial.
The up/down arrow symbol disappears and the
cursor appears again.
Repeat steps 3 – 7 to adjust the level
8.
and panning for other tracks.
To return to the 4-track mode top
9.
screen, repeatedly press the center
of the [MENU] key.
10
Press the top (@
.
to start playback, and check the
output level as indicated by the
meter.
) of the [MENU] key
ZOOM H4
Page 53

If signal clipping occurs, perform the mixing
adjustment again.
.
11
To stop playback, press the top (@
of the [MENU] key.
)
4-Track Mode
Linking two tracks (stereo link)
The stereo link function allows you to link two
adjacent odd/even numbered tracks (tracks 1/2 or
3/4) to create a stereo track that can be controlled
in one operation. This section describes how to
enable stereo linking.
NOTE
The H4 recorder can play back monaural tracks
only in mono and stereo tracks in stereo.
Consequently, when switching between stereo
link enabled and disabled, a file previously
selected for a track may no longer be playable,
and the “NO DATA” condition (no file selected) will
apply.
Verify that the recorder is stopped
1.
and press the center of the [MENU]
key at the top screen.
The main menu for making various settings
appears.
Move the jog dial up/down to bring
2.
the cursor to “STEREO LINK”. Then
press the jog dial.
The STEREO LINK screen appears.
Move the jog dial up/down to bring
3.
the cursor to 1/2 (tracks 1 and 2) or
3/4 (tracks 3 and 4). Then press the
jog dial.
The stereo link can now be enabled or disabled.
To enable the stereo link condition,
4.
move the jog dial up/down to display
“ON” and then press the jog dial.
The tracks selected in step 3 are now linked.
For example, when stereo link is enabled for
tracks 1/2, track 1 will become the L stereo track
and track 2 the R stereo track.
Two tracks which have been stereo linked
operate as follows.
• The track level is linked.
• The panning setting adjusts the left/
right stereo balance.
• TRACK [1]/[2] and [3]/[4] keys are
linked.
NOTE
If you attempt to change the setting while the
recorder is operating, the indication “Stop
Recorder!” appears in a popup window. Press the
jog dial or press the center of the [MENU] key to
close the window. Then stop the recorder and
repeat the procedure.
5.
To return to the 4-track mode top
screen, repeatedly press the center
of the [MENU] key.
ZOOM H4
53
Page 54

4-Track Mode
Projects
This section explains various operation steps
related to projects.
What is a project?
In 4-track mode, the H4 manages recordings
(songs) in a unit called a “project”. When you
load a project, all recordings and settings will be
restored to the original condition.
A project comprises the following information.
• All files recorded in the project
• Recording mode settings
• Input source and recording level
settings
• Internal track mixer settings
• Patch numbers and patch contents of
the effect section
• Protect settings
• Tuner settings
• Other setting data
NOTE
•Projects are active only in 4-track mode. In
stereo mode, no project related operations are
possible.
• Operations can only be carried out for the
currently loaded project. It is not possible to
handle multiple projects simultaneously.
Basic project operations
Most project operations follow a basic pattern.
This is described below.
Verify that the recorder is stopped
1.
and press the center of the [MENU]
key at the top screen.
The main menu for making various settings
appears.
Move the jog dial up/down to bring
2.
the cursor to “PROJECT”. Then
press the jog dial.
The PROJECT menu for project related
operations appears.
HINT
When you call up the PROJECT menu, the current
project is saved automatically.
Move the jog dial up/down to bring
3.
the cursor to one of the following
items.
NEW PROJECT
●
Lets you create a new project.
SELECT
●
Lets you select an existing project from the
SD card.
RENAME
●
Lets you change the name of any project.
COPY
●
Lets you create a copy of the currently
selected project on the SD card.
DELETE
●
Lets you delete any project from the SD card.
54
ZOOM H4
Page 55

4-Track Mode
PROTECT
●
Lets you write-protect the currently selected
project.
Press the jog dial to select the
4.
desired operation.
For details on operation steps, see the respective
sections below.
To return to the 4-track mode top
5.
screen, repeatedly press the center
of the [MENU] key.
Creating a new project
To create a new project on the SD card, proceed
as follows.
Refer to steps 1 – 3 of “Basic project
1.
operations” and bring the cursor to
“NEW PROJECT”. Then press the jog
dial.
A screen with the name of the project appears.
The cursor disappears and the first character is
underlined. In this condition, you can change the
project name.
The following characters are available. (Note
that these are slightly different from the
characters available for the file name.)
0 – 9,
A – Z, a – z
(space) ! " # $ % & ' ( ) * + , - . / : ;
< > = ? @ [ ] ^ _ ` { } \
For details on how to change the name, see page
47.
To create the new project, move the
3.
jog dial up/down to bring the cursor
to the OK button, and then press the
jog dial.
The newly created project is automatically
loaded, and 4-track mode top screen appears.
If you select the CANCEL button instead of the
OK button, the new project is not created, and
the PROJECT menu appears again.
˜
Name for project
to be created
A name using the lowest free number is
automatically assigned to the new project. In the
default condition, this is “PPJxxx” (where xxx is
the project number).
2.
To change the name for the project,
move the jog dial up/down to bring
the cursor to the project name, and
then press the jog dial.
OK button CANCEL button
ZOOM H4
Selecting a project
To select a project from the SD card, proceed as
follows.
HINT
When you turn the unit on in 4-track mode, the
most recently selected project is automatically
loaded again.
1.
Refer to steps 1 – 3 of “Basic project
operations” and bring the cursor to
“SELECT”. Then press the jog dial.
A list with the names and numbers of projects
that can be loaded appears.
55
Page 56

4-Track Mode
Project nameProject number
Move the jog dial up/down to bring
2.
the cursor to the project you want to
load.
To load the folder, press the jog dial.
3.
The selected project is loaded, and the 4-track
mode top screen appears again.
If you press the center of the [MENU] key
instead of the jog dial, the operation is canceled
and unit returns to the previous condition.
Changing a project name
To change the name of a project on the SD card,
proceed as follows.
Refer to steps 1 – 3 of “Basic project
1.
operations” and bring the cursor to
“RENAME”. Then press the jog dial.
A list with the projects whose names can be
changed appears. The list shows the project name
and number.
Project nameProject number
The name of the selected project is shown.
Name of selected project
OK button CANCEL button
Move the jog dial up/down to bring
3.
the cursor to the project name. Then
press the jog dial.
The cursor disappears and the first character is
underlined. In this condition, you can change the
project name.
For details on how to change the name, see page
47.
For information on available characters, see page
55. (Note that these are slightly different from
the characters available for the file name.)
To accept the new name, move the
4.
jog dial up/down to bring the cursor
to the OK button, and then press the
jog dial.
The unit returns to the condition of step 1, with
the new project name shown in reverse.
If you select the CANCEL button instead of the
OK button, the new name does not become valid,
and the PROJECT menu appears again.
To return to the PROJECT menu,
5.
repeatedly press the center of the
[MENU] key.
Move the jog dial up/down to bring
2.
the cursor to the project you want to
rename. Then press the jog dial.
56
ZOOM H4
Page 57

4-Track Mode
Copying a project
You can copy the content of the currently
selected project to a free project number. To do
this, proceed as follows.
1.
Refer to steps 1 – 3 of “Basic project
operations” and bring the cursor to
“COPY”. Then press the jog dial.
A screen with the name and number of the
project that will be used as copy target appears.
Project nameProject number
Move the jog dial up/down to bring
2.
the cursor to the number of the
project, and then press the jog dial.
In this condition, you can select the number of
the project to use as copy target.
Move the jog dial up/down to select
3.
the copy target project number. Then
press the jog dial.
The copy target project number is set.
NOTE
Only empty projects can be selected as copy
target. It is not possible to copy to existing
projects.
4.
To change the name of the copy
target project, move the jog dial up/
down to bring the cursor to the
project name. Then press the jog
dial.
The cursor disappears and the first character is
underlined. In this condition, you can change the
project name.
For details on how to change the name, see page
47.
For information on available characters, see page
55. (Note that these are slightly different from
the characters available for the file name.)
5.
To execute the copy process, move
the jog dial up/down to bring the
cursor to the OK button, and then
press the jog dial.
The copied project is automatically loaded, and
the 4-track mode top screen appears.
If you select the CANCEL button instead of the
OK button, the copy process is canceled, and the
PROJECT menu appears again.
Deleting a project
To delete a project from the SD card, proceed as
follows.
NOTE
Once deleted, a project cannot be restored. Use
this function with care.
1.
Refer to steps 1 – 3 of “Basic project
operations” and bring the cursor to
“DELETE”. Then press the jog dial.
A list with the projects that can be deleted
appears. The list shows the project name and
number.
Project nameProject number
ZOOM H4
57
Page 58

4-Track Mode
2.
Move the jog dial up/down to bring
the cursor to the project you want to
delete. Then press the jog dial.
A confirmation message for the deletion appears.
CANCEL buttonDELETE button
To proceed with the deletion, move
3.
the jog dial up/down to bring the
cursor to the DELETE button, and
then press the jog dial.
The project is deleted, and the PROJECT menu
appears again. If the currently selected project
was deleted, the project with the lowest number
will be selected, and the display returns to the top
screen.
If you select the CANCEL button instead of the
OK button, the delete process is canceled, and
the DELETE menu appears again.
To return to the PROJECT menu,
4.
repeatedly press the center of the
[MENU] key.
• Changing file assignments
• Editing effect patches
HINT
Even when write-protect is enabled for a project,
you can perform playback as usual and change
the mixing balance etc. However, these changes
will not be stored.
Refer to steps 1 – 3 of “Basic project
1.
operations” and bring the cursor to
“PROTECT”. Then press the jog dial.
The PROJECT PROTECT screen appears.
Move the jog dial up/down to select
2.
“ON” (protection enabled) or “OFF”
(protection disabled).
The changed setting becomes effective
immediately.
When the setting is completed, press the center
of the [MENU] key to return to the 4-track mode
top screen. When protection is enabled, the
mark is shown to the left of the counter.
Write-protecting a project
The currently selected project can be writeprotected. This will prevent the project from
being deleted, and no new recordings can be
made.
When a project is write-protected, the following
actions are not possible.
• Recording
• Deleting the project
• Deleting the file(s)
58
P mark
HINT
When you have completed a song, we
recommend to enable write-protect for the
project, to prevent unintended changes.
ZOOM H4
Page 59

Tuner
The 4-track mode of the H4 gives access to a
multi-function tuner that also supports various
unconventional tunings such as 7-string guitar
and 5-string bass. This section explains how to
use the tuner.
NOTE
The tuner can only be used in 4-track mode.
4-Track Mode
the jog dial.
The tuner function is called up. In the default
condition of a project, the chromatic tuner is
selected.
Currently selected
tuner mode
CALIB button
Using the chromatic tuner
To use the chromatic tuner which detects notes in
semitone steps, proceed as follows.
1.
Connect the instrument to tune to
the [INPUT 1] or [INPUT 2] jack and
verify that the correct jack is
selected as input source.
HINT
• If you select MIC as input source, it is also
possible to perform tuning using the built-in
stereo mic.
• If two input sources are selected, the signal will
be mixed and then sent to the tuner.
2.
At the 4-track mode top screen,
press the bottom of the [MENU] key.
The INPUT menu for making various input
related settings appears.
HINT
• Other tuner modes are also available. For
details, see the next section.
• While the tuner function is active, the effect
section is disabled.
NOTE
While the chromatic tuner is selected, the rightside button at the bottom of the display is grayed
out and cannot be used. In other tuner modes,
this button serves to specify the string number.
4.
Play the note that you want to tune.
The pitch is automatically detected, and the
center of the display shows the nearest note name
(C, C#, D, D#, E...). The display also indicates
by how much the current pitch is different from
the correct pitch.
Pitch is flat
Move the jog dial up/down to bring
3.
the cursor to “TUNER”. Then press
ZOOM H4
Correct pitch
59
Page 60

4-Track Mode
Using other tuner types
Pitch is sharp
5.
Adjust the pitch until the ● indication
is right above the desired note.
6.
To change the reference pitch of the
tuner, proceed as follows.
(1) Move the jog dial up/down to bring the
cursor to the CALIB button, and then
press the jog dial.
The screen for changing the reference pitch
appears.
(2) Move the jog dial up/down to change the
reference pitch.
In the default condition, the reference pitch is
center A = 440 Hz. This can be adjusted over
the range of 435 – 445 Hz, in 1-Hz steps.
When the setting is complete, press the center
of the [MENU] key to close the screen. You
can now perform tuning with the new
reference pitch.
The H4 allows various other tuning types besides
chromatic tuning, including standard tuning for
guitar and bass, and various special tuning
functions.
When using these tuner modes, you specify each
string for tuning separately.
1.
Connect the instrument to tune to
the [INPUT 1] or [INPUT 2] jack and
verify that the correct jack is
selected as input source.
HINT
If you select MIC as input source, it is also
possible to perform tuning using the built-in
stereo mic.
At the 4-track mode top screen,
2.
press the bottom of the [MENU] key.
The INPUT menu for making various input
related settings appears.
Move the jog dial up/down to bring
3.
the cursor to “TUNER”. Then press
the jog dial.
The tuner function is called up.
HINT
The reference pitch setting is saved separately for
each project.
When you have finished using the
7.
tuner function, press the center of
the [MENU] key repeatedly to return
to the 4-track mode top screen.
60
4.
Move the jog dial up/down to bring
the cursor to the MODE button, and
then press the jog dial.
The TUNER MODE screen for selecting the
tuner mode appears.
ZOOM H4
Page 61

Move the jog dial up/down to bring
5.
the cursor to the name of the tuner
mode you want to select.
The tuner mode changes.
When the tuner mode change is
6.
complete, press the center of the
[MENU] key to close the TUNER
MODE screen.
For example, when you select “GUITAR” as
tuner mode, the display looks as follows.
Note corresponding
to string
STRING button
4-Track Mode
the center of the display.
The notes for each string in the various tuner
modes are listed in the table below.
7.
Play the indicated string as an open
string, and perform tuning.
8.
To switch to another string number,
proceed as follows.
(1) Move the jog dial up/down to bring the
cursor to the STRING button, and then
press the jog dial.
The STRING button changes to reverse
indication, and you can select a string
number.
(2) Move the jog dial up/down to select the
string number, and then press the jog dial.
9.
Tune the other strings in the same
way.
.
10
When tuning is complete, press the
center of the [MENU] key to return to
the 4-track mode top screen.
In tuner modes other than chromatic tuner, the
STRING button on the display can be used. This
button shows a string number in the format
STRING: x (where x is a number from 1 to 7).
The note corresponding to that string is shown in
Tuner type
String number/
Note name
GUITAR BASS OPEN A OPEN D OPEN E OPEN G DADGAD
1E G E D E D D
2B D C A BBA
3G A A F G G G
4D E E D E D D
5A B A A B G A
6E E D E D D
7B
ZOOM H4
HINT
You can change the reference pitch of the tuner
(default center A = 440 Hz) in the same way as for
the chromatic tuner.
61
Page 62

Effects
This section describes the operation of the effect section integrated in the H4.
input source.
About Effects
The H4 incorporates an effect section that can be
inserted immediately after the inputs to process
the signal before it is sent to recorder tracks for
recording.
Stereo mode
Input 1
Input 2
4-track mode
Input 1
Input 2
Effect
section
Input
mixer
The effect section of the H4 consists of several
single effects such as compressor, preamp, etc.
Each of these separate effects is called an “effect
module”.
Depending on the operation mode of the H4, the
effect module configuration is as follows.
Effect
section
Recorder
L stereo track
R stereo track
Recorder
Track 1
Track 2
Track 3
Track 4
• When two input sources are assigned in 4-track
mode, the signal is mixed down to mono in the
input mixer before being input to the effect
section.
Each effect module has an element that
determines the general style of the effect (effect
type) and elements that determines the intensity
and operation of the effect (effect parameters).
By selecting the effect type and adjusting the
effect parameters, you can control what the effect
does and achieve a wide range of sound
characteristics.
Operation and handling of effects differs in
stereo mode and 4-track mode. For details, see
the sections “Using effects in stereo mode”
(below) and “Using effects in 4-track mode” (
p. 64).
Using effects in stereo
mode
→
Stereo mode module configuration
(Stereo input → Stereo output)
MIC MODEL COMP/LIMIT
4-track mode module configuration
(Mono input → Stereo output)
PREAMP EFX
NOTE
• In stereo mode, the MIC MODEL module is only
used when the built-in stereo mic is selected as
62
This section explains how to use effects in stereo
mode.
In stereo mode, effects are used with stereo
input/stereo output. The stereo signal supplied
from the built-in stereo mic or the [INPUT 1]/
[INPUT 2] jacks can be processed by the effect
section.
Out of the two effect modules, the MIC MODEL
module can only be used when the built-in stereo
mic is selected as input source.
When the H4 is in the default condition, the
ZOOM H4
Page 63

Effects
modules in the effect section are set to OFF. To
enable the effects in stereo mode, proceed as
follows.
1.
At the stereo mode top screen, press
the bottom of the [MENU] key.
The INPUT menu for making various input
related settings appears.
To use the COMP/LIMIT module,
2.
bring the cursor to the “COMP/
LIMIT” item and press the jog dial.
The COMP/LIMIT module can now be used.
3.
Move the jog dial up/down to change
the COMP/LIMIT module setting.
The following settings are available.
HINT
The COMP/LIMIT module allows only selection of
the effect type.
4.
To accept the COMP/LIMIT module
setting, press the jog dial.
5.
If the built-in stereo mic is selected
as input source, bring the cursor to
the “MIC MODEL” item and press the
jog dial.
The MIC MODEL module can now be used.
Move the jog dial up/down to change
6.
the MIC MODEL module setting.
The MIC MODEL module simulates the
characteristics of various microphones. This
module allows only selection of the effect type.
The following microphone simulation settings
are available.
• OFF (default)
The MIC MODEL module is off.
• OFF (default)
The COMP/LIMIT module is off.
• COMP
The COMP/LIMIT module is enabled, and
the effect type is set to COMP (Compressor).
• LIMIT
The COMP/LIMIT module is enabled, and
the effect type is set to LIMIT (Limiter).
ZOOM H4
• SM57, MD421, U87, C414
The MIC MODEL module is enabled, and the
respective mic characteristics are selected.
To accept the MIC MODEL module
7.
setting, press the jog dial.
To return to the stereo mode top
8.
screen, repeatedly press the center
of the [MENU] key.
63
Page 64

Effects
HINT
• The effect settings made in stereo mode are
saved separately for the stereo mode. When
you switch to 4-track mode and then return to
stereo mode later, the previous settings will be
established again.
• For details about the types and parameters in
each effect module, see the reference section
at the end of this manual.
• After switching an effect on or off or changing
the effect settings, you should adjust the
recording level again.
• Manufacturer names and product names
mentioned in this documentation are
trademarks or registered trademarks of their
respective owners. The names are used only to
illustrate sonic characteristics and do not
indicate any affiliation with ZOOM
CORPORATION.
Using effects in 4-track
mode
This section explains how to use effects in 4track mode.
About effect input/output
In 4-track mode, effects are used with mono
input/stereo output. The signal flow differs,
depending on whether one or two input sources
are connected and on whether one or two tracks
are used as recording targets.
Mono track recording
Input 1
Input 1
Input 2
Stereo track recording
Input 1
Input 1
Input 2
Effect
section
Effect
section
Effect
section
Effect
section
Tra ck
Tra ck
Tra ck 1 or 3
Tra ck 2 or 4
Tra ck 1 or 3
Tra ck 2 or 4
Selecting a patch
In 4-track mode, effect types and effect
parameters are adjusted for each module and the
result can be stored as a patch. The H4 has a total
capacity for 60 patches, and 50 of these are
already preprogrammed at the factory. This
section describes how to select a stored patch.
NOTE
In the default condition, the effect section is set to
off in 4-track mode.
At the 4-track mode top screen,
1.
press the bottom of the [MENU] key.
The INPUT menu appears.
Bring the cursor to the “EFFECT”
2.
item and press the jog dial.
The EFFECT menu for selecting effect patches
appears. When a project is in the default
condition, the effect section is off. (In this
condition, the ON/OFF button at the bottom of
the display shows “ON” because it will turn the
effect section on when clicked.)
ON/OFF button
Verify that the cursor is on the ON/
3.
OFF button and press the jog dial.
64
ZOOM H4
Page 65

Effects
The effect section is activated. (The ON/OFF
button at the bottom of the display now shows
“OFF” because it will turn the effect section off
when clicked.) The currently selected patch
number and patch name are shown in the center
of the display.
Currently selected patch number/patch name
4.
Bring the cursor to the patch
number/patch name indication and
press the jog dial.
The patch selection can now be changed.
5.
Move the jog dial up/down to select
the patch, and then press the jog
dial.
The selected patch is changed.
HINT
If the indication “EMPTY” is shown as the patch
name, a blank patch is selected. This will have no
effect on the sound.
2.
Bring the cursor to the “EFFECT”
item and press the jog dial.
The EFFECT menu appears. If the effect section
is off (ON/OFF button shows ON), switch it to
on (ON/OFF button shows OFF).
Select the patch to edit.
3.
HINT
If the indication “EMPTY” is shown as the patch
name, a blank patch is selected. In this case, you
can create a patch from scratch.
NOTE
When the effect section is off, the EDIT button is
grayed out and cannot be used.
4.
Bring the cursor to the EDIT button
and press the jog dial.
The EFFECT EDIT screen appears. The “PRE
AMP” and “EFX” items stand for the PREAMP
and EFX modules.
6.
To return to the 4-track mode top
screen, repeatedly press the center
of the [MENU] key.
Editing a patch
At the 4-track mode top screen,
1.
press the bottom (INPUT MENU) of
the [MENU] key.
The INPUT menu appears.
ZOOM H4
HINT
This screen not only shows the module indication,
it also allows adjusting the patch level (overall
volume of the patch) (see step 10), changing the
patch name (
67).
p. 68), and saving the patch (→ p.
→
65
Page 66

Effects
5.
Bring the cursor to the item you want
to edit (“PRE AMP” or “EFX”) and
press the jog dial.
The effect module edit screen appears.
For example, if you have selected the “PRE
AMP” item, the following indication appears.
This screen allows effect module on/off selection
("ON/OFF"), effect type selection ("TYPE"), and
effect parameter control (other items).
6.
To change the effect type, proceed
as follows.
(1) Bring the cursor to the “TYPE” item and
press the jog dial.
The effect type can now be changed.
(2) Move the jog dial up/down to select the
effect type, and then press the jog dial.
The newly selected effect type becomes
active, and the effect parameter display
changes accordingly.
(1) Bring the cursor to the target item (other
than "ON/OFF" and "TYPE"), and then
press the jog dial.
The selected item can now be changed.
If the parameters cannot be fully displayed on
one screen, you can move the cursor to scroll
the display and show other parameters.
The illustration below is an example for the
display shown when you move the cursor to
the “ZNR” item of the PREAMP module.
(2) Move the jog dial up/down to adjust the
value and then press the jog dial.
Parameter selection becomes possible again.
To quit the editing screen for the
8.
currently selected effect module,
press the center of the [MENU] key
once.
The EFFECT EDIT screen appears.
When the content patch has been changed, the
mark appears on the EFFECT EDIT screen.
If you return the changes to the original setting,
the icon disappears.
HINT
•To disable the effect module, bring the cursor
to "ON/OFF" (effect module on/off) and select
"OFF".
• For details about the types and parameters in
each effect module, see the reference section
at the end of this manual.
To adjust the effect parameters,
7.
proceed as follows.
66
ED mark
9.
Repeat steps 5 – 8 as necessary to
edit the other module.
.
10
To adjust the patch level, proceed as
follows.
ZOOM H4
Page 67

Effects
(1) On the EFFECT EDIT screen, bring the
cursor to the “LEVEL” item and press the
jog dial.
The patch level can now be edited.
(2) Move the jog dial up/down to change the
setting value, and then press the jog dial.
The parameter selection screen appears again.
.
11
To close the EFFECT EDIT screen,
press the center of the [MENU] key.
If any setting was changed, a confirmation
message such as shown below appears.
.
13
To return to the 4-track mode top
screen, repeatedly press the center
of the [MENU] key.
Saving a patch
This section describes how to store the currently
selected patch in the same location (overwrite) or
in another location (copy).
At the 4-track mode top screen,
1.
press the bottom (INPUT MENU) of
the [MENU] key.
The INPUT menu appears.
Bring the cursor to the “EFFECT”
2.
item and press the jog dial.
The EFFECT menu appears. If required, select
the patch to be used as store source.
If the effect section is off, switch it to on. (The
screen below appears only when the effect
section is on.)
.
12
To save the changed settings, bring
the cursor to the STORE button, and
then press the jog dial.
The existing patch is overwritten and the
EFFECT menu appears again.
If you select the DON'T STORE button, the
settings are not stored and the EFFECT menu
appears again. If you select another patch in this
condition, the changes will be lost. You can also
select the CANCEL button to close the message
and cancel the store process. You can then
continue editing.
ZOOM H4
Bring the cursor to the EDIT button
3.
and press the jog dial.
The EFFECT EDIT screen appears.
67
Page 68

Effects
4.
Bring the cursor to the “STORE” item
and press the jog dial.
The EFFECT PATCH STORE screen appears.
Store target patch number
5.
Bring the cursor to the patch number
to be used as store target and press
the jog dial.
The patch number can now be selected.
6.
Move the jog dial up/down to select
the store target patch number, and
then press the jog dial.
7.
To execute the store process, bring
the cursor to the OK button and
press the jog dial.
When the store process is completed, the
indication “Complete!” appears on the display.
If you select the CANCEL button instead of the
OK button, the store process is canceled and the
EFFECT EDIT screen appears again.
Assigning a name to a patch
You can change the name of the currently
selected patch.
1.
At the 4-track mode top screen,
press the bottom (INPUT MENU) of
the [MENU] key.
The INPUT menu appears.
2.
Bring the cursor to the “EFFECT”
item and press the jog dial.
The EFFECT menu appears. If the effect section
is off, switch it to on.
3.
Bring the cursor to the EDIT button
and press the jog dial.
The EFFECT EDIT screen appears.
4.
Bring the cursor to the “RENAME”
item and press the jog dial.
The EFFECT PATCH RENAME screen where
you can change a patch name appears with the
first character underlined.
Current patch name
8.
To return to the 4-track mode top
screen, repeatedly press the center
of the [MENU] key.
HINT
• Patches are saved for each project individually.
•You can import a patch from another project
into the currently selected project (
→
p. 69).
68
Underline
Move the jog dial up/down to bring
5.
the underline to the character that
you want to change, and then press
the jog dial.
The character can now be changed.
Move the jog dial up/down to select
6.
the desired character, and then
press the jog dial to accept the
ZOOM H4
Page 69

Effects
character.
For information on available characters, see page
55. (Note that these are slightly different from
the characters available for the file name.)
7.
Repeat steps 5 and 6 as necessary to
change other characters.
8.
When the name is as desired, press
the center of the [MENU] key twice.
A confirmation message for saving the patch
appears.
NOTE
To retain the changed patch name, you must save
the patch (
without saving, the patch name change will be
lost.
p. 67). If you switch to another patch
→
the [MENU] key.
The INPUT menu appears.
2.
Bring the cursor to the “EFFECT”
item and press the jog dial.
The EFFECT menu appears. If the effect section
is off, switch it to on.
IMPORT button
3.
Bring the cursor to the IMPORT
button and press the jog dial.
The EFFECT PATCH IMPORT screen appears.
To return to the 4-track mode top
9.
screen, repeatedly press the center
of the [MENU] key.
Importing a patch
You can import a specific or all patches from
another project into the current project.
NOTE
When you execute the import process, existing
patches in the current project will be overwritten.
Take care not to accidentally erase patches that
you want to keep.
At the 4-track mode top screen,
1.
press the bottom (INPUT MENU) of
ZOOM H4
NOTE
When the effect section is off, the IMPORT button
is grayed out and cannot be used.
Move the jog dial up/down to select
4.
“ALL PATCHES” (import all patches)
or “EACH PATCH” (import individual
patch). Then press the jog dial.
A screen for selecting the import source project
appears.
69
Page 70

Effects
Project nameProject number
5.
Move the jog dial up/down to bring
the cursor to the project to be used
as import source, and then press the
jog dial.
●
If “ALL PATCHES” was selected in
step 4
The confirmation message “Are you sure?”
appears on the display. Check the message
and proceed to step 6.
patch to be used as import source, and
then press the jog dial.
(3) Bring the cursor to the OK button and
press the jog dial.
(4) Repeat steps (1) – (3) to select the import
target patch. Then bring the cursor to the
OK button and press the jog dial.
The confirmation message “Are you sure?”
appears.
IMPORT button CANCEL button
●
If “EACH PATCH” was selected in step
4
A display showing a patch of the selected
project appears. Proceed as follows to select
the patch to import.
(1) Bring the cursor to the patch number/
patch name and press the jog dial.
(2) Move the jog dial up/down to select the
70
6.
To carry out the import process,
bring the cursor to the IMPORT
button and press the jog dial. When
the import process is completed, the
indication “Complete!” appears on
the display.
If you select the CANCEL button instead of the
IMPORT button, the import process is canceled
and the display from one step previously appears
again.
To return to the 4-track mode top
7.
screen, repeatedly press the center
of the [MENU] key.
ZOOM H4
Page 71

Managing Recorded Files
This section explains how to perform various functions with recorded files saved on SD card.
About recorded files
The location where files are saved on the SD
card depends on the current operation mode of
the H4 and on the currently selected project.
When the H4 is in stereo mode, the files are
saved together in a dedicated folder for stereo
mode. In 4-track mode, a separate folder is
created for the current project, and the files are
saved in that folder (See below).
HINT
In 4-track mode, it is possible to import files from
another project or files recorded in stereo mode
into the current project. However, for files
recorded in stereo mode, this is possible only
when the recording format is 44.1 kHz/16 bit.
Basic file operations
Most operations regarding recorded files follow
a basic pattern. This is described below.
1.
Verify that the recorder is stopped
and press the center of the [MENU]
key at the 4-track mode top screen.
The main menu for making various settings
appears.
HINT
In 4-track mode, verify that the project whose files
you want to manage is selected.
Move the jog dial up/down to bring
2.
the cursor to “FILE” and press the
jog dial.
ZOOM H4
Save location for
files created in
stereo mode
SD card
Dedicated
stereo mode
folder
Project 1 folder
Project 2 folder
Project 3 folder
Save location for files
created as part of project
2 in 4-track mode
71
Page 72

Managing Recorded Files
The FILE menu for selecting various operations
for recorded files appears.
For example, when you call up the FILE menu in
4-track mode, the display looks as follows.
Move the jog dial up/down to select
3.
the operation. The following choices
are available.
●
RENAME
Change the name of a file.
●
DELETE
Delete a file.
●
COPY (4-track mode only)
Copy a file within the same project.
●
IMPORT (4-track mode only)
Import a file from another project or a file
recorded in stereo mode into the current
project.
●
SIZE
Display the file size in KB (kilobytes), or the
recording time.
Renaming a file
To change the name of a recorded file in the
current project folder (or in the stereo mode
folder), proceed as follows.
1.
Refer to steps 1 – 3 of “Basic file
operations” and bring the cursor to
“RENAME”. Then press the jog dial.
A list of files stored in the folder for the current
project or in the stereo mode folder appears.
Move the jog dial up/down to bring
2.
the cursor to the file that you want to
rename, and then press the jog dial.
The name of the selected file is shown.
Name of
selected file
NOTE
In stereo mode, the “COPY” and “IMPORT” items
are not shown.
Press the jog dial to execute the
4.
operation.
For details on operation steps, see the respective
sections below.
To return to the 4-track mode top
5.
screen, repeatedly press the center
of the [MENU] key.
72
OK button CANCEL button
3.
To change the file name, move the
jog dial up/down to bring the cursor
to the file name, and then press the
jog dial.
The cursor disappears and the first character is
underlined. In this condition, you can change the
file name.
When the underline appears, change the file
name as described on page 47.
For information on available characters, see page
ZOOM H4
Page 73

47. (Note that these are slightly different from
the characters available for the project name.)
4.
To accept the new name, move the
jog dial up/down to bring the cursor
to the OK button, and then press the
jog dial.
The display returns to the condition of step 1.
If you select the CANCEL button instead of the
OK button, the name change is canceled, and the
display returns to the condition of step 1.
NOTE
If a file with the same name already exists in the
current project folder (or in the stereo mode
folder), a message appears when you select the
OK button, and the name change cannot be
carried out. In this case, press the center of the
[MENU] key to close the message, and then
specify a different name.
To return the FILE menu, press the
5.
center of the [MENU] key.
Deleting a file
To delete a recorded file in the current project
folder (or in the stereo mode folder), proceed as
follows.
NOTE
Once deleted, a file cannot be restored. Use this
function with care.
1.
Refer to steps 1 – 3 of “Basic file
operations” and bring the cursor to
“DELETE”. Then press the jog dial.
A list of files stored in the folder for the current
project or in the stereo mode folder appears.
Managing Recorded Files
Move the jog dial up/down to bring
2.
the cursor to the file that you want to
delete, and then press the jog dial.
A confirmation message for the deletion appears.
DELETE button CANCEL button
To proceed with the deletion, move
3.
the jog dial up/down to bring the
cursor to the DELETE button, and
then press the jog dial.
The file is deleted, and the display returns to the
condition of step 1.
If you select the CANCEL button instead of the
OK button, the delete process is canceled, and
the display returns to the condition of step 1.
To return the FILE menu, press the
4.
center of the [MENU] key.
Copying a file
(4-track mode only)
To copy a recorded file in the current project
folder to another file in the same project, proceed
as follows.
ZOOM H4
Refer to steps 1 – 3 of “Basic file
1.
operations” and bring the cursor to
73
Page 74

Managing Recorded Files
“COPY”. Then press the jog dial.
A list of files stored in the folder for the current
project appears.
Move the jog dial up/down to bring
2.
the cursor to the file that you want to
copy, and then press the jog dial.
The name of the file after copying is shown.
File name
after copying
OK button CANCEL button
To change the file name, move the
3.
jog dial up/down to bring the cursor
to the file name, and then press the
jog dial.
The cursor disappears and the first character is
underlined. In this condition, you can change the
file name.
When the underline appears, change the file
name as described on page 47.
For information on available characters, see page
47. (Note that these are slightly different from
the characters available for the project name.)
If you select the CANCEL button instead of the
OK button, the copy process is canceled, and the
display returns to the condition of step 1.
NOTE
If a file with the same name already exists in the
current project folder a message appears when
you select the OK button, and the name change
cannot be carried out. In this case, press the
center of the [MENU] key to close the message,
and then specify a different name. If no name was
specified, a name using the default pattern
COPY-XXX (where XXX is a number between 000
– 999) will be automatically assigned.
To return the FILE menu, press the
5.
center of the [MENU] key.
Importing a file
(4-track mode only)
To import a recorded file from another project
folder or from the stereo mode folder into the
current project folder, proceed as follows.
Refer to steps 1 – 3 of “Basic file
1.
operations” and bring the cursor to
“IMPORT”. Then press the jog dial.
The FILE IMPORT screen for selecting the
folder where the file to be imported is stored
appears.
Project folders are shown with the project
number/project name. The stereo mode folder is
shown as “STEREO”.
To carry out the copy process, move
4.
the jog dial up/down to bring the
cursor to the OK button, and then
press the jog dial.
The display returns to the condition of step 1,
with the copied file added.
74
Folder where file to be imported is stored
ZOOM H4
Page 75

2.
Move the jog dial up/down to select
the folder, and then press the jog
dial.
A file stored in the selected folder is shown.
File in selected folder
HINT
When the stereo mode folder is selected, only files
with the recording format 44.1 kHz/16 bit are
shown.
3.
To import a file, move the jog dial up/
down to select the file, and then
press the jog dial.
The selected file is imported, and the display
returns to the condition of step 1.
If you press the center of the [MENU] key
instead of pressing the jog dial, the import
process is canceled and the display returns to the
condition of step 1.
Managing Recorded Files
RENAME button CANCEL button
To change the file name before importing,
proceed as follows.
(1) Move the jog dial up/down to bring
the cursor to the RENAME button
and then press the jog dial.
The name of the file to be imported appears.
Name of file
to be imported
HINT
If you select the CANCEL button at this display,
the name change is canceled and the display
returns to the condition of step 2.
NOTE
If there is no recorded file in the current project
folder (or the stereo mode folder) and you select
an item other than “IMPORT”, the message “No
File” appears and the process cannot be carried
out. Press the center of the [MENU] key to close
the message.
If a file with the same name as the file to be
imported already exists in the current project, a
message such as shown below appears.
ZOOM H4
(2) To change the file name, move the
jog dial up/down to the file name,
and then press the jog dial.
The cursor disappears and the first character
is underlined. In this condition, you can
change the file name.
When the underline appears, change the file
name as described on page 47.
For information on available characters, see
page 47. (Note that these are slightly
different from the characters available for
the project name.)
(3) When the file name is as intended,
move the jog dial up/down to select
the OK button, and then press the
jog dial.
75
Page 76

Managing Recorded Files
The file is imported, and the display returns
to the condition of step 1.
4.
To return the FILE menu, press the
center of the [MENU] key.
Checking the file size
To check the size of a recorded file in the current
project folder (or in the stereo mode folder),
proceed as follows.
1.
Refer to steps 1 – 3 of “Basic file
operations” and bring the cursor to
“SIZE”. Then press the jog dial.
A list of files stored in the folder for the current
project or in the stereo mode folder appears.
Move the jog dial up/down to bring
2.
the cursor to the file whose size you
want to check, and then press the
jog dial.
The name, size (in kilobytes), and recording time
(in hours, minutes, seconds, milliseconds) of the
file are shown.
3.
To return the FILE menu, press the
center of the [MENU] key twice.
76
ZOOM H4
Page 77

Miscellaneous Settings
This section explains various other settings and functions of the H4.
Metronome setting
The H4 incorporates a metronome function that
is convenient for use during practice or a
recording session. To set up the metronome,
proceed as follows.
At the stereo mode or 4-track mode
1.
top screen, press the center of the
[MENU] key.
The main menu for miscellaneous settings of the
H4 appears.
2.
Move the jog dial up/down to bring
the cursor to “METRONOME”, and
then press the jog dial.
The METRONOME setting screen appears.
only),
(no click sound).
• PRE COUNT
Determines whether pre-count beats are
played before recording. Available settings
are OFF (no pre-count), 1 – 8 (1 – 8 pre-count
beats), and SP (SPECIAL).
When SP (SPECIAL) is selected, the precount pattern is as follows.
• TEMPO
Determines the metronome tempo setting.
The setting range is 40.0 – 250.0 (BPM) in
0.1 steps.
• SOUND
Determines the sound character of the
metronome. Available settings are BELL
(normal metronome sound; combination of
bell and click), CLICK (click sound only),
STICK (stick-hitting sound), COW-B
(cowbell sound), and HI-Q (synthesizer click
sound).
• PATTERN
Determines the metronome beat pattern.
Available settings are 0/4 – 8/4 and 6/8 (0/4
results in unaccentuated sound).
• LEVEL
Determines the metronome volume level. The
setting range is 0 – 15.
/R (recording and playback), OFF
O
Setting items available from this screen are as
follows.
• CLICK
Determines the conditions under which the
metronome click sound is heard. Available
settings are
(playback only), O (recording
R
ZOOM H4
3.
Move the jog dial up/down to bring
the cursor to the item to set, and
then press the jog dial.
The setting for the selected item can now be
adjusted.
4.
Move the jog dial up/down to adjust
77
Page 78

Miscellaneous Settings
the setting, and then press the jog
dial.
5.
Repeat steps 3 and 4 as required to
complete the settings for the
metronome.
6.
To return to the top screen of the
currently selected mode, press the
center of the [MENU] key.
When you perform playback or recording, the
selected metronome function will be active.
HINT
If you locate a point within a recording, and then
start playback/recording from there, the first beat
of the metronome will start from that point.
Controlling the display
contrast/backlight
To adjust the contrast of the display and switch
the backlight on or off, proceed as follows.
1.
At the stereo mode or 4-track mode
top screen, press the center of the
[MENU] key.
The main menu for miscellaneous settings of the
H4 appears.
Setting items available from this screen are as
follows.
• CONTRAST
Adjusts the display contrast. The setting
range is 1 – 8.
• BACK LIGHT
Switches the backlight on and off. Available
settings are ON (always on), OFF (always
off), 15sec (display is switched off
automatically 15 seconds after key/dial
operation), and 30sec (display is switched off
automatically 30 seconds after key/dial
operation).
Move the jog dial up/down to bring
3.
the cursor to the item to set, and
then press the jog dial.
The setting for the selected item can now be
adjusted.
Move the jog dial up/down to adjust
4.
the setting, and then press the jog
dial.
Repeat steps 3 and 4 as required to
5.
complete the settings for the display.
Move the jog dial up/down to bring
2.
the cursor to “DISPLAY”, and then
press the jog dial.
The DISPLAY setting screen appears.
78
To return to the top screen of the
6.
currently selected mode, press the
center of the [MENU] key.
ZOOM H4
Page 79

Turning the phantom power
supply on/off
The [INPUT 1]/[INPUT 2] jacks of the H4 can
be set to provide a phantom power supply of +48
V or +24 V, if required by a condenser mic or a
direct box. To switch this feature on or off,
proceed as follows.
At the stereo mode or 4-track mode
1.
top screen, press the bottom (INPUT
MENU) of the [MENU] key.
The INPUT menu for making various input
related settings appears.
2.
Move the jog dial up/down to bring
the cursor to “PHANTOM”. Then
press the jog dial.
The phantom power supply can now be set.
Miscellaneous Settings
+48 V phantom power supply.
NOTE
Some external equipment may not operate with a
+24 V phantom power supply. However, because
it reduces current consumption compared to the
+48 V setting, the +24 V setting is recommended
if supported by the equipment.
4.
To accept the new setting, press the
jog dial.
5.
To return to the top screen of the
currently selected mode, press the
center of the [MENU] key.
If the phantom power supply has been enabled,
the +48V or +24V mark appears on the top
screen.
+48V mark
Move the jog dial up/down to select
3.
one of the following settings.
• OFF
The phantom power supply is turned off.
• 24V
The [INPUT 1]/[INPUT 2] jacks provide a
+24 V phantom power supply.
• 48V
The [INPUT 1]/[INPUT 2] jacks provide a
ZOOM H4
Controlling the key-hold
function
The H4 allows you to lock the operation keys to
prevent inadvertent operation during a recording.
This function is called “key-hold”. To enable or
disable the function, proceed as follows.
1.
Set the H4 to the playback or
recording condition.
Once key-hold has been enabled, most
keypresses will be disregarded. This allows you
to maintain the current operating condition of the
unit.
79
Page 80

Miscellaneous Settings
2.
Press and hold the center of the
[MENU] key until the indication “Key
Hold” appears on the display.
The key-hold function is enabled and all control
operations will be disregarded, except for the
[POWER] switch, [MIC GAIN] switch, [INPUT
1 GAIN] switch, [INPUT 2 GAIN] switch,
[PHONES LEVEL] and the center of the
[MENU] key.
When a disabled control is operated, the
indication shown below appears on the display
for 2 seconds.
To disable the key-hold function,
3.
press and hold the center of the
[MENU] key.
The display returns to the original condition.
Using the USB function
The operating environment requirements for use
of the H4 as an audio interface are as follows.
●
Compatible operating system
• Windows XP
• MacOS X (10.2 or later)
●
Bit rate
16-bit
●
Sampling rate
44.1 kHz/48 kHz, selectable
When the H4 has been recognized by the
computer as an audio interface, the input signal
of the H4 can be processed by the effect section
and then recorded as audio tracks using a DAW
(Digital Audio Workstation) software application
on the computer. The playback signal of the
DAW software application can be obtained at the
[LINE OUTPUT] jack and [PHONES] jacks of
the H4.
Regardless of the record/playback condition of
the DAW software application, the input signal
can always be monitored at the H4.
For information on recording and playback steps
of the DAW software application, refer to the
documentation of the software.
By connecting the [USB] port of the H4 to a
computer, the H4 can be used as an audio
interface with built-in effects. (Effects can only
be used when the sampling rate is 44.1 kHz.) It
is also possible to use the H4 as a card reader, to
access an SD card inserted in the H4 from the
computer.
Using the H4 as audio interface for
a computer
This section explains how to use the H4 as an
audio interface for a computer.
80
NOTE
• If the DAW software application has an echo
back function (input signal during recording is
supplied directly to an output), this must be
disabled when using the H4. If recording is
carried out with this function enabled, the
output signal will sound as if processed by a
flanger or delay effect.
•Effects can only be used when the sampling
rate is 44.1 kHz.
Connect the [USB] port of the H4 to
1.
the computer, using a USB cable.
Verify that the recorder is stopped.
2.
Then press the center of the [MENU]
ZOOM H4
Page 81

Miscellaneous Settings
key at the stereo mode or 4-track
mode top screen.
The main menu for miscellaneous settings of the
H4 appears.
Move the jog dial up/down to bring
3.
the cursor to “USB”, and then press
the jog dial.
The USB MODE SELECT screen appears.
HINT
If the H4 is connected to a computer while the
[POWER] switch of the H4 is off, power will be
automatically supplied via the USB connection
and the screen shown above will appear. In this
case, the H4 does not operate as a normal
recorder, and only the functions “AUDIO I/O” and
“CONNECT TO PC” are available.
4.
Move the jog dial up/down to bring
the cursor to “AUDIO I/O”, and then
press the jog dial.
The display changes as follows.
From this screen, you can cause the H4 to be
recognized by the computer (CONNECT), and
you can change the sampling rate (SAMPLE ).
5.
To change the sampling rate,
proceed as follows.
(1) Move the jog dial up/down to bring the
cursor to the “SAMPLE” item, and then
press the jog dial.
Move the jog dial up/down to select 44.1
(2)
kHz or 48 kHz, and then press the jog dial.
The selected sampling rate is now active.
NOTE
Note that the sampling rate cannot be changed
while the H4 is being recognized by the computer
as an audio interface.
6.
To have the H4 recognized as an
audio interface by the computer,
move the jog dial up/down to select
the “CONNECT” item, and then press
the jog dial.
The display changes as follows.
At this screen, you can make various settings for
the audio interface function of the H4. The
following items are available.
• INPUT
Selects the input source for the audio
interface. The selection method is the same as
when selecting the input source in 4-track
mode.
• LEVEL
Adjusts the input level for the computer. The
setting method is the same as when setting the
recording level in 4-track mode.
• EFFECT
Sets the effect section operation for the audio
ZOOM H4
81
Page 82

Miscellaneous Settings
interface. The setting method is the same as
when making effect section settings in 4-track
mode.
• TUNER
Sets the tuner operation for the audio
interface. The setting method is the same as
when making tuner settings in 4-track mode.
• PHANTOM
Sets the phantom power supply operation for
the audio interface. The setting method is the
same as when making the normal phantom
power supply settings.
HINT
• For input/output of audio signals via the H4,
various settings will also have to be made at
the DAW software application. For details, refer
to the documentation of the software.
•Effects can only be used when the sampling
rate is 44.1 kHz.
• Make sure that the sampling rate selected at
the H4 and the sampling rate selected at the
computer are matched. Otherwise correct
communication with the computer is not
possible.
NOTE
Settings made with the procedure described here
will be effective only when using the H4 as an
audio interface and will be saved separately. They
have no effect on the settings for stereo mode
and 4-track mode operation.
8.
To return to the stereo mode or
4-track mode top screen, repeatedly
press the center of the [MENU] key.
NOTE
If power to the H4 is being supplied via the USB
link, pressing the center of the [MENU] key will not
cancel the selected USB function. To return to the
normal top screen, disconnect the USB cable to
turn power off, and then start the H4 normally by
setting the [POWER] switch to ON.
Using the H4 as an SD card reader
The USB connection can also be used to access
an SD card inserted in the H4 from the computer.
This is convenient to transfer material recorded
with the H4 to the computer, for further editing
or mixing.
Connect the [USB] port of the H4 to
1.
the computer, using a USB cable.
Verify that the recorder is stopped.
2.
Then press the center of the [MENU]
key at the stereo mode or 4-track
mode top screen.
The main menu for miscellaneous settings of the
H4 appears.
7.
To terminate the connection, press
the center of the [MENU] key in step 6.
The indication “Terminate The Connection”
appears on the display. When you select the OK
button, the connection to the computer is
terminated, and the screen that was shown before
establishing the connection appears again.
If you select the CANCEL button, the message
disappears and the connection is maintained.
If power to the H4 is being supplied via the USB
link with the [POWER] switch set to off, this
operation has no effect.
82
Move the jog dial up/down to bring
3.
the cursor to “USB”, and then press
the jog dial.
The USB MODE SELECT screen appears.
ZOOM H4
Page 83

Miscellaneous Settings
HINT
If the H4 is connected to a computer while the
[POWER] switch of the H4 is off, power will be
automatically supplied via the USB connection
and the screen shown above will appear.
Move the jog dial up/down to bring
4.
the cursor to “CONNECT TO PC”,
and then press the jog dial.
The display changes as follows.
When the above display is shown, the H4 and the
computer are in the online condition, and the H4
is recognized as an external memory device,
allowing the computer to access the SD card.
You can now copy or delete files as needed.
5.
To terminate the connection, cancel
the online condition at the computer.
6.
To return to the stereo mode or
4-track mode top screen, press the
center of the [MENU] key.
in the condition as specified by the data saved
on the SD card.
SD card operations
This section explains various SD card operations.
Checking available space on the
SD card
To display the remaining capacity of the SD
card, proceed as follows.
1.
Verify that the recorder is stopped.
Then press the center of the [MENU]
key at the stereo mode or 4-track
mode top screen.
The main menu for miscellaneous settings of the
H4 appears.
2.
Move the jog dial up/down to bring
the cursor to “CARD”, and then press
the jog dial.
The CARD menu screen for various SD card
operations appears.
NOTE
• If you press the [MENU] key without terminating
the connection at the computer, the connection
will be forcibly terminated, and an error
indication will be shown at the computer. To
prevent corruption of files, be sure to terminate
the connection at the computer first.
• If the H4 is being powered via the [USB] port,
pressing the center of the [MENU] key
repeatedly will cause the display to return to the
screen that was shown when the H4 started up
with USB power.
• When you press the center of the [MENU] key
to terminate the connection to the computer
and return to the top screen, the unit will restart
ZOOM H4
3.
Move the jog dial up/down to bring
the cursor to “REMAIN”, and then
press the jog dial.
The remaining capacity of the SD card is shown
as a bar graph, in MB (megabytes), and as
remaining recording time (hours/minutes/
seconds) converted to one track.
83
Page 84

Miscellaneous Settings
HINT
• The above display is for information only. No
changes can be made at this display.
• The indication of remaining recording time is
only an approximation.
4.
To return to the stereo mode or
4-track mode top screen, repeatedly
press the center of the [MENU] key.
3.
Move the jog dial up/down to bring
the cursor to “FORMAT”, and then
press the jog dial.
The display changes as follows.
Initializing an SD card
To initialize (format) an SD card inserted in the
H4, proceed as follows. To use an SD card that
has previously been initialized in a computer or
digital camera or similar, be sure to format in the
H4 first.
NOTE
The initialization process will erase all information
stored on the SD card, and the information cannot
be retrieved. Perform this operation with care.
Verify that the recorder is stopped.
1.
Then press the center of the [MENU]
key at the stereo mode or 4-track
mode top screen.
The main menu for miscellaneous settings of the
H4 appears.
Move the jog dial up/down to bring
2.
the cursor to “CARD”, and then press
the jog dial.
The CARD menu screen for various SD card
operations appears.
FORMAT button
To carry out the initialization
4.
process, move the jog dial up/down
to bring the cursor to the FORMAT
button, and then press the jog dial.
The initialization process starts. When it is
complete, the stereo mode top screen appears
automatically.
If you select the CANCEL button instead of the
OK button, the initialization process is canceled,
and the display returns to the condition of step 2.
CANCEL button
About the software version
Using the SD card and a computer with an
Internet connection, you can update the system
software of the H4 to the latest version, by
performing the procedure described below.
Download the latest system software
1.
from the web site of ZOOM
Corporation.
84
ZOOM H4
Page 85

HINT
• The current system software version of the H4
is shown at startup on the display.
• The latest version is always available at the
ZOOM Corporation web site:
http://www.zoom.co.jp/
Copy the downloaded system
2.
software to the SD card via a USB
connection.
For details, see the section “Using the H4 as an
SD card reader” (
Insert the SD card into the H4. Then
3.
turn on power to the H4 while holding
down the bottom (INPUT MENU) of
the [MENU] key.
The H4 starts up with the following screen.
→
p. 82).
Miscellaneous Settings
CANCEL buttonOK button
To perform the version update
4.
process, press the jog dial.
When the version update process is completed,
the indication "Complete!" appears on the
display. Turn the unit off and on again to start
operation with the new version. You can check
the version using the display shown during
startup.
ZOOM H4
85
Page 86

●
Recorder
●
Effects (Insert)
Metronome
A/D conversion
Specifications
Tracks
Maximum number of simultaneous recording tracks
Maximum number of simultaneous playback tracks
Recording time
Projects
Locate function
Audio file editing functions
Other functions
Modules
Types
Patches
Tuner
Metronome sound sources
Variable beat
Tempo
24 bit
x128 oversampling
4
2
4
2GB Approx. 190 minutes (converted to WAV 44.1kHz/
16bit stereo track)
Approx. 34 hours (converted to MP3 44.1kHz/
128kbps stereo track)
* Recording times are approximations. Actual times
may differ according to recording conditions.
1000/card
Hours/Minutes/Seconds/Milliseconds
Name edit, Delete, Copy, Import, Size check
Punch-in/out, Bounce, A-B repeat
2
53
60
Chromatic, Guitar, Bass, Open A/D/E/G, DADGAD
5
1/4 - 8/4, 6/8, unaccentuated
40.0 - 250.0 BPM
D/A conversion
Recording media
Data type
Display
86
24 bit
x128 oversampling
SD card (16MB – 2GB)
Format
<Record/Play>
Format
<Recording>
<Playback>
128 x 64 dots
Full-dot LCD (with backlight)
WAV
Quantization 16 bit (Stereo, 4-track mode)/
Sampling frequency
MP3 (Stereo mode)
Bit rate 48,56,64,80,96,112,128,160,
Sampling frequency
Bit rate 32,40,48,56,64,80,96,112,128,
Sampling frequency
24bit (Stereo mode)
44.1 kHz (Stereo, 4-track mode),
48kHz, 96kHz (Stereo mode)
192,224,256,320 kbps,VBR
44.1 kHz
160,192,224,256,320 kbps,VBR
44.1 kHz, 48 kHz
ZOOM H4
Page 87

Specifications
Inputs
Phantom power supply
Master output
Headphone output
USB
Input
Built-in stereo mic
48V, 24V, OFF
Mini stereo phone jack
Output load impedance 10 kilohms or more
Rated output level -10 dBm
Mini stereo phone jack
50 mW (into 32-ohm load)
USB 2.0 Full Speed Mass Storage Class operation,
Audio Interface operation
USB functions can be operated by USB bus power
XLR (balanced input)/standard phone (unbalanced input)
combo jack
Input impedance
(using balanced input)
1 kilohm balanced, pin 2 hot
(using unbalanced input)
480 kilohms unbalanced
Input level
(INPUT1,2 switch)
(using balanced input)
(using unbalanced input)
Unidirectional condenser microphone
Gain (mic switch)
L -20 dBm (for mic)
M -30 dBm (for mic)
H -40 dBm (for mic)
L -10 dBm
(for guitar, bass, line input)
M -30 dBm (for mic)
H -40 dBm (for mic)
L +6 dB
M +20 dB
H +30 dB
Power requirements
Batteries
Continuous recording time
Continuous playback time
Dimensions
Weight
* 0 dB = 0.775 Vrms
* Design and specifications subject to change without notice.
9 V DC, 300mA from AC adapter (ZOOM AD-0006)
IEC R6 (size AA) x 2
4 hours
4.5 hours
70 (W) x 152.7 (D) x 35 (H) mm
190 g
ZOOM H4
87
Page 88

Troubleshooting
If there are problems during operation of the H4, check the following points first.
recording target track are lit in red.
Problems during recording/
playback
No sound, or sound is very weak
◆
• Check the connections to your monitor
system, and the volume setting of the
system.
• Check whether the volume level setting
of tracks 1 – 4 is appropriate.
Recorder stops during playback
◆
• When playback is carried out with a
track in recording standby condition, a
temporary file is created in the H4. If the
remaining capacity of the SD card is
low, the temporary file may use up all
the remaining space, causing playback
to stop. In such a case, cancel the
recording standby condition of the
track.
No sound from connected instrument,
◆
or sound is very weak
• Check input source settings (→ p. 31,
48).
• Check setting of [INPUT 1 GAIN],
[INPUT 2 GAIN], and [MIC GAIN]
→
switches (
• Check whether recording level setting
is appropriate (
• If [INPUT 1]/[INPUT 2] jacks are used,
try raising output level of connected
instrument.
• When the monitor function (
off, the input signal can only be
monitored if a track is set to recording
standby or if the recorder is in the
recording standby condition.
Cannot record on a track
◆
• Verify that [REC] key and key for
p. 32).
→
p. 31, 48).
→
p. 51) is
• If a project is protected, recording is
not possible. Use another project or
turn protection off (
• Verify that an SD card is inserted in the
slot.
• Check whether the key-hold function is
→
enabled (
• If the indication "Card Protected" is
shown on the display, the SD card is
write-protected. Slide the write-protect
switch to the non-protected position.
◆
Cannot perform bounce
• Verify that the level of tracks 1 – 4 is not
fully lowered.
• Verify that there is sufficient free space
on the SD card.
p. 79).
Other problems
Cannot use effects
◆
• Check whether effect section is on. The
effect section is off by default in stereo
mode and in 4-track mode.
Cannot use tuner
◆
• Check whether the jack to which the
instrument is connected is selected as
input source.
Unit is not recognized when connected
◆
to a computer via USB
• Check whether the operating system of
the computer meets the requirements
listed on page 80.
• To have the H4 recognized by the
computer, USB mode must first be
selected at the H4 (
→
p. 58).
→
p. 81).
88
ZOOM H4
Page 89

Effect Types and Parameters
Effect types and parameters in 4-track mode
PREAMP module
●
Guitar preamp effect types
FD CLEAN
VX CLEAN
HW CLEAN
UK BLUES
BG CRUNCH
MS #1959
PV DRIVE
RECT VNT
DZ DRIVE
TS+FD_CMB
SD+MS_STK
FZ+MS_STK
The above 12 effect types have the same parameters.
(1) CABINET
Adjusts the intensity of the speaker cabinet sound. Adjusts the preamp gain (distortion depth).
(3) BASS
Adjusts boost/cut in the low range. Adjusts boost/cut in the middle range.
(5) TREBLE
Adjusts boost/cut in the high range.
(7) ZNR (ZOOM Noise
Reduction)
Adjusts the sensitivity of the noise reduction circuit
developed by ZOOM.
Clean sound of Fender TwinReverb ('65)
Clean sound of Vox AC30
Clean sound of Hiwatt Custom 100
Crunch sound of Marshall 1962 Bluesbreaker
Crunch sound of Mesa Boogie MK
Crunch sound of Marshall 195.9
High-gain sound of Peavey 5150
High-gain sound using the red channel of Mesa Boogie Dual Rectifier
(Vintage mode)
High-gain sound of Diezel Herbert channel 3
Combination of Fender Combo amp and Ibanez TS-9
Combination of Marshall stack amp and Boss SD-1
Combination of FuzzFace and Marshall stack amp
0 –2
-12 – 12
-12 – 12
OFF, 1 – 16
(2) GAIN
(4) MIDDLE
(6) LEVEL
Adjusts the level of the signal after passing the
PREAMP module.
III
0 – 100
-12 – 12
1 – 100
ACO SIM
(1) TOP
Adjusts the characteristic string tone of the acoustic
guitar.
(3) BASS
Adjusts boost/cut in the low range. Adjusts boost/cut in the middle range.
(5) TREBLE
Adjusts boost/cut in the high range.
This effect makes an electric guitar sound like an acoustic guitar.
0 – 10
-12 – 12
-12 – 12
(2) BODY
Adjusts the characteristic body tone of the acoustic
guitar.
(4) MIDDLE
(6) LEVEL
Adjusts the level of the signal after passing the
PREAMP module.
0 – 10
-12 – 12
1 – 100
ZOOM H4
89
Page 90

Effect Types and Parameters
(7) ZNR (ZOOM Noise
Reduction)
Adjusts the sensitivity of the noise reduction circuit
developed by ZOOM.
Bass preamp effect types
●
SVT
BASSMAN
HARTKE
SuperBass
SANSAMP
TUBE PRE
The above 6 effect types have the same parameters.
(1) CABINET
Adjusts the intensity of the speaker cabinet sound. Adjusts the preamp gain (distortion depth).
(3) BASS
Adjusts boost/cut in the low range. Adjusts boost/cut in the middle range.
(5) TREBLE
Adjusts boost/cut in the high range.
(7) LEVEL
Adjusts the level of the signal after passing the
PREAMP module.
* Manufacturer names and product names mentioned in this table are trademarks or registered
trademarks of their respective owners. The names are used only to illustrate sonic characteristics and do
not indicate any affiliation with ZOOM CORPORATION.
OFF, 1 – 16
Simulation of Ampeg SVT sound.
Simulation of Fender Bassman 100 sound.
Simulation of Hartke HA3500 sound.
Simulation of Marshall Super Bass sound.
Simulation of Sansamp Bass Driver DI sound.
ZOOM original tube preamplifier sound.
0 –2
-12 – 12
-12 – 12
1 – 100
(2) GAIN
(4) MIDDLE
(6) BALANCE
Sets the mixing balance between the signal before
input and after passing the module. Higher values
result in a higher ratio of post-module signal.
(8) ZNR (ZOOM Noise
Reduction)
Adjusts the sensitivity of the noise reduction circuit
developed by ZOOM.
0 – 100
-12 – 12
0 – 100
OFF, 1 – 16
●
Mic preamp effect types
VO MICPRE
AG MICPRE
FLAT MPRE
The above 3 effect types have the same parameters.
(1) COMP
Adjusts the parameter which keeps the level within a
certain range by attenuating high-level signals and
boosting low-level signals.
(3) LOW CUT
Adjusts the frequency of a filter designed to attenuate
low-frequency noise that is easily picked up my a mic.
(5) MIDDLE
Adjusts boost/cut in the middle range. Adjusts boost/cut in the high range.
Preamp with characteristics optimized for vocals.
Preamp with characteristics optimized for recording an acoustic guitar.
Preamp with flat characteristics.
OFF, 1 – 10
OFF, 1 – 10
-12 – 12
(2) DE-ESSER
Adjusts the degree by which sibilants are attenuated.
(4) BASS
Adjusts boost/cut in the low range.
(6) TREBLE
OFF, 1 – 10
-12 – 12
-12 – 12
90
ZOOM H4
Page 91

Effect Types and Parameters
(7) LEVEL
Adjusts the level of the signal after passing the
PREAMP module.
1 – 100
(8) ZNR (ZOOM Noise
Reduction)
Adjusts the sensitivity of the noise reduction circuit
developed by ZOOM.
OFF, 1 – 16
EFX module
●
Compressor/limiter effect types
RACK COMP
(1) THRESHOLD
Adjusts the threshold level of the compressor. Adjusts the compression ratio of the compressor.
(3) ATTACK
Adjusts the attack speed of the compressor.
LIMITER
(1) THRESHOLD
Adjusts the threshold level of the limiter. Adjusts the compression ratio of the limiter.
(3) RELEASE
Adjusts the speed of the limiter release after the signal
falls below the threshold level.
●
Modulation effect types
AUTO WAH
(1) POSITION
Selects the insertion position of the EFX module:
"Before" the PREAMP module or "After" the
PREAMP module.
(3) RESONANCE
Adjusts the resonance characteristic of the effect.
This is a compressor which attenuates high-level signals and boosts lowlevel signals.
0 – 50
1 – 10
(2) RATIO
(4) LEVEL
Adjusts the level of the signal after passing the EFX
module.
1 – 10
2 –100
This is a limiter which attenuates high-level signals that exceed a certain
threshold.
0 – 50
1 – 10
(2) RATIO
(4) LEVEL
Adjusts the level of the signal after passing the EFX
module.
1 – 10
2 – 100
This is an auto wah effect that tracks the input signal intensity.
Before, After
0 – 10
(2) SENSE
Adjusts the effect sensitivity.
(4) LEVEL
Adjusts the level of the signal after passing the EFX
module.
-10 – -1, 1 – 10
2 – 100
PHASER
(1) POSITION
Selects the insertion position of the EFX module:
"Before" the PREAMP module or "After" the
PREAMP module.
(3) COLOR
Selects the sound type of the effect.
This effect produces sound with a pulsating character.
Before, After
4STAGE, 8STAGE,
INVERT 4, INVERT 8
ZOOM H4
(2) RATE
Adjusts the modulation rate.
(4) LEVEL
Adjusts the level of the signal after passing the EFX
module.
0 – 50,
(See Table on page 93)
2 – 100
91
Page 92

Effect Types and Parameters
TREMOLO
(1) DEPTH
Adjusts the modulation depth. Adjusts the modulation rate.
(3) WAVE
Allows selection of the modulation waveform.
Available settings are UP (rising sawtooth), DOWN
(falling sawtooth), and TRI (triangle). Higher setting
values result in more clipping of wave peaks, which
reinforces the effect.
RING MOD
(1) POSITION
Selects the insertion position of the EFX module:
"Before" the PREAMP module or "After" the
PREAMP module.
(3) BALANCE
Adjusts the balance between original sound and effect
sound.
SLOW ATK
(1) POSITION
Selects the insertion position of the EFX module:
"Before" the PREAMP module or "After" the
PREAMP module.
(3) CURVE
Adjusts the attack volume change curve.
This effect periodically varies the volume.
0 – 100
UP 0 – 9, DOWN 0 – 9,
TRI 0 – 9
(2) RATE
(4) LEVEL
Adjusts the level of the signal after passing the EFX
module.
This effect produces a metallic ringing sound. Adjusting the FREQUENCY
parameter results in a drastic change of sound character.
Before, After
0 – 100
(2) FREQUENCY
Adjusts the modulation frequency.
(4) LEVEL
Adjusts the level of the signal after passing the EFX
module.
This effect softens the attack rate of each note, resulting in a violin playing
style sound.
Before, After
0 – 10
(2) TIME
Adjusts the rise time.
(4) LEVEL
Adjusts the level of the signal after passing the EFX
module.
0 – 50,
(See Table on page 93)
2 – 100
1 – 50
2 – 100
1 – 50
2 – 100
CHORUS
ENSEMBLE
The above 2 effect types have the same parameters.
(1) DEPTH
Adjusts the modulation depth. Adjusts the modulation rate.
(3) TONE
Adjusts the tone.
FLANGER
(1) DEPTH
Adjusts the modulation depth. Adjusts the modulation rate.
This effect mixes a variable pitch-shifted component to the original signal,
resulting in full-bodied resonating sound.
This is a chorus ensemble with three-dimensional movement.
0 – 100
0 – 10
(2) RATE
(4) MIX
Adjusts the level of effect sound mixed to the original
sound.
This effect produces a resonating and strongly undulating sound.
0 – 100
(2) RATE
92
1 – 50
0– 100
0 – 50,
(See Table on page 93)
ZOOM H4
Page 93

Effect Types and Parameters
(3) RESONANCE
Adjusts the resonance characteristic of the effect.
STEP
(1) DEPTH
Adjusts the modulation depth. Adjusts the modulation rate.
(3) RESONANCE
Adjusts the resonance characteristic of the effect. Adjusts the effect sound envelope.
VIBE
(1) DEPTH
Adjusts the modulation depth. Adjusts the modulation rate.
(3) TONE
Adjusts the tone.
CRY
(1) RANGE
Adjusts the frequency range in which the effect
operates.
(3) SENSE
Adjusts the effect sensitivity.
PITCH
(1) SHIFT
Adjusts the pitch shift amount in semitones. Adjusts the tone.
(3) FINE
Fine-adjusts the pitch shift amount in cent (1/100
semitone units).
-10 – 10
Special effect that changes the sound in a staircase pattern.
0 – 100
0 – 10
This is an automatic vibrato effect.
0 – 100
0 – 10
This effect varies the sound like a talking modulator.
1 – 10
-10 – -1, 1 – 10
This effect shifts the pitch up or down.
-12 – 12, 24
-25 – 25
(4) MANUAL
Adjusts the frequency range in which the effect
operates.
(2) RATE
(4) SHAPE
(2) RATE
(4) BALANCE
Adjusts the balance between original sound and effect
sound.
(2) RESONANCE
Adjusts the resonance characteristic of the effect.
(4) BALANCE
Adjusts the balance between original sound and effect
sound.
(2) TONE
(4) BALANCE
Adjusts the balance between original sound and effect
sound.
0 – 100
0 – 50,
0 – 10
0 – 50,
0 –100
0 – 10
0 – 100
0 – 10
0 – 100
(See Table )
(See Table )
[Table]
Parameters with a < > symbol can be selected in note units, using the metronome tempo as reference. Note durations
according to selected settings are as follows.
Thirty-second note Quarter note
Sixteenth note Dotted quarter note
Quarter triplet note Quarter note x 2
Dotted sixteenth note Quarter note x 3
Eighth note
Half triplet note
Dotted eighth note Quarter note x 20
ZOOM H4
• • •
• • •
NOTE
• The actual note range that can be
selected depends on the parameter.
• Some tempo and note symbol
combinations may result in values that
exceed the parameter range. In such a
case, the value will automatically be
set to 1/2. If this would still exceed the
range, the value is set to 1/4.
93
Page 94

Effect Types and Parameters
Delay/reverb effect types
●
AIR
(1) SIZE
Adjusts the size of the simulated space. Adjusts the amount of wall reflections.
(3) TONE
Adjusts the tone.
This effect lends spatial depth to the sound by reproducing the ambient
atmosphere of a room.
1 – 100
0 – 10
(2) REFLEX
(4) MIX
Adjusts the level of effect sound mixed to the original
sound.
0 – 10
0 – 100
DELAY
ECHO
ANALOG
The above 3 effect types have the same parameters.
(1) TIME
Adjusts the delay time. Adjusts the feedback amount.
(3) HIDAMP
Adjusts the delay sound damping characteristics in the
high frequency range.
RVS DELAY
(1) TIME
Adjusts the delay time. Adjusts the feedback amount.
(3)HIDAMP
Adjusts the delay sound damping characteristics in the
high frequency range.
HALL
ROOM
SPRING
ARENA
T ROOM
M SPRING
The above 6 effect types have the same parameters.
(1) DECAY
Adjusts the reverb duration.
(3)TONE
Adjusts the tone.
This a long delay of up to 5000 milliseconds.
This simulates a tape echo with a long delay time of up to 5000
milliseconds.
This simulates a warm-sounding analog delay with a long delay time of up
to 5000 milliseconds.
1 – 5000ms,
(See Table on page 93)
0 – 10
(2) FEEDBACK
(4) MIX
Adjusts the level of effect sound mixed to the original
sound.
This is a reverse delay with a long delay time of up to 2500 milliseconds.
10 – 2500ms,
(See Table on page 93)
0 – 10
(2) FEEDBACK
(4) BALANCE
Adjusts the balance between original sound and effect
sound.
This reverb effect simulates the acoustics of a concert hall.
This reverb effect simulates the acoustics of a room.
This effect simulates a spring reverb.
This effect simulates a large venue such as an arena.
This effect simulates the acoustics of a tiled room.
This effect simulates a bright and clear sounding spring reverb.
1 – 30
0 – 10
(2) PRE DELAY
Adjusts the delay between the original sound and the
start of the reverb sound.
(4) MIX
Adjusts the level of effect sound mixed to the original
sound.
0 – 100
0 – 100
0 – 100
0 –100
1 – 100
0 – 100
94
ZOOM H4
Page 95

Effect Types and Parameters
Effect types in stereo mode
In stereo mode, only the effect type can be selected. There are no parameters.
MIC MODEL module
SM57
MD421
U87
C414
Simulates the Shure SM57 dynamic microphone.
Simulates the Sennheiser MD421 dynamic microphone.
Simulates the Neumann U87 condenser microphone.
Simulates the AKG C414 condenser microphone.
COMP/LIMIT module
COMP
LIMIT
* Manufacturer names and product names mentioned in this table are trademarks or registered
trademarks of their respective owners. The names are used only to illustrate sonic characteristics and do
not indicate any affiliation with ZOOM CORPORATION.
This is a compressor which attenuates high-level signals and boosts lowlevel signals.
This is a limiter which attenuates high-level signals that exceed a certain
threshold.
ZOOM H4
95
Page 96

H4 Patch List
Effect patches in this page" Patch List" can be used in 4track mode and audio interface function. (with sampling
rate in 44.1kHz )
Category No. Patch Name Description
Guitar
Bass
00 Fender Clean
01 Natural Cho
02 FunkyCutting
03 Clean Lead
04 Vox Clean
05 Light AcoSim
06 Clean Comp
07 CuttingPhase
08 Smooth Trem
09 Deep Vibe
10 Octave Down
11 MS Crunch
12 Full Crunch
13 Air Crunch
14 Blues Tone
15 Crossover
16 Peavey Lead
17 Diezel Riff
18 Rectify Lead
19 Melody Line
20 Classic MS
21 Fuzz Box
22 Air Lead
23 Jet Flanger
24 Wah Lead
25 Hartke
Basic clean sound optimized for recording.
Versatile clean chorus sound for applications ranging
from arpeggio to melody playing.
Great sound for seventies style funky cutting.
Sound suitable for solo play, characterized by clean
delay with a tempo setting of about 120 BPM.
Mersey beat sound as exemplified by the Beatles
using the Vox AC30TBX.
Acoustic guitar simulation ideal for stroke playing.
Natural compressor sound that differs from a
conventional stomp box compressor.
Phaser with a wide range of applications for various
cutting styles.
Tremolo sound that smoothly enhances everything
from full notes to delicate arpeggios.
Vibrato sound provides body to sound effects and
band sound.
Distorted unison sound adds a one octave lower
component.
Marshall Bluesbreaker crunch sound that closely
tracks your picking.
Simulation of the versatile Mesa Boogie Mk III for
backing or lead.
Crunch sound with a light and airy feel.
Solid backbone for lead parts in Blues and Rock'n Roll.
Overdrive tone with just the right chorus for Fusion
and Crossover.
High gain sound of Peavey 5150 fits power chords,
speedy riffs, or technical solos.
Heavy riff sound using a Diezel Herbert simulation.
Simulation of the Mesa Boogie Rectifier high-gain sound.
Delay sound for playing everything from melody to
improvised solos.
Sound modeled on the Marshall 1959 SuperLead
100.
Distinct fuzz tone using a combination of Fuzz Face
+ Marshall sound.
Mesa Boogie Mk III drive sound combines airiness
with a gutsy touch.
Well-known jet sound makes chords more
expressive.
Heavy wah sound combining distortion and auto
wah, suitable for lead play.
Tight sound modeled on the Hartke HA3500.
PREAMP
module
FD CLEAN OFF
OFF ENSEMBLE
FD CLEAN AUTO WAH
HW CLEAN DELAY
VX CLEAN LIMITER
ACO SIM HALL
FD CLEAN RACK COMP
OFF PHASER
FD CLEAN TREMOLO
OFF VIBE
TS+FD_CMB PITCH
UK BLUES RACK COMP
BG CRUNCH RACK COMP
UK BLUES AIR
TS+FD_CMB ROOM
BG CRUNCH ENSEMBLE
PV DRIVE OFF
DZ DRIVE OFF
RECT VNT RACK COMP
PV DRIVE DELAY
MS #1959 ROOM
FZ+MS_STK SPRING
BG CRUNCH AIR
SD+MS_STK FLANGER
SD+MS_STK AUTO WAH
HARTKE OFF
EFX
module
96
ZOOM H4
Page 97

H4 Patch List
26 Bassman
27 SVT
28 SuperBass
29 SANSAMP
Bass
30 Studio Pre
31 Pick Bass
32 Chorus Bass
33 Slap Comp
34 Flange Bass
35 StandardComp
36 Studio Comp
37 Chorus Vocal
38 Flange Vocal
39 Light Vocal
40 Spring
41 Arena
42 Doubling
43 Lead Vocal
Mic
44 Analog Echo
45 Reverse Trip
46 AG Reverb
47 AG Arpeggio
48 AG Ensemble
49 AG Lead
50-59 EMPTY
Standard bass sound inspired by the Fender Bassman
100.
Rock bass sound modeled on the Ampeg SVT.
Drive sound modeled on the Marshall 1992
SuperBass.
Simulates the sound of the Sansamp Bass Driver DI.
Straightforward tube preamp sound is highly
versatile.
Hartke HA3500 sound optimized for picking.
Sound with chorus blend, suitable for melody
playing.
Compressor sound that allows free selection of
styles, such as slap (chopper), picking and finger
playing.
Flanging bass sound such as used in Fusion music.
Standard compressor optimized for recording.
Compressor sound suitable for vocal recording.
Deep chorus sound for solo vocals.
Flanger sound for soothing pop music vocals.
Effect sound for bright and articulate vocals.
Effect sound with effective use of spring reverb.
Deep reverb sound as if singing in an arena.
Conventional doubling effect.
Delay effect suitable for main vocal parts.
Vocal echo sound using an analog delay effect.
Trippy sound using a reverse delay.
Preamp + reverb combination optimized for mic
recording of acoustic guitar.
Preamp + chorus combination optimized for mic
recording of acoustic guitar (arpeggio play).
Preamp + ensemble combination optimized for mic
recording of acoustic guitar (arpeggio play).
Preamp + delay combination optimized for mic
recording of acoustic guitar (lead play).
BASSMAN OFF
SVT OFF
SuperBass OFF
SANSAMP OFF
TUBE PRE OFF
HARTKE OFF
BASSMAN ENSEMBLE
SVT RACK COMP
TUBE PRE FLANGER
FLAT MPRE RACK COMP
VO MICPRE RACK COMP
VO MICPRE CHORUS
VO MICPRE FLANGER
FLAT MPRE ROOM
VO MICPRE SPRING
VO MICPRE ARENA
VO MICPRE DELAY
VO MICPRE DELAY
VO MICPRE ANALOG
VO MICPRE RVS DELAY
AG MICPRE ARENA
AG MICPRE CHORUS
AG MICPRE ENSEMBLE
AG MICPRE DELAY
* Manufacturer names and product names mentioned in this patch list are trademarks or registered trademarks of their
respective owners and do not indicate any affiliation with ZOOM CORPORATION. All product and artist names are intended
only to illustrate sonic characteristics that were used as reference in the development of this product.
* Concerning effects which can be used in stereo mode, please refer to P.95.
Contents of SD Card
PROJxxx folder
●
PRJDATA.ZIF
STEREO folder
●
Contains audio files created in stereo mode.
SYS folder
●
MACPRM.ZIF
NOTE
• Multi-byte character file names and folder
names will not be displayed correctly by the
H4. These will be shown as "H4_XXX...(.mp3 or
.wav)". File names and folder names containing
Unicode characters also cannot be handled by
the H4.
• If a file name is changed using a generic SD
card reader/writer, it may no longer be
recognized correctly by the H4.
ZOOM H4
97
Page 98

INDEX
4-track mode.................................................... 6, 39
Add more tracks ...........................................26
Basic operation ............................................. 19
Bounce.................................................... 28, 45
Effect types and parameters.......................... 89
Effects........................................................... 64
File selection................................................. 42
Input source selection............................. 21, 48
[MENU] key operation................................. 25
Mix ..............................................................51
Mixer ............................................................47
Mixing ..........................................................27
Mode selection........................................ 19, 39
Project........................................................... 54
Punch-in/out .................................................43
Recording level adjustment .......................... 48
Recording preparations ................................ 19
Recording the first track ............................... 21
Recording track selection .......................21, 50
Stereo link..................................................... 53
[A]
A-B repeat............................................................38
Always New recording mode ..............................40
Recording procedure ....................................41
Audio interface, use as.........................................80
Auto gain function............................................... 33
Auto punch-in/out (4-track mode).......................44
[D]
Display................................................................. 78
[E]
Effect types and parameters (4-track mode)........ 89
Effects........................................................7, 16, 62
4-track mode................................................. 64
Assigning a name to a patch......................... 68
Editing a patch.............................................. 65
Importing a patch.......................................... 69
Input/output ..................................................64
Saving a patch............................................... 67
Selecting a patch..................................... 24, 64
Stereo mode.................................................. 62
EFX module......................................................... 91
[F]
File selection
4-track mode................................................. 42
Stereo mode.................................................. 36
File
Checking capacity ........................................76
Copying a file (4-track mode) ......................73
Deleting a file ...............................................73
Importing a file............................................. 74
Renaming a file............................................. 72
[B]
Battery-powered operation ..................................11
Bit rate .................................................................34
Bounce (4-track mode) .................................. 28, 45
[C]
Chromatic tuner ................................................... 59
COMP/LIMIT module................................... 63, 95
Connections ......................................................... 10
98
[I]
[INPUT 1 GAIN]/[INPUT 2 GAIN]
switches .........................................................23, 32
Input sensitivity ...................................................14
[INPUT 1 GAIN]/[INPUT 2 GAIN]
switches ..................................................23, 32
[MIC GAIN] switch ...............................13, 32
Input source selection (4-track mode) .................48
Input/output
Effects........................................................... 64
Setup .................................................................... 12
ZOOM H4
Page 99

INDEX
[K]
Key-hold function................................................79
[M]
Manual punch-in/out (4-track mode)...................43
[MENU] key operations
4-track mode ................................................25
Stereo mode ..................................................15
Metronome.....................................................20, 77
[MIC GAIN] switch.............................................13
MIC MODEL module....................................63, 95
Mixer (4-track mode).......................................7, 47
Mixing (4-track mode).........................................27
Mode switching
4-track mode .................................................39
Stereo mode ..................................................30
Monitor function..................................................36
MP3......................................................................34
[O]
Add more tracks (4-track mode)..........................26
Off-mic recording ................................................12
On-mic recording.................................................12
Overwrite recording mode ...................................40
Recording procedure.....................................41
[R]
Recorded files ......................................................71
Recording (stereo mode)..........................17, 31, 35
Recording format selection (stereo mode)...........34
Recording level ....................................................14
Recording mode (4-track mode) ..........................40
Recording steps (stereo mode).............................12
Recording track selection (4-track mode)............50
[S]
Sampling rate .......................................................34
SD card.................................................................10
Checking available space on the SD card.....83
Contents ........................................................97
Initializing.....................................................84
Software version upgrading .................................84
Stereo link (4-track mode) ...................................53
Stereo mode .....................................................6, 30
Basic operation .............................................14
Effect types ..................................................95
Effects ...........................................................62
File selection.................................................36
[MENU] key operation .................................15
Mode selection..............................................30
Playback..................................................18, 36
Recording..........................................17, 31, 35
Recording format selection...........................34
[P]
Panning ................................................................51
Parameters............................................................89
Phantom power supply.........................................79
Playback (stereo mode)..................................18, 36
PREAMP module ................................................89
Projects.................................................................54
Basic operation .............................................54
Changing a project name ..............................56
Copying a project..........................................57
Creating a new project ............................20, 55
Deleting a project..........................................57
Protecting a project .......................................58
Selecting a project.........................................55
Punch-in/out (4-track mode)................................43
ZOOM H4
[T]
Tuner....................................................................59
Tuner types...........................................................60
[U]
USB
Use as audio interface...................................80
Use as SD card reader...................................82
[W]
WAV....................................................................34
Write-protect........................................................58
99
Page 100

The FCC regulation warning (for U.S.A.)
This equipment has been tested and found to comply with the limits for a Class B digital device, pursuant to
Part 15 of the FCC Rules. These limits are designed to provide reasonable protection against harmful
interference in a residential installation. This equipment generates, uses, and can radiate radio frequency
energy and, if not installed and used in accordance with the instructions, may cause harmful interference to
radio communications. However, there is no guarantee that interference will not occur in a particular
installation. If this equipment does cause harmful interference to radio or television reception, which can be
determined by turning the equipment off and on, the user is encouraged to try to correct the interference by
one or more of the following measures:
• Reorient or relocate the receiving antenna.
• Increase the separation between the equipment and receiver.
• Connect the equipment into an outlet on a circuit different from that to which the receiver
is connected.
• Consult the dealer or an experienced radio/TV technician for help.
ZOOM CORPORATION
ITOHPIA Iwamotocho 2chome Bldg. 2F, 2-11-2, Iwamoto-cho,
Chiyoda-ku, Tokyo 101-0032, Japan
Web Site: http://www.zoom.co.jp
H4 - 5000-2
 Loading...