

Page 1
Operation manual
©ZOOM Corporation
Reproduction or duplication of this manual without
permission, in whole or in part, is prohibited.
Page 2
Usage and safety precautions
02
Usage and safety precautions
03
H2n
Handy Recorder
Warning
Caution
Usage and safety precautions
SAFETY PRECAUTIONS
In this man ual , symbols are us ed to highligh t
war nin gs an d cauti on s that you mu st read to
prevent accidents. The meanings of these symbols
are as follows:
Som eth ing th at coul d cause ser ious
injury or death.
Something that could cause inju ry or
damage to the equipment.
Other symbols
Required (mandatory) actions
Prohibited actions
Warning
Operation using an AC adapter
Use only a ZOOM AD-17 (sold separately) AC
adapter with this unit.
Do not use do anything that could exceed the
ratings o f outlets a nd other electrical wiring
equi pmen t. Before using the equipme nt in
a foreign country or oth er region w here the
electr ical voltage differs fr om that i ndicat ed
on the AC adapter, always consult with a shop
that carries ZOOM produ cts beforehand and
use the appropriate AC adapter.
Operation using batteries
Use 2 conv en ti onal 1.5- vo lt AA batt er ie s
(alkaline or nickel-metal hydride).
Read battery warning labels carefully.
Always close the battery compartment cover
when using the unit.
Alterations
Never open the case or attempt to modify the
product.
Precautions
Product handling
Do not drop, bump or apply excessive force to
the unit.
Be car eful not to allow fore ign objec ts or
liquids to enter the unit.
Operating environment
Do not use in extremely high or low tempera-
tures.
Do n ot use near heaters, stoves and oth er
heat sources.
Do no t use in very hi gh hu mid it y or near
splashing water.
Do not use in places with excessive vibrations.
Do not use in places wi th excessive dust or
sand.
AC adapter handling
When disconnecting the AC adapter from an
outl et, always pull the body of the adap ter
itself.
During lightning stor ms or w hen not using
the unit for a long time, disconnect the power
plug from the AC outlet.
Battery handling
Insta ll the ba tte ri es wit h the corr ec t +/-
orientation.
Use a specifi ed battery type. Do not mix new
and old batteries or different brands or types
at the same time. Wh en not u sing the unit
for an extended period of time, r emove the
batteries from the unit.
If a battery leak should occur, wipe the battery
compartment and the battery terminals
carefully to remove all battery residue.
Connecting cables with input and output
jacks
Always turn the power OFF for all equipment
before connecting any cables.
Always disconnect all connection cables and
the AC adapter before moving the unit.
Volume
Do not use the product at a loud volume for a
long time.
Usage Precautions
Interference with other electrical equipment
In consideration of safety, the
been designed to minimize the emission of
electromagnetic radiation from the device and to
minimize external electromagne tic interference.
However, equipment that is very susceptible to
interference or that emits powerful electromagnetic
waves could result in interference if placed nearby.
If this occurs, place the
has
and the other
device farther apart. With any type of electronic
device that uses digital control, including the
, electromagnetic interference could cause
malfunction, corrupt or destroy data and result in
other unexpected trouble. Always use caution.
Cleaning
Use a soft cloth to clean the panels of the unit if
they become dirty. If necessary, use a damp cloth
that has been wrung out well. Never use abrasive
cle ans er s, wax or so lve nts , inclu di ng alco hol ,
benzene and paint thinner.
Malfunction
If th e uni t beco me s bro ken or malf un ct io ns ,
immediately disconnect the AC adapter, turn the
power OFF and disconnect other cables. Contact
the store where you bo ught the unit or ZOOM
ser vice w ith the follo wing informa tion: prod uct
mod el , serial numb er an d speci fi c symp tom s
of failure or malfun ction, along with your name,
address and telephone number.
Copyrights
•Windows, Windows Vista, Windows XP and
Windows 7 are trademarks or registered trademarks
of Microsoft Corporation. •Macintosh and Mac OS
are trademarks or registered trademarks of Apple
Inc. •The SD and SDHC logos are trademarks.
•The use of MPEG Layer-3 audio compression
technology is licensed from Fraunhofer IIS and
Sisvel SpA.
* All other product names, trademarks and company names
in this docu ment are t he p ropert y of t heir respec tive
owners.
Page 3
Introduction
04
Introduction
05
H2n
Handy Recorder
Introduction
Thank you very much for purchasing a ZOOM Handy Recorder.
The features of the
include the following.
• Four-channel recording captures sound in 360°
The built in microphones are divided into mid-side (MS) mics on the rear side
and XY mics on the front side. This independent placement allows you to record
sound coming from every direction. This unrestricted range means you can
record diverse sound sources in all kinds of conditions.
• New microphone array allows control of stereo width
The MS m ic includ es a dire ctional m id mic that covers the f ront and a
bidirectional side mic that covers both sides. By controlling the amount of side
mic signal, you can freely adjust the stereo width of recordings.
• Stereo recording is clear and three-dimensional
Using the XY mic, you can realize three-dimensional stereo recordings that
faithfully capture a sense of depth.
• Uninterrupted long recordings possible at high-quality
Recording is possible without interruption for very long times. You can even fi ll
an entire 32GB SDHC card in one session!
• Runs for a long time on standard batteries
You can record for up to 20 hours (44.1kHz/16bit WAV format) with one set of
alkaline batteries. So, even in situations where you must rely on batteries, you
can keep recording without worrying about the time.
• Use as an SD card reader and computer audio interface
The built-in USB 2.0 high-speed port allows direct connection with a computer.
Use the recorder as an SD card reader with a computer to transfer recordings to
your computer for use in DAW software or to burn them to CDs. You can even
use the recorder as a computer audio interface at USB 1.0 speed.
• Tuner, metronome and other practice features
In addition to standard chromatic tuning, the tuner also supports seven-string
guitar, five-string bass and alternate tunings. The convenient metronome can
even provide a count in and the speed and pitch of playback can be adjusted,
making it a useful practice companion.
Please read this manual carefully to fully understand the
you can maximize your use of its features. After reading the manual once,
please keep it with the warranty in a safe place.
so that
Page 4
Contents
06
Package contents
07
H2n
Handy Recorder
Contents
Operation manual
©ZOOM Corporation
Reproduction or duplication of this manual without
permission, in whole or in part, is prohibited.
Usage and safety precautions ......................... 02
Introduction ..................................................... 04
Contents ......................................................... 06
Package contents ............................................ 07
Part names ...................................................... 08
Display ............................................................ 10
Preparation
Powering the recorder.....................................12
Using batteries ............................................12
Using an AC adapter (sold separately) ......... 12
Installing an SD card ....................................... 13
Turning the power ON and OFF ...................... 14
Turning the power ON ................................. 14
Turning the power OFF ................................ 14
Using the hold function ...............................15
Connecting an external mic ............................ 16
Using plug-in power..................................... 16
Setting the date and time ................................ 17
Setting the battery type ..................................18
Recording
Recording mode overview .............................. 20
Mid-side (MS) stereo mode ......................... 20
XY stereo mode ........................................... 20
2ch and 4ch surround modes ...................... 21
Selecting the recording mode ......................... 22
Adjusting the S level (MS stereo,
2ch/4ch surround modes) ............................ 22
Using MS-RAW mode (WAV format only) ... 23
Selecting where recordings are saved ............ 23
Recording manually ......................................... 24
Recording automatically .................................. 26
Pre-recording ................................................... 28
Counting in before recording .......................... 29
Playback
Playing back recordings ................................... 30
Selecting the fi le to playback from a list ......... 32
Changing the playback speed .........................33
Loop playback of a set interval (AB REPEAT) .. 34
Changing the play mode .................................36
Adjusting the playback pitch
(KEY CONTROL) ............................................. 38
Changing the S level (MS-RAW only) .............. 39
Mixing a 4ch surround fi le ............................... 40
Checking & Editing Files
Checking fi le information ................................ 42
Checking track marks (WAV fi les only) ............ 43
Changing fi le names (Stereo fi les only) ........... 44
Convert WAV fi les into MP3 fi les
(Stereo fi les only) ............................................ 46
Normalizing WAV fi les ..................................... 48
Dividing fi les (Stereo fi les only) ....................... 50
Deleting fi les ................................................... 52
Deleting all fi les in a folder .............................. 53
Converting MS-RAW fi les into stereo fi les ..... 54
Converting 4ch surround fi les into
stereo fi les ...................................................... 56
Using USB
Exchanging fi les with a computer
(Card reader) ................................................... 58
Audio interface use (MS/XY stereo and
2ch surround modes only) ............................... 60
Tuner
Using the tuner ...............................................62
Metronome
Using the metronome ..................................... 64
Various settings
Reducing noise (LO CUT) ................................ 66
Monitoring the input signal .............................67
Compressing/limiting the input signal ............. 68
Automatically adjusting the input gain ............70
Monitoring MS-RAW signals
(MS stereo mode only) ................................... 71
Setting the recording format ........................... 72
Changing automatic recording settings ........... 74
Setting how fi les are named
(Stereo fi les only) ............................................ 76
Pausing recording when adding marks
(WAV format only) .......................................... 77
Changing the display backlight time ................ 78
Adjusting the display contrast ......................... 79
Checking the software versions ...................... 80
Restoring the unit to its factory settings ......... 81
Checking the open capacity of the SD card .... 82
Formatting an SD card.....................................83
Other functions
Updating the system software ........................ 84
Using SD cards from older H series
recorders ......................................................... 85
Using a remote control .................................. 86
Troubleshooting ............................................... 87
Specifi cations .................................................. 88
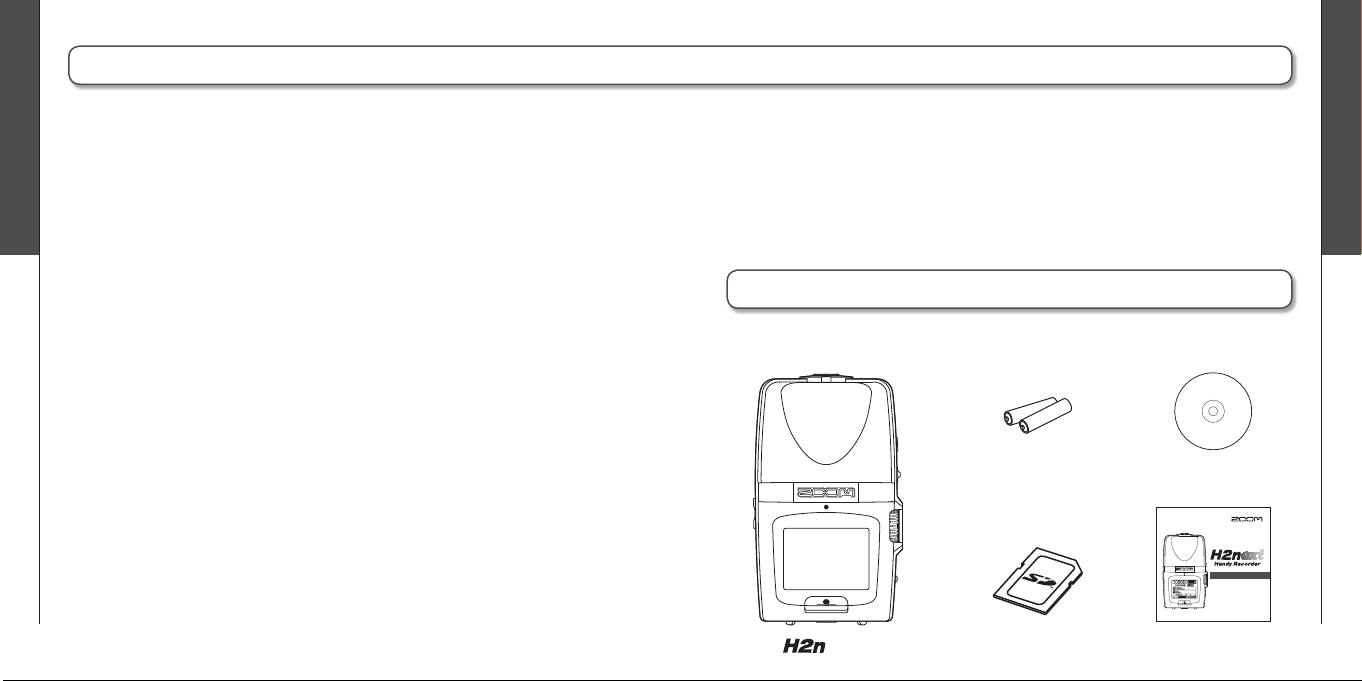
Package contents
Please confi rm that the package contains the following items.
2 AA batteries
(for testing the unit)
recorder
SD card
(2GB)
Wave Lab LE
Installer CD
Operation manual
(this document)
Page 5
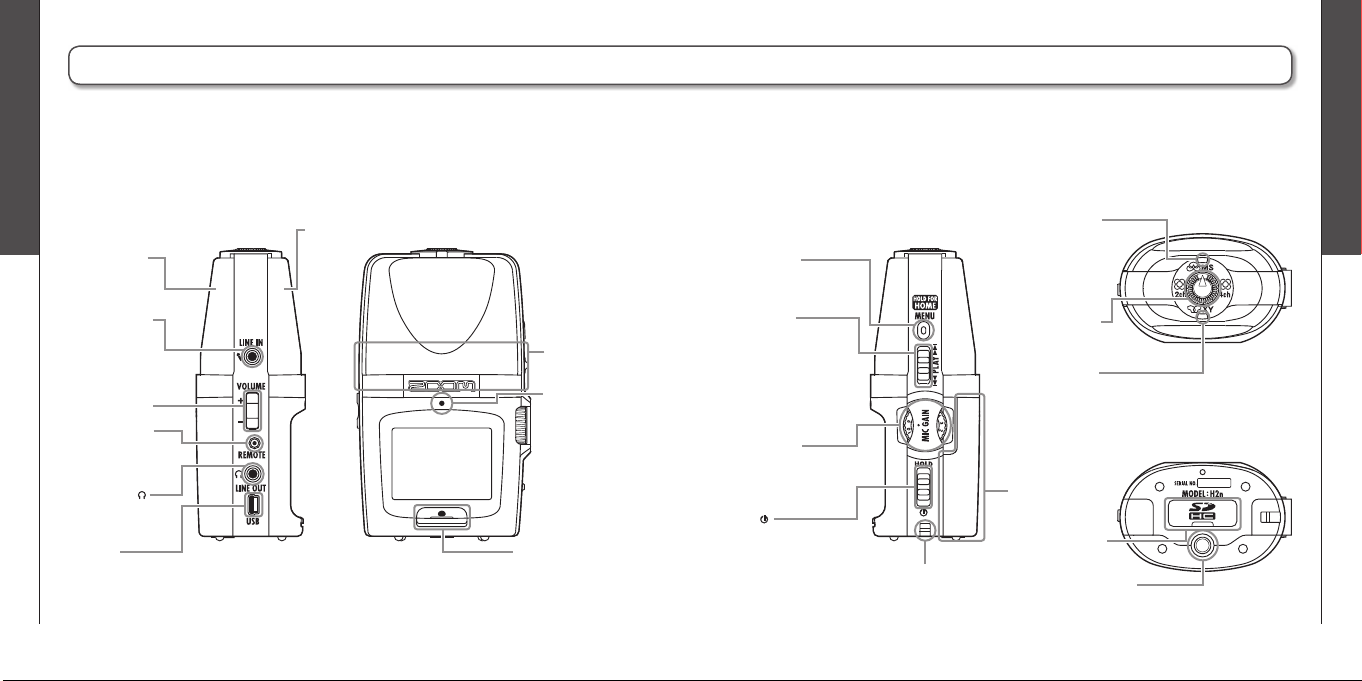
Part names
08
Part names
09
H2n
Handy Recorder
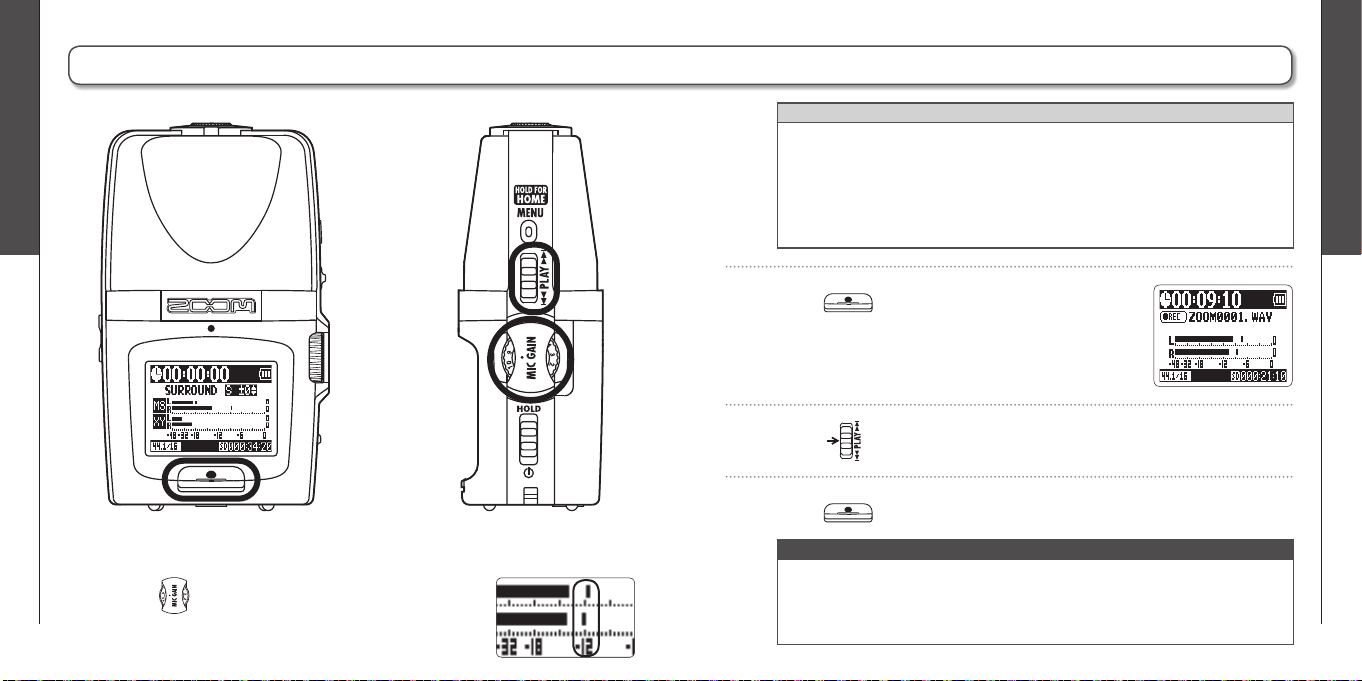
Part names
Left side Right side Top
Bottom
Front
Record button
Speaker
LINE IN jack for
mic/line input
(can provide
plug-in power)
Remote control
jack (Remote
control sold
separately)
Headphones
/LINE OUT jack
MS stereo mic
XY stereo mic
Recording
indicator
MIC GAIN dial
Adjusts mic
input gain
Strap attachment
(Use to prevent dropping)
PLAY control
Press to play/pause
(in menu, set item)
Shift up/down to search
forward/backward
(in menu, select item)
MS mic indicator
Lights when the MS
mic (rear) is ON.
Flashes when the
input signal is
distorting.
XY mic indicator
Lights when the XY
mic (front) is ON.
Flashes when the
input signal is
distorting.
Recording mode
selection dial
Battery
compartment
cover
SD card slot cover
MENU button
Volume control
USB port
Tripod mounting socket
Power
/HOLD switch
Page 6
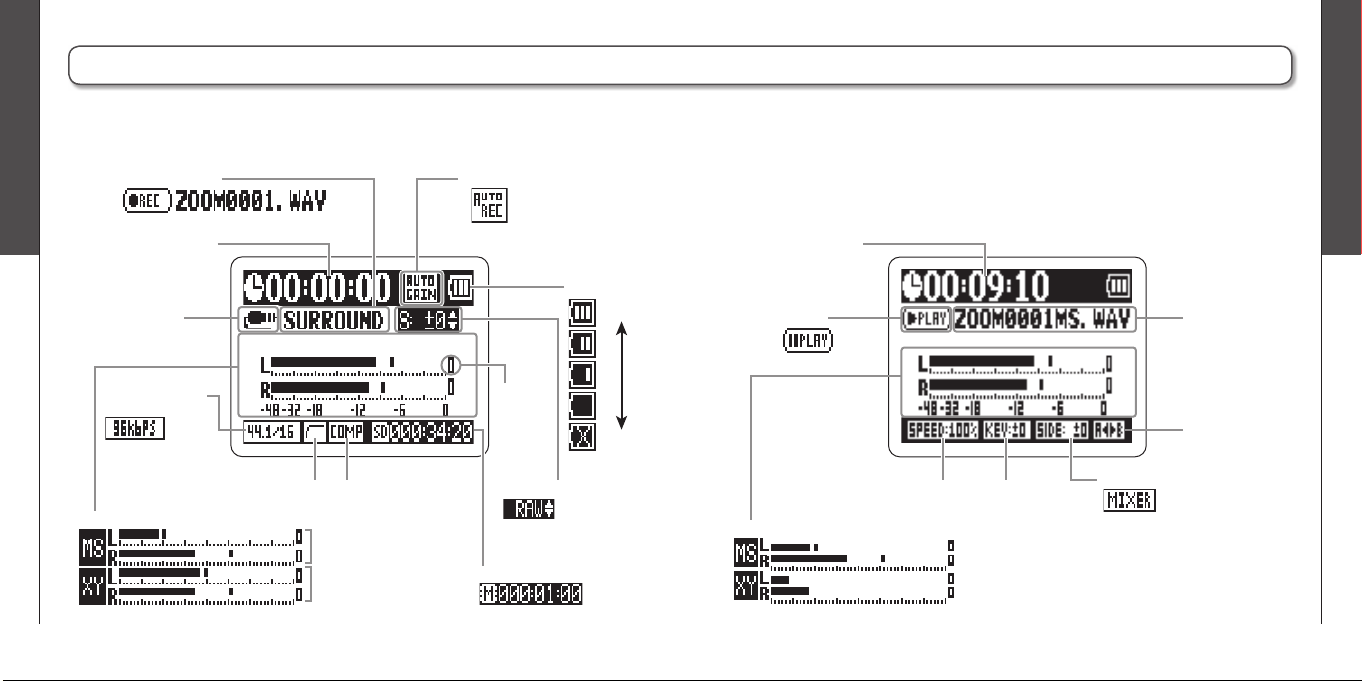
Display
10
Display
11
H2n
Handy Recorder
Display
Recording time
LINE IN jack in
use indicator
Home (recording) screen Playback screen
Recording mode
(File name shown during recording)
Recording level
MS mic recording level
Remaining recordable time
(When using built-in memory)
Side level adjustment
(When set to MS-RAW)
LO CUT
indicator
Clipping
indicator
(When AUTO REC enabled)
AUTO GAIN/AUTO REC indicator
Full
Empty
COMP/LIMITER
indicator
XY mic recording level
(Appearance in 4ch surround mode)
Playback time
Playing
(Playback paused)
File name
AB repeat
Playback level
(Appearance in 4ch surround mode)
Playback speed Key control
Side mic level
Mixer
(when in 4ch surround mode)
Remaining
battery level
indicator
Recording format
(WAV example)
(MP3 example)
Page 7

Preparation
Powering the recorder
12
Preparation
Installing an SD card
13
H2n
Handy Recorder
Press here
and slide down
Powering the recorder
Using batteries
Turn the power OFF, and then remove the battery cover.
1.
Insert batteries.
2.
Close the cover.
3.
NOTE
∙ Use alkaline or nickel-metal hydride batteries.
∙ If the “Low battery!” warning appears, turn the power OFF
soon and put in new batteries.
∙ Set the type of battery used. (➝P.18)
Using an AC adapter (sold separately)
Connect the cable to the USB port.
1.
Plug the adapter into a power outlet.
2.
Installing an SD card
After turning the power OFF, open the SD card slot cover.
1.
Insert the card into the slot.
2.
To remove a card, push it further into
the slot and then pull it out.
NOTE
∙ Always turn the power OFF before inserting or removing an SD card. Doing so
when the power is ON could cause data to be lost.
∙ Be sure to insert the SD card correctly, using the cut-off corner illustration next
to the slot as a guide.
∙ The built-in memory will be used if no SD card is in the recorder.
∙ Format the SD card if necessary. (➝ P.83)
HINT
Built-in memory
∙ The built-in memory only keeps the most recent recording.
∙ The recording format is fi xed at 96kbps MP3.
∙ It cannot be used to record in 4ch surround or MS-RAW modes.
∙ Recording time is limited to 1 minute.
∙ Recordings saved to the built-in memory cannot be copied to an SD card or a
computer.
Page 8
Preparation
Turning the power ON and OFF
14
Preparation
Turning the power ON and OFF
15
H2n
Handy Recorder
Turning the power ON and OFF
Turning the power ON Using the hold function
Slide down.
•
NOTE
∙ If “No SD card!” appears, confi rm that an SD card is
correctly inserted into the recorder.
∙ If “Ca r d Prote c t e d” a p p e ars , S D ca r d w r i t e
prote ct io n is ON. Turn wr it e prot ec tion OF F by
sliding the “Lock” switch on the card.
∙ If “Invalid card” appears, the card format is
incorrect. Use a different card or format the card.
(➝ P.83)
In order to prevent accidental operation during recording, the has a hold
function that disables the use of controls other than the MIC GAIN.
Enabling the hold function
Slide up to the HOLD position.
•
NOTE
Even when the hold function is on, the remote control
(sold separately) can still be used.
Disabling the hold function
Slide back to the middle.
•
Turning the power OFF
Slide down and hold it until “Goodbye
•
see you!” appears on the screen.
Page 9

Preparation
Connecting an external mic
16
Preparation
Setting the date and time
17
H2n
Handy Recorder
Connecting an external mic
Connect an external mic (sold separately) to the LINE IN jack.
1.
NOTE
∙ An external mic can be used instead of the XY stereo mic.
∙ An external mic cannot be used with MS Stereo mode.
Using plug-in power
Make the following setting before connecting a mic that requires plug-in power.
Press .
1.
Use to select INPUT, and then
2.
press .
Use to select PLUG-IN POWER,
3.
and then press .
Use to select ON, and then
4.
press .
The date and time is added to recording fi les automatically, so set it correctly
whenever the batteries are replaced.
1.
2.
3.
4.
5.
Setting the date and time
Press .
Use to select SYSTEM, and then press .
Use to select DATE/TIME, and then
press .
Adjust the settings.
Use to move the cursor
Press to select the item
Use to change the value
Press to confi rm the setting
Use to select OK, and then press .
Page 10
Preparation
Setting the battery type
18
Preparation
Setting the battery type
19
H2n
Handy Recorder
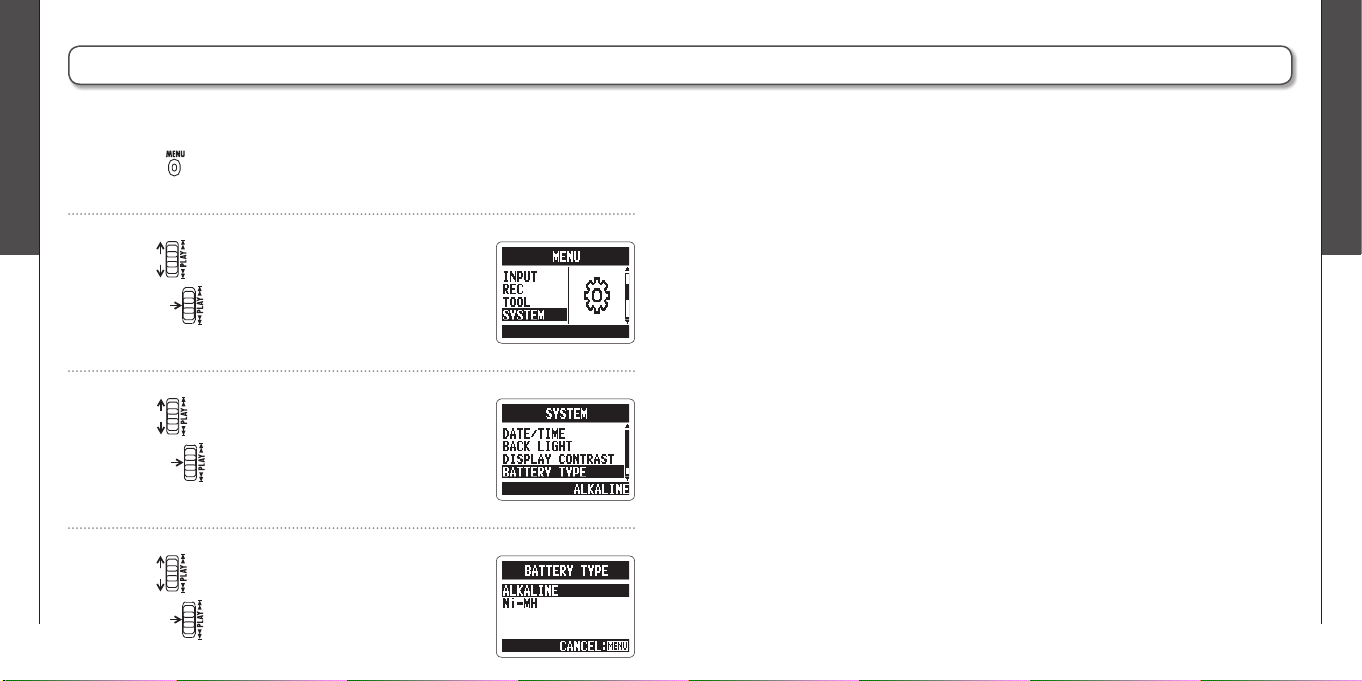
Setting the battery type
Set the battery type in order to show the remaining battery charge accurately.
Press .
1.
Use to select SYSTEM, and then
2.
press .
Use to select BATTERY TYPE, and then
3.
press .
Use to select the battery type, and then
4.
press .
Page 11
Recording
Recording mode overview
20
Recording
Recording mode overview
21
H2n
Handy Recorder
L
LR
R
Mid
Side
(adjustable)
90°
Display
(front) side
LR
90°
Display
(front) side
L R
Mid
Side
(adjustable)
Display
(front) side
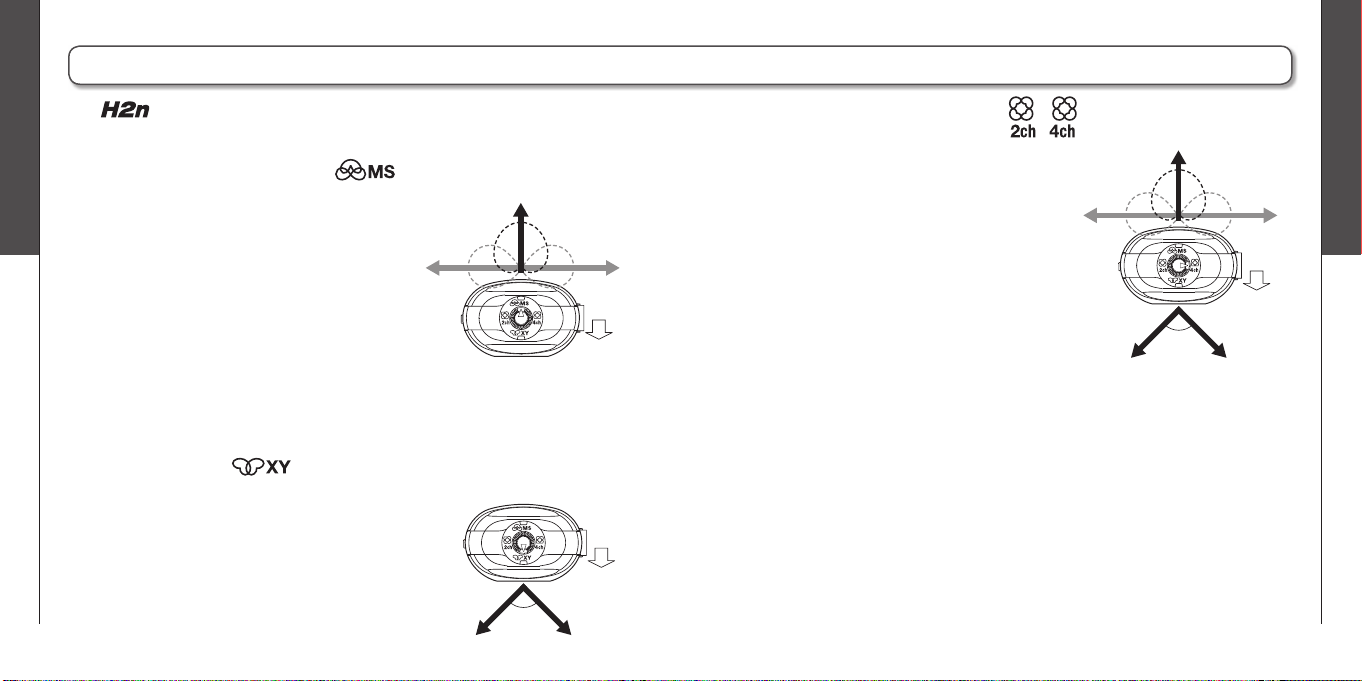
Recording mode overview
The has four recording modes that can be selected according to your
purposes.
Mid-side (MS) stereo mode
This mode uses a mid mic to capture the sound
directly ahead and a bidirectional side mic to
capture sound from left and right.
The recording level of the side mic (S level) can
be adjusted, allowing the stereo width to be
changed. If you record with the S level set to
MS-RAW, you can also adjust the S level after
recording.
MS mics can capture a rich stereo image, so it is ideal for recording sounds in
wide and open conditions, including orchestras, live concerts and soundscapes.
XY stereo mode
This mode records in stereo with mics at 90º angles.
This allows a natural, deep and accurate sound image
to be captured, making it optimal for recording sources
nearby, including solo performances, chamber music,
interviews, live rehearsals and fi eld recordings.
2ch and 4ch surround modes
Sound can be captured in all directions using
both MS and XY mics.
You can select 2ch, which mixes the signals
from the MS and XY mics, or 4ch, which records
the signals from the MS and XY mics separately.
With 4ch surround, you can adjust the balance
between the MS and XY signals after recording.
The S level can be adjusted for both 2ch and 4ch
recordings.
These modes are suitable for recording live
rehearsals, studio sessions, business meetings and soundscapes, for example.
Page 12
Recording
Selecting the recording mode
22
Recording
Selecting where recordings are saved
23
H2n
Handy Recorder
Wide The graphic changes along with the value Narrow
Selecting the recording mode
Turn so that the triangle points to the desired mode.
1.
NOTE
∙ The 4ch surround mode can only be used
when an SD card is in the unit.
∙ In 4ch surround mode, only WAV formats
(44.1/48kHz, 16/24bit) can be used.
∙ In 4ch su rroun d mode, two stere o files
are created (MS mic recording and XY mic
recording).
Make settings for the recording mode.
2.
Adjusting the S level (MS stereo, 2ch/4ch surround modes)
You can adjust the stereo width (S level) before recording.
Use to adjust the stereo width.
•
NOTE
Set to OFF, RAW or between –24 and +6 dB.
Using MS-RAW mode (WAV format only)
If you want to adjust the stereo width after recording, record using MS-RAW
mode.
Hold down until RAW appears.
•
Selecting where recordings are saved
Press .
1.
Use to select FOLDER, and then
2.
press .
Use to select the folder where you want
3.
to save fi les, and then press .
NOTE
Select from among 10 folders. There are separate sets of folders for stereo and 4ch recordings.
Page 13
Recording
Recording manually
24
Recording
Recording manually
25
H2n
Handy Recorder
1
2, 4
3
Recording manually
Turn to adjust the input level.
1.
HINT
∙ Adjust the MIC GAIN so that the peak level stays around -12 dB.
∙ If an input signal is too strong, the MS/XY ind icator on the to p will flash
immediately.
∙ The recorder can also adjust mic gain automatically. (➝ P.70)
∙ You can change the recording format beforehand. (➝ P.72)
∙ The mic can also be set to cut wind and other unwanted noise. (➝ P.66)
Press to start recording.
2.
Press to add a mark.
3.
Press to stop recording.
4.
NOTE
∙ One fi le can have a maximum of 99 marks.
∙ The mic can also be set to pause immediately after adding a mark. (➝ P.77)
∙ During recording, if the size of the fi le exceeds 2 GB, recording will continue in
a new fi le that will be created automatically.
Page 14

Recording
Recording automatically
26
Recording
Recording automatically
27
H2n
Handy Recorder
Recording automatically
The mic can be set to start and stop recording automatically in response to
changes in the input level.
Press .
1.
Use to select REC, and then press .
2.
Use to select AUTO REC, and then
3.
press .
Use to select ON/OFF, and then
4.
press .
5.
6.
7.
Use to select ON, and then press .
NOTE
Ot he r s etti ngs c an als o be mad e for a uto ma tic
recording. (➝ P.74)
After the home screen reopens, press
to put the recorder in standby.
Recording will start automatically when the input
signal exceeds the REC START LEVEL.
Recording will stop automatically when the input
signal becomes less than the REC STOP LEVEL.
Press to end recording standby and
stop recording.
NOTE
Automati c re cording can only be u sed wit h an SD
card.
Page 15
Recording
Pre-recording
28
Recording
Counting in before recording
29
H2n
Handy Recorder
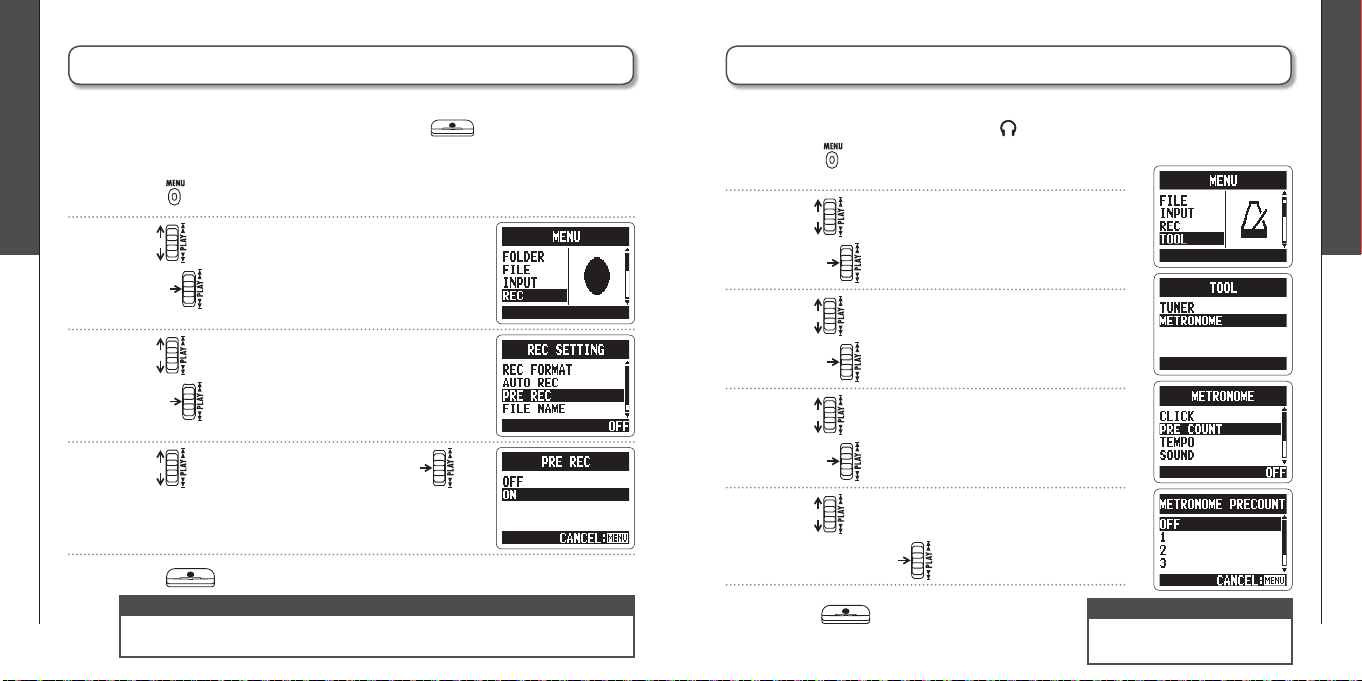
Pre-recording
When pre-recording is on, this recorder can continuously capture two seconds of
sound before recording is started manually. When is pressed, these two
seconds are included at the beginning of the recording. This is useful when, for
example, performances start suddenly.
Press .
1.
Use to select REC, and then
2.
press .
Use to select PRE REC, and then
3.
press .
Use to select ON, and then press .
4.
Press after returning to the home screen to start recording.
5.
NOTE
PRE REC cannot be used at the same time as the metronome PRE COUNT function.
∙
∙ Pre-recording can only be used with an SD card.
Counting in before recording
The built-in metronome can play a count-in sound before recording starts. This
pre-count sound is output through the /LINE OUT jack.
Press .
1.
Use to select TOOL, and then
2.
press .
Use to select METRONOME, and then
3.
press .
Use to select PRE COUNT, and then
4.
press .
Use to select the pre-count number,
5.
and then press .
Press after returning to the home
6.
screen to start pre-count and recording.
NOTE
PRE COUNT cannot be used at
the same time as PRE REC.
Page 16

Playback
Playing back recordings
30
Playback
Playing back recordings
31
H2n
Handy Recorder
1
2
Playing back recordings
You can play fi les in the current folder. Change the folder to play fi les in a different
folder.
Press .
1.
Use to jump between marks and fi les
Hold to search forward or backward
Press to pause and restart playback
Use to adjust the volume
HINT
The longer you hold the PLAY control the faster it will
search in that direction.
Press and hold to return to the home
2.
screen.
Page 17

Playback
Selecting the fi le to playback from a list
32
Playback
Changing the playback speed
33
H2n
Handy Recorder
Selecting the fi le to playback from a list
You can select a fi le in the current folder for playback. Change the folder to select
fi les from a different folder.
When the playback screen is open, press .
1.
Use to select FILE LIST, and then
2.
press .
Use to select a fi le, and then press
3.
to start playback of that fi le.
NOTE
After a fi le plays once, playback will stop or continue
according to the PLAY MODE setting.
Press and hold to return to the home screen.
4.
Changing the playback speed
You can change the playback speed to between 50% and 150% of normal
speed.
When the playback screen is open, press .
1.
Use to select SPEED, and then
2.
press .
Use to set the playback speed, and then
3.
press .
Files will be played at the set speed.
NOTE
The set value will be saved even when the power is
turned OFF.
Page 18

Playback
Loop playback of a set interval (AB REPEAT)
34
Playback
Loop playback of a set interval (AB REPEAT)
35
H2n
Handy Recorder
Loop playback of a set interval (AB REPEAT)
You can loop playback between two set points. Select the fi le that you want to
play back fi rst.
When the playback screen is open, press .
1.
Use to select AB REPEAT, and then
2.
press .
Press at the point you want to start
3.
playback.
NOTE
Use to search for the starting point quickly.
Press at the point you want to stop
4.
playback.
Loop playback between the points will start.
NOTE
∙ Use to search for the stopping point quickly.
∙ If you se t the stopping point befo re the st art ing
point, they will be automatically swapped.
Press to stop loop playback.
5.
Use to select STOP REPEAT, and then
6.
press .
Press .
7.
Page 19

Playback
Changing the play mode
36
Playback
Changing the play mode
37
H2n
Handy Recorder
Changing the play mode
When the playback screen is open, press .
1.
Use to select PLAY MODE, and then
2.
Press to start playback in the selected
4.
mode.
press .
Use to set the mode, and then
3.
press .
NOTE
PLAY ALL: Play all the fi les in the current
folder once.
PLAY ONE: Play the current fi le once.
REPEAT ONE: Play the current fi le repeatedly.
REPEAT ALL: Play all the fi les in the current
folder repeatedly.
Page 20

Playback
Adjusting the playback pitch (KEY CONTROL)
38
Playback
Changing the S level
39
H2n
Handy Recorder
Adjusting the playback pitch (KEY CONTROL)
You can change the pitch without changing the playback speed.
When the playback screen is open, press .
1.
Use to select KEY CONTROL, and then
2.
press .
Use to adjust the playback pitch, and
3.
then press to start playback at the
adjusted pitch.
NOTE
∙ The pitch can be adjusted by ±6 semitones.
∙ The set value will be saved even when the power is
turned OFF.
∙ KEY CO NTROL cannot be used with 96kHz WAV
fi les.
Changing the S level
The S level (stereo width) of fi les recorded using MS-RAW mode can be changed.
Select a fi le that has been recorded in MS-RAW mode fi rst.
When the playback screen is open,
1.
press .
Use to select MS SIDE MIC LEVEL, and
2.
then press .
Use to adjust the S level, and then
3.
press .
NOTE
Set to OFF or between –24 and +6 dB.
Press to start playback with the adjusted S
4.
level.
MS-RAW only
HINT
If you select a fi le recorded
using MS-RAW mode the
icon will appear.
Page 21

Playback
Mixing a 4ch surround fi le
40
Playback
Mixing a 4ch surround fi le
41
H2n
Handy Recorder
Mixing a 4ch surround fi le
You can adjust the levels and panning of the MS and XY recordings made for 4ch
surround fi les.
Set the recorder to 4ch surround mode, select
1.
MS LEVEL MUTE, –48 ~ +12 dB
XY LEVEL
MS PAN L100 ~ CENTER ~ R100
XY PAN
Parameter setting ranges Explanation
(0.5 dB increments)
(even values only)
Adjusts volume
Adjusts left-right balance
the fi le you want to mix, and then press .
Press .
2.
Use to select SURROUND MIXER, and
3.
then press .
Change the values of the parameters.
4.
Use to move th e curso r and change
values
Push to select a parameter to change
Press to turn the mixer ON or OFF.
5.
NOTE
The mixer setting is only applied to playback. It does
not change the recordings.
Press twice to return to the playback
6.
screen.
Page 22

Checking & Editing Files
Checking fi le information
42
Checking & Editing Files
Checking track marks
43
H2n
Handy Recorder
Checking fi le information
You can check various types of information about the current fi le.
Press .
1.
Use to select FILE, and then press .
2.
Select the fi le that you want to check, and
3.
then press .
Use to select INFORMATION, and then
4.
press to show information about the
fi le.
Use to scroll through the screen to see
additional information
Checking track marks
You can view a list of the marks in a WAV fi le.
Press .
1.
Use to select FILE, and then press .
2.
Select the fi le that you want to check, and
3.
then press .
Use to select MARK LIST, and then
4.
press to open the mark list.
This mark appears when skipping
WAV fi les only
Shows an added mark
occurred during recording
Page 23

Checking & Editing Files
Changing fi le names
44
Checking & Editing Files
Changing fi le names
45
H2n
Handy Recorder
1.
2.
3.
4.
5.
Changing fi le names
Press .
Use to select FILE, and then press .
Use to select the fi le name that you
want to change, and then press .
Use to select RENAME, and then
press .
Edit the name.
Stereo fi les only
Use to move the cursor and change characters
Push to select a character to change and to confi rm a change
Use to select OK, and then press .
6.
NOTE
∙ The following characters can be used in fi le names.
(Space)!#$% &'()+,-0123456789;=@ABCDEFGHIJKLMNOPQRSTUVWXYZ[]^_`
abcdefghijklmnopqrstuvwxyz{ }~
∙ A fi le name cannot be only spaces.
∙ If a file with the same nam e already exists in the same fol der, a warning
appears and the screen shown in step fi ve automatically reopens.
Page 24

Checking & Editing Files
Convert WAV fi les into MP3 fi les
46
Checking & Editing Files
Convert WAV fi les into MP3 fi les
47
H2n
Handy Recorder
Convert WAV fi les into MP3 fi les
WAV fi les (other than MS-RAW) that have been recorded in any mode other than
4ch surround can be converted to MP3 fi les.
Press .
1.
Use to select FILE, and then press .
2.
Use to select the fi le you want to
3.
convert, and then press .
Use to select MP3 ENCODE, and then
4.
press .
If you want to change the bit rate, use to
5.
select BIT RATE, and then press .
Stereo fi les only
Use to select the bit rate, and then
6.
press .
Use to select EXECUTE, and then press
7.
to start encoding.
NOTE
∙ The converted fi le will be created in the same folder.
∙ If the SD card lacks open space, the screen shown in
step 4 will reopen automatically.
∙ If a fi le already exists with the name that will be given
to the converted fi le, the screen at right will appear.
Rename the fi le before conversion.
Page 25

Checking & Editing Files
Normalizing WAV fi les
48
Checking & Editing Files
Normalizing WAV fi les
49
H2n
Handy Recorder
Normalizing WAV fi les
If the volume of a recording is lower than desired, you can raise the level of the
recording as a whole.
Press .
1.
Use to select FILE, and then press .
2.
Use to select the fi le you want to
3.
change, and then press .
Use to select NORMALIZE, and then
4.
press .
Use to select YES, and then press
5.
to start normalization.
NOTE
No rm ali za tio n inc rea se s the o ve ra ll leve l of the
recording so that the maximum level in the file is 0
dB.
Page 26

Checking & Editing Files
Dividing fi les
50
Checking & Editing Files
Dividing fi les
51
H2n
Handy Recorder
Dividing fi les
You can divide a fi le into two at any point.
Press .
1.
Use to select FILE, and then press .
2.
Use to select the fi le you want to divide,
3.
and then press .
Use to select DIVIDE, and then
4.
press .
Stereo fi les only
Set the dividing point.
5.
Use to move the point
Press to play and pause the fi le
Press to confi rm the dividing point
HINT
The longer you hold the PLAY control the faster it will
search in that direction.
Use to select YES, and then press .
6.
NOTE
∙ If a fil e already ex ists with the nam e that will
be gi ven to a divi ded file, rename the file before
dividing.
∙ When a fi le is divided, “A” will be added to the end
of the name of the fi le made from the part before
the dividing point, and “B” will be added to the end
of the name of the fi le made from the part after the
dividing point.
∙ The original fi le is deleted.
Page 27

Checking & Editing Files
Deleting fi les
52
Checking & Editing Files
Deleting all fi les in a folder
53
H2n
Handy Recorder
Deleting fi les
You can delete unwanted fi les.
Press .
1.
Use to select FILE, and then press .
2.
Use to select the fi le you want to delete,
3.
and then press .
Use to select DELETE, and then
4.
press .
Use to select YES, and then press .
5.
Deleting all fi les in a folder
You can delete all the fi les in the current folder at once.
Press .
1.
Use to select FILE, and then press .
2.
Use to select one fi le you want to delete,
3.
and then press .
Use to select DELETE ALL, and then
4.
press .
Use to select YES, and then press .
5.
Page 28

Checking & Editing Files
Converting MS-RAW fi les into stereo fi les
54
Checking & Editing Files
Converting MS-RAW fi les into stereo fi les
55
H2n
Handy Recorder
Converting MS-RAW fi les into stereo fi les
You can convert an MS-RAW fi le into a stereo fi le. S level (stereo width)
adjustments will affect stereo fi les.
Press .
1.
Use to select FILE, and then press .
2.
Use to select the fi le you want to
3.
change, and then press .
Use to select MS-RAW TO STEREO, and
4.
then press .
If you want to adjust the S level, use to
5.
select MS SIDE MIC LEVEL, and then press .
Use to adjust the S level, and then
6.
press .
NOTE
Set to OFF or between –24 and +6 dB.
Use to select EXECUTE, and then press
7.
to start conversion.
NOTE
∙ If a file already exists with the name that will be
given to the converted fi le, you will have a chance to
change the name to be given to the converted fi le.
∙ When a file is converted, the S level value will be
added to the end of the name of the fi le.
∙ The original fi le is not deleted.
Page 29

Checking & Editing Files
Converting 4ch surround fi les into stereo fi les
56
Checking & Editing Files
Converting 4ch surround fi les into stereo fi les
57
H2n
Handy Recorder
Converting 4ch surround fi les into stereo fi les
Press .
1.
Use to select FILE, and then press .
2.
Use to select the fi le you want to
3.
change, and then press .
Use to select STEREO ENCODE, and
4.
then press .
Use to select MIXER, and then
5.
press .
Use to select ENABLE or DISABLE,
6.
and then press .
NOTE
For an explanation about how to mix, see P.40.
Use to select STORE IN, and
7.
then press .
Use to select the folder where you want
8.
to save the fi le, and then press .
Use to select EXECUTE, and then press
9.
to start conversion.
NOTE
∙ If a file already exists with the name that will be
giv en to the conve rt ed fi le, you will be given a
chance t o chang e the name to be give n to the
converted fi le.
∙ When a fi le is converted, “MIX” will be added to the
end of the name of the fi le.
∙ The original fi le is not deleted.
Page 30

Using USB
Exchanging fi les with a computer (Card reader)
58
Using USB
Exchanging fi les with a computer (Card reader)
59
H2n
Handy Recorder
Exchanging fi les with a computer (Card reader)
You can connect the recorder to a computer to check and copy data on the SD
card.
After turning the power on, connect the to a computer by a
1.
USB cable.
NOTE
∙ To run the
the power is OFF.
∙ The
Windows XP, Windows Vista, Windows 7, Macintosh OS X (10.2 or later)
Press .
2.
Use to select USB, and then press .
3.
using USB bus power, connect it to a computer by USB while
is compatible with the following operating systems.
Use to select SD CARD READER, and
4.
then press .
The SD card will appear on the computer as a
connected drive where you can check the files
on it.
Unmount the card from the computer before
5.
disconnecting the recorder.
Windows: Use “Safely Remove Hardware” to
Mac: Drag and drop the icon into
NOTE
Al w ays foll o w t h e pro p e r proc e d ure s on you r
computer to unmount the
disconnecting the USB cable.
Disconnect the cable from the computer and
6.
the
select the
the Trash
SD ca rd be fore
, and then press .
Page 31

Using USB
Audio interface use
60
Using USB
Audio interface use
61
H2n
Handy Recorder
Audio interface use
You can record the signal from the directly to a computer, and output the
playback signal from a computer through the .
Follow steps 1–3 in “Exchanging fi les with a computer” on P.58.
1.
Use to select AUDIO I/F, and then
2.
press .
Use to select SAMPLING FREQUENCY,
3.
and then press .
Use to select the sampling frequency,
4.
and then press .
NOTE
Make sure that the sampling frequency settings are
the same for both the
are using.
MS/XY stereo and 2ch surround modes only
and the software you
Use to select CONNECT, and then
5.
press .
NOTE
∙ For information about the menu items that can be used see the following.
LO CUT (➝P.66) PLUG-IN POWER (➝P.16) AUTO GAIN (➝P.70)
COMP/LIMITER (➝P.68) MONITOR (➝P.67) DISCONNECT
MS-RAW MONITOR (➝P.71) TUNER (➝P.62) INPUT
∙ If you want to send signals from the recorder to the computer, set INPUT to
ON in the USB AUDIO MENU.
To disconnect the recorder, press , use
6.
to select DISCONNECT, and then press .
Use to select YES, and then press .
7.
Disconnect the cable from the computer and the .
8.
Page 32

Tuner
Using the tuner
62
Tuner
Using the tuner
63
H2n
Handy Recorder
Low High Low High
The correct pitch is indicated by the middle circle The correct pitch is indicated by the middle circle
String
number
Pitch
Using the tuner
The built-in tuner can help you tune instruments by detecting the pitches of input signals.
Press .
1.
Use to select TOOL, and then press .
2.
Use to select TUNER, and then
3.
press .
If you want to change the standard pitch,
4.
use to select CALIBRATION,
and then press .
Use to select the pitch you want to use,
5.
and then press .
Use to select the tuner type, and then
6.
press .
Tune the instrument.
7.
The available tuner types work as follows.
■ Using the chromatic tuner
Th e i npu t pit ch is au tom a ti c all y
det ected and the nearest pi tch is
shown a lo ng with the amou nt o f
discrepancy.
Tuner type
GUITAR E B G D A E B
BASS G D A E B – –
OPEN A E C# A E A E –
OPEN D D A F# D A D –
OPEN E E B G# E B E –
OPEN G D B G D G D –
DADGAD D A G D A D –
1 2 3 4 5 6 7
■
Using the guitar and bass tuners
Th e i npu t pit ch is au tom a ti c all y
de tec ted and t he nea res t s tr i ng
and pitch are shown along with the
amount of discrepancy.
String number/pitch
Page 33

Metronome
Using the metronome
64
Metronome
Using the metronome
65
H2n
Handy Recorder
Using the metronome
You can use the metronome to count in before recording and to provide a guide tempo.
Press .
1.
Use to select TOOL, and then press .
2.
Use to select METRONOME, and then
3.
press .
Use to select the desired menu item,
4.
and then press .
■ Setting the CLICK
Use to sele ct when the click should
sound, and then press
.
■ Setting the PRE COUNT (➝P.29)
■ Setting the TEMPO
Use to adjust the metronome tempo
(BPM), and then press .
■ Setting the SOUND
Use to select the metronome sound,
and then press .
■ Setting the PATTERN
Use to select the metronome pattern,
and then press .
■ Setting the LEVEL
Use to adjust the metronome volume,
and then press .
Page 34

Various settings
Reducing noise (LO CUT)
66
Various settings
Monitoring the input signal
67
H2n
Handy Recorder
Reducing noise (LO CUT)
Monitoring the input signal
The recorder can be set to reduce the sound of wind, vocal pops and other
noise.
Press .
1.
Use to select INPUT, and then
2.
press .
Use to select LO CUT, and then
3.
press .
Use to select ON, and then press .
4.
You can listen to the input signal level through headphones.
Press .
1.
Use to select INPUT, and then
2.
Use to select MONITOR, and then
3.
Use to select when monitoring is
4.
press .
press .
enabled, and then press .
Setting Explanation
HOME AND REC Mon itori ng en abled when ho me sc reen open an d
when recording
ALWAYS ON Monitoring always enabled
ALWAYS OFF Monitoring disabled
Page 35

Various settings
Compressing/limiting the input signal
68
Various settings
Compressing/limiting the input signal
69
H2n
Handy Recorder
Compressing/limiting the input signal
The recorder can be set to automatically increase the level of input signals that
are too weak and decrease the level of input signals that are too strong for each
input.
Press .
1.
Use to select INPUT, and then
2.
press .
Use to select COMP/LIMITER, and then
3.
press .
Use to select the setting you want to
4.
use, and then press .
OFF Compressor/limiter disabled
COMP1(GENERAL) Standard compressor Compressors decrease
COMP2(VOCAL) Compressor for vocals
COMP3(DRUM) Compressor for drums and
LIMIT1(GENERAL) Standard limiter Limiters reduce high
LIMIT2(CONCERT) Limiter for live performances
LIMIT3(STUDIO) Limiter for studio recording
NOTE
This cannot be used at the same time as the AUTO GAIN function.
Setting Explanation
high levels and increase
low levels.
percussion
levels that exceed a set
threshold.
Page 36

Various settings
Automatically adjusting the input gain
70
Various settings
Monitoring MS-RAW signals
71
H2n
Handy Recorder
Automatically adjusting the input gain
Monitoring MS-RAW signals
MS stereo mode only
The recorder can automatically adjust the amount of gain used on signals input
through the built-in microphones and the LINE IN input in order to avoid distortion.
Press .
1.
Use to select INPUT, and then
2.
press .
Use to select AUTO GAIN, and then
3.
press .
Use to select the setting you want to
4.
use, and then press .
Setting Explanation
OFF AUTO GAIN disabled
CONCERT For concerts and other loud sound
SOLO For acoustic guitars and other solo
MEETING For meetings and other quiet sound
sources
performances
sources
NOTE
∙ When AUTO GAIN is ON, the
MIC GAIN dial setting has no
effect.
∙ This cannot be used at the
same time as the automatic
recording function.
When recording in MS-RAW mode, you can monitor the MID input signal on the
left output channel and the SIDE input signal on the right output channel.
Press .
1.
Use to select INPUT, and then
2.
press .
Use to select MS-RAW MONITOR, and
3.
then press .
Use to select RAW, and then press .
4.
NOTE
If you want to monitor an ordinary stereo mix of the
signals, select STEREO.
Page 37

Various settings
Setting the recording format
72
Various settings
Setting the recording format
73
H2n
Handy Recorder
WAV96kHz/24bit
WAV96kHz/16bit
WAV48kHz/24bit
WAV44.1kHz/24bit
WAV48kHz/16bit
WAV44.1kHz/16bit
MP3 320kbps
MP3 256kbps
MP3 224kbps
MP3 192kbps
MP3 160kbps
MP3 128kbps
MP3 112kbps
MP3 96kbps
MP3 80kbps
MP3 64kbps
MP3 56kbps
MP3 48kbps
Sound quality File size
High
Low
Large
Small
Only these formats
can be selected
when using 4ch
recording mode
Setting the recording format
You can set the recording format according to your sound quality and fi le size needs.
Press .
1.
Use to select REC, and then press .
2.
Use to select REC FORMAT, and then
3.
press .
Use to select the recording format, and
4.
then press .
NOTE
∙ Use WAV formats for higher audio quality.
∙ Use MP3 formats, which are compressed and have much smaller fi le sizes, to
save space on the SD card. Beware, however, that MP3 compression reduces
audio quality.
Page 38

Various settings
Changing automatic recording settings
74
Various settings
Changing automatic recording settings
75
H2n
Handy Recorder
Changing automatic recording settings
You can change settings related to the input level threshold that causes recording to start
and stop automatically, as well as the amount of delay before automatic stopping.
Press .
1.
Use to select REC, and then press .
2.
Use to select AUTO REC, and then
3.
press .
If you want to adjust the recording start
4.
threshold, use to select REC START
LEVEL, and then press .
Use to adjust the recording start
5.
threshold, and then press .
If you want to set the recording stop
6.
threshold, use to select REC STOP
LEVEL, and then press .
Use to set the recording stop threshold, and then press .
7.
If you want to set the delay before recording
8.
stops, use to select AUTO STOP,
and then press .
Use to set the time, and then press
9.
.
NOTE
The AUTO REC STOP time is the delay until recording
stops after the input level drops below the REC STOP
LEVEL.
Page 39

Various settings
Setting how fi les are named
76
Various settings
Pausing recording when adding marks
77
H2n
Handy Recorder
Setting how fi les are named
Stereo fi les only
Pausing recording when adding marks
WAV format only
You can change how stereo fi les are automatically named.
Press .
1.
Use to select REC, and then press .
2.
Use to select FILE NAME, and then
3.
press .
Use to select, and then press .
4.
NOTE
∙ File names are assigned in the following manner.
DEFAULT: ZOOM0001(MS).wav/mp3 ~ ZOOM9999(MS).wav/mp3
DATE: YYMMDD-HHMMSS(MS).wav/mp3
(for example, 110531-130512.wav)
∙ DATE uses the starting time of the recording.
∙ If a fi le already exists with the same name in the folder, the
new file will have a number added to the end of its name.
Numbers will be added sequentially in the case of multiple
duplicates.
You can set the unit to pause when you add a mark during recording.
Press .
1.
Use to select REC, and then press .
2.
Use to select PLAY KEY FUNCTION, and
3.
then press .
Use to select PAUSE AND MARK, and
4.
then press .
NOTE
Marks cannot be added to MP3 fi les, so this setting has
no effect when recording MP3 fi les.
Page 40

Various settings
Changing the display backlight time
78
Various settings
Adjusting the display contrast
79
H2n
Handy Recorder
Changing the display backlight time
Adjusting the display contrast
You can set the amount of time that the display backlight stays lit.
Press .
1.
Use to select SYSTEM, and then
2.
press .
Use to select BACK LIGHT, and then
3.
press .
Use to select the amount of time, and
4.
then press .
Setting Explanation
OFF The backlight stays unlit.
ON The backlight stays lit when the unit is on.
15sec The backlight st ays lit for 15 seconds after the last time that a control
30sec The backlight stays lit for 30 seconds after the last time that a control
(besides MIC GAIN) was used.
(besides MIC GAIN) was used.
Press .
1.
Use to select SYSTEM, and then
2.
press .
Use to select DISPLAY CONTRAST, and
3.
then press .
Use to adjust the contrast, and then
4.
press .
NOTE
∙ The contrast can be set to a value from 1–8.
∙ The higher the number, the greater the contrast.
Page 41

Various settings
Checking the software versions
80
Various settings
Restoring the unit to its factory settings
81
H2n
Handy Recorder
Checking the software versions
Restoring the unit to its factory settings
You can view the versions of the system and other software used by the .
Press .
1.
Use to select SYSTEM, and then
2.
press .
Use to select SOFTWARE VERSION,
3.
and then press to show the software
versions in use.
System software version
You can restore the recorder to the settings it had when it was shipped from the
factory.
Press .
1.
Use to select SYSTEM, and then press
2.
.
Use to select FACTORY RESET, and then
3.
press .
Use to select YES, and then press .
4.
NOTE
∙ The date and time, recording mode and input gain
settings are not reset by this.
∙ This als o e ras es any rec o rdi ng in t he buil t-i n
memory.
Page 42

Various settings
Checking the open capacity of the SD card
82
Various settings
Formatting an SD card
83
H2n
Handy Recorder
Checking the open capacity of the SD card
Formatting an SD card
Press .
1.
Use to select SD CARD, and then
2.
Use to select REMAIN, and then press
3.
press .
to show the open space on the card.
You can format an SD card for use with the
Press .
1.
Use to select SD CARD, and then
2.
press .
Use to select FORMAT, and then
3.
press .
Use to select YES, and then press .
4.
NOTE
∙ You must format an SD card after purchase or if it
has been formatted by a computer or other device
before using it with the
∙ Be aware that when you format an SD card, all data
saved on it will be erased.
.
.
Page 43

Other functions
Updating the system software
84
Other functions
Using SD cards from older H series recorders
85
H2n
Handy Recorder
Updating the system software
Using SD cards from older H series recorders
You can update the system software used by your to the latest version.
Copy the updater fi le to the root directory of the SD card.
1.
NOTE
Download the latest system software at the ZOOM
website (http://www.zoom.co.jp).
With the SD card in the , turn the power
2.
ON while pressing and holding .
Use to select OK, and then press .
3.
After updating completes, turn the power OFF.
4.
NOTE
You cannot update the system software if the battery
charge is low. In such a case, install new batteries or
use an AC adapter (sold separately).
This recorder can read SD cards that have been used in older H series recorders
and copy their fi les into folders for use by the .
With the SD card inserted, turn the power ON.
1.
Use to select YES, and then press .
2.
NOTE
A file must be ren amed before mov ing if an oth er
fi le with the same name already exists in the
folder.
Page 44

Other functions
Start and stop recording
Add marks (WAV format only)
Lights during recording
Pause (resume) recording
Using a remote control
Troubleshooting
H2n
Handy Recorder
By using a remote control (sold separately) you can operate the from a
distance.
Connect the remote control to the REMOTE jack on the .
•
The functions of the buttons on the remote are as follows.
Using a remote control
86
If you think that the
fi rst.
is not operating properly, please check the following
Recording/playback trouble
There is no sound or output is
◆
very quiet
· Check the con nect ion s to you r
monitoring system and its volume
setting.
· Confi rm that the volum e of the
is not too low.
The recorded sound cannot be
◆
heard or is very quiet
· I f you ar e us i n g built- i n mi c s ,
con firm that the acti ve mi cs are
or ient ed corr ect ly a nd that the
recording mode is suitable. (➝ P.20)
· Check the MIC GAIN setting.
(➝ P.24, 70)
· If you ar e r eco rdi ng fro m a CD
player or other device connected to
the LINE IN jack, raise the output
level of the connected device.
Recording is not possible
◆
· Confi rm that the SD card has open
space. (➝ P.82)
· If “Hold” appears on the display,
the ho l d funct i o n is enab l e d .
Disable the hold function. (➝ P.15)
Other trouble
The recorder is not recognized by
◆
a computer when connected by
USB
· Check that the OS of the computer
is compatible. (➝ P.58)
· The
be selected on the recorder before
it will be recognized by a computer.
(➝ P.58)
op eration mode must
Troubleshooting
87
Page 45

Specifi cations
88
Specifi cations
89
H2n
Handy Recorder
Specifi cations
Recording media 16MB–2GB SD cards, 4GB–32GB SDHC cards
Built-in memory Can be used to record up to 1 minute in 96 kbps MP3 format (recording to this memory
Recording Mic arrangements MS stereo with adjustable side mic level
Microphones Types Directional (XY, MS mid mics)
File formats
Digital processing A/D conversion 24-bit 128× oversampling
Recording time 2GB card example 3:08:00 (44.1kHz/16bit WAV)
Features LO CUT 80Hz high-pass fi lter
(Cards that can be used with this recorder are to be verifi ed individually)
overwrites any previous recording in it)
Modes MS, XY, MS+XY (stereo) and MS+XY (4ch)
Maximum sound
pressure input
Stereo
Uncompressed PCM 44.1/48/96kHz, 16/24bit WAV (BWF)
Compressed MP3
(recording)
Compressed MP3
(playback)
4ch
Uncompressed PCM 44.1/48kHz, 16/24bit WAV (BWF)
D/A conversion 24-bit 128× oversampling
Signal processing 32-bit
COMP/LIMITER 3 types of compressors and 3 types of limiters
AUTO GAIN Automatic input gain adjustment
PRE REC 2 seconds of pre-recording
AUTO REC Automatic recording start/stop, continuous st andby
TUNER Chromatic, guitar, bass and alternate (A/E/G/D/DADGAD) tunings
METRONOME 40–250 BPM range, fi ve tones, pre-count
SPEED Playback speed adjustable between 50–150%
90º XY stereo
Bidirectional (MS side mic)
120 dB spl (directional)
122 dB spl (bidirectional)
44.1kHz, 48/56/64/80/96/112/128/160/192/224/256/320kbps
(Not compatible with MS-RAW recording)
44.1/48kHz, 32/40/48/56/64/80/96/112/128/160/192/224/256/
320kbps
Two stereo fi les for each recording
34:43:00 (128kbps MP3)
with automatic string detection
Features KEY CONTROL Playback pitch adjustable ±6 semitones (cannot be used with
AB REPEAT Repeats playback between selected points in a fi le
FILE DIVIDE Divides a fi le into two
FILE NORMALIZE Maximizes fi le volume (cannot be used with MP3s)
FILE MP3 ENCODE WAV fi les can be converted to MP3 formats at fi xed bit rates
MARK Up to 99 marks can be added as desired when recording WAV
SURROUND MIXER Mix balance can be adjusted when playing back 4ch surround
Display Graphic LCD (128×64 pixels) with backlight
Input gain 0 to +39 dB
Input jack Line/mic stereo mini jack can supply plug-in power
Output jack Line/headphone stereo mini jack
Built-in speaker 400mW, 8Ω, mono
USB Mini-B type
Power AD-17 USB to AC adapter (DC 5V 1A), operates using two AA batteries
Physical features Tripod mounting socket, strap attachment
Included
accessories
* Recording concerts and public performances, for example, without permission from rights holders is prohibited by law.
* Product specifi cations and appearance might be changed for the purpose of improvement without warning.
* 0 dBm = 0.775 Vrms
2 kΩ impedance at input levels of 0 to –39 dBm
Rated output level: −10 dBm (output impedance 10 kΩ or more)
Headphones: 20 mW + 20 mW (into 32 Ω load)
Card reader operation
USB 2.0 High Speed
Audio interface operation
USB 1.0 Full Speed
Supports 44.1/48kHz sampling rates and 16-bit rate
Bus power operation supported
Continuous operation of 20 or more hours when recording 44.1kHz/16-bit WAV fi les using
alkaline batteries
Dimensions (mm): 67.6 (W) × 113.85 (H) × 42.7 (D)
Weight: 130 g (without batteries)
Operation manual, SD card (2GB), 2 AA batteries, WAVELAB LE CD-ROM
96kHz fi les)
fi les
recordings
Page 46

FCC regulation warning (for U.S.A.)
This equipment has been tested and found to comply with the limits for a Class B digital device,
pursuant to Part 15 of the FCC Rules. These limits are designed to provide reasonable protection
against harmful interference in a residential installation. This equipment generates, uses, and can
radiate radio frequency energy and, if not installed and used in accordance with the instructions,
may cause harmful inter ference to radi o communi cations. However, th ere is no guara ntee that
inte rfer ence wil l not occ ur in a par tic ular ins tal lat ion. If this equip ment doe s cause harmful
interference to radio or television reception, which can be determined by turning the equipment off
and on, the user is encouraged to tr y to correct the interference by one or more of the following
measures:
• Reorient or relocate the receiving antenna.
• Increase the separation between the equipment and receiver.
•
Connect the equipment to an outlet on a circuit different from that to which the receiver is
connected.
• Consult the dealer or an experienced radio/TV technician for help.
For EU Countries
Declaration of Conformity:
This product complies with the requirements of EMC Directive 2004/108/
EC, Low Voltage Directive 20 06/95/EC and ErP Directive 2009/125/EC
Disposal of Old Electrical & Electronic Equipment
(Applicable in European countries with separate collection systems)
This symbol on the product o r on its packaging indicates that this product
shall not be treated as household waste. Instead it shall be handed over to
the applicable collection p oint for the recycling of electrical an d electronic
equipment. By ensuring this product is disposed of correctly, you will help
prevent potential ne gative consequen ces for the environment an d h uman
health, which could other wise be caused by inappropriate waste handling
of this prod uct. T he recycling of material s will help to conserv e natur al
resources. For more detailed information about re cycling of this p roduct,
please contact your local city office, your household waste disposal service
or the shop where you purchased the product.
Page 47

4-4-3 Kanda-Surugadai, Chiyoda-ku, Tokyo 101-0062 Japan
Zoom Corporation
http://www.zoom.co.jp
H2n-5000-1
Page 48

H2n
Handy Recorder
Installing WAVELAB LE7
In WaveLab LE, you can perform various edits such as recording audio, adjusting
the volume of the recorded files, and cutting unwanted sections.
Windows
Insert the supplied WAVELAB LE7 CD-ROM into the CD drive
1.
of your computer.
On the screen for selecting the way to AutoPlay, click Run
2.
WaveLab_LE_7_Start_Center.exe.
If no thin g happ ens wh en you ins ert th e C D-RO M, sel ect
Computer from the Start menu. Click the WaveLab LE7 icon that
appears, and select Open Auto Play... on the File tab.
In the Start Center WaveLab LE7 that appears, select the
3.
language you use for the installation.
After the selection, follow the on-screen prompts.
Mac OS
Insert the supplied WaveLab LE CD-ROM into the CD drive
1.
of your Macintosh computer.
When the conten ts of the CD-ROM appear, dou ble -click
2.
WaveLab LE 7 for Mac OS X.
If the contents do not appear automatically, double-click to open the WaveLab LE 7
icon on the desktop, and double-click WaveLab LE7 for Mac OS X.
When the contents in the folder app ear, use
3.
WaveLab LE 7.mpkg to perform the installation.
[Minimum System
Requirements]
Windows 7
・ 2 GHz of CPU
・ 1024 MB of RAM
・ DVD-ROM drive
・ 200 MB of free hard disk
space
1024x768 of monitor resolution
・
[Minimum System
Requirements]
Mac OS X 10.6
・ Intel CPU
・ 1024 MB of RAM
・ DVD-ROM drive
・ 200 MB of free hard disk
space
1024x768 of monitor resolution
・
 Loading...