

Page 1

Version 5.0
Reference guide
This document cannot be displayed properly
on black-and-white displays.
© 2019 ZOOM CORPORATION
Copying or reprinting this manual in part or in whole without permission is prohibited.
Page 2
Contents
Introduction .................................................3
Copyrights ..................................................3
Installing and launching
EFFECT View - Overview .......................................4
PATCH View - Overview .......................................5
EDITOR View - Overview .......................................6
NEWS View - Overview ........................................7
Opening the EFFECT view .....................................8
Checking the amount of device memory used ......................9
Loading new effects on the device ...............................9
Deleting effects on the device / Restoring deleted effects /
Viewing effect properties ......................................10
Selecting favorite effects ......................................11
Sorting effects ..............................................11
Opening the PATCH view .....................................12
.....................3
Adjust effect parameters / Change an effect type ...................19
Add effects/ Delete effects/ Change effect order ...................20
Create a clip/ Add a clip to a patch ...............................21
Edit a clip name / Delete a clip / Change the clip order ...............22
Save a patch / Adjust patch level/ Adjust tempo / Tune your instrument ..23
Opening the NEWS view ......................................24
Select and view news updates / Add new patches to Guitar Lab .......25
Managing versions ..........................................26
Showing the update history ...................................27
Showing the manual .........................................27
Using when connected to a
Guitar Lab Circuit Emulator ........28
GCE-3
Checking patch sounds / Changing patch order /
Showing patch properties .....................................13
Editing patch names .........................................14
Editing patch comments ......................................15
Undoing the last change to a patch ..............................15
Backing up patches on the device ...............................16
Restoring patches to the device ................................17
Opening the EDITOR view ....................................18
— 2 —
Page 3
Introduction
is an application that is compatible with ZOOM eect products. Using this app, you can add and remove eects, manage patches and even edit and/or create new
patches from a computer.
Copyrights
• Windows® is a registered trademark of Microsoft® Corporation.
• Mac® is a registered trademark of Apple Inc.
Note: All trademarks and registered trademarks in this document are for identication purposes only and are not intended to infringe on the copyrights of their respective owners.
Installing and launching
1. Download to the computer
Download the application from the ZOOM website
(http://www.zoom.co.jp/downloads/).
HINT
• Download the latest from the above website.
• Download
for the operating system that you are using.
2. Install on the computer
Follow the instructions that appear on screen to install .
— 3 —
3. Start
Click the icon and launch the application.
4. Select the effects product
Use a USB cable to connect the computer and a ZOOM eects product supported by
.
NOTE
When using with a
to emulate. ( → “Selecting the product emulated by the
Guitar Lab Circuit Emulator connected, select the product
GCE-3
” on P.28)
GCE-3
Page 4
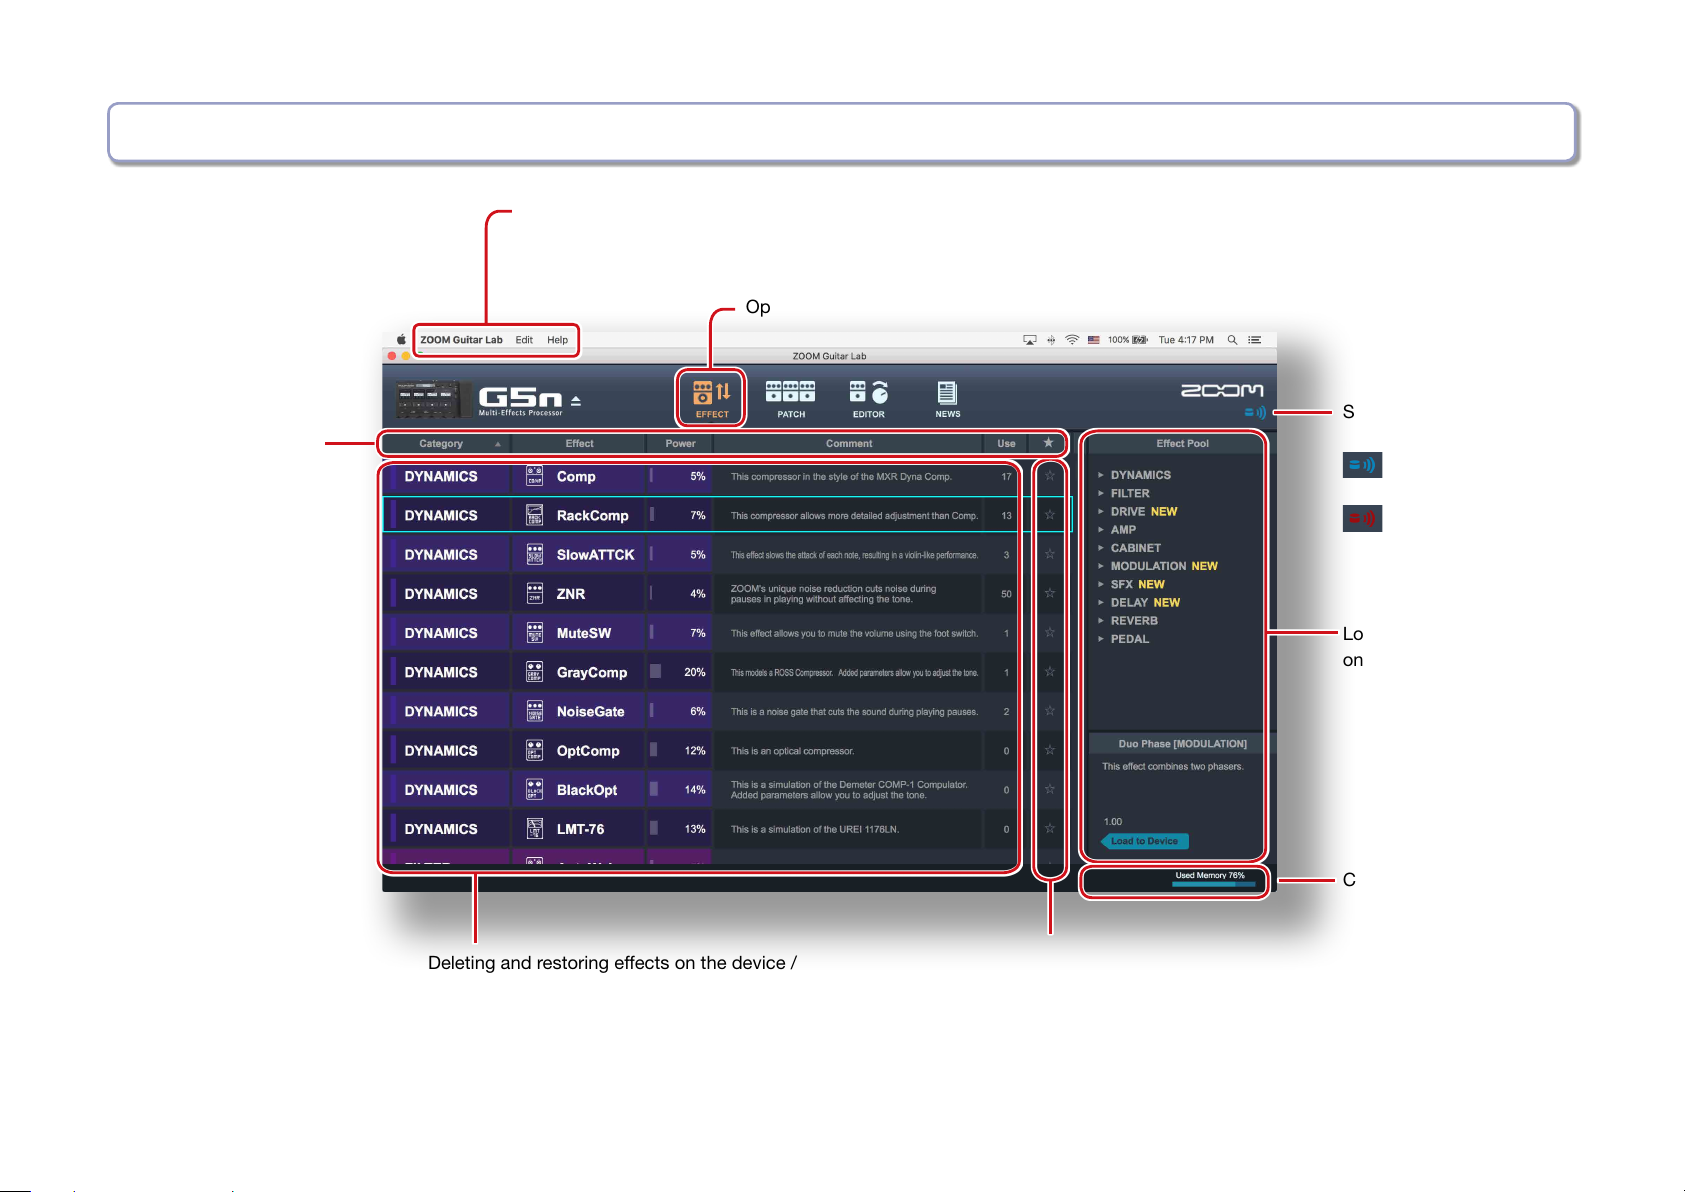
EFFECT View - Overview
Managing versions / Showing the Update History/ Showing the manual P.25 — P.26
Sorting effects P.10
Opening the EFFECT view P.7
Server connection LED
Connected
Not connected
Loading new effects
on the device P.8
Deleting and restoring effects on the device /
Viewing effect properties P. 9
Checking the amount of
device memory used P.8
Selecting favorite effects P.10
— 4 —
Page 5
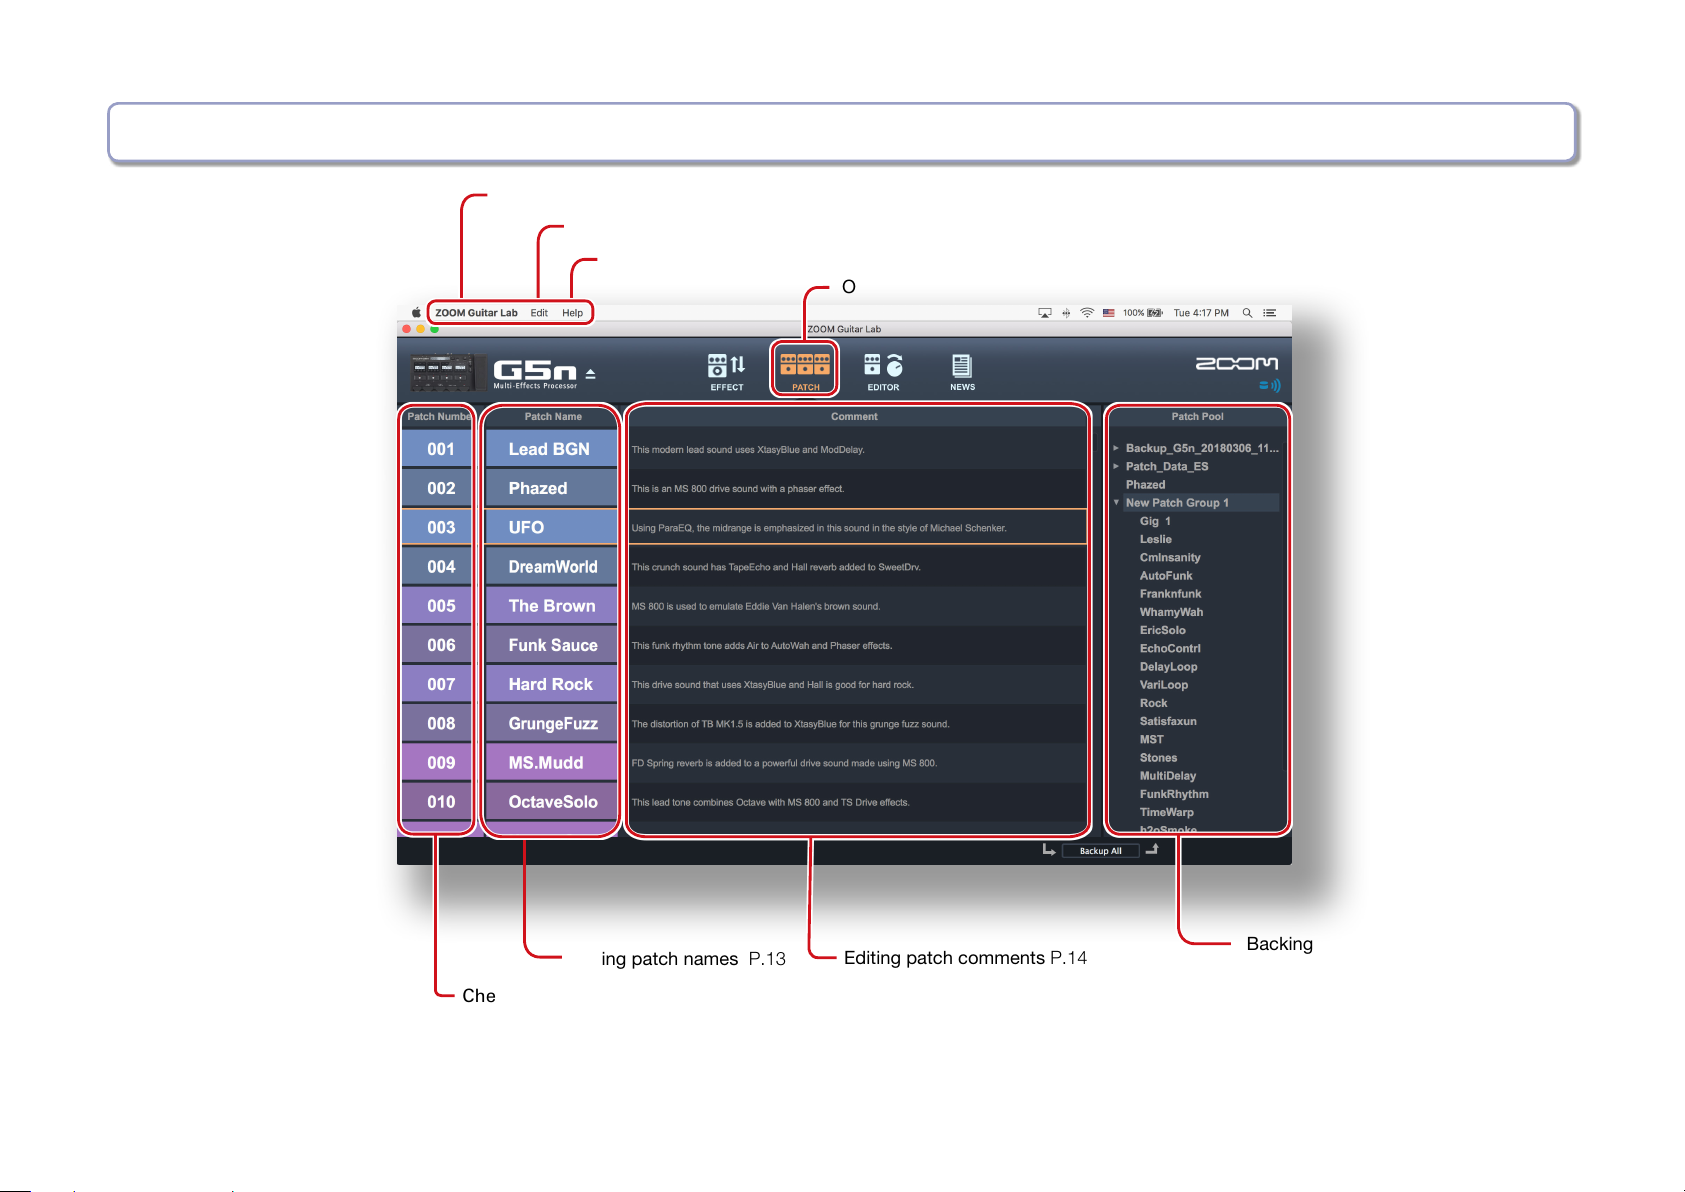
PATCH View - Overview
Managing Versions P.25 - 26
Undoing the last change to a patch
Showing the manual / Update History P.25
P.14
Opening the PATCH view P.11
—
P.26
Editing patch names P.13
Checking patch sounds / Changing patch order / Showing patch properties P.12
Editing patch comments P.14
— 5 —
Backing up patches on the device /
Restoring patches to the device
—
P.15
P.16
Page 6
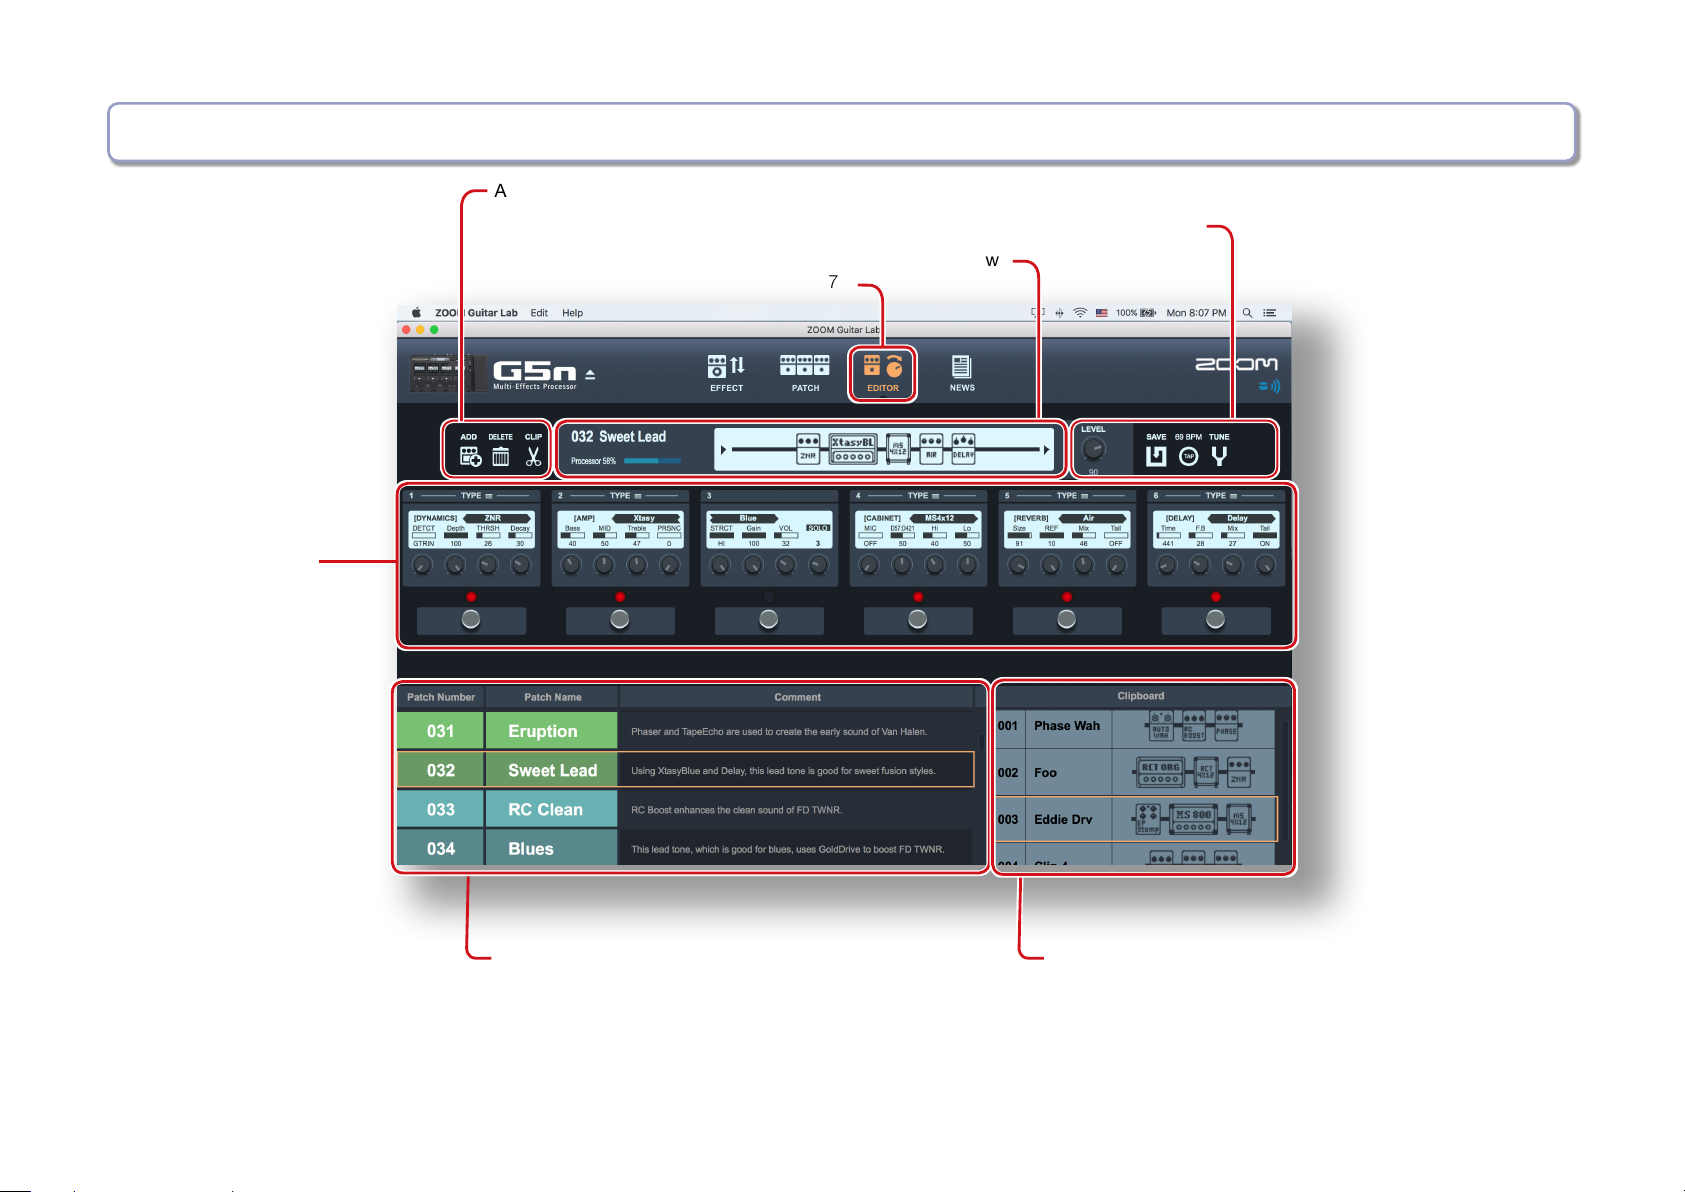
EDITOR View - Overview
Add effects/ Delete effects/Reorder effects P.19
View, change
and adjust
effects P.18
Save patch/ Adjust level/ Adjust tempo/ Tune your instrument P.22
Display Overview
Opening the EDITOR view P.17
Select patches for editing
— 6 —
Create clips/ Add clips / Delete clips / Rename
clips / Change clip order P.20
—
P.21
Page 7
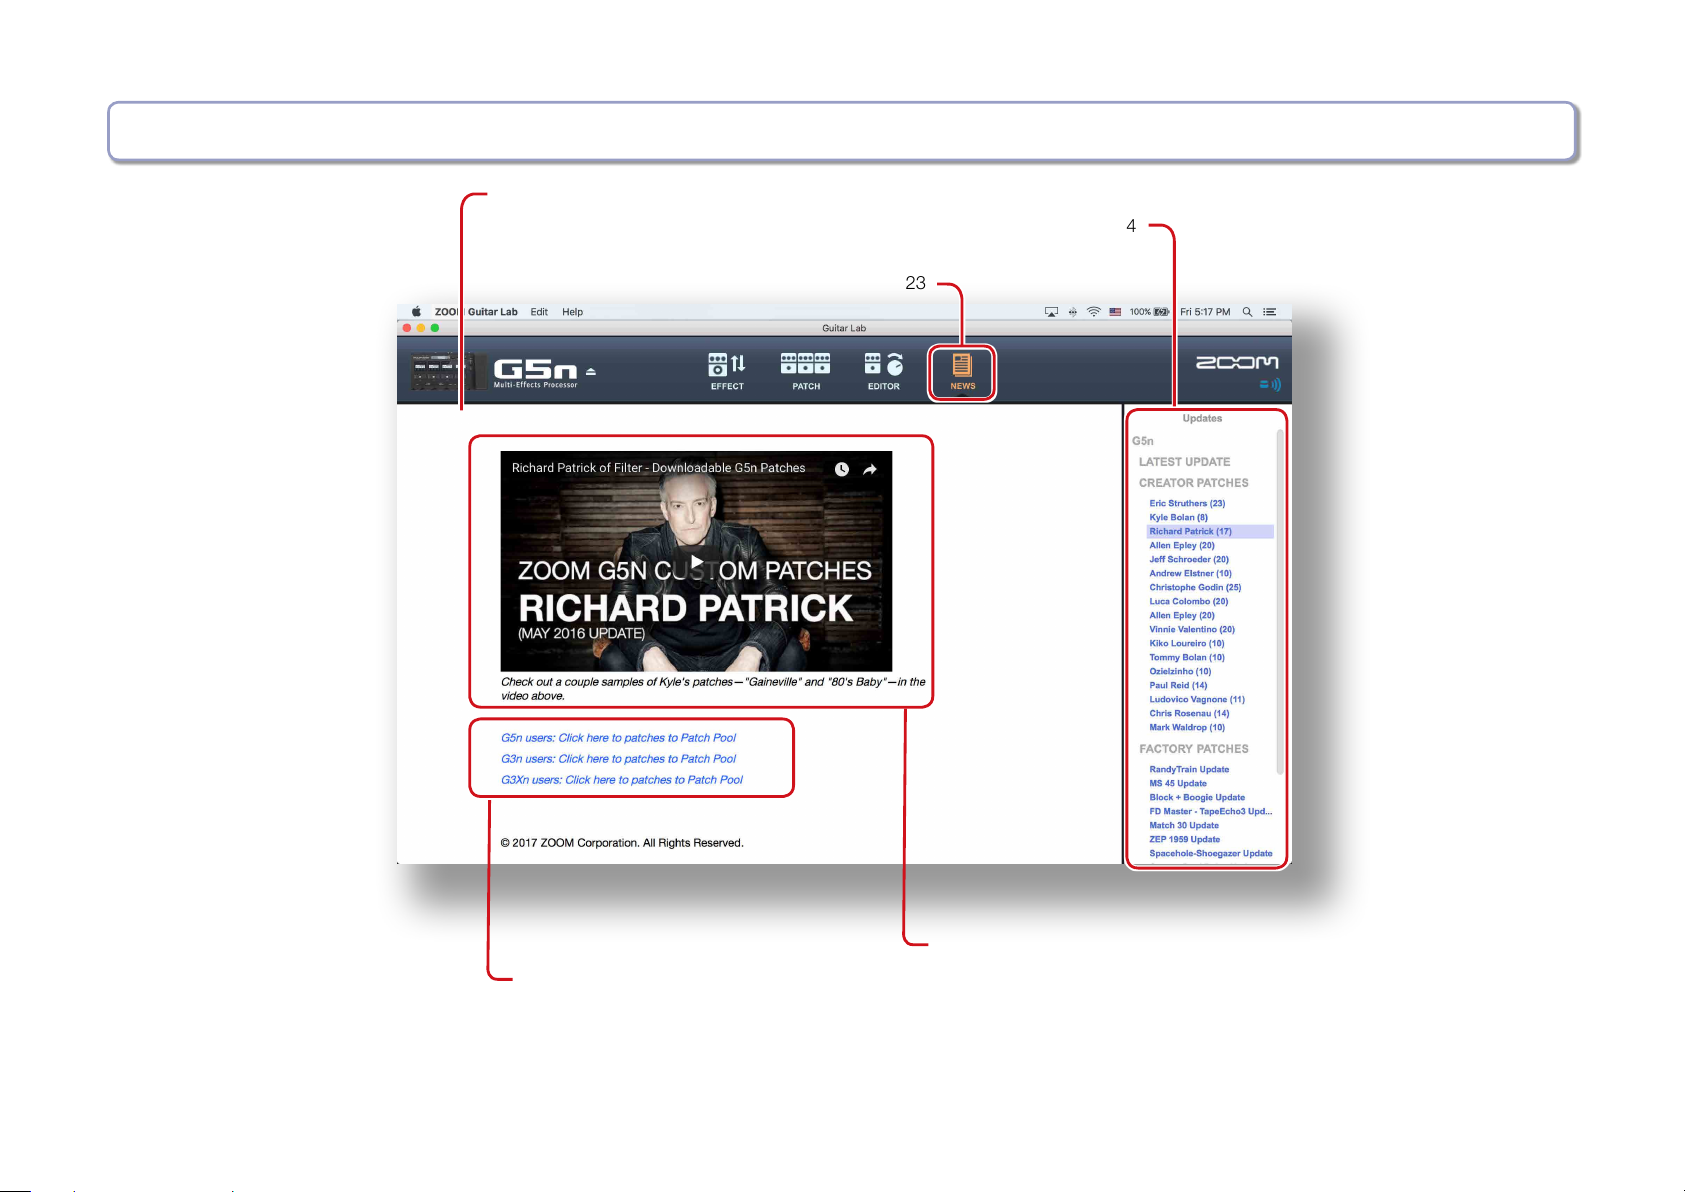
NEWS View - Overview
News update featuring artists
Click on an update to view its contents P.24
Open the NEWS view P.23
Add Patches to Guitar Lab’s patch pool P.24
— 7 —
Preview sound examples and video clips
Page 8
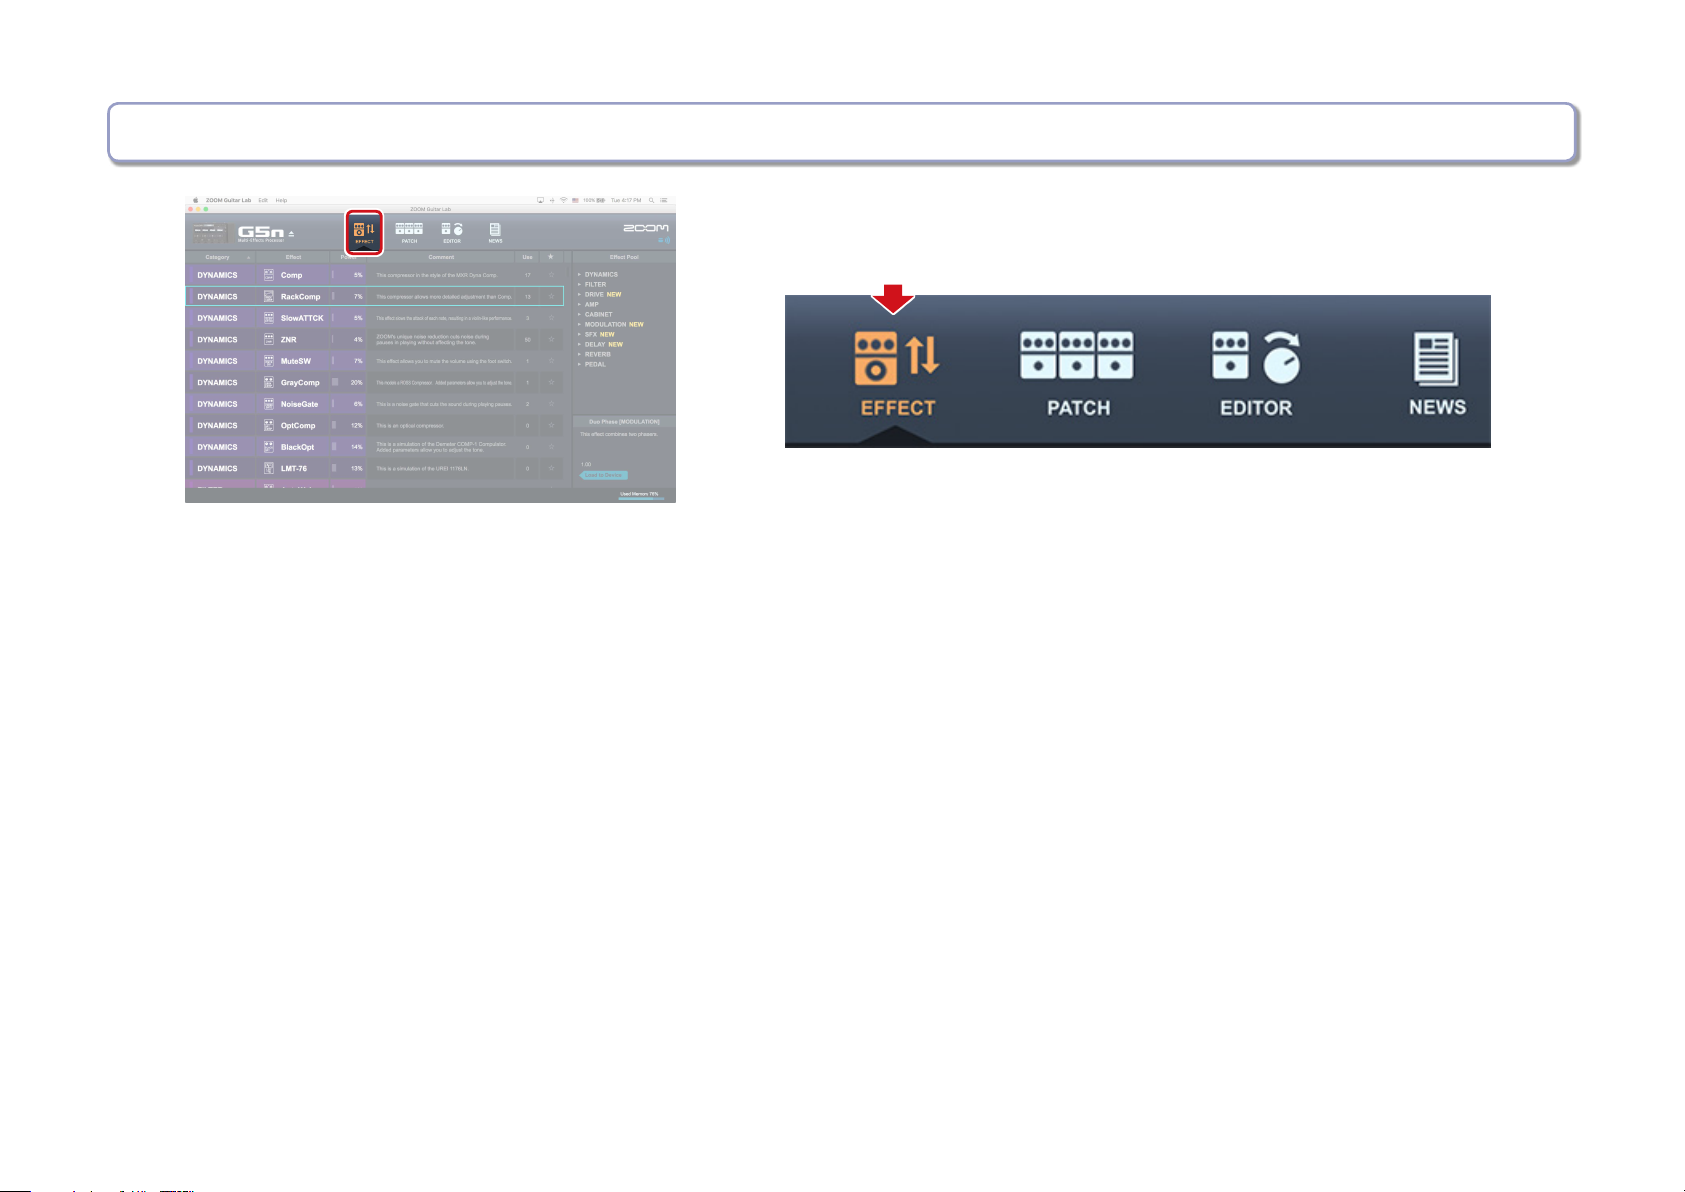
Opening the EFFECT view
Click the EFFECT icon.
Click
— 8 —
Page 9
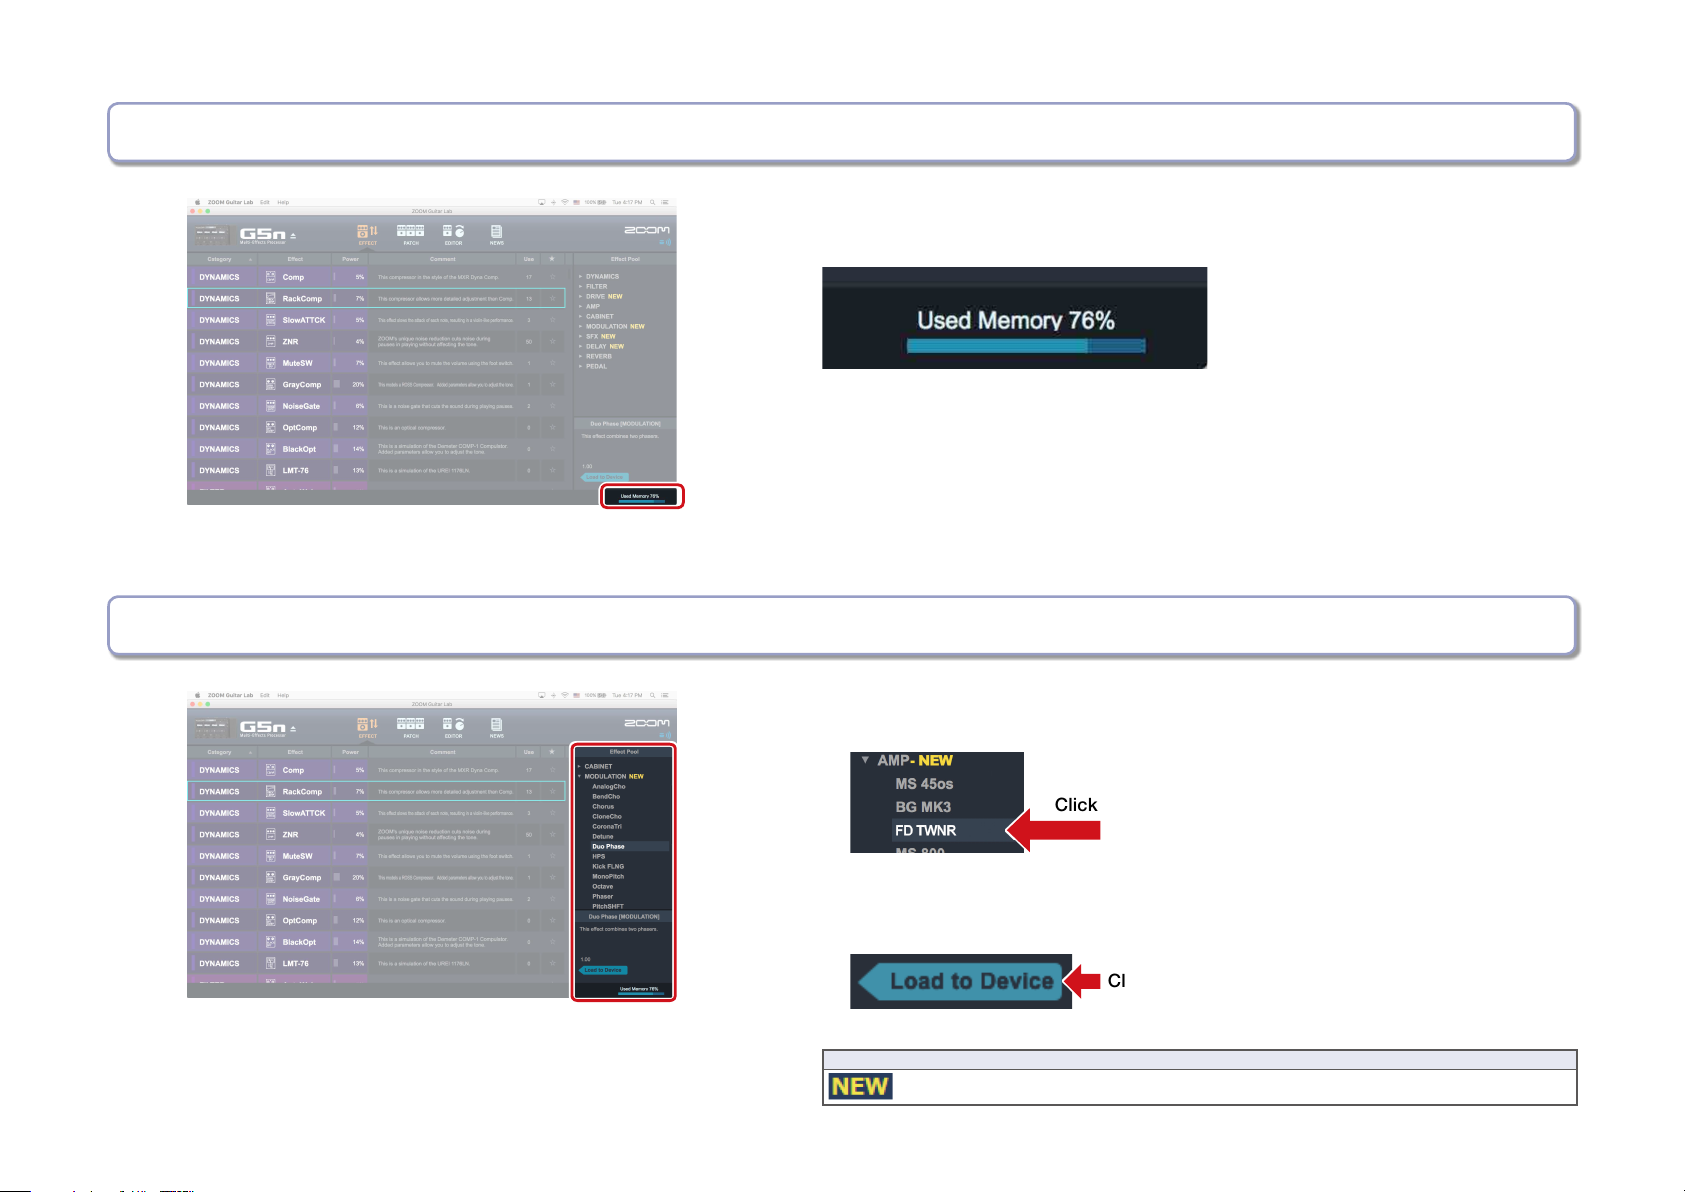
Checking the amount of device memory used
You can check the amount of memory used on the device.
Loading new effects on the device
1. Click the new eect to add.
2. Select “Load to device”.
HINT
appears by folders that contain new effects.
— 9 —
Click
Click
Page 10
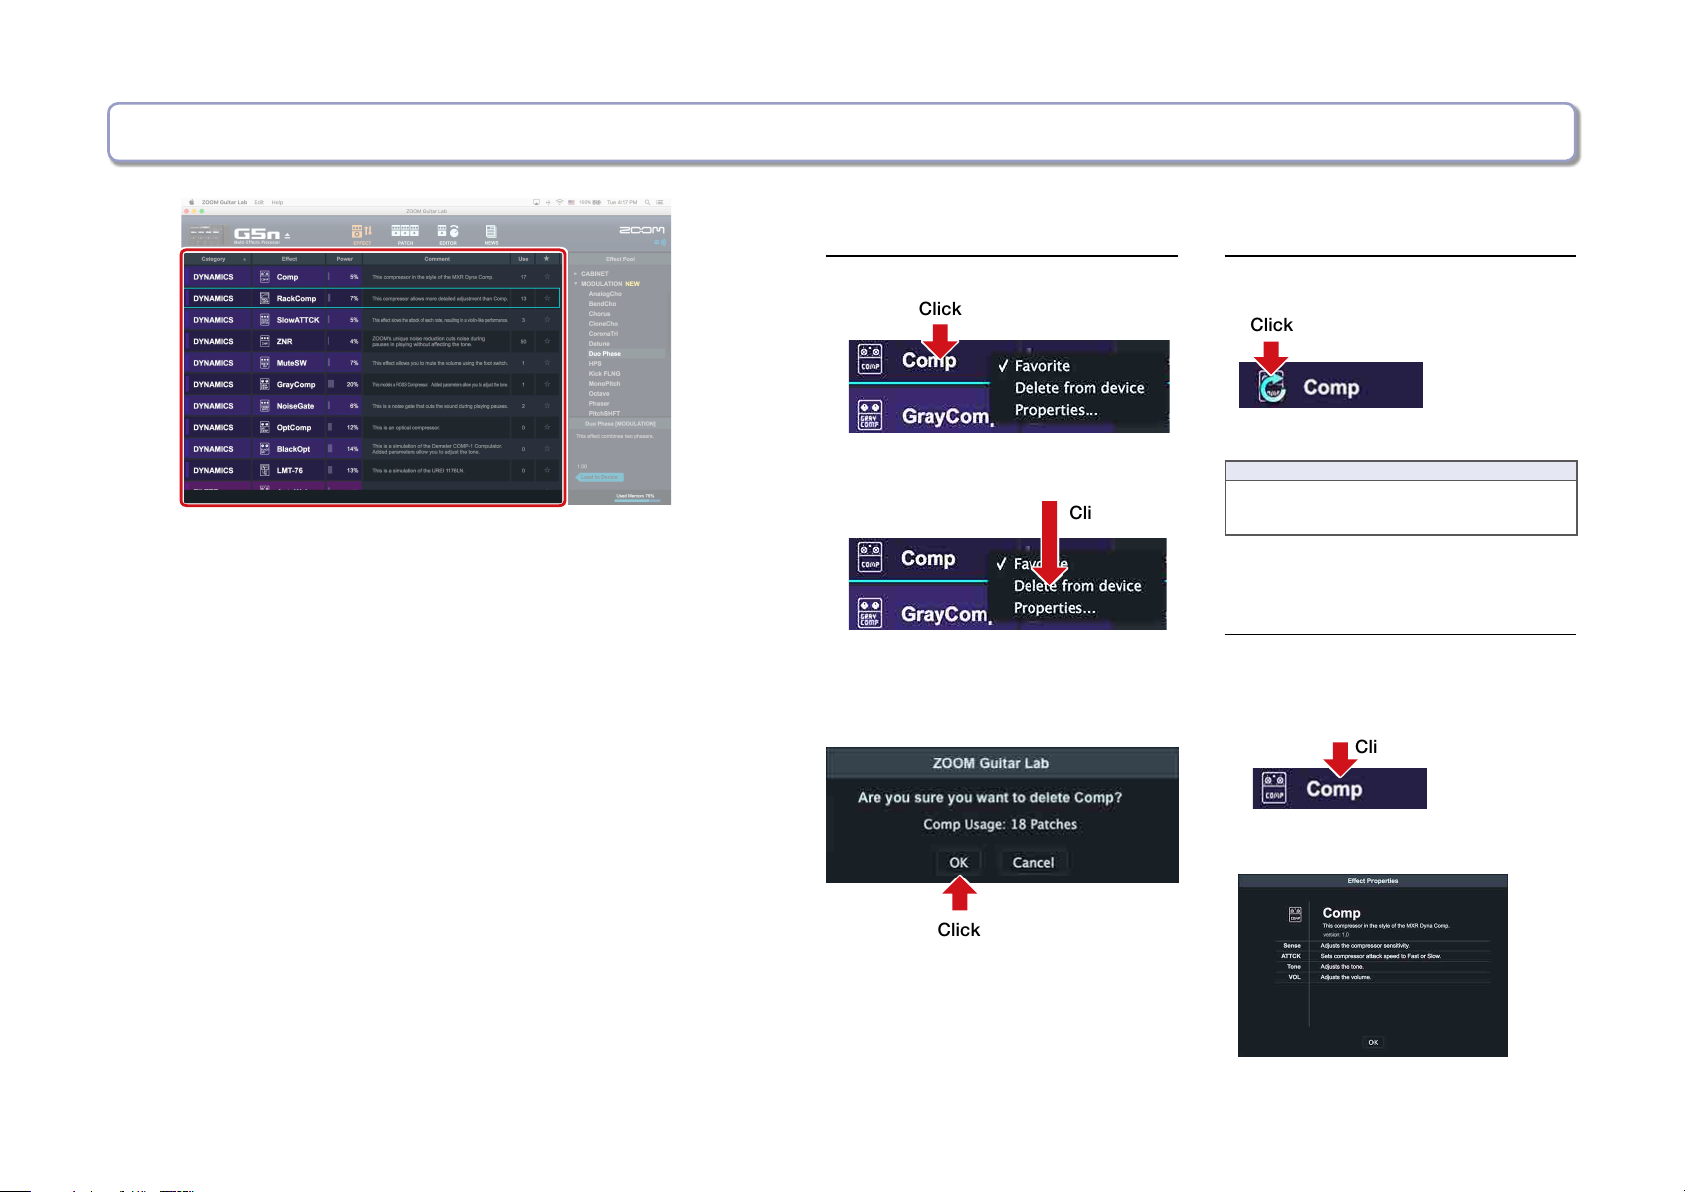
Deleting effects on the device / Restoring deleted effects / Viewing effect properties
Deleting effects on the device
1. Right-click the eect to delete.
Click
2. Select “Delete From Device”.
Click
3. Click “OK”.
Restoring deleted effects
Click the load icon to restore the eect.
Click
HINT
The load icon will appear for effects that
had been loaded after they are removed.
Viewing effect properties
Double-click an effect to view its properties.
Click
— 10 —
Click
Page 11

Selecting favorite effects
Sorting effects
Click the to select an eect as a favorite.
Click
Select the order in which eects are sorted.
Click
■
Sort condition types
Category Sort in category order.
Effect Sort in alphabetical order.
Power Sort by power usage.
Use Show by the number of times used in patches on the device.
Sort with favorites rst.
— 11 —
Page 12

Opening the PATCH view
Click the PATCH icon.
Click
HINT
appears next to patches that use eects that are not loaded on the device.
— 12 —
Page 13

Checking patch sounds / Changing patch order / Showing patch properties
Checking patch sounds
Select a patch to check its sound.
Click
Changing the patch order
1. Select the patch to reorder.
Click
2. Drag that patch to the position you want.
Drag
Showing patch properties
1. Select the patch to view.
Click
2. Right-click the patch and select
“Properites...” from the context menu.
3. Release the mouse to drop the reordered
patch.
Drop
— 13 —
Page 14

Editing patch names
1. Double-click the patch name to edit.
Click
2. Edit the patch name.
NOTE
• The characters and symbols that can be used are as follows.
! # $ % &
• Patch names can have a maximum of 10 characters.
’
() +, -. ; = @ [] ^ _ ` { }~(space) A‒Z, a‒z, 0‒9
— 14 —
Page 15

Editing patch comments
Undoing the last change to a patch
1. Double-click the comment to edit.
2. Edit the comment.
NOTE
A comment can have a maximum of 200 characters.
1. Click “Edit”.
Click
Click
2. Select “Undo”.
— 15 —
Click
Page 16

Backing up patches on the device
Backing up individual patches
1. Right-click a patch to back up.
Click
2. Select "Save To Patch Pool" to back up the
patch.
3. The patch is copied to the pool.
Click
Backing up all patches
1. Select a patch on the device.
Click
2. Select “Backup All”.
Click
HINT
• Select multiple patches to back up by holding down the Cmd key (Mac) /Ctrl key (Win) as you click them.
• Export patches by dragging and dropping them outside the application window.
• Import patches by dragging and dropping their les into the application window.
— 16 —
Page 17

Restoring patches to the device
Restoring individual patches
1. Select where to restore the patch.
Click
2. Right-click the patch to restore.
3. Select “Copy To Device”.
Restoring patch backups
1. Select the patch backup to restore.
Click
2. Click “Restore All”.
Click
Click
Click
HINT
Select multiple patches by holding down the Cmd Key (Mac)/ Ctrl key(Win) as you click them.
— 17 —
Page 18

Opening the EDITOR view
Click the EDITOR icon.
Click
— 18 —
Page 19

Adjust effect parameters / Change an effect type
Adjust effect parameters of a patch
1. Select a patch you want to edit.
Click Click
2. Click and drag any of the knobs to adjust
their values.
Click and
drag up or
down on
knobs to
adjust
Click to bypass effect
Change an effect type
1. Select the patch you want to edit.
2. Click TYPE at the top of the eect.
Click
3. Select a category and an effect from the
Eect Type View.
Category Eect
HINTS
• Press ESC to close the Eect Type View.
• When changing parameters use CTRL + mouse (Win) CMD + mouse (Mac) to make ne adjustments.
• Click the
at the bottom right to zoom the display of an eect.
— 19 —
Page 20

Add effects/ Delete effects/ Change effect order
Add an effect to the patch
1. Click the ADD button in the toolbar.
2. Place the mouse cursor
Overview where you’d like to insert the eect
and click the mouse button.
3. A bypassed eect unit will be inserted.
4. Click the TYPE button in the eect header
to open the Eect Type View.
5. Select a category and an eect.
Category Eect
in the Display
Delete an effect
1. Click the DELETE button in the toolbar.
2. Place the mouse cursor
Overview on the eect you wish to remove.
The eect is highlighted.
3. Click to delete it.
in the Display
Change effect order
1. In the Display Overview, click the effect
that you want to move.
2. Drag it left or right along the signal ow line
to re-order it.
— 20 —
3. Release the mouse when the effect is in
the desired position.
Page 21

Create a clip/ Add a clip to a patch
Clips
A “Clip” is a frequently used combination of 1
- 4 eects and their settings. In Guitar Lab,
you can create your own clips, store them in
the Clipboard pane, and use them to quickly
build new patches.
Create a clip
1. Click the CLIP button in the toolbar
and select any eect.
2. Resize the highlighted selection box by
clicking and dragging the left/right edge to
include up to 4 eects in your clip.
You can also move the selection box.
3. Click the clip icon
to add the clip to the Clipboard. The new clip
appears in the Clipboard pane.
in the selection box
Add a clip to a patch
1. Click to select a clip in the clipboard.
2. Drag the clip from the clipboard into the
Display Overview.
3. Release the mouse when the indicator is in
the desired location.
— 21 —
The effects from the clip are added to the
patch.
Page 22

Edit a clip name / Delete a clip / Change the clip order
Edit a clip name
1. Double-click the clip name to edit it.
Click
2. Edit the clip name.
3. Press ENTER to accept the change, or
press ESC to cancel.
Delete a clip
1. Right-click the clip you want to delete.
Click
Change the clip order
1. Click the clip you want to reorder.
Click
2. Drag that clip to the position you want.
3. Release the mouse to drop the reordered
clip.
2. Choose “Delete”.
— 22 —
Page 23

Save a patch / Adjust patch level/ Adjust tempo / Tune your instrument
Autosave
When autosave is enabled on your device,
any edits are automatically saved. You can
also save a patch at any time whether the
hardware’s autosave feature is enabled or
not.
If a patch has been edited the SAVE
button will appear orange.
Saving edits to a patch
1. Click the SAVE button in the toolbar.
2. Use the up/down arrow buttons to select
the patch number you want to overwrite.
Click
3. Click “OK” to save the patch or “Cancel” to
return to the EDITOR view.
Adjust patch level
On the hardware, each patch has its own
level setting (Menu | Patch | Level ). In Guitar
Lab, you can easily adjust patch level in the
Display Overivew:
Adjust tempo
1. Click the “TAP” button repeatedly to set
the tempo to your mouse click interval.
Click
2. Double-click the tempo value.
Click
3. Type in the desired tempo value.
4. Press ENTER to accept the change. Press
ESC key to cancel the change.
Tune your instrument
1. Click the Tuner button to show/hide the
tuner display
.
If a patch hasn’t been edited, the SAVE
button will appear white.
1. Click and drag the patch level knob to ad
just the volume of the patch.
Click
— 23 —
-
2. Use the on Display Overview to help you
adjust the tuning of your instrument.
Page 24

Opening the NEWS view
Click the NEWS icon.
Click
— 24 —
Page 25

Select and view news updates / Add new patches to Guitar Lab
Select and view news updates
News updates are organized by hardware
model, then into 3 categories: “Latest update,” “Creator patches,” and “Factory patches.”
1
. Double-click a Gray header label (e.g.
“Creator Patches”) to show the list of contents.
2
. Click a Creator name (e.g. “Richard Patrick”). The news update related to “Richard
P
atrick” will appear in the main part of the
screen.
Double-click
to show list
Add new patches to Guitar Lab
1. Select an update to view.
2. Click the “Add Patches to Patch Pool” link
for your hardware.
Click
The patches will be downloaded, extracted
and installed into the Patch Pool.
3. Select one or more of the patches and
drag into the Patch List to install it on your
hardware device.
NOTE
Guitar Lab must be connected to the internet to view News Updates.
Select patch
and drag to
Patch List
— 25 —
Page 26

Managing versions
Showing the application and device version
1. Click “ZOOM Guitar Lab”.
Click Click
2. Select “About”.
Click
3. Check the application and hardware device versions.
Setting version update notifications
1. Click “ZOOM Guitar Lab”.
2. Select “Preferences...”
Click
3. Select “Notify when the new version of ZOOM Guitar
Lab exists” and/or “Notify when the new version of rm
ware exists” from the Preferences panel.
-
— 26 —
Page 27

Showing the update history
Showing the manual
1. Click “Help”.
2. Select “Update History”.
Click
Click
1. Click “Help”.
Click
2. Select “ZOOM Guitar Lab Manual”.
Click
— 27 —
Page 28

Using when connected to a GCE-3 Guitar Lab Circuit Emulator
Selecting the product emulated by the
GCE-3
GCE-3
GCE-3
of preset patches and artist patches available for products that are compatible with Guitar Lab. You can also edit all the amp models and eects. You
c
ucts. For example, you can use a compact
multi-eect processor unit with high mobility for rehearsals and live performances. Use the model that is best for your circumstances.
Y
can use it to record in real time to a Mac/Windows computer.
With ZOOM
an also edit patches with the
ou can also use
GCE-3
GCE-3
, you can immediately access the massive library
and share them with emulated prod-
GCE-3
GCE-3
as a USB audio interface. Since DSP is built-in, you
at home and a ZOOM
1. Click the icon .
Click
2. Click the product to emulate.
Click
See the ZOOM website (www.zoom.co.jp) for information about supported products.
— 28 —
NOTE
The rhythm and looper functions are not supported with the following
products. G1 FOUR / G1X FOUR / B1 FOUR / B1X FOUR
Page 29

Changing tuner settings
1. Click “Edit”.
Click
2. Select “Device Settings...”
■
OUTPUT SOUND
Setting Explanation
BYPASS Eects are bypassed and the guitar sound is output.
MUTE The guitar sound is not output.
■
CALIBRATION
The standard pitch setting range is 435–445 Hz for middle A.
■
TYPE
Setting Explanation
CHROMATIC The pitch detuning is shown according to the nearest note (in semitones).
Other tuner types
The nearest string number is shown according to the selected type, and the amount
of detuning from its pitch is shown. The following tuner types can be selected.
3. Change the tuner settings.
Click
For Guitar
Display Explanation
GUI TA R Standard guitar tuning with a 7th string B E A D G B E
OPEN A Open A tuning (open strings play A chord) - E A E A C# E
OPEN D Open D tuning (open strings play D chord) - D A D F# A D
OPEN E Open E tuning (open strings play E chord) - E B E G# B E
OPEN G Open G tuning (open strings play G chord) - D G D G B D
DADGAD Alternate tuning often used for tapping and other techniques - D A D G A D
For Bass
Display Explanation
BASS
NOTE
“LB” is for the low B string, and “HC” is for the high C string.
■
FLAT
All strings can be tuned at from an ordinary tuning by 1 (
NOTE
Flat tuning cannot be used when the tuner type is “CHROMATIC”.
Standard bass guitar tuning (including basses with ve and six strings)
×1), 2 (♭×2) or 3 (♭×3) semitones.
♭
String number/note
7 6 5 4 3 2 1
String number/note
LB 4 3 2 1 HC
B E A D G B
— 29 —
Page 30

Changing audio interface settings
1. Click “Edit”.
Click
2. Select “Device settings...”
3. Change the audio interface settings.
Click
■
MONITAR BALANCE
You can balance the
NOTE
When using the monitoring function of DAW software, always set the USB audio monitoring balance to DAW.
A
ny other setting will give the output signal a anger-like sound.
■
RECORDING GAIN
This adjusts the volume sent to the computer (DAW software).
■
LOOPBACK
The
output and computer output can be mixed and sent back to the computer.
GCE-3
output and the computer output.
GCE-3
— 30 —
Page 31

Restore [GCE-3] to factory default settings.
1. Click “Edit”.
Click
2. Click “All Initialize…”
3 .Click “OK”.
Click
Click
NOTE
Initialization will overwrite all settings, including patches, to their factory defaults.
Be certain before using this function.
— 31 —
Page 32

ZOOM CORPORATION
4-4-3 Kanda-surugadai, Chiyoda-ku, Tokyo 101-0062 Japan www.zoom.co.jp
Z2I-2592-04
 Loading...