

Page 1

August 2009 9650-0914-01 Rev. A
Non-Invasive Blood
Pressure (NIBP)
Page 2

R SERIES — NON-INVASIVE BLOOD PRESSURE (NIBP) OPTION INSERT
The issue date or revision level for this operation guide is shown on the front cover.
ZOLL, R Series and “Advancing Resuscitation. Toda y .” are register ed trademarks of ZOLL
Medical Corporation.
SunTech Advantage is a registered trademark of SunTech Medical Group.
All other trademarks and registered trademarks are property of their respective owners.
Copyright 2009 by ZOLL Medical Corporation. All rights reserved.
ii www.zoll.com 9650-0914-01 Rev. A
Page 3

Non-Invasive Blood Pressure (NIBP)
Product Description
The Non-Invasive Blood Pressure (NIBP) option on the R Series® unit gives you the ability to
take a single blood pressure measurement, STAT measurements (automatically repeated
measurements over a 5 minute period), or automatic measurements at repeating pre-selected
intervals. The blood pressure information (including the patient’s systolic, diastolic and mean
blood pressure values) is shown on the R Series monitor in the NIBP display area, on the left
side of the screen.
For R Series BLS/Plus models, the NIBP option can only be used while the unit is in Manual
mode.
How To Use This Manual
This insert describes how to set up and use the R Series NIBP option. Important safety
information relating to the general use of t he R Series NIBP option appears in “Safety
Considerations” on page 2.
Before attempting to use the NIBP option, you must read and understand all the information
contained in the R Series Operator’s Guide, which provides information that operators need for
the safe and effective use and care of the R Series unit.
Thoroughly read the Safety Considerations and Warnings sections in both the R Series
Operator’s Guide and the relevant inserts before operating your R Series product.
SunTech CE Contact
Direct all cuff, hose, and NIBP questions with regards to the Declaration of Conformity with
European Union Directives to the authorized representative for SunTech:
SunTech Medical Instruments Ltd.
Oakfield Industrial Estate
Stantom Harcourt Road
Eynsham, Witney
OX8 ITS
UK
9650-0914-01 Rev. A 1
Page 4

R SERIES — NON-INVASIVE BLOOD PRESSURE (NIBP) OPTION INSERT
Safety Considerations
General NIBP Safety
• Read the R Series Operator’s Guide and this manual insert before use.
• Ensure that the R Series NIBP option is operated by qualified personnel only.
• Consult a physician for the proper interpretation of pressure measurements.
• Do not use on patients known to be susceptible to bruising.
• Use caution when using on elderly hypertensive patients, as such patie nts may be more
susceptible to bruising.
• Route patient hoses carefully to avoid patient entang lement, strangulation or compressio n of
hose.
• Do not select a cuff inflation pressure that exceeds the patient’s expected systolic pressure
by more than 30-40 mmHg (4.0-5.3 kPa). The factory-installed default adult cuff inflation
pressure is 160 mmHg (21.3 kPa) for adult patients, 120 mmHg (16.0 kPa) for pediatric
patients, and 90 mmHg (12.0 kPa) for neonatal patients.
• Keep patient, hose and cuff as still as possible during measurement. Patient movement or
vibrations from outside sources, particularly moving vehicles, can degrade measurement
accuracy.
• Check patient regularly for signs of skin irritation or impaired circulation in the monitored
limb.
• Do not use the NIBP option on a patient when the R Series unit is connected to an ECG
simulator.
• If an alarm occurs while the audible alarm indicators are disabled, alarms do not sound;
rather only the visual alarm indicators are displayed.
• If the accuracy of measurements is suspect, first check the patient's vital signs by alternate
means. Then check the cuff, hose and R Series NIBP option for proper functioning.
• The cuff, hose, and fitting are defibrillation-protected. Using the NIBP option introduces no
risk for shock due to defibrillation. The cuff and hose are non-conductive. Using the NIBP
option introduces no risk for burns due to electrosurgery.
Cuff and Hose Safety
• Only use cuffs, hoses, and connectors supplied or specified by ZOLL.
• Ensure that the hose is not kinked or obstructed before taking measurement.
• Do not use damaged cuffs, hoses, or connectors.
• Ensure proper cuff selection and placement to avoid inaccurate measurements or patient
injury.
• Position the cuff so it is level with the heart during measurement.
• Do not attach the cuff to a limb being used for IV infusion or SpO
inflation might block the infusion, causing harm to the patient or inaccurate SpO
measurements.
• Do not repeat NIBP measurements (particularly STAT measurements) at intervals less than
3-5 m inutes over an extended period of time. Rapidly repeating measurement can impair
circulation in the monitored limb.
• Do not sterilize or immerse the cuffs or hoses.
2 www.zoll.com 9650-0914-01 Rev. A
monitoring. Cuff
2
2
Page 5

NIBP Indications for Use
The ZOLL R Series NIBP option is indicated for the non-invasive measurement of arterial
blood pressure for resting patients in critical care and in-hospital transport.
The R Series NIBP option is designed to measure blood pressure for adult patients (21 years of
age and older) and for pediatric patients, as described in the following table:
Pediatric Subpopulation Approximate Age Range
Newborn (neonate) Birth to 1 month of age
Infant 1 month to 2 years of age
Child 2 to 12 years of age
Adolescent 12-21 years of age
What Can I Do With the NIBP Option?
With the NIBP option you can do the following in MONITOR, PACER, or DEFIB (ON for
BLS/Plus units, then select Manual) mode:
• Take a single blood pressure measurement.
• Take a STAT measurement (as many measurements – up to 10 – as possible with in 5
minutes).
• Take repeated measurements at user-programmable intervals.
• Immediately abort any measurement in progress by pressing one button.
• Set the cuff inflation pressure to adjust automatically based on the previously measured
systolic value.
• Display systolic, diastolic and mean blood pressure on the screen.
• Configure alarms to go off when the unit detects blood pressure values above or below
user-programmable limits.
• Display a history of NIBP measurements taken in the last 4 hours.
NIBP Indications for Use
How Do I Use the NIBP Option?
To take safe and accurate blood pressure measurements using the R Series NIBP option, you
must perform the following steps, each of which corresponds to a subsequent section in this
document. Read each section carefully before you use the R Series NIBP option.
1. Select the proper size cuff.
2. Connect the hose to the R Series unit and to the cuff.
3. Apply the cuff to the patient.
4. Display the NIBP menu.
5. Select the correct patient type (if the current setting is not appropriate).
6. Set the cuff inflation pressure (if the current setting is not appropriate).
7. Configure alarms (if the current settings are not appropriate).
8. Take blood pressure measure ment (s).
9. Read the display.
9650-0914-01 Rev. A R Series Non-Invasive Blood Pressure (NIBP) 3
Page 6

R SERIES — NON-INVASIVE BLOOD PRESSURE (NIBP) OPTION INSERT
WARNING! Do not use the NIBP option without proper training. Setting initial inflation pressure
too high can result in serious injury to the patient. Patient movement, very low pulse
volume, or vibration from outside sources can influence the accuracy of blood pressure
measurements.
How Does the NIBP Option Work?
The patient blood pressure cuff and hose connect to the R Series unit through the NIBP
connector on the rear panel of the unit. The NIBP button ( ) on the front panel of the
R Series allows you to initiate and terminate non-invasive blood pressure mea surements, whose
values display in the NIBP area of the monitor. You can also initiate and terminate Auto or
STAT mode measurements using the softkeys on the NIBP menu.
The ZOLL R Series NlBP Option non-invasively measures arterial blood pressure and pulse
rate in resting adult, neonate and pediatric patients. By incorporating the SunTech Medical
Advantage OEM BP A+ R-wave Motion Tolerance Module into the R Series
Defibrillator/Monitor/Pacemaker devices, the option faci litates the ability to monitor and assess
the physiological characteristics of the indicated patient populations.
The NIBP module measures the oscillometric pulses transmitted thro ugh the blood pressure
cuff and hose, and calculates the blood pressure measurements according ly. The pressure
measurement cycle takes approximately 30 seconds and proceeds as follows:
1. The cuff inflates to a preconfigured pressure (configured default value for adult patients is
160 mmHg), above the patient’s systolic blood pressure, to occlude blood flow through the
arteries in the monitored limb.
2. The cuff deflates incrementally, allowing blood to flow through the cuff and into the
monitored limb.
3. As blood flows past the partially deflated cuff, it produces pressure oscillations that are
transmitted to the R Series unit through the hose.
4. The R Series unit measures the oscil lometric pulses and uses them to calculate the
corresponding systolic, diastolic, and mean blood pressure, as well as the patient’ s pulse rate.
5. The NIBP option automatically adjusts the blood pressure measurement procedure in
response to certain error conditions such as:
Condition Adjustment/Response
The unit cannot detect
systolic pressure
The unit cannot detect
systolic, diastolic or
mean pressure after
3 minutes
The unit detects a
fault
The unit automatically
increases the cuff inflation
pressure and completes
the blood pressure
measurement
The unit aborts the blood
pressure measurement
and deflates the cuff
The unit displays a
corresponding error
message on the monitor
and aborts the
measurement
4 www.zoll.com 9650-0914-01 Rev. A
Page 7
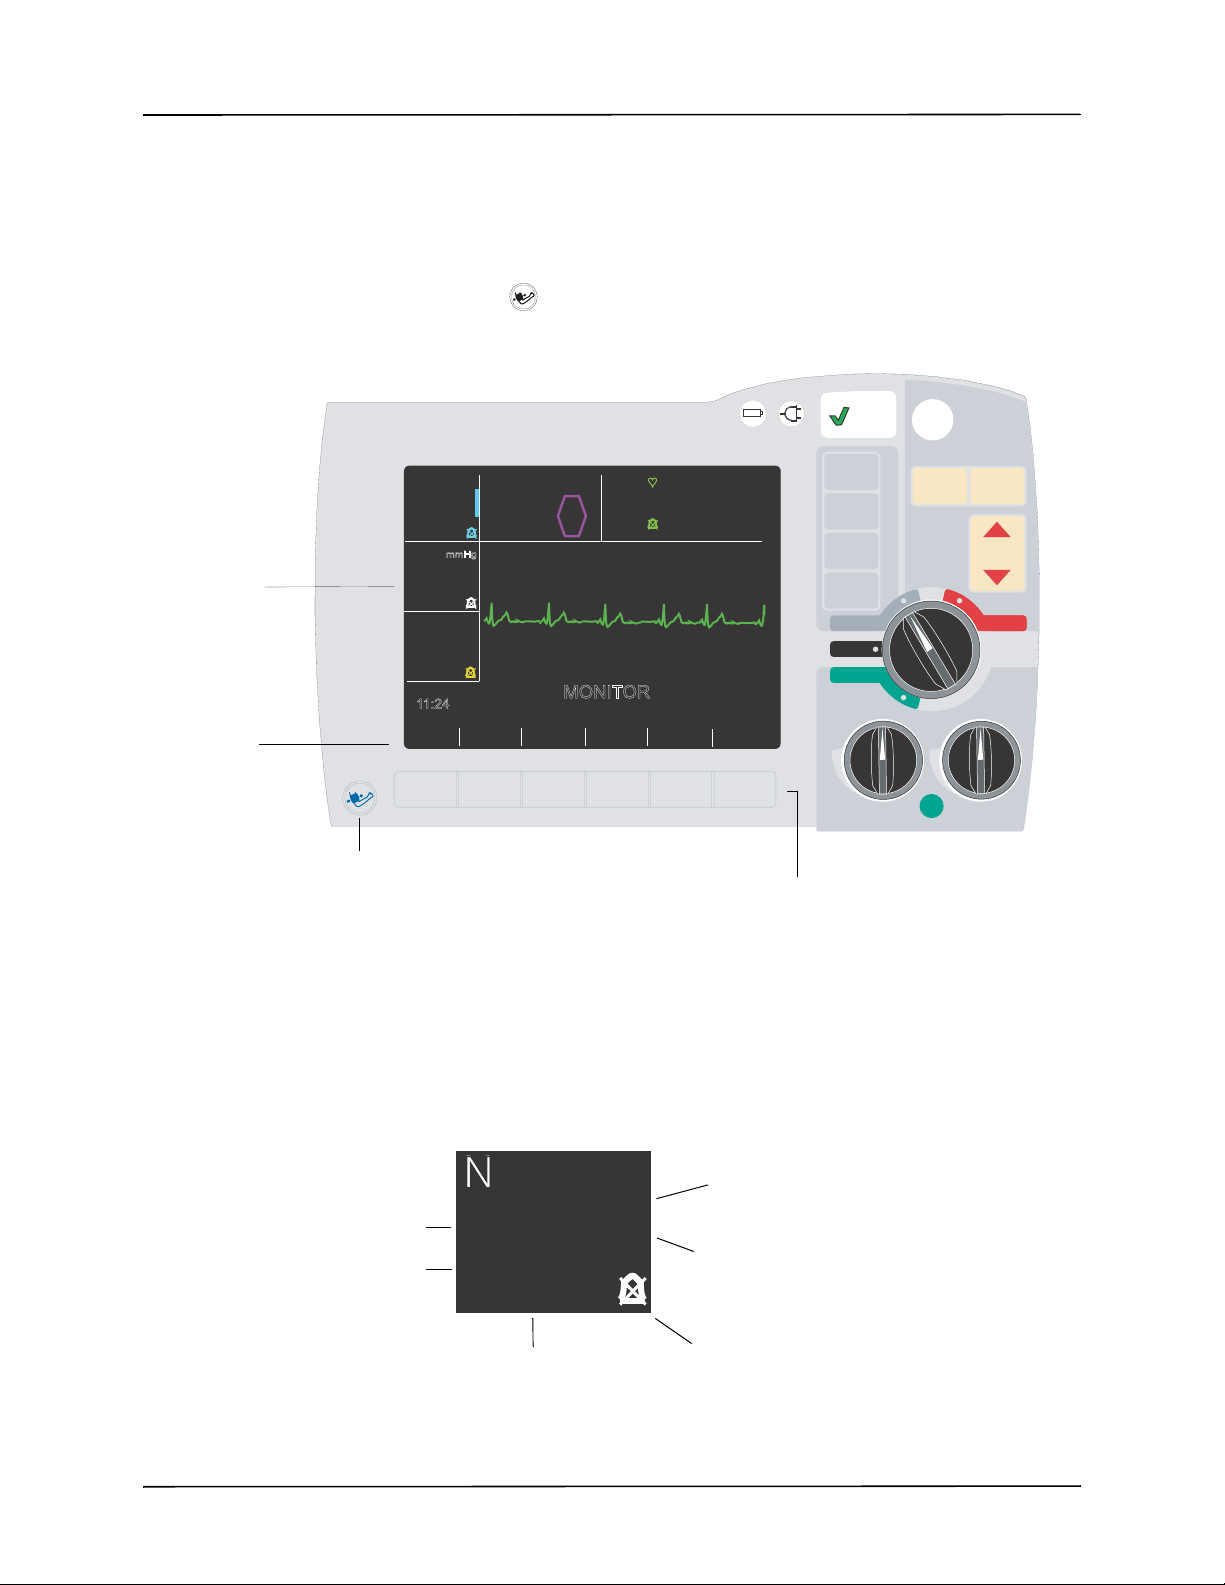
How Do I Read the Display?
Softkey Label
3
1
SHOCKSHOCK
2
ENERGY
SELECT
ENERGY
SELECT
ANALYZEANALYZE
CHARGECHARGE
OUTPUTmAOUTPUT
mA
RATE
ppm
RATE
ppm
4:1
LEAD
SIZE
ALARM
SUSPEND
RECORDER
DEFIB
OFF
MONITOR
PACER
Options Param
Code
Marker
Report
Data
Alarms
11:24
72
ECG
PADS
x1
SpO2%
CPR
0:00
IDLE
Depth
Rate
99
MONITOR
NIBP
ECG
mmHg
---
---
---
CO2
RR
---
---
mmHg
NIBP Button
Softkeys
NIBP
100
120
mmHg
P
80
*
Alarm
Diastolic BP
Systolic BP
Mean BP
* = artifact
Patient Type
(blank if Adult)
After each measurement, the NIBP display area displays measured systolic, diastolic, and mean
blood pressure values.
To facilitate quick reaction in emergency situations, you can control certain NIBP features by
pressing the NIBP button ( ) at the lo we r left-hand corner of the unit. To access other NIBP
features, you must press a softkey with the appropriate softkey label.
NIBP
Display
Area
How Do I Read the Display?
Softkey Labels
Note: Depending on the options included in your R Series unit, your display may differ
slightly from the illustrations in this insert.
The NIBP display area on the left side of the monitor screen consists of:
• Symbols that represent the status of blood pressure measurements.
• Numbers that represent the measurement values (refer to the following figure).
When taking a reading, the screen will display only the current cuff pressure.
9650-0914-01 Rev. A R Series Non-Invasive Blood Pressure (NIBP) 5
Page 8

R SERIES — NON-INVASIVE BLOOD PRESSURE (NIBP) OPTION INSERT
The symbols below show the current status or action being taken.
Display Symbols Status
NIBP Idle, or taking a single
measurement
STAT
alternating with
NIBP
AUTO
alternating with
NIBP
P Pediatric Patient Type
N Neonatal Patient Type
* Artifact indicator
Taking a STAT measurement
Taking an Auto measurement
Alarms enabled
Alarms disabled
The artifact indicator is shown when the R Series unit detects artifact in the signal. Under such
circumstances, the displayed pressure values may be inaccurate. Perform additional blood
pressure measurements before taking clinical action. If you repeatedly obtain artifact, use
alternate techniques to obtain blood pressure prior to taking clinical action.
Note that the R Series default unit of measure is millimeters of mercury (mmHg), but you can
configure the R Series to display kilopascals (kPa). Refer to the R Series Configuration Guide
for information on configuring alternate units of measure.
Preparing to Take Measurements
The following sections describe how to prepare to take measurements.
Selecting the Proper Size Cuff
The NIBP option comes with a cuff that inflates to cut off the patient’s blood flow and then
deflates slowly to allow the blood flow to resume gradually. To take accurate measurements,
you must use the proper sized cuff. Bladder length should be at least 80 percent of the limb
circumference, while the cuff width should be equal to 40 percent of the limb circumference.
6 www.zoll.com 9650-0914-01 Rev. A
Page 9

Preparing to Take Measurements
Select the appropriate size cuff for the patient from the following table:
Limb Circumference Cuff
38 to 50 cm
(14.96 to 19.69 in.)
31 to 40 cm
(12.20 to 15.75 in.)
23 to 33 cm
(9.06 to 12.99 in.)
17 to 25 cm
(6.69 to 9.84 in.)
12 to 19 cm
(4.72 to 7.48 in.)
8.0 cm to 15.0 cm
(3.1 to 5.9 in.)
7.0 to 13.0 cm
(2.8 to 5.1 in.)
6.0 to 11.0 cm
(2.4 to 4.3 in.)
4.0 to 8.0 cm
(1.6 to 3.1 in.)
3.0 to 6.0 cm
(1.2 to 2.4 in.)
Thigh
Large Adult
Adult
Small Adult
Child
Neonate #5
Neonate #4
Neonate #3
Neonate #2
Neonate #1
Caution You must use the 3 m hose when making neonatal NIBP measurements with the R Series. The 3 m
hose (ZOLL Part No. 8000-0662) is standard on R Series uni ts. Do not use the 1.5 m ho se when
making neonatal NIBP measurements; the cuff may not inflate, causing the unit to abort the NIBP
measurement.
You can order additional cuffs and hoses from ZOLL Medical Corporation. See “NIBP
Accessories” on page 22.
Connecting the Hose
The NIBP option comes with a hose that has a plastic connector on one end and a metal
connector on the other end; you must attach the hose to both the R Series unit rear panel using
the metal connector and the cuff’s hose using the plastic connector. The cuff has its own short
length of hose with a connector on the end. This connector fits into the end of the hose that is
not connected to the R Series unit.
To connect the hose :
9650-0914-01 Rev. A R Series Non-Invasive Blood Pressure (NIBP) 7
Page 10

R SERIES — NON-INVASIVE BLOOD PRESSURE (NIBP) OPTION INSERT
NIBP connector
1. Insert the metal connector on the NIBP hose into the NIBP connector at the back of the
R Series unit and push the connector until it snaps into place.
2. Insert the plastic connector on the NIBP hose into the cuff hose connector, and twist the
connectors until they lock into place.
You can now apply the cuff to the patient.
Applying the Cuff to the Patient
Using a cuff that is too small or is loosely applied results in values higher than the patient’s
actual blood pressure. Using a cuff that is too large results in values lower than the patient’s
actual blood pressure.
To apply the cuff to the patient:
1. Ensure the patient is sitting or lying down with the limb relaxed, extended, and placed on a
smooth surface for support.
2. Place the cuff 2 to 5 cm above the elbow crease or 5 to 10 cm (1.9 to 3.9 in.) above the knee
crease.
Caution Do not place the NIBP cuff on the same arm/leg as an SpO2 sensor. Inflation of the cuff causes
the SpO2 monitor to read incorrectly. Also, do not attach the cuff to a limb being used for IV
infusion. Cuff inflation might block the infusion, causing harm to the patient.
Caution Ensure that the cuff is at the same level as the heart. If the cuff is located below the patient’s
heart, the blood pressure measurements display false high readings. If the cuf f is located above
the patient’s heart, the blood pressure measurements display false low readings.
3. Adjust the cuff so that the artery marker on the cuff is over the artery , pointing to the hand or
foot.
8 www.zoll.com 9650-0914-01 Rev. A
Page 11

4. Check that the cuff ends between the range lines marked on the cuff. If not, use a different
size cuff.
5. Wrap the deflated cuff snugly around the limb without impeding blood flow.
6. Ensure that the hose is routed to avoid kinking or compression.
You can now access the NIBP features.
Accessing NIBP Features
Unless you are sure that the NIBP patient type, cuff inflation and ala rm settings are appropri ate
for the patient, display the NIBP menu before you take a blood pressure measurement. When
you first turn on the R Series unit, the NIBP settings are at their default values.
While the factory-installed default settings are appropriate for most adult patients, do not
assume the settings are at their default. A previous user may have:
• Changed the settings (if you did not turn on the R Series unit).
• Reconfigured the default settings.
Use the default settings unless they are clearly inappropriate for the patient. Any changes to
these settings remain in ef fect until either the settings are again changed, or for 10 seconds after
the R Series unit is turned of f. If you hav e not received trai ning on setting N IBP features, do not
use the NIBP option.
Preparing to Take Measurements
To facilitate quick reaction during emergency situations, you can directly access many NIBP
features without displaying the NIBP menu (see the following table).
WARNING! Do not start NIBP measurements unless you are sure that the cuff inflation and alarm
settings are appropriate for the patient. Incorrect settings can result in patient injury or
inaccurate measurements.
9650-0914-01 Rev. A R Series Non-Invasive Blood Pressure (NIBP) 9
Page 12

R SERIES — NON-INVASIVE BLOOD PRESSURE (NIBP) OPTION INSERT
SPO2
ECG
Return
NIBP
CO2
NIBP
Stat
Return
Settings
NIBP
Auto
NIBP
PT. Type
Trend
Task Action
Taking a single
measurement
Press the NIBP button
().
Taking STAT
measurements
Taking automatic
measurements
Aborting
measurement in
progress
Changing NIBP
settings
Displaying the NIBP Menu
Unless it is an emergency situation where quick reaction is essential, you should always check
that the cuff inflation and alarm settings are set properly before taking a measurement. You can
display the NIBP menu without leaving MONITOR, DEFIB or PACER mode. BLS/Plus units
must be in Manual mode to display the NIBP menu.
Press and hold the NIBP
() for two seconds
button
(if the NIBP Button Press and
Hold configuration option is
set to NIBP STAT), or see the
next section, “Displaying the
NIBP Menu.”
Press and hold the NIBP
() for two seconds
button
(if the NIBP Button Press and
Hold configuration option is
set to NIBP AUTO), or see
the next section, “Displaying
the NIBP Menu.”
Press the NIBP button.
See “Displaying the NIBP
Menu” on page 10.
To display the NIBP menu:
1. Press the Param softkey.
If the Param softkey label is not displayed, press the Return softkey until it is displayed.
The R Series unit displays the Parameter menu:
2.
Press the NIBP softkey.
The R Series unit displays the NIBP menu:
10 www.zoll.com 9650-0914-01 Rev. A
Page 13

• NIBP Stat: Take a STAT blood pressure measurement, as many as possible (up to 10) in
Return
NIBP
Ped
NIBP
Neonate
NIBP
Adult
5minutes.
• NIBP Auto: T ake an auto matic bloo d pressure measure ment at regular in tervals (t he default
is 30 minutes)
• NIBP PT. Type: Select the patient type of Adult, Pediatric, or Neonatal
• Settings: Adjust the settings for Cuff Inflation or Auto Interval.
• Trend: View the patient trend data.
Selecting the Patient Type
On R Series units, you can select a patient type for NIBP measurements: adult, pediatric, or
neonate. The patient type setting determines the default cuff inflation pressure, as well as
default alarm limits for high/low systolic, diastolic and mean blood pressure values.Unless
configured otherwise, the R Series defaults to adult patient mode when initially powered on.
See the R Series Configuration Guide for more information.
Note: When y ou change the patient type sett ing, the unit clears any currently disp layed NIBP
values from the display. You must reinitiate NIBP measurement to display new blood
pressure values.
To change the Patient Type setting:
Preparing to Take Measurements
1. Press the NIBP PT . Type softkey from the NIBP menu. If the NIBP PT. Type softkey label
is not displayed, see “Displaying the NIBP Menu” above.
The R Series displays the NIBP Patient menu. The current pat ient type setting is highlighted.
Press the NIBP Adult, NIBP Ped, or NIBP Neonate softkey to select the appropriate patient
2.
type setting.
The unit displays a Patient Type indicator in the NIBP display area (“P” for pediatric mode, or
“N” for neonatal mode, blank for adult mode), and automatically updates the default cuff
inflation pressure and default alarm settings accordingly.
Note: If you press the Return softkey, the R Series unit returns to the NIBP menu without
changing the patient type setting.
Selecting Cuff Inflation Settings
Before taking a measurement, ensure that the cuff inflation settings are appropriate for the
patient. To measure a patient’s blood pressure, the cuff begins the measurement cycle by
inflating to a pressure higher than the patient’s systolic blood pressure. This value is called the
cuff inflation pressure. During an NIBP measurement, the R Series unit may increase the cuff
inflation pressure over the initial value to obtain a systolic reading.
By default, the cuff inflation pressure for the first measurement after power-up is set as follows:
• 160 mmHg (21.3 kPa) for adult mode
• 120 mmHg (16.0 kPa) for pediatric mode
• 90 mmHg (12.0 kPa) for neonatal mode
9650-0914-01 Rev. A R Series Non-Invasive Blood Pressure (NIBP) 11
Page 14

R SERIES — NON-INVASIVE BLOOD PRESSURE (NIBP) OPTION INSERT
Return
Inc
Dec
Prev
Next
Auto Adjust
On
Adult Inflation Pressure
160 mmHg
Use the default setting unless it is clearly inappropriate. Any changes to this setting remain in
effect until either the setting is changed or 10 seconds after the R Series unit is turned off
(returning the setting to its default).
As a safety feature, the cuff can never be inflated to more than 300 mmHg (40.0 kPa) in adul t or
pediatric mode, and 150 mmHg (20.0 kPa) in neonatal mode.
Setting Cuff Inflation Pressure
Before taking a measurement, check that the cuff inflation pressure is appropriate for the
patient. The cuff inflation pressure option s are:
Adult Pediatric Neonatal
120 mmHg (16.0 kPa) 80 mmHg (10.7 kPa) 60 mmHg (8.0 kPa)
140 mmHg (18.7 kPa) 90 mmHg (12.0 kPa) 70 mmHg (9.3 kPa)
160 mmHg (21.3 kPa) 100 mmHg (13.3 kPa) 80 mmHg (10.7 kPa)
180 mmHg (24.0 kPa) 110mmHg (14.7kPa) 90 mmHg (12.0 kPa)
200 mmHg (2 6.7 kPa) 120 mmHg (16.0 kPa) 100 mmHg (13.3 k Pa)
220 mmHg (29.3 kPa) 130 mmHg (17.3 kPa) 110mmHg (14.7kPa)
240 mmHg (32.0 kPa) 140 mmHg (18.7 kPa) 120 mmHg (16.0 kPa)
260 mmHg (34.7 kPa) 150 mmHg (20.0 kPa) 130 mmHg (1 7.3 kPa)
See the R Series Configuration Guide for information on reconfiguring the cuff inflation
pressure default setting.
WARNING! Do not set cuff inflation pressure too high, particularly for neonatal, pediatric, or frail
patients. Serious injury can result.
To set the cuff inflation pressure:
1. Press the Settings softkey, then the Cuff Inflation softkey from the NIBP menu. If the
Cuff Inflation softkey is not displayed, see “Displaying the NIBP Menu” on page 10.
The R Series unit displays the Cuff Inflation menu:
2. Press the Next softkey if “Inflation Pressure” is not highlighted.
3. Press the Inc or the Dec softkey to select cuff inflation pressure.
4. Press the Return softkey to return to the NIBP menu.
The cuff inflation pressure is set.
12 www.zoll.com 9650-0914-01 Rev. A
Page 15

Preparing to Take Measurements
Return
Inc
Dec
Prev
Next
Auto Adjust
On
Adult Inflation Pressure
160 mmHg
Return
Inc
Dec
Prev
Next
Adult Inflation Pressure
180 mmHg
Auto Adjust
Off
Auto Adjust
The R Series unit automatically adjusts the cuff inflation pressure for all subsequent
measurements to 30 mmHg (4.0 kPa) greater than the systolic value of the previous
measurement. This default setting is called Auto Adjust. For example, the cuff inflates to
180 mmHg for the first measurement and the unit obtains a systolic reading of 110 mmHg. For
the next measurement, the cuff inflates to 140 mmHg (i.e., 110 + 30 = 140).
If the Auto Adjust feature is set to OFF, the selected cuff inflation pressure is used for all
measurements. If the Auto Adjust feature is set to ON, the selected cuff inflation pressure is
used for the first measurement only.
Turning Off Auto Adjust
You should turn off the Auto Adjust feature in situations where the R Series unit might inflate
the cuff to levels that can cause discomfort or harm to the patient. For example, when the
patient is:
• being transported over a very bumpy road
• moving the monitored arm
• a small child
When you turn the Auto Adjust feature off, the R Series unit repeats the same cuff inflation
pressure for every measurement. Because this method does not readjust to the patient’s
previously measured blood pressure, do not use fixed cuff inflation pressures unless you have
received the proper training.
To turn off Auto Adjust:
1. Press the Cuff Inflation softkey from the NIBP menu.
If the Cuff Inflation softkey is not displayed, see “Displaying the NIBP Menu” on page 10.
The R Series unit displays the Cuff Inflation menu:
2. Press the Next softkey until Auto Adjust is highlighted.
3. Press the Inc softkey until Auto Adjust is set to OFF:
4. Press the Return softkey to return to NIBP menu.
The R Series unit repeats the selected cuff inflation pressure for every measurement.
9650-0914-01 Rev. A R Series Non-Invasive Blood Pressure (NIBP) 13
Page 16

R SERIES — NON-INVASIVE BLOOD PRESSURE (NIBP) OPTION INSERT
Setting Alarms
The R Series NIBP option includes blood pressure alarms for the measurements shown in the
following table.
Before taking a measurement, ensure that all the NIBP alarms settings are appropriate for the
situation. See the R Series Operator’s Guide for instructions on setting alarms. When an NIBP
or heart rate alarm is triggered, the unit automatically initiates a single blood pressure
measurement. See the R Series Configuration Guide for instructions on how to enable/disable
this automatic measurement.
Patient Type Alarm Parameter Defaul t Setting Range (increments of 5)
Adult Systolic High 160 mmHg (2 1.3 kPa) 80-260 mmHg (10.7-34.7 kPa)
Low 90 mmHg (12.0 kPa) 40-140 mmHg (5.3-18.7 kPa)
Diastolic High 110mmHg (14.7kPa) 50-200 mmHg (6 .7-26.7 kPa)
Low 50 mmHg (6.7 kPa) 25-100 mmHg (3.3-13.3 kPa)
Mean High 130 mm H g (17.3 kPa) 60-220 mmHg (8.0-29.3 kPa)
Low 60 mmHg (8.0 kPa) 30-120 mm Hg (4.0-16.0 kPa)
Pediatric Systolic High 145 mmHg (19.3 kPa) 80-160 mmHg (10.7-21.3 kPa)
Low 75 mmHg (10.0 kPa) 35-140 mmHg (4.7-18.7 kPa)
Diastolic High 100 mmHg (13.3 kPa) 50-130 mmHg (6.7-17.3 kPa)
Low 35 mmHg (4.7 kPa) 20-100 mm Hg (2.7-13.3 kPa)
Mean High 110mmHg (14.7kPa) 60-140 mmHg (8.0-18 .7 kPa)
Low 50 mmHg (6.7 kPa) 30-120 mm Hg (4.0-16.0 kPa)
Neonate Systolic High 100 mmHg (13.3 kPa) 60-130 mmHg (8.0-17 .3 kPa)
Low 50 mmHg (6.7 kPa) 25-120 mm Hg (3.3-16.0 kPa)
Diastolic High 70 mmHg (9.3 kPa) 30-105 mmHg (4.0-14.0 kPa)
Low 30 mmHg (4.0 kPa) 20-100 mm Hg (2.7-13.3 kPa)
Mean High 80 mmHg (10.7 kPa) 35-110 mmHg (4.7-14.7 kPa)
Low 35 mmHg (4.7 kPa) 30-105 mm Hg (4.0-14.0 kPa)
When the R Series unit is turned on, all alarm functions are disabled, and the alarm limits are
set to their default values for the selected patient type. Any changes to these settings remain in
effect until either the settings are changed for the patient type or for 10 seconds after the
R Series unit is turned off. You can configure the default alarm limits at power-up; see the
R Series Configuration Guide for more information.
Setting Alarm Limits
You can change all the alarm limits using standard R Series procedures. See the RSeries
Operator’s Guide for instructions on setting alarm limits.
14 www.zoll.com 9650-0914-01 Rev. A
Page 17

Taking Measurements
You can set the alarm limits using the Auto function, or you can choose your own limits (see
the preceding table). The Auto function sets the high limit to 30 mmHg (4.0 kPa) above and the
low limit to 20 mmHg (2.7 kPa) below the last measurement.
Enabling, Disabling, and Suspending Alarms
You can activate and deactivate all NIBP alarms, as well as disable audible NIBP alarm
indicators, using standard R Series procedures; refer to the R Series Operator’s Guide for
instructions.
Changing the status of one NIBP alarm automatically sets all the other NIBP alarms to the same
status. For example, if you enable the systolic alarm, all other NIBP alarms are automatically
activated. Similarly, if you deactivate the diastolic alarm, all other NIBP alarms are
automatically deactivated. Activating or deactivating NIBP alarms or disabling audible NIBP
alarm indicators does not affect the status of other R Series alarms.
Suspending an NIBP alarm disables t he audible in dicators unt il after the comple tion of the next
measurement. All visual alarm indicators remain active.
Triggering NIBP Measurements
You can configure the R Ser ies unit to take a single NIBP measurement after the heart rate
alarm is triggered and/or the NIBP alarm is triggered. See the R Series Configuration Guide for
further details.
Setting Motion Tolerance
You can configure the R Series unit to compensate for motion tolerance during patient
movement, such as on a moving stretcher. The motion tolerance option is not supported for
neonatal patients. See the R Series Configuration Guide for details on how to change this
setting.
Taking Measurements
This section describes how to take each type of measurement (a single measurement, a STAT
measurement, or an automatic measurement). You can take any type of measurement whether
you are in MONITOR, DEFIB or PACER mode (ON for BLS/Pl us models, in Manual mode
only) except in the following cases:
• The defibrillator is charged or charging.
• The previous measurement occurred within 30 seconds in automatic interval measurement
mode.
T o immediately abort any measurement in progress and deflate the cuff, press the NIBP button.
As a safety feature, the R Series unit does not take measurements with in 3 0 seconds of another
completed measurement when in automatic interval measurement mode.
If the R Series unit finds a fault, a message displays on the screen. See “Troubleshooting” on
page 23 for a list of NIBP display messages and their corresponding corrective action.
9650-0914-01 Rev. A R Series Non-Invasive Blood Pressure (NIBP) 15
Page 18

R SERIES — NON-INVASIVE BLOOD PRESSURE (NIBP) OPTION INSERT
WARNING! If the R Series unit takes a measurement but detects the presence of artifact in the
signal (denoted by “*” in the NIBP display area), the measurement may not be
accurate. Under such circumst ances, perform add itional bloo d pres sure measur ements.
If you repeatedly obtain artifact, use alternate techniques to determine blood pressure
prior to taking clinical action.
When reading the blood pressure values on the display, keep in mind that the following
conditions can influence NIBP measurements:
• Position of the patient
• Position of the cuff relative to the patient’s heart
• Physical condition of the patient
• Patient limb movements
• Convulsions or tremors
• Very low pulse volumes
• Premature ventricular beats
• Vibrations in the cuff or hose caused by moving vehicles
• Improper cuff size or application
WARNING! Do not begin NIBP measurements unless the patient type setting is appropriate for the
patient. Taking NIBP measurements on a pediatric or neonatal patient while the unit is
in adult mode can result in inaccurate measurements and injury to the patient. Taking
NIBP measurements on an adult patient while in pediatric or neonatal mode can result
in inaccurate measurements.
Taking a Single Measurement
You can take a single measurement by pressing the NIBP button ( ) unless the R Series
defibrillator is charged or charging.
Caution Make sure that no measurement is being taken when you start a new meas urement. If you press
the NIBP button while the R Series unit is taking a measurement, the measurement aborts
immediately and the cuff deflates.
16 www.zoll.com 9650-0914-01 Rev. A
Page 19

Taking Measurements
3
1
SHOCKSHOCK
2
ENERGY
SELECT
ENERGY
SELECT
ANALYZEANALYZE
CHARGECHARGE
OUTPUTmAOUTPUT
mA
RATE
ppm
RATE
ppm
4:1
LEAD
SIZE
ALARM
SUSPEND
RECORDER
DEFIB
OFF
MONITOR
PACER
Options Param
Code
Marker
Report
Data
Alarms
11:24
72
ECG
PADS
x1
SpO2%
CPR
0:00
IDLE
Depth
Rate
99
MONITOR
NIBP
ECG
mmHg
---
---
---
CO2
RR
---
---
mmHg
NIBP Button
To take a single measurement, press the NIBP button on the R Series front panel.
The R Series unit takes one blood pressure measurement.
Taking STAT Measurements
You can set the R Series unit to take a STAT measurement, which consists of the unit taking as
many blood pressure measurements as possible (up to 10) in five minut es. When the R Series
unit finishes taking a measurement and the cuff deflates, it immediately starts another
measurement. Whenever practical, allow several minutes between STAT measurement
sequences to restore full circulation to the monitored limb.
WARNING! Repeated use of STAT measurements on the same patient over a short time interval can
affect blood pressure readings, limit circulation to the limb, and cause injury to the
patient.
You cannot set the R Series unit to take STAT measurements while the defibrillator is charged
or charging. Charging the defibrillator aborts all STAT measurements and deflates the cuff.
Starting STAT Measurements
To start STAT measurements, either:
• Press the NIBP button () and hold for two seconds (if the unit is configured to do so), or
• Press the NIBP Stat softkey.
If the NIBP Stat softkey label is not displayed, see “Displaying the NIBP Menu” on page 10.
If the R Series unit is configured to automatically generate strips, it prints a history of the STAT
measurements at the end of the 5-minute period.
Aborting STAT Measurements
You can abort STAT measurements at any time. Doing so terminates the current measurement
and all subsequent measurements.
To abort STAT measurements, either:
9650-0914-01 Rev. A R Series Non-Invasive Blood Pressure (NIBP) 17
Page 20

R SERIES — NON-INVASIVE BLOOD PRESSURE (NIBP) OPTION INSERT
Return
Inc Dec
Repeat BP Meas Every 30 Min
• Press the NIBP button ( ), or
• Press the NIBP Stat softkey.
If the NIBP Stat softkey label is not displayed, see “Displaying the NIBP Menu” on page 10.
The R Series unit immediately aborts all measurements, and the cuff deflates.
Taking Automatic Measurements
You can set the R Series unit to automatically take a series of measurements at selected
intervals. For example, if you set the R Series unit to take an automatic measurement with an
interval of 15 minutes, it immediately takes a measurement, waits 15 minutes, takes another
measurement, waits another 15 minutes, and so on.
To take automatic measurements at set intervals, you must:
1. Set the measurement interval (if not set to desired value).
2. Start automatic measurements.
Setting the Measurement Interval
Before you take automatic measurements, ensure that the measurement interval is properly set.
The measurement interval is the time period between when one measurement starts and the
next measurement starts. The measurement interval options (i n minutes) are: 2.5, 3, 4, 5, 6, 7, 8,
9, 10, 15, 20, 30, 45, 60, 90, and 120.
When you turn on the R Series unit, the measurement interval is set to the default value of
30 minutes. To change the default, see the R Series Configuration Guide.
To set measurements intervals:
1. Press the the Settings softkey, then the Auto Interval softkey from the NIBP menu.
If the Settings softkey is not displayed, see “Displaying the NIBP Menu” on page 10.
The R Series unit displays the Auto Interval menu:
2. Press the Inc or the Dec softkey to scroll through the interval options.
3. Press the Return softkey to select the desired measurement interval and return to NIBP
menu.
The measurement interval sets and remains until 10 seconds after the R Series unit is turned off,
or the value is reset.
Starting Automatic Measurements
To start automatic measurements, either:
• Press the NIBP button ( ) and hold for 2 seconds (if the unit is configured to do so), or
• Press the NIBP Auto softkey. If the NIBP Auto softkey label is not displayed, see
“Displaying the NIBP Menu” on page 10.)
18 www.zoll.com 9650-0914-01 Rev. A
Page 21

Taking Measurements
The R Series unit takes a measurement, and repeats subsequent measurements at the selected
interval.
Note that if the defibrillator is charged or charging when the R Series unit is about to take an
automatic measurement, it aborts the blood pressure measurement. All subsequent automatic
measurements take place at their scheduled time.
Note: If it is necessary to replace the battery of the R Series unit and AC power is not
connected during an automatic NIBP int erval, the interval wil l be extended b y the time
it takes to replace the battery up to 10 seconds.
Taking an Additional Measurement
You can take an immediate measurement between the automatic measurements except when:
• The R Series unit is currently taking a measurement.
• The defibrillator is charged or charging.
To take an additional measurement, press the NIBP button ( ).
The R Series unit takes an extra measurement without altering the timing of the other
measurements. It does not start a new automatic measurement unless 30 seconds have elapsed
since the end of the previous completed measurement cycle. If the extra measurement
completes less than 30 seconds before a scheduled measurement, the R Series unit omits the
scheduled measurement.
Aborting a Single Measurement
When the R Series unit is taking auto matic meas urements, you can stop a single blood pressure
measurement by pressing the NIBP button.
The R Series unit immediately stops taking the measurement and deflates the cuff, but takes all
subsequent automatic measurements at their selected interval.
Stopping All Automatic Measurements
You can stop all upcoming blood pressure measurements. If the R Series unit is taking a
measurement, it completes the current measurement, but does not take any subsequent
measurements.
To stop automatic measurements, simply press the NIBP Auto softkey. (If the NIBP Auto
softkey label is not displayed, see “Displaying the NIBP Menu” on page 10.)
Aborting Measurements
You can immediately abort a blood pressure measurement at any time whether you are in
MONITOR, DEFIB or PACER mode (ON for BLS/Plus models, in Manual mode only).
To abort the current measurement:
• Press the NIBP button ( ) on the R Series front panel.
The R Series unit immediately stops taking the measurement, displays the
NIBP MEAS ABORTED message, and deflates the cuff.
9650-0914-01 Rev. A R Series Non-Invasive Blood Pressure (NIBP) 19
Page 22

R SERIES — NON-INVASIVE BLOOD PRESSURE (NIBP) OPTION INSERT
3
1
SHOCKSHOCK
2
ENERGY
SELECT
ENERGY
SELECT
ANALYZEANALYZE
CHARGECHARGE
OUTPUTmAOUTPUT
mA
RATE
ppm
RATE
ppm
4:1
LEAD
SIZE
ALARM
SUSPEND
RECORDER
DEFIB
OFF
MONITOR
PACER
Options Param
Code
Marker
Report
Data
Alarms
11:24
72
ECG
PADS
x1
SpO2%
CPR
0:00
IDLE
Depth
Rate
99
MONITOR
NIBP
ECG
mmHg
---
---
---
CO2
RR
---
---
mmHg
NIBP Button
Return
TIME
HR/PR
NIBP mmHg
SYS DIA M
11:22 92 127 81 96
Newer
Older
Print
11:27
11:32
11:37
11:42
11:47
11:52
11:57
12:02
91
91
92
72
86
87
91
92
127 81 96
126 72 99
126 73 100
125 72 99
127 81 96
88 54 65
86 65 72 *
81 53 62
SpO2
%
99
99
98
99
98
99
97
98
99
WARNING! Make sure that a measurement has already started before attempting to abort. If you
press the NIBP button while a measurement is not being taken, the R Series un it starts a
new measurement.
Viewing Trend Data
20 www.zoll.com 9650-0914-01 Rev. A
Note that:
• If you press the NIBP button while taking a STAT measurement, the R Series unit
terminates all subsequent measurements.
• If you press the NIBP button while the R Series unit is taking an automatic measurement, it
aborts the current measurement, deflates the cuf f, and take s all subsequent meas urements at
the set interval.
To view the patient’s trend data over the past 4 hours, press the Trend softkey. The time,
HR/PR, and readings will be displayed.
Measurements with alarm values are highlighted; an asterisk (*) shows measurements that
contain artifact.
Page 23

Press Older to view previous entries if available; press Newer to return to newer entries. The
screen updates automatically during automatic or STAT measurements.
Press the Print softkey to print the displayed measurements.
Press the Return softkey to return to the main menu.
The patient’s trend data is cleared when the R Series unit remains off for more than 10 seconds.
Printing Data
A strip recorder is provided wi th the R Series unit to document events and data. See the
“Recorder Operation” section of the R Series Operator’s Guide for instructions on how to
record data. If you have already taken NIBP measurements, press the RECORDER button to
print a stripchart that includes the following values for the currently displayed measurement:
• Systolic blood pressure
• Diastolic blood pressure
• Mean blood pressure
• Pulse rate
• Time of measurement
Printing Data
Checkout Procedure
Perform the following checkout procedure daily to ensure that the NIBP option is functioning
properly. This daily checkout procedure also ensures that medical personnel maintain
familiarity with the proper use of the NIBP option.
For more specific instructions on how to accomplish each step listed below, refer to the related
section in this manual.
Perform the daily checkout procedure as follows:
1. Select the proper size cuff, as described in “Selecting the Proper Size Cuff” on page 6.
2. Connect the hose to the R Series unit and to the cuff , as describ ed in “Co nnecting the Hose”
on page 7.
3. Apply the cuff to a human test subject, as described in “Applying the C uf f to the Patien t” on
page 8.
4. Set the cuff inflation pressure (if current setting is not appropriate), a s descri bed in “Sett ing
Cuff Inflation Pressure” on page 12.
5. Take a blood pressure measurement.
During cuff inflation, inspect cuff, hoses, and connectors for air leakage. If a leak is present,
correct, replace, or service item.
6.
Verify that the unit displays no error messages.
7. Verify that the displayed blood pressure values are correct.
8. With alarms enabled, verify that the patient alarms are functional by adjusting the high and
low limits and repeating the above blood pressure measurement. Check that the unit:
• emits a continuous audio tone, and
• highlights the alarming parameter’s value and flashes the alarm symbol on the display.
9650-0914-01 Rev. A R Series Non-Invasive Blood Pressure (NIBP) 21
Page 24

R SERIES — NON-INVASIVE BLOOD PRESSURE (NIBP) OPTION INSERT
9. Visually inspect hose, hose connector , and cuf fs for signs of damage. If damaged, replace the
damaged item.
Cleaning the Hose and Reusable Cuffs
You can clean the hose and reusable cuffs by wiping the surface with a damp cloth and
disinfecting with a mild disinfectant solution. Blow dry air th rough the hose before use;
likewise, ensure the reusable cuff is dry before use.
NIBP Accessories
The following accessories can be used with the R Series NIBP option:
NIBP CUFFS
Limb
Cuffs
Thigh
(Reusable)
Large Adult
(Reusable)
Adult
(Reusable)
Small Adult
(Reusable)
Child
(Reusable)
Neonate #5
(Disposable)
Neonate #4
(Disposable)
Neonate #3
(Disposable)
Neonate #2
(Disposable)
Neonate #1
(Disposable)
Circumference REF
38 to 50 cm
(14.96 to 19.69 in.)
31 to 40 cm
(12.20 to 15.75 in.)
23 to 33 cm
(9.06 to 12.99 in.)
17 to 25 cm
(6.69 to 9.84 in.)
12 to 19 cm
(4.72 to 7.48 in.)
8.0 cm to 15.0 cm
(3.1 to 5.9 in.)
7.0 to 13.0 cm
(2.8 to 5.1 in.)
6.0 to 11.0 cm
(2.4 to 4.3 in.)
4.0 to 8.0 cm
(1.6 to 3.1 in.)
3.0 to 6.0 cm
(1.2 to 2.4 in.)
8000-1654
8000-1653
8000-1651
8000-1650
8000-1655
8000-0644
8000-0643
8000-0642
8000-0641
8000-0640
NIBP HOSES
Hoses Length (m) REF
Air hose with
pneumatic fittings
Air hose with
pneumatic fittings
3 m (9.8 ft.) 8000-0662
1.5 m (4.9 ft.) 8000-0655
22 www.zoll.com 9650-0914-01 Rev. A
Page 25

T roubleshooting
The following table lists the error messages and p roblems associate d with the NIBP option and
the associated corrective action(s). Read this section carefully. For further assistance, call
ZOLL Technical Service at 1-800-348-9011. International customers should call the nearest
authorized ZOLL Medical Corporation representa tiv e.
Message/Symptom Problem User Action
Troubleshooting
--- (dashed lines in
NIBP field)
CALIBRATE NIBP NIBP calibration is incomplete or failed Recalibrate NIBP. (See the R Series
NIBP COMM ERROR There is a communication problem with the
NIBP FAULT No communication from the NIBP module.
NIBP MEAS
ABORTED
NIBP NOT READY The defibrillator is charged or charging in
No NIBP measurement has been taken.
The last measurement taken has expired
after 120 minutes.
The patient type has been changed.
NIBP module.
NIBP module failed self-test.
Cuff inflation pressure is set too high for
attached cuff.
Inflation is too fast.
R Series is unable to find systolic value for
180 seconds.
Defibrillator is charged or charging. User
initiated abort.
progress.
NIBP module is performing power-up
self-test.
None, normal operation.
Repeat NIBP measurement.
Service Manual for details).
Cycle power and retry.
If problem persists, return for service.
Cycle power, and retry.
If the problem persists, return for
service.
Verify that you are using proper size
cuff.
Check for cuff and hose blockages.
Confirm that the unit was not charging.
If the problem persists, return for
service.
Wait until the unit discharges before
taking the next measurement.
Wait for more than 10 seconds after
power-up before taking blood pressure
measurements.
NIBP OUT OF RANGE The data from the NIBP module is out of
range.
REPEAT NIBP MEAS The unit exceeded the maximum number of
inflation attempts.
The unit exceeded the 180-second
measurement time limit.
Measure patient’s blood pressure with
other equipment.
Check cuff fit and positioning.
Switch cuff to other arm.
If problem persists, return for service.
Check cuff and hose.
Repeat NIBP measurement.
9650-0914-01 Rev. A R Series Non-Invasive Blood Pressure (NIBP) 23
Page 26

R SERIES — NON-INVASIVE BLOOD PRESSURE (NIBP) OPTION INSERT
Message/Symptom Problem User Action
REPEAT NIBP MEAS
alternating with
CHECK CUFF/HOSE
REPEAT NIBP MEAS
alternating with
NIBP ARTIFACT
REPEAT NIBP MEAS
alternating with
NIBP SIGNAL WEAK
SYSTEM FAULT Communication problem with the NIBP
NIBP box displays a
large “X”
Blood pressure cuff or hose is not installed
correctly.
Cuff or hose is faulty.
Hose kinked or disconnected.
Inflation rate too fast or too slow.
The unit is unable to detect systolic, diastolic
or mean blood pressure due to excessive
motion or vibration.
There is a weak or no oscillometric signal. Check cuff fit and positioning.
module.
Communication problem with the NIBP
module.
Check cuff connection to hose.
Check hose connection to unit.
Check for kinked hose or air leaks in the
hose.
If problem persists, replace cuff then
hose.
Take a single blood pressure
measurement.
Keep patient as still as possible.
Insulate patient, cuff and hose from
vibrations as much as possible.
Check hose connection to unit.
Check for kinked hose.
Increase cuff inflation pressure if
clinically appropriate.
Cycle power, and retry.
If problem persists, return for service.
Cycle power, and retry.
If problem persists, return for service.
NIBP M.T. OFF The NIBP motion tolerance feature is not
functioning properly.
False high reading Cuff too small.
Cuff not centered over brachial artery.
Cuff too loose.
Patient’s limb below level of heart.
False low reading Cuff too large.
Limb above level of heart.
If problem persists, return for service.
Select larger cuff.
Readjust cuff.
Reapply cuff or select smaller cuff.
Raise patient’s limb to heart level.
Select smaller cuff.
Lower patient’s limb to heart level.
24 www.zoll.com 9650-0914-01 Rev. A
Page 27

Specifications
Principle of Operation Oscillometric
Warm-up Time Operational in less than 10 seconds
Regulatory Standards ANSI/AAMI SP10-2002;
EN 1060-1: 1996 Specification for Non-invasive sphygmomanometers;
EN 1060-3: 1997;
EN 60601-2-30: 2000
Specifications
NIBP Measurement Range
NIBP Measurement Accuracy Per AAMI SP10 +/- 5 mmHg (0.7 kPa) mean difference;
NIBP Measurement Resolution 1 mmHg; 0.13 kPa
NIBP Measurement Cycle Time
Pulse Rate Range
Pulse Rate Accuracy
Pulse Rate Resolution
Alarm Limits Systolic Adult High 80 – 260 mmHg; High 10.7 – 34.7 kPa
Systolic Adult: 40 – 260 mmHg ; 5.3 – 34.6 kPa
Pediatric: 40 – 160 mmHg; 5.3 – 21.3 kPa
Neonatal: 40 – 130 mmHg; 5.3 – 17.3 kPa
Diastolic Adult: 20 – 200 mmHg; 2.7 – 26.7 kPa
Pediatric: 20 – 120 mmHg; 2.7 – 16.0 kPa
Neonatal: 20 – 100 mmHg; 2.7 – 13.3 kPa
Mean Adult: 30 – 220 mmHg; 4.0 – 29.3 kPa
Pediatric: 30– 133 mmHg; 4.0 – 17.7 kPa
Neonatal: 30 – 110 mmHg; 4.0 – 14.6 kPa
8 mmHg (1.1 kPa) standard deviation
Typical: 30 seconds
Worst Case: 180 seconds
30 – 220 pulses per minute
±2% or ±3 bpm, whichever is greater
1 bpm (beats per minute)
Low 40 – 140 mmHg; Low 5.3 – 18.7 kPa
Pediatric High 80 – 160 mmHg; High 10.7 – 21.3 kPa
Low 35 – 140 mmHg; Low 4.7 – 18.7 kPa
Neonatal High 60 – 130 mmHg; High 8.0 – 17.3 kPa
Low 25 – 120 mmHg; Low 3.3 – 16.0 kPa
Diastolic Adult High 50 – 200 mmHg; High 6.7 – 26.7 kPa
Low 25 – 100 mmHg; Low 3.3 – 13.3 kPa
Pediatric High 50 – 130 mmHg; High 6.7 – 17.3 kPa
Low 20 – 100 mmHg; Low 2.7 – 13.3 kPa
Neonatal High 30 – 105 mmHg; High 4.0 – 14.0 kPa
Low 20 – 100 mmHg; Low 2.7 – 13.3 kPa
Mean Adult High 60 – 220 mmHg; High 8.0 – 29.3 kPa
Low 30 – 120 mmHg; Low 4.0 – 16.0 kPa
Pediatric High 60 – 140 mmHg; High 8.0 – 18.7 kPa
Low 30 – 120 mmHg; Low 4.0 – 16.0 kPa
Neonatal High 35 –110 mmHg; High 4.7 – 14.7 kPa
Low 30 – 105 mmHg; Low 4.0 – 14.0 kPa
a
9650-0914-01 Rev. A R Series Non-Invasive Blood Pressure (NIBP) 25
Page 28

R SERIES — NON-INVASIVE BLOOD PRESSURE (NIBP) OPTION INSERT
Operating Time (with SpO2, EtCO2
and NIBP options)
For a new, fully charged lithium ion battery pack at 20°C (6 8°F):
• 90 defibrillator discharges at maximum energy (200 J), or
• 2.75 hours minimum of continuous ECG monitoring and blood
pressure measurements once every 5 minutes, or 2.25 hours of
continuous ECG monitoring/pacing at 60 mA, 70 beats per
minute.
Environmental Operating Temperature: 0 to 40 C (32º to 104º F)
Storage Temperature: -20 to 60 C (-4º to 140º F)
Humidity: 5 to 95% relative humidity, non-condensing
Electromagnetic Immunity
Operating Pressure
a
Blood pressure measurements determined with this dev ice are equivalen t to those ob tained by
AAMI DF-80; EN 61000-4-3: 2002, 10 V/m
594 to 1060 mBar
a trained observer using the cuff/stethoscope auscultation method, within the limits prescribed
by the American National Standard, Electronic or Automated Sphygmomanometers (AAMI
SP10). To receive a copy of the report containing the AAMI SP10 test results, contact ZOLL
Technical Support at (800) 348-9011 or (978) 421-9655
.
26 www.zoll.com 9650-0914-01 Rev. A
 Loading...