


Operating Guide Warranty
Model numbers C27V28, C32V28, C36V28 Direct View HDTV Monitors
t a b l e o f c o n t e n t s |
p a g e |
5 |
|
|
TM |
® |
|
|
|
|
|
|
©Copyright 2002, Zenith Electronics Corporation. |
® |
|
RECORD YOUR MODEL NUMBER
The model and serial number of your MultimediaTM TV are located on the back of the TV cabinet. For your future convenience, we suggest that you record these numbers here:
Model No._________________________ Serial No. __________________________
WARNING
RISK OF ELECTRIC SHOCK
DO NOT OPEN
WARNING:
TO REDUCE THE RISK OF ELECTRIC SHOCK DO NOT REMOVE COVER (OR BACK). NO USER SERVICEABLE PARTS INSIDE. REFER TO QUALIFIED SERVICE PERSONNEL.
The lightning flash with arrowhead symbol, within an equilateral triangle, is intended to alert the user to the presence of uninsulated “dangerous voltage” within the product’s enclosure that may be of sufficient magnitude to constitute a risk of electric shock to persons.
The exclamation point within an equilateral triangle is intended to alert the user to the presence of important operating and maintenance (servicing) instructions in the literature accompanying the product.
WARNING:
TO PREVENT FIRE OR SHOCK HAZARDS, DO NOT EXPOSE THIS PRODUCT TO RAIN OR MOISTURE.
POWER CORD POLARIZATION:
CAUTION: To prevent electric shock, match wide blade of plug to wide slot, fully insert.
ATTENTION: Pour éviter les chocs électriques, introduire la lame la plus large de la fiche dans la borne correspondante de la prise et pousser jusqu’au fond.
NOTE TO CABLE/TV INSTALLER:
This reminder is provided to call the cable TV system installer’s attention to Article 820-40 of the National Electric Code (U.S.A.). The code provides guidelines for proper grounding and, in particular, specifies that the cable ground shall be connected to the grounding system of the building, as close to the point of the cable entry as practical.
REGULATORY INFORMATION: FCC Part 15
This product has been tested and found to comply with the limits for a Class B digital device, pursuant to Part 15 of the FCC Rules. These limits are designed to provide reasonable protection against harmful interference when the product is operated in a residential installation. This product generates, uses and can radiate radio frequency energy and, if not installed and used in accordance with the instruction manual, may cause harmful interference to radio communications. However, there is no guarantee that interference will not occur in a particular installation. If this product does cause harmful interference to radio or television reception, which can be determined by turning the product off and on, the user is encouraged to try to correct the interference by one or more of the following measures:
•Reorient or relocate the receiving antenna.
•Increase the separation between the product and receiver.
•Connect the product into an outlet on a circuit different from that to which the receiver is connected.
•Consult the dealer or an experienced radio/TV technician for help.
FCC Part 68
•This product complies with Part 68 of the FCC rules. On the back of this product is a label that contains, among other information, the FCC registration number and Ringer Equivalent Number (REN) for this product. If requested, this information must be provided to the telephone company.
•The REN is used to determine the quantity of devices that may be connected to the telephone line. Excessive RENs on the telephone line may result in the devices not ringing in response to an incoming call. Typically, the sum of the RENs should not exceed five (5). To be certain of the number of devices that may be connected to the line (as determined by the total RENs) contact the local telephone company.
•If this product causes harm to the telephone network, the telephone company will notify you in advance that temporary discontinuance of service may be required. But if advance notice isn’t practical, the telephone company will notify the customer as soon as possible. Also, you will be advised of your right to file a complaint with the FCC if you believe it is necessary.
•The telephone company may make changes to it’s facilities, equipment, operations or procedures that could affect the operation of the product. If this happens, the telephone company will provide advance notice so you can make the necessary modifications to maintain uninterrupted service.
•Connection to party line service is subject to state tariffs. (Contact the state public utility commission, public service commission, or corporate commission for information.)
•If trouble is experienced with this product, for repair or warranty information, please contact Zenith Electronics Corporation. If the product is causing harm to the telephone network, the telephone company may request that you disconnect the product until the problem is resolved.
COMPLIANCE: The responsible party for this product’s compliance is:
Zenith Electronics Corporation, 201 James Record Road, Huntsville, AL 35824, USA • Digital TV Hotline: 1-800-243-0000.
CAUTION:
Do not attempt to modify this product in any way without written authorization from Zenith Electronics Corporation. Unauthorized modification could void the user’s authority to operate this product.
MultimediaTM is a trademark of Zenith Electronics Corporation
MULTMEDIA I PHONE10/00
© Copyright 2002 Zenith Electronics Corporation

IMPORTANT SAFETY INSTRUCTIONS
Important safeguards for you and your new product
Your product has been manufactured and tested with your safety in mind. However, improper use can result in potential electrical shock or fire hazards. To avoid defeating the safeguards that have been built into your new product, please read and observe the following safety points when installing and using your new product, and save them for future reference.
Observing the simple precautions discussed in this operating guide can help you get many years of enjoyment and safe operation that are built into your new product.
This product complies with all applicable U.S. Federal safety requirements, and those of the Canadian Standards Association.
1. Read Instructions
All the safety and operating instructions should be read before the product is operated.
2. Follow Instructions
All operating and use instructions should be followed.
3. Retain Instructions
The safety and operating instructions should be retained for future reference.
4. Heed Warnings
All warnings on the product and in the operating instructions should be adhered to.
5. Cleaning
Unplug this product from the wall outlet before cleaning. Do not use liquid cleaners or aerosol cleaners. Use a damp cloth for cleaning.
6. Water and Moisture
Do not use this product near water for example, near a bath tub, wash bowl, kitchen sink, or laundry tub, in a wet basement, or near a swimming pool.
7. Accessories, Carts, and Stands
Do not place this product on a slippery or tilted surface or on an unstable cart, stand, tripod, bracket, or table. The product may slide or fall, causing serious injury to a child or adult, and serious damage to the product. Use only with a cart, stand, tripod, bracket, or table recommended by the manufacturer, or sold with the product. Any mounting of the product should follow the manufacturer’s instructions, and should use a mounting accessory recommended by the manufacturer.
8. Transporting Product
A product and cart combination should be moved with care. Quick stops, excessive force, and uneven surfaces may cause the product and cart combination to overturn.
9. Attachments
Do not use attachments not recommended by the product manufacturer as they may cause hazards.
10. Ventilation
Slots and openings in the cabinet are provided for ventilation and to ensure reliable operation of the product and to protect it from overheating, and these openings must not be blocked or covered. The openings should never be blocked by placing the product on a bed, sofa, rug, or other similar surface. This product should not be placed in a built-in installation such as a bookcase or rack unless proper ventilation is provided or the manufacturer’s instructions have been adhered to.
11. Power Sources
This product should be operated only from the type of power source indicated on the marking label. If you are not sure of the type of power supply to your home, consult your product dealer or local power company. For products intended to operate from battery power, or other sources, refer to the operating instructions.
12. Power Cord Polarization
This product is equipped with a polarized alternating current power plug (a plug havind one blade wider than the other). This plug will fit into the power outlet only one way. This plug is a safety feature. If you are unable to insert the plug fully into the outlet, try reversing the plug. If the plug should still fail to fit, contact your electrician to replace your obsolete outlet. Do not defeat the safety purpose of the polarized plug.
13. Power Cord Protection
Power-supply cords should be routed so that they are not likely to be walked on or pinched by items placed upon or against them, paying particular attention to cords at plugs, convenience receptacles, and the point where they exit from the product.
(Continued on next page)
PORTABLE CART WARNING
3-WireRev6/00 |
P A G E 3 |
|
IMPORTANT SAFETY INSTRUCTIONS
(Continued from previous page)
14. Outdoor Antenna Grounding
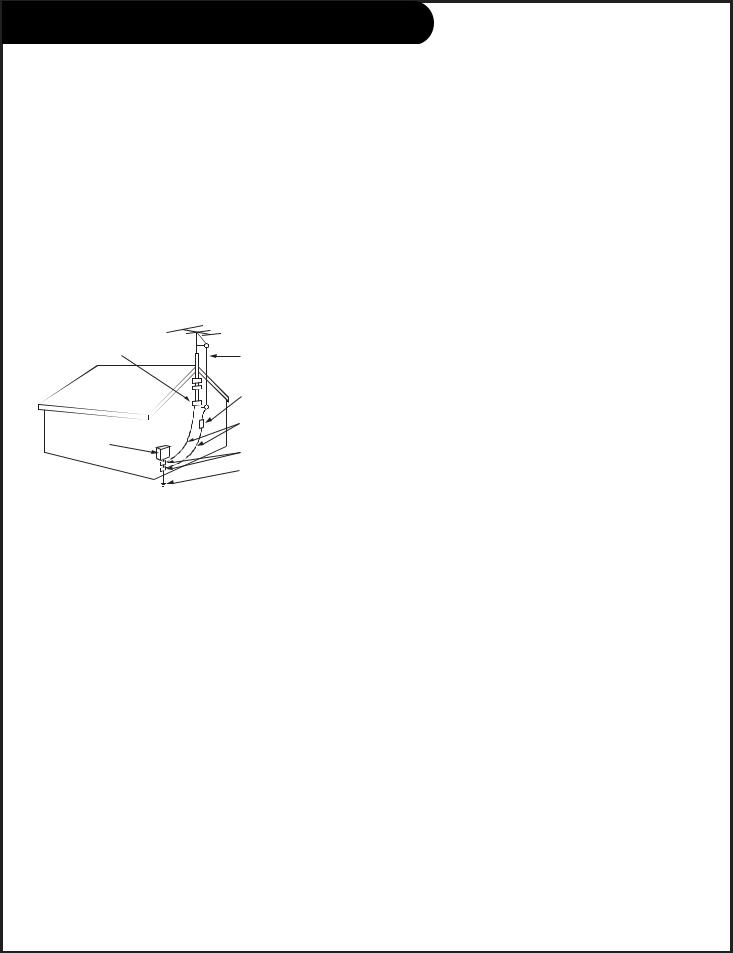
If an outside antenna or cable system is connected to the product, be sure the antenna or cable system is grounded so as to provide some protection against voltage surges and built-up static charges. Article 810 of the National Electrical Code (U.S.A.), ANSI/ NFPA 70 provides information with regard to proper grounding of the mast and supporting structure, grounding of the lead-in wire to an antenna discharge unit, size of grounding conductors, location of antenna-discharge unit, connection to grounding electrodes, and requirements for the grounding electrode.
Example of Grounding According to National Electrical Code Instructions
Ground Clamp
|
|
Antenna Lead in Wire |
|
|
|
|
|
Antenna Discharge Unit |
|
|
(NEC Section 810-20) |
|
|
Grounding Conductor |
Electric Service |
|
(NEC Section 810-21) |
|
|
|
Equipment |
|
Ground Clamps |
|
|
|
|
|
Power Service Grounding |
|
|
Electrode System (NEC |
|
|
Art 250, Part H) |
NEC - National Electrical Code
15. Lightning
For added protection for this product (receiver) during a lightning storm, or when it is left unattended and unused for long periods of time, unplug it from the wall outlet and disconnect the antenna or cable system. This will prevent damage to the product due to lightning and power-line surges.
16. Power Lines
An outside antenna system should not be located in the vicinity of overhead power lines or other electric light or power circuits, or where it can fall into such power lines or circuits. When installing an outside antenna system, extreme care should be taken to keep from touching such power lines or circuits as contact with them might be fatal.
17. Overloading
Do not overload wall outlets and extension cords as this can result in a risk of fire or electric shock.
18. Object and Liquid Entry
Never push objects of any kind into this product through openings as they may touch dangerous voltage points or
P A G E 4
short-out parts that could result in a fire or electric shock. Never spill liquid of any kind on the product.
19. Servicing
Do not attempt to service this product yourself as opening or removing covers may expose you to dangerous voltage or other hazards. Refer all servicing to qualified service personnel.
20. Damage Requiring Service
Unplug this product from the wall outlet and refer servicing to qualified service personnel under the following conditions:
a.If the power-supply cord or plug is damaged.
b.If liquid has been spilled, or objects have fallen into the product.
c.If the product has been exposed to rain or water.
d.If the product does not operate normally by following the operating instructions. Adjust only those controls that are covered by the operating instructions as an improper adjustment of other controls may result in damage and will often require extensive work by a qualified technician to restore the product to its normal operation.
e.If the product has been dropped or the cabinet has been damaged.
f.If the product exhibits a distinct change in performance.
21. Replacement Parts
When replacement parts are required, be sure the service technician has used replacement parts specified by the manufacturer or have the same characteristics as the original part. Unauthorized substitutions may result in fire, electric shock, or other hazards.
22. Safety Check
Upon completion of any service or repairs to this product, ask the service technician to perform safety checks to determine that the product is in proper operating condition.
23. Wall or Ceiling Mounting
The product should be mounted to a wall or ceiling only as recommended by the manufacturer. The product may slide or fall, causing serious injury to a child or adult, and serious damage to the product.
24. Heat
The product should be situated away from heat sources such as radiators, heat registers, stoves, or other products (including amplifiers) that produce heat.
25. Telephone Line Cord
CAUTION: To reduce the risk of fire, use only No.26 AWG or larger telecommunication line cord.
3-WireRev6/00

Table of Contents
Read the information below, then turn to page 7 to hook up your Entertainment MachineTM
Step 1. Hook up external equipment and antenna or cable service wires to the TV. Install batteries in the remote control. After all connections have been made, plug your TV into standard household power, see pages 7 thru 16.
Step 2. Go to page 18 to EZ program the TV.
Step 3. Set up all other TV options see pages listed below.
Safety Warnings . . . . . . . . . . . . . . . . . . . . . . . . . . . . |
. . . . 2 |
Important Safety Information . . . . . . . . . . . . . . . . . . . |
. 3 - 4 |
Table of Contents . . . . . . . . . . . . . . . . . . . . . . . . . . . . |
. . . 5 |
Features on this TV . . . . . . . . . . . . . . . . . . . . . . . . . . |
. . . 6 |
Step 1. Hook Up TV |
|
TV/VCR/Cable Box/Computer and other Equipment Hookup |
|
Directory . . . . . . . . . . . . . . . . . . . . . . . . . . . . . . . . . |
. . . 7 |
Equipment Connection Options |
|
Antenna, Install batteries in remote control . . . . . . . . . . . |
. . . 8 |
Cable Service, Install batteries in remote control . . . . . . . |
. . . 9 |
Antenna with VCR, Install batteries in remote control . . . . |
. . 10 |
Cable Service with VCR, Install batteries in remote control |
. . . 11 |
S-VHS VCR-DVD/External Audio Amplifier . . . . . . . . . . . . . |
. . 12 |
Component Video . . . . . . . . . . . . . . . . . . . . . . . . . . . . |
. . 13 |
Computer Hook up . . . . . . . . . . . . . . . . . . . . . . . . . . . |
. . 14 |
Caller ID, GUIDE Plus+TM connections . . . . . . . . . . . . . . . . . .15 Front Panel Controls/Inputs . . . . . . . . . . . . . . . . . . . . . . . 16 Remote Control Key Functions in TV mode . . . . . . . . . . . . . . 17
Step 2. Reception Setup and Channel Search |
|
EZ Program: Select Cable service or Air Antenna |
|
and run channel search . . . . . . . . . . . . . . . . . . . . . |
. . . 18 |
On-Screen Menu Operation with Remote . . . . . . . . . . . . |
. . . 19 |
Multi-media Hookup Options . . . . . . . . . . . . . . . . . . . |
. . . 20 |
Multi-media Source Capabilities . . . . . . . . . . . . . . . . . |
. . . 21 |
On-Screen Menus/Displays Overview . . . . . . . . . . . . . . . |
22 - 23 |
Other functions & On-Screen Displays . . . . . . . . . . . . . |
. . . 24 |
Step 3. Customize the TV’s Features
Setup Menu (Start with page 18, EZ Program)
Add/Del/Surf . . . . . . . . . . . . . . . . . . . . . . . . . . . . . . . 25 EZ Clock Set . . . . . . . . . . . . . . . . . . . . . . . . . . . . . . . 26 Captions (Caption/Text) . . . . . . . . . . . . . . . . . . . . . . . . 27 Language . . . . . . . . . . . . . . . . . . . . . . . . . . . . . . . . . 28 Sources . . . . . . . . . . . . . . . . . . . . . . . . . . . . . . . . . . 29
Background Menu . . . . . . . . . . . . . . . . . . . . . . . |
. . . . . 30 |
Video Menu . . . . . . . . . . . . . . . . . . . . . . . . . . . . |
. . . . . 31 |
Contrast, Brightness, Color, Tint, Sharpness, Color Temp: . . . . |
|
(Cool, Warm), EZ Picture: (Custom, Normal, Movie, Digital |
|
Pres, Video Game, Sports, Night Time, Weak Signal). |
|
Video Sub Menu, Aspect Ratio and other settings . |
. . . . . 32 |
Audio Menu . . . . . . . . . . . . . . . . . . . . . . . . . . . . |
. . . . . 33 |
Bass, Treble, Balance, Audio Mode: (Stereo, Mono, SAP), |
|
EZ Bass Front Surround, EZ SoundRite, Speakers, EZ Sound: |
|
(Custom, Normal, Stadium, News, Music, Theater). |
|
Lock (Parental Control Menu) . . . . . . . . . . . . . . . . |
. . 34 - 36 |
Restricts viewer programming. |
|
Special Menu |
|
EZ Timer: Sleep Timer . . . . . . . . . . . . . . . . . . . . |
. . . . . 37 |
EZ Timer: On/Off Timer Functions . . . . . . . . . . . . |
. . . . . 38 |
Channel Labels . . . . . . . . . . . . . . . . . . . . . . . . |
. . . . . 39 |
XDS Display . . . . . . . . . . . . . . . . . . . . . . . . . . |
. . . . . 40 |
PIP Menu (Setup PIP picture appearance) . . . . . . |
. . . . . 41 |
Source Sense . . . . . . . . . . . . . . . . . . . . . . . . . |
. . . . . 42 |
GUIDE Plus+ . . . . . . . . . . . . . . . . . . . . . . . . . |
. . . . . 43 |
Caller ID (Identify incoming caller’s phone numbers) |
. . . . 44 |
EZ Demo (On-screen menus overview) . . . . . . . . . |
. . . . . 45 |
PIP (2-Tuner Picture-in-Picture) . . . . . . . . . . . . . . . |
. . 46 - 47 |
GUIDE Plus+ Setup/Operation . . . . . . . . . . . . . . . . |
. . 48 - 54 |
Remote Control Programming |
|
Set up remote to operate other devices . . . . . . . . |
. . . . . 55 |
Programming Product Brand Codes . . . . . . . . . . . |
. . 56 - 57 |
Remote Modes Key Functions . . . . . . . . . . . . . . . |
. . 58 - 59 |
Maintenance . . . . . . . . . . . . . . . . . . . . . . . . . . . . |
. . . . . 60 |
Troubleshooting . . . . . . . . . . . . . . . . . . . . . . . . . . |
. . 61 - 63 |
Glossary . . . . . . . . . . . . . . . . . . . . . . . . . . . . . . . |
. . . . . 64 |
Notes . . . . . . . . . . . . . . . . . . . . . . . . . . . . . . . . . |
. . . 65-67 |
Zenith Warranty . . . . . . . . . . . . . . . . . . . . . . . . . |
Back Cover |
Note: Design and specifications are subject to change without prior notice.
206-03807 |
Entertainment MachineTM is a registered trademark of Zenith Electronics Corporation. |
P A G E 5 |
|

Multimedia TV’s Features
Features On This Multimedia TV Include
COMPUTER INPUTS - Hookup your computer to the TV, see page 14.
CALLER ID - Shows the phone number of a caller on the TV Screen, see page 43.
GUIDE Plus+ GOLD system - Programs your TV to turn on your VCR, and start/stop recording broadcasts, (if available over-the-air in your area, or provided by your cable service) see page 49.
Lock (Parental Control) - Restricts programs which can appear on your TV, see page 35.
PIP - 2-Tuner Picture-in-Picture, see page 47. Adjustable PIP inset picture options, see page 41.
Programmable Remote Control - Remote may be programmed to control other products, see page 54.
XDS Display - Extended Data Service. Shows current program information, see page 40.
EZ Features: Designed to make your viewing experience less work.
EZ Program, EZ Clock, EZ Timer, EZ Picture, EZ Demo, EZ Bass, EZ Sound, EZ SoundRite, EZ Mute.
For a more complete list of the features on this TV, see page 5.
VCR Plus+, C3, PlusCode, G-LINK and GUIDE Plus+ are trademarks of Gemstar Development Corporation. The VCR Plus+ system and GUIDE Plus+ systems are manufactured under license from Gemstar Development Corporation and VCR Index Systems B.V. respectively.
GEMSTAR IS NOT IN ANY WAY LIABLE FOR THE ACCURACY OF THE PROGRAM SCHEDULE INFORMATION PROVIDED BY THE GUIDE PLUS+ SYSTEM. IN NO EVENT SHALL GEMSTAR BE LIABLE FOR ANY AMOUNTS REPRESENTING LOSS OF PROFITS, LOSS OF BUSINESS, OR INDIRECT, SPECIAL, OR CONSEQUENTIAL DAMAGES IN CONNECTION WITH THE PROVISION OR USE OF ANY INFORMATION, EQUIPMENT, OR SERVICES RELATING TO THE GUIDE PLUS+ SYSTEM.
NOTE: VCR required for recording.
P A G E 6 |
206-03807 |
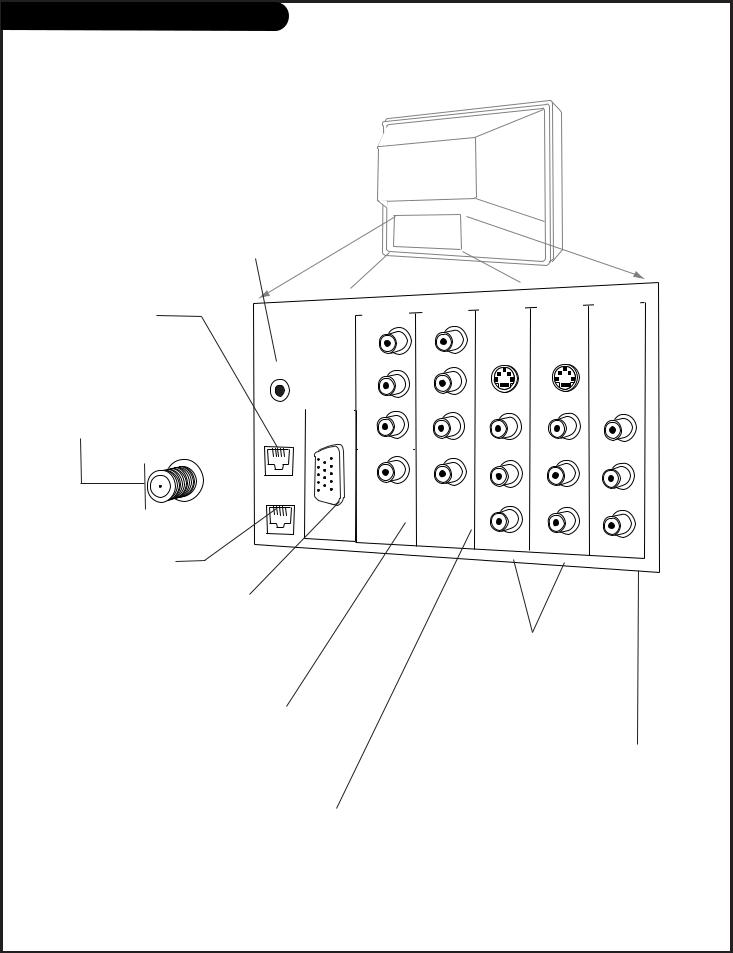
Connection Panel Overview
Use this page for reference if connecting: DVD Player, high-definition equipment, standard definition equipment,
or a computer.
TV Back
G-LINK
Connect G-LINK cable (supplied with your TV set) to make timed recordings usign the GUIDE Plus+ system and accessory VCR/Cable converter boxes.
To hook up a computer, see page 14. To hookup other equipment, refer to the Table of Contents on page 5; shows pages to go to for equipment hookup options. Also, see the front connections panel hookup options on page 16.
PHONE
Connect your phone to this jack.
ANTENNA/CABLE
Use to hookup your antenna or cable system.
ANTENNA
CABLE
LINE IN
Connect your telephone line here for Caller I.D. hookup.
G-LINK
TO PHONE
LINE IN
|
HD IN |
DVD IN |
|
|
|
|
Y |
Y |
|
Pr |
Pr |
RGB/ |
|
|
COMPUTER |
|
|
INPUT |
Pb |
Pb |
|
||
|
HD/COMPUTER |
|
|
R |
R |
|
AUDIO |
AUDIO |
L  L
L 
VIDEO 1 |
VIDEO 2 |
MONITOR |
|
IN |
OUTPUT |
||
IN |
|||
|
|
||
S-VIDEO 1 |
S-VIDEO 2 |
|
|
VIDEO |
VIDEO |
VIDEO |
R |
R |
R |
|
AUDIO |
AUDIO AUDIO |
L |
L |
L |
|
MONO |
MONO |
RGB/COMPUTER INPUT
Connect RGB/computer here.
Computer Format: SVGA 800 x 600p
Computer Format: VGA 640 x 480p
RGB Format:EDTV Set top Box 640 x 480p
RGB Format:HDTV Set top Box 1920 x 1080i
HD IN
Connect progressive scan or high-definition component video equipment here.
Progressive Scan DVD, 480p EDTV Set top Box, 480p HDTV Set top Box, 1080i
DVD IN
Connect a standard component video equipment or DVD player here.
DVD Player, 480i SDTV Set Top Box, 480i
VIDEO 1 IN VIDEO 2 IN
Connect Audio/Video or S-Video equipment to these jacks.
VIDEO / R - L AUDIO OUT
Use these output jacks to connect external audio/video equipment.
206-03807 |
P A G E 7 |
|
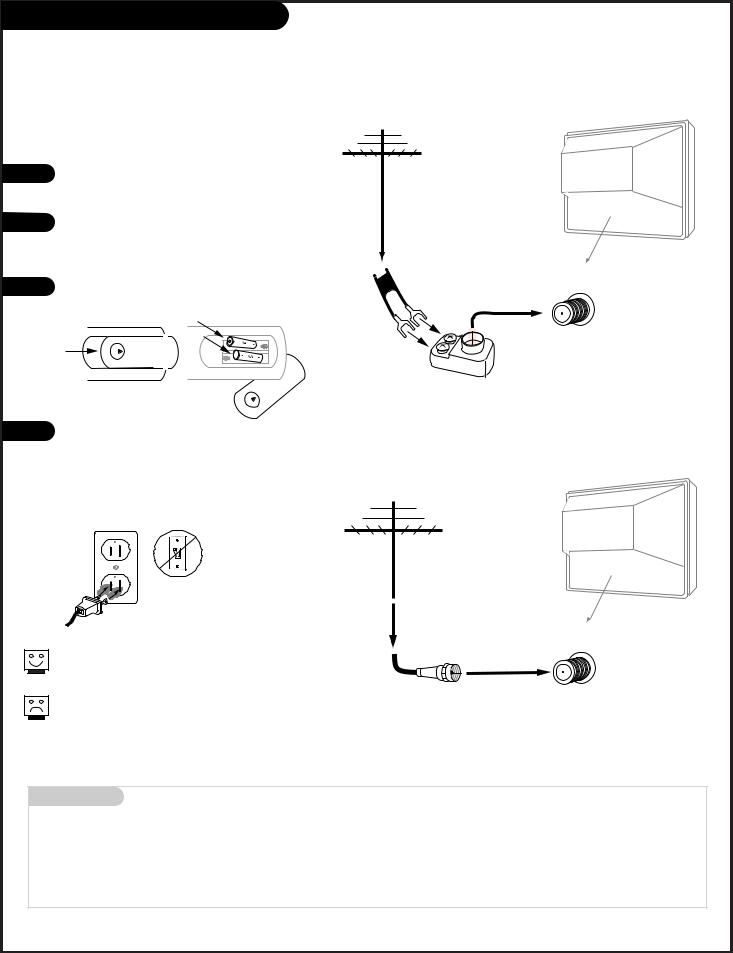
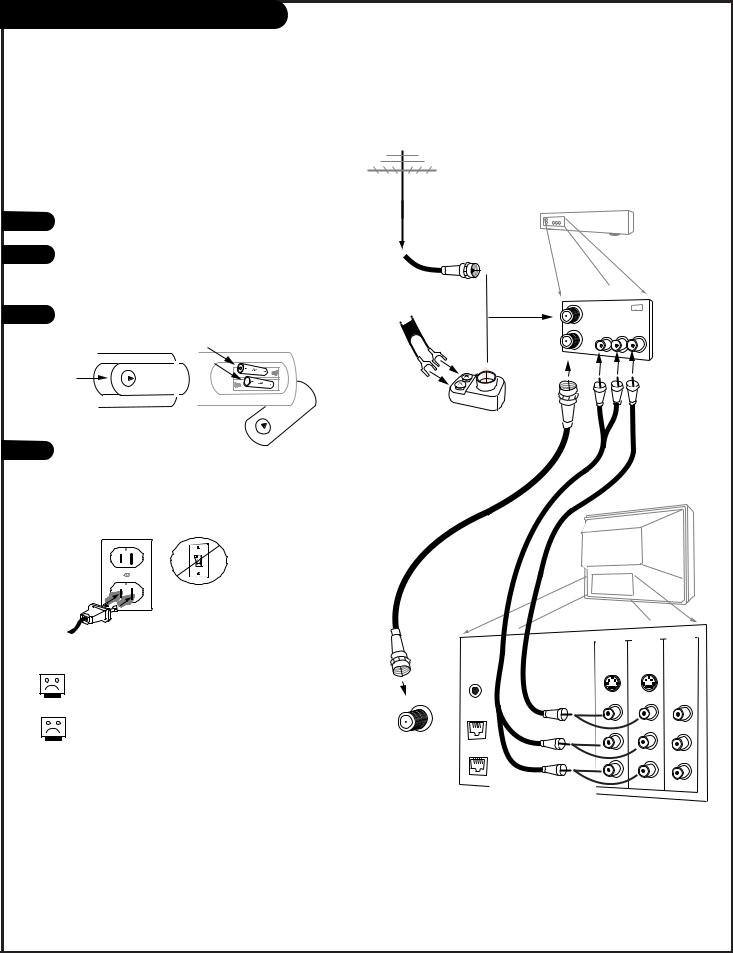
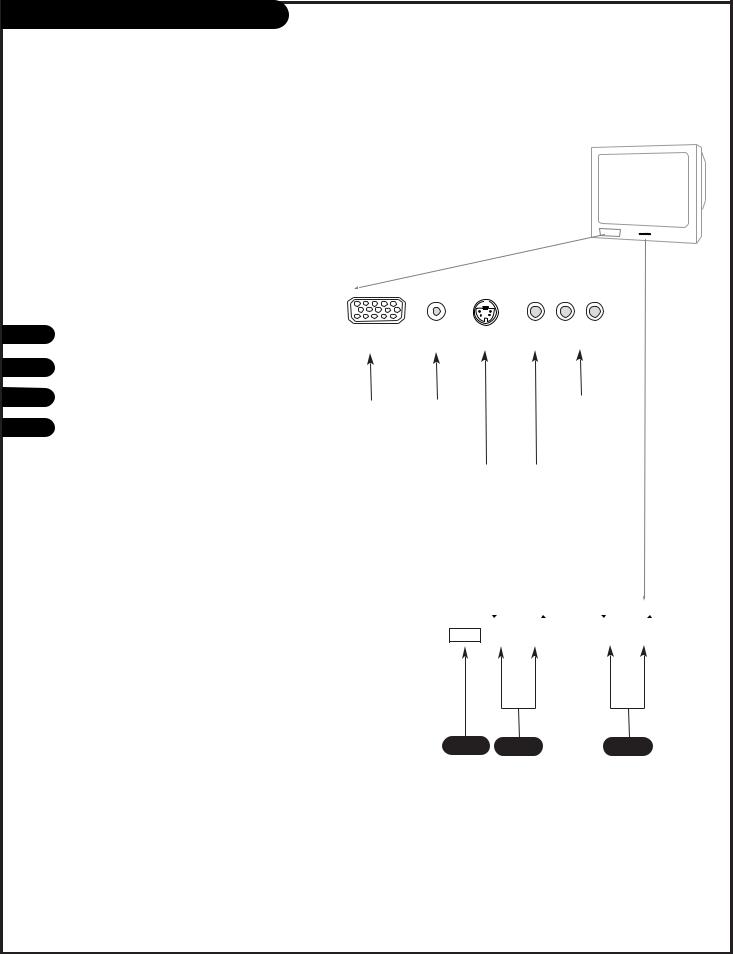
Hook Up an Off-Air Antenna
Connect an off-air antenna
1
2
3
4
Locate the Antenna/Cable jack on the back of your Entertainment Machine.
Connect the wire that runs from the wall directly to this jack, according to one of the diagrams to the right.
Remove the back of the remote and put in two “AA” batteries.
Back of
Remote
Typical
TV Back
Antenna
ANTENNA
CABLE
Flat Wire (300 ohm)
300/75 ohm Adapter
Plug in your TV. Do not plug it into an outlet controlled by a switch. Your Entertainment Machine is designed to operate on standard household current, 120-volt 60 Hertz AC. Do not attempt to operate it on DC power.
120 V AC
60 Hz
If you have a 75 ohm RF cable, then you don’t need any adapters!
A 300 to 75 ohm adapter is not included with the TV.
Typical
TV Back
Antenna
ANTENNA
CABLE
RF Coaxial Wire
(75ohm)
Mini glossary
75 OHM RF CABLE
300 TO 75 OHM ADAPTER
The wire that comes from an off-air antenna or cable service provider. Each end looks like a hex shaped nut with a wire sticking through the middle, and it screws onto the threaded jack on the back of your TV.
A small device that connects a two-wire 300 ohm antenna to a 75 ohm RF jack. They are usually about an inch long with two screws on one end and a round opening with a wire sticking out on the other end.
P A G E 8 |
206-03807 |

Hook Up Cable Service (CATV)
Connect cable service to your Entertainment Machine
1
2
3
Locate the Antenna/Cable jack on the back of the TV.
Connect the cable service wire that runs from the wall or cable box directly to this jack, according to one of the diagrams to the right.
Remove the back of the remote and put in two “AA” batteries.
Back of
Remote
Typical
TV Back
Typical
Cable TV
Wall Jack
ANTENNA
CABLE
Coaxial Round Wire
(75ohm)
4 |
Plug in the TV. Do not plug it into an out- |
|||
|
let controlled by a switch. Your TV is |
|||
|
designed to operate on standard house- |
|||
|
hold current, 120-volt 60 Hertz AC. Do |
|||
|
not attempt to operate it on DC power. |
|||
|
|
|
|
|
|
|
|
|
|
|
|
|
|
|
|
|
|
|
|
120 V AC
60 Hz
If you’re using a cable box, leave the TV on channel 3 or 4 and use your cable box to change channels.
If you’re using a cable box, EZ Program might only find the channel your cable service is on (usually channel 3 or 4). Don’t worry, that’s all you need!
Typical
Cable TV
Wall Jack
Typical
In |
TV Back |
|
Cable Box |
||
Out |
output |
|
switch 3 4 |
||
|
||
|
ANTENNA |
|
|
CABLE |
|
|
RF Coaxial Wire |
|
|
(75ohm) |
206-03807 |
P A G E 9 |
Hook Up an Off-Air Antenna and VCR
Connect your off-air antenna and VCR to your Entertainment Machine
1
2
3
4
Locate the Antenna In jack on the back of the VCR.
Connect the wire that runs from the antenna, according to the diagram to the right. Make any other connections as necessary.
Remove the back of the remote and put in two “AA” batteries.
Back of
Remote
RF Coaxial Round Wire
(75ohm)
Typical
Antennas:
Flat or
Round Wire
Flat Wire (300 ohm)
300/75 ohm Adapter
Plug in the TV. Do not plug it into an outlet controlled by a switch. The TV is designed to operate on standard current, 120-volt 60 Hertz AC. Do not attempt to operate it on DC power.
120 V AC
60 Hz
No adapters or A/V cables are included with the TV. See your Zenith dealer to purchase any adapters or cables.
Without A/V cables, most VCRs will not play videocassettes in stereo sound.
|
G-LINK |
|
TO |
|
PHONE |
ANTENNA |
|
CABLE |
LINE IN |
VCR Back
VCR Back AV Panel
In output  switch 3 4
Out Audio Video
TV Back
VIDEO 1 |
VIDEO 2 |
MONITOR |
|
IN |
OUTPUT |
||
IN |
|||
|
|
||
-VIDEO 1 |
S-VIDEO 2 |
|
|
VIDEO |
VIDEO |
VIDEO |
|
R |
|
R |
|
AUDIO |
AUDIO |
AUDIO |
L |
L |
|
L |
|
MONO |
MONO |
|
Connect your VCR to the Video 1 or Video 2 set of input jacks
P A G E 1 0 |
206-03807 |

Hook Up Cable Service (CATV) and VCR
Connect Cable service and a VCR to the TV
1 |
Locate the Antenna/Cable In jack on the |
|
back of the VCR. |
||
|
||
2 |
Connect the cable service wire that runs |
|
|
from the wall, according to one of the dia- |
|
|
grams to the right. Make any other connec- |
|
|
tions necessary for your setup. |
|
3 |
Remove the back of the remote and put in |
|
|
two “AA” batteries. |
|
|
Back of |
|
|
Remote |
4 Plug in the TV. Do not plug it into an outlet controlled by a switch. The TV is designed to operate on standard current, 120-volt 60 Hertz AC. Do not attempt to operate it on DC power.
120 V AC
60 Hz
Typical
Cable TV
Wall Jack
 In Cable Box
|
output |
|
Out |
switch |
3 4 |
Cable service with or without a cable box
Typical
Cable TV
Wall Jack
Tune both the VCR and the television to channel 3 or 4 (cable box output channel) and use the cable box to change channels.
No A/V cables are included with your TV. Without A/V cable hookups, most VCRs will not play videocassettes in stereo sound.
G-LINK
TO
PHONE
ANTENNA  CABLE LINE IN
VCR Back
VCR Back AV Panel
In output  switch 3 4
Out Audio Video
TV Back
VIDEO 1 |
VIDEO 2 |
MONITOR |
|
IN |
OUTPUT |
||
IN |
|||
|
|
||
S-VIDEO 1 |
S-VIDEO 2 |
|
|
VIDEO |
VIDEO |
VIDEO |
R |
R |
R |
|
AUDIO |
AUDIO AUDIO |
L |
L |
L |
|
MONO |
MONO |
Connect your VCR to the Video 1 or Video 2 set of input jacks
206-03807 |
P A G E 1 1 |
|

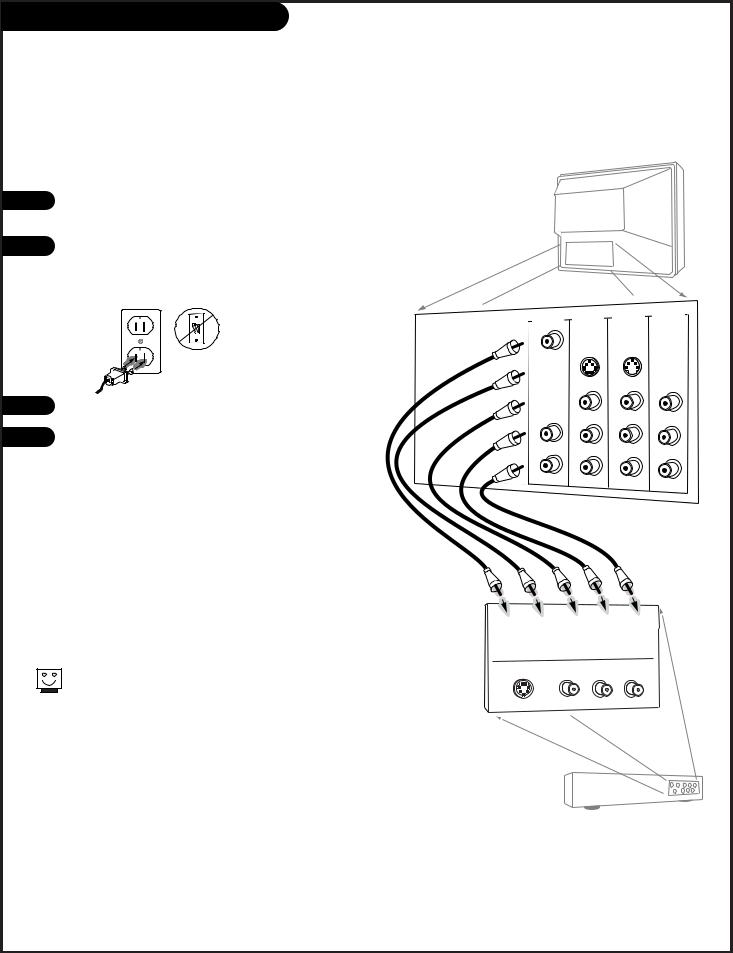
Hook Up an S-VHS VCR
1
2
3
Your Zenith TV may be connected to a Super-VHS VCR through the S-Video Input located on the front or rear connection
panel on your TV |
From Antenna or |
VCR Back |
||
|
Cable Service With |
|
|
|
|
or Without a Cable Box |
|
|
|
Hook up your S-VHS VCR to your Zenith TV |
VCR Back AV Panel |
|||
according to the diagram shown at the right. |
||||
|
|
output |
||
|
|
|
||
|
In |
|
switch 3 4 |
|
Remove the back of the remote and put in two |
Audio Out |
S-Video Out |
||
“AA” batteries. |
R |
L |
|
|
Out |
|
|
||
|
Flat Wire |
|
|
|
Back of |
(300 ohm) |
|
|
|
Remote |
|
|
|
|
300/75 ohm Adapter
Plug in your TV. Do not plug it into a switched outlet. Your Zenith TV is designed to operate on standard household current, 120-volt 60 Hertz AC. Do not attempt to operate it on DC power.
120 V AC
60 Hz
Audio Audio Output: Use the Left and Right Audio Out jacks to connect an external amplifier and speakers. (Refer to the Audio Menu on page 33 for instructions on how to turn the TV’s internal speakers off and on.)
ANTENNA
CABLE
Audio
R
AUDIO
L
Connect Audio R-L Out to your external amplifier's input jacks
TV Back
VIDEO 1 |
VIDEO 2 |
MONITOR |
|
IN |
OUTPUT |
||
IN |
|||
|
|
||
-VIDEO 1 |
S-VIDEO 2 |
|
|
G-LINK |
|
|
|
VIDEO |
VIDEO |
VIDEO |
|
TO |
|
|
|
PHONE |
|
|
LINE IN |
R |
|
R |
|
AUDIO |
AUDIO |
AUDIO |
||
|
||||
L |
L |
|
L |
|
|
MONO |
MONO |
|
Connect your S-Video VCR to the S-Video 1 or S-Video 2 set of input jacks
P A G E 1 2 |
206-03807 |
Hook Up Component Video Equipment
Connecting component video equipment
1 Make the connections as indicated. (Appearance of components may vary from those in the illustrations.)
2 Plug in your TV. Do not plug it into a switched outlet. Your Entertainment Machine is designed to operate on standard household current, 120-volt 60 Hertz AC. Do not attempt to operate it on DC power.
|
120 V AC |
|
60 Hz |
3 |
Press POWER to turn TV on. |
4 |
On the remote, press SOURCE repeatedly until “DVD” is |
|
displayed. Or use the Source menu to choose DVD. |
Component video jacks are sometimes labeled with CR, CB, or PB, PR. In this case, connect B to B and the R to R. The “Y” jack is usually labeled “Y”, connect Y to Y.
TV Back
DVD IN
Y
Pr
b
VIDEO 1 IN
S-VIDEO 1
VIDEO
VIDEO 2 |
MONITOR |
||
IN |
OUTPUT |
||
S-VIDEO 2 |
|
||
|
|
|
|
VIDEO |
VIDEO |
R |
AUDIO |
R |
R |
R |
|
AUDIO |
AUDIO |
AUDIO |
|
L |
|
|||
|
L |
L |
L |
|
|
|
MONO |
MONO |
|
Y CR
CR CB
CB R
R  L
L
COMPONENT VIDEO OUT
S-VIDEO OUT VIDEO R-AUDIO L-/MONO
DVD Player with
Component Video
206-03807 |
P A G E 1 3 |
|
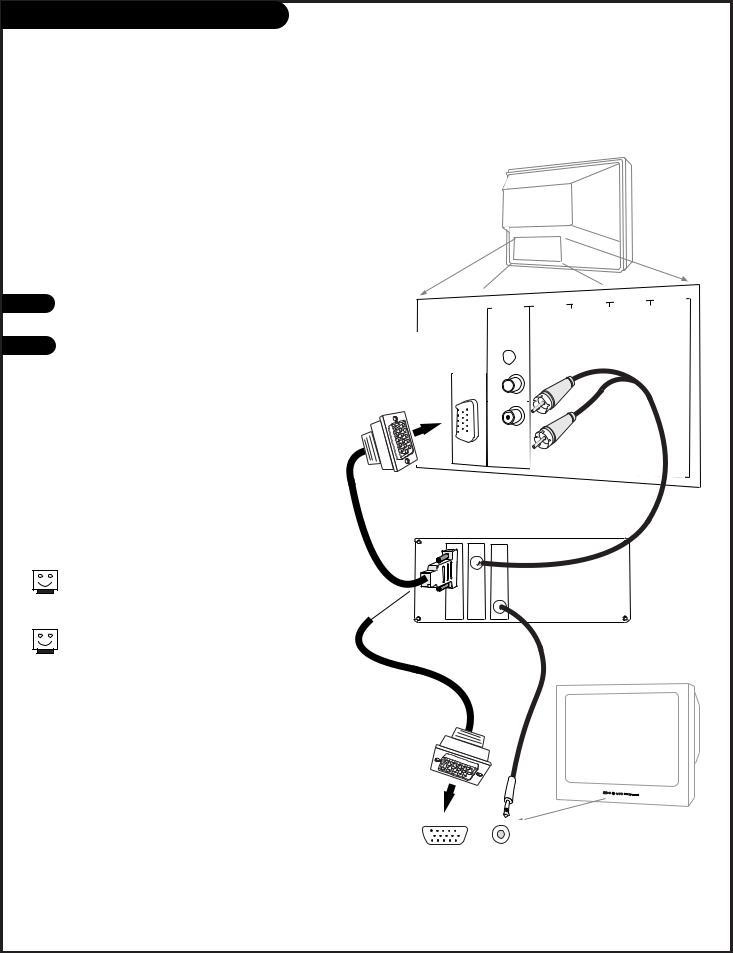
Hook Up a PC Computer
Here is the basic setup to use your TV as a computer monitor
If your computer is equipped with R-L Audio out jacks, use the rear computer inputs. If your computer provides a mini-plug for audio out, use the front
panel computer inputs as shown. (Appearance of components may vary from those in the illustrations.)
TV Back
1 |
Make the connections as shown for front or |
|
rear computer hookup. |
2 |
On the remote, press SOURCE repeatedly to |
|
select Front PC or Rear PC (the front or rear |
|
computer inputs as the source for the picture |
|
and sound.) |
On some notebook models you must locate the “display toggle key” and switch the display to “external.” Refer to the instructions for your computer.
You can also connect your computer to the Front computer inputs; specify Front PC in the Source menu; or press SOURCE repeatedly on the remote.
G-LINK
HD IN
Y 
Pr 
RGB/
COMPUTER
INPUT
Pb 
HD/COMPUTER
R
AUDIO
L 
DVD IN |
VIDEO |
1 |
VIDEO 2 |
MONITOR |
||||
|
|
|
|
|||||
|
|
|
|
|
||||
|
|
|
|
|
|
|
|
|
Typical Computer
Connection Panel
Typical TV
Front Panel
Computer In |
Computer |
|
Audio In |
P A G E 1 4 |
206-03807 |
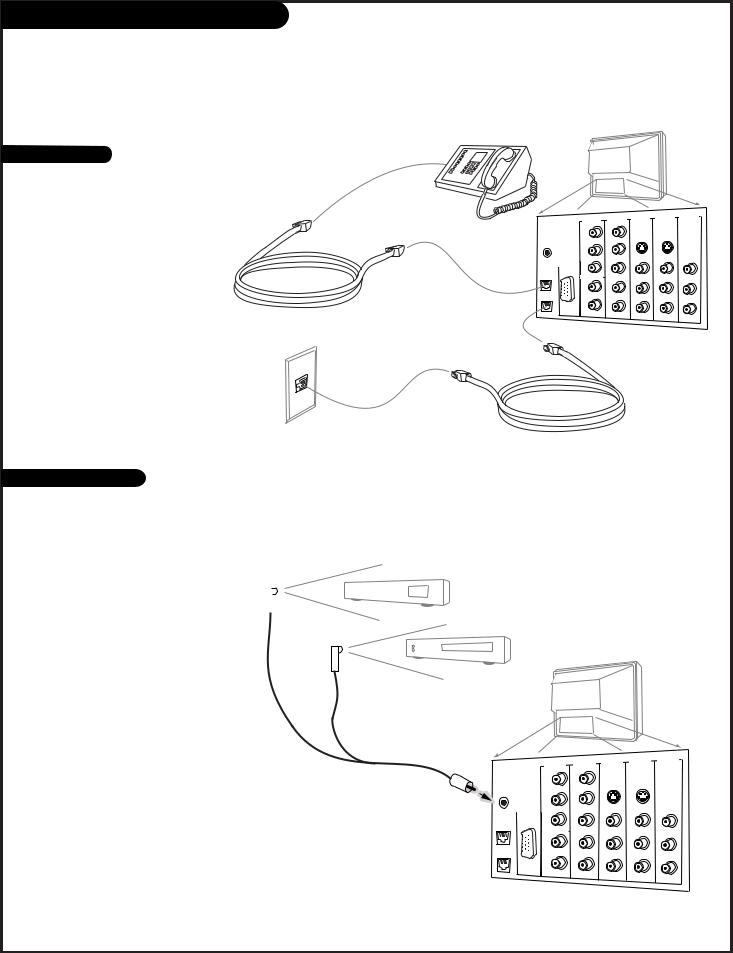
Caller ID / GUIDE Plus+TM Connections
Connect your telephone to your Entertainment Machine and use your local phone service provider’s Caller ID feature
Caller ID Hookup
Connect a standard telephone line cord between the telephone output jack and the LINE IN jack on the TV back connections panel.
Connect your telephone to the PHONE jack on the TV back connections panel.
Notes: Caller ID service is |
|
|
available from your local |
|
|
telephone service provider. |
Typical |
|
Telephone line cords shown |
Telephone |
|
Line |
|
|
are not included with TV. |
Output |
|
|
||
|
Jack |
|
GUIDE Plus+ Hookup
TV back
|
|
HD IN |
DVD |
IN |
|
|
Y |
Y |
|
G-LINK |
|
PR |
CR |
|
|
|
|
||
|
COMPUTER |
|
|
|
|
INPUT |
PB |
CB |
|
TO |
|
|
||
|
HD/COMPUTER |
|
|
|
PHONE |
|
|
|
|
|
|
R |
R |
|
LINE IN |
|
AUDIO |
AUDIO |
|
|
|
L |
L |
|
VIDEO 1 |
VIDEO 2 |
OUTPUT |
IN |
IN |
|
S-VIDEO 1 |
S-VIDEO 2 |
|
VIDEO |
VIDEO |
VIDEO |
R |
R |
R |
|
AUDIO |
AUDIO AUDIO |
L |
L |
L |
|
MONO |
MONO |
Use your Entertainment Machine to control your cable box and VCR with the GUIDE Plus+ feature
Locate the jack marked G-LINK. This jack is for the G-LINK cable. Insert the connector into the G-LINK jack.
Note: If there is a “demo pin” in the jack, remove it to disable demo mode.
Place the other end of the G-LINK cable with the G-LINK wands in front of your VCR and Cable Box in such a way as to allow for an unrestricted path for the IR signals to be able to reach the front panels of the VCR and Cable Box.
IR=Infrared
Note: See page 21 and 48 for GUIDE Plus+ GOLD feature information and setup.
|
Cable Box |
17 |
|
|
|
VCR
TV back
|
|
|
HD IN |
DVD IN |
|
|
|
|
|
|
|
|
Y |
Y |
G-LINK |
|
Pr |
Pr |
|
|
|
|
||
|
|
RGB/ |
|
|
|
|
COMPUTER |
|
|
TO |
|
INPUT |
Pb |
Pb |
|
|
|||
PHONE |
|
HD/COMPUTER |
|
|
|
|
|
|
|
|
|
|
R |
R |
LINE |
IN |
|
AUDIO |
AUDIO |
|
L |
|||
|
|
|
L |
|
VIDEO 1 |
VIDEO 2 |
MONITOR |
IN |
IN |
OUTPUT |
|
|
|
S-VIDEO 1 |
S-VIDEO 2 |
|
VIDEO |
VIDEO |
VIDEO |
R |
R |
R |
|
AUDIO |
AUDIO AUDIO |
L |
L |
L |
|
MONO |
MONO |
206-03807 |
P A G E 1 5 |
|
Front Panel Controls/Inputs
Using the front panel to operate the TV’s basic features and to make temporary connections
Typical TV
Front Panel
1
2
3
4
Menu Operation
Press MENU to place menus on-screen.
Use Channel Up/Down to select menu option.
Use Volume Left/Right to adjust menu option.
Use MENU to remove menus from screen.
TV Operation
Press POWER to turn TV on and off.
Press the CHANNEL Up or Down button to select the next higher/lower channel number
Use either the VOLUME Up or Down button to adjust the sound level louder or quieter to your preference.
Computer |
video |
L-audio-R |
in |
|
|
Computer / Audio Input Connectors
Used for 800 x 600 60Hz SVGA for PC type computer hookup.
Standard computer audio input.
Left/Right Audio
Used for stereo sound from external equipment.
S-Video / Video
Connects the video signals from external equipment.
Typical Front Panel
channel |
|
|
|
|
power |
|
|
|
|
|
|
|
|
|
|
|
|
|
|
|
3
P A G E 1 6 |
206-03807 |
|

TV Mode Remote Key Functions
Shows remote key functions in TV mode.
See pages 58-59 for remote key functions in other operating modes
SOURCE |
|
|
|
|
|
Selects available TV sources. |
|
|
|
|
|
Mode Indicator Lights |
|
|
|
|
|
Light indicates mode when |
|
|
|
|
|
keys are pressed. |
|
|
|
|
|
|
tv |
vcr cable dvd |
hd/stb |
||
MODE (TV, VCR, CABLE, |
|
|
|
|
|
DVD, HD/STB) |
source |
light |
power |
||
Switches remote operating |
|
mode |
|
||
mode to control other devices. |
|
|
|||
tv |
vcr |
cable |
|||
|
|||||
NUMBER KEYPAD 0 - 9 |
dvd |
hd/stb |
ID |
||
Selects channels directly and |
|||||
|
|
|
|
||
enters numerical values. |
1 |
|
2 |
3 |
|
- (Digital Mode Dash) |
|
||||
Use as the dash when select- |
4 |
|
5 |
6 |
|
ing digital channel numbers. |
|
||||
MUTE |
7 |
|
8 |
9 |
|
Turns sound Off/On while |
|
|
0 |
|
|
picture remains. |
|
|
surf |
||
|
|
|
page up |
||
VOL - VOLUME (+/-) |
mute |
|
|
flshbk |
|
+ Increases the sound level. |
|
vol |
ch |
|
|
- Decreases the sound level. |
|
|
|||
GUIDE |
|
|
page down |
||
Turns GUIDE Plus+ system |
guide |
pip ch |
freez |
pip |
|
On and Off. See GUIDE Plus+ |
|
|
|
|
|
section. |
|
|
quit |
|
|
INFO |
menu |
info |
enter |
||
|
|||||
|
|
||||
GUIDE Plus+ function key. |
|
|
|
|
|
See GUIDE Plus+ section. |
|
|
|
|
|
MENU |
ratio |
|
|
|
|
Press to show on-screen |
|
|
sleep |
||
menus for TV mode. |
vcr+ |
|
|
|
|
|
|
|
|
||
RATIO |
record |
stop |
skip |
||
|
|
|
|
||
Selects different picture |
|
|
|
|
|
proportion formats. |
pause |
rew |
play |
f f |
|
VCR+ |
|
|
|
|
|
VCR Plus+ function key. See |
|
|
|
|
|
GUIDE Plus+ section. |
|
|
|
|
|
VCR Function Keys |
remote control part number |
||||
|
MBR6000T |
||||
RECORD, STOP, PAUSE, REW (Rewind), |
|
P124-00239 |
|
||
PLAY, FF (Fast Forward) Still operate your |
|
|
|
|
|
VCR, while remote is in TV operating mode. |
|
|
|
|
|
SKIP <<
Left chapter scan for DVD.
|
SKIP >> |
206-03807 |
Right chapter scan for DVD. |
LIGHT
Lights keys for five seconds
POWER
Turns TV On and Off.
I.D. (Caller Identification)
Shows last ten caller’s phone numbers, press again to remove list.
SURF
Turns Surf channel scanning mode On and Off; for use with Channel Up/Down.
On = Surf channels tuning. Off = All channels tuning.
FLSHBK (FLASHBACK)
Returns to the previously tuned channel.
Selects a.m. and p.m. in the Clock and Timer menus.
CH - CHANNEL (+/ -)
Tunes to next higher/lower available channel.
CH - Page Up / Down
GUIDE Plus+ function keys.
See GUIDE Plus+ section.
PIP Feature Keys
(PIP CH, FREEZ, PIP Lock)
For PIP (Picture-in-Picture) operation. See PIP section.
QUIT/ 
Removes menu/display from screen.  With no menus shown onscreen, turns front surround sound On and Off.
 With PIP On, switches audio between Main and PIP sources.
ENTER
Changes to selected menu option. Shows the Channel/Time display. Press after channel numbers for instant channel selection.
UP/DOWN/LEFT/RIGHT/NEXT (Menu Operation Directional Arrows and Next action key)
Up/Down arrows select, and Left/Right arrows adjust menu options. Press the bulls eye (shown on the menus as “Next”) the action button in the center of the directional arrows for an “Enter” function, or use the ENTER key.
SLEEP (TIMER)
Selects a preset time for the TV to turn itself Off.
P A G E 1 7
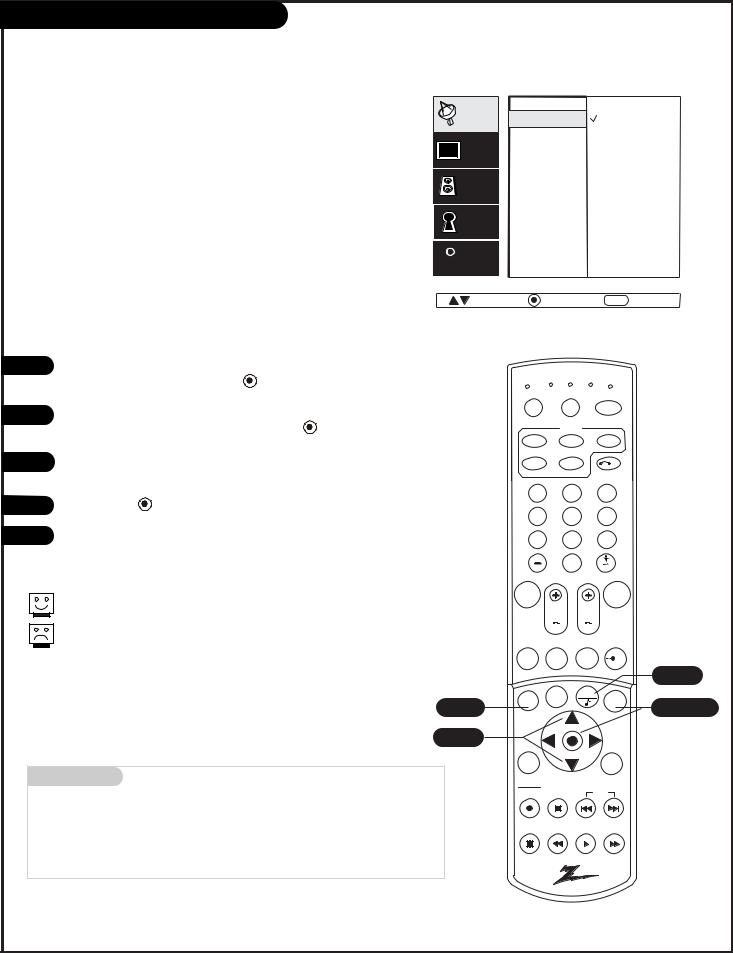
EZ Program (Channel Search)
Use EZ Program to automatically find and store in the TV’s memory, all the channels in your area
Select:
CABLE TV, If you subscribe to a cable service.
AIR ANTENNA, If you receive over-the-air programs.
Setup |
EZ Program |
Cable TV |
Video |
Add/Del/Surf |
Air Antenna |
|
||
EZ Clock |
|
|
Audio |
Captions |
|
Caption/Text |
|
|
|
|
Language
Lock
Source Menu
 Special Background
Move |
Next |
MENU Back |
1 |
Press MENU, (if not selected, use the Up/Down arrow to choose |
tv |
vcr cable dvd hd/stb |
|||||||
|
Setup Menu,) then press ENTER/ |
. |
|
|||||||
|
|
|
|
|
|
|||||
2 |
Using the Up or Down arrow on the remote control, select EZ |
source |
light |
|
power |
|||||
|
mode |
|
||||||||
|
Program on your screen, then press ENTER/ |
. |
|
|
||||||
|
tv |
vcr |
|
cable |
||||||
|
|
|
|
|
|
|
|
|||
3 |
Using the Up or Down arrow, select either Cable TV or Air Antenna, |
dvd |
hd/stb |
ID |
||||||
|
on your screen. |
|
|
|
|
|
|
|
||
4 |
Press ENTER/ |
to begin the channel search. |
|
1 |
2 |
|
3 |
|||
|
4 |
5 |
|
6 |
||||||
|
|
|
|
|
|
|
|
|||
5 |
When the channel search is complete, press MENU repeatedly until |
7 |
8 |
|
9 |
|||||
|
all menus are removed, or press QUIT. |
|
|
0 |
|
|
||||
|
|
|
|
|
|
|
|
|
surf |
|
|
|
|
|
|
|
|
|
page up |
||
|
EZ Program finds channels being received by the TV tuner. |
mute |
|
|
flshbk |
|||||
|
|
vol |
ch |
|
||||||
|
|
|
|
|
|
|
|
|
||
|
Cable will not work unless you subscribe to a cable service. |
|
page down |
|||||||
|
|
|
|
|
|
|
|
|||
|
|
|
|
|
|
|
guide |
pip ch |
freez |
pip |
|
|
|
|
|
|
|
|
|
quit |
5 |
|
|
|
|
|
|
|
1/5 |
info |
|
|
|
|
|
|
|
|
|
|
|
||
|
|
|
|
|
|
|
|
|
|
|
|
|
|
|
|
|
|
2/3 |
|
|
|
|
|
|
|
|
|
|
ratio |
|
|
sleep |
|
Mini glossary |
|
|
|
|
vcr+ |
|
|
|
|
|
|
|
|
|
|
|
|
|
|
|
|
|
|
|
|
|
|
record |
stop |
skip |
|
|
Air Antenna |
The device receiving the program signal sent over-the-air. |
pause |
rew |
play |
f f |
||||
|
Cable TV |
|
Your EZ Program selection, if you subscribe to a cable service. |
|||||||
|
|
|
|
|
|
|||||
P A G E |
1 8 |
|
|
|
|
|
|
|
206-03807 |
|
|
|
|
|
|
|
|
|
|||
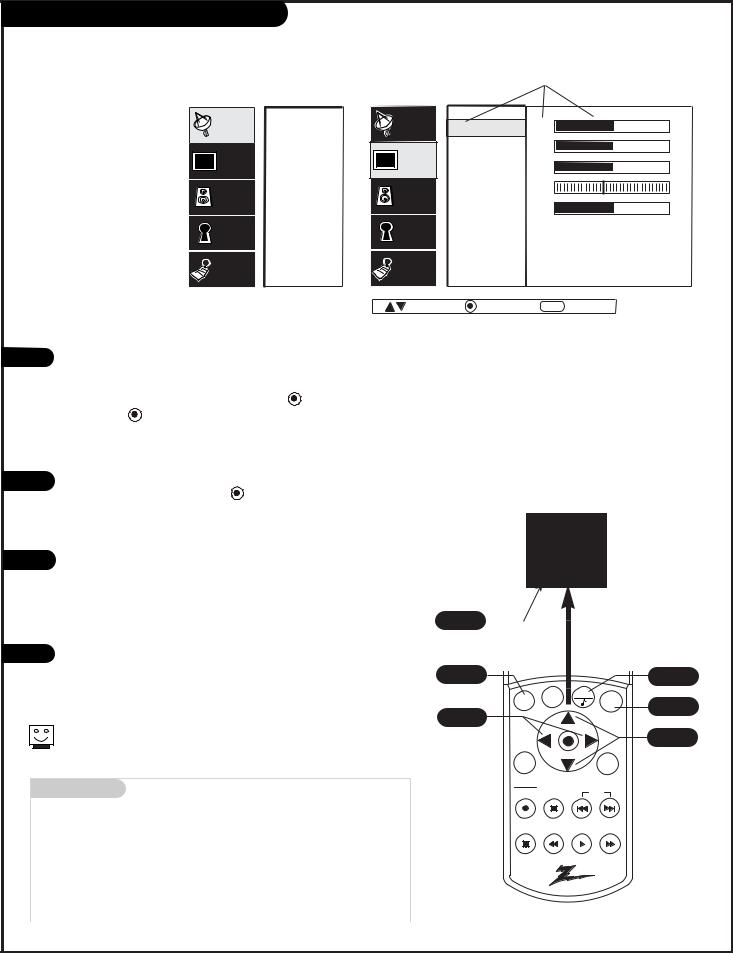
On-Screen Menu Operation
|
|
|
|
When selected, words and |
||
|
|
|
|
values change to a gold color |
||
|
Setup |
EZ Program |
Setup |
Contrast |
50 |
|
Use the remote to |
Video |
Add/Del/Surf |
Video |
Brightness |
50 |
|
access the on-screen |
EZ Clock |
Color |
50 |
|
||
menus |
Audio |
Captions |
Audio |
Tint |
G |
R |
|
Caption/Text |
Sharpness |
50 |
|
||
|
|
|
|
|||
|
Lock |
Language |
Lock |
Color Temp |
|
|
|
Source Menu |
Advanced |
|
|
||
|
|
|
|
|
||
|
Special |
Background |
Special |
EZ Picture |
|
|
|
|
|
Move |
Next |
MENU |
Back |
|
Main TV Features Menu |
|
Video Menu |
|
||
1 |
Press MENU on the remote control. Use the Up or Down direc- |
|||
|
tional arrow to “select” or highlight (change the text color to |
|||
|
gold) the name of one of the five main menus on your screen |
|||
|
like the VIDEO menu, then press ENTER/ |
. Note: You can also |
||
|
press the “ |
” in the center of the |
|
|
|
directional arrows (shown alongside “Next” on menus) and use it |
|||
|
for the Enter function. |
|
|
|
2 |
Use the Up or Down directional arrow to highlight an option like |
|||
|
CONTRAST, then press ENTER/ |
. You can select other menu |
||
|
options like COLOR TEMP by pressing the UP or DOWN directional |
|||
|
arrow repeatedly. |
|
|
|
3 |
Once the option is selected, in this case CONTRAST, use the |
|||
|
RIGHT or LEFT directional arrow to adjust the setting; the larger |
|||
|
the number the more contrast, the lower the number, the less |
|||
|
contrast in the picture. Note: Some menu options use a check- |
|||
|
mark to indicate setting, see page 18. |
|
||
4 |
You can adjust the other menu options using the above proce- |
|||
|
dure or if you are done changing |
|
|
|
a.Press MENU repeatedly to go back
b.Press QUIT to remove the menus from the TV screen.
Additional instructions are usually included on the bottom of the menu indicating which remote keys to use to move to the right, move to the left, or return to the original menu, etc.
Mini glossary
|
MENU |
On-screen displays used to set up and operate TV features. |
|
ENTER |
Action key used to make changes on the menus. |
|
UP/DOWN |
Menu UP or DOWN directional arrows used to “select” or |
|
|
highlight and choose menu options. |
|
LEFT/RIGHT |
Menu LEFT or RIGHT directional arrows used to “adjust” |
|
|
some menu settings. |
|
QUIT |
Exits menus and removes on-screen displays. |
|
|
|
206-03807 |
|
|
Press the thumbstick center bulls eye to go to the “next” action, as shown on the menus.
1/2 |
|
|
|
|
|
|
|
quit |
|
4 |
|
menu |
info |
enter |
1/2 |
||
|
|||||
|
|
||||
3 |
|
|
|
||
|
|
|
|
||
ratio |
|
|
sleep |
|
|
vcr+ |
|
|
|
|
|
record |
stop |
skip |
|
||
pause |
rew |
play |
f f |
|
|
|
|
|
P |
9 |
|
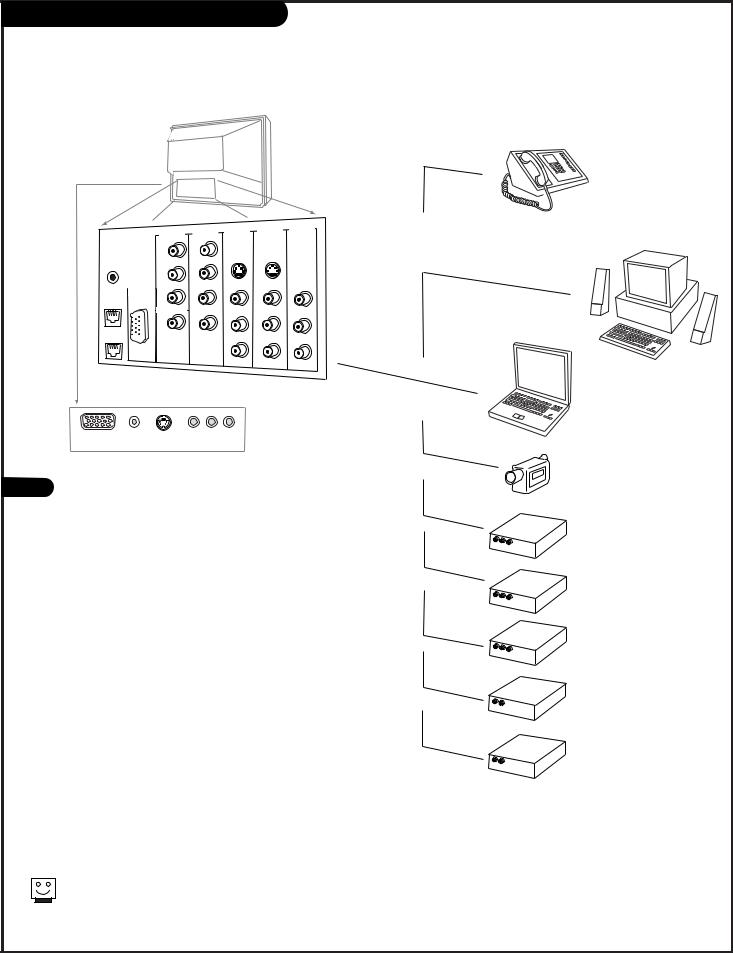
Multimedia Sources Hookup Options
Choose the source you want to see and hear
TV Back
G-LINK
TO PHONE
LINE IN
|
HD IN |
DVD IN |
|
|
|
|
Y |
Y |
|
PR |
CR |
COMPUTER |
|
|
INPUT |
PB |
CB |
|
||
|
HD/COMPUTER |
|
|
R |
R |
|
AUDIO |
AUDIO |
L  L
L 
VIDEO 1 |
VIDEO 2 |
OUTPUT |
IN |
|
|
IN |
|
|
|
|
|
S-VIDEO 1 |
S-VIDEO 2 |
|
VIDEO |
VIDEO |
VIDEO |
R |
R |
R |
|
AUDIO |
AUDIO AUDIO |
L |
L |
L |
|
MONO |
MONO |
Computer In |
Computer |
S-Video |
Video |
L Audio R |
|
Audio In |
|
|
|
1 Press SOURCE repeatedly to choose from the available viewing sources connected to the TV.
Antenna: Antenna/Cable on TV back near Jackpack, Over-the-Air Antenna or Cable service signal source.
Video 1: on TV back Jackpack,
Set of Composite Audio/Video Input jacks.
Video 2: on TV back Jackpack,
Set of Composite Audio/Video Input jacks.
F Video: on TV front Jackpack,
Set of Composite Audio/Video Input jacks.
DVD: on TV back Jackpack,
Set of Component Audio/Video Input jacks.
HD: on TV back Jackpack,
Set of Component Audio/Video Input jacks.
R-Comp: on TV back Jackpack,
Rear Computer Input Connector.
F-Comp: on TV front Jackpack,
Front Computer Input Connector.
The source equipment you intend to view should be turned on.
Phone
(Caller ID only)
Computers
Desktop/Laptop
|
|
|
Camcorder |
|
|
|
Component |
R - |
AUDIO-L |
VIDEO |
Video |
AUDIO/VIDEO OUT |
|
||
|
|
|
VCR |
R - |
AUDIO-L |
VIDEO |
|
|
|
||
AUDIO/VIDEO OUT |
|
||
|
|
|
S-Video VCR |
R - |
AUDIO-L |
VIDEO |
|
|
|
||
AUDIO/VIDEO OUT |
|
||
R -AUDIO-L |
|
DVD Player |
|
AUDIO IN |
|
|
|
AUDIO IN |
|
Other |
|
R - |
|
|
|
AUDIO-L |
|
|
|
Typical Viewing Sources
P A G E 2 0 |
206-3594-01 |
|
Multi-Media Capabilities
GUIDE Plus+ GOLD system
Premium electronic program guide that uses an easy to read grid guide system for channel navigation. Offers current news stories, program information, instant program tuning, scheduling to watch and record upcoming programs, and other features.
See page 49.
CH 32-UPN |
2:45 PM |
STEREO |
PIP |
CH 2-CBS |
2-Tuner Picture-In-Picture (PIP)
The most convenient way to watch 2 channels at the same time on the TV screen. Swap the audio from the main picture to the audio from the PIP inset. Move the PIP inset around the screen. Adjust the PIP picture image to your personal preferences with the options available in the PIP menu.
See page 46.
Recent Calls |
|
|
(123) 456-7890 |
11:39 PM |
OCT 22 |
(123) 567-8904 |
8:30 PM |
OCT 22 |
(123) 678-9045 |
8:33 AM |
OCT 21 |
(123) 789-0456 |
10:33 AM |
OCT 21 |
(123) 890-4567 |
7:33 PM |
OCT 19 |
(123) 904-5678 |
9:33 AM |
OCT 19 |
(123) 456-7890 |
11:33 PM |
OCT 18 |
(123) 045-6789 |
8:33 AM |
OCT 17 |
(123) 456-7890 |
5:33 PM |
OCT 17 |
(123) 567-8904 |
6:33 AM |
OCT 16 |
|
|
|
|
|
|
16 x 9
Caller ID
If you subscribe to Caller ID service from your local telephone service provider, incoming telephone call numbers can be displayed on your TV screen; assuming the caller’s number is not an unlisted number. Also displays the last ten callers numbers.
See page 44.
Aspect Ratio
Choose the correct picture proportion for your: Computer’s image, DVD’s image, Normal broadcast’s image, etc.
See page 32.
206-03807 |
P A G E 2 1 |
|
 Loading...