


Owner’s Manual
Bedienungsanleitung Mode d’emploi
Manual de instrucciones

Copyright Notice
The followings are the titles, credits and copyright notices for six (6) of the songs pre-installed in this electronic trumpet:
In The Midnight Hour
Words and Music by Steve Cropper and Wilson Pickett
Copyright © 1965 IRVING MUSIC, INC. and COTILLION MUSIC, INC.
Copyright Renewed
All Rights Reserved Used by Permission
The Lonely Bull
By Sol Lake
Copyright © 1962 ALMO MUSIC CORP.
Copyright Renewed
All Rights Reserved Used by Permission
Respect
Words and Music by Otis Redding
Copyright © 1965 IRVING MUSIC, INC.
Copyright Renewed
All Rights Reserved Used by Permission
Soul Man
Words and Music by Isaac Hayes and David Porter
Copyright © 1967 ALMO MUSIC CORP. and WALDEN MUSIC, INC.
Copyright Renewed
All Rights Reserved Used by Permission
Spanish Flea
Words and Music by Julius Wechter
Copyright © 1965 ALMO MUSIC CORP.
Copyright Renewed
All Rights Reserved Used by Permission
Raiders March
from the Paramount Motion Picture RAIDERS OF THE LOST ARK Music by John Williams
Copyright © 1981 by Bantha Music and Ensign Music Corporation
All Rights for the World Controlled and Administered by Ensign Music Corporation International Copyright Secured All Rights Reserved
All Rights Reserved, Unauthorized copying, public performance and broadcasting are strictly prohibited regarding the above six songs pre-installed.
● COPYRIGHT NOTICE
This product incorporates and bundles computer programs and contents in which Yamaha owns copyrights or with respect to which it has license to use others’ copyrights.
Such copyrighted materials include, without limitation, all computer software, styles files, MIDI files, WAVE data and sound recordings. Any unauthorized use of such programs and contents outside of personal use is not permitted under relevant laws.
Any violation of copyright has legal consequences. DON’T MAKE, DISTRIBUTE OR USE ILLEGAL COPIES.
Copying of the commercially available software is strictly prohibited except for your personal use.
2 EZ-TP Owner’s Manual

PRECAUTIONS
PLEASE READ CAREFULLY BEFORE PROCEEDING
* Please keep this manual in a safe place for future reference.
 WARNING
Always follow the basic precautions listed below to avoid the possibility of serious injury or even death from electrical shock, short-circuiting, damages, fire or other hazards. These precautions include, but are not limited to, the following:
Power supply/AC power adaptor
•Only use the voltage specified as correct for the instrument. The required voltage is printed on the name plate of the instrument.
•Use the specified adaptor (PA-3C or an equivalent recommended by Yamaha) only. Using the wrong adaptor can result in damage to the instrument or overheating.
•Check the electric plug periodically and remove any dirt or dust which may have accumulated on it.
•Do not place the AC adaptor cord near heat sources such as heaters or radiators, and do not excessively bend or otherwise damage the cord, place heavy objects on it, or place it in a position where anyone could walk on, trip over, or roll anything over it.
Do not open
•Do not open the instrument or attempt to disassemble the internal parts or modify them in any way. The instrument contains no user-serviceable parts. If it should appear to be malfunctioning, discontinue use immediately and have it inspected by qualified Yamaha service personnel.
Water warning
•Do not expose the instrument to rain, use it near water or in damp or wet conditions, or place containers on it containing liquids which might spill into any openings.
•Never insert or remove an electric plug with wet hands.
Fire warning
•Do not put burning items, such as candles, on the unit. A burning item may fall over and cause a fire.
If you notice any abnormality
•If the AC adaptor cord or plug becomes frayed or damaged, or if there is a sudden loss of sound during use of the instrument, or if any unusual smells or smoke should appear to be caused by it, immediately turn off the power switch, disconnect the adaptor plug from the outlet, and have the instrument inspected by qualified Yamaha service personnel.
 CAUTION
Always follow the basic precautions listed below to avoid the possibility of physical injury to you or others, or damage to the instrument or other property. These precautions include, but are not limited to, the following:
Power supply/AC power adaptor
•When removing the electric plug from the instrument or an outlet, always hold the plug itself and not the cord.
•Unplug the AC power adaptor when not using the instrument, or during electrical storms.
•Do not connect the instrument to an electrical outlet using a multiple-connector. Doing so can result in lower sound quality, or possibly cause overheating in the outlet.
Battery
•Always make sure all batteries are inserted in conformity with the +/- polarity markings. Failure to do so might result in overheating, fire, or battery fluid leakage.
•Always replace all batteries at the same time. Do not use new batteries together with old ones. Also, do not mix battery types, such as alkaline batteries with manganese batteries, or
batteries from different makers, or different types of batteries from the same maker, since this can cause overheating, fire, or battery fluid leakage.
•Do not dispose of batteries in fire.
•Do not attempt to recharge batteries that are not intended to be charged.
•When the batteries run out, or if the instrument is not to be used for a long time, remove the batteries from the instrument to prevent possible leakage of the battery fluid.
•Keep batteries away from children.
•If the batteries do leak, avoid contact with the leaked fluid. If the battery fluid should come in contact with your eyes, mouth, or skin, wash immediately with water and consult a doctor. Battery fluid is corrosive and may possibly cause loss of sight or chemical burns.
(4)-8 1/2 |
EZ-TP Owner’s Manual 3 |
1
Location |
|
Maintenance |
•Do not expose the instrument to excessive dust or vibrations, or extreme cold or heat (such as in direct sunlight, near a heater, or in a car during the day) to prevent the possibility of panel disfiguration or damage to the internal components.
•Do not use the instrument in the vicinity of a TV, radio, stereo equipment, mobile phone, or other electric devices. Otherwise, the instrument, TV, or radio may generate noise.
•Do not place the instrument in an unstable position where it might accidentally fall over.
•Before moving the instrument, remove all connected adaptor and other cables.
Connections
•Before connecting the instrument to other electronic components, turn off the power for all components. Before turning the power on or off for all components, set all volume levels to minimum. Also, be sure to set the volumes of all components at their minimum levels and gradually raise the volume controls while playing the instrument to set the desired listening level.
•When cleaning the instrument, use a soft, dry cloth. Do not use paint thinners, solvents, cleaning fluids, or chemicalimpregnated wiping cloths.
Handling caution
•Do not place vinyl, plastic or rubber objects on the instrument, since this might discolor the panel or keyboard.
•Do not rest your weight on, or place heavy objects on the instrument, and do not use excessive force on the buttons, switches or connectors.
•Do not operate the instrument for a long period of time at a high or uncomfortable volume level, since this can cause permanent hearing loss. If you experience any hearing loss or ringing in the ears, consult a physician.
Saving data
Saving and backing up your data
•Data in the instrument’s internal memory can be lost due to operational errors or malfunction. Be sure to save any important data to external media via a computer connected to the instrument. (page 30)
Yamaha cannot be held responsible for damage caused by improper use or modifications to the instrument, or data that is lost or destroyed.
Always turn the power off when the instrument is not in use.
When using a power adaptor, even when the power switch is in the “STANDBY” position, electricity is still flowing to the instrument at the minimum level. When you are not using the instrument for a long time, make sure you unplug the AC power adaptor from the wall AC outlet.
Make sure to discard used batteries according to local regulations.
The illustrations and LED screens as shown in this owner’s manual are for instructional purposes only, and may be different from the ones on your instrument.
● Trademarks
•Apple and Macintosh are trademarks of Apple Computer, Inc., registered in the U.S. and other countries.
•Windows is the registered trademark of Microsoft® Corporation.
•All other trademarks are the property of their respective holders.
4 EZ-TP Owner’s Manual |
(4)-8 2/2 |
2

Congratulations and thank you for purchasing the Yamaha EZ-TP! Please read this owner’s manual carefully before using the instrument, in order to take full advantage of its various features.
Make sure to keep this manual in a safe and handy place even after you finish reading, and refer to it often when you need to better understand an operation or function.
Contents
Copyright Notice ....................................... |
2 |
Setting Up ...................................................... |
6 |
Power Requirements ................................ |
6 |
Connections.............................................. |
7 |
Supplied Accessories ............................... |
7 |
Controls & Features ...................................... |
8 |
Holding the EZ-TP....................................... |
10 |
Playing the EZ-TP ....................................... |
11 |
Play by Singing ....................................... |
11 |
Fingering Chart ....................................... |
12 |
Setting the EZ-TP To Match Your |
|
Voice ................................................... |
14 |
Adjust the Microphone ............................ |
15 |
Select Different Sounds .......................... |
16 |
Changing the Pitch (Basic Key) of |
|
the EZ-TP............................................ |
17 |
Tuning..................................................... |
19 |
Producing a Thick “Brass Section” |
|
Sound.................................................. |
19 |
Playing Songs.............................................. |
20 |
Starting Song Playback .......................... |
20 |
Select and Listen To a Specific Song ..... |
20 |
Play With Song Accompaniment ............... |
22 |
Play Mode 1 – Play by Singing ............... |
22 |
Play Mode 2 – Press the Valves |
|
Indicated By the Guide Lamps ............ |
23 |
Play Mode 3 – Sing and Use the |
|
Valves ................................................. |
23 |
Change the Song Tempo........................ |
24 |
Change the Song Key............................. |
24 |
Adjust the Song/Performance Volume |
|
Balance ............................................... |
24 |
Velocity Curve......................................... |
25 |
Retained Data & Initialization..................... |
26 |
Retained Data ......................................... |
26 |
Initialization Procedure............................ |
26 |
Connecting to MIDI Devices ...................... |
27 |
What is MIDI?.......................................... |
27 |
Some Things You Can Do with MIDI ...... |
27 |
Connecting To a Computer ..................... |
28 |
Loading Song Data Into the EZ-TP ......... |
29 |
Setting the Transmit Channel.................. |
31 |
Local Control ON/OFF ............................ |
31 |
Cleaning the EZ-TP ..................................... |
32 |
Troubleshooting .......................................... |
33 |
Message List................................................ |
34 |
Sound List .................................................... |
35 |
MIDI Implementation Chart ........................ |
36 |
MIDI Data Format ........................................ |
38 |
Specifications .............................................. |
40 |
EZ-TP Owner’s Manual 5
3
Setting Up
Power Requirements
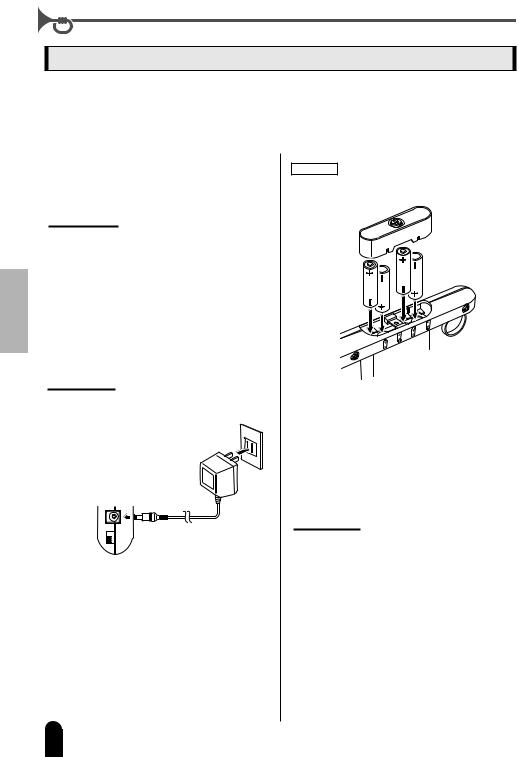
Although the instrument will run either from the supplied AC adaptor or optional batteries, Yamaha recommends use of an AC adaptor whenever possible. An AC adaptor is more environmentally friendly than batteries and does not deplete resources.
■ Using an AC Power Adaptor
qMake sure that the [STANDBY/ON] switch of the instrument is set to STANDBY.
 WARNING
•Use ONLY a Yamaha PA-3C AC Power Adaptor (or other adaptor specifically recommended by Yamaha) to power your instrument from the AC mains. The use of other adaptors may result in irreparable damage to both the adaptor and the instrument.
wConnect the AC adaptor (PA-3C or other adaptor specifically recommended by Yamaha) to the power supply jack.
ePlug the AC adaptor into an AC outlet.
 CAUTION
•Unplug the AC Power Adaptor when not using the instrument, or during electrical storms.
AC adaptor
PA-3C
DC IN 12V 


■ Using the Batteries
qUsing a coin or screwdriver open the battery compartment located on the bottom of the instrument.
wInsert four new alkaline batteries, being careful to follow the polarity markings as shown below.
eReplace the compartment cover, making sure that it locks firmly in place.
6 EZ-TP Owner’s Manual
NOTE • Connecting the AC adaptor automatically supplies from the adaptor and battery even when batteries are installed.
For battery operation the instrument requires four 1.5V “AA” size, LR6 or equivalent batteries. (Alkaline batteries are recommended.) When the batteries run low and the battery voltage drops below a certain level, the instrument may not sound or function properly. As soon as this happens, make sure to replace all batteries, following the precautions listed below.
 CAUTION
•Be sure to observe the +/- polarity markings, and install the batteries with the proper orientation. Improper battery orientation can result in overheating, fluid leakage, and possibly fire.
•When the batteries run down, replace them with a complete set of four new batteries. NEVER mix old and new batteries. Do not use different kinds of batteries (e.g. alkaline and manganese) at the same time.
•If the instrument is not to be in use for a long time, remove the batteries from it, in order to prevent possible fluid leakage from the battery.
•Always use the AC power adaptor when using the Song Filer application to load song data into the EZ-TP. The Song Filer will not function when battery power is used.
4
Setting Up
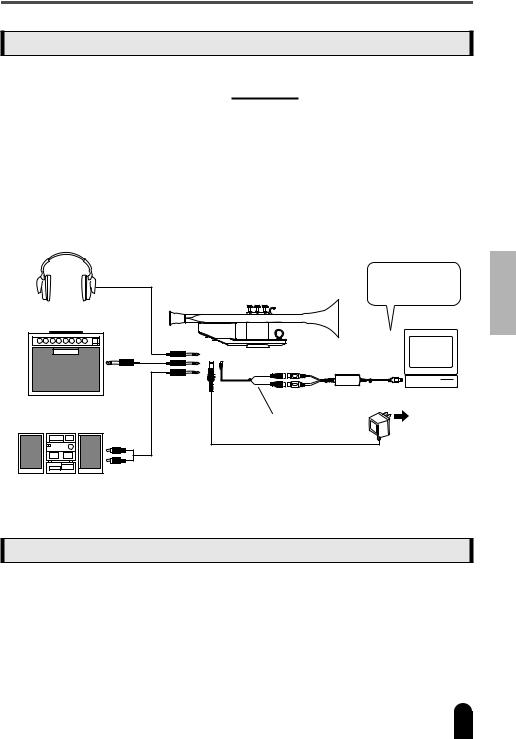
Connections
 CAUTION
•When connecting the EZ-TP to external equipment make sure that the power to all equipment is turned off to prevent possible electrical shock or equipment damage. Also start with all volume controls turned down to their minimum settings to prevent possible damage to speakers.
•Make sure that the EZ-TP ON/STANDBY switch is in the STANDBY position when connecting or disconnecting the AC adaptor or installing/ changing batteries to prevent possible damage to connected equipment.
Headphones
|
Refer to “Connecting |
|
To a Computer” on |
EZ-TP |
page 28. |
External Amplifier |
Computer |
To PHONES/ |
|
OUTPUT |
|
Connector |
|
Standard
Plug
Audio System,
Television, etc.
Pin Plugs
|
To MIDI |
|
|
|
USB |
|
Connector |
|
|
||
|
IN |
MIDI OUT |
UX16 Connector |
||
|
|
|
|||
Stereo |
To DC |
|
|
|
|
Mini Plug |
|
OUT |
MIDI IN |
USB-MIDI |
|
|
IN 12V |
|
|
|
Interface |
|
Connector |
|
|
|
To AC Outlet |
|
|
Supplied MIDI |
|||
|
|
Adaptor Cable |
|
||
|
|
|
|
|
AC Adaptor |
Supplied Accessories
•AC Adaptor
•MIDI Adaptor Cable
•Song Book
EZ-TP Owner’s Manual 7
5
Controls & Features
|
|
q |
r w |
|
|
|
|
|
e |
|||||||||||
|
|
|
|
|
|
|
||||||||||||||
|
|
|
|
|
|
|
|
|
|
|
|
|
|
|
|
|
|
|
|
|
|
|
|
|
|
|
|
|
|
|
|
|
|
|
|
|
|
|
|
|
|
|
|
|
|
|
|
|
|
|
|
|
|
|
|
|
|
|
|
|
|
|
|
|
|
|
|
|
|
|
|
|
|
|
|
|
|
|
|
|
|
|
|
|
|
|
|
|
|
|
|
|
|
|
|
|
|
|
|
|
|
|
|
|
1
!6!7!8
!9@0@1
u i o !0
t |
1 |
y |
|
!1 !2 !3 !4 !5
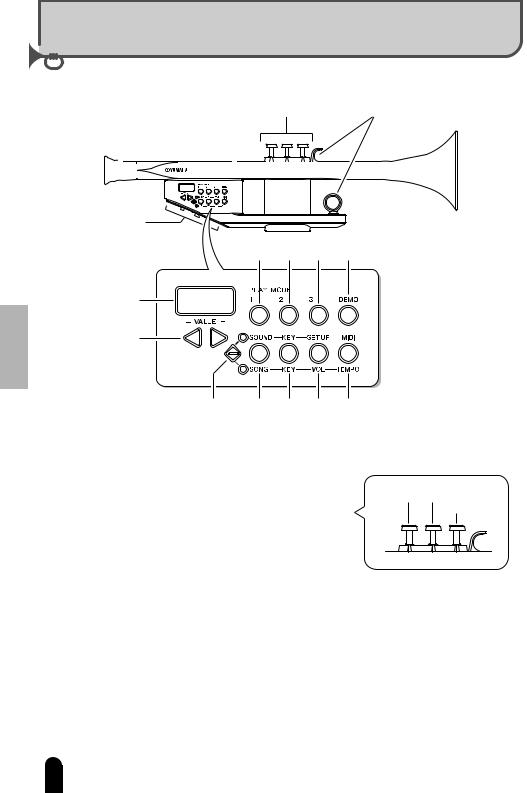
qMouthpiece
Place your lips against the mouthpiece and sing when playing the instrument.
w Valves 1 ~ 3
Valve 1 Valve 2
Valve 3
The combination of valves pressed – i.e., the “fingering” – determines the pitch produced (page 12).
e Finger Hooks
The little and ring fingers of your right and left hands, respectively, rest here to stabilize the instrument when playing (page 10).
r Guide Lamps
The guide lamps glow red to indicate which valves you should press. Depending on the selected mode, they may also indicate song tempo or note timing (page 23).
tDisplay
The display shows sound and song numbers, as well as parameter values.
8 EZ-TP Owner’s Manual
6

Controls & Features
y [-] and [+] Buttons
These buttons are used to select sound and song numbers, as well as to edit parameter values.
When some parameters are selected the [+] and [-] buttons can be pressed simultaneously to recall the default setting.
u PLAY MODE [1] Button
Sing into the mouthpiece along with the song to produce the appropriate trumpet lines (page 22).
i PLAY MODE [2] Button
Press the valves indicated by the guide lamps to play the song melody (page 23).
o PLAY MODE [3] Button
Press the appropriate valves while singing into the mouthpiece (page 23).
!0[DEMO] Button
Starts or stops song playback (page 20).
!1 (Function Shift) Button
Alternately selects the functions listed above and below the four function buttons (!2~ !5). When the upper indicator is lit the function buttons select the functions listed above the buttons, and when the lower indicator is lit the function buttons select the functions listed below the buttons.
Button names separated by a slash (!2~ !5) indicate the upper and lower functions of the button, respectively.
For example, the [SOUND]/[SONG] button: Upper indicator lit → [SOUND] button. Lower indicator lit → [SONG] button.
!2[SOUND]/[SONG] Button
Selects the sound or song you want to play (page 16, 20).
!3[KEY] Button
Use to change the “key” or pitch of the sound.
When the upper indicator is lit this button changes the key of the sound you are playing (page 17). When the lower indicator is lit this button changes the key of song playback (page 24).
!4[SET UP]/[VOL] Button
When the upper indicator is lit this button accesses the instrument’s setup parameters (page 14). When the lower indicator is lit it can be used to adjust the volume of song playback in order to achieve the best balance with the sound you are playing (page 24).
!5[MIDI]/[TEMPO] Button
When the upper indicator is lit this button is used to access a range of MIDI parameters (page 31). When the lower indicator is lit it is used to adjust song
playback tempo (page 24).
EZ-TP Owner’s Manual 9
7
Holding the EZ-TP
!6MIC VOL Control
Adjusts the sensitivity of the instrument’s mouthpiece microphone to match your voice (page 15).
!7MIDI Connector
The supplied MIDI adaptor cable and an optional USB-MIDI interface and standard MIDI cable can be connected here to connect to other MIDI instruments or a computer running MIDI music software. (page 27).
!8MASTER VOL Control
Adjusts the overall volume (page 11).
!9PHONES/OUTPUT Connector
MIC VOL
MIDI
MASTER VOL
PHONES / OUTPUT
DC IN 12V 

ON
STANDBY 

 !6
!6

 !7
!7

 !8
!8

 !9
!9 


 @0
@0
@1
This connector can be used to feed the instrument’s audio output to headphones, a stereo system, or amplifier (page 7).
@0DC IN 12V Connector
The supplied AC adaptor (PA-3C) should be connected here (page 6).
@1STANDBY/ON Switch
This is the instrument’s power on/off switch (page 11).
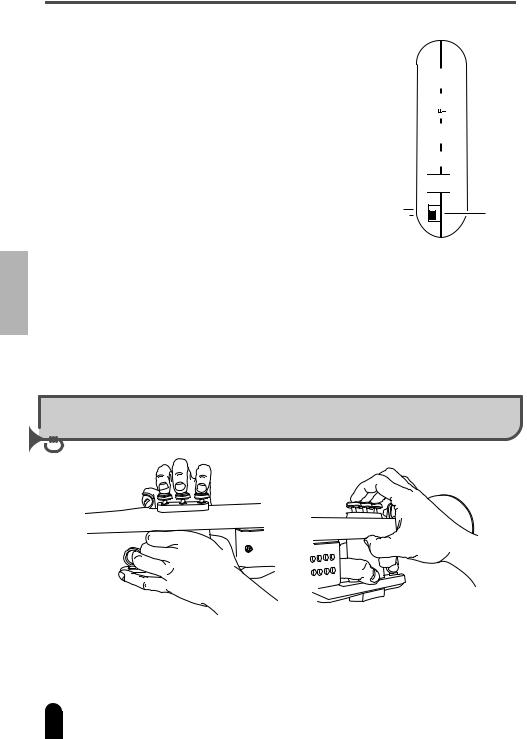
Holding the EZ-TP
Hold the center of the valve case with the left hand, as shown in the illustration. Your right-hand index finger should rest on valve 1, your middle finger on valve 2, and your ring finger on valve 3. The right-hand thumb should rest comfortably below valves 1 and 2, and the little finger should be placed in the upper finger hook for support.
10 EZ-TP Owner’s Manual
8
Playing the EZ-TP
When all preparations have been properly made, turn on the power and try playing the EZ-TP.
Play by Singing
1 Turn on the power.
ON STANDBY
Slide the switch to the “ON” position to turn the power on. Slide the switch to the “STANDBY” position when you want to turn the power off.
2
3
Place the mouthpiece against your lips and sing a note.
This should produce a trumpet note.
Refer to “Setting the EZ-TP To Match Your Voice” on page 14.
Adjust the overall volume.
MASTER VOL
Rotate the control clockwise to increase the volume, or counter-clock- wise to decrease the volume.
4 Sing a melody you want to play while fingering the valves to produce the appropriate notes.
A fingering chart is provided on page 12.
NOTE • If you sing without fingering the notes, only certain harmonics of one fingering will sound (page 13).
● About Trumpet Pitch
Like a real trumpet, the EZ-TP is a “Bb instrument” (page 17). This means that a “C” note played on the trumpet will normally produce the same pitch as a “Bb” note on a piano.
The EZ-TP can also be set to other basic pitches – C, Eb, and F, in addition to the standard Bb pitch. The EZ-TP includes a function that lets you easily check the base pitch by ear – see “Check the Pitch Of the Bb, C, Eb, and F Keys” on page 18.
(When set to Bb)
“C” on the EZ-TP
A B C D E F G A
“C” on the piano
EZ-TP Owner’s Manual 11
9
Playing the EZ-TP
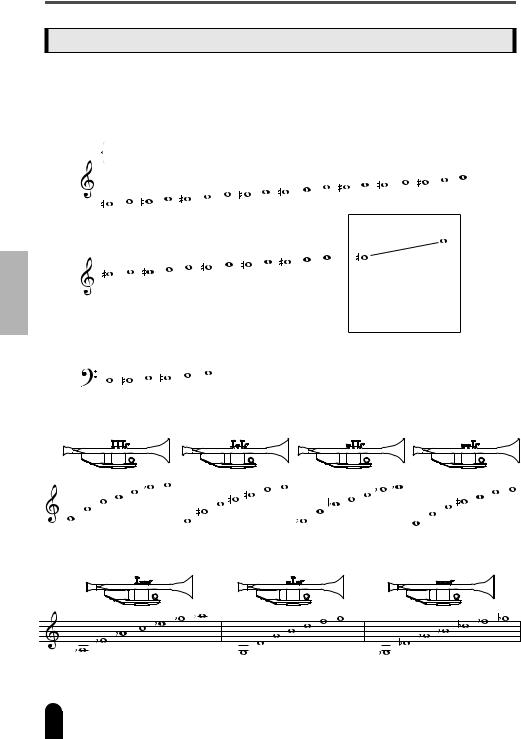
Fingering Chart
Finger the valves to produce the appropriate notes while singing the melody.
*The numbers in the chart are the numbers of the valves that must be pressed to produce the corresponding notes. “0” means that no valves should be pressed (page 8).
● Fingerings
|
Valve |
1 |
|
|
|
|
|
|
|
|
|
|
|
|
1 |
|
|
|
|
|
|
|
|
|
|
|
|
|
|
2 |
|
1 |
|
2 |
1 |
|
|
|
|
|
|
2 |
1 |
2 |
1 |
|
|
|
2 |
1 |
|
|
|
|
|||
numbers |
|
|
|
|
|
|
|
|
|
|
|
|
|
|
|
|||||||||||||
|
|
3 |
|
3 |
|
3 |
2 |
1 |
|
2 |
0 |
3 |
3 |
3 |
2 |
1 |
2 |
0 |
3 |
2 |
1 |
2 |
0 |
|
||||
|
|
|
|
|
|
|
|
|
|
|
|
|
|
|
|
|
|
|
|
|
|
|
|
|
|
|
|
|
|
|
|
|
|
|
|
|
|
|
|
|
|
|
|
|
|
|
|
|
|
|
|
|
|
|
|
|
|
|
|
|
|
|
|
|
|
|
|
|
|
|
|
|
|
|
|
|
|
|
|
|
|
|
|
|
|
|
|
|
|
|
|
|
|
|
|
|
|
|
|
|
|
|
|
|
|
|
|
|
|
|
|
|
|
|
|
1 |
|
2 |
0 |
1 |
|
|
|
|
|
|
2 |
1 |
|
|
|
|
|
|
|
|
|
|
|
|
|
|
2 |
1 |
2 |
0 |
1 |
2 |
0 |
3 |
2 |
|
1 |
2 |
0 |
|
|
|
|
|
|
|
|
||
|
|
|
|
|
|
|
|
|
||||||||||||||
|
|
|
|
|
|
|
|
|
|
|
|
|
|
|
|
|
|
|
|
|
|
|
|
|
|
|
|
|
|
|
|
|
|
|
|
|
|
|
|
|
|
|
|
|
|
|
|
|
|
|
|
|
|
|
|
|
|
|
|
|
|
|
|
|
|
|
|
|
The fingerings below are not available on a real trumpet, but can be used on the EZ-TP.
|
1 |
|
|
|
|
|
|
2 |
1 |
2 |
1 |
|
|
0 |
3 |
3 |
3 |
2 |
1 |
|
|
|
|
|
|
|
|
Fingerings in this range are the same as for the octave below.
● Harmonics Chart
|
|
|
|
0 |
|
|
|
|
|
|
|
|
|
|
2 |
1 |
|
|
|
|
12 |
|
|
|
|
|||||||||||||||
|
|
|
|
|
|
|
|
|
|
|
|
|
|
|
|
|
|
|
|
|
|
|
|
|
|
|
|
|
|
|
|
|
|
|
|
|
|
|
|
|
|
|
|
|
|
|
|
|
|
|
|
|
|
|
|
|
|
|
|
|
|
|
|
|
|
|
|
|
|
|
|
|
|
|
|
|
|
|
|
|
|
|
|
|
|
|
|
|
|
|
|
|
|
|
|
|
|
|
|
|
|
|
|
|
|
|
|
|
|
|
|
|
|
|
|
|
|
|
|
|
|
|
|
|
|
|
|
|
|
|
|
|
|
|
|
|
|
|
|
|
|
|
|
|
|
|
|
|
|
|
|
|
|
|
|
|
|
|
|
|
|
|
|
|
|
|
|
|
|
|
|
|
|
|
|
|
|
|
|
|
|
|
|
|
|
|
|
|
|
|
|
|
|
|
|
|
|
|
|
|
|
|
|
|
|
|
|
|
|
|
|
|
|
|
|
|
|
|
|
|
|
|
|
|
|
|
|
|
|
|
|
|
|
|
|
|
|
|
|
|
|
|
|
|
|
|
|
|
|
|
|
|
|
|
|
|
|
|
|
|
|
|
|
|
|
|
|
|
|
|
|
|
|
|
|
|
|
|
|
|
|
|
|
|
|
|
|
|
|
|
|
|
|
|
|
|
|
|
|
|
|
|
|
|
|
|
|
|
|
|
|
|
|
|
|
|
|
|
|
|
|
|
|
|
|
|
|
|
|
|
|
|
|
|
|
|
|
|
|
|
|
|
|
|
|
|
|
|
|
|
|
|
|
|
|
|
|
|
|
|
|
|
|
|
|
|
|
|
C G C E G Bb C B F# B D# F# A B Bb F Bb D F Ab Bb A E A C# E G A
23 1 3 123
Ab Eb Ab C Eb Gb Ab |
G D G B D F G |
Gb Db Gb Bb Db Fb Gb |
* The actual notes produced will depend on the key setting (page 17).
12 EZ-TP Owner’s Manual
10
Playing the EZ-TP
● Harmonics |
|
|
|
|
|
In the chart on the previous page you can see that the same fingering – |
|
|
|
|
|
1 2 |
|
|
|||
valves 1 and 2 – is used to produce two different notes: E and A. |
|
|
|||
|
|
|
|
|
|
Real trumpets function in the same way, allowing you to produce more |
|
|
|
|
|
|
|
|
|
|
|
than one note with each fingering. These are “harmonic” notes, and are |
|
|
|
|
|
|
|
|
|
|
|
|
|
|
|
|
|
produced on a real trumpet by changing your “embouchure,” or the |
|
|
|
|
|
|
|
|
|
|
|
shape of your lips against the instrument’s mouthpiece. In the EZ-TP |
|
|
|
|
|
|
|
|
|
|
|
the harmonic produced is determined by the pitch of the note you sing |
|
|
|
|
|
into the mouthpiece. |
|
|
|
|
|
|
|
|
|
|
|
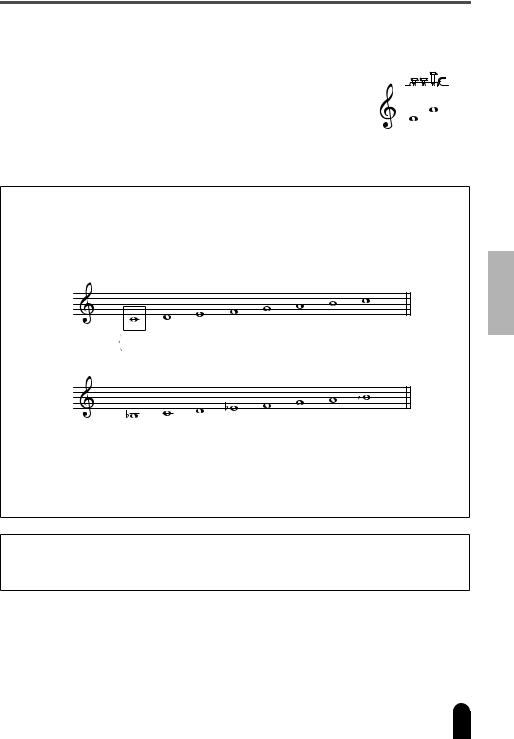
● Pitch
The default key for the EZ-TP is Bb – the standard key for most trumpets. If you play Example 1 using the default Bb key setting the actual pitches of the notes produced will be as shown in Example 2 (piano-pitch score).
● Trumpet
Example 1
Valve |
0 |
1 |
1 |
1 |
0 |
1 |
2 |
0 |
numbers |
|
3 |
2 |
|
|
2 |
|
|
● Piano
Example 2
● Singing the Correct Pitch
Since the key of the EZ-TP is Bb, you will also have to sing the notes you want to “play” in the key of Bb. To play the note indicated by the dotted outline in the above score, for example, you will need to sing a note corresponding to Bb on a piano. Refer to “Check the Pitch Of the Bb, C, Eb, and F Keys” on page 18.
● Fingering
Two modes are provided that lets you play by singing only, without requiring trumpet fingerings. Refer to “Fr1 and Fr2 – Play By Singing Only” on page 18.
EZ-TP Owner’s Manual 13
11
Playing the EZ-TP
Setting the EZ-TP To Match Your Voice
Select the “0” or “1” setting to match the EZ-TP to the pitch of your voice.
There is generally a difference of about 1 octave between male and female voices. If the appropriate setting is not made for your voice, the notes you produce may be either too high or too low, so it is important to make the right selection.
Most female and adolescent voices are best matched by the “1” setting, while the average male voice is best matched by the “0” setting.
The default EZ-TP setting is “0”.
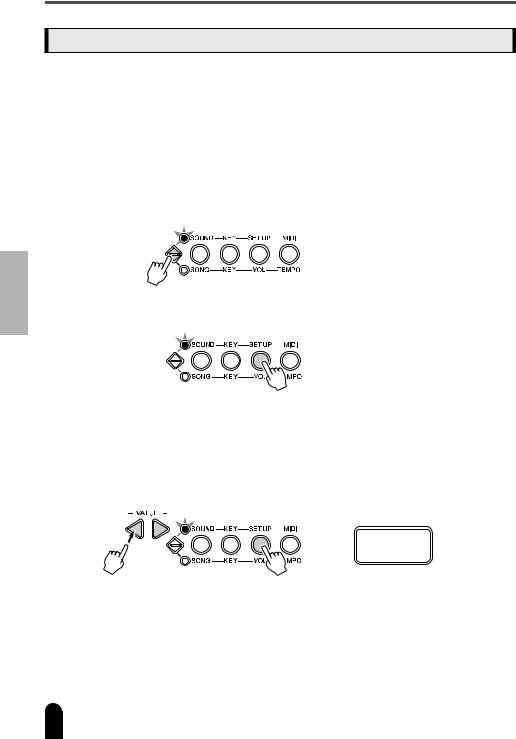
1 Press the  button so that the upper indicator lights.
2 Press the [SET UP] button – the button will light.
3 Press and hold the [SET UP] button, use the [-]/[+] buttons to select either “1” or “0”.
This setting is retained in memory even when the power is turned off. This setting can be changed during song playback, but in this case the new setting won’t be retained in memory when the power is turned off.
0
14 EZ-TP Owner’s Manual
12
 Loading...