


 Loading...
Yamaha Expansion Manager
Owner’s Manual
Contents |
|
Overview of Yamaha Expansion Manager ........................................................... |
2 |
Screen Items & Functions ..................................................................................... |
3 |
Managing Pack Data ............................................................................................. |
5 |
Installing Pack Data on a Digital Instrument ..................................................... |
6 |
Creating Your Own Original Packs..................................................................... |
9 |
Creating Your Own Original Voices.................................................................. |
11 |
Special Features for Tyros5 ................................................................................ |
23 |
Confidential
•Copying of the commercially available music sequence data and/or digital audio/graphic /video files is strictly prohibited except for your personal use.
•The software and this Owner’s Manual are exclusive copyrights of Yamaha Corporation.
•Copying of the software or reproduction of this manual in whole or in part by any means is expressly forbidden without the written consent of the manufacturer.
•Yamaha makes no representations or warranties with regard to the use of the software and documentation and cannot be held responsible for the results of the use of this manual and the software.
•The screen displays as illustrated in this Owner’s Manual are for instructional purposes, and may appear somewhat different from the screens which appear on your computer.
•Windows is a registered trademark of Microsoft® Corporation in the United States and other countries.
•Apple, Mac and Macintosh are trademarks of Apple Inc., registered in the U.S. and other countries.
•The company names and product names in this Owner’s Manual are the trademarks or registered trademarks of their respective companies.
This owner’s manual assumes that you are already familiar with basic Windows/Mac operations. If you are not, please refer to the owner’s manual which came with your Windows/Mac software before using this application.
Manual Development Department
© 2013 Yamaha Corporation
Published 03/2016 PO-G0
1

Overview of Yamaha Expansion Manager
The term “Pack” is used to refer to a full set of Voice, Style, Song, and other data (collectively referred to as “content” below) for use on Yamaha digital instruments.
Content
Pack
Voice data
Style data
Song data
Multi Pad data
Registration data
Music Finder data
:
Yamaha Expansion Manager can be used with Packs to perform the following:
•Management of Pack data
•Installation of Pack data on a digital instrument
•Creation of your own original Packs
•Creation of your own original Voices
2

Screen Items & Functions
The Pack Manager window shown below is displayed whenever the application is launched. Here, you can import Packs and install them on your digital instrument.
y u |
!3!4!5 |
q e r
e r
 t
t
w
i !0!1!2
 o
o
qMy Packs button
The term “My Packs” is used to refer to Packs that you have imported or created. Click My Packs to display all Packs in the Pack list t (on the My Packs page).
wInstall Target list
This area shows a list of instruments on which Pack data can be installed.  is displayed when the instrument is connected via wireless network.
eAdd Install Target button
This button can be used to manually add instruments to the Install Target list.
rEdit Install Target button
Click this button with an Install Target selected to display a menu for editing the Install Target list.
tPack list
This area shows all of the Packs that you have imported or created.
yAdd Pack button
Click this button to add to the Pack list by importing Packs or creating new ones.
3
Screen Items & Functions
uPack Edit button
Click this button to display a menu for editing the Pack selected in the Pack list.
iPack name
This area shows the name of the currently selected Pack.
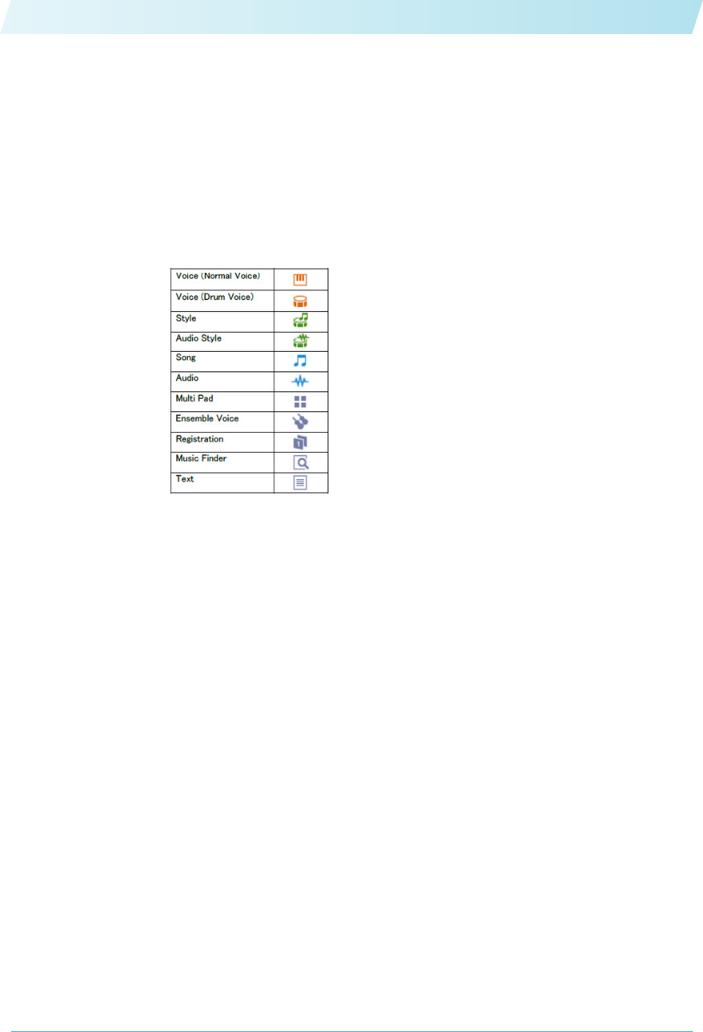
oContent list
This area shows all of the content included in the Pack currently selected in the Pack list. Each item of Pack content is identified using its name and the corresponding icon from the following table.
!0Add Content button
Click this button to display a menu for adding content to the Content list. This button will not be displayed in the case of protected Packs, such as any that you have purchased, and you will not be able to add content to them.
!1Content Edit button
Click this button to display a menu for editing content. This button will not be displayed in the case of protected Packs, such as any that you have purchased, and you will not be able to edit their content.
!2Protected icon
This icon is displayed whenever you select a protected Pack.
!3Device Setting button
Click this button to open the Device Setting window. On this window, you can make the settings required to listen to the Voice currently being edited using a MIDI keyboard, or other similar devices.
!4Shop button
Click this button to launch your default browser and visit the Yamaha MusicSoft web site.
!5About Yamaha Expansion Manager button
Click this button to display the current version number, copyright details, and other information on the Yamaha Expansion Manager application.
4

Managing Pack Data
Importing Packs and managing your library
1.
2.
3.
Click My Packs on the Pack Manager window.
Click the Add Pack button and then select Import Pack from the menu displayed.
When the file selector dialog is displayed, select the file containing the Pack you wish to install and click Open.
4. If a user verification dialog is then displayed, enter your User ID and password.
Your Pack will now be imported.
The icons for all imported Packs will be displayed in the Pack list on the My Packs page. When you select a Pack by clicking the corresponding icon, all of its content will be displayed in the Content list.
NOTE
•When importing a purchased Pack for the first time, your computer must be connected to the Internet.
•You can also import a Pack by dragging and dropping its file into the Pack list on the My Packs page.
•SoundFont files (.sf2) can also be imported as Packs. The SoundFont format was developed by Creative Labs and differs considerably from the format used in this software. Accordingly, it may not be possible to accurately convert all of the data from .sf2 files. If imported data does not produce the expected sounds, use this software’s editing functions to make the necessary adjustments.
•REX files (.rex, .rx2, .rcy) can be imported in the same way as Packs.
Developed by Propellerhead Software, REX is a file format that allows you to freely slice an audio file into multiple samples, which it arranges in the same order as in the original file. In this way, you can change playback tempo without affecting pitch and also rearrange the samples to create new phrases.
Importing REX files creates Drum and Normal Voices with which the constituent samples are assigned in sequence to individual keys. The samples are assigned in the same way in the Drum and Normal Voice, so you can use either type as appropriate. In addition, importing a REX file also creates Style and Multi Pad data that allows the original audio to be recreated by using the individual Voices. These can be installed into your instrument together with the Voices and edited as required.
Deleting an imported Pack
1. Select the Pack to be deleted by clicking its icon in the Pack list on the My Packs page.
2.
3.
Click the Pack Edit button and select Delete from the menu displayed.
Click Delete when asked to confirm whether you wish to proceed.
Your Pack will now be deleted.
The icons for deleted Packs will be removed from the Pack list.
5

Installing Pack Data on a Digital Instrument
First of all, ensure that your computer is connected to the correct network.
NOTE
Depending on the instrument to which the Pack is to be installed, the length of Waves that can be played back may be limited.
1. Add the digital instrument on which you wish to install Pack content to the Install Target list.
As described below, this can be done in two different ways—using a USB flash drive or via wireless network.
Adding using a USB flash drive
1-1. Plug the USB flash drive into the digital instrument in question and save the corresponding Instrument Info file to the USB flash drive.
NOTE
•Details on the USB flash drives that can be used with your digital instrument can be found on the following web site. http://download.yamaha.com
•Refer to the Owner’s Manual or Reference Manual that came with your digital instrument for instructions on how to save its Instrument Info file.
1-2.
1-3.
1-4.
Plug the USB flash drive into your computer and click the Add Install Target button in the Yamaha Expansion Manager application.
Select Import Instrument Info from the menu displayed.
When the file selector dialog is displayed, select the Instrument Info file that you exported from your digital instrument.
The instrument will now be added to the Install Target list.
Adding via wireless network
1-1. Connect your digital instrument and computer to the same wireless network or wireless access point.
1-2.
1-3.
NOTE
Refer to the Owner’s Manual or Reference Manual that came with your digital instrument for instructions on how to connect it to a wireless network.
Click the Add Install Target button in the Yamaha Expansion Manager application.
Select Search Instruments from the menu displayed.
The instrument will now be added to the Install Target list.
2. Select the digital instrument on which you wish to install the Pack content.
Click the digital instrument added to the Install Target list in the previous step.
6

Installing Pack Data on a Digital Instrument
3. Select the Pack or content to install on the digital instrument.
A screen similar to that shown below will be displayed when you select an Install Target.
q |
w |
t |
y |
e
 r
r
q The name of the selected Install Target is shown here.
wThis area displays size information related to Wave-format audio files for Voices or Audio Styles. Click to select either Voice Wave Size or Audio Style Wave Size.
The left side indicates the combined size for Voices or Audio Styles already installed on the instrument and for Voices or Audio Styles selected in the Content list. The right side indicates the total capacity available for Voices or Audio Styles on the instrument selected for installation. If you have connected the instrument using a wireless network, the total size for Voices from the previous wireless installation (Step 4) is also shown on the very left.
NOTE
A part of your instrument’s total capacity is used for the optimization of data access.
eThis button indicates whether or not the Pack is to be installed. Click to toggle between installation of all or none of the Pack’s content. Depending on the selection status, this button is displayed in one of the three following ways.
All of the Pack’s content will be installed.
Some of the Pack’s content will be installed.
None of the Pack’s content will be installed.
rThese buttons can be used to specify whether or not individual content items from the selected Pack are to be installed. Click any item of Pack content to toggle its selection status on or off. You can also drag the selection range over multiple items to toggle them all on or off together. In such a case, the selection status of all selected Pack content items will depend on whether the first item in the selection range is toggled on or off.
7

Installing Pack Data on a Digital Instrument
NOTE
Content items may be displayed in gray or become unselectable if they are not supported by the instrument selected for installation.
Click any Pack or content item you wish to install and verify that  is displayed on its icon.
4. Install the selected Pack(s) and content on your digital instrument.
As described below, this can be done in two different ways—using a USB flash drive or via wireless network.
Installation using a USB flash drive
4-1.
4-2.
4-3.
4-4.
4-5.
Plug a USB flash drive into your computer and click Save as Pack Install File t in the Yamaha Expansion Manager application.
Click Yes when asked to confirm whether you wish to proceed. A user verification dialog may then be displayed. If so, enter the User ID and password you used when adding the Pack(s) to the My Packs page.
When the file save dialog is displayed, select a destination for saving the Pack content to be installed.
Click Save to start saving the content file to the USB flash drive. A window showing the state of progress will be displayed.
When the Pack content has been saved, remove the USB flash drive from your computer, plug it into the digital instrument, and import the content.
NOTE
Refer to the Owner’s Manual or Reference Manual that came with your digital instrument for instructions on how to import Pack content from a USB flash drive.
This completes the process for installation using a USB flash drive.
Installation via wireless network
4-1.
4-2.
4-3.
Click Send to Instrument y in the Yamaha Expansion Manager application.
Click Yes when asked to confirm whether you wish to proceed. A user verification dialog may then be displayed. If so, enter the User ID and password you used when adding the Pack(s) to the My Packs page.
Click OK when asked to confirm whether you wish to install the Pack content. Yamaha Expansion Manager will now start installing on your digital instrument. A window showing the state of progress will be displayed.
Installation via wireless network will be complete when this window disappears.
8
Loading...