


 Loading...
Blu-ray Disc Player
Lecteur Blu-ray Disc
BD-A1060
EN Owner’s Manual
FR Mode d’emploi
DE Bedienungsanleitung
SV Bruksanvisning
IT Manuale di istruzioni
ES Manual de Instrucciones
NL Gebruiksaanwijzing
PURE DIRECT
|
CD MODE |
SA-CD |
USB |
CD MODE |
|
5V 0.5A
G
Nederlands Español Italiano Svenska Deutsch Français English

■ For U.K. customers
If the socket outlets in the home are not suitable for the plug supplied with this appliance, it should be cut off and an appropriate 3 pin plug fitted. For details, refer to the instructions described below.
Note
–The plug severed from the mains lead must be destroyed, as a plug with bared flexible cord is hazardous if engaged in a live socket outlet.
■Special Instructions for U.K. Model
IMPORTANT
THE WIRES IN MAINS LEAD ARE COLOURED IN ACCORDANCE WITH THE FOLLOWING CODE:
Blue: NEUTRAL Brown: LIVE
As the colours of the wires in the mains lead of this apparatus may not correspond with the coloured markings identifying the terminals in your plug, proceed as follows:
The wire which is coloured BLUE must be connected to the terminal which is marked with the letter N or coloured BLACK. The wire which is coloured BROWN must be connected to the terminal which is marked with the letter L or coloured RED.
Make sure that neither core is connected to the earth terminal of the three pin plug.
OBSERVERA
Apparaten kopplas inte bort från växelströmskällan (nätet) så länge som den är ansluten till vägguttaget, även om själva apparaten har stängts av.
ADVARSEL
Netspæendingen til dette apparat er IKKE afbrudt, sålæenge netledningen siddr i en stikkontakt, som er t endt - også selvom der or slukket på apparatets afbryder.
VAROITUS
Laitteen toisiopiiriin kytketty käyttökytkin ei irroita koko laitetta verkosta.
Caution-i En

•Hereby, Yamaha Music Europe GmbH, declares that this BD-A1060 is in compliance with the essential requirements and other relevant provisions of Directive 1999/5/EC.
•This product is limited to indoor use only.
•Par la présente, Yamaha Music Europe GmbH déclare que lappareil BD-A1060 est conforme aux exigences essentielles et aux autres dispositions pertinentes de la directive 1999/5/CE.
•Ce produit est uniquement destiné à une utilisation en intérieur.
•Hiermit erklärt Yamaha Music Europe GmbH, dass sich das Gerät BD-A1060 in Übereinstimmung mit den grundlegenden Anforderungen und den übrigen einschlägigen Bestimmungen der Richtlinie 1999/5/EG befindet.
•Dieses Gerät ist ausschließlich auf den Gebrauch in geschlossenen Räumen ausgelegt.
•Härmed intygar Yamaha Music Europe GmbH att denna BD-A1060 står I överensstämmelse med de väsentliga egenskapskrav och övriga relevanta bestämmelser som framgår av direktiv 1999/5/EG.
•Den här produkten får bara användas inomhus.
•Con la presente Yamaha Music Europe GmbH dichiara che questo BD-A1060 è conforme ai requisiti essenziali ed alle altre disposizioni pertinenti stabilite dalla direttiva 1999/5/ CE.
•Il prodotto è destinato all’utilizzo esclusivo in interni.
•Por la presente, Yamaha Music Europe GmbH, declara que este BD-A1060 cumple con los requisitos esenciales y otras exigencias relevantes de la Directiva 1999/5/EC.
•Este producto está limitado para su uso exclusivo en interiores.
•Hierbij verklaart Yamaha Music Europe GmbH dat het toestel l BD-A1060 in overeenstemming is met de essentiële eisen en de andere relevante bepalin-gen van richtlijn 1999/ 5/EG.
•Dit product kan alleen binnenshuis gebruikt worden.
С настоящето, Yamaha Music Europe GmbH, декларира, че
BD-A1060 евсъответствиесъссъщественитеизискванияи другитеприложими разпоредби на Директива 1999/5/EC.
Yamaha Music Europe GmbH tímto prohlašuje, že BD-A1060 splňuje základní požadavky a všechna příslušná ustanoveni Směrnice 1999/5/ES.
Undertegnede Yamaha Music Europe GmbH erklærer herved, at følgende udstyr BD-A1060 overholder de væsentlige krav og øvrige relevante krav i direktiv 1999/5/EF.
Käesolevaga kinnitab Yamaha Music Europe GmbH seadme BD-A1060 vastavust direktiivi 1999/5/EÜ põhinõuetele ja nimetatud direktiivist tulenevatele teistele asjakohastele sätetele.
ΜΕ ΤΗΝ ΠΑΡΟΥΣΑ Yamaha Music Europe GmbH
ΔΗΛΩΝΕΙΟΤΙBD-A1060 ΣΥΜΜΟΡΦΩΝΕΤΑΙΠΡΟΣΤΙΣ ΟΥΣΙΩΔΕΙΣ ΑΠΑΙΤΗΣΕΙΣ ΚΑΙ ΤΙΣ ΛΟΙΠΕΣ ΣΧΕΤΙΚΕΣ ΔΙΑΤΑΞΕΙΣ ΤΗΣ ΟΔΗΓΙΑΣ 1999/5/ΕΚ.
Ar šo Yamaha Music Europe GmbH deklarē, ka BD-A1060 atbilst Direktīvas 1999/5/EK būtiskajām prasībām un citiem ar to saistītajiem noteikumiem.
Šiuo Yamaha Music Europe GmbH deklaruoja, kad šis BDA1060 atitinka esminius reikalavimus ir kitas 1999/5/EB Direktyvos nuostatas.
A Yamaha Music Europe GmbH ezzennel kijelenti, hogy a BD-A1060 típusú beren-dezés teljesíti az alapvető követelményeket és más 1999/5/EK irányelvben meghatározott vonatkozó rendelkezéseket.
Niniejszym Yamaha Music Europe GmbH deklaruje że BD-A1060 jest zgodny z zasadniczymi wymaganiami i innymi właściwymi postanowieniami Dyrektywy 1999/5/EC.
Eu, Yamaha Music Europe GmbH, declaro que o BD-A1060 cumpre os requisitos essenciais e outras provisões relevantes da Directiva 1999/5/EC.
Prin prezenta, Yamaha Music Europe GmbH, declară că aparatul BD-A1060 este în conformitate cu cerinţele esenţiale şi cu alte prevederi pertinente ale Directivei 1999/5/CE.
Yamaha Music Europe GmbH týmto vyhlasuje, že BD-A1060 spĺňa základné požiadavky a všetky príslušné ustanovenia Smernice 1999/5/ES.
Yamaha Music Europe GmbH izjavlja, da je ta BD-A1060 v skladu z bistvenimi zahtevami in drugimi relevantnimi določili direktive 1999/5/ES.
Yamaha Music Europe GmbH vakuuttaa täten että BD-A1060 tyyppinen laite on direktiivin 1999/5/EY oleellisten vaatimusten ja sitä koskevien direktiivin muiden ehtojen mukainen.
Yamaha Music Europe GmbH
Siemensstr. 22-34 25462 Rellingen, Germany
Tel: +49-4101-303-0
Caution-ii En

Caution: Read this before operating your unit.
1To assure the finest performance, please read this manual carefully. Keep it in a safe place for future reference.
2Install this sound system in a well ventilated, cool, dry, clean place-away from direct sunlight, heat sources, vibration, dust, moisture, and/or cold. For proper ventilation, allow the following minimum clearances.
Top : 10 cm (4 in) Rear: 10 cm (4 in) Side: 10 cm (4 in)
3Locate this unit away from other electrical appliances, motors, or transformers to avoid humming sounds.
4Do not expose this unit to sudden temperature changes from cold to hot, and do not locate this unit in an environment with high humidity (i.e. a room with a humidifier) to prevent condensation inside this unit, which may cause an electrical shock, fire, damage to this unit, and/or personal injury.
5Avoid installing this unit where foreign object may fall onto this unit and/or this unit may be exposed to liquid dripping or splashing. On the top of this unit, do not place:
–Other components, as they may cause damage and/or discoloration on the surface of this unit.
–Burning objects (i.e. candles), as they may cause fire, damage to this unit, and/or personal injury.
–Containers with liquid in them, as they may fall and liquid may cause electrical shock to the user and/or damage to this unit.
6Do not cover this unit with a newspaper, tablecloth, curtain, etc. in order not to obstruct heat radiation. If the temperature inside this unit rises, it may cause fire, damage to this unit, and/or personal injury.
7Do not plug in this unit to a wall outlet until all connections are complete.
8Do not operate this unit upside-down. It may overheat, possibly causing damage.
9Do not use force on switches, knobs and/or cords.
10When disconnecting the power cable from the wall outlet, grasp the plug; do not pull the cable.
11Do not clean this unit with chemical solvents; this might damage the finish. Use a clean, dry cloth.
12Only voltage specified on this unit must be used. Using this unit with a higher voltage than specified is dangerous and may cause fire, damage to this unit, and/or personal injury. Yamaha will not be held responsible for any damage resulting from use of this unit with a voltage other than specified.
13To prevent damage by lightning, keep the power cable disconnected from a wall outlet or this unit during a lightning storm.
14Do not attempt to modify or fix this unit. Contact qualified Yamaha service personnel when any service is needed. The cabinet should never be opened for any reasons.
15When not planning to use this unit for long periods of time (i.e. vacation), disconnect the AC power plug from the wall outlet.
16Be sure to read the “Troubleshooting” section on common operating errors before concluding that this unit is faulty.
17Before moving this unit, press p to set this unit to the standby mode, and disconnect the AC power plug from the wall outlet.
18Condensation will form when the surrounding temperature changes suddenly. Disconnect the power cable from the outlet, then leave this unit alone.
19When using this unit for a long time, this unit may become warm. Turn the power off, then leave this unit alone for cooling.
20Install this unit near the AC outlet and where the AC power plug can be reached easily.
21The batteries shall not be exposed to excessive heat such as sunshine, fire or the like.
Do not use this unit within 22 cm (9 inches) of persons with a heart pacemaker implant or defibrillator implant.
Radio waves may affect electro-medical devices. Do not use this unit near medical devices or inside medical facilities.
This unit is not disconnected from the AC power source as long as it is connected to the wall outlet, even if this unit itself is turned off by p. This state is called the standby mode. In this state, this unit is designed to consume a very small quantity of power.
Where the mains plug or an appliance coupler is used as the disconnect device, the disconnect device shall remain readily operable.
WARNING
TO REDUCE THE RISK OF FIRE OR ELECTRIC SHOCK, DO NOT EXPOSE THIS UNIT TO RAIN OR MOISTURE.
LASER SAFETY
This unit employs a laser. Due to possible eye injury, only a qualified service person should remove the cover or attempt to service this device.
DANGER
This unit emits visible laser radiation when open. Avoid direct eye exposure to beam. When this unit is plugged into the wall outlet, do not place your eyes close to the opening of the disc tray and other openings to look into inside.
Caution-iii En

Contents
1. Introduction |
|
What you can do with this Player ..................... |
2 |
Wide variety of supported discs and file formats ........... |
2 |
Enhanced network features............................................. |
2 |
Easy setup and operations............................................... |
2 |
High-quality audio features ............................................ |
2 |
Supplied parts .................................................... |
2 |
About discs and files ......................................... |
3 |
Types of discs/files that can be used with this Player .... |
3 |
Loading a disc................................................................. |
4 |
Disc precautions ............................................................. |
5 |
Notice for watching 3D video images ............................ |
5 |
Cinavia technology ......................................................... |
5 |
Controls and functions...................................... |
6 |
Front panel...................................................................... |
6 |
Rear panel ....................................................................... |
7 |
Remote control ............................................................... |
8 |
2. Connection |
|
Video/audio connections................................. |
12 |
Connecting to a TV via an AV receiver ....................... |
13 |
Connecting to a TV directly ......................................... |
13 |
Connecting to a TV and audio equipment.................... |
14 |
Network connection......................................... |
16 |
Wireless connection...................................................... |
16 |
Wired connection.......................................................... |
16 |
DLNA server setup....................................................... |
16 |
Other connections ........................................... |
18 |
Connecting Yamaha components that support remote |
|
connections............................................................... |
18 |
USB connection ............................................... |
19 |
Connecting the power cable ........................... |
20 |
3. Playback |
|
Initial settings ................................................... |
21 |
Setting with the Easy Setup .......................................... |
21 |
Wireless connection setting .......................................... |
21 |
Playing back video/music/photo .................... |
22 |
Playing back commercially available discs .................. |
22 |
Playing back video/music files ..................................... |
22 |
Viewing photos............................................................. |
23 |
Enjoying high-quality sound........................... |
25 |
Enjoying music CD/SA-CD in high-quality sound |
|
(CD mode)................................................................ |
25 |
Enjoying music and movies with pure high fidelity |
|
sounds (Pure Direct)................................................. |
25 |
Enjoying DLNA playback of mobile device |
|
contents via Wi-Fi Direct ............................. |
26 |
Enjoying smartphone pictures and videos |
|
on the TV screen (Miracast™)..................... |
27 |
Operating this Player from mobile devices ... |
28 |
Advanced playback operation ........................ |
29 |
On Screen menu............................................................ |
29 |
Status menu................................................................... |
30 |
Program play................................................................. |
31 |
Using Search ................................................................ |
31 |
Enjoying BONUSVIEW™ and BD-Live™................. |
31 |
Using Picture in Picture function |
|
(secondary audio/video playback) ........................... |
32 |
Using the feature of BD-Live™ ................................... |
32 |
4. Settings |
|
SETUP menu..................................................... |
33 |
Example of SETUP menu operation ............................ |
35 |
General Setting ............................................................. |
36 |
Display Setting.............................................................. |
39 |
Audio Setting ................................................................ |
41 |
System Information....................................................... |
42 |
Video/audio output formats............................. |
43 |
Video output formats .................................................... |
43 |
Audio output formats .................................................... |
44 |
Software upgrade ............................................. |
45 |
Upgrading the software................................................. |
45 |
5. Additional information |
|
Troubleshooting ............................................... |
46 |
Power ............................................................................ |
46 |
Basic operation.............................................................. |
46 |
Disc playback................................................................ |
46 |
Picture ........................................................................... |
47 |
Sound ............................................................................ |
47 |
Network......................................................................... |
48 |
Messages on the screen ................................................. |
49 |
Glossary ............................................................ |
50 |
Specifications ................................................... |
52 |
General .......................................................................... |
52 |
Audio performance ....................................................... |
52 |
Input/output................................................................... |
52 |
Copyright ...................................................................... |
52 |
Index .................................................................. |
54 |
New software that provides additional features or product improvements will be released as needed. We recommend upgrading the software of this Player to the latest version periodically. For details, refer to “Software upgrade” (p. 45).
■About this manual
–This manual describes how to operate this Player using a remote control except when it is not available. Some of these operations are also available using the front panel buttons.
–Notes contain important information about safety and operating instructions. Hint(s) indicates a tip for your operation.
–This manual is printed prior to production. Design and specifications are subject to change in part as a result of improvements, etc. In case of differences between the manual and the product, the product has priority.
The icons used in this manual
Icons are used to indicate available buttons/functions for a particular format. For details on playable discs and formats, see page 3.
BD : BD-Video
DVD : DVD-Video, DVD-VR, DVD+VR
CD : Audio CD, Super Audio CD
VIDEO : Video files
MUSIC : Audio files
PHOTO : Photo files
1 En
1 |
2 |
3 |
4 |
5 |
English
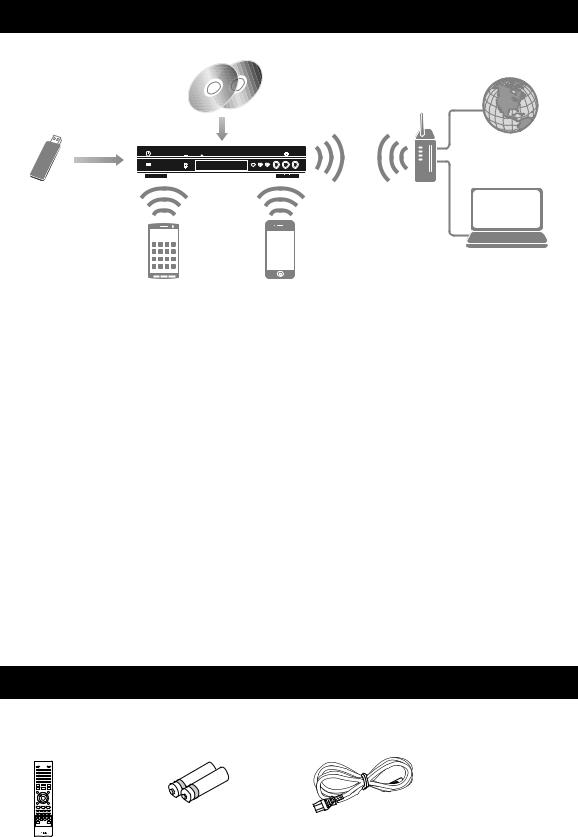
What you can do with this Player
Various discs |
Network streaming |
|
contents |
USB contents |
Wireless network |
|
(WPS supported) |
PC/NAS contents (DLNA)
Smartphone contents |
Mobile device contents |
(Miracast) |
(Wi-Fi Direct) |
■Wide variety of supported discs and file formats
–Blu-ray Disc™, DVDs, SA-CDs and CDs (p. 29)
–Blu-ray 3D™ (p. 12), BONUSVIEW™ and BD-Live™ (p. 31)
–Video, music and photo files on DVD-R/RW discs, CD-R/RW discs and USB memory devices (p. 22)
■Enhanced network features
–Enjoying DLNA server (PC or NAS) contents (p. 17)
–Operating this player from mobile devices via network (AV CONTROLLER) (p. 28)
–Enjoying smartphone pictures and videos on the TV screen (Miracast™) (p. 27)
–Direct network connection to a mobile device (Wi-Fi Direct) (p. 26)
■Easy setup and operations
–Quick and easy initial setup (p. 21)
–Automatic wireless setup with the WPS (Wi-Fi Protected Setup) (p. 21)
–Software upgrade via network or USB (p. 45)
–Sequential operations of the TV, AV receiver and this Player (HDMI Control) (p. 36)
■High-quality audio features
–CD mode for hi-quality and accurate disc playback for audio CD and SA-CD (p. 25)
–Pure Direct mode for hi-quality audio for any audio sources (p. 25)
–Up to 192-kHz/24-bit audio file formats including WAV, FLAC and ALAC supported (p. 3)
–Super Audio CD (SA-CD) and DSD audio file (2.8/5.6 MHz) supported (p. 4)
–XLR balanced output jacks for transmitting high-quality audio to a power amplifier (p. 15)
Supplied parts
Make sure the following accessories are provided with the product.
Remote control |
Batteries (×2) |
Power cable |
|
(AAA, R03, UM-4) |
|
2 En
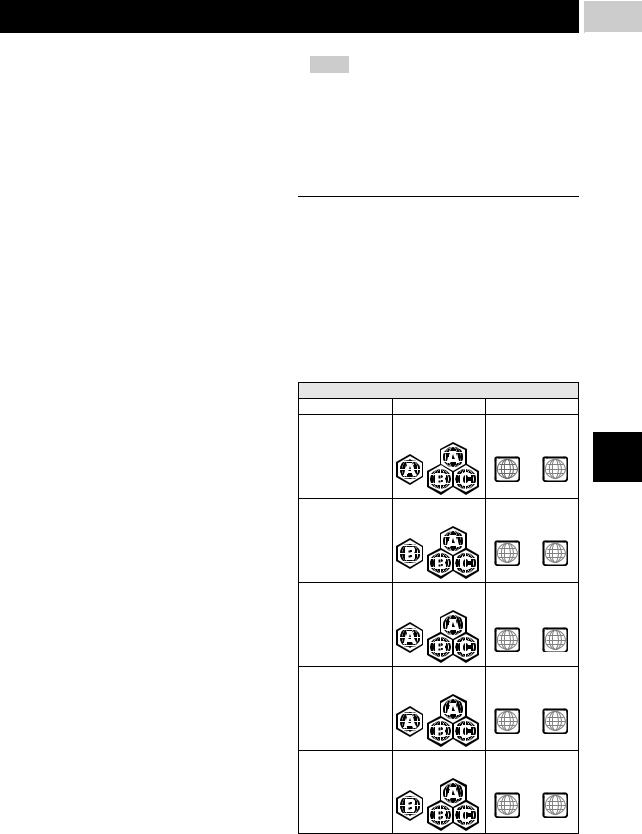
About discs and files |
1 |
■Types of discs/files that can be used with this Player
–12 cm (5”) and 8 cm (3”) discs can be played back in this Player. Do not use an 8 cm (3”) to 12 cm (5”) adapter.
–Use discs that conform to compatible standards as indicated by the presence of official logos on the disc label. Playback of discs not complying with these standards is not guaranteed. In addition, the image quality or sound quality is not guaranteed even if the discs can be played back.
Media Type |
Recording Format |
BD-ROM/BD-R/ |
BD-Video/Data files |
BD-RE |
|
|
|
DVD-ROM |
DVD-Video |
|
|
DVD-R/DVD-R |
DVD-Video/DVD-VR/AVCHD/Data files |
DL/DVD-RW |
|
|
|
DVD+R/DVD+R |
DVD-Video/DVD+VR/AVCHD/Data files |
DL/DVD+RW |
|
|
|
CD-ROM |
CDDA/HDCD |
|
|
CD-R/CD-RW |
CDDA/Data files |
|
|
SA-CD |
SA-CD |
|
|
USB* |
Data files |
|
|
DLNA |
Data files |
|
|
*This Player is compatible with a USB memory device formatted with FAT 16/32 and NTFS.
Playable audio |
Playable video |
Playable photo |
||||||
file formats |
file formats |
file formats |
||||||
|
|
|
|
|
|
|
|
|
|
MUSIC |
VIDEO |
PHOTO |
|||||
|
|
|
|
|
|
|
|
|
MP3 (.mp3) *1 |
MKV with H.264 |
JPEG (.jpeg/.jpg) |
||||||
WMA (.wma) *2 |
(.mkv) |
GIF (.gif) |
||||||
AAC (.aac/.m4a) |
MPEG PS (.mpeg/ |
PNG (.png) |
||||||
WAV (.wav) *3 |
.mpg) |
|
|
|
||||
FLAC (.flac) *3 |
MPEG TS (.ts) |
|
|
|
||||
ALAC (.m4a) *3 |
MPEG-4 (.mp4) |
|
|
|
||||
DSDIFF (.dff) *4 |
VOB (.vob) |
|
|
|
||||
AVI (.avi) |
|
|
|
|||||
DSF (.dsf) *4 |
|
|
|
|||||
ASF (.asf) |
|
|
|
|||||
|
|
|
|
|
|
|||
|
|
|
WMV (.wmv) *5 |
|
|
|
||
*1 Sampling frequency within 32-48 kHz (Stereo) and bitrate within 8-320 kbps
*2 Sampling frequency within 32-48 kHz (Stereo) and bitrate within 32-192 kbps
*3 Sampling frequency of up to 192 kHz/24 bit (LPCM/ Stereo)
*4 Sampling frequency of 2.8/5.6 MHz
*5 WMV9 (maximum resolution: 1,920 x 1,080)
Notes
–Playback of a file listed in the chart above is not guaranteed depending on methods of file creation or codecs used.
–Playback of all files on the disc, USB memory device and network is not guaranteed.
–A copyright protected file cannot be played back.
–When using DLNA, a file needs to meet the DLNA sever requirement.
Region management information for Blu-ray Disc/DVD videos
–Blu-ray Disc/DVD video players and discs have region codes, which dictate the regions in which a disc can be played. Verify the region code mark on the rear panel of this Player.
–For a Blu-ray Disc, the disc can be played back on this Player with the same region code mark, or the region code “ABC” mark.
–For a DVD disc, the disc can be played back on this Player with the same region code mark, or the region code “ALL” mark.
Region management information
Destination |
BD-Video |
DVD-Video |
|
U.S.A. and Canada |
Region code “A” or |
Region number “1” |
|
|
“ABC” |
or “ALL” |
|
|
|
1 |
ALL |
Europe |
Region code “B” or |
Region number “2” |
|
|
“ABC” |
or “ALL” |
|
|
|
2 |
ALL |
Asia and Taiwan |
Region code “A” or |
Region number “3” |
|
|
“ABC” |
or “ALL” |
|
|
|
3 |
ALL |
Central and South |
Region code “A” or |
Region number “4” |
|
America |
“ABC” |
or “ALL” |
|
|
|
4 |
ALL |
Australia |
Region code “B” or |
Region number “4” |
|
|
“ABC” |
or “ALL” |
|
|
|
4 |
ALL |
3 En
Introduction
English

About discs and files
Region management information
Destination |
BD-Video |
DVD-Video |
|
Russia |
Region code “C” or |
Region number “5” |
|
|
“ABC” |
or “ALL” |
|
|
|
5 |
ALL |
Notes
–Blu-ray Disc/DVD video operations and functions may be different from the explanations in this manual and some operations may be prohibited due to disc manufacturer’s settings.
–If a menu screen or operating instructions are displayed during playback of a disc, follow the operating procedure displayed.
–Playback for some of the discs may not be possible depending on the disc.
–Finalize all recording media that is played back in this Player.
–“Finalize” refers to a recorder processing a recorded disc so that it will play in other players/recorders as well as this Player. Only finalized discs can be played back in this Player. (This Player does not have a function to finalize discs.)
About Super Audio CD (SA-CD)
–Audio format based upon the current CD standards but includes a greater amount of information that provides higher quality sound. There are three types of discs: single layer, dual layer and hybrid discs. The hybrid disc can be played on existing CD players as well as Super Audio CD players since it contains both standard audio CD and Super Audio CD information.
Super Audio CD disc type
Dual layer disc
Single layer disc
HD layer |
HD layer |
Hybrid layer disc
CD layer |
HD layer |
Hybrid Super Audio CD disc
 1 CD layer that plays on any
CD player
High Density layer containing:
 2 - High Quality DSD Stereo
3 - High Quality DSD Multi-channel
Hint
–You can select the output audio signals from DSD or PCM (p. 41).
Note
–This unit does not show the text data included in the discs on the front panel display.
■Loading a disc
–Insert the disc with the label facing up.
–In case of the disc recorded on both sides, face down the side to play back.
Notes
–Playback may begin automatically, depending on the disc and setting of this Player.
–The menu may be displayed first, depending on the disc.
–The disc load time may vary depending on the disc.
4 En
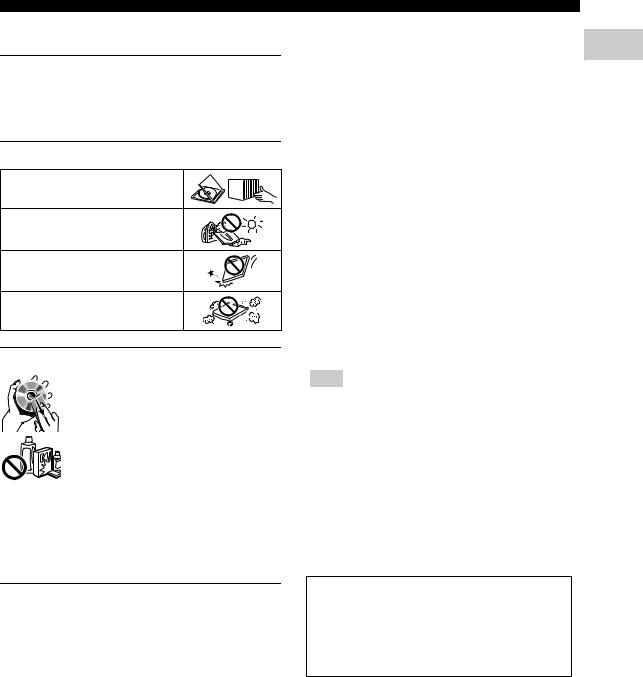
■ Disc precautions
Be careful of scratches and dust
–Blu-ray Disc, DVD and CD discs are sensitive to dust, fingerprints and especially scratches. A scratched disc may not be able to be played back. Handle discs with care and store them in a safe place.
Proper disc storage
Place the disc in the center of the disc case and store the case and disc upright.
Avoid storing discs in locations subject to direct sunlight, close to heating appliances or in locations of high humidity.
Do not drop discs or subject them to strong vibrations or impacts.
Avoid storing discs in locations where there are large amounts of dust or moisture.
Handling precautions
– If the surface is soiled, wipe gently with a soft, damp (water only) cloth. When wiping discs, always move the cloth from the center hole toward the outer edge.
– Do not use record cleaning sprays, benzene, thinner, static electricity prevention liquids or any other solvent.
–Do not touch the surface.
–Do not stick paper or adhesive labels to the disc.
–If the playing surface of a disc is soiled or scratched, the Player may decide that the disc is incompatible and eject the disc tray, or it may fail to play the disc correctly. Wipe any dirt off the playing surface with a soft cloth.
Cleaning the pick up lens
–Never use commercially available cleaning discs. The use of these discs can damage the lens.
–Request the nearest service center approved by Yamaha to clean the lens.
About discs and files |
|
|
■ Notice for watching 3D video |
1 |
|
images |
||
– Some people may experience discomfort (such as |
Introduction |
|
eye strain, fatigue, or nausea) while watching 3D |
||
|
||
video images. We recommend that all viewers take |
|
|
regular breaks while watching 3D video images. |
|
|
– If you experience any discomfort, stop watching the |
|
|
3D video images until the discomfort subsides. |
|
|
Consult a doctor if you experience severe |
|
|
discomfort. |
|
|
– Read the owner’s manuals (Blu-ray Disc and TV) |
|
|
and/or the caution messages that appear on the TV |
|
|
carefully. |
|
|
– The vision of young children (especially those under |
|
|
six years old) is still under development. Consult |
|
|
your doctor (such as a pediatrician or eye doctor) |
|
|
before allowing young children to watch 3D video |
|
|
images. |
|
|
– Adults should supervise young children to ensure |
|
|
they follow the recommendations described above. |
|
|
■ Cinavia technology |
|
|
– Cinavia technology is a part of the content protection |
|
|
system included in your Blu-ray Disc Player. |
|
Note
–The following messages may be displayed and playback stopped or audio outputs temporarily muted by your Blu-ray Disc player if you are playing an unauthorized copy of content that is protected by Cinavia technology.
Playback stopped. The content being played is |
English |
|
These messages are displayed in English only. |
|
|
|
|
|
protected by Cinavia® and is not authorized for |
|
|
|
||
playback on this device. |
|
|
For more information, see http://www.cinavia.com. |
|
|
Message Code 1. |
|
|
|
|
|
Audio outputs temporarily muted. Do not adjust the playback volume. The content being played is protected by Cinavia® and is not authorized for playback on this device.
For more information, see http://www.cinavia.com. Message Code 3.
Cinavia Notice
This product uses Cinavia technology to limit the use of unauthorized copies of some commercially-produced film and videos and their soundtracks. When a prohibited use of an unauthorized copy is detected, a message will be displayed and playback or copying will be interrupted. More information about Cinavia technology is provided at the Cinavia Online Consumer Information Center at http://www.cinavia.com. To request additional information about Cinavia by mail, send a postcard with your mailing address to: Cinavia Consumer Information Center, P.O. Box 86851, San Diego, CA, 92138, USA.
5 En
Controls and functions
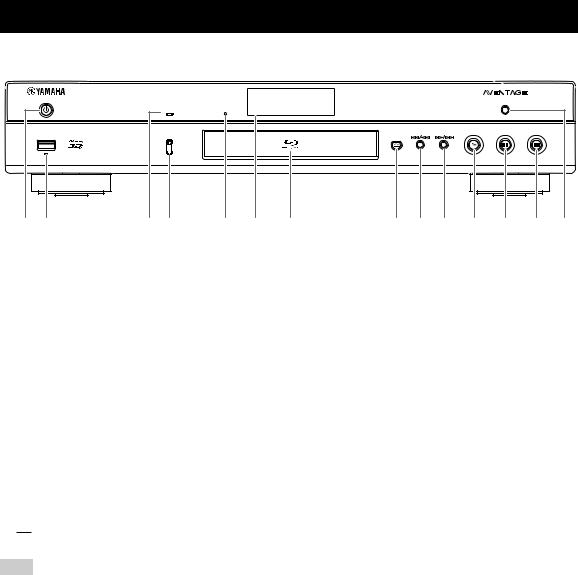
■ Front panel
PURE DIRECT
CD MODE |
SA-CD |
USB |
CD MODE |
|
|
|
5V |
0.5A |
|
|
|
1 2 |
3 4 |
5 6 7 |
8 9 0 A B C D |
|
1 p (On/Standby)
Turns this Player on/Sets to standby mode.
Press and hold p on the front panel for more than 5 seconds to reset this Player (system reset).
2 USB connector (p. 19)
3 CD MODE indicator
Lights up when the CD mode is enabled (p. 25).
4 CD MODE
Enables/disables the CD mode (p. 25).
5 SA-CD indicator
Lights up when an SA-CD is loaded and the SA-CD layer (p. 4) is selected.
6 Front panel display
Displays various information for operational status.
7 Disc tray door
8  (Eject)
Opens/Closes the disc tray.
Note
9 
 (Search backward/Skip backward)
Press to skip backward, and press and hold to search backward.
0 
 (Search forward/Skip forward)
Press to skip forward, and press and hold to search forward.
A  (Play)
Starts a playback.
B 
 (Pause)
Pauses a playback.
C  (Stop)
Stops a playback.
D PURE DIRECT
Enables/disables the Pure Direct mode (p. 25).
– Remove the protective film from the front panel before operating the Player.
6 En
Controls and functions
■ Rear panel
AC IN 
|
COAXIAL |
|
|
|
|
|
|
NETWORK |
OUT |
IN |
BALANCED OUT |
ANALOG OUT |
BALANCED OUT |
|
|
REMOTE CONTROL |
||||
|
|
|
|
|
||
HDMI |
OPTICAL USB |
|
|
|
|
|
|
DIGITAL OUT |
|
|
|
|
|
1 |
Introduction
1 |
2 |
3 4 |
5 |
6 |
7 |
8 |
1 HDMI (p. 12) |
|
|
|
|
5 REMOTE CONTROL (IN/OUT) (p. 18) |
|
2 DIGITAL OUT (COAXIAL/OPTICAL) (p. 14) |
|
6 BALANCED OUT (L/R) (p. 15) |
||||
3 USB (p. 19) |
|
|
|
|
7 ANALOG OUT (L/R) (p. 14) |
|
4 NETWORK (p. 16) |
|
|
|
|
8 AC IN (p. 20) |
|
English
7 En

Controls and functions
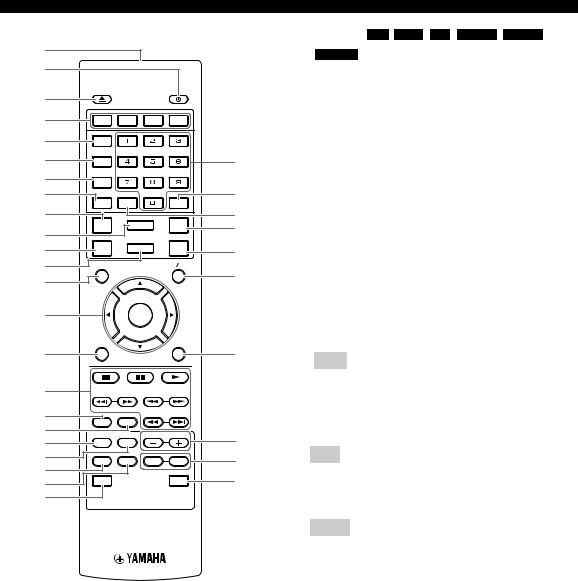
■ Remote control
Note
– will appear on the top left corner of the screen when the pressed button is not available.
1
2
3
4 |
RED |
GREEN |
YELLOW |
BLUE |
|
5 |
SUBTITTLE |
|
|
|
|
|
|
|
|
|
|
6 |
AUDIO |
|
|
|
N |
7 |
ANGLE |
|
|
|
|
8 |
ZOOM |
CLEAR |
|
SEARCH |
O |
|
|
|
|||
9 |
|
|
|
PURE |
P |
|
STATUS |
MIRACAST |
Q |
||
|
DIRECT |
||||
: |
|
|
|
|
|
|
|
|
|
R |
|
A |
SETUP |
HOME |
CD |
||
|
MODE |
|
|||
|
|
|
|
|
|
B |
TOP MENU |
|
|
POP-UP MENU |
|
C |
|
|
|
|
S |
|
|
|
|
|
|
D |
|
ENTER |
|
|
|
|
RETURN |
|
|
ON SCREEN |
|
E |
|
|
|
|
t |
F |
|
|
|
|
|
G |
SETUP |
STATUS |
|
|
|
H |
|
|
|
||
|
2ND AUDIO |
PAGE |
U |
||
I |
|
||||
PIP |
|
|
|
||
J |
PROGRAM |
SHUFFLE |
REPEAT |
A/B |
V |
K |
|
|
|
|
W |
L |
DIMMER |
|
|
SA-CD/CD |
|
M
1 Infrared signal transmitter: Outputs infrared signal. Aim this window to the remote control sensor (p. 11).
2 p: Turns this Player on or sets it to standby mode.
3 : Opens/closes the disc tray.
4Color buttons BD : Use these buttons according to on-screen instructions.
5SUBTITLE BD DVD VIDEO : Changes subtitle languages (p. 51) if available. You can also select this item from On Screen menu (p. 29).
6 AUDIO BD DVD VIDEO : Changes the audio
language or format. You can also select this item from On Screen menu (p. 29).
7 ANGLE BD DVD : Changes the camera angle if
video is recorded with multiple angles. The Angle Mark ( ) is displayed on the screen when this function is available. You can also select this item from On Screen menu (p. 29).
Note
–Angle Mark is displayed only when the Angle Mark is set to on (p. 37).
8 ZOOM DVD VIDEO PHOTO : Zooms in/out. The
size of the screen will change each time you press the button (zoom in/out: 3 steps each).
9 STATUS: Displays the playback information (p. 30).
0 MIRACAST: Starts Miracast (p. 27).
A SETUP: Displays SETUP menu screen (p. 33).
B HOME: Displays the HOME menu screen (p. 22).
C TOP MENU BD DVD : Displays the top menu
screen if the disc contains a menu. Select the desired item using 5/a/2/3 and ENTER.
Note
–Specific operations may be different depending on the disc. Follow the instructions of each menu screen.
DCursor buttons (5/a/2/3): Moves the focus in the menu screen.
ENTER: Selects the focused menu/item.
ERETURN: Returns to the previous menu or screen, etc.
8 En

F Control buttons
BD DVD CD VIDEO MUSIC PHOTO
 : Stops playback.
 : Pauses playback.
 : Plays back contents.
 /
/ : Skips backward/forward.
 /
/ 
BD DVD CD VIDEO MUSIC :
Searches backward/forward. The search speed will change each time you press the button (search backward/forward: 5 steps each). Press  to resume normal playback.
PHOTO : Changes the speed of a slide show (slower/
faster: 3 steps).

 /
/

BD DVD CD VIDEO MUSIC :
Press for instant search/replay. Instant search skips the content 30 seconds. Instant replay replays the content from 10 seconds before.
G SETUP: Displays SETUP menu screen (p. 33).
H STATUS: Displays the playback information (p. 30).
I PIP BD : Turns on/off the Picture in Picture (p. 32).
PIP Mark ( ) is displayed on the screen when this function is available. You can also select this item from On Screen menu (p. 29).
Note
–PIP Mark is displayed only when the PIP Mark is set to on (p. 37).
J 2ND AUDIO BD : Selects the secondary audio of the
Picture in Picture (p. 32) or audio commentaries. The Secondary Audio Mark (  ) is displayed on the screen when this function is available (p. 41). You can also select this item from On Screen menu (p. 29).
Note
–Secondary Audio Mark is displayed only when Secondary Audio Mark is set to on (p. 37).
|
Controls and functions |
|
|
K PROGRAM DVD |
CD : Sets the order of playback |
1 |
|
(p. 31). You can set up to 15 tracks (for an audio disc) |
|||
or titles/chapters (DVD-Video). |
Introduction |
||
L SHUFFLE DVD |
CD VIDEO MUSIC PHOTO : |
||
|
|||
Selects shuffle play mode (p. 29). |
|
||
M DIMMER: Changes the brightness of the front panel |
|
||
display in four steps. |
|
||
N Number buttons: Enter numbers, or during playback, jump to the track/chapter corresponding to the number you input. These buttons may not be available depending on the disc type and playback condition.
O SEARCH BD DVD CD VIDEO MUSIC :
Jumps to a specified point during playback. For details on this function, refer to “Using Search” (p. 31). You can also select this item from status menu (p. 30).
P CLEAR: Clears entered number/set item.
Q PURE DIRECT: Enables/disables the Pure Direct mode (p. 25).
R CD MODE: Enables/disables the CD mode (p. 25).
S POP-UP/MENU BD DVD : Displays pop-up menu. |
|
The menu contents displayed vary depending on the |
|
disc. For details on how to see and operate the pop-up |
|
menu, refer to the manual for the disc. |
|
The top menu screen may be displayed by pressing |
|
POP-UP/MENU depending on the DVD. |
English |
U PAGE (+/-) : Moves to a previous/next page when you |
|
T ON SCREEN: Displays On Screen menu (p. 29). |
|
select an item on the content list menu. |
|
Continued to the next page. \
9 En
Controls and functions
1
2
3
4 |
RED |
GREEN |
YELLOW |
BLUE |
5 |
SUBTITTLE |
|
|
|
|
|
|
|
|
6 |
AUDIO |
|
|
|
7 |
ANGLE |
|
|
|
8 |
ZOOM |
CLEAR |
|
SEARCH |
|
|
|||
9 |
|
|
|
PURE |
|
STATUS |
MIRACAST |
||
|
DIRECT |
|||
: |
|
|
|
|
|
|
|
|
|
A |
SETUP |
HOME |
CD |
|
|
MODE |
|||
|
|
|
|
|
B |
TOP MENU |
|
|
POP-UP MENU |
C |
|
|
|
|
D |
|
ENTER |
|
|
|
RETURN |
|
|
ON SCREEN |
E |
|
|
|
|
F |
|
|
|
|
G |
SETUP |
STATUS |
|
|
H |
|
|
||
|
2ND AUDIO |
PAGE |
||
I |
|
|||
PIP |
|
|
|
|
|
|
|
|
|
J |
PROGRAM |
SHUFFLE |
REPEAT |
A/B |
K |
|
|
|
|
L |
DIMMER |
|
|
SA-CD/CD |
M
V REPEAT BD DVD CD VIDEO MUSIC
PHOTO : Changes repeat mode. Repeat mode shown below will change each time you press the button.
 : Repeats the title being played back.
 : Repeats the chapter being played back.
 : Repeats the folder being played back.
N : Repeats all tracks/files on the disc.
 : Repeats the track/file being played back.
O |
A/B |
|
|
|
|
|
|
|
|
|
: Plays back |
|
BD |
|
DVD |
|
CD |
|
VIDEO |
|
MUSIC |
||||
|
|
|
|
|
||||||||
P |
a specific part you want to repeat. |
|||||||||||
Q |
1 |
Press A/B at the scene where you want to set the |
||||||||||
|
||||||||||||
R |
|
start point. “A-” is displayed on the screen. |
||||||||||
S |
2 |
Press A/B again at the scene where you want to set |
||||||||||
|
the end point. “A-B” is displayed on the screen. |
|||||||||||
|
|
|||||||||||
|
|
Repeat playback starts. |
||||||||||
|
3 |
To cancel the repeat playback, press A/B. “A-B” |
||||||||||
|
|
disappears and the repeat playback is finished. |
||||||||||
tNote
–This function cannot be performed depending on the specifications of the disc.
W SA-CD/CD: Selects the layer to be played when an
SA-CD/CD hybrid disc (p. 4) is played back.
U
V |
Hint |
|
|
||
W |
– The SA-CD indicator (p. 6) on the front panel lights |
|
up when an SA-CD is loaded and the SA-CD layer is |
||
|
||
|
selected. |
Notes
–This operation is available only when no disc is loaded.
–Audio signals are not output from the COAXIAL or OPTICAL jack when the SA-CD layer is selected.
10 En

Loading the batteries in the remote control
1
3
2 |
Notes
–Change both batteries when the operation range of the remote control decreases.
–Use AAA, R03, UM-4 batteries.
–Make sure that the polarities are correct. Refer to the illustration inside the battery compartment.
–Remove the batteries if the remote control is not to be used for an extended period of time.
–Do not use old batteries together with new ones.
–Do not use different types of batteries (such as alkaline and manganese batteries) together. Read the packaging carefully as these different types of batteries may have the same shape and color.
–If the batteries have leaked, dispose of them immediately. Avoid touching the leaked material or letting it come into contact with clothing, etc. Clean the battery compartment thoroughly before installing new batteries.
–Do not throw away batteries with general house waste; dispose of them correctly in accordance with your local regulations.
–Keep batteries away from children. If a battery is accidentally swallowed, contact your doctor immediately.
–When not planning to use the remote control for long periods of time, remove the batteries from the remote control.
–Do not charge or disassemble the supplied batteries.
Approximate operating range of remote control
Remote control sensor
30° |
30° |
6 m (20 ft) |
|
Controls and functions |
|
|
ID function |
1 |
|
When using multiple Yamaha products, the remote control |
Introduction |
|
may work on another Yamaha product or another remote |
||
|
||
control may work on this Player. In this case, change the |
|
|
remote control ID to prevent unwanted operation. If you |
|
|
have changed the remote control ID, make sure that you |
|
|
select the same ID for the main unit. |
|
|
The default setting is ID1. |
|
1Remote control setting
To change the ID from ID1 to ID2, press and hold the red color button and 2 of number button simultaneously for 7 seconds. To change the ID from ID2 to ID1, press and hold the red color button and 1 of number button simultaneously for 7 seconds.
2Main unit setting
Press and hold 
 and
and 
 on the front panel simultaneously for 2 seconds to display current ID when:
–No disc is inserted in this Player.
–The disc tray is closed.
–Playback is stopped.
–“NO DISC” is displayed on the front panel
display.
Keep pressing and holding the keys for another 2 seconds to change the ID between ID1 and ID2.
Note |
|
|
|
– If the remote control is without batteries for a few |
|
||
English |
|||
minutes or if exhausted batteries remain in the |
|||
|
|||
remote control, the remote control ID is |
|
||
automatically set to ID1. If you want to use the |
|
||
remote control in ID2 setting, install new batteries |
|
||
and set the remote control ID again. |
|
||
11 En

Video/audio connections
Make the corresponding video/audio cable connections depending on the equipment you want to use.
Hints
–See page p. 43 for information on the video/audio output formats.
–Prepare commercially available cables required for connections. The type and number of cables you need vary depending on the equipment to be connected.
Enjoying video/audio using a TV and an AV receiver
Refer to “Connecting to a TV via an AV receiver” (p. 13).
AV receiver |
TV |
This Player
Video/audio |
|
Video (HDMI) |
(HDMI) |
|
Speakers |
|
|
|
|
Audio |
♪ |
|
|
♪

Enjoying video/audio using only a TV
Refer to “Connecting to a TV directly” (p. 13).
TV
This Player
Video/audio |
|
(HDMI) |
♪ |
|
♪
Enjoying video/audio using a TV and audio equipment
Refer to “Connecting to a TV and audio equipment” (p. 14).
|
|
|
|
This Player |
|
|
|
|
Video (HDMI) |
|
|
|
|
|
|
|
|
|
|
|
|
|
|
|
|
|
|
|
|
|
|
|
|
|
|
|
|
|
|
|
|
|
|
|
|
|
|
|
|
Audio
(coaxial, optical, analog or XLR balanced) |
♪ |
|
TV
Audio equipment (such as sound bar)


 ♪
♪
About HDMI
To enjoy high quality video and digital sound through the HDMI terminal, use commercially available HIGH SPEED HDMI cables that have the HDMI logo (as shown on the back cover).
Hints
–For information on the HDMI Control function, refer to “HDMI Control” (p. 36).
–To change the output mode of HDMI terminal, configure “HDMI” (p. 41) in Audio Setting.
Connection for the playback of Blu-ray 3D Discs
To enjoy Blu-ray 3D Discs on this Player, your system must meet the following conditions.
–Your TV and AV receiver (if available) must support the 3D feature.
–3D Output in Display Setting (p. 39) is set to “Auto”.
12 En

■Connecting to a TV via an AV receiver
Connect this Player to the AV receiver and the AV receiver to the TV with HDMI cables.
For details on speaker connections, refer to the owner’s manuals of the AV receiver and speakers.
Caution!
Do not connect the power cable of this Player until all connections are completed.
This Player
COAXIAL
NETWORK
RE
OPTICAL USB 


DIGITAL OUT
Video/audio connections
■ Connecting to a TV directly
Connect this Player to the TV with an HDMI cable.
2 |
Player until all connections are completed. |
Connection |
Caution! |
|
Do not connect the power cable of this |
|
This Player |
|
COAXIAL |
|
NETWORK |
|
RE |
|
HDMI OPTICAL USB |
|
DIGITAL OUT |
|
HDMI terminal |
HDMI terminal |
HDMI |
HDMI |
HDMI cable
HDMI cable
HDMI input
HDMI IN
AV receiver
Speaker connections
Speakers
HDMI output
HDMI OUT
HDMI input
HDMI IN
TV
HDMI cable
HDMI input
HDMI IN
TV
English
13 En

Video/audio connections
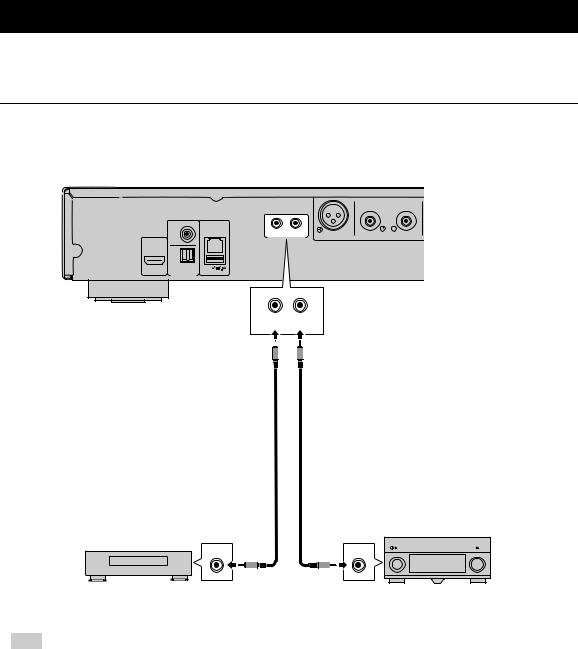
■ Connecting to a TV and audio equipment
Connect this Player to the TV with an HDMI cable, and this Player to the audio equipment with an audio cable (digital optical, digital coaxial or stereo pin cable).
Caution!
Do not connect the power cable of this Player until all connections are completed.
This Player
|
COAXIAL |
|
|
|
|
|
NETWORK |
OUT |
IN |
BALANCED OUT |
ANALOG OUT |
|
|
REMOTE CONTROL |
|||
|
|
|
|
||
HDMI |
OPTICAL USB |
|
|
|
|
|
DIGITAL OUT |
|
|
|
|
COAXIAL
HDMI output
HDMI
OPTICAL |
ANALOG OUT |
||||||||||||
|
|
|
|
|
|
|
|
|
|
|
|
|
|
|
|
|
|
|
|
|
|
|
|
|
|
|
|
|
|
|
|
|
|
|
|
|
|
|
|
|
|
|
|
|
|
|
|
|
|
|
|
|
|
|
|
|
|
|
|
|
|
|
|
|
|
|
|
|
|
|
|
|
|
|
|
|
|
|
|
|
|
|
|
|
|
|
|
|
|
|
|
|
|
|
|
|
|
OPTICAL, COAXIAL or ANALOG OUT L/R jacks
Audio cable
HDMI cable (digital optical, digital coaxial or stereo pin cable)
HDMI input |
|
Audio input |
|
(digital optical, digital coaxial or |
|
HDMI IN |
|
|
|
analog stereo) |
|
|
|
|
COAXIAL |
OPTICAL |
ANALOG |
TV
Audio equipment  (such as sound bar)
Hints
–To change the output mode of COAXIAL/OPTICAL jacks, configure “Coaxial / Optical” (p. 41) in Audio Setting.
–If the playback audio is output from both the TV speakers and audio equipment, set HDMI in Audio Setting to Off to disable the audio output to the TV.
–Audio signals of SACDs cannot be output from the COAXIAL or OPTICAL jack (p. 44).
14 En

Video/audio connections
XLR balanced connection
If your audio equipment is equipped with the XLR balanced input jacks, you can connect this player to the audio equipment (such as an AV receiver) with an XLR balanced cable.
For details on speaker connections, refer to the owner's manual of the audio equipment and speakers.
This Player
|
COAXIAL |
|
|
|
|
|
|
NETWORK |
OUT |
IN |
BALANCED OUT |
ANALOG OUT |
BALANCED OUT |
|
|
REMOTE CONTROL |
||||
HDMI |
OPTICAL USB |
|
|
|
|
|
|
DIGITAL OUT |
|
|
|
|
|
HDMI output |
BALANCED OUT L/R jacks |
|
|
|
HDMI |
|
BALANCED OUT BALANCED OUT |
|
(female connector) |
HDMI cable |
XLR balanced cable |
|
(male connector) |
HDMI input |
XLR balanced input |
|
HDMI IN |
|
BALANCED IN |
TV |
Audio equipment |
|
(such as AV receiver) |
|
Speaker |
|
connections |
Speakers
2 |
Connection
English
Note
–The pin assignments for the BALANCED OUT (L/R) jacks of this Player are shown below. Before connecting an XLR balanced cable, refer to the instruction manual of your device and verify that its XLR balanced input jacks are compatible with the pin assignments.
1.GND 


 2. HOT
3.COLD
15 En

Network connection
By connecting this Player to the network (wireless or wired), you can use the following features.
–Playing back DLNA server (PC or NAS) contents (p. 22)
–Playing BD-Live compatible discs (p. 31)
–Operating this Player from mobile devices (AV CONTROLLER) (p. 28)
Notes
–To use the network services or BD-Live feature, a broadband internet connection is required.
–Refer to the operation manual of the equipment you have as the connected equipment and connection method may differ depending on your network environment.
–Use a network cable/router supporting 10BASE-T/100BASE-TX.
Hint
–If you are using a router that supports DHCP, you do not need to configure any network settings for this Player, as the network parameters (such as the IP address) will be assigned automatically to it. You only need to configure the network settings if your router does not support DHCP or if you want to configure the network parameters manually (p. 38).
■ Wireless connection
By using the Wi-Fi feature of this Player, you can connect this Player to your network (router) wirelessly. To use the Wi-Fi feature, refer to “Wireless connection setting”
(p. 21) and configure the wireless connection setting.
This Player
■ Wired connection
Connect this Player to your network (router) with a commercially available Shielded Twisted Pair (STP) network cable.
This Player
|
COAXIAL |
|
|
|
NETWORK |
OUT |
IN |
|
|
REMOTE CONTROL |
|
HDMI |
OPTICAL USB |
|
|
|
DIGITAL OUT |
|
|
NETWORK
NETWORK terminal
Internet |
Modem |
Router |
PC |
|
|
Network cable
LAN terminal
LAN
Internet |
Modem |
Router |
PC |
16 En
Network connection
■ DLNA server setup
By using DLNA, you can share multimedia contents (such as videos, music and photos) stored on your DLNA server (PC or NAS) connected to your network, and enjoy those contents with this Player.
In addition, you can use your mobile device (such as a smartphone and a tablet) as a wireless controller to operate this Player through the network.
To use the DLNA features, perform the following DLNA server setup after making the network connection (p. 16).
Notes
–To use DLNA features, all the devices must be connected to the same network.
–To use a NAS as a DLNA server, the NAS must be compatible with DLNA.
2 |
Connection
DLNA
This Player
DLNA server (PC or NAS)
|
|
|
|
|
|
|
|
Remote control |
Controller |
||
|
(mobile device) |
||
Media sharing setting on DLNA server
To play back multimedia contents stored on your DLNA server (PC or NAS), first you need to configure the media sharing setting on the DLNA server software installed on the DLNA server.
Hint
–For information about DLNA server setting or file formats supported by DLNA server, refer to the owner’s manuals of your DLNA server and its software.
1Turn on your DLNA server (PC or NAS) and this Player.
2If you are using a PC as a DLNA server, check that DLNA server software (such as Windows Media Player 12) is installed on your PC.
3On your DLNA server, enable media sharing and allow media to be shared with this Player.
Now the DLNA server setting is complete. To enjoy the DLNA server contents on this Player, select a DLNA server and multimedia file from the HOME menu (p. 22).
Using a mobile device as a media controller
If you have a mobile device (such as smartphone and tablet) that supports the Digital Media Controller (DMC) feature, you can operate this Player from your smart phone or tablet through the network.
Hints
–To allow the mobile device to control this Player, set DMC Control (p. 38) in the SETUP menu to Enable (default).
–To use this function, a DMC application must be installed on your mobile device.
Using the Wi-Fi Direct function for DLNA
You can enjoy DLNA playback of mobile device contents via the Wi-Fi Direct function (p. 26).
Hint
–To use DLNA playback on the mobile device, a DLNA DMC/Server application must be installed on your mobile device.
English
17 En
Other connections
■ Connecting Yamaha components that support remote connections
If you are using Yamaha components that support remote connections, you can transmit remote control signals by connecting the REMOTE CONTROL (IN/OUT) jacks with monaural 3.5 mm mini-plug cables.
Caution!
Do not connect the power cable of this Player until all connections are completed.
This Player
|
COAXIAL |
|
|
|
|
|
NETWORK |
OUT |
IN |
BALANCED OUT |
ANALOG OUT |
|
|
REMOTE CONTROL |
|||
HDMI |
OPTICAL USB |
|
|
|
|
|
DIGITAL OUT |
|
|
|
|
REMOTE CONTROL (IN/OUT) jacks
OUT IN
REMOTE CONTROL
|
Monaural 3.5 mm mini-plug cable |
|
(commercially available) |
Remote control |
Remote control |
input |
output |
IN |
OUT |
Yamaha component |
Yamaha component |
(such as CD player) |
(such as AV receiver) |
Hint
–If you use a Yamaha AV receiver that supports SCENE link (via remote control connection) playback, you can control playback of this Player in conjunction with AV receiver operations. For details, refer to the owner's manual of the AV receiver.
18 En
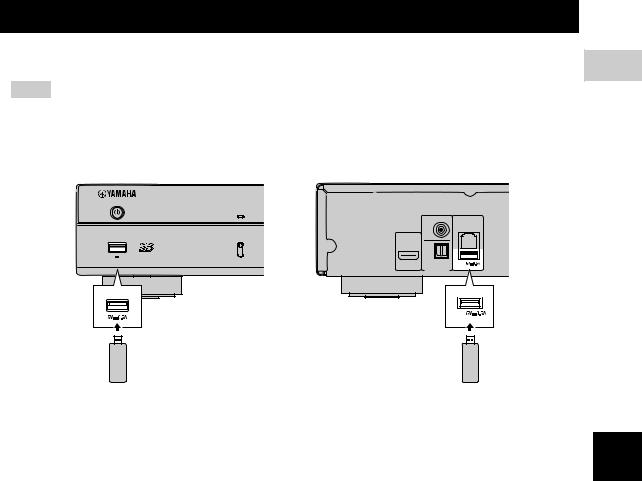
USB connection
By connecting a USB memory device to the USB connector on the front or the rear panel of this Player, you can play multi-media files stored on the USB memory device (p. 22).
Notes
–Yamaha cannot guarantee that all brands’ USB memory devices will operate with this Player.
–Connect a USB memory device to one of the USB connectors (front/rear) of this Player when using BD-Live feature (p. 32).
This Player |
This Player |
|
|
|
|
CD MODE |
|
|
|
|
COAXIAL |
|
|
|
NETWORK |
USB |
CD MODE |
|
|
5V |
0.5A |
|
|
|
|
HDMI |
OPTICAL USB |
|
|
|
DIGITAL OUT |
USB |
|
USB connector (front) |
USB connector (rear) USB |
USB memory device |
USB memory device |
2 |
Connection
English
19 En

Connecting the power cable
After all connections are completed, plug the supplied power cable into the AC IN on the rear of the Player. Then plug into AC outlet.
AC IN 
BALANCED OUT
To AC outlet
20 En
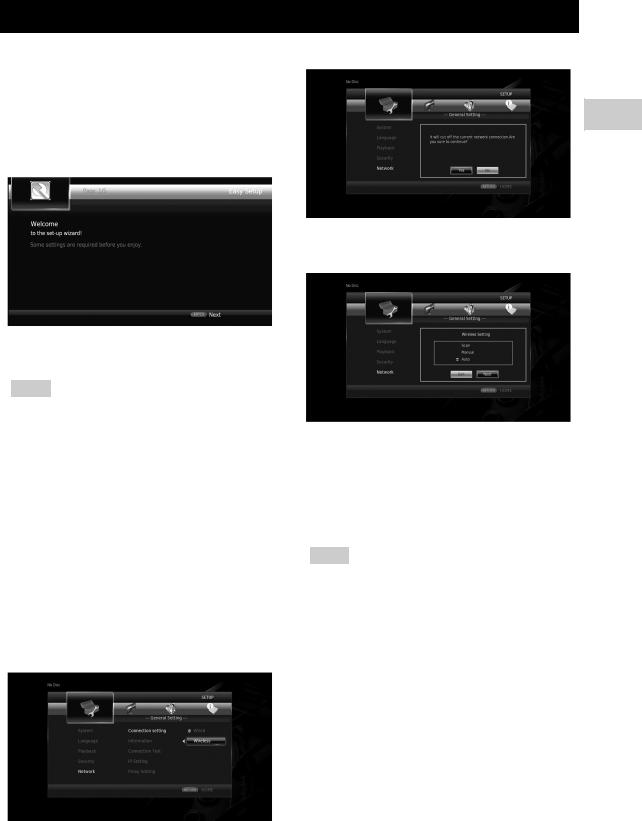
Initial settings
■ Setting with the Easy Setup
Easy Setup allows you to set language, resolution, and screen aspect ratio easily. Easy Setup screen is displayed when you turn this Player on for the first time after purchase. Same setting can be performed from SETUP menu = System = Easy Setup.
1When Easy Setup screen is displayed, press ENTER to start Easy Setup.
2Set the language, resolution, and screen aspect ratio by following the on-screen messages.
Notes
–When no picture is displayed after Easy Setup is completed, refer to “Troubleshooting” (p. 47).
–A warning message concerning 3D video playback appears when this Player is turned on. Press ENTER to dismiss the message or CLEAR to disable it
(p. 36).
■ Wireless connection setting
To connect this Player to your network (router) wirelessly, follow the procedure below to configure the wireless connection setting.
If your router (access point) supports the WPS (Wi-Fi Protected Setup) function, you can use the auto setup method to connect this Player to the router without entering network information (such as SSID) manually.
1Press SETUP to display the SETUP menu screen.
2Select General Setting = Network = Connection setting = Wireless.
3 Press 2/3 to select Yes, then press ENTER.
3 |
Playback
4Press 2/3 to select one of the following setup methods, then press ENTER.
Scan: Select this option to search for available wireless |
English |
|
networks. When the network list is displayed, select the |
||
|
||
SSID to be connected and enter the password. |
|
|
Manual: Select this option to enter the network |
|
|
information (such as SSID) manually. |
|
|
Auto: Select this option to use the WPS function. Select |
|
|
PBC (Push Button Configuration) or PIN code method, |
|
|
then follow the on-screen messages. |
|
Notes
–For details on operations of your router (access point), refer to the owner’s manual of it.
–When the WPS function does not work, select “Scan” or “Manual” to configure the wireless connection settings.
–Devices that use a 2.4 GHz frequency band, such as a microwave, or other wireless devices, may interrupt the wireless communication. Move this Player away from such devices, or turn off such devices.
–The speed of a wireless network connection depends on your network environment (router type, distance between the router and this Player, installation places, etc.). In case the sound or video is interrupted during playback, move this Player closer to the router or change the orientation of this Player or the antenna of the router.
21 En
Playing back video/music/photo
■Playing back commercially available discs
You can enjoy commercially available Blu-ray discs, DVDs, and CDs.
1Open the disc tray and load the disc. Playback starts automatically.
Hints
–If playback does not start automatically, press 3 (playback).
–The top menu screen may be displayed when a Bluray disc or a DVD is loaded.
–Some functions may not work or work differently from the manual descriptions depending on the disc.
–For information on the supported discs, refer to “About discs and files” (p. 3).
Remote control buttons used for Bluray disc/DVD playback
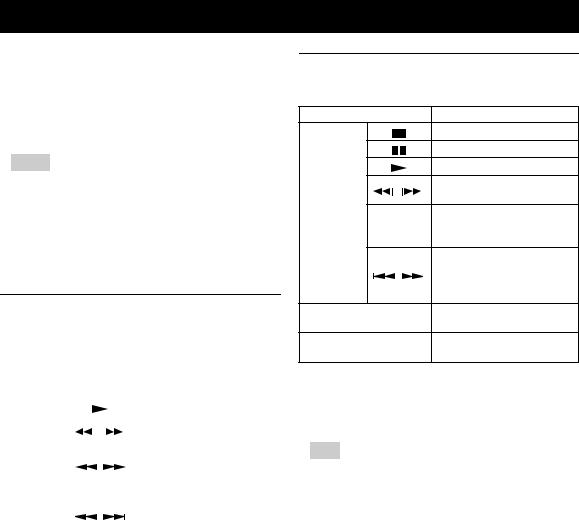
Remote control buttons |
Function |
|||||
|
|
|
|
|
Stops playback. |
|
|
|
|
|
|
||
|
|
|
|
|
|
|
|
|
|
|
|
Pauses playback. |
|
|
|
|
|
|
||
|
|
|
|
|
|
|
|
|
|
|
|
Starts playback. |
|
|
|
|
|
|
|
|
|
|
/ |
|
Skips 10 seconds backward or |
||
Control |
|
|
30 seconds forward. |
|||
|
|
|
|
|||
|
|
|
|
|
||
|
|
|
|
Searches backward or forward. |
||
buttons |
|
|
|
|
||
/ |
|
The search speed changes each |
||||
|
|
|||||
|
|
|
|
|
time the button is pressed. |
|
|
|
|
|
|
|
|
|
|
|
|
|
Skips to the beginning of the |
|
|
/ |
|
chapter (previous chapter if the |
|||
|
|
button is pressed repeatedly) or |
||||
|
|
|
|
|
||
|
|
|
|
|
next chapter. |
|
|
|
|
|
|
|
|
Number buttons |
Skips to the specified chapter |
|||||
during playback. |
||||||
|
|
|
|
|
||
|
|
|
|
|
|
|
STATUS |
|
|
|
|
Displays the playback |
|
|
|
|
|
information (p. 30). |
||
|
|
|
|
|
||
|
|
|
|
|
|
|
|
Cursor |
Selects an item (such as |
||||
Menu |
buttons |
chapters). |
||||
|
|
|
|
|
||
Cursor |
|
|||||
operation |
Confirms the selected item. |
|||||
buttons |
||||||
buttons |
|
|||||
|
|
|
|
|
||
RETURN |
Returns to the previous menu or |
|||||
|
||||||
|
screen. |
|||||
|
|
|
|
|
||
|
|
|
|
|
|
|
TOP MENU |
|
|
|
|
Displays the top menu screen of |
|
|
|
|
|
the disc. |
||
|
|
|
|
|
||
|
|
|
|
|
|
|
|
|
|
|
|
Displays the pop-up menu |
|
POP-UP/MENU |
screen of the Blu-ray disc or disc |
|||||
|
|
|
|
|
menu screen of the DVD. |
|
|
|
|
|
|
|
|
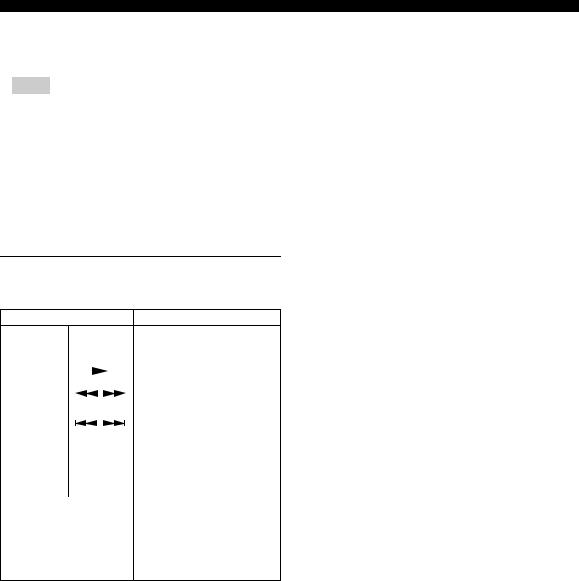
Remote control buttons used for CD playback
Remote control buttons |
Function |
Stops playback.
Pauses playback.
Starts playback.
/
Skips 10 seconds backward or 30 seconds forward.
Control buttons
Searches backward or forward.  /
/  The search speed changes each
time the button is pressed.
Skips to the beginning of the
/
track (previous track if the button is pressed repeatedly) or next track.
Number buttons
Skips to the specified track during playback.
STATUS
Displays the playback information (p. 30).
■ Playing back video/music files
You can enjoy video/music files stored on own discs (such as DVD-R/RWs), USB memory devices or DLNA servers (PC/NAS).
Hint
–For information on the supported files, refer to “About discs and files” (p. 3).
1Perform the following operation according to your purpose.
To play back files on the disc:
Open the disc tray and load the disc.
To play back files on the USB memory device:
Connect the USB memory device to the USB connector.
To play back files on the DLNA server:
Check that the DLNA server is turned on and connected to the network.
22 En

2Press HOME.
The HOME menu screen is displayed.
Hint
–You cannot display the HOME menu screen during playback of a commercially available disc, DVD, or video files. To display the HOME menu screen, first stop playback.
3Use the cursor buttons (5/a) to select the desired item (disc, USB or DLNA) and press ENTER.
4Use the cursor buttons (5/a) to select “Music”, “Video” or “AVCHD”, and press ENTER.
If you selected “DLNA” in Step 3, select the desired DLNA server in Step 4.
Hints
–To return to previous screen, press RETURN or cursor key (2), or select  in the menu screen.
–“AVCHD” is a file format for recording highresolution videos on the recording discs (such as DVD-Rs).
Playing back video/music/photo
5Use the cursor buttons (5/a) to select the desired file and press ENTER.
Playback of the file starts.
Remote control buttons used for file playback
Remote control buttons |
Function |
3 |
|
||
|
Stops playback. |
|
/ |
Pauses playback. |
Playback |
|||
|
|
|
|
|
|
|
|
|
|
|
|
|
|
|
|
Starts playback. |
|
|
|
|
|
|
|
|
|
|
|
Skips 10 seconds backward or |
|
|
|
|
|
30 seconds forward. |
|
Control |
|
|
|||
|
|
||||
buttons |
Searches backward or forward. |
|
|||
/ |
The search speed changes each |
|
|||
|
|
|
|
time the button is pressed. |
|
Skips to the beginning of the file  /
/ (previous file if the button is
pressed repeatedly) or next file.
STATUS
Displays the playback information (p. 30).
■ Viewing photos
You can enjoy photos stored on own discs (such as DVD- R/RWs), USB memory devices or DLNA servers (PC/ NAS).
|
Hint |
|
|
|
|
– For information on the supported files, refer to |
|
||
|
“About discs and files” (p. 3). |
|
||
1 |
English |
|||
Steps 1 to 3. |
||||
Refer to “Playing back video/music files” and follow |
|
|||
|
|
|
|
|
Hint
– If you load a commercially available photo DVD, slide show playback may start automatically. In this case, you do not need to perform the following steps.
2 Use the cursor buttons (5/a) to select “Photo” and press ENTER.
Hint
– To return to previous screen, press RETURN or cursor key (2), or select  in the menu screen.
23 En
Playing back video/music/photo
3Use the cursor buttons (5/a) to select the desired photo and press ENTER.
Slide show playback starts from the selected photo.
Hints
–If you select photos during playback of a CD or a music file, you can enjoy slide show while listening to music.
–You can use the slide show as the screen saver. When using the slide show as the screen saver, create the “autopict” folder under the root directory of the USB memory device and put photo files into the folder. When the USB memory device is connected to this Player, the screen saver will activate according to the Screen Saver settings
(p. 40).
Remote control buttons used for photo playback
Remote control buttons |
Function |
|
|
|
|
|
|
Stops playback. |
|
|
|
|
|
|
|
||
|
|
|
|
|
|
|
|
|
|
|
|
|
|
Pauses playback. |
|
|
|
|
|
|
|
||
|
|
|
|
|
|
|
|
Control |
|
|
|
|
|
Starts playback. |
|
|
|
|
|
|
|
||
buttons |
/ |
|
Changes the speed of slide show |
||||
|
|
playback. |
|||||
|
|
|
|
|
|
||
|
|
|
|
|
|
|
|
|
/ |
|
Skips to the previous photo or |
||||
|
|
next photo. |
|||||
|
|
|
|
|
|
||
|
|
|
|
|
|
|
|
|
5/a |
Inverts the photo up-down or |
|||||
Cursor |
left-right. |
||||||
|
|
|
|
|
|||
buttons |
2/3 |
Rotates the photo 90 degrees to |
|||||
|
the left or right. |
||||||
|
|
|
|
|
|
||
|
|
|
|
|
|
|
|
|
|
|
|
|
|
Zoom in/out the photo. When |
|
ZOOM |
|
|
|
|
|
the photo size is larger than the |
|
|
|
|
|
|
screen, use the cursor buttons to |
||
|
|
|
|
|
|
||
|
|
|
|
|
|
move the viewing area. |
|
|
|
|
|
|
|
|
|
STATUS |
|
|
|
|
|
Displays the playback |
|
|
|
|
|
|
information (p. 30). |
||
|
|
|
|
|
|
||
24 En

Enjoying high-quality sound
The CD mode and Pure Direct mode allow you to enjoy better quality sounds.
The CD mode allows you to play back music CDs or SA-CDs with accurate and high quality sound. The Pure Direct mode allows you to enjoy pure high fidelity sound on any sources.
■Enjoying music CD/SA-CD in high-quality sound (CD mode)
CD
If the CD mode is enabled when you play back a music CD or an SA-CD, this player operates in the following conditions and allows you to enjoy more enhanced quality sounds.
•Disables the electrical distribution to the circuitries for unused functions to reduce electrical noises from those circuitries.
•Limits HDMI video signal outputs to reduce electrical noises from the HDMI circuitry.
•Slows the disc rotation speed to reduce the negative effect of the electric current driving the motor to improve the sound quality (when playing back a music CD).
1Press CD MODE.
Each time you press the button, the CD mode is enabled or disabled.
Notes
–During the CD mode, the auto-playback function does not work.
–The CD mode works on music CDs (CDDA) and SA-CDs only. If this Player is set to the CD mode during playback of other disc (such as a Blu-ray disc), playback stops and the disc will be automatically ejected.
–You cannot switch this player to the CD mode during playback of other media (USB or DLNA). To switch to the CD mode, first stop the ongoing playback.
Hints
–You can also enables/disables the CD mode with the CD MODE switch on the front panel. When the CD mode is enabled, the CD MODE indicator on the front panel lights up.
–When connecting the AV receiver to the HDMI jack of this Player, set HDMI (CD Mode) (p. 41) in the SETUP menu to Audio Only (default). This setting disables HDMI video output during the CD mode in order to reduce the electrical noise from the circuitry.
–When connecting the AV receiver to the DIGITAL OUT, ANALOG OUT or BALANCED OUT jacks of this Player, set HDMI (CD Mode) (p. 41) in the SETUP menu to Off. This setting disables the HDMI circuitry (HDMI video/audio output) during the CD mode and allows you to enjoy a better quality sound.
■ Enjoying music and movies with |
3 |
|
pure high fidelity sounds (Pure |
|
|
Direct) |
Playback |
|
When the Pure Direct mode is enabled, this Player plays |
||
|
||
back the selected source with the least circuitry in order to |
|
|
reduce the electrical noise from other circuitry (such as the |
|
|
front display). It allows you to enjoy Hi-Fi sound quality. |
|
1Press PURE DIRECT.
Each time you press the button, the Pure Direct mode switches as follows.
|
Front panel |
Function |
|
|
|
display |
|
||
|
|
|
||
|
|
|
Enables the Pure Direct mode (mode 1). |
|
|
|
|
In this mode, the front panel display is |
|
PDIRECT1 |
turned off and HDMI video output is |
|
||
|
|
|
disabled. This mode is suitable for |
|
|
|
|
listening music with high quality sound. |
|
|
|
|
|
|
|
|
|
Enables the Pure Direct mode (mode 2). |
|
PDIRECT2 |
In this mode, the front panel display is |
|
||
turned off. This mode is suitable for |
|
|||
|
|
|
|
|
|
|
|
watching movies with high quality sound. |
|
|
|
|
||
(no display) |
Disables the Pure Direct mode. |
English |
||
|
|
|
|
|
|
|
|
|
|
|
Hints |
|
|
|
|
|
|
|
|
|
|
|
|
|
–When the CD mode is enabled, the Pure Direct mode switches between on and off.
–You can also switch the Pure Direct mode with the PURE DIRECT button on the front panel. When the Pure Direct mode is enabled. the PURE DIRECT button on the front panel lights up.
25 En

Enjoying DLNA playback of mobile device contents via Wi-Fi Direct
By using the Wi-Fi Direct function, you can connect a mobile device directly to this Player without using a wireless router and enjoy DLNA playback of the mobile device contents on this Player.
♪ |
♪ |
|
This Player
TV
Mobile device
Notes
–To check if your device is Wi-Fi Direct compliant, refer to the owner’s manual of the device. If your device is not Wi-Fi Direct compliant, follow the procedure below to make a manual connection.
–When Wi-Fi Direct is enabled, playback of other network functions, discs and USB memory devices are not available.
1If playback of other source is ongoing, stop the playback.
2Press HOME.
The HOME menu screen is displayed.
3Use the cursor buttons (5/a) to select “Wi-Fi Direct” and press ENTER.
4Perform the following operation to make a Wi-Fi Direct connection.
If your device is Wi-Fi Direct compliant:
1 Within 2 minutes, operate your device to make a connection.
If your device is not Wi-Fi Direct compliant:
1 Press RED to enter the manual connection mode. The SSID information appears on the screen.
2 On your device, open the Wi-Fi setup screen and enter the SSID information.
5Press ENTER (or wait for 3 seconds) and use the DLNA-compatible player application to start playback on your mobile device.
Hint
–Select this Player as the renderer on the DLNAcompatible player application.
6To exit from Wi-Fi Direct, press HOME.
Hint
–You can also exit from Wi-Fi Direct by pressing SETUP or RETURN.
Depending on the environment, audio/video may be interrupted or noise may appear on the TV screen. In this case, try the following solutions.
–Move the Wi-Fi Direct device closer to this Player.
–Turn off other wireless devices not in use.
–Move the Wi-Fi Direct device and this Player away from microwave ovens, or other wireless devices.
26 En
Loading...