

Page 1

Storm Central
GETTING STARTED GUIDE
V.2.0
Page 2

This guide is a brief overview of the Storm Central site and its basic features. Storm
Central is a cloud data collection service for a new era of data loggers and data
collection platforms. This means that wherever your data loggers are located, their realtime data can be accessed 24/7/365. Please refer to waterlog.com/storm or contact your
sales representative for more information. Updated manuals, brochures, and technical
notes are available.
For additional assistance, please contact us at
+1.435.753.2212 or sales@waterlog.com
Page 3

Storm Central Getting Started Guide
CONTENTS
Get to Know Storm Central............................................2
Obtain Access to Storm Central....................................4
Collect Data with Storm Central (Cell Modem)...........6
Collect Data with Storm Central (GOES)....................10
Review and Download Data.......................................14
Set up Alarms.................................................................14
1
Page 4
GET TO KNOW
01 /
STORM CENTRAL
2
Page 5
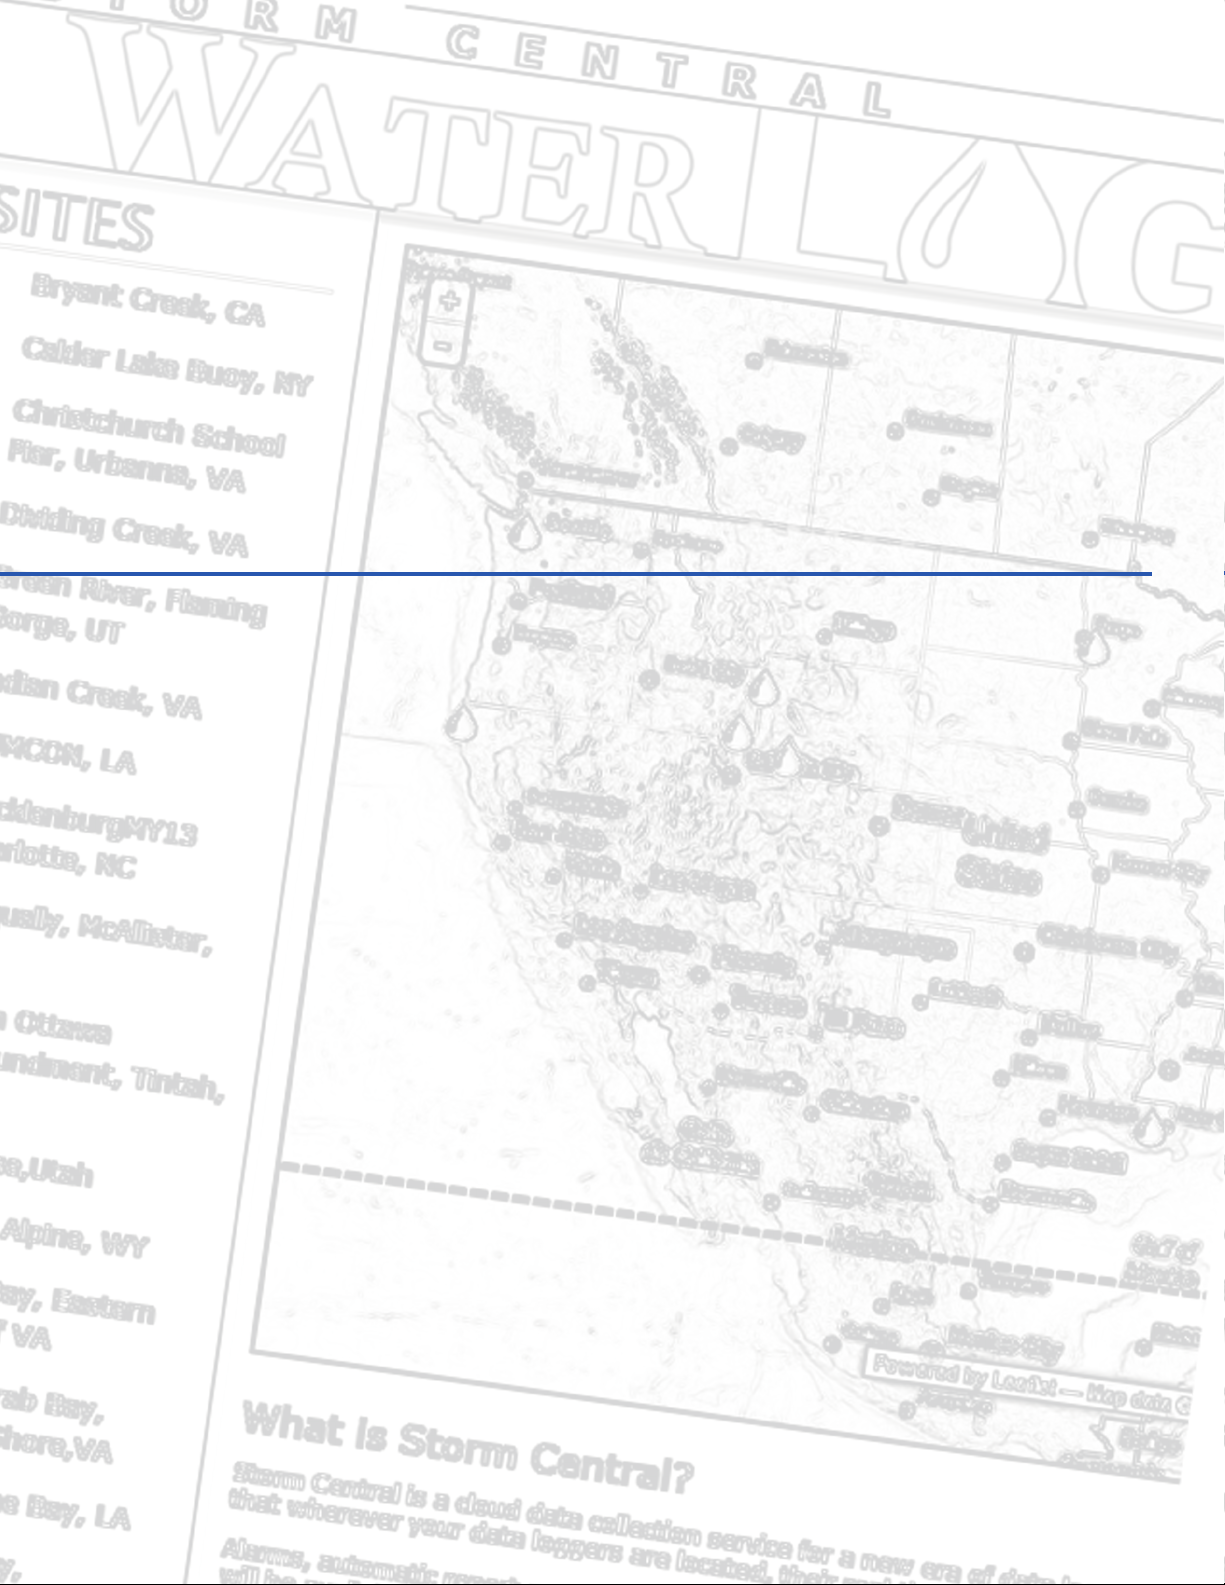
Get to Know Storm Central
Storm Central is a cloud data collection
service for a new era of data loggers and
data collection platforms. This means that
wherever your data loggers are located,
their real-time data can be accessed
24/7/365. Frequent field visits to your site
will become a thing of the past!
Storm Central was originally built for the
WaterLOG Storm data logger, allowing
data from a remote Storm to be pushed to
the Storm Central server, using a GSM or
CDMA cellular modem, in near real-time.
Additional WaterLOG and non-WaterLOG
data loggers and controllers are now also
capable of pushing data into Storm Central using a cellular modem with minimal effort.
Sites using GOES to transmit their data can also be set up within Storm Central to have their data
retrieved, decoded, and made easily accessible. Both WaterLOG ASCII (SHEF) and Pseudo-Binary
formats are fully supported.
Once data has been collected and stored in Storm Central, it is immediately visible within the
simple and intuitive Storm Central interface. Data is presented graphically as well as tabularly on
the same page. Downloading data is also just a button-click away.
Recently added to Storm Central is the ability to generate simple-to-complex Alarm conditions
based on the data collected. Icons on your map can change colors and notifications via e-mail or
SMS (text message) can be sent, alerting you of an alarm condition.
Storm Central was built with you in mind. From automatic data collection, to notifications about
alarm conditions, Storm Central can save you time and prevent costly visits to your site while
simplifying your job at the same time.
In addition to existing features, Storm Central comes with WaterLOG’s commitment to
improvement and sustainability. You can expect additional features to be added regularly to
Storm Central based on customer requests and your input. Let us know how we can improve
Storm Central and we’ll help you make it yours.
3
Page 6
OBTAIN ACCESS
02 /
TO STORM CENTRAL
4
Page 7

Contact WaterLOG
Obtaining access to Storm Central
couldn’t be easier. Simply contact your
WaterLOG Sales Representative or
WaterLOG technical support and they’ll
provide you the information you need to
get started with a Hosting Plan.
Obtain Access to Storm Central
WaterLOG Sales / Technical Support
95 West 100 South
Suite 150
Logan, UT 84321USA
WaterLOG contact information can be
found in the box to the right.
Registration ID
If you plan to send data using a Storm
data logger, a Registration ID will
be required to connect the Storm to
Storm Central. Log in to Storm Central
and navigate to Sites through the
Administration link. The location of the
Registration ID is highlighted in the
screen below. It is required for a Storm
data logger to communicate with Storm
Central.
Phone: +1.435.227.1767
E-mail: sales@waterlog.com
Web: www.waterlog.com
Each Registration ID is unique to each
account on Storm Central. Make note of
this ID as it will be used later when setting
up your Storm data logger.
5
Page 8

COLLECT DATA WITH
03 /
STORM CENTRAL
Cell Modem
6
Page 9
Collect Data with Storm Central
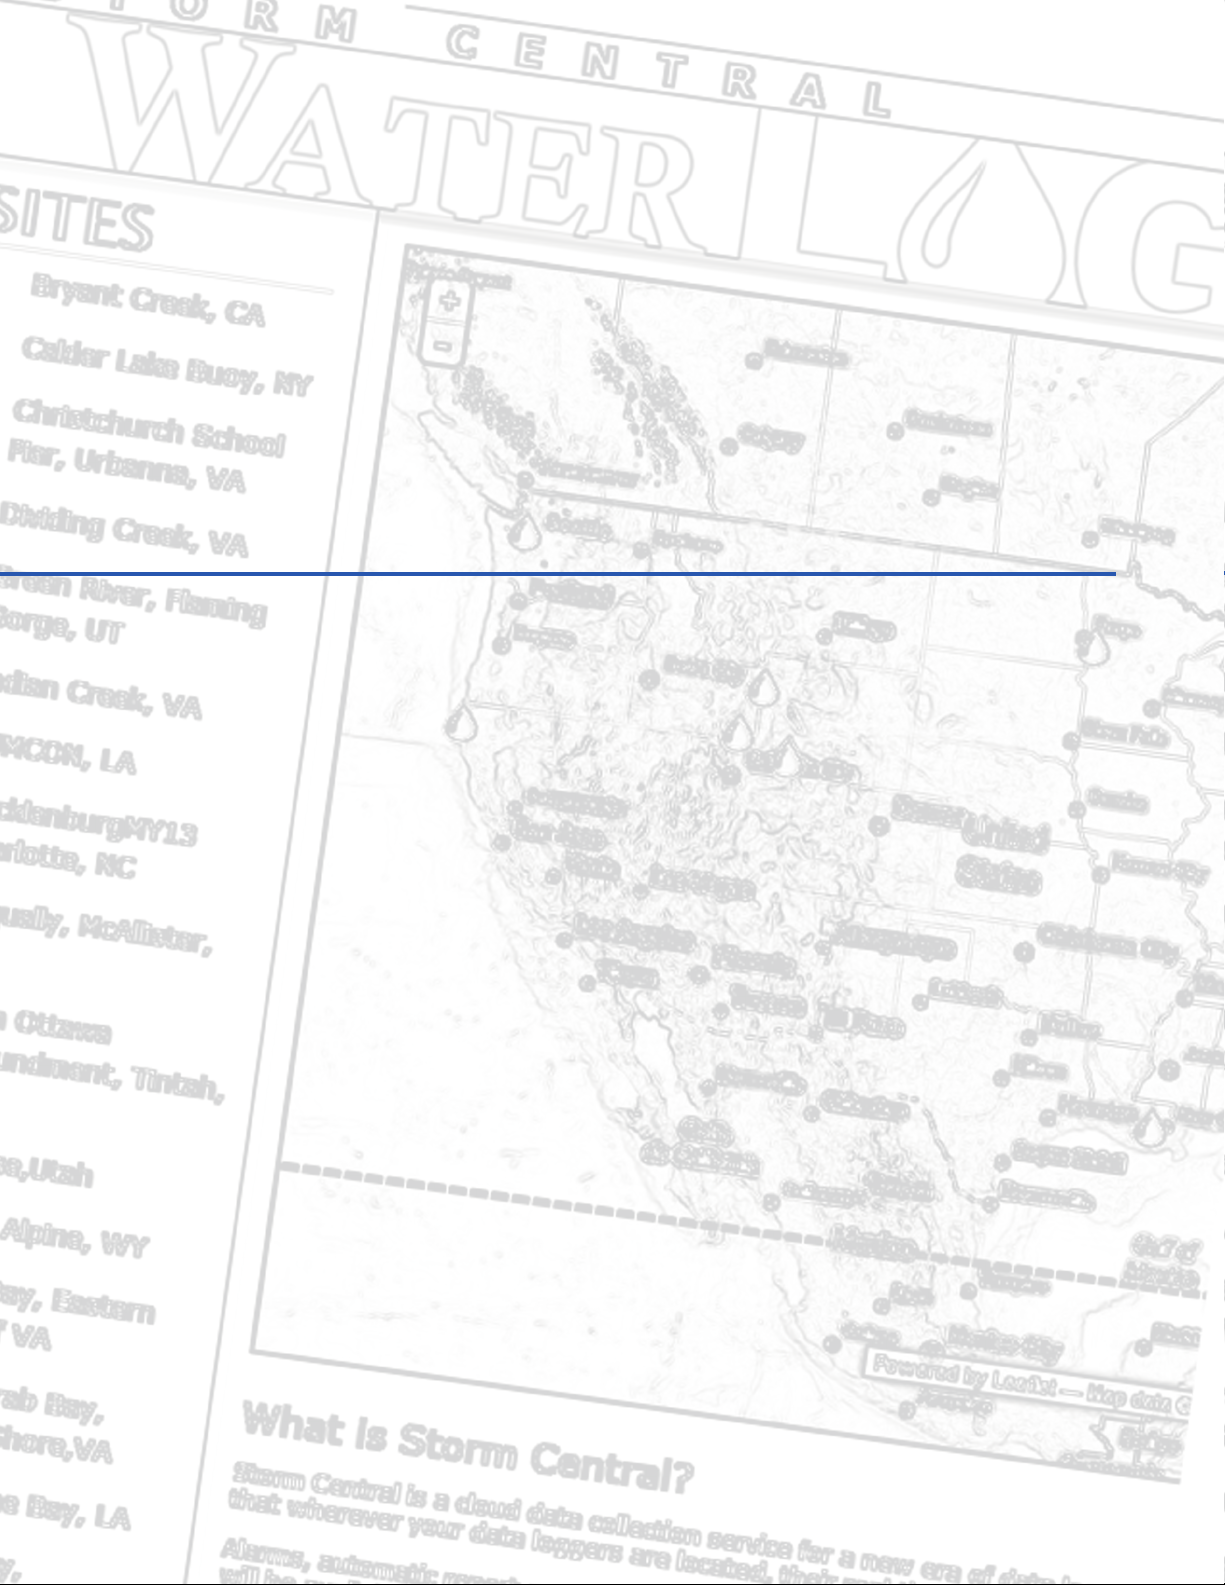
Storm Central was created specifically for communicating with the Storm data logger. As such,
the following section focuses on connecting a Storm data logger to Storm Central using a
cellular modem. Other data loggers can also send their data to Storm Central, though their
implementation will not be covered below. Please contact WaterLOG Sales about your data logger
for further options on connecting it to Storm Central.
Connecting a Storm data logger to Storm
Central is as easy as pressing a button—
literally. However, prior to pressing that
button, the modem and cellular service
need to first be configured and verified
by following these steps:
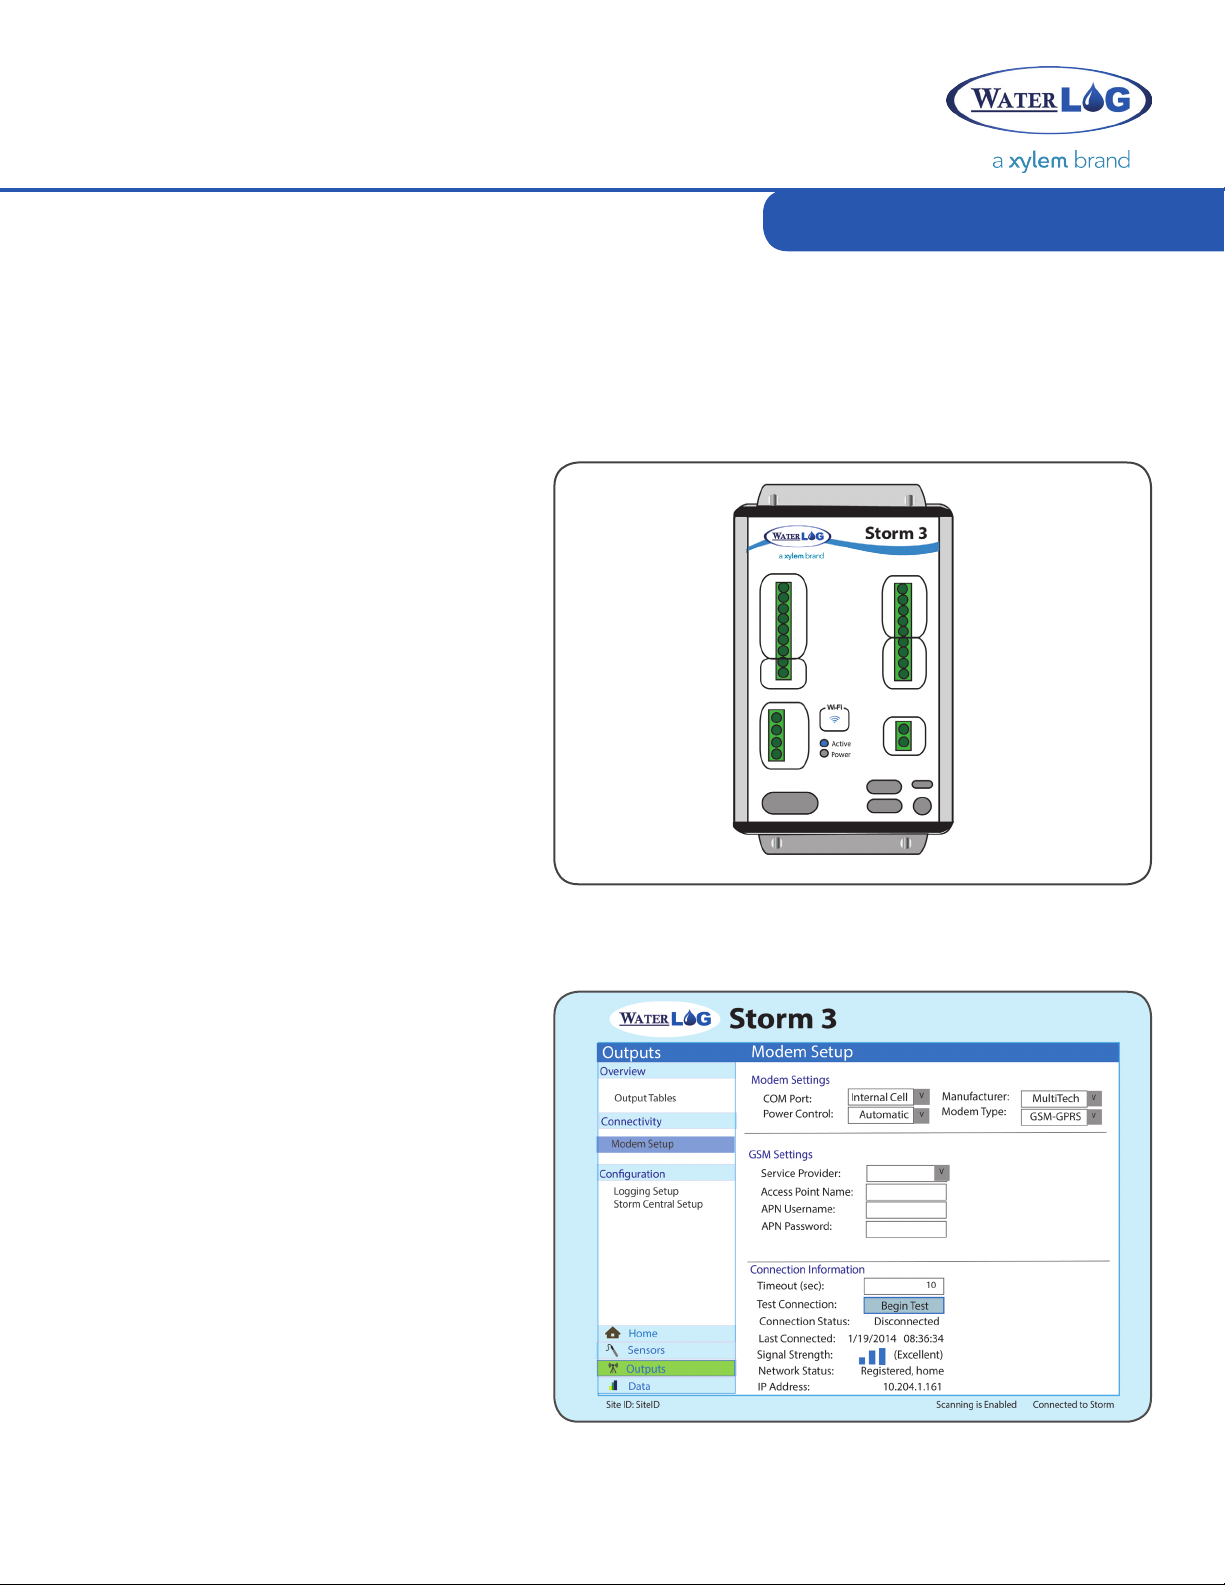
Configure and Verify
First, the modem should be configured
and tested. This can be done within the
Modem Setup page of the Storm data
logger.
Both GSM modems (GPRS, 3G, 4G, etc)
and CDMA modems (1x), require Modem
Settings to be specified. GSM modems
also require the Service Provider, Access
Point Name (APN), and possible APN
Username and APN Password, provided
by the cellular Service Provider.
7
Page 10

COLLECT DATA
CELL MODEM
Activate Modem
For a modem to successfully
communicate, it must first be activated.
Modems supplied by WaterLOG are
deactivated prior to shipping to prevent
unwanted charges to your account. If the
cellular service was purchased through
WaterLOG Sales, contact your WaterLOG
Sales Representative via one of the
methods mentioned above and request
activation of your modem. Activation
takes just a few minutes.
Note: If you have your own cellular service, be
sure to have it activated. If using a GSM service
provider, also have your SIM card installed, and
GSM Settings specified.
The Timeout (sec) field allows the various timeouts within the modem initialization scripts to be
altered. Generally, a 10 second timeout is enough for areas with good signal strength. However, it
may be necessary to increase the timeout period (perhaps to 15 or 20 seconds) in order to allow
the modem more time to initialize and find a signal. It may be wise to test the connection a couple
of times with various timeouts to determine the best setting for your particular area.
Press Test Button
Once the modem has been configured,
press the ‘Begin Test’ button under
the Connection Information section to
test the modem settings. The modem
will power up and initialize. It will then
check its activation status by testing its
Signal Strength, retrieving its Network
Status, and looking for an IP Address.
The Connection Status will update
as it performs its tests. If all settings
are correct and the connection was
successful, the IP address field will be
filled in (e.g. 10.204.1.161). An IP address
indicates the modem setup is complete.
8
Page 11

Collect Data with Storm Central
Setup Page
To complete the connection setup with
Storm Central, navigate to the Storm
Central Setup page on the Storm data
logger.
The Transmit Rate determines the rate
at which your Storm data is transmitted
to Storm Central. This rate should not
be faster than any Scan Rate on the
Storm data logger. If the Transmit Rate is
slower than Sensor Scan Rates, any data
collected since the last transmission will
be transmitted to Storm Central on its
next connection.
Select Storm Central from the Server Type field and enter the Registration ID retrieved from Storm
Central as detailed on page 5. The Registration ID is case-sensitive, be sure to enter it exactly as
shown on Storm Central.
Verify Registration
The final step is to press the Verify
Registration button to have the modem
communicate with Storm Central. When
the Registration ID is verified, Storm
Central links and sets up the Storm data
logger on your account. Next time you
log in to Storm Central, the Site will be
available. All future updates to the Storm
data logger will be replicated on Storm
Central and data will begin flowing in at
the next transmission. Your Storm Central
setup is now complete.
9
Page 12

COLLECT DATA WITH
04 /
STORM CENTRAL
GOES
10
Page 13

Collect Data with Storm Central
Storm Central can also retrieve and display data from GOES Sites using WaterLog’s GOES data
formats. Decoding of both Psuedo-Binary and ASCII (SHEF) formats is fully supported. Setting up a
GOES Site is a simple process.
Add a GOES Site
Log in to Storm Central and navigate to
Sites through the Administration link.
Press the ‘Add’ button at the bottom of
the Sites table to add a new Site. Under
the Site Setup screen for that Site, select
GOES as the Site Type.
Note: In order for Storm Central to accurately
retrieve and decode GOES data, all aspects of
the GOES transmission need to be configured.
The settings must match the data being retrieved
or the data decoding will fail. In addition to
the transmission settings, the number of Data
Columns must match the number of sensors
being retrieved.
Validate Entered Information
Once the settings have been configured,
press the ‘Get Last Tx’ button to
validate the entered information. Storm
Central will attempt to retrieve the last
GOES transmission and decode the
data according settings. Data that is
successfully decoded will be displayed in
the Processed Data section further down
on the page. It will appear in a tabular
format identical to how it will display on
the Site Details page.
Note: Be sure to review this data carefully to
verify it is decoded correctly. If the data in the
Processed Data window is not correct, pressing
the Delete Last Tx button will remove the
displayed information from your Site’s data
storage.
11
Page 14

COLLECT DATA
GOES
Continue Data Retrieval
When the Processed Data appears
correct, your GOES Site setup is
complete. GOES Data will continue to be
retrieved based on the Transmit Rate and
Transmit Offset intervals specified for the
Site.
GOES data generally does not include
any type of date or time associated to the
data values. Storm Central timestamps
each piece of data according to the time
the transmission arrived, which is based
on Universal Coordinated Time (UTC).
Test Timestamp Effects
In most cases, the data logger’s time zone
is not UTC. As such, a Timestamp Offset
field is available to shift the timestamps
of the data being collected back to
resemble that of the data logger. For
example, to shift the timestamp of the
data back six hours, the Timestamp Offset
would be set to 06:00:00. The effects of
the Timestamp Offset field can be easily
tested by pressing the Get Last Tx button
to see its effects on the timestamps
associated with the data.
12
Page 15

Collect Data with Storm Central
Example
An example GOES Binary Site setup is detailed below. The options listed should be familiar as they
follow the same layout and format as presented on a WaterLog data logger.
13
Page 16

REVIEW AND
DOWNLOAD DATA,
05 /
SET UP ALARMS
14
Page 17

Review and Download Data
Once data is being collected by Storm
Central, the data can be reviewed and
downloaded at any time using the Site
Details screen. To access Site Details,
simply click on the name of the site
after logging into Storm Central. Data is
presented in both graphical and tabular
views that make it easy to see trends and
view the raw data.
Downloading data can be done either
by downloading the entire data set or by
selecting a date from which to start the
data download. Data files are presented
in a spreadsheet-friendly commaseparated format (.csv).
Review and Download Data
Set Up Alarms
Alarms can be simple to set up and
very useful for identifying potential
problems. Whether managing a large
Network or just a few small Sites, Storm
Central can help collect, store, and
organize your data. With the added
functionality of Alarms, Storm Central
can notify you when an issue arises
before it becomes a major problem.
Data within Storm Central, regardless
of how the data is collected, can be
analyzed and evaluated. Based on those
evaluations, an action or notification
can occur, such as changing the color
of an icon on your map or sending out
an e-mail or SMS (text) message. These
automatic evaluations and resulting
actions are called Alarms.
15
Page 18

SET UP ALARMS
Add Contacts
Alarms are located under the
Administration link after logging
into Storm Central. In order to notify
individuals about an Alarm condition
using e-mail or SMS, Contacts will
need to be added to your account. The
Contacts link is next to Alarms under
Administration. Contacts can be easily
added or removed and only require a
few pieces of information (name, phone
number, e-mail address, etc).
Alarm Components
Storm Central enables both Simple and Advanced Alarms to be created. Simple Alarms typically
consist of a single sensor value compared to a given set point or range of values. Advanced Alarms
allow multiple sensor values from potentially multiple sites to be compared and contrasted. When
a Simple Alarm is created, its Advanced Alarm counterpart is also automatically generated, giving
you access to the exact syntax required for an Advanced Alarm.
An Alarm consists of three main components: the Alarm Information, the Alarm Condition, and the
Alarm Actions & Notifications. The Alarm Information simply provides information about the Alarm.
The Alarm Condition allows the specific requirements of the Alarm to be determined. The Alarm
Actions & Notifications specifies what will happen when the Alarm is triggered.
Alarms are evaluated every time new data is stored in your Storm Central account. As each Alarm is
logically evaluated, its result must be either true or false. When an Alarm becomes true, an Action
and/or Notification can occur. Notifications such as E-mail and SMS Text Messages are Alarmspecific and can vary per Alarm.
The simplest of Alarms consist of comparing a Sensor’s data value to a provided Set Point. For
example, the image on page 17 under ‘Test an Alarm’ shows an Alarm Condition that will evaluate
to true when the TempC data value of the River Surveyor Site is less than 20. The optional Reset
Point allows the Alarm to only re-evaluate to true once the Reset Point has been reached. In other
words, if a Reset Point of 25 was specified, the Alarm would only be true once the TempC data
point became higher than 25, then dipped back below 20 again. Reset Points can be useful for
data values that may hover around a certain threshold, but should not send a notification every
time the threshold is crossed.
16
Page 19

Test an Alarm
Testing an Alarm is performed by pressing
the ‘Evaluate’ button. If the result of
the Condition is true and the Alarm
has not been disabled, all Actions and
Notifications will also be run. If an error is
displayed, a syntax or typographical error
was discovered when trying to evaluate
the Alarm Condition. It will need to be
corrected before the Condition can be
properly evaluated.
Complex Alarm
Setup Alarms
If a more complex Alarm is desired, the
Advanced Alarm Condition can be used to
describe nearly any combination of Sites,
Sensors, and other functions. For example,
the image on the right shows an Alarm
Condition that will evaluate to true when
Stage from the UpperDam Site is greater
than 26.8 and Rain from the GageHouse
Site is greater than 0.30.
Supported syntax:
Retrieve the latest value of a Site’s Sensor
(case-sensitive): [SiteName~Sensor]
Logical operators: OR, AND, ==, !=, >, <,
>=, <=
Built-in functions: RSUM, MIN,MAX
where RSUM is the Reimann Sum. Syntax for these functions is Function(x,y) where x is a
[SiteName~Sensor], and y is the number of previous samples from the most recent to include in
the calculation. For example, MIN([Site1~Battery],5) would retrieve the minimum Battery value
from the last five samples recorded for Site1.
Retrieve the result of another Alarm (case-sensitive): {AlarmName}
Using another Alarm’s result can help you set up differing levels of Alarms. For example, if you
already had an UpperDamAlarm set up, you could rewrite the above Advanced Condition as
{UpperDamAlarm} AND [GageHouse~Rain] > 0.30.
17
Page 20

What Can Xylem Do For You?
Xylem
1) The tissue in plants that brings water upward from the roots;
2) a leading global water technology company.
We’re 12,900 people unified in a common purpose: creating innovative solutions
to meet our world’s water needs. Developing new technologies that will improve
the way water is used, conserved, and re-used in the future is central to our work.
We move, treat, analyze, and return water to the environment, and we help people
use water efficiently, in their homes, buildings, factories and farms. In more than 150
countries, we have strong, long-standing relationships with customers who know us
for our powerful combination of leading product brands and applications expertise,
backed by a legacy of innovation.
For more information on how Xylem can help you, go to www.xyleminc.com
Xylem—WaterLOG
95 West 100 South
Suite 150
Logan, UT 84321 USA
Tel: +1.435.753.2212
Email: sales@waterlog.com
Internet: www.waterlog.com
©2014 Xylem Inc.
D27-01 0214
 Loading...