

Global Water
800-876-1172 • globalw.com
Global Water
Instrumentation, Inc.
11390 Amalgam Way
Gold River, CA 95670
T: 800-876-1172
Int’l: (916) 638-3429, F: (916) 638-3270
6” Tipping Bucket: RG200
02/05/10
01-343
- 1 -

Global Water
800-876-1172 • globalw.com
Congratulations on your purchase of the Global Water RG200
6” Tipping Bucket. This instrument has been quality tested and
approved for providing accurate and reliable measurements. We
are confident that you will find the RG200 to be a valuable asset
for your application. Should you require assistance, our technical
staff will be happy to help.
Table of Contents
I. Checklist • • • • • • • Page 3
II. Inspection
III. Tipping Bucket Installation
IV. Tipping Bucket Calibration Information
V. Adjusting the Rain Gauge Tipping Bucket
VI. Tipping Bucket Calibration Check
VII. Tipping Bucket Specifications
VIII. Maintenance
IX. Troubleshooting
X. Warranty
* Copyright © Global Water Instr umentation, Inc. 2005
• • • • • • • 10
• • • • • • 3
• • • • 4
• • 5
• • 7
• • • 8
• • • • 8
• • • • • • 9
• • • • • • 9
- 2 -
I. RG200 Checklist
a. 6” Tipping Bucket
b. RG200 Manual
c. Mounting Screws, strainer, metric conversion weight
II. Inspection
a. Your RG200 unit was carefully inspected and certified by our Quality
Assurance Team before shipping. If any damage has occurred during
shipping, please notify Global Water Instrumentation, Inc. and file a
claim with the carrier involved.
Use the checklist to ensure that you have received everything needed
to operate the RG200.
Global Water
800-876-1172 • globalw.com
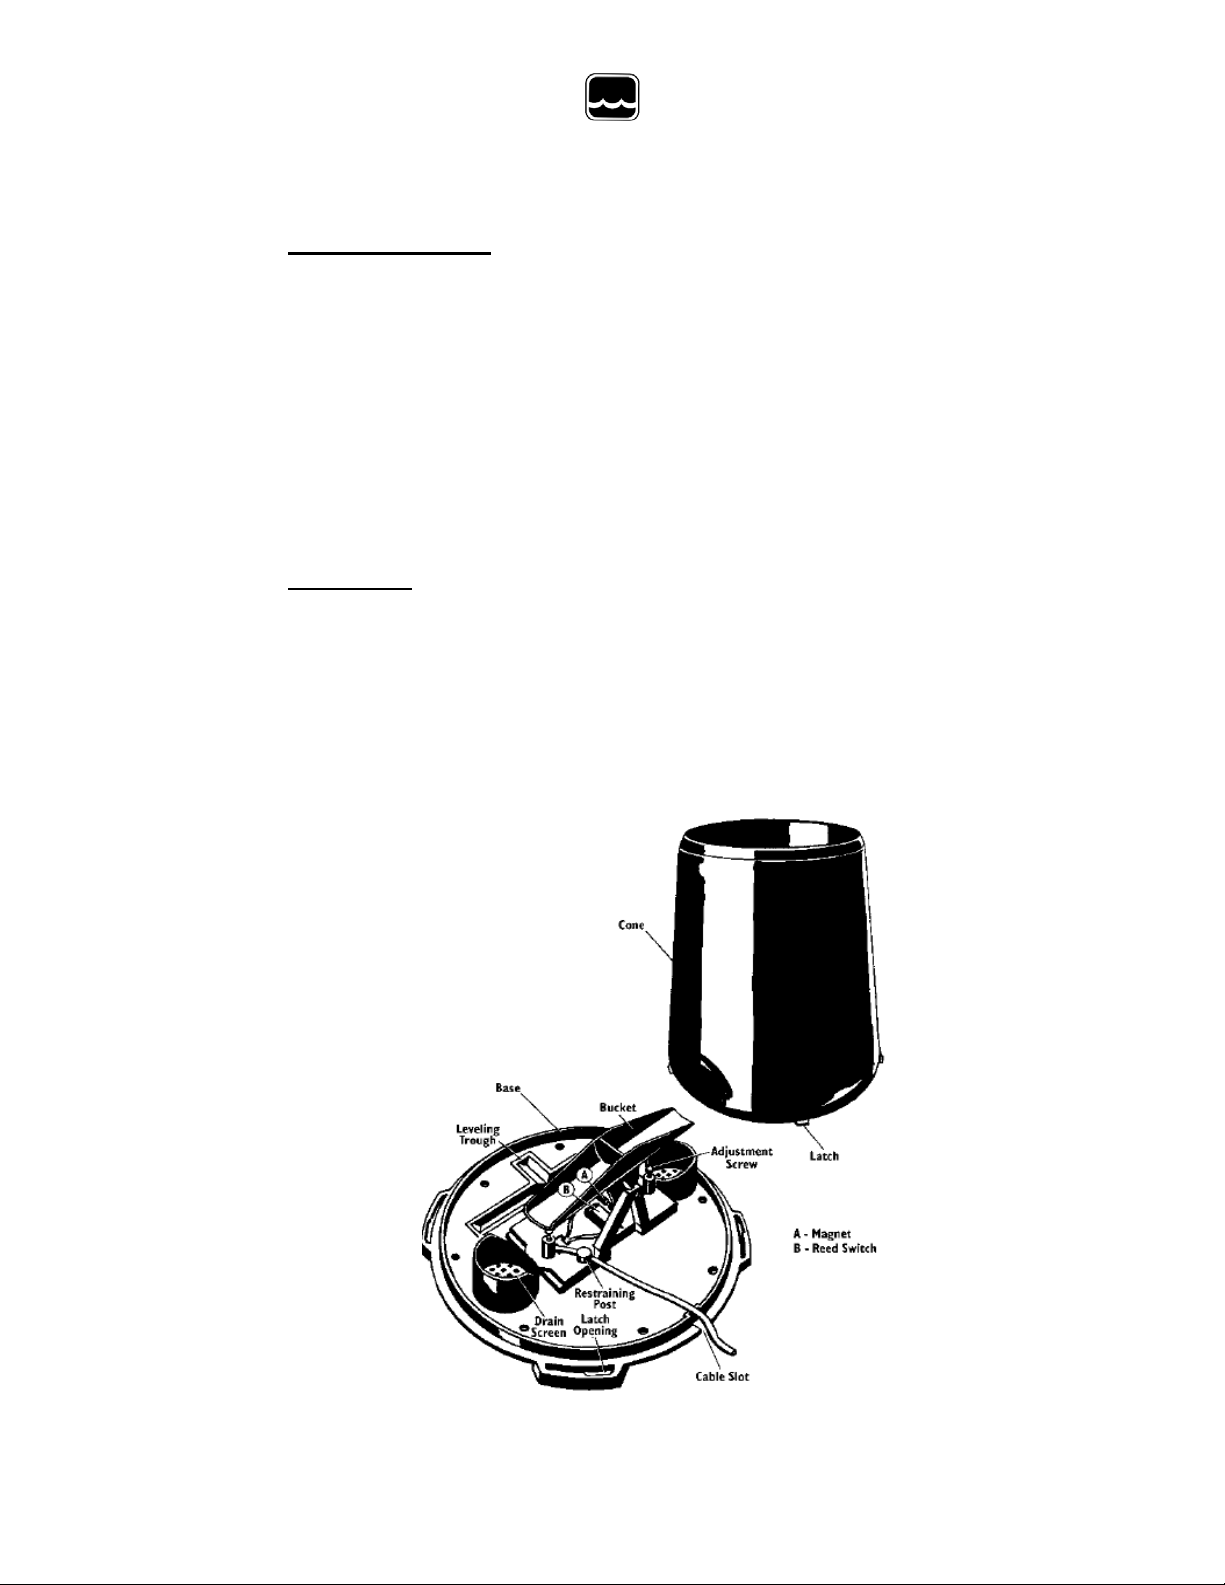
Rain Gauge Internal Components
- 3 -

800-876-1172 • globalw.com
III. Tipping Bucket Installation
Tools and Materials Needed
You may need some of the following tools and materials to install the
RG200 Rain Gauge Tipping Bucket:
1. Drill with 3/32" (2 mm) drill bit
2. Medium Phillips Screwdriver
3. 3/16" (or 5 mm) Wrench
4. Cable Clips or Weather-Resistant Cable Ties with screw holes or other
means for mounting
5. Bubble Level
Precautions
Global Water
a. The tipping bucket requires a clear an unobstructed mounting location
to obtain accurate rainfall readings. It must also be mounted on a level
surface that is free of vibration. Once the tipping bucket is mounted
remove the housing cover by rotating it counter clockwise. Verify that
the tipping bucket is not held in the center position. If held in upright
gently press either end down against the stop to ensure proper
operation.
b. To ensure that the surface is level, use a bubble level or pour water
into the T-shaped leveling trough in the base and observe the surface
of the water.
c. Be sure there is an unobstructed path for water runoff from the drain
screens.
d. Choose a location that is easily accessible for normal cleaning and is
distant from trees or other sources of heavy pollen or debris.
- 4 -

Global Water
800-876-1172 • globalw.com
Installation of Tipping Bucket with the GL500 Data Logger
e. Pass the Tipping Bucket cable through an unused strain relief. Attach
the two wires to the pulse channel of the GL500.
Installation of Tipping Bucket with other Global Water products
f. The Tipping Bucket comes with an attached RCA jack. Review the
literature for the other product to determine where the Tipping Bucket
RCA jack should be plugged into.
IV. Tipping Bucket Calibration Information
a. Accurate calibration can be obtained only with laboratory equipment,
but an approximate field check can be easily made. The tipping
bucket mechanism is a simple and highly reliable device. Any
accumulation of foreign material, dust, etc. will alter the calibration of
the unit. The tipping bucket must be calibrated with the rate of flow of
water through the tipping bucket mechanism. At least 36 seconds
should be allowed to fill one side of the tipping bucket. This
represents a maximum flow rate of one inch of rain per hour. If the
flow rate is increased, the unit will read low (if properly calibrated).
Decreasing the rate of flow will not affect the calibration. Some time is
required for the bucket to tip (a few milliseconds). During the first 50%
of this tipping time, water continues to flow into the filled bucket; the
last 50% of this tipping time, water flows into the empty bucket. The
amount of water flowing during the first 50% of time is the error, the
faster the flow rate the greater the error. At flow rates of one inch per
hour or less, the water actually drips into the bucket rather than
flowing. Under these conditions, the bucket tips between drips and
there is no error in the readings.
- 5 -

Global Water
800-876-1172 • globalw.com
Optional Metric Measurement Adapter
The rain gauge collector tipping bucket mechanism contains a standard
measurement weight magnet that takes measurements in .01” for every
tip of the bucket. The tipping bucket assembly contains a metric
measurement that adjusts the tipping bucket mechanism so that it takes
0.2 mm metric measurements. To change the weight magnet:
1. Find the metric measurement adapter included in the hardware.
2. Locate the standard measurement weight magnet between the arms of
the tipping mechanism.
3. Open the arms slightly with one hand while pulling the magnet out with
the other hand.
4. Separate an end cap from one side of the magnet.
5. Slide the magnet, with the exposed end of the magnet first, into the
open slot of the metric measurement adapter.
- 6 -

Global Water
800-876-1172 • globalw.com
6. Insert the metric measurement adapter between the arms of the tipping
bucket, with solid side of the metric measurement facing up.
V. Adjusting the Rain Gauge Tipping Bucket
Our Rain Gauge is calibrated at the factory so the bucket tips (and records
rainfall) for each 0.01" (or 0.2 mm if the metric adapter has been fitted) of
rain. To adjust the calibration slightly, use a 3/16" (or 5 mm) wrench to
rotate the adjustment screws that are located underneath the bucket.
The adjustment guide embossed in the platform shows how far you must
rotate both screws in turn to effect a 1% and a 2% change.
Moving the screws in the positive (+) direction causes the bucket to tip
more times (i.e. give a larger count) for a given amount of water.
- 7 -

Global Water
800-876-1172 • globalw.com
VI. Tipping Bucket Calibration Check
a. Obtain a plastic or metal container of at least one-quart capacity.
Place a very small hole in the bottom of the container.
b. Place the can in the tipping bucket funnel.
c. Pour exactly 27.9 ounces of water into the can.
d. If it takes less than 45 minutes for the water to run out, then the hole in
the container is too large.
e. Rough field calibration of this sort should result in one hundred tips, +
three.
f. Adjusting screws are located under the tipping bucket mechanism on
the base plate. Adjust both screws equally, i.e. if you turn one a half
turn then turn the other a half turn. Turning the screws clockwise will
increase the number of tips per 27.9 ounces of water. Turning the
screws counter-clockwise decreases number of tips per 27.9 ounces
of water. One half turns of both screws normally results in a change of
2-3%.
VII. Tipping Bucket Specifications
Resolution: 0.01 inches
Accuracy: 3% up to 4”/hr
Average Switch Closure Time: 135 ms
Maximum Bounce Settling Time: 0.75 ms
Maximum Switch Rating: 30 VDC @ 0.2 amps
Operating Temperature: 0° to +51°C
Size of Gauge: 6”x15”
Weight: 2.0 lb.
- 8 -
VIII. Maintenance
The funnel and tipping bucket mechanism should be cleaned periodically.
An accumulation of dirt, bugs, etc. on the tipping bucket will adversely
affect the readings.
1. Separate the cone from the base.
2. Use warm soapy water and a soft cloth to clean pollen, dirt, and other
debris from the cone, cone screens, and bucket.
3. Use a pipe cleaner to clear the funnel hole in the cone and the drain
screens in the base.
4. When all parts are clean, rinse with clear water.
5. Reattach the cone and replace the screen.
6. Reconnect the rain collector cable to the junction box.
Global Water
800-876-1172 • globalw.com
IX. Trouble Shooting
Issue: 6” Tipping Bucket not reading correctly
a. Clean Tipping Bucket.
b. Recalibrate Tipping Bucket.
Other issues
c. Call us for tech support: 800-876-1172 or 916-638-3429 (many
problems can be solved over the phone). Fax: 916-638-3270 or Email:
globalw@globalw.com.
Be prepared to describe the problem you are experiencing including
specific details of the application and installation and any additional
pertinent information.
d. In the event that the equipment needs to be returned to the factory for
any reason, please call to obtain an RMA# (Return Material
Authorization). Do not return items without an RMA# 6” Tipping
Bucketed on the outside of the package.
Include a written statement describing the problems.
- 9 -

Send the package with shipping prepaid to our factory address. Insure
your shipment, as the warranty does not cover damage incurred during
transit.
e. When calling for tech support, please have the following information
ready;
X. Warranty
a. Global Water Instrumentation, Inc. warrants that its products are free
from defects in material and workmanship under normal use and
service for a period of one year from date of shipment from factory.
Global Water’s obligations under this warranty are limited to, at Global
Water’s option: (I) replacing or (II) repairing; any products determined
to be defective. In no case shall Global Water’s liability exceed the
products original purchase price. This warranty does not apply to any
equipment that has been repaired or altered, except by Global Water
Instrumentation, Inc., or which has been subject to misuse, negligence
or accident. It is expressly agreed that this warranty will be in lieu of
all warranties of fitness and in lieu of the warranty of merchantability.
b. The warranty begins on the date of your invoice.
Global Water
800-876-1172 • globalw.com
1. Model #.
2. Unit serial number.
3. P.O.# the equipment was purchased on.
4. Our sales number or the invoice number.
5. Repair instructions and/or specific problems relating to the
product.
- 10 -
 Loading...