

Page 1

UPGRADE TO STORM
Bottom of Enclosure
INSTALLATION INSTRUCTIONS
What You Need
1
*Activate your stormcentral.waterlog.com account and log in prior to going out to your
equipment site. Contact WaterLOG Technical Support at 435.227.1767 for further questions, and to obtain access to the Storm Central Service. Refer to the ‘Storm Central Getting
Started Guide’ for detailed instruction on set up with Storm Central.
Required Quantity
Storm 3 Data Logger 1
Mounting plate 1
Phillips screwdriver that is 9.5” long 1
Small flat blade screw driver (2mm wide blade) 1
Adjustable wrench 1
Laptop / Smart Phone / Tablet with Wi-Fi 1
Storm Central Registration ID 1
Anti-static wrist band
2
Take a picture of the inside of your enclosure
for reference, put on your anti-static wristband
and attach the clip to the ground lug located
on the bottom of the EcoNet enclosure.
The ground lug should already be wired to
a ground rod, which is buried in the ground.
Green Connectors
3
Remove the three green five position
connectors from the side of the EcoNet.
Remove and label the individual wires as
A-F, from the green five position Phoenix
connectors:
Suggested Quantity
Safety glasses 1
White electrical tape 1
Pen 1
Anti-static wristband 1
Camera or notepad 1
Digital multimeter 1
Connector 1
A. GND black wire from 4th position of 1st connetor.
B. SDI-12 purple wire from 5th position of 1st connector.
Connector 2
C. GND green wire from 3rd position of 2nd connector
D. GND black wire from 4th position of 2nd connector
E. VBATT red wire from 5th position of 2nd connector
Connector 3
F. +12V Out red wire from 5th position of 3rd connector
To avoid short circuits, cover the wire
ends with electrical tape until it is time for
reconnection in Storm 3 connectors.
1
Page 2
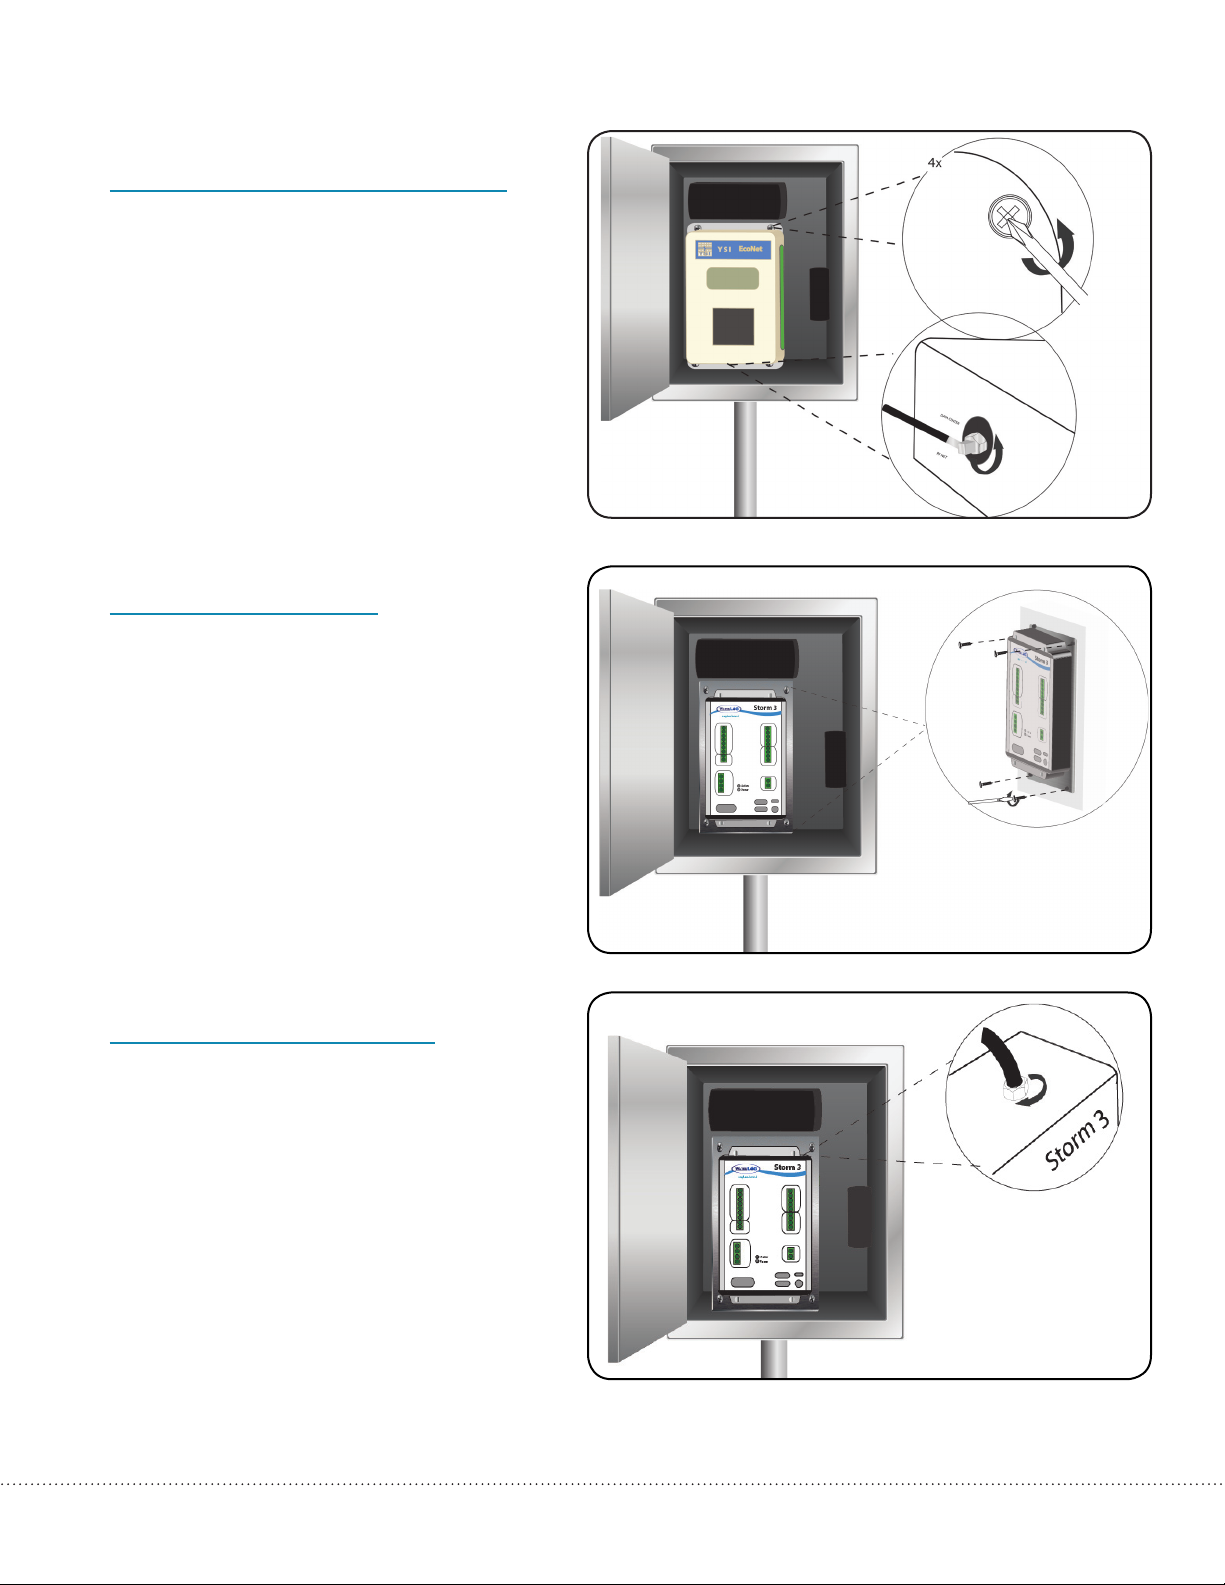
Disconnect Antenna, Remove EcoNet
4
Disconnect the black antenna cable from the
bottom of the EcoNet unit. Use wrench to
loosen if needed.
Using a 9.5” Philips head screwdriver,
unscrew four screws holding the EcoNet to
the enclosure.
Remove the EcoNet unit from the enclosure.
Install Storm 3
5
Secure Storm 3 into enclosure using four
screws and the hole pattern used with the
EcoNet unit.
Connect antenna
6
Connect the black antenna cable to Storm 3.
*Connecting power to the Storm 3 should be
the last step of the wiring procedure.
2
Page 3

Connect Wires to Storm 3
7
Connect the wires to the three green
connectors that come with the Storm 3.
Refer to the image for placement of labeled
wires (A-F).
Do not attempt to use the green five position
Phoenix connectors that were used in the
EcoNet unit.
Communicate with Storm 3
8
Insert wireless adaptor into a USB port and
wait until the active light starts blinking.
Connect to the Storm 3 Wi-Fi network, via PC
/ Smart Phone / Tablet or connect directly to
PC with the USB cable.
Open a web browser and navigate to
http://172.20.20.20. The Storm 3 “Home”
screen should be displayed.
Set Date and Time
9
From the home screen,click the calendar
icon to change the date. Click on the box
displaying the current time, set the time and
press ‘Enter’.
3
Page 4

Add a Sensor
10
Select a sensor from the built-in sensor library
and click ‘Add Sensor’. Click the “Wiring
Diagram” button so you can see how the
sensor should be wired to the Storm 3.
11
Start Data Collection
Make sure the Site ID is set. Start collecting
data by selecting “Enabled” from the
“Scanning” drop down box on the home
screen.
Go to the “Data” screen to view collected
data graphically.
Configure Storm 3 with your Registration ID
(from stormcentral.waterlog.com) to ensure
data will show up on the website.
*Refer to the ‘Storm Central Getting Started Guide’ for
detailed instruction on Storm Central.
Storm Central
12
stormcentral.waterlog.com
Review and download data collected by
Storm Central at any time using the “Site
Details” screen. Generate simple-to-complex
alarm conditions based on the data collected.
Receive notifications of alarm conditions via
email, SMS text message or through color
change of map icons.
If you have your own cellular service, be sure
to have it activated. If using a GSM service
provider, have your SIM card installed and
GSM settings specified.
WaterLOG
95 West 100 South, Suite 150
Logan, Utah 84321 USA
Tel: (435) 753-2212
www.waterlog.com
4
 Loading...