

TV-Ghettoblaster
with DVD, DVB-T
and Radio
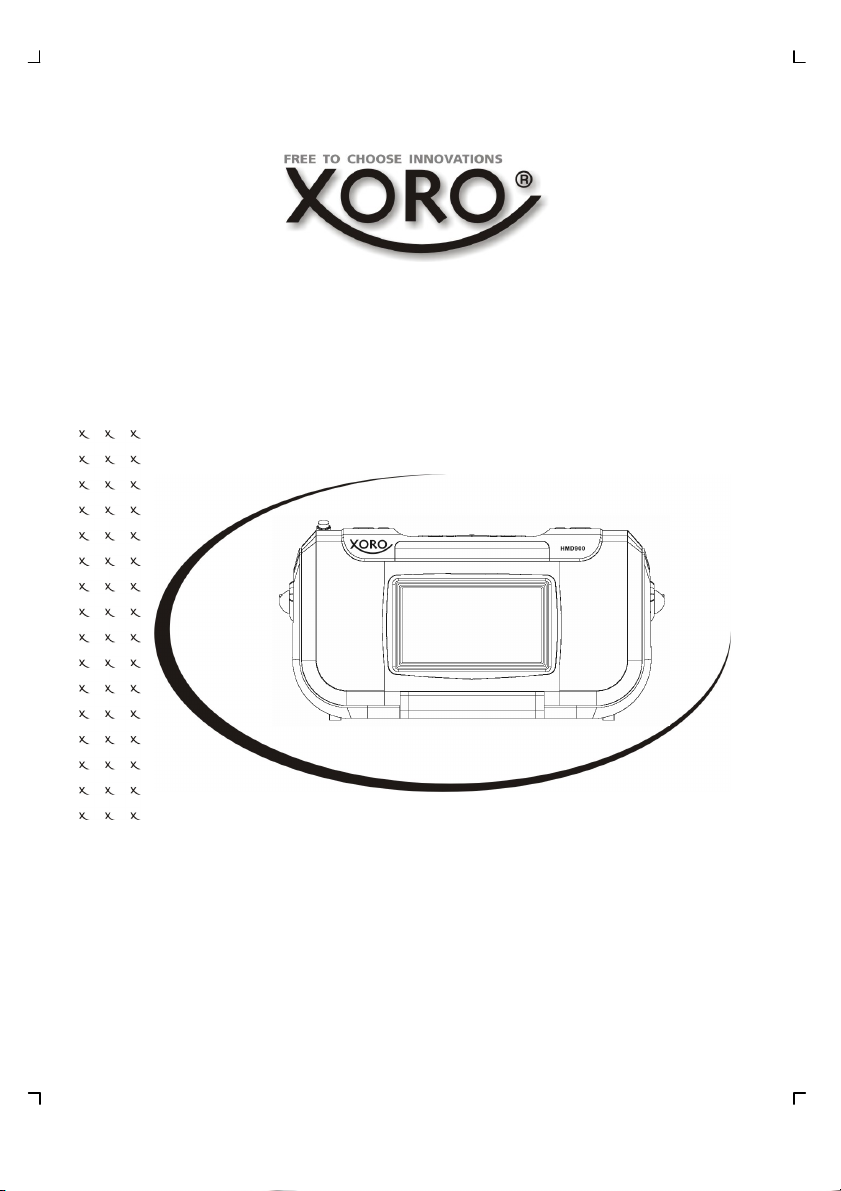
HMD 900
OPERATION MANUAL
BEDIENUNGSANLEITUNG
MANUEL D'EMPLOI
РУКОВОДСТВО по эксплуатации
MANUAL DE OPERACIÓN


INHALT
Inhaltsangabe..................................................................................................................... 3
SICHERHEITSHINWEISE ................................................................................................. 4
FEATURES ........................................................................................................................ 7
PACKUNGSINHALT.......................................................................................................... 7
BEDIENELEMENTE
Oben................................................................................................................................... 8
Vorderseite ......................................................................................................................... 8
Rückseite............................................................................................................................ 8
Linke Seite.......................................................................................................................... 9
Rechte Seite....................................................................................................................... 9
Unterseite ........................................................................................................................... 9
Bedientasten/Kontrollfeld ................................................................................................. 10
FERNBEDIENUNG
Einlegen der Batterie........................................................................................................ 11
Fernbedienung ................................................................................................................. 12
Tastenbeschreibug........................................................................................................... 12
EINLEGEN DER BATTERIEN......................................................................................... 14
USB.................................................................................................................................. 15
Kartenleser...................................................................................................................... 15
FM-Radio ......................................................................................................................... 15
VERBINDEN
TV mit CVBS und Stereo................................................................................................. 16
Amplifier mit Digitalem Audioausgang (optisch oder koaxial) .......................................... 17
Audio/Video-Eingang........................................................................................................ 18
Starten des DVD-Players ............................................................................................... 19
Einfache Bedienfunktionen............................................................................................... 20
Systemeinstellungen ........................................................................................................ 24
DVB-T TV
Erstinstallation .................................................................................................................. 29
Einstellungen.................................................................................................................... 29
OSD (TFT– und Lautsprechereinstellungen) ............................................................... 32
FEHLERBEHEBUNG ...................................................................................................... 33
TECHNISCHE DATEN..................................................................................................... 34
GLOSSAR........................................................................................................................ 35
Deutsch
3
SICHERHEITSHINWEISE
Das Blitzsymbol im Dreieck weist den Benutzer auf gefährliche Spannun-
Deutsch
Das ist jedoch keine Garantie dafür, dass diese Störungen nie auftreten können. Sollten
diese Störungen bei Ihnen auftreten probieren Sie folgendes:
Positionieren oder richten Sie die empfangende Antenne anders aus.
Vergrößern Sie den Abstand zwischen dem Gerät und demgestörten Gerät.
Stecken Sie den Netzstecker des DVD Players in eine andere Steckdose als das gestörte
Gerät.
Setzen Sie sich mit dem Händler odereinem Radio/Fernsehtechniker in Verbindung.
Warnung:
Das Gerät darf nicht Regen oder Feuchtigkeit ausgesetzt werden, da dadurch Feuer oder
Kurzschluss hervorgerufen werden können. Das Gehäuse darf aufgrund innenliegender
Spannung nicht aufgeschraubt werden. Bitte lassen Sie es nur von qualifiziertem Servicepersonal öffnen.
Vorsicht:
Während der Wiedergabe dreht sich die Disk sehr schnell. Bitte öffnen und bewegen Sie
den Player nicht, sonst könnte die CD beschädigt werden.
Dieses Gerät enthält ein Lasersystem. Um austretende Strahlung zu vermeiden, sollte das
Gerät nicht geöffnet werden. Die Laserstrahlung kann Augenschäden hervorrufen. Um eine
einwandfreie Nutzung zu gewährleisten, halten Sie sich bitte an
die Hinweise der Bedienungsanleitung. Sollten Reparaturarbeiten notwendig sein, kontaktieren Sie einen Fachmann oder wenden Sie sich an Ihren Händler.
Das Gerät ist nur von Leuten aus dem Servicebereich zu öffnen.
Warnung:
Nicht in den Laserstrahl schauen.
gen" an einigen freiliegenden Bauteilen im Inneren des Gerätes hin.
Das Ausrufezeichen im Dreieck weist den Benutzer auf wichtige Bedienungs- und Wartungsanweisungen (Service) in diesem Handbuch hin, die
unbedingt befolgt werden sollten.
Das Gerät wurde getestet und entspricht lt. FCC Norm den Standards eines
Klasse B Audiospielers. Diese Standards wurden entwickelt um Interferenzen mit anderen heimischen Elektrogeräten zu vermeiden bzw. zu reduzieren. Dieses Gerät kann Radiowellen verursachen und ist es nicht wie in der
Anleitung vorgeschrieben installiert, kann es zu Störungen des Radios oder
Fernsehers, zum Beispiel beim Ein- oder Ausschalten des DVD Spielers
kommen.
4

SICHERHEITSHINWEISE
Um eine einwandfrei Nutzung zu gewährleisten, dürfen keine technischen Änderungen oder
Modifikationen durchgeführt werden. Änderungen und Modifikation am Gerät lassen den
Garantieanspruch nichtig werden.
Batterie Hinweise:
Es besteht das Risiko von Verbrennungen und Feuer bei falscher Benutzung. Öffnen, Beschädigen und Überladen Sie die Batterien nicht und verhindern Sie Kontakt mit Feuer und
Wasser. Nutzen Sie nur Original Ersatzteile. Entsorgen Sie leere Batterien in den dafür vorgesehen Behälter.
Hinweis:
Sollte das Gerät in anderer Weise als hier beschrieben genutzt werden, könnte dies zum
Austritt von gefährlicher Laserstrahlungen führen.
Bitte studieren Sie dieses Handbuch gründlich und bewahren Sie es an einem Ort auf, zu
dem Sie jederzeit Zugriff haben.
1. Folgen Sie den Sicherheitshinweisen und Instruktionen dieses Handbuches.
2. Aufbewahrung - dieses Handbuch sollte sicher für späteres Nachschlagen aufbewahrt werden.
3. Alle Hinweise und Warnungen, die in diesem Handbuch erwähnt werden, müssen
eingehalten werden.
4. Ziehen Sie für die Reinigung den Netzstecker aus der Steckdose.
5. Benutzen Sie keine Flüssigreiniger oder Reinigungssprays. Das Gerät darf nur mit
einem feuchten Tuch gereinigt werden.
6. Schließen Sie keine Zusatzgeräte an, die nicht vom Hersteller empfohlen sind.
7. Dieses Gerät darf nicht in der Nähe von Feuchtigkeit und Wasser positioniert werden.
8. Stellen Sie das Gerät nicht auf eine instabile Fläche, es könnte fallen und Personen
verletzen und der DVD-Player könnte beschädigt werden. Jegliche Befestigungen
sollten nur nach den Herstellerinformationen angebracht werden oder von dem Hersteller bezogen werden.
9. Dieses Produkt sollte in einem TV-Regal mit Rollen vorsichtig bewegt werden. Ruckartige Stopps, unebene Flächen könnten dafür sorgen, dass der Wagen evtl. umkippt.
10. Die Öffnungen des Gehäuses dienen der Lüftung, damit das Gerät nicht überhitzt.
Diese müssen immer frei gehalten werden.
11. Das Gerät kann nur mit der auf der Rückseite beschriebenen Voltzahl betrieben
werden. Sollten Sie die Stromstärke nicht kennen, fragen Sie bitte einen Elektriker.
12. Das Kabel ist ummantelt und isoliert den Strom. Stellen Sie bitte keine Gegenstände
auf das Kabel, da dadurch die Schutzfunktion verloren gehen könnte. Vermeiden Sie
große Belastungen des Kabels, insbesondere an Buchsen und Steckern.
13. Das Gerät hat einen Überladungsschutz, sollte dieser vom Fachmann ausgetauscht
werden, versichern Sie sich, dass diese Sicherheitsfunktion wieder gegeben ist. Um
das Gerät vor einem Blitzeinschlag zu schützen, sollten Sie es aus der Steckdose
entfernen. Dies gilt auch für den Fall, dass das Gerät längere Zeit nicht genutzt wird.
Deutsch
5

SICHERHEITSHINWEISE
14. Sollten Sie das Gerät in Verbindung mit einer Außenantenne nutzen, versichern Sie
sich, dass diese oder das Kabel geerdet ist.
15. Gewitter - Für zusätzlichen Schutz des Gerätes während eines Gewitters oder wenn
es längere Zeit unbeaufsichtigt ist, stöpseln Sie es von der Steckdose und der An-
Deutsch
tenne/Kabel ab . Dies verhindert Schäden aufgrund von Blitzschlägen.
16. Stromleitungen - Eine Außenantenne sollte nicht in der Nähe von Stromleitungen,
sonstigen Stromkreisen oder dort wo sie in solche stürzen kann angebracht werden.
Beim Anbringen solcher Antennen ist extreme Vorsicht geboten, da der Kontakt mit
solchen Leitungen tödlich enden kann.
17. Überspannung- Überspannen Sie keine Steckdosen, Verlängerungskabel oder
sonstige Leitungen, da dies zu Bränden oder elektrischen Schocks führen kann.
18. In die Öffnungen des Gerätes dürfen keine Gegenstände jeglicher Art eingeführt
werden, da an einigen Stellen Strom fließt und der Kontakt Feuer oder einen Stromschlag hervorrufen kann.
19. Führen Sie Reparaturen niemals selber durch, bitte überlassen Sie dies immer qualifiziertem Personal.
20. Reparaturen - Kontaktieren Sie den Reparaturdienst bei folgenden Fehlern:
a. Wenn das Netzteil oder Netzkabel defekt ist.
b. Wenn Wasser verschüttet wurde oder Gegenstände in das Gerät gefallen sind.
c. Wenn das Gerät mit Wasser in Berührung gekommen ist.
d. Wenn das Gerät trotz richtiger Anwendung nicht funktioniert. Ändern Sie nur die
Einstellungen die hier beschrieben werden. Das Ändern anderer Einstellungen zieht
eine kostspielige Instandsetzung eines Technikers mit sich.
e. Wenn das Gerät fallen gelassen wurde und wenn das Produkt Leistungsschwan kungen aufzeigt.
24. Ersatzteile - Achten Sie auf original Ersatzteile oder Teile, die die selben Eigenschaften besitzen. Falsche Ersatzteile können zu Kurzschlüssen oder Feuer und
anderen Pannen führen.
25. Sicherheitsprüfung - Nach jeder Reparatur sollte der Techniker Sicherheitschecks
durchführen um die richtige Funktionsweise sicherzustellen.
26. Dieses Produkt sollte an der Wand befestigt werden und nur nach Anweisung des
Hersteller montiert werden.
27. Das Gerät sollte nicht in der Nähe von Hitzequellen, wie z.B. Öfen, Heizungen positioniert werden.
Macrovision:
U.S. Patens Nos. 4,631,603; 4,577,216; 4,819,098; 4,907,093; 5,315,448 and 6,516,132
"This product incorporates copyright protection technology that is protected by U.S. patents
and other intellectual property rights. Use of this copyright protection technology must be
authorized by Macrovision, and is intended for home and other limited viewing uses only
unless otherwise authorized by Macrovision. Reverse engineering or disassembly is prohibited."
Dolby:
Manufactured under license from Dobly Laboratories. “Dolby” and the double-D symbol are
trademarks of Dobly laboratories.
6

Eigenschaften / Packungsinhalt
• Portabler TV Ghettoblaster HMD 900
• DVD-Player
• DVB-T TV Tuner (integriert)
• FM Radio
• 7 Zoll 16:9 TFT-Display
• Kraftvolles Stereo-Lautsprechersystem mit 2 x 10 Watt Leistung
• Unterstützt Video-DVD, VCD, SVCD, MPEG-1 und MPEG-2 Video, MPEG-4 Video,
AUDIO-CD, JPEG, Kodak Picture CD
• Kompatibel zu DVD-ROM, DVD+R DL, DVD+R(W), DVD-R DL, DVD-R(W), CD-
ROM, CD-R(W), CD-DA
• Integrierter Kartenleser für SD-, MMC- und MS-Karten
• USB 1.1 – Anschluss für externe Speichermedien
• DVB-T-Receiver mit automatischer Kanalsuche, EPG und Teletext
• Audio/Video-Ein– und Ausgänge
• Digitale Audioausgänge (optisch und koaxial)
• FM Radio Frequenz: 87,5—108 MHz
• AC/DC Stromadapter (Input: 100—240 V AC V, 0,7 A)
• Batteriefach für 8x 1,5V Batterien der Größe D
Packungsinhalt
Bitte vergewissern Sie sich, dass folgende Zubehörteile in der Verpackung des DVD-Players
enthalten sind:
• HMD 900
• Fernbedienung
• Batterien für die Fernbedienung
• Stromadapter
• Bedienungsanleitung
• Garantiekarte
Deutsch
7
BEDIENELEMENTE
Oben
1. Kontrollknöpfe
2. Antenne für das FM-Radio
Deutsch
Hinweise:
Mit den Kontrollknöpfen können die wesentlichen Funktionen des HDM 900 wie z.B. den
DVD-Player, DVB-T TV oder Radio bedient
werden.
Die integrierte Antenne kann zu dem Empfang einiger DVB-T TV Programme ausreichen. Bitten benutzen Sie für die DVB-T
Funktion eine entsprechende Antenne.
Vorderseite
1. IR Empfängerfeld
2. Griff
3. Lautsprecher
4. TFT Display
Rückseite
1. DVD-Player Lade
2. Öffnentaste
3. DC Eingang
Hinweis:
Der DC Eingang beträgt 13,8 V. Benutzen
Sie ausschließlich den mitgelieferten Stromadapter.
8
BEDIENELEMENTE
Linke Seite
Beschreibung der Anschlüsse von Links nach
Rechts.
Oberste Reihe:
Audio L: Linker Audioeingang
Audio R: Rechter Audioeingang
Video-In: CVBS Videoeingang
Coaxial: Digitaler elektrischer Audio
ausgang
Untere Reihe:
Audio L: Linker Audioausgang
Audio R: Rechter Audioausgang
Video-Out: CVBS Videoausgang
Optical: Digitaler optischer Audioausgang
Rechte Seite
1. Cardreader für SD, MMC und MS
2. USB Anschluss für externe Speicher-
3. RF Antenneneingang für den DVB-T
Hinweis:
Benutzen Sie zu dem Empfang digitaler
Fernsehprogramme entsprechende Antennen.
Unterseite
1. Batteriefach
Hinweis:
Bitte legen Sie nur 8x 1,5 V Alkaline der Größe D in das Fach.
Speicherkarten
medien
TV-Tuner (DTV/ANT)
Deutsch
9

BEDIENELEMENTE
Bedientasten
Deutsch
No. Name Description
1 OSD Radio Modus: Speichern der Radioprogramme
2 MENU /
3 |<< / CH- DVD Modus: Vorheriges Kapitel. Beim halten der Taste schaltet das
4 >>| / CH+ DVD Modus: Nächstes Kapitel. Beim halten der Taste schaltet das
5 >|| DVD Modus: Abspielen oder Pause
6
EPG
7 RADIO- Radio Modus: Vorherige Radiokanal
8 RADIO+ Radio Modus: Nächster Radiokanal
9 TUNE
DOWN
TUNE UP Radio Modus: Sendersuche vorwärts
10
POWER Anschalten / Ausschalten in den Stand-By Modus
11
12
SOURCE Wechsel zu den unterschiedlichen Modi: DVD, DVB-T, FM Radio
VOL +/- Ändern der Lautstärke
13
DVD, DVB-T, AUX Modus: Anzeige des OSD Menüs
DVD Modus: Hauptmenü einer Video-DVD
DVB-T Modus: EPG Anzeige
Gerät in den schnellen Rücklauf (x2, x4, x8, x20)
DVB-T Modus: Vorheriger TV Kanal
Gerät in den schnellen Vorlauf (x2, x4, x8, x20)
DVB-T Modus: Vorheriger TV Kanal
DVB-T Modus: Bestätigen
DVD Modus: Pre-Stopp bei dem einmaligen Drücken. Das Abspielen
kann an der gleichen Stelle wieder aufgenommen werden. Zweimaliges Drücken der Stopptaste bewirkt ein kompletter Stopp der Wiedergabe.
DVB-T Modus: Wechsel von TV zu Radio (und zurück)
AUX Modus: Einstellungen Rechts und Links des OSD
AUX Modus: Einstellungen Rechts und Links des OSD
Radio Modus: Sendersuche abwärts
und AUX
10
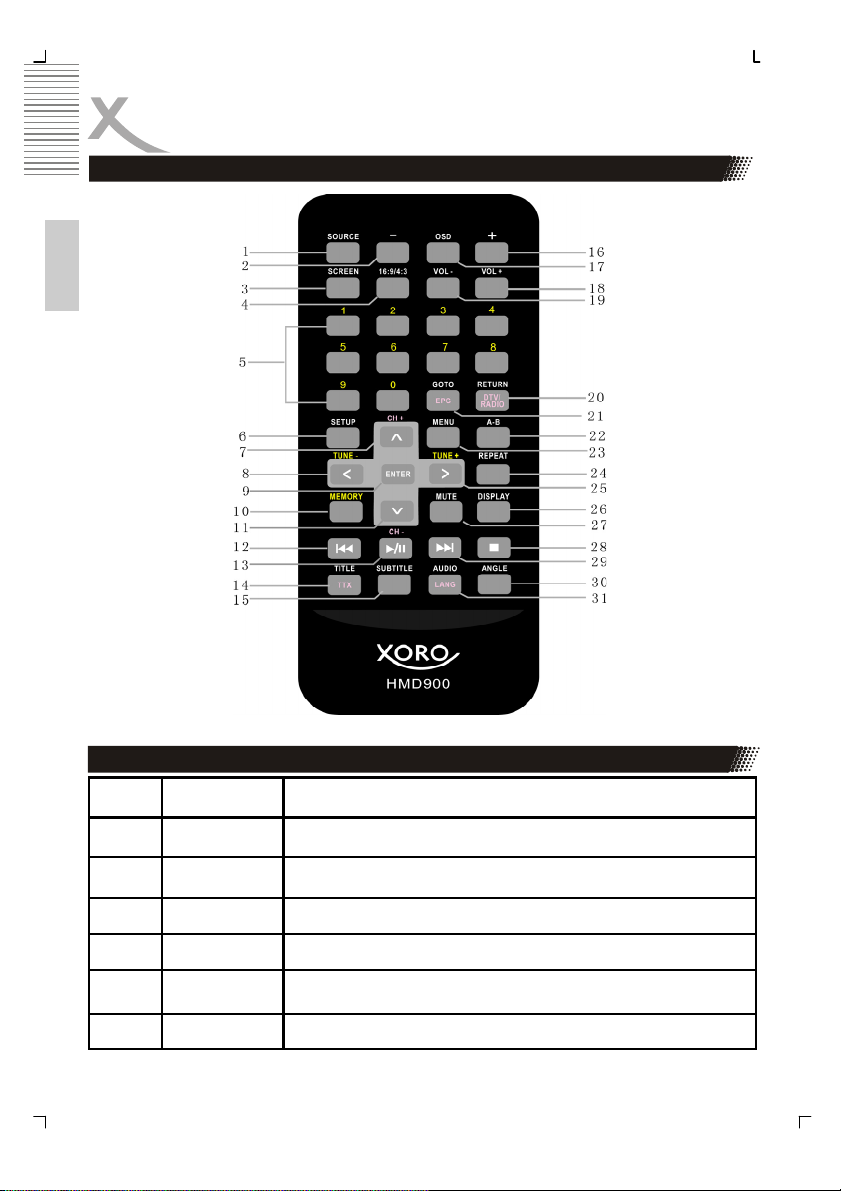
Fernbedinung
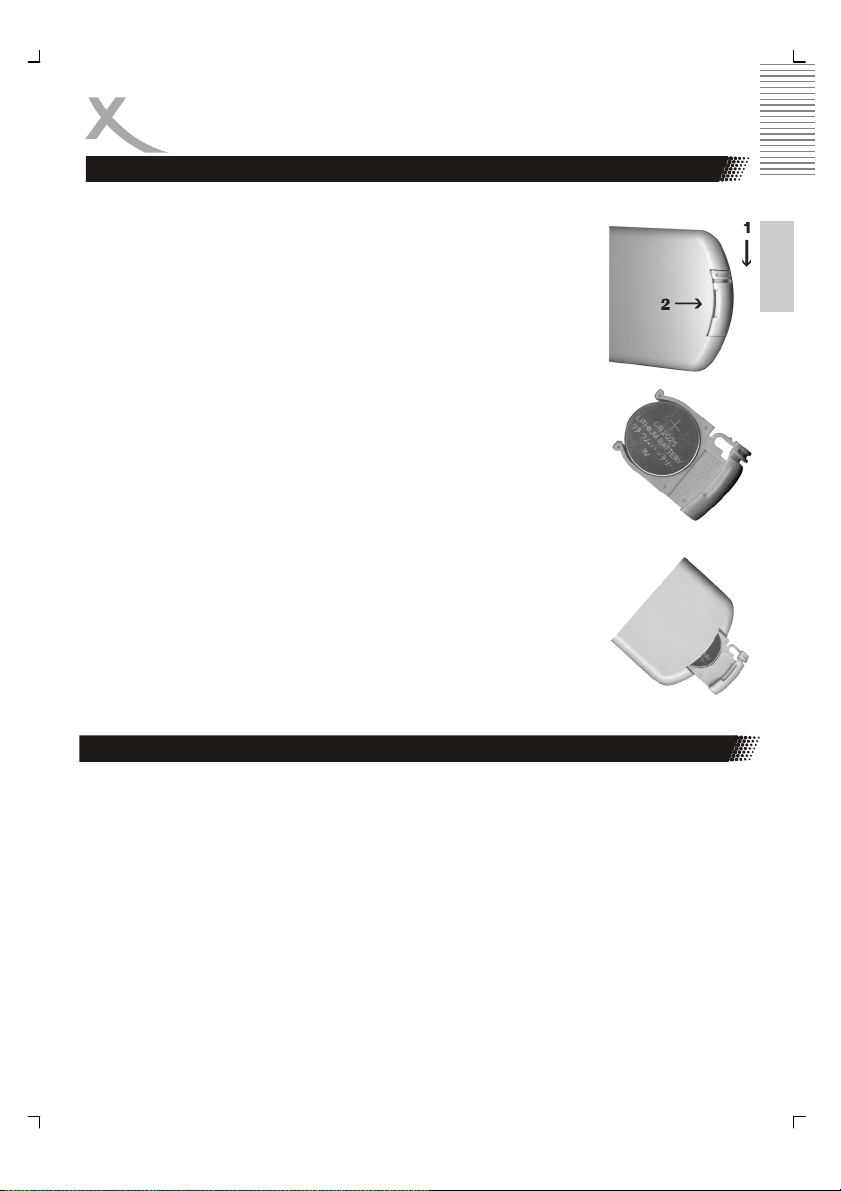
Fernbedienung-Batterie und Bedienung
1. Öffnen Sie das Batteriefach.
Halten Sie das Gerät am Punkt 1 (siehe Abbildung) und schie
ben Sie das Fach in Richtung 2 (siehe Abbildung).
2. Legen Sie die Batterie in das Fach ein.
3. Schieben Sie das Fach zurück in die Fernbedienung.
Achten Sie bitte beim Einlegen der Batterie auf die richtige
Polarität (+/-).
Bedienung des DVD-Players über die Fernbedienung
Deutsch
1. Richten Sie die Fernbedienung immer auf das Sensor-Feld des DVD-Players.
2. Achten Sie bei der Benutzung der Fernbedienung, dass der Anstand zu dem Sensor
nicht größer als 5 Meter ist.
3. Achten Sie bei der Benutzung der Fernbedienung, dass der Winkel nicht größer als
30° in jede Richtung ist.
4. Ziehen Sie die Folio aus dem Batteriefach der Fernbedienung heraus.
5. Treten Sie nicht auf die Fernbedienung oder lassen Sie die Fernbedienung fallen.
6. Bitte achten Sie darauf, dass sich keinerlei Hindernisse zwischen Fernbedienung
und IR Sensor befinden. Andernfalls kann das Gerät nicht auf die Fernbedienung
reagieren.
7. Unter starker Lichteinstrahlung kann die Funktionsfähigkeit der Fernbedienung eingeschränkt sein.
11
Deutsch
FERNBEDIENUNG
Tastenbeschreibung der Fernbedienung
No Name Funktion
12
1
2
3
4
5
6
SOURCE
-
SCREEN
16:9/4:3
0-9 DVD Modus: Direkte Track-/Kapitelanwahl
SETUP
Wechsel der Quelle (DVD, DVB-T, FM-Radio, AUX)
TFT Setup: Verkleinern der Einstellungen
An-/Abschalten des TFT Bildschirms
Ändern des Aspektverhältnisses von 16:9 zu 4:3
DVB-T / Radio Modus: Direkte Kanalanwahl
DVD Modus: Einstellungen des DVD Players
FERNBEDIENUNG
▲ (CH+) Cursor auf
7
◄ (TUNE -) Cursor Links
8
ENTER
9
MEMORY
10
▼ (CH-) Cursor runter
11
|<< DVD Modus: Vorheriges Kapitel/Track bei einmaligen Drücken der
12
>||
13
TITLE/TTX DVD Modus: Titel einer Video-DVD
14
SUBTITLE
15
+
16
OSD
17
VOL+
18
VOL-
19
RETURN/
20
DTV RADIO
GOTO/EPG DVD Modus: Suche / Gehe zu Track, Kapitel oder Zeit
21
A-B
22
MENU
23
REPEAT
24
► (TUNE
25
+)
DISPLAY DVD Modus: Informationsanzeige
26
MUTE
27
28
DVB-T Modus: Nächster Kanal
FM-Radio Modus: Vorheriger Kanal
Bestätigen der Einstellungen
FM-Radio Modus: Speichern der Radioprogramme
DVB-T modus. Vorheriger TV Kanal
Taste. Beim Drücken und halten der Taste wechselt der Player in
den schnellen Rücklauf.
DVD Modus: Abspielen oder Pause
DVB-T Modus: Teletextanzeige
DVD Modus: Untertitelanzeige
TFT Setup: Vergrößern der Einstellungen
Aktiviert das OSD Menü des Displays (bei DVD, DVB-T und AUX)
Erhöht die Lautstärke
Verringert die Lautstärke
DVD Modus: Zurück zu dem vorherigen Menü
DVB-T Modus: Wechselt zwischen TV und Radio (nur digital)
DVB-T Modus: EPG Anzeige
DVD Modus: Wiederhole A-B Segment
DVD Modus: Menü einer Video-DVD
DVD Modus: Wiederholenfunktion (Einzel, Alle)
Cursor rechts
FM-Radio Modus: Nächster Radiokanal
FM-Radio Modus: Ab- / Anschalten der Hintergrundbeleuchtung
Stummschaltung
DVD Modus: Pre-Stopp und kompletter Stopp
Deutsch
13
FERNBEDIENUNG
Tastenbeschreibung der Fernbedienung
>>|
29
ANGLE
30
AUDIO /
31
Deutsch
LANG
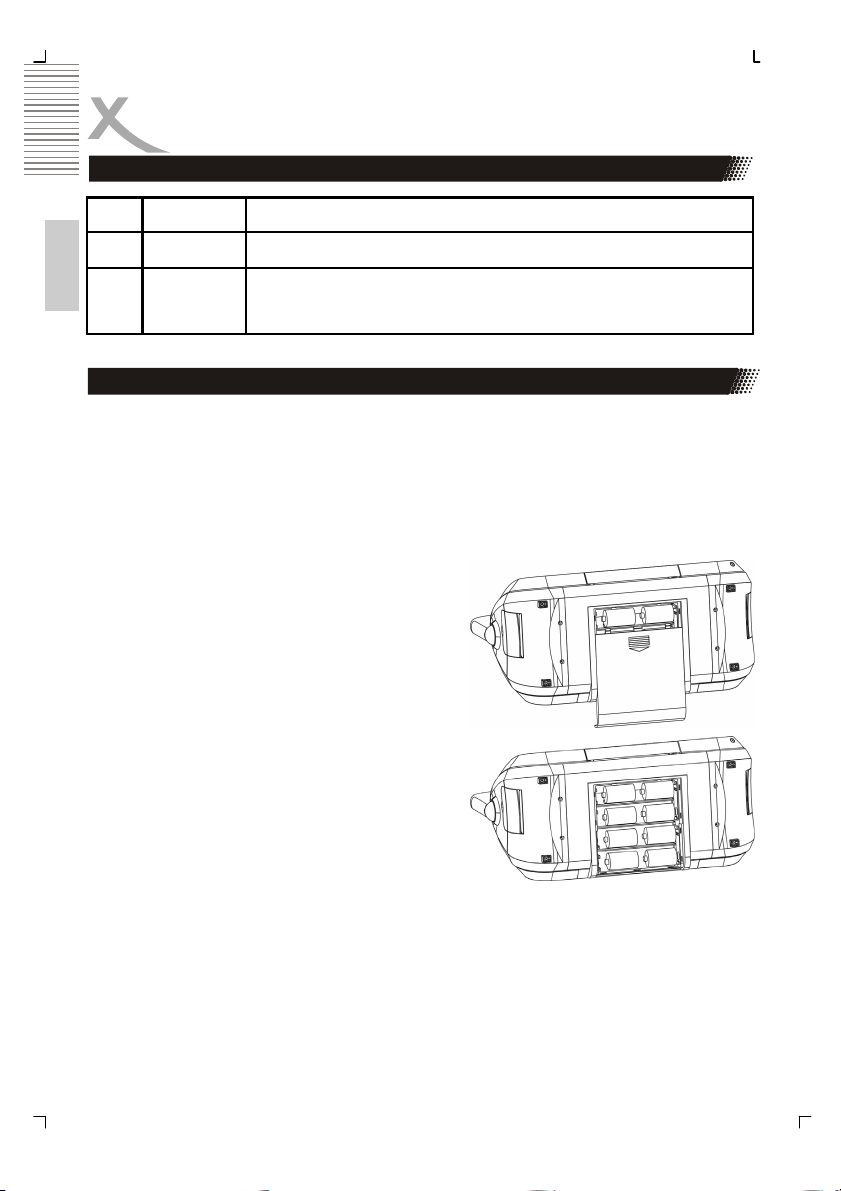
Einlegen und Entfernen der Batterien
Bitte legen Sie die Batterien in folgender Weise ein:
1. Entfernen Sie die Batterieabdeckung
2. Legen Sie 8x 1,5 V Batterien mit der Größe D in das Batteriefach ein.
3. Beachten Sie bei dem Einlegen der einzelnen Batterien immer auf die Polung und
Ausrichtung der Batterie.
4. Schieben Sie die Batterieabdeckung wieder auf.
Hinweis:
Die Batterien (1,5V Größe D) sind nicht im Lieferumfang enthalten.
Sicherheitshinweise:
1. Benutzen ausschließlich 1,5V Batterien der
Größe D.
2. Beachten Sie die Polung der Batterien.
Andernfalls kann es zur Beschädigung des
Gerätes kommen.
3. Mischen Sie keine unterschiedlichen Batterien wie z.B. Zink/Kohle mit Alkaline oder
alte Batterien mit neuen.
4. Falls das Gerät eine längere Zeit nicht benutzt wird, bitte entfernen Sie alle Batterien.
5. Bitte laden Sie keine Batterien auf welche
nicht wideraufladbar sind.
6. Schließen Sie die Batterieanschlüsse nicht
kurz.
DVD Modus: Nächstes Kapitel oder schneller Vorlauf
DVD Modus: Wechsel der Kammerawinkeleinstellung
DVD Modus: Wechsel des Audiotracks
DVB-T Modus: Wechsel der Sprache
14
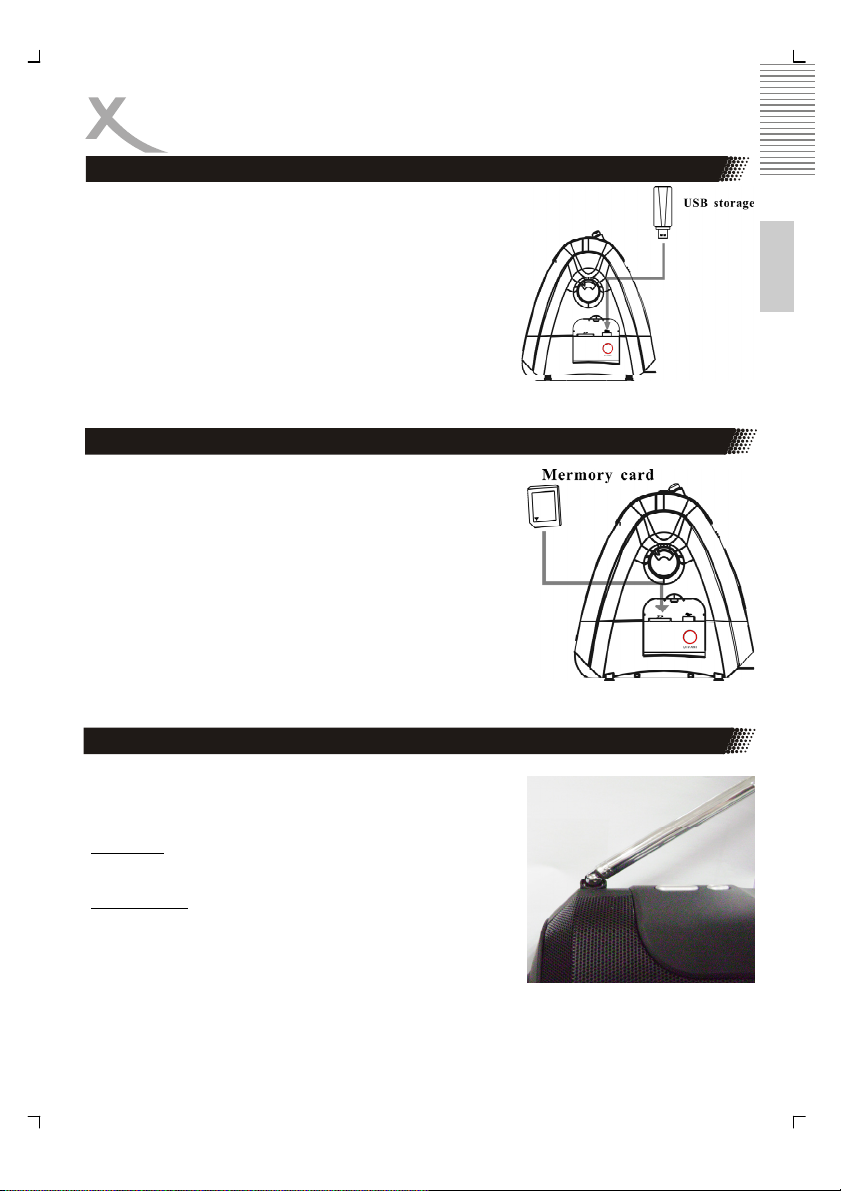
USB Anschluss
Bitte schließen Sie USB Speichermedien an dem USB
Anschluss des HMD 900 wie in der Abbildung beschrieben
an.
Der HMD 900 liest den Inhalt des USB Speichers automatisch ein.
Hinweise:
1. Der USB Anschluss unterstützt USB 1.1
2. Der HMD 900 liest den Inhalt des USB Speichers
nur dann, wenn sich keine Disc im Laufwerk befindet.
Kartenleser
Legen Sie die Speicherkarten (SD, MMC oder MS) wie in
der Abbildung gezeigt in den Kartleser ein.
Der HMD 900 liest den Inhalt der Speicherkarten automatisch ein.
Hinweise:
1. Legen Sie die Speicherkarten in der richtigen Richtung ein.
2. Der HMD 900 liest den Inhalt des Speicherkarten
nur dann, wenn sich keine Disc im Laufwerk befindet.
3. Legen Sie keine Speicherkarte oder USB Speicher
zu der gleichen Zeit ein.
Deutsch
FM Radio
Das FM-Radio aktivieren Sie mit der SOURCE Taste. Drücken Sie die SOURCE Taste mehrmals, bis im Display FM
erscheint.
Antenne:
steigert sich die Empfangsqualität des FM-Radios.
Kanalsuche:
Sie die TUNE+ oder TUNE- Taste auf der Ferndebienung
oder auf dem Kontrollfeld des Gerätes drücken und gedrückt
halten. Dadurch wird der automatische Suchlauf gestartet,
bis ein Radiosender gefunden wird. Der gefundene Radiosender kann mit der MEMORY Taste auf der Fernbedienung gespeichert werden. Sie werden danach aufgefordert eine numerische Taste (0 — 9) zu drücken, um dem Radiosender
einen Speicherplatz zuzuweisen.
Ziehen Sie die eingebaute Antenne aus. Damit
Radioprogramme können Sie suchen, indem
15
Verbinden
FM-Radio
Kanalwechsel: Sie können die gespeicherten Radiosender entweder mit den numerischen Tasten
der Fernbedienung anwählen oder mit der RADIO
- oder RADIO + Taste auf dem Kontrollfeld des
HMD 900.
Deutsch
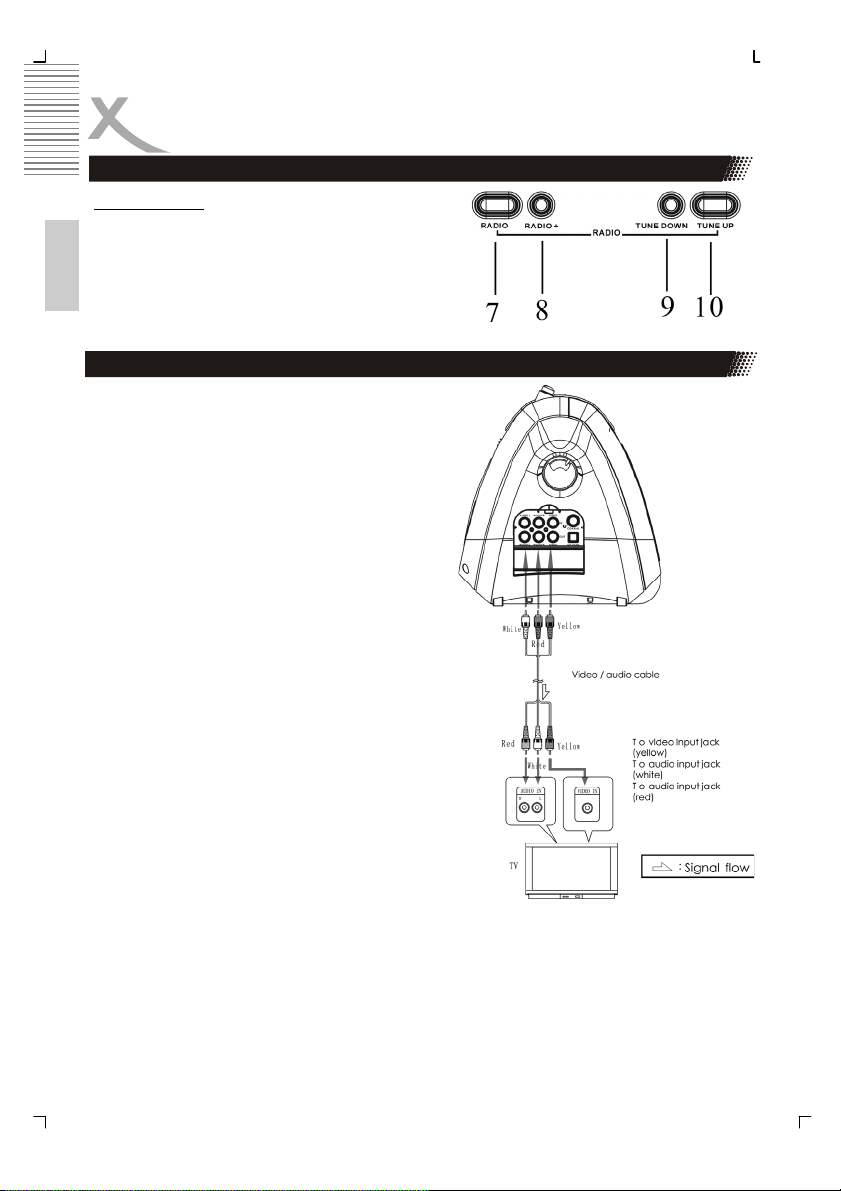
Verbinden an einem TV
Sie können den HMD 900 auch an einem TV
Fernsehgerät anschließen.
Der Anschluss über ein Video (CVBS) Kabel
Mit diesem Video-Anschlusskabel werden die
Signale für Helligkeit (Y-Signal) und Farbe (CSignal) kombiniert übertragen. Diese Anschlussart
sollte nur dann gewählt werden, wenn keine andere Anschlussart genutzt werden kann.
Schließen Sie das eine Ende des CVBS-Kabels
an den Anschluss VIDEO (CVBS) auf der linken
Seite des HMD 900 an. Der Anschluss ist mit
Video-Out gekennzeichnet. Das andere Ende
schließen Sie an den Video-Eingang des TVGeräts an. (Der Eingang ist normalerweise mit
„VIDEO IN“ oder 'AV IN' gekennzeichnet. Bitte
beachten Sie auch die Bedienungsanleitung Ihres
TV-Gerätes.)
Da über Video kein Ton übertragen wird, müssen
Sie nun noch eine separate Verbindung für die
Audiosignale herstellen.
Schließen Sie das eine Ende des Audiokabels
(Cinch) an den rot/weißen Cinch-Anschluss L/R
AUDIO OUT auf der Rückseite des DVD-Players
an.
Das andere Ende schließen Sie an den Audioeingang des TV-Geräts an. (Dieser ist normalerweise auch mit rot/weiß und der Aufschrift
„AUDIO IN“ oder „AV IN“ gekennzeichnet. Bitte beachten Sie auch die Bedienungsanleitung
Ihres TV-Gerätes.)
Schalten Sie das TV-Gerät ein und wählen Sie die entsprechende Eingangsquelle für diese
Anschlussart. Bitte beachten Sie hierzu auch die Bedienungsanleitung Ihres TV-Gerätes).
16
Verbinden
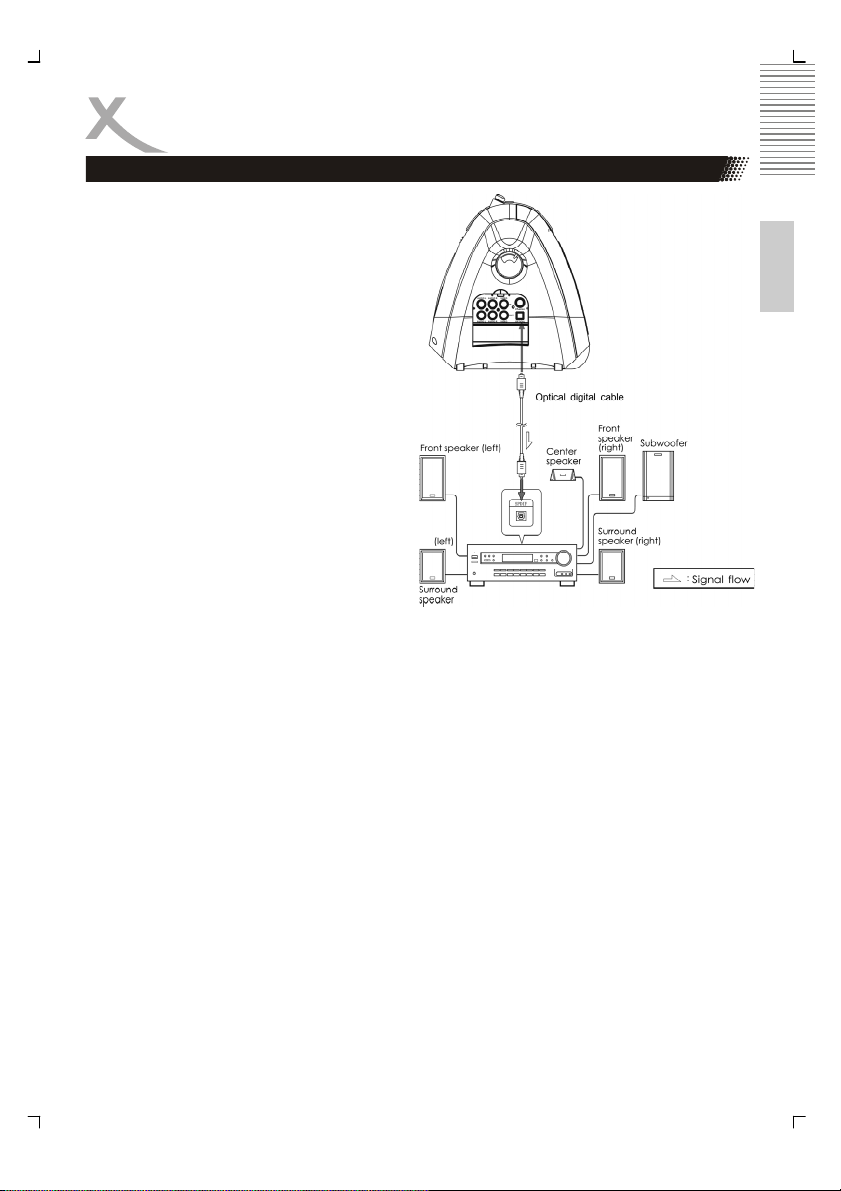
Digitale Tonausgänge
Anschluss an AV-Verstärker mit S/PDIF
Dieser Player enthält einen Dolby Digitalbzw. MPEG2-Decoder. Somit können Sie
DVDs, die in Dolby Digital, MPEG1/2-Audio
oder linearem PCM aufgenommen wurden,
ohne Hilfe eines externen Decoders wiedergeben. Wenn der Player an einen AVVerstärker mit 5.1 Kanal-Eingängen angeschlossen wird, können Sie in Ihrem Zuhause
Kinoklang genießen, wenn Sie Discs wiedergeben, die in Dolby Digital, MPEG1/2 oder
linearem PCM aufgenommen wurden.
Die “S/PDIF”-Spezifikationen erlauben die
Nutzung unterschiedlicher Kabel– und Anschlusstypen, solange sie zum verwendeten
Gerät passen. Schlüsselwörter für die elektrische Methode sind "koaxial" und "CinchStecker". Der andere Typ ist "optisch"; hierbei hört man oft den Ausdruck "TOSLINK".
Schließen Sie den DVD-Player am AVVerstärker mit einem TOSLINK-Kabel an;
verwenden Sie den Anschluss mit der Beschriftung “OPTICAL” auf dem DVD-Player
(s. Bild oben). Alternativ hierzu können Sie den DVD-Player mit einem Kabel am AVVerstärker anschließen, das normalerweise orangefarben markiert und mit Coaxial beschrieben ist, und den Cinch-Anschluss des DVD-Players verwenden.
Hinweise:
1. Wählen Sie nach dem Anschließen die korrekte Audio-Einstellung, die gemäß Ihres
Audio-Systems für diesen Player erforderlich ist.
2. Wenn der Typ der angeschlossenen Lautsprecher nicht den Kanälen entspricht, die
für eine MPEG2- oder lineare PCM-Disc aufgezeichnet wurden, wird die Disc nicht
auf allen Kanälen ausgegeben, sondern nur auf 2 Kanälen (d. h. selbst wenn die
vorderen Lautsprecher und der mittlere Lautsprecher angeschlossen sind, wird eine
Disc, die im 5.1-Format aufgenommen wurde, nur über 2 Kanäle ausgegeben).
Wenn DVDs, die in DOLBY Digital, MPEG-Audio oder anderen Formaten aufgezeichnet
wurden, wiedergegeben werden, wird der entsprechende Bit-Datenstrom über den digitalen
optischen und Koaxial-Audio-Ausgang ausgegeben. Wird der Player an einen externen Decoder oder Verstärker angeschlossen, können Sie Heimkino-Qualität genießen.
Hinweise für den Anschluss eines digitalen optischen Kabels:
Entfernen Sie die Schutzkappe vom Stecker, stecken Sie die Stifte in den entsprechenden
Anschluss des DVD-Players und Verstärkers. Bewahren Sie die Schutzkappe auf, und bringen Sie sie immer an, wenn Sie den Anschluss nicht nutzen, um die Einwirkung von Staub
zu verhindern und Schutz vor dem Laserstrahl zu gewährleisten.
Deutsch
17
Verbinden
Vorsichtshinweise für den digitalen Koaxial-Anschluss und optischen Anschluss:
Schließen Sie keinen Verstärker mit einem Koaxial-Anschluss (oder digitalen optischen
Eingang) an, der nicht Dolby Digital- oder MPEG-Audiodecoder unterstützt, da dies zu
Schäden an Ihrem Gehör und/oder Lautsprechern führen könnte.
Deutsch
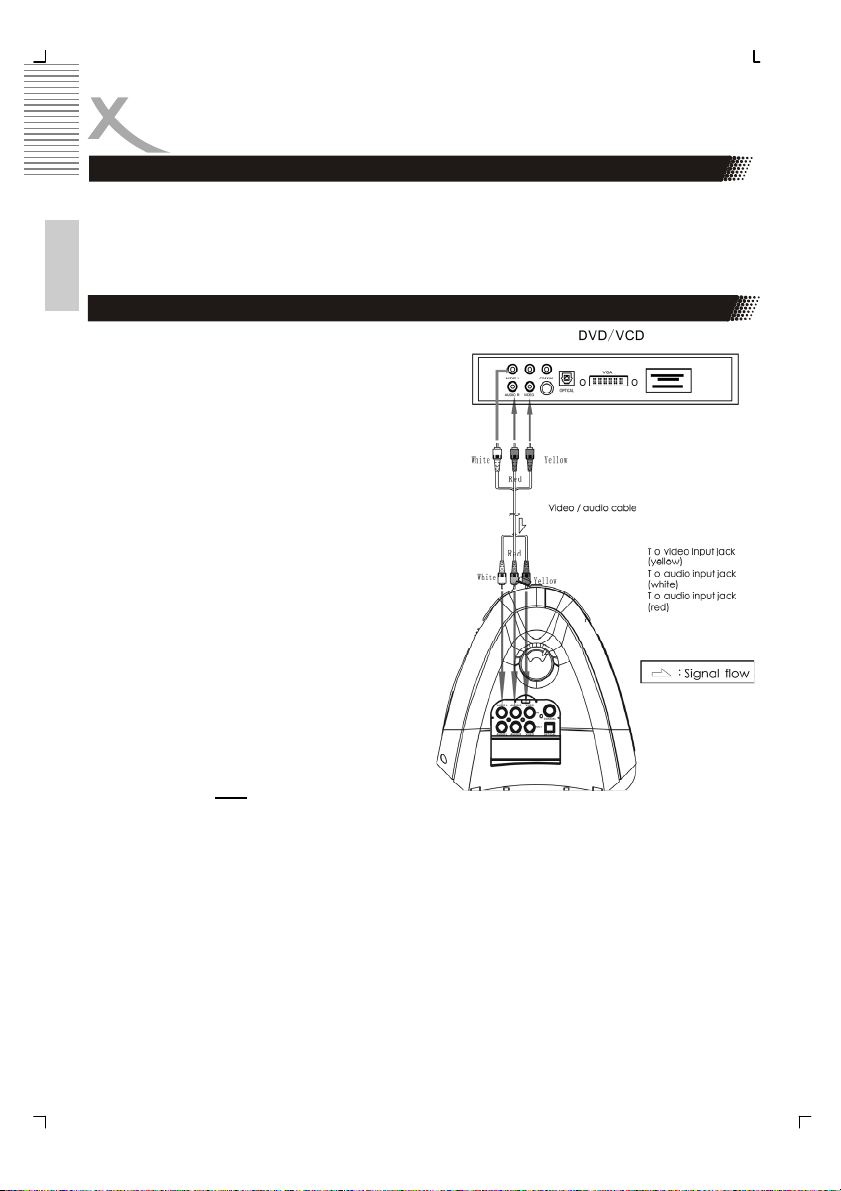
Audio/Video-Eingang
Der Anschluss über ein Video (CVBS) Kabel
Mit diesem Video-Anschlusskabel werden die
Signale für Helligkeit (Y-Signal) und Farbe (CSignal) kombiniert übertragen.
Schließen Sie das eine Ende des CVBSKabels an den Anschluss VIDEO (CVBS) auf
der linken Seite des HMD 900 an. Der Anschluss ist mit Video-IN gekennzeichnet. Das
andere Ende schließen Sie an den VideoAusgang der Quelle (DVD-Player, Spielekonsole, Setopboxen ect.) an.
Da über Video kein Ton übertragen wird, müssen Sie nun noch eine separate Verbindung für
die Audiosignale herstellen.
Schließen Sie das eine Ende des Audiokabels
(Cinch) an den rot/weißen Cinch-Anschluss L/R
AUDIO OUT auf der Rückseite des z.B. DVDPlayers an und verbinden Sie das Kabel mit
AUDIO L und AUDIO R am Eingang des HMD
900.
Drücken Sie die SOURCE Tast auf der Fernbedienung oder auf dem Kontrollfeld des HMD
900 solange, bis AUX
erscheint.
18
Starten des DVD-Players
Anschalten
1. Verbinden Sie das Stromkabel des AC/DC Stromadapter an der Rückseite des HMD
900 mit dem Eingang. Der Eingang ist mit DC 13,5V beschriftet.
2. Drücken Sie die POWER Taste auf dem Kontrollfeld. Der HMD 900 wird eingeschaltet.
3. Wenn Sie den HMD 900 ausschalten möchten, drücken Sie dazu wieder die PO-
WER Taste auf dem Kontrollfeld. Das Gerät wird ausgeschaltet.
Quelle wählen
1. Schalten Sie den HMD 900 mit der POWER Taste auf dem Kontrollfeld ein.
2. Drücken Sie die SOURCE taste auf dem Kontrollfeld oder auf der Fernbedienung bis
3. Die Reihenfolge der Quellen ist: DVD —> DVB-T —> FM-Radio —> AUX —> DVD
Einlegen einer Disc
1. Schalten Sie den HMD 900 mit der
2. Aktivieren Sie mit der SOURCE Tas-
3. Drücken Sie auf das OPEN (Öffnen)
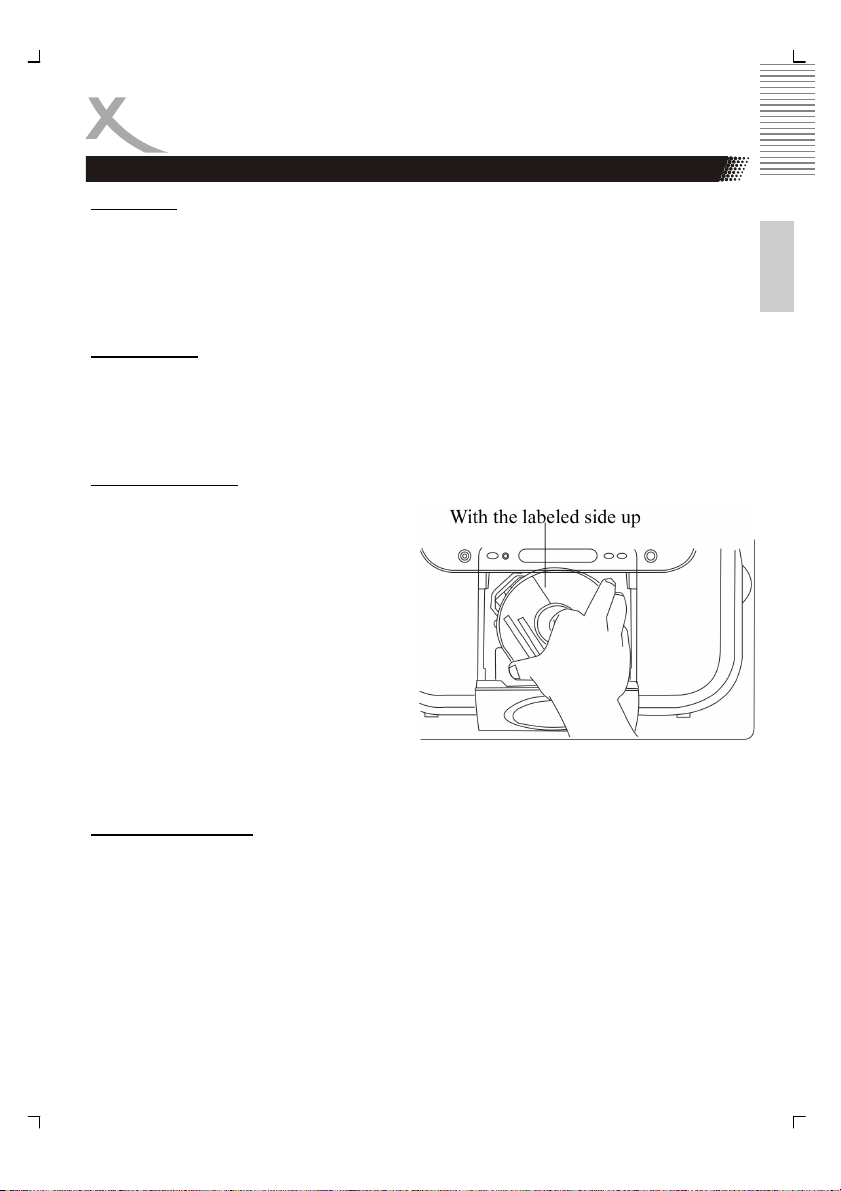
4. Legen Sie die Disc mit der beschrifte-
5. Drücken Sie vorsichtig die Disc auf
6. Schließen Sie die Klappe des Lauf-
7. Der eingebaute DVD-Player liest den
Abspielen einer Disc:
Nachdem der HMD 900 eingeschaltet, die Disc eingelegt und der Inhalt der Disc gelesen
worden ist, befinden Sie sich entweder im Titelmenü einer Video-DVD oder im Dateibrowser
im Falle einer Daten-Disc.
1. Wählen Sie den Content und Drücken Sie die PLAY Taste auf dem Kontrollfeld oder
2. Mit der Stopp Taste können Sie den Film/Musik anhalten.
3. Mit der |<< Taste können Sie das vorherige Kapitel oder den vorherigen Track/Stück
4. Mit der >>| Taste können Sie das nächste Kapitel oder den nächsten Track/Stück
5. Mit der >|| Taste können Sie das Abspielen pausieren.
die gewünschte Quelle aktiv ist.
POWER Taste an.
te die DVD-Player.
Feld und die Klappe der Laufwerks
öffnet sich.
ten Seite nach oben ein.
die zentrale Aufnahme bis die Disc
einrastet.
werks.
Inhalt der Disc und startet entweder den Film (Video-DVD) oder zeigt den Inhalt der
Disc in dem Dateibrowser an.
der Fernbedienung.
ansteuern.
ansteuern.
Deutsch
19

EINFACHE BEDIENFUNKTIONEN
Stopp
1. Über die Taste STOP stoppen Sie die Wiedergabe temporär. Der Stopppunkt wird
automatisch vom Gerät gespeichert.
2. Zum Fortfahren der Wiedergabe drücken Sie die Taste PLAY.
3. Durch erneutes Drücken der Taste STOP beenden Sie die Wiedergabe einer Disc
Deutsch
vollständig.
Play/Pause
1. Durch Drücken der Taste PLAY/PAUSE pausieren Sie die Wiedergabe einer Disc.
2. Durch erneutes Drücken der Taste PLAY/PAUSE setzen Sie die Wiedergabe fort.
Schneller Rück– oder Vorlauf
1. Durch Drücken und Halten der Taste |<< auf der Fernbedienung für 1, 5 können Sie
2. Durch Drücken und Halten der Taste >>| auf der Fernbedienung für 1, 5 können Sie
Kapitelsprung oder anderes Stück
1. Durch Drücken der Taste |<< auf der Fernbedienung navigieren Sie zum vorherigen
2. Durch Drücken der Taste >>| auf der Fernbedienung navigieren Sie zum nächsten
Wiedergabe Punkt A bis Punkt B
1. Durch Drücken der Taste REPEAT legen Sie den Startpunkt einer Sequenz fest.
2. Durch erneutes Drücken der Taste REPEAT legen Sie den Endpunkt der Sequenz
3. Wenn Sie noch einmal die Taste REPEAT drücken, wird die normale Wiedergabe
Wiedergabe-Wiederholung für Titel, Kapitel oder Tracks
1. Durch Drücken der Taste REPEAT während der Wiedergabe können Sie Titel, Kapi-
2. Die Wiederholungsfunktion unterscheidet sich etwas je nach dem Inhalt der Disc:
die Wiedergabe rückwärts mit 2x-4x-8x-20x höherer Geschwindigkeit aktivieren.
die Wiedergabe vorwärts mit 2x-4x-8x-20x höherer Geschwindigkeit aktivieren.
Kapitel oder Stück/Track.
Kapitel oder Stück/Track.
Auf dem Bildschirm wird “Repeat A-“ angezeigt.
fest. Die Wiedergabe von Punkt A bis Punkt B wird automatisch gestartet.
fortgesetzt.
tel oder Tracks wiederholen.
• DVD: Titel, Kapitel
• VCD oder CD: Track
• MP3: Dateien, Ordner
20
EINFACHE BEDIENFUNKTIONEN
GOTO oder Suche (Search)
1. Drücken Sie die Taste GOTO.
2. Mit dem Cursor und der Taste ENTER können Sie den gewünschten Menüpunkt für
die Auswahl Wiedergabezeit, Titel, Kapitel oder Track bestimmen.
3. Über die Taste ENTER bestätigen Sie die Auswahl.
4. Über die Taste GOTO setzen Sie die normale Wiedergabe fort.
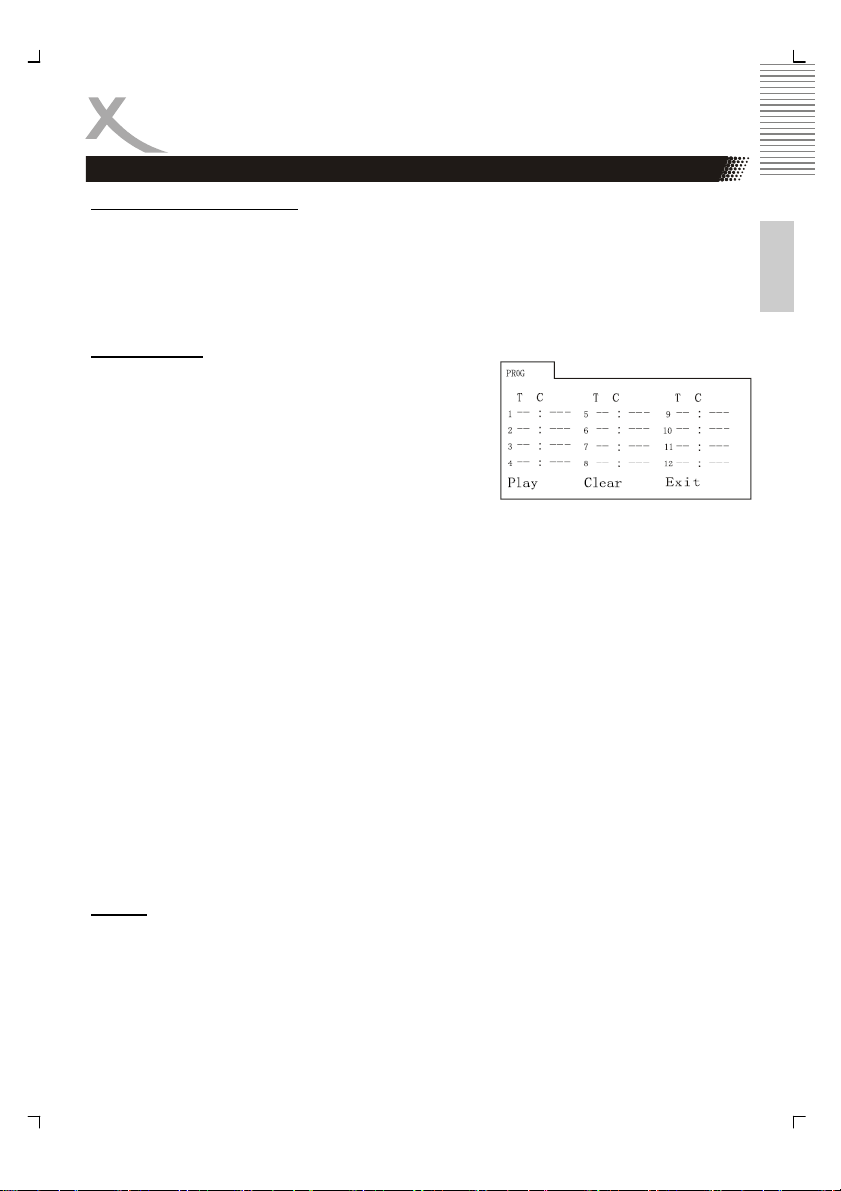
Programmliste
Um die Wiedergabe einer Programmliste zu nutzen,
beachten Sie bitte das folgende Beispiel.
1. Drücken Sie die Taste PROGRAM, um das
Hinweise:
• T dient der Eingabe der Titelnummern. C dient
• T dient der Eingabe der Tracknummern einer CD/VCD.
• Einige Discs enthalten keine Titel-, Kapitel– oder Tracknummern.
• Mit den Richtungstasten ∧ /∨ / < / > können Sie die Liste navigieren (siehe Abbil-
2. Um die Wiedergabe eines Titels aus der Liste zu starten, aktivieren Sie das Feld
3. Durch Drücken der Taste PLAY/PAUSE oder Auswahl des Feldes “EXIT” und Drü-
Hinweise:
• Die Funktion „Programmliste“ wird beendet, wenn das Gerät ausgeschaltet oder die
• Einige Discs unterstützen die Funktion „Programmliste“ nicht.
• Die Wiedergabe der Liste kann nicht gestartet werden, wenn Sie einen Menüpunkt
Display
1. Durch Drücken der Taste Display rufen Sie Informationen zu Disc-Typ, aktuellem
2. Wenn Sie die Taste Display ein drittes Mal drücken, deaktivieren Sie die Informati-
Programm-Menü aufzurufen.
der Eingabe der Kapitelnummern einer DVD.
dung).
„PLAY” mit dem Cursor und drücken die Taste ENTER.
cken der Taste ENTER beenden Sie die Programmliste.
Disc ausgeworfen wird.
ausgewählt haben, der nicht Teil der genutzten Disc ist.
Titel, aktuellem Kapitel und Wiedergabezeit auf. Durch erneutes Drücken können
Sie die aktuellen Spracheinstellungen für Untertitel und Sprachausgabe und den
aktuellen Kamerawinkel (während der Wiedergabe einer Disc) anzeigen lassen.
ons-Funktion.
Deutsch
21
EINFACHE BEDIENFUNKTIONEN
Untertitel
1. Durch Drücken der Taste SUBTITLE können Sie (während der Wiedergabe einer
DVD) die verfügbaren Untertitel auswählen.
Deutsch
Audio
1. Durch Drücken der Taste AUDIO können Sie (während der Wiedergabe einer DVD)
die Audio-Einstellungen auswählen.
2. Durch Drücken der Taste AUDIO können Sie (während der Wiedergabe einer VCD
oder CD) den Audio-Kanal einer Disc auswählen.
Kamerawinkel
Über diese Funktion können Sie während der Wiedergabe die verschiedenen, verfügbaren
Kamerawinkel einer DVD aufrufen.
1. Durch Drücken der Taste D ANGLE wählen Sie die verschiedenen Kamerawinkel
Hinweis:
Diese Funktion steht nicht bei allen DVDs zur Verfügung.
während der Wiedergabe einer DVD aus.
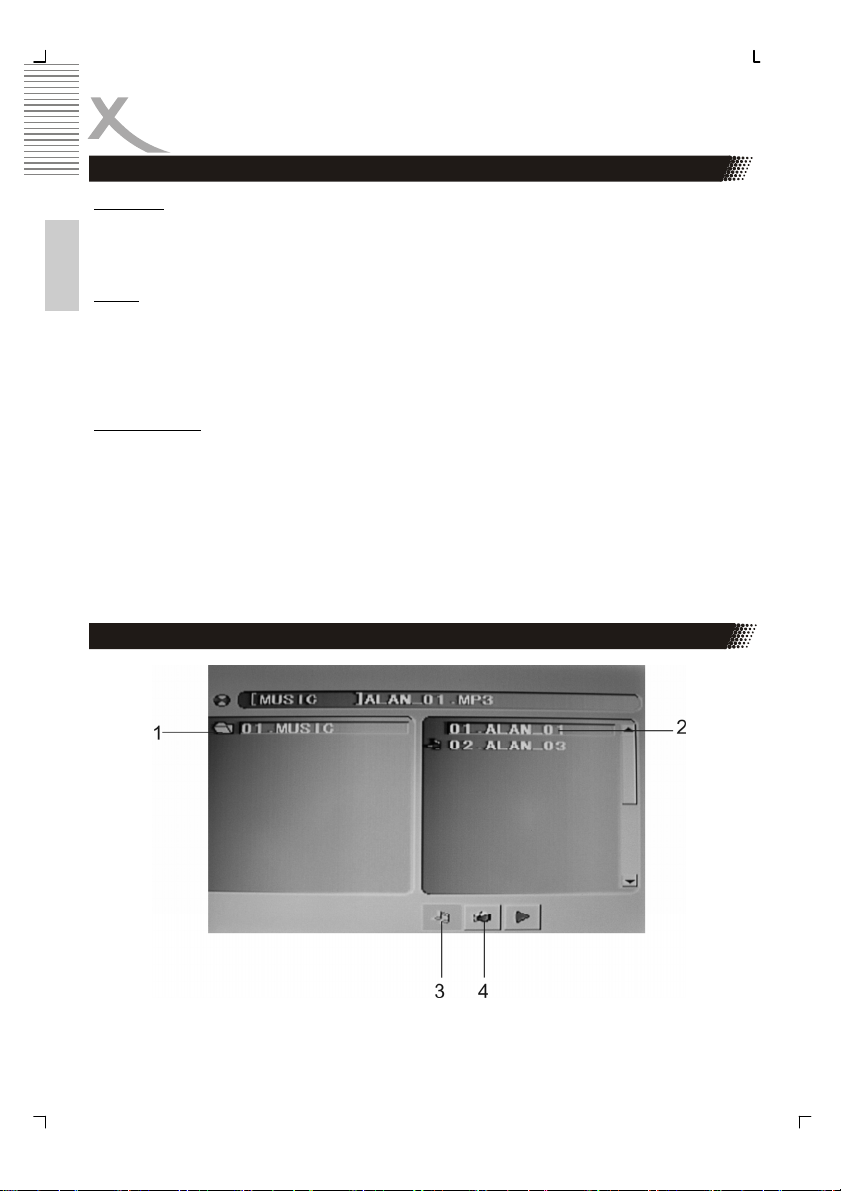
Wiedergabe von Musik und JPEG-Discs
1. Mit den Richtungstasten </∧/∨/> können Sie den Cursor zum Verzeichnis, dem
Musik-Symbol, dem JPEG-Symbol oder zu dem Film-Symbol bewegen.
22

EINFACHE BEDIENFUNKTIONEN
Wiedergabe von Musik und JPEG-Discs
2. Wählen Sie das Musik-Symbol (3) aus und drücken Sie die Taste ENTER, um Mu-
sik-Dateien anzuzeigen; Wählen Sie das JPEG-Symbol (4) aus und drücken Sie die
Taste ENTER, um JPEG-Dateien anzuzeigen.
3. Wählen Sie eine Datei (2) aus und drücken Sie die Taste ENTER, um die Wiederga-
be zu starten.
4. Über die Taste PLAY/PAUSE können Sie die Wiedergabe pausieren. Durch erneu-
tes Drücken der Taste setzen Sie die Wiedergabe fort.
Deutsch
23
SYSTEMEINSTELLUNGEN
1.
Auswahl des TV-Systems
Bitte wählen Sie das geeignete Signalformat entsprechend Ihres TV-Geräts aus.
• NTSC: Für NTSC-TV-Geräte.
• PAL: Für PAL-TV-Geräte.
• Standardeinstellung: PAL
Deutsch
Hinweis:
• Bei einer nicht korrekten Einstellung für Ihr
TV-Gerät kann das Bild “grau” erscheinen.
Einstellen des Bildschirmschoners
Über diese Funktion wird der LCD-Bildschirm geschont, wenn das Gerät im Stopp-Modus ist oder für
mehr als 1 Minute keine andere Funktion aktiviert
wird.
• ON: Bildschirmschoner aktiviert
• OFF: Bildschirmschoner deaktiviert
• Standardeinstellung: ON
Auswahl des Bildschirmformats
•
16:9: Bei Anschluss an ein 16:9-TV-Gerät.
• 4:3 LB: Bei Anschluss an ein „normales“ TV-
Gerät.
• 4:3 PS: Bei Anschluss an ein „normales“ TV-
Gerät.
Hinweis:
• Das Bildschirmformat ist auch abhängig vom
unterstützten Disc-Format.
24
TV Type
4:3 PS
4:3 LB
16:9
SYSTEMEINSTELLUNGEN
Kindersicherung
1. Standardeinstellung: 0000
2. Nach dem Freischalten können Sie einen
neuen Kindersicherungscode und eine
neue Kindersicherungsstufe festlegen.
Auswahl der Kindersicherungsstufe
Über diese Funktion können Sie eine individuelle
Kindersicherungsstufe auswählen, um die Wiedergabe für Kinder ungeeigneter (Sex-/Gewalt-) Szenen zu blockieren.
• Es stehen 8 Stufen zur Auswahl: „Normal“
und „Kinder“.
• Durch die Auswahl „normal” wird diese
Funktion deaktiviert.
• Standardeinstellung: Adult (keine Sperre)
Hinweis:
• Die Kindersicherungsstufe kann nicht
geändert werden, solange die Kindersicherung aktiv ist.
Password - - - - -
Rating
1 Kid save
2 G
3 PG
4 PG13
5 PG-R
6 R
7 NC-17
8 Adult
Deutsch
Standardeinstellungen
Um das Gerät auf die werksseitigen Standardeinstellungen zurückzustellen, wählen Sie diesen Menüpunkt aus und drücken die Taste ENTER.
Default Restore
25
SYSTEMEINSTELLUNGEN
Spracheinstellungen
Auswahl der OSD-Sprache
Im Sprachauswahl-Menü (Language Setup) können
Sie das Untermenü „OSD Language“ auswählen,
mit den Richtungstasten ∧/∨ die gewünschte Sprache bestimmen und mit der Taste ENTER bestäti-
Deutsch
gen.
Auswahl der Audio-Sprache
Im Sprachauswahl-Menü (Language Setup) können
Sie das Untermenü „Audio Language“ auswählen,
mit den Richtungstasten ∧/∨ die gewünschte Sprache bestimmen und mit der Taste ENTER bestätigen.
Auswahl der Untertitel-Sprache
Im Sprachauswahl-Menü (Language Setup) können
Sie das Untermenü „Subtitle Language“ auswählen,
mit den Richtungstasten ∧/∨ die gewünschte Sprache bestimmen und mit der Taste ENTER bestätigen.
Auswahl der Menü-Sprache
Im Sprachauswahl-Menü (Language Setup) können
Sie das Untermenü „Menu Language“ auswählen,
mit den Richtungstasten ∧/∨ die gewünschte Sprache bestimmen und mit der Taste ENTER bestätigen.
Hinweis:
• Wenn die gewünschte Sprache nicht zur
Verfügung steht, wird die Standardsprache
der eingelegten Disc verwendet.
• Standardsprache: Englisch
26

SYSTEMEINSTELLUNGEN
Auswahl des digitalen Audio-Ausgangs
SPDIF / OFF: Zum Ausschalten des digita-
•
len Audio-Ausgangs
• SPDIF / RAW: Wählen Sie „RAW“ für einen
Dolby Digital 5.1- oder DTS– kompatiblen
Verstärker.
• SPDIF /PCM: Wählen Sie „PCM“ für einen
2-Kanal-Dolby Digital-Verstärker.
• Standardeinstellung: SPDIF / PCM
Einstellen des Klangs
Im Audio-Setup-Menü können Sie den Menüpunkt
„Tonhöhe“ (Klang) auswählen, mit den Richtungstasten ∧/∨ die gewünschte Einstellung vornehmen
und mit der Taste ENTER bestätigen.
Einstellen der Helligkeit
Im Video-Setup-Menü können Sie den Menüpunkt
„BRIGHTNESS“ (Helligkeit) auswählen, mit den
Richtungstasten ∧/∨ die gewünschte Einstellung
vornehmen und mit der Taste ENTER bestätigen.
Deutsch
Einstellen des Kontrasts
Im Video-Setup-Menü können Sie den Menüpunkt
„CONTRAST“ (Kontrast) auswählen, mit den Richtungstasten ∧/∨ die gewünschte Einstellung vornehmen und mit der Taste ENTER bestätigen.
27
SYSTEMEINSTELLUNGEN
Einstellen des Farbtons
Im Video-Setup-Menü können Sie den Menüpunkt
„HUE“ (Farbton) auswählen, mit den Richtungstasten ∧/∨ die gewünschte Einstellung vornehmen
und mit der Taste ENTER bestätigen.
Deutsch
Einstellen der Sättigung
Im Video-Setup-Menü können Sie den Menüpunkt
„SATURATION“ (Sättigung) auswählen, mit den
Richtungstasten ∧/∨ die gewünschte Einstellung
vornehmen und mit der Taste ENTER bestätigen.
Einstellen der Schärfe
Im Video-Setup-Menü können Sie den Menüpunkt
„SHARPNESS“ (Schärfe) auswählen, mit den Richtungstasten ∧/∨ die gewünschte Einstellung vornehmen und mit der Taste ENTER bestätigen.
28
DVB-T TV
1. Bei der erstmaligen Nutzung der DVD-TFunktion wählen Sie bitte „Yes“ wie in der
rechten Abbildung angezeigt aus.
2. Mit den Richtungstasten </∧/∨/> und der
Taste ENTER können Sie dann
“Country” (Land) , “OSD Language” (OSDSprache) und “Time Zone” (Zeitzone) entsprechend des Aufstellungsortes festlegen.
Um danach fortzufahren, aktivieren Sie das
Feld “Next”.
3. Über das Feld “Yes” starten Sie den „AutoScan“ (automatische Sendersuche).
4. Die von der Antenne empfangenen TV– und
Radiosender werden auf dem Bildschirm
angezeigt. Mit den Richtungstasten ∧/∨
können Sie ein Programm auswählen und
durch Drücken der Taste ENTER wiederge-
ben.
5. Durch Drücken der Taste SETUP rufen Sie
das DVB-T-Setup-Menü auf. Mit den Richtungstasten </∧/∨/> und der Taste ENTER
können Sie das “Channel Guide” (Programmführer) “System Confing” (Systemeinstellungen), “Installation”
und Spiel auswählen.
Deutsch
29

DVB-T TV
Einstellungen
Programmführer
Unter den Optionen Programmführer befinden sich die Fernsehkanäle, Radiokanäle, Kanalklassifikationen und die Bearbeitung der Kanallisten.
Fernsehkanäle/Radiokanäle
Deutsch
Hier können Sie die Art der Sortierung ändern. Mit dem Drücken der DISPLAY Taste auf der
Fernbedienung wird die Sortierreihenfolge alphabetisch (A — Z oder Z — A), Freie — Verschlüsselt oder umgekehrt oder nach Transponder festgelegt.
Standardeinstellung: Sortierung nach Transponder
Kanalklasse
Mit dieser Konfiguration können Sie die Fernsehsender nach bestimmten Kategorien einteilen. Die unterschiedlichen Kategorien sind: Favoriten (Fav.), Film, Nachrichten (Nach) und
Shows.
Mit Drücken der ENTER Taste auf der Fernbedienung können die Programme eingeteilt
werden.
Liste Bearbeiten
Hiermit ist es möglich, die Sortierung manuell zu ändern, indem einzelne Kanäle entweder
verschoben oder gelöscht werden können.
Verschieben (Versc): Wählen Sie den TV Kanal aus, der verschoben der muss. Drücken Sie
die ENTER Taste auf der Fernbedienung und ändern Sie dann die Position des Kanals mit
den Tasten Oben/Unten. Mit ENTER wird die endgültige Position bestätigt.
Löschen (Entf): Wählen Sie das Programm welches gelöscht werden soll. Mit dem Drücken
der ENTER Taste auf der Fernbedienung wird der Kanal makiert und dann aus der Liste
gelöscht.
Systemkonfiguration
Unter der Option „Systemkonfiguration“ können wesentliche Parameter geändert werden.
Die Unteroptionen sind: TV-Einstellungen, Videoeinstellungen, Audioeinstellungen, Sprache, Kindersicherung und Systeminformation.
TV-Einstellungen
Mit den TV-Einstellungen wird die Art des TV-Systems, der Videoausgabe und dem TVType festgelegt.
TV-System: Hier wird das TV System definiert. Wahlweise haben Sie die Optionen zwischen
PAL, NTSC oder AUTO. Standard ist die Einstellung AUTO.
Video: Die Videoausgabe kann nicht geändert werden, da der DVB-T Tuner intern verdrahtet ist.
TV-Typ: Die möglichen Einstellungen sind 4:3 PanScan, 4:3 Letterbox und 16:9. Der HMD
900 hat ein 16:9 Display und deshalb sollte die Einstellung auch 16:9 lauten. Möchten Sie
normale 4:3 Sendungen unverzerrt anschauen, bitte wechseln Sie hier nicht die Einstellung.
Besser ist der Wechsel mit der OSD Taste auf der Fernbedienung. Unter der Option Zoom
können Sie das richtige Aspektverhältnis einstellen. Nun wird eine 4:3 Sendung unverzerrt
dargestellt. Wenn Sie rechts und Links einen schwarzen Balken sehen, so ist dies ein normales Verhalten und notwendig, damit das 4:3 Aspektverhältnis richtig angezeigt wird.
30

DVB-T TV
Videoeinstellungen
Mit dieser Option können Sie die Darstellung in Helligkeit, Kontrast und Farbsättigung (Heu)
verändern.
Audioeinstellungen
Hiermit wird die Art der Audioausgabe für DVB-T definiert. Die Optionen sind SPDIF/Aus,
SPDIF/RAW und SPDIF/PCM.
Sprache
Mit dieser Option können Sie die Menüsprache ändern.
Kindersicherung
Mit dieser Option können Sie bestimmte Kanäle sperren, besonders im Hinblick auf den
Jugendschutz.
Systeminfo
Unter dieser Option werden die verschiedenen Versionsnummern angezeigt.
Installation
Hier kann die automatische oder manuelle Suche alle TV-/Radioprogramme ausgeführt
werden.
Die automatische Suche wurde schon bei der Erstinstallation beschrieben.
Die manuelle Suche unterscheidet sich davon, dass hier gezielt einzelne Kanäle oder be-
stimmet Kanalbereiche gesucht werden können.
Standardeinstellungen: Mit dieser Option können Sie alle Parameter auf die Werkseinstellungen zurücksetzen.
Spiele
Die installierten Spiele können Sie im DVB-T Setup erreichen und starten. Drei verschiedene Spiele sind installiert, BoxMan, Tetris und Hit Rat.
Mit den Pfeiltasten auf der Fernbedienung können
Sie die verschiedenen Aktionen im Spiel ausüben.
Deutsch
31

OSD (TFT– und Lautsprecher)
Der HMD 900 verfügt über gesonderte Einstellungen an denen die Darstellungseigenschaften des TFT Displays oder auch die Lautsprechereigenschaften verändert werden können.
Hierzu drücken Sie die OSD Taste auf dem Kontrollfeld oder auf der Fernbedienung. Wenn
Sie die einzelnen Optionen ansteuern möchten, Drücken Sie mehrmals die OSD Taste bis
zu der gewünschten Option. Mit der - oder + Tate auf der Fernbedienung können Sie die
Deutsch
Werte ändern.
Die einzelnen Optionen sind Helligkeit (brightness), Kontrast (contrast), Farbe (colour), Farb-
ton (tint), Bass, Höhen (Treble), Zoom, TFT aus (Screen OFF) und Werkseinstellungen
(Laod Default).
Die Einstellungen Helligkeit (brightness), Kontrast (contrast), Farbe (colour) und Farbton
(tint) verändern die Darstellungseigenschaften des Bildschrims und dessen Darstellungsqualität.
Die Option Zoom ändert das Aspektverhältnisses des Bildschirmes von 16:9 zu 4:3 und
zurück.
1. Wird ein Film oder eine TV-Sendung im 16:9 Aspektverhältnis gezeigt, bitte verwenden Sie die Werkseinstellung 16:9. Dann wird das Bild unverzerrt wiedergegeben.
2. Wenn eine Film oder eine TV-Sendung im 4:3 Aspektverhältnis übertragen wird,
bitte wechseln Sie auch die Bildschirmdarstellung von 16:9 und 4:3. Andernfalls ist
das Bild verzerrt.
Sie können das Aspektverhältnis entweder über die Fernbedienung mittels der 16:9/4:3
Taste ändern, oder in den OSD Einstellung unter der Option Zoom.
Wenn Sie über eine längere Zeit nur Musik hören, haben Sie die Möglichkeit den TFT Bildschirm abzuschalten. Entweder Drücken Sie direkt die SCREEN Taste auf der Fernbedienung und dann schaltet sie der Bildschirm ab, oder über die OSD Option SCREEN OFF.
Nach dem Drücken der SCREEN Taste schaltet sich der Bildschirm ab. Sie können den
Bildschir wieder aktivieren indem Sie die SCREEN Taste erneut drücken oder die OSD Taste benutzen.
Mit den Optionen Bass und Höhen (Treble) können die die Soundqualität der Lautsprecher
verändern.
Mit der Option Load Default können Sie die Werkseinstellungen zurücksetzen.
32

FEHLERBEHEBUNG
Bitte beachten Sie die folgende Liste zur Behebung möglicher Probleme, bevor Sie den
Kundenservice kontaktieren.
Technischer Kundenservice von Xoro/MAS:
• Tel.: 040/77 11 09 17
• Internet: www.xoro.de/support.htm
PROBLEM MÖGLICHE URSACHE LÖSUNG
Disc-Fehler.
Keine DiscWiedergabe:
Kein TV-Bild.
Kein Ton Lautstärke auf dem Minimum Erhöhen Sie die Lautstärke
Disc schmutzig oder zerkratzt.
Area-Code-Fehler.
Kabel möglicherweise nicht
korrekt angeschlossen.
Einstellungsfehler.
Legen Sie die Disc korrekt ein
(Label nach oben).
Legen Sie eine funktionierende
Disc ein.
Wählen Sie den korrekten Area
Code für die Disc aus.
Prüfen Sie die Kabelverbindungen.
Prüfen Sie die Einstellungen von
DVD-Player und TV-Gerät.
Deutsch
Unterschiedliche
Lautstärke bei
DVD/CD-Discs.
Keine Wiedergabe von 8 cmDiscs.
Rauschen beim
FM-Radio
Disc ruckelt oder
wird nicht abgespielt
Kein Strom
Die Lautstärkelevels der
Discs können variieren.
8cm-Disc werden nicht unterstützt.
Antenne ist nicht ausgezogen
Antenne nicht richtig ausgerichtet
Sender hat nicht die richtige
Frequenz
Die Disc ist verschmutzt
Disc entspricht nicht dem
Standard
Disc ist falsch eingelegt
Netzkabel nicht verbunden
Gerät ist ausgeschaltet
Batterien sind zu schwach
Stellen Sie die Lautstärke am DVDPlayer ein.
Bitte verwenden Sie diese Art Discs
nicht für dieses Gerät.
Ziehen Sie die Antenne aus.
Richten Sie die Antenne aus.
Wählen Sie bei dem Suchlauf eine
andere Frequenz
Reinigen Sie die Disc.
Benutzten Sie nur Standard Discs.
Legen Sie die Disc richtig ein
Verbinden Sie das Netzkabel
Schalten Sie das Gerät ein
Wechseln Sie die Batterien aus
33

TECHNISCHE DATEN
Maße (B x H x T) 42,3 x 20,9 x 21,7 cm
Netto-Gewicht (ohne Batterie) 3,9 Kg
Deutsch
Stromversorgung 13,8 V DC bei 1,7 A
AC/DC Stromadapter 100-240V AC 50/60Hz
Stromverbrauch 25 W / Standby < 1 W
Batterie (optional) 8x 1,5 V Alkaline mit der Größe D
TV-System PAL / NTSC (nur Wiedergabe)
Bildschirm 7 Zoll TFT
Video CVBS Ein- / Ausgang
Audio Stereo Cinch Ein- / Ausgänge, optischer und
Andere Schnittstellen USB 1.1
Cardreader SD, MMC und MS Speicherkarten
Antenne RF Antenneneingang: IEC 169-2 Typ
Lautsprecher 2x 10 Watt RMS
FM Radio Frequenz 870,5—108 MHz
DVB-T TV Tuner Frequenz: 174—860 MHzVHF & UHF
Betrieb Betriebstemperatur: 0 - 40° C
Feuchtigkeit: 5 - 90% (ohne Kondensation)
34
koaxialer digitaler Tonausgang
Impedanz: 75 Ohm
Bandweite: 6 / 7 / 8 MHz

GLOSSAR
5.1 Kanal
5.1-Mehrkanalcodierung bedeutet, dass sowohl fünf Kanäle mit voller Bandbreite (Links,
Center, Rechts, Surround links, Surround rechts) als auch ein Tieftonkanal vorhanden sind
(für diesen steht das ".1" er sorgt für das dröhnende Bassgrollen, das Sie auch in einem gut
ausgestatteten Kinosaal hören und spüren). Sowohl Dolby Digital® als auch DTS® unterstützen 5.1-Codierung und -Decodierung.
CD
Eine CD (Compact Disc) ist eine mit Metall beschichtete Kunststoffscheibe. Sie hat einen
Durchmesser von 12 cm und eine Stärke von ca. 1,2 mm. Die Entwicklung dieses Speichermediums erfolgte 1985 von Sony und Phillips. Die Vorteile liegen in der digitalen Verarbeitung der Musiksignale, was eine nahezu originalgetreue Wiedergabe ermöglichte. Darüber
ist war bei der CD die Speicherdichte höher, das Handling einfacher, die Lebensdauer deutlich länger und sie ist nahezu verschleißfrei.
Mittlerweile sind aus der CD zwölf verschiedene Datenträger entstanden. Die geläufigsten
sind die CD-DA (Compact Disc - Digital Audio) , CD-ROM (Compact Disc - Read Only Memory, Speicher mit Lesezugriff) und die DVD (Digitale Versatile Disk).
Man kann auf einer CD (-DA) zwischen 74 - 80 Minuten Musik speichern. Dies entspricht
einer Datenmenge von ca. 650 - 700 MB.
Die Signalübertragung bei der CD erfolgt berührungslos mittels Laserlicht. Die CD wird von
der Mitte zum Rand ausgelesen. Die Daten/Musik sind in einer spiralförmigen Bahn von
innen nach außen angelegt.
Eine CD im Querschnitt hat Vertiefungen "Pits" und Erhebungen "Lands". Sie sind in der
vorher erwähnten Spirale angeordnet. Der Abstand zwischen den Pits ist ungefähr 1,6 mm.
Das Laserlicht, das durch eine Laserdiode erzeugt wird, wird durch verschiedene Spiegel
und Prismen umgeleitet und dann durch eine Linse zu einem Laserstrahl gebündelt. Dieser
Laserstrahl tastet in der spiralförmigen Laufbahn die CD-Oberfläche ab. Bei Pits werden die
Laserstrahlen gebrochen. Dieses gebrochene Licht wandert auf dem Laserstrahl zurück und
wird an einen Fotosensor geleitet. Der Fotosensor schickt die Informationen an den Mikroprozessor weiter. Dieser übersetzt die Informationen (Ein/Aus) in Tonsignale zurück. Den
Rest übernimmt die Stereo-Anlage.
CVBS
Composite Video Schnittstelle. Das Videosignal wird über eine einzige Leitung übertragen.
Diese Schnittstelle sollten Sie nur dann verwenden, wenn Ihr Wiedergabegerät keine andere
von ihrem Xoro Fernseher unterstützte Schnittstelle hat, da die Übertragung über CVBS
prinzipiell ein deutlich schlechteres Bild liefert als andere Übertragungsarten (siehe hierzu
auch YUV, S-Video, SCART und RGB). Zu erkennen ist die CVBS-Schnittstelle an der gelben Farbe des Cinch-Steckers.
Dolby Digital®
Dolby Digital® ist ein Verfahren zur Übertragung und Speicherung von 5.1-Kanal-Tonspuren
bei digitalen Medien wie DVDs, digitalem Kabelfernsehen, terrestrisch übertragenem Digitalfernsehen (DTV) und Satellitenübertragungen. Anders als bei den Codier- bzw. Decodierverfahren Dolby Surround® und Pro Logic®, die die Kanaltrennung aufgeben, um SurroundSound in Stereo-Tonspuren unterbringen zu können, handelt es sich bei Dolby Digital® um
Deutsch
35

GLOSSAR
ein diskretes Verfahren, bei dem die verschiedenen Kanäle während der Codierung und
Decodierung vollständig voneinander getrennt bleiben. Dolby Digital 5.1 ist der Industriestandard für die Codierung von DVD-Filmen mit Surround-Sound.
DSP
Deutsch
Digital Signal Processor. Abkürzung für Mikrochips, die Signale (z.B. den Ton) digital weiterverarbeiten (z.B. wird Virtual Surround durch einen DSP erzeugt)
DTS®
DTS ® ist ein mit Dolby Digital® konkurrierender Kodierstandard. DTS Digital Surround®
ist ein Mehrkanaltonsystem von Digital Theater Systems. Es arbeitet wie auch Dolby Digital® mit bis zu 5.1 Kanälen. Jedoch liegt die mögliche Datenrate weit über 1 MBit/s, muss
also nicht so stark komprimiert werden, was im Vergleich mit Dolby Digital® zu geringeren
Qualitätsverlusten führt. Der Frequenzbereich umfasst 20Hz bis 20kHz bei 20Bit, der Basskanal reicht aber nur bis 80Hz. Das verwendete Kodierungsverfahren heißt CAC.
DVD
Die DVD (Digital Versatile Disk) kam 1995 auf den Markt und ist ein Datenträger mit großer
Speicherkapazität. Eine gewöhnliche CD-ROM, die einen Speicherplatz von 650 MB aufweist, wird durch den Speicherplatz der DVD von bis zu 9 GB in den Schatten gestellt. Gerade bei der Wiedergabe von Videoformaten spielt die Speicherkapazität eine große Rolle.
Neben dem hohen Speicherplatz genießt der Konsument bei der Wiedergabe von DVDs
zusätzlich hochwertige digitale Bild- und Tonqualität. Bis zu acht Audiokanäle kann eine
DVD ansteuern. Das heißt im besten Fall, das ein Film in 8 Sprachen gehört werden kann.
Foto-CD (JPEG CD)
Eine Foto-CD ist ein Aufzeichnungsverfahren zur Speicherung von Fotos auf einer CD-ROM
in einer plattformenabhängigen Multiresolutionsstruktur (Unterstützung verschiedener Auflösungen und Formate z.B.: JPEG, BMP, etc). Da ein einzelner Foto-Film kaum ausreicht, um
eine CD zu füllen, können nachträglich weitere Filme auf eine noch nicht vollständig gefüllte
CD übertragen werden. Damit ein CD-ROM-Laufwerk diese Bilder laden kann, muß es multisessionfähig sein.
GUI
Graphic User Interface Siehe OSD.
HUE
engl. Farbton. Mit HUE kann man den Farbton einstellen.
Interlaced
Bildaufbauverfahren im Zeilensprungverfahren. Hierbei werden nacheinander zwei um eine
Bildzeile versetzte Halbbilder erzeugt. Dies ist das übliche Verfahren bei herkömmlichen 50
Hz TV Geräten.
36

GLOSSAR
Seitenverhältnis: 4:3 und 16:9
"Vollbildformat" ("Full Frame") bezieht sich auf Inhalte, die für die Darstellung auf TVs mit
einem Seitenverhältnis von 4:3 entwickelt wurden. "Breitbildformat" ("Widescreen") bezieht
sich auf Inhalte, die für die Darstellung auf Bildschirmen mit einem Seitenverhältnis von 16:9
(wie z. B. Breitbild-Fernsehgeräte) entwickelt wurden.
Werden Inhalte im Breitbildformat auf einem 4:3-Bildschirm angezeigt, so erscheinen im
entstehenden Leerraum am oberen und unteren Bildrand schwarze Streifen.
Super Video CD (SVCD)
SVCD steht für "Super VideoCD". SVCDs sind den VCDs sehr ähnlich; sie fassen (auf 650bzw. 700-MB-CDs) etwa 35 bis 60 Minuten sehr hochwertige Videodaten sowie bis zu 2
Stereo-Tonspuren und 4 wählbare Untertitel. SVCDs können auf allen Xoro DVD-Playern
abgespielt werden.
Video CD (VCD)
VCD steht für "Video Compact Disc". VCDs bauen auf dem CD-Format auf und enthalten
Bewegtbilder mit Ton. Eine VCD fasst bis zu 74 bzw. 80 Minuten (650- bzw. 700-MB-CDs)
Video mit Stereosound. Zur Speicherung der Video- und Audiodaten verwenden VCDs einen
Komprimierungsstandard namens MPEG. VCDs können auf allen Xoro DVD-Playern abgespielt werden.
YPbPr / YUV
Videosignal, bei dem in der Signalübertragung Farb- und Helligkeitsinformationen getrennt
werden. Ähnlich der RGB Übertragungstechnik werden die Signale über 3 Chinch-Leitungen
übertragen. Wird auch als Komponenten-Signal bezeichnet. Über YUV erhält man die bei
analogen Videosignalen bestmögliche Signalübertragung.
Deutsch
37

Deutsch
38


CONTENT
Content 3
Safety Informations 4
Features 9
Accessories 9
Control elements
Top Side 11
Front Side 11
Rear Side 11
Left Side 12
Right Side 12
Bottom Side 12
Remote control
Insert Battery 13
Layout 14
Button description 14
Insert Battery on the bottom side 16
USB 17
Cardreader 17
FM-Radio 17
Connecting
Connecting to a TV set 18
Connecting to an Amplifier 19
Connecting CVBS Video to the HMD 900 20
Basic operations
Selecting the Source 21
Place a disc into the loader 21
Playing a DVD 22
System setup 26
DVB-T
First time installation 31
Settings 31
OSD (Settings of the TFT and Speakers) 32
Troubleshooting 33
Specifications 34
Glossary 35
English
3

SAFETY INFORMATION
The lightning flash with an arrowhead symbol within an equilateral triangle is
intended to alert the user of the presence of uninsulated
"dangerous voltage" within the product's enclosure that may be of sufficient
magnitude to constitute a risk of electric shock to persons.
The exclamation point within an equilateral triangle is intended toalert the
user of the presence of important operating and
English
WARNING: DO NOT EXPOSE THIS APPLIANCE TO RAIN OR MOISTURE, DUE TO THE
HIGH RISK OF FIRE OR ELECTRIC SHOCK, DO NOT OPEN THE CABINET DANGEROUS HIGH VOLTAGES ARE PRESENT INSIDE THE ENCLOSURE. ONLY QUALIFIED
SERVICE PERSONNEL SHOULD ATTEMPT THIS. CAUTION: DURING PLAYBACK, THE
DISC SPINS AT HIGH SPEED, SO DO NOT LIFT OR MOVE THE PLAYER, DOING SO
MAY DAMAGE THE DISC.
CAUTION:This Digital Video Disc Player employs a Laser System. Make sure the device is
shut down prior to opening player lid.Visible laser radiation when open and interlocks defeated.Use of controls or adjustments or performance of procedures other than those specified
herein may result in hazardous radiation exposure.
The lightning flash with an arrowhead symbol within an equilateral triangle is intended to
alert the user of the presence of uninsulated "dangerous voltage" within the product's enclosure that may be of sufficient magnitude to constitute a risk of electric shock to persons. The
exclamation point within an equilateral triangle is intended to alert the user of the presence
of important operating and maintenance (servicing) instructions in the literature accompanying the appliance.
DO NOT STARE INTOBEAM.
To ensure proper use of this product, please read this owner's manual carefully and retain
for future reference. Should the unit require maintenance, contact an authorized service
location, or contact us.Only qualified service personnel should remove the cover.
maintenance (servicing) instructions in the literature accompanying the appliance.
THIS DEVICE COMPLIES WITH PART 15 OF THE FCC RULES. OPERATION IS SUBJECT TO THE FOLLOWING TWO CONDITIONS: (1)THIS
DEVICE MAY NOT CAUSE HARMFUL INTERFERENCE, AND (2) THIS
DEVICE MUST ACCEPT ANY INTERFERENCE RECEIVED. INCLUDING
INTERFERENCE THAT MAY CAUSE UNDESIRED OPERATION.
4

SAFETY INFORMATION
FCC NOTICE: This equipment has been tested and found to comply with the limits for a
Class B digital device. Pursuant with the FCC Rules, Part 15. These limits are designed to
provide reasonable protection against harmful interference in a residential installation.
This equipment generates,uses and can radiate radio frequency energy and,if not installed
and used in accordance with the instructions, may cause harmful interference to radio communication, However,this is no guarantee that interference will not occur in a particular installation.If this equipment does cause harmful interference to radio or television reception,
which can be determined by turning the equipment off and on,the user is encouraged to try
to correct the interference by one of the following measures:
• Reorient or relocate the receiving antenna.
• Increase the separation between the equipment and receiver.
• Connect the equipment into an outlet on a circuit different from that to which the
receiver is connected.
• Consult the dealer or an experienced radio/TV technician for help.
FCC Caution:To assure continued compliance,(example-use only shielded interface cables
when connecting to computer or peripheral devices).Any changes or modifications not expressly approved by the party responsible for compliance could void the user's authority to
operate this equipment.
BATTERYWARNING:
The DVD player contains a NiMH battery pack. There is a risk of fire and burns if the battery
pack is handled improperly. Do not disassemble, crush, puncture, short external contacts, or
dispose of in fire or water. Do not attempt to open or service the battery pack. Replace only
with the battery pack designated for this product. Discard used batteries according to the
manufacturer's instructions.
CAUTION: Use of controls or adjustments or performance of procedures other than those
specified herein may result in hazardous radiation exposure.
Please carefully study this manual and always keep it available. There are, however, some
installation and operation precautions which you should be aware of.
1. Read Instructions - All the safety and operating instructions should be read before
the product is operated.
2. Retain Instructions - The safety and operating instructions should be retained for
future reference.
3. Heed Warnings - All warnings on the product and in the operating instructions should
be adhered to.
4. Follow Instructions - All operating and use instructions should be followed.
5. Cleaning - Unplug this product from the wall outlet before cleaning. Do not use liquid
cleaners or aerosol cleaners. Use a damp cloth for cleaning.
6. Attachments - Do not use attachments not recommended by the product m a -
nufacturer as they may cause hazards.
English
5

SAFETY INFORMATION
7. Water and Moisture - Do not use this product near water for example, near a bath
tub, wash bowl, kitchen sink, or laundry tub; in a wet basement; or near a swimming
pool; and the like.
8. Accessories - Do not place this product on an unstable cart, stand, tripod, bra cket, or table. The product may fall, causing serious injury to a child or adult, and serious damage to the product. Use only with a cart, stand, tripod, bracket, or table recommended by the manufacturer, or sold with the product. Any mounting of the p r oduct should
follow the manufacturer's instructions, and should use a mounting accessory recommended by the manufacturer.
9. A product and cart combination should be moved with care. Quick stops, excessive
force, and uneven surfaces may cause the product and cart combination to overturn.
English
10. Ventilation - Slots and openings in the cabinet are provided for ventilation and to
ensure reliable operation of the product and to protect it from overheating, and these
openings must not be blocked or covered. The openings should never be blocked by
placing the product on a bed, sofa, rug, or other similar surface. This product should
not be placed in a built-in installation such as a bookcase or rack unless proper
ventilation is provided or the manufacturer's instructions have been adhered to.
11. Power Sources - This product should be operated only from the type of power source indicated on the marking label. If you are not sure of the type of power supply to
your home, consult your product dealer or local power company. For products intended to operate from battery power, or other sources, refer to the operating instructions.
12. Grounding or Polarization - This product may be equipped with a polarized alternating-current line plug (a plug having one blade wider than the other). This plug will fit
into the power outlet only one way. This is a safety feature. If you are unable to
insert the plug fully into the outlet, try reversing the plug. If the plug should still fail to
fit, contact your electrician to replace your obsolete outlet. Do not defeat the safety
purpose of the polarized plug. Alternate Warnings - This product is equipped with a
three-wire grounding-type plug, a plug having a third (grounding) pin. This plug will
only fit into a grounding-type power outlet. This is a safety feature, If you are unable
to insert the plug into the outlet, contact your electrician to replace your obsolete
outlet. Do not defeat the safety purpose of the grounding-type plug.
13. Power-Cord Protection - Power-supply cords should be routed so that they are not
likely to be walked on or pinched by items placed upon or against them, paying particular attention to cords at plugs, convenience receptacles, and the point where they
exit from the product.
14. Protective Attachment Plug - The product is equipped with an attachment plug having overload protection. This is a safety feature. See Instruction Manual for replacement or resetting of protective device. If replacement of the plug is required, be sure
the service technician has used a replacement plug specified by the manufacturer
that has the same overload protection as the original plug.
6

SAFETY INFORMATION
15. Outdoor Antenna Grounding - If an outside antenna or cable system is connected to
the product, be sure the antenna or cable system is grounded so as to provide some
protection against voltage surges and built-up static charges. Article 810 of the National Electrical Code, ANSI/NFPA 70, provides information with regard to proper
grounding of the mast and supporting structure, grounding of the lead-in wire to an
antenna discharge unit, size or grounding conductors, location of antenna-discharge
unit, connection to grounding electrodes, and requirements for the groundin
telectrode.
16. Lightning - For added protection for this product during a lightning storm, or when it
is left unattended and unused for long periods of time, unplug it from the wall outlet
and disconnect the antenna or cable system. This will prevent damage to the pr o duct due to lightning and power-line surges.
17. Power Lines - An outside antenna system should not be located in the vicinity of
overhead power lines or other electric light or power circuits, or where it can fall into
such power lines or circuits. When installing an outside antenna system, extreme
care should be taken to keep from touching such power lines or circuits as contact
with them might be fatal.
18. Overloading - Do not overload wall outlets, extension cords, or integral convenience
receptacles as this can result in a risk of fire or electric shock.
19. Object and Liquid Entry - Never push objects of any kind into this product through
openings as they may touch dangerous voltage points or short-out parts that could
result in a fire or electric shock.Never spill liquid of any kind on the product.
20. Servicing - Do not attempt to service this product yourself as opening or removing
covers may expose you to dangerous voltage or other hazards. Refer all servicing to
qualified service personnel.
21. amage Requiring Service - Unplug this product from the wall outlet and refer servicing to qualified service personnel under the following conditions:
a. When the power-supply cord or plug is damaged.
b. If liquid has been spilled, or objects have fallen into the product.
c. If the product has been exposed to rain or water.
d. If the product does not operate normally by following the operating instructions. Ad-
just only those controls that are covered by the operating instructions as an improper
adjustment of other controls may result in damage and will often require extensive
work by a qualified technician to restore the product to its normal operation.
e. If the product has been dropped or damaged in any way, and
f. When the product exhibits a distinct change in performance this indicates a need for
service.
22. Replacement Parts - When replacement parts are required, be sure the service
technician has used replacement parts specified by the manufacturer or have the
same characteristics as the original part. Unauthorized substitutions may result in
fire, electric shock, or other hazards.
English
7

SAFETY INFORMATION
23. Safety Check - Upon completion of any service or repairs to this product, ask the
service technician to perform safety checks to determine that the product is in pr oper operating condition.
24. Wall or Ceiling Mounting - The product should be mounted to a wall or ceiling only
as recommended by the manufacturer.
25. Heat - The product should be situated away from heat sources such as radiators,
heat registers, stoves or other products (including amplifiers) that produce heat.
MACROVISION:
English
This product incorporates copyright protection technology that is protected by U.S. patents
and other intellectual property rights. Use of this copyright protection technology must be
authorized by Macrovision, and is intended for home and other limited viewing uses only
unless otherwise authorized by Macrovision. Reverse engineering or disassembly is prohibited.
DOLBY:
Manufactured under license from Dobly Laboratories. “Dolby” and the double-D symbol are
trademarks of Dobly laboratories.
8

FEATURES
• Portable TV Ghettoblaster HMD 900
• DVD-Player
• DVB-T TV Tuner (integrated)
• 7 inch 16:9 TFT display
• Powerfull Stereo speakers with 2x 10 Watt
• Play DVD, VCD, SVCD, MPEG-1, MPEG-2, MPEG-4, AUDIO-CD, JPEGand Music
• Supports DVD-ROM, DVD+R DL, DVD+R(W), DVD-R DL, DVD-R(W), CD-ROM,
CD-R(W), CD-DA
• Integrated card reader for SD, MMC and MS memories
• USB 1.1 port for external storage
• DVB-T receiver with automatic channel scan, EPG and Teletext
• Audio/Video In and Out
• Digital audio outputs (optical and coxial)
• FM Radio
• Battery compartment for 8x 1,5V size D batteries
Package Contents
When opening the package of this Portable-DVD player please make sure that the following
accessories are included:
• HMD 900
• Remote Control
• Batteries for the remote controlö
• AC/DC power adaptor
• Manual
• Waranty Card
English
9

CONTROL ELEMENTS
Top Side
1. Control keys. Press these buttons to op-
erate this player.
2. Antenna. Adjust the antenna to improve
FM reception.
English
Front Side
1. IR Receiver Window. Receive the
2. Handle
3. Speakers
4. TFT LCD Display
signal from the remote control.
Back Side:
1. DVD Compartment Door
2. Open Button
3. DC 13.8V IN
10

CONTROL ELEMENTS
Left Side
1. Audio input/output
This is used in combination with the audio
input/output devices.
2. AM Antenna Socket
3. Video input/output
This is used in combination with the video
input/output devices.
4. OPTICAL. This is used in combination with the optical digital audio output devices.
5. Coaxial. This is used in combination with the coaxial digital audio output devices.
English
Right Side
1. Memory card socket
2. USB socket
3. DTV Antenna Socket
Bottom Side
1. Battery Compartment
Install the batteries into the battery compartment of the unit.
Insert the SD/MMC/MS card into the player.
Connect the USB storage devices to the player.
11

CONTROL ELEMENTS
Control keys
English
Item Name Description
1 SETUP Press to save the channel when in Radio mode; Press to show OSD
2 MENU/
3
4
5
EPG
CH-
CH+
menu when in DVD, DVB-T, AUX mode.
Press to view the DVD disc’s main menu. Press to access EPG
menu in DVB-T mode.
Press to go to previous track or chapter; press and hold to fast re-
verse playback at 2x, 4x, 8x, and 20x speeds when in DVD mode.
/
Press to select previous channel when in DVB-T mode.
Press to go to next track or chapter; press and hold to fast forward
playback at 2x, 4x, 8x, and 20x speeds when in DVD mode. Press to
/
select next channel upwards when in DVB-T mode.
Press to play or pause DVD or CD when in DVD mode. Press to
confirm your select in DVB-T mode.
/
6
7 RADIO- Press to select previous channel when in Radio mode; Press to ad-
8 RADIO+ Press to select next channel when in Radio mode; Press to adjust
9 TUNE
DOWN
10 TUNE UP Press once to scan channel upwards automatically when in Radio
11 POWER Press to turn the player on or off.
12 SOURCE Press to switch the player mode (DVD/DVB-T/ FM RADIO/ AUX).
13 VOL +/- Press to increase or decrease the volume.
Press to stop playback, press >|| button to start playing at the last
position; Press twice to fully stop playback, press >|| button to start
playing at the beginning of DVD. In the DVB-T mode, press to switch
DTV and RADIO mode.
just the AUX ’s OSD menu left and right.
the TV, AUX ’s OSD menu left and right.
Press once to scan channel downwards automatically when in Radio
mode.
mode; Press to adjust the OSD menu up and down.
12

REMOTE CONTROL
Introduction of the remote control
1. Open the battery drawer
Hold in addition the equipment by point 1 (see picture) and push the cover into the
direction 2 (see picture).
2. Please insert the battery into the drawer.
3. Push the drawer back into the remote control
Pay attention when inserting the battery to the correct polarity (/-).
English
Operation of the DVD Players with the remote control
Always direct the remote control toward the sensor field of the DVD Players
13

English
REMOTE CONTROL
Item Name Function or control
14
1
2
3
4
5
SOURCE
-
SCREEN
16:9/4:3
0-9
Switch the player mode (DVD/DVB-T/FM RADIO /AUX).
Press to decrease the value of selected items when in the TFT’ s
Setup menu.
Press to turn on/off the screen display.
Press to switch the display ratio between 16:9 and 4:3.
Press to select track or chapter directly when in DVD mode; Press to
select channel directly when in TV mode and Radio mode.

REMOTE CONTROL
6 SETUP Press to access the OSD setup menu of DVD.
7 ▲(CH+) Press to move cursor up. Press to select next channel upwards when
8 ◄ (TUNE -
)
9 ENTER Press to confirm the items or settings.
10 MEMORY Press to save channel when in Radio mode.
11 ▼(CH-) Press to move cursor down. Press to select previous channel when
12
13
in DVB-T mode.
Press to move cursor left. Press and hold to select channel down-
wards when in Radio mode.
in DVB-T mode.
Press once to go to previous chapter, press and hold to reverse play-
back when in DVD mode.
Press to play or pause playback in DVD.
14 TITLE/TTX Press to display the DVD title. Press to access the teletext menu in
15 SUBTITLE Press to select and turn on DVD subtitles during playback.
16 + Press to increase the value of selected items when in the TFT’ s
17 OSD Press to display OSD menu (DVD, TV, AUX,),
18 VOL+ Press to increase the volume.
19 VOL+ Press to decrease the volume.
20 RETURN/
DTV RADIO
21 GOTO/
22 A-B Press to repeat playback from point A to point B when in DVD mode.
EPG
DVB-T mode.
setup menu.
Press to return disc’s previous menu when in DVD mode. Press to
switch the DTV and digital radio mode in DVB-T mode.
Press to start playback at a selected time or chapter when in DVD
mode. Press to display the TV menu when in DVB-T.
English
23 MENU Press to display the main menu of DVD.
24 REPEAT Press to repeat the track or the entire disc in DVD.
25 ►(TUNE
26 DISPLAY Press to display the information of disc (title, chapter, track, time,
27 MUTE Press to turn the sound on or off.
28
+)
Press to move the cursor right; Press and hold to select channel
upwards when in Radio mode.
etc…).Press to close the panel backlight when in Radio mode
Press to stop playback; Press again to fully stop playback when in
DVD mode.
15

REMOTE CONTROL
Button discription of remote control
29
30
31
Notes:
1. Please pull out the PVC tab before using the remote control unit for the first time.
2. Don’t drop or step on the remote control unit or subject it to shocks.
English
3. Note that it may not be possible to operate the main unit if there are obstacles be-
4. Don’t expose the remote sensor to strong light.
Angle Press to select different filming angle of DVD.
Audio/
LANG
tween it and the remote sensor.
Insert the battery
Please install the battery as followings:
1. Install 8 x “size D 1.5V” batteries (not
supplied).
2. Refer to the polarity diagram in the battery compartment of the unit. Match the
marks of (+) and (-) on the diagram to the
marks of (+) and (-) on the batteries.
Note:
8 x “size D 1.5V” batteries
Battery precautions
Follow these precautions when using batteries in this device:
1. Use only the size and type of batter-
ies specified.
2. Be sure to follow the correct polarity
when installing the batteries as indicated in the battery compartment.
Reversed batteries may cause damage to the device.
3. Do not mix different types of batter-
ies together (e.g. Alkaline and Carbon-Zinc) or old batteries with fresh ones.
4. If the device is not to be used for a long period of time, remove the batteries to pre-
vent damage or injury from possible battery leakage.
5. Do not try to recharge batteries, which are not intended to be recharged; they can
overheat and rupture. (Follow battery manufacturer’s directions.)
6. Do not short the battery terminals.
Press once to go to next chapter, press and hold to fast forward
playback when in DVD mode.
Press to change the audio language during playback. Press to
change the audio channel (Left, Right, Stereo during VCD and
CD playback. Press to switch the language in DVB-T mode.
16

Other Connections
1. Please connect the USB storage to the USB
terminal of the player as shown in the illustration.
2. The player will read the contents of the USB
storage automatically.
Notes:
• The USB terminal of the player only supports
USB 1.1.
• The player can read the contents of USB stor-
age when there is no disc in it.
Using the memory card
1. Please insert the memory card to the memory
socket of the player as shown in the illustration.
2. The player will read the contents of the memory
card automatically.
Notes:
• Please insert the memory card in right direc-
tion.
• The player can read the contents of memory
card automatically when no disc in it.
• Do not insert the USB storage and the memory
card at the same time .Failure to do so may cause
damage to the player.
FM Radio
Attention: To allow flexible movement of radio antenna, please extend the Antenna to the end
when the rotating point can be seen as shown in the photo.
Press SOURCE button to select FM or AM radio mode
Press and hold ▲/ (TUNE +) or ▼/ (TUNE -) button to scan channel upward or downward
when in Radio mode.
Radio reception can be improved by using the built-in FM
antenna or by attaching the enclosed AM antenna.
Use the |<< / >>| buttons on the player or on the remote
control to change channels
You can save your favorite station by pressing the memory button on the player or remote and then select a number to identify the channel that you have selected to save.
You can access saved radio stations by either pressing
the |<< / >>| buttons on the player or on the remote. Then,
just input the station number you have stored. Detailed
directions can be found in the Instruction Manual.
English
17

CONNECTING
Connecting to a TV set
Connecting with a VIDEO (CVBS) cable
The video (CVBS) cable transmits the signals for
brightness (Y-signal) and colour (C-signal) in a
combined way.
Plug a cable into the VIDEO (CVBS) socket on
the left side of your HMD 900 and uses the jack
which are marked with “OUT”. The other side of
the cable must be connected to the VIDEO input
socket of the TV-set (usually labeled “VIDEO IN”
or “AV IN”. Please also refer to your TV set’s user
English
manual). As VIDEO (CVBS) does not transmit
sound, you also must add an audio connection.
Insert one end of the supplied audio (Cinch [RCA])
cable into the white/red Cinch [RCA] socket L/R
AUDIO OUT at the left side of the HMD 900 and
the other end into the audio input socket (usually
white/red) on the TV set (usually labeled “AUDIO
IN” or “AV IN”. Please also refer to your TV set’s
user manual).
Switch on the TV set and select the AV input or
the respective channel number. For channel number and input selection please also refer to your
TV operating instructions.
18

CONNECTING
Connecting to an Amplifier
Connecting to AV amplifier by S/PDIF
This player contains a Dolby Digital or MPEG2
decoder. This enables the playback of DVD
recorded in Dolby Digital, MPEG1/2 audio or
linear PCM without an external decoder supports. When the player is connected to an AV
amplifier with 5.1 channel input connectors,
theater quality audio could be enjoyed at your
home at the time of playing disc recorded in
Dolby digital, MPEG1/2 audio or linear PCM.
The "S/PDIF" specifications allow several different types of cables and connectors which must
match the device being used. Key words for the
electrical type are "coaxial" and "RCA jack."
The other type is called "optical" with the word
"TOSLINK" often used.
Please connect the DVD-Player with the AV
amplifier by a toslink cable and use the connector “OPTICAL” on the DVD-Player (please refer
the picture above). The second way is to connect the DVD-Player with the AV amplifier by
cable which is normally marked in orange and use the orange RCA jack by the DVD-Player.
Notes:
1. Choose right audio setting for this player according to your audio system require-
ment after connection is made.
2. If the type of the speaker connected does not satisfy the channels recorded in a
MPEG-2 or Linear PCM disc, the disc will not be played in all channels but only in 2
channels (i.e. even if the front speakers and the center speakers are connected, a
disc recorded in 5.1 channels will be played only in 2 channels.
When DVD discs recorded in DOLBY digital, MPEG audio or other formats are played, corresponding bit stream is output from the player OPTICAL and COAXIAL digital audio output
connector. When the player is connected to an external decoder or a power amplifier, you
can enjoy theater-quality at your home.
Notes when connecting the optical digital cable:
Remove the protective cap from the connector, insert the plug-ins of DVD and amplifier optical slot so that the configurations of both the cable and the connector match. Keep the protective cap and always reattach the cap when not using the connector to protect against dust
and laser beam.
Caution for the coaxial/optical digital audio output connector:
Do not connect an amplifier with a Coaxial or optical digital input connector) which does not
contain the Dolby digital or MPEG audio decoder otherwise it may be harmful to your ears
and damage your speakers.
English
19

CONNECTING
Connecting to the HMD 900
Connecting with a VIDEO (CVBS) cable
The video (CVBS) cable transmits the signals
for brightness (Y-signal) and colour (C-signal)
in a combined way.
Plug a cable into the VIDEO (CVBS) socket on
the left side of your HMD 900 and uses the jack
which are marked with “IN”. The other side of
the cable must be connected to the VIDEO
output socket of the STB, Game Console or
DVD-Player (usually labeled “VIDEO Out” or
English
“AV Out”.)
As VIDEO (CVBS) does not transmit sound,
you also must add an audio connection.
Insert one end of the supplied audio (Cinch
[RCA]) cable into the white/red Cinch [RCA]
socket L/R AUDIO IN at the left side of the
HMD 900 and the other end into the audio
output socket (usually white/red) on the STB,
Game Console or DVD-Player (usually labeled
“AUDIO Out” or “AV Out”. )
Switch on the HMD 900 and press the
SOURCE button on the control field or remote
control until AUX is displayed.
20

Basic operations
Selecting the player mode
1. When power is ON, press SOURCE button to switch from one mode to another.
The operating modes changes in the following order:
DVD > DVB-T> RADIO > AUX > DVD
Turning on/off the player
Connect the AC/DC adapter to the player of the jack marked DC13.5V, then Press POWER
button to turn on the player.
Press POWER button to turn off the player.
Playing a disc
1. Press open button to open the CD
Compartment door.
2. Load disc with the label facing up,
and press the disc firmly onto the
center spindle.
3. Push down to close the DVD/CD
door.
4. Press MENU to display the menu list.
5. Press STOP button to stop playback.
6. Press |<< button to play the previous
track or chapter.
7. Press >>| button to play the next
track or chapter.
8. Press ||> button to pause or resume playback.
Playing DVD
Accessing the DVD root menu
Press MENU on the remote control during the playback to display the menu.
A DVD is divided into sections called titles and chapters. When you play a DVD, a root menu
of the disc appears on the screen of your Monitor. The contents of the menu are vary from
disc to disc. Press MENU during playback to display the menu again. Some DVDs only allow
you to select disc playback options using the DVD root menu.
English
21

Basic operations
Changing the audio language during Playback (Multi Audio)
1. Press AUDIO button to change audio track during DVD playback. The current audio lan-
guage number, the total number of available audio channels (languages) and current
language are displayed.
2. If there are multiple languages are available, press the AUDIO button again to cycle
through the available languages. The audio display disappears automatically if AUDIO
button is not pressed again within 3 seconds
Note: Some DVDs only allow access to this function through the DVD menu.
English
Turning the subtitles and changing the subtitle Language on :
1. Press SUBTITLE button to change the subtitle language you want during DVD Playback.
The current language number, the total number of the subtitle languages and current language are displayed.
2. If multiple languages are available, press SUBTITLE button again to cycle through the
available languages.
3. To turn subtitles off, Press SUBTITLE button until “subtitle off” appears on the screen.
The subtitle display disappears automatically if SUBTITLE button is not pressed again within
3 seconds.
Note: Some DVDs only allow access to this function through the DVD menu.
Using Repeat Playback
To repeat a chapter, a title, or both:
During playback, press REPEAT repeatedly to cycle through the available settings:
Chapter---Repeats the current chapter.
Title---Repeats the current title.
All---Repeats all chapters and titles.
Off---Resumes normal playback
22

Basic operations
Stopping playback
1. Press STOP to stop playback. The unit automatically memorizes the stopping point.
2. Press PLAY to resume playback.
3. Press STOP again to fully stop playback of the disc.
Note:
• Some kind of discs do not support the resuming of playback after first stopping.
Pausing playback
1. Press PLAY/PAUSE to pause the playback of a disc.
2. Press PLAY/PAUSE to resume playback.
Fast-forwarding / Fast-reversing
1. Press |<< on the remote control and hold for 1.5 seconds to scan backward at 2x-4x-
8x-20x times of normal speed.
2. Press >>| on the remote control and hold for 1.5 seconds to scan forward at 2x-4x-
8x-20x times of normal speed.
Note :
• There is no sound during fast-forward / fast-reverse.
Slow and frame-by frame playback
1. Press SLOW on the remote control to start slow playback. Each pressing of this
button will after the speed to 1/2,1/3,1/4,1/5,1/6 and 1/7 of normal playback.
Note:
• No sound during frame-by-frame playback
• For CD/MP3, this function is not available.
Repeat playback
1. Press REPEAT to set the starting point of a segment. The screen will show “Repeat
A-“
2. Press REPEAT again to set the stop point of a segment. The main unit will start
repeat playback of the segment from A to B.
3. Press REPEAT again to resume normal playback status.
Repeat playback of titles, chapters or tracks
1. While playback of a disc press REPEAT to select the title, chapter or track for re-
peat playback.
English
23

BASIC OPERATIONS
Searching the disc
1. Press GOTO.
2. Use the cursor and ENTER to select the proper item for selection of playing time,
title, chapter or track.
3. Press ENTER again to confirm your selection.
4. Press GOTO to resume normal playback.
Searching the disc
The unit can play a program list as shown in the following example:
1. Press PROGRAM to display the program
English
menu.
Note:
• T is for input of the title number. C is for input
of the chapter number of a DVD.
• T is for input of the track number of a CD/VCD.
Note:
• Some discs may not offer title, chapter or track
numbers.
• Use the direction buttons ∧ /∨ / < / > to select your prepped list (see picture).
3. Use the direction buttons to move the cursor to the “PLAY” icon, and press ENTER
to start playback of the list order.
4. Press PLAY/PAUSE or select the “EXIT” icon and the
5. press ENTER to exit the program list.
Note:
1. The program list will be canceled when the main unit is powered off or the disc will
be ejected.
2. Some discs may not allow for some program functions.
3. The player cannot start playback of the list if you select an item that it is not part of
the playing disc.
Using Display
1. Press OSD to display disc type, current title, current chapter and the playing time.
Press again to display the current subtitle language, the current audio language and
the current angle number (during playback of a disc).
2. Press OSD for the 3td time to deactivate the information display.
24

BASIC OPERATIONS
Selecting subtitles
1. Press SUBTITLE to select the subtitle of a disc (during DVD playback).
Selecting audio settings
1. Press AUDIO to select the audio language of a disc (during DVD playback).
2. Press AUDIO to select the audio channel of a disc (during VCD or CD playback)
Selecting angles
This function allows for selecting different filming angles stored on the DVD media during
playback.
1. Press ANGLE to select the playback angle when playing a DVD disc.
Note:
This function is only available on certain DVD media.
Playback of MP3 and JPEG discs
1. Use the direction buttons </∧/∨/> to move the cursor to the directory file, Music
icon (3) or JPEG icon (4).
2. Select the Music icon (3) and press ENTER for playback of Music files; select the
JPEG icon and press ENTER for playback of JPEG files.
3. Select a file and press ENTER to start playback.
4. Press PLAY/PAUSE to pause playback. Press again to resume playback.
5. Press A-B to start repeat playback of an A-B segment.
English
25

SYSTEM SETUP
Selecting a TV system
Please select the proper video signal system according to your TV set.
• NTSC: Please select this item for NTSC
system TV sets.
• PAL: Please select this item for PAL system
TV sets.
• Default: PAL
Note:
• The picture may appear “grey” if the setting is
English
Setting screen saver
not suitable for the TV set
This function will save the LCD life if the unit is in stop
or no disc mode for over 1 minute.
• ON: Screen saver enabled.
• OFF: Screen saver disabled.
• Default: ON
Screen sever ON
OFF
Selecting a TV scale
•
16:9: Please select this item when connecting
this unit to a 16:9 TV set.
• 4:3 LB: Please select this item when connect-
ing this unit to a normal TV set.
• 4:3 PS: Please select this item when connect-
ing this unit to a normal TV set.
Note:
• Picture scale depends also on supported
disc format
26
TV Type
4:3 PS
4:3 LB
16:9

SYSTEM SETUP
Setting parent lock
1. Default setting: 0000
2. After unlocking you can set a new parental lockand the parental lock level.
Password - - - - -
Setting parent lock level
With this function the user can select a custom
parental lock for removing scenes being too violent or containing sex scenes that are not suitable
for children.
• There are 8 levels: normal and children.
• By selecting “normal” the lock function is
disabled.
• Default: 8 ADULT
Note:
• The parent lock level can not be set if the
parental lock is locked.
Default settings
To restore the factory settings please select this
item and press ENTER
.
Screen saver
Default Restore
1 Kid save
2 G
3 PG
4 PG13
5 PG-R
6 R
7 NC-17
8 Adult
English
27

SYSTEM SETUP
Selecting languages
Selecting a OSD language
In the OSD language selection menu you can use
the direction buttons ∧/∨ to move the cursor to the
desired language and press ENTER to confirm your
selection.
Selecting an audio language
In the audio language selection menu you can use
the direction buttons ∧/∨ to move the cursor to the
English
desired language and press ENTER to confirm your
selection.
Selecting a sub-title language
In the subtitle language selection menu you can use
the direction buttons ∧/∨ to move the cursor to the
desired language and press ENTER to confirm your
selection.
Selecting a menu language
In the menu language selection menu you can use
the direction buttons Up/Down to move the cursor to
the desired language and press ENTER to confirm
your selection..
Note:
• If your desired language cannot be sup-
ported, the actual language will be the disc
standard language.
• Default language: English
28

SYSTEM SETUP
Selecting digital audio output
SPDIF / OFF: switching off digital audio output
•
• SPDIF / RAW: please set the audio output to RAW
if you have a Dolby digital 5.1 or DTS cable amplifirer .
• SPDIF /PCJM: please set the audio output to PCM
if you have a 2-channel Dolby digital amplifier
• Default: SPDIF / PCM
Adjusting the key
When you enter the KEY menu, you can use the
cursor keys ∧/∨ to adjust the desired tone and
press ENTER.
Adjusting the brightness
When you are in Video Setup, you can enter the
Brightness menu and move the cursor keys ∧/∨ to
the desired brightness, then press ENTER.
English
Adjusting the contrast
When you are un VIDEO SETUP, you can enter the
Contrast menu and move the courser keys ∧/∨ to
the deiered contrast, then press ENTER.
29

SYSTEM SETUP
Adjusting the hue
When you are in VIDEO SETUP, you can enter the
hue menu and move the coursor keys ∧/∨ to the
desired hue, then press ENTER
Adjusting the saturation
When you are in VIDEO SETUP, you can enter the
English
satuation menu and move the cursor keys ∧/∨ to
the desired saturation, then press ENTER .
Adjusting the sharpness
When you are in Video Setup, you can enter the
Sharpness menu and move he cursor keys ∧/∨
the desired sharpness, then press ENTER
30

DVB-T TV
Using DVB-T
1. Press „Yes“ when using DVB-T for the first time.
2. Press </∧/∨/> , ENTER to set “Country” , “OSD
Language”, “Time Zone” properly as the local situation, then press “Next” to go on.
3. Press “Yes” to start auto scan
4. The TV and radio program will be listed on the
screen if the antenna reveives signal. Press ∧/∨ to
choose a program, then press ENTER to play
5. Press SETUP to enter DVB-T setup menu. Use </
∧/∨/> , ENTER to set “Channel Guide” “System
Confing” and “Installation”.
English
31

OSD (TFT– and Speaker-Settings)
By pressing OSD on the control field or the remote control you get access to the settings of
the TFT panel and the speakers. One time pressing the OSD button activates the OSD
menu. To select the different setting options, you have to press the OSD again and again.
The settings for the TFT are brightness, contrast, colour, tint and zoom. With the options of
brightness, contrast, colour and tint you can adjust the displaying quality. Please adjust the
values by pressing the minus or plus button on the remote control.
The setting Zoom is specially for changing the aspect ratio from 16:9 to 4:3 and back.
1. By viewing a movie or the TV program with an aspect ratio of 4:3 you can change
English
the preset of 16:9 to 4:3. The content is not distorted. With the 4:3 setting, the HMD
900 add on the right and left side a black bar. This characteristic is normal.
2. By viewing a movie or a TV program with an aspect ratio of 16:9, please use only the
16:9 settings. Otherwise the picture is distorted.
You can also change directly with the remote control the aspect ratio. Please use therefore
the 16:9/4:3 button.
By hearing Music files you have the choice to switch off the TFT screen for saving power or
batter power. For switching the TFT screen off or On, you can use the remote control and
press the SCREEN button or you can navigate in the OSD menu until the option SCREE
OFF.
After activating the SCREEN OFF the TFT display switches off. To restart the TFT display,
please press the OSD or the SCREEN button again.
The OSD settings Bass and Treble are for adjusting the sound quality.
With the last option Load Default you can restore the factory settings.
32

TROUBLESHOOTING
Check the following guide for the possible cause of a problem before contacting service.
Technical Support of Xoro/MAS:
• Tel.: +49 40 77 11 09 17
• Internet: www.xoro.de/support.htm
SYMPTOM POSSIBLE CAUSE SOLUTION
English
Noise or sound
distorted on FM
broadcasts.
FM no sound
Disc can not play.
Disc is inserted
but player skips
over spot and will
not play.
No power
Station not tuned properly for
AM or FM
FM: Rod antenna is not extended.
AM: Unit is not positioned
correctly.
Function Selector is not at
RADIO mode.
Volume at minimum. Increase Volume.
Function Selector is not at
DVD mode.
CD is not installed or installed
incorrectly.
Disc inserted upside down. Insert disc properly.
Disc is dirty. Clean disc.
Disc is non-standard. Use correct disc.
Player doesn’t connect to the
power plug.
Function Selector is not at ON
mode.
The battery in the player is
low.
Return the AM or FM broadcast
station.
Extend rod antenna.
Rotate unit until best reception is
obtained.
Set Function selector to RADIO.
Set Function Selector to DVD.
Insert CD with lable side facing
up.
Insert the power plug securely
into the power outlet.
Check if the ON/OFF button on
the back of the player is set to
ON.
Replace the battery.
33

SPECIFICATIONS
Dimensions (WxHxD) 42,3 x 20,9 x 21,7 cm
Net weight ( without battery) 3,9 Kg
Power inlet 13,8 V DC by 1,7 A
100-240V AC 50/60Hz with power supply
English
Power consumption 25 W / StandBy < 1 W
TV type PAL / NTSC (playback only)
Display 7 inch TFT with 16:9 aspect ratio
Video CVBS (RCA) in/out
Audio Stereo (RCA) In/Out, optical and coaxial
Others USB 1.1
Cardreader SD, MMC, MS cards
Antenna RF In: IEC 169-2 Type
Speakers 2x 10 Watt RMS
FM Radio Frequency 87,5—108 MHz
DVB-T TV Tuner Frequency: 174—860 MHz VHF & UHF
Operating conditions Temperature 0 - 40° C
Humidity 5 - 90% (non condensing)
34
digital out
Impedance: 75 Ohm
Bandwith: 6 / 7 / 8 MHz

GLOSSARY
CD
A CD (Compact Disc) is a metal-coated plastic disc. It has a diameter of 12 cm and a thickness of about 1,2 mm. It was developed by Sony and Philips in 1985. The advantages are
digital storage of music enabling very natural sound reproduction. Beyond this, the data is
stored more compact, the handling is easy. The long lifetime of the media and the fact that
usage does not decrease quality made the CD the ideal storage media.
In the meantime, 12 different storage media have been developed from the first CD. The
mostly used are CD-DA (Compact Disc - Digital Audio) , CD-ROM (Compact Disc - Read
Only Memory), and the DVD (Digital Versatile Disc). One can store about 74 to 80 minutes of
music on a CD (-DA). This is equal to 650 to 700 MB
Signal transmission is performed touchless with a laser beam. The CD is being read from the
middle to the outer side. The data or music is recorded in a spiral from the middle to the
outer side.A CD has pits and lands, the distance is about 1,6 mm. The laser light created by
a laser diode passes different mirrors and prisms and then is focused by a lens to a laser
beam. This laser beam scans the data spiral of the CD. On the pits, the laser beam is reflected in another direction and is detected by a photocell. The photocell transmits the signal
to a microprocessor, which converts the digital data to an audio signal. The rest is done by
the sound system.
CVBS
Composite Video Interface. The video signal is transmitted via a single signal line. CVBS
should only be used, if your playback device does not offer other interfaces for connection
with you Xoro TV set, as CVBS due to technical reasons delivers worst quality of all available interfaces (please also refer to YUV, S-Video, SCART and RGB). The CVBS interface
can easily be identified from the yellow colour of the RCA jack.
DTS®
DTS® is a coding standard similar to Dolby Digital®. DTS Digital Surround® is a multichannel surround system from Digital Theatre Systems. Similar to Dolby Digital® it uses up to 5.1
channels. Different from Dolby, the data rate can be far above 1 Mbit/sec so the sound is not
compresses as strong as in Dolby Digital® resulting in a higher sound quality.
The frequency range is from 20Hz to 20kHz at 20Bit, but the subwoofer channel only transmits frequencies below 80Hz. The coding system also is called CAC.
DVD
The DVD (Digital Versatile Disk) was introduced in 1995 and is a storage media with a large
capacity.
While a standard CD can store 650 MB of data, the DVD can store up to 9 GB. Especially
when it comes to video playback, a large storage capacity is important. Beyond its high capacity, the consumer enjoys high quality video and audio. A DVD can store up to 8 different
audio streams, so in best case, the movie can be watched in 8 different languages.
Photo-CD (JPEG CD)
A Photo-CD is a storage system for image storage on a CD-ROM in a platform independent
multi resolution structure (support of different resolutions and file formats, e.g. JPEG, BMP,
etc). As a single camera film dies not fill a complete CD, more films can be added to the CD
English
35

GLOSSARY
at a later time. A CD-ROM drive must be multisession enabled to load images from a PhotoCD.
GUI
Graphic User Interface. See OSD.
HUE
HUE settings affect the color balance of the picture
Contrast
Means the range of luminance between the brightest and the darkest pixel, which can be
English
displayed.
MP3
MPEG 1 Layer 3 Codec, or short MP3, was developed in 1987 by Fraunhofer Institut für
Integrierte Schaltungen and was e revolution in audio compression. In 1992 it became part
of MPEG-1 video format. As MP3 offered high quality audio at incredible small filesize, it
became a standard. With this codec one can compress audiofiles to about 1 MB / minute.
NTSC
Widespread TV standard, especially in US and Asia. 525 (480 viewable) Lines and 60 Hz
refresh rate. Describes the way the video information (brightness, colour, refresh rate etc.) is
transmitted. Within Europe, this video standard only appears on imported media (like US
DVDs).
OSD
The OSD (On Screen Display) is all the menus and options shown on the screen.
PAL
European TV standard. PAL stands for Phase Alternation Line; refresh rate: 50 Hz, vertical
line resolution: 625 Lines, 576 visible lines. Describes the way the video information
(brightness, color, refresh rate etc.) is transmitted.
PBC
PBC stands for playback control. This function can be used to show a menu on Video CD's
(if contained on the VCD). One can move in this menu with the arrow keys and select the
desired function with “enter”.
S/PDIF
S/PDIF (Sony/Philips Digital Interface) is a digital transmission standard for audio data. S/
PDIF can transmit audiofiles from one source to another without having to leave the digital
transmission, which would result in worse quality.
Aspect ratio: 4:3 and 16:9
Full Frame refers to programs developed for TV display with an aspect ratio of 4:3. Widescreen refers to programs developed for screens with an aspect ratio of 16:9.
If a widescreen program is displayed on a 4:3 screen, the picture will have black borders on
36

GLOSSARY
top and bottom.
Super Video CD (SVCD)
SVCD stands for Super Video CD. SVCD's are very similar to VCD's, one can store 35 - 60
minutes of high quality video with up to 2 Stereo audiotracks and 4 different subtitles. All
Xoro DVD players can play SVCD's.
Video CD (VCD)
VCD stands for "Video Compact Disc". VCD's are similar to normal CDs. They contain movies with sound. A VCD can store 74 to 80 minutes of video with stereo sound. For the storage of audio and video, MPEG-1 is used. All Xoro DVD players can play VCD's.
English
37

English
38


TABLE DES MATIERES
Consignes de sécurité importantes 5
Caractéristiques 10
Contenu 11
Interfaces et commandes 11
Face supérieure 11
Face avant 11
Face arrière 11
Côté gauche 12
Côté droit 12
Face inférieure 12
Touches de commande 13
Télécommande 14
Présentation 14
Description des touches 15
Insérer les piles 17
Autres fonctions 18
Connexions 19
Connecter à un téléviseur avec un câble CVBS 20
Connecter à un amplificateur AV par S/PDIF 21
Connecter à un lecteur DVD avec un câble vidéo 21
Fonctionnement 22
Choisir le mode 22
Allumer / Éteindre 22
Lire un disque 22
Accéder au menu racine 22
Changer la langue audio 23
Sous-titres 23
Touche répétition 23
Arrêter la lecture 24
Pause 24
Avance / Retour rapide 24
Répéter la lecture 24
Recherche dans disque 25
Lecture d’un programme 25
Affichage à l’écran 26
Sélection des sous-titres 26
Sélection des angles 26
Sélection des réglages audio 26
Lecture de fichiers MP3 et JPEG 27
Français
Français
3

TABLE DES MATIERES
Configuration du système 28
Sélectionner un système 28
Régler l’économiseur d’écran 28
Sélectionner le format TV 28
Régler le contrôle parental 29
Définir le niveau de contrôle parental 29
Paramètres par défaut 29
Sélection des langues 30
Sélection sortie audio numérique 31
Ajuster le ton 31
Ajuster la luminosité 31
Ajuster le contraste 31
Ajuster la teinte 32
Ajuster la saturation 32
Ajuster la netteté 32
Fonctionnement TNT 33
Menu OSD 34
Dépannage 35
Spécifications 36
Français
Glossaire 37
4

CONSIGNES DE SÉCURITÉ IMPORTANTES
Consignes de sécurité
Ce symbole avertit l’utilisateur que l’appareil est sous tension et qu’il existe
un danger d’électrocution.
Ce symbole attire l’attention de l’utilisateur sur les fonctions importantes et
les instructions d’entretien.
Cet appareil a été testé et il a été établi qu'il est conforme aux limites fixées
pour les appareils numériques de classe B, conformément aux normes du
FCC, section 15. Ces limites sont destinées à fournir une protection raisonnable contre les interférences dommageables dans une installation résidentielle. Cet appareil génère, utilise et peut émettre des fréquences radio qui,
en cas de mauvaise installation ou d'utilisation non conforme aux instructions, peut causer des interférences dommageables à la réception des ondes
radio et hertziennes, ce qui peut résulter en des arrêts intempestifs
Avertissement :
Éviter d’exposer l’appareil à la pluie ou à toute autre humidité afin d’éviter tout danger
d’électrocution ou d’inflammation. L’appareil est sous tension. N’ouvrez jamais vous-même
l’appareil. Seul du personnel de maintenance est qualifié pour le réparer.
Précaution :
Pendant la lecture, le disque tourne très rapidement. Veuillez à ne pas déplacer le lecteur
lors de l'ouverture, afin de ne pas endommager le disque.
Cet appareil est muni d'un laser. Pour éviter une exposition directe au rayon laser, n'essayez pas de l'ouvrir. L'utilisation de commandes, de réglages ou de procédures différentes de
celles spécifiées ci-après comporte des risques d'exposition à des radiations.
Remarques concernant les piles
Une mauvaise utilisation des piles peut conduire à ce que de l’acide sorte des piles. Ceci
engendre une corrosion endommageante et peut provoquer un dysfonctionnement
permanent de la télécommande. Merci de suivre les règles suivantes:
• Toujours veiller à ce que les piles soit correctement placées selon les pôles respectifs.
Les placer seulement comme le montrent les symboles + et - du compartiment à piles.
• Ne jamais utiliser deux types différents de piles et ne jamais mélanger de vieilles piles
avec des neuves.
• Si vous prévoyez de ne pas utiliser la télécommande pendant une longue période,
veuillez retirer les piles. Vous éviterez ainsi d’éventuels dommages.
• Si la télécommande ne fonctionne pas correctement ou si elle n’agit plus sur les mêmes
distances, échanger les piles contre des neuves.
5
Français

CONSIGNES DE SÉCURITÉ IMPORTANTES
AVIS DE LA FCC :
Cet appareil a subi les tests de la FCC et a été reconnu conforme aux normes établies pour
le matériel numérique de classe B, conformément au chapitre 15 de la réglementation de la
FCC.
Ces normes sont prévues pour garantir une protection raisonnable contre toute interférence
dommageable, dans une installation privée.
Cet appareil génère, utilise et peut émettre des fréquences radio qui, en cas de mauvaise
installation ou d'utilisation non conforme aux instructions, peut causer des interférences
dommageables à la réception des ondes radio et hertziennes, ce qui peut résulter en des
arrêts intempestifs. Nous conseillons à l'utilisateur d'essayer de corriger ces interférences
par l'un ou plusieurs des moyens suivants :
Réorienter ou déplacer l'antenne.
Éloigner l'appareil du récepteur.
Brancher l'appareil sur une prise ou un circuit différent de celui sur lequel est branché le
récepteur.
Consulter votre revendeur ou un professionnel radio/TV qualifié.
AVERTISSEMENT DE LA FCC
Tous changements ou modifications apportés à cet appareil, non expressément approuvés
par le fabriquant ou par des organismes autorisés par le fabriquant, pourraient annuler toutes les garanties.
Français
Précautions pour les piles
Ce lecteur de DVD contient un bloc piles NiMH. Il existe des risques d'incendie et de brûlures si le bloc piles n'est pas manipulé correctement. Ne pas désassembler, écraser, trouer,
court-circuiter les piles, ni les placer dans l'eau ou le feu. N'essayez pas d'ouvrir ou de réparer le bloc piles. Remplacer les piles usagées uniquement par des piles adaptées à cet appareil. Les piles contiennent un produit chimique qui présente un danger pour l'environnement. Ne les jetez pas n'importe où.
Précautions d'emploi
L'utilisation de commandes, de réglages ou l'exécution de procédures différentes de celles
spécifiées ci-dessous, peut résulter en une exposition dangereuse aux radiations.
Veuillez lire attentivement ce manuel d'utilisation et conservez le précieusement. Il y a,
néanmoins, quelques précautions d'installation et de fonctionnement dont vous devez être
informé.
6

CONSIGNES DE SÉCURITÉ IMPORTANTES
1. Lisez les instructions Toutes les mesures de sécurité et conseils d'utilisation devraient être lus avant la première utilisation de l'appareil.
2. Conserver le manuel - Les mesures de sécurité et conseils d'utilisation devraient
être conservés pour une utilisation ultérieure
3. Avertissement - Tous les avis indiqués sur l'appareil et dans le manuel d'utilisation
devraient être suivis.
4. Suivez les instructions- Tous les conseils d'utilisation et de fonctionnement de l'appareil devraient être suivis
5. Nettoyage Toujours débranchez l'appareil avant de le nettoyer. N'utilisez pas de
nettoyant liquide ou d'aérosol directement sur l'appareil. Utilisez plutôt un chiffon
humide
6. Accessoires Pour éviter tout risque, n'utilisez pas d'accessoires non-recommandés
par le fabriquant
7. Eau et Humidité- N'utilisez pas cet appareil près d'eau, par exemple: près d'une
baignoire, d'un évier, d'une machine à laver ou près d'une piscine.
8. Supports - Ne placez pas l'appareil sur un pied, un trépied, un support ou une table
instable. L'appareil pourrait tomber et blesser sérieusement quelqu'un et/ou être
endommagé. N'utilisez qu'un pied, trépied ou support recommandé par le fabriquant
ou vendu avec l'appareil. Les fixations de l'appareil devraient suivre les instructions
du constructeur et ne devraient être faites qu'avec des accessoires de montage
recommandés par le fabriquant.
9. Le déplacement de l'appareil et de son support devrait être fait précautionneusement - Les arrêts brutaux, la force excessive ou les surfaces inégales peuvent provoquer la chute de l'appareil et de son support.
10. Aération - Les ouvertures et les fentes pratiquées dans le boîtier de l'appareil servent à son aération et permettent que l'appareil ne surchauffe pas. Ces ouvertures
ne doivent jamais être obstruées ou recouvertes. Ces ouvertures ne doivent jamais
être bloquées en plaçant l'appareil sur un lit, un canapé, un tapis ou toute autre
surface similaire. Cet appareil ne doit pas être placé dans un meuble incorporé
comme une bibliothèque ou un tiroir sauf si la ventilation nécessaire est fournie et si
les instructions du constructeur ont été respectées.
11. Alimentation électrique - Ce produit ne doit fonctionner qu'avec le type d'alimentation électrique indiqué sur l'étiquette. Si vous n'êtes pas sûr de votre l'ampérage,
veuillez consulter votre revendeur ou votre compagnie d'électricité. Pour les appareils fonctionnant avec une batterie ou des piles, veuillez vous référer aux conseils
d'utilisation.
12. Mise à la terre ou Polarisation Cet appareil peut être équipé d'une prise de courant
alternatif polarisée (prise possédant une branche plus large que les autres). Cette
prise ne pourra s'emboîter dans votre prise murale que dans un seul sens. Il s'agit
d'une mesure de sécurité. Si vous ne pouvez pas l'emboîter complètement dans la
prise murale, essayez de la retourner. Si vous ne pouvez toujours pas l'emboîter
complètement, veuillez contacter votre électricien afin qu'il change votre prise murale qui pourrait s'avérer obsolète. Ne défaites pas l'objectif de sécurité de la prise
polarisée. Mesures de sécurité supplémentaires : Cet appareil est équipé d'une
prise de terre à 3 fils, une prise ayant une 3ème branche. Cette prise ne pourra
s'emboîter que dans une prise de terre murale. Il s'agit là aussi d'une mesure de
sécurité. Si vous ne pouvez pas l'emboîter complètement dans la prise murale,
Français
7

CONSIGNES DE SÉCURITÉ IMPORTANTES
13. Protection des câbles d'alimentation Les câbles d'alimentation doivent être installés
de façon à ce qu'on ne puisse pas marcher dessus ou à ne pas être coincés par des
objets placés au-dessus ou à côté d'eux. Faites surtout attention aux câbles près
des prises et aux endroits
14. Antenne extérieure Si une antenne extérieure ou un système satellite est connecté
à l'appareil, veillez à ce qu'ils soient reliés à la terre, afin d'assurer une protection
contre la surcharge et les décharges d'électricité statique.
15. Antenne extérieure Si une antenne extérieure ou un système satellite est connecté
à l'appareil, veillez à ce qu'ils soient reliés à la terre, afin d'assurer une protection
contre la surcharge et les décharges d'électricité statique.
16. La foudre Afin de renforcer la sécurité de cet appareil en cas d'orages et de foudre,
ou lorsqu'il est inutilisé pendant une longue période, veillez à le débrancher de la
prise électrique et de déconnecter l'antenne ou le système satellite. Ceci pourra
éviter certains dommages pouvant être occasionnés à l'appareil en cas d'orages.
17. Lignes électriques - Une antenne extérieure ne doit pas être placée à proximité
d'une ligne électrique ou autre circuit électrique. Lorsque vous installez une antenne
extérieure, faites très attention à ne jamais être en contact avec un circuit électrique
ou une ligne à haute tension. Cela pourra vous être fatal.
18. Surcharge - Ne surchargez pas la prise murale ou les rallonges. Ceci peut entraîner
un risque d'incendie ou de décharge électrique.
19. ntroduction d'objets ou de liquide Veillez à ne jamais faire tomber d'objets dans les
ouvertures de l'appareil. Cela pourrait entraîner un incendie ou une décharge électri-
Français
que. Veillez également à ne jamais renverser de liquides.
20. Maintenance - N'essayez pas de réparer cet appareil vous-même, en l'ouvrant et en
retirant le couvercle, vous vous exposez à un courant important. La maintenance de
votre lecteur est strictement réservée aux techniciens de maintenance qualifiés.
21. Dommages nécessitant une réparation Débranchez l'appareil de la prise murale et
référez-vous au personnel de maintenance qualifié sous certaines conditions :
a. Lorsque le cordon d'alimentation ou la prise électrique sont endommagés
b. Si du liquide ou un objet est tombé dans l'appareil
c. Si l'appareil a été exposé à l'eau ou à la pluie
d. Si l'appareil ne fonctionne pas correctement en suivant les conseils d'utilisation.
Ajuster uniquement les commandes qui sont couvertes par les conseils d'utilisation.
Tout ajustement impropre des autres commandes pourra entraîner des dommages
et nécessitera un travail supplémentaire de la part d'un technicien qualifié pour
réparer l'appareil.
e. Si l'appareil est tombé ou s'il a été endommagé de quelque façon que se soit, et,
f. Quand l'appareil montre une modification de ses performances, indiquant qu'une
réparation ou un contrôle est nécessaire.
22. Pièces de rechange Lorsque le remplacement de certaines pièces est nécessaire,
assurez-vous que le technicien de maintenance a utilisé des pièces de rechange
spécifiées par le constructeur ou des pièces qui ont les mêmes caractéristiques que
les pièces originales. Le remplacement par des pièces non-reconnues pouvant
entraîner des risques d'incendie, de décharge électrique et d'autres dommages.
23. Vérifications de sécurité - Demandez au technicien de maintenance de procéder aux
vérifications de sécurité après avoir achevé le montage de l'appareil.
8

CONSIGNES DE SÉCURITÉ IMPORTANTES
24. Fixation murale ou au plafond L'appareil ne peut être fixé au mur ou au plafond que
selon les recommandations du constructeur.
25. Chaleur - Cet appareil doit être placé loin des sources de chaleur, comme les radiateurs, les fours ou tout autre appareil qui produit de la chaleur (comme les amplificateurs)
26. Vérification - Une fois que le produit a été réparé, demander à un technicien
d‘effectuer une vérification de sécurité pour être sûr que le produit fonctionne correctement.
27. Montage mural - Ce produit peut être installé au mur uniquement selon les recommandations du constructeur.
28. Chaleur - Ce produit doit être éloigné de toutes sources de chaleur (ex. Radiateurs,
fours...)
MACROVISION:
This product incorporates copyright protection technology that is protected by U.S. patents
and other intellectual property rights. Use of this copyright protection technology must be
authorized by Macrovision, and is intended for home and other limited viewing uses only
unless otherwise authorized by Macrovision. Reverse engineering or disassembly is prohibited.
DOLBY:
Manufactured under license from Dobly Laboratories. “Dolby” and the double-D symbol are
trademarks of Dobly laboratories.q
Français
9

CARACTÉRISTIQUES
Caractéristiques
• Lecteur DVD portable
• Téléviseur TNT
• Écran TFT de 7 pouces - Format 16:9
• Haut-parleurs puissants (2x 10 Watt)
• Compatible DVD, VCD, SVCD, MPEG-1, MPEG-2, MPEG-4 vidéos, CD audio,
JPEG et Musique
• Compatible DVD-ROM, DVD+R DL, DVD+R(W), DVD-R DL, DVD-R(W), CD-ROM,
CD-R(W), CD-DA
• Lecteur de cartes intégré pour cartes SD, MMC et MS
• Port USB 1.1 pour mémoire externe
• Récepteur TNT avec recherche automatique des canaux, EPG et télétexte
• Entrée et sortie Audio et Vidéo
• Sorties audio numérique (optique et coxiale)
• Radio FM
• Compartiment à piles ( 8x 1,5V)
Français
Contenu de l‘emballage
Lorsque vous ouvrez l’emballage pour la première fois, vérifiez qu’il contient bien tous les
éléments suivants :
• HMD 900
• Télécommande
• Piles pour la télécommande
• Adaptateur secteur (AC/DC)
• Manuel d’utilisation
• Carte de garantie
10

INTERFACES ET COMMANDES
Face supérieure
1. Touches de commande. Appuyez sur ces
touches pour faire fonctionner l’appareil
2. Antenne. Ajuster l’antenne pour améliorer
la réception de la radio.
Face avant
1. Récepteur infrarouges. Reçoit le
signal de la télécommande.
2. Poignée
3. Haut-parleurs
4. Écran LCD
Face arrière
1. Compartiment DVD
2. Bouton d’ouverture
3. Entrée DC 13.8V
Français
11

INTERFACES ET COMMANDES
Côté gauche
1. Entrée et sortie audio. Utiliser avec les
entrée/sortie audio d’un périphérique
externe
2. Prise antenne AM
3. Entrée/sortie Vidéo. Utiliser avec les
entrée/sortie vidéo d’un périphérique
externe
4. Optique. Utiliser avec la sortie audio numérique optique d’un périphérique.
5. Coaxial. Utiliser avec la sortie audio numérique coaxiale d’un périphérique.
Côté droit
1. Entrée cartes mémoire. Utiliser pour introduire une
Français
carte SD/MMC/MS dans le lecteur.
2. Port USB. Pour connecter un périphérique USB au
lecteur
3. Prise antenne DTV.
Face inférieure
1. Compartiment à piles
Installer les piles dans ce compartiment pour
faire fonctionner l’appareil
12

INTERFACES ET COMMANDES
Touches de commande
N° Nom Description
1 SETUP En mode Radio, appuyer sur cette touche pour sauvegarder la
2 MENU/
3 |<< /CH- Appuyer sur cette touche pour aller à la piste/chapitre précédent(e).
4 >>| /CH+ Appuyer sur cette touche pour aller à la piste/chapitre suivant(e). En
5
6
EPG
>|| /
7 RADIO- En mode Radio, appuyer pour choisir la chaîne précédente. En
8 RADIO+ En mode Radio, appuyer pour choisir la chaîne suivante. En modes
9 TUNE
DOWN
10 TUNE UP Appuyer une fois pour démarrer la recherche automatique
11 POWER Appuyer pour allumer / éteindre le lecteur
station. En mode DVD, TNT et AUX appuyer sur cette touche pour
afficher le menu OSD.
Appuyer sur cette touche pour afficher le menu principal du CD/DVD.
En mode TNT cette touche affichera le menu EPG.
En mode DVD, rester appuyer pour le retour rapide (vitesses 2x, 4x,
8x et 20x) En mode TNT, appuyer pour afficher la chaîne
précédente.
mode DVD, rester appuyer pour l’avance rapide (vitesses 2x, 4x, 8x
et 20x). En mode TNT, appuyer pour afficher la chaîne suivante.
En mode DVD appuyer pour débuter ou mettre en pause la lecture
du CD/DVD. En mode TNT appuyer pour confirmer votre sélection.
Appuyer pour arrêter la lecture. Appuyer sur >|| pour recommencer
la lecture depuis la dernière position. .
Appuyer 2 fois pour arrêter complètement la lecture et appuyer sur
>|| pour reprendre la lecture depuis le début. En mode TNT cette
touche sert à passer du mode TNT au mode radio.
modes TV et AUX appuyer pour régler le menu OSD.
TV et AUX appuyer pour régler le menu OSD.
Appuyer une fois pour démarrer la recherche automatique
descendante en mode Radio.
ascendante en mode Radio.
Français
12 SOURCE Appuyer pour changer de mode (DVD/TNT FM RADIO/ AUX).
13 VOL +/- Appuyer pour augmenter / diminuer le volume
13

TÉLÉCOMMANDE
Présentation de la télécommande
1. Ouvrir le clapet protecteur des piles
Tenir la télécommande par le point 1 (voir illustration) et pousser le clapet vers la
direction 2 (voir illustration).
2. Placer la pile dans son compartiment.
Français
3. Repousser le compartiment dans la télécommande.
Lorsque vous placez la pile, veuillez faire attention aux polarités (+/-).
Utilisation du lecteur DVD avec la télécommande
Veuillez toujours diriger la télécommande vers le capteur du lecteur DVD.
14

TÉLÉCOMMANDE
Description des touches de la télécommande
Français
N° Nom Fonction / Description
1
SOURCE
-
2
SCREEN
3
16:9/4:3
4
0-9
5
Appuyer pour changer les modes (DVD/TNT/FM RADIO /AUX).
Appuyer pour diminuer la valeur de l’objet sélectionné pendant le
réglage de l’écran.
Appuyer pour allumer / éteindre l’écran
Appuyer pour passer du format 16:9 au format 4:3.
Appuyer pour choisir directement une piste / un chapitre en mode
DVD. Appuyer pour changer de chaine en modes TV et Radio.
15

TÉLÉCOMMANDE
Description des touches de la télécommande
6 SETUP Appuyer pour afficher le réglage du menu OSD.
7 ▲(CH+) Appuyer pour déplacer le curseur en haut. En mode TNT appuyer
8 ◄ (TUNE -
)
9 ENTER Appuyer pour confirmer
10 MEMORY En mode Radio appuyer pour sauvegarder la station.
11 ▼(CH-) Appuyer pour déplacer le curseur en bas. En mode TNT appuyer
12
13
pour sélectionner la chaine suivante (ordre croissant)
Appuyer pour déplacer le curseur à gauche. En mode TNT appuyer
pour sélectionner la chaine suivante (ordre décroissant)
pour sélectionner la chaîne précédente.
Appuyer une fois pour aller au chapitre précèdent. Rester appuyer
pour le retour rapide en mode DVD.
Appuyer pour démarrer la lecture ou mettre en pause en mode DVD.
14 TITLE/TTX Appuyer pour afficher le titre du DVD. En mode TNT appuyer pour
15 SUBTITLE Appuyer pour sélectionner et afficher les sous-titres pendant la
16 + Appuyer pour augmenter la valeur de l’objet sélectionné dans le
Français
17 OSD Appuyer pour afficher le menu OSD (DVD, TV, AUX,),
18 VOL+ Appuyer pour augmenter volume.
19 VOL+ Appuyer pour diminuer le volume.
20 RETURN/
DTV RADIO
21 GOTO/
22 A-B Appuyer pour répéter la lecture de A à B en mode DVD.
EPG
afficher le menu télétexte.
lecture d’un DVD.
menu de configuration de l’écran.
Appuyer pour retourner au menu précédent du DVD/CD en mode
DVD. Appuyer pour passer du mode TNT au mode Radio en mode
TNT.
Appuyer pour démarrer la lecture à l’heure ou chapitre sélectionné
en mode DVD. Appuyer pour afficher le menu TV en mode TNT.
23 MENU Appuyer pour afficher le menu principal en mode DVD.
24 REPEAT Appuyer pour répéter une piste ou le disque entier en mode DVD.
25 ►(TUNE
26 DISPLAY Appuyer pour afficher les informations du disque (titre, chapitre,
27 MUTE Appuyer pour allumer / éteindre le son
28
+)
16
Appuyer pour déplacer le curseur à droite. Rester appuyer pour
sélectionner les chaînes (ordre croissant) en mode Radio.
piste, temps, etc.) .Appuyer pour éteindre l’éclairage de l’écran en
mode Radio.
Appuyer pour arrêter la lecture. Appuyer une nouvelle fois pour
l’arrêter complètement en mode DVD.

TÉLÉCOMMANDE
Description des touches de la télécommande
29
30
31
Notes:
1. Retirer l’étiquette en plastique avant d’utiliser la télécommande pour la première
2. Eviter de la faire tomber ou de l’endommager.
3. Noter qu’il peut être difficile de faire fonctionner l’appareil s’il y a des obstacles en lui
4. N’exposez pas le capteur de la télécommande à une lumière trop vive.
Angle Appuyer pour sélectionner un des différents angles de vision en
Audio/
LANG
fois.
et la télécommande.
Insérer les piles
Merci d’insérer les piles comme indiqué :
1. Installer 8 piles 1.5V” (non fournies).
2. Vérifier la polarité
Précaution
Merci de suivre ces précautions lorsque
vous utiliser des piles:
1. Utiliser uniquement le type de piles
spécifié.
2. Vérifier la polarité avant d’insérer les
piles. Une mauvais polarité pourrait
endommager l’appareil.
3. Ne mélanger pas différents types de
piles. (e.g. Alcaline et Carbon-Zinc)
ou des vieilles piles avec des neuves
4. Si l’appareil n’est pas utilisé pendant
un certain temps, nous vous
conseillons de retirer les piles.
5. N’essayer pas de recharger les piles
qui ne sont pas rechargeables.
Appuyer une fois pour aller au chapitre suivant. Rester appuyer
pour le lecture rapide en mode DVD.
mode DVD.
Appuyer pour changer la langue audio pendant la lecture.
Appuyer pour changer le canal audio pendant la lecture d’un
CD / VCD. En mode TNT appuyer pour changer la langue.
Français
17

AUTRES FONCTIONS
1. Veuillez brancher le périphérique USB à la
prise USB de l’appareil.
2. L’appareil lira le contenu en mémoire du
périphérique USB automatiquement.
Remarque:
• Il s’agit d’une prise USB 1.1
• L’appareil peut lire le contenu de périphériques
USB que lorsqu’il n’y a pas de disque dans
l’appareil.
Insérer une carte mémoire (SD/MMC/MS)
1. Veuillez introduire la carte mémoire dans l’en-
coche pour cartes mémoire sur l’appareil.
2. L’appareil lira le contenu de la carte mémoire
automatiquement.
Remarque:
• Veuillez introduire la carte mémoire dans la
bonne direction (voir illustration).
• L’appareil peut lire le contenu d’une carte
Français
mémoire que lorsqu’il n’y a pas de disque dans
l’appareil.
Radio FM
Attention: Pour permettre un mouvement plus flexible de l’antenne radio, il faut la déplier
entièrement comme montré sur la photo.
Appuyer sur la touche SOURCE pour sélectionner le mode radio FM ou AM.
Rester appuyer sur ▲/ (TUNE +) ou ▼/ (TUNE -) pour rechercher les stations par ordre
croissant ou décroissant.
La réception radio peut être améliorée en utilisant une antenne FM ou en connectant
l’antenne AM fournie.
Utiliser les touches |<< / >>| pour changer de chaînes.
Vous pouvez sauvegarder vos stations préférées en
appuyant sur la touche MEMORY et en sélectionnant un
nombre pour l’identifier.
Vous avez accès aux stations que vous avez
sauvegardées en appuyant sur les touches |<< / >>|. Ou
alors entrer directement le numéro de la station
enregistrée. Plus d’information sont disponibles dans ce
manuel.
18

CONNEXIONS
Connecter à un téléviseur avec un câble CVBS
Le câble vidéo composite (CVBS) transmet les
signaux de luminance (signal Y) et de
chrominance (signal C) de façon combinée.
Branchez le câble dans la prise VIDEO (CVBS)
située à l’arrière de votre HMD 900. L’autre
extrémité du câble doit être connectée à la prise
VIDEO de votre téléviseur. (Celle-ci est
généralement nommée « VIDEO in » ou « AV IN
». Merci de vous référez également au manuel
d’utilisation de votre téléviseur.)
Comme la connexion VIDEO (CVBS) ne transmet
pas le son, vous devez également ajouter
une connexion audio.
Insérez une extrémité du câble audio (Cinch
[RCA]), fourni, dans la prise Cinch [RCA] L/R
AUDIO OUT blanche/rouge située à l’arrière du
HMD 900 et l’autre extrémité dans la prise audio
(usuellement blanche/rouge) de votre téléviseur
(généralement nommée « AUDIO IN » ou « AV IN
». Merci de vous référez également au manuel
d’utilisation de votre téléviseur.) Allumez le
téléviseur et sélectionnez l’entrée vidéo composite
ou le numéro du canal correspondant. Pour les
numéros de canaux et la sélection des sources,
merci de vous référez au manuel d’utilisation de votre téléviseur.
Français
19

CONNEXIONS
Connecter à un amplificateur AV par S/PDIF
Ce lecteur contient un décodeur Dolby Digital
ou MPEG2. Ceci permet de jouer des DVD
enregistrés en Dolby Digital, en audio
MPEG1/2 ou PCM linéaire sans avoir besoin
d’un décodeur externe. Quand le lecteur est
relié à un amplificateur AV ayant des prises
d’entrée de canal 5.1, vous pouvez apprécier le
son audio en qualité grand écran chez vous
lorsque vous jouez des disques enregistrés en
Dolby Digital, MPEG 1/2 ou en PCM linéaire.
Les caractéristiques “S/PDIF" permettent
d’utiliser divers types de câbles et de prises
devant être branchés à l’appareil utilisé. Le mot
correspondant pour cette catégorie de
branchements est “coaxial” et “prise RCA”.
L’autre catégorie est appelée “optique” ou
également "TOSLINK".
Veuillez brancher le lecteur DVD à
l’amplificateur AV par un câble toslink et
employer la prise “OPTIQUE” sur le lecteur
DVD (voir l’image ci-dessus). Une autre
possibilité serait de brancher le lecteur DVD à l’amplificateur AV par un câble habituellement
Français
marqué en orange et d’employer la prise RCA du lecteur DVD.
Quand des disques DVD enregistrés en Dolby Digital, en audio MPEG ou d’autres formats
sont joués, le lecteur émet un flux de bit correspondant par les sorties digitales OPTIQUES
et COAXIALES. Si le lecteur est relié à un décodeur externe ou à un amplificateur de
puissance, vous pourrez apprécier la qualité grand écran (théâtre) chez vous.
Remarques pour le branchement du câble numérique optique:
Enlever la languette protectrice de la prise, introduire les doigts de la prise optique du DVD
et de l’amplificateur de sorte que les configurations du câble et de la prise correspondent.
Conservez la languette protectrice et veuillez toujours la remettre quand vous n’utilisez pas
cette prise afin de la protéger contre la poussière et le rayon laser.
Précaution à prendre pour la prise de sortie audio numérique coaxiale/optique:
Veuillez ne pas relier un amplificateur à une prise d’entrée coaxiale ou optique ne contenant
pas de décodeur Dolby Digital ou audio MPEG, sinon, cela pourrait causer des dommages à
votre ouïe ou endommager les haut-parleurs.
20

CONNEXION
Connecter à un lecteur DVD avec un câble Vidéo
Le câble vidéo composite (CVBS) transmet les
signaux de luminance (signal Y) et de
chrominance (signal C) de façon combinée.
Branchez le câble dans la prise VIDEO in
située à l’arrière de votre HMD 900. L’autre
extrémité du câble doit être connectée à la
prise VIDEO out de votre lecteur DVD. (Merci
de vous référez également au manuel
d’utilisation de votre lecteur DVD)
Comme la connexion VIDEO (CVBS) ne
transmet pas le son, vous devez également
ajouter
une connexion audio.
Insérez une extrémité du câble audio (Cinch
[RCA]), fourni, dans la prise Cinch [RCA] L/R
AUDIO IN blanche/rouge située à l’arrière du
HMD 900 et l’autre extrémité dans la prise
AUDIO OUT (usuellement blanche/rouge) de
votre lecteur DVD (Merci de vous référez
également au manuel d’utilisation de votre
lecteur) Allumez le lecteur et sélectionnez
l’entrée vidéo composite ou le numéro du canal correspondant. Pour les numéros de
canaux et la sélection des sources, merci de vous référez au manuel d’utilisation de votre
lecteur.
Français
21

FONCTIONNEMENT
Choisir le mode
Lorsque l’appareil est allumé, appuyer sur la touche SOURCE pour passer d’un mode à
l’autre.
L’ordre des modes est le suivant: DVD > TNT> RADIO > AUX > DVD
Allumer / Eteindre le lecteur
Branchez le câble AC-DC dans la prise DC IN. Allumez le lecteur et appuyer sur la touche
POWER.
Lire un disque
1. Appuyer sur la touche OPEN pour
ouvrir le compartiment à CD.
2. Mettre le disque avec l’étiquette sur
le dessus.
3. Fermer le compartiment à CD.
4. Appuyer sur MENU pour afficher le
menu.
5. Appuyer sur STOP pour arrêter la
lecture.
6. Appuyer sur |<< pour lire le chapitre /
la piste suivante.
7. Appuyer sur >>| pour lire la piste / le
Français
chapitre suivant.
8. Appuyer sur ||> pour mettre la lecture
en pause ou la reprendre.
Accéder au menu racine d‘un DVD
Appuyer sur MENU pendant la lecture pour l’afficher.
Un DVD est divisé en différentes sections nommées titres et chapitres. Lorsque vous lisez
un DVD, le menu racine du disque apparaît sur l’écran. Le contenu varie d’un disque à
l’autre Appuyer sur MENU pendant la lecture pour le réafficher. Certains DVD vous
permettent de choisir les options uniquement à partir de ce menu racine.
22

FONCTIONNEMENT
Changer la langue audio pendant la lecture
1. Appuyer sur AUDIO pour changer la piste audio pendant la lecture d’un DVD. Le nombre
de langues audio, le nombre total de langues disponibles et la langue choisie sont
affichés.
2. Si différentes langues sont disponibles appuyer une nouvelle fois sur AUDIO pour choisir
celle que vous voulez. La liste audio disparaîtra après 3 secs si la touche AUDIO n’est
pas utilisée.
Note: Certains DVD ne permettent cette fonction qu’à partir du menu racine.
Sous-titres
1. Appuyer sur SUBTITLE pour changer la langue des sous-titres pendant la lecture. Le
nombre de langues audio, le nombre total de langues disponibles et la langue choisie
sont affichés.
2. Si différentes langues sont disponibles appuyer une nouvelle fois sur SUBTITLE pour
choisir celle que vous voulez.
3. La liste audio disparaîtra après 3 secs si la touche n’est pas utilisée.
Note: Certains DVD ne permettent cette fonction qu’à partir du menu racine.
Touche répétition
Pour répéter un titre, un chapitre ou les 2.
Pendant la lecture, appuyer sur REPEAT plusieurs fois pour passer d’une option à une
autre :
Chapitre---Répète le chapitre actuel
Titre---Répète le titre actuel
Toutl---Répète tous les titres et chapitres
Off---Retour à la lecture normale
Français
23

FONCTIONNEMENT
Arrêter la lecture
1. Appuyer sur STOP pour arrêter la lecture. L’appareil mémorise automatiquement
l’endroit de l’arrêt.
2. Appuyez sur PLAY pour reprendre la lecture.
3. Réappuyez sur STOP pour complètement arrêter la lecture du disque.
Remarque:
• Certains types de disques ne supportent pas la reprise de la lecture après le premier
arrêt.
Pause
1. Appuyez sur PLAY/PAUSE pour mettre la lecture d’un disque sur pause.
2. Appuyez sur PLAY/PAUSE pour reprendre la lecture.
Avance rapide / retour rapide
1. Rester appuyé sur |<< pour passer au retour rapide (vitesse 2x-4x-8x-20x .)
2. Rester appuyé sur >>| pour passer à l’avance rapide (vitesse: 2x-4x-8x-20x )
Note :
• En avance/retour rapide, il n’y a pas de son
Français
Répéter la lecture
1. Appuyer sur REPEAT pour choisir le point de départ de la répétition. L’écran
affichera “Répétition A-“
2. Appuyer une nouvelle fois sur REPEAT pour choisir le point d’arrêt de la répétition.
La répétition du segment A-B démarrera.
3. Appuyer une nouvelle fois sur REPEAT pour annuler la répétition et revenir à la
lecture normale.
Répétition de titres, chapitres ou pistes
1. Appuyer sur REPEAT pendant la lecture pour choisir le titre, chapitre ou la piste à
répéter.
2. DVD: titre, chapitre – VCD ou CD: piste – Musique: fichiers, répertoire
24
 Loading...