


FULL ELECTRONIC WASHING MACHINE USER MANUAL

THE CONTENTS
SECTION 1:BEFORE USING
Safety warnings
Recommendations
SECTION 2:INSTALLATION
Removal of transportation screws
Adjustment of feet
Electrical connection
Water supply connection
Water drain connection
SECTION 3:TECHNICAL SPECIFICATIONS SECTION 4:CONTROL PANEL
Start/Pause button
Function indicator lights
Function buttons
Program knob
SECTION 5:WASHING YOUR LAUNDRY
Before washing
Running the machine
SECTION 6:MAINTENANCE AND CLEANING
Water inlet filters
Pump filter
Detergent drawer
Siphon plug
The cabinet
The drum
Remove of your machine from lime
SECTION 7: PRACTICAL INFORMATION
SECTION 8:AVOIDING MINOR FAULTS
SECTION 9:AUTOMATIC FAILURE DETECTION SYSTEM SECTION 10:INTERNATIONAL WASHING SIGNS
1

SECTION 1:BEFORE USING
SAFETY WARNINGS
Do not use a multiple socket or extension cord.
Do not insert a plug with damaged or broken cord into the socket.
If the cord is damaged it should be replaced by the manufacturer or appointed service agent in order to avoid a hazard.
Never remove the plug from the socket by pulling from the cord section. Remove the plug by holding.
Do not plug the power supply with wet hands.
Never touch the machine with wet hands or feet.
Never open the detergent drawer while the device is running.
Never force to open the door of the machine while the machine is running.
Since the machine can reach high temperatures while running, do not touch the drain hose and water during draining.
In case of any failure, first unplug the device and close the water tap. Do not attempt to repair.Please apply to the nearest authorized service station.
Do not forget that the packing material of your machine may be hazardous for children.
Do not let your children play with the washing machine.
Keep your pet away from your machine.
Your machine should only be used by adults within the information written in this manual.
Your machine is designed for use in house environment. Warranty will be invalid if you use it for commercial purposes.
Never use or store flammable materials nearby the appliance.
To clean the appliance do not use inflammable cleaning agents.
The appliance should not be put on a carpet which can block the air ventilation on the bottom side.
RECOMMENDATIONS
The detergent or softener in contact with air for a long time will dry and stick to your detergent drawer.To avoid this put your detergent and softener into the detergent drawer just before washing.
It is recommended that you use pre-washing program for only very dirty clothes.
Please do not exceed the maximum loading capacity.
The appliance is not intended for use by people (including children) with reduced physical,sensor yor mental capabilities , or lack of experience and knowledge , unless they have been given supervision or instruction concerning use of the appliance by a preson responsible for their safety.Children should be supervised to ensure that they don’t play with the appliance.
2
If you will not use your machine for a long time, unplug your machine, close the water supply and leave the door open in order to keep the inside of the machine dry and for prevention from unpleasant odour.
As a result of the quality control procedures, a certain amount of water may remain in your machine. This is not harmful for your machine.
SECTION 2: INSTALLATION
You must pay attention to the following issues before using your washing machine.
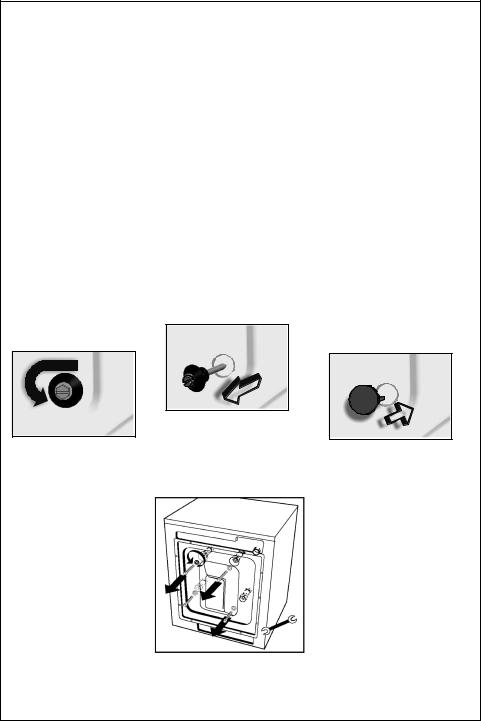
REMOVAL OF TRANSPORTATION SCREWS
Transportation screws, which are located at the back side of the machine, must be removed before running the machine.
Loosen the screws by rotating counterclockwise by a suitable wrench. (DIAGRAM-1)
Remove the screws by pulling them.(DIAGRAM-2)
To the holes where the transport screws have been removed, insert the plastic transport screw taps found in the accessories bag. (DIAGRAM-3)
The transportation screws, that have been removed from the machine should be kept in hand for any other transportation necessities.
|
DIAGRAM-2 |
DIAGRAM-1 |
DIAGRAM-3 |
3
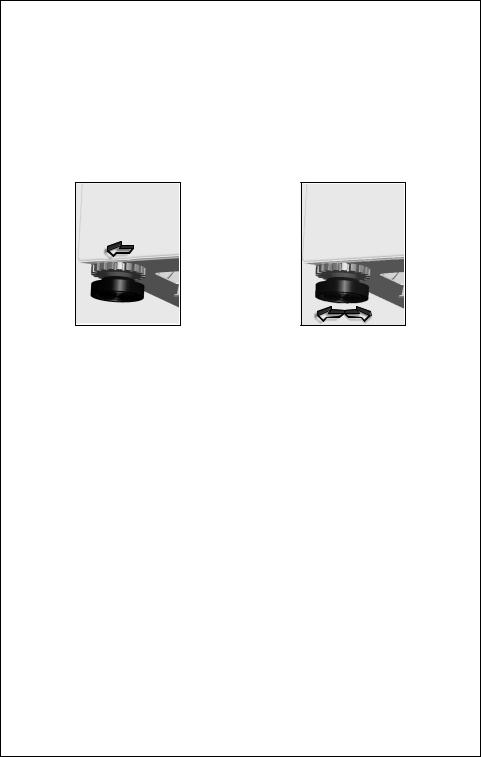
ADJUSTMENT OF FEET
Do not install your machine on rugs or similar surfaces.
For your machine to work silently and without any vibration, it should be settled on a flat, non-slippery and tough ground.
You can adjust the balance of your machine from its feet.
First, loosen the plastic adjustment nut.
Adjust by rotating the feet upwards or downwards.
After the balance has been reached, tighten the plastic adjustment nut again by rotating it upwards.
Never put cartons, wooden blocks or similar materials under the machine to balance the irregularities on the level of the ground.
ELECTRICAL CONNECTION
Your washing machine works with 220-240V and 50Hz.
A special grounded plug has been attached to the network cable of your washing machine. This plug must definitely be inserted to a grounded socket with 10 ampere. The fuse flow value of the electricity line attached to this should also be 10 ampere. If you have no such sockets and fuses in your house, let it be made by a qualified electrician.
Our company will not be responsible for any damages that may occur as a result of usage without grounding.
Insert the machine’s plug to a grounded socket which you can easly reach.
WATER SUPPLY CONNECTION
Depending on the features your machine,may be with single water inlet(cold) or double water inlet (cold/hot). The white headed hose is for cold water inlet and red headed hose is for hot water inlet (valid for machines with hot&cold water inlet).
To prevent leakage from the connection joints, 1 (valid for cold water inlet) or 2 (valid for machines with hot&cold water inlet) seals are included in the hose packing. Fit these seals at the end of water inlet hoses on the tap side.
Connect the white headed hose to the water inlet valve with white filter and connect the red headed hose to the water inlet valve with red filter (latter is valid in machines with hot&cold water inlet). Tighten the plastic parts of the connections with your hand.Please call a qualified plumber for safer connections.
4

Water pressure of 0,1-1 MPa from your tap will enable your machine to work more efficiently.(0,1 MPa pressure means water flow of more than 8 liters in 1 minute from a fully opened tap)
After connections are completed, check for the non-leakage of the connection joints by turning on your tap completely.
Be sure that water inlet hoses are not folded, broken or crushed.
Mount the water inlet hoses to a 3”/4, geared water tap.
Cold water inlet (White filter valve)
Hot water inlet (Red filter valve)
WATER DRAIN CONNECTION
Be sure that water inlet hoses are not folded, twisted, crushed or elongated by stretching.
Water drain hose should be mounted at a height of minimum 60 cm, maximum 100 cm from the ground.
The end of the water drain hose may directly be fitted to the dirty water outlet hole or a special apparatus mounted on the outlet bracket of the wash-stand.
Never attempt to extend the water drain hose by adding extra parts.
5
SECTION 3:TECHNICAL SPECIFICATIONS
|
AWG 1506/H |
AWG 1508/H |
AWG 1510/H |
|
Maximum dry laundry |
5 |
5 |
5 |
|
capacity (kg) |
||||
|
|
|
||
Height (cm) |
85 |
85 |
85 |
|
|
|
|
|
|
Width (cm) |
59,6 |
59,6 |
59,6 |
|
|
|
|
|
|
Depth (cm) |
51 |
51 |
51 |
|
Maximum spin cycle |
600 |
800 |
1000 |
|
(rpm) |
||||
|
|
|
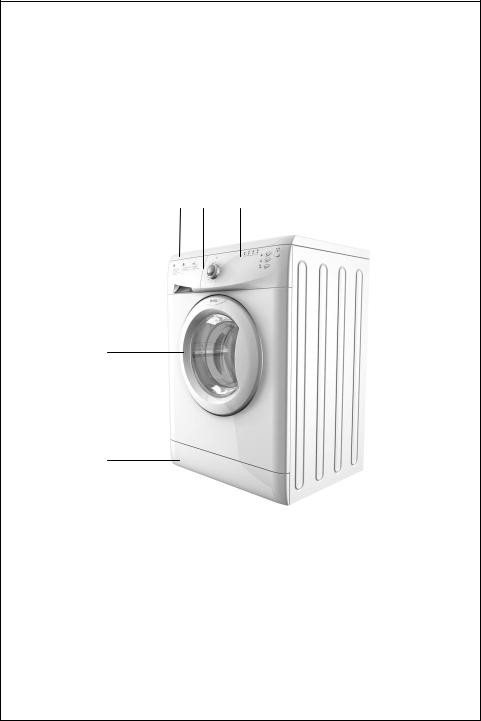
1 2 3
4
5
1-Upper tray |
5-Kickplate |
2-Detergent drawer |
|
3-Control panel |
|
4-Door |
|
These technical specifications written above for single water inlet (cold) and double water inlet (cold/hot) in machines.
6
SECTION 4:CONTROL PANEL
1 |
2 |
3 |
|
4 |
|||
|
|
|
|
|
|
|
|
|
|
|
|
|
|
|
|
|
|
|
|
|
|
|
|
|
|
|
|
|
|
|
|
|
|
|
|
|
|
|
|
|
|
|
|
|
|
|
|
|
|
|
|
|
|
|
|
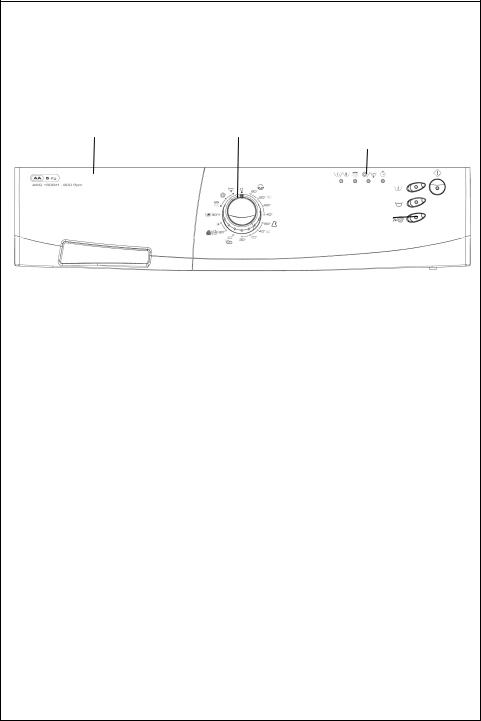
5
1-Detergent drawer
2-Program knob
3-Washing operation light
4-Start/pause and cancel button
5-Function buttons
7
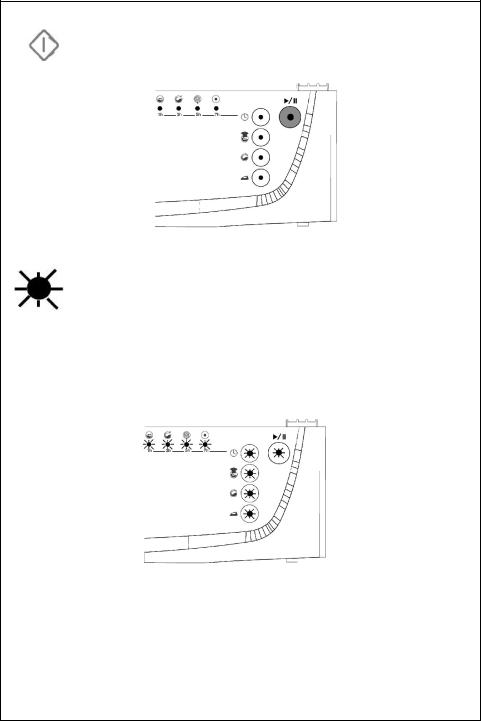
START/PAUSE BUTTON
This button is used for starting a selected programme or putting a programme in progress on pause.
FUNCTION INDICATOR LAMPS
Pressing the start/pause button or any other function button switches on the lamps found above the buttons and the control panel, which indicate the wash stages of programmes. When any one of these lamps is on it means that certain programme is in use. The lamp is off when any function button or the start/pause button is pressed, or the selected function has finished its operation.
The function indicator lamps are also used for failure codes specified in Section 9.
8
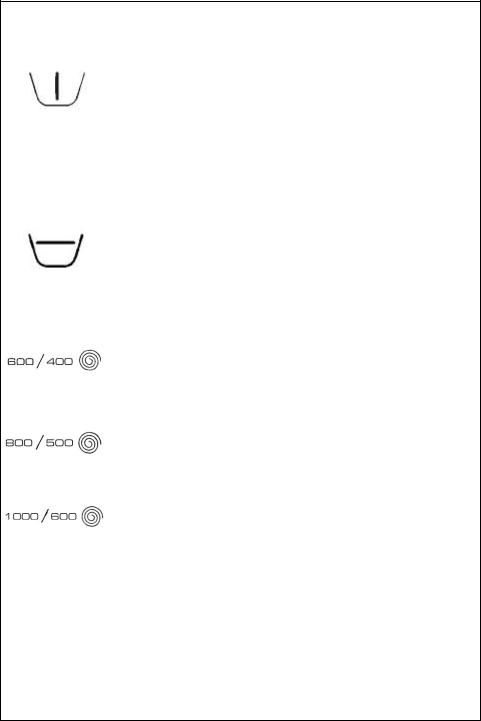
FUNCTION BUTTONS
Pre-wash
With this function you can start an additional wash operation for heavily soiled laundry. When you use this function you must put detergent into the prewash compartment of the detergent drawer. If the additional function features of your machine contain this option and you will wash your laundry in a prewash programme, the lamp above the function button will automatically light up. Even if you press the function button to cancel this feature it will not be cancelled at a wash function with a prewash operation.
Rinse hold
This function is recommended to be used when the clothes cannot be taken immediately after the end of the program. This will prevent occurrence of wrinkles.When this button is pressed, the last rinsing water is not drained. For the program to continue from the same point, repress the startpause button.
Spin speed reduce (AWG 1506/H)
By using this function, you can reduce your spinning cycle speed from 600 cycles to 400 cycles,depending on the model you’ve chosen.
Spin speed reduce (AWG 1508/H)
By using this function, you can reduce your spinning cycle speed from 800 cycles to 500 cycles,depending on the model you’ve chosen.
Spin speed reduce (AWG 1510/H)
By using this function, you can reduce your spinning cycle speed from 1000 cycles to 600 cycles, depending on the model you’ve chosen.
WARNING!
If you have forgotten to use an additional function and the machine has started the wash operation press the button of the additional function you wish to select; if the indicator lamp above it keeps lighting the additional function you selected will become active. If the lamp stays lit for a certain while and then goes out the additional function you selected will not become active.
9
 Loading...