


Waves Tune
Tuning Correction Plug-in for Vocals and Monophonic Sound Sources.
Software Users Guide
Introduction and Overview
Waves Tune is a software audio processor which allows for correction and manipulation of pitch in vocals and monophonic instruments. When Tune is inserted into a track of your audio sequencer or editor , it detects the signal’s pitch and corrects to the nearest “clean” (in-tune) note. You can perform straightforward pitch clean-ups of a track, meticulous, nuanced touch-ups or complete manipulation of the melody, depending your settings choices. Tune delivers excellent results in any form of music, even non-Western. Vocalists, producers and engineers facing complicated pitch-correction problems will benefit from the extraordinary quality and flexibility which Waves Tune offers.
Tune operates in perfect sync with the host timeline. It even takes charge of transport functions and region playback in host applications using ReWire technology by Propellerhead Software.
Tune offers natural sounding results while maintaining tight pitch correction by using formant corrected pitch shifting, combined with smoothing of note transitions as well as detection and editing of natural vibrato. Now, pitch shift with a synthetic sounding quantized effect is a choice rather than artifact.
A piano roll interface makes pitch curve editing familiar and comfortable, much like editing MIDI notes on a sequencer track. The pitch correction curve is a WYSIWYG (What You See Is what You Get) display. Changes to a selection’s correction parameters can be viewed and auditioned in real time.
The process is streamlined and scalable, so that you can start from a purely default tuning scheme, then intervene after an initial scan to fine-tune sections needing further attention using the graphical and parametric correction tools. The controls are laid out in a way that makes the workflow clear, intuitive and efficient.
Please note!
•Tune must scan the audio before any correction will take place.
•Tune will display the intended correction during the scan but the sound correction will be bypassed until the scan is complete.
•When using ProTools, a Waves ReWire plug-in must be inserted in order to work in sync with the host transport and timeline.

Quick Start
INSERTING THE PLUG-IN
To get started, insert Tune onto your vocal track (or monophonic instrument track.) It is important that Tune precedes any effects processing on the source. We recommend that Tune is your first insert on the track.
Important note to ProTools users!
For proper operation of Tune you need to first insert the Waves ReWire plug-in into your session. Since the Waves ReWire plug-in has no audio output you should insert it into an auxiliary track so that it doesn’t use a valuable voice.
Other host applications automatically launch the Waves ReWire device. ReWire technology is made by Propellerhead software.
Once inserted on a track, Tune is ready to scan an incoming signal. To keep memory usage reasonable and to offer you an extremely stable work environment, Tune can track pitches for a duration of ten consecutive minutes. If you need to scan more than ten minutes, you can clear the memory and use the Session Start Time dialogue to start a new scan at a later specific location.
Tune fully syncs with the host editor’s time line, so that you will not have to leave the plug-in during your session. The following transport functions can be performed from within Tune:
1.Play start time.
2.Mark and playback loop regions.
3.Stop playback.
4.Start playback.
5.Set session start time.
6.Snap marker to host’s grid option.
All this is done using ReWire technology licensed from Propellerhead Software.
Before you begin scanning your track, you can set global parameters and segmentation parameters such as Scale and Root. These can be modified later, but the modifications will affect only the selected notes. Reference Pitch should be adjusted before the scan, as any changes made after the scan will require clearing the graph and re-scanning.
SCANNING AND PITCH TRACKING
When you send audio through the plug-in, Tune will perform a scan and create the following displays:
•Waveform overview - displayed at the top.
•Detected pitch curve - displayed in orange on the piano roll pitch editing graph.
•Correction pitch curve - displayed in green on the piano roll pitch editing graph.
•Note segments – displayed as light white blocks around segments of the pitch correction curve.
An orange highlight on the top waveform overview indicates that Tune is scanning audio. During the scan, you will not hear any changes in the original audio.
There’s no need to scan the entire track at once. Whenever Tune detects signal in a section where it hasn’t yet established a pitch curve or where the pitch curve has been
cleared, it will automatically begin scanning. The sound output will remain uncorrected during the scan, but an orange highlight will appear to indicate that scanning in progress.
PITCH CORRECTION AND PITCH CURVE EDITING
After a section is scanned and its correction curve and note segmentation are created, you can play back the section to apply and hear the correction. Audition through the track’s assigned output. You can now select notes, sections or the entire piece and begin adjusting the correction curves.
Use the default Note tool to make a selection in the Tune graph. Select a single note by clicking on it or select multiple notes by clicking outside and dragging over the area you would like to select. The Select All button allows you to quickly select the entire curve with all its notes.
During the scan, Tune scans the track and applies default correction parameters for the construction of the correction graph. Choosing Select All is a convenient way to choose your own custom parameters rather than the automatic defaults. Once all segments are selected you can change the Segmentation and Correction Parameters. Increasing Note Tolerance in the Segmentation section, for example, will reduce the amount of false note transitions in places where the singer went off key momentarily.
When you are satisfied with the segmentation settings, you can increase or decrease any of the Correction Parameters for tighter or more relaxed correction. The results are animated and auditioned in real time. Once you are happy with the overall correction, you can make local adjustments to sections or individual notes using the Correction Parameters and Graphic Tools.
SO MUCH FOR THE QUICK START
The Tune interface is logical and intuitive, so with a bit of trial and error and a good pair of ears you should quickly be able to achieve quality results. But to get the most from the product, please read the rest of this manual.
The next chapter will take you through Tune’s interface and describe each control. After that, in the chapter “Working with Tune,” you’ll find comprehensive instructions describing how to control Tune in greater detail.

Tune Interface Reference
The Tune Interface is divided into the following sections –
•Global Correction section
•Segmentation section
•Correction Parameters section
•Graphic Editing Tools section
•Vibrato section
•Main Pitch Editing Graph
GLOBAL CORRECTION SECTION:
The Global Correction section , the first section of the Tune work flow, offers four global tune parameters which are critical for pitch detection:
Reference Pitch –This is similar to the calibration adjustment on a standard guitar/instrument tuner. It allows adjusting the overall tuning offset for any scale. Reference Pitch should be adjusted before the scan. Changing Reference Pitch later will require clearing the graph and re-scanning.
Default: A = 440hz; Range: +/- 2 octaves (220hz-880hz.)
Global Pitch Shift - Here you will define the global pitch shift which you want to perform on all scanned material. Global shift defines a constant shift in equal tempered semitones (half steps.)
Default = 0 ; +/- 12 half-steps (semitones.)
Formant Correction - The correction type can be set to Formant corrected or Non Formant corrected. For vocals we recommend formant correction to avoid unnatural pitch shifts. You may change this setting at any time and the note shift method will adjust accordingly.
Range- This parameter will narrow Tune’s detection area to a certain range (bass, baritone, tenor, soprano etc.,) making detection in that range more precise. You can change the range of detection simply by narrowing or enlarging the grayed out area on the Piano Roll. This is done by placing the mouse over the current range border until the pointer changes into a resize tool. Click-dragging will adjust the detection range boundary.
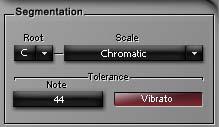
SEGMENTATION SECTION:
The Segmentation section allows you to select conditions by which Tune will segment the correction curve into notes. These conditions set the “rules” of the Correction Grid in determining whether or not a note is “legal.” This section has two main parts: Scale Selection and Tolerance Parameters.
Root and Scale (pop up menu items):
The Root pop-up defines the root note for the selected scale. The default scale is a 12 semitone (half-step) equal tempered chromatic scale. Since the notes in a scale will define the correction grid, a selected scale preset will adjust the number of notes, as well as the Note Status (legal vs. illegal.) The grid serves as a table of possible “correct to” pitch values which are designated according to the detected input pitch.
Default Scale: Chromatic.
Default Root: Grayed out - will become available when scale is changed.
Clicking on the Edit Scale button allows you to further change and manipulate the scale.
Tolerance:
The Tolerance control works between the detection and the assignment of target notes (segments.) It sets a couple of rules, making the target note hold to the current target unless the change lasts for more then the Tolerance time, or is steeper then a defined Slope. This allows marginal detunes and small “getaways” to maintain the same target and move to a new note only when the change is more significant than the Tolerance value.
Vibrato Segmentation Button:
The Vibrato button enables detection of natural vibrato in the track. Tune will segment a section with detected vibrato so that the target note of the selection is the average pitch of the vibrato. A red highlight will appear over segments in which natural vibrato was detected.
On/Off, default off.
The detection of natural vibrato is not always perfect and some false detection might occur. If you apply vibrato re-segmentation onto a section that does not have natural vibrato, it might cause artifacts or clicks. Try using Natural Vibrato for selections in which you think there is vibrato to detect and see whether Tune’s vibrato segmentation is helpful. Working with vibrato is as much an art as a science.
Natural Vibrato has separate controls for segmentation in the Segmentation section and manipulation control in the Vibrato section. Although these two applications both rely on the same type of vibrato detection processes, You will only have the option to use the
 Loading...