


 Loading...
1

Table of Contents
|
Introduction |
4 |
|
About SoundGrid |
4 |
|
1. StudioRack Integration and Components |
6 |
|
1.1 Installation |
8 |
|
1.2 Inserting StudioRack |
8 |
|
1.3 File Locations |
9 |
|
1.4 StudioRack Interfaces |
10 |
|
2. Controls Common to All StudioRack Components |
12 |
|
2.1 SoundGrid Network Status Section |
12 |
|
2.2 Chainer Section |
14 |
|
2.2.1 Bypass / Disable / Enable |
16 |
|
2.2.2 Copy and Paste Features |
16 |
|
2.2.3 Storing and Recalling Presets |
19 |
|
2.2.4 Sidechain |
20 |
|
2.3 Input and Output Faders and Meters |
22 |
|
3. Plugin Automation in Studiorack |
23 |
|
4. Assigning Controls |
26 |
|
4.1 Assigning Plugin Parameters to StudioRack Quick Keys |
26 |
|
4.1.1 Displaying a Plugin’s Gain Reduction with the Quick Meter |
29 |
|
4.1.2 Disconnecting Quick Key Assignments |
29 |
|
|
|
|
|
|

|
|
4.1.3 Viewing Quick Keys Assignments |
30 |
|
|
|
4.2 Assigning Plugin Parameters to a MIDI Controller |
31 |
|
|
|
4.3 Assigning Plugin Parameters to an Avid Controller |
32 |
|
|
|
4.4 Multi-Assign Mode |
33 |
|
|
|
5. Low-Latency Recording and Monitoring |
34 |
|
|
|
5.1 eMotion ST Monitoring Section |
36 |
|
|
|
5.2 Monitoring Section Controls |
36 |
|
|
|
5.3 Control What You’re Listening To |
38 |
|
|
|
5.4 Establishing a Link Between StudioRack and eMotion ST |
39 |
|
|
|
5.5 Where Do You Work: StudioRack or eMotion ST? |
44 |
|
|
|
5.6 Step-by-Step Guide to StudioRack Monitoring Setup |
45 |
|
|
|
6. StudioRack for Pro Tools HD and HDX Systems |
47 |
|
|
|
6.1 How Many StudioRacks Can I Use? |
47 |
|
|
|
6.2 Using StudioRack in I/O Insert Mode |
50 |
|
|
|
Appendix 1: Moving StudioRacks to Another DAW |
55 |
|
|
|
Appendix 2: Monitor Switching Under DAW Command |
56 |
|
|
|
Appendix 3: The WaveSystem Toolbar |
62 |
|
|
|
Appendix 4: A Note to Mac Users |
62 |
|
|
|
|
|
|
|
|
|
|
|

INTRODUCTION
Thank you for choosing the StudioRack plugin from Waves. In order to get the most out of this product, please take some time to read this manual. We also suggest that you become familiar with the Waves support site: www.waves.com/support. There you will find an extensive answer base, the latest tech specs, detailed installation guides, software updates, and current information about licensing and registration.
About SoundGrid
SoundGrid is a scalable network infrastructure that provides a variety of cost-effective, high-quality solutions for recording studios. It can be configured in many ways and with many hardware possibilities to provide a very flexible audio work environment. This framework is managed by the SoundGrid Studio application, which configures the network, assigns and manages I/Os, controllers and servers, and streams audio throughout the system. Any user, anywhere on the SoundGrid network, has access to any network I/O device. Adding a SoundGrid DSP server moves processing away from the host computer. This enables users to work with a large number of plugins simultaneously and to create complex, low-latency monitor mixes from numerous sources. Key to these features are the StudioRack plugin and the eMotion ST mixer.
4
StudioRack is a DAW plugin.
As a channel insert to any DAW, StudioRack chains up to eight plugins, controls them, assigns them to external controllers, and manages them—with their presets—all in a way that makes it easy to move from one DAW session to another and from one DAW platform to another.
StudioRack enables users to create racks of processors with limitless parameters and flexible signal flows that are easily inserted into any track of the session.
As part of a SoundGrid network with a DSP server, StudioRack can shift plugin processing from the local CPU to the SoundGrid DSP server. StudioRack works in conjunction with the eMotion ST mixer to create numerous personalized monitor mixes that use the same plugins heard in the mix—all with virtually no latency. There are no surprises between tracking and mixing. Using StudioRack, you can switch between playback and live input while recording; switching can be controlled manually or automated from the DAW transport.
StudioRack is a flexible tool that can be used with local processing on any DAW, including Pro
Tools HD/HDX and HD Native systems. Processing can take place locally on the host CPU or on a
DSP server.
5
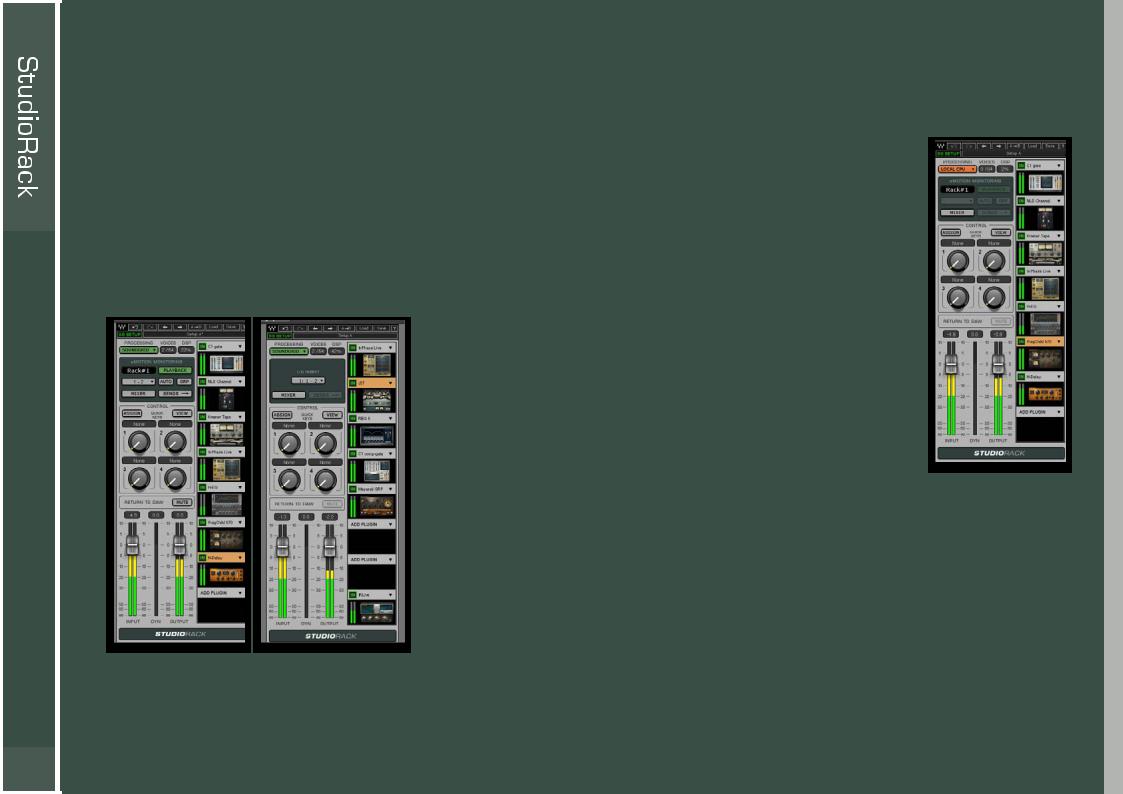
1. STUDIORACK INTEGRATION AND COMPONENTS |
|
||
StudioRack can be used in a number of configurations. |
|
||
■ |
Local CPU Mode: Processing takes place in the host computer. In this mode, a StudioRack can be inserted |
|
|
■ |
on tracks on any compatible DAW, regardless of the ASIO/Core Audio driver. No special setup is required. |
|
|
SoundGrid DSP Mode: Processing is sent to an external DSP server. Working in this mode requires a |
|
||
|
SoundGrid-compatible I/O and server. |
|
|
SoundGrid real-time processing integrates differently on systems that use the Waves SoundGrid ASIO/Core |
|
||
Audio driver as their sound engine than on those that use the Avid Pro Tools HD/HDX or HD Native driver: |
|
||
|
|
- SoundGrid ASIO/Core Audio driver: |
|
|
|
For DAWs using the SoundGrid driver and a DSP server, processing |
|
|
|
takes place on the server, while audio is routed to the server and |
|
|
|
back by StudioRack. Integration is transparent. |
|
|
|
- Avid Pro Tools driver: Pro Tools HD/HDX and HD Native DAWs |
|
|
|
cannot be integrated directly into a SoundGrid network because |
Local CPU |
|
|
they must use their own playback engine. This requires a special |
|
|
|
|
|
|
|
solution: I/O inserts are assigned manually to route audio between |
|
|
|
DAW channels and StudioRack inputs. This enables Pro Tools systems |
|
|
|
to take advantage of StudioRack while continuing to operate under their |
|
|
|
own playback engine. |
|
|
|
The eMotion mixer’s Monitoring section differs slightly in each of the two cases |
|
|
|
(see diagram). |
|
|
StudioRack |
StudioRack |
|
|
SoundGrid |
SoundGrid |
|
|
SG driver |
Avid driver |
|
6 |
|
|
|

StudioRack Local CPU. |
|
Opens on any DAW, |
|
any driver. StudioRack |
|
functions like any plugin. |
|
StudioRack |
|
DSP Processing |
|
Systems using SoundGrid |
HD Systems |
ASIO/Core Audio driver |
I/O Insert mode |
StudioRacks Are Transportable |
|
Move a StudioRack from one track to another or from one DAW session to another, and rack organization, plugins and all presets will |
|
follow. Move a session from one studio to another, and the StudioRack—with all its properties—will follow. You will, of course, need the |
|
same plugins in both systems, but you don’t need the same hardware. StudioRacks can move between Local, SoundGrid DSP, and I/O |
|
Insert sessions. |
|
StudioRacks created in SoundGrid mode on a server-based DAW system can be used in Local CPU mode on other systems. And sessions |
|
created on a StudioRack working in Local mode can operate in SoundGrid DSP mode on a server-based network. |
|
This means you can record and monitor with low latency at a studio with a SoundGrid DSP system, edit the tracks on a native DAW, and |
|
then mix on a Pro Tools HD/HDX or HD Native system. |
|
7 |
|

1.1 Installation
Install StudioRack with the Waves SoundGrid Studio installer. Use the Waves Installer for the Waves plugins you will be using with StudioRack. Both installers can be found on the download page at www.waves.com. Create or log on to your Waves account, and use the Waves License Center to license your products.
Licenses
SoundGrid licensing is layered, so you can find the system that best meets your current needs.
■ The StudioRack Native license allows plugin processing on your local CPU. All Waves Native plugins are compatible.
■ The StudioRack SoundGrid license lets you offload your plugin processing to a DSP server. You can use StudioRack with either local CPU or SoundGrid processing. StudioRack SoundGrid requires SoundGrid plugins.
■ The eMotion ST license enables low-latency monitoring while recording, as well as other eMotion ST features.
License your SoundGrid components with the Waves License Center, an application that manages licenses for all Waves products
1.2 Inserting StudioRack
Whether you are using StudioRack in Local CPU or in SoundGrid mode, the plugin is always called “StudioRack” in the DAW’s insert menu. Your hardware/software combination will determine which component to load. You must, however, choose the correct track component:
■ Mono
■ Mono-to-stereo1
■ Stereo (multi-mono not supported)
1. StudioRack I/O Insert mode does not have a mono-to-stereo component.
8

1.3 File Locations
The StudioRack plugin and its library are installed to a different location than your other Waves plugins. StudioRack works closely with the SoundGrid Studio Application and the eMotion ST mixer. To ensure compatibility and full functionality between them, we have isolated them from your other plugins.
StudioRack and its accompanying library are installed to:
Mac: System HD /Applications /Waves /SG Studio /Modules
PC: C /Program Files (x86) /Waves /SG Studio /Modules
StudioRack has a dedicated WaveShell for each of its supported formats: DAE, AAX, VST, VST3, AU.
9

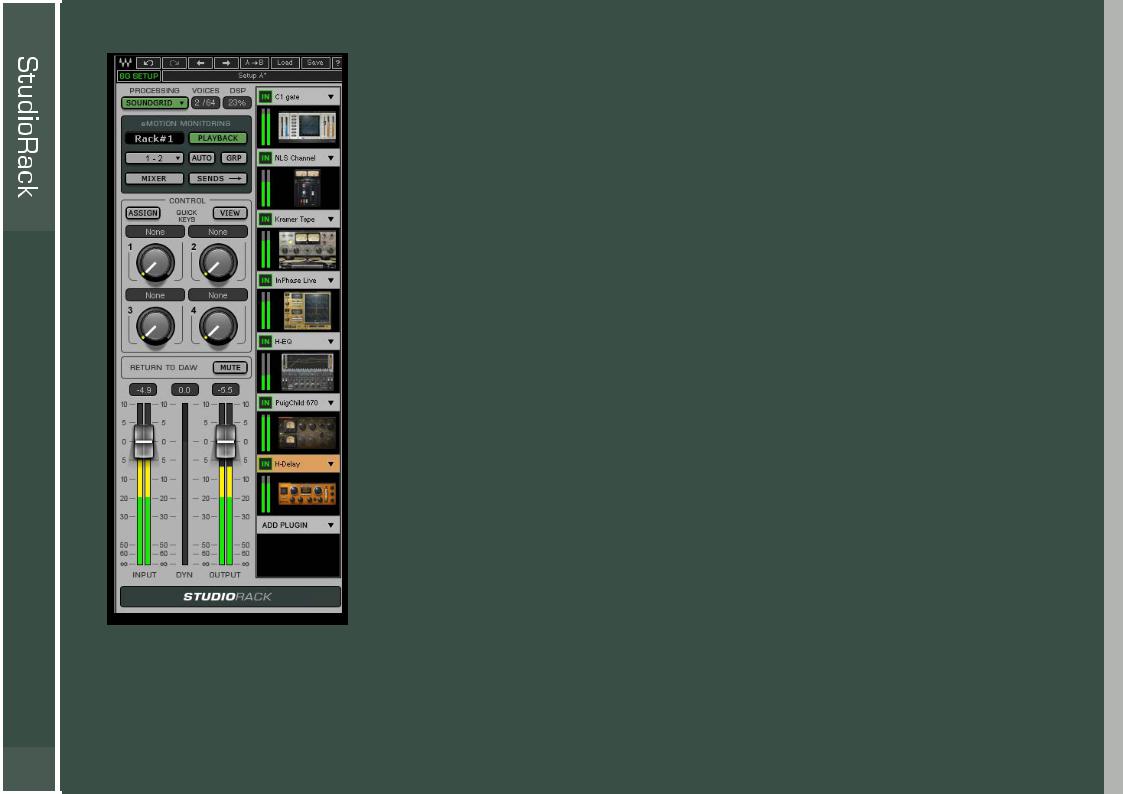
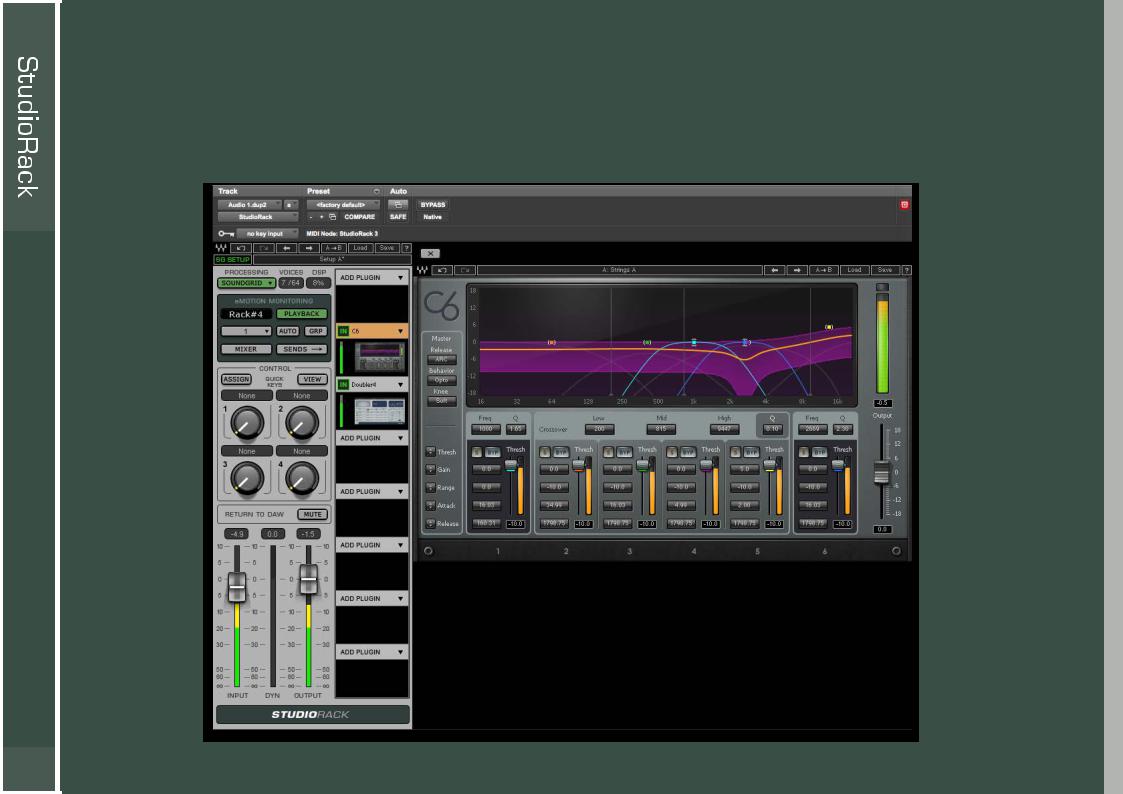
1.4 StudioRack Interfaces |
|
There are two StudioRack interfaces. They are identical except for the eMotion ST monitoring section. |
|
|
SoundGrid network status |
|
Processing mode |
|
Plugin chainer section |
|
eMotion ST monitoring section |
|
I/O insert mode section |
|
Assignment controls |
|
Input/output section |
|
The red outline indicates |
|
the section that differs |
|
between modes. |
StudioRack I/O Insert Plugin |
StudioRack Standard Plugin |
10 |
|
Default Instantiation Modes |
|
The two StudioRack interfaces differ because there are two ways of integrating StudioRack and SoundGrid Studio with the host |
|
DAW. When inserted to a DAW track, StudioRack opens with a view that reflects the system’s configuration and the selected |
|
component (mono, mono-to-stereo, stereo). |
|
Host |
Default Open Condition |
All DAWs |
Standard StudioRack component / Local DSP processing |
Pro Tools HD Native* |
Standard StudioRack component / Local DSP processing |
Pro Tools HD/HDX* (through DSP menu) |
StudioRack SG DSP I/O Insert mode |
Pro Tools HD/HDX (through Native menu) |
Standard StudioRack component / Local DSP processing |
* Requires SoundGrid DSP server and I/O. |
|
Switching from one processing mode to another is discussed later in this manual. |
|
11 |
|
2. CONTROLS COMMON TO ALL STUDIORACK COMPONENTS
The following controls and indicators are common to all StudioRack modes and components.
2.1 SoundGrid Network Status Section
When StudioRack is operating as part of a SoundGrid network, this section is used to monitor network status and activity and to choose between Local CPU and SoundGrid DSP processing. When the host is not part of a SoundGrid network, this panel is inactive.
PROCESSING is a drop-down menu for selecting between Local CPU and SoundGrid DSP processing. In SoundGrid DSP mode, all plugin processing is performed in the SoundGrid DSP server. In Local CPU mode, the host computer does the audio processing.
Menu options:
Switch to Local or SoundGrid - Sets current StudioRack to Local CPU or SoundGrid processing. Switch all to Local CPU - All StudioRack instances in the host session are set to Local CPU processing. Switch all to SoundGrid - All StudioRack instances in the host session are set to SoundGrid processing.
Switching from Local CPU to SoundGrid processing is done in a different manner when using Pro Tools HD/HDX and HD Native systems. Rather than using the PROCESSING menu to change modes, you must use the NATIVE/DSP button on the Pro Tools menu bar.
12

Switch all instances to Local CPU mode before performing an offline bounce.
In order to provide low-latency monitoring and recording, SoundGrid DSP servers process audio in real time.
As a result, StudioRack in DSP mode does not support offline bounces.
If you attempt an offline bounce while in DSP mode, the audio will likely become corrupted.
Before performing an offline bounce in the DAW, set all StudioRack instances to Local mode. Select Switch
All to Local in the StudioRack processing section.
When the offline bounce is complete, you can switch all StudioRack incidents bank to SoundGrid DSP processing mode. Real-time bounces are not affected and can be undertaken while StudioRack is in SoundGrid mode.
VOICES displays the number of StudioRack channels in use compared with the number of allotted channels.
This applies only to server-based systems, and is independent of the voices used in the DAW. StudioRack has 64 available voices. Depending on configuration, StudioRack I/O Insert mode supports up to 64 voices. A mono StudioRack uses one voice; a stereo, two. Routing a key input/sidechain to a StudioRack also uses voices.
DSP A SoundGrid server has multiple processing cores. When StudioRack is in SoundGrid mode, the DSP meter displays the processing usage of the processing core where this StudioRack is loaded. This gives you an indication of processing headroom. If this value is over 80%, then StudioRack is using too much DSP. You may need to close or move certain plugins. If any of the processing cores—not just the one used by the StudioRack you’re currently looking at—exceed 80%, you may encounter pops or dropouts. In such a condition, the background of the window appears red.
The DSP window displays N/A if no server is present, or if you are in Local CPU mode.
To view the average CPU usage of all cores in the SoundGrid sever, refer to the DSP meter of the SoundGrid Studio on the top bar.
The SG Setup indicator is located in the Top Bar of the StudioRack interface. It reports the overall status of the SoundGrid network and server. Green indicates OK. Red indicates an error state, such as the absence of an I/O device, server or driver.
To see an overview of the SoundGrid network, click on the SoundGrid SETUP button. This section contains information about devices, servers, network status, and more. Refer to the SoundGrid Studio user guide for additional information.
13
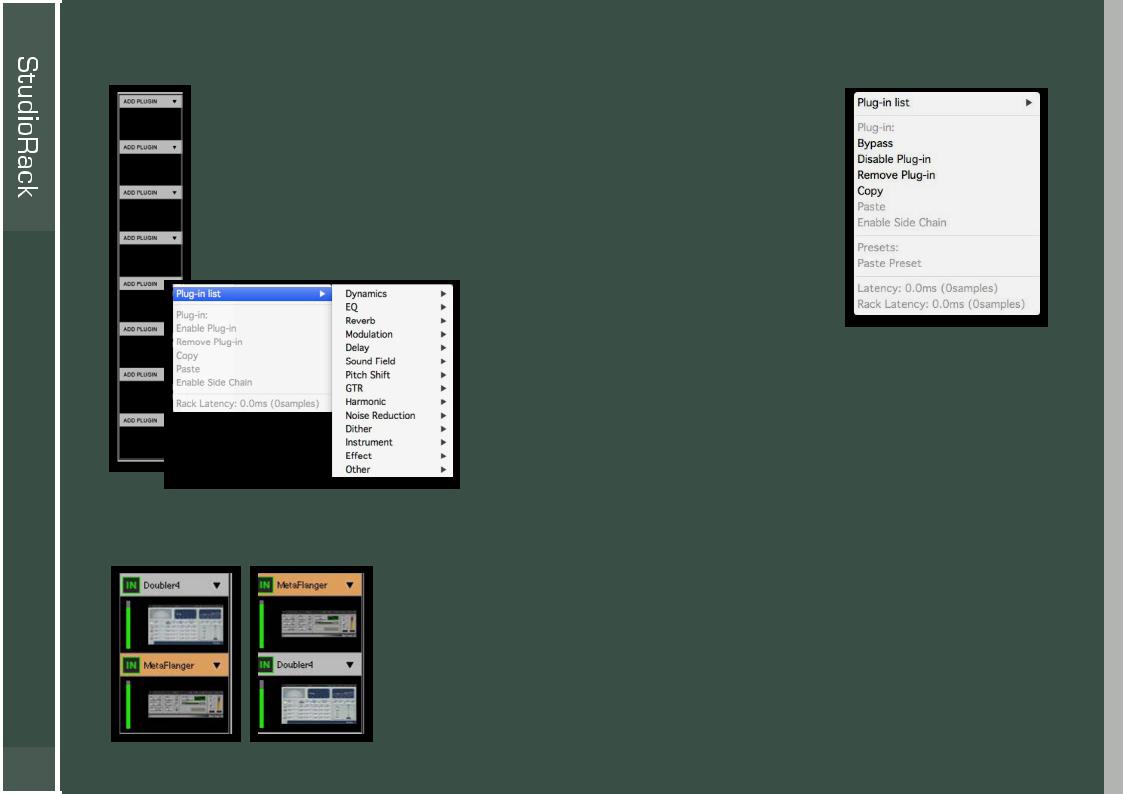
2.2 Chainer Section |
|
|
Consider this section an equipment rack that you fill with outboard processors—in this |
|
|
case, any SoundGrid Studio plugin. A chainer rack can hold up to eight plugins, each in |
|
|
its own slot. |
|
|
Every slot has a drop-down menu that is used for loading and managing plugins. It also |
|
|
provides information about latency and can be used to enable a sidechain for the rack. |
|
|
To load a plugin into a slot, left-click on the small arrow beside ADD PLUGIN. |
|
|
Select from the list of plugins that are installed |
|
|
in your DAW. Plugins are displayed by category |
Menu of a |
|
or by manufacturer, and will appear in the list |
||
populated slot |
||
whether or not they are licensed to you. |
|
|
A StudioRack using a server for processing |
|
|
may display a different set of plugins than a |
|
|
StudioRack in Local CPU mode. |
|
|
Chainer signal flow is top-to-bottom, but don’t be too concerned about processor sequence at this point. You can always rearrange |
||
the plugin order—and the signal flow—by clicking on a processor and dragging it to the desired position. |
|
|
In addition to moving plugins within a rack, you can move them from one track to another. |
||
Settings, assignments, and other characteristics will be preserved. |
|
|
14 |
|
|
When you assign a plugin to a slot, its interface will open.
This is the Plugin window. Set plugin parameters as you normally do. To hide a plugin interface, click the X in the upper left corner of the window or double-click on the name of the plugin in the rack. Click on the name of another plugin to bring the new plugin to the front.
15
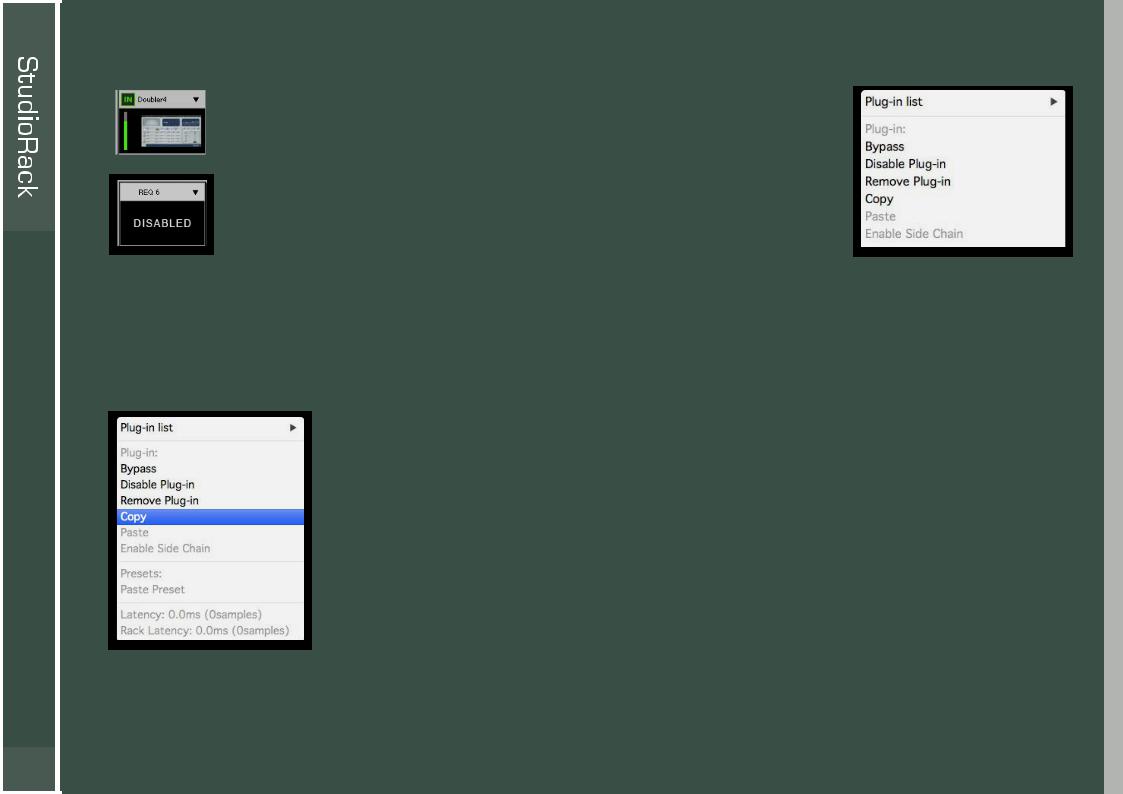
2.2.1 Bypass / Disable / Enable
To bypass a plugin, click on the IN button next to the plugin’s name. You can also select this through the menu. Disable or enable a plugin through the plugin menu, or by clicking its slot while holding down the Control key.
Both Bypass and Disable defeat the effect of the plugin’s processor. However, Disable actually removes the plugin from the processing chain without deleting it from the rack. You can re-enable the plugin without losing its settings, controls, or automation assignments. When a plugin is disabled, its name will remain visible above the slot, and its icon will be replaced with DISABLED.
Remove Plugin deletes the plugin from the slot. All parameter settings and control assignments are lost.
2.2.2 Copy and Paste Features
You can copy and paste a plugin and its parameters to another slot in a StudioRack. It is not possible to use this menu to copy only selected parameters of a plugin.
Choose Copy in the plugin menu of the selected plugin. This will copy the plugin and a snapshot of its current settings. There are two paste options:
16
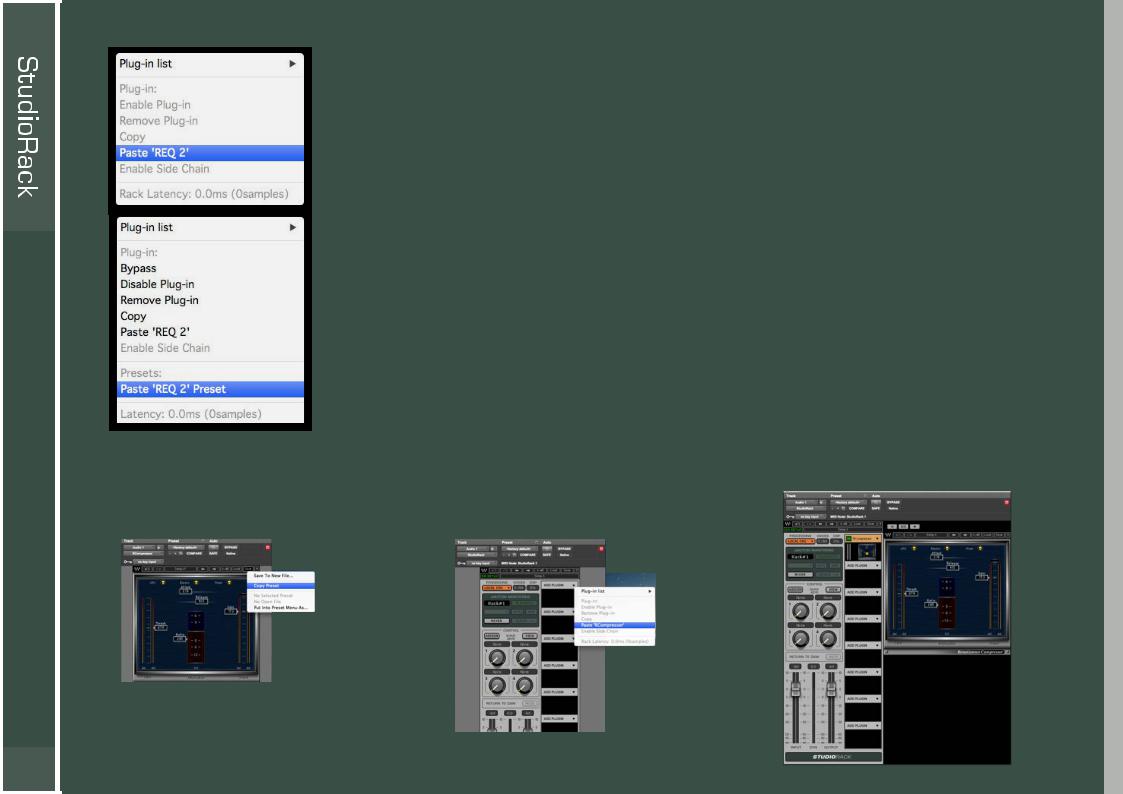
|
Paste [plugin name] |
|
Pastes the plugin and settings that have been saved to the clipboard. The paste action will replace all |
|
contents of the slot, whether empty or populated. |
|
In this image the Paste [plugin name] function is the only available paste option, since the copied |
|
information is not relevant to the plugin in this slot. |
|
Paste [plugin name] Preset |
|
Paste Preset appears only if the information on the clipboard can be applied to the plugin in the |
|
destined slot. This is applicable if the plugins are of the same family, for example between REQ2 and |
|
REQ6, but not between Q4 and REQ4. |
|
In this image, both Paste [plugin name] and Paste [plugin name] Preset functions are available. |
|
The data copied to the clipboard contains information relevant to the existing plugin. |
To copy/paste a plugin preset from an individual plugin into StudioRack, use the plugin’s Copy Preset feature to copy the preset, |
|
then use StudioRack’s Paste Preset feature to paste the entire plugin plus the copied preset. |
|
Copy |
Paste |
17 |
|
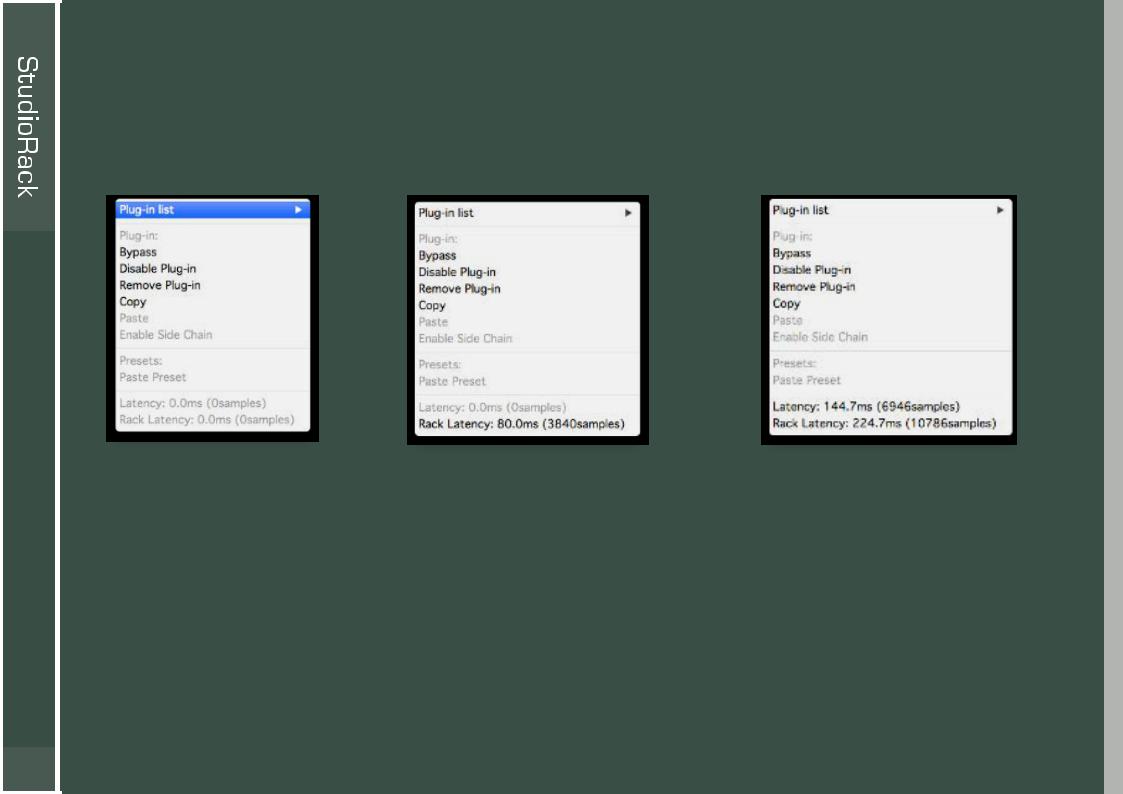
Latency |
|
|
For information about the latency introduced by plugins in the rack, go to the plugins’ drop-down menus. “Latency” indicates the |
||
latency introduced by the plugin. “Rack Latency” is the total latency of the rack. If no latency is introduced by any of the plugins in |
||
the rack, both sections will be grayed out. |
|
|
No latency introduced. |
When the selected plugin does |
When the selected plugin and |
|
not introduce latency but other |
the other plugins in the rack |
|
plugins in the rack do, only |
introduce latency, both latency |
|
“Rack Latency” reports a value. |
indicators report a value. |
18 |
|
|
2.2.3 Storing and Recalling Presets
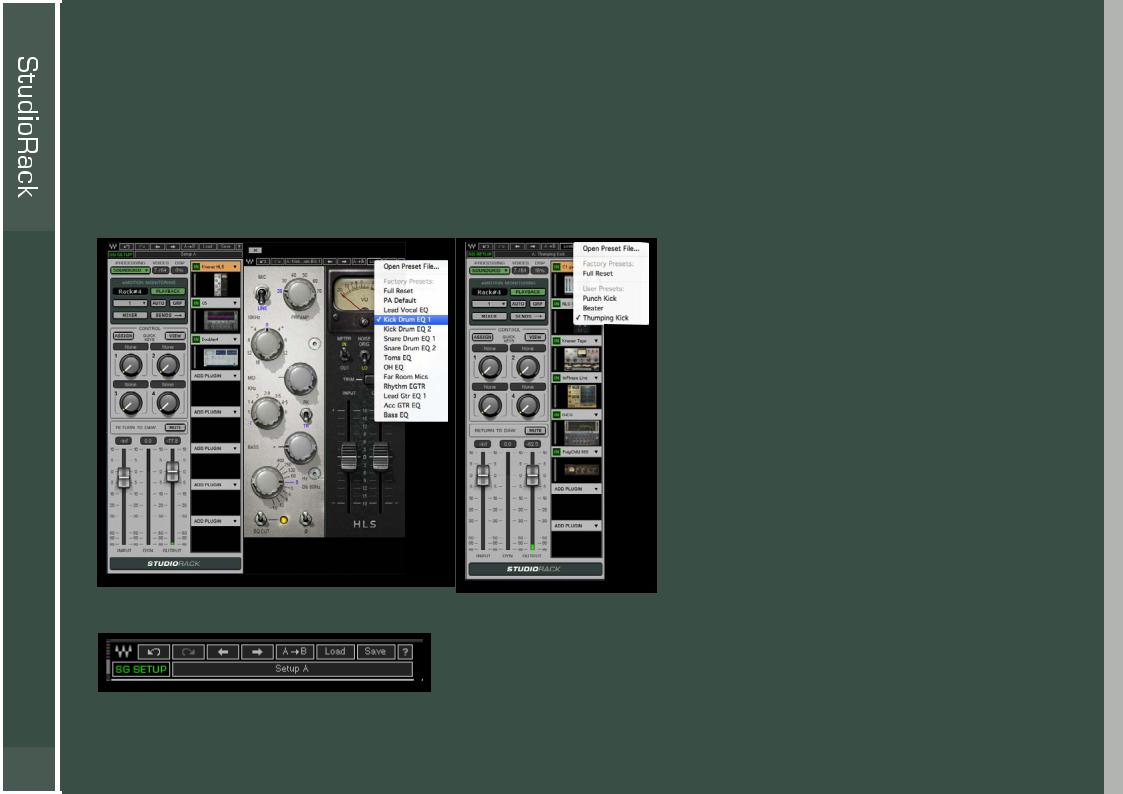
At the top of the interface of each Waves plugin are two WaveSystem Toolbars, one for each plugin and one for the entire rack. The WaveSystem Toolbar is a narrow control bar that you can use to load or save plugin presets, undo and redo actions, and compare settings. For more information, please refer to the final chapter of this user guide, “The WaveSystem Toolbar.”
To load a plugin preset, click the LOAD button on the toolbar above the plugin. A drop-down menu shows the plugin’s presets, including factory presets and the user presets you have saved.
There is also a WaveSystem Toolbar for the StudioRack itself that allows you to save and load presets for
the entire rack, including the structure of the rack, the plugins, and their settings. Plugin presets are interchangeable between all modes of StudioRack— Local, DSP, and I/O Insert. However, if plugins that are not SoundGrid-compatible are used in a Local session that is later opened in DSP mode, the incompatible plugins will be disabled. Similarly, plugins that are not licensed will not be available.
Use the rack’s A/B button to compare parameters for the entire rack. This allows you to compare changes made in several plugins and hear how they affect the overall sound. However, an A/B comparison will not compare changes to a rack’s structure (adding or deleting plugins, or changing the plugin sequence in the rack).
19
While the rack toolbar can save and load the parameters of the plugins in the rack, the Undo/Redo buttons
in this toolbar will not reflect changes in parameter settings of hosted plugins—only the parameters of the rack
itself. For example, clicking Undo on the Rack Toolbar may affect the rack’s input or output level, or undo a previous plugin addition or removal, but will not reflect changes in the parameter settings of individual plugins. So, if you’ve changed the rack’s input gain setting and then made four adjustments within a plugin, clicking Undo on the rack toolbar will return rack input to its previous level, but
the intervening plugin parameter changes will be unaffected. To undo the plugin changes, use the plugin’s toolbar. The WaveSystem Toolbar has 32 levels of Undo/Redo.
Learn more about the WaveSystem Toolbar in this manual’s final section, “The WaveSystem Toolbar,” or visit www.waves.com.
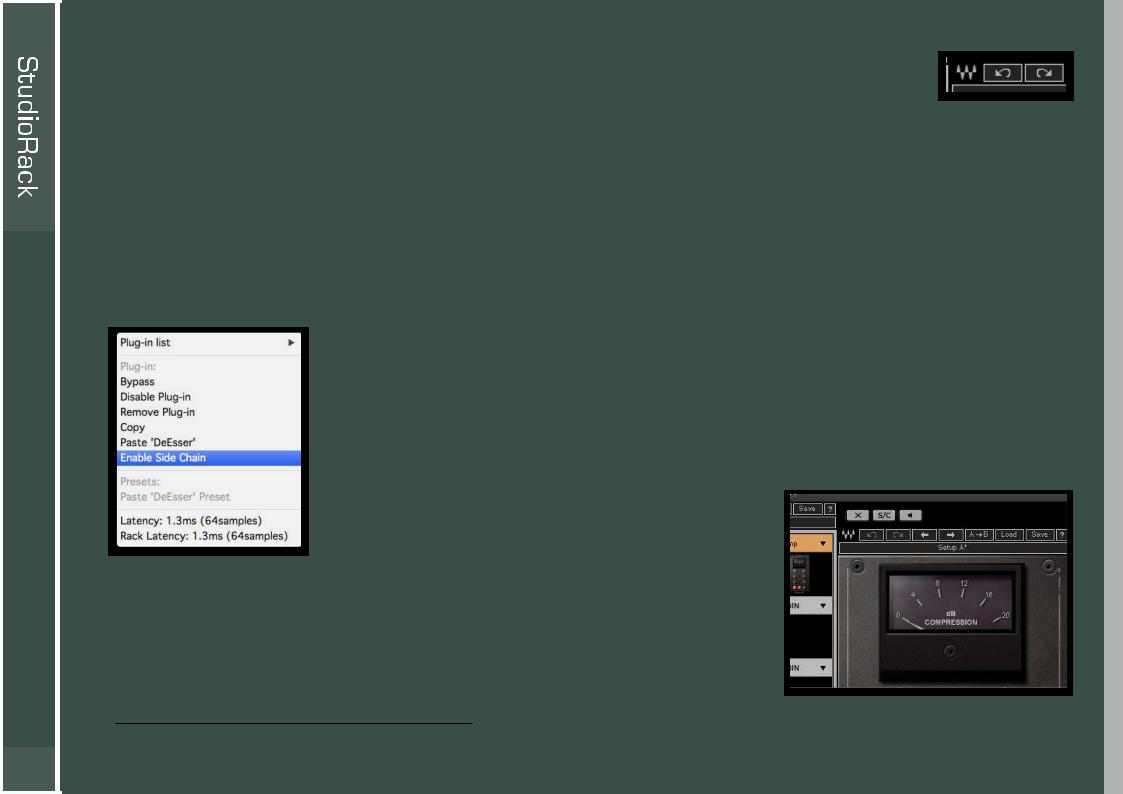
2.2.4 Sidechain
You can assign an external sidechain to the plugins in a rack.2 The key input can be activated on any hosted plugin with sidechain capability. Only one sidechain signal at a time can be fed to a rack. However, once the signal has been routed to StudioRack, the sidechain can be applied to any sidechain-capable plugins.
Only when an active sidechain is in place does the “Enable Sidechain” menu item become active. Also, the Sidechain button (S/C) appears at the top of the Plugin window. This switch activates the rack sidechain for the selected plugin.
The Sidechain Listen switch also becomes visible.
2. Sidechain not available in StudioRack I/O Insert mode or with VST 2.4
20
Loading...