


 Loading...
USER GUIDE
1

Studio SoundGrid
Table of Contents |
|
1. Soundgrid and soundgrid studio................................................................................................................................................ |
4 |
1.1 Welcome to SoundGrid Studio.............................................................................................................................................. |
4 |
1.1.1 Typical Uses........................................................................................................................................................................ |
5 |
1.1.2 How to Use This Manual................................................................................................................................................ |
5 |
1.2 SoundGrid Tools.......................................................................................................................................................................... |
8 |
1.2.1 StudioRack ........................................................................................................................................................................ |
8 |
1.2.2 eMotion ST Mixer............................................................................................................................................................. |
9 |
1.2.3 MultiRack.......................................................................................................................................................................... |
10 |
2. Using SoundGrid Studio............................................................................................................................................................... |
11 |
2.1 Getting Started.......................................................................................................................................................................... |
11 |
2.1.1 Hardware Installation................................................................................................................................................... |
11 |
2.1.2 Software Installation..................................................................................................................................................... |
12 |
2.2 Automatic Configuration....................................................................................................................................................... |
14 |
2.3 Manually Configuring a SoundGrid Studio Network................................................................................................... |
16 |
2.3.1 Connecting and Configuring I/Os........................................................................................................................... |
17 |
2.3.2 Device Racks.................................................................................................................................................................... |
19 |
2.3.3 Adding a Server.............................................................................................................................................................. |
23 |
2.3.4 Adding Computers to a SoundGrid Network...................................................................................................... |
25 |
2.3.5 Clock Basics...................................................................................................................................................................... |
27 |
2.3.6 I/O Device Control Panels........................................................................................................................................... |
28 |
2.3.7 Patching SoundGrid Studio Inputs and Outputs............................................................................................... |
31 |
2.3.8 Configuration Review................................................................................................................................................... |
32 |

Studio SoundGrid
3
3. SoundGrid Studio Workflows and Configurations.............................................................................................................. |
33 |
3.1 One DAW, One Computer, One I/O .................................................................................................................................. |
34 |
3.2 One DAW, Two or More I/O Devices................................................................................................................................... |
35 |
3.3 One Computer, Two I/O and DSP Server, One DAW..................................................................................................... |
36 |
3.4 Project Studio: One Computer, DSP Server, Pro Tools HD/HDX or HD Native System..................................... |
37 |
3.5 Two Native DAWs, Two or More I/O Devices................................................................................................................... |
38 |
3.6 Sharing Drivers in a Studio Environment......................................................................................................................... |
39 |
3.7 HD Mix Room and Several Smaller Recording/Editing Rooms................................................................................ |
40 |
3.8 Integrating Avid Hardware Devices................................................................................................................................... |
42 |
3.9 Large Studio............................................................................................................................................................................... |
43 |
3.10 Live Sound: MultiRack and SoundGrid Studio............................................................................................................ |
45 |
4. SoundGrid Studio Components................................................................................................................................................. |
46 |
4.1 Startup and Navigation.......................................................................................................................................................... |
46 |
4.2 SoundGrid Studio Interface.................................................................................................................................................. |
47 |
4.2.1 Top Bar............................................................................................................................................................................... |
48 |
4.2.2 SoundGrid Studio Sections........................................................................................................................................ |
49 |
4.2.3 SoundGrid Studio: System Inventory Page.......................................................................................................... |
50 |
4.2.4 Device Racks.................................................................................................................................................................... |
56 |
4.2.5 Settings Page................................................................................................................................................................... |
66 |
4.2.6 Session Info Page........................................................................................................................................................... |
68 |
4.2.7 Patch Page........................................................................................................................................................................ |
69 |
5. Further Learning.............................................................................................................................................................................. |
76 |

Studio SoundGrid
4
1. SOUNDGRID AND SOUNDGRID STUDIO
Thank you for choosing SoundGrid Studio from Waves. In order to get the most out of this unique product, please take some time to read this manual. We suggest that you also become familiar with the Waves support site: www.waves.com/support.
There you will find an extensive answer base, the latest tech specs, detailed installation guides, software updates, and current information about authorization and registration.
1.1 Welcome to SoundGrid Studio
SoundGrid Studio is a new way of thinking for recording studios. It brings flexibility, quality, and economy to workplaces ranging from simple project studios to complex networked recording or broadcast companies. The SoundGrid infrastructure is open to thirdparty hardware and software developers; SoundGrid Studio thus offers studios a wide range of solutions. Streamlined workflow, sharing of assets, and extremely low latency are some of its benefits. SoundGrid Studio brings a new world of productivity and freedom to sound production.
SoundGrid is an audio processing and networking protocol for real-time, low-latency audio processing. It enables applications such as MultiRack and SoundGrid Studio and DAW plugins such as StudioRack to share and control I/O devices and servers across a network. It also allows recording and monitoring in near-zero latency.
The SoundGrid Studio Application configures and controls the devices in a SoundGrid network. Using SoundGrid Studio, users can set up and manage I/Os, patch between drivers and devices, and manage the network.
Most Waves plugins are SoundGrid-compatible. The SoundGrid protocol is open to development by all manufacturers of audio hardware and plugins.

Studio SoundGrid
5
1.1.1 Typical Uses
■ Use SoundGrid I/O devices with any DAW.
■ Offload plugin processing to a server to increase the number of plugins you can use simultaneously. ■ Stream audio between DAWs from the same manufacturer or from different manufacturers.
■ Use SoundGrid I/O devices and servers from anywhere in a SoundGrid network with almost any DAW.
■ Use a DSP server, the StudioRack plugin, and the eMotion ST mixer to record and monitor with very low latency. ■ Integrate Pro Tools HD/HDX or HD Native systems into the SoundGrid Studio system.
1.1.2 How to Use This Manual
This manual serves both as a step-by-step “how-to” guide and as a reference to answering your questions. It is divided into four major sections:
Welcome to SoundGrid Studio is an introduction to SoundGrid Studio: what it does, how it fits together, how it can grow.
Using SoundGrid Studio provides the essentials for installing software and hardware, setting up a network, configuring I/O devices, adding a server and streaming audio within a network.
SoundGrid Studio Workflows and Configurations presents several audio production workflows and describes how to use SoundGrid Studio in these environments.
SoundGrid Studio Components is a reference chapter that explains the details of connecting, configuring and using SoundGrid Studio.
Read the first two major sections and you will know most of what you need to get up to speed. Then use SoundGrid Studio Components to fill in the gaps. Some critical information is repeated in several places throughout this manual, so that no matter how you use it, you will not miss important concepts and instructions. SoundGrid Studio Workflows and Configurations is helpful when considering which configuration best suits your needs.
Studio SoundGrid
6
1.1.3 SoundGrid Essentials
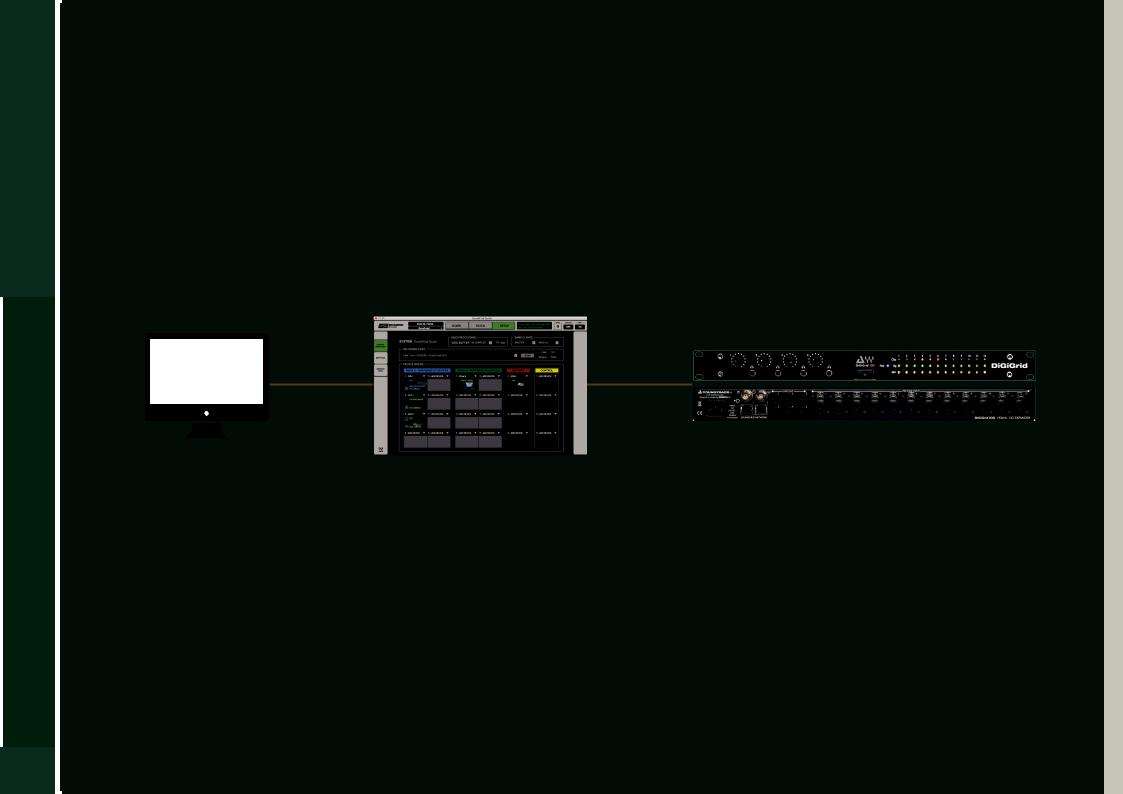
Any SoundGrid Studio system, no matter how large or small, how simple or complex, consists of three basic elements:
■Waves SoundGrid ASIO/Core Audio driver
■SoundGrid Studio Application
■One or more SoundGrid I/Os
The Waves SoundGrid ASIO/Core Audio driver enables you to connect your DAW to the SoundGrid Studio system. This allows your workstation to communicate with devices on the SoundGrid network. The I/Os move sound in and out of the network. The SoundGrid Studio Application manages all these devices.
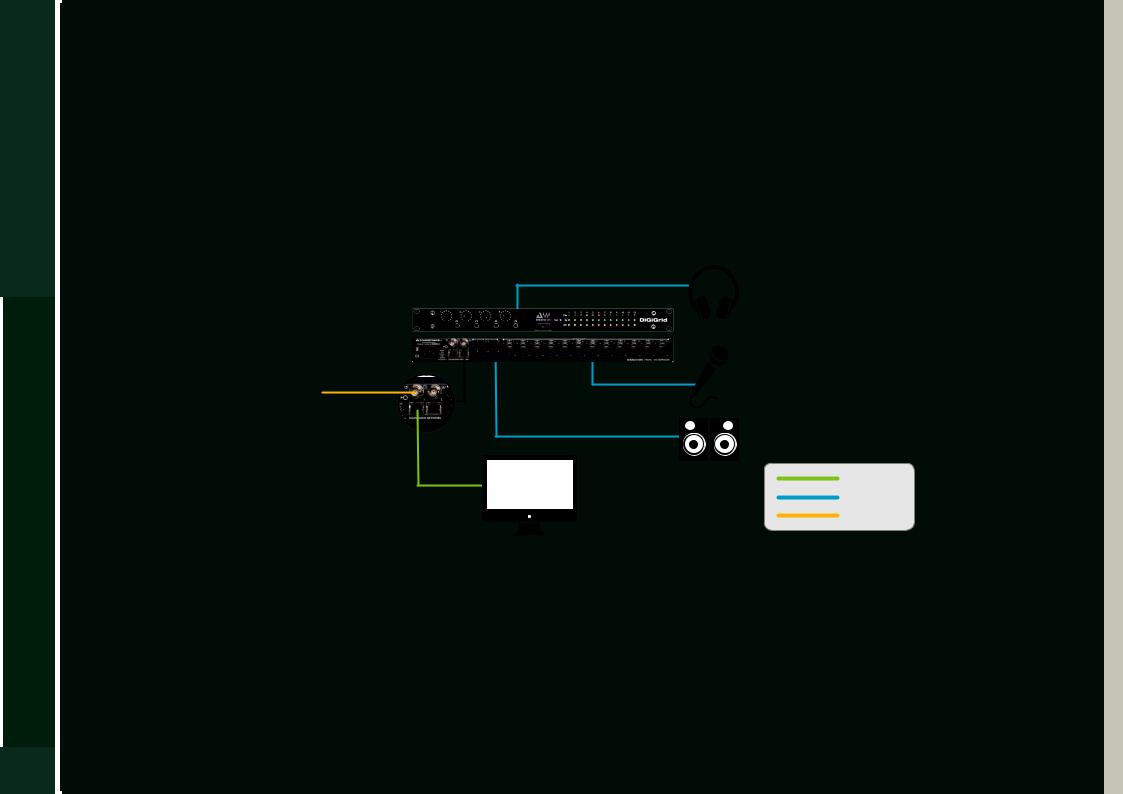
DiGiGrid IOX
Host Computer
SoundGrid Studio Application configures and manages devices on the network. Users assign I/O, control preamps, and patch devices from this page
SoundGrid protocol enables devices to connect to the network and to stream audio via Ethernet
Connects SoundGrid network with analog and digital sources, and with other devices
A SoundGrid network is completely scalable, so this basic configuration can grow. SoundGrid is compatible with most popular DAWs and combinations of different DAWs, as well as with Pro Tools HD/HDX and HD Native systems.
Studio SoundGrid
7
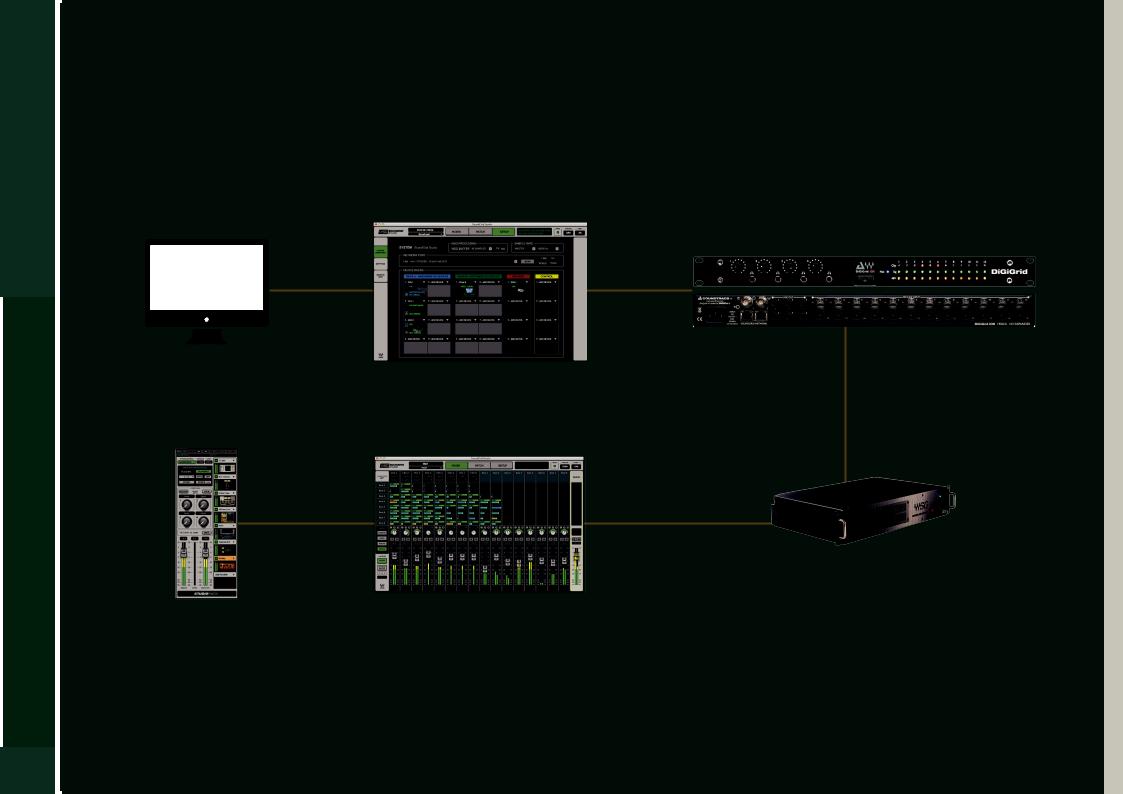
Once you learn how the basic setup works, it is not hard to build a more powerful system.
Adding a DSP server offloads plugin processing from your DAW. This enables you to use the eMotion ST mixer and StudioRack plugins, add additional plugins, and record and monitor with very low latency.
DiGiGrid IOX
Host Computer
SoundGrid Studio
Server
StudioRack |
eMotion ST |
|

Studio SoundGrid
8
1.2 SoundGrid Tools
SoundGrid Studio works in conjunction with other systems to deliver extra DSP processing, low-latency recording and monitoring, and live sound streaming.
1.2.1 StudioRack
StudioRack is a plugin software rack that runs chains of up to eight plugins each. It enables a greater number of plugins per DAW channel and, with certain configurations, recording and monitoring with very low latency.
Insert StudioRack in the host DAW as you would any plugin. Any SoundGrid Studio-compatible plugin can be added to StudioRack. All parameters can be automated in the host DAW, controlled by Quick Keys, or assigned to control surfaces. StudioRack can operate in Local mode, where processing is carried out in the local CPU, or in SoundGrid mode, where processing takes place on a DSP server. 1
For more information, please refer to the StudioRack user manual.
1. DSP processing, whether in StudioRack HD or StudioRack in DSP mode, requires a SoundGrid I/O, a SoundGrid server and a StudioRack SoundGrid license.

Studio SoundGrid
9
1.2.2 eMotion ST Mixer
eMotion ST is a utility mixer that enables mixing and monitoring in extremely low latency. It is therefore well suited for monitor mixing. It also serves as the audio engine and mixer for the StudioRack plugin. It is available only with SoundGrid DSP server systems.
The eMotion ST mixer has two layers: Mixer and StudioRack. The Mixer layer accepts audio from any source on the network: DAW output, microphone preamps, digital audio—anything you can plug into a SoundGrid Studio I/O device. The StudioRack layer connects to up to 64 StudioRack plugins outputs for low-latency monitoring.
Studio SoundGrid
10
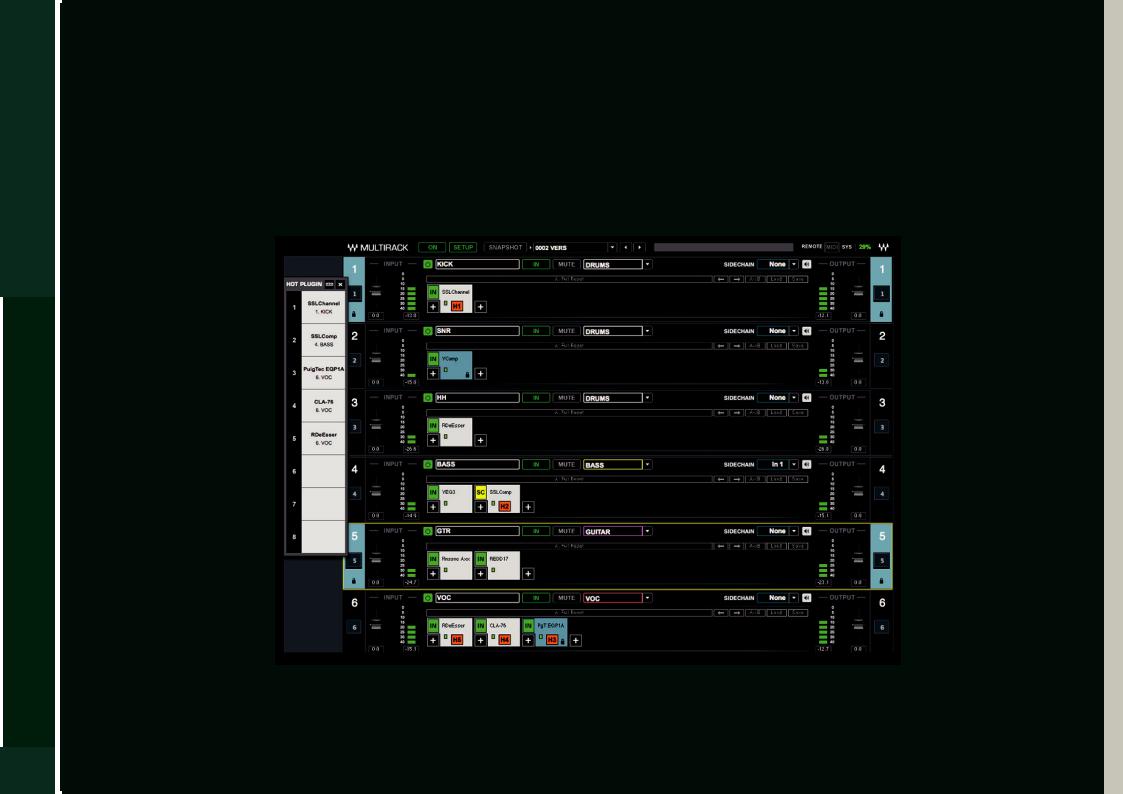
1.2.3 MultiRack
MultiRack is a host platform for Waves audio processing plugins, designed especially for live sound applications. It provides a software rack equivalent to outboard hardware processing racks. Signal flow to and from a console is similar to that of traditional hardware racks.
MultiRack can be integrated into a SoundGrid Studio system in order to stream audio between drivers.
Studio SoundGrid
11
2. USING SOUNDGRID STUDIO
A SoundGrid network consists—at a minimum—of a host driver (a computer with the Waves SoundGrid ASIO/Core Audio driver installed) and one or more hardware devices. From the simplest setup to the most complex, the process of connecting and configuring devices is based on the same principles. This section looks at the most common configurations and shows you how to set them up. Since SoundGrid is an open protocol available to all manufactures of audio hardware and software, you may encounter setups not specifically described in this section. Once you understand the basics of using SoundGrid Studio to create and manage a SoundGrid network, integrating other devices should not be difficult.
This section provides a general overview of the SoundGrid Studio system. Specific components are discussed in greater detail in the chapter SoundGrid Studio Components. The specifics of connecting, configuring and using hardware devices and DAWs vary among manufactures and models. Please refer to the user manuals of your hardware devices for product-specific information.
2.1 Getting Started
Setting up a SoundGrid network involves three steps:
■Connect the hardware devices.
■Install the SoundGrid software.
■Choose a SoundGrid Studio configuration template that describes your equipment and suits your needs.
2.1.1 Hardware Installation
Connecting SoundGrid hardware is quite simple:
■Use a Cat 5e or Cat 6 Ethernet cable to connect computers to devices.
■SoundGrid I/O devices have more than one network connector, so you can chain them together. If you prefer, you can use an approved 1GB network switch. Some hardware units use other connectors, such as MADI or DigiLink. To learn more about connecting these devices, refer to their user manuals.
■Power up (we have to say that).
Studio SoundGrid
12
2.1.2 Software Installation
■Register your SoundGrid product at www.waves.com. Log on to your Waves account and select Register New Product. If you do not have a Waves account, you need to create one at this time.
■Use the SoundGrid Studio Installer to load SoundGrid software to all computers that will be on the network. Reboot each computer after the software is installed.
■Use the Waves License Center to authorize the related Waves products (such as Waves plugins). SoundGrid Studio operates without a license. Adding a DSP server requires a license from Waves.
The Waves License Center is an application included with the Waves Installer (v9 and above).
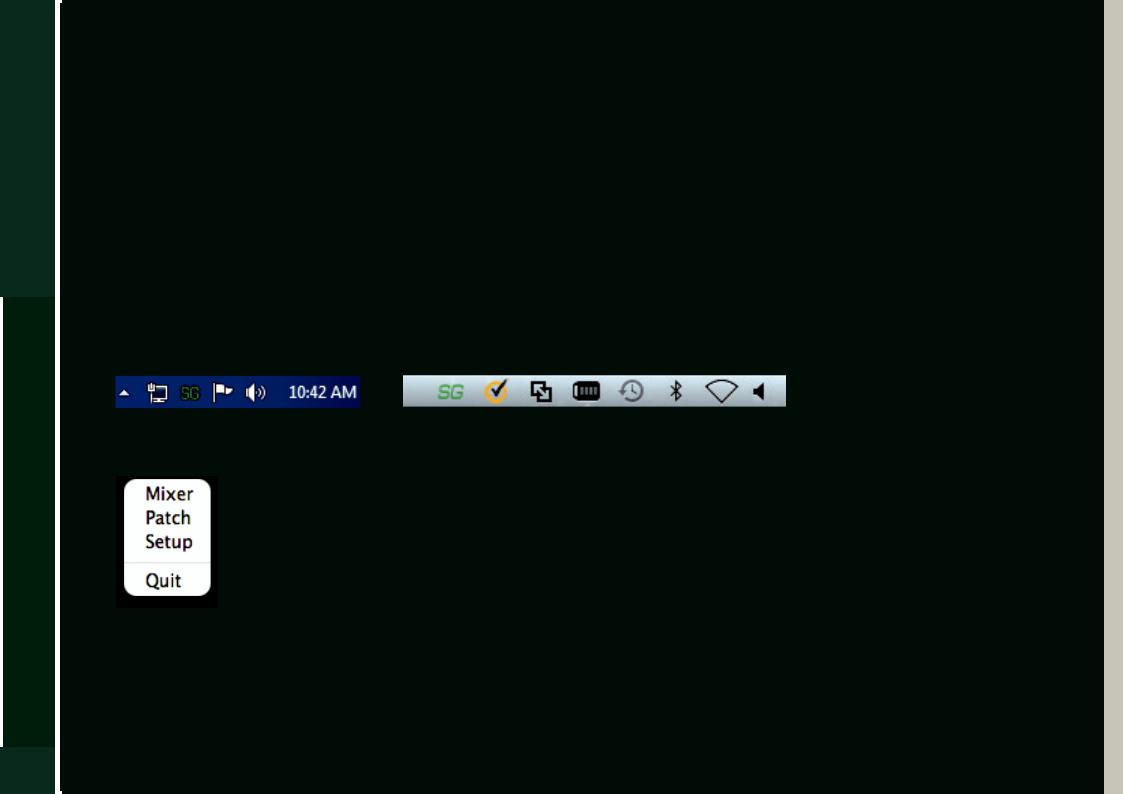
SoundGrid Studio is an application that launches at computer startup and is always available. The green SG logo on the top Menu Bar (Mac) or System Tray (Windows) indicates that SoundGrid Studio is running.
|
|
PC |
Mac |
Click on the SG icon to bring eMotion ST and SoundGrid Studio to the front. You can also quit the SoundGrid Studio Application from this menu.
If the application closes, you can restart it from the Mac Dock or the Windows Start menu, or by double-clicking on the original application icon. The SoundGrid Studio Application can be found at these locations:
Windows: C/Program files (x86)/Waves/SG Studio Mac: Sys HD/Applications/Waves/ SG Studio
Studio SoundGrid
13
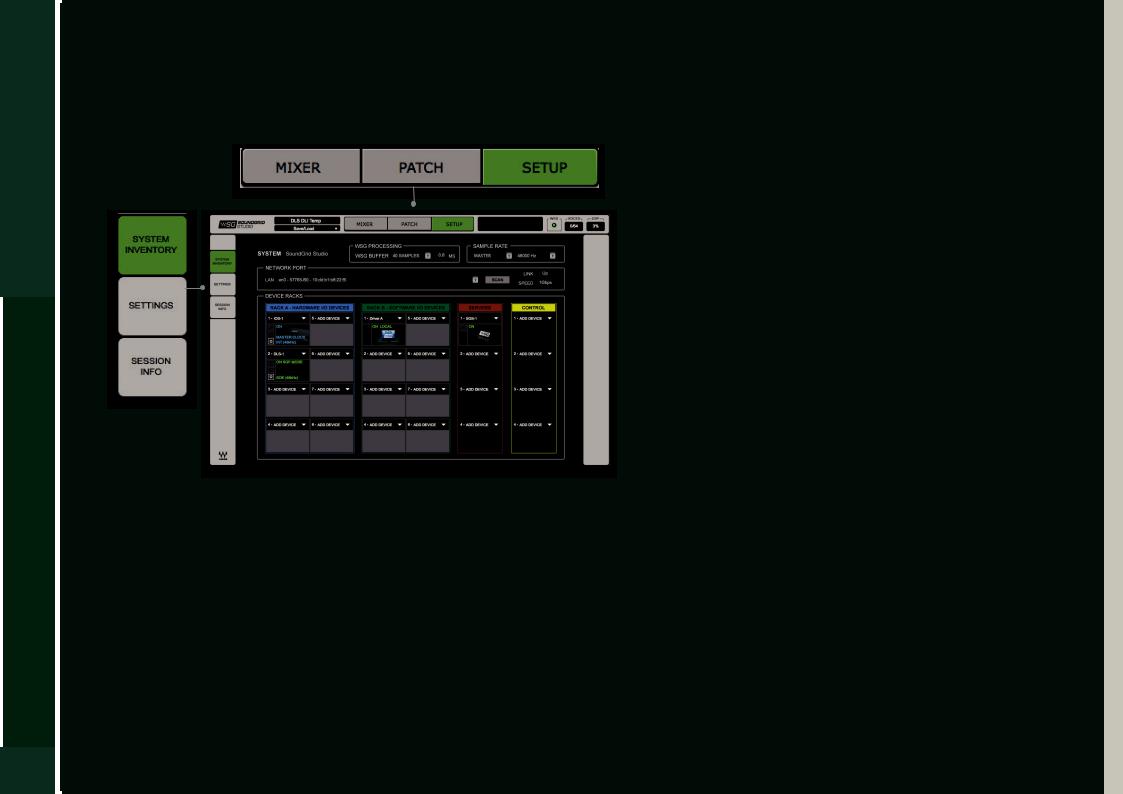
To navigate to the System Inventory page from other sections of the SoundGrid Studio interface, select the Setup tab at the top of the page and then click the System Inventory tab on the left sidebar.
Navigation tabs at the top of each page take you to the three SoundGrid Studio sections:
The eMotion ST mixer: A multi-purpose mixer, designed primarily for monitor mixes.
An audio Patch section that connects physical and virtual
I/O devices.
A Setup page for allocating hardware and software I/O devices, servers and controllers and for managing the network.
Studio SoundGrid
14
2.2 Automatic Configuration
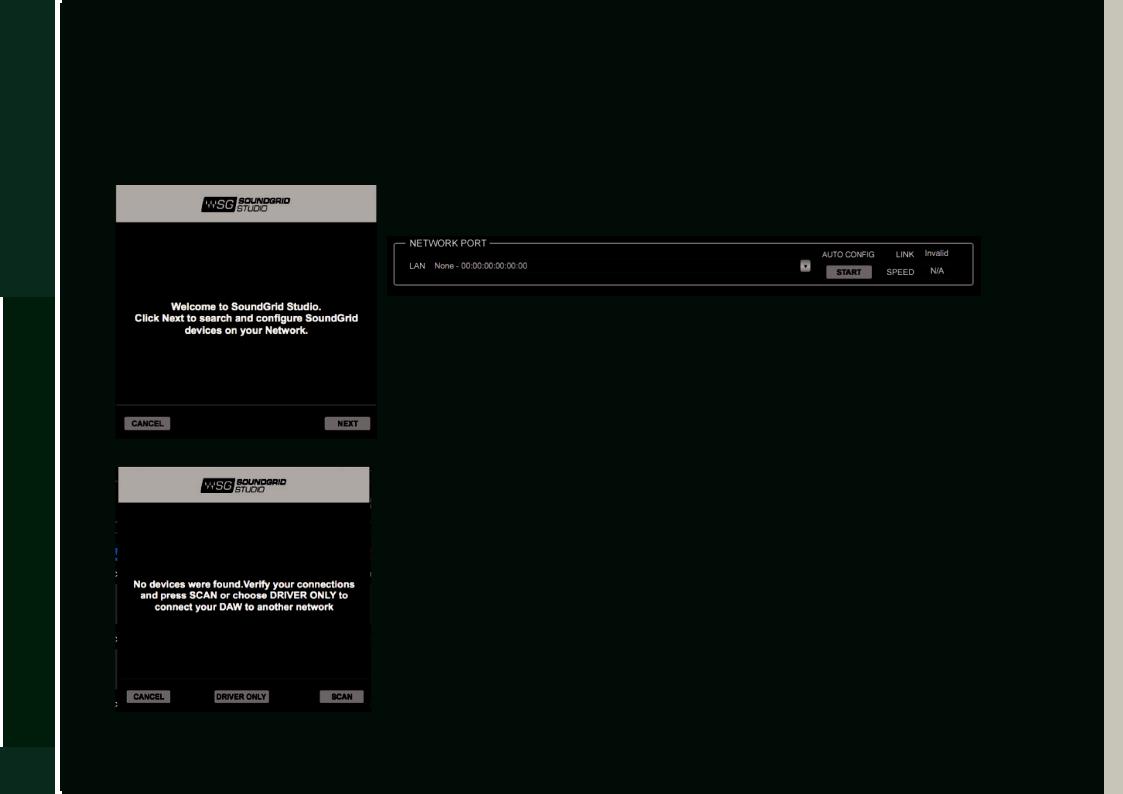
The Auto Config Wizard is a utility that scans the SoundGrid network and then allocates hardware and other devices. The first time you launch SoundGrid Studio, the Wizard will open. It scans the network, inventories its assets, and then configures the devices
Choose “NEXT” to start automatic configuration. This will take a few moments. Choose “CANCEL” to configure manually
Pressing the Auto Config button will also trigger the Wizard
The Wizard assigns devices, configures and patches your system automatically.
If a SoundGrid Server is found on the network the Wizard will patch IO and Drivers to the eMotion ST.
All connections can be viewed in the SoundGrid Studio Patch page
When the Wizard scans the system, it will automatically run essential firmware updates.
If the Wizard cannot locate the requested SoundGrid network devices, this means the devices might be off or not connected properly. In such a case the Wizard will allow you to rescan the network or work as a Driver node slaved to another system.
Selecting Driver Only will close the SoundGrid Studio application and allow the Local Core
Audio Driver be assigned on a secondary “Master system”.
It is not essential to scan when adding a device. When you connect a new device to the network, it will appear in the drop-down menu in Rack A (I/O devices) or Rack B (drivers), or in the Servers rack. The devices can then be assigned and configured manually.
Studio SoundGrid
15
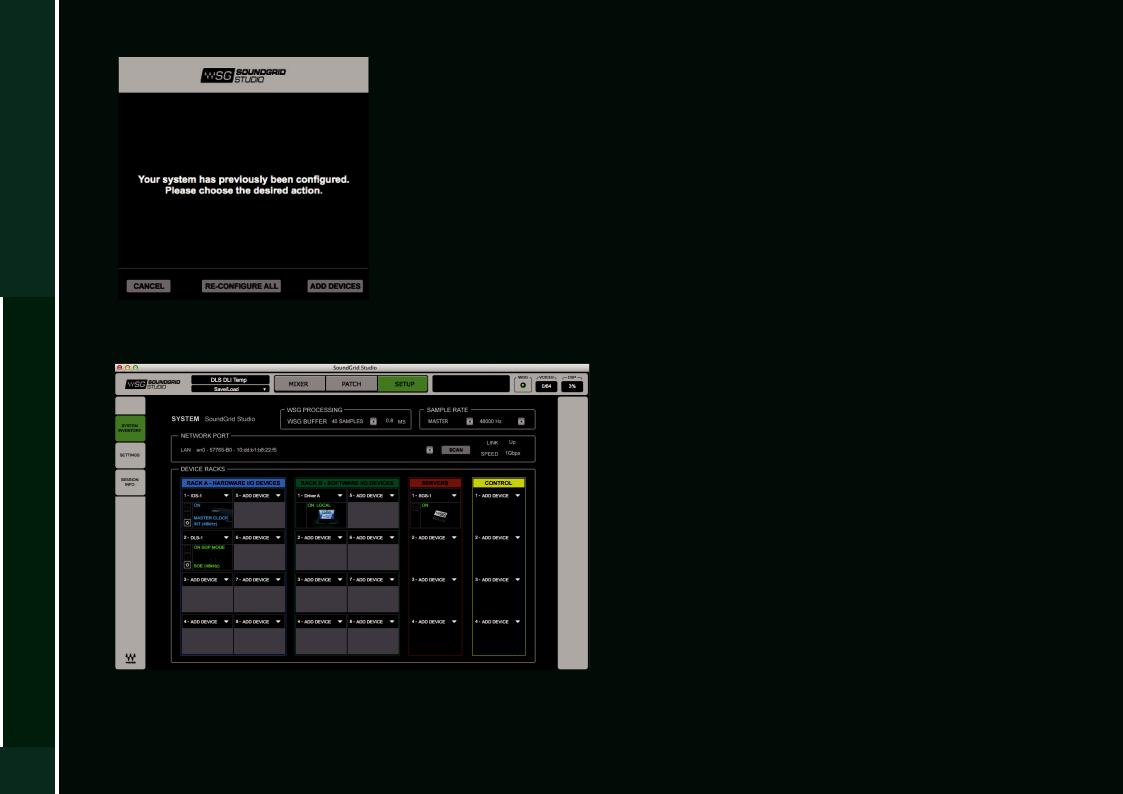
However, If you choose to run the “Auto Config” a second time, you will have 2 options.
Reconfigure All – This will reset and rescan your network and reassign All found devices. Important: This will reset all custom patches and configurations.
Add Devices – This will preserve current Assignments and patches and will add new devices to your inventory.
Once the Wizard finishes, All devices assigned to you—whether manually or by the Wizard— will appear in the System Inventory page. Audio to and from these devices will be patched, Go to the Patch page to review or change I/O patching.
All devices assigned to you—whether manually or by the Wizard—will appear in the System Inventory page.
Audio to and from these devices will be patched based on the template you choose.
Use the Device Racks to control devices. Go to the Patch page to change I/O patching.
Studio SoundGrid
16
2.3 Manually Configuring a SoundGrid Studio Network
The Wizard will configure a SoundGrid Studio network that reflects your available devices and desired use. However, there are times when you will want to change the network’s configuration: assign devices, set mic preamps, enable audio streaming between computers, change network parameters, etc.
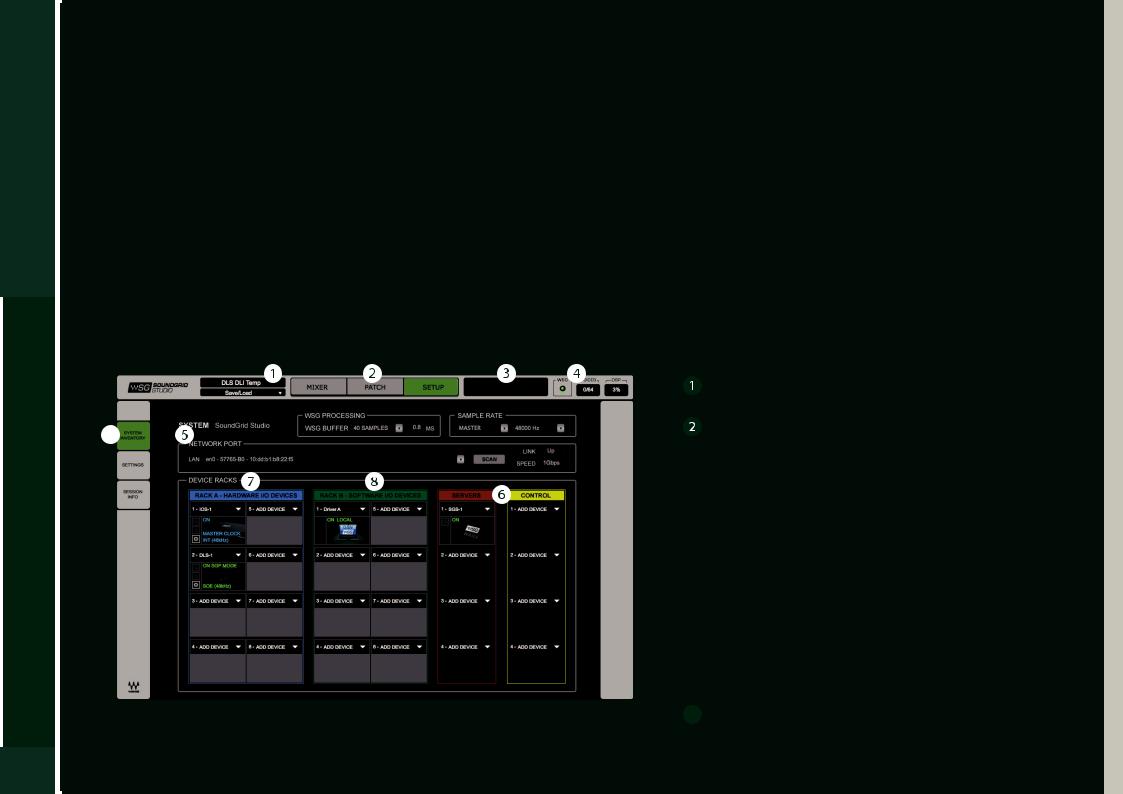
Use the System Inventory page (see below) to configure and manage the SoundGrid network and your hardware and software devices:
■Network status
■Clock
■Hardware and software I/Os
■Waves SoundGrid ASIO/Core Audio drivers (the computers on the SoundGrid network)
■Servers
■Controllers
|
Session name |
9 |
SoundGrid Studio section tabs |
|
 Messages
 Network use status
 Network and system sections
 Server and controller Racks
 Hardware I/O devices
 Software I/O devices
9 Page tabs
Studio SoundGrid
17
2.3.1 Connecting and Configuring I/Os
Adding hardware I/O devices to a SoundGrid network is quite simple: attach, configure, and set up preamps. Generally, Native systems are linked solely by Ethernet. DigiLink-enabled hardware (i.e. 96, 192 I/O) requires a combination of DigiLink and Ethernet cables. Outboard hardware that is not SoundGrid-compatible connects to a networked device via AES/EBU.
Basic Configuration
Almost any Native DAW can easily be incorporated into a SoundGrid network. With or without a server, and regardless of the number of hardware I/O devices, Native systems are built around an Ethernet network infrastructure.
DiGiGrid IOX
External
Word Clock
Ethernet
Analog
Clock
■Connect the computer network port to an approved I/O device using a Cat 5e or Cat 6 Ethernet cable (maximum cable run between devices is 70 m/230 ft).
■Click SCAN to trigger the Wizard.
■Attach analog and/or digital connections to the I/O.
■If other applications are running, bring the SoundGrid Studio Application to the front so that it’s visible. The interface will likely open to the System Inventory page. If not, then navigate to it as described above.
You will now see the Device Racks, further described on page 20.

Studio SoundGrid
18
Connecting Pro Tools HD/HDX and HD Native Systems
Avid I/O hardware and Pro Tools HD/HDX and HD Native DAWs cannot be integrated directly into a SoundGrid network. The Pro Tools driver is not compatible with the SoundGrid driver, so a “bridge” device is needed. The DLI/DLS interfaces give SoundGrid users access to Avid HD interfaces and enable Pro Tools HD/HDX and HD Native workstations to join a SoundGrid network. Once bridged to a SoundGrid network, Pro Tools HD/HDX and HD Native DAWs have complete access to I/O devices anywhere on the network.
To learn how to integrate Pro Tools HD/HDX and HD Native DAWs into a SoundGrid network, refer to the user manuals for the StudioRack plugin and the DLI/DLS interface devices.
Studio SoundGrid
19
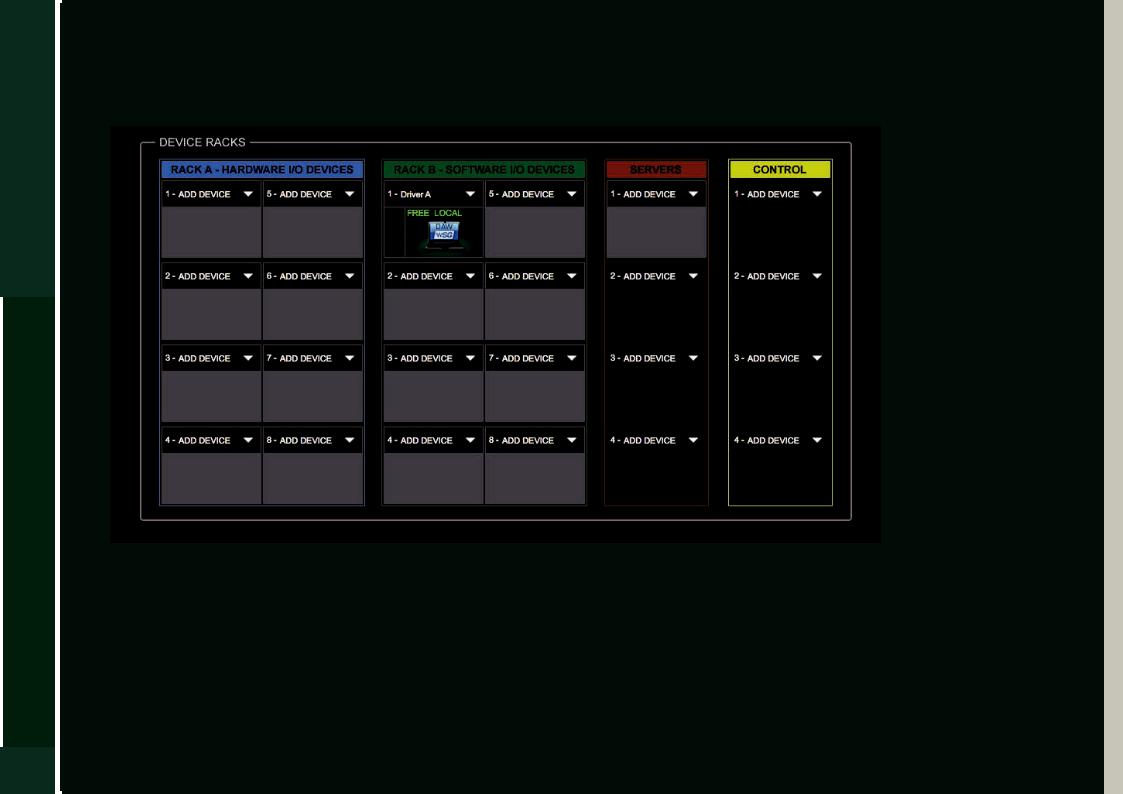
2.3.2 Device Racks
Use the Device Racks to assign I/Os, drivers, servers and control devices. Most setup activities are done from this page.
There are four Device Racks for assigning different types of resources.
■Rack A: Hardware I/O Devices
■Rack B: Software I/O Devices (drivers, virtual I/Os)
■Servers
■Control devices
For now we will focus on I/O Rack A, since this is where you assign and configure your I/O devices.

Studio SoundGrid
20
I/O Rack A: Hardware I/O Devices
Rack A can host up to eight I/O hardware devices. You can load devices in any order. By default, the device in the first slot—typically, the first device loaded—will be the clock master.
If you add a device manually, it will appear in the Device Racks drop-down menu, but it will not be assigned. You must manually claim the device as your own.
When you connect a device and then run the Wizard, the device will appear in I/O Rack A
and will be assigned to you. All users will see the device in their Device Racks menu, but will not be able to assign it.
Manually assigning an I/O device involves three steps:
■Choose a device and assign it to an I/O slot.
■If multiple devices are assigned, determine which is the clock master.
■Open the device’s control panel to configure I/O, preamp parameters and clock.
When you assign an I/O using the Wizard, its audio input and output are patched automatically.
To change these connections, go to the Patch page.
Studio SoundGrid
21
If no device has been assigned, the slot will appear empty.
To add an I/O to an empty slot or to replace an existing one, click on the arrow next to ADD DEVICE. A drop-down menu will appear with a list of SoundGrid-compatible I/O devices on your SoundGrid network.
A drop-down menu indicates which I/Os are currently available to you. If a device has already been claimed by you or someone else, its name will be grayed out and unavailable to select.
The I/O appears as an icon in the first slot of Rack A.
Text on the icon indicates the device name, status, sample rate and clock information.
Pro Tools HD/HDX and HD Native DAWs, as well as Avid hardware interfaces, will appear in the device slot under the name“DLI”or“DLS.”
Studio SoundGrid
22
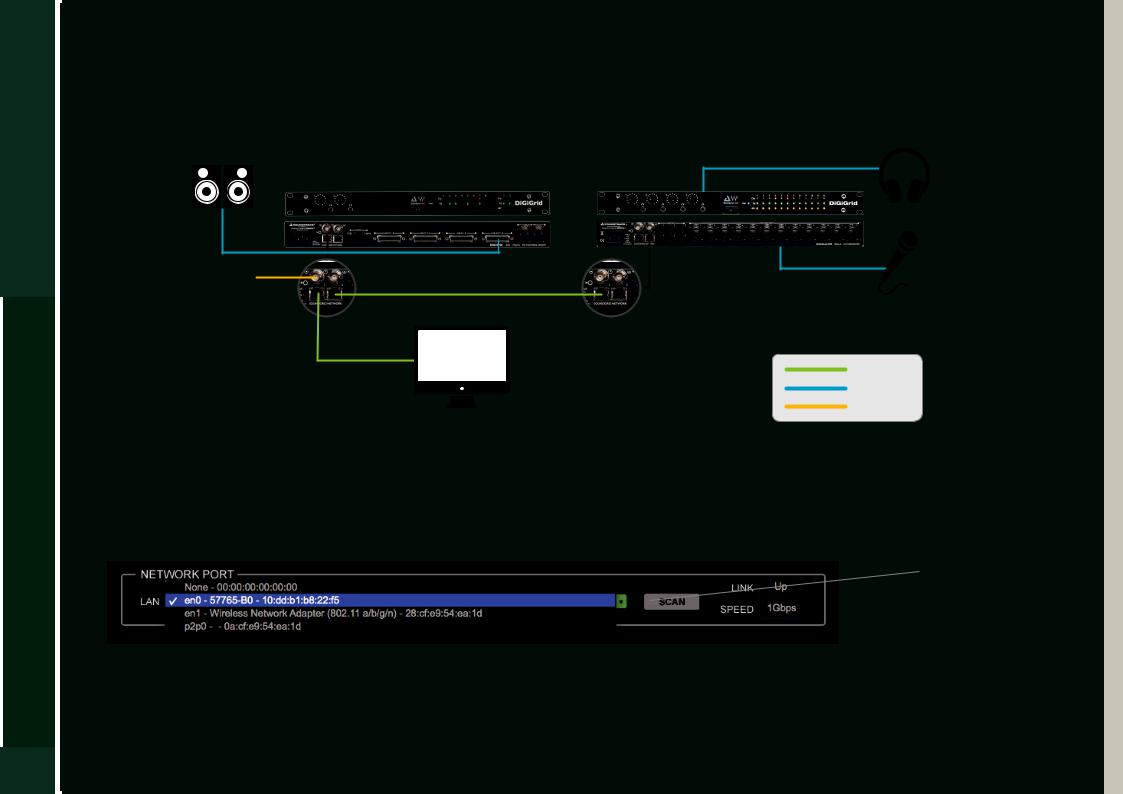
Native DAW: Adding More I/O Devices
Additional SoundGrid-compatible I/Os can be added to the old one via an Ethernet cable. Run the Wizard to set up the new configuration. SoundGrid-approved devices can accept clock via SoE (Sync over Ethernet).
External |
DiGiGrid IOC |
DiGiGrid IOX |
|
|
|
Word Clock |
|
|
Ethernet
Analog
Clock
Host Computer
SoundGrid I/O devices have internal Ethernet switches. Some have four ports, others two. This enables you to add devices by chaining several units together. If you prefer, you can use an approved external 1GB switch.
Add the new device to your network by clicking the SCAN button.
 SCAN button
Open the System Inventory section of SoundGrid Studio to confirm and modify the configuration of your devices. By default, the first I/O device in a rack will be the clock master. To assign another device as clock master, click on the device menu and select
Set as Master
Studio SoundGrid
23
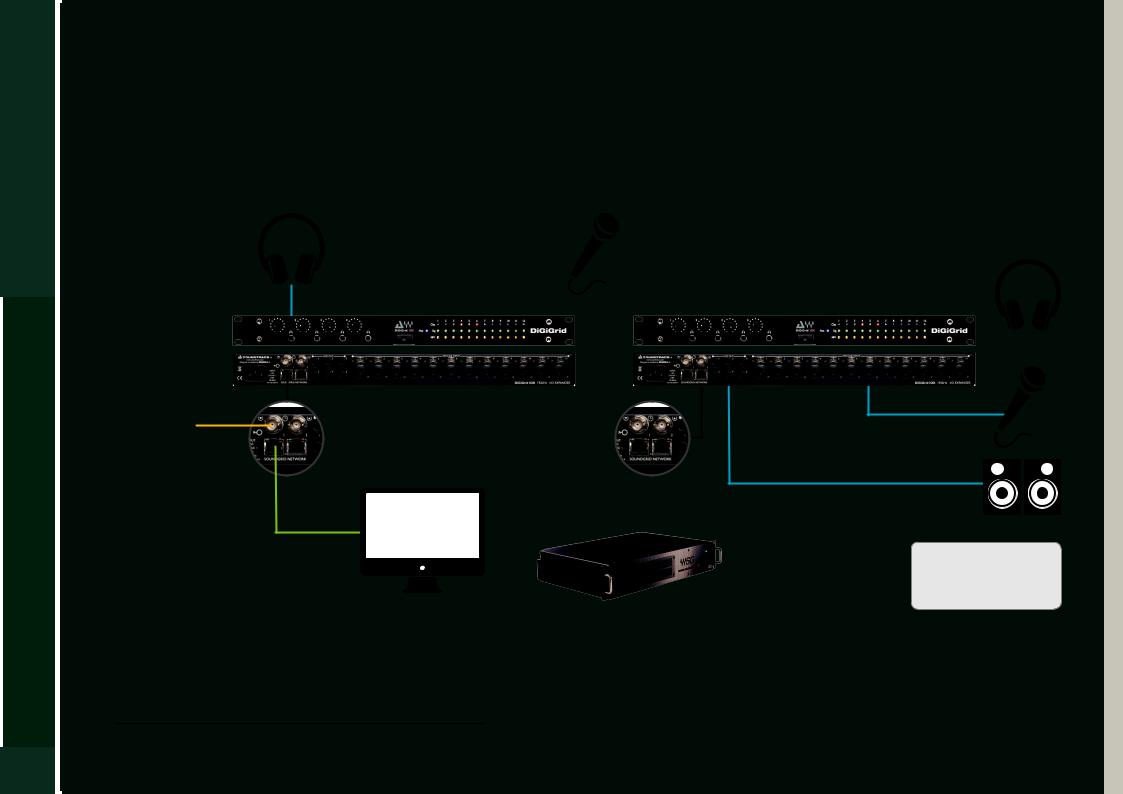
2.3.3 Adding a Server
Adding a SoundGrid DSP server to a SoundGrid Studio system provides the processing power for the eMotion ST mixer and the StudioRack plugin in DSP mode.2 This enables low-latency recording and monitoring, and increases the number of plugins you can use simultaneously.
DiGiGrid IOX |
|
|
DiGiGrid IOX |
|
|
|
|||
|
|
|
|
|
DiGiGrid IOC |
|
|
|
DiGiGrid IOX |
|
|
|||
External
Word Clock
|
|
|
|
Ethernet |
|
|
|
|
|
|
|
|
|
|
|
|
|
|
Analog |
|
|
|
|
|
Host Computer |
Server |
|
Clock |
|
|
||||
|
|
|||
2. eMotion ST SoundGrid and StudioRack SoundGrid licenses are required.
Loading...