


VTech CS6199-4 User Manual
T
Compatible with
Hearing Aid T-Coil
TIA-1083
Abridged user’s manual
CS6199-4/CS6199-42
DECT 6.0 cordless telephone
Register online to get an additional 3-month warranty!
Go to www.vtechphones.com to register your product for enhanced warranty
support and latest VTech product news.
Telephones identied with this logo have reduced noise and
interference when used with most T-coil equipped hearing aids and
cochlear implants. The TIA-1083 Compliant Logo is a trademark of
the Telecommunications Industry Association. Used under license.
®
The ENERGY STAR
and encourages the use of products that save energy and help
protect our environment. We are proud to mark this product with
the ENERGY STAR
efciency guidelines.
program (www.energystar.gov) recognizes
®
label indicating it meets the latest energy
Introduction
To help protect the environment, this Abridged user’s manual provides you with
basic installation and use instructions. A limited set of features are described in
abbreviated form.
Please refer to the online Complete user’s manual for a full set of installation and
operation instructions at www.vtechphones.com.
Before using this VTech product, please read Important safety instructions on
page 11 of this user’s manual.
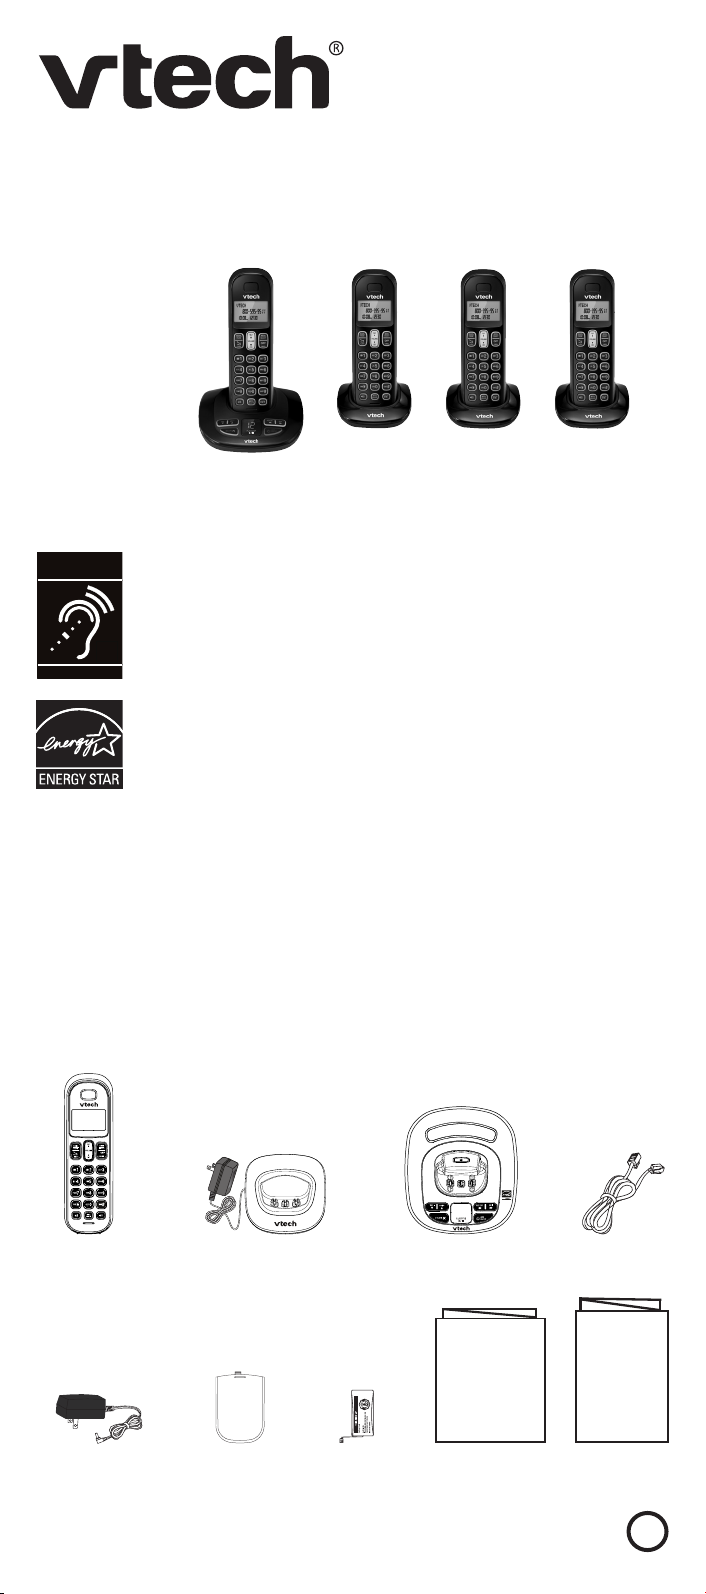
Parts checklist
Your telephone package contains the following items. Save your sales receipt and
original packaging in the event warranty service is necessary.
Handsets (4)
Chargers and
charger adapters (3)
Telephone base
Abridged user’s manual
Telephone
line cord
Quick start guide
Telephone base
power adapter
compartment
covers (4)
Batteries (4)Battery
Abridged user’s
manual
Quick start
guide
BC
1
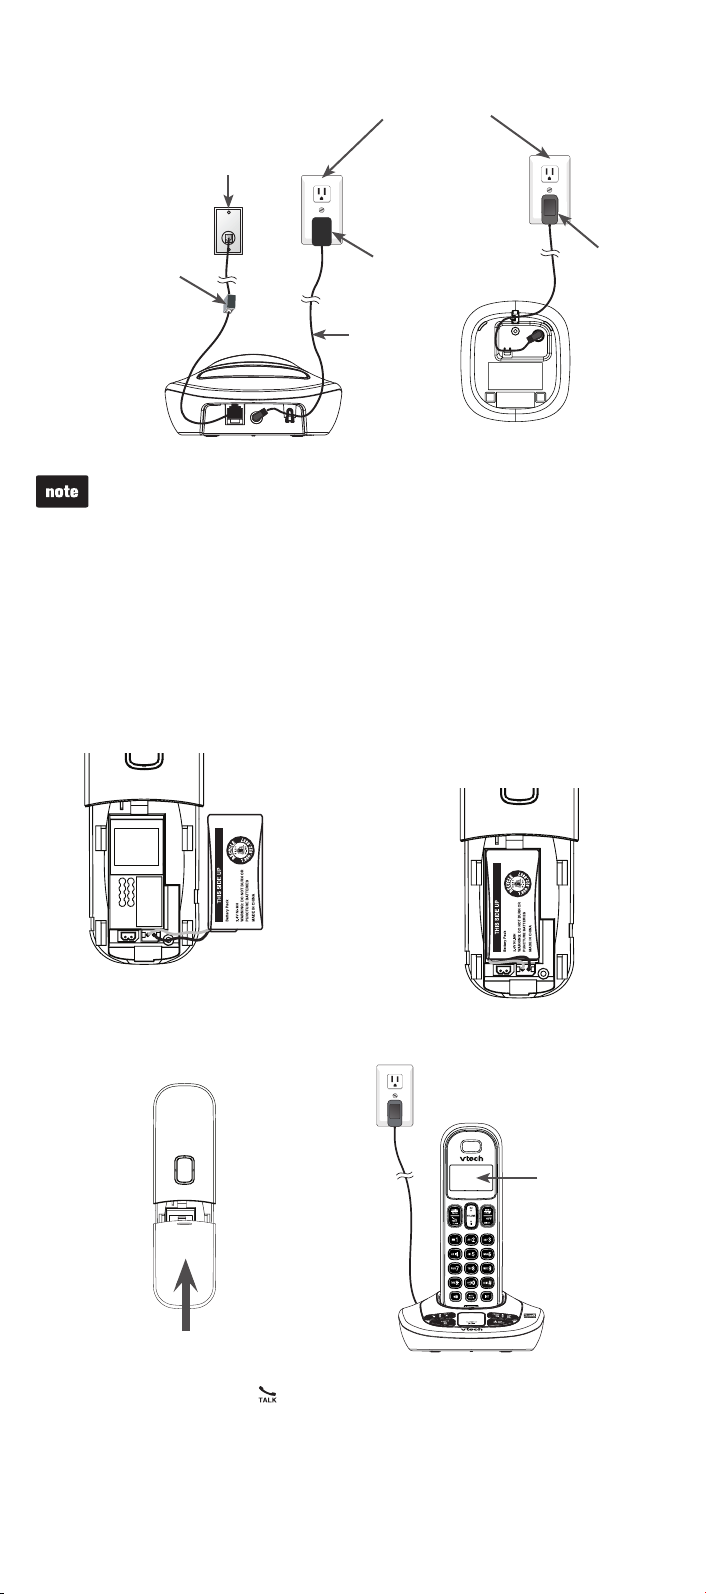
Telephone base and charger installation
Install the telephone base and charger as shown below.
Electrical outlet
(not controlled
by a wall switch)
Telephone wall jack
A DSL lter (not
included) is required
if you have DSL highspeed Internet service.
The DSL lter must
be plugged into the
telephone wall jack.
Telephone base
power adapter
Telephone
line cord
Charger
adapter
Telephone base
Use only the power adapters and batteries supplied with this product.
To order replacements, visit our website at www.vtechphones.com or call
1 (800) 595-9511. In Canada, go to www.vtechcanada.com or call
1 (800) 267-7377.
CAUTION:
If you subscribe to telephone service from a cable company or a VoIP service provider, contact
your cable/VoIP service provider for more information.
Charger
Battery installation
Install the battery as shown below.
Insert the battery connector
1. Place the battery with the label
securely into the socket.
2.
THIS SIDE UP facing up and
the wires inside the battery
compartment.
Slide the battery compartment cover
3.
towards the center of the handset until
Place the handset in the telephone
4.
base or charger to charge.
it clicks into place.
The LCD
backlight
turns on for
10 seconds
to denote the
battery starts
to charge.
IMPORTANT:
Check for a dial tone by pressing . If you hear a dial tone, the installation is successful.
If you do not hear a dial tone:
Make sure the installation procedures described above are properly done.
•
It may be a wiring problem. If you have changed your telephone service to digital service
•
from a cable company or a VoIP service provider, the telephone line may need to be
rewired to allow all existing telephone jacks to work. Contact your cable/VoIP service
provider for more information.
2
Battery charging
Once you have installed the battery, the screen indicates the battery status. For
best performance, keep the handset in the telephone base or charger when not in
use. The battery is fully charged after 11 hours of continuous charging.
Battery indicators Battery status Action
The screen is blank, or
displays Put in charger
and ashes.
The screen displays
Low battery and ashes.
The screen displays
HANDSET X.
The battery has no or very little
charge. The handset cannot
be used.
The battery has enough charge
to be used for a short time.
The battery is charged. To keep the battery
Charge without interruption
(at least 30 minutes).
Charge without interruption
(about 30 minutes).
charged, place it in the
telephone base or charger
when not in use.
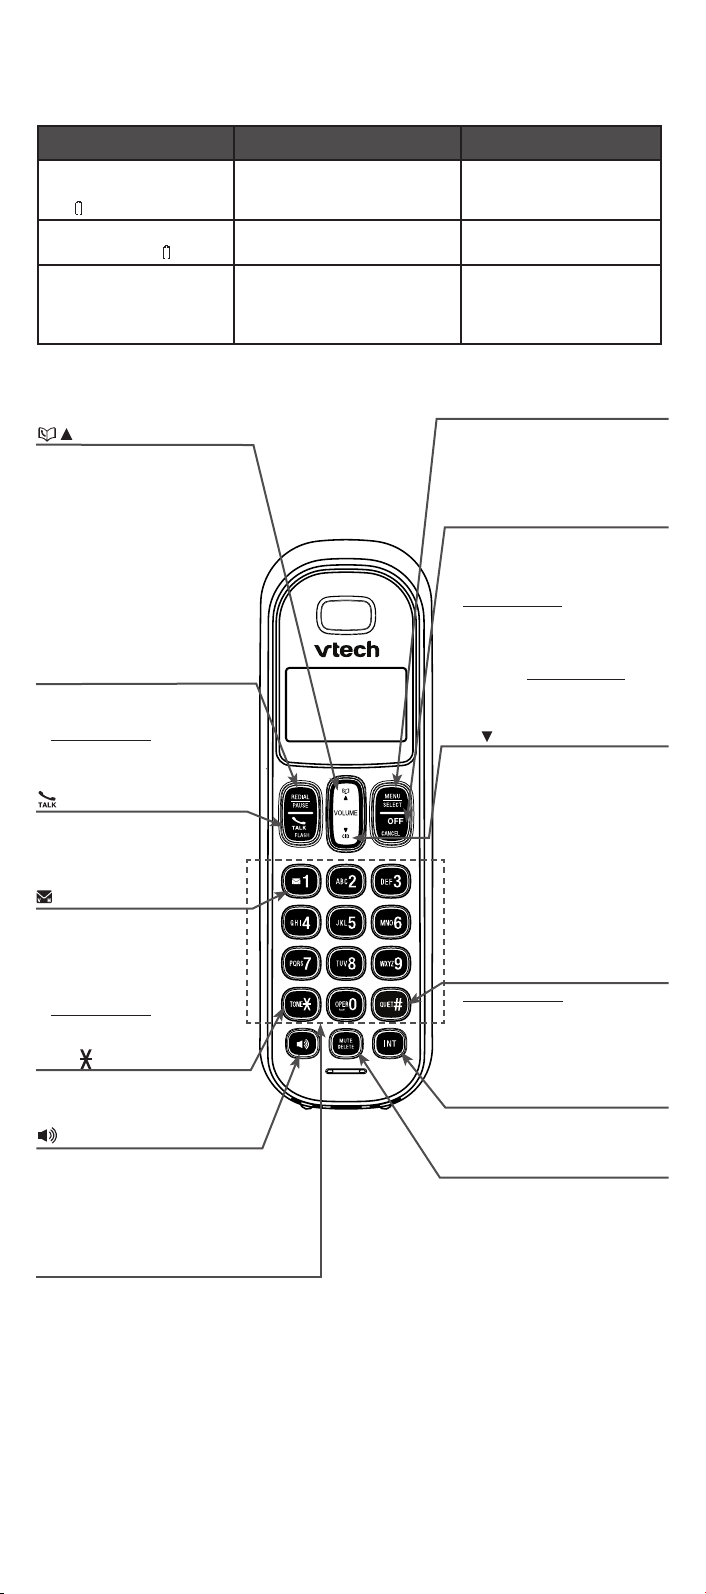
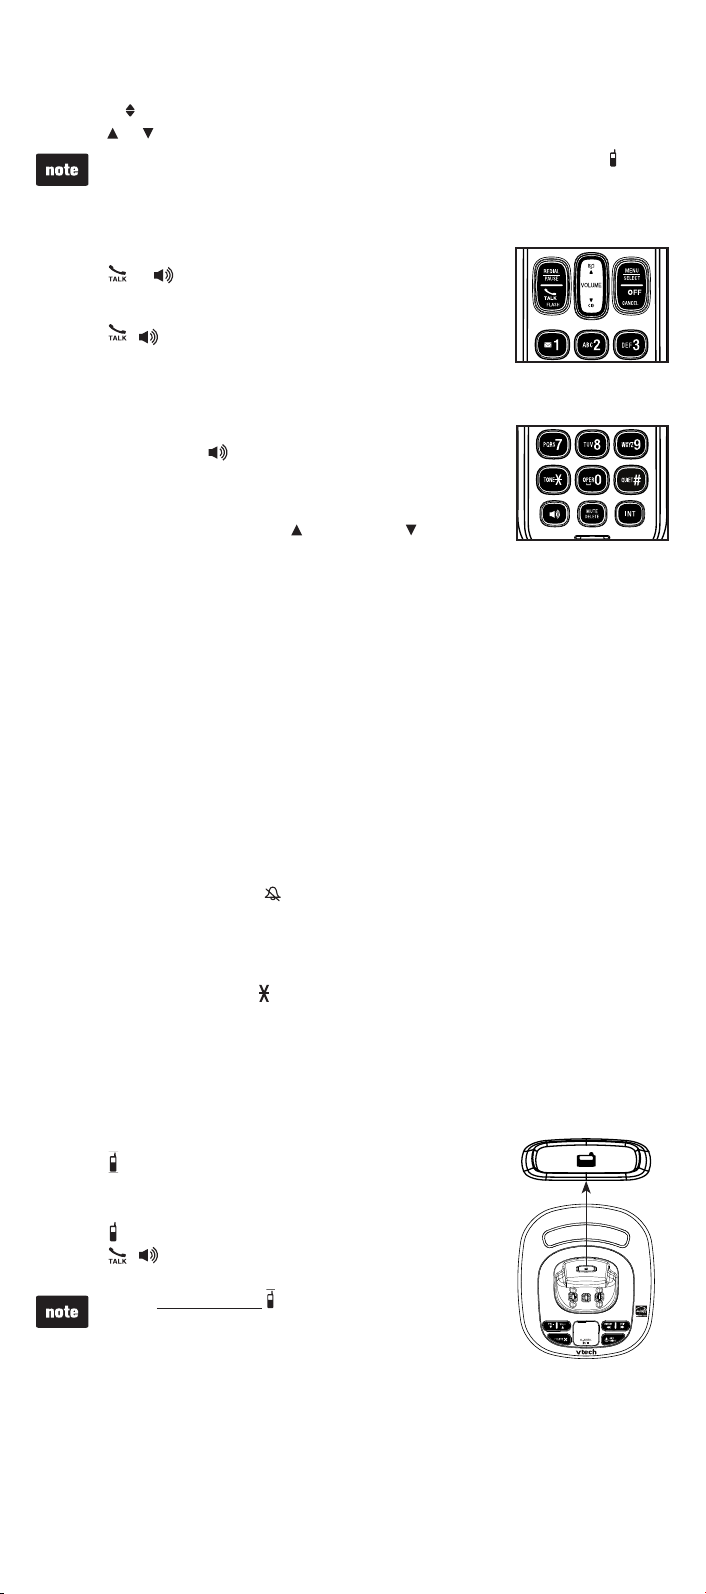
Handset overview
MENU/SELECT
Show the menu.
/ /VOLUME
Review the directory when
•
the phone is not in use.
Increase the listening volume
•
during a call or message
playback.
Scroll up while in a menu, or
•
in the directory, caller ID log
or redial list.
Move the cursor to the right
•
when entering numbers or
names.
REDIAL/PAUSE
Press repeatedly to review
•
the redial list.
Press and hold to insert a
•
dialing pause while dialing
or entering a number.
/FLASH
Make or answer a call.
•
Answer another incoming
•
call during a call.
1
Press repeatedly to add
•
or remove 1 in front of
the caller ID log entry
before dialing or saving
it to the directory.
Press and hold to set or
•
dial your voicemail number.
TONE
Switch to tone dialing
•
temporarily during a call.
Make or answer a call using
•
the handset speakerphone.
During a call, press to switch
•
between the speakerphone and
the handset.
Dialing keys
Enter numbers or characters.
•
Answer an incoming call.
•
•
While in a menu, press to
•
select an item, or save an
entry or setting.
OFF/CANCEL
Hang up a call.
•
Silence the ringer temporarily
•
while the handset is ringing.
Press and hold to erase the
•
missed call indicator while the
phone is not in use.
Press to return to the previous
•
menu, or press and hold to
return to idle mode, without
making changes.
CID/ /VOLUME
•
Review the caller ID log when
the phone is not in use.
•
Decrease the listening volume
during a call or message
playback.
•
Scroll down while in a menu,
or in the directory, caller ID log
or redial list.
•
Move the cursor to the left
when entering numbers or
names.
QUIET#
Press and hold to set and turn
•
on the quiet mode, or turn it off.
Press repeatedly to show other
•
dialing options when reviewing
a caller ID log entry.
INT
Start an intercom conversation
•
or transfer a call.
MUTE/DELETE
Mute the microphone during
•
a call.
Delete digits or characters
•
while using the dialing keys.
Silence the ringer temporarily
•
while the handset is ringing.
Delete the displayed entry
•
while in the directory, caller ID
log or redial list.
3
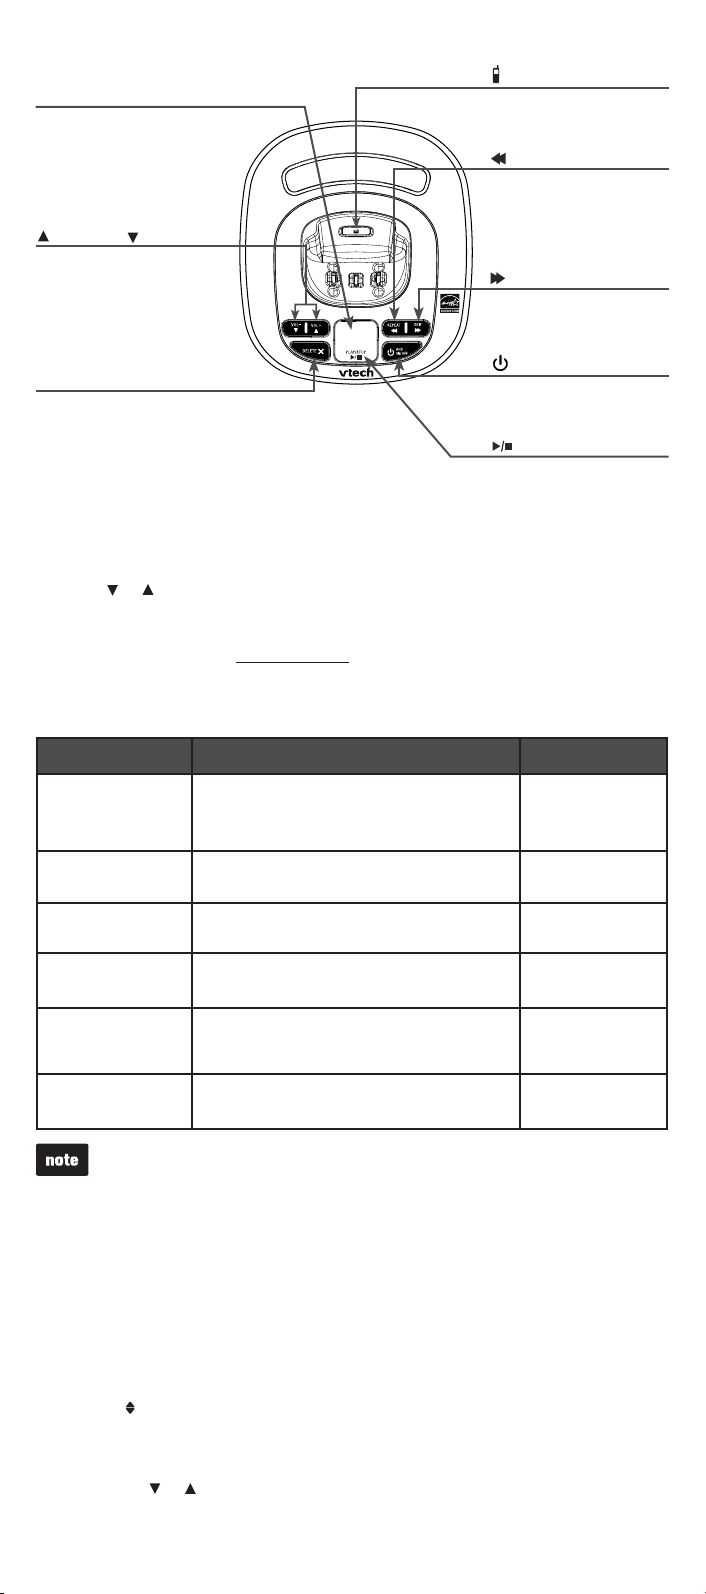
Telephone base overview
Message window
Shows the number of
•
messages, and other
information of the
answering system or
telephone base.
VOL+ and VOL-
Adjust the volume during
•
message playback.
Adjust the telephone base
•
ringer volume when the
phone is not in use.
X/DELETE
Delete the playing message.
•
Press twice to delete
•
all previously reviewed
messages when the phone
is not in use.
Using the menu
Press MENU when the phone is not in use.
1.
Press or until the screen displays the desired feature menu.
2.
Press SELECT.
3.
To return to the previous menu, press CANCEL.
•
To return to idle mode, press and hold CANCEL.
•
Press to page all system
•
handsets.
/REPEAT
Press to repeat a
•
message.
Press twice to play the
•
previous message.
/SKIP
Skip to the next
•
message.
ANS ON/OFF
Turn the answering
•
system on or off.
/ PLAY/STOP
Play or stop playing
•
messages.
Telephone settings
Default settings are indicated by asterisks (*).
Settings menu Description Options
LCD language Set the screen display language. English*
Français
Español
Voicemail # Set the speed dial voicemail number. Voicemail #
Clr voicemail Turn off the voicemail indicators (see the note
below).
Key tone Set whether the handset beeps whenever a
key is pressed.
Home area code Set the home area code so that the caller ID
log stores only seven digits for local
telephone numbers.
Dial mode Set the telephone to be touch-tone or pulse
dialing.
Use the Clr voicemail feature when the telephone indicates there is new voicemail
but there is none. For example, when you have accessed your voicemail while away
from home. The Clr voicemail feature only turns off the indicators; it does not delete
your voicemail messages. As long as you have new voicemail messages, your
telephone service provider continues to send the signal that turns on the indicators.
The following are some of the telephone features you may wish to set. Refer to
Telephone settings in the online Complete user’s manual for complete instructions
on setting all telephone features.
-
Reset VM Icon?
Key tone:On*
Key tone:Off
Home area code
_ _ _
Touch-tone*
Pulse
Set date and time
If you subscribe to caller ID service, the day, month and time are set automatically
with each incoming call. You can also set the date and time manually.
Press MENU when the handset is not in use.
1.
Scroll to Set date/time and then press SELECT.
2.
Use the dialing keys (0-9) to enter the month (MM), date (DD) and year (YY).
3.
Then press SELECT.
Use the dialing keys (0-9) to enter the hour (HH) and minute (MM).
4.
Then press or to choose AM or PM.
Press SELECT.
5.
4
Ringer volume (handset)
You can adjust the ringer volume level, or turn the ringer off.
Press MENU when the handset is not in use.
1.
Scroll to Ringers and then press SELECT twice.
2.
Press or to sample each volume level, then press SELECT.
3.
When the ringer volume is set to Off, the handset still rings when you press on the
telephone base.
Telephone operation
Make a call
Press or and then dial the telephone number.
•
Answer a call
Press , or any dialing key.
•
End a call
Press OFF or put the handset to the telephone base or charger.
•
Speakerphone
During a call, press to switch between speakerphone
•
and normal handset use.
Volume
During a call, press VOLUME/ or VOLUME/ to adjust
•
the listening volume.
Mute
The mute function allows you to hear the other party but the other party cannot hear you.
During a call, press MUTE. The screen displays Muted.
1.
Press MUTE again to resume the conversation. The screen displays
2.
Microphone on briey.
Call waiting
When you subscribe to call waiting service from your telephone service provider,
you hear an alert tone if there is an incoming call while you are already on a call.
Press FLASH to put the current call on hold and take the new call.
•
Press FLASH at any time to switch back and forth between calls.
•
Temporary ringer silencing
When the telephone is ringing, you can temporarily silence the ringer of that handset
without disconnecting the call. The next call rings normally at the preset volume.
Press OFF or MUTE, then displays and Ringer muted displays briey.
•
Temporary tone dialing
If you have pulse (rotary) service only, you can switch from pulse to touch-tone
dialing temporarily during a call.
During a call, press TONE .
1.
Use the dialing keys to enter the relevant number. The telephone sends
2.
touch-tone signals. It automatically returns to pulse dialing mode after you end
the call.
Find handset
Use this feature to nd all system handsets.
To start paging:
Press on the telephone base. All idle handsets ring and
•
display ** Paging **.
To end paging:
Press on the telephone base.
•
Press , , OFF or any dialing key on a handset.
•
Place the handset in the telephone base or charger.
•
Do not press and hold for more than four seconds. It
may lead to handset deregistration. If To register HS...
and ...see manual displays alternately on the handset,
refer to Troubleshooting to register the handset to the
telephone base.
5
 Loading...