


Vtech CM18245 User Manual

Go to
www.vtechphones.com
to register your product for
enhanced warranty support and
the latest VTech product news.
CM18245
4-Line
Small Business System
Deskset
BC
User’s manual

Congratulations
on your purchase of this VTech product. Before using this product, please read
the Important safety information.
This user’s manual provides you with the complete installation, setup and
operation instructions.
For customer service or product information, visit our website at
www.vtechphones.com or call 1 (800) 595-9511. In Canada, please dial
1 (800) 267-7377.
Model number: CM18245
Type: 4-Line Small Business System Deskset
Serial number:
Purchase date:
Place of purchase:
Both the model and serial numbers of your VTech product can be found on the
bottom of the deskset.
Save your sales receipt and original packaging in case it is necessary to return
your telephone for warranty service.
Compatible with
Hearing Aid T-Coil
T
TIA-1083
Telephones identified with this logo have reduced noise and interference when
used with most T-coil equipped hearing aids and cochlear implants. The TIA-1083
Compliant Logo is a trademark of the Telecommunications Industry Association.
Used under license.

Important safety information
This symbol is to alert you to important operating or servicing instructions that may appear
in this user’s manual. Always follow basic safety precautions when using this product to
reduce the risk of injury, fire, or electric shock.
Safety information
• Read and understand all instructions in the user’s manual. Observe all markings on
the product.
• Avoid using a telephone during a thunderstorm. There may be a slight chance of electric shock
from lightning.
• Do not use the telephone to report a gas leak in the vicinity of the leak. Under certain
circumstances, a spark may be created when the adapter is plugged into the power outlet, or
when the handset is replaced in its cradle. This is a common event associated with the closing
of any electrical circuit. The user should not plug the phone into a power outlet, and should
not put a charged handset into the cradle, if the phone is located in an environment containing
concentrations of flammable or flame-supporting gases, unless there is adequate ventilation. A
spark in such an environment could create a fire or explosion. Such environments might include:
medical use of oxygen without adequate ventilation; industrial gases (cleaning solvents; gasoline
vapors; etc.); a leak of natural gas; etc.
• Do not use this product near water, or when you are wet. For example, do not use it in a wet
basement or shower, or next to a swimming pool, bathtub, kitchen sink, or laundry tub. Do not
use liquids or aerosol sprays for cleaning. If the product comes in contact with any liquid, unplug
any line or power cord immediately. Do not plug the product back in until it has dried thoroughly.
• Avoid placing the telephone system in places with extreme temperature, direct sunlight, or other
electrical devices. Protect your phone from moisture, dust, corrosive liquids and fumes.
• Install this product in a protected location where no one can trip over any line or power cords.
Protect cords from damage or abrasion.
• If this product does not operate normally, see the Troubleshooting section on pages 70-73 of this
user’s manual. If you cannot solve the problem, or if the product is damaged, refer to the Limited
warranty section on pages 80-81. Do not open this product except as directed in your user’s manual.
Opening the product or reassembling it incorrectly may expose you to hazardous voltages or
other risks.
• This power adapter is intended to be correctly oriented in a vertical or floor mount position. The
prongs are not designed to hold the plug in place if it is plugged into a ceiling, an under-the-table
or cabinet outlet.
• For PLUGGABLE EQUIPMENT, the socket-outlet shall be installed near the equipment and shall
be easily accessible.
Caution:
• Use only the power adapter provided with this product. To obtain a replacement,
visit our website at www.vtechphones.com or call 1 (800) 595-9511. In Canada,
dial 1 (800) 267-7377.
• Use only the supplied rechargeable battery or replacement battery (model BT266342).
To order a replacement battery, visit our website at www.vtechphones.com or call
1 (800) 595-9511. In Canada, dial 1 (800) 267-7377.
• To prevent risk of fire or battery explosion, replace with the correct battery type.
Dispose of used batteries according to the instructions.
i

Important safety information
Especially about cordless telephones
• Electrical power: The deskset must be connected to a working electrical outlet. The electrical
outlet should not be controlled by a wall switch. Calls cannot be made from the handset if the
deskset is unplugged, switched off or if the electrical power is interrupted.
• Power adapter: The power adapter is intended to be correctly oriented in a vertical or floor mount
position. The prongs are not designed to hold the plug in place if it is plugged into a ceiling,
under-the-table or cabinet outlet.
• Rechargeable batteries: This product contains nickel-metal hydride rechargeable batteries.
Exercise care in handling batteries in order not to create a short circuit with conductive material
such as rings, bracelets, and keys. The battery or conductor may overheat and cause harm.
Observe proper polarity between the battery and the battery charger.
• Nickel-metal hydride rechargeable batteries: Dispose of these batteries in a safe manner. Do
not burn or puncture. Like other batteries of this type, if burned or punctured, they could release
caustic material which could cause injury.
The RBRC® Seal means that the manufacturer is voluntarily participating in
an industry program to collect and recycle nickel-metal hydride rechargeable
batteries when taken out of service within the United States. These batteries
may be taken to a participating local retailer of replacement batteries or recycling
center. You may call 1 (800) 8-BATTERY® for locations accepting spent Ni-MH
batteries.
RBRC® and 1-800-8-BATTERY® are registered trademarks of the Rechargeable
Battery Recycling Corporation.
Precautions for users of implanted cardiac pacemakers
Cardiac pacemakers (applies only to digital cordless telephones):
Wireless Technology Research, LLC (WTR), an independent research entity, led a multidisciplinary
evaluation of the interference between portable wireless telephones and implanted cardiac
pacemakers. Supported by the U.S. Food and Drug Administration, WTR recommends to
physicians that:
Pacemaker patients
• Should keep wireless telephones at least six inches from the pacemaker.
• Should NOT place wireless telephones directly over the pacemaker, such as in a breast pocket,
when it is turned ON.
• Should use the wireless telephone at the ear opposite the pacemaker.
WTR’s evaluation did not identify any risk to bystanders with pacemakers from other persons using
wireless telephones.
Especially about telephone answering systems
Two-way recording: This unit does not sound warning beeps to inform the other party that the call is
being recorded. To ensure that you are in compliance with any federal or state regulations regarding
recording a telephone call, you should start the recording process and then inform the other party
that you are recording the conversation.
SAVE THESE INSTRUCTIONS
ii

Parts checklist
Your telephone package contains the following items. Save your sales receipt
and original packaging in the event warranty service is necessary.
Go to
www.vtechphones.com
to register your product for
enhanced warranty support and
the latest VTech product news.
User’s manual
User’s manual
Deskset
CM18245
Small Business System
Deskset
Go to
www.vtechphones.com
4-Line
BC
to register your product for
enhanced warranty support and
the latest VTech product news.
Small Business System
CM18245
Deskset
4-Line
BC
Quick start guide
Quick start guide
Deskset power
adapter
Battery Pack
BT166342/BT266342
2.4V 750mAh Ni-MH
WARNING:DO NOT BURN OR
PUNCTURE BATTERIES
MADE IN CHINA GY1224
Handset with coiled
Backup battery
cord installed
Wall mount bracketDirectory card X2
iii

Table of contents
Getting started
Installation ................................................1
Backup battery installation........................2
Backup battery charging ........................... 3
Deskset installation ...................................4
Wall mount installation (Optional) .............6
Tabletop to wall installation ....................6
Wall to tabletop installation ....................7
Add and register a deskset ....................... 8
Add a corded headset (Optional) ..............9
Deskset overview ...................................10
Deskset icon display ...............................16
Alert tones and lights .............................. 17
Telephone settings
Deskset setup ......................................... 18
Menu settings ...................................... 18
Ringer volume .....................................18
Ringer tone .......................................... 19
Do not disturb (DND) ........................... 19
LCD contrast .......................................20
Key tone ..............................................20
LCD language .....................................21
Primary line ......................................... 21
Call privacy .......................................... 22
Hold reminder ...................................... 22
Deskset name .....................................23
Factory reset .......................................23
Deskset information .............................24
User support ........................................24
Telephone operation
Telephone operation ............................... 25
Line indicators ..................................... 25
Making and ending a call .....................25
On hook dialing (predialing) ................26
Full duplex speakerphone ...................26
Answering a call ..................................26
Temporary ringer silencing .................. 26
Options while on calls ............................. 27
Call waiting .......................................... 27
Volume control .....................................27
Mute ....................................................27
Temporary tone dialing ........................ 27
Hold ..................................................... 28
Switching between lines ...................... 28
Call privacy .......................................... 29
Recording a call ...................................30
Chain dialing ........................................31
Redial .....................................................32
To view the 10 most recently dialed
numbers ..............................................32
To redial a number ............................... 32
To copy a redial entry to directory .......32
To delete a number .............................. 33
Auto-redial ...........................................33
Conference call .......................................34
Options during a conference call ......... 35
Intercom ..................................................36
Make an intercom call to
an extension ........................................36
Answer an intercom call ......................36
End an intercom call ............................ 36
Answer an incoming call during an
intercom call ........................................ 36
Hold an intercom call ........................... 37
Handle an intercom call by the
private mailbox ....................................37
Call transfer ............................................38
Blind transfer .......................................38
Call transfer using intercom ....................39
Transfer a call and speak to the
receiving party .....................................39
Paging ....................................................40
Make a paging call to an extension .....40
Set and edit a group for paging call .....40
Make a paging call to multiple
extensions ...........................................41
iv

End a paging call ................................. 41
Delete the group settings ....................41
Speed dial ...............................................42
Assign a speed dial entry .................... 42
Dial a speed dial entry .........................44
Delete a speed dial entry ....................44
Directory
About the directory ................................. 45
Capacity ..............................................45
Exit the directory .................................45
Create directory entries .......................... 46
Create a new directory entry ............... 46
Review directory entries ..................... 47
Search directory ..................................... 48
Search by name ..................................48
Dial, delete or edit entries ....................... 49
Display dial ..........................................49
Delete an entry .................................... 49
Edit an entry ........................................ 49
Call history
About the caller ID .................................. 50
Information about caller ID with
call waiting ........................................... 50
Caller ID information ............................... 51
How the caller ID information
(call log) works .................................... 51
Caller ID operation .................................. 52
Memory match ....................................52
Missed (new) calls indicator ................52
Review the caller ID information .......... 52
View dialing options ............................. 53
Dial a call history entry ........................ 53
Save a call history entry to
the directory ........................................ 54
Delete entries ...................................... 55
Reasons for missing caller ID
information ..........................................56
Answering system
Private mailbox setup .............................57
Activate private mailbox .......................57
Number of rings ................................... 57
Voice language .................................... 57
Announcement .................................... 58
Remote access code ........................... 59
Message Length .................................. 60
Call screening ......................................60
Call intercept .......................................61
Message alert ......................................61
Remaining time ...................................62
Answering system operation ..................63
New message indication .....................63
Call screening ......................................63
Call intercept .......................................63
Message playback ...............................63
Options during playback ......................64
Transfer messages ..............................64
Delete all mailbox messages ...............65
Record memo ...................................... 65
Remote access ....................................... 66
Appendix
Deregister a deskset ...............................67
Deskset display screen messages .........68
Troubleshooting ......................................70
Maintenance ........................................... 74
FCC part 68 and ACTA ........................... 75
FCC part 15 ............................................ 76
California Energy Commission battery
charging testing instructions................77
For C-UL compliance only ......................78
Limited warranty .....................................80
Technical specifications .......................... 82
Index ...................................................... 83
v

Getting started
Installation
This CM18245 deskset is an accessary of CM18445 concole. You must
purchase the CM18445 console and register this deskset to the console before
use.
Install and set up CM18445 console first before expanding your system with this
CM18245 deskset.
Phone lines
DECT
Optional 2.5mm
corded headset
CM18445 console
(Ext. 0)
CM18245 deskset
(Ext. 1, 2, 3...)
Install the deskset close to a power outlet not controlled by a wall switch.
The deskset can be placed on a flat surface or vertically mounted on the
wall (pages 6-7). For optimum range and better reception, place the
CM18445 console in a central and open location.
Your product may be shipped with a protective sticker covering the deskset
display, remove it before use.
For customer service or product information, visit our website at
www.vtechphones.com or call 1 (800) 595-9511. In Canada, dial
1 (800) 267-7377.
(purchased
separately)
Avoid placing the deskset too close to:
• Communication devices such as television sets, VCRs, or other cordless telephones.
• Excessive heat sources.
• Noise sources such as a window with traffic outside, motors, microwave ovens,
refrigerators, or fluorescent lighting.
• Excessive dust sources such as a workshop or garage.
• Excessive moisture.
• Extremely low temperature.
• Mechanical vibration or shock such as on top of a washing machine or
work bench.
1

Getting started
Battery Pack
BT166342/BT263342
2.4V 300mAh Ni-MH
WARNING:DO NOT BURN OR
PUNCTURE BATTERIES
MADE IN CHINA GY1224
Backup battery installation
Install the backup battery, as shown below. In the event of a power failure, the
charged backup battery allows the deskset to operate. The backup battery
will be charged when you connect the AC power adapter to a wall outlet not
controlled by a wall switch.
1. Press down on the tab to open the battery compartment cover.
2. Place the battery in the
compartment. Make sure the
supplied battery with the label
3. Align the cover flat against the
battery compartment, then press
down until it clicks into place.
THIS SIDE UP faces up, as
indicated.
MADE IN CHINA GY1224
2.4V 300mAh Ni-MH
WARNING:DO NOT BURN OR
PUNCTURE BATTERIES
Battery Pack
BT166342/BT263342
NOTE: Use only the supplied rechargeable battery or replacement battery (model BT266342).
To order a replacement battery, visit our website at www.vtechphones.com or call
1 (800) 595-9511. In Canada, please dial 1 (800) 267-7377.
2
Getting started
Backup battery charging
When the deskset loses power with the backup battery installed, the screen
indicates the battery status (see the following table). The backup battery is
fully charged after 16 hours of continuous charging. See the table on page 82 for
battery operating times.
The following table summarizes the battery charge indicators and actions to
take.
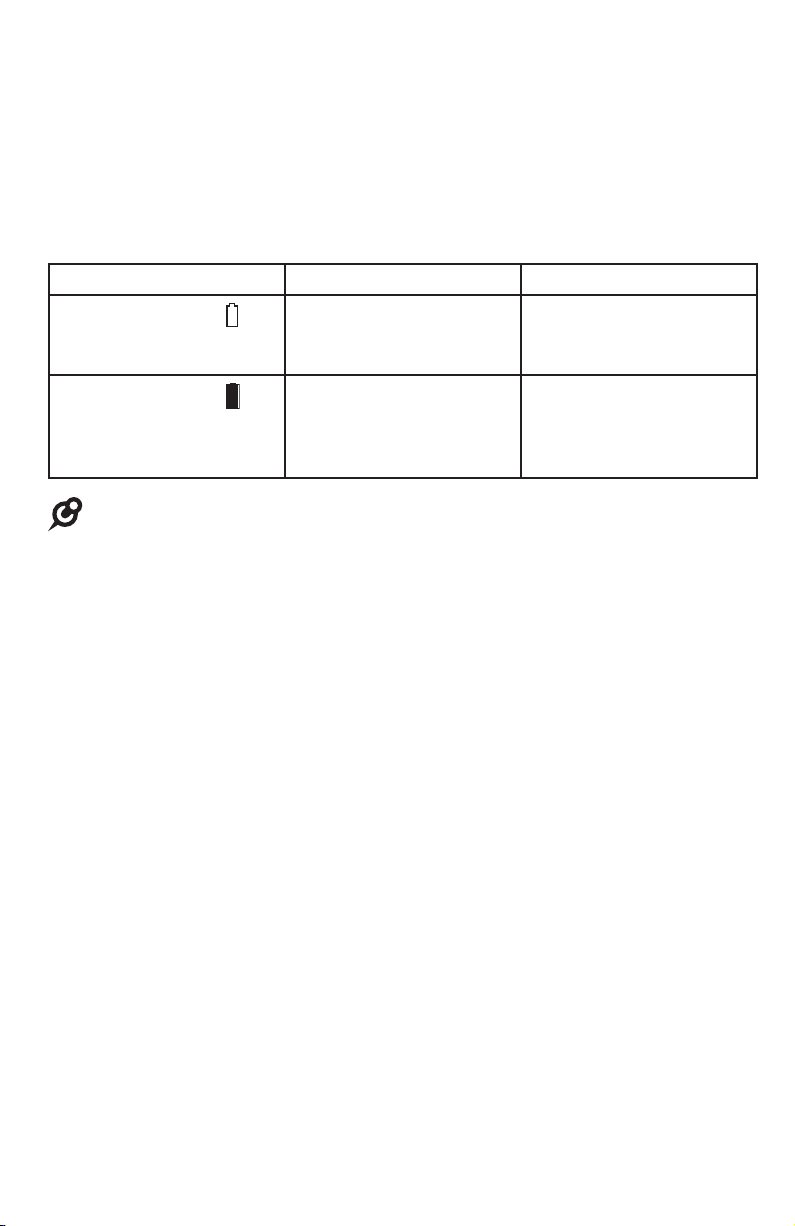
Battery indicators Battery status Action
The screen shows
and it flashes.
The screen shows .
NOTE: When there is a power outage, make sure you have also installed four AA batteries in
the console to allow continuous telephone operation.
Battery has enough
charge to be used for a
short time.
Battery is fully charged. Keep the backup
Charge without
interruption at least one
hour.
battery in the battery
compartment to
recharge.
3

Getting started
Deskset installation
1. Install the mounting bracket for tabletop use.
Low tabletop position: Insert the fixed tabs of the mounting bracket into slots
and B. Press the flexible tabs into slots C and D until they click into place.
A
C D
A B
D
B
High tabletop position: Insert the fixed tabs of the mounting bracket into slots
and B. Press the flexible tabs into slots C and D until they click into place.
A
D
B
C
A
D
B
Low tabletop position
C
A
D
B
High tabletop position
4

Getting started
Deskset installation
2. Connect the coiled handset and the power cord to the deskset.
Plug the large end of the
power adapter into a power
outlet not controlled by a
wall switch.
Plug the end of the
coiled handset cord into
the jack at the bottom of
the deskset.
Raise the antenna for
optimum wireless range
and performance.
Plug the small end of the
power adapter into the
power jack at the bottom of
the deskset.
NOTES:
• Use only the power adapter supplied with this product. To order a replacement power adapter,
visit our website at www.vtechphones.com or call 1 (800) 595-9511. In Canada, please
dial 1 (800) 267-7377.
• The power adapter is intended to be correctly oriented in a vertical or floor mount position. The prongs
are not designed to hold the plug in place if it is plugged into a ceiling, under-the-table or cabinet outlet.
Route the power adapter
cord through the slot at the
bottom of the deskset.
5
Getting started
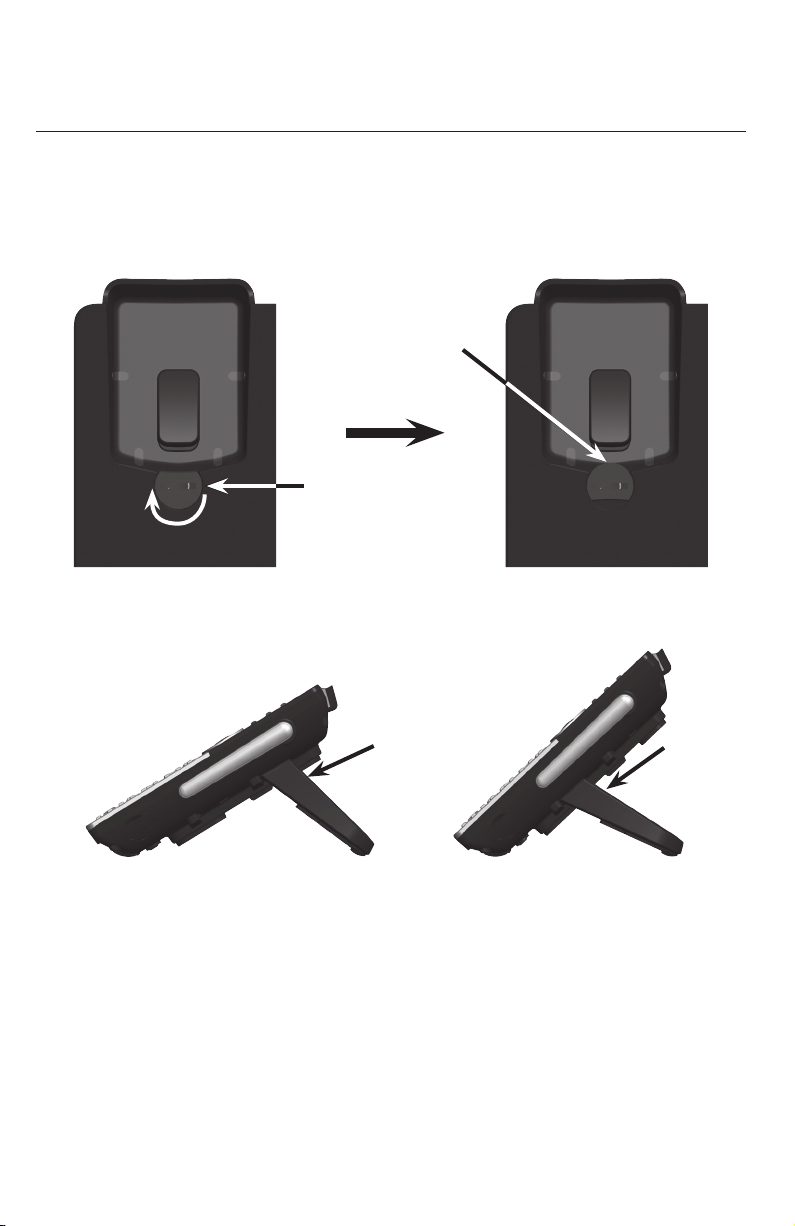
Wall mount installation (Optional)
Tabletop to wall installation
To install your deskset in the wall installation position, make sure you first
unplug the power adapter from the electrical outlet.
1. Place your corded handset aside. Use a coin to rotate the handset tab 180
degrees. The protruding edge holds the corded handset when the deskset is
mounted on the wall.
Protruding edge
Handset tab
2. Press in the direction indicated by the arrows to release and remove the
mounting bracket from the deskset.
Low tabletop position
High tabletop position
3. Place the corded handset back to the deskset. Plug the small end of the
power adapter cord into the power jack on the back of the deskset.
6

Getting started
Wall mount installation (Optional)
4. Align the wall mounting holes on the back of the deskset with the tabs of the
standard wall plate. Push the deskset down until it clicks securely in place.
5. Plug the large end of the power adapter into an electrical outlet not
controlled by a wall switch.
Wall to tabletop installation
Follow the instructions below to return the deskset from wall installation to
tabletop position.
1. Remove the deskset from the wall. Unplug the power adapter cord from the
electrical outlet.
2. Use a coin to rotate the handset tab 180 degrees.
3. Follow the steps in Deskset installation on pages 4-5 to install your deskset
for tabletop use.
7

Getting started
Add and register a deskset
You can add CM18245 desksets to the CM18445 console at any time, each
new deskset must be registered with the console before use.
The desksets are assigned with available extension numbers starting from 1
in ascending order (1 to 9). You can register a maximum of nine devices to the
console.
To register the deskset to the CM18445 console:
Start registration when the deskset shows
1) Press MENU on Console ->Registration ->Register
Ext. and 2) Press # on this extension to register.
alternately.
1. On the console, press MENU/SELECT.
2. Press or to scroll to Registration, then press
MENU/SELECT or /SKIP.
3. Press MENU/SELECT or /SKIP to choose Register
ext. The console shows Registering....
4. On the deskset, press #. The deskset shows
Registering....
5. You hear a beep sound when the registration
process is successful. The deskset shows Deskset
X registered. (X represents the extension number,
ranged from 1 to 9). It takes up to 60 seconds to
complete the registration process.
6. Lift the handset. If you hear a dial tone, the registration
was successful.
1) Press MENU
on Console
->Registration
->Register Ext.
Registering...
Directory
Call log
Ringer setting
Console setup
Line mode
Ans sys setup
>Registration
Registration:
>Register ext
Deregistration
NOTE: If the registration is not successful, the deskset returns to the
previous screen. Try the registration process again.
8
Deskset X
registered.

Getting started
Add a corded headset (Optional)
You can use this telephone handsfree when you install any industry-standard
2.5mm corded telephone headset (purchased separately).
To add a corded headset to the deskset
Side view of the deskset
1. Lift open and rotate the plastic cover.
2. Then, plug a 2.5 mm headset into the HEADSET (
deskset.
) jack on the side of the
NOTE: The HEADSET button on the deskset controls only the corded headset. For more details
on the operation of the corded headset, refer to the user’s manual of the corded headset.
9

Getting started
Getting started
Deskset overview
Deskset overview
MESSAGE WAITING indicator
• On when there are new messages in
the private mailbox.
LINE 1-LINE 4 keys
• Press to make or answer a call on the
desired line.
ANS SYS
• Press to enter the answering system
menu.
DELETE
• While playing a message, press to
delete the message.
• While reviewing the caller ID
information, press to delete an
individual entry.
• While predialing, press to delete digits.
/DIR
• Press to view directory information.
LOWER
• When assigning or dialing a speed dial
number, press to switch to the lower
location (the second 16 locations) of a
speed dial key.
Navigation keys
• While in menus, press or to scroll through the
menus, highlight items or change settings. Press /SKIP
to enter the selected item, or press /REPEAT to return
to the previous menu.
• While entering names or numbers, press /REPEAT or
/SKIP to move the cursor to the left or right.
• While playing back messages, press /REPEAT to
repeat the message, or press /SKIP to skip to the next
message.
/CID
• Press to view caller ID information.
Speed dial keys
• Press to dial the desired speed dial
number.
MIC
10

Getting started
Deskset overview
TRANSFER
• Press to transfer a
call to an extension.
• During message
playback, press to
transfer the message
to an extension.
HOLD
• Press to place
an outside call or
intercom call on hold.
FLASH
• During a call,
press to answer an
incoming call when
you receive a call
waiting alert.
AUTO REDIAL
• Press to view the
last 10 numbers
dialed.
MUTE
• During a call,
press to mute the
microphone.
CONFERENCE
• Press to add another
extension or outside
line to an existing call.
MENU/SELECT
• Press to enter the
menu.
• While in the menu,
press to select an
item or save an entry
or setting.
CANCEL
• While in a menu,
press to cancel an
operation and exit the
menu display.
DND (Do not
disturb)
• Press once to turn
the feature on. Press
again to turn off.
INTERCOM
• When in idle mode,
press to initiate an
intercom call.
PAGE
• Press to begin a
one-to-one or
one-to-group broadcast.
HEADSET
• When a corded headset
is connected to the
deskset, press to make,
answer or hang up a
call.
11
SPEAKER
• Press to turn on the
speakerphone. Press
again to turn it off.
+/VOL/-
• During a call, press to
adjust the listening volume.
• During message playback,
press to adjust the
playback volume.
• Press to adjust the ringer
volume when in idle mode.

Getting started
Deskset overview
Directory card
Use the directory card to record the names of the speed dial numbers you
stored.
To write names on the directory card:
1. Write the information on the directory card
that comes with the package.
2. Insert the edge of the directory card in the
slot at the front of the deskset, under the
plastic cover.
12

Getting started
Deskset overview
Menus
The > symbol highlights a menu item.
Main menu
• Directory
• Call history
• Ringer setting
• Deskset setup
• Speed dial
• User support
• Deskset info
• Factory reset
Answering system menu
• Play messages
• Mailbox On/Off
• Record memo
• Gen MB
• Settings
• Remaining time
• Delete all old
>Directory
Call history
Ringer setting
Deskset setup
1
0 New message
>Play messages
Mailbox On/Off
Record memo
Using menus
• Press MENU/SELECT to show the main menu; or
press ANS SYS to show the answering system menu.
• Press or to scroll through menu items.
• Press MENU/SELECT or /SKIP to select a highlighted menu item.
• Press MENU/SELECT to save changes.
• Press CANCEL to cancel an operation, exit the menu display or return to the
idle screen.
13

Getting started
Deskset overview
The following tables provides you with more details on the main menu and the
answering system menu of the deskset.
Table 1 - Main menu (Press MENU/SELECT in idle screen)
Menu Description Reference
Directory Review, add or delete directory entries. Pages 45-49
Call history Review, delete call history entries, or
copy an entry to directory.
Ringer setting Set ringer volume and ring tone for an
incoming call.
Deskset setup Set LCD contrast, key tone, language,
Primary line*, call privacy**, deskset
name, and hold remainder.
*Primary line defines which line is
automatically selected each time you
pick up the corded handset or press
the speakerphone.
**Call privacy defines whether other
extensions can barge in to join a call in
progress.
Speed dial Program the desired telephone
numbers or extension numbers into the
speed dial keys.
User support Display a website for you to get extra
support.
Deskset info Display ring group status, and
the extension number of a paired
accessory.
Factory reset Reset all settings of the deskset to the
factory default.
Pages 50-56
Pages 18-19
Pages 20-23
Pages 42-44
Page 24
Page 24
Page 23
14

Getting started
Deskset overview
Table 2 - Answering system menu (Press ANS SYS in idle screen)
Menu Description Reference
Play messages Play messages in the private mailbox. Pages 63-64
Mailbox On/Off Turn on or off the private mailbox, or
set to play an announcement only to
caller when no one is available to pick
up the call.
Record memo Record reminders for yourself or others
who are using the same telephone
system.
Gen MB Play or delete messages in the general
mailbox.
Settings Set up the deskset’s private mailbox.
Mailbox On, Announce only - Set
the number of rings before the system
answers the incoming calls, and record
your own greeting announcements.
Remote access - Modify the passcode
for users to access private mailbox
remotely by making a call to one of the
telephone lines.
Message length - Set the maximum
duration allowed for any voice
messages.
Call screening - Set whether the
deskset user hear the caller whenever
a voice recording is taking place.
Call intercept - Set whether users of
other system extensions can intercept
and stop a recording in private mailbox
and talk to the caller.
Msg alert tone - Set whether a tone
is played in idle mode when there are
unattended messages in the private
mailbox.
Remaining time Check the remaining recording time
and number of messages available in
the private mailbox.
Delete all old Delete all old messages in the private
mailbox.
Page 57
Page 65
Pages 63-64
Pages 57-61
Page 62
Page 65
15

Getting started
Deskset icon display
1 2 3 4 5
-Mute
-Priv
-Rec
Conf.
LOWER
On when any corresponding extensions are in use.
Ringer off - On steadily when the ringer volume is set to OFF or the do not
disturb function is on.
Headset - On steadily when using a corded headset.
Backup battery indicator - Shows the backup battery status.
Microphone is muted.
On steadily when the call privacy feature is set to On.
On steadily when recording a call.
On steadily during a conference call.
The lower location of speed dial keys is active.
16

Getting started
Alert tones and lights
Alert tones
One beep The deskset is recording an announcement or memo.
Two beeps You have set the hold reminder on; a call has been on hold for
Lights
more than three minutes.
-OR-
You have set the message alert tone on.
-OR-
There is an incoming call waiting.
Large
lighted
display
ANS SYS
• On when
the private
mailbox is
on.
INTERCOM
• On when the deskset
is on an intercom call.
• Flashes showly when
an intercom call is on
hold.
• Flashes quickly when
there is an incoming
intercom call.
PAGE
• On when deskset
begins a
one-to-one or
one-to-group
broadcast.
MESSAGE WAITING
• On when there are new private
messages.
LINE 1/LINE 2/LINE 3/LINE 4
• On when a telephone line is in
use.
• Flashes slowly when the
telephone line is on hold.
• Flashes quickly when there is
an incoming call or a transfer
call.
DND (Do not disturb)
• On when the do not disturb
feature is on.
MUTE
• On with the microphone is muted.
SPEAKER
• On when the speakerphone
is on.
HEADSET
• On when the corded headset
is in use.
17
Telephone settings
Deskset setup
Menu settings
Use this menu to change the deskset settings.
1. Press MENU/SELECT when in idle mode (when the deskset is not in use) to
enter the main menu.
2. Press or to scroll to the feature to be changed. The > symbol indicates
the selected menu item.
3. Press MENU/SELECT or /SKIP to select the menu item.
4. Press CANCEL to exit setup without making changes.
NOTE: Press CANCEL to cancel an operation, exit the menu display, or return to idle mode.
Ringer volume
Use this feature to set the ringer volume to one of six levels or turn the ringer off.
When the ringer is off, the icon appears on the deskset screen. The deskset
stores the volume setting for all lines.
1. When the deskset is idle, press MENU/SELECT.
2. Press or to scroll to Ringer setting, then press MENU/SELECT or /SKIP.
3. Press MENU/SELECT again or press /SKIP to select Ringer volume.
4. Press , , or +/VOL/- on the deskset to adjust the ringer volume.
5. Press MENU/SELECT to save the setting and return to the previous menu. To
exit without making changes, press CANCEL or /REPEAT.
-OR-
When the deskset is idle, press +/VOL/- to adjust the ringer volume, then press
MENU/SELECT to save.
NOTE: The ringer volume also determines the ringer volume for intercom calls. If the deskset
ringer volume is set to off, it is silenced for all incoming calls, including intercom calls.
18

Telephone settings
Deskset setup
Ringer tone
Use this feature to choose one of the ten ringer tones for incoming calls. You
can choose different ringer tones for different lines so you can easily identify
which line is calling.
1. When the deskset is idle, press MENU/SELECT.
2. Press or to scroll to Ringer setting, then press MENU/SELECT or /SKIP.
3. Press or to scroll to Ringer tone, then press MENU/SELECT or /SKIP.
4. Press or to select the desired line (Line 1, Line 2, Line 3 or Line 4),
then press MENU/SELECT or /SKIP.
5. Press or to select a desired ringer tone.
6. Press MENU/SELECT to save the setting and return to the previous menu. To
exit without making changes, press CANCEL or /REPEAT.
7. Repeat steps 4-6 above to choose ringer tones for other lines if desired.
Do not disturb (DND)
Use this feature to silence your deskset. When you activate the do not disturb
function, the icon appears on the deskset screen. You will not receive any
paging call and you will not hear rings of incoming call or intercom call.
Instead, the LINE 1-LINE 4 indicator flashes to signal an incoming call. If you
receive an intercom call, the extension number of that intercom call appears on
the screen display.
1. Press DND to prevent interruptions. The DND indicator turns on.
2. Press DND again to resume normal call alerts. The DND indicator turns off.
19

Telephone settings
Deskset setup
LCD contrast
Use this feature to adjust the screen contrast to one of five levels to optimize
readability in different lighting conditions.
1. When the deskset is idle, press MENU/SELECT.
2. Press or to scroll to Deskset setup, then press MENU/SELECT or /SKIP.
3. Press MENU/SELECT again or press /SKIP to select LCD contrast.
4. Press , , or +/VOL/- on the deskset to adjust the screen contrast level.
5. Press MENU/SELECT or /SKIP to save the setting and return to the previous
menu. To exit without making changes, press CANCEL or /REPEAT.
Key tone
The deskset is set to beep with each key press. If you turn off the key tone,
there are no beeps when you press keys.
1. When the deskset is idle, press MENU/SELECT.
2. Press or to scroll to Deskset setup, then press MENU/SELECT or /SKIP.
3. Press or to scroll to Key tone, then press
MENU/SELECT or /SKIP.
4. Press or to choose On or Off.
5. Press MENU/SELECT or /SKIP to save the setting and return to the previous
menu. To exit without making changes, press CANCEL or /REPEAT.
20

Telephone settings
Deskset setup
LCD language
This feature allows you to change the language used for all screen displays.
The language settings on the console and desksets are independent. By
default, the language is set to English.
1. When the deskset is idle, press MENU/SELECT.
2. Press or to scroll to Deskset setup, then press MENU/SELECT or
/SKIP.
3. Press or to scroll to Language, then press MENU/SELECT or /SKIP.
4. Press or to select English, Français or Español.
5. Press MENU/SELECT or /SKIP to save the setting and return to the
previous menu. To exit without making changes, press CANCEL or
/REPEAT.
Primary line
Use this feature, also known as automatic line selection, to choose which line is
automatically selected each time you make an outside call. If you select Auto,
the deskset picks up any available line starting from Line 1.
1. When the telephone is idle, press MENU/SELECT.
2. Press or to scroll to Deskest setup, then press
MENU/SELECT or /SKIP.
3. Press or to scroll to Primary line, then press
MENU/SELECT or /SKIP.
4. Press or to choose the desired line, then press MENU/SELECT or /SKIP.
To exit without making changes, press CANCEL.
NOTE: If you install less than four telephone line cords to the CM18445 console and select
Auto as your Primary line setting, make sure you plug in your telephone line cords starting
from L1/2 jack. Avoid having any unoccupied telephone jack between other occupied
telephone jacks.
21
 Loading...