


Quick start guide
CS6648-2/CS6649/
CS6649-2/CS6649-3
Introduction
This quick start guide provides you with the basic installation
and setup instructions. A limited set of features are described
in abbreviated form.
For complete installation and operation instructions, refer to the
Abridged user’s manual provided in the product package, or see
the online Complete user’s manual at www.vtechphones.com.
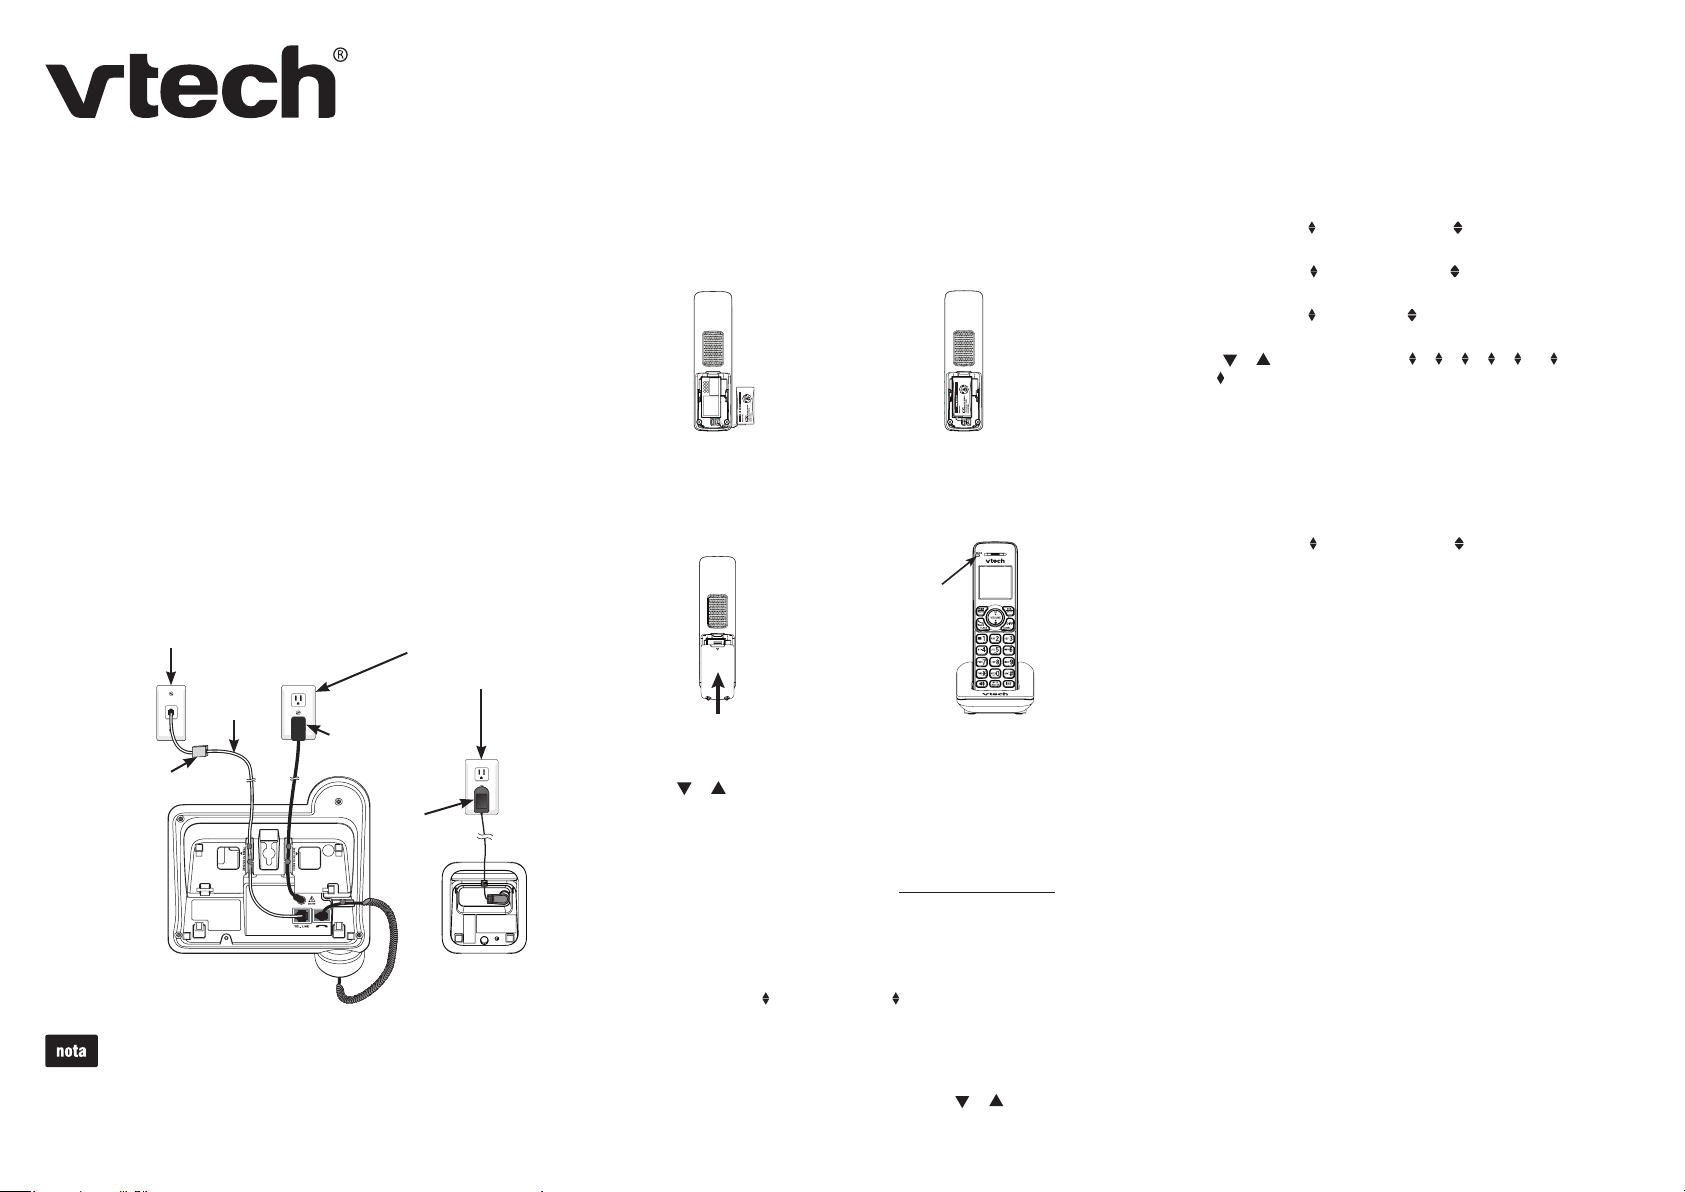
Telephone base and handset charger installation
Install the telephone base and handset charger as shown below.
Telephone
wall jack
A DSL filter
(not included)
is required if you
have DSL
high-speed
Internet service.
The DSL
filter must be
plugged into the
telephone wall
jack.
Telephone
line cord
Telephone base
Telephone base
power adapter
Electrical outlet
not controlled by a
wall switch
Charger
adapter
Handset charger
Battery installation and charging
Install the battery as shown below. Once you have installed
the battery, you may be able to make and receive short
calls. For best performance, charge the handset battery
continuously for at least 10 hours.
Place the battery with the
Plug the battery
1.
connector securely into
the socket.
2.
label THIS SIDE UP facing
up and the wires inside the
battery compartment.
Slide the battery
3. Place the handset in
compartment cover
towards the center of
4.
the handset charger
to charge.
the handset until it clicks
into place.
CHARGE light
remains on when
charging.
Enter the menu
Press MENU.
1.
Press or until the screen displays the desired
2.
feature menu.
Press SELECT to enter that menu.
3.
To return to the previous menu, press CANCEL.
•
To return to idle mode, press and hold CANCEL.
•
Set number of rings
You can set the answering system to answer an incoming
call after 2, 3, 4, 5 or 6 rings; or toll saver. If you choose toll
saver, the answering system answers a call after 2 rings when
you have new messages, or after 4 rings when you have no
new messages.
Press MENU.
1.
Scroll to Answering sys then press SELECT.
2.
Scroll to Ans sys setup then press SELECT.
3.
Scroll to # of rings then press SELECT.
4.
Press or to choose 6, 5, 4, 3, 2 or Toll saver and
5.
then press SELECT.
Record your own announcement
You can use the preset announcement to answer calls,
or replace it with your own recorded announcement. The
announcement can be up to 90 seconds in length.
Press MENU.
1.
Scroll to Answering sys then press SELECT twice.
2.
The system announces, “To play, press 2. To record,
3.
press 7.” Then press 7 to record.
The system announces, “Record after the tone. Press 5
4.
when you are done.” After the tone, speak towards the
microphone.
Press 5 when done.
5.
Use only the power adapters and batteries supplied with
this product.
Set date and time
Press MENU.
1.
Scroll to Set date/time, then press SELECT.
2.
Use the dialing keys (0-9) to enter the month (MM),
3.
date (DD) and year (YY), then press SELECT.
Use the dialing keys (0-9) to enter the hour (HH) and
4.
minute (MM). Then press or to choose AM or PM.
Press SELECT to save.
5.
IMPORTANT!
Refer to the online Complete user’s manual for a full set of
installation and operation instructions. For manual download or
customer service, visit our website at www.vtechphones.com or
call 1 (800) 595-9511. In Canada, go to www.vtechcanada.com
or call 1 (800) 267-7377.
Copyright © 2012 for VTECH TELECOMMUNICATIONS LTD.
All rights reserved. Printed in China.
96-008624-020-100
Guía de inicio rápido
CS6648-2/CS6649/
CS6649-2/CS6649-3
Introducción
En esta guía de inicio rápido encontrará instrucciones básicas
de instalación y de configuración. Algunas características se
describen de manera abreviada.
Consulte el manual del usuario en línea donde aparecen
instrucciones completas de instalación y funcionamiento.
Instalación de la base del teléfono y del cargador del
auricular
Instale la base del teléfono y el cargador del auricular como se
indica a continuación.
Toma telefónica
de la pared
Es necesario un
filtro DSL (no se
incluye) si cuenta
con servicio de
Internet DSL de
alta velocidad.
El filtro DSL
debe conectarse
en el enchufe
para el teléfono
en la pared.
Utilice sólo los adaptadores y las baterías que vienen con
el producto.
Cable de
la línea
telefónica
Base del teléfono
Adaptador
eléctrico de
la base del
teléfono
Tomacorriente
no controlado por
un interruptor
de pared
Adaptador
del cargador
Cargador del
auricular
Instalación y carga de la batería
Instale la batería como se indica a continuación. Una vez que
la haya instalado, podrá iniciar y recibir llamadas cortas. Para
obtener el mejor desempeño, cargue la batería del auricular
durante al menos 10 horas continuas.
Coloque la batería de
Conecte rmemente la
1.
batería en el enchufe.
2.
modo que la etiqueta
THIS SIDE UP quede
hacia arriba y los cables
queden dentro del
compartimiento.
Deslice la cubierta del
3. Coloque el auricular en
compartimiento de la
batería hacia el centro del
4.
el cargador para que se
cargue.
auricular hasta encajarlo
en su lugar.
La luz de CHARGE
(carga) permanece
encendida durante el
proceso de carga.
Ingrese al menú
Oprima MENU (menú).
1.
Oprima o hasta que se visualice en pantalla el menú
2.
con la función deseada.
Oprima SELECT (seleccionar) para ingresar al menú.
3.
Para volver al menú anterior, oprima CANCEL (cancelar).
•
Para volver al modo de inactividad, mantenga oprimido
•
CANCEL (cancelar).
Fija la fecha y la hora
Oprima MENU (menú).
1.
Desplácese hasta Set date/time ( Conf fecha/hora) y
2.
oprima SELECT (seleccionar).
Use las teclas de marcado (0-9) para ingresar el mes (MM), el
3.
día (DD) y el año (YY), y después oprima SELECT (seleccionar).
Use las teclas de marcado (0-9) para ingresar la hora
4.
(HH) y los minutos (MM). Después oprima o para
seleccionar AM o PM.
Oprima SELECT (seleccionar) para guardar.
5.
Número de timbres
Puede ajustar el sistema de contestadora para responder a
una llamada entrante después de 2, 3, 4, 5 o 6 timbres o con
ahorrador de tarifas. Si selecciona el ahorrador de tarifas, el
sistema de contestadora responde a una llamada después
de 2 timbres cuando tenga mensajes nuevos o después de 4
timbres cuando no tenga mensajes nuevos.
Oprima MENU (menú).
1.
Desplácese hasta Answering sys ( Sis cont llams) y
2.
oprima SELECT (seleccionar).
Desplácese hasta Ans sys setup ( Cnf st cnt llm) y
3.
oprima SELECT (seleccionar).
Desplácese hasta # of rings ( # de timbres) y oprima
4.
SELECT (seleccionar).
Oprima o para seleccionar 6, 5, 4, 3, 2 o Toll
5.
saver ( Ahorrdr cuotas) y oprima SELECT (seleccionar).
Grabar su propio saludo
Puede usarse el saludo predeterminado para contestar
llamadas o reemplazarlo con una grabación propia. El saludo
puede ser de hasta 90 segundos.
Oprima MENU (menú)..
1.
Desplácese hasta Answering sys ( Sis cont llams) y
2.
oprima SELECT (seleccionar) dos veces.
El sistema anuncia, “To play, press 2. To record, press 7.”
3.
(Para reproducir, oprima 2. Para grabar, oprima 7.) Después
oprima 7 para grabar.
El sistema anuncia, “Record after the tone. Press 5 when
4.
you are done.” (Grabar después del tono. Oprima 5 cuando
termine.). Después del tono, hable hacia el micrófono.
Oprima 5 cuando haya terminado.
5.
¡IMPORTANTE!
Consulte el manual del usuario en línea donde aparecen
instrucciones completas de instalación y funcionamiento. Para
descargar el manual o solicitar servicio al cliente, visite nuestro
sitio Web www.vtechphones.com o llame al 1 (800) 595-9511. En
Canadá, visite www.vtechcanada.com o llame al 1 (800) 267-7377
Todos los derechos reservados © 2012 para
VTECH TELECOMMUNICATIONS LTD.
Todos los derechos reservados. Impreso en China.
96-008624-020-100
 Loading...