


UserGuide
MiFi® 4620L
90026531 - R2
©2012 Novatel Wireless, Inc. All rights reserved. The information contained in this document is subject to change without notice and should not be construed as a commitment by Novatel Wireless, Inc.
Patents and Licenses
Visit www.novatelwireless.com/patents for a complete list of all Novatel Wireless patents.
Software License
Proprietary Rights Provisions:
The software drivers provided with this product are copyrighted by Novatel Wireless and/or Novatel Wireless’ suppliers. Although copyrighted, the software drivers are unpublished and embody valuable trade secrets proprietary to Novatel Wireless and/or Novatel Wireless’ suppliers. The disassembly, decompilation, and/or Reverse Engineering of the software drivers for any purpose is strictly prohibited by international law. The copying of the software drivers, except for a reasonable number of back-up copies is strictly prohibited by international law. It is forbidden by international law to provide access
to the software drivers to any person for any purpose other than processing the internal data for the intended use of the software drivers.
U.S. Government Restricted Rights Clause:
The software drivers are classified as “Commercial Computing device Software” and the U.S. Government is acquiring only “Restricted Rights” in the software drivers and their Documentation.
U.S. Government Export Administration Act Compliance Clause:
It is forbidden by US law to export, license or otherwise transfer the software drivers or Derivative Works to any country where such transfer is prohibited by the United States Export Administration Act, or any successor legislation, or in violation of the laws of any other country.
Trademarks and Service Marks
Novatel Wireless is a trademark of Novatel Wireless, Inc., and the other trademarks, logos, and service marks (collectively the “Trademarks”) used in this user manual are the property of Novatel Wireless or their respective owners. Nothing contained in this user manual should be construed as granting by implication, estoppel, or otherwise, a license or right of use of Novatel Wireless or any other Trademark displayed in this user manual without the written permission of Novatel Wireless or its respective owners.
•Novatel Wireless, and the Novatel Wireless logo are all trademarks of Novatel Wireless, Inc.
•MiFi® and the MiFi logo are registered trademarks of Novatel Wireless, Inc.
•Microsoft and Windows are either registered trademarks or trademarks of Microsoft Corporation in the United States and/or other countries.
•Apple®, Mac®, and Mac OS® are trademarks of Apple, Inc., registered in the U.S. and other countries.
•Linux® is the registered trademark of Linus Torvalds in the U.S. and other countries.
The names of actual companies and products mentioned in this user manual may be the trademarks of their respective owners.
Novatel Wireless Revision History
Part Number |
Revision |
Description |
Date |
90026530 |
R1 |
Initial release |
21 Mar 2012 |
|
R2 |
Added Wi-Fi Settings content, p 27; |
25 Apr 2012 |
|
|
Revised USB tethered mode content, p 66; |
|
|
|
product specifications information, p 86; |
|
|
|
and glossary definitions, p 93-94 |
|
|
|
Deleted set-up GPS using a USB cable, p 69 |
|
FCC ID: PKRNVWMIFI4620 |
|
|
|
PN: 90026530_R2_MASTER_UG MiFi4620L_VZW_25Apr2012 |
|
||
Please visit www.novatelwireless.com for the latest information about your device. |
|
||
Contents
Getting Started . . . . . . . . . . . . . . . . . . . . . . . . . . . . . . . . . . . . . . . . . . . . . . . . . . . . . . . . . |
1 |
Overview. . . . . . . . . . . . . . . . . . . . . . . . . . . . . . . . . . . . . . . . . . . . . . . . . . . . . . . . . . . . . . . . . . . . . . . . . . . . . . . . . . . . |
2 |
Features.. . . . . . . . . . . . . . . . . . . . . . . . . . . . . . . . . . . . . . . . |
2 |
Package Contents . . . . . . . . . . . . . . . . . . . . . . . . . . . . . . . . . . . . |
2 |
System Requirements. . . . . . . . . . . . . . . . . . . . . . . . . . . . . . . . . . . . . . . . . . . . . . . . . . . . . . . . . . . . . . . . . . . . |
3 |
Components. . . . . . . . . . . . . . . . . . . . . . . . . . . . . . . . . . . . . . . . . 4 |
|
Service Status Indicator (LED) States. . . . . . . . . . . . . . . . . . . . . . . . . . . . . . . . . . . . . . . . . . . . . . . . . . . . . . |
6 |
Service Display States. . . . . . . . . . . . . . . . . . . . . . . . . . . . . . . . . . . . . . . . . . . . . . . . . . . . . . . . . . . . . . . . . . . . |
7 |
Power Management. . . . . . . . . . . . . . . . . . . . . . . . . . . . . . . . . . . . . |
8 |
Caring for Your Device. . . . . . . . . . . . . . . . . . . . . . . . . . . . . . . . . . . . |
9 |
Using the MiFi 4620L . . . . . . . . . . . . . . . . . . . . . . . . . . . . . . . . . . . . . . . . . . . . . . . . . . . |
10 |
Accessing the Network . . . . . . . . . . . . . . . . . . . . . . . . . . . . . . . . . . . |
11 |
Using the Device for the First Time . . . . . . . . . . . . . . . . . . . . . . . . . . . . . |
. 12 |
Assemble the Wall Charger. . . . . . . . . . . . . . . . . . . . . . . . . . . . . . . . . . . . . . . . . . . . . . . . . . . . . . . . . . . . . |
. 13 |
Install the 4G LTE SIM Card. . . . . . . . . . . . . . . . . . . . . . . . . . . . . . . |
. 13 |
Remove the 4G LTE SIM Card. . . . . . . . . . . . . . . . . . . . . . . . . . . . . . |
. 14 |
Insert and Charge the Battery. . . . . . . . . . . . . . . . . . . . . . . . . . . . . . |
15 |
Remove the Battery. . . . . . . . . . . . . . . . . . . . . . . . . . . . . . . . . . . . . . . . . . . . . . . . . . . . . . . . . . . . . . . . . . . . |
. 16 |
Battery Tips. . . . . . . . . . . . . . . . . . . . . . . . . . . . . . . . . . . . . . . . . . . . . . . . . . . . . . . . . . . . . . . . . . . . . . . . . . . . |
. 17 |
Power the MiFi 4620L On and Off. . . . . . . . . . . . . . . . . . . . . . . . . . . . |
18 |
Power On. . . . . . . . . . . . . . . . . . . . . . . . . . . . . . . . . . . . . . . . . . . . . . . . . . . . . . . . . . . . . . . . . . . . . . . . . . |
. 18 |
Power Off . . . . . . . . . . . . . . . . . . . . . . . . . . . . . . . . . . . . . . 18 |
|
Activate Your Device. . . . . . . . . . . . . . . . . . . . . . . . . . . . . . . . . . |
. 18 |
Connecting to the Device . . . . . . . . . . . . . . . . . . . . . . . . . . . . . . . . . . . . . . . . . . . . . . . . . . . . . . . . . . . . . . . . . . |
. 19 |
Using the Device After Setup is Complete . . . . . . . . . . . . . . . . . . . . . . . . . . |
20 |
Normal Use. . . . . . . . . . . . . . . . . . . . . . . . . . . . . . . . . . . . . . . . . . . . . . . . . . . . . . . . . . . . . . . . . . . . . . . . . |
20 |
Setting up a Temporary Hotspot . . . . . . . . . . . . . . . . . . . . . . . . . . |
. 20 |
Security for the MiFi 4620L . . . . . . . . . . . . . . . . . . . . . . . . . . . . . . . . . . . . . . . . . . . . . . . . . . . . . . . . . . |
20 |
MiFi Settings . . . . . . . . . . . . . . . . . . . . . . . . . . . . . . 21 |
|
Configuring MiFi Settings . . . . . . . . . . . . . . . . . . . . . . . . . . . . . . . . . . . . . . . . . . . . . . . . . . . . . . . . . . . . . . . . . . . |
22 |
Login. . . . . . . . . . . . . . . . . . . . . . . . . . . . . . . . . . . . . . . . . . . . . . . . . . . . . . . . . . . . . . . . . . . . . . . . . . . . . . . . . . . . . . . |
23 |
Login. . . . . . . . . . . . . . . . . . . . . . . . . . . . . . . . . . . . . . . . . . . . . . . . . . . . . . . . . . . . . . . . . . . . . . . . . . . . . . . . . . . |
23 |
Menu Bar. . . . . . . . . . . . . . . . . . . . . . . . . . . . . . . . . . . . . . . . . . . . . . . . . . . . . . . . . . . . . . . . . . . . . . . . . . . . . . . |
23 |
Quick Start. . . . . . . . . . . . . . . . . . . . . . . . . . . . . . . . . . . . . . . . . |
24 |
Admin Password. . . . . . . . . . . . . . . . . . . . . . . . . . . . . . . . . . . . |
24 |
Change Admin Password . . . . . . . . . . . . . . . . . . . . . . . . . . . . . . |
25 |
Wi-Fi Settings. . . . . . . . . . . . . . . . . . . . . . . . . . . . . . . . . . . . . . . . . . . . . . . . . . . . . . . . . . . . . . . . . . . . . . . . . . . |
27 |
Wi-Fi. . . . . . . . . . . . . . . . . . . . . . . . . . . . . . . . . . . . . . . . . . . . |
28 |
Wi-Fi Profile . . . . . . . . . . . . . . . . . . . . . . . . . . . . . . . . . . . . . . . 28 |
|
Choosing a Profile . . . . . . . . . . . . . . . . . . . . . . . . . . . . . . . . . . 31 |
|
Connected Devices. . . . . . . . . . . . . . . . . . . . . . . . . . . . . . . . . . . |
34 |
Network. . . . . . . . . . . . . . . . . . . . . . . . . . . . . . . . . . . . . . . . . . |
35 |
LAN. . . . . . . . . . . . . . . . . . . . . . . . . . . . . . . . . . . . . . . . . . |
. 36 |
IPv4. . . . . . . . . . . . . . . . . . . . . . . . . . . . . . . . . . . . . . . . |
. 37 |
IPv6. . . . . . . . . . . . . . . . . . . . . . . . . . . . . . . . . . . . . . . . |
. 38 |
WWAN. . . . . . . . . . . . . . . . . . . . . . . . . . . . . . . . . . . . . . . . . |
39 |
Internet Connection. . . . . . . . . . . . . . . . . . . . . . . . . . . . . . . . . 40 |
|
WWAN Settings. . . . . . . . . . . . . . . . . . . . . . . . . . . . . . . . . . . . . . . . . . . . . . . . . . . . . . . . . . . . . . . . . . . . |
. 43 |
SIM. . . . . . . . . . . . . . . . . . . . . . . . . . . . . . . . . . . . . . . . . . . . . . . . . . . . . . . . . . . . . . . . . . . . . . . . . . . . . . . . . . . . |
. 44 |
SIM Operations. . . . . . . . . . . . . . . . . . . . . . . . . . . . . . . . . . . |
44 |
Security. . . . . . . . . . . . . . . . . . . . . . . . . . . . . . . . . . . . . . . . . . . 45 |
|
Password . . . . . . . . . . . . . . . . . . . . . . . . . . . . . . . . . . . . . . . . . . . . . . . . . . . . . . . . . . . . . . . . . . . . . . . . . . . . . . |
. 45 |
Set Administration Password. . . . . . . . . . . . . . . . . . . . . . . . . . . . |
. 46 |
MAC Filtering . . . . . . . . . . . . . . . . . . . . . . . . . . . . . . . . . . . . . . . . . . . . . . . . . . . . . . . . . . . . . . . . . . . . . . . . . . |
. 47 |
MAC Filter. . . . . . . . . . . . . . . . . . . . . . . . . . . . . . . . . . . . . |
. 48 |
Trusted Device List. . . . . . . . . . . . . . . . . . . . . . . . . . . . . . . . . . . . . . . . . . . . . . . . . . . . . . . . . . . . . . . . . |
. 49 |
Connected Devices. . . . . . . . . . . . . . . . . . . . . . . . . . . . . . . . . |
50 |
Port Filtering . . . . . . . . . . . . . . . . . . . . . . . . . . . . . . . . . . . . . . |
51 |
Port Filtering . . . . . . . . . . . . . . . . . . . . . . . . . . . . . . . . . . . . |
52 |
Allowed Applications. . . . . . . . . . . . . . . . . . . . . . . . . . . . . . . . |
52 |
Custom Applications. . . . . . . . . . . . . . . . . . . . . . . . . . . . . . . . |
53 |
System . . . . . . . . . . . . . . . . . . . . . . . . . . . . . . . . . . . . . . . . . . . . . . . . . . . . . . . . . . . . . . . . . . . . . . . . . . . . . . . . . . . . |
. 55 |
. . . . . . . . . . . . . . . . . . . . . . . . . . . . . . . . . . . . . . . . . . . . . 55 |
|
System Status . . . . . . . . . . . . . . . . . . . . . . . . . . . . . . . . . . . . . |
. 56 |
System Information. . . . . . . . . . . . . . . . . . . . . . . . . . . . . . . . . . . . . . . . . . . . . . . . . . . . . . . . . . . . . . . . |
. 57 |
System Log . . . . . . . . . . . . . . . . . . . . . . . . . . . . . . . . . . . . . . . . . . . . . . . . . . . . . . . . . . . . . . . . . . . . . . . . |
. 57 |
Config File. . . . . . . . . . . . . . . . . . . . . . . . . . . . . . . . . . . . . . . . . . . . . . . . . . . . . . . . . . . . . . . . . . . . . . . . . . . . . |
. 58 |
Config File Download . . . . . . . . . . . . . . . . . . . . . . . . . . . . . . . . . . . . . . . . . . . . . . . . . . . . . . . . . . . . . . |
. 58 |
Config File Upload . . . . . . . . . . . . . . . . . . . . . . . . . . . . . . . . . . . . . . . . . . . . . . . . . . . . . . . . . . . . . . . . . |
. 59 |
Software Update . . . . . . . . . . . . . . . . . . . . . . . . . . . . . . . . . . . . |
60 |
Advanced. . . . . . . . . . . . . . . . . . . . . . . . . . . . . . . . . . . . . . . . . . 61 |
|
Audio Alerts. . . . . . . . . . . . . . . . . . . . . . . . . . . . . . . . . . . . . . |
. 62 |
Audio Alerts. . . . . . . . . . . . . . . . . . . . . . . . . . . . . . . . . . . . |
. 62 |
Audio Alert Notifications. . . . . . . . . . . . . . . . . . . . . . . . . . . . . . |
. 63 |
Settings. . . . . . . . . . . . . . . . . . . . . . . . . . . . . . . . . . . . . . . . |
. 64 |
Wi-Fi . . . . . . . . . . . . . . . . . . . . . . . . . . . . . . . . . . . . . . . . 65 |
|
Router. . . . . . . . . . . . . . . . . . . . . . . . . . . . . . . . . . . . . . . . . . . . . . . . . . . . . . . . . . . . . . . . . . . . . . . . . . . . . |
. 66 |
GPS Over Wi-Fi. . . . . . . . . . . . . . . . . . . . . . . . . . . . . . . . . . . . . . . . . . . . . . . . . . . . . . . . . . . . . . . . . . . . . |
. 67 |
System. . . . . . . . . . . . . . . . . . . . . . . . . . . . . . . . . . . . . . . |
69 |
Diagnostics. . . . . . . . . . . . . . . . . . . . . . . . . . . . . . . . . . . . . . . . . . . . . . . . . . . . . . . . . . . . . . . . . . . . . . . . . . . . |
. 71 |
Modem . . . . . . . . . . . . . . . . . . . . . . . . . . . . . . . . . . . . . . |
. 72 |
4G Network (LTE) . . . . . . . . . . . . . . . . . . . . . . . . . . . . . . . . . . |
73 |
iii
3G Network (EVDO/1xRTT). . . . . . . . . . . . . . . . . . . . . . . . . . . . . . . |
. . . . . . . . . . . . . . . . . . . . . . . . . . . 73 |
3G Network (GSM/WCDMA) . . . . . . . . . . . . . . . . . . . . . . . . . . . . . . |
. . . . . . . . . . . . . . . . . . . . . . . . . . . 74 |
Port Forwarding. . . . . . . . . . . . . . . . . . . . . . . |
. . . . . . . . . . . . . . 75 |
Port Forwarding. . . . . . . . . . . . . . . . . . . . . . . . . . . . . . . . . . . 76 |
|
Custom Applications. . . . . . . . . . . . . . . . . . . . . . . . . . . . . . . . |
77 |
DMZ . . . . . . . . . . . . . . . . . . . . . . . . . . . |
. . . . . . . . . . . . . 78 |
Troubleshooting . . . . . . . . . . . . . . . . . . . . . . . . . . . . . . . . . . . |
. . . . . . . . . . . . . . . . . . . . 79 |
Overview. . . . . . . . . . . . . . . . . . . . . . . . . . . . . . . . . . . . . . . . . . . . . . . . . . . . . . . . |
. . . . . . . . . . . . . . . . . . . . . . . . . . . 80 |
Common Problems and Solutions . . . . . . . . . . . . . . . . . . . . . . . . . . . . . . . . |
. . . . . . . . . . . . . . . . . . . . . . . . . . . 81 |
Technical Support. . . . . . . . . . . . . . . . . . . . . . . . . . . . . . . . . . . . . . 83 |
|
Technical Support. . . . . . . . . . . . . . . . . . . . . . . . . . . . . . . . . . . . 83 |
|
Product Specifications and Regulatory Information. . |
. . . . . . . . . . 84 |
Product Specifications. . . . . . . . . . . . . . . . . . . . . . . . . . . . . . . . . . . . 85 |
|
General . . . . . . . . . . . . . . . . . . . . . . . . . . . . . . . . . . . . . . . . . 85 |
|
Technology/Bands. . . . . . . . . . . . . . . . . . . . . . . . . . . . . . . . . . . . . . . . . . . |
. . . . . . . . . . . . . . . . . . . . . . . . . . . 85 |
Environmental. . . . . . . . . . . . . . . . . . . . . . . . . . . . . . . . . . . . . . . . . . . . . . . |
. . . . . . . . . . . . . . . . . . . . . . . . . . . 85 |
Regulatory Statements . . . . . . . . . . . . . . . . . . . . . . |
. . . . . . . . . . . . . 86 |
Wireless Communications. . . . . . . . . . . . . . . . . . . . . . . . . . . . . . . . . . . . . . . . |
. . . . . . . . . . . . . . . . . . . . . . . . . . . 88 |
Limited Warranty and Liability . . . . . . . . . . . . . . . . . . |
. . . . . . . . . . . . . . 88 |
Safety Hazards. . . . . . . . . . . . . . . . . . . . . . . . . . . . . . . . . . . . . . . . . . . . . . . . . . . |
. . . . . . . . . . . . . . . . . . . . . . . . . . . 89 |
Proper Battery Use and Disposal . . . . . . . . . . . . . . . . . . . . . . . . . . . . . . . 91 |
|
Glossary. . . . . . . . . . . . . . . . . . . . . . . . . . . . . . . . . . . . . . . . . . . |
. . . . . . . . . . . . . . . . . . . . 92 |
iv

1
Getting Started
Overview
Components
Power Management
Caring for Your Device

Overview
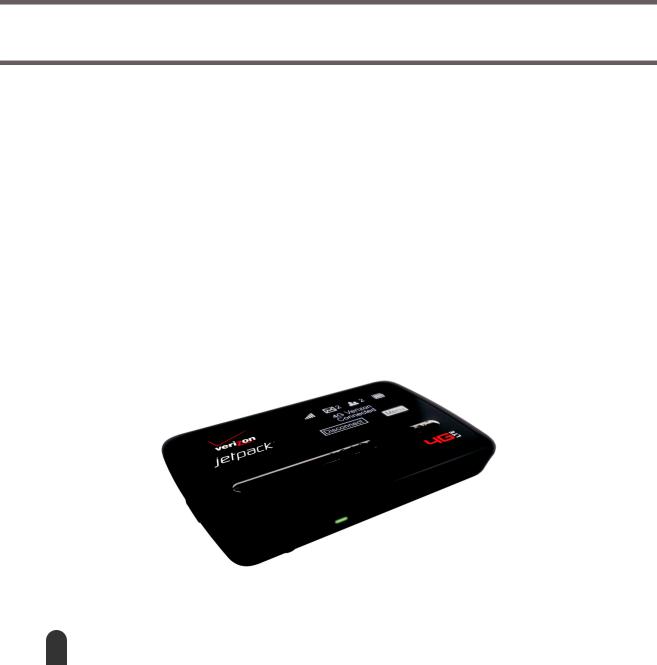
Congratulations on your purchase of the Verizon Jetpack™ Mobile Hotspot - MiFi® 4620L for 4G LTE™ and Wi-Fi!
With the MiFi 4620L you can access 4G LTE networks for faster apps, uploads and downloads. Connect up to ten Wi-Fi enabled devices to the Internet at once - laptops, tablets, e-readers, gaming consoles and more* - and experience download speeds of up to 100 Mbps**.
The MiFi 4620L is backwards compatible to 3G networks, ensuring reliable connectivity when you need it most.
Features
•• Connect to High-Speed Wireless Data (4G LTE, 3G CDMA and GSM)
•• Wi-Fi Connectivity
•• Manage Wireless Network Activity
•• MiFi Settings is an easy-to-use web-based interface that allows you to manage, monitor, and customize your Wi-Fi and 4G LTE connection.
•• Advanced Embedded Antenna Design
•• VPN Capability
•• Auto Connectivity Options
Package Contents
The Verizon Wireless MiFi 4620L package includes:
•• MiFi 4620L
•• 1500mAh Standard Lithium Ion Battery
•• Wall Charger
•• Protective Pouch
•• Verizon Wireless Brochures
*When multiple users are connected to the MiFi 4620L, all of their data usage will be aggregated and applied to the mobile broadband customer.
**Manufacturer’s rated peak theoretical speed. Actual speeds may vary.
2
System Requirements
•• Compatible with all major operating systems
•• Works with the latest versions of browsers, including Android™, Chrome™, Firefox®, Internet Explorer®, Safari™ and Mobile Safari™
To use Wi-Fi mode, your computer needs Wi-Fi capability and Internet browser software only.
Your device must have proper data service to function properly. (See Using the Device for the First Time on page 12.)
3
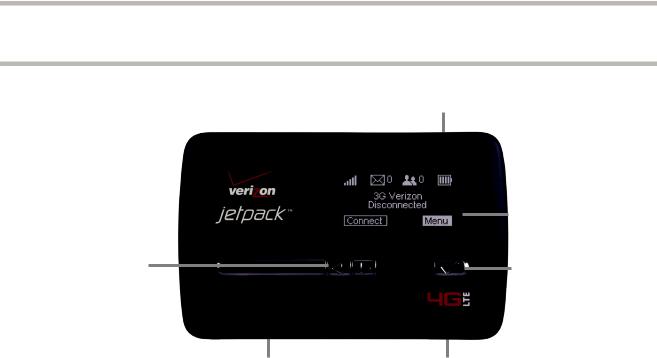
Components
|
|
Scroll Button — Scrolls left or right through available menu options.
Service Status Indicator (LED) — Shows the device status, including connection and error states. (See Service Status Indicator (LED) States on page 6.)
Micro USB Connector — The wall charger connects here.
Selection Button — Use to select a menu option.
Status Display — Provides connection and battery status, network signal strength, roaming status, and the number of users connected with Wi-Fi. (See Service Display States on
page 7.)
Power Button — Powers the device on and off.
4
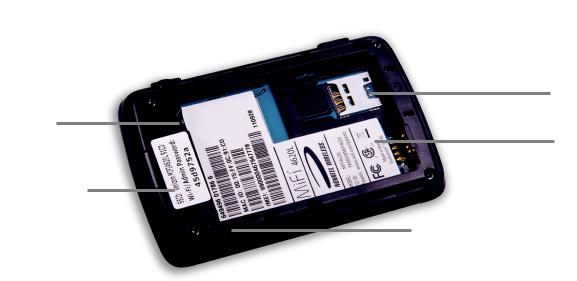
SIM Card Slot — The SIM card is installed here.
Battery Compartment — The battery contacts connect here.
Master Reset Button — Insert a paperclip in the small hole to reset the device to factory settings. (See How do I reset the MiFi 4620L back to factory settings? on page 82.)
Battery Removal Divot — When the battery is installed, insert a fingernail here and lift to easily remove it.
Network Name and Password Label — The pre-configured network name (SSID) and Wi-Fi/ Admin password are printed on a label inside the back cover of your device.
5
Service Status Indicator (LED) States
LED Color |
|
|
Status |
Description |
|
|
|
|
|
|
|
No Light |
|
|
|
Off |
The device is powered off or otherwise is not receiving power. |
|
|
|
|||
|
|
|
|
|
|
|
|
|
|
|
|
Yellow |
|
|
|
Solid |
The device is in power down mode. |
|
|
|
|
Blinking |
The device is powered off and also charging the battery. |
|
|
|
|
|
|
Green |
|
|
Slow |
The device is powered on; 4G service is available but not |
|
|
|
||||
|
|
|
|
Blinking |
connected or connected while dormant. |
|
|
|
|
Blinking |
The device is powered on and connected to the 4G network and |
|
|
|
|
|
transmitting data. |
|
|
|
|
|
|
Violet |
|
|
Slow |
The device is powered on; 3G 1X or EV-DO service is available but |
|
|
|
||||
|
|
|
|
Blinking |
not connected or connected while dormant. |
|
|
|
|
Blinking |
The device is powered on and connected to a 3G 1X or EV-DO |
|
|
|
|
|
network and transmitting data. |
|
|
|
|
|
|
Red |
|
|
Blinking |
If this occurs during power up, no SIM card is inserted. All other |
|
|
|
||||
|
|
|
|
|
times, this indicates an error or a SIM card failure. |
|
|
|
|
|
|
|
|
|
|
Blinking |
The device is powered on and the firmware is being upgraded. |
White |
|
|
|
||
|
|
|
|
|
This LED only applies to over-the-air firmware updates. |
|
|
|
|
|
|
6

Service Display States
Display Icon |
Status |
Description |
No icons |
The display is off, and the LED |
|
is also off. |
The device is powered off or otherwise is not receiving power.
Network |
An antenna with 0-5 bars. |
More bars indicate stronger signal. |
signal |
|
|
strength |
|
|
|
|
|
Message |
An SMS message logo. |
If the logo is present, there are unread |
status |
|
SMS messages. |
|
|
|
Battery |
A battery outline filled with |
More bars indicate more battery life. |
status |
bars; while charging, the bars |
|
|
cycle from 0-4 bars. When |
|
|
fully charged, the bars don’t |
|
|
move. |
|
|
When the battery is very |
|
|
low, the battery outline |
|
|
blinks on and off every two |
|
|
seconds. Charge the battery |
|
|
immediately. |
|
|
|
|
Connected |
A connected device |
If the logo is present, the |
Device |
logo. |
number of connected |
status |
|
devices is displayed. |
|
|
|
Roaming |
A device roaming logo. |
If the logo is present, the device is currently |
status |
|
roaming. |
|
|
|
7

Power Management
Your device will work from its battery or when plugged into a power source.
•• Battery — Charge the battery by plugging in the wall charger. While the battery is charging the battery icon bars blink. When the battery is fully charged, the battery icon is solid.
•• Wall charger — You can use the device when the charger is plugged into a wall socket. The MiFi battery charges while it is plugged in.
Before using the MiFi 4620L, read the battery safety information in the "Safety Hazards" section of this guide. (See Proper Battery Use and Disposal on page 92.)
8

Caring for Your Device
Like any electronic device, the device must be handled with care to ensure reliable operation. Novatel Wireless recommends the following guidelines:
•• Protect the device from liquids, dust, and excessive temperatures.
•• Do not apply adhesive labels to the device; they might cause the device to potentially overheat and they might alter the performance of the antenna.
•• Store the device in a safe place when not in use.
9

2
Using the MiFi 4620L
Accessing the Network Using the Device for the First Time Connecting to the MiFi Device Using the Device After Setup is Complete

Accessing the Network
4G LTE
With LTE bandwidth (700 MHz) you can get the broadband-like speed you require to work efficiently outside the home or office. You can connect to the Internet, access your corporate intranet, check your email and download attachments at speeds that are up to 10 times faster than 3G*.
4G Mobile Broadband with LTE*
•• Download: typical download speeds of 5-12 Mbps
•• Upload: typical upload speeds of 2-5 Mbps
3G Mobile Broadband with EVDO Rev. A**
•• Download: typical download speeds of 600 kbps–1.4 Mbps with bursts up to 3.1 Mbps.
•• Upload: typical upload speeds of 500-800 kbps with bursts up to 1.8 Mbps.
GSM Mobile Broadband with HSPA+, WCDMA, EDGE and GPRS***
•• Download and upload speeds depend on the roaming network.
WiFi 802.11b/g/n
•• 802.11b uses the 2.4 GHz frequency with a bandwidth of 11 Mbps.
•• 802.11g uses the 2.4 GHz frequency with a bandwidth of 54 Mbps.
•• 802.11n uses the 2.4 GHz frequency with a bandwidth of 150 Mbps.
*Speeds shown are those published by Verizon Wireless, Inc. and are theoretical in nature. Actual throughput speed and coverage may vary. Speed claims not applicable when roaming.
**Mobile Broadband Rev.A speed claim based on Verizon Wireless network tests with 5 MB FTP data files without compression. Your Mobile Broadband Rev. A-enabled device will indicate coverage when you are in a Mobile Broadband Rev. A service area. When outside the Rev. A service area, your wireless device will revert to Mobile Broadband Rev. 0 (typical download speeds will be 400–700 Kbps and upload speeds will be 60–80 Kbps).
***Subject to Customer Agreement, Calling Plan, credit approval, and other service terms.
11

Using the Device for the First Time
To get started, follow these steps:
Confirm your computer meets the minimum system requirements. (See System Requirements on page 3.)
Assemble the wall charger. (See Assemble the Wall Charger on page 13.)
Install the 4G LTE SIM card. (See Install the 4G LTE SIM Card on page 13.)
Insert and charge the battery. (See Insert and Charge the Battery on page 15.)
Turn on the device. (See Power the MiFi 4620L On and Off on page 18.)
Connect the device to your computer using Wi-Fi. (See Connecting to the Device on page 19.)
Connect to MiFi Settings. (See Connect to MiFi Settings on page 19.)
12

Assemble the Wall Charger
The wall charger comes with a removable plug. You need to connect it before using the MiFi device for the first time. To assemble the wall charger, follow these steps:
Remove the plug and the wall charger from the package.
Slide the plug on to the wall charger.
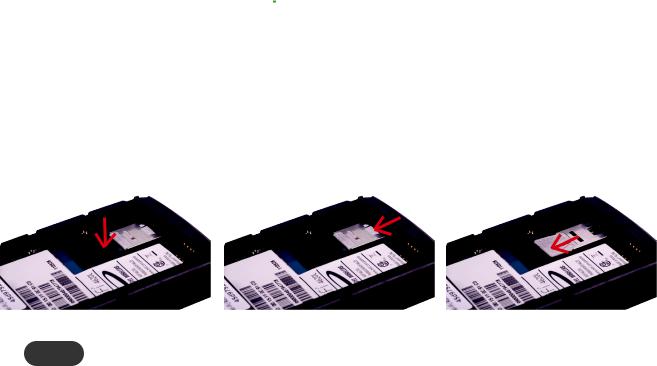
Install the 4G LTE SIM Card
To install your new 4G LTE SIM card, follow these steps:
Open the cover located on the underside of the MiFi 4620L.
Remove SIM card from the outer card, being careful not to touch the gold-colored contacts.
Hold the card as shown with the gold-colored contact points facing down.
Insert the SIM card into the slot. The 4G SIM card MUST remain in the SIM card slot when in use.
Your SIM (Subscriber Identity Module) card is a small rectangular plastic card that stores your phone number and important information about your wireless service.
CAUTION! Do not bend or scratch your SIM card. Avoid exposing your SIM card to static electricity, water, or dirt.
13
Remove the 4G LTE SIM Card
To remove the 4G LTE SIM card, follow these steps:
Open the SIM card cover located on the underside of the MiFi 4620L. Press down firmly on the small black tab to the left side of the SIM card slot.
Apply firm pressure to the right side of the SIM card and push to slide the card over the small black tab. A piece of transparent tape can be attached to the end of the SIM card once it has been pushed over the small black tab to complete lifting the card out of the slot.
NOTE Should your 4G SIM card be lost or damaged, contact your network operator.
14
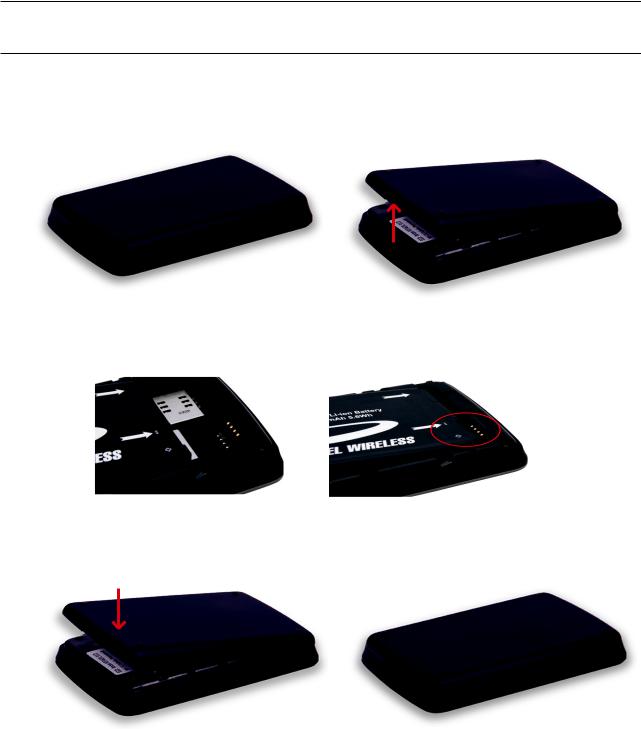
Insert and Charge the Battery
IMPORTANT Before you use your device, be sure to charge the battery for at least three hours to ensure a full initial charge.
To insert and charge the battery, follow these steps:
Insert your fingernail into the indention on the back cover and lift to open the battery compartment, located on the bottom of the device. Set the cover aside.
Align the gold-colored contacts on the battery with the gold-colored contacts on the device and gently slide the battery into place.
Replace the cover by setting it on the device where the notches align, and then press on the cover until it clicks into place.
15
Connect the micro USB end of the charger to the micro USB port of the device.
Plug the other end of the AC wall charger into the appropriate electrical outlet. Charge for at least three hours.
CAUTION! Use only batteries and chargers with your device that have been approved by Novatel Wireless. The failure to use approved batteries and chargers may increase the risk that your device will overheat, catch fire, or explode, resulting in serious bodily injury, death, or property damage.
You are now ready to connect your computer or other Wi-Fi device to the MiFi 4620L.
Remove the Battery
To remove or replace the battery, follow these steps:
Remove the cover to open the battery compartment, located on the bottom of the device. Set the cover aside.
Insert your fingernail into the battery removal divot and lift the battery out of the battery compartment.
16

Battery Tips
WARNING! Use only batteries and chargers with your device that have been approved by Novatel Wireless. Always use Novatel Wireless original batteries and chargers. The warranty does not cover damage caused by non-Novatel Wireless batteries and/or chargers.
•• It normally takes at least three hours to fully charge the battery with the wall charger.
•• Do not use sharp objects to access the battery well, this may damage the device and the battery.
•• Do not use excessive force to remove the battery or to access the battery well.
•• The battery discharges more rapidly as additional devices access your MiFi device.
•• Battery life depends on the network, signal strength, temperature, features, and accessories you use.
•• Your device also works with an approved car charger.
•• New batteries or batteries stored for a long time may take more time to charge.
•• When charging your battery, keep it near room temperature.
•• When storing your battery, keep it uncharged in a cool, dark, dry place.
•• Never expose batteries to temperatures below -20°C (4°F) or above 60°C (140°F).
•• Never leave the device in an unattended vehicle due to uncontrollable temperatures that may be outside the desired temperature for this device.
•• Some batteries perform best after several full charge/discharge cycles.
•• It is normal for batteries to gradually wear down and require longer charging times. If you notice a change in your battery life, it is probably time to purchase a new battery.
IMPORTANT Whenever you remove or insert either the battery or the SIM card, ensure your MiFi device is not connected to any device or power source. Never use tools, knives, keys, pens or any type of object to force the door open or to remove the battery. Using any of these types of objects could result in puncturing the MiFi battery.
WARNING! The failure to use approved batteries and chargers may increase the risk that your device will overheat, catch fire, or explode, resulting in serious bodily injury, death, or property damage. To avoid risk of explosion, never dispose of batteries in a fire.
17

Power the MiFi 4620L On and Off
Power On
•• Press the Power Button until the LED illuminates green or violet.
Power Off
•• Press and hold the Power Button until the display shows MiFi Powering Off and the LED turns yellow.
Activate Your Device
Your SIM card should come pre-activated and ready to connect. Insert the SIM card, power up the MiFi device, and connect.
If your SIM card did not come pre-activated or you need to re-activate your SIM card, you can:
•• go to your network operator’s retail store
•• contact your network operator's customer service department
IMPORTANT The MiFi 4620L requires an activated account with a wireless carrier to function.
18

Connecting to the Device
Now you can connect your computer to your MiFi 4620L using Wi-Fi.
Connect to MiFi Settings
To connect to the MiFi 4620L, follow these steps:
Turn on your computer and turn on the MiFi 4620L.
The MiFi 4620L's LED should be slow blinking green or violet, indicating the device is in service and ready to connect. The MiFi 4620L broadcasts its own wireless network.
On your computer, use the Wi-Fi manager (Windows) or the AirPort menu bar icon (Mac OS X) to connect wirelessly to the MiFi 4620L wireless network.
Tip! The steps to connect to a Wi-Fi network vary depending on your operating system and whether you use the native application or third-party software. Generally, you click an icon in the Windows notification area where you can select View Available Wireless Networks, or click the Airport icon in the menu bar on a Mac. If you are unfamiliar with wireless networking on your computer, consult the computer help system.
Connect to the network name found on the sticker that appears on the back of the MiFi device as well as on the Activation Guide. The network name or SSID is in the format MiFi4620L Jetpack XXXX Secure, where XXXX are four digits unique to your device.
Enter the 8-digit Wi-Fi/Admin password. The password appears on the back of the MiFi device as well as on the Activation Guide.
NOTE If you are entering the SSID manually, please add the word “Secure” after the SSID. For example, “MiFi4620L Jetpack 1A3B Secure”.
You can change device settings by connecting to the MiFi Settings on-device web page. (See Configuring MiFi Settings on page 22.)
IMPORTANT Charge the battery completely before you connect your computer to your MiFi device. (See Insert and Charge the Battery on page 15.)
19

Using the Device After Setup is Complete
You can use the MiFi 4620L as a wireless mobile hotspot to connect your computer and/or (up to a total of ten) other Wi-Fi enabled devices to the mobile broadband network.
You can customize the MiFi 4620L's settings using MiFi Settings. (See Configuring MiFi Settings on page 22.)
Normal Use
•• The MiFi 4620L is powered on as soon as you press the power button and the display turns on.
•• The LED on the device becomes green (4G) or violet (3G) and blinks according to the connection speed.
Setting up a Temporary Hotspot
See Setting Up a Temporary Hotspot on page 31 for more information about setting up a temporary hotspot.
Security for the MiFi 4620L
The MiFi 4620L comes from the factory with security enabled. A sticker on the back panel includes the name of the wireless network (SSID) and the network password. You can change the security settings in the MiFi Settings Wi-Fi screen. (See Wi-Fi on page 28.)
20

3
MiFi Settings
Configuring MiFi Settings
Login
Quickstart
Wi-Fi
Network
Security
System
Advanced
Configuring MiFi Settings
You can configure the Wi-Fi settings on your device using the easy-to-use MiFi Settings web-based User Interface (MiFi Settings). It allows you to manage, monitor, and customize your Wi-Fi and
4G LTE mobile broadband connection.
The following sections describe how to connect to MiFi Settings, as well as each screen and the corresponding functionality.
Connect to MiFi Settings
To connect to MiFi settings, follow these steps:
Turn on your computer and turn on the MiFi 4620L device.
MiFi 4620L's LED should be slow blinking green (4G) or violet (3G), indicating the device is in service and ready to connect. MiFi 4620L broadcasts its own wireless network.
On your computer, use the Wi-Fi manager (Windows) or the AirPort menu bar icon (Mac OS X) to connect wirelessly to the MiFi 4620L wireless network.
Tip! The steps to connect to a Wi-Fi network vary depending on your operating system and whether you use the native application or third-party software. Generally, you click an icon in the Windows notification area where you can select View Available Wireless Networks, or click the Airport icon in the menu bar on a Mac. If you are unfamiliar with wireless networking on your computer, consult the computer help system.
Click Connect and enter the Wi-Fi/Admin password found on the sticker on the back of the device and on the Activation Guide.
Open your browser and type http://vz.hotspot or http://192.168.1.1 into the address bar. Then press the Enter or Return key. The Welcome Page opens. (See Login on page 23.)
Type your Wi-Fi/Admin password in the Login field in the upper right corner of the window and click Login. The Login page changes to the Home page. (See Wi-Fi on page 65.)
22
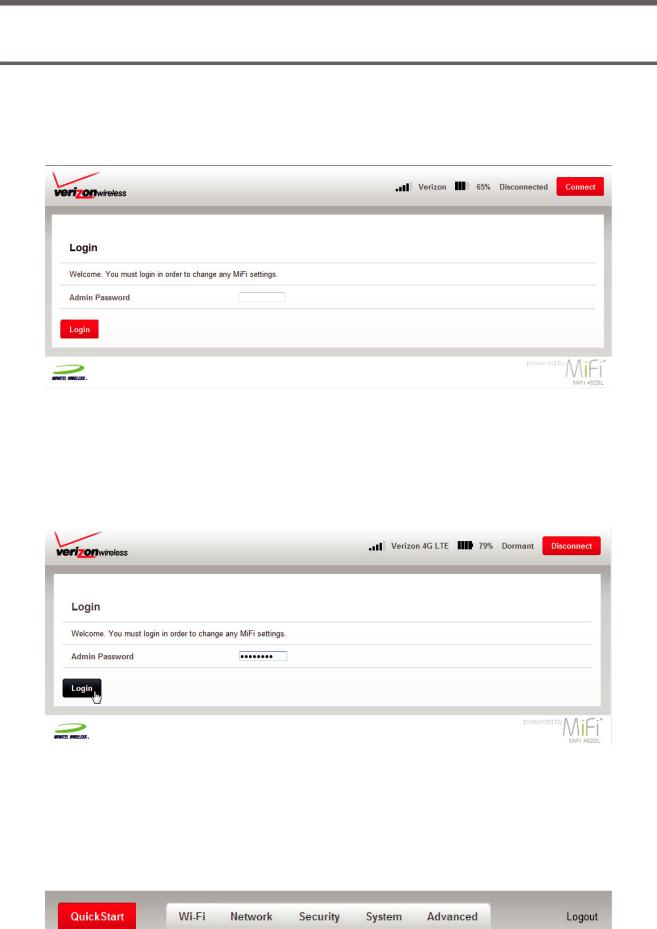
Login
The Login page is the first page you see after connecting and prior to logging in. It contains the status bar, the Connect/Disconnect button, and the Login button. You can access more information after you log in.
Login
Type the password (the default password is found on the sticker on the back of the MiFi device, and on the back of the Quick Start Guide) in the Login field at the top right corner of the window.
Menu Bar
The Menu Bar is the primary navigation for MiFi Settings. You can access each feature under the appropriate menu.
23
Quick Start
The QuickStart menu allows you to quickly change the security settings (administration password and Wi-Fi settings) for your MiFi 4620L. The QuickStart menu has the following options:
•• Admin Password (See Admin Password on page 24.)
•• Wi-Fi Settings (See Wi-Fi Settings on page 27.)
Admin Password
The Admin Password screen has the following section:
•• Change Admin Password (See Change Admin Password on page 25.)
24

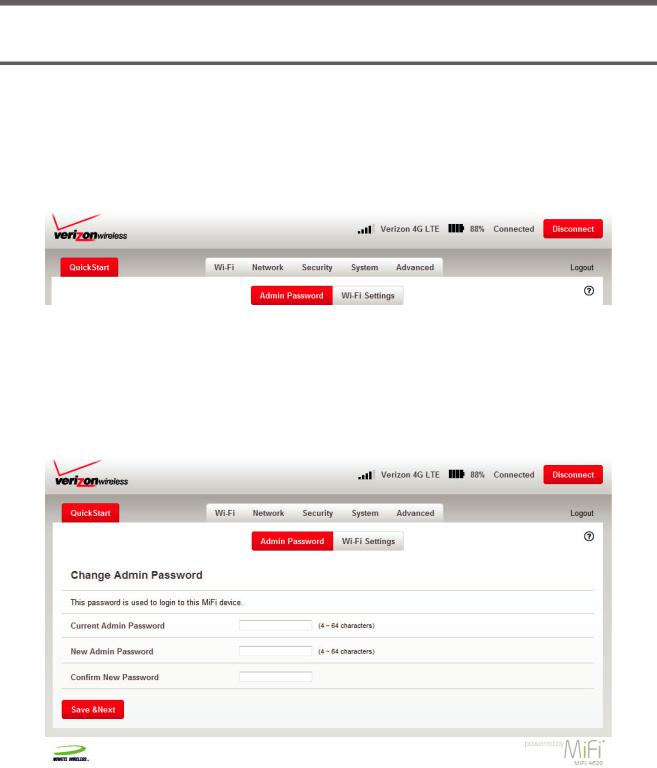
Change Admin Password
To change the administration password used to login to the MiFi device from the QuickStart screen, follow these steps:
Enter your current password in the Current Admin Password box.
Enter your new password in the New Admin Password box.
Re-enter your new password in the Confirm New Password box.
Click Save & Next.
A screen displays confirming that your password has been changed. Click OK.
25
 Loading...