


User Guide
1

Table of Contents
Section 1. Getting Started......................................... |
3 |
Understanding this User Guide..................................................... |
3 |
Front........................................................................................................... |
5 |
Back............................................................................................................ |
5 |
Sides......................................................................................................... |
6 |
Top and Bottom .................................................................................... |
7 |
Inserting and removing SIM Card ................................................ |
8 |
Charge the Tablet................................................................................ |
9 |
Memory Card......................................................................................... |
9 |
Turning Your Tablet On/Off......................................................... |
10 |
Unlocking the Screen..................................................................... |
10 |
Setup Wizard...................................................................................... |
11 |
Setting Up Your Google Account..............................................11 |
|
Section 2. Messaging................................................. |
12 |
Types of Messages.......................................................................... |
12 |
Email....................................................................................................... |
12 |
Messenger........................................................................................... |
14 |
Section 3. Apps ............................................................ |
15 |
Managing Applications .................................................................. |
15 |
Using Recent Apps.......................................................................... |
19 |
The Pre-loaded Applications ..................................................... |
20 |
Using Camera...................................................................................... |
25 |
Using Clock.......................................................................................... |
31 |
Using Play Store................................................................................ |
34 |
Using Maps........................................................................................... |
34 |
Widgets................................................................................................. |
35 |
Section 4. Connections............................................. |
37 |
Wi-Fi........................................................................................................ |
37 |
Bluetooth.............................................................................................. |
39 |
Wi-Fi Direct......................................................................................... |
42 |
VPN.......................................................................................................... |
43 |
Tethering.............................................................................................. |
44 |
Connecting to a Computer.......................................................... |
46 |
Section 5. Settings ..................................................... |
47 |
More Wireless and Network Settings ..................................... |
47 |
Sound...................................................................................................... |
56 |
Display................................................................................................... |
59 |
Wallpaper............................................................................................. |
61 |
Storage.................................................................................................. |
63 |
Battery.................................................................................................. |
64 |
Application manager....................................................................... |
65 |
Accounts and sync........................................................................... |
68 |
|
1 |
Security................................................................................................ |
69 |
Language and input ......................................................................... |
74 |
Back up and reset ............................................................................. |
79 |
Date and time .................................................................................... |
81 |
Accessibility....................................................................................... |
82 |
About tablet........................................................................................ |
83 |
Section 6. Health and Safety Information........ |
84 |
Important safety precautions ................................................... |
84 |
Additional safety guidelines....................................................... |
85 |
Caring for your device .................................................................... |
87 |
Federal Communication Commission Interference |
|
Statement........................................................................................... |
88 |
RF Exposure Information (SAR)................................................. |
89 |
WEEE...................................................................................................... |
91 |
Section 7. Warranty Information .......................... |
92 |
Warranty Period................................................................................ |
92 |
Limited Warranty Statement ..................................................... |
92 |
Disclaimer of Warranties; Exclusion of Liability ................ |
93 |
2

Section 1. Getting Started
Understanding this User Guide
The sections of this guide generally follow the features of your device:
•The safety information beginning on page 84 provides the important information that you should know before using your device.
This guide gives navigation instructions according to the default display settings. If you select other settings, navigation steps may be different.
Unless otherwise specified, all instructions in this guide assume that you are starting from the Home screen. To get to the Home screen, you may need to unlock the device.
All screen images in this guide are for your reference only. Actual displays may vary, depending on the software version of your device and any changes to the device’s Settings.
& NOTE!
Instructions in this guide are based on default settings, and may vary from your device, depending on the software version on your device, and any changes to the device’s Settings.
3

SpecialText
In this guide, you’ll find text that is set apart from the rest. These are intended to point out important information, share quick methods for activating features, to define terms, and more. The definitions for these methods are as follows:
•Notes: Presents alternative options for the current feature or menu.
•Tips: Provides quick or innovative methods, or useful shortcuts.
•Important: Points out important information about the current feature that could affect performance.
•Caution: Brings to your attention important information to prevent loss of data or functionality, or even damage to your device.
Text Conventions
This guide provides condensed information about how to use your device. To make this possible, the following text conventions are used to represent often-used steps:
Arrows are used to represent the sequence of selecting successive options in longer, or repetitive, procedures.
For example:
“From the Home screen, tap Apps Settings
  .”
.”
4

Front
Notifications Panel |
Front Camera |
Status Panel & |
||||
|
|
|
|
|
||
|
|
|
|
|
Quick Settings |
|
|
|
|
|
|
|
|
|
|
|
|
|
|
|
|
|
|
|
|
|
|
|
|
|
|
|
|
|
|
|
|
|
|
|
|
Google™ Search
 Apps
Apps
Back |
|
|
|
|
Recent Apps |
|
|
|
Home
Front Camera: Take pictures and record videos.
Back
Rear Camera
Rear Camera: Take pictures and record videos.
5

Sides
 Microphone
 Power/Lock Key
 Volume Keys
 SIM Card Slot
 MicroSD™ Card Slot
Microphone: Receives sound and voice.
Power/Lock Key:
•Press and hold to turn the device ON/OFF;
•When the device is turned ON, press to access Silent mode, Airplane mode, or Restart the device;
•You can also lock the device or to wake the screen for unlocking, press this key.
Volume Keys:
•From the Home screen, press to adjust the system volume;
•Press to adjust volume during playback;
•Press to mute an alert notification.
SIM Card Slot: Install the 4G LTE SIM card.
MicroSD Card Slot: Install a memory card (sold separately) for storage of songs, pictures, and other data.
6

Top and Bottom
Headset Connector
USB/Charger Port
Headset Connector: Plug in a 3.5mm headset or earphones (not included).
USB/Charger Port: Charge or sync music and files by connecting the provided USB cable.
 CAUTION!
Use only an approved charger to charge your tablet. Improper handling of the charging port, as well as the use of an incompatible charger, may cause damage to your device and void the warranty.
Your tablet is equipped with an internal rechargeable battery that is non-removable. You should never attempt to open or disassemble this tablet. Doing so may cause damage that voids your warranty.
7
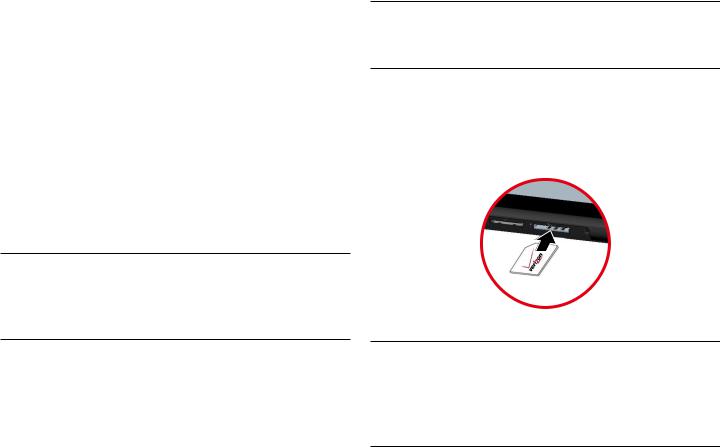
Inserting and removing SIM Card
You may need to insert a Verizon SIM card before you start using your device. If there is no SIM card installed, the message “NO SIM CARD” appears on the device’s lock screen.
Your device uses a 4G LTE SIM card. The SIM card is used to store your phone number, contacts, and more.
If you purchased your device at a Verizon Wireless store, the SIM card is activated and ready to use. If you ordered a new device, the card may need to be activated before you can use it. For more information about activating the SIM card, visit:
verizonwireless.com/4GLTE
 IMPORTANT!
Turn the device off before installing or removing the SIM card. To turn the device off, press and hold the Power/ Lock key and tap Power off > OK.
& NOTE!
If not already installed, follow the instructions below to insert your 4G LTE SIM card.
1.Open the cover to the SIM card slot and carefully insert the 4G LTE SIM card with the Verizon logo facing up.
2.Push the SIM card into the slot until it clicks into
3.Replace the SIM card slot cover.
 CAUTION!
DO NOT bend or scratch the SIM card. Take care when handling, installing, or removing the SIM card, and avoid exposing the SIM card to static electricity, water, or dirt. Keep the SIM card out of reach of small children.
8

Charge the Tablet
Before turning on your tablet, charge it fully. Be sure to use the charger that came with your tablet.
Charger
 USB Cable
Memory Card
The device supports up to 32GB MicroSD memory cards. The MicroSD card is sold separately. The manufacturer does not guarantee the product’s compatibility with MicroSD cards from all providers.
1.Open the cover to locate the MicroSD card slot on the right panel of the device.
2.With the gold contacts facing down, carefully push the MicroSD card into the slot (as shown) until it clicks into place.
3.Replace the cover.
4.To remove the card, gently push the top edge of the card inwards to release it, and pull it out of the slot.
 CAUTION!
DO NOT apply pressure to the centre of the card.
9
Turning Your Tablet On/Off
•To turn your tablet on, press and hold the Power/Lock key for a couple of seconds until the screen lights up.
•To turn your tablet off, press and hold the Power/Lock key  until the tablet options are displayed. Tap Power off > OK.
Unlocking the Screen
1.Press the Power/Lock key  to turn on your screen. Your Lock Screen will appear.
2.From the center of the screen, swipe in any direction to unlock it.
10

Setup Wizard
The Setup Wizard will prompt when you start using the device for the very first time, which will guide you through the required basic settings of the tablet.
Complete the Setup Wizard to choose your preferred language, activate network connection, set up your account, and more.
1.Turn on your tablet by pressing and holding the Power/Lock key  for a couple of seconds until the screen lights up.
2.Follow the prompts to set up your new device:
•Select the display language
•Activate the device
•Set up your Google Account
•Add shortcuts to the screen
&TIP!
You can change these settings while using the tablet from the Settings menu.
Setting Up Your Google Account
Your Gmail™, Google™ contacts, and Google calendar events can all be loaded to your tablet automatically.
Follow the onscreen instructions to quickly set up your Gmail account.
Record your Google account information here. Please keep this document in a safe place.
Username: ____________________________@gmail.com Password: _____________________________
Setting Up Other Email Accounts
To add additional email accounts, tap Apps Settings 
+ Add account . Tap one of the options and enter your email address, password, and any other necessary information.
•Corporate is for Exchange server work email accounts.
•Email is for most personal email accounts. For account details, contact the account provider.
•Google is for adding other Gmail accounts.
11

Section 2. Messaging
Types of Messages
Your device supports the following messages types:
•Email: Send and receive email using popular email services.
•Gmail: Send and receive emails via Gmail, Google’s web-based email.
•Google+ Messenger: Chat with other Google+ Messenger users.
& NOTE!
Depends on your network and service plan, some of the Messaging service may not be available. For more information, please contact Verizon Wireless service center.
Email allows you to send and receive email using popular email services.
For more information on setting up email, visit the Smartphone Resource Center at:
https://smartphones.verizonwireless.com
Configuring Email Accounts
1.From the Home screen, tap Apps Email
Email  .
.
2.Select your email provider, and then follow the prompts to set up your email account.
From the Home screen, you can also tap Apps Settings Add account, and then select your email provider and follow the prompts to set up your email account.
& TIP!
You can access Email  directly from the Home screen.
12

Configuring Email Accounts
1.From the Home screen, tap Apps Email
Email  .
.
2.Select an account, and then tap Compose.
3.Tap the required fields to enter recipients, a subject, and the email text.
You can also attach files, and set options for Priority and Tracking options.
4.When done, tap SEND.
Combined View
The Combined view function allows you to view email from all accounts together.
1.From the Home screen, tap Apps Email
Email  .
.
2.Tap the list in the Action bar, and then choose
Combined view.
Synchronizing Your Email Account
You can refresh your account to update your device from the servers.
1.From the Home screen, tap Apps Email
Email  .
.
2.Tap Sync in the Action bar.
Change Email Account Settings
You can use Account settings to change your email account settings.
1.From the Home screen, tap Apps Email
Email  .
.
2.Tap Menu Settings, select an account, and then change the settings as desired.
&NOTE!
Depending on the email service provider, the related Email settings may differ.
13

Messenger
Messenger allows you to chat with other Google+ Messenger users.
From the Home screen, tap Apps Messenger
  . For more information about Google+ Messenger, visit: http://www.google.com/mobile/+/
14

Section 3. Apps
Managing Applications
The Apps screen holds all applications installed on your tablet. Applications that you download and install from Play Store or from the web are displayed on the APPS tab.
1. From the Home screen, tap Apps .
.
2.From the Apps screen, you can:
•Move between screens. Just slide your finger left or right until the next screen appears so you can browse all apps on your tablet.
•Open an app: Tap its icon to launch the app.
•Place an app shortcut on the Home screen. Tap and hold the app icon, slide your finger, and lift your finger to drop the icon in place on the desired home screen page.
•Browse widgets. Slide your finger left continuously until the Widgets screen appears, or directly tap the WIDGETS tab at the top of Apps screen.
&TIP!
To remove the shortcut of the app from the Home
screen, tap & hold it, slide your finger toward the top
of the screen, and then drop the app over the X Remove icon .
15

Downloading and Installing New Apps
From the Home screen, tap Apps Play Store
  to find new apps. Browse the app stores and follow the prompts to download and install apps on your tablet.
Uninstalling Apps
You can remove apps that you have downloaded and installed on your device.
To remove an app:
1.From the Home screen, tap Apps > Settings
  > Apps.
2.Tap the app you would like to remove, and tap
Uninstall > OK.
&NOTE!
Pre-loaded apps cannot be uninstalled.
Creating app shortcuts
You can access to some of your favorite applications easily by creating app shortcuts on your Home Screen.
To create an app shortcuts:
1.From the Home screen, tap Apps .
.
2.From the Apps screen, tap and hold the app’s icon then drag it to the Home Screen.
16

Organizing the app shortcuts
Once you create many app shortcuts on your Home screen, you can organize the desktop by moving or deleting the existing app shortcut. You can also create a “folder” to manage these app shortcuts.
¬¬ Moving the app shortcut
Tap and hold the app shortcut until it displays as movable mode, and then drag it to the place you want.
movable mode
You can also move the app shortcut to a different screen. Tap and hold the app shortcut until it displays as movable mode, and then drag it to the edge of the current screen. Wait for awhile and the screen will switch to the next home screen automatically. Drag the app shortcut to the desired position on the new screen and release.
¬¬ Removing the app shortcut
You can free up space for new app shortcuts by removing existing app shortcuts on your Home Screen.
To remove an app shortcut:
1.On the Home screen, tap and hold an app shortcut until the X Remove appears on top of the screen.
2.Drag the app shortcut to X Remove and release.
17

¬¬ Creating app folder
Once you create many app shortcuts on your Home screen, you can create “folder” to manage the app shortcuts.
To make a new folder on your Home screen, stack one app on top of another.
1.On the Home Screen, tap and drag an app shortcut onto another app shortcut until a black circle appears.
2.You can add multiple apps in your folder by repeating step 1.
3.To open the folder, tap on the folder icon.
4.From the opened folder, you can:
•Tap the app shortcut to launch the application.
•Tap Unnamed Folder to change the folder name.
18

Viewing app info
While creating a shortcut for the app, you can view the detailed app information.
1.From the Home screen, tap Apps .
.
2.While holding an app on the Apps screen, the App info will appear on the top of the Home Screen.
3.Drag the app to App info to display its detailed information.
Using Recent Apps
The Recent Apps screen displays a list of app shortcuts based from your recently launched apps. You can also use this screen to go back to or switch between the apps you recently launched.
To access the Recent Apps screen:
1.From the Home screen, tap the Recent Apps icon.
2.The Recent Apps list displays all of your recently launched apps.
19
3.From the Recent Apps list, you can:
•Tap on the app you want to launch.
•To remove the app from the list, tap and hold the desired item to display a pop-up menu, and then tap Remove from list.
•To view the information of an app, tap and hold the desired item to display a pop-up menu, and then tap App info.
&TIP!
You can easily remove an app from the list by swiping it left or right.
The Pre-loaded Applications
From the Home screen, tap Apps to display the pre-loaded apps. Simply tap the desired icon to launch the application.
Amazon Kindle 
Amazon Kindle lets you read more than one million eBooks available in the Kindle store. Enjoy personalized
recommendations, customer reviews, and automatic syncing with other Kindle-capable devices you own.
Calculator 
Launch Calculator and then you can use your device to perform mathematical calculations.
Calendar 
Your device’s Calendar allows you to record events and appointments to manage your schedule.
You can also use the Calendar widget in the WIDGETS tab.
Camera 
Camera lets you take pictures and record video with your device.
20

For more information, refer to the “Using Camera” section.
 IMPORTANT!
Do not take videos of people without their permission.
Do not take videos in places where cameras are not allowed.
Do not take videos in places where you may interfere with another person’s privacy.
Chrome 
Google Chrome is a full function web browser that lets you surf the Internet easily.
For more information about Google Chrome, visit: http://support.google.com/chrome
Clock 
Tap Clock to display the current date and time on the screen.
The Clock also provides you with the alarm, timer, and stopwatch functions.
Downloads 
Files, apps, and other items that you have downloaded from the Web, Gmail, Email, or in other ways, are stored in your device’s internal storage. Use Downloads to view, reopen, or delete what you have downloaded.
Email 
Email lets you send and receive email using popular email services.
For more information, refer to the “Email” section.
Flipboard 
Flipboard is your personal magazine. Now you can turns Flipboard covers into a screensaver for your device.
To activate this function, tap Apps Settings
  Display Daydream and then select Flipboard. When done, tap Start Now to get a preview.
Now, when your device is inactive, you can get lost in the dreamy beauty of Flipboard covers.
21
Gallery 
You can use Gallery to view, capture, and manage pictures and videos.
Gmail 
Gmail lets you send and receive emails via Gmail, Google’s web-based email.
For more information, refer to the “Gmail” section.
Google 
Google allows you to search the web, or applications, contacts and music stored on your device.
Google Settings 
You can easily change your Google account settings by using Google Settings.
Google+ 
You can stay connected and share life as it happens with Google+ on your device. Join a Hangout, post a photo, or see what friends are sharing while you’re on the go.
Hangouts 
The instant messaging and video chat platform developed by Google, Hangouts, will let you reach friends easily and happily.
Help 
You can get information about using your device, including videos, useful tips, and other information.
iHeartRadio 
You can listen to your favorite live stations or create your own with iHeartRadio.
Local 
Google Local identifies your location to help you find nearby destinations, such as restaurants, bars, hotels, attractions, ATMs and gas stations, or you can enter a location.
Maps 
You can use Google Maps to find your current location, get directions, and other location-based information.
22

For more information, refer to the “Using Maps” section.
& NOTE!
You must enable location services to use Navigation, Maps, and some features require Standalone or Google location services.
Messenger 
You can use Google+ Messenger to chat and coordinate with any of your friends, all at the same time.
Movie Studio 
You can use the unique video editing app, Movie Studio, to share your video memories with your friends easily.
My Verizon Mobile 
My Verizon Mobile allows you to access self-serve functionality for managing your wireless account directly from your device.
& NOTE!
You can use My Verizon Mobile free of charge. You will not incur any airtime or megabyte charges when you use My Verizon Mobile in the national Enhanced Service Area.
Navigation 
Google Navigation lets you search for locations, and get turn- by-turn directions.
You must enable location services to use Navigation, and some features require Standalone or Google location services.
People 
You can use People to quick access to everyone you want to reach.
Plants Vs Zombies 
The pre-loaded app lets you play the popular game on your device.
Play Books 
Play Books lets you discover your favorite books and authors has never been easier. You can shop the world’s largest selection of ebooks and read them anywhere you like - on a tablet, phone, e-reader, or the Web.
23

Play Games 
Play Games lets you discover new games, track achievements and scores, and play with friends around the world.
Play Music 
Play Music lets you shop for millions of songs from your favorite artists, including hundreds of free tracks from the biggest names in Rock, Pop, Hip-Hop, and more.
Play Store 
Google Play Store can provide you with all your favorite books, movies, apps, and games are all in one place that’s accessible from the Web and your device.
For more information, refer to the “Using Play Store” section.
& NOTE!
You need a Google account set up on your device to download apps and music.
Redbox Instant 
Enjoy unlimited streaming movies when you download the one-and-only, super-official Redbox Instant by Verizon app.
Settings 
Launch Settings to customize your device.
For more information, refer to the “Settings” section.
Sound Recorder 
Sound Recorder is a handy tool for recording the sound and editing the saved recordings, allowing you to edit your saved recordings until you think you have them right.
Verizon Messages 
Verizon Messages helps you stay in touch with family and friends on your device.
Video Player 
You can use Video Player to play videos, download and share them with your friends.
24

Voice Search 
Voice Search allows you to search the web and access things on your phone just by speaking.
VZ Navigator 
You can use VZ Navigator to find, share and navigate to millions of locations, avoid traffic and drive or walk with ease.
& NOTE!
Download, subscription, and airtime required for use; airtime and data usage for download only. Roaming rates may apply. VZ Navigator only available in National Enhanced Services Coverage Area; accuracy and completeness of information is not guaranteed; information about location of device will be used to
deliver service. You must have VZ Navigator added to your account in order for GPS features to work.
YouTube 
YouTube lets you view and upload YouTube videos from your device.
Using Camera
The Camera app allows you to take pictures and record videos using your device.
To launch Camera, tap Apps Camera
  from the Home screen.
Using Camera
After launching Camera, the image from the camera lens will be displayed on the screen.
Follow the instructions below to take a picture:
•While using Camera, hold the device in either landscape or portrait orientation. The Camera screen orientation and the on-screen function icons will adjust depending on how you are holding the device.
25

•You can use the screen display as a viewfinder. To compose your picture, aim the camera at the subject.
•Use the on-screen function icons to set up the Camera, including zoom in/out, changing image settings, switching the Camera/Camcorder mode, and more.
•Tap the Shutter button to take the picture.
On-screen Controls
On the Camera screen, the on-screen controls allow you to take the picture and change the Camera settings.
Self portrait
 Gallery
 Shutter
 Camcorder
 Settings
Options |
Viewfinder |
•Self portrait: Tap the icon to switch between the back camera and the front camera, for self-portraits.
•Gallery: When you take a picture or record a video, the Gallery window will display the thumbnail of the image. Tap the window to review it in Gallery.
While using Gallery to review pictures/videos, you can use the on-screen options to modify or share the files.
•Shutter: Tap to take a picture.
•Camcorder: Tap to record a video.
•Settings: Tap to change the Camera settings.
The settings are included in three categories.
26

Setting |
Description |
Store location |
Select ON to store the location the |
|
picture was taken at (using GPS) as |
|
part of the image meta data. |
|
Select OFF (default) to disable the |
|
function. |
|
|
Exposure |
Adjust the proper exposure level |
|
to fix the overall brightness of the |
|
image. |
|
Select the proper setting value: -1 |
|
/ 0 (default) / +1. |
|
|
Color effect |
Use this option to apply different |
|
color effects to images. |
|
Select the proper setting: None |
|
(default) / Mono / Sepia / Negative |
|
/ Sepia Blue. |
|
|
Scene mode |
Camera provides the optimized |
|
settings for certain types of |
|
scenes. |
|
Select the proper image’s scene |
|
setting: Auto (default) or Night. |
|
|
Setting |
Description |
White balance |
This is used to compensate for |
|
color differences found within |
|
different lighting conditions. |
|
Select the proper setting: Auto |
|
(default) / Incandescent / Daylight |
|
/ Fluorescent / Cloudy / Tungsten. |
|
|
Setting |
Description |
Face Detection |
Select ON to display rectangles |
|
around detected faces. |
|
Select OFF (default) to disable the |
|
function. |
|
|
|
27 |

Setting |
Description |
Picture size |
Set the image resolution. |
|
Select the proper setting value: |
|
QVGA / VGA / 1M pixels / 1.3M |
|
pixels / 2M pixels / 3M pixels |
|
(default). |
|
|
Color effect |
Adjust the camera sensor’s |
|
sensitivity to light. |
|
Select the proper setting value: |
|
Auto (default) / 100 / 200 / 400. |
Setting |
Description |
Microphone |
Select ON (default) to record the |
|
video with voice. |
|
Select OFF to disable the |
|
function. |
|
|
Time lapse |
This option determines the speed |
interval |
of your output video. |
|
Select the proper setting value: |
|
Off (default) / 1 /1.5 / 2 / 2.5 / 3 / |
|
5 / 10 seconds. |
|
|
Effects |
Apply an effect to videos. |
|
These interesting effects include: |
|
None (default) / Squeeze / Big |
|
eyes / Big mouth / Small mouth / |
|
Big nose / Small eyes. |
|
|
Video quality |
Set the recording quality. |
|
Select the proper setting value: |
|
Low / Medium / High (default) / |
|
Fine. |
|
|
28
 Loading...