

Page 1
KFZ-BATTERIELADEGERÄT ULG 3.8 A1
KFZ-BATTERIELADEGERÄT
Bedienungs- und Sicherheitshinweise
CARICABATTERIE PER AUTO E MOTO
Indicazioni per l’uso e per la sicurezza
CAR BATTERY CHARGER
Operation and Safety Notes
IAN 89885
CHARGEUR DE BATTERIE AUTO/MOTO
Instructions d‘utilisation et consignes de sécurité
BATTERIJLADER VOOR
MOTORV OERTUIGEN
Bedienings- en veiligheidsinstructies
Page 2
Klappen Sie vor dem Lesen die Seite mit den Abbildungen aus und machen Sie sich anschließend mit allen
Funktionen des Gerätes vertraut.
Avant de lire le mode d‘emploi, ouvrez la page contenant les illustrations et familiarisez-vous ensuite avec
toutes les fonctions de l‘appareil.
Prima di leggere aprire la pagina con le immagini e prendere confidenza con le diverse funzioni
dell’apparecchio.
Vouw vóór het lezen de pagina met de afbeeldingen open en maak u vertrouwd met alle functies van het
apparaat.
Before reading, unfold the page containing the illustrations and familiarise yourself with all functions of the
device.
DE / AT / CH Bedienungs- und Sicherheitshinweise Seite 5
FR / CH Instructions d‘utilisation et consignes de sécurité Page 13
IT / CH Indicazioni per l’uso e per la sicurezza Pagina 23
NL Bedienings- en veiligheidsinstructies Pagina 33
GB Operation and Safety Notes Page 41
Page 3
A
1 3 4 52
B
C
9
16
15 14 13
678
10
1112
12
Page 4

Page 5

Inhaltsverzeichnis
Einleitung
Bestimmungsgemäße Verwendung .................................................................................................... Seite 6
Lieferumfang ........................................................................................................................................ Seite 6
Teilebeschreibung ............................................................................................................................... Seite 6
Technische Daten ................................................................................................................................ Seite 6
Sicherheit
Sicherheitshinweise ............................................................................................................................. Seite 7
Produkteigenschaften .......................................................................................................................... Seite 8
Bedienung
Anschließen ......................................................................................................................................... Seite 9
Trennen ................................................................................................................................................ Seite 9
Lademodus auswählen ....................................................................................................................... Seite 9
Reset / Einstellungen löschen .............................................................................................................. Seite 9
Umschalten zwischen Modus 1, 2, 3 und 4 ..................................................................................... Seite 10
Modus 1 „6 V“ (7,3 V / 0,8 A) ...........................................................................................................Seite 10
Modus 2 „12 V“ (14,4 V / 0,8 A) ......................................................................................................Seite 10
Modus 3 „12 V“ (14,4 V / 3,8 A) ......................................................................................................Seite 10
Modus 4 „12 V“ (14,7 V / 3,8 A) ......................................................................................................Seite 10
Leere (verbrauchte, überladene) 12 V Batterien regenerieren / aufladen ......................................Seite 11
Geräteschutzfunktion .......................................................................................................................... Seite 11
Überhitzungsschutz ............................................................................................................................. Seite 11
Wartung und Pflege ............................................................................................................... Seite 11
Service ............................................................................................................................................... Seite 11
Garantie ........................................................................................................................................... Seite 12
Entsorgung ..................................................................................................................................... Seite 12
5 DE/AT/CH
Page 6
Einleitung Einleitung / Sicherheit
KFZ-Batterieladegerät ULG 3.8 A1
Einleitung
Wir beglückwünschen Sie zum Kauf Ihres neuen
Gerätes. Sie haben sich damit für ein hochwertiges
Produkt entschieden. Die Bedienungsanleitung ist
Teil dieses Produkts. Sie enthält wichtige Hinweise für
Sicherheit, Gebrauch und Entsorgung. Machen Sie
sich vor der Benutzung
und Sicherheitshinw
des Produkts mit allen Bedien-
eisen vertraut. Benutzen Sie das
Produkt nur wie beschrieben und für die angegebenen Einsatzbereiche. Händigen Sie alle Unterlagen
bei Weitergabe des Produkts an Dritte mit aus.
Bestimmungsgemäße
Verwendung
Das ULTIMATE SPEED ULG 3.8 A1 ist ein Batterieladegerät mit Pulserhaltungsladung, das zur Aufladung
und Erhaltungsladung von folgenden 6 V- oder 12 VBlei-Akkus (Batterien) mit Elektrolyt-Lösung oder -Gel
geeignet ist:
• 6 V: Kapazität von 1,2 Ah bis 14 Ah
• 12 V: Kapazität von 1,2 Ah bis 14 Ah
• 12 V: Kapazität von 14 Ah bis 120 Ah
Außerdem können Sie vollkommen entladene Batterien regenerieren. Das Batterieladegerät verfügt über
eine Schutzschaltung gegen Funkenbildung und
Überhitzung. Jeder nicht bestimmungsgemäße oder
unsachgemäße Gebrauch führt zum Garantieverlust.
Für aus bestimmungswidriger Verwendung entstan
Schäden übernimmt der Hersteller keine Haftung. Das
Gerät ist nicht für den gewerblichen Einsatz bestimmt.
Lieferumfang
Kontrollieren Sie unmittelbar nach dem Auspacken
den Lieferumfang und das Gerät sowie alle Teile auf
Beschädigungen. Nehmen Sie ein defektes Gerät
oder Teile nicht in Betrieb.
1 Ladegerät ULTIMATE SPEED ULG 3.8 A1
2 Schnellkontakt-Anschlussklemmen
(1 rot, 1 schwarz)
1 Bedienungsanleitung
6 DE/AT/CH
dene
Teilebeschreibung
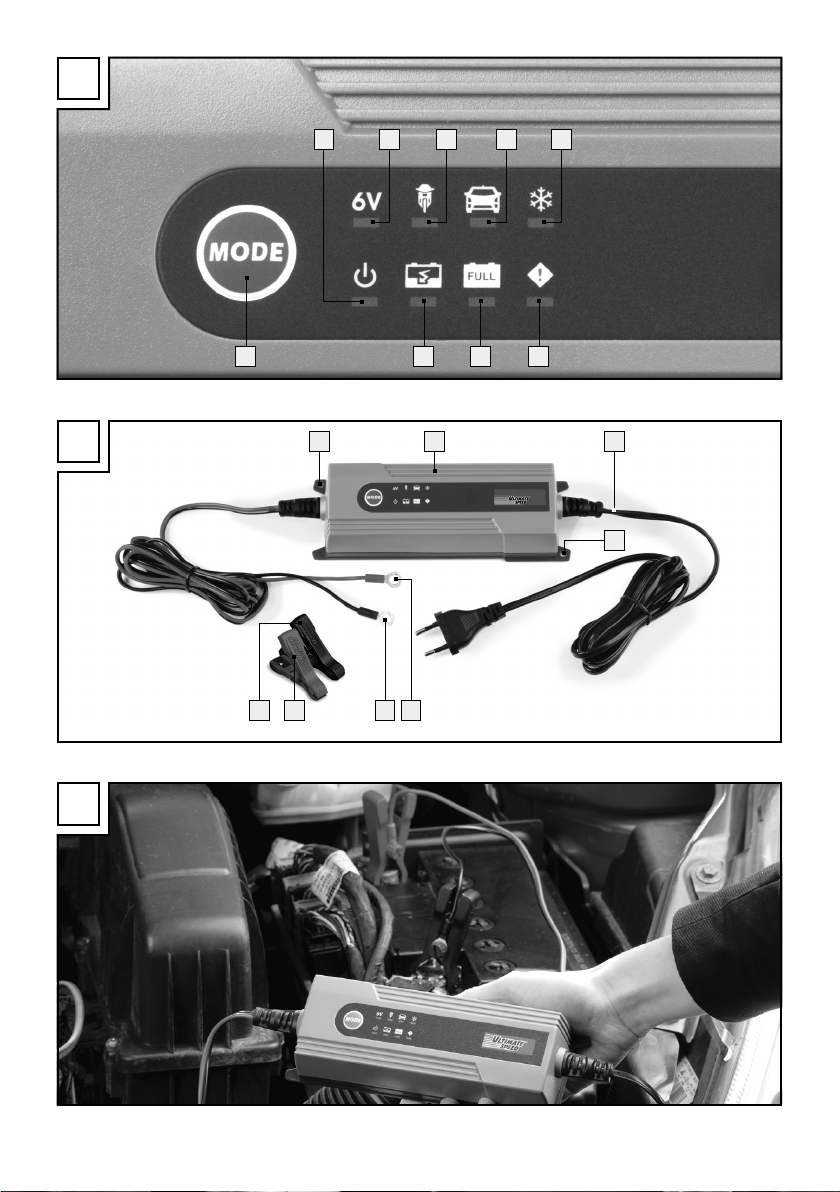
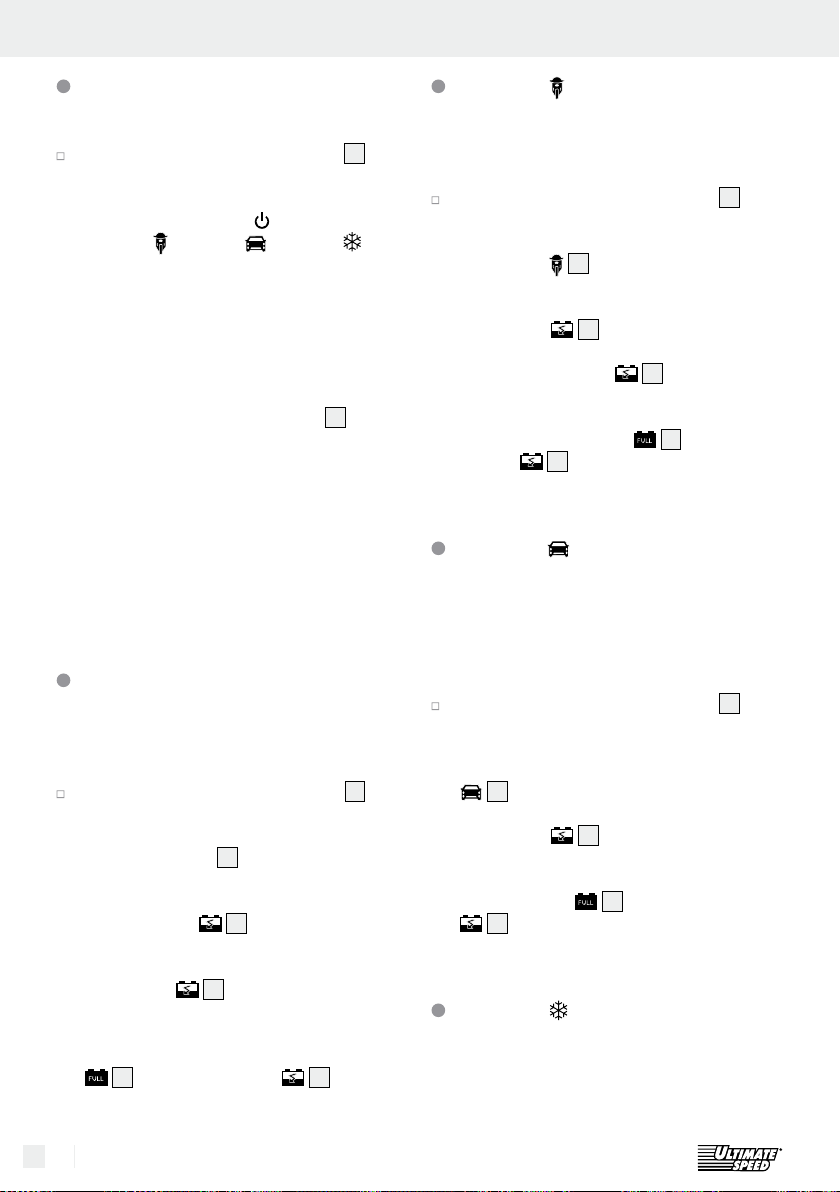
siehe Abbildung A:
1
LED-Anzeige (Bereitschaft)
2
„6 V“ LED-Anzeige „Modus 1“
3
LED-Anzeige „Modus 2“
4
LED-Anzeige „Modus 3“
5
LED-Anzeige „Modus 4“
6
LED-Anzeige „verpolter Anschluss/Fehler“
7
LED-Anzeige „vollständig aufgeladen“
8
LED-Anzeige „Ladevorgang aktiv“
Q
9
Auswahltaste „MODE“
siehe Abbildung B:
10
Ladegerät
11
Netzkabel
12
Befestigungsbohrungen
13
„+“-Pol-Anschlusskabel (rot), inkl. Ringschuh
14
„–“-Pol-Anschlusskabel (schwarz), inkl. Ringschuh
15
„+“-Pol-Schnellkontakt-Anschlussklemme (rot),
inkl. roter Befestigungsschraube
16
„–“-Pol-Schnellkontakt-Anschlussklemme
(schwarz), inkl. schwarzer Befestigungsschraube
Technische Daten
Eingangsspannung: 220–240 V~ 50 / 60 Hz
Leistungsaufnahme: 60 W
Rückstrom*: < 5 mA (kein AC-Eingang)
Nennausgangsspannung: 6 V
/ 12 V
Nennausgangsstrom: 0,8 A / 3,8 A
Ladespannung:
7,3 V oder 14,4 V oder 14,7 V
Ladestrom: 0,8 A ± 10 %
3,8 A ± 10 %
Batterietyp: 6 V-Blei–Säure–Batterie
1,2 Ah–14 Ah
12 V-Blei–Säure–Batterie
1,2 Ah–120 Ah
Temperatur (min.): 0°C
Temperatur (max.): 40°C
Gehäuseschutzart: IP 65 (staubdicht,
strahlwassergeschützt)
Schutzklasse: II /
Page 7
* = Rückstrom bezeichnet den Strom, den das
Ladegerät aus der Batterie verbraucht, wenn
kein Netzstrom angeschlossen ist.
Sicherheit
Sicherheitshinweise
GEFAHR! Vermeiden Sie Lebens- und Verlet-
zungsgefahr durch unsachgemäßen Gebrauch!
VORSICHT! Betreiben Sie das Gerät
mit beschädigtem Kabel, Netzkabel
nicht
oder
Netzstecker. Beschädigte Netzkabel bedeuten
Lebensgefahr durch elektrischen Schlag.
Nur für den Innenbereich geeignet.
Lassen Sie das Netzkabel im Beschädigungsfall
nur von autorisiertem und geschultem Fachpersonal reparieren! Setzen Sie sich im Reparaturfall
mit der Servicestelle Ihres Landes in Verbindung!
SCHÜTZEN SIE SICH VOR STROM-
SCHLAG! Verwenden Sie beim Anschluss des
Batterieladegerätes Schraubendreher und
Schraubenschlüssel mit schutzisoliertem Griff!
STROMSCHLAGGEFAHR! Stellen Sie bei
einer fest im Fahrzeug montierten Batterie sicher,
dass das Fahrzeug außer Betrieb ist! Schalten Sie
die Zündung aus und bringen Sie das Fahrzeug
in Parkposition, mit angezogener Feststellbremse
(z.B. PKW) oder festgemachtem Seil (z.B. Elektroboot)!
STROMSCHLAGGEFAHR! Trennen Sie das
Batterieladegerät vom Netz, bevor Sie Verbindungen zur Batterie schließen oder öffnen.
- Schließen Sie die Anschlussklemme, die nicht
an die Karosserie angeschlossen ist, zuerst an.
Schließen Sie die andere Anschlussklemme
entfernt von der Batterie und der Benzinleitung
an die Karosserie an.
Schließen Sie das Batterieladegerät erst
danach an das Versorgungsnetz an.
- Trennen Sie das Batterieladegerät nach dem
Laden vom Versorgungsnetz.
Entfernen Sie erst danach die Anschlussklemme
von der Karosserie. Entfernen Sie im Anschluss
daran die Anschlussklemme von der Batterie.
STROMSCHLAGGEFAHR! Fassen Sie die
Pol-Anschlusskabel („–“ und „+“) ausschließlich
am isolierten Bereich an!
STROMSCHLAGGEFAHR! Führen Sie den
Anschluss an die Batterie und an die Steckdose
des Netzstroms vollkommen geschützt vor
Feuchtigkeit durch!
STROMSCHLAGGEFAHR! Führen Sie die
Montage, die Wartung und die Pflege des Batterieladegerätes nur frei vom Netzstrom durch!
STROMSCHLAGGEFAHR! Trennen Sie
nach Beendigung des Auflade- und Erhaltungsladevorgangs, bei einer ständig im Fahrzeug
angeschlossenen Batterie, zuerst das MinusPol-Anschlusskabel (schwarz) des Batterieladegeräts vom Minus-Pol der Batterie.
Lassen Sie Kleinkinder und Kinder
nicht unbeaufsichtigt mit dem Batterieladegerät! Kinder können mögliche Gefahren
im Umgang mit Elektrogeräten noch nicht einschätzen. Kinder sollten beaufsichtigt werden,
um sicherzustellen, dass sie nicht mit dem Gerät spielen.
Dieses Gerät ist nicht dafür bestimmt, durch Per-
sonen (einschließlich Kinder) mit eingeschränkten
physischen, sensorischen oder geistigen Fähigkeiten oder mangels Erfahrung und / oder mangels
Wissen benutzt zu werden, es sei denn, sie
werden durch eine für ihre Sicherheit zuständige
Person beaufsichtigt oder erhielten von ihr Anweisungen, wie das Gerät zu benutzen ist.
EXPLOSIONSGEFAHR! Schützen Sie sich
vor einer hochexplosiven Knallgasreaktion! Gasförmiger Wasserstoff kann beim
Auflade- und Erhaltungsladevorgang von der
Batterie ausströmen. Knallgas ist eine explosionsfähige Mischung von gasförmigem Wasserstoff und Sauerstoff. Beim Kontakt mit offenem
Feuer (Flammen, Glut oder Funken) erfolgt die
so genannte Knallgasreaktion! Führen Sie den
Auflade- und Erhaltungsladevorgang in einem
witterungsgeschützten Raum mit guter Belüftung
durch. Stellen Sie sicher, dass beim Aufladeund Erhaltungsladevorgang kein offenes Licht
(Flammen, Glut oder Funken) vorhanden ist!
EXPLOSIONS- UND BRANDGEFAHR!
Stellen Sie sicher, dass explosive oder brennbare Stoffe z.B. Benzin oder Lösungsmittel beim
7 DE/AT/CH
Page 8
Gebrauch des Batterieladegerätes nicht entzündet werden können!
EXPLOSIVE GASE!
FLAMMEN UND FUNKEN VERMEIDEN!
Während des Ladens für ausreichende Belüftung
sorgen.
Stellen Sie die Batterie während des Ladevor-
gangs auf eine gut belüftete Fläche. Andernfalls
kann das Gerät beschädigt werden.
EXPLOSIONSGEFAHR! Stellen Sie sicher,
dass das Plus-Pol-Anschlusskabel keinen Kontakt
zu einer Treibstoffleitung (z.B. Benzinleitung) hat!
VERÄTZUNGSGEFAHR! Schützen Sie
Ihre Augen und Haut vor Verätzung
durch Säure (Schwefelsäure) beim
Kontakt mit der Batterie! Verwenden Sie:
säurefeste Schutzbrille, -bekleidung und -handschuhe! Wenn Augen oder Haut mit der
Schwefel säure in Kontakt geraten sind, spülen Sie
die betroffene Körperregion mit viel fließendem,
klarem Wasser ab und suchen Sie umgehend
einen Arzt auf!
Vermeiden Sie einen elektrischen Kurzschluss
beim Anschluss des Batterieladegerätes an die
Batterie. Schließen Sie das Minus-Pol-Anschlusskabel ausschließlich an den Minuspol der Batterie bzw. an die Karosserie. Schließen Sie das
Plus-Pol-Anschlusskabel ausschließlich an den
Pluspol der Batterie!
Stellen Sie vor dem Netzstromanschluss sicher,
dass der Netzstrom vorschriftsmäßig mit 230 V
50 Hz, geerdetem Nullleiter, einer 16 A Sicherung
und einem FI-Schalter (Fehlerstromschutzschalter)
ausgestattet ist! Andernfalls kann das Gerät
beschädigt werden.
Setzen Sie das Batterieladegerät nicht der Nähe
von Feuer, Hitze und lang andauernder Temperatureinwirkung über 50 °C aus! Bei höheren
Temperaturen sinkt automatisch die Ausgangsleistung des Batterieladegerätes.
Beschädigen Sie bei der Montage des Batterie-
ladegerätes keine Leitungen für Treibstoff, Elektrizität, Bremsanlagen, Hydraulik oder Wasser
mit Schrauben! Andernfalls droht Lebens- und
Verletzungsgefahr!
Verwenden Sie das Batterieladegerät nur mit
den gelieferten Originalteilen!
8 DE/AT/CH
Decken Sie das Batterieladegerät nicht mit
Gegenständen ab! Andernfalls kann das Gerät
beschädigt werden.
Schützen Sie die Elektrokontaktflächen der
Batterie vor Kurzschluss!
Verwenden Sie das Batterieladegerät ausschließ-
lich zum Auflade- und Erhaltungsladevorgang
von unbeschädigten 6 V- / 12 V-Blei-Batterien
(mit Elektrolyt-Lösung oder -Gel)! Andernfalls
kann Sachbeschädigung die Folge sein.
Verwenden Sie das Batterieladegerät nicht
zum Auflade- und Erhaltungsvorgang von nicht
wiederaufladbaren Batterien. Andernfalls kann
Sachbeschädigung die Folge sein.
Verwenden Sie das Batterieladegerät nicht zum
Auflade- und Erhaltungsladevorgang einer
beschädigten oder eingefrorenen Batterie! Andernfalls kann Sachbeschädigung die Folge sein.
Informieren Sie sich vor dem Anschluss des La-
degerätes über die Wartung der Batterie anhand
deren Bedienungsanleitung! Andernfalls besteht
eine Verletzungsgefahr und / oder die Gefahr,
dass das Gerät beschädigt wird.
Informieren Sie sich vor dem Anschluss des
Ladegerätes an eine Batterie, die ständig in
einem Fahrzeug angeschlossen ist, über die
Einhaltung der elektrischen Sicherheit und
Wartung anhand der Bedienungsanleitung des
Fahrzeugs! Andernfalls besteht eine Verletzungsgefahr und / oder die Gefahr, dass Sachschäden
~
entstehen.
Trennen Sie das Batterieladegerät auch aus
Umweltschutzgründen bei Nichtgebrauch vom
Netzstrom! Bedenken Sie, dass auch der
Standby-Betrieb Strom verbraucht.
Seien Sie stets aufmerksam und achten Sie immer
darauf was Sie tun. Gehen Sie stets mit Vernunft
vor und nehmen Sie das Batterieladegerät nicht
in Betrieb, wenn Sie unkonzentriert sind, oder
sich unwohl fühlen.
Produkteigenschaften
Dieses Gerät ist zum Laden einer Vielfalt von SLABatterien (versiegelter Bleisäure-Batterien) konzipiert,
welche weitestgehend in PKWs, Motorrädern und
einigen anderen Fahrzeugen verwendet werden.
Page 9
Sicherheit / BedienungSicherheit
Diese können z.B. WET- (mit flüssigem Elektrolyt),
GEL- (mit gelförmigem Elektrolyt) oder AGM-Batterien
(mit Elektrolyt absorbierenden Matten) sein. Eine
spezielle Konzeption des Gerätes (auch „Drei-StufenLade-Strategie“ genannt) ermöglicht ein Wiederaufladen der Batterie bis auf fast 100 % ihrer Kapazität.
Ferner kann ein Langzeitanschluss der Batterie mit
dem Batterieladegerät erfolgen, um diese möglichst
immer in optimalem Zustand zu halten.
Bedienung
Ziehen Sie den Netzstecker
immer aus der Steckdose, bevor Sie Arbeiten
am Batterieladegerät durchführen.
STROMSCHLAGGEFAHR!
GEFAHR EINES SACHSCHADENS!
VERLETZUNGSGEFAHR! Vergewissern Sie
sich, dass Sie nicht auf Strom-, Gas- oder Wasserleitungen stoßen, wenn Sie Schrauben in die
Wand bohren. Prüfen Sie ggf. mit einem Leitungssucher, bevor Sie in eine Wand bohren.
Montieren Sie das Batterieladegerät ggf. auf
ein Brett oder an eine Wand. Schrauben Sie
hierzu zwei Schrauben durch die Befestigungsbohrungen
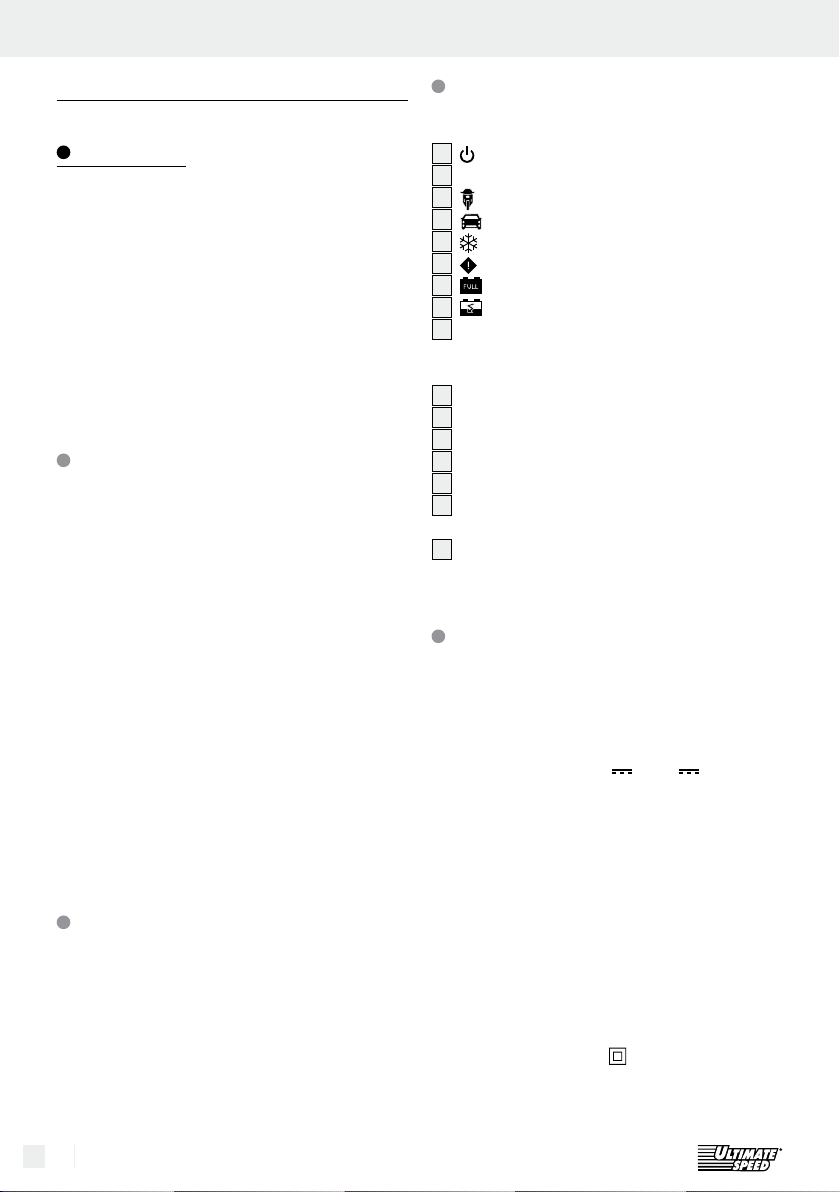
Anschließen
12
auf das Brett oder in die Wand.
Trennen
Trennen Sie das Gerät vom Netzstrom.
Nehmen Sie die „–“-Pol-Schnellkontakt-An-
schlussklemme (schwarz)
16
vom „–“-Pol der
Batterie.
Nehmen Sie die „+“-Pol-Schnellkontakt-An-
schlussklemme (rot)
15
vom „+“-Pol der Batterie.
Schließen Sie das Plus-Pol-Anschlusskabel des
Fahrzeugs wieder an den Plus-Pol der Batterie an.
Schließen Sie das Minus-Pol-Anschlusskabel
des Fahrzeugs wieder an den Minus-Pol der
Batterie.
Lademodus auswählen
Sie können zum Laden verschiedener Batterien bei
unterschiedlicher Umgebungstemperatur aus verschiedenen Lademodi auswählen.
Im Vergleich zu herkömmlichen Batterieladegeräten,
verfügt dieses Gerät über eine spezielle Funktion
zum erneuten Verwenden einer leeren Batterie /
eines Akkus. Sie können eine vollständig entladene
Batterie / einen Akku wieder aufladen. Ein Schutz
gegen Fehlanschluss und Kurzschluss gewährleistet
den sicheren Ladevorgang. Durch die eingebaute
Elektronik setzt sich das Batterieladegerät nicht unmittelbar nach Anschluss der Batterie in Betrieb, sondern
erst, nachdem ein Lademodus ausgewählt wurde.
Trennen Sie vor dem Auflade- und Erhaltungs-
ladevorgang, bei einer ständig im Fahrzeug
angeschlossenen Batterie, zuerst das MinusPol-Anschlusskabel (schwarz) des Fahrzeugs
vom Minus-Pol der Batterie. Der Minus-Pol der
Batterie ist in der Regel mit der Karosserie des
Fahrzeugs verbunden.
Trennen Sie anschließend das Plus-Pol-Anschluss-
kabel (rot) des Fahrzeugs vom Plus-Pol der Batterie.
Klemmen Sie erst dann die „+“-Pol-Schnellkontakt-
Anschlussklemme (rot)
15
des Batterieladegeräts
an den „+“-Pol der Batterie (siehe Abb. C).
Klemmen Sie die „–“-Pol-Schnellkontakt-An-
schlussklemme (schwarz)
16
an den „–“-Pol
der Batterie (siehe Abb. C).
Schließen Sie das Netzkabel 11 des Batterie-
ladegeräts an die Steckdose an.
Auf diese Weise werden Funken, die oftmals während
des Anschlussvorgangs auftreten, vermieden. Des
Weiteren wird das Batterieladegerät durch eine interne MCU (Mikro-Computer-Einheit) gesteuert.
Reset / Einstellungen löschen
Nach Anschluss an die Stromversorgung bringt sich
das Gerät automatisch in die Grundstellung und
bleibt im STANDBY-Betrieb.
9 DE/AT/CH
Page 10
Umschalten zwischen Modus 1,
2, 3 und 4
Drücken Sie die Auswahltaste MODE 9 ent-
sprechend nacheinander.
Das Gerät schaltet die Lademodi in folgender
Reihenfolge: Bereitschaft
MODE 2
startet dann den nächsten Zyklus.
HINWEIS: Wird eine 12V-Batterie angeschlossen,
ist MODE 1 „6V“ nicht wählbar. Wird eine 6V-Batterie angeschlossen, ist MODE 2, 3 und 4 „12V“
nicht wählbar.
HINWEIS: Wenn Sie die Auswahltaste
schaltet der Lademodus zum nächsten Modus und
führt diesen aus.
HINWEIS: Wenn jedoch eine Batterie nach voller
Ladung nicht vom Batterieladegerät abgeklemmt
wird, verbleibt sie im Erhaltungslademodus, sogar
wenn der Benutzer in einen anderen Modus schaltet.
Dies ist nützlich, um die voll geladene Batterie vor
Schäden zu schützen.
Modus 1 „6 V“ (7,3 V / 0,8 A)
Dieser Modus eignet sich zum Laden von 6 V-BleiSäure-Batterien mit einer Kapazität geringer als 14 Ah.
Drücken Sie die Auswahltaste MODE 9, um
Modus 1 auszuwählen. Nach Durchführung
dieses Vorgangs leuchtet die entsprechende
LED-Anzeige „6 V“
ßend keinen weiteren Vorgang vornehmen, stellt
sich die Elektronik automatisch zusammen mit
der LED-Anzeige
vorgang mit einem Strom von 0,8 A ± 10 %.
Verläuft der Vorgang ohne Probleme, bleibt die
LED-Anzeige
Ladeverlaufs sichtbar, bis die Batterie auf 7,3 V /
± 0,25 V geladen ist. Wenn die Batterie vollständig aufgeladen ist, leuchtet die LED-Anzeige
7 und die LED-Anzeige 8 erlischt.
Das Gerät wechselt nun automatisch in den
Erhaltungslademodus.
10 DE/AT/CH
, MODE 3 , MODE 4 und
8 während des gesamten
, MODE 1 „6 V“,
9
drücken,
2
auf. Wenn Sie anschlie-
8 an und startet den Lade-
Modus 2 „12 V“ (14,4 V / 0,8 A)
Dieser Modus eignet sich zum Laden von 12 V-BleiSäure-Batterien mit einer Kapazität geringer als 14 Ah.
Drücken Sie die Auswahltaste MODE 9, um
Modus 2 auszuwählen. Nach Durchführung
dieses Vorgangs leuchtet die entsprechende
LED-Anzeige
keinen weiteren Vorgang vornehmen, stellt sich
die Elektronik automatisch zusammen mit der
LED-Anzeige
vorgang. Verläuft der Vorgang ohne Probleme,
bleibt die LED-Anzeige
samten Ladeverlaufs an, bis die Batterie geladen
ist. Wenn die Batterie vollständig aufgeladen ist,
leuchtet die LED-Anzeige
Anzeige
nun automatisch in den Erhaltungslademodus.
Modus 3 „12 V“ (14,4 V / 3,8 A)
Dieser Modus wird hauptsächlich zum Laden von
12 V-Blei-Säure-Batterien mit großer Kapazität von
mehr als 14 Ah unter normalen Bedingungen angewendet.
Drücken Sie die Auswahltaste MODE 9, um
Modus 3 auszuwählen. Wenn Sie anschließend
keinen weiteren Vorgang vornehmen, stellt sich
die Elektronik zusammen mit der LED-Anzeige
4 an und startet den Ladevorgang.
Verläuft der Vorgang ohne Probleme, bleibt die
LED-Anzeige
Ladeverlaufs an, bis die Batterie
die Batterie vollständig aufgeladen ist, leuchtet
die LED-Anzeige
8 erlischt. Das Gerät wechselt nun automatisch in den Erhaltungslademodus.
Modus 4
Dieser Modus wird zum Laden von 12 V-Blei-SäureBatterien mit einer größeren Kapazität von mehr als
14 Ah unter kalten Bedingungen oder zum Laden einiger AGM-Batterien von mehr als 14 Ah angewendet.
3 auf. Wenn Sie anschließend
8 an und startet den Lade-
8 während des ge-
7 und die LED-
8 erlischt. Das Gerät wechselt
8 während des gesamten
geladen ist. Wenn
7 und die LED-Anzeige
„12 V“
(14,7 V / 3,8 A)
Page 11
Bedienung / Wartung und Pflege / ServiceBedienung
Drücken Sie die Auswahltaste MODE 9, um
Modus 4 auszuwählen. Sobald Sie den gewünschten Modus ausgewählt haben, leuchtet die
entsprechende LED-Anzeige
auf. Die Elektronik schaltet nach einer festgelegten Verzögerung zum Beginn des Ladevorgangs ein, wenn Sie keine weitere Handlung
vornehmen. In diesem Modus ist der Ladestrom
der gleiche, wie in „Modus 3“.
Verläuft der Vorgang ohne Probleme, leuchtet
die LED-Anzeige
eingeschaltet und bleibt in diesem Zustand bis
die Batterie geladen ist. Sobald dies erreicht ist,
wechselt das Batterieladegerät in den Erhaltungsmodus der Batterie. Nun erlischt die LED-Anzeige
8 und die LED-Anzeige 7 leuchtet,
um den derzeitigen Status anzuzeigen.
Leere (verbrauchte, überladene)
8 auf, die Elektronik ist
5 unmittelbar
12 V Batterien regenerieren /
aufladen
Wenn das Batterieladegerät an eine Batterie angeschlossen wird und den Ladevorgang startet, erkennt
es die Batteriespannung automatisch. Es wechselt
in den Impulslademodus, wenn die Spannung im
Bereich von 7,5 V ± 0,5 bis 10,5 V ± 0,5 V liegt.
Dieser Impulsladelauf wird fortgesetzt, bis die Batteriespannung auf 10,5 V ± 0,5 V ansteigt. Sobald
dieser Zustand erreicht ist, wechselt das Batterieladegerät in den normalen Lademodus, den Sie zuvor
ausgewählt haben.
Nun kann die Batterie schnell und sicher aufgeladen
werden. Mit diesem Verfahren lassen sich die meisten
leeren Batterien wieder aufladen und können wieder
verwendet werden.
HINWEIS: Während des Impulsladevorgangs
blinkt die LED-Anzeige
Geräteschutzfunktion
Sobald eine abweichende Situation wie Kurzschluss,
kritischer Spannungsabfall während des Ladevor
offener Stromkreis oder umgekehrter Anschluss der
8.
gangs,
Ausgangsklemmen auftritt, schaltet das Batterieladegerät die Elektronik aus und stellt das System unmittelbar in die Grundstellung zurück, um Schäden zu
vermeiden.
Sofern Sie keine andere Einstellung vornehmen, bleibt
das System im STANDBY-Betrieb. Bei umgekehrtem
Anschluss der Ausgangsklemmen leuchtet zusätzlich
die LED-Anzeige „verpolter Anschluss / Fehler“
Überhitzungsschutz
Sollte das Gerät während des Ladevorgangs zu heiß
werden, wird automatisch die Ausgangsleistung
verringert. Dies schützt das Gerät vor Beschädigung.
Wartung und Pflege
Ziehen Sie den Netzstecker
immer aus der Steckdose, bevor Sie Arbeiten
am Batterieladegerät durchführen.
Verwenden Sie keinesfalls Lösungsmittel oder
andere aggressive Reinigungsmittel.
Das Gerät ist wartungsfrei.
Schalten Sie das Gerät aus.
Reinigen Sie die Kunststoffoberflächen des
Gerätes mit einem trockenen Tuch.
Service
Lassen Sie Ihr Gerät
nur von qualifiziertem Fachpersonal
und nur mit Originalersatzteilen
reparieren. Damit wird sichergestellt, dass
die Sicherheit des Gerätes erhalten bleibt.
Austausch des Netzsteckers oder der
Anschlussleitung immer vom Hersteller
des Elektrowerkzeugs oder seinem
Kundendienst ausführen. Damit wird
sichergestellt, dass die Sicherheit des Gerätes
erhalten bleibt.
Lassen Sie den
6.
11 DE/AT/CH
Page 12
Garantie / Entsorgung Table des matières
Garantie
Sie erhalten auf dieses Gerät 3 Jahre Garantie ab Kaufdatum. Das Gerät wurde
sorgfältig produziert und vor Anlieferung
gewissenhaft geprüft. Bitte bewahren Sie
den Kassenbon als Nachweis für den Kauf
auf. Bitte setzen Sie sich im Garantiefall mit
Ihrer Servicestelle telefonisch in Verbin
Nur so kann eine kostenlose Einsendung
Ihrer Ware gewährleistet werden.
dung.
CH
Service Schweiz
Tel.: 0842 665566
(0,08 CHF/Min., Mobilfunk
max. 0,40 CHF/Min.)
E-Mail: kompernass@lidl.ch
IAN 89885
Entsorgung
Die Garantieleistung gilt nur für Material- oder
Fabrikationsfehler, nicht aber für Transportschäden,
Verschleißteile oder für Beschädigungen an zerbrechlichen Teilen, z. B. Schalter oder Akkus. Das
Produkt ist lediglich für den privaten und nicht für
den gewerblichen Gebrauch bestimmt.
Bei missbräuchlicher und unsachgemäßer Behandlung, Gewaltanwendung und bei Eingriffen, die nicht
von unserer autorisierten Service-Niederlassung
vorgenommen wurden, erlischt die Garantie. Ihre
gesetzlichen Rechte werden durch diese Garantie
nicht eingeschränkt.
Die Garantiezeit wird durch die Gewährleistung nicht
verlängert. Dies gilt auch für ersetzte und reparierte
Teile. Eventuell schon beim Kauf vorhandene Schäden
und Mängel müssen sofort nach dem Auspacken
gemeldet werden, spätestens aber zwei Tage nach
Kaufdatum. Nach Ablauf der Garantiezeit anfallende
Reparaturen sind kostenpflichtig.
DE
Service Deutschland
Tel.: 0800 5435 111
E-mail: kompernass@lidl.de
IAN 89885
AT
Service Österreich
Tel.: 0820 201 222
(0,15 EUR/Min.)
E-Mail: kompernass@lidl.at
Die Verpackung besteht aus umweltfreundlichen Materialien, die Sie über die
örtlichen Recyclingstellen entsorgen können.
Werfen Sie Elektrogeräte
nicht in den Hausmüll!
Gemäß Europäischer Richtlinie 2002 / 96 / EC
über Elektro- und Elektronik-Altgeräte und Umsetzung
in nationales Recht müssen verbrauchte Elektrogeräte
getrennt gesammelt und einer umweltgerechten
Wiederverwertung zugeführt werden.
Über Entsorgungsmöglichkeiten für ausgediente
Elektrogeräte informieren Sie sich bitte bei Ihrer
Gemeinde- oder Stadtverwaltung.
Batterieentsorgung
Sie als Endverbraucher sind gesetzlich
(Batterieverordnung) zur Rückgabe aller
gebrauchten Batterien verpflichtet.
Schadstoffhaltige Batterien sind mit nebenstehenden
Symbolen gekennzeichnet, die auf das Verbot der
Entsorgung über den Hausmüll hinweisen. Die
Bezeichnungen für das ausschlaggebende Schwermetall sind: Cd = Cadmium, Hg = Quecksilber,
Pb = Blei
Befördern Sie verbrauchte Batterien zu einer Entsorgungseinrichtung Ihrer Stadt oder Gemeinde, oder
zurück zum Händler. Sie erfüllen damit die gesetzlichen Verpflichtungen und leisten einen wichtigen
Beitrag zum Umweltschutz.
IAN 89885
12 DE/AT/CH
Page 13

Table des matières
Introduction
Utilisation conforme ............................................................................................................................Page 14
Accessoires fournis .............................................................................................................................. Page 14
Description des pièces ........................................................................................................................ Page 14
Caractéristiques techniques ................................................................................................................ Page 14
Sécurité
Consignes de sécurité ......................................................................................................................... Page 15
Propriétés du produit ...........................................................................................................................Page 17
Utilisation
Raccordement .....................................................................................................................................Page 17
Séparation ........................................................................................................................................... Page 17
Sélection du mode de charge ............................................................................................................ Page 17
Reset / effacer les réglages ................................................................................................................Page 18
Commutation entre les modes 1, 2, 3 et 4 ........................................................................................ Page 18
Mode 1 «6 V» (7,3 V / 0,8 A) ............................................................................................................Page 18
Mode 2 «12 V» (14,4 V / 0,8 A) ........................................................................................................ Page 18
Mode 3 «12 V» (14,4 V / 3,8 A) ........................................................................................................ Page 18
Mode 4 «12 V» (14,7 V / 3,8 A) ........................................................................................................ Page 19
Régénération / rechargement des batteries 12 V vides (usées, surchargées) .................................Page 19
Fonction de protection de l‘appareil .................................................................................................Page 19
Protection contre la surchauffe ........................................................................................................... Page 19
Maintenance et entretien ..................................................................................................Page 19
Service ............................................................................................................................................... Page 20
Garantie ........................................................................................................................................... Page 20
Mise au rebut ............................................................................................................................... Page 20
13 FR/CH
Page 14
Chargeur de batterie Auto / Moto
ULG 3.8 A1
Q
Introduction
1 chargeur ULTIMATE SPEED ULG 3.8 A1
2 pinces de raccordement à contact rapide
(1 rouge, 1 noire)
1 mode d‘emploi
Félicitations pour l‘acquisition de votre nouvel appareil ! Vous avez opté pour un produit de grande
qualité. Le mode d‘emploi fait partie intégrante de
ce produit. Il contient des indications importantes
pour la sécurité, l’utilisation et la mise au rebut. Veuillez lire consciencieusement toutes les indications
d‘utilisation et de sécurité du produit. Ce produit doit
uniquement être utilisé conformément aux instruc
tions
et dans les domaines d‘application spécifiés. Lors
d‘une cession à tiers, veuillez également remettre
tous les documents.
Q
Utilisation conforme
Le ULTIMATE SPEED ULG 3.8 A1 est un chargeur
de batterie avec chargement à maintien de pulsion
conçu pour charger ou maintenir la charge de batteries 6 V ou 12 V au plomb avec solution ou gel
électrolytique.
• 6 V : capacité de 1,2 Ah à 14 Ah
• 12 V : capacité de 1,2 Ah à 14 Ah
• 12 V : capacité de 14 Ah à 120 Ah
De plus, il est possible de régénérer les batteries
complètement déchargées. Le chargeur de batterie
est doté d’une commutation de protection contre
les étincelles ou la surchauffe. Toute utilisation non
conforme ou non adéquate conduit à une annulation
de la garantie. Le fabricant n‘endosse aucune
responsabilité pour des dommages causés résultant
d‘une utilisation non conforme. L‘appareil n‘est pas
prévu pour une mise en application commer-ciale.
Q
Accessoires fournis
Après le déballage des éléments, contrôlez immédiatement le contenu de la livraison, l‘appareil ainsi
que les pièces en vue d‘un éventuel endommagement.
Ne mettez pas un appareil ou des pièces défectueuses en service.
14 FR/CH
Q
Description des pièces
Voir illustration A :
1
Affichage LED (appareil prêt
à fonctionner)
2
«6 V» Affichage LED «Mode 1»
3
Affichage LED «Mode 2»
4
Affichage LED «Mode 3»
5
Affichage LED «Mode 4»
6
Affichage LED «polarité inversée / erreur»
7
Affichage LED «entièrement chargé»
8
Affichage LED «procédure de charge ac
Q
9
Touche de sélection «MODE»
tive»
Voir illustration B :
10
Chargeur
11
Cordon secteur
12
Trous de fixation
13
Câble de raccordement de pôle «+» (rouge),
avec coussinet en boucle
14
Câble de raccordement de pôle «-» (noir),
avec coussinet en boucle
15
Pince de raccordement à contact rapide pôle
«+» (rouge), avec vis de fixation rouge
16
Pince de raccordement à contact rapide pôle
«-» (noir), avec vis de fixation noire
Q
Caractéristiques techniques
Tension d‘entrée : 220–240 V~ 50 / 60 Hz
Puissance absorbée : 60 W
Courant de retour*: < 5 mA (pas d’entrée CA)
Tension de sortie
nominale : 6 V
/ 12 V
Courant de sortie
nominal : 0,8 A / 3,8 A
Tension de charge : 7,3 V ou 14,4 V ou 14,7 V
Courant de charge : 0,8 A ± 10 %
3,8 A ± 10 %
Type de batterie : Batterie plomb-acide 6 V
1,2 Ah–14 Ah
Page 15
Introduction / SécuritéIntroduction
Batterie plomb-acide 12 V
1,2 Ah–120 Ah
Température (min.): 0°C
Température (max.): 40°C
Type de protection
du boîtier : IP 65 (étanche à la pous-
sière, protégé contre les
jets d’eau)
Classe de protection : II /
* = Le courant de retour désigne le courant que
le chargeur consomme à partir de la batterie
lorsque le courant électrique n‘est pas
raccordé.
Q
Sécurité
Q
Consignes de sécurité
DANGER ! Evitez les risques de blessures et les
dangers de mort en utilisant l‘appareil correctement!
ATTENTION ! N‘utilisez pas l‘appareil
lorsque le câble, le cordon d‘alimentation ou la fiche secteur sont endommagés. Des cordons d‘alimentation endommagés
signifient un danger de mort par électrocution.
N’utiliser qu’à l’intérieur !
S‘il est endommagé, remettez le cordon d‘ali-
mentation j à du personnel spécialisé autorisé
et formé afin qu‘il soit réparé! En cas de réparation, veuillez prendre contact avec le service
aprèsvente de votre pays!
PROTÉGEZ-VOUS CONTRE TOUT
RISQUE D‘ÉLECTROCUTION ! Lors du raccordement du chargeur, utilisez des tournevis
ou des clés plates équipés d‘une poignée ou
d‘un manche à double isolation !
RISQUE DE CHOC ELECTRIQUE ! Si la bat-
terie est montée dans le véhicule, s’assurer que
le véhicule ne soit pas en marche ! Couper le
contact et mettre le véhicule en position parking,
frein à main serré (p.ex. voiture de tourisme) ou
cordon serré (p.ex. bateau électrique !)
RISQUE DE CHOC ELECTRIQUE ! Avant
de brancher à la batterie ou de débrancher,
débrancher le chargeur de batterie du réseau.
- Raccorder en premier la borne d’alimentation
non branchée à la carrosserie. Raccorder à
la carrosserie l’autre borne d’alimentation
éloignée de la batterie et de la conduite d’essence. Ne brancher qu’après le chargeur de
batterie au réseau d’alimentation.
- Après la charge, débrancher le chargeur de
batterie du réseau d’alimentation. Ce n’est
qu’après qu’il faut enlever la borne d’alimentation de la carrosserie. Enlever ensuite la
borne d’alimentation de la batterie.
RISQUE DE CHOC ELECTRIQUE ! Ne tou-
cher les câbles de branchement à polarité («-»
et «+») qu’à la partie isolée.
RISQUE DE CHOC ELECTRIQUE ! Guider
le raccordement à la batterie et à la prise de
courant du réseau électrique bien protégé
contre l’humidité !
RISQUE DE CHOC ELECTRIQUE ! Effectuer
le montage, la maintenance et l’entretien que
débranché du courant de réseau !
RISQUE DE CHOC ELECTRIQUE ! Une fois
l’opération de charge et de maintien terminée,
pour une batterie constamment branchée dans
le véhicule, débrancher tout d’abord le câble
de branchement (-) (noir) du chargeur de batterie da la cosse (-) de la batterie.
Ne jamais laisser les enfants sans sur-
veillance avec le chargeur de batterie!
Les enfants ne savent pas évaluer les dangers
potentiels lors de l’utilisation d’appareils électriques. Les enfants doivent être surveillés pour
s’assurer qu’ils ne jouent pas avec l’appareil.
Les enfants ou les personnes ne possédant pas
les connaissances ou l’expérience requise avec
cet appareil, ou dont les aptitudes physiques,
sensorielles ou mentales sont limitées, ne doivent
pas utiliser l’appareil sans la surveillance ou la
direction d’une personne responsable pour
leur sécurité.
RISQUE D‘EXPLOSION ! Protégez-vous
contre une réaction de gaz détonant
hautement explosif! De l‘hydrogène peut
s‘écouler de la batterie sous forme de gaz lors
de la procédure de chargement et de charge
15 FR/CH
Page 16

de compensation. Le gaz détonant est un mélange explosif d‘hydrogène et d‘oxygène à
l‘état gazeux. En cas de contact avec un feu à
l‘air libre (flammes, cendres ou étincelles), la
réaction de gaz détonant est provoquée! Réalisez la procédure de chargement et de charge
de compensation dans un local protégé des
intempéries et bien ventilé. Assurezvous qu‘aucune source de lumière libre ne soit présente
lors de la procédure de chargement et de charge
de compensation (flammes, cendres ou étin
celles).
RISQUE D’EXPLOSION ET D’INCENDIE !
Veiller à ce que des matières explosives ou inflammables p.ex. essence ou solvant ne puissent
pas s’enflammer lors de l’utilisation du chargeur
de batterie.
GAZ EXPLOSIF !
EVITER LES FLAMMES ET LES ÉTIN
Pendant la charge, veiller à une aération suffi
CELLES !
sante.
Lors de la charge, placer la batterie sur une
surface bien aérée. Sinon, cela endommagerait l’appareil.
RISQUE D’EXPLOSION ! S’assurer que le
câble de branchement positif (+) n’a pas de
contact avec une conduite de carburant (p.ex.
conduite d’essence) !
RISQUE DE BRÛLURE PAR ACIDES ! Pro-
tégez vos yeux et votre peau contre les
brûlures par acides (acide sulfurique)
lors du contact avec la batterie ! Utiliser :
des lunettes, des vêtements et des gants de
protection résistant à l’acide ! Si vos yeux ou
votre peau sont entrés en contact avec l‘acide
sulfurique, rincez la partie du corps concernée
avec une grande quantité d‘eau courante et claire
et consultez un médecin dans les meilleurs délais !
Eviter un court-circuit électrique lors du bran-
chement du chargeur de batterie à la batterie.
Raccordez le câble de raccordement avec le
pôle négatif exclusivement sur le pôle négatif
de la batterie ou sur la carrosserie. Raccordez
le câble de raccordement avec le pôle positif
sur le pôle positif de la batterie !
Avant le raccordement au courant du réseau,
assurez-vous que le courant électrique présente
les propriétés et les équipements prescrits, c‘està-dire une tension de 230 V~ 50 Hz, un conducteur neutre mis à la terre, un fusible de 16 A et
16 FR/CH
un disjoncteur de protection (interrupteur de
protection contre les courants de court-circuit) !
Sinon, cela endommagerait l’appareil.
Ne pas placer le chargeur de batterie à proxi-
mité du feu, des chaleurs ni soumettre à l’impact
de températures dépassant durablement 50 °C !
En cas de températures trop élevées, la puissance de sortie du chargeur de batterie baisse
automatiquement.
Ne pas endommager les conduites de carburant,
des câbles électriques, des freins, du système
hydraulique, de l’eau ou lors de l’installation
du chargeur de batterie avec les vis. Sinon, il y
a danger de mort ou de blessure !
N’utiliser le chargeur de batterie qu’avec les
pièces d’origine livrées.
Ne jamais recouvrir le chargeur de batterie
avec des objets. Sinon, cela endommagerait
l’appareil.
Protégez les surfaces de contact électriques de
la batterie des courtscircuits !
Utiliser le chargeur de batterie exclusivement
pour les opérations de charge et de maintien
de batteries 6 V / 12 V au plomb (avec solution
ou gel électrolyte) non endommagées. Sinon,
des dommages matériels pourraient en résulter.
Ne pas utiliser le chargeur de batterie pour
charger et maintenir les batteries non rechargeables. Sinon, des dommages matériels
pourraient en résulter.
Ne pas utiliser le chargeur de batterie pour
charger et maintenir une batterie endommagée
ou gelée. Sinon, des dommages matériels
pourraient en résulter.
Avant le raccordement du chargeur infor-
mez-vous de la maintenance de la batterie en
consultant sa notice d‘utilisation ! Sinon, il y a
risque de blessure et / ou risque d’endommagement de l’appareil.
Avant le raccordement du chargeur à une bat-
terie qui est constamment fixée dans un véhicule,
informez-vous du respect de la sécurité électrique
et de la maintenance en consultant la notice
d‘utilisation du véhicule ! Sinon, il y a risque de
blessure et / ou risque d’endommagement de
l’appareil.
Afin de contribuer à la préservation de notre
environnement, veuillez débrancher le chargeur
Page 17

de la prise de courant lorsqu‘il n‘est pas utilisé
! Le mode de veille (stand-by) consomme aussi
de l‘électricité.
Rester attentif et veiller à ce que vous faites.
Procéder raisonnable et ne pas mettre le chargeur de batterie en service si vous n‘êtes pas
concentré ou ne vous sentez pas bien.
Q
Propriétés du produit
Cet appareil est destiné à la charge de nombreuses
batteries SLA (batteries acides-plomb scellées) qui
sont conçues en grande partie pour une utilisation
dans des véhicules automobiles, des motos et
d‘autres types de véhicules. Ces dernières peuvent
par exemple être des batteries WEB (avec de
l‘électrolyte liquide), GEL (avec du gel électrolytique)
ou AGM (avec des tapis absorbant l‘électrolyte).
Une conception spéciale de l‘appareil (également
appelée „stratégie de charge à 3 niveaux“), permet
un rechargement de la batterie quasiment jusqu‘à
100 % de sa capacité. De plus, un branchement
prolongé de la batterie au chargeur de batterie
peut s’effectuer pour la maintenir le plus possible
constamment dans un état optimal.
Q
Utilisation
Toujours débrancher
la fiche de la prise de courant avant d’effectuer
des travaux sur le chargeur de batterie.
DANGER DE CHOC
ELECTRIQUE ! RISQUE D’UN DOMMAGE
MATERIEL ! RISQUE DE BLESSURE ! S’as-
surer de ne pas toucher des câbles électriques,
des conduites de gaz ou d’eau en vissant
dans le mur. Si nécessaire, contrôler avec
les vis
un dé-
tecteur de câble avant de percer dans le mur.
Si nécessaire, installer le chargeur de batterie
sur une planche ou un mur. A cet effet, visser
deux vis par les trous de fixation
12
sur la
planche ou dans le mur.
Sécurité / UtilisationSécurité
Q
Raccordement
Avant la procédure de chargement et de charge
de compensation dans un véhicule où la batterie
est fermement fixée dans le véhicule, séparez
tout d‘abord le câble de raccordement avec le
pôle positif (noir) du véhicule du pôle négatif de
la batterie. Le pôle négatif de la batterie est en
règle générale relié à la carrosserie du véhicule.
Séparez ensuite le câble de raccordement avec
le pôle positif (rouge) du véhicule du pôle positif
de la batterie.
Brancher d’abord la borne contact rapide posi-
tive «+» (rouge)
la cosse «+» de la batterie (voir illustr. C).
Brancher d’abord la borne contact rapide
négative «-» (noire)
batterie (voir illustr. C).
Brancher le cordon de réseau 11 de chargeur
de batterie à une prise de courant.
Q
Séparation
Séparez l‘appareil du courant électrique du
réseau.
Enlever la borne contact rapide négative «-»
16
(noire)
Enlever la borne contact rapide positive «+»
(rouge)
Raccordez de nouveau le câble de raccorde-
ment avec le pôle positif du véhicule au pôle
positif de la batterie.
Raccordez de nouveau le câble de raccorde-
ment avec le pôle négatif du véhicule au pôle
négatif de la batterie.
Q
Sélection du mode de charge
Il est possible de choisir à partir de différents modes
de charge pour charger différentes batteries à des
températures environnantes différentes.
Comparé aux chargeurs de batterie courants, ce
chargeur dispose d‘une fonction spéciale pour l‘utilisation répétée d‘une batterie / d‘un accumulateur
vide. Vous pouvez recharger une batterie / un accumulateur intégralement vide. Une protection contre
15
du chargeur de batterie à
16
à la cosse «-» de la
de la cosse «-» de la batterie.
15
de la cosse «+» de la batterie.
17 FR/CH
Page 18

un raccordement erroné et un court-circuit garantit
une procédure de chargement en toute sécurité.
Grâce au système électronique intégré, le chargeur ne
se
met pas en service directement après le raccordement
de la batterie, mais uniquement lorsqu‘un mode de
charge aura été sélectionné.
De cette manière, des étincelles, qui sont fréquemment générées lors de la procédure de raccordement,
sont évitées. De plus, le chargeur de batterie est
commandée par une MCU interne (unité micro-ordinateur).
Q
Reset / effacer les réglages
Suite au raccordement à l‘alimentation en courant,
l‘appareil se met automatiquement en position initiale et reste en mode STANDBY.
Q
Commutation entre les modes
1, 2, 3 et 4
Q
Mode 1 «6 V» (7,3 V / 0,8 A)
Ce mode est adapté à la charge de batterie plombacide 6 V avec une capacité inférieure à 14 Ah.
Appuyez sur la touche de sélection MODE 9
pour choisir le mode 1. Après exécution de cette
étape, l‘affichage LED correspondant s‘allume
2
«6 V»
. Si vous n‘effectuez ensuite plus aucune action, le système électronique s‘adapte
automatiquement à l‘affichage LED
8 et
démarre la procédure de charge avec un courant de 0,8 A ± 10 %. Si la procédure se déroule sans problème, l‘affichage LED
8
reste allumé pendant toute la procédure de
charge, jusqu‘à ce que la batterie soit chargée
à 7,3 V / ± 0,25 V. Lorsque la batterie est intégralement chargée, l‘affichage LED s‘allume
7 et l‘affichage LED 8 s‘éteint. L’ap-
pareil passe automatiquement en mode charge
de maintien.
Q
Mode 2 «12 V» (14,4 V / 0,8 A)
Appuyer sur la touche MODE 9 l’une après
l’autre.
L’appareil commute les modes de charge en
chronologie suivante : Veille
MODE 2
, MODE 3 , MODE 4 et
, MODE 1 «6 V»,
démarre ensuite le cycle suivant.
REMARQUE : Si une pile 12 V est branchée, le
MODE 1 „6 V“ ne peut être sélectionné. Si une pile
6 V est branchée, les MODES 2, 3 et 4 „12 V“ ne
peuvent être sélectionnés.
REMARQUE : Si vous appuyez sur le bouton de
sélection
9
, le mode de charge permute sur le
mode suivant et exécute ce dernier.
REMARQUE : Cependant, si une batterie n‘est
pas débranchée du chargeur suite à un chargement
intégral, elle reste en mode de charge de compensation, même si l‘utilisateur permute dans un autre
mode. Ceci est utile pour protéger la batterie intégralement chargée d‘éventuels en-dommagements.
18 FR/CH
Ce mode est adapté à la charge de batterie plombacide 12 V avec une capacité inférieure à 14 Ah.
Appuyez sur la touche de sélection MODE 9
pour choisir le mode 2. Une fois cette opération
réalisée, l’affichage LED correspondant
3
s’allume. Si, ensuite, aucune autre opération
n’a lieu, le dispositif électronique s’allume automatiquement avec l’affichage LED
8 et
démarre l’opération de charge. Si la procédure
se déroule sans problème, l‘affichage LED
8
reste allumé pendant toute
charge, jusqu‘à ce que la batte
Lorsque la batterie est intégrale
l‘affichage LED
LED
8
7 s‘allume et l‘affichage
s‘éteint. L’appareil passe automati-
la procédure de
rie
soit chargée.
ment chargée,
quement en mode charge de maintien.
Q
Mode 3 «12 V» (14,4 V / 3,8 A)
Ce mode est adapté essentiellement à la charge
de batterie plomb-acide 12 V avec une capacité
supérieure à 14 Ah à des conditions normales.
Page 19

Utilisation / Maintenance et entretienUtilisation
Appuyez sur la touche de sélection MODE 9
pour choisir le mode 3. Si, ensuite, aucune autre
opération n’a lieu, le dispositif électronique
s’allume ainis que l’affichage LED
4 et
démarre l’opération de charge. Si l’opération
s’effectue sans problème, l’affichage LED
8
reste allumé pendant toute la durée de charge
jusqu’à ce que la batterie soit rechargée.
Lorsque la batterie est complètement chargée,
l’affichage LED
LED
8 s’éteint. L’appareil passe automati-
7 s’allume et l’affichage
quement en mode charge de maintien.
Q
Mode 4 «12 V» (14,7 V / 3,8 A)
Ce mode est adapté essentiellement à la charge
de batterie plomb-acide 12 V avec une capacité
supérieure à 14 Ah dans des conditions froides et
pour charger les batteries AGM de plus de 14 Ah.
Appuyer sur la touche MODE 9 pour choisir
le mode 4. Une fois le mode souhaité choisi,
l’affichage LED correspondant
5 s’allume
directement. Le dispositif s’allume après une
temporisation fixée pour le début de l’opération de charge si aucune autre action n’est effectuée. Dans ce mode, le courant de charge
est la même qu’en «mode 3». Si l’opération
s’effectue sans problème, l’affichage LED
8
s’allume, le dispositif est en marche et reste
dans cet état jusqu’à ce que la batterie soit rechargée. Dès que ceci est atteint, le chargeur
de batterie passe en mode de maintien de la
batterie. Maintenant, l’affichage LED
s’éteint et l’affichage LED
7 s’allume pour
8
afficher l’état actuel.
Q
Régénération / rechargemen t
des batteries 12 V vides
(usées, surchargées)
± 0,5 à 10,5 V ± 0,5 V. Ce cycle de charge par impulsions est poursuivi jusqu‘à ce que la tension de
la batterie monte jusqu‘à 10,5 V ± 0,5 V. Dès que
cet état est atteint, le chargeur de batterie passe au
mode de charge normal choisi auparavant. La batterie peut maintenant être rapidement chargée en
toute sécurité. Avec cette procédure, il est possible
de recharger la plupart des batteries vides, qui
peuvent alors être réutilisées.
REMARQUE : Pendant la procédure de chargement par impulsions, l’affichage à diodes lumineuses
8 clignote.
Q
Fonction de protection
de l‘appareil
Dès qu’apparaît une situation divergente, telle que
court-circuit, chute de tension critique pendant le
chargement, circuit électrique ouvert ou inversement
du raccordement des bornes de sortie, le chargeur
coupe le système électronique et remet immédiatement le système en position de base pour éviter tous
endommagements.
Si vous n‘avez procédé à aucun autre réglage, le
système reste en mode STANDBY. Dans le cas où
la polarité des bornes de sortie a été inversée,
l‘affichage LED
s‘allume.
Q
Protection contre la surchauffe
Si l‘appareil chauffe trop pendant la procédure de
charge, la puissance de sortie est automatiquement
réduite. Ceci est destiné à protéger l‘appareil d‘endommagements ultérieurs.
Q
Maintenance et entretien
6
«Polarité inversée / Erreur» e
La tension de batterie reconnaît automatiquement
lorsque le chargeur de batterie est branché à une
batterie et que l’opération de charge démarre.
Il passe dans le mode de charge par impulsions
lorsque la tension se trouve dans la plage de 7,5 V
Toujours débrancher
la fiche de la prise de courant avant d’effectuer
des travaux sur le chargeur de batterie.
N’utilisez sous aucun prétexte des solvants ou
d’autres produits nettoyants agressifs.
19 FR/CH
Page 20

L’appareil ne nécessite aucune maintenance
particulière.
Eteignez l’appareil.
Essuyer les surfaces plastiques de l‘appareil
avec un chiffon sec.
Q
Service
ration de vos appareils au S.A.V. ou à
un électricien qualifié et exiger l’utilisation exclusive de pièces de rechange
d’origine. Ceci permet d’assurer la sécurité
de fonctionnement de l’appareil.
danger, toujours confier le remplacement de la fiche ou du cordon secteur
au fabricant de l’appareil ou à son
S.A.V. Ceci permet d’assurer la sécurité de
fonctionnement de l’appareil.
Q
Garantie
Confier la répa-
Afin d’éviter tout
par ex. les interrupteurs ou les batteries. Le produit
est exclusivement destiné à un usage privé et non
commercial.
La garantie est annulée en cas de manipulation incorrecte et inappropriée, d’utilisation brutale et en
cas d’intervention qui n’aurait pas été réalisée par
notre centre de service après-vente agréé. Cette
garantie ne constitue pas une restriction de vos
droits légaux.
La durée de la garantie n’est pas prolongée par la
garantie du fabricant. Ceci vaut également pour
les pièces remplacées et réparées. Tous dommages
et défauts présents dès l’achat doivent être notifiés
dès que le produit est déballé, et au plus tard deux
jours après la date d’achat. Toutes réparations survenant après la période sous garantie ne seront
pas prises en charge.
FR
Service France
Tel.: 0800 919270
e-mail: kompernass@lidl.fr
Indépendamment de la garantie commerciale souscrite, le vendeur reste tenu des défauts de conformité
du bien et des vices rédhibitoires dans les conditions
prévues aux articles L211-4 et suivants du Code de
la consommation et aux articles 1641 et suivants
du Code Civil.
Cet appareil bénéficie de 3 ans de garantie
à compter de la date d’achat. L’appareil
a été fabriqué avec soin et consciencieusement contrôlé avant sa distribution.
Veuillez conserver le ticket de caisse en
guise de preuve d’achat. Si la garantie
devait s’appliquer, contactez par télé
votre interlocuteur du service après-vente.
Cette condition doit être respectée pour
assurer l’expédition gratuite de votre
marchandise.
La prestation de garantie s’applique uniquement
pour les erreurs de matériaux et de fabrication, pas
pour les dommages de transport, les pièces d’usure
ou les dommages subis par les pièces fragiles,
20 FR/CH
phone
comme
IAN 89885
CH
Service Suisse
Tel.: 0842 665566
(0,08 CHF/Min., mobile
max. 0,40 CHF/Min.)
e-mail: kompernass@lidl.ch
IAN 89885
Q
Mise au rebut
L’emballage se compose exclusivement
de matières recyclables qui peuvent être
mises au rebut dans les déchetteries locales.
Ne jetez pas les appareils élec-
triques aux ordures ménagères !
Conformément à la directive européenne
2002 / 96 / EC relative aux appareils électriques
Page 21

et électroniques usés, et à son application dans les
législations nationales, les outils électriques usés
doivent être collectés séparément et faire l’objet
d’un recyclage écophile.
Pour les possibilités d’élimination d’appareils électriques usagés, renseignez-vous auprès de votre
commune.
Mise au rebut des accus
En tant que consommateur final, la loi
vous oblige (directive piles) à remettre
toutes les piles usées. Les piles contenant
des substances toxiques sont signalées par les symboles ci-contre, pour indiquer l‘interdiction de les
mettre au rebut dans les ordures ménagères. Les
désignations pour les métaux lourds respectifs sont :
Cd = cadmium, Hg = mercure, Pb = plomb
Remettez les piles usées dans une déchetterie municipale ou communale ou recyclez-les auprès d‘un
commerçant. Vous respectez ainsi les obligations
légales et contribuez ainsi à préserver l‘environnement.
Mise au rebutMaintenance et entretien / Service / Garantie / Mise au rebut
21 FR/CH
Page 22

22
Page 23

Indice
Introduzione
Utilizzo conforme alla destinazione d‘uso .................................................................................... Pagina 24
Fornitura ........................................................................................................................................... Pagina 24
Descrizione dei componenti ........................................................................................................... Pagina 24
Dati tecnici ....................................................................................................................................... Pagina 24
Sicurezza
Avvertenze di sicurezza.................................................................................................................. Pagina 25
Caratteristiche del prodotto ............................................................................................................ Pagina 27
Utilizzo
Collegamento .................................................................................................................................. Pagina 27
Scollegamento ................................................................................................................................ Pagina 27
Selezione della modalità di caricamento ...................................................................................... Pagina 27
Reset / Cancellazione delle impostazioni ...................................................................................... Pagina 28
Commutazione tra modalità 1, 2, 3 e 4 ....................................................................................... Pagina 28
Modalità 1 „6 V“ (7,3 V / 0,8 A) ................................................................................................... Pagina 28
Modalità 2 „12 V“ (14,4 V / 0,8 A) ............................................................................................... Pagina 28
Modalità 3 „12 V“ (14,4 V / 3,8 A) ............................................................................................... Pagina 29
Modalità 4 12 V (14,7 V / 3,8 A) .................................................................................................. Pagina 29
Rigenerare / caricare batterie da 12 V vuote (usate, sovraccariche) .......................................... Pagina 29
Funzione di protezione dell‘apparecchio ..................................................................................... Pagina 29
Protezione dal surriscaldamento .................................................................................................... Pagina 30
Cura e manutenzione ........................................................................................................ Pagina 30
Service ........................................................................................................................................... Pagina 30
Garanzia ...................................................................................................................................... Pagina 30
Smaltimento .............................................................................................................................. Pagina 30
23 IT/CH
Page 24

Caricabatterie per auto e moto
ULG 3.8 A1
Q
Introduzione
1 Caricabatteria ULTIMATE SPEED ULG 3.8 A1
2 Morsetti di collegamento rapido
(1 rosso, 1 nero)
1 Manuale di istruzioni per l‘uso
Ci congratuliamo con voi per l‘acquisto del vostro
nuovo prodotto. Avete optato per un prodotto di
alta
qualità. Le istruzioni d‘uso sono parte integrante di
questo prodotto. Esse contengono importanti avvertenze sulla sicurezza, l‘impiego e lo smaltimento.
Prima dell‘utilizzo del prodotto, prendere conoscenza
di tutte le istruzioni d‘uso e delle avvertenze di sicurezza. Utilizzare il prodotto solo come descritto e
per i campi di applicazione indicati. Consegnare
tutte le documentazioni su questo prodotto quando
viene ceduto a terzi.
Q
Utilizzo conforme alla
destinazione d‘uso
L’apparecchio ULTIMATE SPEED ULG 3.8 A1 è un
caricabatteria con mantenimento di carica ad impulsi adatto al caricamento e al mantenimento di
carica dei seguenti accumulatori (batterie) al piombo da 6V- o 12 V con soluzione o gel elettrolitici:
• 6 V: Capacità compresa tra 1,2 Ah e 14 Ah
• 12 V: Capacità compresa tra 1,2 Ah e 14 Ah
• 12 V: Capacità compresa tra 14 Ah e 120 Ah
Inoltre si possono rigenerare batterie completamente
scariche. Il caricabatteria dispone di un circuito di
protezione dalla formazione di scintille e dal surriscaldamento. L‘utilizzo non conforme alla destinazione d‘uso o inappropriato annulla la garanzia.
Il produttore non si assume alcuna responsabilità
per i danni derivanti da un utilizzo non conforme.
L‘apparecchio non è destinato a un uso commerciale.
Q
Fornitura
Subito dopo l‘apertura dell‘imballaggio, controllare
la fornitura, l‘apparecchio e tutti i componenti alla
ricerca di eventuali danni. In presenza di danni visibili
all‘apparecchio o ai suoi componenti, non metterlo
in funzione.
Q
Descrizione dei componenti
vedi figura A:
1
Spia LED (pronto per l‘uso)
2
„6 V“ Spia LED „Modalità 1“
3
Spia LED „Modalità 2“
4
Spia LED „Modalità 3“
5
Spia LED „Modalità 4“
6
Spia LED „Connessione con polarità
inversa / errore“
7
Spia LED „Caricamento completato“
8
Spia LED „Procedimento di carica attivato“
Q
9
Tasto di selezione „MODE“
vedi figura B:
10
Caricabatteria
11
Cavo di rete
12
Fori di fissaggio
13
Cavo di connessione con polo „+“ (rosso),
incl. capocorda a occhiello
14
Cavo di connessione con polo „–“ (nero),
incl. capocorda a occhiello
15
Morsetto di contatto rapido polo „+“ (rosso),
incl. vite di fissaggio rossa
16
Morsetto di contatto rapido polo „–“ (nero),
incl. vite di fissaggio nera
Q
Dati tecnici
Tensione di
alimentazione:
220–240 V~ 50 / 60 Hz
Potenza assorbita: 60 W
Inversione di corrente*: < 5 mA
(nessun ingresso AC)
Tensione nominale
di uscita: 6 V
/ 12 V
Corrente nominale
di uscita: 0,8 A / 3,8 A
Tensione di carica: 7,3 V oppure 14,4 V
oppure 14,7 V
24 IT/CH
Page 25

Introduzione / SicurezzaIntroduzione
Corrente di carica: 0,8 A ± 10 %
3,8 A ± 10 %
Tipo di batteria utilizzata: Batteria da 6 V
piombo-acido
1,2 Ah–14 Ah
Batteria da 12 V
piombo-acido
1,2 Ah–120 Ah
Temperatura (min.): 0 °C
Temperatura (max.): 40 °C
Tipo di protezione
dell’alloggiamento: IP 65 (resistente alla
polvere, protetto da
getti d‘acqua)
Classe di protezione: II /
* = La corrente inversa è quella che il caricabat-
teria consuma dalla batteria quando non è
collegato alla rete elettrica.
Q
Sicurezza
Q
Avvertenze di sicurezza
PERICOLO! Evitare l‘uso inidoneo, che può
provocare il rischio di morte e di lesioni!
ATTENZIONE! Non operare l‘apparec-
chio in caso di danni al cavo, al cavo
di rete o alla presa di rete. I cavi di rete
danneggiati costituiscono un pericolo di morte
a causa di scossa elettrica.
Da utilizzare solo in ambienti interni!
In caso di danni al cavo di rete j, fare eseguire
le riparazioni unicamente da personale autorizzato e specializzato! In caso di necessità di
riparazioni, mettersi in contatto con il centro di
assistenza della propria nazione!
PROTEGGERSI DALLE SCOSSE ELET
CHE! Nel collegare il caricabatteria,
un cacciavite e una chiave per dadi con impugnatura isolata!
PERICOLO DI SCOSSA ELETTRICA! In pre-
senza di una batteria montata in modo fisso su
un automezzo, assicurarsi che questo sia spento!
Disinserire l’accensione e porre l’automezzo in
TRI-
utilizzare
posizione di parcheggio con il freno a mano tirato (se si tratta di un’automobile) o con la fune
fissata (se si tratta di un’imbarcazione elettrica)!
PERICOLO DI SCOSSA ELETTRICA! Stac-
care il caricabatteria dalla rete di alimentazione
elettrica prima di chiudere o aprire i collegamenti
alla batteria.
- Per prima cosa connettere il morsetto non
collegato alla carrozzeria. Connettere l’altro
morsetto alla carrozzeria tenendolo tuttavia
lontano dalla batteria e dal condotto della
benzina. Solo successivamente collegare il caricabatteria alla rete di alimentazione elettrica.
- Dopo avere caricato la batteria, staccare il
caricabatteria dalla rete di alimentazione elettrica. Solo successivamente rimuovere il morsetto dalla carrozzeria. In seguito staccare il
morsetto dalla batteria.
PERICOLO DI SCOSSA ELETTRICA! Pren
in mano il cavo di collegamento (con polarità
negativa e positiva) esclusivamente per l’area
isolata!
PERICOLO DI SCOSSA ELETTRICA! Eseguire
il collegamento alla batteria e alla presa della
tensione di rete in modo che esso sia perfettamente protetto dall’umidità!
PERICOLO DI SCOSSA ELETTRICA! Eseguire
il montaggio, la manutenzione e la pulizia del
caricabatteria solo quando esso è non è collegato dalla tensione di rete!
PERICOLO DI SCOSSA ELETTRICA! Una
volta conclusa la procedura di carica e di mantenimento di una batteria stabilmente collegata
nell’automezzo, staccare anzitutto il cavo di
collegamento di polarità negativa (nero) del
caricabatteria dal polo negativo della batteria.
Non lasciare bambini incustoditi con
l’apparecchio! I bambini possono non anco-
ra comprendere i possibili pericoli esistenti maneggiando apparecchi elettrici. I bambini devono essere sorvegliati per impedire che giochino
con l’apparecchio.
Senza la sorveglianza o la guida di una perso-
na responsabile, questo apparecchio non deve
essere utilizzato da bambini né da persone non
in possesso della conoscenza e dell’esperienza
necessarie per maneggiarlo, o le cui capacità
corporali, sensoriali o intellettuali fossero limitate.
dere
25 IT/CH
Page 26

PERICOLO DI ESPLOSIONE! Protegger-
si da eventuali reazioni altamente
esplosive in presenza di gas tonante!
Durante il procedimento di caricamento e di
mantenimento della carica, dalla batteria può
fuoriuscire idrogeno allo stato gassoso. Il gas
tonante è una miscela esplosiva di idrogeno e
ossigeno allo stato gassoso. In caso di contatto
con fiamme libere (fuoco, brace o scintille) avviene la cosiddetta reazione del gas tonante! Eseguire il procedimento di carica e mantenimento
in un luogo al riparo dalle intemperie e provvisto
di buona aerazione. Accertarsi che durante il
processo di carica e di mantenimento non siano
presenti fiamme libere (fuoco, brace o scintille)!
PERICOLO DI ESPLOSIONE E DI INCEN-
DIO! Assicurarsi che materiali esplosivi o in-
fiam
mabili, quali ad esempio benzina o solventi,
non possano prendere fuoco mentre si utilizza
il caricabatteria.
GA
S ESPLOSIVI! EVITARE
DI GENERARE FIAMME E SCINTILLE! Du-
rante la procedura di carica fare in modo che
vi sia sufficiente ventilazione.
Durante la procedura carica porre la batteria
su una superficie ben ventilata. In caso contrario
l’apparecchio potrebbe essere danneggiato.
PERICOLO DI ESPLOSIONE! Assicurarsi
che il cavo di collegamento a polarità positiva
e negativa non entri in contatto con una tubazione di carburante (ad esempio il condotto
della benzina).
PERICOLO DI CORROSIONE! Protegge-
re gli occhi e la cute dagli acidi corrosivi
(acido solforico) in caso di contatto con
la batteria! Utilizzare occhiali di protezione
resistenti agli acidi, vestiario e guanti protettivi!
In caso di contatto dell‘acido solforico con gli
occhi o con la cute, sciacquare la parte del
corpo interessata con acqua corrente pulita e
consultare immediatamente un medico!
Evitare di generare cortocircuiti elettrici mentre
si collega il caricabatteria alla batteria. Collegare il cavo di connessione con il polo negativo
esclusivamente al polo negativo della batteria
o alla carrozzeria. Collegare il cavo di connessione con il polo positivo esclusivamente al polo
positivo della batteria!
26 IT/CH
Prima del collegamento alla rete elettrica, assi-
curarsi che la presa di corrente sia corrispondente
a 230 V~ 50 Hz, provvista di conduttore neutro
di messa a terra, fusibile da 16 A e circuito di
sicurezza per correnti di guasto! In caso contrario
l’apparecchio potrebbe essere danneggiato.
Non posizionare il caricabatteria nei pressi di
fiamme libere e non esporlo a calore e al costante influsso di temperature superiori a 50 °C.
In caso di temperature più alte, la potenza di
uscita scende automaticamente.
Non danneggiare con viti le condutture per
carburante, elettricità, gruppo freni, idraulica,
acqua durante il montaggio del caricabatteria!
In caso contrario sussiste il pericolo di morte e
di lesioni!
Utilizzare il caricabatteria solamente con i
componenti originali in dotazione!
Non coprire il caricabatteria con oggetti! In
caso contrario l’apparecchio potrebbe essere
danneggiato.
Proteggere le superfici dei contatti elettrici delle
batterie dai cortocircuiti!
Utilizzare il caricabatteria esclusivamente per il
caricamento ed il mantenimento di batterie da
6 V–12 V a piombo non danneggiate (con soluzione o gel elettrolitici)! In caso contrario il
prodotto potrebbe essere danneggiato.
Non utilizzare il caricabatteria per la ricarica
o il mantenimento di batterie non ricaricabili. In
caso contrario il prodotto potrebbe essere danneggiato.
Non utilizzare il caricabatteria per la ricarica
o il mantenimento di una batteria danneggiata
o congelata! In caso contrario il prodotto potrebbe essere danneggiato.
Prima di collegare l‘apparecchio, informarsi
sulla manutenzione della batteria consultando il
relativo manuale di istruzioni! In caso contrario
sussiste un pericolo di lesione e / o il pericolo
che l’apparecchio ne sia danneggiato!
Prima del collegamento del caricabatteria a una
batteria installata in un autoveicolo, informarsi
sulle norme di sicurezza elettrica e sulla manutenzione consultando il manuale di istruzioni
dell‘autoveicolo! In caso contrario sussiste un
pericolo di lesione e / o il pericolo che l’apparecchio ne sia danneggiato!
Page 27

Sicurezza / UtilizzoSicurezza
In caso di mancato utilizzo, staccare il carica-
batteria dalla rete elettrica anche per contribuire
alla protezione dell‘ambiente! Non dimenticare
che anche se posto in modalità di stand-by,
l‘apparecchio consuma elettricità.
E‘ necessario essere sempre concentrati e fare
sempre attenzione a ciò che si fa. Procedere sempre in modo assennato e non mettere in funzione
il caricabatteria quando si è deconcentrati o non
ci si sente bene.
Q
Caratteristiche del prodotto
Questo prodotto è stato progettato per caricare diversi tipi di batterie sigillate al piombo acido, utilizzate per lo più in autoveicoli, motociclette e alcuni
altri veicoli. Esse possono essere del tipo con elettrolito liquido (WET), elettrolito in gel, o AGM (con
tappetini imbevuti di elettrolito). La speciale progettazione dell‘apparecchio (denominata anche „strategia di caricamento a tre livelli“) permette il ricaricamento della batteria fino a quasi il 100 % della
sua capacità. Inoltre può essere eseguito un collegamento della batteria con il caricabatteria a lungo
periodo per mantenere la batteria medesima sempre
in ottimali condizioni.
Q
Utilizzo
Estrarre sempre la spina
dalla presa prima di eseguire qualsiasi tipo di
intervento sul caricabatteria!
PERICOLO DI SCOSSA
ELETTRICA! PERICOLO DI DANNI MATE-
RIALI! PERICOLO DI LESIONE! Quando si
eseguono forature nella parete per inserire viti,
assicurarsi di non entrare in contatto con condutture elettriche, idriche o del gas. Eventualmente,
verificarne la presenza con un dispositivo di
rilevazione di condutture prima di eseguire forature o spaccature nella parete.
Se necessario, montare il caricabatteria su una
mensola o in una parete. A questo scopo avvitare
due viti sulla mensola o nella parete facendole
passare per i fori di fissaggio
.
12
Q
Collegamento
Prima del processo di carica e di mantenimento
sotto carica con batteria collegata stabilmente
al veicolo, scollegare prima il cavo di connessione al polo negativo (nero) del veicolo dal
polo negativo della batteria. Il polo negativo
della batteria di solito è collegato alla carrozzeria del veicolo.
Infine, scollegare il cavo di connessione al polo
positivo (rosso) del veicolo dal polo positivo
della batteria.
In primo luogo collegare il morsetto di collega-
mento rapido con polarità positiva (rosso)
15
del caricabatteria al polo positivo (+) della
batteria (vedi fig. C).
Collegare il morsetto di collegamento rapido con
polarità negativa (nero)
del caricabatteria
16
al polo negativo (-) della batteria (vedi fig. C).
Collegare il cavo di alimentazione 11 del cari-
cabatteria alla presa elettrica.
Q
Scollegamento
Scollegare l‘apparecchio dalla rete elettrica.
Scollegare il morsetto di collegamento rapido
con polarità negativa (nero)
dal polo nega-
16
tivo (-) della batteria (vedi fig.
Scollegare il morsetto di collegamento rapido
con polarità positiva (rosso)
dal polo positi-
15
vo (+) della batteria.
Collegare nuovamente il cavo di connessione al
polo positivo del veicolo al polo positivo della
batteria.
Collegare nuovamente il cavo di connessione
al polo negativo del veicolo al polo negativo
della batteria.
Q
Selezione della modalità
di caricamento
Per caricare diverse batterie in presenza di differenti temperature ambiente è possibile scegliere diverse
modalità di caricamento. In confronto ai tradizionali caricabatteria, questo apparecchio possiede una
27 IT/CH
Page 28

funzione speciale per il riutilizzo di una batteria /
accumulatore scarico. È possibile ricaricare una
batteria / accumulatore completamente scarico. Il
procedimento di caricamento sicuro è garantito da
un dispositivo di protezione dai collegamenti errati
e dai cortocircuiti. I circuiti elettronici installati permettono la messa in funzione dell‘apparecchio non
subito dopo il collegamento della batteria, ma solo
dopo la selezione della modalità di caricamento.
una modalità diversa. Ciò è utile per proteggere la
batteria carica dai danni.
Q
Modalità 1 „6 V“ (7,3 V / 0,8 A)
Questa modalità è indicata per caricare batterie a
piombo-acido da 6 V aventi una capacità inferiore
a 14 Ah.
In tal modo, si evita la formazione delle scintille
solitamente prodotte durante il procedimento di
connessione. Inoltre il caricabatteria viene controllato da un’unità MCU (unità microcomputer) interna.
Q
Reset / Cancellazione
delle impostazioni
Dopo il collegamento alla rete elettrica, l‘apparecchio
si posiziona automaticamente nell‘impostazione
principale e resta in modalità STANDBY.
Q
Commutazione tra modalità
1, 2, 3 e 4
Premere il tasto di selezione MODE in succes-
sione rapida
desiderata.
L’apparecchio inserisce le modalità di caricamento scelta secondo nel seguente ordine:
Stand-by
MODE 3
ciclo successivo.
NOTA: Se viene collegata una batteria da 12 V,
non la MODALITÀ 1 “6 V” non è selezionabile.
Se viene collegata una batteria da 6 V, le MODALITÀ 2, 3, 4 non sono selezionabili.
NOTA: Premendo il tasto di selezione
chio passa alla modalità successiva di caricamento
e la esegue.
NOTA: Se però la batteria non viene scollegata
dal caricabatteria dopo la carica, essa resta in modalità di mantenimento, anche se l‘utente passa a
per giungere alla modalità
9
, MODE 1 „6 V“, MODE 2 ,
, MODE 4 e in seguito avvia il
9
, l‘apparec-
Premere il tasto di selezione MODE 9, per
selezionare la modalità 1. Al termine di questo
procedimento, si accende la relativa spia LED
2
„6 V“
procedimenti, l‘elettronica si regola automaticamente in base alla spia LED
il procedimento di carica corrente di 0,8 A ±
10 %. Se il procedimento prosegue senza problemi, la spia LED
tutto il procedimento, fino al caricamento della
batteria da 7,3 V / ± 0,25 V. Se la batteria si è
caricata completamente, la spia LED
accende e la spia LED
parecchio ora si commuta automaticamente
nella modalità di mantenimento.
Q
Modalità 2 „12 V“
. Se non si desiderano eseguire altri
8 e avvia
8 resta accesa durante
7 si
8 si spegne. L’ap-
(14,4 V / 0,8 A)
Questa modalità è indicata per caricare batterie a
piombo-acido da 12 V aventi una capacità inferiore
a 14 Ah.
Premere il tasto di selezione MODE 8, per
selezionare la modalità 2. Successivamente
all’esecuzione di questa procedura, la relativa
spia LED
non si esegua alcun’altra procedura, il sistema
elettronico si regola automaticamente insieme
alla spia LED
carica. Se il procedimento prosegue senza
problemi, la spia LED
rante tutto il procedimento, fino al caricamento
della batteria. Se la batteria si è caricata completamente, la spia LED
spia LED
3 si illumina. Qualora in seguito
8 avvia e la procedura di
8 resta accesa du-
7 si accende e la
8 si spegne. L’apparecchio ora
28 IT/CH
Page 29

UtilizzoUtilizzo
si commuta automaticamente nella modalità di
mantenimento.
Q
Modalità 3 „12 V“
(14,4 V / 3,8 A)
Questa modalità è indicata, in condizioni normali,
per caricare batterie a piombo-acidi da 12 V con
capacità superiore a 14 Ah.
Premere il tasto di selezione MODE 9, per
selezionare la modalità 3. Qualora in seguito
non si esegua alcun’altra procedura, il sistema
elettronico si regola automaticamente insieme
alla spia LED
carica Qualora la procedura proceda senza
problemi, la spia LED
durante tutta la procedura di carico fino a che
la batteria è stata caricata. Quando la batteria
è stata completamente caricata, la spia LED
7 si illumina mentre la spia LED 8 si
spegne. L’apparecchio ora si commuta automaticamente in modalità di mantenimento.
Q
Modalità 4 12 V (14,7 V / 3,8 A)
Questa modalità è indicata per caricare batterie a
piombo-acido da 12 V con una capacità superiore
al 14 Ah in condizioni di condizioni climatiche caratterizzate da freddo o per caricare alcune batterie
AGM di capacità superiore a 14 Ah.
Premere il tasto di selezione della modalità
MODE
appena è stata raggiunta la modalità deside
si illumina la spia LED corrispondente
Qualora l’utilizzatore non modifichi la situazione
dopo un’attesa prestabilita il sistema elettronico
si inserisce per iniziare la procedura carica. In
questa modalitá la corrente di carico è la stes
come nella „modalità 3“. Qualora la procedura
prosegua senza problemi, il LED si illumina
8
, il sistema elettronico è inserito e rimane in
questo stato fino a quando la batteria è carica
Una volta raggiunto tale stato, il caricabatteria
4 avvia e la procedura di
8 rimane accesa
9
, per selezionare la modalità 4. Non
5.
rata,
sa
ta.
si commuta in modalità di mantenimento della
batteria. Ora la spia a LED
si accende la spia LED
stato corrente.
Q
Rigenerare / caricare
8 si spegne e
7 per segnalare lo
batterie da 12 V vuote
(usate, sovraccariche)
Qualora il caricabatteria venga collegato ad una
batteria e la procedura di carica si avvia, esso riconosce automaticamente la tensione della batteria.
Esso passa alla modalità di caricamento a impulsi
qualora la tensione sia compresa fra 7,5 V ± 0,5 e
10,5 V ± 0,5 V.
Questo caricamento a impulsi continua finché la
tensione della batteria arriva a 10,5 V ± 0,5 V.
Una volta raggiunto questo stato, il caricabatteria
si commuta nella modalità di carica normale scelta
in precedenza.
Ora la batteria può essere caricata con rapidità e
sicurezza. In tal modo è possibile caricare la maggior
parte delle batterie scariche, che possono essere
così riutilizzate.
NOTA: Durante la procedura di caricamento a impulsi, lampeggia la visualizzazione LED
Q
Funzione di protezione
dell‘apparecchio
Non appena si manifesta una situazione differente,
quali cortocircuito o caduta di corrente durante la
procedura di caricamento, un circuito aperto o collegamento errato dei morsetti, per evitare danni il
caricabatteria disinserisce l’impianto elettronico e
pone immediatamente il sistema in stato di homing.
,
Se non vengono eseguite altre impostazioni, il sistema
resta in STANDBY. In caso di connessione errata
dei morsetti di uscita, si accende inoltre la spia LED
„Connessione con polarità inversa / errore“
8.
6.
29 IT/CH
Page 30

Q
Protezione dal surriscaldamento
Se l‘apparecchio si surriscalda durante la carica,
viene automaticamente ridotta la potenza in uscita,
per proteggere l‘apparecchio dai danni.
La garanzia vale solo per i difetti di materiale o
fabbricazione, non per i danni da trasporto, parti
soggette a usura o danni a parti fragili come ad
es. interruttori o accumulatori. Il prodotto è destinato esclusivamente all’uso domestico e non a quello
commerciale.
Q
Cura e manutenzione
Estrarre sempre la spina
presa prima di eseguire qualsiasi tipo di inter-
vento sul caricabatteria!
Non utilizzare assolutamente solventi o altri
deter-genti aggressivi.
L‘apparecchio non necessita di manutenzione.
Spegnere l‘apparecchio.
Pulire la superficie in plastica dell‘apparecchio
con un panno asciutto.
Q
Service
parecchio dal Centro di Assistenza o da
un elettricista specializzato e solo con
pezzi di ricambio originali. In questo modo
viene garantita la sicurezza dell’apparecchio.
sostituzione della spina o del cavo di
alimentazione solamente dal produttore dell’apparecchio o dal suo Centro di
Assistenza. In questo modo viene garantita
la sicurezza dell’apparecchio.
Q
Garanzia
Questo apparecchio è garantito per tre
anni a partire dalla data di acquisto.
L’apparecchio è stato prodotto con cura
e debitamente collaudato prima della
consegna. Conservare lo scontrino come
prova d’acquisto. In caso di interventi in
garanzia, contattare telefonicamente il
proprio centro di assistenza. Solo in questo modo è possibile garantire una spedizione gratuita della merce.
30 IT/CH
Fare riparare l’ap-
Fare eseguire una
dalla
La garanzia decade in caso di impiego improprio
o manomissione, uso della forza e interventi non
eseguiti dalla nostra filiale di assistenza autorizzata.
Questa garanzia non costituisce alcun limite ai diritti legali del consumatore.
Il periodo di garanzia non viene prolungato in caso
di un intervento in garanzia. Ciò vale anche per le
componenti sostituite e riparate. I danni e difetti
presenti già all’acquisto devono essere comunicati
immediatamente dopo il disimballaggio, e non oltre
due giorni dalla data di acquisto. Le riparazioni effettuate dopo la scadenza del periodo di garanzia
sono a pagamento.
IT
Assistenza Italia
Tel.: 02 36003201
e-mail: kompernass@lidl.it
IAN 89885
CH
Assistenza Svizzera
Tel.: 0842 665566
(0,08 CHF/Min.,
telefonia mobile
max. 0,40 CHF/Min.)
e-mail: kompernass@lidl.ch
IAN 89885
Q
Smaltimento
L’imballaggio è composto da materiali
ecologici, che possono essere smaltiti
presso i siti di riciclaggio locali.
Page 31

Non gettate apparecchi elettrici
nella spazzatura della casa!
In base ala Direttiva Europea 2002 / 96 / EC relativa agli apparecchi elettrici ed elettronici usati e le
norme di armonizzazione di tale direttiva nel diritto
di ciascun Paese, i dispositivi elettrici usati debbono
essere smaltiti separatamente ed essere condotti
ad un loro riutilizzo non dannoso per l’ambiente.
Le possibilitá di smaltimento dell’apparecchio
usurato potete reperire presso il vostro comune.
Smaltimento delle batterie
Come consumatore finale Lei è obbligato in termini di legge (regolamentazione
sulle batterie) di restituire tutte le batterie
consumate. Le batterie contenti sostanze nocive sono
caratterizzate dai simboli riportati qui a fianco che
fanno riferimento al divieto di smaltimento con i rifiuti domestici. Le definizioni per il metallo pesante
sono: Cd = cadmio, Hg = mercurio, Pb = piombo
Portare le batterie esauste fino ad una struttura di
smaltimento della Sua città o comune o restituirle al
proprio rivenditore. In tal modo Lei adempie ai
Suoi obblighi di legge e fornisce un contributo importante a favore della tutela dell‘ambiente.
SmaltimentoUtilizzo / Cura e manutenzione / Service / Garanzia / Smaltimento
31 IT/CH
Page 32

32
Page 33

Inhoudsopgave
Inleiding
Gebruik in overeenstemming met bestemming ............................................................................. Pagina 34
Inhoud van de verpakking .............................................................................................................. Pagina 34
Beschrijving van onderdelen .......................................................................................................... Pagina 34
Technische gegevens ...................................................................................................................... Pagina 34
Veiligheid
Veiligheidsvoorschriften .................................................................................................................. Pagina 35
Producteigenschappen ................................................................................................................... Pagina 36
Bediening
Aansluiten ........................................................................................................................................ Pagina 37
Loskoppelen .................................................................................................................................... Pagina 37
Laadstand kiezen ............................................................................................................................ Pagina 37
Reset / instellingen wissen ............................................................................................................... Pagina 37
Omschakelen tussen de modi 1, 2, 3 en 4 ................................................................................... Pagina 37
Stand 1 “6 V” (7,3 V / 0,8 A) ......................................................................................................... Pagina 38
Stand 2 “12 V” (14,4 V / 0,8 A) .................................................................................................... Pagina 38
Stand 3 “12 V” (14,4 V / 3,8 A) .................................................................................................... Pagina 38
Stand 4 “12 V” (14,7 V / 3,8 A) .................................................................................................... Pagina 38
Lege (verbruikte, overladen) 12 V-accu’s regenereren / opladen ...............................................Pagina 39
Beveiligingsfunctie van apparaat ................................................................................................... Pagina 39
Oververhittingsbeveiliging .............................................................................................................. Pagina 39
Onderhoud en reiniging ................................................................................................. Pagina 39
Service ........................................................................................................................................... Pagina 39
Garantie ....................................................................................................................................... Pagina 39
Afvoer ............................................................................................................................................ Pagina 40
33 NL
Page 34

Inleiding Inleiding / Veiligheid
Batterijlader ULG 3.8 A1 voor
motorvoertuigen
Q
Inleiding
Gefeliciteerd met de koop van uw nieuwe
apparaat.
U heeft voor een hoogwaardig product gekozen.
De gebruiksaanwijzing is een deel van het product.
Deze bevat belangrijke aanwijzingen voor veiligheid, gebruik en verwijdering. Maakt U zich voor
de ingebruikname van het product met alle bedienings- en veiligheidsvoorschriften vertrouwd. Ge
bruik
het apparaat alleen zoals beschreven en voor de
aangegeven toepassingsgebieden. Overhandig alle
documenten bij doorgifte van het product aan derden.
Q
Gebruik in overeenstemming
met bestemming
De ULTIMATE SPEED ULG 3.8 A1 is een batterijlader
met druppellading die geschikt is voor het opladen
en druppelladen van de volgende 6 V- of 12 V-loodaccu’s (accu’s) met elektrolytoplossing of -gel:
• 6 V: capaciteit van 1,2 Ah tot 14 Ah
• 12 V: capaciteit van 1,2 Ah tot 14 Ah
• 12 V: capaciteit van 14 Ah tot 120 Ah
Bovendien kunt u hiermee volkomen ontladen accu’s
regenereren. De batterijlader beschikt over een veiligheidsschakeling tegen vonkvorming en oververhittin
Elk niet in overeenstemming met de bestemming zijnd
of onoordeelkundig gebruik resulteert in het vervallen
van de garantie. De fabrikant aanvaardt geen enkele
aansprakelijkheid voor schade die voortvloeit uit gebruik in strijd met de bestemming. Het apparaat is niet
bestemd voor bedrijfsmatig of commercieel gebruik.
Q
Inhoud van de verpakking
Controleer meteen na het uitpakken de inhoud van
het pakket en het apparaat alsmede alle onderdelen
op beschadiging. Neem een defect apparaat of
defecte onderdelen niet in gebruik.
1 Lader ULTIMATE SPEED ULG 3.8 A1
2 Snelcontact-aansluitklemmen (1 rood, 1 zwart)
1 Gebruiksaanwijzing
34 NL
Q
Beschrijving van onderdelen
zie afbeelding A:
1
LED-indicatie (gereed voor gebruik)
2
“6 V“ LED-indicatie “Stand 1”
3
LED-indicatie “Stand 2”
4
LED-indicatie “Stand 3”
5
LED-indicatie “Stand 4”
6
LED-indicatie “ aansluiting met verkeerde
stand van polen / fout”
7
LED-indicatie “volledig opgeladen”
8
LED-indicatie “Laadprocedure actief”
Q
9
Selectietoets “MODE”
zie afbeelding B:
10
Lader
11
Netkabel
12
Bevestigingsboringen
13
“+”-pool-aansluitkabel (rood), incl. ringschoen
14
“–“-pool-aansluitkabel (zwart), incl. ringschoen
15
“+”-pool-snelcontact-aansluitklem (rood), incl.
rode bevestigingsschroef
16
“–“-pool-snelcontact-aansluitklem (zwart), incl.
zwarte bevestigingsschroef
Q
Technische gegevens
Ingangsspanning : 220–240 V ~ 50 / 60 Hz
Opgenomen vermogen: 60 W
Keerstroom*: < 5 mA (geen AC-ingang)
g.
Nominale
uitgangspanning: 6 V
/ 12 V
Nominale
uitgangsstroom: 0,8 A / 3,8 A
Laadspanning: 7,3 V of 14,4 V of 14,7 V
Laadstroom: 0,8 A ± 10 %
3,8 A ± 10 %
Batterijtype: 6 V-loodzuuraccu’s
1,2 Ah–14 Ah
12 V-loodzuuraccu’s
1,2 Ah–120 Ah
Temperatuur (min.): 0°C
Temperatuur (max.): 40°C
Beschermingsklasse
apparaat:
IP 65 (stofdicht, bescherm
tegen straalwater)
Beschermingsklasse: II /
d
Page 35

Inleiding / Veiligheid
* = Keerstroom is de stroom die de lader uit de
accu verbruikt wanneer er geen netstroom is
aangesloten.
Q
Veiligheid
Q
Veiligheidsvoorschriften
GEVAAR! Voorkom levens- en letselgevaar
door onoordeelkundig gebruik!
VOORZICHTIG! Gebruik het apparaat
niet wanneer de kabel, het netsnoer of
de netstekker beschadigd is. Beschadigen
netsnoeren betekenen levensgevaar vanwege
elektrische schok.
Alleen geschikt voor gebruik bin-
nenshuis!
Als het netsnoer j beschadigd is, laat het dan
uitsluitend door bevoegd en geschoold vakpersoneel repareren! Neem voor reparaties contact
op met het serviceadres in uw land!
BEVEILIG UZELF TEGEN EEN ELEKTRI-
SCHE SCHOK! Gebruik bij aansluiting van de
lader een schroevendraaier en een moersleutel
met een handgreep met veiligheidsisolatie!
GEVAAR VOOR ELEKTRISCHE SCHOK-
KEN! Waarborg bij een vast in het voertuig
gemonteerde accu dat het voertuig uitgeschakeld
is! Schakel de ontsteking uit en breng de auto in
parkeerpositie, met aangetrokken handrem (bijv.
auto) of vastgemaakt touw (bijv. elektroboot)!
GEVAAR VOOR ELEKTRISCHE SCHOK-
KEN! Onderbreek de stroomtoevoer naar de
batterijlader voordat u verbindingen naar de
accu sluit of opent.
- Sluit eerst de aansluitklem aan die niet op de
carrosserie aangesloten is. Sluit de andere
aansluitklem op afstand van de accu en de
benzineleiding aan op de carrosserie. Sluit de
batterijlader pas daarna aan op het stroomnet.
- Onderbreek na het laden de stroomtoevoer
naar de batterijlader. Verwijder pas daarna
de aansluitklem van de carrosserie. Verwijder
vervolgens de aansluitklem van de accu.
GEVAAR VOOR ELEKTRISCHE SCHOK-
KEN! Pak de aansluitkabel van de polen (“–“ en
“+“) uitsluitend vast aan het geïsoleerde bereik!
GEVAAR VOOR ELEKTRISCHE SCHOK-
KEN! Voer de aansluiting op de accu en de
contactdoos van de stoomtoevoer volledig tegen
vocht beschermd uit.
GEVAAR VOOR ELEKTRISCHE SCHOK-
KEN! Voer de montage, het onderhoud en de
reiniging van de batterijlader alleen uit bij onderbroken stroomtoevoer!
GEVAAR VOOR ELEKTRISCHE SCHOK-
KEN! Verwijder bij een voortdurend in de auto
aangesloten accu na het laden of druppelladen
eerst de minpool-aansluitkabel (zwart) van de
batterijlader van de accuminpool.
Laat kleine kinderen en jongeren nooit
zonder toezicht in de buurt van de batterijlader! Kinderen kunnen mogelijke gevar
en
bij de omgang met elektrische apparaten nog
niet correct inschatten. Op kinderen dient toe
zicht
te worden gehouden om te voorkomen dat ze
met het product spelen.
Kinderen of personen met onvoldoende kennis
over en ervaring in de omgang met het apparaat of met beperkte lichamelijke, sensorische
of geestige vermogens mogen het apparaat
niet zonder toezicht of voorafgaande instructie
door een voor hun veiligheid verantwoordelijke
persoon gebruiken.
EXPLOSIEGEVAAR! Pas op voor een
uiterst explosieve knalgasreactie! Waterstof kan bij het opladen en druppelladen in
gasvorm uit de accu stromen. Knalgas is een
explosief mengsel van gasvormige waterstof en
zuurstof. Bij contact met open vuur (vlammen,
gloed of vonken) vindt de zogenaamde knalgasreactie plaats! Voer het opladen en druppelladen uit in een goed geventileerde ruimte
met een bliksemafleider. Zorg dat bij het opladen en druppelladen geen open licht of vuur
(vlammen, gloed of vonken) aanwezig is!
EXPLOSIE- EN BRANDGEVAAR! Zorg er-
voor dat explosieve of brandbare stoffen bijv.
benzine of oplosmiddelen niet kunnen ontsteken
tijdens het gebruik van de batterijlader!
EXPLOSIEVE
GASSEN! VLAMMEN EN VONKEN VER-
35 NL
Page 36

Veiligheid Bediening
MIJDEN! Zorg tijdens het laadproces voor
voldoende ventilatie.
Plaats de batterij tijdens het laadproces op een
goed geventileerd oppervlak. In het andere geval kan het apparaat beschadigd worden.
EXPLOSIEGEVAAR! Waarborg dat de aan-
sluitkabel van de pluspool geen contact maakt
met een brandstofleiding (bijv. benzineleiding)!
CORROSIEGEVAAR! Bescherm uw ogen
en huid tegen corrosie door zuren
(zwavelzuur) bij contact met de accu!
Gebruik: zuurvaste veiligheidsbril, -bekleding
en -handschoenen! Wanneer uw ogen of huid
in aanraking zijn gekomen net het zwavelzuur,
spoelt u het betroffen deel van het lichaam af
met veel stromend, helder water en raadpleegt
u onmiddellijk een dokter!
Voorkom elektrische kortsluiting bij de aanslui-
ting van de batterijlader op de accu. Sluit de
aansluitkabel met de minpool uitsluitend aan
op de minpool van de accu resp. op de carrosserie. Sluit de aansluitkabel met de pluspool
uitsluitend aan op de pluspool van de accu!
Controleer voordat u de lader aansluit op de
netstroom of de netstroom volgens de voorschriften is voorzien van een 230 V~ 50 Hz,
geaarde nulfase, een 16 A zekering en een
FI-schakelaar (aardlekschakelaar)! In het andere geval kan het apparaat beschadigd worden.
Plaats de batterijlader niet in de buurt van vuur,
hitte of langdurige temperatuurinwerkingen bove
50 °C! Bij hogere temperaturen daalt het uitgangsvermogen van de batterijlader automatisch.
Beschadig tijdens de montage van de batterijlad
met schroeven geen leidingen voor brandstof,
elektriciteit, remsysteem, hydraulica, water! In
het andere geval dreigt levensgevaar en gevaar
voor letsel!
Gebruik de batterijlader alléén met de bijgele-
verde originele onderdelen!
Dek de batterijlader niet af met voorwerpen! In
het andere geval kan het apparaat beschadigd
worden.
Beveilig de stroomcontactvlakken van de accu
tegen kortsluiting!
Gebruik de batterijlader uitsluitend voor het laden
en druppelladen van onbeschadigde 6 V- / 12 Vloodzuuraccu’s (met elektrolytoplossing of -gel)!
36 NL
In het andere geval kan materiële schade het
gevolg zijn.
Gebruik de batterijlader niet voor het opladen
en druppelladen van niet-oplaadbare batterijen.
In het andere geval kan materiële schade het
gevolg zijn.
Gebruik de batterijlader niet voor het laden en
druppelladen van een beschadigde of bevroren
accu! In het andere geval kan materiële schade
het gevolg zijn.
Neem voor aansluiting van de lader kennis van
het onderhoud van de accu aan de hand van
de gebruiksaanwijzing ervan! In het andere
geval bestaat gevaar voor persoonlijk letsel
en / of schade aan het apparaat.
Voordat u de lader aansluit op een accu die vast
is aangesloten in een voertuig, dient u zich te
informeren over het waarborgen van de elektrische veiligheid en het onderhoud aan de hand
van de bedieningshandleiding van het voertuig!
In het andere geval bestaat gevaar voor persoonlijk letsel en / of schade aan het apparaat.
Bescherm het milieu en onderbreek de stroom-
toevoer naar het laadapparaat wanneer u het
niet gebruikt! Bedenk dat ook de standby-modus
stroom verbruikt.
Wees altijd opmerkzaam en let altijd op met
wat u doet. Ga altijd bedachtzaam te werk en
gebruik de batterijlader niet wanneer u ongeconcentreerd bent of u zich niet goed voelt.
n
Q
Producteigenschappen
er
Dit apparaat is bedoeld voor het opladen van uiteenlopende SLA-accu‘s (verzegelde loodaccu‘s), die
vooral worden gebruikt in personenauto‘s, motorfietsen en enkele andere typen voertuigen. Dit kunnen bijvoorbeeld WET- (met vloeibaar elektrolyt),
GEL- (met elektrolyt in gelvorm) of AGM-accu‘s (met
elektrolyt absorberende matten) zijn. Een speciale
toepassing van het apparaat (ook wel “driefasenlaadstrategie” genoemd) maakt het mogelijk de accu
op te laden tot bijna 100 % van zijn capaciteit.
Verder kunt u de batterijlader gedurende een langere periode op de accu aansluiten om de accu in
een zo goed mogelijke toestand te houden.
Page 37

Q
Bediening
Trek altijd eerst de
steker uit de contactdoos voordat u werk-
zaamheden aan de batterijlader uitvoert.
GEVAAR VOOR
ELEKTRISCHE SCHOKKEN! GEVAAR
VOOR MATERIËLE SCHADE! GEVAAR
VOOR LETSEL! Waarborg dat u niet op st
room-,
gas- of waterleidingen stoot wanneer u de
schroeven in de wand boort. Controleer de
wand eventueel met een leidingzoeker voordat
u gaat boren.
Monteer de batterijlader eventueel op een plank
of een wand. Schroef hiervoor twee schroeven
door de bevestigingsboring
12
op de plank of
in de wand.
Q
Aansluiten
Voor het opladen en druppelladen van een vast
in een voertuig aangesloten accu maakt u eerst
de aansluitkabel met de minpool (zwart) van
het voertuig los van de minpool van de accu.
De minpool van de accu is in de regel verbonden
met de carrosserie van het voertuig.
Haal vervolgens de aansluitkabel met de plus-
pool (rood) van het voertuig van de pluspool
van de accu.
Klem eerst de “+“-pool-snelcontact-aanslutiklem
15
(rood)
van de batterijlader op de “+“-pool
van de accu (zie afb. C).
Klem de “–“-pool-snelcontact-aanslutiklem (zwart)
16
op de “–“-pool van de accu (zie afb. C).
Sluit de netkabel 11 van de batterijlader aan
op de contactdoos.
Q
Loskoppelen
Bediening
Sluit de aansluitkabel met de minpool van
voertuig weer aan op de minpool van de accu.
Q
Laadstand kiezen
U kunt kiezen uit verschillende bedrijfsmodi om
verschillende accu’s bij verschillende omgevingstemperaturen op te laden.
Anders dan de meeste batterijladers beschikt dit apparaat over een speciale functie om een lege batterij /
accu op-nieuw te kunnen gebruiken. U kunt een
volledig ontladen batterij / accu opnieuw opladen.
Een beveiliging tegen verkeerde aansluiting en kortsluiting waarborgt een veilige laadprocedure. Door
de ingebouwde elektronica begint de lader niet
meteen na aansluiting van de accu te werken,
maar pas nadat een laadstand is gekozen.
Zo worden vonken, die vaak optreden bij het aansluiten, voorkomen. Bovendien wordt de batterijlader
gestuurd door een interne MCU (microcomputereenheid).
Q
Reset / instellingen wissen
Na aansluiting op de stroomvoorziening gaat het
apparaat automatisch over op de basisstand en
blijft het in de standbystand.
Q
Omschakelen tussen de modi
1, 2, 3 en 4
Druk de keuzetoets MODE 9 dienovereen-
komstig vaak achter elkaar in.
Het apparaat schakelt in de volgende volgorde naar de laadmodi: Stand-by
“6 V“, MODE 2
en start vervolgens de volgende cyclus.
, MODE 3 , MODE 4
het
, MODE 1
Haal het apparaat van de netstroom.
Verwijder de “–“-pool-snelcontact-aanslutiklem
16
(zwart)
van de “–“-pool van de accu.
Verwijder de “+“-pool-snelcontact-aanslutiklem
15
(rood)
van de “+“-pool van de accu.
Sluit de aansluitkabel met de pluspool van het
voertuig weer aan op de pluspool van de accu.
OPMERKING: Als u een 12 V-accu aansluit, kan
MODUS 1 “6 V” niet worden geselecteerd.
als u een 6 V-accu aansluit, kan MODUS 2, 3, of 4
“12 V” niet worden geselecteerd.
37 NL
Page 38

Bediening Bediening / Onderhoud en reiniging / Service / Garantie
OPMERKING: Wanneer u op de toets 9 drukt,
schakelt het apparaat over op de volgende laadstand
en wordt deze uitgevoerd.
OPMERKING: Wanneer een accu echter na
volledig opladen niet van het lader wordt losgekoppeld, blijft de druppellaadstand actief, zelfs
wanneer de gebruiker overschakelt op een andere
stand. Dit dient om een volledig opgeladen accu te
beschermen tegen beschadiging.
Q
Stand 1 “6 V” (7,3 V / 0,8 A)
Deze modus is geschikt om 6 V-loodzuuraccu’s met
een capaciteit van minder dan 14 Ah te laden.
Druk op de toets MODE 9 om stand 1 te kie
zen.
Nadat dit is gedaan, brandt de bijbehorende
LED-indicatie “6 V“
2
. Wanneer u verder niets
doet, wordt de elektronica automatisch samen
met de LED-indicatie
8 geactiveerd en wordt
de laadprocedure gestart met een stroom van
0,8 A ± 10 %. Als de procedure zonder problemen verloopt, blijft de LED-indicatie
8
tijdens de volledige laadprocedure branden, tot
de accu is opgeladen tot 7,3 V / ± 0,25 V.
Wanneer de accu volledig is opgeladen, brandt
de LED-indicatie
dicatie
8. Het apparaat schakelt automa-
7 en verdwijnt de LED-in-
tisch naar de druppelladingsmodus.
LED-indicatie
8. Het apparaat schakelt
automatisch naar de druppelladingsmodus.
Q
Stand 3 “12 V” (14,4 V / 3,8 A)
Deze modus wordt hoofdzakelijk gebruikt om 12 Vloodzuuraccu’s met een capaciteit van meer dan
14 Ah onder normale voorwaarden op te laden.
D
ruk op de toets MODE
9
om stand 3 te kiezen
Wanneer u vervolgens geen ander proces uitvoert, schakelt de elektronica samen met de LEDweergave
4 in en begint het laadproces.
Wanneer het proces probleemloos uitgevoerd
wordt, blijft de LED-weergave
8 tijdens het
complete ladingsproces ingeschakeld totdat de
accu opgeladen is. Wanneer de accu volledig
opgeladen is, brandt de LED-weergave
en de LED-weergave
8 dooft. Het apparaat
7
schakelt automatisch naar de druppelladingsmodus.
Q
Stand 4 “12 V” (14,7 V / 3,8 A)
Deze modus wordt gebruikt om 12 V-loodzuuraccu’s
met een capaciteit van meer dan 14 Ah onder koude
omstandigheden of om sommige AGM-accu’s van
meer dan 14 Ah op te laden.
.
Q
Stand 2 “12 V” (14,4 V / 0,8 A)
Deze modus is geschikt om 12 V-loodzuuraccu’s
met een capaciteit van minder dan 14 Ah te laden.
Druk op de toets MODE
9
om stand 2 te kiezen.
Na dit proces brandt de dienovereenkomstige
LED-weergave
3. Wanneer u vervolgens
geen ander proces uitvoert, schakelt de elektronica samen met de LED-weergave
8 auto-
matisch in en begint het laadproces.
Als de procedure zonder problemen verloopt,
blijft de LED-indicatie
8 tijdens de volledige
laadprocedure branden, tot de accu is opgeladen. Wanneer de accu volledig is opgeladen,
brandt de LED-indicatie
38 NL
7 en verdwijnt de
Druk de keuzetoets MODE 9 om modus 4 te
kiezen. Zodra u de gewenste modus hebt gekozen, begint de dienovereenkomstige LEDweergave
5 direct te branden. Wanneer u
geen verdere instellingen uitvoert, schakelt de
elektronica in na afloop van een bepaalde vertraging aan het begin van het laadproces. In
deze modus is de laadstroom dezelfde als in
„modus 3”. Wanneer het proces probleemloos
uitgevoerd wordt, begint de LED-weergave
8
te branden, de elektronica is ingeschakeld
en blijft ingeschakeld totdat de accu opgeladen
is. Zodra de accu geladen is, schakelt de batterijlader over naar de druppelladingsmodus.
Nu dooft de LED-weergave
weergave
7 brandt om de actuele status
weer te geven.
8 en de LED-
Page 39

Bediening / Onderhoud en reiniging / Service / Garantie
Q
Lege (verbruikte, overladen)
12 V-accu’s regenereren /
opladen
Wanneer de batterijlader op een accu aangesloten
wordt en het laadproces start, herkent de batterijlader
automatisch de accuspanning. De lader schakelt
over op de druppellaadstand wanneer de spanning
binnen het bereik van 7,5 V ± 0,5 tot 10,5 V ±
0,5 V ligt.
Het druppelladen gaat door tot de accuspanning
toeneemt tot 10,5 V ± 0,5 V. Zodra deze toestand
bereikt is, schakelt de batterijlader over naar de
normale laadmodus die u tevoren hebt gekozen.
Nu kan de accu snel en veilig worden opgeladen.
Met deze procedure kunnen de meeste lege accu‘s
weer worden opgeladen en opnieuw worden gebruikt.
OPMERKING: Tijdens de impulslading knippert
de ledweergave
Q
Beveiligingsfunctie
van apparaat
Zodra een afwijkende situatie optreedt, zoals bijv.
een kortsluiting, een kritiek spanningsverlies tijdens
het laadproces, een open stroomkring of een omgekeerde aansluiting van uitgangsklemmen, schakelt de acculader de elektronica uit en schakelt het
systeem onmiddellijk terug naar de uitgangspositie
om schade te voorkomen.
Als u geen andere instelling uitvoert, blijft het systeem
in de standbystand. Bij omgekeerd aansluiten van
de klemmen licht bovendien de LED-indicatie “aansluiting met verkeerde stand van polen / fout”
Q
Oververhittingsbeveiliging
Als het apparaat tijdens het opladen te heet wordt,
dan wordt automatisch het uitgangsvermogen verlaagd. Hierdoor wordt het apparaat beschermd
tegen beschadiging.
8.
6.
Q
Onderhoud en reiniging
Trek altijd eerst de
steker uit de contactdoos voordat u werkzaam-
heden aan de batterijlader uitvoert.
Gebruik in geen geval oplosmiddelen of andere
agressieve schoonmaakmiddelen.
Het apparaat is onderhoudsvrij.
Schakel het apparaat uit.
Reinig de kunststof oppervlakken van het ap-
paraat met een droge doek.
Q
Service
raten door het servicepunt of een gekwalificeerd vakpersoneel en alléén
met originele onderdelen repareren.
Op deze wijze wordt gewaarborgd dat de
veiligheid van het apparaat behouden blijft.
of de aansluitleiding altijd door de fabrikant van het apparaat of door diens
technische dienst repareren. Op deze
wijze wordt gewaarborgd dat de veiligheid
van het apparaat behouden blijft.
Q
Garantie
U heeft op dit apparaat 3 jaar garantie
vanaf de aankoopdatum. Het apparaat
is met de grootst mogelijke zorg vervaardigd en voorafgaand aan de levering
nauwkeurig gecontroleerd. Bewaar a.u.b.
de kassabon als aankoopbewijs. Als u
aanspraak wilt maken op garantie, neem
dan a.u.b. telefonisch contact op met uw
servicefiliaal. Alleen op die manier is een
kostenloze verzending van uw product
gegarandeerd.
De garantie geldt alleen voor materiaal- of fabricagefouten, echter niet voor transportschade, of voor
onderdelen die aan slijtage onderhevig zijn, of voor
beschadigingen aan breekbare delen, bijv. schake-
Laat uw appa-
Laat de steker
39 NL
Page 40

Garantie / Afvoer Table of contents
laars of accu’s. Het product is uitsluitend bestemd
voor privé-gebruik en niet voor bedrijfsmatige doeleinden.
Bij verkeerd gebruik en ondeskundige behandeling,
bij gebruik van geweld en bij reparaties die niet
door ons geautoriseerd servicefiliaal zijn uitgevoerd,
vervalt de garantie. Uw wettelijke rechten worden
door deze garantie niet beperkt.
De garantieperiode wordt niet verlengd door de aansprakelijkheid. Dit geldt eveneens voor vervangen
en gerepareerde onderdelen. Schade en gebreken
die mogelijk reeds bij de aankoop aanwezig zijn,
moeten direct na het uitpakken worden gemeld, uiterlijk echter twee dagen na de dag van aankoop.
Na verstrijken van de garantieperiode moeten alle
voorkomende reparaties vergoed worden.
NL
Service Nederland
Tel.: 0900 0400223
(0,10 EUR/Min.)
e-mail: kompernass@lidl.nl
IAN 89885
Accu afvoeren
U bent als eindverbruiker wettelijk (batterijverordening) verplicht, alle gebruikte
batterijen terug te geven. Batterijen met
schadelijke stoffen zijn gekenmerkt met het hiernaast
afgebeelde symbool dat wijst op het verbod, deze
bij het huisafval te deponeren. De benamingen voor
het betreffende zware metaal zijn: Cd = cadmium,
Hg = kwikzilver, Pb = lood
Geef oude batterijen af bij een milieupark van uw
stad of gemeente of bij uw handelaar. U vervult uw
wettelijke plichten en levert tevens een belangrijke
bijdrage aan de milieubescherming.
Q
Afvoer
De verpakking bestaat uit milieuvriende-
lijke materialen die u via de plaatselijke
recyclingdiensten kunt afvoeren.
Voer elektronische apparaten
niet af via het huisafval!
Conform de Europese richtlijn 2002 / 96 / EC
betreffende afgedankte elektrische en elektronische
apparatuur en de omzetting daarvan naar nationaal
recht moeten oude elektrische gereedschappen separaat worden ingezameld en op milieuvriendelijke
wijze worden gerecycled.
Over de afvoermogelijkheden van oude elektrische
apparaten kunt u bij uw gemeente informeren.
40 NL
Page 41

Introduction
Proper Use ........................................................................................................................................... Page 42
Delivery Contents ................................................................................................................................ Page 42
Component description ......................................................................................................................Page 42
Technical Data ....................................................................................................................................Page 42
Safety
Safety information ............................................................................................................................... Page 43
Product features...................................................................................................................................Page 44
Operation .......................................................................................................................................Page 44
Connection ..........................................................................................................................................Page 45
Disconnecting ...................................................................................................................................... Page 45
Select charging mode ......................................................................................................................... Page 45
Reset / deleting settings ....................................................................................................................... Page 45
Switching between modes 1, 2, 3 and 4 .......................................................................................... Page 45
Mode 1 „6 V“ (7.3 V / 0.8 A) .............................................................................................................Page 46
Mode 2 „12 V“ (14.4 V / 0.8 A) ........................................................................................................ Page 46
Mode 3 „12 V“ (14.4 V / 3.8 A) ........................................................................................................ Page 46
Mode 4 „12 V” (14.7 V / 3.8 A) ........................................................................................................ Page 46
Regenerating / charging empty (used, overcharged) 12 V batteries ..............................................Page 47
Protective function of the device ......................................................................................................... Page 47
Overheating protection ......................................................................................................................Page 47
Maintenance and care .........................................................................................................Page 47
Service ............................................................................................................................................... Page 47
Warranty ......................................................................................................................................... Page 47
Disposal ............................................................................................................................................ Page 48
41 GB
Page 42

Introduction
Car battery charger ULG 3.8 A1
Q
Introduction
We congratulate you on the purchase of your new
device. You have chosen a high quality product. The
instructions for use are part of the product. They
contain important information concerning safety,
use and disposal. Before using the product, please
familiarise yourself with all of the safety information
and instructions for use. Only use the unit as de
and for the specified applications. If you pass the
product on to anyone else, please ensure that you
also pass on all the documentation with it.
Q
Proper Use
The ULTIMATE SPEED ULG 3.8 A1 is a battery
charger with a pulse trickle charge mode and is
suitable for charging and maintenance charging of
the following 6 V or 12 V lead rechargeable batteries with wet cell or gel electrolyte:
• 6 V: with a capacity of 1.2 Ah to 14 Ah
• 12 V: with a capacity of 1.2 Ah to 14 Ah
• 12 V: with a capacity of 14 Ah to 120 Ah
You can also used it to regenerate completely discharged batteries. The battery charger has protective
circuits to prevent sparking and overheating. Any incorrect or improper use leads to loss of the warranty.
The manufacturer takes no responsibility for damage
arising out of usage that is contrary to the instructions
laid down. The appliance is not meant for commercial use.
Q
Delivery Contents
Check the appliance and all accessories for damage
immediately after unpacking. Do not put a defective
appliance or parts into operation.
1 Charger ULTIMATE SPEED ULG 3.8 A1
2 Quick / contact clamps (1 red, 1 black)
1 Operating manual
scribed
(s)
Q
Component description
see Fig. A:
1
LED display (standby)
2
„6 V“ LED display „Mode 1“
3
LED display „Mode 2“
4
LED display „Mode 3“
5
LED display „Mode 4“
6
LED display „incorrect polarity / fault“
7
LED display „fully charged“
8
LED display „Charging process active“
Q
9
Selection button „MODE“
see Fig. B:
10
Charging station
11
Mains lead
12
Mounting holes
13
„+“-Pole connection cable (red), incl. ring shoe
14
„–“-Pole connection cable (black), incl. ring shoe
15
„+“-Pole quick-contact terminal (red), incl. red
fixing screw
16
„–“-Pole quick-contact terminal (black), incl.
black fixing screw
Q
Technical Data
Input voltage: 220–230–240 V ~
50 / 60 Hz
Power consumption: 60 W
Reverse current*: < 5 mA (no AC input)
Nominal output voltage: 6 V
/ 12 V
Nominal output current: 0.8 A / 3.8 A
Charging voltage: 7.3 V or 14.4 V or 14.7 V
Charging current: 0.8 A ± 10 %
3.8 A ± 10 %
Battery type: 6 V lead-acid battery
1.2 Ah–14 Ah
12 V lead-acid battery
1.2 Ah–120 Ah
Temperature (min.): 0°C
Temperature (max.): 40°C
Housing protection type: IP 65 (dust-tight, protected
against water jets)
Safety class: II /
42 GB
Page 43

* = Return current is the current used by the
charging station battery, when no mains
current is connected.
Q
Safety
Q
Safety information
DANGER! Avoid danger to life and limbs
caused by improper use!
CAUTION! Do not operate the appliance
with a damaged cable, power cord or
plug. A damaged power cord causes danger
to life by electric shock.
For indoor use only!
If damaged, have the power cord repaired by
authorised and trained technicians only! Please
contact the service department for your country!
PROTECT YOURSELF FROM AN ELEC-
TRIC SHOCK! When connecting the charging
station, use a screwdriver and a spanner with
an insulated handle!
DANGER OF ELECTRIC SHOCK! Do not
operate the vehicle if you are charging a battery
while it is still in the vehicle! Switch off the ignition and park the vehicle. Apply the parking
brake (e.g. in cars) or secure with a mooring
rope (e.g. electric boat)!
DANGER OF ELECTRIC SHOCK! Disconnect
the battery charger from the mains before you
make or break the connections to the battery.
- First connect the clamp that is not connected to
vehicle bodywork, then connect the other clamp
to the vehicle bodywork at a point away from
the battery and the fuel line. After this is done,
you can connect the battery charger to the mains.
- After charging, disconnect the battery charger from the mains. Then disconnect the clamp
attached to the vehicle bodywork before you
disconnect the clamp from the battery.
DANGER OF ELECTRIC SHOCK! Handle
the connecting cables („–“ and „+“) by their
insulated areas only!
DANGER OF ELECTRIC SHOCK! Ensure that
there is complete protection from moisture at the
connections to the battery and at the mains
outlet socket!
DANGER OF ELECTRIC SHOCK! Carry out
the mounting, maintenance and cleaning of the
battery charger only when it is disconnected
from mains!
DANGER OF ELECTRIC SHOCK! After
completion of the charging and maintenance
charging process on a battery mounted in a
vehicle, first disconnect the negative connection
cable (black) of the battery charger from the
negative terminal of the battery.
Do not leave small children unattended
with the battery charger! Children are
too
young to assess the possible dangers associated
with electrical devices. Children should be supervised in order to ensure that they do not play
with the device.
Children or persons who lack the knowledge or
experience to use the device or whose physical,
sensory or intellectual capacities are limited
must never be allowed to use the device without
supervision or instruction by a person responsible for their safety.
EXPLOSION HAZARD! Protect yourself
from a highly explosive oxyhydrogen
gas reaction! Gaseous hydrogen can leak
from the battery during the charging and dis
charging process. Oxyhydrogen gas is an explosive
mixture of gaseous hydrogen and oxygen. The
result is the so-called oxyhydrogen reaction
upon contact with open fire (flames, embers or
sparks)! Carry out the charging or discharging
procedure in a wellventilated room protected
from the weather. Make sure that there are no
sources of open fire (flames, embers or sparks)
in the vicinity when charging or discharging
batteries!
RISK OF EXPLOSION OR FIRE! Ensure that
the use of the battery charger cannot ignite any
explosive or combustible substances, e.g. petrol
or solvents!
EXPLOSIVE GASES! AVOID
FLAMES AND SPARKS! Ensure that there is
adequate ventilation during the charging process.
43 GB
Page 44

Safety / Operation
Stand the battery on a well ventilated surface
while charging. Otherwise the device could be
damaged.
DANGER OF EXPLOSION! Ensure that the
positive terminal connection cable does not come
into contact with a fuel line (e.g. petrol line)!
DANGER OF CHEMICAL BURNS! Protect
your eyes and skin against chemical
burns caused by acid (sulphuric acid)
upon contact with the battery! Wear:
Acid-resistant glasses, clothing and gloves! If
your eyes or skin come into contact with sulphuric
acid, rinse the affected part of the body with
plenty of clear running water and seek immediate medical assistance!
Avoid causing an electrical short-circuit when
connecting the battery charger to the battery.
Connect the minus pole connecting cable only
to the minus pole of the battery or to the car
body. Connect the plus pole connecting cable
only to the plus pole of the battery!
Before connecting to the mains, make sure that
the mains current is equipped with standard
230 V~ 50 Hz, PEN conductor, a 16 A fuse and
a residual-current circuit-breaker! Otherwise the
device could be damaged.
Do not place the battery charger near fire, heat,
or subject it to prolonged temperatures of over
50 °C! The output from the battery charger
drops automatically in high temperatures.
Avoid damaging any lines carrying fuel, electricity
brake fluid, hydraulic oil or water. Be particularly
careful not to cause damage when mounting the
charger in place with screws! Failure to observe
this advice risks loss of life or injury!
Use only the supplied original manufacturer’s
parts with the battery charger!
Do not allow any objects to cover the battery
charger! Otherwise the device could be damaged.
Protect the electrical contacts of the battery
against short-circuiting!
Use the battery charger only for charging and
maintenance charging of undamaged 6 V / 12 V
lead batteries (wet cell or gel electrolyte)!
Otherwise damage to property could occur.
Do not use the battery charger for charging or
maintenance charging of disposable batteries.
Otherwise damage to property could occur.
44 GB
Do not use the battery charger for charging or
maintenance charging of damaged or frozen
batteries! Otherwise damage to property could
occur.
Before connecting the charging station, read
the information on battery maintenance in the
operating instructions of the battery! Otherwise
personal injury and / or damage to the device
could occur.
Before connecting the charging station to a
battery permanently installed in a vehicle, read
the information on electrical safety and maintenance in the operating instuctions of the vehicle!
Otherwise personal injury and / or damage to
the device could occur.
Unplug the charger from the mains supply when
not being used! This also benefits the environment.
Consider how much electricity is consumed,
even in standby mode.
Remain alert at all times and always watch what
you are doing. Always proceed with caution
and do not use the battery charger if you cannot concentrate or feel unwell.
Q
Product features
This appliance has been designed for charging a
variety of SLA batteries (sealed lead acid batteries),
as mainly used in cars, motorbikes and several other
vehicles. They may be of types e.g. WET (with liquid
,
electrolyte), GEL (with mit gel-type electolyte) or AGM
(absorbed glass mat) batteries. A special design of
the appliance (also named „three-phase-charging
strategy“) enables the recharging of the batttery to
almost 100 % of its original capacity. Connecting
the battery for a long period to the battery charger
is also a good way of ensuring that your battery is
kept in optimum condition.
Q
Operation
Before you carry out any work
on the battery charger always pull the mains
plug out of the mains socket.
DANGER OF ELECTRIC
SHOCK! DANGER OF DAMAGE TO
Page 45

PROPERTY! DANGER OF INJURY! Ensure
that you do not strike electrical cables, gas or
water pipes when you are drilling into the wall.
If necessary, check the wall using a suitable
detector before you drill.
You may find it convenient to attach the battery
charger on to a board or a wall. Screw the two
screws through the mounting holes
12
into the
board or wall.
Q
Connection
Before starting the charging or discharging
procedure on a permanently installed battery
in a vehicle, first disconnect the minus pole connecting cable (black) of the vehicle from the
minus pole of the battery. The minus pole of the
battery is usually connected to the car body.
Then disconect the plus pole connecting cable
(red) of the vehicle from the plus pole of the
battery.
First attach the „+“ quick-release clamp (red) 15
of the battery charger to the „+“ terminal of the
battery (see Fig. C).
Attach the „–“ quick-release clamp (black) 16
of the battery charger to the „–“ terminal of
the battery (see Fig. C).
Connect the mains lead 11 of the battery
charger to an electrical power outlet socket.
Q
Disconnecting
Disconnect the appliance from the power supply.
Detach the „–“ quick-release clamp (black) 16
from the „–“ terminal of the battery.
Detach the „+“ quick-release clamp (red) 15
from the „+“ terminal of the battery.
Reconnect the plus pole connecting cable of
the vehicle to the plus pole of the battery.
Reconnect the minus pole connecting cable of
the vehicle to the minus pole of the battery.
Q
Select charging mode
You can select different charging modes for charging
different batteries at different ambient temperatures.
In comparison with conventional battery charging
stations, this appliance has a special function for
reusing an empty battery or rechargeable battery.
You can recharge an empty battery / rechargeable
battery. Safe charging is ensured by means of a
protection function against incorrect connection and
short circuiting. Due to the installed electronics, the
charging station does not begin operation directly
after connecting the battery, but only starts after a
charging mode has been selected.
This avoids sparking, which often occurs when
connecting. The battery charger is controlled by an
internal MCU (Micro-Computer Unit).
Q
Reset / deleting settings
After connection to the power supply, the appliance
automatically returns to its basic setting and remains
in STANDBY mode
Q
Switching between modes 1,
2, 3 and 4
Press the MODE selection button 9 the appro-
priate number of times.
The device switches between charging modes in
the following order: Standby
„6 V“, MODE 2
, MODE 3 , MODE 4
and then repeats the cycle
NOTE: If a 12 V battery is connected, MODE 1 “6 V”
cannot be selected. If a 6 V battery is connected,
MODES 2, 3 and 4 “12 V” cannot be selected.
NOTE: If you press the selector button
mode automatically switches over to the next mode
and begins operation in that mode.
, MODE 1
9
, charging
NOTE: However, if a battery is not disconnected
from the charging station after a full charge, the
45 GB
Page 46

Operation
appliance remains in trickle-charge mode, even if
the user switches over to another mode. This protects the battery from being damaged.
Q
Mode 1 „6 V“ (7.3 V / 0.8 A)
This mode is suitable for charging 6 V lead-acid
batteries with a capacity less than 14 Ah.
Press the selection button MODE 9, to select
mode 1. After doing so, the corresponding LED
display „6 V“
an-other process afterwards, the electronic system will automatically start the charging process
together with the LED display
current of 0.8 A ± 10 %. If the procedure runs
without any problems, the LED display
remains on during the entire charging proc
til the battery is fully charged at 7.3 V / ±
When the battery is fully charged, LED display
7 lights up and LED display 8 goes
out. The device now switches automatically into
maintenance charging mode.
Q
Mode 2 „12 V“ (14.4 V / 0.8 A)
This mode is suitable for charging 12 V lead-acid
batteries with a capacity less than 14 Ah.
Press the selection button MODE 9, to activate
mode 2. After completion of this process, the
appropriate LED indicator
Then if you do not take any further action, the
electronic control and the LED indicator
automatically switches on and starts the charging process. If the procedure runs without any
problems, the LED display
during the entire charging process, until the
battery is fully charged. When the battery is
fully charged, LED display
LED display
switches automatically into maintenance charging mode.
2
lights up. If you do not activate
8 at with a
ess,
0.25 V.
3 lights up.
8 remains on
7 lights up and
8 goes out. The device now
8
8
Q
Mode 3 „12 V“ (14.4 V / 3.8 A)
This mode is mainly suitable for charging 12 V
lead-acid batteries with a capacity greater than
14 Ah under normal conditions.
Press the selection button MODE 9, to activate
mode 3. Then if you do not take any further action, the electronic control and the LED indicator
4 switches on and starts the charging pro-
cess. If the process runs without any problems,
the LED indicator
whole charging process until the battery is
charged. When the battery is fully charged, the
LED indicator
8 go out. The device now switches auto-
matically into maintenance charging mode.
Q
un-
Mode 4 „12 V” (14.7 V / 3.8 A)
This mode is used for charging 12 V lead-acid batteries with a capacity greater than 14 Ah under
cold conditions or for charging some AGM (Absorbent Glass Mat) batteries with a capacity greater
than 14 Ah.
Press the MODE selection button 9 to select
mode 4. As you select the desired mode, the
appropriate LED indicator
mediately. If you take no further action, the electronic control switches on after a preset delay
to begin the charging process. In this mode the
charging current is the same as in “mode 3”. If
the process runs without any problems, the LED
indicator
switches on and remains in this state until the
battery is charged. As soon as this point is
reached, the battery charger switches to maintenance charging mode. Now the LED indicator
8 goes out and the LED indicator 7
lights up to indicate the present status.
8 remains on during the
7 and the die LED indicator
5 lights up im-
8 lights up, the electronic control
46 GB
Page 47

Q
Regenerating / charging
empty (used, overcharged)
12 V batteries
The battery charger detects the battery voltage automatically once the battery charger is connected
to a battery and the charging process has started.
It changes to pulse charging mode if the voltage is
in the range of 7.5 V ± 0.5 to 10.5 V ± 0.5 V.
This pulse charging process is continued until the
battery voltage has increased to 10.5 V ± 0.5 V.
As soon as this state is reached, the battery charger
switches into the normal charging mode that you
selected earlier.
Now the battery can be charged quickly and safely.
Most empty batteries can be charged and used
again using this procedure.
NOTE: The LED indicator
the pulse-charging process.
Q
Protective function of the device
As soon as a deviating situation, such as short-circuit,
critical voltage drop during the charging process,
open circuit or reversed connection of the output
clamps, occurs, the battery charger switches the
electronics off and resets the system directly into the
default settings to avoid causing any damage. If you
do not activate any settings, the system will remain
in STANDBY mode. With the inverse connection of
the output clamps the LED display „incorrect polarity / fault“
6
lights up additionally.
8 flashes during
Do not under any circum-stances use solvents
or other aggressive cleaning agents.
The appliance is maintenance-free.
Switch off the appliance.
Clean the plastic surfaces of the device with
a dry cloth.
Q
Service
Have your device
repaired at the service centre or by
qualified specialist personnel using
original manufacturer parts only. This
will ensure that your device remains safe to use.
If the plug or lead
needs to be replaced, always have
the replacement carried out by the
manufacturer or its service centre. This
will ensure that your device remains safe to use.
Q
Warranty
The warranty for this appliance is for 3
years from the date of purchase. The appliance has been manufactured with care
and meticulously examined before delivery. Please retain your receipt as proof
of purchase. In the event of a warranty
claim, please make contact by telephone
with our Service Department. Only in this
way can a post-free despatch for your
goods be assured.
Q
Overheating protection
If the appliance becomes too hot during charging,
the power output is automatically reduced. This
protects the appliance from damage.
Q
Maintenance and care
Before you carry out any work
on the battery charger always pull the mains
plug out of the mains socket.
The warranty covers only claims for material and
maufacturing defects, but not for transport damage,
for wearing parts or for damage to fragile components, e.g. buttons or batteries. This product is for private use only and is not intended for commercial use.
The warranty is void in the case of abusive and improper handling, use of force and internal tampering
not carried out by our authorized service branch. Your
statutory rights are not restricted in any way by this
warranty.
47 GB
Page 48

Warranty / Disposal
The warranty period will not be extended by repairs
made unter warranty. This applies also to replaced
and repaired parts. Any damage and defects extant
on purchase must be reported immediately after
unpacking the appliance, at the latest, two days after
the purchase date. Repairs made after the expiration
of the warranty period are subject to payment.
GB
Service Great Britain
Tel.: 0871 5000 720
(0,10 GBP/Min.)
e-mail: kompernass@lidl.co.uk
IAN 89885
Q
Disposal
The packaging is wholly composed of envi-
ronmentally-friendly materials that can be
disposed of at a local recycling centre.
Do not dispose of electrical
appliances in household waste!
In accordance with European Directive 2002 / 96 / EC
on used electrical and electronic appliances and its
implementation in national law, used power tools
must be collected separately and recycled in an
ecologically compatible manner. Please return the
tool via the available collection facilities.
Take exhausted batteries to a local authority approved disposal facility or back to the retailer. By doing
this you will be complying with the legal requirements
and making an important contribution to protecting
the environment.
Information on options for disposing of electrical
appliances after their useful life can be obtained
from your local or city council.
Disposal of batteries
As the end user you have a duty to
recycle or properly dispose of all your
used batteries. Batteries containing
environmentally polluting substances are labelled
with the adjacent symbols to indicate that they must
not be disposed of with household refuse. The abbreviations for the critical heavy metals are: Cd =
cadmium, Hg = mercury, Pb = lead
48 GB
Page 49

KOMPERNASS HANDELS GMBH
BURGSTRASSE 21
44867 BOCHUM
DEUTSCHLAND
Stand der Informationen · Version des informations · Versione
delle informazioni · Stand van de informatie · Last Information
Update: 05 / 2013 · Ident.-No.: ULG3.8A1052013-1
IAN 89885
 Loading...