


CAR CHARGER
WITH STARTER FUNCTION ULG 12 B3
GB |
HU |
CAR CHARGER WITH STARTER |
SZEMÉLYGÉPJÁRMŰ AKKUMULÁ- |
FUNCTION ULG 12 B3 |
TORTÖLTŐ BERENDEZÉS INDÍTÁSI |
Operation and Safety Notes |
SEGÉD FUNKCIÓVAL ULG 12 B3 |
Translation of the original instructions |
Kezelési és biztonsági hivatkozások |
SI |
Az eredeti használati utasítás fordítása |
|
POLNILNIK ZA MOTORNA VOZILA
S FUNKCIJO POMOČI PRI ZAGONU
ULG 12 B3
Navodila za upravljanje in varnostna opozorila Prevod originalnega navodila za uporabo
SK
CZ
AUTONABÍJEČKA S FUNKCÍ
POMOCNÉHO STARTU ULG 12 B3
Návod k obsluze a bezpečnostní pokyny
Originální návod k obsluze
DE
NABÍJAČKA AUTOBATÉRIÍ S FUNKCIOU |
KFZ-LADEGERÄT MIT STARTHILFE- |
POMOCNÉHO ŠTARTOVANIA ULG 12 B3 |
FUNKTION ULG 12 B3 |
Návod na obsluhu a bezpečnostné upozornenia |
Bedienungsund Sicherheitshinweise |
Originálny návod na obsluhu |
Originalbetriebsanleitung |
IAN 290923
GB HU SI CZ SK DE
GB
Before reading, unfold the page containing the illustrations and familiarise yourself with all functions of the device.
HU
Olvasás előtt hajtsa ki az ábrát tartalmazó oldalt, és ezután ismerje meg a készülék mindegyik funkcióját.
SI
Pred branjem odprite stran s slikami in se nato seznanite z vsemi funkcijami naprave.
CZ
Než začnete číst tento návod k obsluze, rozložte stránku s obrázky a seznamte se se všemi funkcemi zařízení.
SK
Prv než začnete čítať tento návod, rozložte si stranu s obrázkami a potom sa oboznámte so všetkými funkciami zariadenia.
DE
Klappen Sie vor dem Lesen die Seite mit den Abbildungen aus und machen Sie sich anschließend mit allen Funktionen des Gerätes vertraut.
GB |
Operation and Safety Notes |
Page |
5 |
HU |
Kezelési és biztonsági hivatkozások |
Oldal |
17 |
SI |
Navodila za upravljanje in varnostna opozorila |
Stran |
31 |
CZ |
Návod k obsluze a bezpečnostní pokyny |
Strana |
43 |
SK |
Návod na obsluhu a bezpečnostné upozornenia |
Strana |
55 |
DE |
Bedienungsund Sicherheitshinweise |
Seite |
67 |
A 

1
2
3 |
6 |
5 |
|
4 |
|
8
7

Table of contents
Introduction ........................................................................................................... |
Page |
6 |
Intended use ............................................................................................................... |
Page |
6 |
Parts description .......................................................................................................... |
Page |
7 |
Technical specifications ................................................................................................ |
Page |
7 |
Delivery contents ......................................................................................................... |
Page |
7 |
Safety notes .......................................................................................................... |
Page |
7 |
Operation............................................................................................................... |
Page |
10 |
Product properties........................................................................................................ |
Page |
10 |
Connection ................................................................................................................. |
Page |
10 |
Disconnecting ............................................................................................................. |
Page |
11 |
Choosing the charging mode ........................................................................................ |
Page |
11 |
Using the jump-start function.......................................................................................... |
Page |
12 |
Replacing the fuse ....................................................................................................... |
Page |
13 |
Maintenance and care ..................................................................................... |
Page |
13 |
Warranty and service information ............................................................ |
Page |
13 |
Warranty conditions..................................................................................................... |
Page |
13 |
Extent of warranty........................................................................................................ |
Page |
13 |
Processing of warranty claims ....................................................................................... |
Page |
14 |
Environmental notes and disposal information .................................. |
Page |
14 |
Declaration of conformity..................................................................................... |
Page |
15 |
GB 5
Introduction
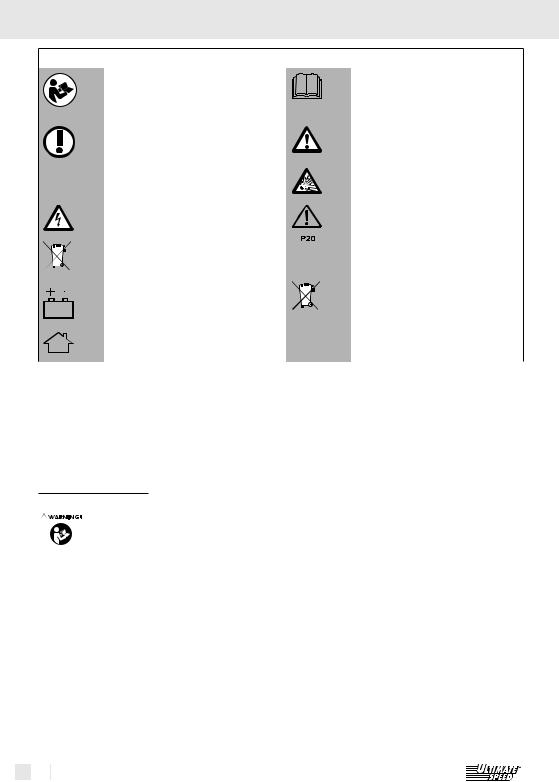
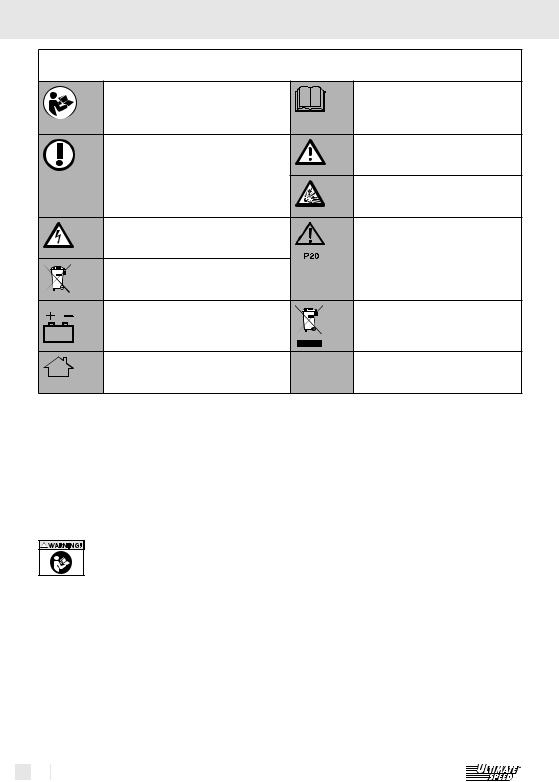
The following icons are used in this original operating manual/at the device:
|
|
|
|
|
|
|
Read the operating instructions of this |
|
|
|
|
|
|
|
Read the operating manual of this |
|
|
|
|
|
|
|
product attentively and completely |
|
|
|
|
|
|
|
product attentively and completely |
|
|
|
|
|
|
|
before use. |
|
|
|
|
|
|
|
before using it. |
|
|
|
|
|
|
|
|
|
|
|
|
|
|
|
|
|
|
|
|
|
|
|
NOTE: This symbol indicates addi- |
|
|
|
|
|
|
|
Caution! Possible dangers! |
|
|
|
|
|
|
|
tional information and explanations |
|
|
|
|
|
|
|
|
|
|
|
|
|
|
|
on the product and its use. |
|
|
|
|
|
|
|
|
|
|
|
|
|
|
|
|
|
|
|
|
|
|
|
Caution! Danger of explosion! |
|
|
|
|
|
|
|
|
|
|
|
|
|
|
|
|
|
|
|
|
|
|
|
Caution! Danger of electric shock! |
|
|
|
|
|
|
|
Protection type: Protected from |
|
|
|
|
|
|
|
|
|
|
|
|
|
|
|
solid foreign bodies with diameter |
|
|
|
|
|
|
|
|
|
|
I |
≥ 12.5 mm, protected from access |
||||
|
|
|
|
|
|
|
Dispose of batteries at the intended |
||||||||
|
|
|
|
|
|
|
|
|
|
|
|
|
|
with a finger; no protection from |
|
|
|
|
|
|
|
|
|
|
|
|
|
||||
|
|
|
|
|
|
|
battery collection points. |
|
|
|
|
|
|
|
water. |
|
|
|
|
|
|
|
|
|
|
|
|
|
|
|
|
|
|
|
|
|
|
|
Suitable for lead-acid battery: |
|
|
|
|
|
|
|
Do not dispose of electrical devices |
|
|
|
|
|
|
|
|
|
|
|
|
|
|||
|
|
|
|
|
|
|
8Ah - 180Ah. |
|
|
|
|
|
|
|
in the household waste! |
|
|
|
|
|
|
|
|
|
|
|
|
|
|
|
|
|
|
|
|
|
|
|
|
|
|
|
|
|
|
|
|
|
|
|
|
|
|
|
|
|
|
|
|
|
|
|
|
|
|
|
|
|
|
|
Only for use in closed, ventilated |
~50Hz |
Alternating voltage at a frequency |
||||||
|
|
|
|
|
|
|
rooms! |
|
|
|
|
|
|
|
of 50Hz. |
|
|
|
|
|
|
|
|
|
|
|
|
|
|
|
|
Car charger with
starter function ULG 12 B3
Introduction
acid-lead batteries, deep cycle (boat batteries) or gel batteries:
•For car and motorcycle batteries with 12 V/6 V and 8–180 Ah capacity
You can also regenerate discharged batteries (depending on the battery type). The car charger has a safety circuit against sparking and over-
|
Congratulations! |
heating. Any non-intended or improper use causes |
|
||
|
You have purchased one of our |
loss of warranty. The manufacturer assumes no |
|
high-quality products. |
liability for damage resulting from non-intended |
Before initial setup, please familiarize yourself with |
use. The device is not intended for commercial use. |
|
the product. Read the following original operat- |
Note: The car charger cannot charge any electri- |
|
ing and safety instructions carefully. Only trained |
cal vehicles with integrated rechargeable battery. |
|
persons may set up this product. |
|
|
Intended use
The Ultimate Speed ULG 12 B3 is a car charger with pulse maintenance charge (chip software), used for charging and maintenance charging and suitable for the following 6 V or 12 V-lead batteries (batteries) with electrolyte solution, AGM batteries,
6 GB

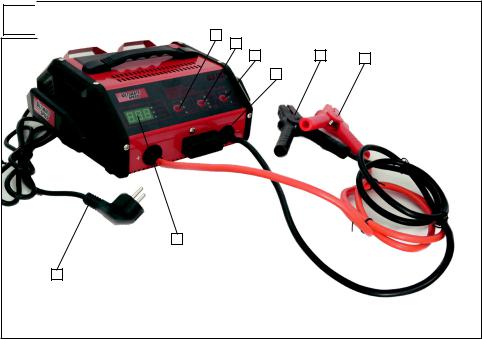
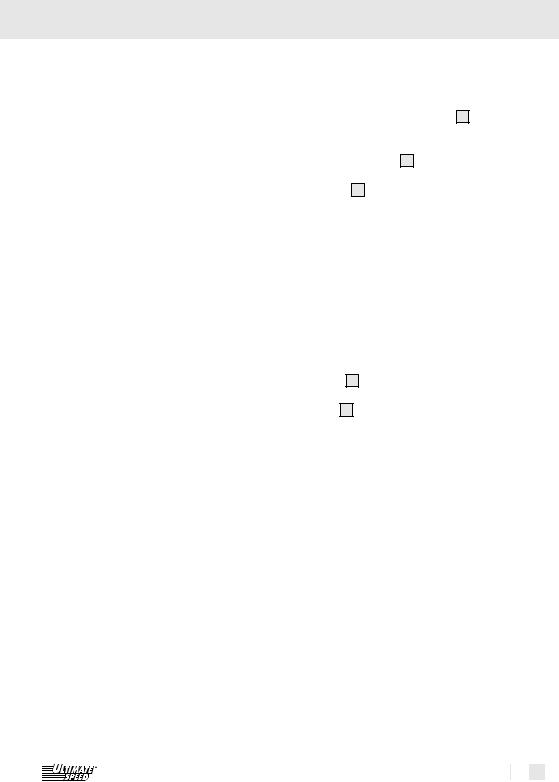
Parts description
1Digital display button
2Battery type button
3Charge start button
4Fuse with cover
5"+" pole connection cable (red)
6"–" pole connection cable (black)
7Mains cable
8Digital display
Technical specifications
Input voltage: |
230 V~ 50 Hz |
|
Return current*: |
< 5 mA (no AC input) |
|
Nominal output voltage: |
6 |
V/12 V |
Charge current: |
2 |
A, 6 A, 12 A ± 10% |
Battery type with: |
12 V/6 V and |
|
|
8–180 Ah capacity |
|
Housing protection type: |
IP 20 |
|
*= Return current means the current that the charger consumes from the battery when no mains current is connected.
Delivery contents
Check the scope of delivery and the device as well as all parts for damage right after unpacking. Do not take a defective unit or parts into operation.
1 Charger Ultimate Speed ULG 12 B3
2 Quick contact connection terminals (1 red, 1 black)
1 original operating instructions
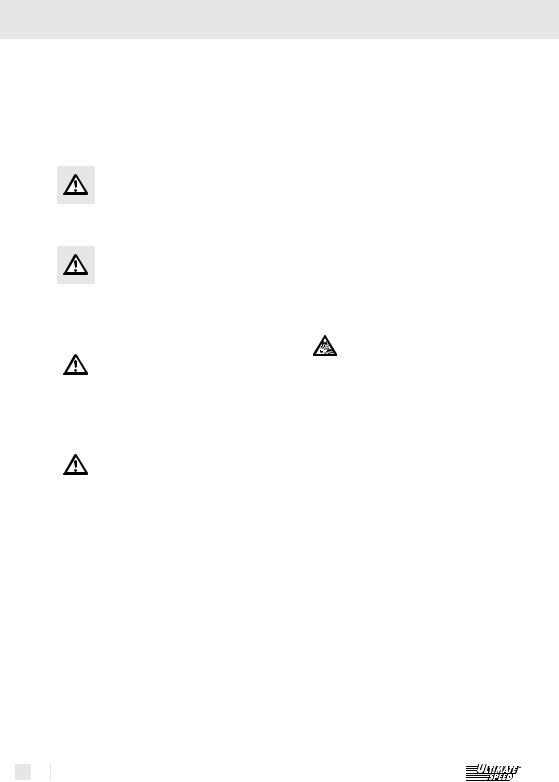
Safety notes
KEEP OUT OF THE REACH
OF CHILDREN!
Introduction / Safety notes
DANGER! Avoid danger to life and danger of injury from improper use!
CAUTION! Do not operate the device with a damaged cable, mains cable or mains plug.
Damaged mains cables pose danger to life from electric shock.
Have the mains cable only repaired by authorized and trained specialists if there is any damage! Contact the service point of your country if you need any repair!
DANGER OF ELECTRIC SHOCK! Ensure that the
vehicle is not in operation if the battery is installed firmly in the vehicle! Switch off the ignition and put the vehicle into the parking position, with the parking brake engaged (e.g. car) or the rope attached (e.g. electrical robot)!
DANGER OF ELECTRIC
SHOCK! Disconnect the car charger from the mains before removing the connection terminals.
Connect the connection terminal that is not connected to the car body first.
Connect the other connection terminal to the car body away from the battery and the gasoline line.
Connect the car charger to the supply grid only thereafter.
GB 7
Safety notes
Disconnect the car charger from the supply grid after charging.
Only then disconnect the connection terminal from the car body. Then disconnect the connection terminal from the battery.
DANGER OF ELECTRIC
SHOCK! Only touch the pole connection cables ("–" and "+") in the insulated area!
vised to ensure that they do not play with the device.
This device may be used by persons with reduced physical, sensory or mental abilities or a lack of experience and knowledge if they are supervised or have been instructed about safe use
of the device and understand the resulting dangers. Do not allow
DANGER OF ELECTRIC children to play with the product.
|
|
SHOCK! Conduct the |
|
Cleaning and user maintenance |
|
|
connection to the battery |
|
must not be performed by children |
||
|
and the socket of the mains grid |
|
without supervision. |
||
|
completely protected from moisture! |
|
|
EXPLOSION HAZARD! |
|
|
|
||||
|
|
DANGER OF ELECTRIC |
|
|
Protect yourself from |
|
|
SHOCK! Perform installa- |
|
highly explosive oxyhydrogen |
|
|
tion, servicing and maintenance |
|
reactions! Gaseous hydrogen can |
||
|
of the car charger only when the |
|
escape during charging or mainte- |
||
|
mains current is not connected! |
|
nance charging of the battery. |
||
|
|
DANGER OF ELECTRIC |
|
Oxyhydrogen is a potentially |
|
|
|
SHOCK! Disconnect the |
|
explosive mix of gaseous hydrogen |
|
|
minus pole connection cable |
|
and oxygen. The oxyhydrogen |
||
|
(black) of the car charger from |
|
reaction occurs at contact with |
||
|
the minus pole of the battery first |
|
open fire (flames, smouldering or |
||
|
after completing charging and |
|
sparks)! Perform charging and |
||
|
maintenance charging if the |
|
maintenance charging in a |
||
|
battery is continually connected |
|
weather-protected space that is |
||
|
in the vehicle. |
|
ventilated well. Ensure that there |
||
Do not leave any toddlers or |
|
are no open light (flames, smoul- |
|||
|
children unsupervised around |
|
dering or sparks) during charging |
||
|
the car charger! |
|
or maintenance charging! |
||
Children cannot assess possible |
EXPLOSION AND FIRE |
||||
|
dangers in use of electrical |
|
HAZARDS! Ensure that explosive |
||
|
devices. Children must be super- |
|
or flammable substances, such |
||
8 GB

|
|
|
Safety notes |
|
as gasoline or solvents cannot be |
Before connecting the mains |
|
|
ignited when you are using the |
current, ensure that the mains |
|
|
car charger! |
current is equipped properly with |
|
EXPLOSIVE GASES! Avoid |
230 V~ 50 Hz, an earthed zero |
||
|
flames and sparks! |
conductor, a 16 A fuse and an |
|
Ensure sufficient ventilation when |
FI-switch (fault-circuit interrupter)! |
||
|
charging. |
Otherwise, the device can be |
|
Put the battery onto a well- |
damaged. |
||
|
ventilated surface when charging. |
Do not use the car charger near |
|
|
Otherwise, the device can be |
any fires, heat and long-term |
|
|
damaged. |
temperatures above 50 °C! For |
|
|
|
EXPLOSION HAZARD! |
higher temperatures, the output |
|
|||
|
|
Ensure that the plus-pole |
power of the car charger will |
|
connection cable has no contact |
drop automatically. |
|
|
with a fuel line (e.g. gasoline line)! Use the car charger only |
||
DANGER OF CAUSTIC |
with the original parts it was |
||
|
BURNS! Protect your eyes |
delivered with! |
|
|
and skin from caustic burns from |
Do not cover the car charger |
|
|
the acid (sulphuric acid) when it |
with any objects! Otherwise, the |
|
|
comes into contact with the battery! |
device can be damaged. |
|
Use: acid-resistant goggles, |
Protect the electrical contact |
||
|
clothing and gloves! If your eyes |
surfaces of the battery from |
|
|
or skin have come into contract |
short circuit! |
|
|
with the sulphuric acid, flush the |
Use the car charger only for |
|
|
affected body region with plenty |
charging and maintenance |
|
|
of running, clear water and seek |
charging of undamaged |
|
|
medical advice at once! |
6 V-/12 V-lead batteries |
|
Avoid electrical short circuit when |
(with electrolyte solution or gel)! |
||
|
connecting the car charger to the |
Otherwise, property damage |
|
|
battery. Connect the minus pole |
may be the consequence. |
|
|
connection cable only to the |
Do not use the car charger for |
|
|
minus pole of the battery or the |
charging and maintenance |
|
|
car body. Connect the plus pole |
charging of non-rechargeable |
|
|
connection cable only to the plus |
batteries. Otherwise, property |
|
|
pole of the battery! |
damage may be the consequence. |
|
GB 9

Safety notes / Operation
Do not use the car charger for charging and maintenance charging of damaged or frozen batteries! Otherwise, property damage may be the consequence.
Learn about the maintenance of your battery in its original
operating instructions before connecting the charger! Otherwise, there is a danger of injury and/or the risk of damage to the device.
Before connecting the charger to a battery that is continually connected to the vehicle, learn about compliance with the electrical safety and maintenance in the original operating instructions of the vehicle! Otherwise, there is a danger of injury and/or the risk of property damage.
Disconnect the car charger from the mains current when it is not is use to protect the environment as well! Note that power is consumed in standby operation as well.
Always pay attention and observe what you are doing. Proceed reasonably and do not take the car charger into operation
when you are not focused or not feeling well.
Operation
Always pull the mains plug from the socket before you perform any work at the car charger.
DANGER OF ELECTRIC SHOCK! DANGER OF PROPERTY DAMAGE! DANGER OF INJURY!
Product properties
This device is designed for charging many SLA batteries (sealed lead-acid batteries), which are mostly used in cars, motorcycles and some other vehicles. They can be, e.g., WET (with liquid electrolyte), GEL (with electrolyte gel) or AGM batteries (with electrolyte-absorbent mats). A special design of the device (also called a "three-stage charging strategy") permits recharging of the battery to nearly 100% of its capacity. The battery may also be connected to the car charger permanently in order to keep it in optimal condition at all times.
Connection
Disconnect the minus pole connection cable (black) of the vehicle from the minus pole of the battery first before charging and maintenance charging if the battery is continually connected in the vehicle. The minus pole of your battery is usually connected to the car body of the vehicle.
Then disconnect the plus pole connection cable (red) of the vehicle from the plus pole of the battery.
Only then connect the "+" pole quick contact
connection terminals (red) 5 of the car charger to the "+"-pole of the battery.
Connect the "–"-pole quick contact-connection terminal (black) 6 to the "–"-pole of the battery. Connect the mains cable 7 of the car charger to the socket.
10 GB
Note: If the connection terminals are connected correctly, the display indicates the voltage and the display "connected" lights up. If polarity is reversed, the display shows 0.0 and the display "connected" does not light up.
Disconnecting
Disconnect the device from the mains current.Disconnect the "–"-pole quick contact-connec-
tion terminal (black) 6 from the "–"-pole of the battery.
Disconnect the "+"-pole quick contact-connec- tion terminal (red) 5 from the "+"-pole of the battery.
Reconnect the plus pole connection cable of the battery to the plus pole of the battery.
Reconnect the minus pole connection cable of the battery to the minus pole of the battery.
Choosing the charging mode
You can choose from different charging modes for charging different batteries at different ambiance temperatures. As compared to conventional car chargers, this device has a special function for reuse of a flat battery/rechargeable battery. You can recharge a completely discharged battery/ rechargeable battery. Protection against wrong connection and short circuit ensures safe charging. The integrated electronics do not start the car charger at once after connection of the battery, but only after a charging mode has been selected.
If the connection terminals are connected to the battery and the device is connected to the mains,
the digital display 8 will show "Connected". After the charging mode has been selected, the display "Charging" lights up. When charging is complete, the display "Charged" lights up.
If the digital display is continually lit before the battery is completely charged, there is a defect.
Operation
In this case, check again if the connection
terminals 6 , 5 are correctly attached to the battery and whether the correct battery type has been chosen. If the display lights up continually anyway, there may be a defect in the battery.
Digital display button 1 : Permits replacing of the digital display of the voltage and the charging progress in percent (battery %). Use this button in order to switch between the following displays:
–Battery %: shows the charging progress of the connected battery in percent.
–Voltage: shows the voltage of the connected battery.
–Alternator %: Output power in percent
Battery type button 2 : Use this button to set the type of the battery to be charged. You can choose between different battery types here. The battery type must be set correctly before charging commences:
–12 V Regular: These batteries (lead-acid batteries) are usually used in cars, trucks and motorcycles. They have venting caps and are often marked as "low-maintenance" or "no maintenance". This battery type is meant for transferring energy quickly (e.g. starting an engine). "Regular" batteries should not be used for "Deep Cycle" applications.
–12 V Deep Cycle: These batteries are usually also marked as "Deep Cycle" or "Marine". Batteries of this type are usually larger than other battery types. This supplies less short-term energy, but a longer-term energy transmission. These batteries can withstand a large number of discharge cycles.
–12 V AGM/gel: The battery types AGM are usually good deep cycle batteries. They have the best "service life" when they are
recharged before they have been discharged by more than 50%. At complete discharge, they can withstand about 300 charge cycles. The battery type GEL is similar to the battery type AGM. The voltage at recharging is lower
GB 11

Operation
than in other lead-acid batteries. If you use the wrong charger for a gel battery, a reduced output or shorter service life can be expected.
–6 V Regular: Choose this mode for commercial
6-V batteries.
Charge-start button 3 : Use this button to switch between the following options:
–Fast charge: fast charging (recommended for low outdoor temperatures/winter)
–Normal charge: normal charging (normal speed)
–Start: supplies 75 Ampere briefly to bridge batteries with a weak charge or flat batteries for starting the engine
Attention: The mode can only be terminated by pulling the mains cable 7 .
Using the jump-start function

 Always make all connections as described and in the proper order. Otherwise, the electronic system of the vehicle can be damaged. If proceeding contrary to the specifications described, you will act at your own risks and responsibility.
Attention: This function is not suitable for batteries below 45 Ah. For batteries below 45 Ah, this function may damage the battery. For diesel vehicles and large-volume gasoline motors, higher currents than 75 A are needed for starting at times. Note: The charger has an analysis program that protects the battery from damage in particular
for the jump-start function (e.g. sulphatisation, too strong voltage drops). If the batteries are discharged very strongly or subject to very high stress, the device will not activate the jump-starter to protect the battery. During this process, the battery is already being charged at low currents (charging is lit). The display then stays at "0". In this case, jump starting is not possible. This protects the battery from damage. The battery should be
12 GB
charged first. The function "Fast Charge" or "Normal Charge" can be used for this.
If the connection terminals are connected correctly, the car charger will automatically choose the proper battery type. You can check it in the option field "Battery type" and change it by pushing the Battery-Type button 2 if necessary.
Now use the Charge-Start button 3 to select the function "Start". The car charger now analysis the charge condition of the battery.
The display now shows "0".
Now actuate the vehicle's ignition. A countdown of 5 seconds now starts in the display (including a lead time or analysis function of 2 seconds and jump-start function of 3 seconds at 75 A), when jump-start by the car charger is necessary (this will be analysed by the car charger in advance). During this countdown, your car charger will briefly supply 75 A, in order to bridge the battery for starting the engine. This will be followed by a break of 180 seconds to protect the battery. Now the cycle restarts (2 seconds lead or analysis function and 3 seconds jump-start function at 75 A / 180 seconds pause).
To disconnect the device, remove the connection terminals first ( 6 / 5 ) and then pull the mains cable 7 .
Note: If the battery is discharged entirely, the 75 A will not be sufficient to start the engine in all vehicles (e.g. diesel vehicles).
In this case, use the Charge-Start button 3 to select the option "Fast Charge" and then
charge the battery to 60 % (for diesel engines, the warm-up withdraws energy from the battery. The 60% must be pending after warm-up).
You can track charging progress at the display by selecting the option "Battery %" with the digital
display button 1 .
When 60% is reached, repeat the jump-start function.
Attention: End the mode by pulling the mains
plug 7 .

Operation / Maintenance and care / Warranty and service information
Alternator test function
Connect the mains cable 7 of the car charger to the socket.
Attach the red connection terminals 5 to the plus pole of your battery. (The plus pole is marked by a "+" and a red mark.)
Attach the black connection terminals 6 to the minus pole of your battery. (The minus pole is marked by a "+" and a black mark.)
Maintenance and care
Always pull the mains cable 7 from the socket before you perform any work at the car charger.
The device is maintenance-free. Deactivate the device. Clean the metal and plastic surfaces of the device with a dry cloth.
Never use any solvents or other aggressive cleaning agents.
Set the function alternator (LED next to the alternator)
via the button 1 . A %-value is displayed. Start the engine. If the %-value rises with the engine running, the alternator will charge the battery. If the %-value drops or remains the same, there is a problem with the alternator, the connection or the battery.
Disconnect the device from the mains current.Disconnect the "–"-pole quick contact-
connection terminal (black) 6 from the "–"- pole of the battery.
Disconnect the "+"-pole quick contactconnection terminal (red) 5 from the "+"-pole of the battery.
Replacing the fuse
The fuse of the car charger may be damaged, e.g. by a device defect, overload, etc.
Before replacing the fuse, pull the mains
cable 7 .
Remove the cover of the fuse 4 by depressing it slightly on the side.
Unscrew the fuse 4 with a matching open-faced wrench and attach the new fuse.
Screw it on subsequently and replace the

 .
.
Note: If you need a new fuse, contact our service (see chapter with notes on guarantee and service processing).
Warranty and service information
Creative Marketing
Consulting GmbH warranty
Dear customer,
The warranty for this equipment is 3 years from the date of purchase. In the event of product defects, you have legal rights against the retailer of this product. Our warranty, outlined below, does not limit your statutory rights.
Warranty conditions
The warranty period begins on the date of purchase. Please retain the original sales receipt.
This document is required as your proof of purchase. Should this product have a material or manufacturing error within three years of the purchase date, the product will be repaired or replaced – dependent on our choice – by us at no cost to you. This warranty service requires that you retain proof of purchase (sales receipt) for the defective device for the three year period and that you briefly explain in writing what the fault entails and when it occurred.
If the defect is covered by our warranty, we will return the repaired device or a replacement thereof. A repair or exchange of the device does not start a new warranty period.
Extent of warranty
The device has been manufactured according to strict quality guidelines and meticulously examined before delivery.
GB 13
... / Environmental notes and disposal information
The warranty applies to defects in material or manufacture. This warranty does not extend to product parts which are subject to normal wear and tear and can thus be regarded as consumable parts, or for damages to fragile parts, e.g. switches, rechargeable batteries, or parts made from glass. This warranty is void if the product is damaged, improperly used, or serviced. For proper use of the product, all of the instructions given in the original operating instructions must be followed precisely. Uses and acts that the original operating instructions advise or warn against are to be avoided without question.
The product is only intended for private use and is not for commercial use. The warranty becomes void in the event of misuse and improper use, use of force, and any interference not carried out by our authorized service branch.
Processing of warranty claims
Please follow the instructions below to ensure quick processing of your claim:
Please retain proof of purchase and the article number (e.g., EAN) for all inquiries. The product number can be found on the type plate, an engraving, the cover page of your instructions (bottom left), or the sticker on the back or bottom. Should you have any functional fault or other error, first contact the service department listed below by phone or email.
You can then forward a product recognized as defective with a proof of purchase (sales receipt) and a statement indicating what the fault entails and when it occurred to the service address, which will be given at no cost to you for postage.
Note:
You can download this handbook and many more, as well as product videos and software at www.lidl-service.com.
14 GB
How to contact us:
GB, NI, IE |
|
Name: |
C. M. C. GmbH |
Website: |
www.cmc-creative.de |
E-mail: |
service.gb@cmc-creative.de |
Phone: |
0-808-189-0652 |
Registered office: |
GERMANY |
IAN 290923
Please note that the following address is not a service address. Please first contact the service point (hotline) named above.
Address:
C. M. C. GmbH
Katharina-Loth-Str. 15
66386 St. Ingbert
GERMANY
Ordering spare parts:
www.lidl.com/contact-us
Environmental notes and disposal information
Do not throw electrical tools into the household waste!
Always recycle the device, accessories and packaging in an environmental- ly-friendly manner.
Do not dispose of the car charger in household waste, in fire or in water. Devices which are no longer functional should be recycled whenever possible.
Contact your local retailer for information.
As the consumer you are legally obligated (Battery Ordinance) to return any used batteries. Batteries containing harmful substances are labelled with the adjacent symbol, which indicates the
Declaration of conformity
ban on disposal in household waste. The abbreviations for the essential heavy metals are: Cd = Cadmium,
Hg = Mercury, Pb = Lead.
Take used batteries to a disposal facility in your city or community, or back to the distributor. This satisfies your legal obligations and you are greatly contributing to protecting the environment.
Declaration of conformity

We,
C. M. C. GmbH
Responsible for documentation: Mark Uhle Katharina-Loth-Str. 15
66386 St. Ingbert GERMANY
declare in our sole responsibility the product
Car charger with jump-start function
Year of manufacture: 2017 / 43
IAN: 920923
Year of CE mark: 2017
Model: ULG 12 B3
meets the basic safety requirements of European Directives
EC low-voltage directive
2014 / 35 / EU
EC directive on electromagnetic compatibility
2014 / 30 / EU
RoHS directive
2011 / 65 / EU
The object of the declaration described above meets the requirements of Directive 2011 / 65 / EU of the European Parliament and Council dated
8th June 2011, restricting the use of certain hazardous substances in electrical appliances and electronics.
The conformity assessment is based on the following harmonized standards:
EN 60335-2-29:2004/A2:2010 EN 60335-1:2012/A11:2014 EN 62233:2008
EN 50498:2010
EN 55014-1:2006/A2:2011 EN 55014-2:1997/A2:2008 EN 61000-3-2:2014
EN 61000-3-3:2013
AfPS GS 2014:01 PAK
St. Ingbert, 18 August 2017
ppa. Marc Uhle
- Document officer
GB 15

16 GB

Tartalomjegyzék
Bevezetés .......................................................................................................................... |
|
Oldal |
18 |
Rendeltetésszerű |
használat .................................................................................................. |
Oldal |
18 |
Az alkatrészek leírása............................................................................................................ |
Oldal |
19 |
|
Műszaki adatok...................................................................................................................... |
|
Oldal |
19 |
Szállítási terjedelem............................................................................................................... |
Oldal |
19 |
|
Biztonsági tudnivalók.................................................................................................... |
Oldal |
19 |
|
Kezelés.................................................................................................................................. |
|
Oldal |
23 |
Terméktulajdonságok............................................................................................................. |
Oldal |
23 |
|
Csatlakoztatás....................................................................................................................... |
|
Oldal |
23 |
Leválasztás............................................................................................................................ |
|
Oldal |
23 |
A töltő mód kiválasztása........................................................................................................ |
Oldal |
23 |
|
Indítássegítő funkció használata ........................................................................................... |
Oldal |
25 |
|
Biztosíték cseréje................................................................................................................... |
Oldal |
26 |
|
Karbantartás és ápolás................................................................................................. |
Oldal |
26 |
|
Garanciával és szervizszolgáltatással kapcsolatos tudnivalók................ |
Oldal |
26 |
|
Garanciális feltételek ............................................................................................................. |
Oldal |
26 |
|
A garancia terjedelme............................................................................................................ |
Oldal |
27 |
|
Garanciális eset kezelése...................................................................................................... |
Oldal |
27 |
|
Környezetvédelemmel kapcsolatos tudnivalók |
|
|
|
és az ártalmatlanítás adatai ........................................................................................ |
Oldal |
29 |
|
EU megfelelőségi nyilatkozat............................................................................................ |
Oldal |
29 |
|
HU 17
Bevezetés |
|
|
|
Jelen eredeti használati útmutatóban / a berendezésen |
|
||
a következő piktogramokat használjuk: |
|
|
|
Használatbavétel előtt figyelmesen |
|
Használatbavétel előtt figyelme- |
|
olvassa el a termék használati útmu- |
|
sen olvassa el a termék használati |
|
tatóját. |
|
útmutatóját. |
|
MEGJEGYZÉS: ez a szimbólum |
|
Figyelem! Lehetséges veszélyek! |
|
a termékkel, és annak használatával |
|
|
|
kapcsolatos kiegészítő információkra |
|
|
|
hívja fel figyelmét. |
|
Figyelem! Robbanásveszély! |
|
Figyelem! Áramütésveszély! |
|
Védettség: védett ≥ 12,5 mm |
|
|
|
átmérőjű szilárd idegen testek |
|
|
I |
ellen; egy ujjal nem nyitható; víz |
|
Az akkumulátorokat az erre a célra |
|
ellen nem védett. |
|
szolgáló gyűjtőhelyen adja le! |
|
|
|
8 - 180 Aó kapacitású ólomakkumu- |
|
Ne helyezze az elektromos ké- |
|
látorokhoz. |
|
szülékeket a háztartási hulladék |
|
|
|
közé! |
|
Csak zárható, jól szellőztethető helyi- |
~50Hz |
50 Hz frekvenciájú váltakozó |
|
ségben használható! |
|
feszültségű áramhoz. |
|
Személygépjármű akkumulátor |
téssel (chip szoftver), mely a következő elektrolit |
||
töltő berendezés indítási segéd |
oldatos 6 V-os vagy 12 V-os ólom akkumulátorok |
||
(elemek), AGM-akkumulátorok, sav-ólom akku- |
|||
funkcióval ULG 12 B3 |
|||
mulátorok, Deep Cycle (boot akkumulátorok) vagy |
|||
|
gél akkumulátorok töltésére és kisütésére szolgál: |
||
Bevezetés |
• 12 V / 6 V és 8–180 Ah kapacitású személy- |
||
gépkocsi és motorkerékpár akkumulátor |
|||
|
Ezen kívül a kisütött akkumulátorokat regene- |
||
Gratulálunk! |
rálni tudja (az akkumulátor típusától függően). |
||
Vállalatunk kiváló minőségű terméke |
A személygépjármű akkumulátortöltő berende- |
||
mellett döntött. |
zés szikraképződés vagy túlmelegedés ellen |
||
A termékkel még az első üzembe helyezés előtt |
védőkapcsolással rendelkezik. Minden nem |
||
ismerkedjen meg. Ehhez figyelmesen olvassa |
rendeltetésszerű vagy szakszerűtlen használat |
||
el a következő eredeti használatai útmutatót |
a garancia elvesztésével jár. A gyártó semmilyen |
||
és a biztonsági tudnivalókat. A termék üzembe |
felelősséget sem vállal a nem rendeltetésszerű |
||
helyezését csak oktatásban részesített személy |
használatból eredő károkért. A berendezés ipari |
||
végezheti. |
használatra nem alkalmas. |
||
|
Tudnivaló: A személygépjármű akkumulátortöltő |
||
Rendeltetésszerű használat |
berendezéssel beépített akkumulátorral rendelke- |
||
ző elektromos autókat nem lehet tölteni. |
|||
Az Ultimate Speed ULG 12 B3 személygépjármű |
|
|
|
akkumulátortöltő berendezés pulzusfenntartó töl- |
|
|
|
18 HU
Az alkatrészek leírása
1Digitális kijelző gombja
2Akkumulátor típus gombja
3Töltés indítás gombja
4A fedél biztosítása
5„+“-pólus sorkapocs (piros)
6„–“-pólus sorkapocs (fekete)
7Hálózati kábel
8digitális kijelző
Műszaki adatok
Bemeneti feszültség: 230 V~ 50 Hz Visszatérő áram*: < 5 mA (nincs ACbemenet) Névleges kimeneti
feszültség: 6 V / 12 V Töltőáram: 2 A, 6 A, 12 A ± 10 % Akkumulátor típusa: 12 V / 6 V és
Bevezetés / Biztonsági tudnivalók
VESZÉLY! Kerülje el a szakszerűtlen használatból eredő életés sérülésveszélyt!
VIGYÁZAT! Sérült kábel, hálózati kábel vagy hálózati csatlakozó esetén ne üzemeltesse a készüléket. A sérült hálózati kábel az áramütés veszélye miatt
életveszélyes.
A hálózati kábelt sérülés esetén csak felhatalmazással rendelkező és képzett szakmai személyzettel javíttassa meg! Javítási igény esetén lépjen kapcsolatba az ön országának
8–180 Ah kapacitás szervizszolgálatával!
Ház védettségi módja: IP 20 * = a visszatérő áram azt az áramot jelenti,
melyet a töltőberendezés az akkumulátorból használ el, ha nincs hálózati áramforrásra kötve.
Szállítási terjedelem
A kicsomagolás után közvetlenül ellenőrizze a szállítási terjedelmet, valamint a gép valamennyi részét, hogy nincsenek-e megsérülve.
A hibás berendezést vagy annak elemeit ne helyezze üzembe. 1 db Ultimate Speed ULG 12 B3 akkumulátor töltő 2 gyorsrögzítő sorkapocs (1 piros, 1 fekete) 1 eredeti kezelési útmutató
Biztonsági tudnivalók
A BERENDEZÉS NE KERÜLJÖN GYEREKEK KEZÉBE!
ÁRAMÜTÉS VESZÉLYE!
Állandó jelleggel
a járműbe szerelt akkumulátor töltésekor biztosítsa, hogy a jármű ne üzemeljen! Kapcsolja ki a gyújtást és vigye a járművet parkoló állásba, a kézifék behúzásával (pl. személygépjármű esetén), vagy a kötél rögzítésével (pl. elektromos csónak esetén)!
ÁRAMÜTÉS VESZÉLYE!
Mielőtt a sorkapcsot
eltávolítja, válassza le a személygépjármű akkumulátortöltő berendezést a hálózatról.
Először azt a sorkapcsot csatlakoztassa, amelyik nem csatlakozik a karosszériára.
HU 19
Biztonsági tudnivalók
A másik sorkapcsot akkumulátor- |
befejezése után először a személ- |
tól és a benzinvezetéktől távol |
ygépjármű akkumulátortöltő |
csatlakoztassa a karosszériához. |
berendezés mínusz pólus csatla- |
Csak ezután csatlakoztassa |
kozó kábelét (fekete) távolítsa el |
a személygépjármű akkumulátor- |
az akkumulátor mínusz pólusáról. |
töltő berendezést a betápláló |
Ne hagyjon kisgyermekeket |
hálózatra. |
és gyermekeket felügyelet |
A személygépjármű akkumulá- |
nélkül a személygépjármű töltő |
tortöltő berendezést töltés után |
berendezéssel! |
válassza le a betápláló hálózatról. |
A gyerekek az elektromos |
Csak ezután távolítsa el |
berendezések kezelésének |
a sorkapcsot a karosszériáról. |
esetleges veszélyeit még |
Közvetlenül ezután távolítsa el |
nem tudják felmérni. Ügy- |
a sorkapcsot az akkumulátorról. |
eljen a gyermekekre annak |
ÁRAMÜTÉS VESZÉLYE! érdekében, hogy ne játszanak
|
|
|
|
|
A pólus csatlakozó kábelt |
a készülékkel. |
|||
|
|
|
|
(„–“ és „+“) kizárólag a szigetelt Korlátozott fizikai, érzékelő |
|||||
|
|
|
|
részén fogja meg! |
vagy mentális képességű, vagy |
||||
|
|
ÁRAMÜTÉS VESZÉLYE! |
ismeretekkel és tapasztalatok- |
||||||
|
|
|
|
|
A csatlakozót az akku- |
kal nem rendelkező személyek |
|||
|
|
|
|
mulátorhoz és az elektromos |
a készüléket csak felügyelet mel- |
||||
|
|
|
|
áram hálózati aljzatához nedves- |
lett, illetve akkor használhatják, |
||||
|
|
|
|
ségtől teljesen védve vezesse el! |
ha őket a készülék használatára |
||||
|
|
ÁRAMÜTÉS VESZÉLYE! |
kioktatták, és a készülék |
||||||
|
|
|
|
|
A személygépjármű |
használatának veszélyeit |
|||
|
|
|
|
akkumulátortöltő berendezés |
megértették. A gyermekek |
||||
|
|
|
|
szerelését, karbantartását és |
nem játszhatnak a készülékkel. |
||||
|
|
|
|
ápolását csak akkor végezze, |
A tisztítást és a felhasználói kar- |
||||
|
|
|
|
ha a berendezés nincs hálózati |
bantartást gyermekek felügyelet |
||||
|
|
|
|
áramforrásra csatlakoztatva! |
nélkül nem végezhetik. |
||||
|
|
ÁRAMÜTÉS VESZÉLYE! |
|
ROBBANÁSVESZÉLY! |
|||||
|
|
|
|
|
Azoknál az akkumuláto- |
|
Óvakodjon a rendkívül |
||
|
|
|
|
roknál, melyek folyamatosan rá |
robbanásveszélyes robbanógáz |
||||
|
|
|
|
vannak csatlakoztatva a járműre, |
reakciótól! A töltő és töltésfenn- |
||||
|
|
|
|
a feltöltési és kisütési folyamat |
tartó művelet végzése során |
||||
|
20 |
|
HU |
|
|
|
|
||
|
|
|
|
|
|
||||
|
|
|
|
|
|
|
|
|
|
hidrogéngáz léphet ki az akkumulátorból. A robbanógáz gáz halmazállapotú hidrogén és oxigén robbanásveszélyes keveréke. Nyílt lánggal való érintkezés esetén (láng, parázs vagy szikra) esetén bekövetkezik az úgynevezett robbanógáz reakció! Végezze a töltő és töltésfenntartó műveletet olyan helyiségben, amely védve van az időjárás hatásaitól és megfelelő szellőzéssel rendelkezik. Biztosítsa, hogy a töltő és töltésfenntartó művelet során ne használjanak nyílt fényforrást (tüzet, parazsat vagy szikrát)!
ROBBANÁS ÉS TŰZVESZÉLY!
Biztosítsa, hogy robbanóképes vagy éghető anyagok, pl. benzin vagy oldószer ne kaphasson lángra a személygépjármű akkumulátortöltő berendezés használata közben!
ROBBANÁSVESZÉLYES GÁZOK! Kerülje a nyílt lángot és a szikrákat!
A töltési folyamat során gondoskodjon a megfelelő szellőzésről.
Az akkumulátort a töltési folyamat során jól szellőző felületre helyezze. Egyébként a készülék megsérülhet.
Biztonsági tudnivalók
ROBBANÁSVESZÉLY!
Győződjön meg róla,
hogy a plusz pólus csatlakozó kábele nem kerül érintkezésbe az üzemanyag vezetékkel (pl. benzin vezetékkel)!
SÉRÜLÉSVESZÉLY!
Védje szemét és bőrét a sav (kénsav) okozta maró sérülésektől, amikor az akkumulátorral kapcsolatba kerül!
Használjon: saválló védőszemüveget, -ruházatot és -kesztyűt! Ha a szeme vagy a bőre kénsavval érintkezett, öblítse le az érintett területet bőven tiszta folyó vízzel, és haladéktalanul keresse fel orvosát!
Csatlakoztassa a személygépjármű akkumulátortöltő berendezést úgy az akkumulátorra, hogy ne keletkezhessen elektromos zárlat. A mínusz pólus csatlakozókábelét kizárólag az akkumulátor illetve a karosszéria mínusz sarkára csatlakoztassa. A plusz pólus csatlakozókábelét kizárólag az akkumulátor plusz sarkára csatlakoztassa!
A hálózati feszültségre való csatlakoztatás előtt győződjön meg arról, hogy a hálózati áram az előírásoknak megfelelően 230 V~ 50 Hz, földelt nulla vezetékkel, 16 A biztosítékkal
HU 21

Biztonsági tudnivalók
és Fi-relével (maradék áram védőkapcsolóval) van ellátva! Egyébként a készülék megsérülhet.
Ne tegye ki a személygépjármű akkumulátortöltő berendezést tűz, nagy meleg és 50 °C-t tartósan meghaladó hőmérsékletek közvetlen hatásának! Magasabb hőmérsékleteken önműködően csökken a személygépjármű akkumulátor töltő berendezés kimenő teljesítménye.
A személygépjármű akkumulátortöltő berendezést csak a szállítmányban található eredeti alkatrészekkel használja!
A személygépjármű akkumulátor töltő berendezést ne fedje le tárgyakkal! Egyébként a készülék megsérülhet.
Ne használja a személygépjármű akkumulátortöltő berendezést sérült vagy befagyott akkumulátor töltési és kisütési folyamataihoz. Ellenkező esetben dologi kár keletkezhet.
A töltőberendezés csatlakoztatása előtt tájékozódjon az akkumulátorok karbantartásáról az eredeti használati útmutató szerint! Ellenkező esetben fennáll a sérülés veszélye és / vagy annak veszélye hogy a berendezés megsérül.
Mielőtt a töltőberendezést olyan akkumulátorhoz csatlakoztatná, mely folyamatosan rá van kötve egy személygépjárműre, tájékozódjon az elektromos biztonság és karbantartás betartásáról
Védje az akkumulátor elektromos a gépjármű eredeti használati érintkező felületeit a rövidzárlattól! útmutatója alapján! Ellenkező
|
A személygépjármű akkumulátor |
esetben fennáll a sérülés ve- |
||||
|
|
|
töltő berendezést kizárólag |
szélye és / vagy annak veszélye |
||
|
|
|
töltési és kisütési folyamatokhoz |
hogy dologi kár keletkezik. |
||
|
|
|
használja sértetlen 6 V- / 12 V-os A személygépjármű akku- |
|||
|
|
|
ólom akkumulátoroknál (elektrolit |
mulátortöltő berendezést |
||
|
|
|
oldattal vagy -géllel)! Ellenkező |
környezetvédelmi okokból |
||
|
|
|
esetben dologi kár keletkezhet. |
válassza le a hálózati áramfor- |
||
|
Ne használja a személygépjármű |
rásról, ha éppen nem használja! |
||||
|
|
|
akkumulátortöltő berendezést |
Ne felejtse el, hogy a beren- |
||
|
|
|
nem tölthető telepek töltésére |
dezés készenléti üzemmódban |
||
|
|
|
és töltésfenntartó töltésére. |
is fogyaszt áramot. |
||
|
|
|
Ellenkező esetben dologi kár |
Legyen figyelmes, és mindig |
||
|
|
|
keletkezhet. |
ügyeljen arra, hogy mit tesz. |
||
|
22 |
|
HU |
|
|
|
|
|
|
|
|
||
|
|
|
|
|
|
|
Mindig ésszerűen járjon el, és ne használja a személygépjármű akkumulátortöltő berendezést, ha nem tud koncentrálni vagy nem érzi jól magát.
Kezelés
A hálózati csatlakozót mindig húzza ki, mielőtt a személygépjármű akkumulátortöltő berendezésen munkát végezne.
ÁRAMÜTÉS VESZÉLYE! DOLOGI KÁR VESZÉLYE! SÉRÜLÉSVESZÉLY!
Biztonsági tudnivalók / Kezelés
Végül kösse le a jármű (piros) plusz csatlakozókábelét az akkumulátor plusz sarkáról.
Csak azután szorítsa be a személygépjármű akkumulátortöltő berendezés „+“-pólus
gyorsrögzítő sorkapcsát (piros) 5 az akkumulátor „+“-pólusára.
Szorítsa be a „–“-pólus gyorsrögzítő
sorkapcsát (fekete) 6 az akkumulátor „–“-pólusára. Dugja be az akkumulátortöltő
készülék 7 hálózati kábelét a hálózati dugaszolóaljzatba.
Tudnivaló: Ha a gyorsrögzítő sorkapcsokat helyesen csatlakoztatta, akkor a feszültség kijelzője megjeleníti a feszültséget, és felvillan a „connected” kijelző. Hibás polaritás esetén a kijelzőn 0.0 jelenik meg, és a „connected” kijelző nem villan föl.
Terméktulajdonságok |
Leválasztás |
Ezt a berendezést SLA-akkumulátorok számos fajtájának (elpecsételt ólomsav akkumulátorok) töltésére tervezték, melyek főleg személyautókban, motorkerékpárokban és néhány egyéb gépjárműben használatosak. Ezek lehetnek pl. WET- (folyékony elektrolittal), GEL- (gél állagú elektrolittal) vagy AGM-akkumulátorok (elektrolittal abszorbeáló alátét). A berendezés speciális koncepciója (a „három-lépcsős-töltési-stratégia”) az akkumulátor majdnem 100%-ban való újratöltését teszi lehetővé. Lehetővé válik továbbá az akkumulátor hosszabb ideig tartó csatlakoztatása a személygépjármű akkumulátortöltő berendezéshez, hogy azt mindig optimális állapotban tartsa.
Csatlakoztatás
Azoknál az akkumulátoroknál, melyek folyamatosan rá vannak csatlakoztatva a járműre, a feltöltési és kisütési folyamat előtt először a személygépjármű akkumulátortöltő berendezés mínusz pólus csatlakozó kábelét (fekete) távolítsa el a személygépjármű akkumulátorának mínusz pólusáról. Az akkumulátor mínusz pólusa rendszerint össze van kötve a jármű karosszériájával.
Válassza le a gépet a hálózatról.Vegye le a „–“-pólus gyorsrögzítő sorkapcsát
(fekete) 6 az akkumulátor „–“-pólusáról.Vegye le a „+“-pólus gyorsrögzítő sorkapcsát
(piros) 5 az akkumulátor „+“-pólusáról.Kösse vissza a jármű plusz pólusának csatlakozókábelét az akkumulátor plusz pólusára.
Kösse vissza a jármű mínusz pólusának csatlakozókábelét az akkumulátor mínusz pólusára.
A töltő mód kiválasztása
A különböző akkumulátorok töltésére különböző környezeti hőmérséklet mellett különböző töltési módokat választhat ki. A hagyományos személygépjármű akkumulátortöltő berendezésekkel összehasonlítva ez a berendezés speciális funkcióval rendelkezik az üres elemek / akkumulátorok újbóli felhasználására. Ezzel a berendezéssel egy teljesen lemerült elemet / akkumulátort is feltölthet. A hibás csatlakoztatás és rövidzárlat elleni védelem biztosítja a biztonságos töltési folyamatot. A beépített elektronika segítségével a személygépjármű akkumulátortöltő berendezés nem az akkumulátorra történő csatlakoztatás
HU 23

Kezelés
után közvetlenül, hanem csak a töltési üzemmód kiválasztása után helyeződik üzembe.
Amennyiben a sorkapcsokat csatlakoztatta az akkumulátorhoz, és a berendezést a hálózati
áramforrásra, a digitális kijelzőn felvillan a 8 „Connected” jelzés. Miután kiválasztotta a töltési üzemmódot, a „Charging” kijelző villan föl. Ha a töltési folyamat lezárult, a „Charged” kijelző villan föl.
Ha a digitális kijelző folyamatosan világít, mielőtt az akkumulátor feltöltődött volna, akkor hiba történt.
Ebben az esetben ismét ellenőrizze, hogy
a sorkapcsokat 6 , 5 helyesen csatlakoz- tatta-e az akkumulátorra, és hogy az akkumulátor típusát megfelelően választotta-e ki. Ha a kijelző még mindig folyamatosan világít, akkor az akkumulátor vélhetően hibás.
Digitális kijelző gombja 1 : Lehetővé teszi a váltást a feszültség digitális megjelenítése és a töltés előrehaladás százalékban (Battery %) való megjelenítése között. Ezt a gombot akkor használja, ha a következő kijelzők között szeretne váltani:
telenítő szeleppel rendelkeznek,és általában „kis karbantartási igényű” vagy „karbantartásmentes” jelöléssel vannak ellátva. Ezt az akkumulátortípust azért adták ki, hogy gyorsan adjon át energiát (pl. a motor beindításakor). A „normál” akkumulátorokat nem szabad „Deep Cycle” alkalmazásokkal használni.
–12 V Deep Cycle: Ezeket az akkumulátorokat általában „Deep Cycle” vagy „Marine” jelöléssel látják el. Ez az akkumulátortípus többnyire nagyobb a többi akkumulátortípusnál. Ez kevésbé képes rövid távú energiát szolgáltatni, ennek fejében viszont hosszú távú energiaátvitelre képes. Ezek az akkumulátorok számos kisütési ciklust képesek elviselni.
–12 V AGM / Gél: Az AGM akkumulátortípusok általában jó Deep Cycle akkumulátorok. Ezeknek a legjobb az „élettartama”, ha még azelőtt újratöltik őket, hogy 50%-ig lemerülnének. Teljes kisütés esetén körülbelül 300 töltési ciklust viselnek el. A GEL akkumulátortípus hasonló az AGM akkumulátortípushoz. Az újbóli feltöltési feszültség alacsonyabb, mint más ólom-sav akkumulátornál. Ha egy gél akkumulátorhoz nem megfelelő töltőt használ, akkor kisebb teljesítménnyel ill. az élettartam megrövidülésével kell számolnia.
–6 V Normál: Ezt az üzemmódot választja
–Akkumulátor %: a csatlakoztatott akkumulá- a kereskedelmi forgalomban kapható 6 V-os tor töltésének előrehaladását mutatja meg akkumulátorokhoz.
százalékban.
– Feszültség: a csatlakoztatott akkumulátor |
Töltés indítás gombja |
3 |
: Ezt a gombot akkor |
feszültségét mutatja meg. |
használja, ha a következő opciók közül szeretne |
||
–Váltóáramú generátor %: Kimenő teljesítválasztani: mény százalékban
–Fast Charge: gyors töltés (ajánlott alacsony
Akkumulátor típus gombja 2 : Ezt a gombot akkor használja, ha a töltendő akkumulátor típusát szeretné beállítani. Itt választhat az akkumulátorok típusa között. A töltési folyamat megkezdése előtt az akkumulátor típusát mindenképpen helyesen kell beállítani.
–12 V Normál: Ezeket az akkumulátorokat (ólom-sav akkumulátorok) általában személygépjárművekben, tehergépjárművekben és motorkerékpárokban használják. Ezek lég-
külső hőmérséklet esetén / télen)
–Normal Charge: normál töltési folyamat (normál sebesség)
–Start: rövid ideig 75 Ampere-t ad le, hogy a gyengén feltöltött vagy üres akkumulátort a motor indításához áthidalja
Figyelem: Ezt az üzemmódot a hálózati
csatlakozó kihúzásával 7 meg lehet szakítani.
24 HU
 Loading...