


User’s Manual
TOSHIBA AT1S0

TOSHIBA AT1S0
Table of Contents
Legal & Regulatory
Copyright. . . . . . . . . . . . . . . . . . . . . . . . . . . . . . . . . . . . . . . . . . . . . . . . . . 5 Disclaimer . . . . . . . . . . . . . . . . . . . . . . . . . . . . . . . . . . . . . . . . . . . . . . . . . 5 Trademarks . . . . . . . . . . . . . . . . . . . . . . . . . . . . . . . . . . . . . . . . . . . . . . . . 6 H.264/AVC, VC-1 and MPEG-4 License Notice . . . . . . . . . . . . . . . . . . . . 7 FCC information . . . . . . . . . . . . . . . . . . . . . . . . . . . . . . . . . . . . . . . . . . . . 7 CE compliance . . . . . . . . . . . . . . . . . . . . . . . . . . . . . . . . . . . . . . . . . . . . . 8 Working environment. . . . . . . . . . . . . . . . . . . . . . . . . . . . . . . . . . . . . . . . 8 Additional environments not related to EMC. . . . . . . . . . . . . . . . . . . . . 9 REACH - Compliance Statement . . . . . . . . . . . . . . . . . . . . . . . . . . . . . . . 9 Following information is only valid for EU-member States:. . . . . . . . 10 Canadian regulatory information (Canada only) . . . . . . . . . . . . . . . . . 10 Canada - Industry Canada (IC) . . . . . . . . . . . . . . . . . . . . . . . . . . . . . . . 11 Following information is only for Turkey: . . . . . . . . . . . . . . . . . . . . . . 11
Introduction
About the guide . . . . . . . . . . . . . . . . . . . . . . . . . . . . . . . . . . . . . . . . . . . 12 Instruction Manual for Safety and Comfort . . . . . . . . . . . . . . . . . . . . . 12 Safety icons . . . . . . . . . . . . . . . . . . . . . . . . . . . . . . . . . . . . . . . . . . . . . . 12
Getting Started
Check the components . . . . . . . . . . . . . . . . . . . . . . . . . . . . . . . . . . . . . 13 Grand tour . . . . . . . . . . . . . . . . . . . . . . . . . . . . . . . . . . . . . . . . . . . . . . . . 13 Hardware . . . . . . . . . . . . . . . . . . . . . . . . . . . . . . . . . . . . . . . . . . . . . . . . . 17 Using the tablet for the first time . . . . . . . . . . . . . . . . . . . . . . . . . . . . . 18 Care and use of the battery . . . . . . . . . . . . . . . . . . . . . . . . . . . . . . . . . . 24 Charging the battery . . . . . . . . . . . . . . . . . . . . . . . . . . . . . . . . . . . . . . . 24
Basics
Using the touch screen . . . . . . . . . . . . . . . . . . . . . . . . . . . . . . . . . . . . . 26 Getting to know the HOME screen . . . . . . . . . . . . . . . . . . . . . . . . . . . . 26 Opening and switching applications . . . . . . . . . . . . . . . . . . . . . . . . . . 28 Monitoring your tablet’s status . . . . . . . . . . . . . . . . . . . . . . . . . . . . . . . 28 Quick Settings . . . . . . . . . . . . . . . . . . . . . . . . . . . . . . . . . . . . . . . . . . . . 29 Managing Notifications . . . . . . . . . . . . . . . . . . . . . . . . . . . . . . . . . . . . . 29
User’s Manual |
2 |

TOSHIBA AT1S0
Locking your screen . . . . . . . . . . . . . . . . . . . . . . . . . . . . . . . . . . . . . . . 30 Customizing the Home screen . . . . . . . . . . . . . . . . . . . . . . . . . . . . . . . 30 Changing the Screen Orientation . . . . . . . . . . . . . . . . . . . . . . . . . . . . . 31 Managing Tasks and Applications . . . . . . . . . . . . . . . . . . . . . . . . . . . . 32 Connecting to a computer . . . . . . . . . . . . . . . . . . . . . . . . . . . . . . . . . . . 32 Factory Reset . . . . . . . . . . . . . . . . . . . . . . . . . . . . . . . . . . . . . . . . . . . . . 33
Applications
Analog clock . . . . . . . . . . . . . . . . . . . . . . . . . . . . . . . . . . . . . . . . . . . . . . 34 Browser . . . . . . . . . . . . . . . . . . . . . . . . . . . . . . . . . . . . . . . . . . . . . . . . . . 34 Calculator . . . . . . . . . . . . . . . . . . . . . . . . . . . . . . . . . . . . . . . . . . . . . . . . 36 Calendar . . . . . . . . . . . . . . . . . . . . . . . . . . . . . . . . . . . . . . . . . . . . . . . . . 36 Camera . . . . . . . . . . . . . . . . . . . . . . . . . . . . . . . . . . . . . . . . . . . . . . . . . . 37 Clock . . . . . . . . . . . . . . . . . . . . . . . . . . . . . . . . . . . . . . . . . . . . . . . . . . . . 38 Contacts . . . . . . . . . . . . . . . . . . . . . . . . . . . . . . . . . . . . . . . . . . . . . . . . . 39 Downloads . . . . . . . . . . . . . . . . . . . . . . . . . . . . . . . . . . . . . . . . . . . . . . . 40 Email . . . . . . . . . . . . . . . . . . . . . . . . . . . . . . . . . . . . . . . . . . . . . . . . . . . . 40 Gallery . . . . . . . . . . . . . . . . . . . . . . . . . . . . . . . . . . . . . . . . . . . . . . . . . . . 41 Music . . . . . . . . . . . . . . . . . . . . . . . . . . . . . . . . . . . . . . . . . . . . . . . . . . . . 42 Picture frame. . . . . . . . . . . . . . . . . . . . . . . . . . . . . . . . . . . . . . . . . . . . . . 43 Service Station . . . . . . . . . . . . . . . . . . . . . . . . . . . . . . . . . . . . . . . . . . . . 43 TOSHIBA Media Player. . . . . . . . . . . . . . . . . . . . . . . . . . . . . . . . . . . . . . 45 TOSHIBA File Manager. . . . . . . . . . . . . . . . . . . . . . . . . . . . . . . . . . . . . . 46 Online Manual . . . . . . . . . . . . . . . . . . . . . . . . . . . . . . . . . . . . . . . . . . . . . 48
Settings
Wireless & networks . . . . . . . . . . . . . . . . . . . . . . . . . . . . . . . . . . . . . . . 49 Sound . . . . . . . . . . . . . . . . . . . . . . . . . . . . . . . . . . . . . . . . . . . . . . . . . . . 54 Screen . . . . . . . . . . . . . . . . . . . . . . . . . . . . . . . . . . . . . . . . . . . . . . . . . . . 54 Multimedia. . . . . . . . . . . . . . . . . . . . . . . . . . . . . . . . . . . . . . . . . . . . . . . . 54 Location & security . . . . . . . . . . . . . . . . . . . . . . . . . . . . . . . . . . . . . . . . 55 Applications . . . . . . . . . . . . . . . . . . . . . . . . . . . . . . . . . . . . . . . . . . . . . . 56 Accounts & sync. . . . . . . . . . . . . . . . . . . . . . . . . . . . . . . . . . . . . . . . . . . 57 Privacy. . . . . . . . . . . . . . . . . . . . . . . . . . . . . . . . . . . . . . . . . . . . . . . . . . . 57 Storage . . . . . . . . . . . . . . . . . . . . . . . . . . . . . . . . . . . . . . . . . . . . . . . . . . 57 Language & input . . . . . . . . . . . . . . . . . . . . . . . . . . . . . . . . . . . . . . . . . . 58 Accessibility . . . . . . . . . . . . . . . . . . . . . . . . . . . . . . . . . . . . . . . . . . . . . . 58 Date & time . . . . . . . . . . . . . . . . . . . . . . . . . . . . . . . . . . . . . . . . . . . . . . . 59 About tablet. . . . . . . . . . . . . . . . . . . . . . . . . . . . . . . . . . . . . . . . . . . . . . . 59
Optional Accessories
Memory media slot . . . . . . . . . . . . . . . . . . . . . . . . . . . . . . . . . . . . . . . . . 61 SIM card slot . . . . . . . . . . . . . . . . . . . . . . . . . . . . . . . . . . . . . . . . . . . . . . 64 HDMI device . . . . . . . . . . . . . . . . . . . . . . . . . . . . . . . . . . . . . . . . . . . . . . 65
User’s Manual |
3 |

TOSHIBA AT1S0
TOSHIBA Tablet Mini Cradle . . . . . . . . . . . . . . . . . . . . . . . . . . . . . . . . . 66
Troubleshooting
Problem solving process. . . . . . . . . . . . . . . . . . . . . . . . . . . . . . . . . . . . 69 Hardware and system checklist . . . . . . . . . . . . . . . . . . . . . . . . . . . . . . 70 TOSHIBA Support. . . . . . . . . . . . . . . . . . . . . . . . . . . . . . . . . . . . . . . . . . 73
Specifications
Physical Dimensions . . . . . . . . . . . . . . . . . . . . . . . . . . . . . . . . . . . . . . . 74 Environmental Requirements . . . . . . . . . . . . . . . . . . . . . . . . . . . . . . . . 74
Information for Wireless Devices
Wireless LAN Interoperability . . . . . . . . . . . . . . . . . . . . . . . . . . . . . . . . 75 Bluetooth wireless technology Interoperability . . . . . . . . . . . . . . . . . 75 CAUTION about Wireless Devices . . . . . . . . . . . . . . . . . . . . . . . . . . . . 76 Wireless Devices and your health . . . . . . . . . . . . . . . . . . . . . . . . . . . . 76 Radio Regulatory Information . . . . . . . . . . . . . . . . . . . . . . . . . . . . . . . . 77 Radio approvals for wireless devices . . . . . . . . . . . . . . . . . . . . . . . . . 81
User’s Manual |
4 |
Legal & Regulatory
Copyright
© 2011 by TOSHIBA Corporation. All rights reserved. Under the copyright laws, this manual cannot be reproduced in any form without the prior written permission of TOSHIBA. No patent liability is assumed, with respect to the use of the information contained herein.
TOSHIBA AT1S0 User’s Manual
First edition September 2011
Disclaimer
This manual has been validated and reviewed for accuracy. The instructions and descriptions it contains are accurate for this device at the time of this manual’s production. However, succeeding devices and manuals are subject to change without notice. TOSHIBA assumes no liability for damages incurred directly or indirectly from errors, omissions or discrepancies between this device and the manual.
This product incorporates copy protection technology that is protected by U.S. and foreign patents, including patent numbers 5,315,448; 5,583,936; 6,836,549; and 7,050,698 and other intellectual property rights. The use of Rovi Corporation's copy protection technology in the product must be authorized by Rovi Corporation. Reverse engineering or disassembly is prohibited.
TO THE MAXIMUM EXTENT PERMITTED BY APPLICABLE LAW, TOSHIBA CORPORATION, ITS AFFILIATES AND/OR SUPPLIERS (“TOSHIBA”) DISCLAIM ALL WARRANTIES WITH REGARD TO THE SOFTWARE, EITHER EXPRESSLY -IMPLIED, OR STATUTORY, INCLUDING, BUT NOT LIMITED TO, THE WARRANTY OF NONINFRINGEMENT OF THIRD PARTY RIGHTS, AND THE IMPLIED WARRANTIES AND CONDITIONS OF MERCHANTABILITY AND
FITNESS FOR A PARTICULAR PURPOSE. THE ENTIRE RISK AS TO THE QUALITY AND PERFORMANCE OF THE SOFTWARE IS WITH YOU. TOSHIBA SHALL NOT WARRANT THAT THE FUNCTIONS CONTAINED IN THE SOFTWARE WILL MEET YOUR REQUIREMENTS OR THAT THE OPERATION OF THE SOFTWARE WILL BE UNINTERRUPTED OR ERROR-FREE.
User’s Manual |
5 |

Legal & Regulatory
Notwithstanding the above, portions of the software include software files subject to certain open source license agreements, and such open source software files are subject to the notices and additional terms and conditions that are referenced in the End User License Agreement (“EULA”) shown in “Toshiba Legal Information” section of the “Legal information” available under the “About tablet” tab on the “Settings” menu. Such open source software files are provided on an “AS IS” basis to the maximum extent permitted by applicable law.
Please carefully read “Open source licenses” section of the “Legal Information” available under the “About tablet” tab on the “Setting” menu for the relevant copyright and licensing terms. If there is any discrepancy between the terms and conditions of the applicable open source license agreement and the EULA, the terms and conditions of the applicable open source license agreement prevail with respect to the applicable open source software.
Until the date that is three years after you acquired the Software, you may obtain a copy of the source code corresponding to the binaries for GPLlicensed file by sending a request to TOSHIBA customer service at [http://support.toshiba-tie.co.jp/android/index_e.htm], and TOSHIBA will send you a link to such source code.
Trademarks
Google, Android, Android Market, Google Mobile, Google Apps, Google Calendar, Google Latitude, Google Maps, Google Talk, Picasa, and YouTube are trademarks of Google Inc.
Availability of Google applications, services, and features may vary by country, carrier, phone model, and manufacturer.
Bluetooth is a trademark owned by its proprietor and used by TOSHIBA under license.
Wi-Fi is a registered trademark of the Wi-Fi Alliance.
Secure Digital and SD are trademarks of SD Card Association. MultiMediaCard and MMC are trademarks of MultiMediaCard Association.
HDMI, the HDMI logo and High-Definition Multimedia Interface are trademarks or registered trademarks of HDMI Licensing LLC.
Adobe, Adobe PDF, Flash, AIR and the Flash logo, AIR logo are either registered trademarks or trademarks of Adobe Systems Incorporated in the United States and/or other countries.
is a trademark of SRS Labs, Inc.
SRS Premium Voice PRO technology is incorporated under license from SRS Labs, Inc.
TouchSense is a trademark of Immersion Corporation.
Other trademarks and registered trademarks not listed above may be used in this manual.
User’s Manual |
6 |

Legal & Regulatory
H.264/AVC, VC-1 and MPEG-4 License Notice
THIS PRODUCT IS LICENSED UNDER THE AVC, THE VC-1 AND MPEG-4 VISUAL PATENT PORTFOLIO LICENSE FOR THE PERSONAL AND NON-COMMERCIAL USE OF A CONSUMER TO (i)ENCODEING VIDEO IN COMPLIANCE WITH THE AVC STANDARD ("VIDEO") AND/OR (ii)DECODEING AVC, VC-1 AND MPEG-4 VIDEO THAT WAS ENCODED BY A CONSUMER ENGAGED IN A PERSONAL AND NONCOMMERCIAL ACTIVITY AND/OR WAS OBTAINED FROM A VIDEO PROVIDER LICENSED BY MPEG LA TO PROVIDE SUCH VIDEO. NO LICENSE IS GRANTED OR SHALL BE IMPLIED FOR ANY OTHER USE. ADDITIONAL INFORMATION INCLUDING THAT RELATING TO PROMOTIONAL, INTERNAL AND COMMERCIAL USES AND LICENSING MAY BE OBTAINED FROM MPEG LA,L.L.C. SEE http://www.mpegla.com
FCC information
FCC notice "Declaration of Conformity Information"
This equipment has been tested and found to comply with the limits for a Class B digital device, pursuant to part 15 of the FCC rules. These limits are designed to provide reasonable protection against harmful interference in a residential installation. This equipment generates, uses and can radiate radio frequency energy and, if not installed and used in accordance with the instructions, may cause harmful interference to radio communications. However, there is no guarantee that interference will not occur in a particular installation. If this equipment does cause harmful interference to radio or television reception, which can be determined by turning the equipment off and on, the user is encouraged to try to correct the interference by one or more of the following measures:
■Reorient or relocate the receiving antenna.
■Increase the separation between the equipment and receiver.
■Connect the equipment into an outlet on a circuit different from that to which the receiver is connected.
■Consult the dealer or an experienced radio/TV technician for help.
Only peripherals complying with the FCC class B limits may be attached to this equipment. Operation with non-compliant peripherals or peripherals not recommended by TOSHIBA is likely to result in interference to radio and TV reception. Shielded cables must be used between the external devices and the TOSHIBA AT1S0 device’s Universal Serial Bus (USB 2.0) ports, HDMI port and microphone/headphone combo jack. Changes or modifications made to this equipment, not expressly approved by TOSHIBA or parties authorized by TOSHIBA could void the user’s authority to operate the equipment.
User’s Manual |
7 |

Legal & Regulatory
FCC conditions
This device complies with part 15 of the FCC Rules. Operation is subject to the following two conditions:
1.This device may not cause harmful interference.
2.This device must accept any interference received, including interference that may cause undesired operation.
Contact
Address: TOSHIBA America Information Systems, Inc. 9740 Irvine Boulevard
Irvine, California 92618-1697 Telephone: (949) 583-3000
Caution: Exposure to Radio Frequency Radiation.
The radiated output power of the Wireless LAN is far below the FCC radio frequency exposure limits. Nevertheless, the Wireless LAN shall be used in such a manner that the potential for human contact during normal operation is minimized.
In the usual operating configuration, the distance between the antenna and the user should not be less than 20cm. Please refer to the "Grand Tour" section in this manual for the details regarding antenna location.
The installer of this radio equipment must ensure that the antenna is located or pointed such that it does not emit RF field in excess of Health Canada limits for the general population; consult Safety Code 6, obtainable from Health Canada’s website.
CE compliance
This product is CE marked in compliance with the essential requirements and other relevant provisions of Directive 1999/5/EC. Responsible for CE marking is Toshiba Europe GmbH, Hammfelddamm 8, 41460 Neuss, Germany. A copy of the official Declaration of Conformity can be obtained from following website: http://epps.toshiba-teg.com
Working environment
The Electromagnetic Compliance (EMC) of this product has been verified typically for this product category for a so called Residential, Commercial & Light Industry Environment. Any other working environment has not been verified by Toshiba and the use of this product in these working environments is maybe restricted or cannot be recommended. Possible consequences of the use of this product in non verified working environments can be: Disturbances of other products or of this product in the nearby surrounding area with temporarily malfunction or data loss/ corruption as result. Example of non verified working environments and related advices:
User’s Manual |
8 |

Legal & Regulatory
Industrial environment (e.g. where 3-phase 380V mains is being used mainly): Danger of disturbances of this product due to possible strong electromagnetic fields especially near to big machinery or power units.
Medical environment: The compliance to the Medical Product Directive has not been verified by Toshiba, therefore this product cannot be used as a medical product without further verification. The use in usual office environments e.g. in hospitals should be no problem if there is no restriction by the responsible administration.
Automotive environment: Please search the owner instructions of the related vehicle for advices regarding the use of this product (category).
Aviation environment: Please follow the instructions of the flight personnel regarding restrictions of use.
Additional environments not related to EMC
Outdoor use: As a typical home/office equipment this product has no special resistance against ingress of moisture and is not strong shock proofed.
Explosive atmosphere: The use of this product in such special working environment (Ex) is not allowed.
REACH - Compliance Statement
The new European Union (EU) chemical regulation, REACH (Registration, Evaluation, Authorization and Restriction of Chemicals), entered into force on 1 June 2007. Toshiba will meet all REACH requirements and is committed to provide our customers with information about the chemical substances in our products according to REACH regulation.
Please consult the following website www.toshiba-europe.com/computers/ info/reach for information about the presence in our articles of substances included on the candidate list according to article 59(1) of Regulation (EC) No 1907/2006 („REACH“) in a concentration above 0.1 % weight by weight.
User’s Manual |
9 |
Legal & Regulatory
Following information is only valid for EU-member States:
Disposal of products
The crossed out wheeled dust bin symbol indicates that products must be collected and disposed of separately from household waste. Integrated batteries and accumulators can be disposed of with the product. They will be separated at the recycling centres.
The black bar indicates that the product was placed on the market after August 13, 2005.
By participating in separate collection of products and batteries, you will help to assure the proper disposal of products and batteries and thus help to prevent potential negative consequences for the environment and human health.
For more detailed information about the collection and recycling programmes available in your country, please visit our website (http://eu.computers.toshiba-europe.com) or contact your local city office or the shop where you purchased the product.
Disposal of batteries and/or accumulators
The crossed out wheeled dust bin symbol indicates that batteries and/or accumulators must be collected and disposed of separately from household waste.
If the battery or accumulator contains more than the specified values of lead (Pb), mercury (Hg), and/or cadmium (Cd) defined in the Battery Directive (2006/66/EC), then the chemical symbols for lead (Pb), mercury (Hg) and/or cadmium (Cd) will appear below the crossed out wheeled dust bin symbol.
By participating in separate collection of batteries, you will help to assure the proper disposal of products and batteries and thus help to prevent potential negative consequences for the environment and human health.
For more detailed information about the collection and recycling programmes available in your country, please visit our website (http:// eu.computers.toshiba-europe.com) or contact your local city office or the shop where you purchased the product.
These symbols may not stick depending on the country and region where you purchased.
Canadian regulatory information (Canada only)
This digital apparatus does not exceed the Class B limits for radio noise emissions from digital apparatus as set out in the Radio Interference Regulation of the Canadian Department of Communications.
Note that Canadian Department of Communications (DOC) regulations provide, that changes or modifications not expressly approved by TOSHIBA Corporation could void your authority to operate this equipment.
This Class B digital apparatus meets all requirements of the Canadian Interference-Causing Equipment Regulations.
User’s Manual |
10 |
Legal & Regulatory
Cet appareil numérique de la class B respecte toutes les exgences du Règlement sur le matériel brouileur du Canada.
Canada - Industry Canada (IC)
This device complies with RSS 210 of Industry Canada.
Operation is subject to the following two conditions: (1) this device may not cause interference, and (2) this device must accept any interference, including interference that may cause undesired operation of this device.
The term "IC" before the equipment certification number only signifies that the Industry Canada technical specifications were met.
Following information is only for Turkey:
■Compliant with EEE Regulations: Toshiba meets all requirements of Turkish regulation 26891 “Restriction of the use of certain hazardous substances in electrical and electronic equipment”.
■The number of possible pixel failures of your display is defined according to ISO 9241-307 standards. If the number of pixel failures is less than this standard, they will not be counted as defect or failure.
■Battery is a consumption product, since the battery time depends on the usage of your computer. If the battery can not be charged at all, then it is a defect or failure. The changes in battery time is not a defect or failure.
User’s Manual |
11 |
Introduction
Welcome and thank you for choosing a TOSHIBA product.
About the guide
For your convenience, your TOSHIBA product is furnished with two guides:
■a Quick Start Guide, and
■this comprehensive PDF User’s Manual
We recommend making a backup of this User's Manual in case of future reference.
Please backup your personal data saved in the internal storage before updating the platform.
Instruction Manual for Safety and Comfort
All important information on the safe and proper use of this tablet is described in the enclosed Instruction Manual for Safety and Comfort. Be sure to read it before using the tablet.
Safety icons
Safety icons are used in this manual to bring important information to your attention. Each type of icon and its implication are identified as shown below.
Indicates a potentially hazardous situation, which could result in death or serious injury, if you do not follow instructions.
Pay attention! A caution informs you that improper use of equipment or failure to follow instructions may cause data loss or damage your equipment.
Please read. A note is a hint or advice that helps you make best use of your equipment.
User’s Manual |
12 |

Getting Started
This chapter provides a general overview of your tablet and some basics before using your tablet.
Some of the features described in this manual may not function properly if you use an operating system that was not pre-installed by TOSHIBA.
Check the components
Check to make sure you have all of the following items:
Hardware
■TOSHIBA AT1S0 Tablet
■AC adaptor and power cable
■Replaceable plug (2-pin plug or 3-pin plug)
Documentation
■TOSHIBA AT1S0 Quick Start Guide
■Instruction Manual for Safety and Comfort
If any of the items is missing or damaged, contact your dealer immediately.
Grand tour
Please handle your product carefully to avoid scratching or damaging the surface.
The following figure shows each important part of your tablet.
User’s Manual |
13 |

Getting Started
|
|
15 |
|
|
|
16 |
17 |
5 |
1 |
2 |
3 |
6 |
|
|
|
||
|
|
|
|
|
|
|
|
7 |
|
|
|
|
|
8 |
|
4 |
|
|
|
|
|
|
 9
9
 10
10
 11
11

 12
12

 13
13 
 14
14
18 |
19 |
18 |
|
1. Web Camera (front) |
|
2. Web Camera indicator |
|
3. Wireless LAN, 3G* and Bluetooth |
4. Microphone |
||
antennas (not shown) |
|
|
|
5. Multi function LED indicator |
6. Ambient light sensor |
||
7. Display screen |
|
|
8. Power button |
9. Volume down/up button |
|
10. Orientation lock switch |
|
11. Micro HDMI port |
|
|
12. Mini USB port |
13. Memory media slot |
|
14. SIM card slot* |
|
15. Headphone/Microphone combo jack |
16. Web Camera (back) |
||
17. Web Camera LED |
|
18. Speakers |
|
19. Docking interface |
|
|
|
*Provided with some models. |
|
|
|
|
(Sample Illustration) Grand tour of the tablet |
||
|
|
|
|
Web Camera |
|
Your tablet is equipped with a front Web Camera |
|
|
|
and a back Web Camera used for recording video |
|
|
|
or taking photographs. |
|
|
|
|
|
Web Camera |
|
The Web Camera indicator will glow blue when |
|
indicator |
|
the Web Camera is in operation. |
|
|
|
||
Wireless LAN, 3G and |
Some models are equipped with these antennas. |
||
Bluetooth antennas |
|
|
|
|
|
|
|
Microphone |
|
A built-in microphone allows you to import and |
|
|
|
record sounds for your application. |
|
|
|
||
Multi function LED |
This indicator gives a visual indication of a defined |
||
indicator |
|
state of the tablet. |
|
Please refer to the section Multi function LED indicator for details.
User’s Manual |
14 |

|
|
|
|
|
|
|
|
|
Getting Started |
|
|
|
|
|
|
|
|
|
|
|
|
|
|
|
|
|
|
|
|
|
|
|
|
|
|
|
|
|
|
|
Ambient light sensor |
Ambient light sensor can detect the light quality |
|
|
|
|
|
|
|
|
|
|
and intensity outside and can use this information |
|
|
|
|
|
|
|
|
|
|
to automatically adjust the display screen |
|
|
|
|
|
|
|
|
|
|
brightness. |
|
|
|
|
|
|
|
|
|
|
|
|
|
|
|
|
|
|
|
|
Display screen |
Display screen brightness can be adjusted in the |
|
|
|
|
|
|
|
|
|
|
Display settings. |
|
|
|
|
|
|
|
|
|
|
|
|
|
|
|
|
|
|
|
|
Power button |
Press and hold this button to turn on/off the tablet. |
|
|
|
|
|
|
|
|
|
|
||
|
|
|
|
|
|
|
|
|
|
|
|
|
|
|
|
|
|
|
|
|
|
|
|
|
|
|
|
|
|
Volume down/up |
Press these buttons to increase or decrease the |
|
|
|
|
|
|
|
|
|
button |
volume. |
|
|
|
|
|
|
|
|
|
|
|
|
|
|
|
|
|
|
|
|
Orientation lock |
Press this switch to lock/unlock automatic rotation |
|
|
|
|
|
|
|
|
|
switch |
of the screen orientation. |
|
|
|
|
|
|
|
|
|
|
|
|
|
|
|
|
|
|
|
|
Micro HDMI port |
Micro HDMI port can connect to HDMI cable with |
|
|
|
|
|
|
|
|
|
|
||
|
|
|
|
|
|
|
|
|
Type D connector. |
|
|
|
|
|
|
|
|
|
|
An HDMI cable sends video and audio signals. In |
|
|
|
|
|
|
|
|
|
|
addition to this, it can send and receive control |
|
|
|
|
|
|
|
|
|
|
signals. |
|
|
|
|
|
|
|
|
|
|
Please refer to the HDMI device section in |
|
|
|
|
|
|
|
|
|
|
"Optional Accessories" chapter for details. |
|
|
|
|
|
|
|
|
|
|
|
|
|
|
|
|
|
|
|
|
Mini USB port |
Mini USB port allows you to connect the tablet to |
|
|
|
|
|
|
|
|
|
|
a computer for transferring data. |
|
|
|
|
|
|
|
|
|
|
Please refer to the Connecting to a computer |
|
|
|
|
|
|
|
|
|
|
section in "Basics" chapter for details. |
|
|
|
|
|
|
|
|
|
|
|
|
|
|
|
|
|
|
|
|
Memory media slot |
This slot lets you insert a single microSD™ Card |
|
|
|
|
|
|
|
|
|
|
which enables you to transfer data from devices, |
|
|
|
|
|
|
|
|
|
|
such as digital camera, onto your tablet. |
|
|
|
|
|
|
|
|
|
|
Please refer to the Memory media slot section in |
|
|
|
|
|
|
|
|
|
|
"Optional Accessories" chapter for details. |
|
|
|
|
|
|
|
|
|
|
|
|
Keep foreign metal objects, such as screws, staples and paper clips, out of the memory media slot. Foreign metal objects can create a short circuit, which can cause damage and fire, possibly resulting in serious injury.
SIM Card slot |
This slot lets you insert a single SIM card which |
|
enables a high-speed access to the Internet, |
|
corporate Intranet and your email while you are |
|
away from office. |
|
|
Headphone/ |
A 3.5 mm mini headphone/microphone combo |
Microphone combo |
jack enables connection of a monaural |
jack |
microphone or a stereo headphone. |
|
|
User’s Manual |
15 |
Getting Started
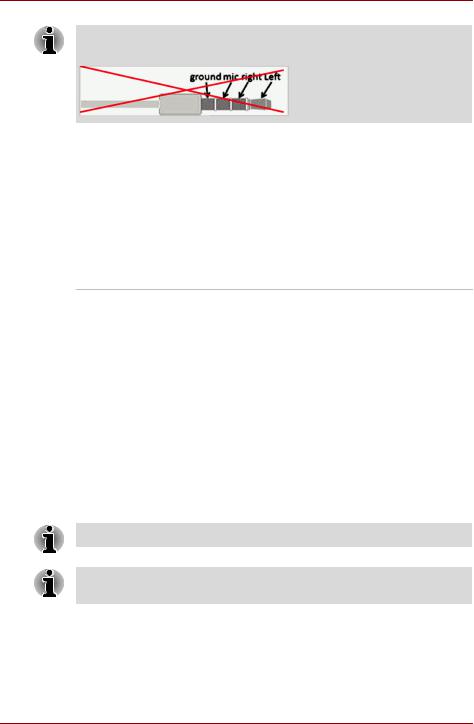
Both the internal and external microphones will be disabled if you use a headset other than a 4-pin headset headphone.
|
|
|
|
|
|
|
|
Web Camera LED |
This LED can be used as a light source when the |
||
|
|
ambient light is not bright. |
|
|
|
||
Speakers |
The speakers emit sound generated by your |
||
|
|
software as well as audio alarms, such as low |
|
|
|
battery condition, generated by the system. |
|
|
|
||
Docking interface |
The AC adaptor connects to this interface in order |
||
|
|
to power up the tablet and charge the battery. The |
|
|
|
interface also enables the connection of an |
|
|
|
optional dock described in Optional Accessories |
|
|
|
chapter. |
|
Multi function LED indicator
The LED indicator on your tablet is multi functional and therefore shows you a defined status of the tablet depending on the settings that you have selected. Please refer to Sound section in “Settings” chapter for details.
Available functions and LED indicator status are described in below table.
Function |
Description |
|
|
Power/battery |
The LED indicator shows the power conditions of your |
indicator |
tablet. It glows white when charging and off when fully |
|
charged. When the tablet enters sleep mode, it flashes |
|
white slowly. |
|
|
Wi-Fi/3G |
The LED indicator glows white when Wi-Fi/3G |
indicator |
communication is turned on. |
Always off |
The LED indicator will not glow. |
|
|
3G indicator function is only supported by 3G models.
The LED indicator works as Power/battery indicator only when the tablet is powered off.
User’s Manual |
16 |

Getting Started
Hardware
This section identifies the various components and the hardware of the tablet - it is recommended that you become familiar with each before you operate the tablet.
The actual specifications may vary depending on the model you purchased.
■ This tablet does not support CD/DVD/Blu-ray Disc™.
■Content that is copyright protected or has limited access rights, cannot be played on this tablet.
Processor
CPU |
Your tablet is equipped with an nVIDIA® Tegra™ |
|
Mobile Processor. |
Memory
Memory on board |
This tablet is equipped with a 1GB memory on |
|
board. The actual amount of usable system |
|
memory will be less than the installed memory |
|
modules. This tablet does not support memory |
|
expansion. |
|
|
Flash Memory |
This tablet is equipped with a flash memory. |
Power
Battery |
The tablet is powered by one lithium-ion battery. |
|
|
AC adaptor |
The AC adaptor provides power to the system |
|
and recharges the battery when it is low. It comes |
|
with a power cable and a 2-pin or 3-pin |
|
replaceable plug. |
|
As the AC adaptor is universal, it can receive a |
|
range of AC voltages from 100 to 240 volts, |
|
however you should note that the output current |
|
varies among different models. Using the wrong |
|
adaptor might damage your tablet. |
|
|
User’s Manual |
17 |

Getting Started
Display
The tablet's internal display panel supports high-resolution video graphics and can be set to a wide range of viewing angles for maximum comfort and readability.
Display panel |
17.8cm (7”) LCD screen configured with the |
|
following resolution: |
|
■ 1280 horizontal x 800 vertical pixels |
|
|
Graphics controller |
The graphics controller maximizes display |
|
performance. |
|
|
Multimedia |
|
|
|
Web Camera |
Web Camera is a device that allows you to record |
|
video or take photographs with your tablet. You |
|
can use it for video chatting or video conferences |
|
by using a communication tool. |
|
|
Communications |
|
|
|
Bluetooth |
Bluetooth wireless communication function |
|
eliminates the need for cables between electronic |
|
devices such as computers, printers and mobile |
|
phones. When it is enabled, Bluetooth will |
|
provide the wireless personal area network |
|
environment which is safe and trustworthy, that is |
|
quick and easy. |
|
|
Wireless LAN |
The tablet is equipped with a Wireless LAN/ |
|
Bluetooth combo module that is compatible with |
|
other Wireless LAN systems based on Direct |
|
Sequence Spread Spectrum/Orthogonal |
|
Frequency Division Multiplexing radio technology |
|
that complies with the IEEE 802.11 Standard. |
|
|
3G |
Some models are equipped with a 3G module. |
|
|
Using the tablet for the first time
This section provides basic information on how to start using your tablet. It covers below steps followed by the details.
■Connecting the AC adaptor
■Turning on the power
■Initial Setup
■Turning off the power
User’s Manual |
18 |
Getting Started
■ Use a virus-check program and make sure it is updated regularly.
■Never format storage media without checking its content - formatting destroys all stored data.
■It is a good idea to periodically backup internal storage of the tablet to an external media. General storage media is not durable or stable over long periods of time and under certain conditions may result in data loss.
Connecting the AC adaptor
Use only the tablet connected to an AC power source or TOSHIBA Tablet Dock to charge the battery. Never attempt to charge the battery with any other charger.
The AC adaptor can automatically adjust to any voltage ranging from 100 to 240 volt and to a frequency of either 50 or 60 hertz, enabling you to use this product in almost all country/region. The adaptor converts AC power to DC power and reduces the voltage supplied to this tablet.
 3
3  2
2
|
|
PUSH |
1 |
2-pin |
|
|
|
||
|
|
|
|
|
|
4 |
|
|
|
|
5 |
|
|
|
|
|
|
|
3-pin |
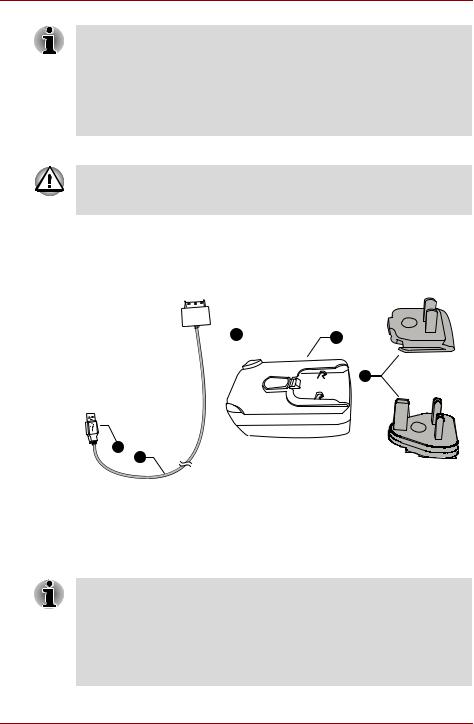
1. |
Replaceable plug (2-pin or 3-pin) |
2. |
AC adaptor |
|
3. |
Power connector |
4. |
USB connector |
|
5. |
Power cable |
|
|
|
(Sample Illustration) The AC adaptor with power cable and repaceable plug
■Depending on the model, either a 2-pin or 3-pin replaceable plug will be bundled with the tablet.
■The supplied power cable conforms to safety rules and regulations in the region the tablet is bought and should not be used outside of this region. In order to use the AC adaptor or tablet in other regions, you should buy a power cable that conforms to the safety rules and regulations in that particular region.
User’s Manual |
19 |

Getting Started
Attach the AC adaptor when you need to charge the battery or you want to operate from AC power. It is also the fastest way to get started, because the battery will need to be charged before you can operate from battery power.
■Always use the TOSHIBA AC adaptor that was included with your tablet, or use AC adaptors specified by TOSHIBA to avoid any risk of fire or other damage to the tablet. Use of an incompatible AC adaptor could cause fire or damage to the tablet possibly resulting in serious injury. TOSHIBA assumes no liability for any damage caused by use of an incompatible adaptor.
■Never plug the AC adaptor into a power source that does not correspond to both the voltage and the frequency specified on the regulatory label of the unit. Failure to do so could result in a fire or electric shock, possibly resulting in serious injury.
■Always use or purchase power cables that comply with the legal voltage and frequency specifications and requirements in the country of use. Failure to do so could result in a fire or electric shock, possibly resulting in serious injury.
■When you connect the AC adaptor to the tablet, always follow the steps in the exact order as described in the User’s Manual. Connecting the plug to a live electrical outlet should be the last step otherwise the DC output plug could hold an electrical charge and cause an electrical shock or minor bodily injury when touched. As a general safety precaution, avoid touching any metal parts.
■Never place your tablet or AC adaptor on a wooden surface, furniture, or any other surface that could be marred by exposure to heat since the tablet base and AC adaptor's surface increase in temperature during normal use.
■Always place your tablet or AC adaptor on a flat and hard surface that is resistant to heat damage.
1.Insert the provided replaceable plug into the AC adaptor.
2.Plug the USB connector of the power cable into the USB port on the AC adaptor.
User’s Manual |
20 |
Getting Started
PUSH
2-pin
PUSH
3-pin
(Sample Illustration) Connecting the AC adaptor 1
3.Plug the power connector of the power cable into the docking interface on your tablet.
4.Plug the AC adaptor into a live wall outlet.
(Sample Illustration) Connecting the AC adaptor 2
You can charge the tablet by connecting the power cable to a USB port on a computer. TOSHIBA recommends charging when the tablet is off or goes into sleep mode.
User’s Manual |
21 |
Getting Started
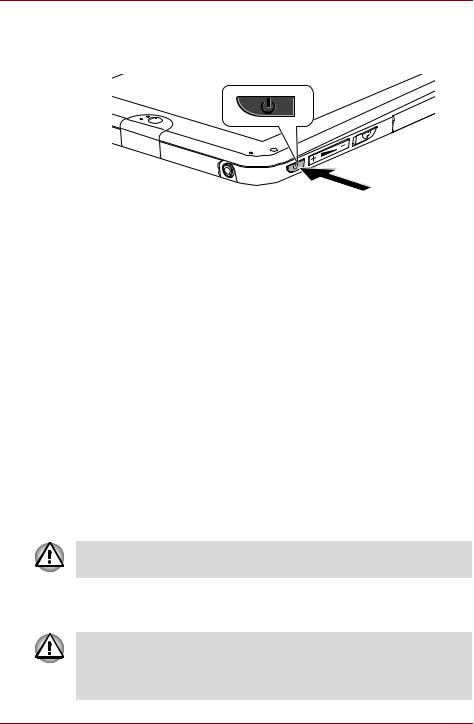
Turning on the power
This section describes how to power up your tablet.
Press and hold Power button to turn on the tablet.
(Sample Illustration) Turn on the tablet
Initial Setup
The Setup Screen will be the first screen displayed when you turn on the power. Setup your tablet according to the following steps:
1.Choose your preferred language and tap Start to continue.
2.Connect to a wireless network via Wi-Fi or 3G (The 3G option is only supported by 3G models).
You may also skip this step and turn Wi-Fi on later in Settings screen.
3.Choose whether to use Google Location ServiceTM and tap Next to continue.
4.Set date and time or use network-provided time and tap Next to continue.
Turning off the power
If you are not going to use your tablet for a long time, shut it down. You can also turn the LCD off in order to extend battery life.
Shut down the tablet
When you shut down the tablet, no data will be saved. The tablet will boot to the operating system's main screen the next time it is turned on.
1.If you have entered data, either save it to flash memory or to other storage media.
Never turn off the power, disconnect an external storage tablet or remove storage media during data read/write. Doing so can cause data loss.
2.Disconnect first if the tablet is connected to a computer.
3.Press and hold Power button for 2 seconds and select OK to turn off the tablet.
■In any emergency case, you can also press and hold Power button for
about six seconds to force power off.
■Do not turn the tablet back on immediately - wait a short period to avoid any potential damage.
User’s Manual |
22 |
Getting Started
Turning the LCD off/on
You can turn the LCD off (while the system is still running) in one of the following ways:
■Press Power button.
■Set the screen timeout in Settings. To turn the LCD on:
■Press Power button once again.
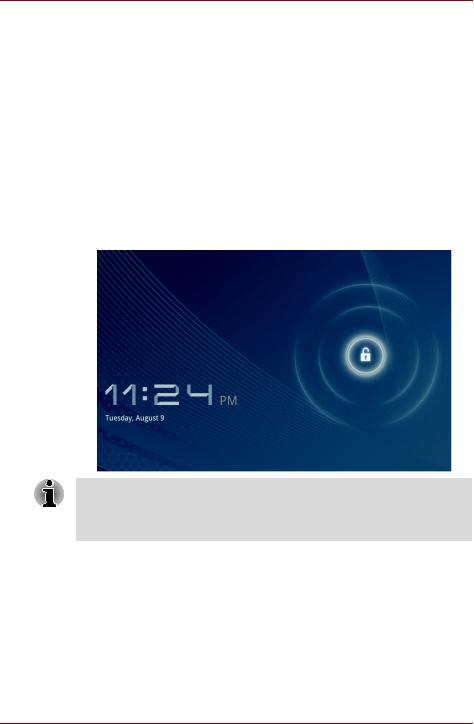
Unlocking your screen
After turning on the LCD, the screen remains locked. You can unlock the screen in the following ways:
1.Press and hold the unlock icon ( ).
).
2.Slide the icon towards the appearing circle.
If you have set up a screen lock through one of the three ways as pattern, PIN or password, the method of unlocking the screen will be different. See Location & security section for other ways to protect your tablet and privacy.
User’s Manual |
23 |
Getting Started
Care and use of the battery
This section provides the important safety precautions in order to handle your battery properly.
Refer to the enclosed Instruction Manual for Safety and Comfort for detailed precautions and handling instructions.
■ The lithium ion battery can explode if not used, handled or disposed of properly. Dispose of the battery as required by local ordinances or regulations.
■The tablet’s RTC battery is a lithium battery and the battery can explode if not properly used, handled or disposed. Dispose of the battery as required by local ordinances or regulations.
■Never try to remove or replace the battery which may possibly result in serious injury.
Charging the battery
When the battery power becomes low, you must recharge it to avoid losing any data.
Charging time
The following table shows the approximate time required to fully charge a discharged battery.
Charging time (hours)
Battery type |
Power on |
Power off |
|
|
|
Battery (14.5Wh, 1 cell) |
about 3.5 |
about 3 |
|
|
|
Please be aware that the charging time when the tablet is on is affected by ambient temperature, the temperature of the tablet and how you are using the tablet - if you make heavy use of external devices for example, the battery might scarcely charge at all during operation.
Battery life
The following table shows the approximate battery life of a fully charged battery.
|
Battery life |
Battery type |
Time |
|
|
Battery (14.5Wh, 1 cell) |
about 4.5 ~ 40 hours (in use) |
|
about 5 days (Sleep Mode) |
|
|
Please be aware that the battery life will be affected by how you are using the tablet.
User’s Manual |
24 |

Getting Started
Battery charging notice
The battery may not begin charging immediately under the following conditions:
■The battery is extremely hot or cold (if the battery is extremely hot, it might not charge at all). To ensure the battery charges to its full capacity, you should charge it at room temperature of between 5°C to 35°C (41°F to 95°F).
■The battery is nearly completely discharged. In this instance you should leave the AC adaptor connected for a few minutes and the battery should begin charging.
The indicator may show a rapid decrease in battery operating time when you try to charge a battery under the following conditions:
■The battery has not been used for a long time.
■The battery has completely discharged and been left unattended for a long time.
In such cases you should follow the steps as detailed below:
1.Fully discharge the battery with the power on until the system automatically turns itself off.
2.Connect the AC adaptor to the docking interface of the tablet, and to a wall outlet that is supplying power.
3.Charge the battery until the multi function LED indicator (given that it is set as Power/battery indicator) is off.
Repeat these steps two or three times until the battery recovers normal capacity.
User’s Manual |
25 |
 Loading...