


 Loading...
Compatible: Virtual Console™/ GameCube™/ Wii™ *
User Manual
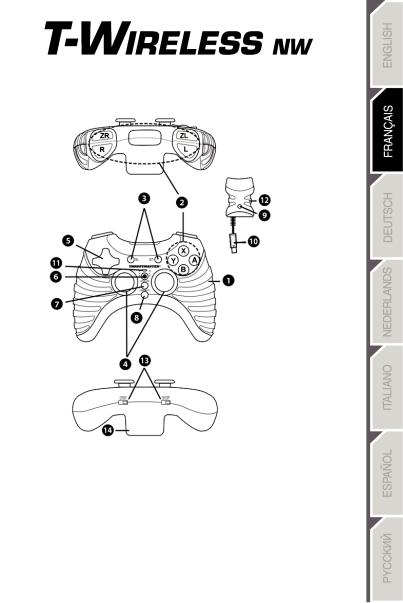
TECHNICAL FEATURES |
8. |
Gamepad CONNECT button |
|
1. |
Vibration motor |
||
2. |
Action buttons |
9. |
Receiver CONNECT button |
3. |
SLOW and START buttons |
|
(with LED) |
4. |
2 analog mini-sticks |
10. |
Receiver connector |
5. |
D-Pad |
11. |
Gamepad LED |
6. |
MAPPING button (for programming) |
12. |
Receiver |
7. |
TURBO button |
13. |
POWER and MOTOR switches |
|
|
14. |
Battery compartment |
1/6
WARNING
•In the event of malfunction during use due to electrostatic emission, please exit the game, switch off your gamepad and unplug the device from your console. Resume normal game play by plugging the device back in, then switch on the gamepad and launch the game again.
•Do not touch or move the mini-sticks when connecting your gamepad (to avoid disrupting the calibration process).
•When you’re done using your gamepad, we recommend that you always set your gamepad’s POWER switch (13) to the OFF position (to extend battery life).
INSTALLING BATTERIES
Insert 3 1.5V type LR03/AAA batteries in the battery compartment located at the back of the gamepad (14).
INSTALLATION ON NINTENDO® WII™
1.Switch on your console.
2.Open the “Nintendo® GameCube™ Controller” hatch situated at the top of your Wii™ console.
3.Connect your gamepad’s receiver connector (10) to port number 1 on your console.
4.Switch on your gamepad using the POWER ON switch (13).
5.Start up your game using your Wiimote™ controller.
You are now ready to play!
COMPATIBILITY
Your gamepad is compatible with:
•All “Virtual Console™” games
(available for download from the Wii™ Shop Channel)
•All “GameCube™” games
(that are compatible with your Wii™ console)
•(*) Certain “Wii™” games
(Please refer to the back of Wii™ game boxes to verify compatibility - A list of compatible Wii™ games is also available on our website: http://ts.thrustmaster.com.)
2/6

ADVANCED FUNCTIONS
• POWER switch (13):
-OFF position = the gamepad is off (and doesn’t use up batteries).
-ON position = the gamepad is on.
• MOTOR switch (13):
- OFF position = vibration mode is disabled (uses less battery power). - ON position = vibration mode is enabled (uses more battery power).
• CONNECT buttons (8 and 9)
The connection between the gamepad and the receiver is established automatically.
These 2 buttons allow you to establish a connection in case of failure or when using more than one T- Pad Wireless gamepad at the same time.
- Both LEDs are on = signal between the gamepad and the receiver.
- Both LEDs flash quickly = no signal between the gamepad and the receiver. - Both LEDs are off = the gamepad is in standby mode or switched off.
- Both LEDs flash slowly = change batteries.
• STANDBY MODE:
- The gamepad switches off automatically after 5 minutes of inactivity. - To reactivate it, press the START button.
•TURBO button (7):
This button allows you to repeat an action continuously by keeping another button pressed down (example: for shooting or hitting functions).
-Simultaneously press the TURBO button and the button corresponding to the action you wish to repeat.
-Turbo mode is now enabled.
-To disable Turbo mode, repeat this procedure. Turbo mode is now disabled.
•SLOW button (3):
This button allows you to slow down an action by repeatedly activating the START/PAUSE function.
-Press the SLOW button to enable the function.
-Press the SLOW button again to disable the function.
3/6

PROGRAMMING BUTTONS / ANALOG MINI-STICKS / D-PAD
All buttons, mini-stick directions and D-pad directions can be programmed.
The MAPPING button (6) allows you to switch the functions of your choice.
•Examples of possible applications:
-Switch the A and B buttons.
-Replace the R and L buttons with the up/down directions on the right mini-stick (for racing games).
-Switch the two analog mini-sticks (in this case, you must map the four directions of the first ministick to the four directions of the second).
-Switch the D-Pad with an analog mini-stick (in this case, you must map the four directions of the D- Pad to the four directions of the mini-stick in question).
•Programming/switching procedure:
|
Steps |
|
Action |
|
|
LED (11) |
|
|
|
|
|
|
|||
|
|
|
|
(on gamepad) |
|
||
|
|
|
|
|
|
|
|
|
1 |
|
Press and release the MAPPING button (6) |
|
FLASHES SLOWLY |
|
|
|
|
|
|||||
|
2 |
|
Press and release the button or direction to switch |
|
FLASHES QUICKLY |
|
|
|
3 |
|
Press and release the button or direction where you wish to |
|
ON |
|
|
|
|
place the function |
|
|
|||
|
|
|
|
|
|
||
|
|
|
The two functions are now switched. |
|
|
|
|
• To return to “default” programming (to erase all of your programming):
|
|
|
|
|
|
|
|
|
Steps |
|
Action |
|
LED (11) |
|
|
|
|
|
|
(on gamepad) |
|
||
|
|
|
|
|
|
|
|
|
1 |
|
Press and hold the MAPPING button (6) for 2 seconds |
|
FLASHES SLOWLY |
|
|
|
|
|
|||||
|
2 |
|
Release the MAPPING button (6) |
|
ON |
|
|
|
|
|
Your programming is now erased. |
|
|
|
|
Please note that your programming also disappears each time the gamepad is disconnected, or when the gamepad or console restarts.
USING MORE THAN ONE T-WIRELESS GAMEPAD AT THE SAME
TIME (In multiplayer mode)
You can use up to 4 T-Wireless gamepads at the same time (in multiplayer mode).
To do so, channel detection must absolutely be carried out manually, as described below.
•Procedure:
-For 2 seconds, simultaneously press and hold the 2 CONNECT buttons on the gamepad and the receiver you wish to use (8 and 9).
-Repeat this procedure for other players.
Once a connection has been established, the LEDs stop flashing and stay lit.
4/6
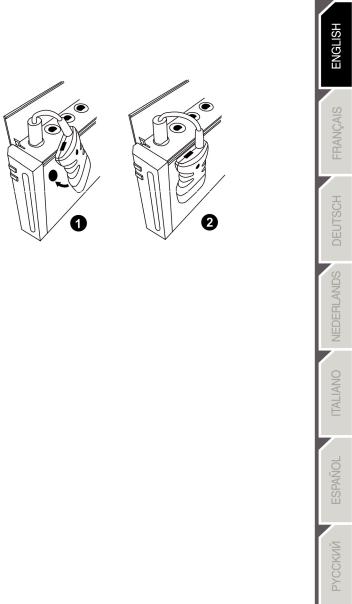
ATTACHING THE RECEIVER
Use the 2 included adhesive pads to attach the receiver perfectly to the side of your console.
TECHNICAL SUPPORT
If you encounter a problem with your product, please go to http://ts.thrustmaster.com and click Technical Support. From there you will be able to access various utilities (Frequently Asked Questions (FAQ), the latest versions of drivers and software) that may help to resolve your problem. If the problem persists, you can contact the Thrustmaster products technical support service (“Technical Support”):
By email:
In order to take advantage of technical support by email, you must first register online. The information you provide will help the agents to resolve your problem more quickly. Click Registration on the left-hand side of the Technical Support page and follow the on-screen instructions. If you have already registered, fill in the Username and Password fields and then click Login.
By telephone:
|
United |
|
08450800942 |
Monday to Friday from Noon to 4pm and 5pm to 10pm |
|
|
Saturday from 9am to Noon and 1pm to 7pm |
||
|
Kingdom |
|
Charges at local rate |
|
|
|
Sunday from 9am to Noon and 1pm to 4pm |
||
|
|
|
|
|
|
United |
|
1-866-889-5036 |
Monday to Friday from 7am to 11am and from Noon to 5pm |
|
States |
|
Free |
Saturday and Sunday from 7am to Noon |
|
|
|
|
(Eastern Standard Time) |
|
Canada |
|
1-866-889-2181 |
Monday to Friday from 7am to 11am and from Noon to 5pm |
|
|
Gratuit / Free |
Saturday and Sunday from 7am to Noon |
|
|
|
|
(Eastern Standard Time) |
|
|
|
|
|
|
|
Denmark |
|
80887690 |
Monday to Friday from 1pm to 5pm and 6pm to 11pm (English) |
|
|
Free |
Saturday from 9am to 1pm and 2pm to 8pm |
|
|
|
|
Sunday from 10am to 1pm and 2pm to 5pm |
|
|
|
|
|
|
|
Sweden |
|
0200884567 |
Monday to Friday from 1pm to 5pm and 6pm to 11pm (English) |
|
|
Free |
Saturday from 9am to 1pm and 2pm to 8pm |
|
|
|
|
Sunday from 10am to 1pm and 2pm to 5pm |
|
|
|
|
|
|
|
Finland |
|
0800 913060 |
Monday to Friday from 2pm to 6pm and 7pm to Midnight (English) |
|
|
Free |
Saturday from 10am to 2pm and 3pm to 9pm |
|
|
|
|
Sunday from 11am to 2pm and 3pm to 6pm |
|
|
|
|
|
5/6

WARRANTY INFORMATION
Worldwide, Guillemot Corporation S.A. (“Guillemot”) warrants to the consumer that this Thrustmaster product will be free from material defects and manufacturing flaws for a period of two (2) years from the original date of purchase. Should the product appear to be defective during the warranty period, immediately contact Technical Support, who will indicate the procedure to follow. If the defect is confirmed, the product must be returned to its place of purchase (or any other location indicated by Technical Support).
Within the context of this warranty, the consumer’s defective product will, at Technical Support’s option, be either repaired or replaced. Where authorized by applicable law, the full liability of Guillemot and its subsidiaries (including for indirect damages) is limited to the repair or replacement of the Thrustmaster product. The consumer’s legal rights with respect to legislation applicable to the sale of consumer goods are not affected by this warranty.
This warranty shall not apply: (1) if the product has been modified, opened, altered, or has suffered damage as a result of inappropriate or abusive use, negligence, an accident, normal wear, or any other cause not related to a material defect or manufacturing flaw; (2) in the event of failure to comply with the instructions provided by Technical Support; (3) to software not published by Guillemot, said software being subject to a specific warranty provided by its publisher.
Additional warranty provisions
In the United States of America and in Canada, this warranty is limited to the product’s internal mechanism and external housing. Any applicable implied warranties, including warranties of merchantability and fitness for a particular purpose, are hereby limited to two (2) years from the date of purchase and are subject to the conditions set forth in this limited warranty. In no event shall Guillemot Corporation S.A. or its affiliates be liable for consequential or incidental damage resulting from the breach of any express or implied warranties. Some States/Provinces do not allow limitation on how long an implied warranty lasts or exclusion or limitation of incidental/consequential damages, so the above limitation may not apply to you. This warranty gives you specific legal rights, and you may also have other legal rights which vary from State to State or Province to Province.
FCC STATEMENT
1.This device complies with Part 15 of the FCC Rules. Operation is subject to the following two conditions:
(1)This device may not cause harmful interference, and
(2)This device must accept any interference received, including interference that may cause undesired operation.
2.Changes or modifications not expressly approved by the party responsible for compliance could void the user's authority to operate the equipment.
COPYRIGHT
© 2007 Guillemot Corporation S.A. All rights reserved. Thrustmaster® is a registered trademark of Guillemot Corporation S.A. Wii, Wiimote, Gamecube and Virtual Console are trademarks of Nintendo Co., Ltd. All other trademarks and brand names are hereby acknowledged and are property of their respective owners. Illustrations not binding. Contents, designs and specifications are subject to change without notice and may vary from one country to another. Made in China.
ENVIRONMENTAL PROTECTION RECOMMENDATION
At the end of its working life, this product should not be disposed of with standard household waste, but rather dropped off at a collection point for the disposal of Waste Electrical and Electronic Equipment (WEEE) for recycling.
This is confirmed by the symbol found on the product, user manual or packaging.
Depending on their characteristics, the materials may be recycled. Through recycling and other forms of processing Waste Electrical and Electronic Equipment, you can make a significant contribution towards helping to protect the environment.
Please contact your local authorities for information on the collection point nearest you.
FAQs, tips and drivers available at www.thrustmaster.com
6/6
Compatible : Virtual Console™/ Gamecube™/ Wii™ *
Manuel de l'utilisateur
CARACTÉRISTIQUES TECHNIQUES |
8. |
Bouton CONNECT de la manette |
|
1. |
Moteur de vibration |
||
2. |
Boutons d'action |
9. |
Bouton CONNECT du récepteur |
3. |
Boutons SLOW et START |
|
(avec Led) |
4. |
2 sticks analogiques |
10. |
Connecteur du récepteur |
5. |
Croix multidirectionnelle |
11. |
Led de la manette |
6. |
Bouton MAPPING (pour programmation) |
12. |
Récepteur |
7. |
Bouton TURBO |
13. |
Interrupteurs POWER et MOTOR |
|
|
14. |
Compartiment à piles |
1/6
AVERTISSEMENT
•En cas de mauvais fonctionnement dû à une émission électrostatique, quittez le jeu, éteignez votre manette et débranchez le périphérique de votre console. Pour rejouer, rebranchez le périphérique, rallumez votre manette et relancez le jeu.
•Evitez de toucher et bouger les mini-sticks lorsque vous branchez votre manette (afin de ne pas perturber la calibration).
•Après utilisation de votre manette il est préconisé de toujours positionner l’intérrupteur POWER (13) de votre manette en position OFF (afin d’économiser les piles)
INSTALLATION DES PILES
Installez 3 piles 1,5V de type LR03 / AAA dans le compartiment à piles situé à l’arrière de la manette (14).
INSTALLATION SUR NINTENDO® WII™
1.Allumez votre console
2.Ouvrez la trappe « Nintendo® Gamecube™ Controller » située sur le dessus de votre console Wii™.
3.Branchez le connecteur (10) du récepteur de votre manette sur le port n°1 de votre console.
4.Allumez votre manette à l’aide de l’interrupteur POWER ON (13).
5.Lancer le jeu à l’aide de votre Wiimote™.
Vous êtes maintenant prêt à jouer !
COMPATIBILITE
Votre manette sera compatible :
•avec l’ensemble des jeux « Virtual Console™ »
(disponible en téléchargement sur la Chaîne boutique Wii™)
•avec l’ensemble des jeux « Gamecube™ » (qui sont compatibles sur votre console Wii™)
•(*) avec certains jeux « Wii™ »
(Consultez l’arrière des boîtes de jeux Wii™ pour vérifier cette compatibilité – Une liste des jeux Wii™ compatibles peut également être consultée sur notre site.)
2/6

FONCTIONS AVANCÉES
• Bouton INTERUPTEUR POWER (13) :
-Position OFF = la manette est éteinte (et n’use pas les piles).
-Position ON = la manette est allumée.
• Bouton INTERUPTEUR MOTOR (13) :
-Position OFF = le mode vibration est désactivé (économise les piles).
-Position ON = le mode vibration est activé (consomme davantage d'énergie).
•Boutons CONNECT (8 et 9)
La connexion entre la manette et le récepteur s’effectue automatiquement.
Ces 2 boutons vous permettront d’établir la connexion en cas d’échec ou pour l’utilisation de plusieurs manettes Wireless en même temps.
-Les 2 Leds sont allumés = présence d'un signal entre la manette et le récepteur.
-Les 2 Leds clignotent rapidement = aucun signal entre la manette et le récepteur.
-Les 2 Leds sont éteints = la manette est en mode veille ou éteinte
-Les 2 Leds clignotent lentement = il convient de changer les piles.
• MODE VEILLE :
-La manette s'éteint automatiquement après 5 minutes d'inactivité.
-Pour la réactiver, appuyez sur START
•Bouton TURBO (7) :
Ce bouton permet de répéter une action en continu tout en gardant votre doigt appuyé sur un bouton. (exemple : pour les fonctions de tir ou de frappe)
-Appuyez simultanément sur le bouton TURBO et sur le bouton correspondant à l'action que vous souhaitez répéter.
-Le mode Turbo est désormais activé.
-Pour désactiver le mode Turbo, répétez cette procédure. Le mode Turbo est désormais désactivé.
•Bouton SLOW (3) :
Ce bouton permet de ralentir une action en activant de manière répétée la fonction START/PAUSE
-Appuyez sur le bouton SLOW pour activer la fonction.
-Appuyez de nouveau sur le bouton pour la désactiver.
3/6
PROGRAMMATION DES BOUTONS / STICKS ANALOGIQUES / CROIX MULTIDIRECTIONNELLE
Tous les boutons, les directions des sticks et les directions de la croix peuvent être programmés. Le bouton MAPPING (6) vous permettra en effet d’inverser les fonctions de votre choix.
•Exemples d’applications possibles :
-Inverser les boutons A et B
-Remplacer les boutons R et L par la direction haut/bas du mini-stick droit (pour les jeux de course)
-Inverser les deux sticks analogiques (Dans ce cas, il est nécessaire de basculer les quatre
directions du premier stick vers les quatre directions du second.)
- Inverser le D-Pad avec un stick analogique (Dans ce cas, il est nécessaire de basculer les quatre directions du D-Pad vers les quatre directions du stick désiré.)
• Procédure de programmation/inversion : |
|
|
|
||||
|
Etapes |
|
Action |
|
|
LED (11) |
|
|
|
|
|
(de la manette) |
|
||
|
|
|
|
|
|
|
|
|
1 |
|
Pressez et relâchez le bouton MAPPING (6) |
|
CLIGNOTE |
|
|
|
|
|
|
||||
|
|
|
LENTEMENT |
|
|||
|
|
|
|
|
|
|
|
|
2 |
|
Pressez et relâchez le bouton ou la direction |
|
CLIGNOTE |
|
|
|
|
à inverser |
|
RAPIDEMENT |
|
||
|
|
|
|
|
|||
|
3 |
|
Pressez et relâchez le bouton ou la direction |
|
ALLUME |
|
|
|
|
où vous désirez placer votre fonction |
|
|
|||
|
|
|
|
|
|
||
|
|
|
Les deux fonctions sont désormais inversées |
|
|
|
|
• Retour à la programmation « par défaut » (pour effacer vos programmations):
|
|
|
|
|
|
|
|
|
Etapes |
|
Action |
|
LED (11) |
|
|
|
|
|
|
(de la manette) |
|
||
|
|
|
|
|
|
|
|
|
1 |
|
Pressez et maintenez appuyé le bouton MAPPING (6) |
|
CLIGNOTE |
|
|
|
|
|
|
||||
|
|
pendant 2 secondes |
|
LENTEMENT |
|
||
|
|
|
|
|
|||
|
2 |
|
Relâchez le bouton MAPPING (6) |
|
ALLUME |
|
|
|
|
|
Vos programmations sont désormais effacées |
|
|
|
|
Veuillez noter que vos programmations disparaîtront également à chaque déconnexion et redémarrage de la manette ou de la console.
UTILISATION SIMULTANEE DE PLUSIEURS MANETTES WIRELESS
(en mode Multijoueur)
Vous pouvez utiliser jusqu’à 4 manettes Wireless simultanément (en mode multijoueur). Pour ce faire, la détection des canaux doit absolument s’effectuer manuellement.
• Procédure :
-Appuyez simultanément pendant 2 secondes sur les 2 boutons CONNECT de la manette et du récepteur désiré (8 et 9).
-Effectuez la même opération pour les autres joueurs.
Une fois la connexion établie, les voyants cessent de clignoter et restent allumés en permanence.
4/6

FIXATION DU RECEPTEUR
Utilisez les 2 patins adhésifs inclus afin de fixer parfaitement votre récepteur sur le côté de votre console
SUPPORT TECHNIQUE
Si vous rencontrez un problème avec votre produit, rendez-vous sur le site http://ts.thrustmaster.com et cliquez sur Support Technique. Vous aurez alors accès à différents services (Foire Aux Questions (FAQ), dernières versions des pilotes et logiciels) susceptibles de résoudre votre problème. Si le problème persiste, vous pouvez contacter le support technique des produits Thrustmaster (« Support Technique ») :
Par e-mail :
Pour bénéficier du support technique par e-mail, vous devez d’abord vous enregistrer en ligne. Les informations fournies vont permettre aux techniciens de résoudre plus rapidement votre problème. Cliquez sur Enregistrement à gauche de la page Support technique et suivez les instructions à l’écran. Si vous êtes déjà enregistré, renseignez les champs Nom d’utilisateur et Mot de passe puis cliquez sur Connexion.
Par téléphone (si vous n’avez pas d’accès Internet) :
|
Canada |
|
1-866-889-2181 |
|
Du lundi au vendredi de 7h à 11h et de 12h à 17h |
|
|
|
Le samedi et le dimanche de 7h à 12h |
||
|
|
Gratuit |
|
||
|
|
|
|
(Heure de l’Est) |
|
|
|
|
|
|
|
|
France |
0 826 09 21 03 |
|
Du lundi au vendredi de 13h à 17h et de 18h à 22h |
|
|
|
Numéro Indigo® |
|
Le samedi de 9h à 13h et de 14h à 20h |
|
|
|
|
(0,15€ TTC/minute*) |
|
Le dimanche de 10h à 13h et de 14h à 17h |
|
Suisse |
|
0842 000 022 |
|
Du lundi au vendredi de 13h à 17h et de 18h à 22h |
|
|
|
Le samedi de 9h à 13h et de 14h à 20h |
||
|
|
Tarif d’une communication locale |
|
||
|
|
|
|
Le dimanche de 10h à 13h et de 14h à 17h |
|
|
|
|
|
|
|
|
Belgique |
078 16 60 56 |
|
Du lundi au vendredi de 13h à 17h et de 18h à 22h |
|
|
|
Tarif d’une communication |
|
Le samedi de 9h à 13h et de 14h à 20h |
|
|
|
|
nationale |
|
Le dimanche de 10h à 13h et de 14h à 17h |
* Tarif indicatif (hors coût de mise en relation)
5/6
INFORMATIONS RELATIVES À LA GARANTIE
Dans le monde entier, Guillemot Corporation S.A. (« Guillemot ») garantit au consommateur que le présent produit Thrustmaster est exempt de défauts matériels et de vices de fabrication, et ce, pour une période de deux
(2) ans à compter de la date d’achat d’origine. Si, au cours de la période de garantie, le produit semble défectueux, contactez immédiatement le Support Technique qui vous indiquera la procédure à suivre. Si le défaut est confirmé, le produit devra être retourné à son lieu d’achat (ou tout autre lieu indiqué par le Support Technique).
Dans le cadre de la garantie, le consommateur bénéficiera, au choix du Support Technique, du remplacement ou de la réparation du produit défectueux. Lorsque la loi applicable l’autorise, toute responsabilité de Guillemot et ses filiales (y compris pour les dommages indirects) se limite à la réparation ou au remplacement du produit Thrustmaster. Les droits légaux du consommateur au titre de la législation applicable à la vente de biens de consommation ne sont pas affectés par la présente garantie.
Cette garantie ne s’appliquera pas : (1) si le produit a été modifié, ouvert, altéré, ou a subi des dommages résultant d’une utilisation inappropriée ou abusive, d’une négligence, d’un accident, de l’usure normale, ou de toute autre cause non liée à un défaut matériel ou à un vice de fabrication ; (2) en cas de non-respect des instructions du Support Technique ; (3) aux logiciels non-édités par Guillemot, lesdits logiciels faisant l’objet d’une garantie spécifique accordée par leurs éditeurs.
Stipulations additionnelles à la garantie
Aux États-Unis d’Amérique et au Canada, cette garantie est limitée au mécanisme interne et au boîtier externe du produit. Toute garantie implicite applicable, incluant les garanties de qualité marchande ou d’adaptation à un usage particulier, est limitée à deux (2) ans à compter de la date d’achat et soumise aux conditions de la présente garantie limitée. En aucun cas, Guillemot Corporation S.A. ou ses sociétés affiliées ne sauraient être tenues responsables envers qui que ce soit de tous dommages indirects ou dommages accessoires résultant du non-respect des garanties expresses ou implicites. Certains États/Provinces n’autorisent pas la limitation sur la durée d’une garantie implicite, ou l’exclusion ou la limitation de responsabilité pour les dommages indirects ou accessoires, de sorte que les limitations ou exclusions ci-dessus peuvent ne pas vous être applicables. Cette garantie vous confère des droits spécifiques ; vous pouvez également bénéficier d’autres droits qui peuvent différer d’un État/Province à l’autre.
COPYRIGHT
© 2007 Guillemot Corporation S.A. Tous droits réservés. Thrustmaster® est une marque déposée de Guillemot Corporation S.A. Wii, Wiimote, Gamecube et Virtual Console sont des marques commerciales de Nintendo Co., Ltd. Toutes les autres marques déposées et noms commerciaux sont reconnus par les présentes et sont la propriété de leurs propriétaires respectifs. Illustrations non contractuelles. Le contenu, la conception et les spécifications sont susceptibles de changer sans préavis et de varier selon les pays. Fabriqué en Chine.
RECOMMANDATION RELATIVE À LA PROTECTION DE L’ENVIRONNEMENT
En fin de vie, ce produit ne doit pas être éliminé avec les déchets ménagers normaux mais déposé à un point de collecte des déchets d'équipements électriques et électroniques en vue de son recyclage.
Ceci est confirmé par le symbole figurant sur le produit, le manuel utilisateur ou l’emballage.
En fonction de leurs caractéristiques, les matériaux peuvent être recyclés. Par le recyclage et par les autres formes de valorisation des déchets d'équipements électriques et électroniques, vous contribuez de manière significative à la protection de l’environnement.
Veuillez consulter les autorités locales qui vous indiqueront le point de collecte concerné.
FAQ, astuces et pilotes sur www.thrustmaster.com
6/6
Loading...