


 Loading...
ENGLISH: Bootloader method: how to wake your racing wheel if it is no longer recognized on PlayStation®3 or PC (i.e. in the event of firmware loss)
FRANÇAIS : « Méthode BOOTLOADER » : Procédure pour réveiller votre volant s’il n’est plus du tout reconnu sous PlayStation®3 ou sur PC (en cas de perte de firmware)
DEUTSCH: Bootloader method: how to wake your racing wheel if it is no longer recognized on PlayStation®3 or PC (i.e. in the event of firmware loss)
NEDERLANDS: Bootloader-methode: hoe het racestuur weer tot leven te wekken als het niet meer wordt herkend op een PlayStation®3 of pc (d.w.z. de firmware werkt niet meer)
1
ITALIANO: Metodo Bootloader: come riattivare il tuo volante qualora non venisse più riconosciuto dalla PlayStation®3 o dal PC (ovvero nel caso di perdita del firmware)
ESPAÑOL: Método Bootloader: procedimiento para despertar a tu volante de carreras si ya no lo reconocen ni la PlayStation®3 ni el PC (p.ej. en caso de pérdida de firmware)
PORTUGUÊS: Método Bootloader: como reactivar o volante se este deixar de ser reconhecido na PlayStation®3 ou no PC (isto é, na eventualidade de perda do firmware)
РУССКИЙ: Использование загрузчика: как активизировать рулевую систему, если она перестала распознаваться на PlayStation®3 или ПК (т. е., в случае сбоя прошивки)
ΕΛΛΗΝΙΚΑ: Μέθοδος φόρτωσης εκκίνησης: πώς να ζωντανέψετε την τιμονιέρα σας, εάν δεν την αναγνωρίζει πλέον το PlayStation®3 ή το PC (δηλ. σε περίπτωση απώλειας υλικολογισμικού)
TÜRKÇE: Bootloader yöntemi: yarış direksiyonunuz PlayStation®3 veya bilgisayar tarafından algılanmadığında (yani, aygıt yazılımı hatası durumunda) direksiyonun nasıl uyandırılacağı
: : PlayStation®3PC ( )
2
ENGLISH:
Bootloader method: how to wake your racing wheel if it is no longer recognized on PlayStation®3 or PC
(i.e. in the event of firmware loss)
Required system: PC running Windows® XP, Vista or 7.
1) If you haven’t already done so, install the DRIVERS FORCE FEEDBACK (Package 2011_TTRS_5) + Firmware V37 package on your PC. You can download it here: http://ts.thrustmaster.com/eng/index.php?pg=view_files&gid=1&fid=2&pid=316&cid=15
During the installation:
-DO NOT CONNECT the racing wheel to the PC before being requested to do so.
-Connect the racing wheel directly to the PC’s USB port. We advise against using a USB hub during this procedure.
-DO NOT CLICK on any windows that may appear during the update.
2)Restart the computer.
3)After restarting the computer:
-Remove the USB plug from the computer.
-Simultaneously press buttons L3 and R3 (located on the racing wheel’s base), then connect (without releasing L3 and R3) the USB plug to the PC.
-After connecting the USB plug to the PC, release buttons L3 and R3.
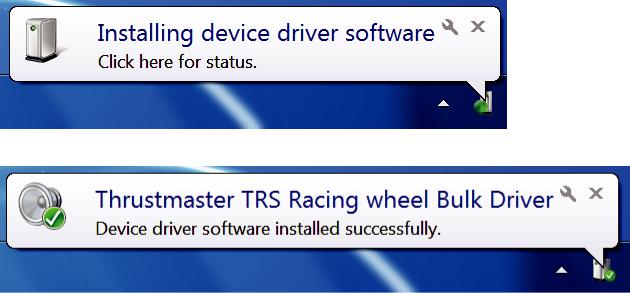
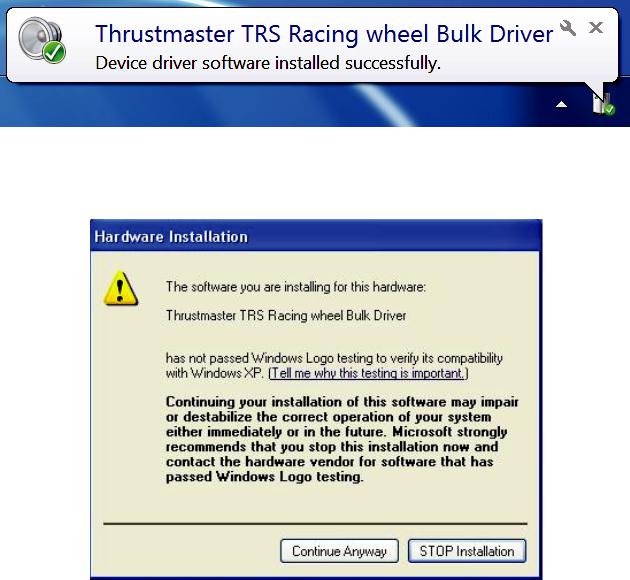
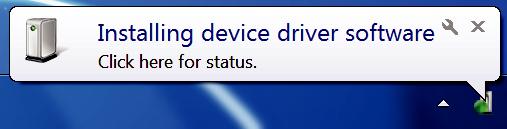
-The following message appears in the lower right-hand corner of your screen (do not do anything or click on any window during the automatic installation procedure).
-After the installation, a second message appears:
3
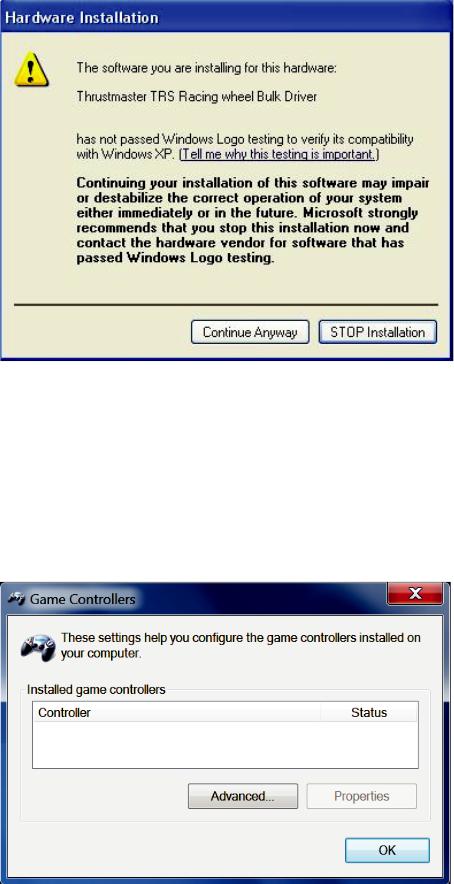
In Windows® XP, if the following window appears, click Continue Anyway to force the installation to run (but do not click on any other windows that may appear).
Your racing wheel’s bulk drivers are now installed.
Notes:
-During the installation, the racing wheel does not run the auto-calibration procedure (i.e. the racing wheel does not automatically move to the left and right) when connected to the PC: this is normal.
-The racing wheel’s MODE LED is off: this is normal.
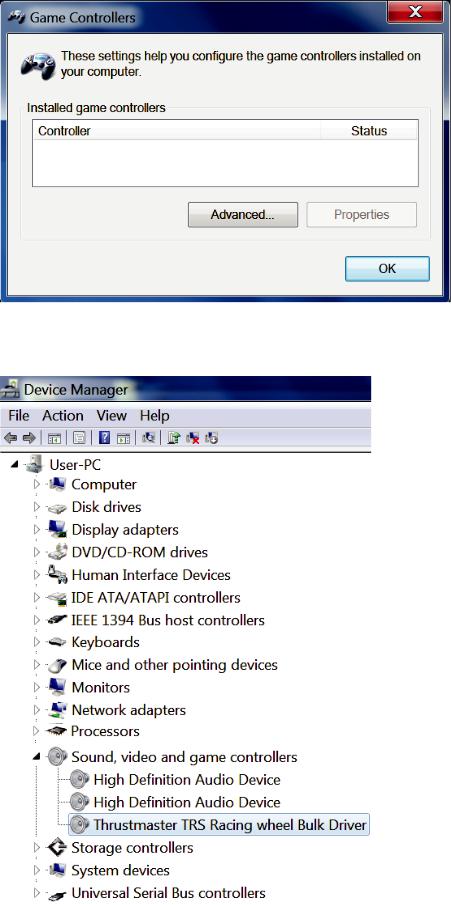
-The racing wheel is not detected in the Control Panel: this is normal.
4

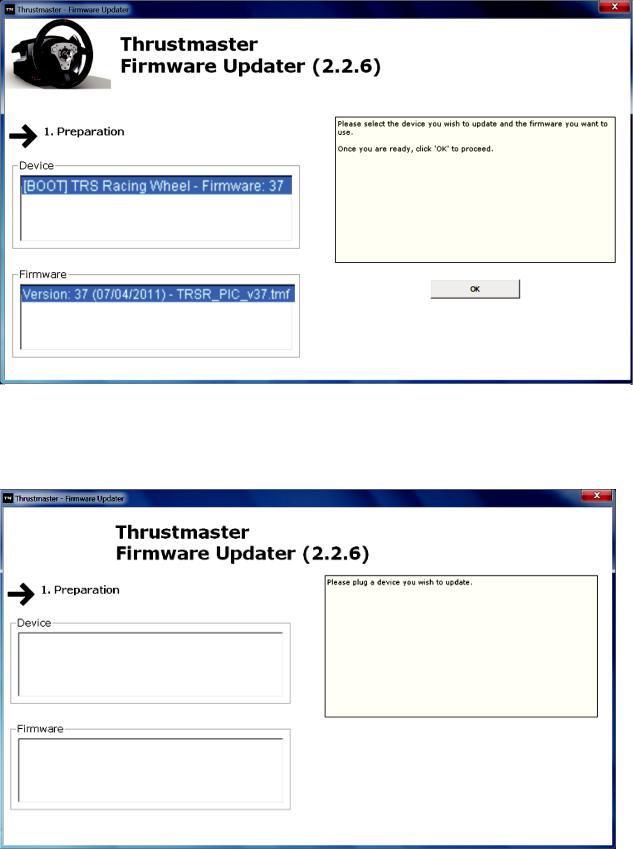
- The racing wheel is detected in the Device Manager, in the Sound, video and game controllers section, under the name Thrustmaster TRS Racing Wheel Bulk Driver: this is normal.
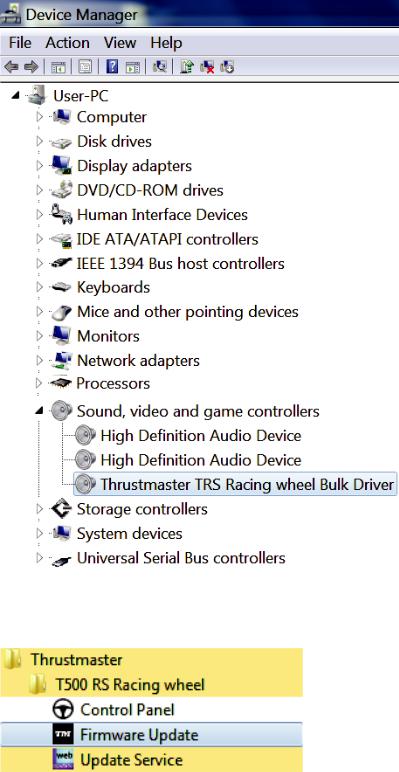
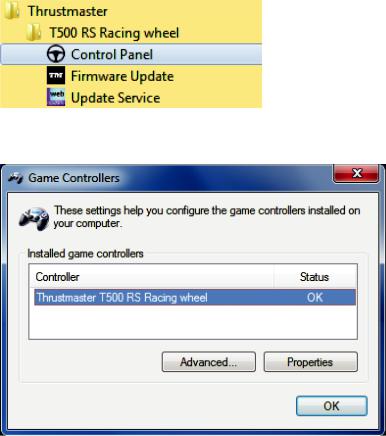
4) Select Start > All Programs > Thrustmaster > T500 RS Racing Wheel, then click Firmware Update.
5
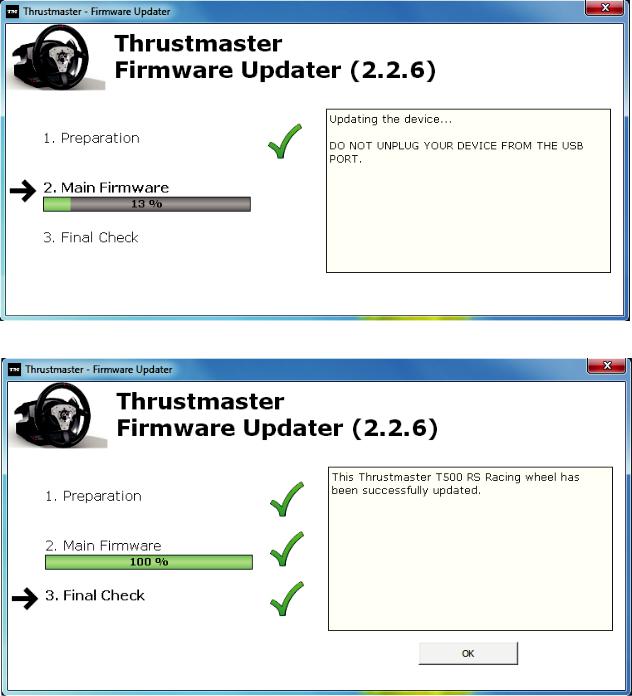
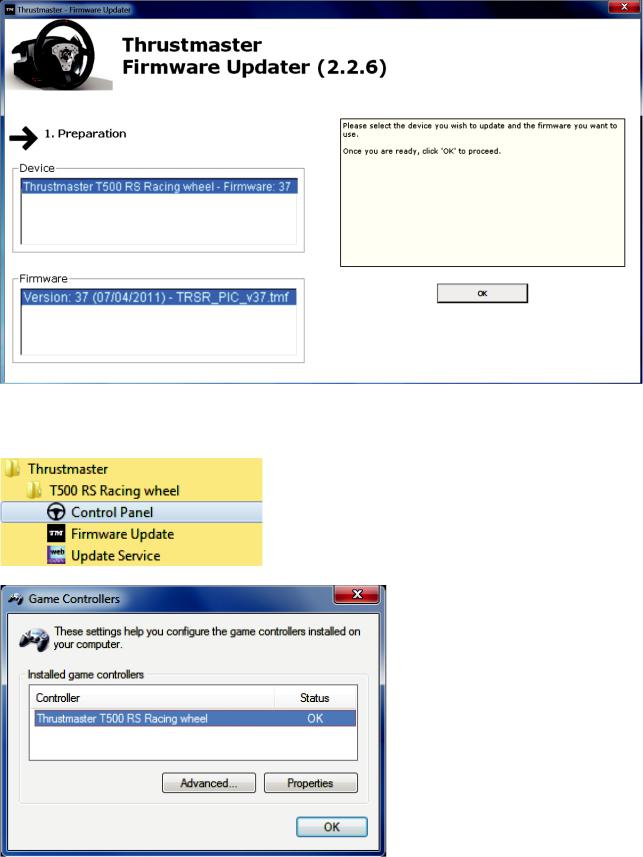
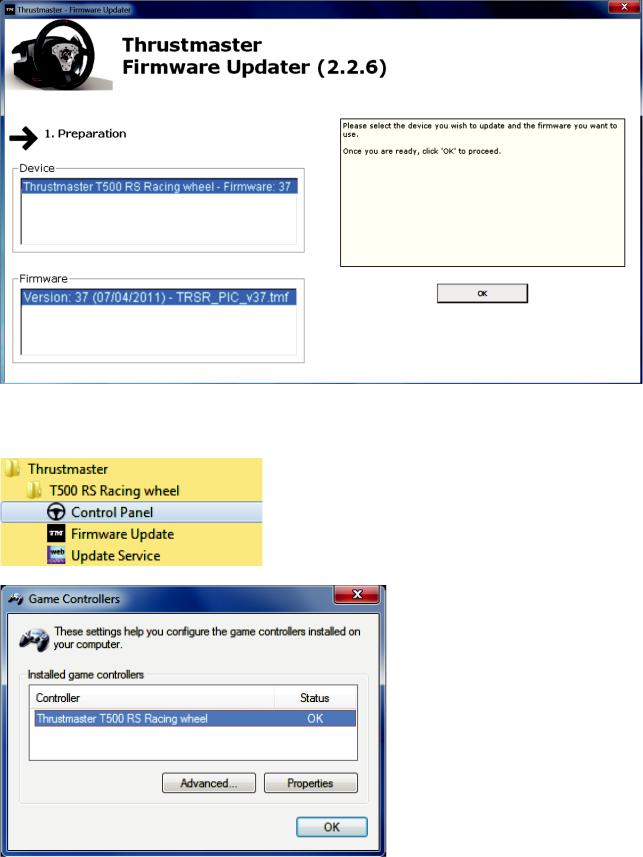
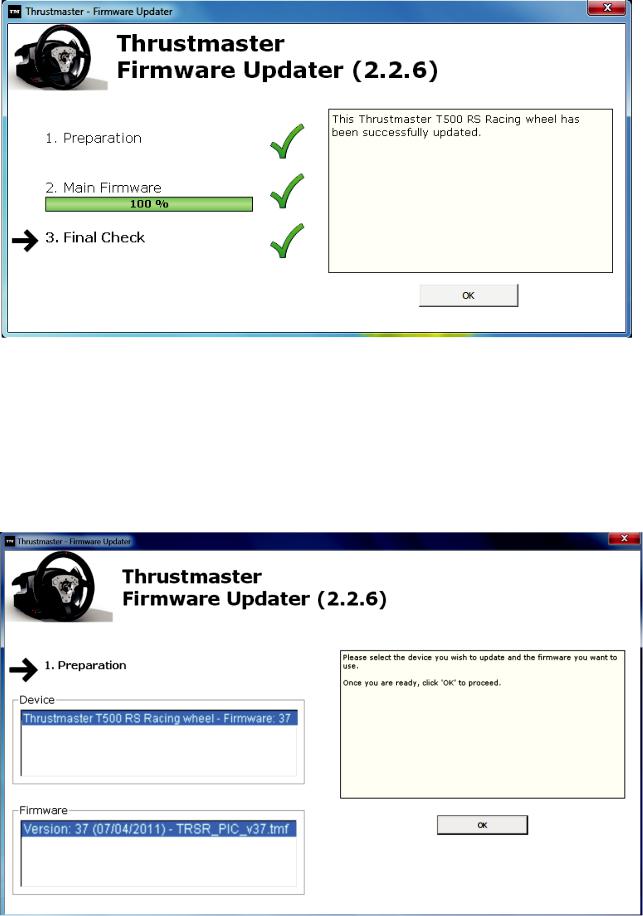
5) The Thrustmaster – Firmware Updater window appears onscreen.
-The Device field shows [BOOT] TRS Racing Wheel – Firmware:....
-The Firmware field displays the firmware version that will be applied to the device.
Note: If nothing appears in the Device or Firmware fields, please repeat the installation procedure from the beginning, connecting the racing wheel’s USB plug to another USB port on the PC (or try running the procedure on another PC).
6
6) Click OK to update the firmware.
IMPORTANT: DO NOT DISCONNECT the racing wheel from the USB port! DO NOT DISCONNECT the racing wheel’s power adapter during the firmware update!
The firmware updater will inform you if the update procedure ran successfully.
The racing wheel then runs the auto-calibration procedure (i.e. the racing wheel automatically moves to the left and right), then the MODE LED lights up again.
7
7) Click OK to return to the firmware updater main window, then click  to exit the program.
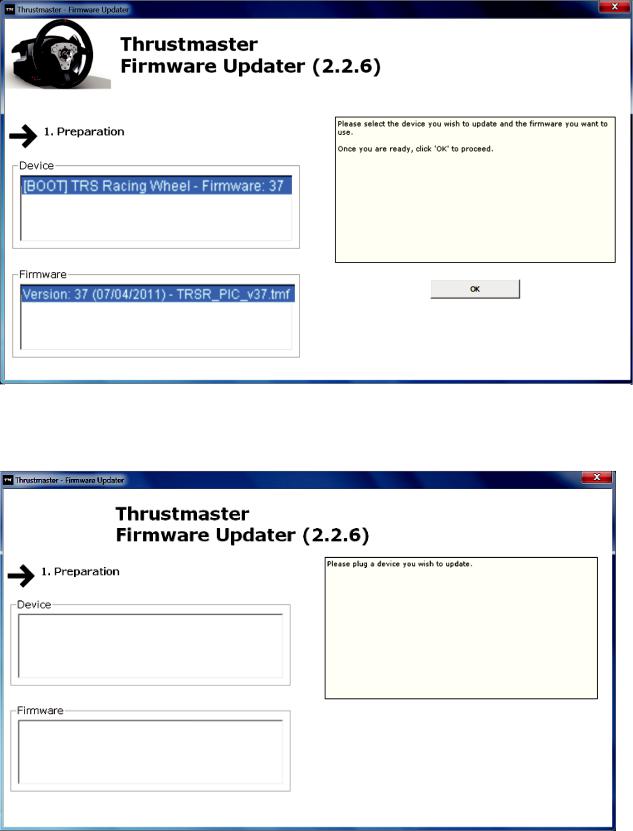
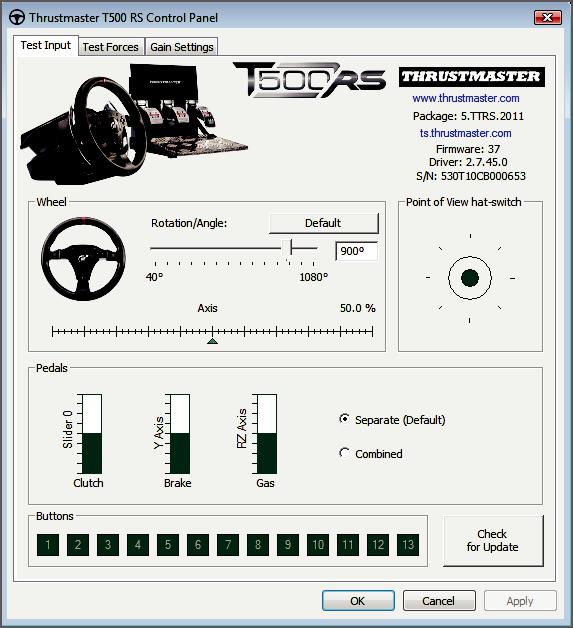
8) Once the firmware has been updated, check that the racing wheel is running correctly in the Control Panel (Start > All Programs > Thrustmaster > T500 RS Racing Wheel > Control Panel).
- The racing wheel appears under the name Thrustmaster T500 RS Racing wheel.
- Click Properties to test the racing wheel.
8

You are now ready to race!
Note: If the procedure fails, please repeat the installation procedure from the beginning, connecting the racing wheel’s USB plug to another USB port on the PC (or try running the procedure on another PC).
If the problem remains, please contact Technical Support, who will then provide other solutions.
9

FRANÇAIS :
« Méthode BOOTLOADER » : Procédure pour réveiller votre volant s’il n’est plus du tout reconnu sous PlayStation®3 ou sur PC
(en cas de perte de firmware)
Système requis: PC avec Windows® XP, Vista ou 7.
1) Si ce n’est déjà fait, installez sur votre PC les « DRIVERS FORCE FEEDBACK (Package 2011_TTRS_5) + Firmware V37 » disponibles ici : http://ts.thrustmaster.com/eng/index.php?pg=view_files&gid=1&fid=2&pid=316&cid=15
Durant cette procédure :
-NE CONNECTEZ PAS le volant à votre PC avant d’être invité à le faire.
-Le volant doit être connecté directement au port USB de l’ordinateur. Nous déconseillons l’utilisation d’un hub USB pour cette procédure.
-NE CLIQUEZ PAS dans les fenêtres Windows qui peuvent apparaître lors de la mise à jour.
2)Redémarrez l’ordinateur.
3)Après le redémarrage :
-Débranchez le connecteur USB de l’ordinateur
-Appuyez simultanément sur les touches L3 + R3 (situées sur la base de votre volant) puis branchez (tout en maintenant appuyé L3 + R3) le connecteur USB sur l’ordinateur.
-Une fois le connecteur USB branché, relâchez les touches L3 + R3
-Ce message apparaît alors en bas à droite de votre écran (ne rien faire et ne pas cliquer pendant l’installation automatique)
-Après l’installation, ce 2ème message apparaît :
10
Sous Windows® XP, si cette fenêtre apparaît, cliquez alors sur « CONTINUE » pour forcer l’installation (ne pas cliquer sur les autres fenêtres qui pourraient apparaître).
Les pilotes BULK de votre volant sont désormais installés.
Remarques :
-Lors de cette opération, le volant ne s’est pas autocalibré (mouvements automatiques de la roue de gauche à droite) lors du branchement : ceci est normal.
-La LED MODE du volant est éteinte : ceci est normal.
-Le volant n’est pas détecté dans le Control Panel : ceci est normal
11
- Le volant est détecté dans « Device Manager » / « Sound,video and game controllers » sous le nom « Thrustmaster TRS Racing Wheel Bulk Driver » : ceci est normal
4) Dans le menu « Démarrer > Tous les programmes > Thrustmaster > T500 RS Racing Wheel », cliquez sur « Firmware Update ».
12
5) La fenêtre « Thrustmaster – Firmware Updater » s’affiche à l’écran.
-« Device » indique le nom « [BOOT] TRS Racing Wheel – Firmware :.. ».
-« Firmware » indique la version du firmware qui sera appliquée au périphérique.
Remarque : Si rien ne s’affiche dans « Device » ni dans « Firmware », répétez l’ensemble de la procédure depuis de début en branchant le connecteur USB sur un autre port USB de votre ordinateur (ou effectuez l’opération sur un autre ordinateur).
13

6) Cliquez sur OK pour effectuer la mise à jour du firmware.
IMPORTANT : NE DÉCONNECTEZ PAS votre volant du port USB et
NE DÉBRANCHEZ PAS son bloc d’alimentation pendant la mise à jour du firmware !
Le programme de mise à jour vous indiquera ensuite si la procédure s’est déroulée avec succès.
Le volant s’autocalibre (mouvements automatiques de la roue de gauche à droite) puis la led MODE s’allume de nouveau
14
7) Cliquez sur OK pour revenir à la fenêtre principale du programme de mise à jour, puis cliquez sur  pour quitter le programme.
8) Une fois la mise à jour du firmware effectuée, assurez-vous que le volant fonctionne correctement dans le Control Panel (Démarrer > Tous les programmes > Thrustmaster > T500 RS Racing Wheel > Control Panel).
- Le volant apparaît sous le nom « Thrustmaster T500 RS Racing wheel ».
- Cliquez sur « PROPRIETES » pour tester le volant.
15
Vous êtes maintenant prêt à jouer !
Remarque : En cas d’échec lors de cette procédure, répétez l’ensemble de la procédure depuis de début en branchant le connecteur USB sur un autre port USB de votre ordinateur (ou effectuez l’opération sur un autre ordinateur).
Si le problème persite, veuillez contacter le support technique qui vous orientera vers d’autres solutions.
16

DEUTSCH:
Bootloader-Methode: Wie reaktivieren Sie Ihren Rennlenker falls dieser nicht mehr auf der PlayStation®3 oder dem PC erkannt wird (i.e. im Falle eines Firmwareausfalls)
Erforderliches Ssystem: PC mit Windows® XP, Vista oder 7.
1) Falls Sie dies nicht bereits getan haben, installieren Sie die FORCE FEEDBACK Treiber (Package 2011_TTRS_5) + Firmware V37 Pakete auf Ihrem PC. Sie können diese hier herunterladen: http://ts.thrustmaster.com/eng/index.php?pg=view_files&gid=1&fid=2&pid=316&cid=15
Während der Installation:
-SCHLIESSEN SIE den Rennlenker NICHT bevor Sie dazu aufgefordert werden an den PC an.
-Schließen Sie den Rennlenker direkt an den USB-Port Ihres PCs an. Wir raten dringend von der Benutzung eines USB-Hubs während dieser Prozedur ab.
-KLICKEN SIE NICHT auf irgendwelche Fenster, die während der Aktualisierung erscheinen könnten.
2)Starten Sie den Computer neu.
3)Nach dem Neustart des Computers:
-Ziehen Sie den USB-Stecker aus dem Computer.
-Drücken Sie gleichzeitig die Buttons L3 und R3 (zu finden an der Basis des Rennlenkers) und stecken dann (ohne dabei L3 und R3 loszulassen) den USBStecker wieder in den PC.
-Nach dem Einstecken des USB-Steckers in den PC, lassen Sie die Buttons L3 und R3 wieder los.
-Die folgende Nachricht erscheint in der unteren rechten Ecke des Bildschirms
(machen Sie nichts oder klicken auf jedwedes sich öffnendes Fenster während der automatischen Installationsprozedur).
17
- Nach der Installation erscheint eine zweite Nachricht:
Bei Windows® XP, falls das folgende Fenster erscheint, klicken Sie auf Installation fortsetzen, um die Installation dennoch durchzuführen (aber klicken Sie auf keinen Fall auf andere Fenster, die erscheinen könnten).
Die Treiber für Ihren Rennlenker werden nun installiert.
Anmerkungen:
-Während der Installation führt der Rennlenker die Auto-Kalibrierungsprozedur nicht durch (d. h. der Rennlenker bewegt sich nicht automatisch nach links und rechts) wenn dieser an den PC angeschlossen wird: Dies ist normal.
-Die MODE LED des Rennlenkers ist aus: Dies ist normal.
18
- Der Rennlenker wird im Control Panel nicht erkannt: Dies ist normal.
- Der Rennlenker wird im Gerätemanager unter dem Namen Thrustmaster TRS Racing Wheel Bulk Driver in der Sektion Audio-, Videound Gamecontroller erkannt: Dies ist normal.
19

4) Wählen Sie Start > Alle Programme > Thrustmaster > T500 RS Racing Wheel, klicken Sie dann auf Firmware Update.
5) Das Thrustmaster – Firmware-Updater Fenster erscheint auf dem Bildschirm.
-Das Geräte Feld zeigt [BOOT] TRS Racing Wheel – Firmware:....
-Das Firmware Feld zeigt die Firmwareversion an, die dem Gerät angelegt wird.
Anmerkung: Falls im Geräteoder Firmware-Fenster nichts angezeigt wird, führen Sie die Installationsprozedur erneut von Anfang an durch und schließen den USBStecker des Rennlenkers an einen anderen USB-Port an Ihrem Computer an (oder versuchen die Prozedur an einem anderen PC auszuführen).
20
6) Klicken Sie auf OK, um die Firmware zu aktualisieren.
WICHTIG: TRENNEN SIE AUF KEINEN FALL den Rennlenker vom USB-Port! TRENNEN SIE AUF KEINEN FALL das Netzteil des Rennlenkers während der Firmware-Aktualisierung vom Stromnetz!
Der Firmware-Updater informiert Sie wenn die Aktualisierung erfolgreich durchgeführt wurde.
21
Der Rennlenker führt nun die Auto-Kalibrierung durch (d. h. der Rennlenker bewegt sich automatisch nach links und rechts), dann leuchtet die MODE LED erneut auf.
7) Auf OK klicken, um zum Hauptfenster des Firmware-Updaters zurück zu kehren, klicken Sie dann auf  , um das Programm zu beenden.
22
8) Ist die Firmware aktualisiert, überprüfen Sie ob der Rennlenker im Control Panel korrekt aufgeführt wird (Start > Alle Programme > Thrustmaster > T500 RS Racing Wheel > Control Panel).
- Der Rennlenker wird unter der Bezeichnung Thrustmaster T500 RS Racing wheel aufgeführt.
- Auf Eigenschaften klicken, um den Rennlenker zu testen.
23

Sie können nun am Rennen teilnehmen!
Bitte beachten: Falls die Prozedur fehlschlägt, führen Sie die Installationsprozedur erneut von Anfang an durch und schließen den USB-Stecker des Rennlenkers an einen anderen USB-Port an Ihrem Computer an (oder versuchen die Prozedur an einem anderen PC auszuführen).
Falls das Problem weiterhin bestehen sollte, wenden Sie sich bitte an den technischen Support, der Ihnen andere Lösungen zur Verfügung stellen kann.
24
NEDERLANDS:
Bootloader-methode: hoe het racestuur weer tot leven te wekken als het niet meer wordt herkend op een PlayStation®3 of pc
(d.w.z. de firmware werkt niet meer)
Vereist systeem: pc met Windows ® XP, Vista of 7.
1) Installeer de bundel DRIVERS FORCE FEEDBACK (Package 2011_TTRS_5) + Firmware V37 op uw pc (als dat nog niet is gebeurd). U kunt deze bundel hier downloaden: http://ts.thrustmaster.com/eng/index.php?pg=view_files&gid=1&fid=2&pid=316&cid=15
Tijdens de installatie:
-SLUIT HET RACESTUUR PAS AAN op uw pc als de software daarom vraagt.
-Het stuur moet rechtstreeks op een USB-poort van de computer worden aangesloten. Tijdens deze installatie mag het stuur niet via een USB-hub op een pc zijn aangesloten.
-KLIK IN GEEN ENKEL Windows-dialoogvenster dat tijdens het bijwerken van de firmware wordt weergegeven.
2)Start de computer opnieuw op.
3)Nadat de computer opnieuw is opgestart:
-Koppel de USB-kabel los tussen stuur en computer.
-Druk gelijktijdig op de knoppen L3 en R3 op de voet van het racestuur en sluit vervolgens de USB-stekker aan op de pc zonder de knoppen L3 en R3 los te laten.
-Sluit nu de USB-stekker op de pc aan en laat daarna de knoppen L3 en R3 los.
-Het volgende bericht wordt weergegeven rechtsonder in het scherm (doe niets en klik nergens op tijdens de automatische installatieprocedure).
25
Loading...