


User’s Manual
TECHNICAL FEATURES |
|
|
|
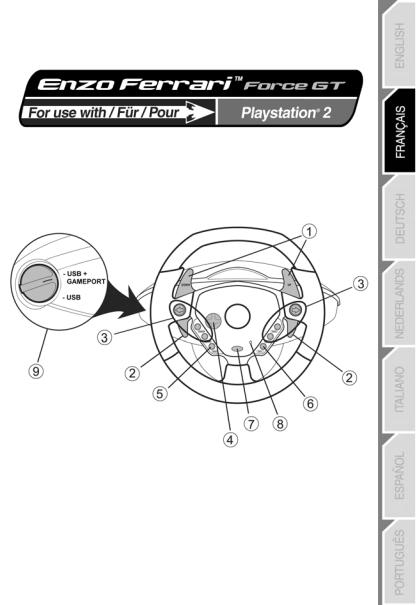
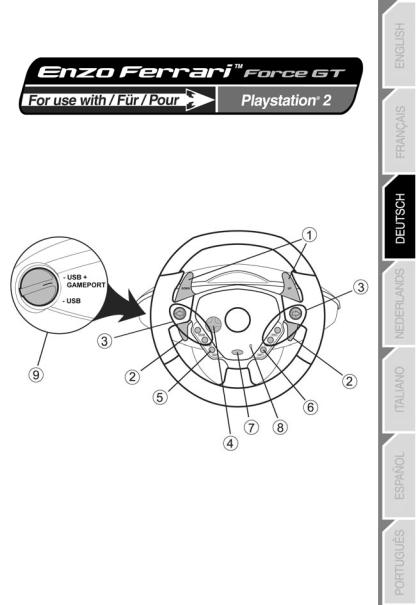
1 |
2 digital gearshift levers |
5 |
Select button |
2 |
2 progressive analog gas |
6 |
Start button |
|
and brake levers |
7 |
Mode button |
3 |
Action buttons |
8 |
Mode LED |
4 |
D-pad |
9 |
USB / USB + GAMEPORT switch |
1/4

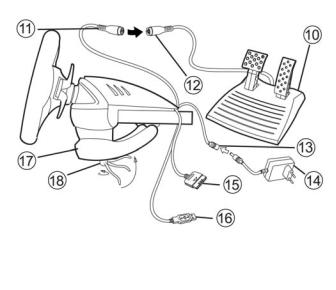
10 |
Analog pedal set |
15 |
Console connector (GAMEPORT) |
11 |
Pedal connector |
16 |
USB connector |
12 |
Pedal cable |
17 |
Table clamp |
13 |
Adapter connector |
18 |
Clamp screw |
14 |
Power adapter |
|
|
INSTALLING THE WHEEL
Fixing the wheel in place
1.Place the wheel on a table or other flat surface.
2.Place the clamp screw (18) in the table clamp (17) and then screw the clamping unit into the hole on the underside of the wheel until firmly fixed in place. Do not turn the screw too tightly, as you risk damaging the clamping unit and/or the table.
Preparing the wheel
1.Connect the pedal cable (12) to the pedal connector (11).
2.Connect the adapter connector (13) to the power adapter (14) and plug the adapter into an electrical outlet.
Connecting the wheel
A - To play a standard racing game with your Enzo wheel recognized as a wheel:
1.Switch off your console before connecting the wheel.
2.Connect the GAMEPORT console connector (15) to port 1 of your console and connect the USB connector (16) to the upper USB port.
3.Set the USB / USB + GAMEPORT switch (9) to the position corresponding to the type of game you will be playing. (Please refer to the Settings chart provided in the appendix.)
2/6

SELECTING A SWITCH POSITION
Switch in “USB” position
This position should be selected for games which do not require you to connect a gamepad in addition to the USB wheel. However, in order to avoid having to repeatedly connect/disconnect the GAMEPORT connector, we recommend that you simply connect it to your console as well as your wheel’s USB connector. Most recent games will use this position.
Switch in “USB + GAMEPORT” position
This position should be selected for games which require you to connect a gamepad in addition to the USB wheel (the gamepad allows you to access the setup options and have the game recognize your Force Feedback wheel). With the Enzo wheel, simply connect both the USB and GAMEPORT connectors simultaneously to replace the gamepad.
4.Switch on your console. Your wheel will auto-calibrate (the wheel will move during this procedure) and the Mode LED (8) will turn red to indicate that Force Feedback mode is enabled.
5.In your game’s controller setup options, identify the Enzo as a Force Feedback wheel.
You are now ready to play!
B - To play a motorbike, quad or other type of racing game with your Enzo wheel emulating a gamepad:
1.Switch off your console before connecting the wheel.
2.Connect the GAMEPORT console connector (15) to port 1 of your console and connect the USB connector (16) to the upper USB port. The position of the USB / USB + GAMEPORT switch (9) is not important.
3.Switch on your console. While the game is loading up, disconnect the USB connector (16) once the Playstation 2 logo is displayed, and then reconnect it immediately. (USB RESET)
4.Your wheel will auto-calibrate (the wheel will move during this procedure) and the Mode LED (8) will turn red to indicate that Force Feedback mode is enabled.
5.In this type of game, your wheel will be recognized as a gamepad. If necessary, verify and modify its configuration in the controller setup options (the left analog stick for steering, the right analog stick for the pedal set).
Note: in this type of game, it will not be possible to disable Force Feedback mode, or use “Precision Drive” mode.
You are now ready to play!
3/4
ADVANCED FUNCTIONS
Calibrating the wheel
Your wheel is auto-calibrated by default for console use. Nevertheless, we recommend that you calibrate both the wheel and the pedal set manually if your game offers this function.
Enabling/disabling Force Feedback
By default, Force Feedback and auto-recentering are enabled. In some games and on some courses, however, it may be helpful to disable Force Feedback in order to improve your performance. Press the Mode button (7) to enable/disable Force Feedback:
-Auto-recentering enabled only: the Mode LED (8) turns green.
-Force Feedback and auto-recentering enabled: the Mode LED (8) turns red.
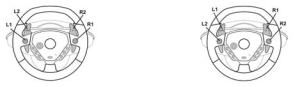
“Sequential gearbox inversion” function
In most games, gearshift functions are assigned to either the L1, R1 buttons or the L2, R2 buttons by default.
The “Sequential gearbox inversion” function allows you to assign gear shifting directly to the 2 digital gearshift levers (1) in 100% of games.
To switch from “Normal sequential gearbox” mode to “Inverted sequential gearbox” mode, press the A,Band Mode buttons simultaneously.
The Mode LED (8) flashes red for 2 seconds when you switch to “Inverted” mode. The Mode LED (8) flashes green for 2 seconds when you return to “Normal” mode.
Normal Sequential Gearbox |
Inverted Sequential Gearbox |
Please refer to the Settings chart provided in the appendix to find the type of sequential gearbox that corresponds to your racing game.
Precision Drive mode
Precision Drive mode has been specially developed with a view to enhancing performance.
Depending on the game, it may help you to beat your best times (and those of your opponents) or make it easier to successfully complete the different driving events.
This new exclusive mode calculates and redistributes your Enzo wheel’s various analogy points without generating any dead zones (as may be the case with other wheels which allow you to adjust their sensitivity).
How appropriate and effective this mode will be depends on the game you are playing and the course you are racing on. In this mode, the wheel is more sensitive and will allow you to powerslide more easily and thus avoid an excessive loss of speed, in courses with hairpin turns for example.
In games where the wheel’s reactions are very sensitive (such as F1 racing, for example), you will therefore probably want to avoid using this mode.
We recommend that you use this mode with an interior view for maximum effectiveness.
4/6

Please refer to the Settings chart provided in the appendix to find out whether this mode is recommended for your game.
To switch to Precision Drive mode, press the D-pad (4) and the Mode button (7) simultaneously. If Force Feedback mode is enabled, the Mode LED (8) flashes red.
If Force Feedback mode is disabled, the Mode LED (8) flashes green.
TROUBLESHOOTING
-My wheel doesn’t work in the game: Change the position of the USB / USB + GAMEPORT switch (9) and then restart your console with the switch in the new position.
-My wheel doesn’t seem to be calibrated properly: Please consult the section in your game’s manual regarding settings for details on how to configure your wheel in the game.
-My wheel moves on its own: This is normal. The auto-recentering function starts up each time you switch on the console and/or let go of the wheel in an uncentered position. Recentering is characterized by back-and-forth movements (left-right-left…) which do not affect playability. To stop these movements, simply place your hands on the wheel. If you will be taking an extended break, unplug the wheel’s power adapter. Plug it back in again before returning to your game.
-My wheel stays turned to one side (left or right) after auto-calibration: This is normal in some games. The wheel will recenter itself once you have identified it as a wheel in the game’s setup options. If the problem persists, disconnect your wheel and repeat the installation.
TECHNICAL SUPPORT
If you encounter a problem with your product, please go to http://ts.thrustmaster.com and click Technical Support. From there you will be able to access various utilities (Frequently Asked Questions (FAQ), the latest versions of drivers and software) that may help to resolve your problem. If the problem persists, you can contact the Thrustmaster products technical support service (“Technical Support”):
By email:
In order to take advantage of technical support by email, you must first register online. The information you provide will help the agents to resolve your problem more quickly. Click Registration on the left-hand side of the Technical Support page and follow the on-screen instructions. If you have already registered, fill in the Username and Password fields and then click Login.
By telephone: |
|
|
|
|
|
||
|
United |
|
|
020 7216 0047 |
|
price of a national phone call, Monday to Friday from 12PM to 10PM |
|
|
Kingdom |
|
|
|
|
||
|
|
|
|
|
|
|
|
|
United |
|
|
|
price of a long distance phone call, Monday to Friday from 7AM to |
|
|
|
States / |
|
514-279-9911 |
|
|
||
|
|
|
5PM (Eastern time) |
|
|||
|
Canada |
|
|
|
|
||
|
|
|
|
|
|
||
|
Australia |
|
|
1902 262 514 |
|
$1.98/min, Monday to Friday from 9AM to 6PM |
|
|
Denmark |
|
|
82 33 28 58 |
|
price of a national phone call, Monday to Friday from 1PM to 10PM |
|
|
Finland |
|
|
09 81 71 01 54 |
|
price of a national phone call, Monday to Friday from 2PM to 11PM |
|
|
Norway |
|
|
23 50 01 16 |
|
price of a national phone call, Monday to Friday from 1PM to 10PM |
|
|
Sweden |
|
|
08-51992032 |
|
price of a national phone call, Monday to Friday from 1PM to 11PM |
|
5/4
Warranty information
Worldwide, Guillemot Corporation S.A. (“Guillemot”) warrants to the consumer that this Thrustmaster product will be free from material defects and manufacturing flaws for a period of two (2) years from the original date of purchase. Should the product appear to be defective during the warranty period, immediately contact Technical Support, who will indicate the procedure to follow. If the defect is confirmed, the product must be returned to its place of purchase (or any other location indicated by Technical Support).
Within the context of this warranty, the consumer’s defective product will, at Technical Support’s option, be either repaired or replaced. Where authorized by applicable law, the full liability of Guillemot and its subsidiaries (including for indirect damages) is limited to the repair or replacement of the Thrustmaster product. The consumer’s legal rights with respect to legislation applicable to the sale of consumer goods are not affected by this warranty.
This warranty shall not apply: (1) if the product has been modified, opened, altered, or has suffered damage as a result of inappropriate or abusive use, negligence, an accident, normal wear, or any other cause not related to a material defect or manufacturing flaw; (2) in the event of failure to comply with the instructions provided by Technical Support; (3) to software not published by Guillemot, said software being subject to a specific warranty provided by its publisher.
Additional warranty provisions
In the United States of America and in Canada, this warranty is limited to the product’s internal mechanism and external housing. Any applicable implied warranties, including warranties of merchantability and fitness for a particular purpose, are hereby limited to two (2) years from the date of purchase and are subject to the conditions set forth in this limited warranty. In no event shall Guillemot Corporation S.A. or its affiliates be liable for consequential or incidental damage resulting from the breach of any express or implied warranties. Some States/Provinces do not allow limitation on how long an implied warranty lasts or exclusion or limitation of incidental/consequential damages, so the above limitation may not apply to you. This warranty gives you specific legal rights, and you may also have other legal rights which vary from State to State or Province to Province.
COPYRIGHT
© Guillemot Corporation 2004. Thrustmaster® is a registered trademark of Guillemot Corporation S.A. Ferrari® is a registered trademark of Ferrari S.p.A. PlayStation® is a registered trademark of Sony Computer Entertainment Inc. All rights reserved. This product is not sponsored, endorsed or approved by Sony. Negcon™ is a trademark of Namco Ltd. All other trademarks and brand names are hereby acknowledged and are property of their respective owners. Illustrations not binding. Contents, designs and specifications are subject to change without notice and may vary from one country to another.
FAQs, tips and drivers available at www.thrustmaster.com
6/6
Manuel de l’utilisateur
CARACTÉRISTIQUES TECHNIQUES |
|
|
|
1 |
2 leviers numériques de changement de vitesse |
5 |
Bouton Select |
2 |
2 leviers analogiques pour l’accélération |
6 |
Bouton Start |
|
et le freinage progressifs |
7 |
Bouton Mode |
3 |
Boutons d’action |
8 |
Voyant lumineux Mode |
4 |
Croix multidirectionnelle |
9 Commutateur USB / USB + GAMEPORT |
|
|
|
1/6 |
|

10 |
Pédalier analogique |
15 |
Connecteur console (GAMEPORT) |
11 |
Connecteur pour le pédalier |
16 |
Connecteur USB |
12 |
Câble du pédalier |
17 |
Système de fixation à la table |
13 |
Connecteur pour l’adaptateur |
18 |
Vis de fixation |
14 |
Adaptateur secteur |
|
|
INSTALLATION DU VOLANT
Fixer le volant
1.Placez le volant sur une table ou autre surface plane.
2.Placez la vis de serrage (18) dans le système de fixation (17) puis vissez l’ensemble dans l’emplacement prévu, sous le volant, jusqu’à ce que ce dernier soit parfaitement stable. Ne serrez pas trop fort la vis car vous risquez d’endommager le système de fixation ou la table.
Relier le volant
1.Reliez le câble du pédalier (12) au connecteur du volant (11).
2.Reliez le câble d’adaptateur (13) à l’adaptateur secteur (14) et branchez l’adaptateur sur le secteur.
Connecter le volant
A - pour jouer à un jeu de course classique avec votre volant Enzo reconnu en tant que volant :
1.Éteignez votre console avant de brancher le volant.
2.Branchez le connecteur console GAMEPORT (15) sur le port 1 de votre console de jeu puis branchez le connecteur USB (16) sur le port USB supérieur.
3.Placez le commutateur USB / USB + GAMEPORT (9) sur la position correspondant à votre type de jeu. (Voir tableau Settings (Réglages) en annexe de ce manuel)
2/6

POSITIONNEMENT DU COMMUTATEUR Commutateur en position « USB »
Cette position est à sélectionner pour les jeux qui ne nécessitent pas de connecter une manette en plus du volant USB. Cependant, nous vous conseillons, afin d’éviter toute manipulation, de brancher sur votre console le connecteur GAMEPORT en plus du connecteur USB de votre volant.
La plupart des jeux récents utiliseront cette position.
Commutateur en position « USB/GAMEPORT »
Cette position est à sélectionner pour les jeux qui nécessitent de connecter une manette en plus du volant USB (la manette vous permettant d’accéder aux options de configuration pour faire reconnaître votre volant Force Feedback par le jeu). Avec le volant ENZO, il suffit de connecter à la fois les connecteurs USB et GAMEPORT pour remplacer cette manette.
4.Rallumez votre console. Le volant va s’autocalibrer de manière autonome. (Cette opération entraîne des mouvements du volant.) et le voyant lumineux (8) s’allume en rouge pour indiquer que le mode Retour de force est activé.
5.Dans les options de réglage du contrôleur de votre jeu, identifiez le Enzo en tant que volant Force Feedback (Retour de force).
Vous êtes maintenant prêt à jouer !
B - pour jouer à un jeu de course type Moto, Quad ou autre véhicule avec votre volant Enzo émulant une manette de jeu :
1.Éteignez votre console avant de brancher le volant.
2.Branchez le connecteur console GAMEPORT (15) sur le port 1 de votre console de jeu puis branchez le connecteur USB (16) sur le port USB supérieur sans vous préoccuper de la position du commutateur
USB / USB + GAMEPORT (9).
3.Rallumez votre console. Lors du lancement du jeu, lorsque le logo Playstation 2 est affiché, déconnectez le connecteur USB (16) et reconnectez-le aussitôt. (USB RESET)
4.Le volant va s’autocalibrer de manière autonome. (Cette opération entraîne des mouvements du volant.) et le voyant lumineux (8) s’allume en rouge pour indiquer que le mode Retour de force est activé.
5.Dans ce type de jeu, le volant est reconnu en tant que manette. Vérifiez et modifiez si nécessaire sa configuration dans les options du contrôleur (direction sur stick analogique gauche et pédalier sur stick analogique droit).
Remarque : dans ce type de jeux, il ne vous sera pas possible de désactiver le mode Retour de force, ni de profiter du mode « Precision Drive ».
Vous êtes maintenant prêt à jouer !
3/6

FONCTIONS AVANCÉES Calibrer le volant
Votre volant est autocalibré par défaut pour une utilisation console. Cependant, nous vous recommandons de calibrer manuellement le volant et le pédalier lorsque cette fonction est proposée dans le jeu.
Activer/Désactiver le retour de force
Par défaut, le retour de force et le retour au centre sont activés. Dans certains jeux et sur certains circuits, il peut être intéressant de désactiver ce retour de force pour améliorer vos performances. Appuyez sur le bouton Mode (7) pour activer/désactiver le retour de force :
-autocentrage activé seulement : le voyant lumineux devient vert.
-retour de force et auto-centrage activés : le voyant lumineux devient rouge.
Fonction « Inversion de la boîte séquentielle »
Par défaut, dans la plupart des jeux, les fonctions de « passage des vitesse » sont allouées soit aux touches L1, R1 soit aux touches L2, R2.
La fonction « Inversion de la boîte séquentielle » vous permet d’affecter dans 100 % des jeux le changement de vitesse directement aux leviers numériques Up et Down (1).
Pour passer du mode « Boîte séquentielle Normal » au mode « Boîte séquentielle Inversé », appuyez simultanément sur les touches A,Bet Mode.
Mode Boîte séquentielle Normal |
Mode Boîte séquentielle Inversé |
Le voyant lumineux clignote en rouge pendant 2 secondes lorsque vous basculez en mode « Inversé », Le voyant lumineux clignote en vert pendant 2 secondes lorsque vous revenez en mode « Normal ».
Reportez-vous au tableau fourni en annexe pour retrouver le type de boîte séquentielle correspondant à votre jeu de course.
Mode Precision Drive
Le mode Precision Drive a été spécialement élaboré dans un esprit d’amélioration des performances.
Il pourra vous permettre, selon les jeux, de battre vos meilleurs temps (et ceux de vos adversaires) ou de passer plus facilement les différentes épreuves de conduite.
Ce nouveau mode exclusif calcule et redistribue les différents points d’analogie de la roue du ENZO sans pour autant engendrer de zones mortes (comme cela peut être le cas sur d’autres volants pour lesquels un réglage de la sensibilité est possible).
La pertinence et l’efficacité de ce mode dépendront du jeu utilisé ainsi que du circuit. En effet dans ce mode, le volant est plus sensible et vous permettra, dans les circuits comportant des virages en épingle par exemple, de déraper plus facilement et éviter ainsi une perte de vitesse excessive.
Dans les jeux où les réactions du volant sont très sensibles (telles les courses de F1), l’utilisation de ce mode sera donc plutôt à éviter.
4/6
Nous vous recommandons d’utiliser ce mode en vue intérieure pour plus d’efficacité. Reportez-vous au tableau fourni en annexe pour savoir si ce mode est recommandé pour votre jeu.
Pour passer en mode Precision Drive, appuyez simultanément sur la croix multidirectionnelle et sur le bouton Mode (7) :
-Si le mode Retour de force est activé, le voyant lumineux rouge clignote.
-Si le mode Retour de force est désactivé, le voyant lumineux vert cligonote.
DÉPANNAGE
-Mon volant ne fonctionne pas dans le jeu : changez la position du commutateur USB / USB + GAMEPORT puis redémarrez votre console avec le commutateur dans sa nouvelle position.
-Mon volant paraît mal calibré : étudiez la notice du fabricant du jeu au chapitre Options pour configurer votre volant dans le jeu.
-Mon volant bouge tout seul : ceci est normal. La fonction d’auto-centrage s’active dès que vous allumez la console et/ou que vous relâchez votre volant en position non centrée. Le recentrage se caractérise par des mouvements de va-et-vient (gauche-droite-gauche…) qui n’affectent pas la jouabilité. Pour arrêter ces mouvements, il suffit de placer ses mains sur le volant. Si vous souhaitez effectuer une pause prolongée, débranchez l’adaptateur secteur du volant. Rebranchez-le avant de reprendre la partie.
-Mon volant reste bloqué d'un coté (gauche ou droite) après l'autocalibration: Ceci est normal dans certains jeux. Il se recentrera de lui-même dès que vous l'aurez déclaré en tant que volant dans le chapitre Options du jeu. Si le problème persiste, débranchez votre volant et recommencez l’installation.
SUPPORT TECHNIQUE
Si vous rencontrez un problème avec votre produit, rendez-vous sur le site http://ts.thrustmaster.com et cliquez sur Support Technique. Vous aurez alors accès à différents services (Foire Aux Questions (FAQ), dernières versions des pilotes et logiciels) susceptibles de résoudre votre problème. Si le problème persiste, vous pouvez contacter le support technique des produits Thrustmaster (« Support Technique ») :
Par e-mail :
Pour bénéficier du support technique par e-mail, vous devez d’abord vous enregistrer en ligne. Les informations fournies vont permettre aux techniciens de résoudre plus rapidement votre problème. Cliquez sur Enregistrement à gauche de la page Support technique et suivez les instructions à l’écran. Si vous êtes déjà enregistré, renseignez les champs Nom d’utilisateur et Mot de passe puis cliquez sur Connexion.
Par téléphone :
|
France |
|
0892 690 024 |
|
0,34 €/min, du lundi au vendredi de 13h à 17h et de 18h à 22h |
|
|
Belgique |
|
02 / 732 55 77 |
|
prix d’un appel national, du lundi au vendredi de 9h à |
12h30 |
|
|
|
et de 14h à 17h30 |
|
||
|
|
|
|
|
|
|
|
Suisse |
|
22 567 51 20 |
|
prix d’un appel national, du lundi au vendredi de 13h |
à 22h |
|
Canada |
|
514-279-9911 |
|
prix d’un appel longue distance, du lundi au vendredi de 7h à 17h |
|
|
|
|
(heure de l’Est) |
|
||
|
|
|
|
|
|
|
5/6
Informations relatives à la garantie
Dans le monde entier, Guillemot Corporation S.A. (« Guillemot ») garantit au consommateur que le présent produit Thrustmaster est exempt de défauts matériels et de vices de fabrication, et ce, pour une période de deux (2) ans à compter de la date d’achat d’origine. Si, au cours de la période de garantie, le produit semble défectueux, contactez immédiatement le Support Technique qui vous indiquera la procédure à suivre. Si le défaut est confirmé, le produit devra être retourné à son lieu d’achat (ou tout autre lieu indiqué par le Support Technique).
Dans le cadre de la garantie, le consommateur bénéficiera, au choix du Support Technique, du remplacement ou de la réparation du produit défectueux. Lorsque la loi applicable l’autorise, toute responsabilité de Guillemot et ses filiales (y compris pour les dommages indirects) se limite à la réparation ou au remplacement du produit Thrustmaster. Les droits légaux du consommateur au titre de la législation applicable à la vente de biens de consommation ne sont pas affectés par la présente garantie.
Cette garantie ne s’appliquera pas : (1) si le produit a été modifié, ouvert, altéré, ou a subi des dommages résultant d’une utilisation inappropriée ou abusive, d’une négligence, d’un accident, de l’usure normale, ou de toute autre cause non liée à un défaut matériel ou à un vice de fabrication ; (2) en cas de non-respect des instructions du Support Technique ; (3) aux logiciels non-édités par Guillemot, lesdits logiciels faisant l’objet d’une garantie spécifique accordée par leurs éditeurs.
Stipulations additionnelles à la garantie
Aux États-Unis d’Amérique et au Canada, cette garantie est limitée au mécanisme interne et au boîtier externe du produit. Toute garantie implicite applicable, incluant les garanties de qualité marchande ou d’adaptation à un usage particulier, est limitée à deux (2) ans à compter de la date d’achat et soumise aux conditions de la présente garantie limitée. En aucun cas, Guillemot Corporation S.A. ou ses sociétés affiliées ne sauraient être tenues responsables envers qui que ce soit de tous dommages indirects ou dommages accessoires résultant du non-respect des garanties expresses ou implicites. Certains États/Provinces n’autorisent pas la limitation sur la durée d’une garantie implicite, ou l’exclusion ou la limitation de responsabilité pour les dommages indirects ou accessoires, de sorte que les limitations ou exclusions ci-dessus peuvent ne pas vous être applicables. Cette garantie vous confère des droits spécifiques ; vous pouvez également bénéficier d’autres droits qui peuvent différer d’un État/Province à l’autre.
COPYRIGHT
© Guillemot Corporation 2004. Tous droits réservés. Thrustmaster® est une marque déposée de Guillemot Corporation S.A. Ferrari® est une marque déposée de Ferrari S.p.A. PlayStation® est une marque déposée de Sony Computer Entertainment Inc. Tous droits réservés. Ce produit n’est pas soutenu, reconnu ou approuvé par Sony. Negcon™ est une marque de Namco Ltd. Toutes les autres marques déposées et noms commerciaux sont reconnus par les présentes et sont la propriété de leurs propriétaires respectifs. Illustrations non contractuelles. Le contenu, la conception et les spécifications sont susceptibles de changer sans préavis et de varier selon les pays.
FAQ, astuces et pilotes sur www.thrustmaster.com
6/6
Benutzerhandbuch
TECHNISCHE FEATURES |
|
|
|
1 |
2 digitale Schalthebel |
5 |
Select-Taste |
2 |
2 progressive analoge Gas- |
6 |
Start-Taste |
|
und Bremshebel |
7 |
Mode-Taste |
3 |
Action-Buttons |
8 |
Mode-LED |
4 |
Steuerkreuz |
9 |
USB / USB +Gameport-Schalter |
1/6
10 |
Analoges Pedal-Set |
15 |
Anschlusskabel für die Konsole |
11 |
Pedal-Anschluss |
16 |
USB-Stecker |
12 |
Pedal-Kabel |
17 |
Tischbefestigung |
13 |
Anschluss für Netzteil |
18 |
Befestigungsschraube |
14 |
Netzteil |
|
|
INSTALLATION DES LENKRADS
Befestigung des Lenkrads
1.Stellen Sie das Lenkrad auf einen Tisch oder eine andere ebene Fläche.
2.Führen Sie die Befestigungsschraube (18) in die Tischbefestigung ein (17) und schrauben Sie dann die Befestigungseinheit in das Loch auf der Unterseite des Lenkrads, bis sie fest sitzt. Ziehen Sie die Schraube nicht zu fest an, um nicht versehentlich die Befestigungseinheit und/oder den Tisch zu beschädigen.
Anschluss des Pedal-Sets
1.Schließen das Pedalkabel (11) an den Pedal-Anschluss (12) an.
2.Schließen Sie den Anschluss für das Netzteil (13) an das Netzteil (14) an und stecken Sie das Netzteil in eine Steckdose ein.
Anschluss des Lenkrads
A - Zum Spielen eines Standard-Rennspiels mit Ihrem Enzo Lenkrad, wenn es als Lenkrad erkannt wurde:
1.Schalten Sie die Konsole aus, bevor Sie das Lenkrad anschließen.
2.Stecken Sie das Anschlusskabel für die Konsole (15) in Port 1 Ihrer Konsole ein und stecken Sie den USB-Stecker (16) in den oberen USB-Anschluss.
3.Stellen Sie den USB / USB + GAMEPORT-Schalter (9) auf die Position, die dem Spieltyp entspricht, den Sie spielen möchten. (Bitte sehen Sie die Settings Tabelle im Anhang, nach.)
2/6
 Loading...