


 Loading...
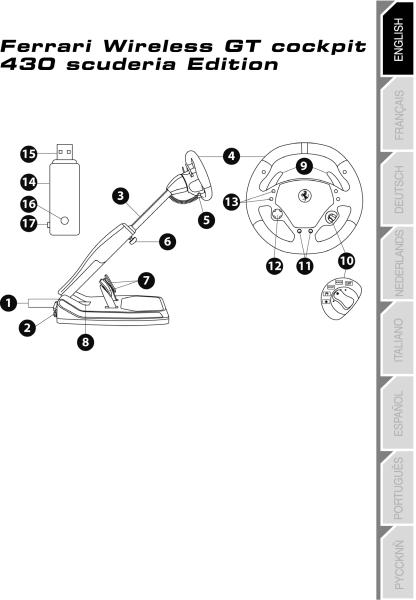
Compatible with: PlayStation®3 & PC
User Manual
TECHNICAL FEATURES
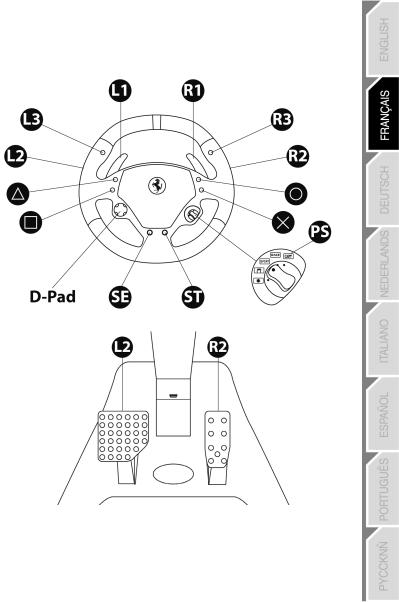
1 |
2 rear clamp screws |
9 Up & Down gearshift paddles |
|
2 |
(to set the steering column angle) |
10 |
Manettino with 5-position rotary switch |
Transport handle |
11 |
(for programming) |
|
3 |
Adjustable column of the base |
“Select” and “Start” buttons |
|
4 |
Removable wheel |
12 |
Multidirectional D-Pad |
5 |
Power cord |
13 |
Action buttons |
6 |
1 front clamp screw |
14 |
Wireless receiver |
|
(for setting the length) |
15 |
USB connector of the receiver |
7 |
Brake and accelerator pedals |
16 |
Receiver LED |
8 |
Battery and receiver |
17 |
PC/PS3 switch of the receiver |
|
storage compartment |
|
|
1/20
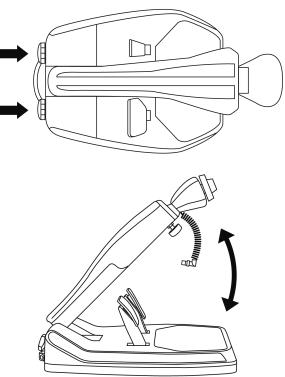
INSTALLING THE WHEEL
ADJUSTING THE TILT AND LENGTH
OF THE DRIVING POSITION
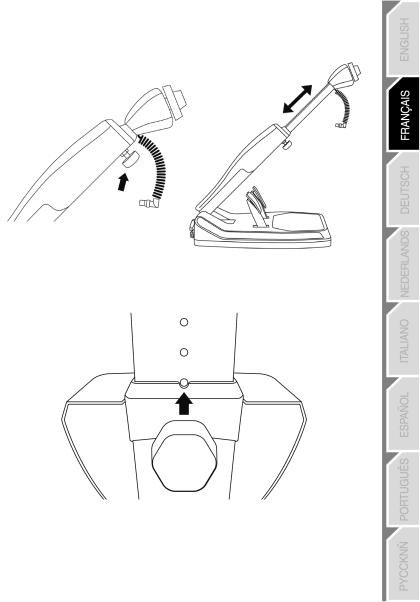
- Slightly unscrew (anticlockwise) the 2 clamp screws (1) at the back of the base.
- Adjust the angle of the base’s column (3) so that is suitable to you.
- Then tighten (clockwise) the 2 clamp screws (1).
2/20
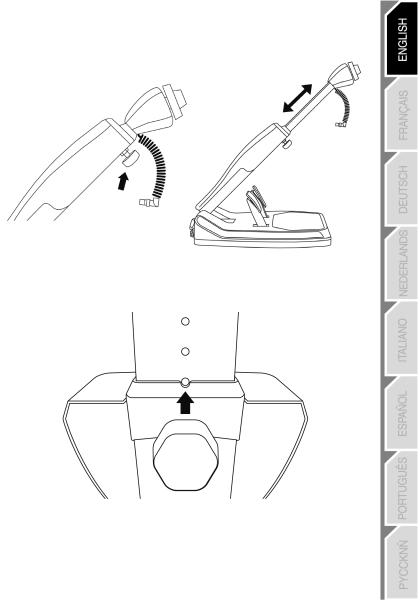
-Slightly unscrew (anticlockwise) the clamp screw (6) located at the front of the base’s column. Then draw out the column to the length you require.
-Then tighten (clockwise) the clamp screw (6), taking care that it is correctly inserted into one of the holes provided for this purpose. You can do this simply by positioning the upper hole by the locating mark
provided for this purpose.
3/20
FITTING THE WHEEL TO THE BASE
Lugs (front of the base)
Lug notches (back of the wheel)
+
Locking tab (back of the wheel)
-Position the removable wheel (4) horizontally, and then insert the 2 lugs (on the front of the base) into the 2 lug notches (on the back of the wheel).
-Let the wheel down vertically, and then lock the wheel into position by pressing the locking tab (on the back of the wheel) then releasing it until you hear a gentle “click”.
- Check that the steering wheel is correctly secured to the base.
4/20
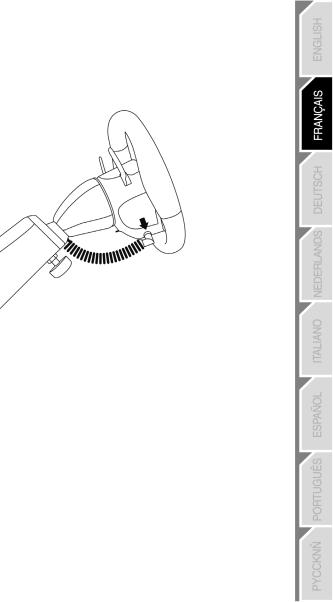
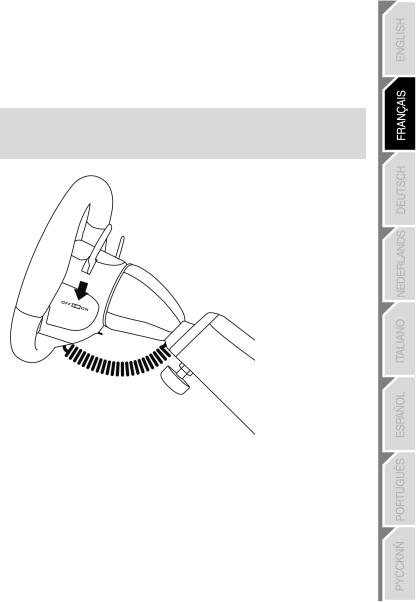
-Electronically connect the steering wheel to its base by connecting the elbow-shaped male connector (on the end of the power cord (5)) to the female connector (to the left of the wheel).
-Rotate the nut (on the end of the connector) clockwise to secure the connection.
PERFORM THE OPERATION IN REVERSE TO
TAKE OFF THE REMOVABLE WHEEL FROM THE BASE
5/20

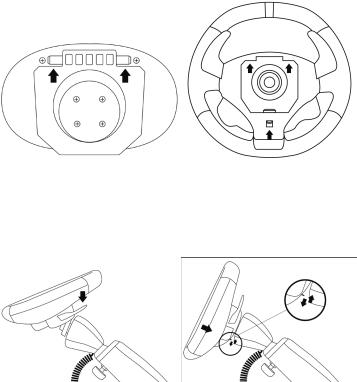
FITTING BATTERIES AND RECOVERING THE RECEIVER
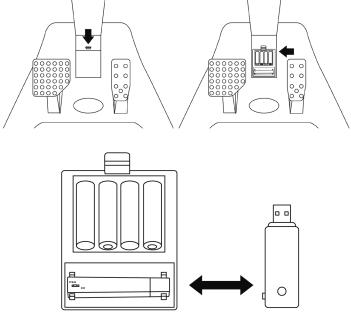
-Remove cover from the battery compartment (8) (located between the 2 pedals) and fit 4 LR6 / AA batteries, ensuring that the polarities are in the right position.
- Recover the wireless receiver (14) found in the lower section of the battery compartment.
- Fit back the battery compartment’s cover.
6/20
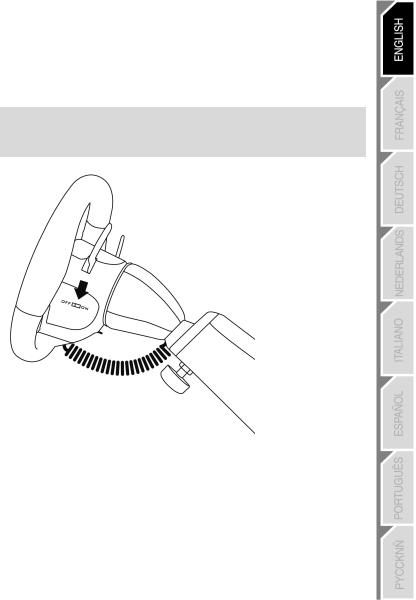
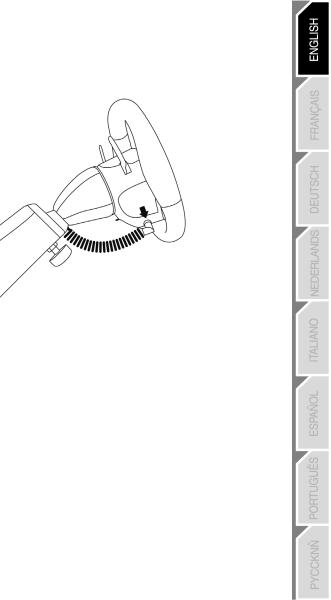
SWITCHING THE WHEEL ON OR OFF
-Position the switch (located on the right-hand side of the wheel):
-To ON for switching on the wheel.
-To OFF for switching off the wheel.
Important note:
When you switch on your wheel, it must always be perfectly centred physically (to prevent any misalignment).
7/20

PLAYSTATION®3
INSTALLATION ON PLAYSTATION®3
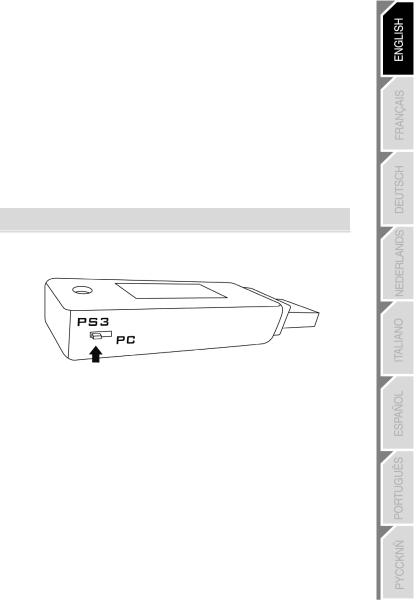
1.Set the PC/PS3 switch (17) of the receiver (14) to the “PS3” position.
2.Connect the USB connector (15) of the receiver to the USB port 1 of the console.
3.Turn on your console.
4.Turn on your wheel by using the ON/OFF switch.
5.When the connection is set up, launch the game.
You are now ready to play!
USING THE “PS” BUTTON
The “PS” button of your wheel allows you to exit your games, access the menus and directly switch off your PlayStation®3 system.
Procedure:
Set the Manettino (10) switch to the relevant icon, and then press the push button.
Important notes on PlayStation®3:
-The PC/PS3 switch (17) of the receiver must always be set to “PS3” before connecting it.
-In “1-player” mode: If your official gamepad is turned on, you will have to switch it to “controller port 2” in order for your wheel to be functional.
-On PlayStation®3, the wheel simulates the official gamepad (which makes it compatible with all racing games).
-In most games, the “Normal Sensitivity” mode (just as on the gamepad) has a slight dead zone that can be felt in the middle of the wheel axis (and therefore the centre of the wheel).
The wheel’s “High Sensitivity” mode is set to remove this dead zone.
However, some games allow you to remove or reduce this dead zone by changing the settings of the steering wheel axis in the game’s “Options/Commands”.
“High Sensitivity” mode is recommended for most PS3 games (where it is not possible to change the central dead zone of the steering wheel axis).
“Normal Sensitivity” mode is recommended only for PS3 games where the central dead zone of the steering wheel axis can be changed.
8/20

CONFIGURING THE “AUTOMATIC PRESET” - PLAYSTATION®3 (in “Separate pedal set” mode)
9/20
PC
INSTALLATION ON PC
Required configuration: PC (Windows® Xp, Windows® Vista, Windows® 7) equipped with a USB port
The CD-ROM included with this product allows you to install the drivers.
1.Insert the installation CD-ROM into your CD-ROM drive. The install wizard is displayed automatically (if the installation menu does not run automatically, double-click “Workstation”, then the icon of the CD-ROM and, “Setup.exe” if necessary).
2.Click on the “DRIVERS” to start installing the drivers.
3.Once the installation is complete, click Finish and restart your computer.
4.Set the PC/PS3 switch (17) of the receiver (14) to the “PC” position.
5.Once your computer has restarted, connect the USB connector (15) of the receiver to one of the USB ports of your central unit. Windows® will automatically detect the new device.
6.Drivers are installed automatically.
Follow the on-screen instructions to complete the installation.
7. Select Start/Programs/Thrustmaster/Control Panel to access the Control Panel.
The Game controllers dialogue box will display the name of the wheel with the OK status.
8. In the Control Panel, click Properties to test and view the buttons, D-pad and axes of the wheel and the pedal set.
You are now ready to play!
Important notes on PC:
-The PC/PS3 (17) switch of the receiver must always be set to “PC” before connecting the wheel.
-The wheel name declared on PC (in the Control Panel and in the games) is “F430 Cockpit Wireless”.
10/20

CONFIGURING THE “AUTOMATIC PRESET” - PC (in “Separate pedal set” mode)
11/20

USING THE 5-POSITION MANETTINO
The Manettino (10) system comprises:
-a rotary switch that you can turn to go from one function to another
-a push button located under the switch (to confirm your choices)
The required function will start as soon as you press the push button (not when you turn the switch) with the switch positioned opposite the relevant icon.
Manettino |
Button functions and correspondence with the LEDs |
|
“PS” on PS3 button and “13” on PC
-On = connection set up between the wheel and the receiver.
-Flashes quickly = no connection between the wheel and the receiver.
-Flashes slowly and continuously = you must change the batteries.
-Off = the wheel is in standby mode or off.
“Normal Sensitivity” mode
-On = “Normal Sensitivity” with “Separate pedal set” modes enabled
-Flashes quickly = mode “Combined pedal set” enabled
“High Sensitivity” mode
-On = “High Sensitivity” with “Separate pedal set” modes enabled
-Flashes quickly = “Combined pedal set” mode enabled
“Mapping”
- On = “Mapping” mode enabled (pending programming)
“Manual Preset”
-On = “Manual Preset” mode enabled
-Set the Manettino switch to the relevant icon.
-Press the push button to confirm the function.
12/20
GENERAL
WHEEL POWER BUTTON
- OFF position = the wheel is off (and does not use the batteries). - ON position = the wheel is on.
The wheel and receiver are automatically connected.
If the connection fails, you can force the connection by pressing the LED button of the receiver (16), then the SELECT + START + buttons simultaneously on the wheel.
STANDBY MODE
The wheel automatically switches off:
-After 5 minutes of inactivity.
-After 5 seconds if the connection fails or is lost.
The wheel can be activated by pressing one of its action buttons (13) or operating the wheel’s ON/OFF switch.
“PC / PS3” SWITCH (17) OF THE RECEIVER
This switch must always be set to the correct position before you connect your receiver to the USB port of your PlayStation®3 or PC.
 LED AND RECEIVER LED (16)
-Both LEDs are on = connection set up between the wheel and the receiver.
-Both LEDs flash quickly = no connection between the wheel and the receiver. -All the LEDs on the Manettino are off = the wheel is in standby mode or off.
-The  LED flashes slowly and continuously = you must change the batteries.
AUTOMATIC CALIBRATION OF THE WHEEL AND PEDALS
-The centre of the wheel is preset as soon as you turn it on: it is therefore vital for the wheel to be perfectly aligned on its axis when you switch it on.
-Nevertheless, you can manually adjust the centre of the wheel. To do this, position the wheel in perfect alignment with the centre, and then simultaneously press “SELECT + START + ENGINE START” (this operation must be carried out each time the wheel is switched on).
-The steering of the wheel and the pedals automatically self-calibrate.
13/20
ADVANCED FUNCTIONS
ADJUSTING THE WHEEL’S SENSITIVITY
Your wheel’s steering has 2 sensitivity modes:
-“Normal Sensitivity” (default mode and recommended on PC - requires setting on PS3)
-“High Sensitivity” (default mode and recommended on PS3 - requires setting on PC)
Setting “Normal Sensitivity” mode (default mode and recommended on PC)
Action |
|
|
|
|
|
- Set the Manettino switch to the relevant icon. |
ON |
|
- Press the push button to confirm the function. |
|
|
|
|
|
Your wheel’s steering is now at Normal Sensitivity |
|
|
Setting “High Sensitivity” mode (default mode and recommended on PS3)
Action |
|
|
|
|
|
|
|
- Set the Manettino switch to the relevant icon. |
|
ON |
|
- Press the push button to confirm the function. |
|
|
|
|
|
|
Your wheel’s steering is now more sensitive, especially at the centre
CONFIGURING THE PEDALS
Your wheel’s accelerator and brake controls are in “separate” mode by default, meaning that the pedals function on independent axes.
This mode lets you considerably improve the precision of your steering.
If you game does not support the “separate” mode, the pedal set of the wheel will not work correctly. You must therefore activate the “Combined” mode.
SETTING
Simultaneously press and release both pedals (accelerator and brake) + the button.
PEDAL SET MODE |
or |
|
|
||
SEPARATE |
DOES NOT FLASH |
|
(recommended mode for most games) |
||
|
||
COMBINED |
FLASHES |
14/20

CONFIGURING THE PEDALS ON PLAYSTATION®3
Separate pedal set (default mode) |
Combined pedal set (must be set) |
- Accelerator = R2 trigger |
- Accelerator = Up direction |
|
of the PS3 gamepad |
||
of the “right mini-stick” of the PS3 gamepad |
||
- Brake = L2 trigger |
||
- Brake = Down direction |
||
of the PS3 gamepad |
||
of the “right mini-stick” of the PS3 gamepad |
||
|
||
CONFIGURING THE PEDALS ON PC |
|
Separate pedal set (default mode) |
Combined pedal set (must be set) |
|
- Accelerator = RZ axis |
- Accelerator = Up direction of the Y axis |
|
- Brake = Y axis |
||
- Brake = Down direction of the Y axis |
||
|
15/20

PROGRAMMING THE WHEEL AND PEDALS
Your wheel is fully programmable:
-All the action buttons can be switched between themselves.
-All the action buttons can be programmed onto the pedals or gearshift paddles.
TWO PROGRAMMING MODES
The button and the PRESET LED allow you to view the programming type chosen:
AUTOMATIC (pre-programmed) or MANUAL (programmed by yourself). Simply pressing this button allows you to switch from one programming mode to another (even during a game).
“AUTOMATIC PRESET” (PRESET BUTTON OFF)
This is the default programming.
For more information, refer to the diagrams in CONFIGURING “AUTOMATIC PRESET”
- PLAYSTATION®3 / PC.
“MANUAL PRESET” (PRESET BUTTON ON)
This is your personal programming. The buttons can either be:
-programmed onto the pedals or gearshift paddles
-or switched between each other.
-You can change your programming whenever you want.
-The programming is automatically saved in the wheel (even when it is disconnected or switched off).
-When your “MANUAL PRESET” is blank, it is identical to “AUTOMATIC PRESET”.
PROGRAMMING PROCEDURE
Steps |
Action |
LED status |
|
1 |
Activate “MANUAL PRESET” |
On |
|
|
by pressing the button. |
||
2 |
Press and release the MAPPING button |
On |
|
|
|||
3 |
Press and release the button to programme. |
Flashing |
|
|
|
||
4 |
Press and release the button, the gearshift paddle or pedal you |
Off |
|
want to assign to this function. |
|
||
|
|
||
|
|
On |
Your “MANUAL PRESET” programming is now enabled and updated (with your programming applied).
16/20

EXAMPLES OF POSSIBLE USES:
-On PS3, programme L2/R2 or L3/R3 onto the Up and Down gearshift paddles (L1/R1 by default).
-On PS3, programme the Cross/Square buttons onto the pedals (L2/R2 by default).
-Switch different buttons for better access.
Note: The  button cannot be programmed or moved.
EEPROM MEMORY
Your wheel has an internal chip that stores all your “MANUAL PRESET” programmes in memory (even when the wheel is off or disconnected for a long period of time).
You can save a different “MANUAL PRESET” on each support used (PC and PS3).
DELETING A “MANUAL PRESET”
Steps |
Action |
LED status |
|
1 |
Activate your “MANUAL PRESET” |
On |
|
|
|||
2 |
Press and hold the MAPPING |
Flashes for 2 seconds |
|
|
button for 2 seconds. |
Your “MANUAL PRESET” is now blank (and becomes identical to the “AUTOMATIC PRESET”).
RETURN TO “FACTORY SETTINGS”
The aim here is to remove all of your programming or settings in one go.
Steps |
|
Action |
LED status |
|
|
||||
1 |
Simultaneously press the following buttons |
|
||
MAPPING |
+ SELECT + START |
Flashes for 5 seconds |
||
|
||||
All your “MANUAL PRESETS” (PC + PS3) or settings are now blank.
Note: The result of this action is to fully restart your wheel. On a PC, you should therefore carry out this operation only when no game is currently playing.
TROUBLESHOOTING
The wheel is not perfectly centred in the games:
-Switch off the wheel (by setting the switch to OFF). Physically centre the wheel. Next, switch the wheel back on (by setting the switch to ON).
-If the problem persists, you can manually centre the wheel. To do this, position the wheel in perfect alignment with the centre, and then simultaneously press “SELECT + START + ENGINE START” (this
operation must be carried out each time the wheel is switched on).
- On the PC, if the wheel or pedals are not properly calibrated, download the “Thrustmaster Calibration Tool v 1.03” manual calibration software available at the following address: http://ts.thrustmaster.com.
17/20

My wheel or pedals do not work correctly:
-Switch the wheel off and back on again (making sure the wheel is centred on start-up).
-Check the condition of the 4 LR6 / AA batteries and that their polarities are correctly positioned.
-If the problem persists, switch off your computer or your console, disconnect the USB receiver as well as the power cord, reconnect all of them again, then restart and launch your game again.
On PC, my wheel is detected but does not work with my game:
Open the interface for managing your game’s “Options” to configure your wheel. Refer to your game’s user manual or online help for more information.
On PS3, my wheel is not detected:
-In “1 player” mode: If your official gamepad is turned on, you will have to switch it to “controller port 2” (using the “PS” button) for your wheel to be functional.
-If the problem persists, switch off your gamepad while leaving only the wheel connected.
My pedals do not work correctly in “Separate Mode”:
(E.g. when the game is running, the selection cursor moves all by itself)
Exit the game and switch the pedals to “combined” mode. Then return to your game to reconfigure the wheel in your game’s option management interface.
My wheel cannot connect itself to the receiver:
The connection between the wheel and the receiver is made automatically.
In the event of a connection failure, you can force the connection by pressing the LED button of the receiver (16), then simultaneously on your wheel’s SELECT + START + buttons.
The LED flashes continuously:
You must change the batteries.
SAFETY RECOMMENDATIONS AND INFORMATION
During extended periods of non-use, switch off the wheel (by setting the switch to OFF), remove the wheel from its base and remove the 4 batteries from the battery compartment. CAUTION: RISK OF EXPLOSION IF BATTERIES ARE REPLACED BY AN INCORRECT TYPE. DISPOSE OF USED BATTERIES ACCORDING TO THE INSTRUCTIONS.
For safety reasons, never use the pedal set with bare feet or while wearing only socks on your feet. THRUSTMASTER® DISCLAIMS ALL RESPONSIBILITY IN THE EVENT OF INJURY RESULTING FROM USE OF THE PEDAL SET WITHOUT SHOES.
18/20

TECHNICAL SUPPORT
If you encounter a problem with your product, please go to http://ts.thrustmaster.com and click Technical Support. From there you will be able to access various utilities (Frequently Asked Questions (FAQ), the latest versions of drivers and software) that may help to resolve your problem. If the problem persists, you can contact the Thrustmaster products technical support service (“Technical Support”):
By email:
In order to take advantage of technical support by email, you must first register online. The information you provide will help the agents to resolve your problem more quickly. Click Registration on the left-hand side of the Technical Support page and follow the on-screen instructions. If you have already registered, fill in the Username and Password fields and then click Login.
By telephone (if you do not have Internet access):
United Kingdom |
08450800942 |
|
Charged at local rate |
||
|
||
United States |
1-866-889-5036 |
|
Free |
||
|
||
Canada |
1-866-889-2181 |
|
Free |
||
|
Monday to Saturday from 8 a.m. to 7 p.m.
Monday to Friday from 9 a.m. to 8 p.m.
Saturday from 8 a.m. to 2 p.m.
(Eastern Standard Time)
Monday to Friday from 6 a.m. to 5 p.m. Saturday from 5 a.m. to 11 a.m.
(Pacific Standard Time)
Monday to Friday from 9 a.m. to 8 p.m.
Saturday from 8 a.m. to 2 p.m.
(Eastern Standard Time)
Monday to Friday from 6 a.m. to 5 p.m. Saturday from 5 a.m. to 11 a.m.
(Pacific Standard Time)
Denmark |
80887690 |
Monday to Saturday from 9 a.m. to 8 p.m. |
|
Free |
(English) |
||
|
|||
|
|
|
|
Sweden |
0200884567 |
Monday to Saturday from 9 a.m. to 8 p.m. |
|
Free |
(English) |
||
|
|||
Finland |
0800 913060 |
Monday to Saturday from 10 a.m. to 9 p.m. |
|
Free |
(English) |
||
|
Hours of operation and telephone numbers are subject to change. Please visit http://ts.thrustmaster.com for the most up-to- date Technical Support contact information.
WARRANTY INFORMATION
Worldwide, Guillemot Corporation S.A. (“Guillemot”) warrants to the consumer that this Thrustmaster product will be free from material defects and manufacturing flaws for a period of two (2) years from the original date of purchase. Should the product appear to be defective during the warranty period, immediately contact Technical Support, who will indicate the procedure to follow. If the defect is confirmed, the product must be returned to its place of purchase (or any other location indicated by Technical Support).
Within the context of this warranty, the consumer’s defective product will, at Technical Support’s option, be either repaired or replaced. Where authorized by applicable law, the full liability of Guillemot and its subsidiaries (including for indirect damages) is limited to the repair or replacement of the Thrustmaster product. The consumer’s legal rights with respect to legislation applicable to the sale of consumer goods are not affected by this warranty.
19/20
This warranty shall not apply: (1) if the product has been modified, opened, altered, or has suffered damage as a result of inappropriate or abusive use, negligence, an accident, normal wear, or any other cause not related to a material defect or manufacturing flaw; (2) in the event of failure to comply with the instructions provided by Technical Support; (3) to software not published by Guillemot, said software being subject to a specific warranty provided by its publisher.
Additional warranty provisions
In the United States of America and in Canada, this warranty is limited to the product’s internal mechanism and external housing. Any applicable implied warranties, including warranties of merchantability and fitness for a particular purpose, are hereby limited to two (2) years from the date of purchase and are subject to the conditions set forth in this limited warranty. In no event shall Guillemot Corporation S.A. or its affiliates be liable for consequential or incidental damage resulting from the breach of any express or implied warranties. Some States/Provinces do not allow limitation on how long an implied warranty lasts or exclusion or limitation of incidental/consequential damages, so the above limitation may not apply to you. This warranty gives you specific legal rights, and you may also have other legal rights which vary from State to State or Province to Province.
Statement of Compliance with EU Regulations
Guillemot Corporation S.A. hereby declares that the device Ferrari Wireless GT Cockpit complies with the main requirements and other relevant clauses of R&TTE Directive 1999/5/EC. The compliance statement can be viewed at the following site:
http://www.thrustmaster.com/certificates/Ferrari_Wireless_GT_Cockpit/Docferrari_Wireless_GT_cockpit.pdf
COPYRIGHT
© 2012 Guillemot Corporation S.A. All rights reserved. Thrustmaster® is a registered trademark of Guillemot Corporation S.A. Ferrari® is a registered trademark of Ferrari Idea S.p.A. PlayStation® is a registered trademark of Sony Computer Entertainment Inc. Microsoft® Windows® is a registered trademark of Microsoft Corporation in the United States and/or other countries. All other trademarks and brand names are hereby acknowledged and are property of their respective owners. Illustrations not binding. Contents, designs and specifications are subject to change without notice and may vary from one country to another. Made in China.
ENVIRONMENTAL PROTECTION RECOMMENDATION
At the end of its working life, this product should not be disposed of with standard household waste, but rather dropped off at a collection point for the disposal of Waste Electrical and Electronic Equipment (WEEE) for recycling.
This is confirmed by the symbol found on the product, user manual or packaging.
Depending on their characteristics, the materials may be recycled. Through recycling and other forms of processing Waste Electrical and Electronic Equipment, you can make a significant contribution towards helping to protect the environment.
Please contact your local authorities for information on the collection point nearest you.
Operates with 4 batteries LR6 / AA (1.5V), not included. Do not recharge non-rechargeable batteries. Used batteries must be removed from the toy. Different types of batteries or new and used batteries must not be mixed. Only batteries of the recommended type or similar type must be used. Batteries must be inserted with the correct polarity. The terminals of a battery must not be short-circuited.
www.thrustmaster.com
20/20

Compatible : PlayStation®3 & PC
Manuel de l’utilisateur
CARACTERISTIQUES TECHNIQUES
1 |
2 Vis de serrage arrière |
9 Palettes séquentielles de vitesse Up & Down |
|
2 |
(pour le réglage de l’inclinaison) |
10 |
Manettino avec switch rotatif 5 positions |
Poignée de transport |
11 |
(pour les programmations) |
|
3 |
Tronc ajustable de la base |
Boutons « Select » et « Start » |
|
4 |
Roue du volant détachable |
12 |
D-Pad multidirectionnel |
5 |
Cordon électronique d’alimentation |
13 |
Boutons d’actions |
6 |
1 Vis de serrage avant |
14 |
Récepteur Wireless |
|
(pour le réglage de la longueur) |
15 |
Connecteur USB du récepteur |
7 |
Pédales d’accélérateur et de frein |
16 |
Led du récepteur |
8 |
Compartiment à piles |
17 |
Interrupteur PC/PS3 du récepteur |
|
et de rangement du récepteur |
|
|
1/20

INSTALLATION DU VOLANT
AJUSTEMENT DE L’INCLINAISON ET DE LA LONGUEUR
DE LA POSITION DE CONDUITE
-Dévissez légèrement (dans le sens inverse des aiguilles d’une montre) les 2 vis de serrage (1) situées à l’arrière de la base.
- Ajustez l’inclinaison du tronc (3) de la base à votre convenance.
- Revissez ensuite (dans le sens des aiguilles d’une montre) les 2 vis de serrage (1).
2/20
-Dévissez légèrement (dans le sens inverse des aiguilles d’un montre) la vis de serrage (6) située à l’avant du tronc de la base. Puis étirez à votre convenance la longueur du tronc.
-Revissez ensuite (dans le sens des aiguilles d’une montre) la vis de serrage (6) en prenant garde que celle-ci entre bien dans l’une des perforations prévues à cet effet. Pour ce faire, positionnez tout
simplement la perforation supérieure dans le détrompeur prévu à cet effet.
3/20

FIXATION DE LA ROUE DU VOLANT SUR LA BASE
Ergots mâles (face avant de la base)
Ergots femelles (arrière de la roue)
+
Languette de fixation (arrière de la roue)
-Positionnez la roue détachable (4) horizontalement, puis insérez les 2 ergots mâles (situés en face avant de la base) à l’intérieur des 2 ergots femelles (situés à l’arrière de la roue).
-Rabattez la roue verticalement, puis fixez le volant en appuyant sur la languette de fixation (située à l’arrière de la roue) et en relâchant, jusqu’à entendre un léger « CLIC ».
- Vérifiez que la roue du volant est bien fixée sur la base.
4/20
-Reliez électroniquement la roue du volant à sa base en branchant le connecteur mâle coudé (situé à l’extrémité du cordon (5) d’alimentation) au connecteur femelle (situé à gauche de la roue).
-Tournez l’écrou (situé à l’extrémité du connecteur) dans le sens des aiguilles d’une montre pour fixer le tout.
EFFECTUEZ L’OPÉRATION INVERSE
POUR DÉMONTER LA ROUE DÉTACHABLE DE LA BASE
5/20
INSTALLATION DES PILES ET RÉCUPERATION DU RECEPTEUR
-Retirez le couvercle du compartiment à piles (8) (situé à l’arrière des 2 pédales) et installez 4 piles de type LR6 / AA en respectant le sens des polarités.
- Récupérez le Récepteur Wireless (14) qui se trouve dans la partie inférieure du compartiment à piles.
- Repositionnez le couvercle du compartiment à piles.
6/20
ALLUMER OU ETEINDRE LE VOLANT
-Positionnez l’interrupteur (situé sur le côté droit de la roue du volant) :
-Sur ON pour allumer le volant.
-Sur OFF pour éteindre le volant.
Remarque importante :
Lorsque vous allumez votre volant, la roue de celui-ci doit toujours être physiquement parfaitement centrée (pour éviter tout décentrage).
7/20

PLAYSTATION®3
INSTALLATION SUR « PLAYSTATION®3 »
1.Positionnez l’interrupteur PC/PS3 (17) de votre récepteur (14) en position « PS3 ».
2.Branchez le connecteur USB (15) du récepteur sur le port USB n°1 de la console.
3.Allumez votre console.
4.Allumez votre volant à l’aide de l’interrupteur ON/OFF.
5.Une fois la connexion établie, lancez le jeu.
Vous êtes maintenant prêt à jouer !
UTILISATION DU BOUTON « PS »
Le bouton « PS » de votre volant vous permettra de quitter vos jeux, d’accéder aux menus et d’éteindre directement votre système PlayStation®3.
Procédure :
Positionnez le switch du Manettino (10) sur l’icône correspondante, puis appuyez sur le bouton poussoir.
Remarques importantes sur PlayStation®3 :
-L’interrupteur PC/PS3 (17) du récepteur doit toujours être positionné sur « PS3 » avant de le connecter
-En mode « 1 Joueur », si votre manette officielle est allumée, il est alors nécessaire de basculer celleci en « port manette 2 » afin que votre volant soit fonctionnel.
-Sur PlayStation®3, le volant émule la manette officielle (ce qui lui permet d’être compatible dans 100% des jeux de course).
-Dans la plupart des jeux, en mode « Sensibilité Normale » (tout comme sur la manette), une légère zone morte se fait sentir au centre de l’axe de direction (et donc au centre de la roue).
Le mode « Sensibilité Haute » du volant est paramétré pour supprimer cette zone morte.
Dans certains jeux, il est cependant possible de supprimer ou de diminuer cette zone morte en modifiant les paramètres de l’axe de direction dans les « Options/Commandes » du jeu.
Le Mode « Sensibilité Haute » est conseillé dans la plupart des jeux PS3 (où il n’est pas possible de modifier la zone morte centrale de l’axe de direction).
Le Mode « Sensibilité Normale » est conseillé uniquement dans les jeux PS3 où il est possible de modifier la zone morte centrale de l’axe de direction.
8/20
CONFIGURATION DU « PRESET AUTOMATIQUE » - PLAYSTATION®3 (en mode « Pédalier Séparé »)
9/20
Loading...