


Ferrari GT Experience
Table of contents
 Loading...
1/10
Compatible: PlayStation®3 / PC
User Manual
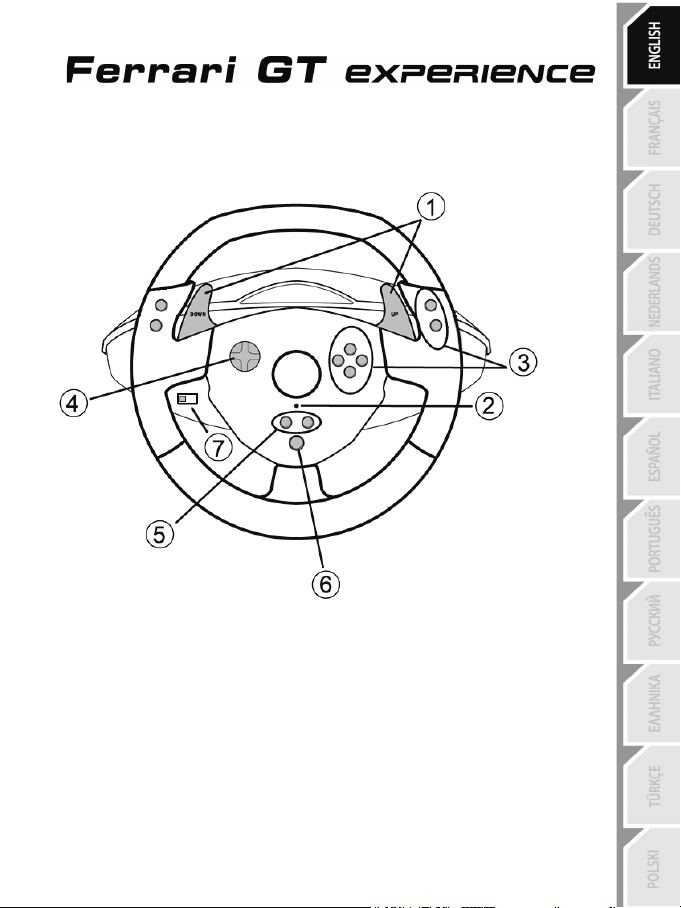
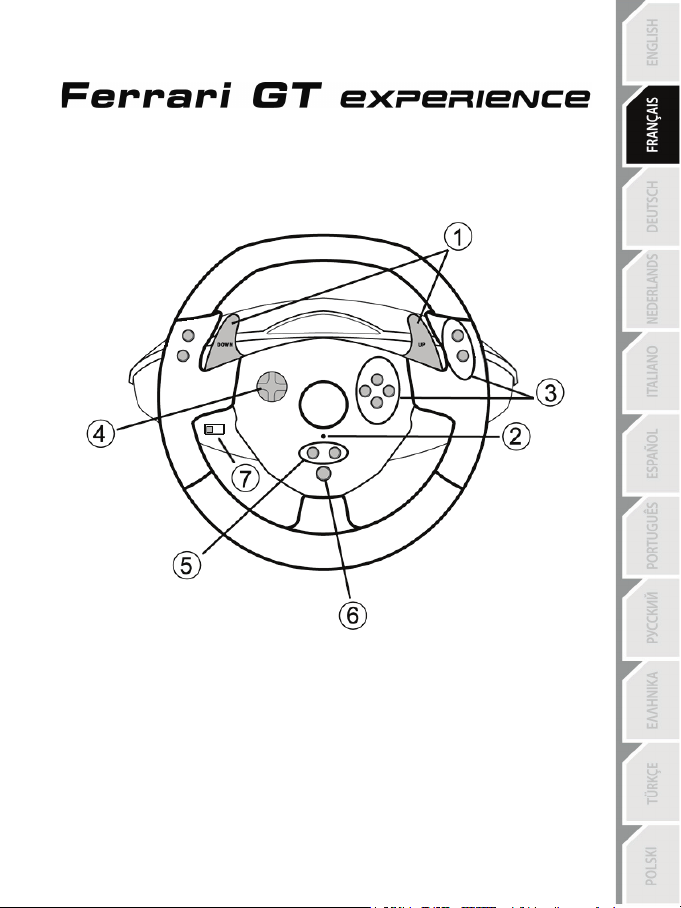
TECHNICAL FEATURES
1 2 digital gearshift levers (UP and DOWN)
2 LED
3 Action buttons
4 D-Pad
5 “SE” and “ST” buttons:
- for Select and Start
- for programming
6 “Home” button for PlayStation®3
7 USB selector (“PC” / “PS3”)
2/10
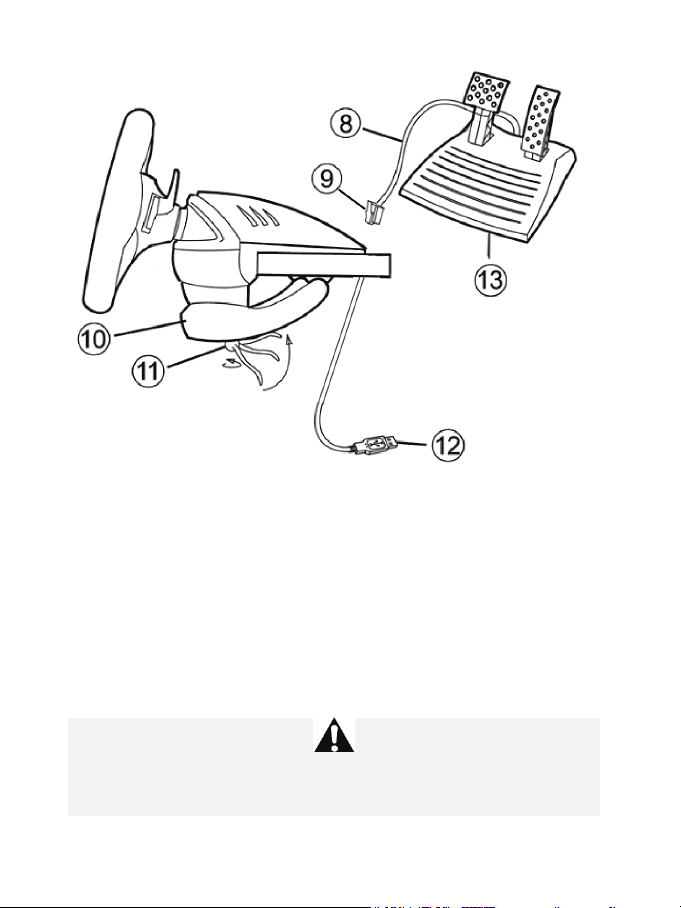
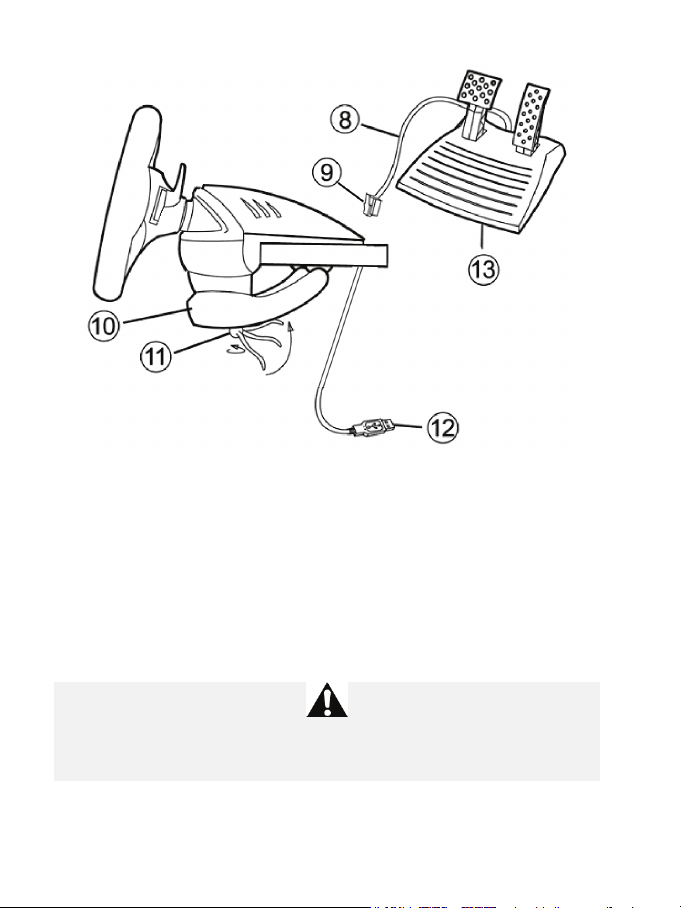
8 Pedal cable
9 RJ45 connector for pedal set
10 Table clamp
11 Clamp screw
12 USB connector (for PC and
PlayStation®3)
13 Pedal set
INSTALLING THE WHEEL
Fixing the wheel in place
1. Place the wheel on a table or other flat surface.
2. Place the clamp screw (11) in the table clamp (10) and then screw the clamping unit into the hole on
the underside of the wheel until firmly fixed in place. Do not turn the screw too tightly, as you risk
damaging the clamping unit and/or the table.
Connecting the pedal set
1. Connect the pedal cable (8) to the wheel’s RJ45 connector (9).
For safety reasons, never use the pedal set with bare feet or while wearing only socks on your
feet.
THRUSTMASTER
®
DISCLAIMS ALL RESPONSIBILITY IN THE EVENT OF INJURY RESULTING
FROM USE OF THE PEDAL SET WITHOUT SHOES.

3/10
PLAYSTATION®3
INSTALLATION ON PLAYSTATION®3
1. Set the wheel’s USB selector (7) to the “PS3” position.
2. Connect the USB connector (13) to a USB port on your console.
3. Turn on your console.
4. Launch the game.
You are now ready to play!
USING THE “HOME” BUTTON (6)
Your wheel’s “Home” button allows you to exit games and access your PlayStation®3 system’s menus.
IMPORTANT NOTES ON PLAYSTATION®3
- The wheel’s USB selector (7) must always be set to the “PS3” position before connecting your wheel.
- In “1 Player” mode: If your official gamepad is turned on, you will have to switch it to “controller port 2” in
order for your wheel to be functional.
- On PlayStation®3, the wheel is only compatible with PlayStation®3 games (and will not function with
PlayStation® 2 games).
- In certain racing games, do not hesitate to test out your wheel’s 2 sensitivity modes in order to optimize
its precision and responsiveness.
"Gran Turismo® 5 PS3™" configuration procedure for the "FERRARI® GT EXPERIENCE" racing
wheel
By default in this game, acceleration and braking are not assigned to the "R2/L2" buttons and switching
gears is not assigned to the "R1/L1" buttons (which is the case for the pedals and Up/Down levers on the
"Ferrari® GT Experience" racing wheel).
Procedure to configure and optimize the wheel:
(This procedure only needs to be carried out once, as the changes will then be saved in the game)
1) Start up your game.
2) Go to the OPTION menu.
3) Go to the CONTROLLER SETUP menu
(by clicking the symbol representing the gamepad and the D-Pad).
4) Configure your controller as follows:
• Accelerate on R2
• Brake on L2
• Shift Up on R1
• Shift Down on L1
• Rear View on L3 and/or R3
• Left & Right View on D-Pad Left & Right

4/10
5) Click OK (in the lower right part of your screen).
6) Return to the main menu to access the track of your choice.
You are now ready to play!
Note: The steering wheel on your "Ferrari® GT Experience" racing wheel features 2 sensitivity modes
(normal or high). To achieve optimal precision in "Gran Turismo® 5 PS3™", we recommend that you
enable "high sensitivity" mode.
PC
Installation on PC
The CD-ROM included with this product allows you to install the “Vibration Feedback” drivers.
1. Set the wheel’s USB selector (7) to the “PC” position.
2. Insert the installation CD-ROM into your CD-ROM drive. Follow the on-screen instructions to install
the “Vibration Feedback” drivers. Once the installation is complete, click Finish and restart your
computer.
3. Once your computer has restarted, connect the USB connector (13) to one of your computer’s USB
ports. Windows® XP or Vista will automatically detect the new device.
4. Driver installation
Drivers are installed automatically. Follow the on-screen instructions to complete the installation.
5. Click Start/Settings/Control Panel and then double-click Game Controllers (or Gaming Options,
depending on your operating system).
The Game Controllers dialog box displays the wheel’s name with OK status.
6. In the Control Panel, click Properties to configure your gamepad:
• Test device: Allows you to test and visualize the buttons, D-pad and axes of the wheel and pedal
set.
• Test forces: Allows you to test 8 vibration effects and configure effect and vibration settings.
You are now ready to play!
IMPORTANT NOTES ON PC
- The wheel’s USB selector (7) must always be set to the “PC” position before connecting your wheel.
- Your wheel and pedals automatically self-calibrate upon connection of the USB connector. In the event
of any problems, you can also carry out manual calibration by downloading the “Thrustmaster
Calibration Tool” software, available at the following address:
http://ts.thrustmaster.com
5/10
ADVANCED FUNCTIONS
ADJUSTING THE WHEEL’S SENSITIVITY
Your wheel’s steering has 2 sensitivity modes:
- Normal sensitivity (the default mode)
- High sensitivity (must be set)
Setting “High Sensitivity” mode:
Action
LED color
Simultaneously press and release:
the D-Pad (4) + the 2 UP and DOWN levers (1)
FLASHES
SLOWLY
Your wheel’s steering is now more sensitive.
(This procedure must be repeated each time you restart or disconnect your wheel)
Setting “Normal Sensitivity” mode (default mode):
Action
LED color
Simultaneously press and release:
the D-Pad (4) + the 2 UP and DOWN levers (1)
DOES NOT
FLASH
Your wheel’s steering has now returned to normal sensitivity (the default mode)
PROGRAMMING THE WHEEL AND PEDALS
Your wheel is fully programmable:
- All buttons as well as the D-Pad can be switched between themselves.
- All buttons as well as the D-Pad can be programmed onto the 2 pedals.
Examples of possible applications:
- On PS3: Programming L2/R2 or L3/R3 onto the 2 UP and DOWN digital levers (L1/R1).
- Programming a button(s) onto one or both pedals.
- Switching different buttons for greater accessibility.
Programming procedure
Steps
Action
LED color
1
Simultaneously press and release:
SE + ST (5)
OFF
2 Press and release the button to program.
FLASHES
QUICKLY
3
Press and release the button or pedal onto which
you wish to place your function.
ON
Your programming has now taken effect.
(You must repeat this procedure each time you restart or disconnect your wheel)
6/10
Erasing your programming
Steps
Action
LED color
1
Press and hold for 2 seconds:
SE + ST (5)
TURNS OFF
THEN ON AGAIN
Your programming has now been erased.
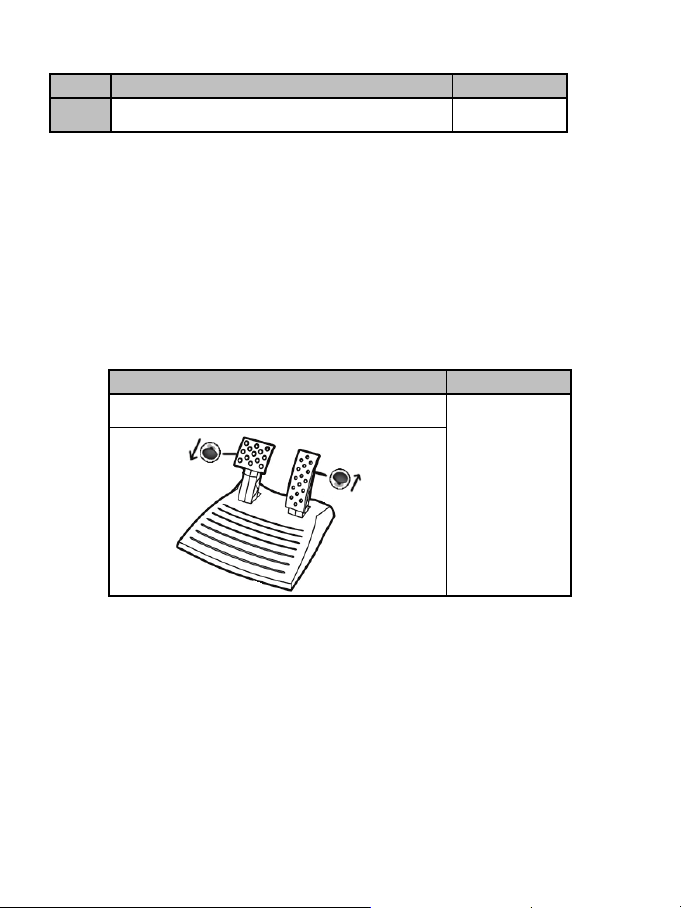
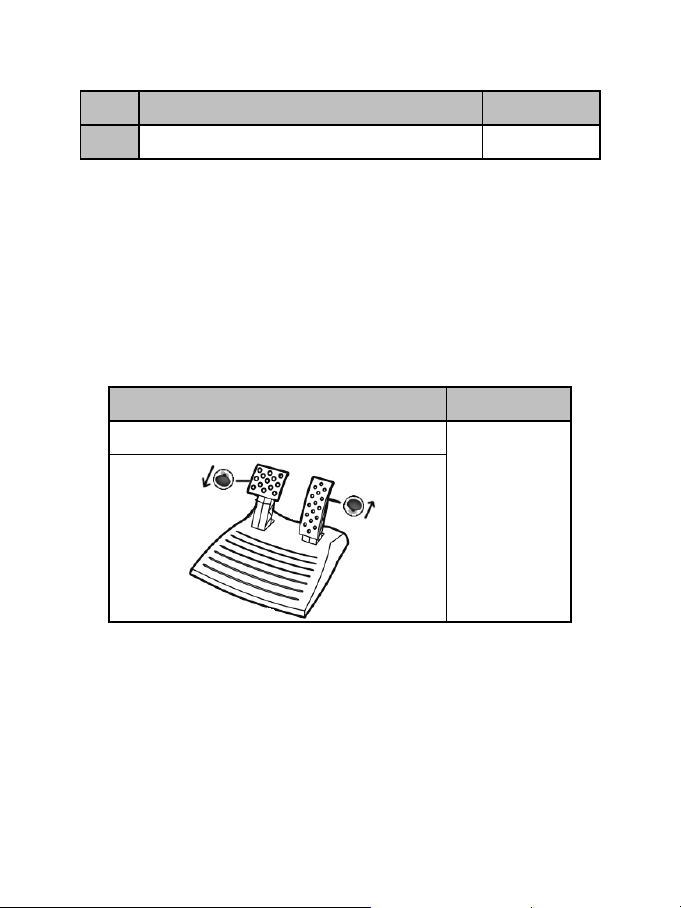
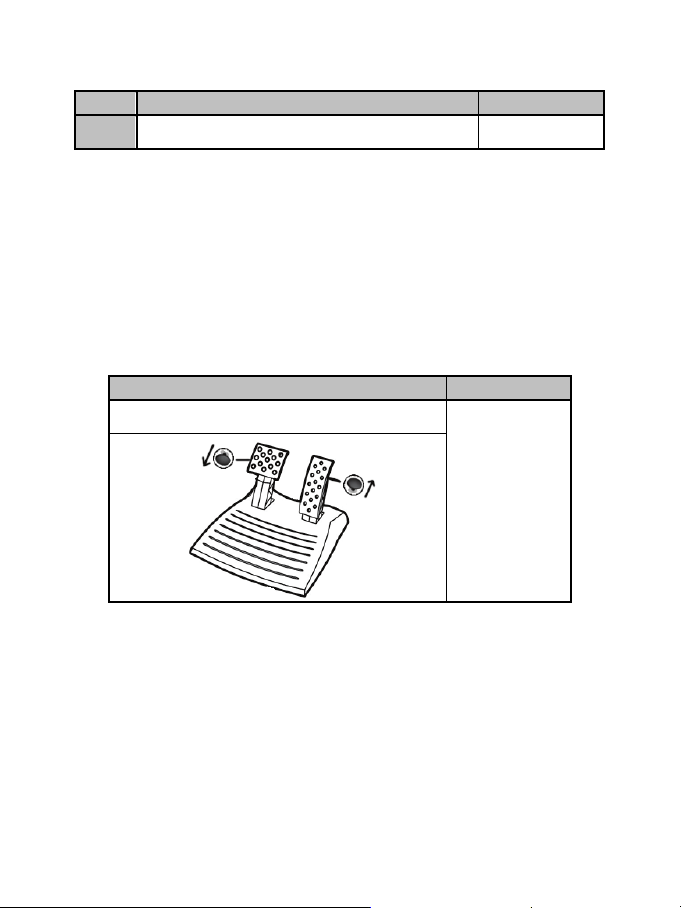
CONFIGURING THE PEDALS ON PLAYSTATION®3
On PlayStation®3, your wheel’s accelerator and brake controls are in “separate” mode by default,
meaning that the pedals function on independent axes:
“Accelerator” = “R2” trigger & “Brake” = “L2” trigger
For a different type of control (to limit skidding, for example), you can switch your wheel to “combined” (2
axes) mode: the pedals then function on a single axis.
“Accelerator and Brake” = Up/Down direction on “Right mini-stick”
Setting “Combined Pedals” mode
Action
LED color
Simultaneously press and release:
the 2 pedals (14) + the “Home” button (6)
GREEN
Your pedals are now combined
(You must repeat this procedure each time you restart or disconnect your wheel)

7/10
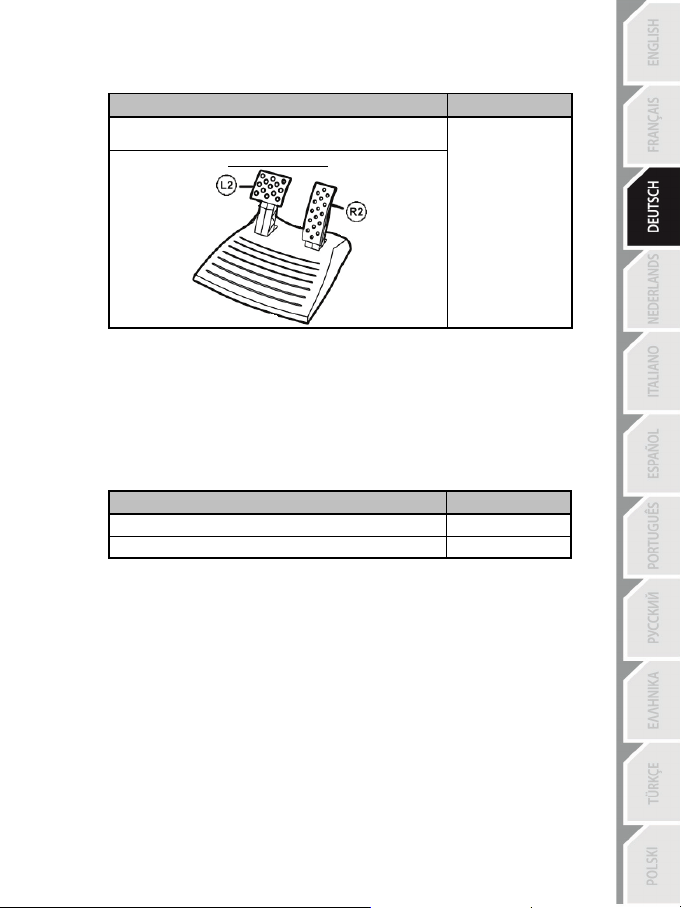
To return to “Separate Pedals” mode (the default mode)
Action
LED color
Simultaneously press and release:
the 2 pedals (14) + the “Home” button (6)
RED
On PlayStation®3
Your pedals have now returned to the default mode: “Separate”
CONFIGURING THE PEDALS ON PC
Your wheel’s accelerator and brake controls are in “separate” (3 axes) mode by default, meaning that the
pedals function on independent axes.
3 axes mode allows you to considerably improve the precision of your driving.
If your game does not support 3 axes mode, your wheel’s pedals will not function properly. You will then
have to exit the game and select “combined” (2 axes) mode instead.
Mode
LED color
Separate pedals (3 axes)
RED
Combined pedals (2 axes)
GREEN
• Selecting axes via “Software”
(This setting will be saved even after you restart or disconnect your wheel)
On page 1 of the “Control Panel”: Select the mode you wish to use, then click OK.
• Selecting axes via “Hardware”
(This setting will not be saved: It must be repeated each time you restart or disconnect)
(Allows you to select your mode directly in your game’s “Controls” options)
Simultaneously press and release: the 2 pedals (14) + the “Home” button (6)

8/10
TROUBLESHOOTING AND WARNINGS
• My wheel doesn’t function correctly or appears to be improperly calibrated:
- Switch off your computer or your console, completely disconnect your wheel including all cables, then
reconnect the wheel and restart your game.
- If the problem persists on PC, download the “Thrustmaster Calibration Tool” manual calibration software
available at the following address: http://ts.thrustmaster.com
- Never move the wheel or pedals when connecting your wheel in order to avoid any calibration problems.
• My pedal set does not work correctly:
- Reconfigure your wheel in your game’s controller options section.
- If the problem persists on PC, exit the game and switch the pedals to “combined” (2 axes) mode. You
can then return to your game to reconfigure the wheel with the new axes.
• I can’t configure my wheel:
- On PS3: In your game’s “Options / Controller / Gamepads” menu: select the most appropriate
configuration.
- On PC: In your game’s “Options / Controller / Wheels” menu: select the most appropriate configuration.
- Please refer to your game’s user manual or online help for more information.
- You can also use your wheel’s “programming” function to resolve this type of problem.
• On PC or PS3, my wheel does not work correctly:
- Exit your game, disconnect your wheel, verify that the “PC/PS3 ” USB selector (7) is in the proper
position, then reconnect everything and try again.
• On PC, my game’s menus scroll by themselves:
- Exit the game and switch the pedals to “combined” (2 axes) mode. Then return to your game to
reconfigure the wheel with the new axes.
• On PC, the vibrations are continuous:
- Decrease the intensity of force effects in your game’s controller options section or adjust the forces in
the wheel’s control panel.
- In your game’s controller options, select “Force type: Gamepad” (if the option is available).
• My wheel’s steering is not responsive enough:
- Switch your wheel to high sensitivity mode.
FAQs, tips and drivers available at www.thrustmaster.com
9/10
TECHNICAL SUPPORT
If you encounter a problem with your product, please go to http://ts.thrustmaster.com and click Technical
Support. From there you will be able to access various utilities (Frequently Asked Questions (FAQ), the latest
versions of drivers and software) that may help to resolve your problem. If the problem persists, you can contact
the Thrustmaster products technical support service (“Technical Support”):
By email:
In order to take advantage of technical support by email, you must first register online. The information you
provide will help the agents to resolve your problem more quickly. Click Registration on the left-hand side of the
Technical Support page and follow the on-screen instructions. If you have already registered, fill in the Username
and Password fields and then click Login.
By telephone:
United Kingdom
08450800942
Charged at local
rate
Monday to Saturday from 8 a.m. to 7 p.m.
United States
1-866-889-5036
Free
Monday to Friday from 9 a.m. to 8 p.m.
Saturday from 8 a.m. to 2 p.m.
(Eastern Standard Time)
Monday to Friday from 6 a.m. to 5 p.m.
Saturday from 5 a.m. to 11 a.m.
(Pacific Standard Time)
Canada
1-866-889-2181
Free
Monday to Friday from 9 a.m. to 8 p.m.
Saturday from 8 a.m. to 2 p.m.
(Eastern Standard Time)
Monday to Friday from 6 a.m. to 5 p.m.
Saturday from 5 a.m. to 11 a.m.
(Pacific Standard Time)
Denmark
80887690
Free
Monday to Saturday from 9 a.m. to 8 p.m.
(English)
Sweden
0200884567
Free
Monday to Saturday from 9 a.m. to 8 p.m.
(English)
Finland
0800 913060
Free
Monday to Saturday from 10 a.m. to 9 p.m.
(English)
Hours of operation and telephone numbers are subject to change. Please visit http://ts.thrustmaster.com for the most up-to-
date Technical Support contact information.
WARRANTY INFORMATION
Worldwide, Guillemot Corporation S.A. (“Guillemot”) warrants to the consumer that this Thrustmaster product will
be free from material defects and manufacturing flaws for a period of two (2) years from the original date of
purchase. Should the product appear to be defective during the warranty period, immediately contact Technical
Support, who will indicate the procedure to follow. If the defect is confirmed, the product must be returned to its
place of purchase (or any other location indicated by Technical Support).
Within the context of this warranty, the consumer’s defective product will, at Technical Support’s option, be either
repaired or replaced. Where authorized by applicable law, the full liability of Guillemot and its subsidiaries
(including for indirect damages) is limited to the repair or replacement of the Thrustmaster product. The
consumer’s legal rights with respect to legislation applicable to the sale of consumer goods are not affected by this
warranty.
This warranty shall not apply: (1) if the product has been modified, opened, altered, or has suffered damage as a
result of inappropriate or abusive use, negligence, an accident, normal wear, or any other cause not related to a
material defect or manufacturing flaw; (2) in the event of failure to comply with the instructions provided by
Technical Support; (3) to software not published by Guillemot, said software being subject to a specific warranty
provided by its publisher.
10/10
Additional warranty provisions
In the United States of America and in Canada, this warranty is limited to the product’s internal mechanism and
external housing. Any applicable implied warranties, including warranties of merchantability and fitness for a
particular purpose, are hereby limited to two (2) years from the date of purchase and are subject to the conditions
set forth in this limited warranty. In no event shall Guillemot Corporation S.A. or its affiliates be liable for
consequential or incidental damage resulting from the breach of any express or implied warranties. Some
States/Provinces do not allow limitation on how long an implied warranty lasts or exclusion or limitation of
incidental/consequential damages, so the above limitation may not apply to you. This warranty gives you specific
legal rights, and you may also have other legal rights which vary from State to State or Province to Province.
FCC STATEMENT
1. This device complies with Part 15 of the FCC Rules. Operation is subject to the following two
conditions:
(1) This device may not cause harmful interference, and
(2) This device must accept any interference received, including interference that may cause
undesired operation.
2. Changes or modifications not expressly approved by the party responsible for compliance could void
the user's authority to operate the equipment.
COPYRIGHT
© 2012 Guillemot Corporation S.A. All rights reserved. Thrustmaster® is a registered trademark of Guillemot
Corporation S.A. Microsoft® Windows® is a registered trademark of Microsoft Corporation in the United States
and/or other countries. PlayStation® is a registered trademark of Sony Computer Entertainment Inc. All other
trademarks and brand names are hereby acknowledged and are property of their respective owners. Illustrations
not binding. Contents, designs and specifications are subject to change without notice and may vary from one
country to another.
TouchSense
®
Technology licensed from Immersion Corporation. Protected by one or more of the following
patents:
U.S. Patents: 5831408, 5844392, 5857986, 5907487, 5959613, 6020875, 6088017, 6104158, 6246390, 6252583,
6271833, 6275213, 6278439, 6343349, 6400352, 6411276, 6424333, 6715045, 6801008, 7131073, 7199790,
7209117, 7299321, 7327348, 7345672, and 7502011.
ENVIRONMENTAL PROTECTION RECOMMENDATION
At the end of its working life, this product should not be disposed of with standard
household waste, but rather dropped off at a collection point for the disposal of Waste
Electrical and Electronic Equipment (WEEE) for recycling.
This is confirmed by the symbol found on the product, user manual or packaging.
Depending on their characteristics, the materials may be recycled. Through recycling
and other forms of processing Waste Electrical and Electronic Equipment, you can
make a significant contribution towards helping to protect the environment.
Please contact your local authorities for information on the collection point nearest you.
www.thrustmaster.com
1/10
Compatible : PlayStation®3 / PC
Manuel de l’utilisateur
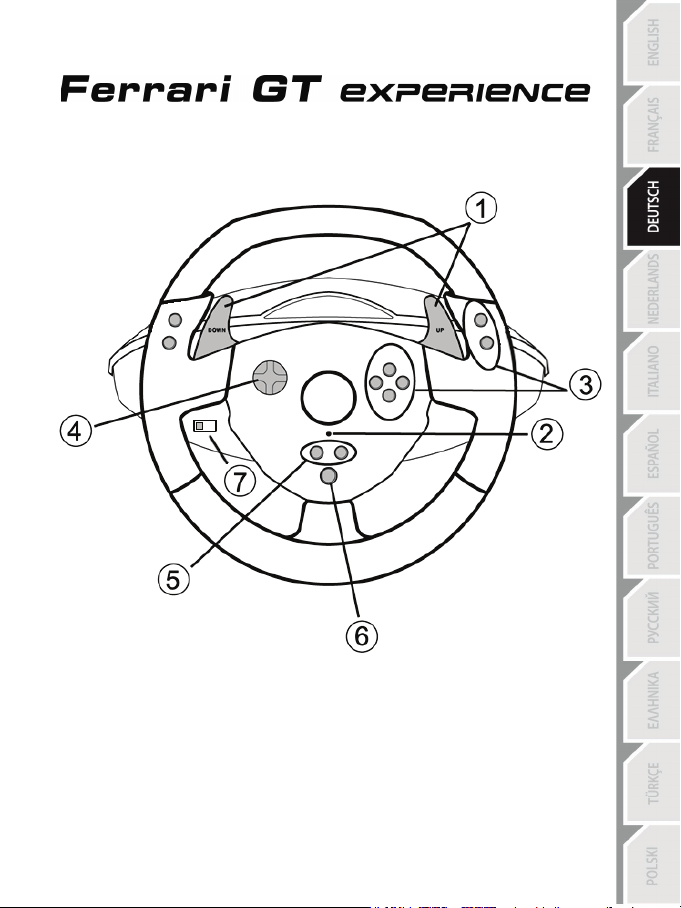
CARACTÉRISTIQUES TECHNIQUES
1 2 leviers numériques
de changement de vitesse Up et Down
2 Voyant lumineux
3 Boutons d’action
4 D-Pad
5 Boutons « SE » et « ST » :
- pour Select et Start
- pour Programmer
6 Bouton « Home » pour PlayStation®3
7 Sélecteur USB « PC » ou « PS3 »

2/10
8 Câble du pédalier
9 Connecteur RJ45 pour le pédalier
10 Système de fixation à la table
11 Vis de fixation
12 Connecteur USB (pour PC et Playstion®3)
13 Pédalier
INSTALLATION DU VOLANT
Fixer le volant
1. Placez le volant sur une table ou autre surface plane.
2. Placez la vis de serrage (11) dans le système de fixation (10), puis vissez l’ensemble dans
l’emplacement prévu, sous le volant, jusqu’à ce que ce dernier soit parfaitement stable. Ne serrez pas
trop fort la vis, car vous risquez d’endommager le système de fixation ou la table.
Relier le pédalier
1. Reliez le câble du pédalier (8) au connecteur RJ45 du volant (9).
Pour des raisons de sécurité, ne jouez pas pieds nus ou en chaussettes lorsque vous utilisez le
pédalier.
THRUSTMASTER
®
DECLINE TOUTE RESPONSABILITE EN CAS DE BLESSURE SUITE A UNE
UTILISATION DU PEDALIER SANS CHAUSSURES.

3/10
PLAYSTATION®3
INSTALLATION SUR « PLAYSTATION®3 »
1. Mettez le sélecteur USB du volant (7) en position « PS3 ».
2. Branchez le connecteur USB (12) sur un port USB de la console.
3. Allumez votre console.
4. Lancez le jeu.
Vous êtes maintenant prêt à jouer !
UTILISATION DU BOUTON « HOME » (6)
Le bouton « Home » de votre volant vous permettra de quitter vos jeux et d’accéder aux menus de votre
système PlayStation®3.
REMARQUES IMPORTANTES SUR « PLAYSTATION®3 »
- Le sélecteur USB du volant (7) doit toujours être positionné sur « PS3 » avant de connecter votre volant
- En mode « 1 Joueur » si votre manette officielle est allumée il est alors nécessaire de basculer celle-ci
en « port manette 2 » afin que votre volant soit fonctionnelle.
- Sur « PlayStation®3 », le volant n’est compatible qu’avec les jeux « PlayStation®3 » (et ne fonctionnera
pas avec les jeux « Playstation® 2 »).
- Sur « PlayStation®3 », les effets de vibrations du volant ne sont pas supportés (uniquement sur PC).
- Dans certains jeux de course, n’hésitez pas à tester les 2 modes de sensibilité de votre volant afin
d’optimiser sa précision et sa réactivité.
Procédure de configuration de « Gran Turismo® 5 PS3™ »
pour le volant « FERRARI® GT EXPERIENCE »
Par défaut dans ce jeu, l’accélération et le freinage ne sont pas assignés aux touches « R2/L2 » et le
passage des vitesses n’est pas assigné aux touches « R1/L1 » (comme cela est le cas pour le pédalier et
les palettes Up/Down du « Ferrari® GT Experience »).
Procédure pour configurer et optimiser le volant :
(Opération à n’effectuer qu’une seule fois car sauvegardée dans le jeu une fois effectuée)
1) Lancez votre jeu.
2) Accédez au menu OPTION.
3) Accédez au menu CONTROLLER SETUP
(en cliquant sur le symbole de la manette et de la croix)
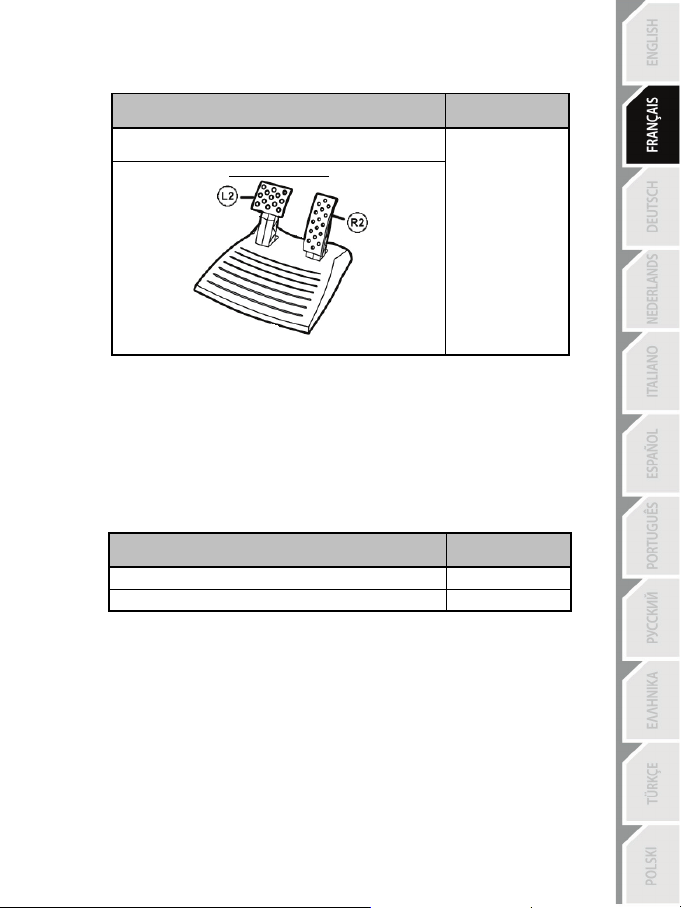
4) Configurez votre contrôleur comme ceci :
• Accelerate sur R2
• Brake sur L2
• Shift Up sur R1
• Shift Down sur L1
• Rear View sur L3 et/ou R3
• Left & Right View sur Croix Digitale Gauche & Droite

4/10
5) Cliquez sur OK (en bas à droite de votre écran).
6) Revenez au menu principal pour accéder à la course de votre choix.
Vous êtes maintenant prêt à jouer !
Remarque : La direction de votre volant « Ferrari® GT Experience » possède 2 modes de sensibilité
(normale ou haute). Pour atteindre une précision optimale dans « Gran Turismo® 5 PS3™ », il vous est
recommandé d’activer la « sensibilité haute ».
PC
Installation sur « PC »
Le CD-ROM fourni avec ce produit permet d'installer les pilotes « Vibration Feedback ».
1. Mettre le sélecteur USB du volant (7) en position « PC ».
2. Insérez le CD-ROM d'installation dans votre lecteur de CD-ROM. Suivez les instructions affichées à
l'écran pour installer les pilotes « Vibration Feedback ». Une fois l'installation terminée, cliquez sur
Terminer et redémarrez votre ordinateur.
3. Au redémarrage de l'ordinateur, reliez le connecteur USB (12) à l'un des ports USB de votre unité
centrale. Windows® détectera automatiquement le nouveau périphérique.
4. Installation des pilotes
L'installation des pilotes est automatique. Suivez les instructions affichées à l'écran pour terminer
l'installation.
5. Sélectionnez Démarrer/Paramètres/Panneau de configuration puis double-cliquez sur
Contrôleurs de jeu (ou Options de jeu selon votre système d’exploitation).
La boîte de dialogue Contrôleurs de jeu affichera le nom de la manette avec l'état OK.
6. Dans le Control Panel, cliquez sur Propriétés pour configurer votre manette :
• Test du périphérique : vous permet de tester et visualiser les boutons, le D-Pad et les axes du
volant et du pédalier.
• Tester les forces : vous permet de tester 8 effets de vibrations et de configurer le réglage des
effets de vibrations.
Vous êtes maintenant prêt à jouer !
REMARQUES IMPORTANTES SUR « PC »
- Le sélecteur USB du volant (7) doit toujours être positionné sur « PC » avant de connecter votre volant
- Votre volant et vos pédales s’auto-calibrent de manière automatique une fois le connecteur USB
connecté. En cas de problème il vous est également possible d’effectuer une calibration manuelle en
téléchargeant le logiciel « Thrustmaster Calibration Tool » disponible à cette adresse :
http://ts.thrustmaster.com
5/10
FONCTIONS AVANCEES
REGLAGE DE LA SENSIBILITE DU VOLANT
La direction de votre volant possède 2 modes de sensibilité :
- Sensibilité Normale (mode par défaut)
- Sensibilité Haute (nécessite un paramétrage)
• Paramétrage en mode « Sensibilité Haute » :
Action
Couleur du voyant
lumineux
Appuyez simultanément et relâchez :
le D-Pad (4) + les 2 leviers UP et DOWN (1)
CLIGNOTE
LENTEMENT
La direction de votre volant est désormais plus sensible.
(Opération à effectuer à chaque redémarrage ou déconnexion de votre volant)
• Paramétrage en mode « Sensibilité Normal » (mode par défaut) :
Action
Couleur du voyant
lumineux
Appuyez simultanément et relâchez :
le D-Pad (4) + les 2 leviers UP et DOWN (1)
NE CLIGNOTE PAS
La direction de votre volant est revenue en sensibilité normale (qui est le mode par défaut).
PROGRAMMATION DU VOLANT ET DES PEDALES
Votre volant est entièrement programmable :
- Tous les boutons ainsi que la croix digitale peuvent être permutés entre eux
- Tous les boutons ainsi que la croix digitale peuvent être programmés sur les 2 pédales
• Exemples d’applications possibles :
- Sur PS3 programmer L2/R2 ou L3/R3 sur les 2 leviers numériques Up et Down (L1/R1)
- Programmer un bouton quelconque sur l’une ou sur les 2 pédales
- Inverser différents boutons pour plus d’accessibilité
• Procédure de programmation
Etapes Action
Couleur du voyant
lumineux
1
Appuyez simultanément et relâchez :
SE + ST (5)
ETEINT
2 Pressez et relâchez le bouton à programmer
CLIGNOTE
RAPIDEMENT
3
Pressez et relâchez le bouton ou la pédale
sur lequel vous désirez placer votre fonction.
ALLUME
Votre programmation est désormais effectuée.
(Opération à effectuer à chaque redémarrage ou déconnexion de votre volant)
6/10
• Effacer votre programmation
Etape Action
Couleur du voyant
lumineux
1
Pressez et maintenez appuyé pendant 2 secondes :
SE + ST (5)
S’ETEINT ET SE
RALLUME
Votre programmation est désormais effacée.
CONFIGURATION DU PEDALIER SUR « PLAYSTATION®3 »
Sur PlayStation®3, les commandes d’accélérateur et de freins de votre volant fonctionnent par défaut en
mode « séparé », ce qui signifie que les pédales fonctionnent sur des axes indépendants :
« Accélérateur » = Gâchette « R2 » & « Frein » = Gâchette « L2 »
Pour un pilotage différent (par exemple pour limiter les dérapages), il est possible de basculer votre volant
en mode « combiné » (2 axes), les pédales fonctionneront alors sur un même axe :
- Sur PlayStation®3 :
« Accélérateur & Frein » = Direction Haut/Bas du « Mini-Stick Droit »
• Paramétrage mode « Pédalier Combiné »
Action
Couleur du voyant
lumineux
Appuyez simultanément et relâchez :
les 2 pédales (13) + le bouton Home (6)
VERT
Votre pédalier est désormais combiné.
(Opération à effectuer à chaque redémarrage ou déconnexion de votre volant)
7/10
• Paramétrage pour retourner en mode « Pédalier Séparé » (mode par défaut)
Action
Couleur du
voyant lumineux
Appuyez simultanément et relâchez :
les 2 pédales (13) + le bouton Home (6)
ROUGE
Sur PlayStation®3
Votre pédalier est revenu en mode par défaut : « Séparé ».
CONFIGURATION DU PEDALIER SUR « PC »
Par défaut, les commandes d’accélérateur et de freins de votre volant fonctionnent en mode « séparés »
(3 axes), ce qui signifie que les pédales fonctionnent sur des axes indépendants.
Le mode 3 axes permet d’améliorer considérablement la précision de votre pilotage.
Si votre jeu ne supporte pas le mode 3 axes, le pédalier de votre volant ne fonctionnera pas correctement.
Vous devez alors quitter le jeu et sélectionner le mode « combiné » (2 axes).
Mode
Couleur du voyant
lumineux
Pédalier Séparé (3 axes)
ROUGE
Pédalier Combiné (2 axes)
VERT
• Sélection des axes par « Software »
(cette opération sera gardé en mémoire même après un redémarrage ou
une déconnexion de votre volant.)
Dans la page 1 du « Control Panel » : cliquez sur le mode désiré puis sur Ok.
• Sélection des axes par « Hardware »
(cette opération ne sera pas gardée en mémoire : à effectuer à chaque redémarrage ou déconnexion.)
(vous permet de choisir votre mode directement dans les options « Contrôles » de votre jeu)
Appuyez simultanément et relâchez : les 2 pédales (13) + le bouton Home (6)

8/10
DEPANNAGE ET AVERTISSEMENT
• Mon volant ne fonctionne pas correctement ou semble mal calibré :
- Eteignez votre ordinateur ou votre console, déconnectez entièrement votre volant et tout les câbles,
rebranchez et relancez votre jeu.
- Sur PC si le problème persiste, télécharger le logiciel de calibration manuel « Thrustmaster Calibration
Tool » disponible à cette adresse : http://ts.thrustmaster.com.
- Ne jamais bouger la roue et les pédales lorsque vous branchez votre volant pour éviter tout problème de
calibration
• Mon pédalier ne fonctionne pas correctement :
- Reconfigurer votre volant dans les « options contrôleur » de votre jeu.
- Sur PC si le problème persiste, quittez le jeu et basculez le pédalier en mode « combiné » (2 axes).
Retournez ensuite dans votre jeu pour reconfigurer le volant avec les nouveaux axes.
• Je n’arrive pas à configurer mon volant :
- Sur PS3, dans le menu « Options / Contrôleur / Manettes » de votre jeu : choisissez la configuration la
mieux approprié.
- Sur PC, dans le menu « Options / Contrôleur / Volants » de votre jeu : choisissez la configuration la
mieux approprié.
- Reportez-vous au manuel de l’utilisateur ou à l’aide en ligne de votre jeu pour plus d’informations.
- Vous pouvez également utiliser la fonction « programmation » de votre volant pour résoudre ce type de
problème.
• Sur PC ou PS3, mon volant ne fonctionne pas correctement :
- Quittez votre jeu, débranchez votre volant, vérifier la bonne position du sélecteur USB « PC/PS3 » (7),
puis rebranchez le tout.
• Sur PC, les menus de mon jeu défilent tout seul :
- Quittez le jeu et basculez le pédalier en mode « combiné » (2 axes). Retournez ensuite dans votre jeu
pour reconfigurer le volant avec les nouveaux axes.
• Sur PC les vibrations sont continues :
- Diminuez l’intensité des effets de force dans les options contrôles de votre jeu ou ajustez les forces
dans le control panel du volant.
- Dans les « options contrôleur » de votre jeu, choisissez « Type de force : Manette » (si l’option est
disponible).
• La direction de mon volant n’est pas assez réactive :
- Basculez votre volant en mode sensibilité haute.
9/10
SUPPORT TECHNIQUE
Si vous rencontrez un problème avec votre produit, rendez-vous sur le site http://ts.thrustmaster.com et
cliquez sur Support Technique. Vous aurez alors accès à différents services (Foire Aux Questions
(FAQ), dernières versions des pilotes et logiciels) susceptibles de résoudre votre problème. Si le
problème persiste, vous pouvez contacter le support technique des produits Thrustmaster (« Support
Technique ») :
Par e-mail :
Pour bénéficier du support technique par e-mail, vous devez d’abord vous enregistrer en ligne. Les
informations fournies vont permettre aux techniciens de résoudre plus rapidement votre problème. Cliquez
sur Enregistrement à gauche de la page Support technique et suivez les instructions à l’écran. Si vous êtes
déjà enregistré, renseignez les champs Nom d’utilisateur et Mot de passe puis cliquez sur Connexion.
Par téléphone (si vous n’avez pas d’accès Internet) :
Canada
1-866-889-2181
Gratuit
Du lundi au samedi de 7h à 14h
(Heure de l’Est)
Du lundi au samedi de 4h à 11h
(Heure du Pacifique)
France
02 99 93 21 33
Numéro fixe France Telecom non surtaxé.
Tarif selon opérateur
Du lundi au samedi de 9h à 20h
Suisse
0842 000 022
Tarif d’une communication locale
Du lundi au samedi de 9h à 20h
Belgique
078 16 60 56
Tarif d’une communication nationale
Du lundi au samedi de 9h à 20h
Luxembourg
80028612
Gratuit
Du lundi au samedi de 9h à 20h
Horaires et numéros de téléphone susceptibles de changer. Veuillez consulter http://ts.thrustmaster.com pour obtenir une
liste à jour.
INFORMATIONS RELATIVES A LA GARANTIE
Dans le monde entier, Guillemot Corporation S.A. (« Guillemot ») garantit au consommateur que le présent produit
Thrustmaster est exempt de défauts matériels et de vices de fabrication, et ce, pour une période de deux (2) ans à
compter de la date d’achat d’origine. Si, au cours de la période de garantie, le produit semble défectueux, contactez
immédiatement le Support Technique qui vous indiquera la procédure à suivre. Si le défaut est confirmé, le produit
devra être retourné à son lieu d’achat (ou tout autre lieu indiqué par le Support Technique).
Dans le cadre de la garantie, le consommateur bénéficiera, au choix du Support Technique, du remplacement ou de la
réparation du produit défectueux. Lorsque la loi applicable l’autorise, toute responsabilité de Guillemot et ses filiales (y
compris pour les dommages indirects) se limite à la réparation ou au remplacement du produit Thrustmaster. Les droits
légaux du consommateur au titre de la législation applicable à la vente de biens de consommation ne sont pas affectés
par la présente garantie.
Cette garantie ne s’appliquera pas : (1) si le produit a été modifié, ouvert, altéré, ou a subi des dommages résultant
d’une utilisation inappropriée ou abusive, d’une négligence, d’un accident, de l’usure normale, ou de toute autre cause
non liée à un défaut matériel ou à un vice de fabrication ; (2) en cas de non-respect des instructions du Support
Technique ; (3) aux logiciels non-édités par Guillemot, lesdits logiciels faisant l’objet d’une garantie spécifique accordée
par leurs éditeurs.

10/10
Stipulations additionnelles à la garantie
Aux États-Unis d’Amérique et au Canada, cette garantie est limitée au mécanisme interne et au boîtier externe du
produit. Toute garantie implicite applicable, incluant les garanties de qualité marchande ou d’adaptation à un usage
particulier, est limitée à deux (2) ans à compter de la date d’achat et soumise aux conditions de la présente garantie
limitée. En aucun cas, Guillemot Corporation S.A. ou ses sociétés affiliées ne sauraient être tenues responsables
envers qui que ce soit de tous dommages indirects ou dommages accessoires résultant du non-respect des garanties
expresses ou implicites. Certains États/Provinces n’autorisent pas la limitation sur la durée d’une garantie implicite, ou
l’exclusion ou la limitation de responsabilité pour les dommages indirects ou accessoires, de sorte que les limitations ou
exclusions ci-dessus peuvent ne pas vous être applicables. Cette garantie vous confère des droits spécifiques ; vous
pouvez également bénéficier d’autres droits qui peuvent différer d’un État/Province à l’ autre.
COPYRIGHT
© 2012 Guillemot Corporation S.A. Tous droits réservés. Thrustmaster
®
est une marque déposée de Guillemot
Corporation S.A. PlayStation
®
est une marque déposée de Sony Computer Entertainment Inc. Windows
®
est une
marque déposée de Microsoft Corporation. Toutes les autres marques déposées et noms commerciaux sont
reconnus par les présentes et sont la propriété de leurs propriétaires respectifs. Illustrations non contractuelles. Le
contenu, la conception et les spécifications sont susceptibles de changer sans préavis et de varier selon les pays.
Fabriqué en Chine.
Technologie TouchSense
®
sous licence de Immersion Corporation. Protégée par un ou plusieurs des brevets ci-
après :
Brevets américains : 5831408, 5844392, 5857986, 5907487, 5959613, 6020875, 6088017, 6104158, 6246390,
6252583, 6271833, 6275213, 6278439, 6343349, 6400352, 6411276, 6424333, 6715045, 6801008, 7131073,
7199790, 7209117, 7299321, 7327348, 7345672 et 7502011.
Informations à conserver. Les couleurs et décorations peuvent varier.
RECOMMANDATION RELATIVE A LA PROTECTION DE L’ENVIRONNEMENT
En fin de vie, ce produit ne doit pas être éliminé avec les déchets ménagers normaux mais
déposé à un point de collecte des déchets d'équipements électriques et électroniques en
vue de son recyclage.
Ceci est confirmé par le symbole figurant sur le produit, le manuel utilisateur ou l’emballage.
En fonction de leurs caractéristiques, les matériaux peuvent être recyclés. Par le recyclage
et par les autres formes de valorisation des déchets d'équipements électriques et
électroniques, vous contribuez de manière significative à la protection de l’environnement.
Veuillez consulter les autorités locales qui vous indiqueront le point de collecte concerné.
www.thrustmaster.com
1/10
Für: PlayStation®3 / PC
Benutzerhandbuch
TECHNISCHE FEATURES
1 2 digitale Schalthebel (HOCH und RUNTER)
2 LED
3 Actionbuttons
4 D-Pad
5 “SE” und “ST” Buttons:
- für Select (Auswahl) und Start
- zum programmieren
6 “Home” Button für PlayStation®3
7 USB Wahlschalter (“PC” / “PS3”)
2/10
8 Pedalkabel
9 RJ45 Buchse für Pedalset
10 Tischklammer
11 Klammerschraube
12 USB-Stecker (für PC und PlayStation®3)
13 Pedalset
INSTALLATION DES LENKERS
Befestigen des Lenkers an seinem Platz
1. Plazieren Sie den Lenker auf einem Tisch oder einer flachen Unterlage.
2. Drehen Sie die Klammerschraube (11) in die Tischklammer (10) und drehen dann die Klammereinheit
in das Loch unterhalb des Lenkers, bis diese fest sitzt. Drehen Sie die Schraube nicht zu fest an oder
überdrehen diese, Sie riskieren evtl. eine Beschädigung der Einheit und/oder des Tisches.
Anschluß des Pedalsets
1. Stecken Sie das Pedalkabel (8) in die RJ45 Buchse (9) am Lenker.
Benutzen Sie das Pedalset aus Sicherheitsgründen niemals barfuß oder wenn Sie nur Socken
tragen.
THRUSTMASTER
®
LEHNT JEDWEDE HAFTUNG IM FALLE EINER VERLETZUNG DURCH DAS
PEDALSET DURCH NUTZUNG DESSELBEN OHNE SCHUHWERK AB.

3/10
PLAYSTATION®3
INSTALLATION AUF DER PLAYSTATION®3
1. Stellen Sie den USB Wahlschalter (7) des Lenkers auf die “PS3” Position.
2. Stecken Sie den USB Stecker (12) in einen USB Port an Ihrer Console.
3. Schalten Sie Ihre Console ein.
4. Starten Sie das Spiel.
Sie können nun spielen!
BENUTZEN DES “HOME” BUTTON (6)
Der “Home” Button gestatten Ihnen eine Beendigung des Spiels und den Zugriff auf die Systemmenüs
Ihrer PlayStation®3.
Wichtige Anmerkungen zur PLAYSTATION®3
- Der USB Wahlschalter (7) am Lenker muß immer auf die “PS3” Position gestellt werden, bevor Sie den
Lenker anschließen.
- Im “1 Player” Modus: Ist Ihr offizielles Gamepad eingeschaltet und angeschlossen, müssen Sie dieses
auf den “Controller Port 2” umschalten damit Ihr Lenker funktioniert.
- Auf der PlayStation®3 ist der Lenker ausschließlich mit PlayStation®3 Spielen kompatibel (und
funktioniert nicht mit PlayStation® 2 Spielen).
- Auf der PlayStation®3 werden die Vibration-Effects (Vibrationseffekte) nicht unterstützt (nur auf dem
PC).
- In bestimmten Rennspielen sollten Sie nicht zögern die beiden Sensitivitätsmodi auszuprobieren. Damit
können Sie die Präzision und die Empfindlichkeit des Lenkers optimieren.
"Gran Turismo® 5 PS3™" Konfigurationsprozedur für den "FERRARI® GT EXPERIENCE" Rennlenker
In den Voreinstellungen für dieses Spiel sind Beschleunigung und Bremsen nicht den Buttons "R2/L2", sowie
die Gangschaltung nicht den "R1/L1" Buttons zugeordnet (was für die Pedale und den Up/Down Hebeln am
"Ferrari® GT Experience" Rennlenker der Fall ist).
Prozedur zum konfigurieren und optimieren des Lenkers:
(Diese Prozedur muß nur einmal ausgeführt werden, die Änderungen werden dann im Spiel gespeichert)
1) Starten Sie das Spiel.
2) Gehen Sie in das OPTION Menü.
3) Gehen Sie zum CONTROLLER SETUP Menü
(durch anklicken des Symbols, das das Gamepad und das D-Pad repräsentiert).
4) Konfigurieren Sie den Kontroller wie folgt:
• Accelerate auf R2
• Brake auf L2
• Shift Up auf R1
• Shift Down auf L1
• Rear View auf L3 und/oder R3

4/10
• Left & Right View auf D-Pad Left & Right
5) OK klicken (Bildschirm rechts unten).
6) Gehen Sie zum Hauptmenü zurück, um den Track Ihrer Wahl aufzurufen.
Sie sind nun spielbereit!
Bitte beachten: Das Lenkrad Ihres "Ferrari® GT Experience" Rennlenkers verfügt über 2
Empfindlichkeitsmodi (normal oder hoch). Um optimale Präzision in "Gran Turismo® 5 PS3™" zu
erreichen, empfehlen wir die Aktivierung des Modus "hohe Empfindlichkeit".
PC
Installation auf dem PC
Die beigelegte CD-ROM erlaubt Ihnen die “Vibration Feedback” Treiber zu installieren..
1. Stellen Sie den USB Wahlschalter (7) des Lenkers auf die “PC” Position.
2. Legen Sie die Installations-CD-ROM in Ihr CD-ROM Laufwerk des Computers. Befolgen Sie die
Bildschirmanweisungen, um die “Vibration Feedback” zu installieren. Nach Beendigung der Installation
klicken Sie auf Fertig und starten Ihren Computer neu.
3. Nach dem Neustart Ihres Computers verbinden Sie den USB Stecker (12) mit einem freien USB Port
an Ihrem Computer. Windows® erkennt automatisch das neue Gerät.
4. Treiberinstallation
Die Treiber werden automatisch installiert. Folgen Sie den Bildschirmanweisungen, um die Installation
zu komplettieren.
5. Klicken Sie auf Start/Einstellungen/Systemsteuerung und (doppel-)klicken dann auf
Gamecontroller (oder Spieloptionen, je nach Betriebssystem).
Die Gamecontroller Dialogbox zeigt nun den Namen des Lenkers mit dem OK Status an
6. In dem Bedienfeld klicken Sie auf Eigenschaften, um Ihren Lenker zu konfigurieren:
• Test Gerät: Erlaubt Ihnen die Buttons, das D-Pad und die Achsen des Lenkers, sowie das
Pedalset zu konfigurieren und zu visualisieren.
• Test Forces: Erlaubt Ihnen die acht Vibrationseffekte zu testen und die Einstellungen der
Vibrationseffekte zu konfigurieren.
Sie können nun spielen!
WICHTIGE ANMERKUNGEN ZUM PC
- Der USB Wahlschalter (7) des Lenkers muß immer auf die “PC” Position gestellt werden bevor der
Lenker angeschlossen wird.
- Der Lenker und die Pedale kalibrieren sich automatisch selbst nachdem eine Verbindung mittels USB
hergestellt wurde. Im Falle irgendwelcher Probleme können Sie auch eine manuelle Kalibrierung
vornehmen. Dazu laden Sie bitte unter http://ts.thrustmaster.com
die “Thrustmaster Calibration Tool”
Software herunter.
5/10
ERWEITERTE FUNKTIONEN
JUSTIERUNG DER LENKEREMPFINDLICHKEIT
Die Lenkersteuerung beinhaltet zwei Empfindlichkeitsmodi:
- Normale Empfindlichkeit (voreingestellter Modus)
- Hohe Empfindlichkeit (muß eingestellt werden)
• Einstellen des “Hochempfindlichkeits”-Modus:
Aktion
LED
Gleichzeitig drücken und wieder loslassen:
das D-Pad (4) + die 2 HOCH- und RUNTER-Schalter (1)
Blinkt
Die Steuerung ist nun empfindlicher.
(Diese Prozedur muß jedesmal wiederholt werden, wenn der Lenker neu gestartet wird
oder abgestöpselt wurde)
• Einstellen des “Normalempfindlichkeits-” Modus (Voreinstellungsmodus):
Aktion LED
Gleichzeitig drücken und wieder loslassen:
das D-Pad (4) + die 2 HOCH- und RUNTER-Schalter (1)
BLINKT NICHT
Ihre Lenkung ist nun wieder normal Empfindlich (Voreinstellung).
PROGRAMMIEREN DES LENKERS UND DER PEDALE
Ihr Lenker ist vollständig programmierbar:
- Alle Buttons und auch das D-Pad können miteinander geschaltet werden.
- Alle Buttons und auch das D-Pad können auf die beiden Pedale programmiert werden.
• Beispiele möglicher Applikationen:
- Auf PS3: Programmierung L2/R2 oder L3/R3 auf die beiden digitalen HOCH und RUNTER
Schalthebel (L1/R1).
- Button(s) auf ein oder beide Pedale programmieren.
- Umschalten verschiedener Buttons für bessere Zugänglichkeit.
• Programmierungsprozedur
Schritte
Aktion
LED
1
Gleichzeitig drücken und wieder loslassen:
SE + ST (5)
AUS
2
Drücken und wieder loslassen des zu programmierenden
Buttons.
BLINKT SCHNELL
3
Drücken und wieder loslassen des Buttons/Pedals auf dem die
Funktion plaziert werden soll.
AN
Die Programmierung ist nun vollzogen.
(Sie müssen diese Prozedur jedesmal erneut ausführen nachdem
Sie Ihren Lenker neu gestartet haben oder abgestöpselt hatten)
6/10
• Löschen Ihrer Programmierung
Schritt
Aktion
LED
1
Für zwei Sekunden drücken und halten:
SE + ST (5)
Geht an und wieder
aus
Ihre Programmierung ist nun gelöscht.
KONFIGURIEREN DER PEDALE AUF PLAYSTATION®3
Auf PlayStation®3 sind das Gas- und die Bremskontrolle im „separaten“ Modus voreingestellt, d. h., die
Pedale funktionieren auf voneinander unabhängigen Achsen:
“Gas” = “R2” Trigger & “Bremse” = “L2” Trigger
Für unterschiedliche Kontrolltypen (z. B. Begrenzung von Rutschen) können Sie Ihren Lenker auf einen
„kombinierten“ Modus (zwei Achsen) schalten: Die Pedale funktionieren auf einer Achse.
- Auf PlayStation®3:
“Gas und Bremse” = Hoch-/Runter-Richtung auf dem rechten „Mini-Stick”
• Einstellen des “kombinierten Pedal-” Modus
Aktion
LED Farbe
Gleichzeitig drücken und dann loslassen:
Die beiden Pedale (13) + den “Home” Button (6)
GRÜN
Ihre Pedale sind nun kombiniert.
(Sie müssen diese Prozedur jedesmal erneut ausführen nachdem Sie Ihren Lenker neu gestartet haben
oder abgestöpselt hatten)
7/10
• Rückkehr zum “Separaten Pedal-” Modus (Voreinstellung)
Aktion
LED Farbe
Gleichzeitig drücken und dann loslassen:
Die beiden Pedale (13) + den “Home” Button (6)
ROT
Auf PlayStation®3
Ihre Pedale sind nun wieder im Voreinstellungsmodus: “Separat”
KONFIGURIEREN DER PEDALE AUF DEM PC
Die Gas- und Bremskontrollen des Lenkers sind voreingestellt im „separaten“ Modus (3 Achsen), d. h., die
Pedale funktionieren auf voneinander unabhängigen Achsen.
Dreiachsiger Modus erlaubt Ihnen die Präzision Ihres Fahrens um einiges zu verbessern.
Sollte Ihr Spiel einen dreiachsigen Modus nicht unterstützen, werden die Pedale nicht richtig funktionieren.
Sie müssen das Spiel beenden und in den zweiachsigen, „kombinierten“ Modus umschalten.
Modus
LED Farbe
Separate Pedale (3 Achsen)
ROT
Kombinierte Pedale (2 Achsen)
GRÜN
• Auswahl der Achsen via “Software”
(Diese Einstellung wird gespeichert auch nach einem Neustart und nach dem Abstöpseln des Lenkers)
Auf Seite 1 des “Control Panel”: Wählen Sie den Modus, den Sie wünschen und klicken dann OK.
• Auswahl der Achsen via “Hardware”
(Diese Einstellung wird nicht gespeichert: Sie müssen diese Prozedur jedesmal erneut ausführen
nachdem Sie Ihren Lenker neu gestartet haben oder abgestöpselt hatten – Erlaubt Ihnen die Auswahl
Ihres Modus direkt in den „Kontrolloptionen“ Ihres Spiels)
Gleichzeitig drücken und dann loslassen: Die beiden Pedale (13) + den “Home” Button (6)

8/10
FEHLERBESEITIGUNG UND WARNUNGEN
• Mein Lenker funktioniert nicht richtig oder scheint ungenau kalibriert zu sein:
- Schalten Sie Ihren PC oder Ihre Console aus, entfernen den Lenker vollständig indem Sie alle Kabel
abziehen. Schließen Sie dann alle Kabel wieder an, starten die Console/den PC und starten dann das
Spiel erneut.
- Sollte das Problem auf einem PC weiter bestehen, laden Sie “Thrustmaster Calibration Tool”, die
manuelle Kalibrierungssoftware von http://ts.thrustmaster.com
herunter.
- Berühren Sie niemals den Lenker oder die Pedale wenn Sie Ihren Lenker anschließen, so vermeiden
Sie jedwede Kalibrierungsprobleme.
• Mein Pedalset funktioniert nicht korrekt:
- Rekonfigurieren Sie Ihren Lenker in der Sektion Gamecontroller-Optionen Ihres Spiels.
- Sollte das Problem auf dem PC weiter fortbestehen, beenden Sie das Spiel und schalten die Pedale in
den „kombinierten“ Modus (zwei Achsen). Rufen Sie das Spiel erneut auf und rekonfigurieren den
Lenker mit den neuen Achsen.
• Ich kann meinen Lenker nicht konfigurieren:
- Auf PS3: Im Spielemenü “Optionen / Controller / Gamepads” – wählen Sie die am besten geeignete
Konfiguration.
- Auf dem PC: Im Spielemenü “Optionen / Controller / Lenker” - wählen Sie die am besten geeignete
Konfiguration.
- Bitte lesen Sie auch im Benutzerhandbuch oder der Onlinehilfe Ihres Spiels für mehr Informationen
nach.
- Sie können ebenfalls die „Programmierfunktion“ Ihres Lenkers dazu nutzen diesen Problemtyp zu
beheben.
• Auf dem PC oder der PS3 – mein Lenker funktioniert nicht korrekt:
- Beenden Sie das Spiel, entfernen den Lenker vollständig indem Sie alle Kabel abziehen und überprüfen
ob der “PC/PS3 ” USB Wahlschalter (7) auf die richtige Position gestellt ist. Schließen Sie dann alle
Kabel wieder an und versuchen es erneut.
• Auf dem PC – meine Spielmenüs scrollen selbständig:
- Beenden Sie das Spiel und schalten die Pedale in den „kombinierten“ Modus (zwei Achsen). Rufen Sie
das Spiel erneut auf und rekonfigurieren den Lenker mit den neuen Achsen.
• Auf dem PC – die Vibrationen hören nicht mehr auf:
- Mindern Sie die Intensität der Force-Effekte in der Sektion der Gamecontroller-Optionen oder justieren
Sie die Effekte in der Steuerkonsole des Lenkers.
- In den Gamecontroller-Optionen wählen Sie “Force type: Gamepad” (falls diese Option verfügbar ist).
• Meine Lenkung reagiert nicht richtig:
- Schalten Sie Ihren Lenker in den hohen Empfindlichkeitsmodus.
9/10
TECHNISCHER SUPPORT
Sollten Sie mit Ihrem Produkt ein Problem haben, besuchen Sie bitte die Seite http://ts.thrustmaster.com
und klicken Sie auf Technischer Support. Von dort aus können Sie auf verschiedene Instrumente
zugreifen (Fragen und Antworten (FAQ), die neuesten Versionen von Treibern und Software), die Ihnen
bei der Lösung Ihres Problems helfen könnten. Falls das Problem weiterhin besteht, können Sie mit dem
technischen Support der Thrustmaster Produkten in Kontakt treten („Technischer Support“):
Per E-Mail:
Um den Vorzug des technischen Supports per Email in Anspruch nehmen zu können, müssen Sie sich
zunächst online registrieren. Mit den Informationen, die Sie uns so zukommen lassen, können die
Mitarbeiter Ihr Problem schneller lösen. Klicken Sie auf Registrierung links auf der Seite des technischen
Supports und folgen Sie den Instruktionen auf dem Bildschirm. Falls Sie bereits registriert sind, füllen Sie die
Textfelder Anwendername und Passwort aus und klicken dann auf Login.
Per Telefon (falls Sie über keinen Internetzugang verfügen):
Deutschland
08000 00 1445
Kostenlos
Montag bis Freitag 9:00 bis 20:00 Uhr
Samstag 9:00 bis 13:00 Uhr und 14:00 bis 18:00 Uhr
Österreich
0810 10 1809
Zum Preis eines
Ortsgesprächs
Montag bis Freitag 9:00 bis 20:00 Uhr
Samstag 9:00 bis 13:00 Uhr und 14:00 bis 18:00 Uhr
Schweiz
0842 000 022
Zum Preis eines
Ortsgesprächs
Montag bis Freitag 9:00 bis 20:00 Uhr
Samstag 9:00 bis 13:00 Uhr und 14:00 bis 18:00 Uhr
Luxemburg
80028612
Kostenlos
Montag bis Freitag 9:00 bis 20:00 Uhr
Samstag 9:00 bis 13:00 Uhr und 14:00 bis 18:00 Uhr
Geschäftszeiten und Telefonnummern können sich ändern. Bitte besuchen Sie für die aktuellen
Kontaktinformationen des Technischen Supports http://ts.thrustmaster.com.
GEWÄHRLEISTUNGSINFORMATIONEN
Guillemot Corporation S.A. („Guillemot“) bietet dem Kunde weltweit eine 2-jährige Garantie auf
Materialschäden und Herstellungsmängel ab dem Kaufdatum. Sollte das Produkt dennoch während
dieser 2 Jahre Schäden oder Mängel aufweisen, kontaktieren Sie unverzüglich den Technischen Support,
der Ihnen mitteilt, wie weiter zu verfahren ist. Sollte ein Defekt vorliegen, muss das Produkt dort
zurückgegeben werden, wo es gekauft wurde (oder an die vom Technischen Support angegebene
Adresse).
Im Rahmen dieser Garantie wird das defekte Produkt des Kunden nach Ermessen des Technischen
Supports entweder repariert oder ersetzt. Überall wo es geltendes Recht zulässt, wird die volle Haftung
von Guillemot und seinen Niederlassungen (einschließlich für indirekte Beschädigungen), begrenzt auf
die Reparatur oder den Ersatz des Thrustmaster Produktes, übernommen. Die Rechte des Käufers
entsprechend geltendem Recht im jeweiligen Land werden nicht durch diese Garantie beeinflusst.
Loading...