


Vernier
EasyData™ App
(by Vernier Software & Technology)
Getting Started
What is the EasyData App?
What you need
Where to find installation instructions
Quick Start: Graphing temperature with Vernier
EasyTemp™
How to...
Start and quit EasyData Use EasyData menus
Collect data automatically Collect data manually
Do a Graph Match Restore default settings
More Information
Exploring data Error messages
In case of difficulty Customer Support
1/12/05 © 2004 Texas Instruments

Important Information
Texas Instruments makes no warranty, either express or implied,
including but not limited to any implied warranties of merchantability
and fitness for a particular purpose, regarding any programs or book
materials and makes such materials available solely on an "as-is"
basis. In no event shall Texas Instruments be liable to anyone for
special, collateral, incidental, or consequential damages in
connection with or arising out of the purchase or use of these
materials, and the sole and exclusive liability of Texas Instruments,
regardless of the form of action, shall not exceed the purchase price
of this product. Moreover, Texas Instruments shall not be liable for
any claim of any kind whatsoever against the use of these materials
by any other party.
Graphing product applications (Apps) are licensed. See the terms of
the license agreement for each product.
In this guidebook, references to TI-83 Plus also apply to the TI-83
Plus Silver Edition. References to TI-84 Plus also apply to the TI-84
Plus Silver Edition.
EasyData, EasyTemp, Go!Motion and LabPro are trademarks of Vernier Software and
Technology.
Microsoft, Windows, Windows NT, Windows XP, Apple, and MacIntosh are trademarks of
their respective owners.
EasyData Page 2

What is the EasyData App?
The EasyData App is a graphing calculator application. It lets you
collect, view , and analyze real-world data on certain TI graphing
calculators using Vernier USB sensors and other data collection
devices, such as Texas Instruments CBR 2™ motion detector,
CBL 2™ System, or Vernier Go!Motion™ or LabPro®.
What you need
Note: In this guidebook, references to TI-83 Plus also apply to the
TI-83 Plus Silver Edition. References to TI-84 Plus also apply to the
TI-84 Plus Silver Edition.
Hardware and software Notes
• TI-84 Plus with operating system version
2.3 or later
-or-
• TI-83 Plus with operating system version
1.16 or later
EasyData Page 3
You can download a free copy of the
latest operating system software for
your calculator from
education.ti.com/latest
The TI-83 Plus requires a separate
data collection device, such as a
Texas Instruments CBL 2™ System.
.

Hardware and software Notes
Data Collection Devices from Vernier
Software & Technology:
• EasyTemp™
• Go!™Motion
• LabPro®
Data Collection Devices from
Texas Instruments:
• CBL 2™ System
• CBR™ and CBR 2™ motion detectors
EasyData supports USB sensors from
Vernier Software and Technology and from
Texas Instuments, such as Go!™Motion,
Vernier EasyTemp™ sensor, Texas
Instruments CBR 2™ motion detector, and
other sensors for measuring pH, force, and
light.
To copy collected data to a computer or to
install the EasyData App on a calculator
from a computer, you need TI Connect™
installed on a computer running Microsoft®
Windows® 98/2000; Windows NT®; or
Windows XP® installed, or an Apple®
MacIntosh® with OS 7.1 or higher.
Cables may be included with the
sensors. Additional cables are
available for purchase from retail
stores, online retailers, and
instructional dealers. See a list at
education.ti.com/buy
or shop the TI
online store at education.ti.com/shop
You can purchase data collection
devices and sensors at
www.vernier.com
.
You can download TI Connect™ from
education.ti.com/downloadticonnect
.
.
EasyData Page 4

Where to find installa tion instructions
Detailed instructions on installing this and other applications are
available at education.ti.com/guides. Follow the link to Flash
Installation Instructions.
Note: The EasyData App may have been preinstalled on your
graphing calculator. To find out if it’s installed, press Œ, and then
press † to scroll through all available applications.
Getting help
The instructions in this guidebook are only for this application. If you
need help using your calculator, refer to it s comprehensive guidebook
at education.ti.com/guides.
Connecting devices
The examples in this guidebook use the EasyTemp™ USB
temperature sensor. To connect other devices, please refer to the
device's user guide.
When the calculator detects the data collection device, EasyData
opens automatically and starts a default experiment appropriate for
that device.
EasyData Page 5
Navigating EasyData menus
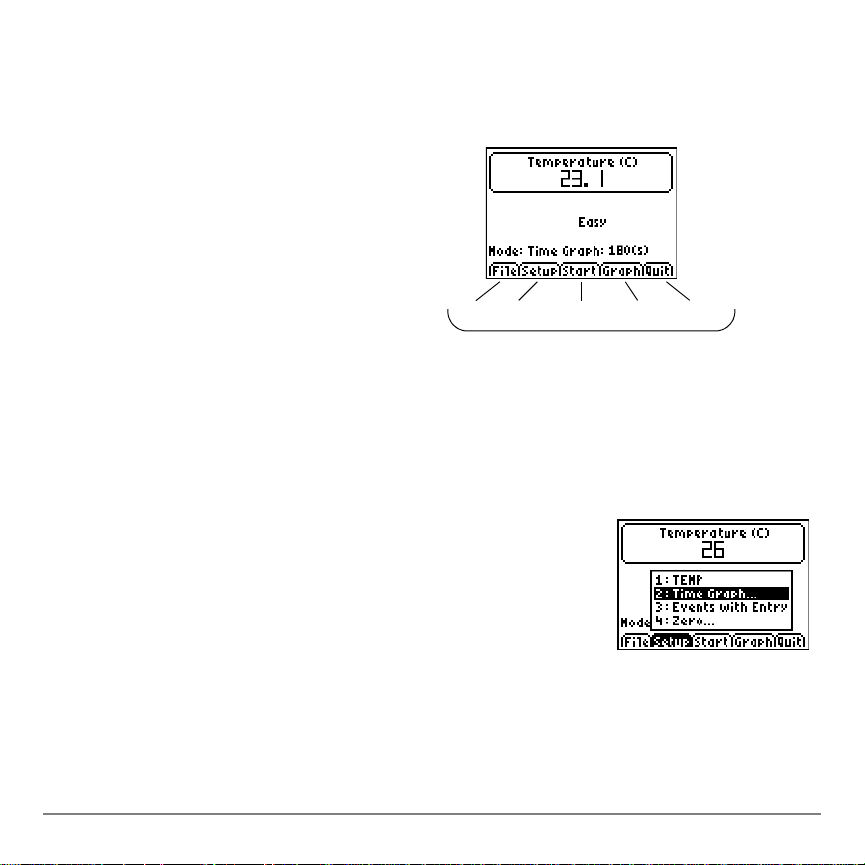
Selecting on-screen options
Each screen displays one or
more options along the
bottom of the screen. To
select an option, press the
For example,
to select
Quit, press
the
s
key.
calculator key directly below
the option.
opqrs
Selecting menu Items
EasyData menus differ slightly among the types of sensors. You can
select menu items in the following ways:
f Press † or } to highlight the menu item,
and then press Í to select it.
- or -
f Press the number key that corresponds
to the menu item.
EasyData Page 6
Quick Start: Graphing temperature with Vernier EasyTemp™
Y ou can connect the EasyTemp™ USB temperature sensor to a TI-84
Plus calculator and use EasyData to watch the effect of holding the
sensor in your hand. This exercise uses the Time Graph mode to
collect samples automatically at regular time intervals.
1. Turn the TI-84 Plus calculator on, and display the home screen.
2. Connect the EasyTemp™ sensor to the
calculator.
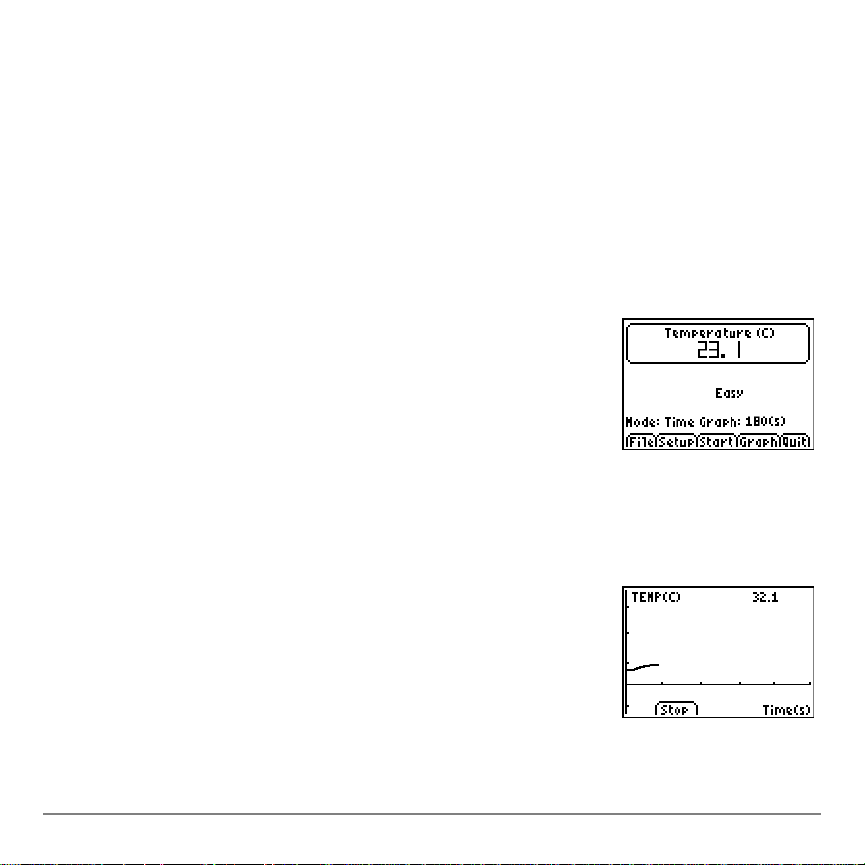
After a few seconds, the EasyData main
screen is displayed. The screen shows
the current EasyData mode and the
current sensor reading.
3. Select Start to start collecting data, and then wait five seconds.
4. Hold the EasyTemp sensor for about 30
seconds.
The graph shows the temperature as it
changes.
EasyData Page 7
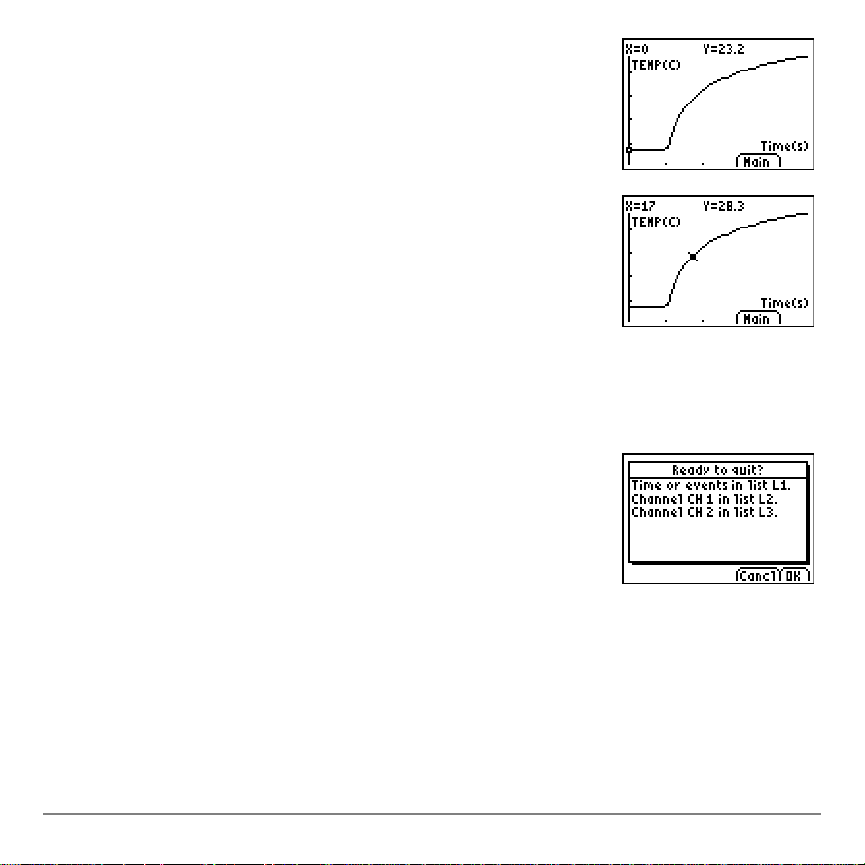
5. Select Stop to stop collecting data.
EasyData displays a scaled graph of the
sampled temperatures.
6. Press ~ repeatedly to scroll the cursor to
the right, and note the temperature at
each data point.
7. When you finish exploring the graph, select Main to return to the
EasyData main screen.
8. Select Quit.
A message indicates that the collected
data has been stored in calculator lists.
9. Select OK to quit EasyData.
You have completed the Quick Start exercise. The remainder of this
guide contains detailed instructions and reference information for
using EasyData features.
EasyData Page 8

Starting and quitting the EasyData App
Note: EasyData starts automatically when you connect a sensor to
the USB port of a TI-84 Plus calculator that is on the home screen.
Starting EasyData
f If EasyData is not already running on
your calculator, press Πto display the
list of available applications, and then
select EasyData.
The application’s information screen is
displayed for about three seconds,
followed by the main screen.
Quitting EasyData
1. Select Quit (press the s key) from the
EasyData main screen.
A message indicates that the collected
data has been transferred to the
calculator’s lists.
2. Select OK to quit EasyData, or select Cancl to return to the
EasyData main screen.
EasyData Page 9

Data collection modes
EasyData has modes that let you collect data automatically or
manually.
•In Time Graph mode, EasyData automatically collects a specific
number of samples at regular time intervals. You set the interval
(in seconds) and the total number of samples to collect. You can
stop the sampling manually, if you wish.
•In Events with Entry mode, you capture samples manually for a
set of events that you define. For example, you might want to
collect Boyle's law data using a gas pressure sensor to sample
pressure readings for corresponding volumes of a container.
When you change an EasyData mode or setting, the change remains
in effect until you restore the default settings, run another App,
connect another sensor, or manipulate or delete list L5 outside the
EasyData App.
EasyData Page 10
Collecting data automatically (Time Graph)
To collect data in the Time Graph mode
This example uses a motion detector. Your screen will vary
depending on which sensor is attached.
1. If EasyData is not already in Time Graph
mode:
a) Select Setup to display the Setup
menu.
b) Select Time Graph to open the Time
Graph Settings
The current settings are displayed.
c) Select OK to return to the main
screen.
2. When you are ready to start collecting data, select Start.
3. To stop the sampling process before it automatically stops, select
and hold Stop (press and hold the q key).
wizard.
When sampling stops, EasyData displays a graph of the sampled
data.
EasyData Page 11

To change Time Graph settings
This example uses a motion detector. Your screen will vary
depending on which sensor is attached.
1. Select Setup to display the Setup menu.
2. Select Time Graph to open the Time
Graph Settings
wizard.
The current settings are displayed.
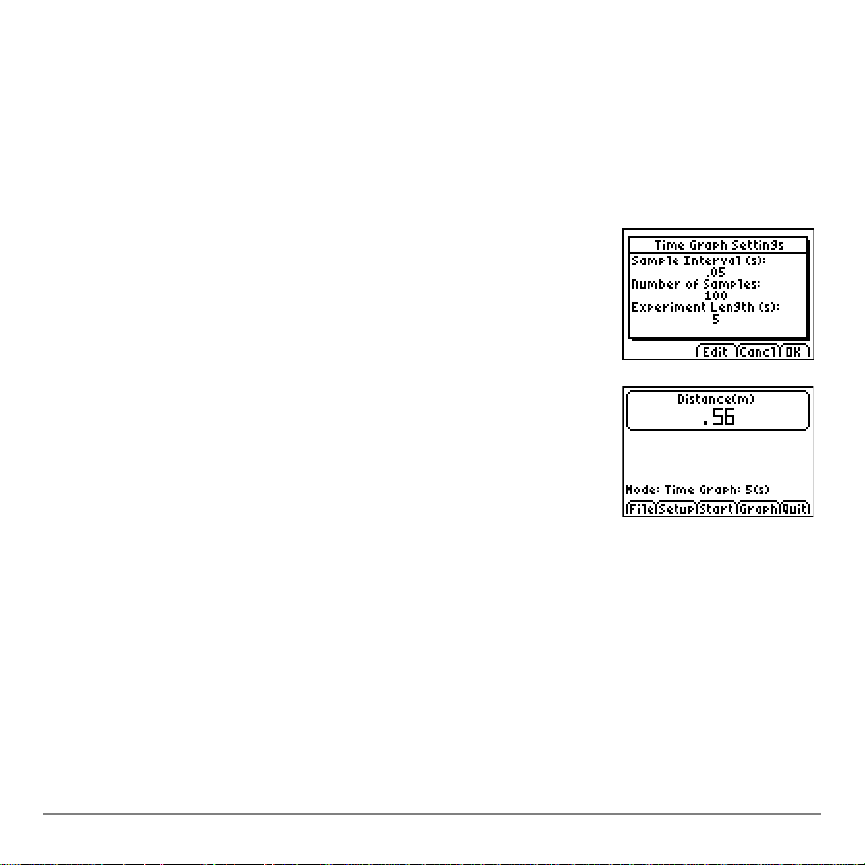
3. Select Edit to open the Sample Interval
step.
4. Type the new interval. For example,
type .1 to sample every 1/10 second.
You can also press u to clear the
current value.
5. Select Next to advance to the Number of
Samples step.
6. Type the new number of samples to
collect.
EasyData Page 12

7. Select Next to display a summary of the
new settings.
The experiment length is calculated from
the settings that you typed.
8. Select OK to return to the main screen.
EasyData Page 13
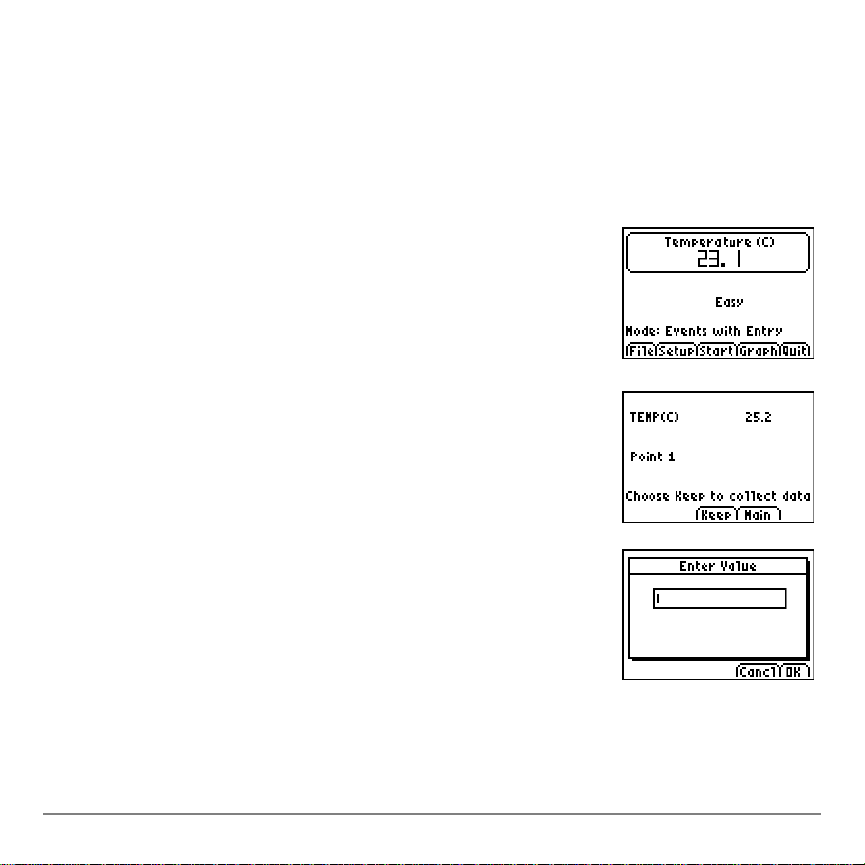
Collecting data manually (Events with Entry)
In Events with Entry mode, each sampled value becomes a y value;
you enter the x value.
To collect data in Events with Entry mode
1. Select Setup from the EasyData main
screen, and then select Events with
.
Entry
The main screen is displayed with
current settings.
2. To begin, select Start.
EasyData waits for you to collect the first
sample.
3. Set up (or wait for) the condition that you
want to capture.
4. When ready to capture the current
sampled (y) value, select Keep.
You are prompted to assign an x value to
define the data point.
EasyData Page 14

5. Type the x value, and then select OK.
EasyData waits for you to collect the next
point.
6. When you have finished collecting data,
select Stop.
The data points are displayed as a graph
(a calculator scatter plot).
7. Press | and ~ to review the data, or select Main to return to the
EasyData main screen.
Exploring collected data graphically
After collecting data, EasyData displays a graph of the data,
automatically scaled for easy viewing. The calculator is placed in
Trace mode automatically so you can scroll through the collected
data points on the graph screen.
• The x-axis (horizontal axis) is the independent variable. In Time
Graph mode, this represents time. In Events with Entry mode, it is
a set of user-defined events.
EasyData Page 15

• The y-axis (vertical axis) is the dependent variable. In all data
collection modes, it is the physical data collected by the attached
sensor
Exploring the data outside EasyData
When you quit the EasyData App, a message reminds you of which
calculator lists contain the collected data. You can then examine the
data using your calculator or a computer.
• On your calculator, you can explore the data by viewing the data
in the list editor. (On the TI-84 Plus, press … and then select
Edit.)
• You can also perform statistical analysis (such as calculating
mean, median, and standard deviation) on the data.
• By using TI Connect™ computer software and an appropriate TI
Connectivity cable, you can copy the data to a computer and
import the data into other software tools such as:
– Spreadsheet software to analyze the data.
– TI InterActive!™ for formal presentations.
EasyData Page 16

Graph Match (motion detector only)
When connected to a motion detector, EasyData has a Distance
Match
letting you try to create data that matches a predefined graph.
Note: The sample interval and number of samples for the Distance
Match
To match a graph
1. While holding the motion detector in one hand and the calculator
2. Start the EasyData App.
3. From the Setup menu, select Distance Match.
4. Select Start and follow the instructions on
mode. This mode helps build understanding of graphs by
mode are preset and cannot be changed.
in the other, aim the motion detector at a wall.
the screen.
5. Select Next to display the graph to
match. Take a moment to study the
graph and what it may represent.
EasyData Page 17

6. Position yourself where you think the graph begins. Select Start
to begin data collection.
You can hear a clicking sound as the data is collected.
7. W alk backward and then forward, trying
to match the graph. Your position is
plotted on the screen.
8. When the sample is finished, examine how well your “walk”
matched the graph.
9. Do one of the following:
– Select Retry to redisplay the same graph to match. Try to
improve your match.
– Select New to display a new graph to match.
– Select Main to return to the main screen.
EasyData Page 18

Changing a sensor’s measuring unit
You can change the measuring unit for a connected sensor. With a
motion detector, for example, you can change the unit from meters
(m) to feet (ft).
To change the measuring unit
1. From the EasyData main screen, select
Setup, and then select the menu item for
the sensor, such as Dist for the motion
detector.
The Sensor Setup screen is displayed.
2. Select Units.
A menu is displayed showing the
possible units for the connected sensor.
3. Select the unit that you want EasyData to
use.
The Sensor Setup screen shows the
selected unit.
4. Select OK.
EasyData Page 19

Setting a zero reference (zeroing the sensor)
By default, EasyData uses the data sampled by the connected
sensor. If the motion detector senses a distance of 2.3 meters, for
example, EasyData displays 2.3 meters.
You may prefer to use the current data reading as a zero reference,
so that data values less than the reference are displayed as negative,
and greater values are displayed as positive. Setting a zero reference
affects all data-collection modes.
To set the zero reference
1. Select Setup to display the Setup menu.
2. Select Zero.
The Zero Sensor(s) screen is displayed,
with a continually updated sample
reading.
3. Adjust the sensor data by, for example,
moving the motion detector closer or
farther from a wall.
EasyData Page 20

4. When the data reading is at the value
you want to use as a zero reference,
select Zero.
You are returned to the main screen.
Sample data is now adjusted for the new
zero reference.
To remove the zero reference
1. Make sure a sensor is connected.
2. Select File, and then select New.
EasyData restarts in the Time Graph mode, and the default
settings are restored.
Restoring EasyDa ta default settings
The default EasyData settings are appropriate for a wide variety of
sampling situations. If you are unsure of the best settings, begin with
the default settings, and then adjust the settings for your specific
activity.
1. Make sure a sensor is connected.
2. Select File, and then select New.
EasyData restarts in the default data-collection mode, and the
default settings are restored.
EasyData Page 21

Viewing EasyData tips
EasyData contains built-in tips to help you. Tips include general
EasyData tips, setup menu tips, graph tips, and a list of supported
products.
1. From the EasyData main screen, select
File, and then select Help.
The first tip screen is displayed.
2. Select Next to view the next tip.
3. Select one of the options.
– Select Back to display the previous tip
– Select Next to display the next tip.
– Select Cancl to cancel and return to the EasyData main
screen.
EasyData Page 22

Ensuring reliable data collection
Do not disconnect the data collection device during data collection or
while the “Checking Sensors” screen is displayed.
Keep in mind that the lists containing previously collected data are
cleared when you select Start. This applies to all data-collection
modes.
In case of difficulty
Problem Cause and/or solution
Insufficient memory You must have sufficient memory for the EasyData App
and the data lists. EasyData needs 5000 bytes to run
effectively. You need to delete items from the calculator
memory.
To delete items on the TI-83 Plus, press y L, select
Mem Mgmt/Del, select All, scroll to the item you wish
to delete, and press {.
Data doesn’t look right Check that the experiment conditions are correct,
and then repeat the sample.
EasyData Page 23
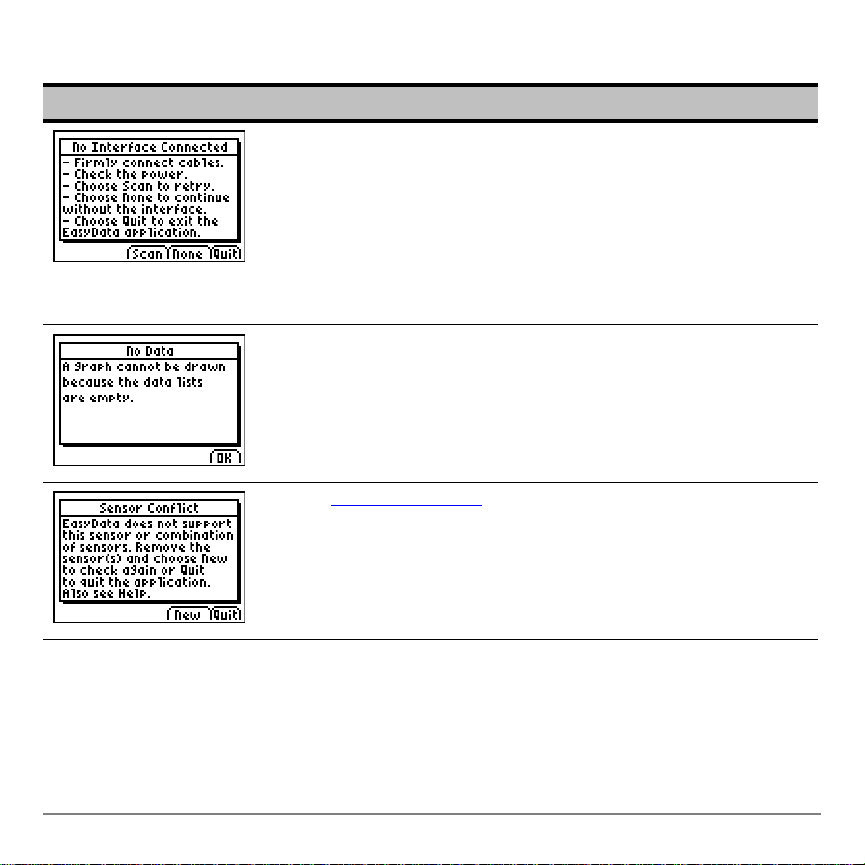
Error messages
Message Description
The calculator could not recognize a valid connection to
the data collection device.
Make sure a sensor is connected.
Check all physical connections, power supply, and device
batteries.
Restore the default settings: On the EasyData main
screen, select
A graph plot was requested without collecting any data.
You can display a graph only after you have run an
experiment to store data in the calculator memory.
File, and then select New.
Visit www.vernier.com
If you are using two sensors, they must be plugged into
CH1 first and CH2 second of CBL 2™ System or LabPro.
Note that you cannot use a motion detector simultaneo usly
with a sensor attached to CH1.
EasyData Page 24
for a list of supported sensors.

Message Description
Check all physical connections, power supply, and device
batteries.
You need to delete items from the calculator memory. (See
“In case of difficulty
Install fresh batteries in the calculator or data collection
device.
” on page 23.)
EasyData Page 25

Texas Instruments Support and Service
For general information
Home Page:
KnowledgeBase
education.ti.com
education.ti.com/support
and e-mail
inquiries:
Phone:
International
(800) TI-CARES / (800) 842-2737
For U.S., Canada, Mexico, Puerto Rico, and
Virgin Islands only
education.ti.com/international
information:
For product (hardware) service
Customers in the U.S., Canada, Mexico, Puerto Rico and Virgin
Islands: Always contact Texas Instruments Customer Support before
returning a product for service.
All other customers: Refer to the leaflet enclosed with this product
(hardware) or contact your local Texas Instruments retailer/distributor.
EasyData Page 26

Texas Instruments App Software License Agreement
By downloading/installing this software and/or documentation,
you agree to abide by the following provisions.
1. License: Subject to your payment of any applicable license fee,
Texas Instruments Incorporated ("TI") grants you a license to
copy and use the software program(s) and documentation from
the linked web page or CD ROM ("Licensed Materials"). In
addition to the copy resident on your calculator, you may keep a
copy on your computer for backup / archive purposes.
2. Restrictions: You may not reverse-assemble or reverse-compile
the software program portion of the Licensed Materials that are
provided in object code format. You may not sell, rent, or lease
copies of the Licensed Materials.
3. Support: Support for the Licensed Materials is described in the
documentation that accompanies the software. Absent such
documentation, support shall be provided by TI.
4. Copyright: The Licensed Materials and any accompanying
documentation are copyrighted. If you make copies, do not delete
the copyright notice, trademark, or protective notices from the
copies.
EasyData Page 27

5. Warranty: TI warrants that it has the right to provide the Licensed
Materials. TI does not warrant that the Licensed Materials will be
free from errors or will meet your specific requirements. The
Licensed Materials are made available "AS IS" to you or any
subsequent user.
Although no warranty is given for the Licensed Material, the
media (if any) will be replaced if found to be defective during the
first three (3) months of use, when the package is returned
postage prepaid to TI. THIS PARAGRAPH EXPRESSES TI'S
MAXIMUM LIABILITY AND YOUR SOLE AND EXCLUSIVE
REMEDY.
6. Limitations: Except as explicitly stated above, TI makes no
warranty or condition, either express or implied, including but not
limited to any implied warranties of merchantability and fitness for
a particular purpose, regarding the Licensed Materials.
In no event shall TI or its suppliers be liable for any indirect,
incidental or consequential damages, loss of profits, loss of
use or data, or interruption of business, whether the alleged
damages are labeled in tort, contract or indemnity.
Some states or jurisdictions do not allow the exclusion or
limitation of incidental or consequential damages, so the
above limitation may not apply.
EasyData Page 28

7. Additional terms: This Agreement will immediately terminate if
you fail to comply with its terms. Upon termination of this
Agreement, you agree to return or destroy the original package
and all whole or partial copies of the Program in your possession
and so certify in writing to TI.
The export and re-export of United States original software and
documentation is subject to the Export Administration Act of 1969
as amended. Compliance with such regulations is your
responsibility. You agree that you do not intend to nor will you,
directly or indirectly, export, re-export or transmit the Program or
technical data to any country to which such export, re-export or
transmission is restricted by any applicable United States
regulation or statute, without the proper written consent or
license, if required of the Bureau of Export Administration of the
United States Department of Commerce, or such other
governmental entity as may have jurisdiction over such export,
re-export or transmission.
If the Program is provided to the U.S. Government pursuant to a
solicitation issued on or after December 1, 1995, the Program is
provided with the commercial license rights and restrictions
described elsewhere herein. If the Program is provided to the
U.S. Government pursuant to a solicitation issued prior to
December 1, 1995, the Program is provided with "Restricted
Rights" as provided for in FAR, 48 CFR 52.227-14 (JUNE 1987)
or DFAR, 48 CFR 252.227-7013 (OCT 1988), as applicable.
EasyData Page 29

Page Reference
This PDF document contains electronic bookmarks designed for easy on-screen
navigation. If you decide to print this document, please use the page numbers
below to find specific topics.
Important Information ........................................................................................... 2
What is the EasyData App? ................................................................................. 3
What you need ..................................................................................................... 3
Where to find installation instructions .................................................................. 5
Getting help .......................................................................................................... 5
Connecting devices ............................. ... .... ... ... ... .... ... .......................................... 5
Navigating EasyData menus ................................................................................ 6
Quick Start: Graphing temperature with Vernier EasyTemp™ ............................ 7
Starting and quitting the EasyData App ............................................................... 9
Data collection modes ............................ .... ... ... ... .... ... ........................................ 10
Collecting data automatically (Time Graph) ....................................................... 11
Collecting data manually (Events with Entry) ..................................................... 14
Exploring collected data graphically ................................................................... 15
Exploring the data outside EasyData ................................................................. 16
Graph Match (motion detector only) ............................. ... ... .... ........................... 17
Changing a sensor’s measuring unit ................... .... ... ... ... .................................. 19
Setting a zero reference (zeroing the sensor) ............................ ... ... .... ... ... ... .... . 20
Restoring EasyData default settings .................................................................. 21
Viewing EasyData tips ............................................................... ... ... .... ... ... ... .... . 22
Ensuring reliable data collection ........................................................................ 23
In case of difficulty ............................................................................................. 23
Error messages .................................................................................................. 24
Texas Instruments Support and Service ............................................................ 26
Texas Instruments App Software License Agreement ..................... .................. 27
EasyData Page 30
 Loading...