

Page 1
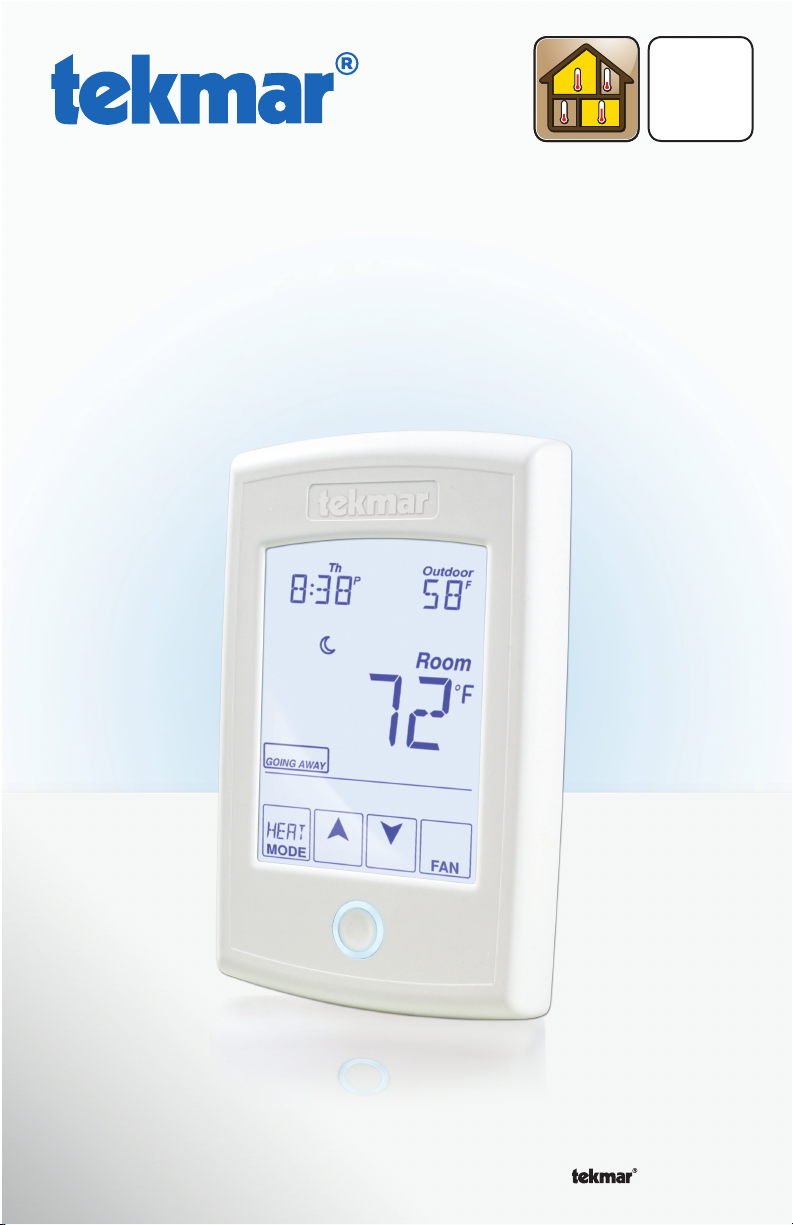
554_U
02/15
tekmarNet® Thermostat 554
User Manual
Zoning
Replaces: New
A Watts Water Technologies Company
1 of 12
© 2015 554_U - 02/15
Page 2
This brochure will provide you with the information you need to benefit the most
from your tekmarNet® thermostat. Please visit tekmarControls.com for more detailed
information on this or any other tekmar product.
The information contained herein is not intended to replace the full product installation
and safety information available or the experience of a trained product installer.
You are required to thoroughly read all installation instructions and product safety
information before beginning the installation of this product.
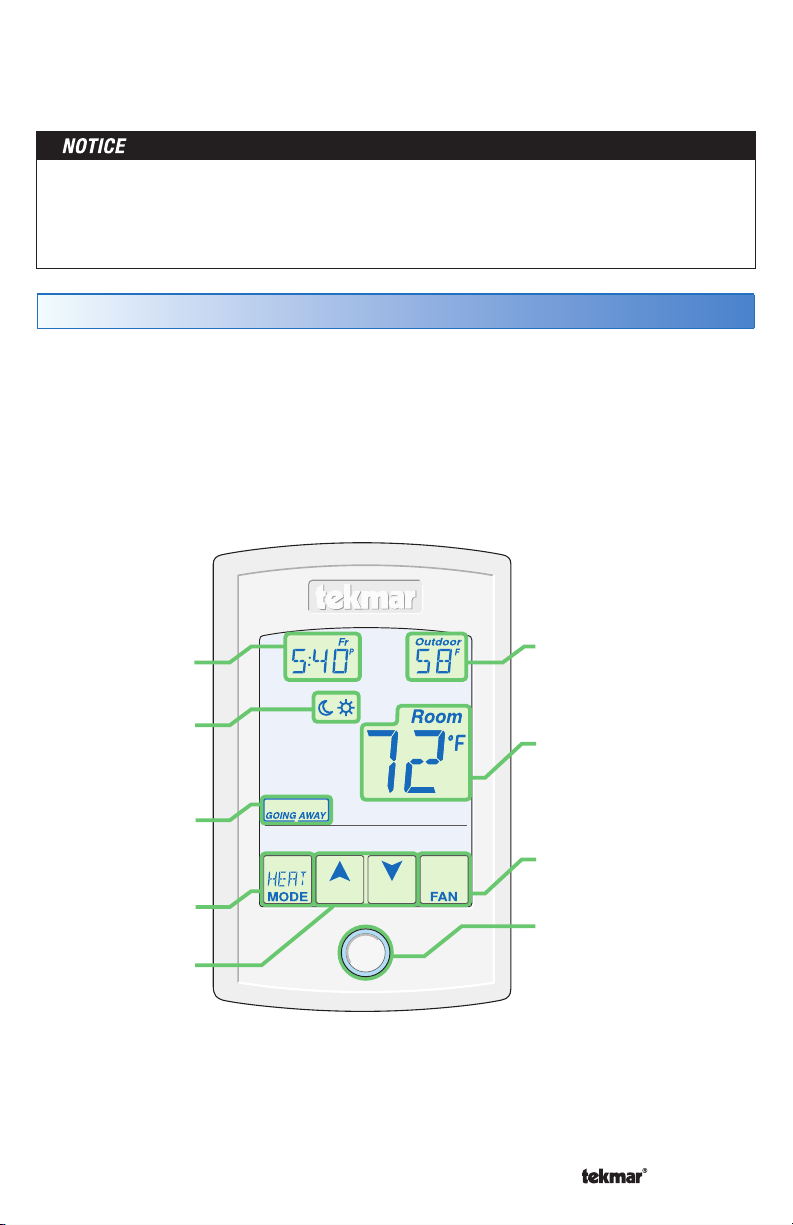
Touchscreen Adjustments
The touchscreen of this thermostat makes it easy to change commonly used settings.
Touch any item to adjust its setting. You will hear a “tick” sound each time you touch
the display. When you are finished making changes, touching the Home button will
return to the Home screen. If you do not touch the screen for 3 seconds, the Home
screen is automatically displayed.
tekmarNet® Thermostat 554 Home Screen
Adjust
the Time
settings, Floor or
Outdoor temperature
Adjust the
Display Heat & Cool
Schedule
Room
Temperature
Away Key
Switch between
Turn the Fan on
Auto, Heat,
Cool & Off Mode
Adjust the
Home
Button
Return to the
‘Home’ Screen
from any menu
Temperature
Display of the time, schedule and the away key on the Home screen is optional and
can be turned on or off in the programming menus.
To enter the programming menus, press and hold the Home button for 3 seconds.
A Watts Water Technologies Company
2 of 12
© 2015 554_U - 02/15
Page 3
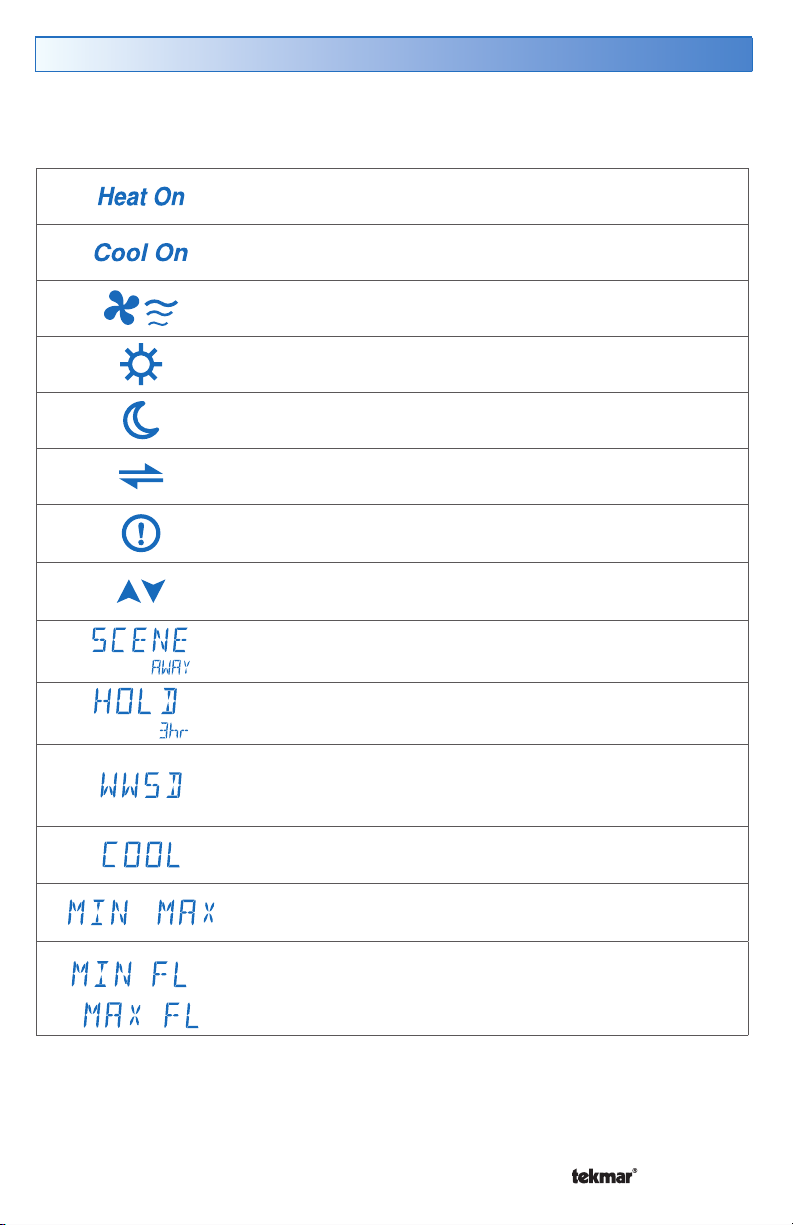
Display Symbols
This thermostat displays symbols on its screen to indicate what mode it is in, what
temperature it is operating at, or what equipment it is trying to turn on. This section
describes each of those symbols.
HEAT ON
Heat is turned on.
COOL ON
Cooling is turned on.
FAN
The fan is turned on.
SUN
Operating at the occupied (day) temperature.
MOON
Operating at the unoccupied (night) temperature.
tekmarNet
Communication is present.
WARNING SYMBOL
Indicates an error is present.
ARROWS
Adjust the displayed setting.
®
SCENE AWAY
Operating at Away temperature.
TEMPORARY HOLD
Hold for 3, 6, 9 or 12 hours.
WWSD
The outdoor air temperature is above the Warm Weather
Shut Down setting, which shuts off the heating system.
COOL
Radiant floor cooling system is on.
MIN or MAX
or
or
Reached the room minimum or maximum.
MIN FL or MAX FL
Reached the floor minimum or maximum.
A Watts Water Technologies Company
3 of 12
© 2015 554_U - 02/15
Page 4

Adjust the Temperature
To change the heating or cooling set temperature, touch the or arrows to
select a preferred temperature setting. Press the Home button to accept the setting
or leave the screen untouched for several seconds. To toggle between changing
the heating or cooling setting, press the H <> C key. This thermostat is capable of
controlling the floor or air temperature.
adjusts
Note: The temperature is not adjustable if the thermostat is in the Away scene or
in the Off mode or has been set to the “Secure” access level by the installer.
Adjust the Temperature — Temporary Hold
Temporary hold allows a user to change the temperature for a period of time and then
automatically return to the permanent temperature setting. This is especially useful
in commercial buildings that are in use for short amounts of time. When selected,
touching the up or down arrows changes the temperature for either 3, 6, 9 or 12
hours. If the thermostat is using a schedule, ‘Schd’ provides a temporary hold until
the next schedule event time. After the temporary hold time expires, the thermostat
returns to normal operation. By default, the temporary hold feature is off.
When the temporary
hold feature is enabled,
touching the up or
down arrow displays
‘TEMPORARY HOLD’.
Use the Up or Down
arrow to select a
A Watts Water Technologies Company
temperature.
4 of 12
Tap the hour
setting until
the preferred
length of time
is displayed.
Cancel the
temporary
hold.
‘HOLD’ is displayed while the
thermostat is operating at the
temporary hold temperature.
© 2015 554_U - 02/15
Page 5

Mode of Operation
This thermostat has 4 operating modes: Heat, Cool, Auto and Off. Touch the Mode
key on the screen to select the desired mode of operation.
Auto mode will automatically switch between heating and cooling as required. The
temperature is not adjustable while the thermostat is off.
Note: If near freezing temperatures are detected, the system will operate to maintain
40°F (4.5°C), even in the Off mode.
or or or
Secondary Temperature Display
This thermostat can display the outdoor or floor temperature or the room heating
and cooling temperature settings in the smaller-number area at the top right of the
screen. To toggle the item currently displayed, touch the secondary temperature.
Display of the floor or outdoor temperature requires a connection to an external
floor or outdoor air sensor.
or or or
Adjust the Time
To change the current time, touch the clock on the display.
Use the or arrow to change the minutes, hour
•
and day.
Touch “NEXT ITEM” to advance to the next item or
•
“BACK” for the previous item.
To store the new time and date, press the Home button,
•
or leave the screen untouched for several seconds.
Note: The time is not visible when the thermostat is in
the Away scene or if the clock display is turned off in the
Time menu.
A Watts Water Technologies Company
5 of 12
© 2015 554_U - 02/15
Page 6

Programmable Schedule — Day and Night
This thermostat is capable of running at a lower temperature setting when you are
asleep or out of the building. When the schedule setting is on, day and night
temperature settings will display on the screen. If you adjust the temperature while
the sun is displayed, the day setting changes. If you adjust the temperature while
the moon is displayed, the night setting changes.
To adjust the times when the day and night temperature start, touch the sun
or
moon on the screen. “Schedule Menu” will display followed by the first adjustable
schedule event time.
Use the or arrow to adjust the time for each event.
•
Touch ‘NEXT ITEM’ to advance to the next event or
•
or
‘BACK’ for the previous event.
To accept the settings, press the Home button, or leave
•
the screen untouched for several seconds.
The thermostat schedule can be set to 2 or 4 events
•
per day repeating on a 24-hour or 7-day cycle. These
schedule settings are detailed later in this brochure.
Going Away Setting
This thermostat can save additional energy while you are
away by lowering the heating temperature and increasing
the cooling temperature. To enable this feature, touch “Going
Away” on the screen. This is only available when the Away
Key has been turned on in the Scene menu.
Select PERM (permanent) or a number of days using
•
the or arrow.
Press the Home button to accept the setting or leave the
•
screen untouched for several seconds.
“Scene Away” is displayed on the Home screen until the
•
number of days expires.
Touch “Cancel Away” to cancel at any time.
•
Note: The temperature is not adjustable while the thermostat is in Away.
Access Levels
This thermostat has access levels. It will typically be installed and programmed by a
heating professional and then locked in a “User”, “Limited”, or “Secure” access level.
System-critical settings are not be available for adjustment. For more information on
these settings, please consult your installing contractor or this product’s Installation
and Operation Manual. This brochure focuses on settings available to the “User”.
A Watts Water Technologies Company
6 of 12
© 2015 554_U - 02/15
Page 7

Program Menu Settings
----------------------------------
---------------------------------------
-------------------------------------------------------
To Enter the Programming Menus
----------------------------------
Press and hold the Home button for 3 seconds to enter the programming menus.
Select a Programming Menu
Touch “NEXT” to advance (clockwise in the illustration below) to the next menu.
•
Touch “BACK” to go backwards (counterclockwise in the illustration below) through
•
---------------------------------------
the menus.
Touch “ENTER” to enter a menu.
•
Setting Items
Touch or arrow to adjust the setting if required.
•
Touch “NEXT ITEM” to advance to the next item within the menu.
•
Touch “BACK ITEM” to go backwards to the previous item within the menu.
•
To return to the parent menu after changing a setting, press and release the
•
-------------------------------------------------------
Home button.
To return to the Home screen, press and release the Home button twice or wait
•
30 seconds to automatically return to the home screen.
A Watts Water Technologies Company
7 of 12
Press and
hold for 3
seconds to
access the
programming
menus.
© 2015 554_U - 02/15
Page 8

Screen Clean Menu
-----------------------------------------------
-----------------------------------------
Entering the Screen Clean menu gives you 30 seconds to clean the thermostat and
display with a moist cloth. Do not use solvents to clean the thermostat.
Set Temp Menu
Entering the Set Temp menu allows you to permanently change both the day
and night temperature settings for both heating and cooling.
If your thermostat is being used for radiant floor heating, a floor sensor can be
connected and floor minimum day and night temperatures can be set. Radiant
floors heat the air by raising the floor temperature. Setting a floor temperature is a
way of enhancing the comfort of your living space.
Air Temperature Only
If there is only an air temperature sensor (no floor sensor), the thermostat operates
to control your desired air temperature.
Floor and Air Temperature
If the air sensor is turned on and a floor sensor is connected, the thermostat will
maintain your desired air temperature as well as a minimum floor temperature.
Controlling temperature this way is recommended for areas with large windows that
allow the sun to shine into a room and keep it warm without the need for additional
heat. This can allow the floors to cool off during the afternoon. When the sun goes
down, it can take a long time for the floors to get warm again and the room may
cool off too much in the early evening. A floor minimum setting can help with this
condition by maintaining a floor minimum temperature. Keep in mind the floor
minimum temperature will override the air temperature, and if set too high, may
overheat the room.
This operation is recommended for rooms with hardwood floors, as well as those
with large windows. Setting floor minimum and maximum temperatures is a way of
enhancing the comfort of your living space while protecting your floor coverings.
90°F (32°C)
Feels hot to the touch
80 to 85°F (26 to 30°C)
Feels warm to the touch
-----------------------------------------------
-----------------------------------------
Suggested maximum for all floor
types other than wood.
Bathrooms and kitchens. Suggested
maximum for wood floors.
70°F (21°C)
Feels cool to the touch
40 to 45°F (5 to 7°C)
Feels cold to the touch
A Watts Water Technologies Company
Rooms with large windows to prevent
under-heating in the evening.
Freeze protection for garages.
8 of 12
© 2015 554_U - 02/15
Page 9

Time Menu Settings
Set date, month and year
Required for daylight savings time.
Daylight Save
Automatic daylight saving time update for the spring and fall.
Time Mode
Select either 12-hour or 24-hour time format.
Clock
Select on to display the time clock in the Home menu (available when schedules
are not used).
Schedule Menu Settings
Energy savings can be achieved by lowering the heating temperature and increasing
the cooling temperature when the building is unoccupied or during the night.
When operating on a programmable schedule, a or a symbol is shown in the
Home menu. The or indicates the current operating temperature.
All schedules are stored in permanent memory and are not affected by a
loss of power.
Display Action
Day temperature
Night temperature
This thermostat can operate on a programmable schedule in order to automatically
lower the heating temperature and increase the cooling temperature setting. Options
include:
Turning off the schedule (OFF)
•
Operating a schedule that applies only to this thermostat zone (ZONE)
•
Operating one of the four systemwide schedules as a master (Schedule Master
•
1 through 4*)
Joining one of the four systemwide schedules as a member (Schedule Member
•
1 though 4*)
*Requires the thermostat to be connected to a tekmarNet® system.
Once the type of schedule has been selected, the thermostat can support schedules
that have either:
2 events per day
•
4 events per day
•
Schedules with 4 events per day are common for residential use while 2 events
per day are common for commercial installations.
A Watts Water Technologies Company
9 of 12
© 2015 554_U - 02/15
Page 10

Schedule Menu Settings (Continued)
The schedules can be repeated every:
•
24 hours
•
7 days (week)
A 7-day schedule allows a unique time to be set to change the temperature for each
day of the week.
The schedule also includes a “SKIP” option that allows the programmable schedule to
skip a temperature change and remain at the previous temperature setting. The “SKIP”
setting can be found between 11:50 PM (23:50 hours) and 12:00 AM (0:00 hours).
When a programmable schedule is selected, there is a time delay for the room to
warm up or cool down from the
temperature to the temperature. The thermostat
has the option of using Optimum Start to predict the heat up or cool down rate of
the room. When Optimum Start is set to On, the heating or cooling is started in
advance to allow the room to reach the Set Room temperature at the time set in
the programmable schedule.
Display Menu Settings
Units
Select temperature units in degrees Fahrenheit or Celsius.
Backlight Options
Select how the display backlight operates.
ON = The display is always at full brightness.
•
DIM = When thermostat is not in use, the display is dim but is at full brightness
•
when touched.
DIM = When the thermostat is not in use, the display is dim while the schedule
•
or scene is . The display backlight is off when the schedule or scene is . The
thermostat display is at full brightness when touched.
ON = When the thermostat is not in use, the display is at full brightness when
•
the schedule or scene is . The display backlight is off when the schedule or
scene is . The thermostat display is at full brightness when touched.
OFF = The display backlight is always off.
•
Secondary Item
Select the setting to display in the upper right corner of the Home screen: outdoor,
floor, or room heating and cooling temperature.
Scene Menu Settings
Scenes
Scenes provide systemwide overrides to save energy. Choose the option of having
scenes not used (none) or have the Away scene available.
Away Key
If scenes are available, choose whether to have the Away key available or not.
Note: When used with a tekmarNet
the domestic hot water tank is not heated while in Away scene.
A Watts Water Technologies Company
®
system control to operate the heating appliance,
10 of 12
© 2015 554_U - 02/15
Page 11

Monitor Menu
The monitor menu allows you to view the following temperatures and running hours
•
Outdoor temperature highs and lows
•
Room temperature highs and lows
•
Floor temperature highs and lows (requires floor sensor to be installed)
•
Filter Hours = Number of hours since the air filter was last replaced
•
Heat W = Number of hours the heat relay is on
•
Cool Y = Number of hours the cooling relay is on
•
Fan = Number of hours the fan relay is on
:
To clear the temperature highs and lows or the running hours:
1. Touch the temperature or running hours.
2. Display will show “
”.
3. Touch Enter.
Toolbox Menu
This menu provides advanced-level information.
Access
Change the access level on the thermostat.
Status Info
Displays the current status of the thermostat including any overrides from the tekmarNet®
system control. Toggles between “Status Info” and the current status.
System Normal = Thermostat is operating normally.
•
For all other thermostat status messages, please see the Installation & Operation
•
Manual 554_D.
Software Version and Type Number
Display the software “SW” and the “TYPE” number.
A Watts Water Technologies Company
11 of 12
© 2015 554_U - 02/15
Page 12

Frequently Asked Questions
Symptom Look for... Corrective Action
indicates heat is on. If the is
displayed and there is no heat, contact your
HVAC professional.
No heating
or
No cooling
No or key
Heat or cool
on before
scheduled time
Touching
key does
not increase
temperature
Touching
key does not
decrease
temperature
MODE
Flashing
Flashing
Flashing
Flashing
Flashing
indicates cooling is on. If the
is displayed and there is no cooling, contact
your HVAC professional.
The thermostat is in the Off mode. Touch the
mode key to change to Heat, Cool, or Auto.
Touch the ‘Cancel Away’ key on the display.
Optimum Start is on and has turned on the
heat or cooling in advance of your schedule
change.
There may be a maximum room temperature
set. Consult your HVAC professional.
The floor has reached the floor maximum
setting. Consult your HVAC professional.
Warm weather shut down is in effect.
Adjustable from your system control.
There may be a minimum floor temperature
set. Consult your HVAC professional.
The floor has reached the floor minimum setting.
Consult your HVAC professional.
More Information
This User Brochure contains standard information on how to make adjustments
to an installed product. More detailed information can be found in this product’s
Installation and Operation Manual (554_D) at tekmarControls.com
Product design, software and literature are Copyright ©2015 by tekmar Control Systems
A Watts Water Technologies Company. Head Offi ce: 5100 Silver Star Road, Vernon,
Ltd.,
B.C. Canada V1B 3K4, 250-545-7749, Fax. 250-545-0650
All specifications are subject
to change without notice
12 of 12 554_U - 02/15.
Web Site
: tekmarControls.com
 Loading...