


This appliance has a serial number located on the rear panel. Please record
the model number and serial number and retain them for your records.
Model number Serial number
1006.MA-1087A
Z
TEAC CORPORATION
3-7-3, Nakacho, Musashino-shi, Tokyo 180-8550, Japan Phone: (0422) 52-5081
TEAC AMERICA, INC. 7733 Telegraph Road, Montebello, California 90640 Phone: (323) 726-0303
TEAC CANADA LTD. 5939 Wallace Street, Mississauga, Ontario L4Z 1Z8, Canada Phone: (905) 890-8008
TEAC MEXICO, S.A. De C.V
Campesinos N°184, Colonia Granjas Esmeralda, Delegacion Iztapalapa, CP 09810, México DF
Phone: (525) 581-5500
TEAC UK LIMITED Unit 19 & 20, The Courtyards, Hatters Lane, Watford, Hertfordshire, WD18 8TE, U.K.
Phone: (0845) 130-2511
TEAC EUROPE GmbH Bahnstrasse 12, 65205 Wiesbaden-Erbenheim, Germany Phone: 0611-71580
TEAC AUSTRALIA PTY., LTD. 30 Tullamarine Park Road, Tullamarine, VIC 3043, Australia Phone: (03) 8336-6500
A.B.N. 11 113 998 048
9A10490700
Z
SR
-
LXi
Hi-Fi Table Radio
OWNER’S MANUAL
Includes adapters for:
iPod nano
iPod with video
iPod mini
iPod with Click Wheel
iPod with color display
Adapters sold separately:
iPod with dock connector
1) Read these instructions.
2) Keep these instructions.
3) Heed all warnings.
4) Follow all instructions.
5) Do not use this apparatus near water.
6) Clean only with dry cloth.
7) Do not block any ventilation openings.
Install in accordance with the
manufacturer’s instructions.
8) Do not install near any heat sources
such as radiators, heat registers, stoves,
or other apparatus (including amplifiers)
that produce heat.
9) Do not defeat the safety purpose of the
polarized or grounding-type plug. A
polarized plug has two blades with one
wider than the other. A grounding type
plug has two blades and a third
grounding prong. The wide blade or the
third prong are provided for your safety.
If the provided plug does not fit into
your outlet, consult an electrician for
replacement of the obsolete outlet.
10)Protect the power cord from being
walked on or pinched particularly at
plugs, convenience receptacles, and the
point where they exit from the
apparatus.
11)Only use attachments/accessories
specified by the manufacturer.
12) Use only with the cart, stand,
tripod, bracket, or table
specified by the manufacturer,
or sold with the apparatus.
When a cart is used, use caution when
moving the cart/apparatus combination
to avoid injury from tip-over.
13) Unplug this apparatus during lightning
storms or when unused for long periods
of time.
14)Refer all servicing to qualified service
personnel. Servicing is required when
the apparatus has been damaged in any
way, such as power-supply cord or plug
is damaged, liquid has been spilled or
objects have fallen into the apparatus,
the apparatus has been exposed to rain
or moisture, does not operate normally,
or has been dropped.
<
Do not expose this apparatus to dripps
or splashes.
< Do not place any objects filled with
liquids, such as vases, on the apparatus.
< Do not install this apparatus in a
confined space such as a book case or
similar unit.
<
The apparatus draws nominal nonoperating power from the AC outlet
with its STANDBY/ON switch in the
standby position.
<
The apparatus should be located close
enough to the AC outlet so that you can
easily grasp the power cord plug at any
time.
<
An apparatus with Class !construction
shall be connected to an AC outlet with
a protective grounding connection.
<
Batteries (battery pack or batteries
installed) shall not be exposed to
excessive heat such as sunshine, fire or
the like.
2 3
CAUTION: TO REDUCE THE RISK OF
ELECTRIC SHOCK, DO NOT REMOVE
COVER (OR BACK). NO USERSERVICEABLE PARTS INSIDE. REFER
SERVICING TO QUALIFIED SERVICE
PERSONNEL.
The lightning flash with
arrowhead symbol, within an
equilateral triangle, is intended to
alert the user to the presence of uninsulated
“dangerous voltage” within the product’s
enclosure that may be of sufficient
magnitude to constitute a risk of electric
shock to persons.
The exclamation point within an
equilateral triangle is intended to
alert the user to the presence of
important operating and maintenance
(servicing) instructions in the literature
accompanying the appliance.
IMPORTANT SAFETY
INSTRUCTIONS
CAUTION
<
DO NOT REMOVE THE EXTERNAL CASES
OR CABINETS TO EXPOSE THE
ELECTRONICS. NO USER SERVICEABLE
PARTS ARE WITHIN!
<
IF YOU ARE EXPERIENCING PROBLEMS
WITH THIS PRODUCT, CONTACT TEAC
FOR A SERVICE REFERRAL. DO NOT USE
THE PRODUCT UNTIL IT HAS BEEN
REPAIRED.
WARNING: TO PREVENT FIRE
OR SHOCK HAZARD, DO NOT
EXPOSE THIS APPLIANCE TO
RAIN OR MOISTURE.
Cautionary Marking is located on bottom of
the unit.
For European customers
Disposal of your old appliance
1.When this crossed-out
wheeled bin symbol is
attached to a product it
means the product is
covered by the European
Directive 2002/96/EC.
2.All electrical and electronic products
should be disposed of separately from
the municipal waste stream via
designated collection facilities
appointed by the government or the
local authorities.
3. The correct disposal of your old
appliance will help prevent potential
negative consequences for the
environment and human health.
4.For more detailed information about
disposal of your old appliance, please
contact your city office, waste disposal
service or the shop where you
purchased the product.
54
Contents
Read this before attempting any
operations.
< As the unit may become warm during
operation, always leave sufficient space
around the unit for ventilation.
<
The voltage supplied to the unit should
match the voltage as printed on the rear
panel. If you are in any doubt regarding
this matter, consult an electrician.
<
Choose the installation location of your
unit carefully. Avoid placing it in direct
sunlight or close to a source of heat. Also
avoid locations subject to vibrations and
excessive dust, heat, cold or moisture.
<
Do not place the unit on an
amplifier/receiver.
< Do not open the cabinet as this might
result in damage to the circuitry or
electrical shock. If a foreign object should
get into the unit, contact your dealer or
service company.
<
When removing the power plug from the
wall outlet, always pull directly on the
plug, never yank the cord.
<
Do not attempt to clean the unit with
chemical solvents as this might damage
the finish. Use a clean, dry cloth.
<
Keep this manual in a safe place for
future reference.
Before Using the Unit
The provided Remote Control Unit allows
the unit to be operated from a distance.
When operating the remote control unit,
point it towards the remote sensor on the
front panel of the unit.
<
Even if the remote control unit is
operated within the effective range,
remote control operation may be
impossible if there are any obstacles
between the unit and the remote control.
<
If the remote control unit is operated near
other products which generate infrared
rays, or if other remote control devices
using infrared rays are used near the unit,
it may operate incorrectly. Conversely, the
other products may also operate
incorrectly.
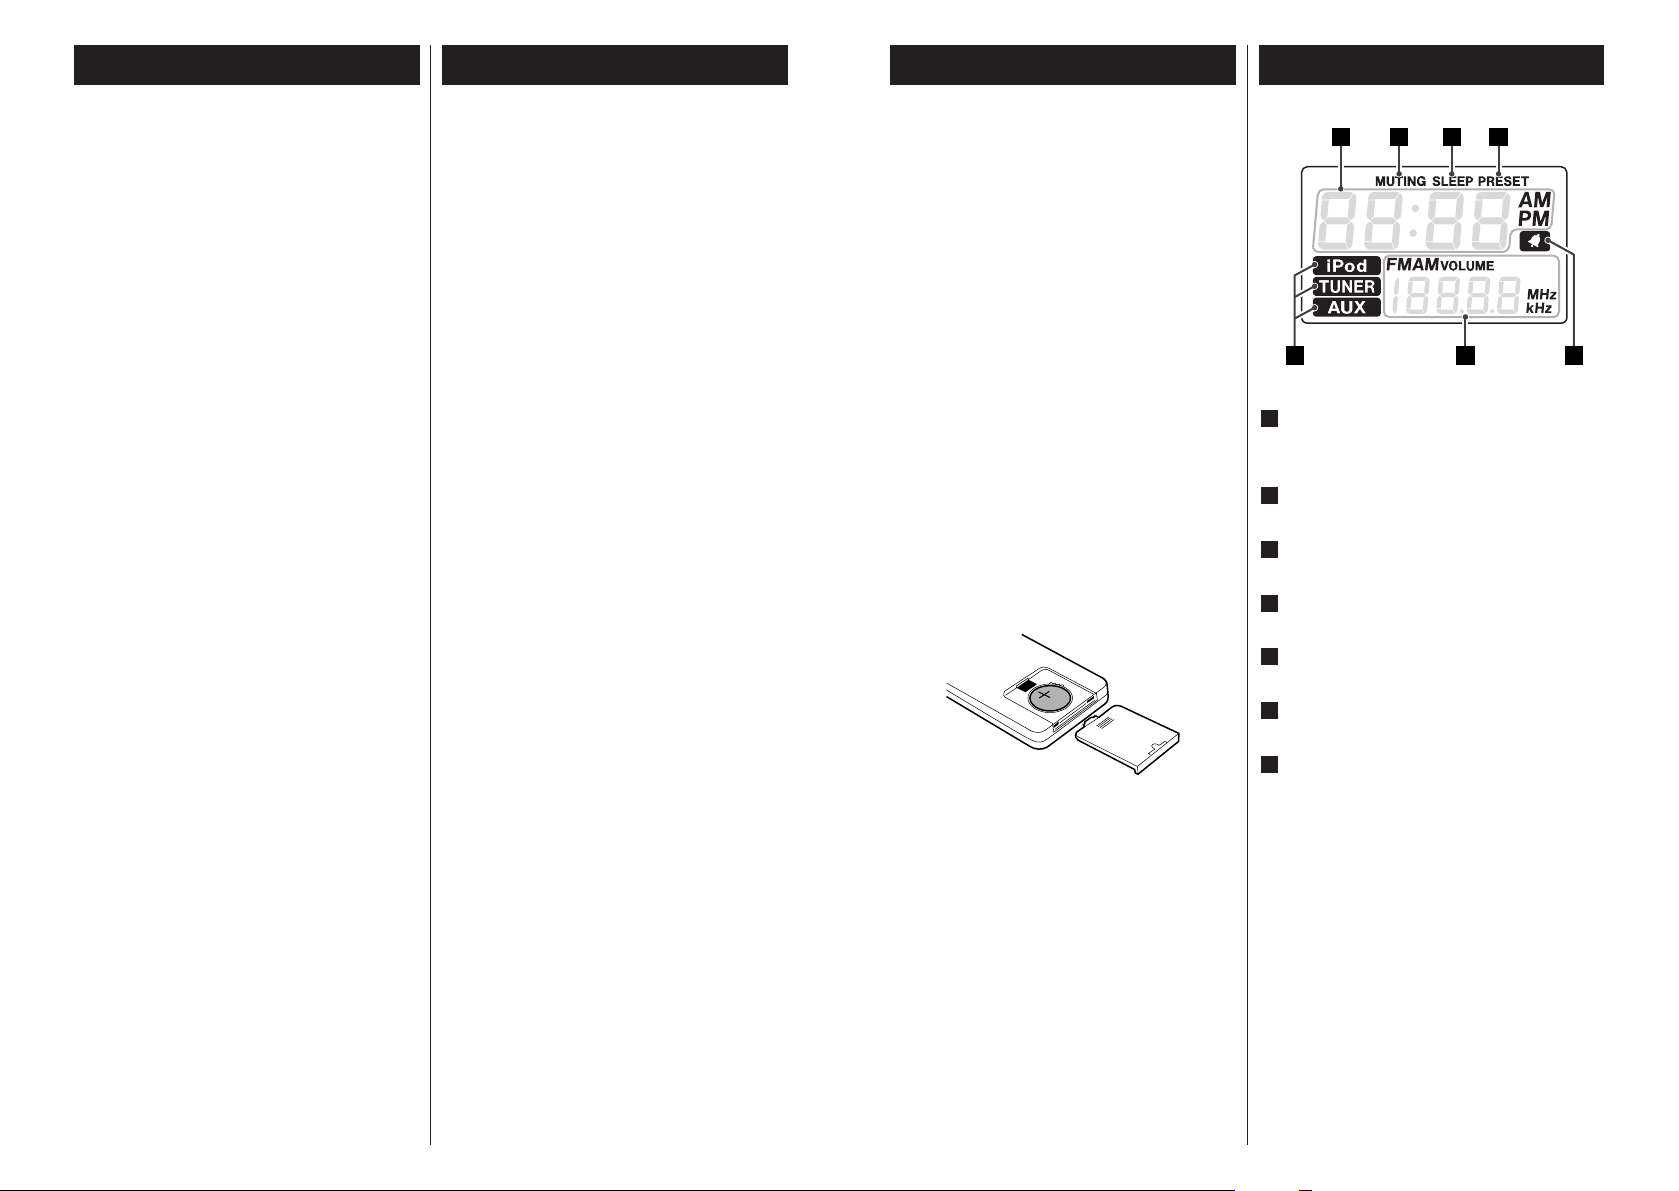
1. Remove the battery compartment cover.
2. Put in the lithium battery (CR2032, 3V).
3. Close the cover.
Battery Replacement
If the distance required between the
remote control unit and main unit
decreases, the battery is exhausted. In this
case, replace the battery with a new one.
Precautions concerning batteries
Do not heat or disassemble batteries and
never dispose of old batteries by throwing
them in a fire.
Remote Control Unit
Battery Installation
Thank you for choosing TEAC. Read this
manual carefully to get the best
performance from this unit.
Important Safety Instructions . . . . . . . . . . 2
Before Using the Unit . . . . . . . . . . . . . . . . 4
Remote Control Unit. . . . . . . . . . . . . . . . . 5
Display . . . . . . . . . . . . . . . . . . . . . . . . . . . 5
Unit Functions. . . . . . . . . . . . . . . . . . . . . . 6
Connection. . . . . . . . . . . . . . . . . . . . . . . . 8
Getting Started. . . . . . . . . . . . . . . . . . . . 10
Setting the Clock . . . . . . . . . . . . . . . . . . 11
Basic Operation. . . . . . . . . . . . . . . . . . . . 12
Listening to iPod . . . . . . . . . . . . . . . . . . . 14
Operating iPod . . . . . . . . . . . . . . . . . . . . 15
Listening to an External Source . . . . . . . . 17
Listening to the Radio . . . . . . . . . . . . . . . 18
Preset Tuning . . . . . . . . . . . . . . . . . . . . . 19
Timer . . . . . . . . . . . . . . . . . . . . . . . . . . . 20
Troubleshooting . . . . . . . . . . . . . . . . . . . 22
Specifications . . . . . . . . . . . . . . . . . . . . . 23
Shows the digital clock, sleep time or
preset channels.
Lights during muting.
Lights when the sleep function is active.
Lights in preset tuning mode.
Lights when the timer is on.
Shows frequency, volume, date, etc.
When the unit is on, one of these
indicators lights to show the current
source.
G
F
E
D
C
B
A
Display
CBA D
FG E
6 7
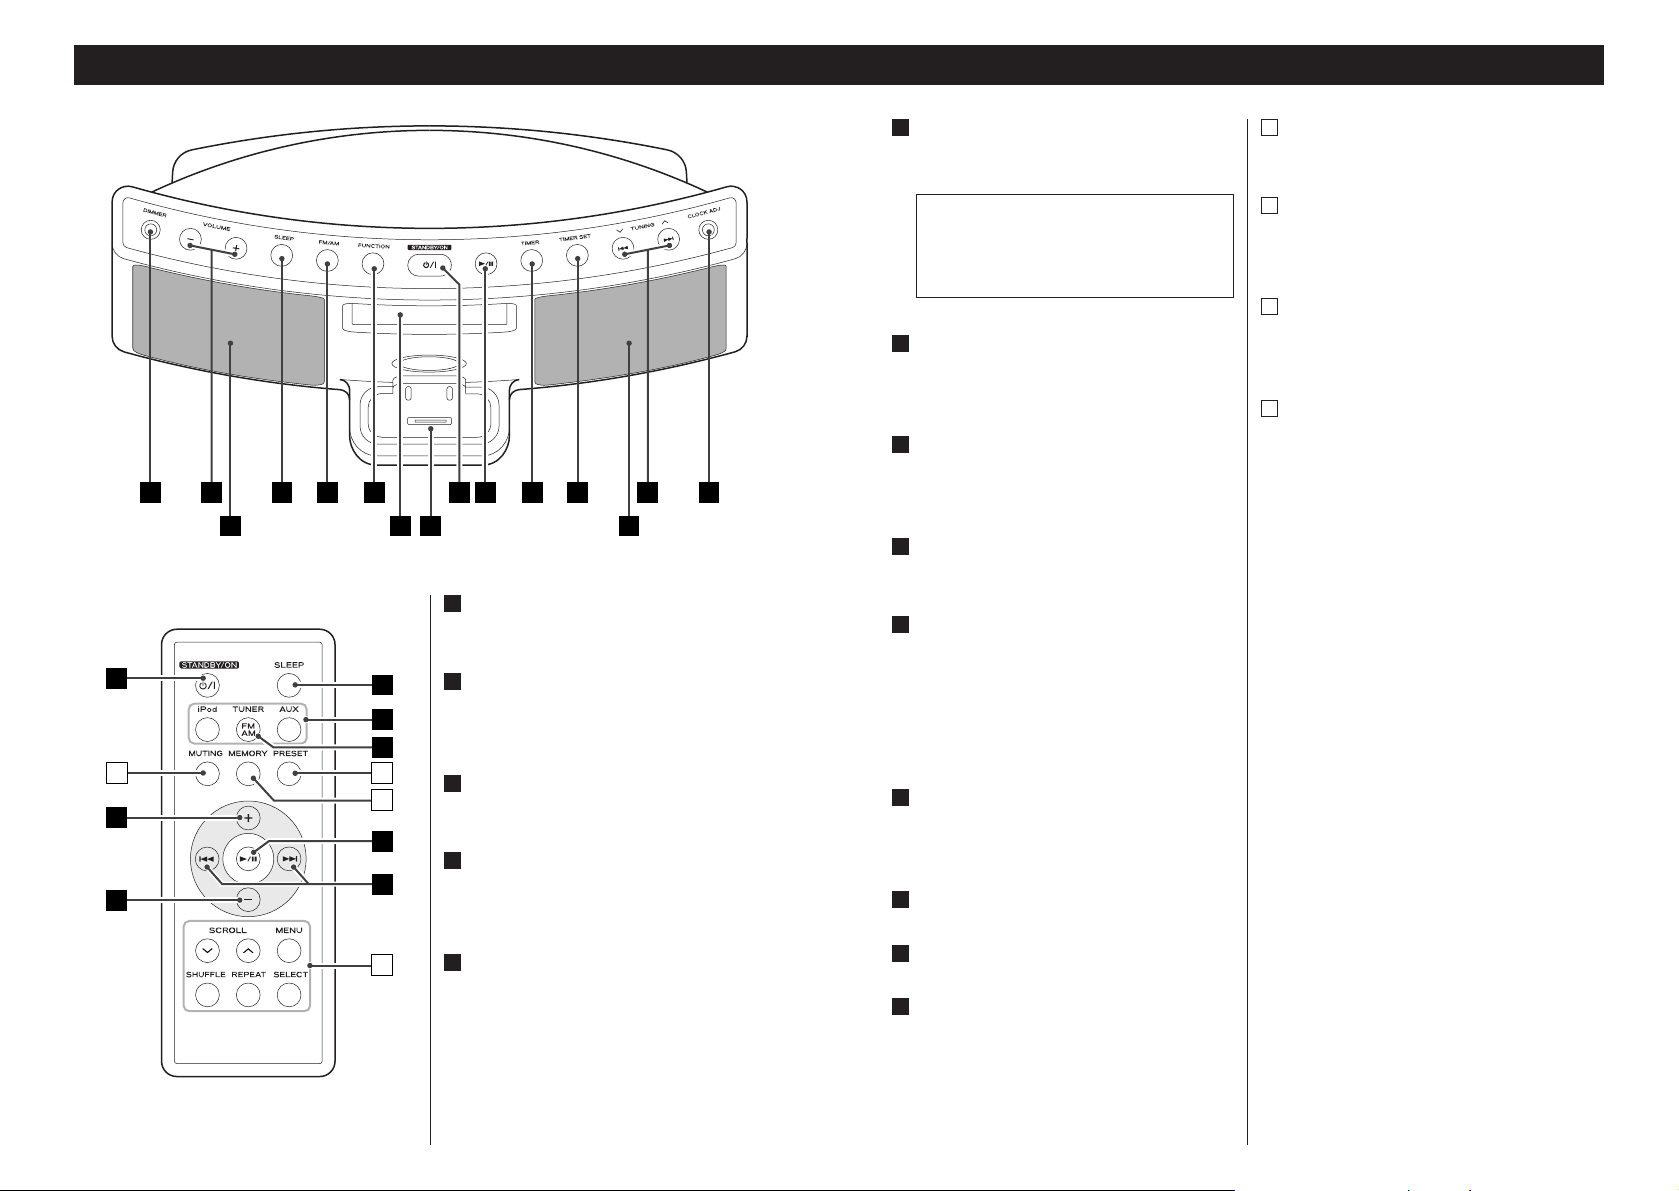
Unit Functions
STANDBY/ON
Use this button to turn the unit on or
standby.
Play/Pause (y/J)
Use this button to start or pause
playback of iPod.
TIMER
Use this button to turn on or off the
timer function.
TIMER SET
Use this button to set a timer.
TUNING(‡/°)/Skip(.//)
In TUNER mode, use these buttons to
tune in stations.
In iPod mode, use these buttons to skip
tracks. Hold down this button to search
for a part of a track.
CLOCK ADJ
Hold down this button for more than 3
seconds to enter clock setting mode.
Speakers (Stereo)
Display
Dock connector
Before use, insert an appropriate Dock
adapter in the Dock (see page 10).
Insert an iPod mobile digital device into
this dock.
N
M
L
K
J
I
H
G
The equipment draws a nominal
amount of power from the AC outlet
even with its STANDBY/ON switch in
the STANDBY position.
F
MUTING
Use this button to mute the sound.
MEMORY
In TUNER mode, use this button to preset
stations.
PRESET
In TUNER mode, use this button to select
a preset station.
iPod operation buttons
SCROLL (
‡/°)
Use these buttons to scroll up and down
the menu.
MENU
Use this button to go back to the
previous menu.
SHUFFLE
Use this button to turn on and off the
shuffle playback.
REPEAT
Use this button to set the repeat
function.
SELECT
Use this button to confirm selection in
menus.
Note:
To simplify explanations, instructions in
this manual refer to the names of the
buttons and controls on the front panel
only. Associated controls on the remote
control will also operate similarly.
R
Q
P
O
DIMMER
Use this button to dim the display.
VOLUME
Press these buttons to adjust the volume
level.
SLEEP
Use this button to set sleep timer.
FM/AM
In TUNER mode, press this button to
select FM or AM.
FUNCTION
Use these buttons to select the source
you want to listen to.
E
D
C
B
A
A CLD E
B KI
F
O
B
B
D
Q
G
HGF J
N
M
C
E
P
J
L
R

8 9
AM loop antenna
Connect the supplied AM loop antenna
to the AM ANTENNA terminal.
Place the antenna on a shelf or hang it
on a window frame, etc., in the
direction which gives the best
reception.
If you want, you can hook the AM
antenna on a wall as shown below:
FM antenna
While in FM mode, tune in an FM
station and extend the lead to find the
best position for the reception. This
antenna may need to be repositioned if
you move your unit to a new location.
S-VIDEO OUT
You can enjoy videos or slideshow
reproduced by your iPod through your
TV screen.
Connect this jack to S-VIDEO IN of your
TV set using a commercially available SVideo cable.
C
B
A
Connection
CAUTION:
<
Switch off the power before making connection.
<
Read the instructions of each component you intend to use with this unit.
<
Be sure to insert each plug securely. To prevent hum and noise, do not bundle the
connection cords.
VIDEO OUT
If the S-VIDEO connection method is
not available, use a commercially
available RCA (pin) video cable to
connect to VIDEO IN of your TV set.
PHONES
For private listening, insert the
headphones plug into this jack, and
adjust the volume using the VOLUME
button.
AUX IN
You can connect a portable audio
player to this jack.
See page 17 for details.
DC IN jack
Connect the provided AC adapter to
this jack. Then connect the AC
adapter’s plug to the AC wall socket.
<
Do not use any AC adapters other than
the one included with this unit to avoid
fire, electric shock, etc. Be sure to
connect the adapter to an AC outlet
that supplies the correct voltage.
G
F
E
D
AC wall socket
Only use one of
method of video
connection.
B
A
FE
DC
G
S-VIDEO IN VIDEO IN
TV

10 11
Getting Started
The SR-LXi comes mounted with an adapter
“60GB (color) + Photo 40GB/60GB”. To
play your iPod through the SR-LXi, you have
first to check if the factory mounted adapter
fits your model of iPod. If it does not, you
have to replace it with a correct one, as
explained below.
1. Remove the adapter from the Dock
of the SR-LXi.
Hold the left and right sides of the
adapter and gently pull it up.
2. Choose the Dock adapter that fits
your iPod mobile digital device.
“Video 30GB” for iPod with video (30
GB).
“Video 60GB” for iPod with video (60
GB).
“nano” for iPod nano.
“mini” for iPod mini.
“20GB (color) + Photo 30GB” for iPod
with color display (20GB, 30GB, U2
Special Edition).
“60GB (color) + Photo 40GB/60GB” for
iPod with color display (40GB, 60GB).
“20GB + U2” for iPod with Click Wheel
(20 GB, U2 Special Edition).
“40GB” for iPod with Click Wheel (40
GB).
<
Use a commercially available adapter to
play iPod with dock connector.
Compatible iPod Software
In case your iPod will not work with the SRLXi or with the remote control unit,
software update may solve the problem.
Visit the Apple website and download the
latest iPod Software.
iPod is a trademark of Apple Computer,
Inc., registered in the U.S. and other
countries.
1
2
< When you need to remove the adapter,
hold the left and right sides of the
adapter and gently pull it up.
<
When you don’t use the Dock, use the
supplied cover for the Dock to prevent
dust from settling on the Dock.
3. Insert the adapter into the Dock of
the SR-LXi.
Fit the front edge of the adapter into the
Dock, and then press the back edge of
the adapter onto the Dock until a slight
“click” is heard indicating the adapter is
inserted correctly.
Setting the Clock
Press the skip buttons (.//) to
adjust the clock, and then press the
CLOCK ADJ button.
2
Press and hold the CLOCK ADJ button
for more than 3 seconds and release
it when the time display starts
blinking.
1
< If you leave the unit idle for about 1
minute, the clock setting mode will be
cancelled.
.// CLOCK
ADJ
TIMER
If the power supply is interrupted, the
settings kept in memory (clock, preset
stations, timer setting) will be erased.
Press the skip buttons (.//) to
select Year, and then press the
CLOCK ADJ button.
3
Press the skip buttons (.//) to
select Date, and then press the
CLOCK ADJ button.
4
< Hold down the skip button (. or
/
) to adjust the clock continuously.
The clock starts from 00 second.

12 13
Basic Operation
< To listen to an external source connected
to the AUX IN jack, select AUX.
< If you press the iPod button when no
iPod is docked, the iPod indicator on the
display blinks.
Press the STANDBY/ON switch to
turn the unit on.
1
< The unit turns on with the source that
was last selected. If the iPod that is in
playback mode is inserted into the Dock,
the SR-LXi will automatically turn on and
start playback of the iPod.
<
You can also use the FUNCTION button
or Play/Pause button (y
/J) to turn the
unit on.
Press the FUNCTION button to select
a source.
2
The volume is adjustable from MIN (00)
to MAX (40). Hold down the VOLUME –
or + buttons to turn down or up the
volume continuously.
Play the source, and adjust the
volume using the VOLUME buttons
(–/+).
3
3 1
2
Dimmer
You can dim the front panel’s display by
pressing the DIMMER button.
<
This function will be cancelled when the
STANDBY/ON switch is pressed.
< When you set the sleep timer, the display
is dimmed automatically.
Insert the headphones plug into the
PHONES jack, and adjust the volume.
CAUTION
Always lower the volume level prior to
plugging in your headphones. TO AVOID
DAMAGING YOUR HEARING - Do not
place your headphones on your head
until after you have plugged them in.
<
The MUTING indicator lights on the
display to indicate that the muting is
engaged.
<
If you change the volume or source
during the muting, the muting will be
canceled.
Muting
To mute the sound temporarily, press the
MUTING button. Press the MUTING
button again to restore the sound.
SLEEP 90, 60 or 30:
The power will be switched off 90, 60 or
30 minutes later.
OFF:
The sleep timer is off.
< When you set the sleep timer, the display
is dimmed automatically.
< If you want to check the remaining time,
press the SLEEP button once. The
remaining time will be displayed for a
few seconds.
Sleep Timer
You can set a sleep timer so the unit
turns itself off after a specified time.
Press the SLEEP button repeatedly until
desired time appears on the display.
Headphones

14 15
Select “iPod” using the FUNCTION
button or the “iPod” button of the
remote control unit. If an iPod is already
docked, playback will start.
When no iPod is docked the iPod
indicator on the display blinks.
<
You can also use the Play/Pause button
(y
/J) to select “iPod”.
Insert the iPod into the Dock of the SRLXi.
Then push the Play/Pause button (y
/J)
on the iPod or the SR-LXi. The SR-LXi
will automatically turn on and start
playback from the iPod’s music list.
<
Make sure to use an appropriate Dock
adapter (see “Getting Started” on page
10).
<
If you remove the iPod during playback,
the SR-LXi automatically turns standby.
< The battery of the iPod is recharged to
the full whenever the iPod is docked and
the SR-LXi is connected to the AC power
supply.
<
When headphones are plugged into the
iPod, sound comes from both the
speakers of the SR-LXi and the
headphones.
Listening to iPod
To select iPod mode
To skip to the next or a previous
track
C
During playback, repeatedly press the
Skip button (.
or/ ) until the
desired track is found. The selected track
will be played from the beginning.
<
When the . button is pressed during
playback, the track being played will be
played from the beginning. To return to
the beginning of the previous track, press
the .
button twice.
Search for a part of a track
B
During playback, hold down the Skip
button (.
or /) for more than 2
seconds and release it when the part you
want to listen to is found.
Operating iPod 1
To suspend playback temporarily
(pause mode)
A
Press the Play/Pause button (G /J )
during playback. Playback stops at the
current position. To resume playback,
press the Play/Pause button (G
/J) again.
CA
B

16 17
Listening to an External Source
Connect the PHONES jack (audio
output jack) of a portable audio
player to the AUX IN jack of the SRLXi using the supplied stereo mini
plug cable.
1
Play the source, and adjust the
volume of both the SR-LXi and the
audio player.
3
Select “AUX” using the FUNCTION
button.
2
When using the PHONES jack of your
mini player, you must adjust the volume
of the mini-player or you may hear no
sound from your SR-LXi.
<
Turning the volume of the mini player up
too high may cause the sound from your
SR-LXi to be distorted. If this is the case,
reduce the volume of the mini player
until the distortion stops and then adjust
the volume level of the SR-LXi to a
comfortable listening level
To activate the shuffle mode
During playback, press the SHUFFLE
button to change the shuffle mode.
Each time the SHUFFLE button is pressed,
the SHUFFLE setting of iPod is changed
as follows:
If iPod is set to shuffle songs or albums,
the Shuffle icon ( ) appears in the
iPod’s display.
albumssongs off
Select the menu item
Press the MENU/ALBUM buttons (‡/°)
to scroll to the menu item you want. And
then press the SELECT button.
Operating iPod 2
To activate the repeat mode
During playback, press the REPEAT
button to change the repeat mode.
Each time the REPEAT button is pressed,
the REPEAT setting of iPod is changed as
follows:
If the iPod is set to repeat one song, the
repeat Once icon ( ) appears in the
iPod’s display.
If the iPod is set to repeat all songs, the
repeat icon ( ) appears in the iPod’s
display.
AllOne off
You can use this way of connection to
listen to an iPod that has no Dock
connector or that has, but an appropriate
Dock adapter is not available.
To go back to the previous
menu
Press the MENU button. It works same as
the MENU button of the iPod.

18 19
Preset Tuning
How to select a preset station
To select FM or AM, press the TUNER
(FM/AM) button.
1
Press the PRESET button repeatedly
until the desired preset station is
found.
2
Select “TUNER” using the FUNCTION
button.
1
To select FM or AM, press the TUNER
(FM/AM) button again.
2
Select the station you want to listen
to (auto selection).
3
Hold down the Skip button (.or/)
for more than 2 seconds and release it
when the frequency display begins to
change.
When a station is tuned in, the tuning
process will stop automatically.
<
To stop the auto selection, press the Skip
button.
Listening to the Radio
Selecting stations which cannot be
tuned automatically (manual selection)
When the Skip button (.or/ ) is
pressed momentarily the frequency
changes by a fixed step.
Press the Skip button repeatedly until the
station you want to listen to is found.
If the reception is poor
For the best reception, rotate the FM or
the AM antenna until you get stations
clearly.
31
2
You can program 10 FM & 10 AM channel
presets.
If the power supply is interrupted, the
settings kept in memory (clock, preset
stations, timer setting) will be erased.
Tune in a station you want to listen
to (see page 18).
Press the MEMORY button.
2
1
Within 5 seconds, press the MEMORY
button.
4
Within 5 seconds, select a preset
channel to store the station using the
PRESET button.
3
To store more stations, repeat steps to
.
4
1

20 21
<
The unit can be programmed to turn on
at a specified time. The unit will turn off
after 60 minutes of reaching the
specified time.
<
Adjust the clock before setting the timer
(see page 11).
If the power supply is interrupted, the
settings kept in memory (clock, preset
stations, timer setting) will be erased.
Setting the timer
Press the TIMER SET button.
The clock and the Timer indicator ( )
blinks on the display.
< If no button is pressed for about 1
minute, the timer setting mode will be
cancelled.
1
Set the start time using the Skip
buttons (.
//), and then press
the TIMER SET button.
Select a source (iPod or TUNER) using
the Skip buttons (.
// ), and
then press the TIMER SET button.
<
You cannot select “AUX”.
Set the volume using the Skip
buttons (.
//), and then press
the TIMER SET button.
The volume for timer operation is
adjustable from 10 to 40.
Setting the timer is now completed.
4
3
2
Timer
.//TIMER
To turn on the timer
After setting the timer, press the
TIMER button to turn the timer on.
The Timer indicator ( ) appears on
the display.
Prepare the source.
When the source is set to “iPod”, insert
an iPod.
When the source is set to “TUNER”, tune
in a station.
Press the STANDBY/ON switch to
turn the unit off (standby).
Don’t forget to turn the unit off
(standby), or the timer won’t work.
3
2
1
< Playback volume will gradually increase
up to your set volume when the unit is
turned on by timer.
<
If the source is set to “iPod” but no iPod
is set, the unit will turn on into TUNER
mode.
<
When the source is set to “TUNER” and
the unit turns on, it will tune in to the
station you selected last time.
To turn off the timer
When you don’t use the timer, press the
TIMER button to turn it off.
The Timer indicator ( ) disappears
from the display.
Press the TIMER button again to turn it
on.
STANDBY/ONTIMER
SET

22 23
If you have problems with your system, look
through this chart and see if you can solve
the problem yourself before calling your
dealer or TEAC service center.
General
No power
e
Check the connection to the AC power
supply. Check and make sure the AC
source is not a switched outlet and
that, if it is, the switch is turned on.
Make sure there is power to the AC
outlet by plugging another item such as
a lamp or fan into the outlet.
No sound from speakers.
e
Select the source by pressing the
TUNER, iPod or AUX button.
e
Adjust the volume.
e
Pull out the headphone’s plug from the
PHONES jack.
e
If the MUTING indicator lights on the
display, press the MUTING button.
The sound is noisy.
e
The unit is too close to a TV or similar
appliances. Install the unit apart from
them, or turn them off.
Remote control doesn’t work.
e
Press the STANDBY/ON switch to turn
the unit on.
e
If the battery is exhausted, replace it
with a new one.
e
Use remote control unit within the
range (5 m) and point at the remote
sensor on the front panel.
e
Clear obstacles between the remote
control unit and the main unit.
e
If a strong light is near the unit, turn it
off.
Troubleshooting
iPod Player
Cannot insert the iPod.
e
Check the dock adapter.
e
Remove dust or obstacles from the
Dock connector of the SR-L200i and
the iPod, and insert the iPod again.
Will not play.
e
Remove the iPod from the dock, wait a
few seconds, and insert it again.
e
Software update may solve the
problem. Visit the Apple website and
download the latest iPod Software.
Cannot operate the iPod.
e
Set off the HOLD switch of the iPod.
Tuner
Cannot listen to any station, or signal is
too weak.
e
Tune in the station properly.
e
Rotate the FM or the AM antenna until
you get stations clearly.
If normal operation cannot be
recovered, unplug the power cord from
the outlet and plug it again.
Maintenance
If the surface of the unit gets dirty, wipe
with a soft cloth or use a diluted mild
liquid soap. Be sure to remove any excess
liquid completely. Do not use thinner,
benzine or alcohol as they may damage
the surface of the unit. Allow the surface
of the unit to dry completely before
using.
Specifications
TUNER Section
Frequency Range . . . . . . . . . . . . FM: 87.5 MHz to 108.0 MHz
AM: 522 kHz to 1,629 kHz
SPEAKER SYSTEM Section
Type . . . . . . . . . . . . . . . . . . . . . . . . . . . . . . . . . . . 65 mm x 2
Impedance . . . . . . . . . . . . . . . . . . . . . . . . . . . . . . . . . 4 ohms
GENERAL
Total Output Power. . . . . . . . . . . . . . . . . . . . . . . . 4 W + 4 W
Power Requirement . . . . . . . . . . . . . . . . . . . AC 230 V, 50 Hz
Power Consumption . . . . . . . . . . . . . . . . . . . . . . . . . . . 23 W
Dimension (W x H x D) . . . . . . . . . . . . . . 320 x 179 x 171 mm
Weight (Net). . . . . . . . . . . . . . . . . . . . . . . . . . . . . . . . . 1.8 kg
Standard Accessories
Remote Control Unit (RC-1084 or RC-1085) x 1
Battery (CR2032) for Remote Control Unit x 1
AM loop antenna x 1
Stereo mini plug cable x 1
AC Adapter x 1
Dock adapter x 8
(adapter “60GB (color) + Photo 40/60GB” premounted)
Cover for the Dock x 1
Owner’s Manual x 1
Warranty Card x 1
• Design and specifications are subject to change without
notice.
• Weight and dimensions are approximate.
• Illustrations may differ slightly from production models.
 Loading...