

SONAR LE Quick Start Guide
We do not support TASCAM Professional Software SONAR LE. If you need
customer support, we ask for your consideration of upgrading to SONAR
X3 series.
For how to use, refer to the help menu of SONAR LE.
Contents
Notations in this manual ..........................................................................................1
About trademarks ......................................................................................................1
How to install ...............................................................................................................2
Downloading SONAR LE .....................................................................................2
How to register .......................................................................................................3
How to record ..............................................................................................................3
Recording .................................................................................................................5
Mix-down .................................................................................................................6
Notations in this manual
In this manual, we use the following conventions:
•
Words that appear on the computer display are shown in quotation
marks like this: “OK”
•
Additional information is provided as necessary as tips, notes and
cautions.
Tip
Describes a tip such as how the device can be used.
Note
Gives a supplementary explanation, an explanation of special
cases, etc.
Caution
Described when failure to follow the instruction may cause injury
to a person, damage to the device, or a data loss.
About trademarks
•
TASCAM is a trademark of TEAC CORPORATION, registered in the U.S.
and other countries.
•
Microsoft, Windows, Windows 7, Windows 8 and Windows Media are
either registered trademarks or trademarks of Microsoft Corporation
in the United States and/or other countries.
•
Cakewalk is a registered trademark or trademark and SONAR LE is a
trademark of Cakewalk, Inc.
•
ASIO is a trademark and software of Steinberg Media Technologies
GmbH. VST is a trademark of Steinberg Media Technologies GmbH.
•
Other company names, product names and logos in this document
are the trademarks or registered trademarks of their respective
owners.
SONAR LE
1
SONAR LE Quick Start Guide
How to install
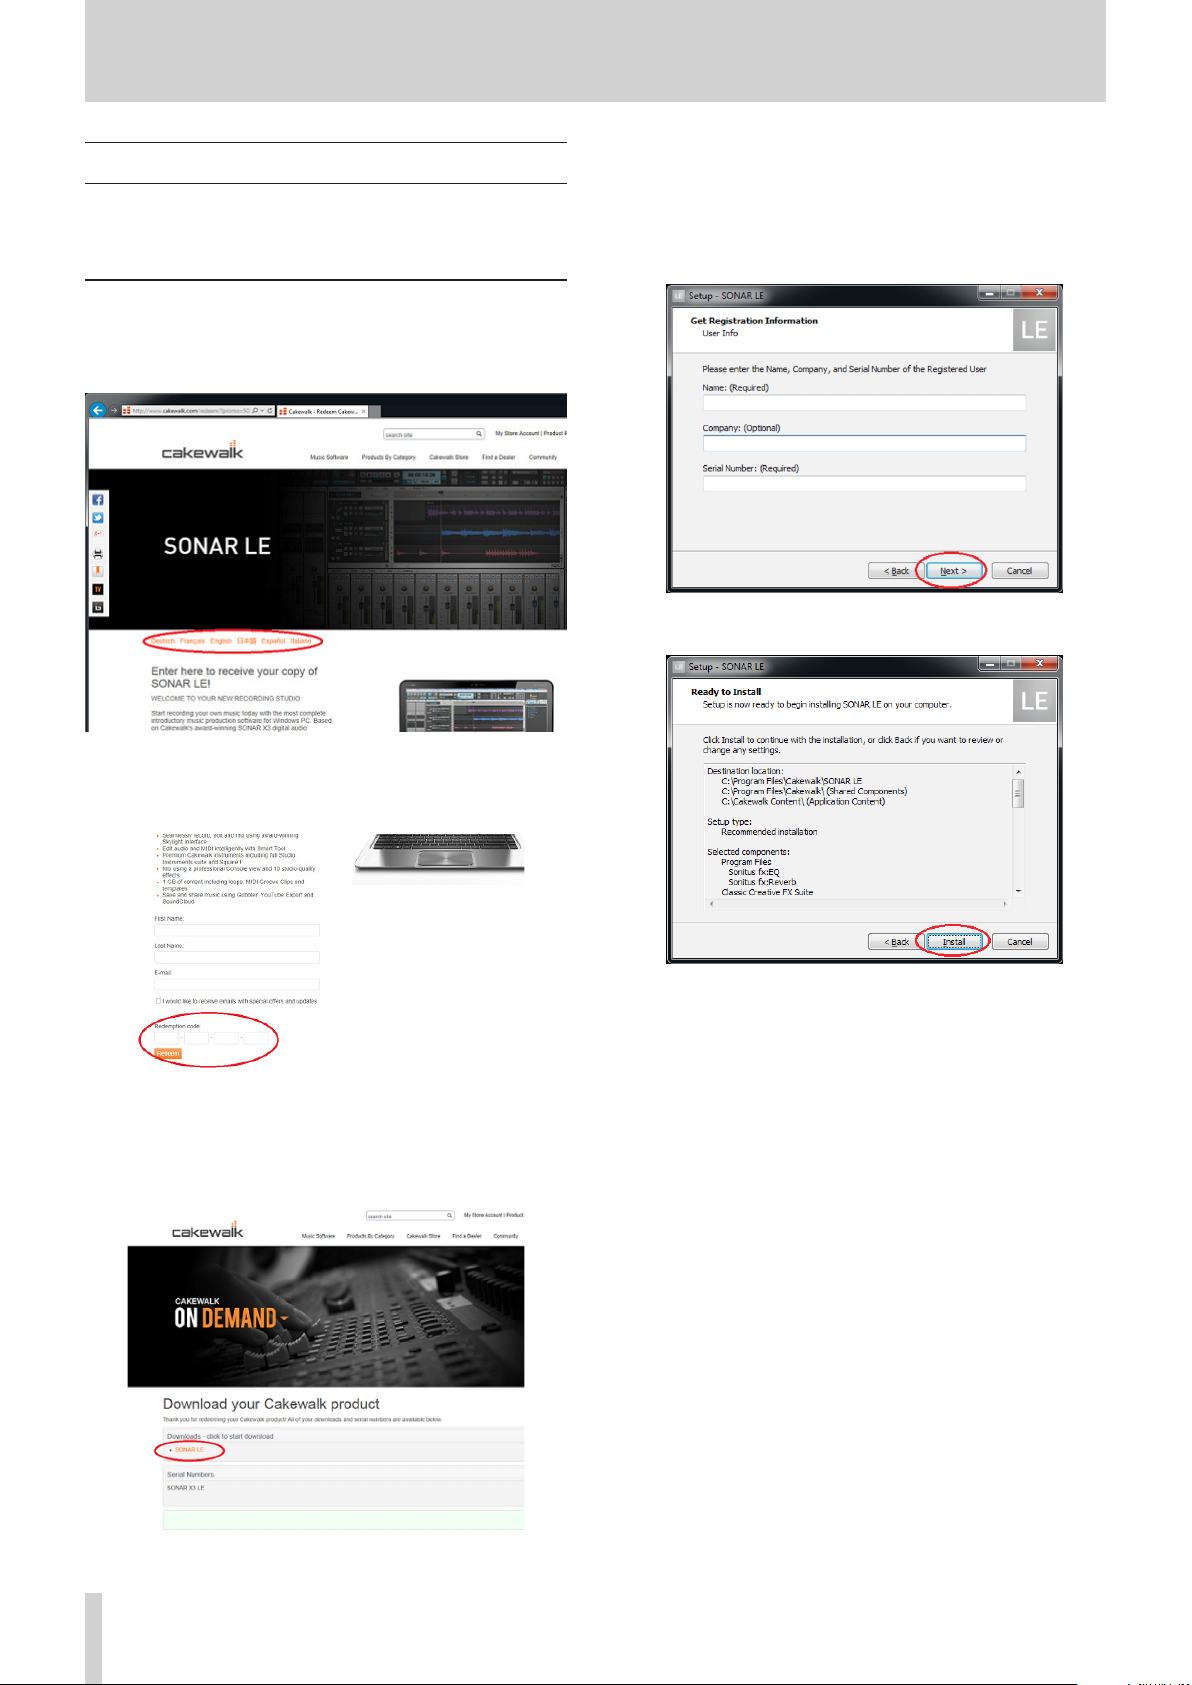
To get SONAR LE, you need to download it from the website of Cakewalk.
The software is provided by downloading so that you can always use the
latest version.
Downloading SONAR LE
Access the following URL and set the language to English.
1.
http://www.cakewalk.com/redeem/?promo=SONARX3LE&kl=16
Double-click the installer to start up.
4.
Set the language to English in language selection. Check each field
5.
and click “Next” to proceed.
Enter the user name, the company name, and the serial number
6.
acquired in 3, and then click “Next”.
Click the Install button to start installation of SONAR.
7.
Enter the names, e-mail address, and redemption code and then
2.
click “Redeem”. The redemption code is described in the license
card included in the audio interface.
Click “SONAR LE” to download and save an installer. A serial number
3.
of SONAR LE is displayed at the same time. An e-mail is sent to the
registered address. Carefully record the serial number by taking a
note or in another way.
When the installation is completed, a pop-up screen is displayed.
8.
Click OK to finish the installation.
SONAR LE
2

SONAR LE Quick Start Guide
How to register
We request you to register for SONAR LE to distinguish authorized users.
The software cannot be used without registration.
Registering SONAR LE
When launching SONAR LE, you are prompted to enter a
1.
registration code.
Click “Register”.
How to record
Settings of SONAR LE are common to Windows 7 and Windows 8. The
following images are examples of screens where a US-200 is used on
Windows 7.
Preparation (enabling the device)
Launch SONAR LE. If the Quick Start window is displayed, click
1.
“CLOSE”.
Note
Selecting “Getting Started” will launch a web browser and open an
online tutorial. We recommend you to refer it.
[Quick Start window]
From the “Edit” menu, select “Preferences...”.
2.
You will be connected to the user registration site. Follow
2.
instructions on the screen to get a registration code.
Now the registration has been completed and the software is ready
for use.
Click “Devices” on the left side of the “Preferences” screen and select
3.
“US-200” in the “Input Drivers” and “Output Drivers” fields on the
right side. Select “US-200” in each of the “Input Drivers” and “Output
Drivers” fields.
Multiple items may be selectable depending on the audio interface.
In this case, select all items having the name of the corresponding
audio interface.
Note
“Generic Low Latency ASIO Driver” may be selected by default.
Since only one device can be enabled in SONAR LE, if “Generic Low
Latency ASIO Driver” is selected, you cannot select an external
audio interface.
In this case, remove the checkmark from “Generic Low Latency
ASIO Driver” and then select the audio interface.
SONAR LE
3

SONAR LE Quick Start Guide
After selecting, click “Apply”. Necessary adjustments will be
4.
automatically carried out.
Click “Devices” on the left side of the “Preferences” screen and check
5.
that “US-200” is selected in the “Playback Timing Master” and “Record
Timing Master” fields on the right side. Multiple items may be
selectable depending on the audio interface. In this case, select all
items having the name of the corresponding audio interface.
Now the device settings have been completed.
6.
Click “CLOSE” to close the screen.
Next, create a project for recording sounds.
Note
Click “ASIO Panel” to open the driver screen for the audio interface.
From the “File” menu, select “New”.
7.
The project opens. In the “Inspector” section on the left side of the
9.
screen, the two tracks “Audio” and “Master” are displayed.
“IN/OUT” indicates the input source and output destination of each
track. Check that the output destination of “Master” track is “US-200
out 1”. If another item is selected, select “US-200 out 1”.
The “New Project File” window is displayed. Enter an arbitrary
8.
project name in the “Name” field. Select “Normal” in the Template
field and click “OK”.
Note
It is useful if the name is after the title of the music, etc. If there is
no appropriate name because the production has not started yet,
give a name such as “test”.
Tip
If you select “16 Track Audio” in the “Template” field, a project
which has 16 audio tracks from the start is created. It is useful for
recording audio.
If you are producing a music using a MIDI keyboard or a plug-in
synthesizer, “16 Channel MIDI” is useful.
Now sounds of SONAR LE can be output to the US-200.
Tip
“US-200 out 1” indicates the first output terminal (Output 1).
Though output sounds are stereo, Output 2 is not displayed. If you
select “US-200 out 3”, sounds of SONAR LE will be output to 3 and 4
of the US-200 (Output 3/4).
SONAR LE
4

SONAR LE Quick Start Guide
Recording
Select a track to be recorded and then select an input bus (signal
1.
path of input source) in the “Inspector” section on the left side of
the screen. If the US-200 is connected, select “Left US-200 US-200 in
1 ”.
Now sounds from the input terminal 1 of the US-200 can be input
into the track.
Click the “Record” button in the “Control bar” section on the top
3.
side of the screen to start recording.
After the playing is finished, click the “Stop” button and then click
4.
the “Arm” button to turn off (light out). Perform other operations
such as rewinding as necessary.
Repeat the above 1. to 4. steps to mix sounds.
5.
Tip
When recording a vocal or acoustic guitar sound with one
microphone, use the mono track. When recording a piano sound
with two microphones or a keyboard sound via stereo line input,
use the stereo track.
Clicking “Interleave” button in the “Inspector” section switches
between mono and stereo.
Turning on the input monitor button at this time allows you to
listen input sounds at all times.
Click the “Arm” button for the track to turn on (light up in red).
2.
SONAR LE
5

SONAR LE Quick Start Guide
Mix-down
Mix-down is a process of combining sounds of a project recorded and
produced in multiple tracks into a stereo file.
First, select a range to be mixed down. Move the cursor to the
1.
starting point and click “Set Thru = Now” of the “ Transport Bar”.
Move the cursor to the ending point in the same way and click “Set
2.
Thru = Now”.
From the “File” menu, select “Export” and then “Audio”.
3.
When the export is completed, the mix-down process is also
5.
completed.
Set each field of the “Export Audio” window and click the “Export”
4.
button.
On this screen, set the name of the file to be exported, save
location, file format, sampling rate (sampling frequency), bit depth
(bit rate), and others.
SONAR LE
6
 Loading...