

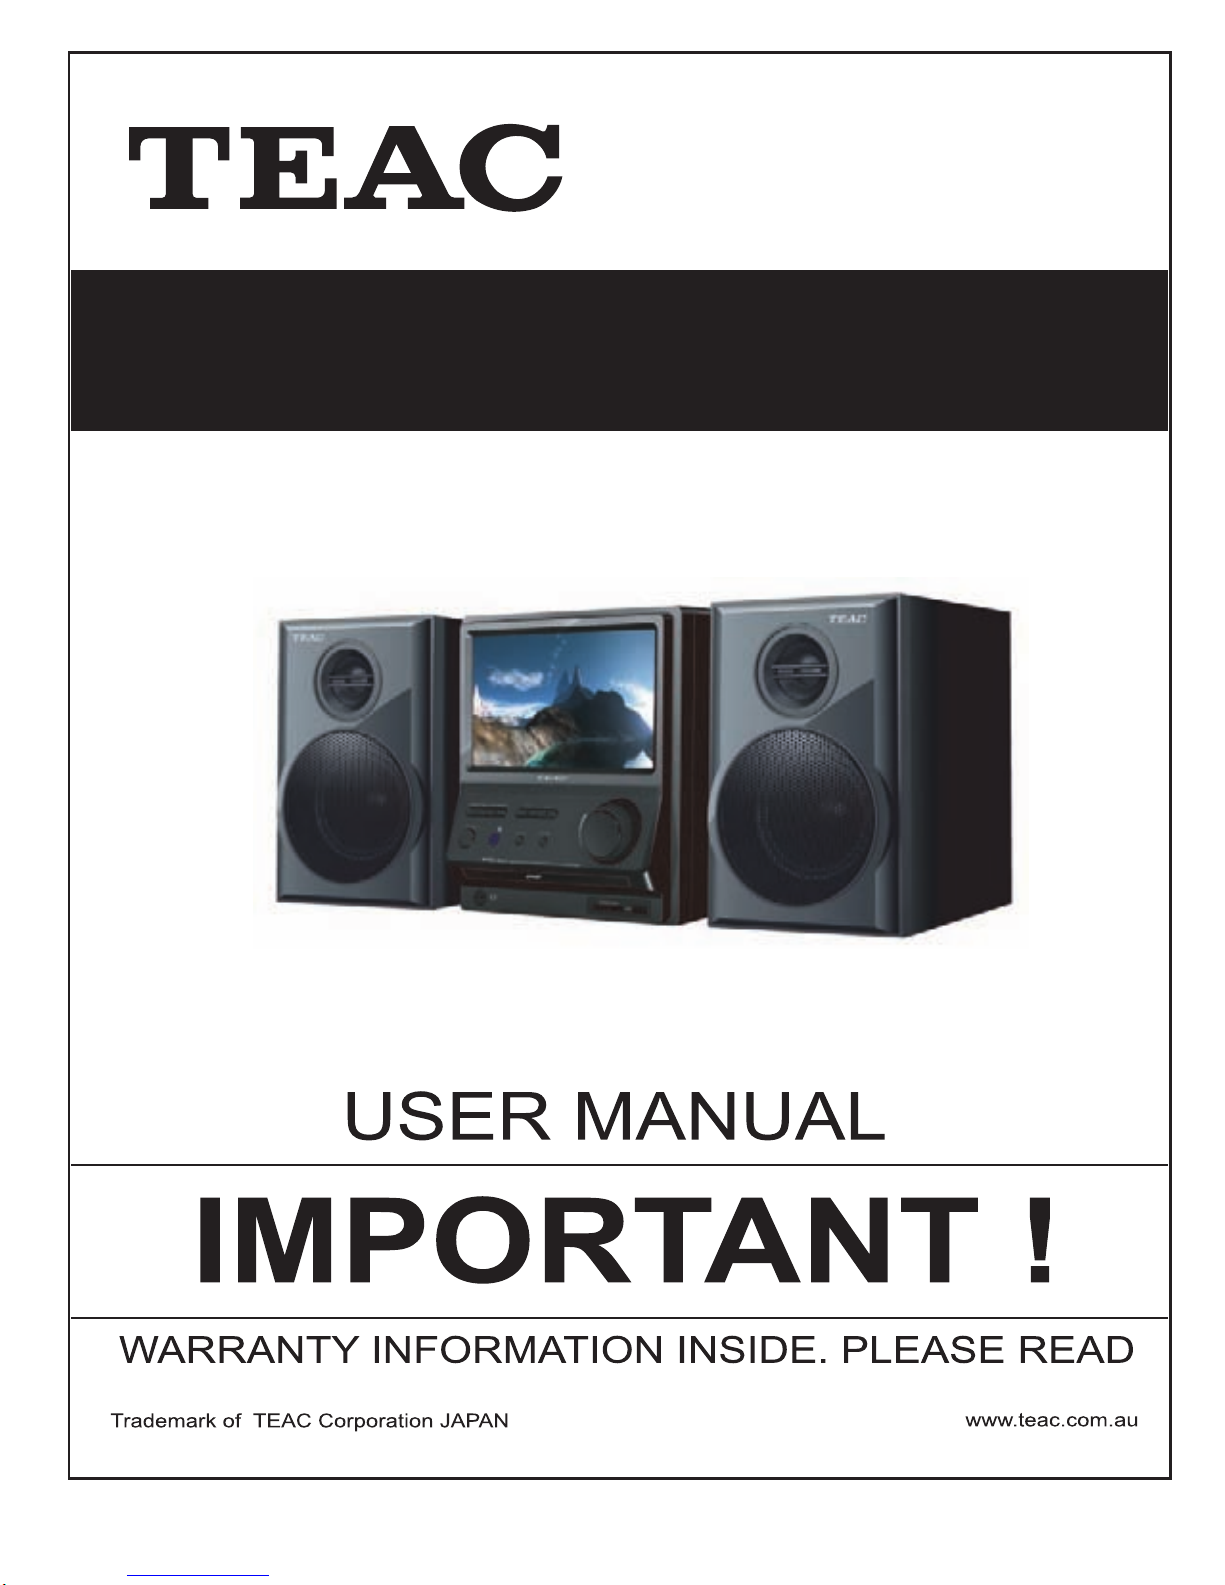
MCDV88
DVD Micro System with 7” LCD Screen


WARRANTY PROCEDURE
v1.5.2: D
EC 2011
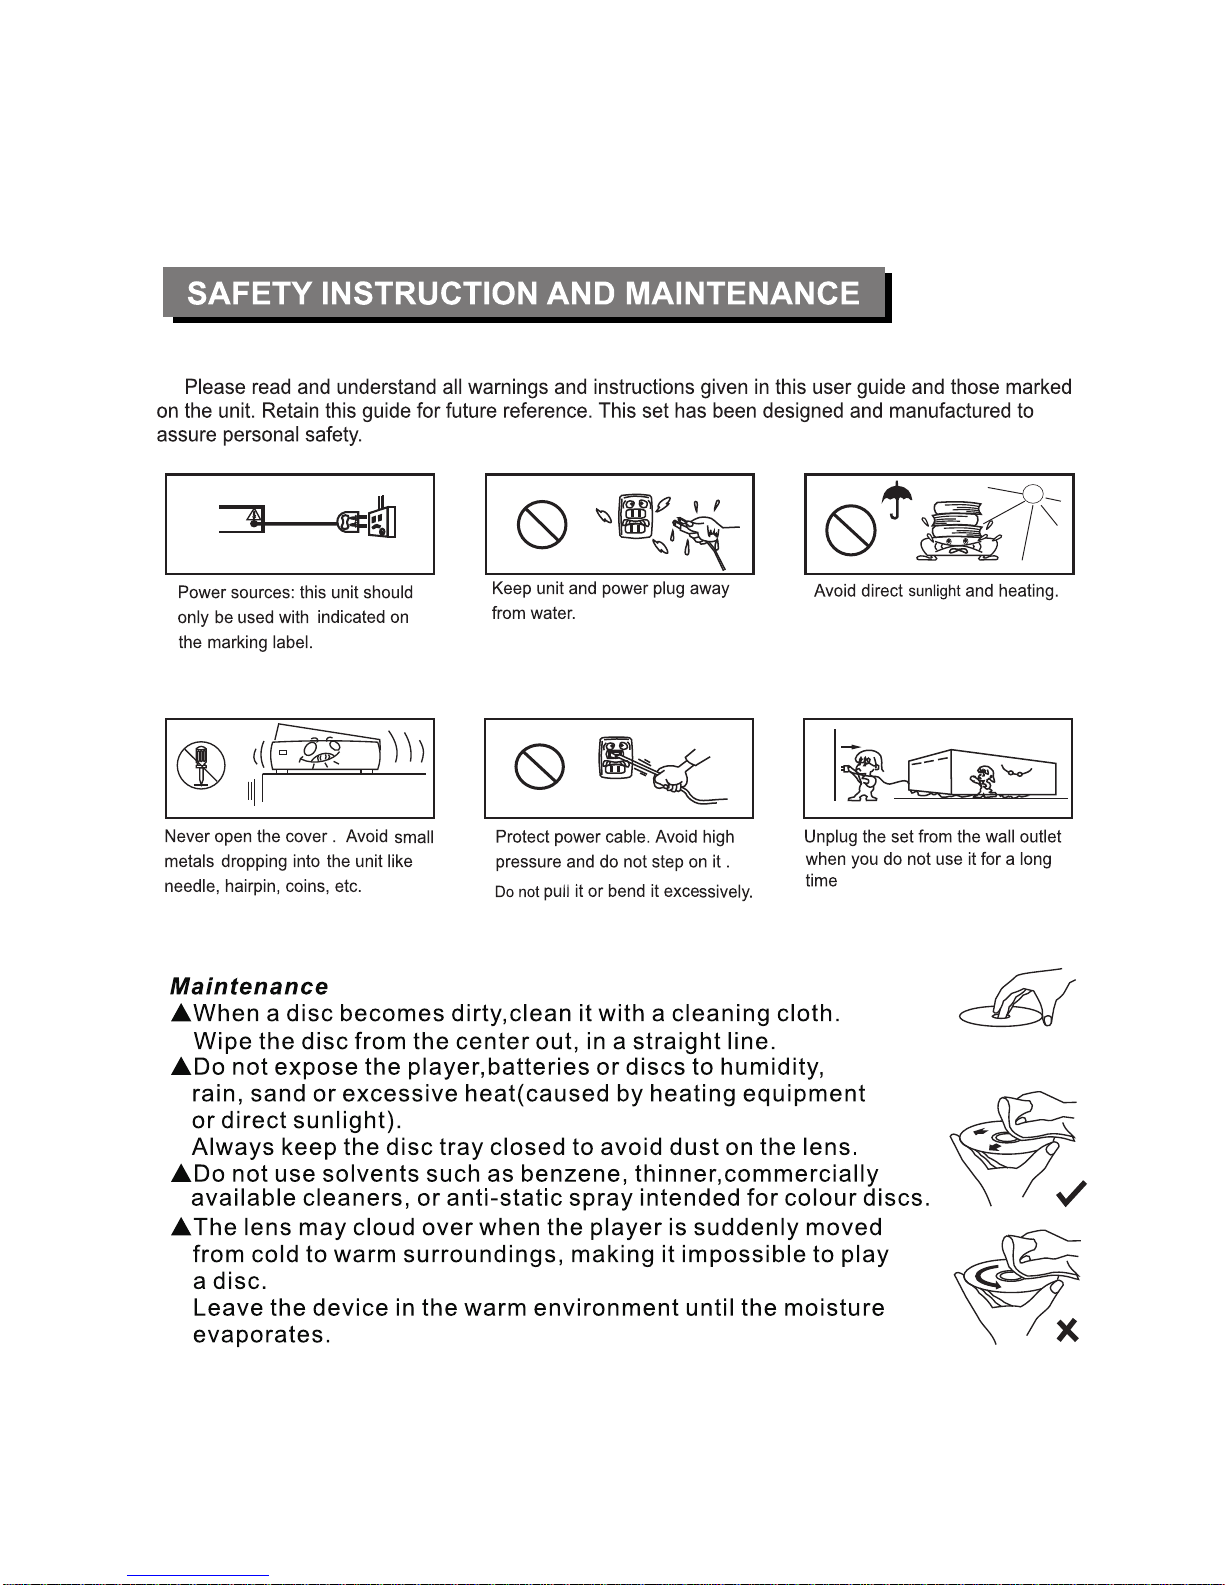
Plea
se read th e owner’s m anu al carefully and ensure that you have followed the correct installation and operating
procedures.
1. Please read this warranty card.
2. Keep your pur chase r ec eip t t o en abl e you t o pr oc eed qui ckly in th e even t of a Warranty Servic e.
3. If you require Warranty Service, please contact the TEAC Customer Support Hotline at 1300 553 315 for
assistance. Pl eas e ens u re that you h ave th e m odel number, serial number an d purchas e r ec eipt ready when
you call.
Please complete the section below and keep this information for your own records.
Owner’s Name
Owner’s Address
Postcode
Model
Name/No. Serial No.
Dealer’s Name
D
eale
r’s Address
Postcode
Authorised Service Centr es in Major A ustralian Cities
NSW
151 A
rthur Street
Homebush West, NSW 2140
Queensland
Unit 1, 320 Curtin Ave West
Eagle Farm, QLD 4009
Western A ust r alia
Unit 2, 50 Pilbara Street
Welshpool, WA 6106
South Australia
11 McInnes Street
Ridleyt on, SA 5008
Victoria
282 Normanby Road
South Mel b our n e, V IC 32 05
Thank
you for selecting a TEAC product
.
If
you should require assistance with your product r egar ding its setup
or operati on, or if any difficulties arise, pl ease call us directly for advice
between Monday to Friday at 8.30AM – 6PM AEST at the
TEA
C Customer Support Hotline
1300
553 315
teac
servicesupport@awa.com.au
www
.teac.com.au

WARRA
NTY INFORMATION
v1.5.2: D
EC 2011
Our g
oods com e with guarantees that cannot be excluded under the Australian Consum er Law. You are
entitled to a replacement or refund for a major failure and for compensation for any other reasonably
fo re se eable l os s or damag e. You ar e al s o e n t i t l e d t o h av e the goods repaired or replaced if the goods f ail
to be of acceptable quality and the failure does not amount to a major failure.
War
ranty Terms & Conditions
1. TEAC war rant s t hat t his pr oduct is f r ee fr om def ects in mat eri al an d wor km ans hip u nder n ormal dom estic use with
reason able care and skill. Mainten ance and c leaning ( i.e. las er head) is not cover ed by this warrant y. The TEAC
warrant y on l y applies to TEAC products purchased, used and serviced in Australia.
2. The ben efits to t he c onsum er given b y this W arrant y ar e in addit ion to other r ights and r emedies of the c onsum er
under a law in rel at i on t o goods or s er vices to whic h th e w arranty rel ates, b ein g the Austral ian Consu m er Law.
3. Refund or replac emen t via y our r etail er is av ail able f or a peri od of 14 da ys after purch ase f or goods that h ave been
inspected and det ermined t o ha ve a m aj or failure. R efu nd and exch ange is not app licable f or ch an g e of mi nd.
4. Subject to the terms herein, this warran ty effecti vely covers the equip ment as sp ecified i n the Warr anty Periods
Table below from the date of purchase.
TEAC PRODUCT
WARRANTY PERIOD
LED/
LCD TV 32” (80 cm) and above 1 Year (In-Home Service/ Pick up Available)*
All
other TEAC products 1 Year (Carry-in Service)
5.
This s ervice will onl y b e provi ded as par t of t his war r anty if all the f ollow i ng conditions ar e met;
In Hom
e Service/Pick up* Service
a) The pr
oduct is indicated in th e Warranty Period Table.
b) The product is within the warranty period.
c) The product is located within the normal service area of the local TEAC Authorised Service Centre.
If TEAC determines that the product is not repairable on site, TEAC can complete the repair by taking the product to
a TEAC Authorised Service Centre.
Where In-Home service/Pick up* is not available, the purchaser is required to send the product to the nearest TEAC
Author is ed Ser vic e C entr e f or r epair . In this e vent , pr o of of pur ch ase is r equir ed to s upp ort a warr ant y cl aim. Aft er
the rep air, t he pr od uct will be avail abl e for c oll ecti on by or retur n to the pur chas er at a fee upon req uest. TE AC inhome service can be made available at a fee upon request.
Carr
y-in Service
6. A 12-m
onth replacement warranty is applicable to all Accessories such as Remote, Power Adaptors and Cables.
7. TEAC will ensure to t he best of its ab il it i es th at all req uired parts are mad e avai l ab le for any required s ervice/r ep air.
8. TEAC Aus tralia Pt y Ltd and its Au thorised S ervic e Centres will use their best endea vours to c omplete produc t
repairs within a reasonable period based on available resources and workload during the time when service is
request ed an d perform ed.
9. Refurbis hed p arts m ay be us ed to r epair t he prod uct. I n the c ase of a replac ement, the pr oduct may be r eplac ed,
with a ref urbished unit of the s ame type or , if one is unavailab le, a si milar refur bished m odel with equal or b etter
features & specifications.
10. Please b e advised that if th e prod uc t presented f or repair is capab le of r etainin g user-g en erated d at a, the d at a m ay
be lost during servicing. Customers are strongly encouraged to back up all important information/data before
sending the product in for service/repair.
11. Servic e will be pr ovided on ly dur ing norm al busin ess hour s and under saf ety condi tions and circ umstanc es. TEA C
and its aut h or ised ser vice agents can r efuse any r ep ai r if saf ety, i n relati on t o O H &S, bec om es a c oncern t o its s t af f
or author ised service agents ’ p ersonnel.
12. The warranty is void and warranty claims may be refused, subject to the Australian Consumer Law, if:
a) The product was not transported, ins talled, op erated or m aint ained a c c ordin g t o m an uf acturer ins tr uc t ion, or
b) The produc t w as abused, dam ag ed, tamp ered, alt ered or rep aired by any un au thoris ed p ersons, or
c) Product failure is due to accidents during use, installation or transit, power surges, use of defective or
incompat ib le exter nal devic es, exp os ure to abn orm al cond itions suc h as excess iv e temp erat ur es or humi dity, or
entry of liqu ids, obj ects or creatur es in to the produc t.
13. No one is au thoris ed t o ass u m e any liability on b eh alf of TEAC or impose any ob ligati on on it, in connecti on with the
sale of any eq ui p m ent other than as stated in th is w arr an t y and ou t l in ed ab ove.
14. TEAC reserves the right to inspect and verify whether the product is exhibiting a major failure as claimed by
customers/retailers.
15. LCD dead pixel policy, please contact TEAC Customer Support Hotline on 1300 553 315 for assistance.
3
9
10
11
1
1
9
9
9
9
9
10
10
10
10
10
10
10
10
10
11
11
11
11
11
11
11
FFuun
nccttiioonnaall DDeessccrriippttiioonn ooff rreemmoottee ccoonnttrrooll
5
CCoon
nnneeccttiioonn OOff DDVVDD aanndd TTVV
6
CCoon
nnneeccttiioonn DDiiggiittaall aauuddiioo oouuttppuutt
7
SSyys
stteemm ccoonnnneeccttiioonn
8
Panel overview
17
19
23
21
Media Operating Instruction
Cd ripping
22
12
13
1
2
12
14
15
16
MIC setup
2
0
Specifiation
24
This is Class
electrical appliance.
2
S
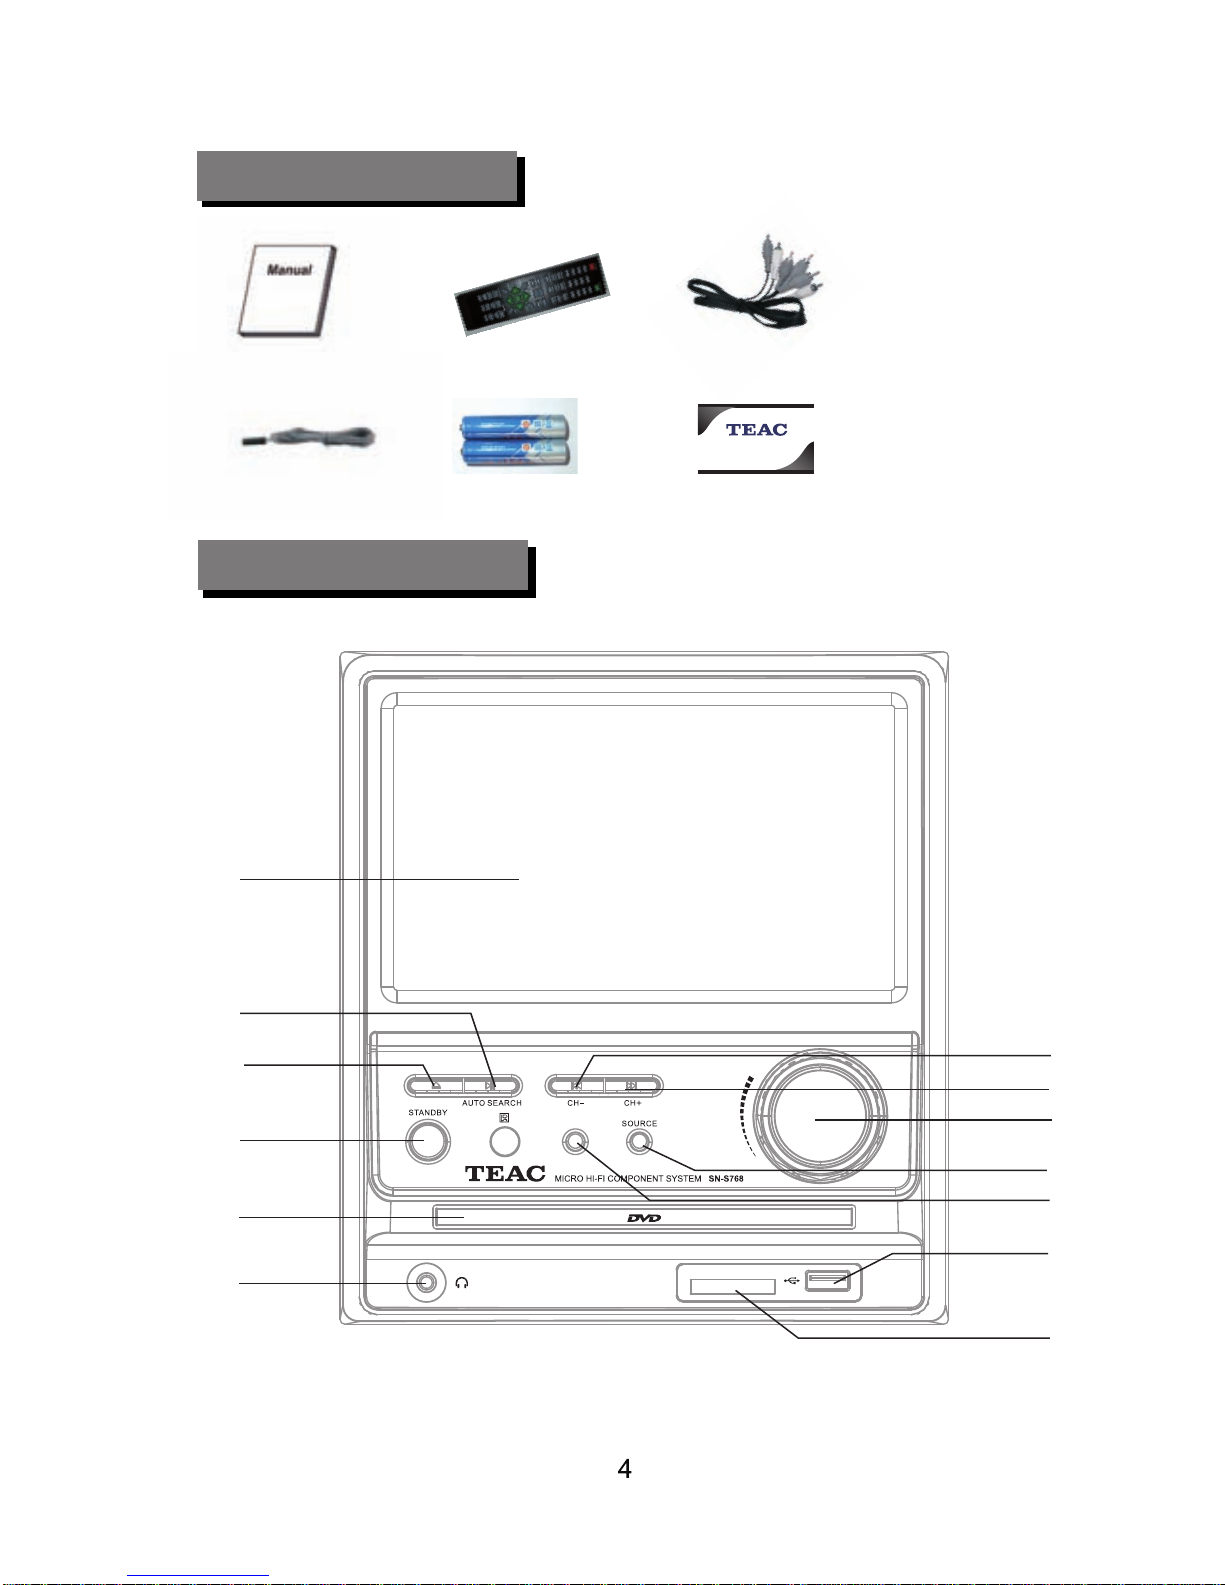
ACCESSORY LIST
PANEL OVER
VIEW
CUSTOMER SUPPORT HOTLINE:
teacservicesupport@awa.com.au
ww
w.teac.com.au
1300553315
SD/
MMC/ MS
7"T
FT
PLAY/PAUSE/
AUTO SEARCH
OPEN/CLOSE
STANDBY
DVD D
OOR
USB J
ACK
SOURCE
VOLUME
NEXT/CH+
PREV/CH-
CARD SLOT
HEADPHONE JACK
SCREEN
User Manual
FM Antenna
Remote Control
2x AAA
Batteries Contact Card
AV Cable
SOUND
SOUND

5
INITIAL
SET UP
CAUTION: Always disconnect units from power when making or changing any cable
connections to avoid risk of electric shock.
Unit Connection
1. Connect the SPEAKERS OUT R+ channel of the DVD player to the jack of the R+ jack on
the right speaker, and the R- channel to the R- jack on the right speaker.
2. In the same way, connect the L+ and L- channels to the L+ and L- jacks on the left speaker.
Remote Control Battery Installation
1. Open the battery compartment on the back of the remote control.
2. Insert 2x AAA batteries by matching the +/- polarities marked in the compartment.
3. Close the battery compartment.
Note: To avoid leaking or cracking cells, install the batteries correctly according to polarity.
Use the correct type of batteries. Batteries that look similar may differ in voltage.
Always replace both batteries at the same time. Do not expose batteries to heat or flame.
Remote Control Operating Range
The remote control can be used up to approximately 5 meters straight ahead of the unit. It
can also be operated at a horizontal angle up to 30
o
from the remote control sensor.
If the remote control doesn’t operate properly:
- Check the polarity of the installed batteries (+/-)
- Check if the batteries are drained
- Check if the remote control sensor is blocked
by obstacles.
- Check if there is any flourescent lighting, sunlight or other interferences nearby.
Use this connection method to input audio and video from compatible external media players
to be played on the DVD player’s LCD screen and its speakers.
1. Use a composite AV cable and connect the Audio L and R plugs to the DVD player’s
AUDIO INPUT ML and MR jacks.
2. Connect the Video plug (yellow) to the DVD player’s VIDEO INPUT jack.
3. After connections are complete, turn on the unit and press the SOURCE button on the
remote control to select AV input mode.
CONNECTING EXTERNAL INPUTS
AUDIO INPUT VIDEO INPUT
VID
EO

3
1. For a basic connection, connect the provided A
V cables according to in the figure below. Set
the TV to AV input mode.
2. If your TV or screen has a S-Video jack, you can use 4-pin S-Video connectors to get a better
quality picture as shown in .
3. For a more vivid picture, use AV wires to connect the YPbPr jacks according to in the
figure below.
CAUTION: Ensure that all units are turned off and disconnected from the AC power outlet before
making or changing cable connections.
1. When watching discs in different video formats, adjust video format settings so that the formats
match. (NTSC/PAL/AUTO)
2. If there are multiple connections between the DVD player and the TV, we recommend that one
of them is selected and the rest are unplugged so that image and sound quality is not affected.
3. Do not switch the power on and off quickly in succession, please allow an interval of 3 seconds
before switching the power on/off again.
Option
Option
Option
3
CONNECTING VIDEO
6

7
Amplif
ier
FM A
ntenna
FM ANT IN
Dolby Amplifier
CONNECTING AUDIO AND FM
Audio output
Option 1
Audio output
Option 2
FM connection
CAUTION: Ensure that all units are turned of
f and disconnected from the AC power outlet before
making or changing cable connections.

8
1A
19
1
8
16
12
11
10
50
C
H
+
S
O
U
R
C
E
U
S
B
/
C
A
R
V
O
L
U
M
E
V
-
M
O
D
E
L
O
U
D
N
E
S
S
M
U
T
E
L
A
N
G
U
A
G
E
R
E
T
U
R
N
S
T
O
P
S
L
O
W
Z
O
O
M
I
I
14
16
14
16
14
16
P
R
O
G
D
I
S
P
L
A
Y
A
-
B
A
N
G
L
E
R
E
P
E
A
T
P
L
A
Y
/
P
A
U
S
E
S
E
A
R
C
H
C
H
-
M
E
N
U
P
B
C
S
E
T
U
P
E
N
T
E
R
-
+
T
V
-
M
O
D
E
OPE
N/CLOSEPOWER
P
O
W
E
R
N
U
M
B
E
R
D
I
S
P
L
A
Y
A
N
G
L
E
P
R
O
G
S
T
O
P
P
L
A
Y
/
P
A
U
S
E
S
E
A
R
C
H
M
E
N
U
S
E
T
U
P
V
O
L
U
M
E
L
O
U
D
N
E
S
S
S
O
U
R
C
E
U
S
B
/
C
A
R
L
A
N
G
U
A
G
E
T
V
-
M
O
D
E
M
U
T
E
V
-
M
O
D
E
Z
O
O
M
P
B
C
E
N
T
E
R
P
R
E
V
/
C
H
-
N
E
X
T
/
C
H
+
R
E
T
U
R
N
S
L
O
W
A
-
B
R
E
P
E
A
T
O
P
E
N
/
C
L
O
S
E
D
I
R
E
C
T
I
O
N
REMOTE CONTROL OVERVIEW
GOTOGOTO
SUBTITLE
COPY
SUBTITLE/COPY
FWD/SCAN+
REV/SCAN-
SCAN+
SCAN-
SOUND
SOUND
D
Battery Installation
1. Open the battery compartment by taking out the battery cover.
2. Insert a 3V battery cell, making sure to match +/- polarities correctly.
3. Close the battery compartment securely.
Note: Remove battery if the remote control is not used for a long time.
Do not mix old and new batteries.
D

9
To play a disc, select DVD Mode with the
SOURCE button. If you are using video
output to a TV
, turn on the TV and switch
it to the correct input mode according to
the connection type being used.
DVD
a logo
(|<<)
(>>|)
(>>)
scan+
(<<)
scan-
exit the screen saver.
.if the screen saver turns on

10
DVD
if available on the DVD
GOTO
title selection menu.The unit
beginning of the disc
digits or arrow navigation buttons
GOTO

11
SOU
RCE
Press this button repeatedly for different
zoom options: 2x, 3x, 4x, 1/2x, 1/3, 1/4x,
1x. When zoomed in, use the arrow buttons
to move the viewing frame.
USB/CARD
Press this button in DVD Mode to switch to
USB/CARD playback. A compatible USB
flash drive or SD/MMC/MS card containing
compatible media files must be connected
to use this feature.
NOTE: Press the SOURCE button to enter
DVD Mode.
SOUND
Press this button for sound balance
adjustment. Press it repeatedly to cycle
through the following: TREBLE, BASS,
VOLUME. Use the volume +/- buttons to
increase/decrease the settings.
This option is in the PROGRAM menu
and enables you to remove a highlighted
chapter in the programmed list.
playback speed
Press this button to cycle through the
following input sources: DVD/AV/FM.
Note: The programmed list is not saved
in memory when the disc is ejected or the
unit is powered of
f

001
/172
00:01
03:11
128kb ps
001
0
02
003
004
12
MUSIC/PICTURE
After an audio disc is loaded,
to select a desired
(|<</ >>|)
Music File
When a music data disc is loaded,
to select a desired folder
folder.
file list
to select a desired file
After a Kodak Picture CD is loaded
.
to select a desired
to select a desired
display the current
picture file formats
After a JPEG CD is loaded
.

Gen
eral
Aud
io
Tv Di
splay
General setup Page
Ang
le Mark
On
Osd L
ang
ENG
Cap
tion
Off
Scr
een Saver
On
Las
t Memory
On
Set T
v Display Mode
Dol
by
Video
Pre
ference
●●
●●
PS
Wid
e
●
General
Aud
io
General setup Page
Clo
sed Caplion
Dol
by
Video
Preference
●●
●●
Off
Gen
eral
Audio
Dolby
Video
Pre
ference
Off
Osd L
ang
Cap
tion
Tv Di
splay
General setup Page
●●
●●
P
S
Ang
le Mark
On
ENG
Off
Scr
een Saver
On
On
Set
Angle Mark
Gen
eral
Aud
io
Tv Di
splay
Tv Display
General setup Page
Ang
le Mark
Angle Mark
On
On
O
sd Lang
Osd L ang
ENG
E
NG
Cap
tion
Off
Scr
een Saver
On
Set O
sd Language
Dol
by
Video
Preference
●●
●●
PS
PS
English
French
German
Spanish
On
Normal/Ps
Normal/Lb
13
HDC
D
1X
Las
t Memory
On
DH C
D
1X
a
L st M
emory
On
HDC
D
1X
MP3 L
yric mode
On
MP3 Lyric mode
On
Cap
tion
Off
Scr
een Saver
O
n
Las
t Memory
On
DH C
D
1X
MP3 L
yric mode
On
MP3 Lyric mode
On
MENU SETUP

Gen
eral
General
Aud
io
Audio
Gen
eral selup Page
General selup Page
Scr
een Saver
Dolby
Dolby
Vid
eo
Video
Pre
ference
Preference
●●
●●
●●
●●
On
On
Off
Off
Vid
eo
Preference
Spd
if Setup
Gen
eral
Audio
Aud
io Setup Page
Go To
Speaker Setup Page
Dol
by
●
●
●●
Video
Preference
Spd
if Off
General
Audio
DIG
ITAL AUDIO SETUP PAGE
Spd
if Output
Set
up Spdif
Dolby
Spd
if/Raw
Spd
if/Pcm
Tv Di
splay
Tv Display
Ang
le Mark
Angle Mark
On
On
O
sd Lang
Osd L ang
ENG
E
NG
Cap
tion
Caption
Off
O
ff
Scr
een Saver
Screen Saver
On
On
Las
t Momory
Las
t Momory
On
PS
PS
14
When the power is cut off suddenly,DVD
player can remember what it is displaying.
After DVD player has power again, it can
contiune to display beginning from its
memory;
F.Last Memory
Las
t Memory
On
HDC
D
1X
E.HDCD
High definition compatible digital cd.
2X
Gen
eral
Aud
io
Gen
eral selup Page
Dol
by
Vid
eo
Pre
ference
●●
●●
Tv Di
splay
Ang
le Mark
O
n
O
s
d Lang
ENG
Cap
tion
Off
Scr
een Saver
O
n
P
S
Las
t Memory
O
n
HDC
D
1X
HDC
D
HDCD
1X
1X
Off
MP3 Lyric mode On
MP3 Lyric mode On
MP3 L
yric mode On
K araoke Setup
Lpcm Out 48 k

Vid
eo
Preference
Gen
eral
Aud
io
●
Dua
l Mono (1+1) Setup
Dol
by
●
●●
Dol
by Digital Setup
Dua
l Mono
Dynamic
Stereo
L-Mono
R-Mono
Mix-Mono
●
●
●●
Dol
by Digital Setup
Vid
eo
Preference
Gen
eral
Aud
io
Dynamic
Set D
rc Off
Dol
by
Dua
l Mono
FUL
L
3/4
1
/2
1/4
Off
15
Preference
Gen
eral
Aud
io
Sha
rpness
Dol
by
●
●
●●
Vid
eo
Hig
h
Middle
Low
Preference
Gen
eral
Aud
io
Bri
ghhtness
Dol
by
●
●
●●
Vid
eo
Preference
Gen
eral
Aud
io
Tv Mo
de
Dol
by
●
●
● ●
Vid
eo
P-Scen
I NTE RFACE
Preference
General
Audio
Bri
ghtness
Brightness
Com
ponent
Dolby
●
●
●●
Video
Video Setup Page
Video Setup Page
V
ideo Setup Page
Video Setup Page
Com
ponent
Component
TV Mode
TV Mode
TV Mode
Shar pness
Sharpness
Contrast
Contrast
00
00
Mid
YUV
YUV
S-video
Quality
Quality
Camma
Hue
Saruration
None
00
00
00
00
Camma
Hue
Saruration
None
00
00
S-video
Mid

D u a
l Mon o
Bri
ghtness
Shar Pness
Contrast
OO
OO
Low
Con
trast
●
●
●●
Video Setup Page
Gen
eral
Aud
io
Dol
by
Preference
Vid
eo
Gen
eral
Aud
io
Bri
ghtness
Dol
by
Preference
Vid
eo
Bri
ghtness 0
General
Aud
io
Dol
by
Preference
Vid
eo
Con
trast 0
Contrast
16
Camma
Hue
Saruration
None
00
00
Preference
Gen
eral
Aud
io
Dol
by
●
●
●●
Vid
eo
Hig
h
Middle
Low
Bri
ghtness
Video Setup Page
Shar pness
Con
trast
Low
Camma
Hue
Saruration
None
00
00
00
00
F
Camma
Camma
None
Camma
Brightness
Shar Pness
Con
trast
OO
OO
Low
Con
trast
●
●
●●
Video Setup Page
Gen
eral
Aud
io
Dol
by
Preference
Vid
eo
Gen
eral
Aud
io
Dol
by
Preference
Vid
eo
Camma
Hue
Saruration
None
00
00
G
Hue
Hue
Hue
0
Hue
H.Saruration
Saruration operating to regulate the
operation and HUE

●
●
●●
Gen
eral
Aud
io
Pre
ferred Audio L anguage
Pas
sword Page
Dol
by
Preference
Vid
eo
English
French
Spanish
Chinese
Japanese
K orean
Portuguese
●
●
●●
Gen
eral
Pre
ferred Menu L anguage
Pas
sword Page
Aud
io
Dol
by
Preference
Vid
eo
●
●
●●
Gen
eral
Pre
ferred Subtitle Language
Pas
sword Page
Aud
io
Dol
by
Preference
Vid
eo
●
●
●●
Gen
eral
Set T
v Standard
Password Page
Aud
io
Dol
by
Preference
Vid
eo
P
AL
Multi
NTSC
Di s
c Menu
Di sc Menu
Di sc Menu
Di sc Menu
TV Ty
pe
TV Type
TV Type
TV Type
Audio
Audio
Audio
Audio
Subtitle
Subtitle
Subtitle
Subtitle
Pas
sword
Password
Password
Password
Def
ault
Default
Default
Default
Parental
Parental
Parental
Parental
ENG
E
NG
ENG
ENG
ENG
E
NG
ENG
ENG
ENG
E
NG
ENG
ENG
PAL
P
AL
PAL
PAL
English
French
Spanish
Chinese
Japanese
English
French
Spanish
Chinese
Japanese
17
R ussian
K orean
Portuguese
R ussian
K orean
Portuguese
R ussian

4 Pg 13
5 P
gr
6 R
7 Nc 17
8 Ad
utl
●
●
●●
Gen
eral
Set P
arental Control
Pas
sword Page
Aud
io
Dol
by
Preference
Vid
eo
1 Kid Saf
2 G
3
Pg
●
●
●●
Gen
eral
Cha
nge Possword
Pas
sword Page
Aud
io
Dol
by
Preference
Vid
eo
●
●
●●
Gen
eral
Loa
d Factory Setting
Pas
sword Page
Aud
io
Dol
by
Preference
Vid
eo
Res
et
Gen
eral
Audio
Dol
by
Preference
Video
Old P
assword
New P
assword
Confirm Pwd
ok
Di s
c Menu
Di sc Menu
Di sc Menu
TV Ty
pe
TV Type
TV Type
Audio
Audio
Audio
Subtitle
Subtitle
Subtitle
P
as
sword
Password
Password
Def
ault
Default
Default
Parental
Parental
Parental
ENG
E
NG
ENG
ENG
E
NG
ENG
ENG
E
NG
ENG
PAL
P
AL
PAL
18
●
●
●●
Gen
eral
Password Mode
Password Setup Page .... ..
Aud
io
Dol
by
Preference
Vid
eo
Password Mode
On
Off
Password

VIDEO FILE COPY
1.
The source CD (Audio CD,
A
VI,XVID) must be in good condition and not
scratched or warped. The DVD player should be able to play it smoothly.
2. The destination USB flash drive must be compatible with the DVD player (up to
16GB, formatted in FAT/FAT32 file system).
1. In DVD Mode, load and play the CD.
2. Plug the destination USB flash drive into the unit.
3. Press the COPY button on the remote control to
display the CD ripping menu on the screen. (FIGURE 1)
4. Adjust your CD ripping preferences by using the arrow
buttons and ENTER button:
- Speed: Ripping speed. FAST mode rips quicker but the
audio will not be played.
- Bitrate: Higher bitrate gives better quality audio but
larger files.
- Create ID3: Choose whether to have ID3 tags attached
to the ripped files.
- Device: Displays the connected memory device.
5. Highlight and press ENTER to select the desired tracks.
"Select All" will select all the tracks. "Select None" will
uncheck all the tracks.
6. After the track selection, select the "Start" option to
start ripping. The ripping progress screen will display.
(FIGURE 2)
7. After ripping is complete, select "Exit" to quit the CD
ripping menu.
8.To stop ripping while it is in progress, select the
"Cancel" option.
VIDEO FILE COPY
1. In DVD Mode, load and play the AVI/XVID CD.
2. Plug the destination USB flash drive into the unit.
3. Press the COPY
button on the remote control to display
the video copy menu on the screen. (FIGURE 3)
4
or deselect all tracks
select
5. After the track selection, select the "Copy" option to
proceed. Adjust settings if needed, then proceed again
to start the copy function. (FIGURE 4 & 5)
6. To stop copying while it is in progress, select the
"Cancel" option.
if needed to view further
down the track list.
19
Move the cursor to the video file you'd like to copy and

20
Vid
eo
Preference
Spd
if output
Karaoke setup
Gen
eral
Aud
io
Spe
aker Setup Page
Go t o k
araoke setup page
Dol
by
●
●
●●
Vid
eo
Preference
MIC s
etup
MIC Threshold
Gen
eral
Aud
io
Kar
aoke Setup Page
Go t o M
IC setup p age
Dol
by
●
●
●●
Vid
eo
Video
Video
Video
Preference
Preference
Preference
Preference
MIC o
n
MIC on
MIC on
MIC on
MIC VOL 1 15
MIC VOL 1 15
MIC VOL 1 15
MIC VOL 1 15
Echo Level 15
Echo Level 15
Echo Level 15
Echo Level 15
Gen
eral
General
General
General
Aud
io
Audio
Audio
Audio
Mic
phone Setup
Micphone Setup
Micphone Setup
Micphone Setup
MIC V
OL 1
MIC VOL 1
Echo Level
Echo Level
Dol
by
Dolby
Dolby
Dolby
●
●
●●
●
●
●●
●
●
●●
●
●
●●
Vid
eo
Preference
MIC o
ff
MIC VOL 1 15
Echo Level 15
Gen
eral
Aud
io
Mic
phone Setup
MIC
Dol
by
●
●
●●
on
of
f
MIC S
ETUP

21

22
3. Tune in to the saved stations by pressing the CH+/- buttons. Use the
SCAN+/- buttons to tune manually
.
1.The FM receiving frequency range of this unit is 87.5MHz-108MHz
2.When the unit is in the DVD mode,press the source key to switch to the FM
mode,Press the AUTO SEARCH key on the remote control,then the system
automatically searches and stores 1 to 20 channels one by one .
NOTE: This unit stores FM channels during auto tune only.
AUTO TUNE
MANUAL TUNE
FINE
POSITION 1
90. 80
FM
TV SETUP FUNCTION
Image Adjustment
Up and down arrow keys to move the
option to reverse left and right keys to
adjust the option
The proportion of video output and
reset options
Up and down arrow keys to move the
option to reverse left and right keys to
adjust the option
The regulation of the TV norm
Up and down arrow keys to move the
option to reverse left and right keys to
adjust the option
Time adjustment
Up and down arrow keys to move the
option to reverse left and right keys to
adjust the option

23

24
Spe
cifications
SYS
TEM
Powe
r supply
~110-240V, 50/60Hz
Powe
r Consumption
60W
Chann
el Separation
>40dB
Oper
ating condition
Temperature: -10~+40 Degree Celsius; Humidity: 5%~90%
Dim
ensions
Main unit: 190 x 210 x 275 mm
Spea
ker: 140 x 215 x 260 mm
Wei
ght
Net: 7 kg
Gro
ss: 8 kg
INP
UT
DVD
Player
Supports DVD, DVD+RW, VCD, CD, CD-R, CD-RW, MP3, HDCD,
WMA, JPEG
Frequency response: 20Hz – 20kHz (±3dB)
Audio S/N: >80dB
Horizontal definition: 500(TV)
Video type: DVD (MPEG2), VCD (MPEG1)
Audio Type: MPEG1, MPEG2, PCM, Stereo
Ana
logue audio output
Digital audio output
Video output
YUV output
(Y.Cb.Cr)
- Electric level output: 1.0-2.0vp-p
- Resistance: 10k
- Ele
ctric level output: 0.5vp-p
- Resistance: 75
- Ele
ctric level output: 1.0vp-p
- Resistance: 75
- Ele
ctric level output: 0.7vp-p
- Resistance: 75
FM T
uner
Frequency range: 87.5MHz – 108MHz
USB
Version 2.0, supports AVI, MP3, WMA, JPEG
CAR
D
3 in 1 reader, supports SD/MS/MMC memory cards
OUT
PUT
Ampl
ifier
Output power: 20W + 20W
Bass: 0dB~+15dB
Treble: 0dB~+15dB
Frequency response: 20Hz-20KHz ±3dB
S/N ratio: >80dB
Spea
ker
2-channel stereo
1x 4” subwoofer, 1x 1.5” treble
2-way shielded
Sensitivity: 88dB(±2dB)
Impedance: 6
LCD
Panel
7” TFT Panel
[05C
T12]
* Specifications are subject to change without notice.
* Weight and dimensions are approximate.

 Loading...