


Teac CR-H255 User Manual

9A10355200
CR-H255
OWNER’S MANUAL
CD/Receiver
Z

2
Contents
Thanks you for choosing TEAC. Read this manual
carefully to get the best performance from this
unit.
Before Use . . . . . . . . . . . . . . . . . . . . . . . . . . . . . . . . 3
Remote Control Unit. . . . . . . . . . . . . . . . . . . . . . . . . 3
Compact Disc . . . . . . . . . . . . . . . . . . . . . . . . . . . . . . 4
MP3 and WMA. . . . . . . . . . . . . . . . . . . . . . . . . . . . . 5
How to Reset the Settings to the Factory Defaults . . . 5
Connections . . . . . . . . . . . . . . . . . . . . . . . . . . . . . . . 6
Connecting Antennas (AM/FM). . . . . . . . . . . . . . . . . 8
Connecting Antennas (DAB) . . . . . . . . . . . . . . . . . . . 9
Names of Each Control . . . . . . . . . . . . . . . . . . . . . . 10
Basic Operation. . . . . . . . . . . . . . . . . . . . . . . . . . . . 14
Listening to CD/MP3/WMA (discs). . . . . . . . . . . . . . 16
Listening to a USB device . . . . . . . . . . . . . . . . . . . . 17
Search. . . . . . . . . . . . . . . . . . . . . . . . . . . . . . . . . . . 17
Basic Playback. . . . . . . . . . . . . . . . . . . . . . . . . . . . . 18
Repeat Playback . . . . . . . . . . . . . . . . . . . . . . . . . . . 19
Programmed Playback. . . . . . . . . . . . . . . . . . . . . . . 20
Shuffle Playback . . . . . . . . . . . . . . . . . . . . . . . . . . . 21
Display . . . . . . . . . . . . . . . . . . . . . . . . . . . . . . . . . . 22
Time Display . . . . . . . . . . . . . . . . . . . . . . . . . . . . . . 22
Before Recording . . . . . . . . . . . . . . . . . . . . . . . . . . 23
Setting the Record Mode . . . . . . . . . . . . . . . . . . . . 23
Recording to USB . . . . . . . . . . . . . . . . . . . . . . . . . . 24
Delete a file from USB. . . . . . . . . . . . . . . . . . . . . . . 24
Setting up your DAB Tuner . . . . . . . . . . . . . . . . . . . 25
Auto Tuning . . . . . . . . . . . . . . . . . . . . . . . . . . . . . . 25
Using the Channel List . . . . . . . . . . . . . . . . . . . . . . 26
Using Function Control . . . . . . . . . . . . . . . . . . . . . . 27
Station order . . . . . . . . . . . . . . . . . . . . . . . . . . . 27
Preset tune . . . . . . . . . . . . . . . . . . . . . . . . . . . . 28
DRC value . . . . . . . . . . . . . . . . . . . . . . . . . . . . . 28
Manual tune . . . . . . . . . . . . . . . . . . . . . . . . . . . 29
Changing Display Settings. . . . . . . . . . . . . . . . . . . . 30
Listening to FM/AM. . . . . . . . . . . . . . . . . . . . . . . . . 32
Preset Tuning . . . . . . . . . . . . . . . . . . . . . . . . . . . . . 33
RDS. . . . . . . . . . . . . . . . . . . . . . . . . . . . . . . . . . . . . 35
PTY Search . . . . . . . . . . . . . . . . . . . . . . . . . . . . . . . 36
About DAB . . . . . . . . . . . . . . . . . . . . . . . . . . . . . . . 37
Setting the Clock . . . . . . . . . . . . . . . . . . . . . . . . . . 38
Setting the Timer . . . . . . . . . . . . . . . . . . . . . . . . . . 39
Sleep Timer. . . . . . . . . . . . . . . . . . . . . . . . . . . . . . . 40
Listening to the External Sources. . . . . . . . . . . . . . . 40
Specifications . . . . . . . . . . . . . . . . . . . . . . . . . . . . . 41
Troubleshooting . . . . . . . . . . . . . . . . . . . . . . . . . . . 42
Disposal of your old appliance
1. When this crossed-out
wheeled bin symbol is
attached to a product it
means the product is covered
by the European Directive
2002/96/EC.
2. All electrical and electronic
products should be disposed of separately from
the municipal waste stream via designated
collection facilities appointed by the government
or the local authorities.
3. The correct disposal of your old appliance will
help prevent potential negative consequences for
the environment and human health.
4. For more detailed information about disposal of
your old appliance, please contact your city
office, waste disposal service or the shop where
you purchased the product.
CAUTION
The product shall not be exposed to dripping or
splashing and that no object filled with liquids, such
as vases, shall be placed on the product.
Do not install this equipment in a confined space
such as a book case or similar unit.
3
Before Use
Read this before operation
< As the unit may become warm during operation,
always leave sufficient space around the unit for
ventilation.
< The voltage supplied to the unit should match the
voltage as printed on the rear panel. If you are in
any doubt regarding this matter, consult an
electrician.
< Choose the installation location of your unit
carefully. Avoid placing it in direct sunlight or close
to a source of heat. Also avoid locations subject to
vibrations and excessive dust, heat, cold or
moisture.
< Do not place the unit on an amplifier/receiver.
< Do not open the cabinet as this might result in
damage to the circuitry or electrical shock. If a
foreign object should get into the set, contact your
dealer or service agency.
< When removing the power plug from the wall
outlet, always pull directly on the plug, never yank
the cord.
< To keep the laser pickup clean, do not touch it, and
do not forget to close the disc tray when not using
the CD player.
< Do not attempt to clean the unit with chemical
solvents as this might damage the finish. Use a
clean, dry cloth.
< Keep this manual in a safe place for future
reference.
DO NOT MOVE THE UNIT DURING PLAYBACK
During playback, the disc rotates at high speed. Do
NOT lift or move the unit during playback. Doing so
may damage the disc.
WHEN MOVING THIS UNIT
When changing places of installation or packing
the unit for moving, be sure to remove the disc and
return the disc table to its original position in the
player. Then, press the power switch to turn the
power off, and disconnect the power cord. Moving
this unit with the disc loaded may result in damage
to this unit.
Remote Control Unit
Battery Replacement
If the distance required between the remote control
unit and main unit decreases, the batteries are
exhausted. In this case replace the batteries with
new ones.
Precautions concerning batteries
< Be sure to insert the batteries with correct positive
‘
+’ and negative ‘_’ polarities.
< Use batteries of the same type. Never use different
types of batteries together.
< Rechargeable and non-rechargeable batteries can
be used. Refer to the precautions on their labels.
< When the remote control unit is not to be used for
a long time (more than a month), remove the
batteries from the remote control unit to prevent
them from leaking. If they leak, wipe away the
liquid inside the battery compartment and replace
the batteries with new ones.
< Do not heat or disassemble batteries and never
dispose of old batteries by throwing them in a fire.
The provided Remote Control Unit allows the unit to
be operated from a distance.
When operating the remote control unit, point it
towards the REMOTE SENSOR on the front panel of
the unit.
< Even if the remote control unit is operated within
the effective range, remote control operation may
be impossible if there are any obstacles between
the unit and the remote control.
< If the remote control unit is operated near other
appliances which generate infrared rays, or if other
remote control devices using infrared rays are used
near the unit, it may operate incorrectly.
Conversely, the other appliances may operate
incorrectly.
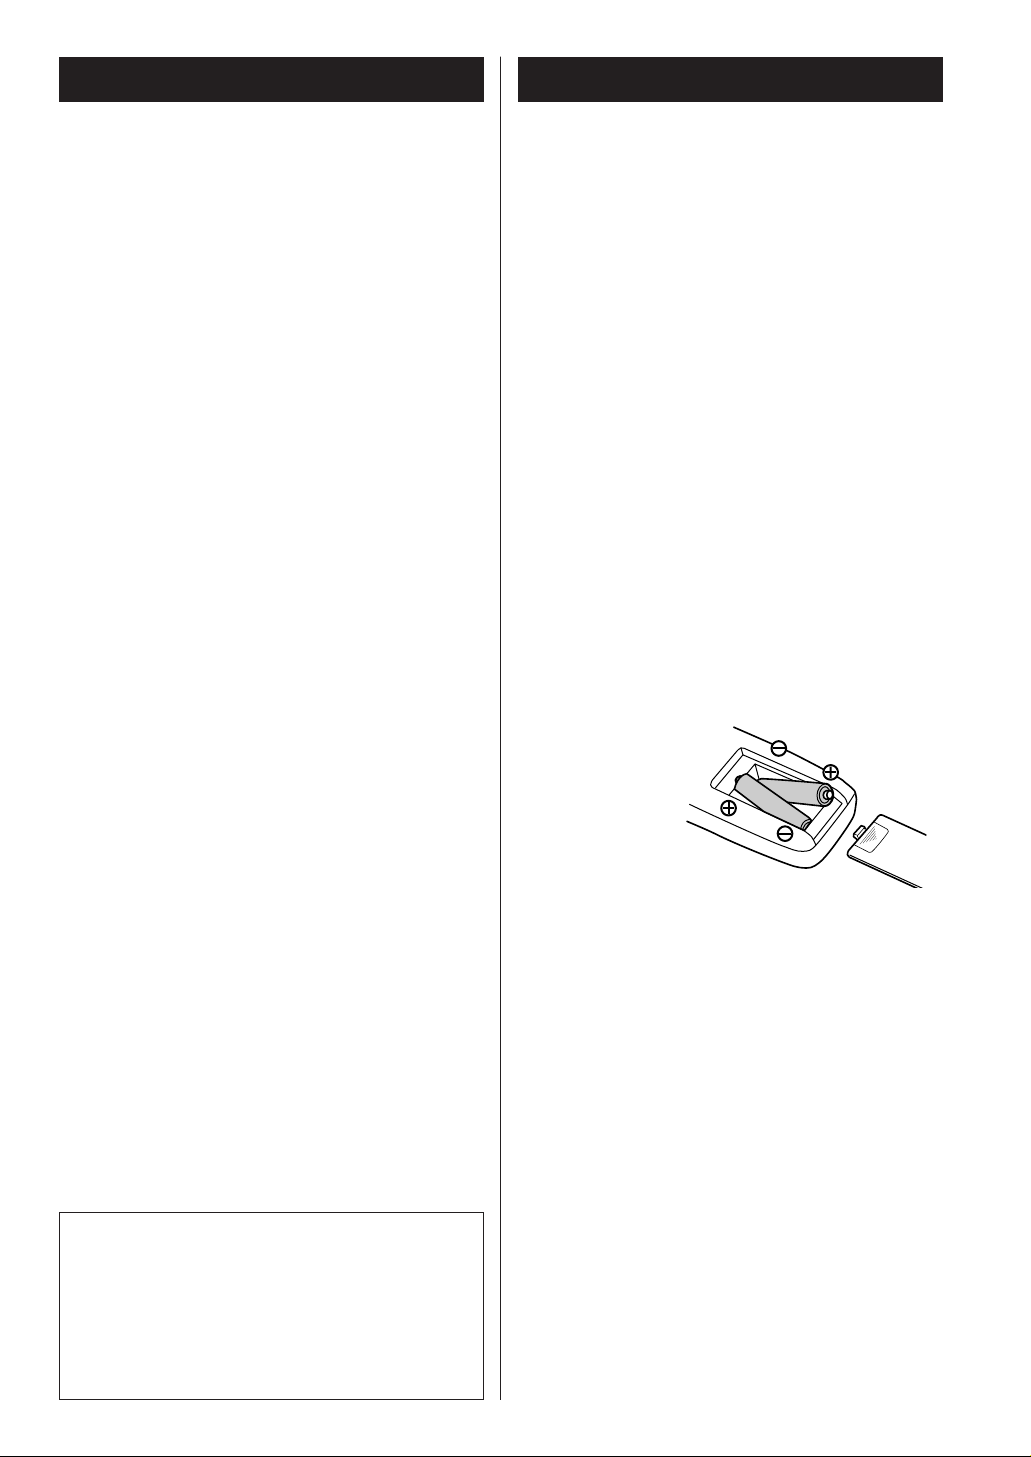
Battery Installation
1. Remove the battery compartment cover.
2. Insert two ‘AAA’ dry batteries. Make sure that the
batteries are inserted with their positive ‘
+’ and
negative ‘
_’ poles positioned correctly.
3. Close the cover.

Compact Disc
Discs which can be played on this unit:
• Conventional audio CDs bearing the CD-DA logo
on the label:
• Properly finalized CD-R and CD-RW discs
Note:
< Depending on the quality of the disc and/or the
condition of the recording, some CD-R/CD-RW
discs may not be playable.
< Copy-protected discs and other discs which do not
conform to the CD standard may not play back
correctly in this player. If you use such discs in this
unit, TEAC Corporation and its subsidiaries cannot
be responsible for any consequences or guarantee
the quality of reproduction. If you experience
problems with such non-standard discs, you should
contact the producers of the disc.
< Discs should be returned to their cases after use to
avoid dust and scratches that could cause the laser
pickup to ‘skip’.
< Do not expose discs to direct sunlight or high
humidity and temperature for extended periods.
Long exposure to high temperatures will warp the
disc.
< Do not play any disc that is warped, deformed or
damaged. Playing such discs may cause irreparable
harm to the playing mechanisms.
< CD-R and CD-RW discs are more sensitive to the
effects of heat and ultraviolet rays than ordinary
CDs. It is important that they are not stored in a
location where direct sunlight will fall on them, and
which is away from sources of heat such as
radiators or heat-generating electrical devices.
< Printable CD-R and CD-RW discs aren’t
recommended, as the label side might be sticky and
damage the unit.
< Do not stick papers or protective sheets on the
discs and do not use any protective coating spray.
< Use a soft oil-based felt-tipped pen to write the
information on the label side. Never use a ball-point
or hard-tipped pen, as this may cause damage to
the recorded side.
< Never use a stabilizer. Using commercially available
CD stabilizers with this unit will damage the
mechanisms and cause them to malfunction.
< Do not use irregular shape CDs (octagonal, heart
shaped, business card size, etc.). CDs of this sort
can damage the unit:
< If you are in any doubt as to the care and handling
of a CD-R/CD-RW disc, read the precautions
supplied with the disc, or contact the disc
manufacturer directly.
< Always place the disc on the disc tray with the label
side uppermost. (Compact discs can be played or
recorded only on one side.)
< To remove a disc from its storage case, press down
on the center of the case and lift the disc out,
holding it carefully by the edges.
How to remove the disc How to hold the disc
< Should the disc become dirty, wipe the surface
radially (from the center hole outward towards the
outer edge) with a soft, dry cloth:
< Never use such chemicals as record sprays,
antistatic sprays or fluid, benzine or thinner to clean
the discs. Such chemicals will do irreparable
damage to the disc’s plastic surface.
4

5
MP3 and WMA
< This unit can play MP3 and WMA files recorded on
a CD-R, CD-RW or USB storage device.
< File names of MP3 or WMA should be alphanumeric
characters. This unit cannot display symbols and
full-size or double-byte characters (such as
Japanese, Chinese, etc.) correctly. Also, be sure to
use the file extension. (‘.mp3’ for MP3 files, ‘.wma’
for WMA files.)
< MP3 files are mono or stereo MPEG-1 Audio Layer 3
format. This unit can play MP3 files with sampling
frequency 44.1 kHz or 48 kHz, bit-rate320 kbps or
less.
< This unit can play WMA files with sampling
frequency 44.1 kHz, bit-rate 192 kbps or less.
WMA means Windows Media Audio.
< Audio encoded at 128 Kbps should sound close to
regular audio CD quality. Although this player will
play lower bit-rate MP3 tracks, the sound quality
becomes noticeably worse at lower bit-rates.
Discs
< The disc must be finalized in order to play.
< The CD-ROM must be ISO 9660 compatible.
< When more than 255 files are recorded on the disc,
the unit might not be able to play it correctly.
USB
< This unit supports USB 1.1 FULL SPEED (12Mbps).
< This unit can play MP3 files recorded in various
external USB storage devices such as USB flash
memory, MP3 player or HDD.
The HDD must be formatted FAT 16 or FAT 32, but
not NTFS.
< When more than 2000 files are recorded on the
USB memory, the unit might not be able to play it
correctly.
How to Reset the Settings
to the Factory Defaults
The unit will be turned on, and all the settings are
reset to the default settings.
If the power supply is interrupted for 14 days or
longer, all the settings kept in memory (such as preset
stations and timer settings) will be erased.
It will take more than 3 days after plugging the power
cord into the outlet to charge enough electricity for
the memory backup function.
If you want to manually initialize the settings,
hold down the FUNCTION/FM MODE button for
more than 4 seconds in stanby mode.

6
Connections
SUBWOOFER
SPEAKER
LINE
IN
A
B
Speaker Connections
Caution:
< To avoid damaging the speakers by a sudden
high-level signal, be sure to switch the power off
before connecting the speakers.
< Check the impedance of your speakers. Connect
speaker with an impedance of 6 ohms or more.
< The amplifier’s red speaker terminals are the +
(positive) terminals and the black terminals are the
_ (negative) terminals.
The
+ side of the speaker cable is marked to
make it distinguishable from the negative side of
the cable. Connect this marked side to the red
+
terminal and the unmarked side to the black _
terminal.
< Prepare the speaker cords for connection by
stripping off approximately 10 mm or less (no
more as this could cause a short-circuit) of the
outer insulation. Twist the wires tightly together
to avoid tangles:
How to connect
1.Turn the terminal cap counterclockwise to loosen
it. The speaker terminal caps cannot be fully
removed from the base.
2.Insert the wire into the terminal fully and turn the
terminal cap clockwise to securely connect it:
3.Make sure it is fastened firm by pulling the cable
lightly.
SUBWOOFER OUT jack
Connect a commercially available powered
subwoofer.
< Subwoofer output will not be cut off, when the
headphone jack is inserted.
B
A
CAUTION
< Turn off the power of all the equipment before
making connections.
< Read instructions of each component you intend
to use with this unit.
< Be sure to insert each plug securely. To prevent
hum and noise, do not bundle the connection
cords with the power cord or speaker cord.

7
C
LINE
OUT
LINE
IN
RLRL
Cassette DeckMD, CD-R, etc.
RLRL
LINE
OUT
LR
VCR, DVD, etc.
LINE
OUT
DIGITAL IN
(OPTICAL)
LINE
IN
E
D
AC Power Cord
Plug this AC power cord into an AC wall socket.
E
TAPE/AUX jacks
Make sure to connect:
white plug
q white jack (L: left channel)
red plug
q red jack (R: right channel)
< Be sure to insert each plug securely. To prevent
hum and noise, do not bundle the connection
cords with the power cord or speaker cord.
DIGITAL OUT terminal
Connect the component with an optical cable.
DIGITAL OUT w DIGITAL IN (MD, etc.)
< When inserting the plug of the optical cable, the
protective shutter of the terminal will open and
you should hear it click into position when fully
inserted. Be careful that you do not force the
plug, because this could result in damage to the
protective shutter, the cable, or the unit itself.
D
C

8
Connecting Antennas (AM/FM)
< If the AM loop antenna provided does not deliver
sufficient reception (often due to being too far
from the transmitter or in a concrete building, etc.),
it may be necessary to use an outdoor AM antenna.
Use either a high quality commercial AM antenna
or, if not available, an insulated wire more than
5 m long, strip one end, and connect this to the
terminal as shown.
The antenna wire should be strung outdoors or
indoors near a window. For better reception,
connect the GND terminal to a reliable ground.
Note:
Even when using an outdoor AM antenna, do not
disconnect the AM loop antenna.
AM Indoor Loop Antenna
The high-performance AM loop antenna provided
with this unit is sufficient for good reception in
most areas.
To stand the loop antenna on a surface, fix the
claw to the slot in the antenna base.
Make sure to connect
the black wire to the
GND terminal.
AM Outdoor
Antenna
Connect the loop antenna’s wires to the AM
antenna terminals.
Place the antenna on a shelf or hang it on a
window frame, etc., in the direction which gives
the best reception. Keep all other wires such as
power cords, speaker wires or interconnect wires as
far away as possible from the antenna.
FM Outdoor Antenna
In an area where FM signals are weak, it will be
necessary to use an outdoor FM antenna.
Generally, a 3-element antenna will be sufficient; if
you live in an area where the FM signals are
particularly weak, it may be necessary to use one
with 5 or more elements.
< Disconnect the FM indoor antenna when using an
outdoor antenna.
FM Indoor Antenna
Connect the lead-type FM antenna to the FM 75Ω
socket, extend the lead and tune the tuner to your
favorite station (see page 32). Adjust the antenna
in a suitable location like a window frame or wall
until the reception is best and then affix the
antenna in that position using thumb tacks, push
pins or any other suitable means.

9
Connecting Antennas (DAB)
DAB Indoor Antenna
Connect the T-type DAB antenna to the DAB
socket, extend the lead vertically and attach it to a
window frame or wall with thumbtacks, or the like,
where reception is best.
< You can check the antenna adjustment or
positioning for the best reception by viewing the
signal strength on the display.
The signal strength is displayed as a bar graph by
pressing the ENTER button once.
DAB Outdoor Antenna
In an area where DAB signals are weak, it will be
necessary to use an outdoor DAB antenna. There
are two main types available.
Dipole:
For use in marginal signal areas. This type of
antenna is omnidirectional and should increase the
strength of all DAB stations being received.
Multi-element antenna:
Also for use in marginal or poor signal areas. This
type of antenna is directional and has high gain.
This antenna needs to be pointed at the transmitter
you want to listen to.
Multi-element
Dipole
< It is possible to use a TV or FM antenna with your
DAB tuner as this is normally mounted externally.
This may give a stronger signal than a simple
internal antenna, however it would not be tuned
specifically for DAB reception.
You would need to change the plug on your TV/FM
antenna to an F type, and it may also be necessary
to use a signal booster to enhance the signal.

10
Names of Each Control 1
Remote Sensor
When operating the remote control unit, point it
towards the remote sensor.
Display
Disc tray
OPEN/CLOSE (
L), TUNING MODE, ENTER
In CD mode, use this button to open and close the
disc tray.
In FM or AM mode, use this button to select the
tuning mode.
In DAB mode, use this button to enter the
selection.
While setting the timer or the clock, use this button
to set the time.
D
C
B
A
VOLUME, SELECT
Turn this knob to adjust the volume.
Turn this knob to adjust the tone, balance and
dimmer together with the TONE/BAL/DIMMER
button.
SKIP
(.
m
/
,
/
)
, TUNING, PRESET, TIME
In CD mode or USB mode, use these buttons to
skip tracks.
In TUNER mode, use these buttons to tune in
stations or select the preset stations.
While setting the clock or the timer, use these
buttons to adjust the time.
F
E
BA EC D
Q
P O N
M
L K J I H G
F

11
STOP (H), INFO, RDS MODE, CLEAR
In CD mode or USB mode, use this button to stop
playback.
In DAB mode, this button is used to change the
text content on the second line of the display, to
show DLS (Dynamic Label Segment, info text
supplied by each radio station), Programme type
(classification given by the radio station i.e.: Pop
music or Rock), Multiplex name (name of multiplex
broadcaster), Time & date, Bitrate, Channel and
frequency, Signal error rate or Software version.
In FM mode, this button is used to select the RDS
mode.
Use this button also to cancel information entry or
modes.
PAUSE (J), FUNCTION, FM MODE
In CD mode or USB mode, use this button to pause
playback.
In DAB mode, this button activates features such as
station order, preset tune, DRC value, manual tune.
In FM mode, use this button to select stereo or
monaural.
PLAY (y), BAND
In CD mode or USB mode, use this button to start
playback.
In TUNER mode, use this button to select FM, AM
or DAB.
RECORD
Use this button to start recording to a USB device.
TONE, BAL, DIMMER
Use this button to adjust the tone, balance and
dimmer together with the VOLUME/SELECT knob.
TIME MODE
Use this button to adjust the clock and to set a
timer.
SOURCE
Use this button to select a source.
USB Jack
Use to connect the external USB storage device to
the unit.
N
M
L
K
J
I
H
G
AUX 3 IN Jack
Use to connect the output of an external source.
PHONES
For private listening, insert the headphones plug
into this jack, and adjust the volume by turning the
VOLUME/SELECT knob.
STANDBY/ON
Press this button to turn the unit on or standby.
The standby indicator surrounding the STANBY/ON
button lights when the unit is in the standby mode.
When the unit is turned on, it goes off.
Q
P
O
The equipment draws nominal non-operating
power from the AC outlet with its STANDBY/ON
switch in the STANDBY position.
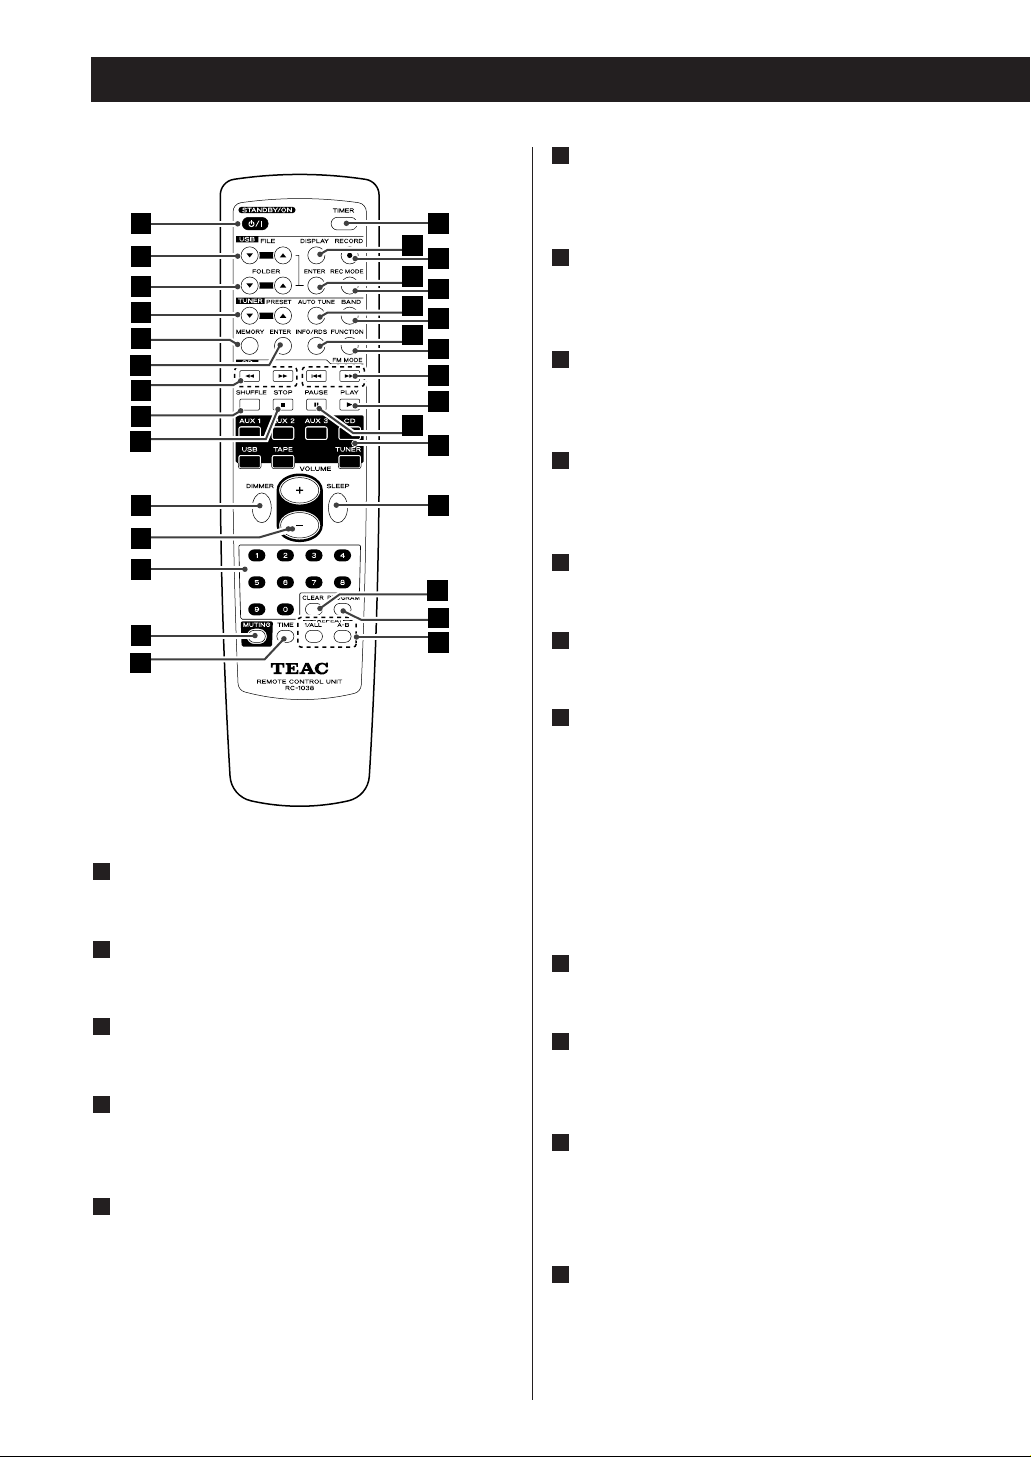
Names of Each Control 2
STANDBY/ON
Press this button to turn the unit on or standby.
FILE (b,5)
Use these buttons to select a file of MP3/WMA.
FOLDER (b,5)
Use these buttons to select a folder of MP3/WMA.
PRESET (b,5)
In TUNER mode, use these buttons to select the
preset stations.
MEMORY
In TUNER mode, press this button to put the
presently tuned-in station in memory.
In TUNER mode, press and hold for 3 seconds to
place the stations in memory automatically.
5
4
3
2
1
1
12
ENTER (TUNER)
In DAB mode, use this button to enter the
selection.
SEARCH (m/,)
During playback of CD or USB, use these buttons to
search the part you want to listen to.
SHUFFLE
In CD mode or USB mode, use this button to enter
the shuffle playback mode.
STOP
In CD mode or USB mode, use this button to stop
playback.
DIMMER
Use this button to dim the display.
VOLUME
Use these buttons to adjust the volume.
Numeric buttons
Use these buttons to select a track number or a
preset channel.
Press the CD, USB or TUNER button to select the
mode, and then press the numeric buttons.
For instance, to select track number 35, first press
the CD button, and then press ‘3’ and ‘5’.
< When you use the numeric buttons, press the input
selector button of the remote control first.
MUTING
Use this button to mute the sound.
TIME
During audio CD playback, use this button to
change the time display.
REPEAT A-B
Use this button to set the point for A-B repeat.
REPEAT 1/ALL
Use this button to select the repeat mode.
PROGRAM
In CD mode or USB mode, use this button to enter
the program mode. In program mode, use this
button to enter the selection.
16
15
14
13
12
11
10
9
8
7
6
2
3
4
5
6
7
8
9
10
11
12
13
14
30
28
26
24
20
31
29
27
25
23
22
21
19
18
17
16
15

CLEAR
Use this button to clear a program.
In the USB mode, use this button to delete
recorded files.
SLEEP
Use this button to set the sleep timer.
Input selector
Use these buttons to select a source.
PAUSE (J)
In CD mode or USB mode, use this button to pause
playback.
PLAY (y)
In CD mode or USB mode, use this button to start
playback.
SKIP (.//)
In CD mode or USB mode, use these buttons to
skip tracks.
FUNCTION, FM MODE
In DAB mode, this button activates features such as
station order, preset tune, DRC value, manual tune.
In FM mode, use this button to select stereo or
monaural.
INFO/RDS
In DAB mode, this button is used to change the
text content on the second line of the display, to
show DLS (Dynamic Label Segment, info text
supplied by each radio station), Programme type
(classification given by the radio station i.e.: Pop
music or Rock), Multiplex name (name of multiplex
broadcaster), Time & date, Bitrate, Channel and
frequency, Signal error rate or Software version.
In FM mode, this button is used to select the RDS
mode.
BAND
In TUNER mode, use this button to select FM, AM
or DAB.
25
24
23
22
21
20
19
18
17
13
AUTO TUNE
In DAB mode, press this button to activate auto
location of all available DAB services. Press once for
UK services or, hold for longer than 2 seconds to
activate international search.
REC MODE
In USB mode, use this button to select Record
mode.
ENTER (USB)
In USB mode or CD (MP3, WMA disc) mode, use
this button to enter the selection.
RECORD
Use this button to start normal recording.
This function is not available in USB mode.
DISPLAY
During MP3/WMA playback, use this button to
bring up the display.
TIMER
Use this button to turn on or off the timer function.
After setting the timer, press this button once more
to set USB timer recording.
One minute before the set time the unit turns on
and recording begins at the set time.
31
30
29
28
27
26

14
B
A
How to select SOURCE
Every time the SOURCE button is pressed, the
mode is changed as follows:
A
Basic Operation
Adjust the volume
To protect speakers from a sudden high-level
signal, gradually turn up the volume to the required
level with the VOLUME knob.
B
Muting
To cut the sound temporarily, press the MUTING
button. To cancel muting, press the MUTING
button again or change the volume setting.
C
Dimmer
Press the DIMMER button to dim the display.
Press the button again to cancel the dimmer
function.
D
Listening through headphones
Insert the headphone plug into the PHONES jack,
and adjust the volume. The sound from speakers
will be cut off.
E
CD USB TAPE AUX 1 AUX 2
AUX 3TUNER
Or press the CD, USB, TAPE, AUX 1/2/3 or TUNER
button on the remote control to select the source
directly.
< This function will be cancelled when the unit is
turned off.
< You can also adjust the dimmer on the front panel
control (see next page).
< Subwoofer output will not be cut off, when the
headphone jack is inserted.
 Loading...